#Python List Data Structure
Explore tagged Tumblr posts
Visit Tumblr Blog
Explore Tumblr blogs with no restrictions, modern design and the best experience.
Last Seen Tumblr Blogs


Fun Fact
There are dozens of funny blogs to kill time on Tumblr.
Text
Day-4: Unlocking the Power of Randomization in Python Lists
Python Boot Camp 2023 - Day-4
Randomization and Python List Introduction Randomization is an essential concept in computer programming and data analysis. It involves the process of generating random elements or sequences that have an equal chance of being selected. In Python, randomization is a powerful tool that allows developers to introduce an element of unpredictability and make programs more dynamic. This article…

View On WordPress
#Advantages of Randomization in Programming#Dynamic Python Applications#Enhancing User Experience with Randomization#Generating Random Data in Python#How to Shuffle Lists in Python#Python List Data Structure#Python List Manipulation#Python programming techniques#Random Element Selection in Python#Randomization in Python Lists#Randomized Algorithms in Python#Secure Outcomes with Randomization#Unbiased Outcomes in Python#Understanding Non-Deterministic Behavior#Versatility of Randomization in Python
0 notes
Text
Getting Started with Python: A Beginner's Guide (pt 2)
They say teaching is the best way to learn. Consider subscribing to the website!
Expanding Your Knowledge: Collections and Control Flow In Part 1 of our beginner’s guide to Python, we covered the basics of variables, data types, and conditional statements. Now, let’s dive deeper into collections like lists, tuples, and dictionaries, as well as control flow mechanisms such as loops and functions. Lists: More Than Just Arrays As mentioned earlier, a list is a collection of…
#Beginner#Coding#Dictionaries#Functions#Getting started with Python#Introduction to Python programming#Learn Python#Lists#Loops#Programming#Python#Python basics#Python conditional statements#Python control structures#Python data types#Python for beginners#Python operators#Python variables#Tuples
0 notes
Text
"Mastering C Programming: A Comprehensive Guide for Beginners and Experts"
Understanding C Programming: The Foundation of Modern Software Development
C programming, developed in the early 1970s by Dennis Ritchie at Bell Labs, is one of the most enduring and influential programming languages in the history of computing. Its design has directly influenced many other popular languages such as C++, Java, and Python. Despite the emergence of numerous high-level programming languages, C remains a cornerstone in both academic and professional software development environments due to its efficiency, control, and widespread use in system-level programming.

The Essence of C Programming
C is a general-purpose programming language that is particularly well-suited for system programming, including the development of operating systems, compilers, and embedded systems. It provides low-level access to memory through the use of pointers, which allows for efficient manipulation of data and memory management. This is one reason why the UNIX operating system, originally written in assembly language, was eventually rewritten in C.
The syntax of C is concise and powerful. Its constructs map efficiently to typical machine instructions, which makes it an ideal language for performance-critical applications. The simplicity of C's syntax, compared to other languages at the time of its creation, made it easier to learn and use while still being robust enough to handle complex programming tasks.
Key Features of C
Portability: One of the primary reasons for C's enduring popularity is its portability. Programs written in C can be compiled and run on different types of computers with little or no modification, which is crucial in today's diverse computing environments.
Efficiency: C is known for producing fast and efficient code. Its low-level capabilities allow programmers to write code that executes quickly and uses system resources judiciously. This makes it an excellent choice for performance-sensitive applications.
Modularity: C encourages the modular design of software. Functions in C can be defined and called independently, which makes code easier to understand, maintain, and reuse. This modularity is further enhanced by the use of header files and libraries.
Rich Library Support: The standard C library provides a rich set of built-in functions for performing common tasks, such as input/output operations, string manipulation, mathematical computations, and memory management. This extensive library support accelerates the development process.
C in Modern Context
Despite being over four decades old, C remains relevant in modern computing. It is extensively used in developing firmware and embedded systems, where direct hardware manipulation is required. The language's influence is also evident in many contemporary programming languages. For example, C++ was developed as an extension of C to include object-oriented features while maintaining C's efficiency and low-level capabilities.
Learning C provides a strong foundation for understanding computer science concepts and principles. Many educational institutions use C as an introductory programming language because it teaches fundamental programming techniques, such as variable manipulation, control structures, data structures, and algorithm development, which are applicable to learning other languages.
Conclusion
C programming is more than just a language; it is a gateway to understanding the inner workings of computers and software development. Its efficiency, control, portability, and rich library support make it an indispensable tool for programmers. Whether used in system programming, embedded systems, or as a stepping stone to other languages, C continues to be a fundamental part of the software development landscape. Its influence on modern programming practices and its role in the development of many other languages underscore its importance and enduring legacy in the world of computing.
1 note
·
View note
Text
DataFrame in Pandas: Guide to Creating Awesome DataFrames
Explore how to create a dataframe in Pandas, including data input methods, customization options, and practical examples.
Data analysis used to be a daunting task, reserved for statisticians and mathematicians. But with the rise of powerful tools like Python and its fantastic library, Pandas, anyone can become a data whiz! Pandas, in particular, shines with its DataFrames, these nifty tables that organize and manipulate data like magic. But where do you start? Fear not, fellow data enthusiast, for this guide will…
View On WordPress
#advanced dataframe features#aggregating data in pandas#create dataframe from dictionary in pandas#create dataframe from list in pandas#create dataframe in pandas#data manipulation in pandas#dataframe indexing#filter dataframe by condition#filter dataframe by multiple conditions#filtering data in pandas#grouping data in pandas#how to make a dataframe in pandas#manipulating data in pandas#merging dataframes#pandas data structures#pandas dataframe tutorial#python dataframe basics#rename columns in pandas dataframe#replace values in pandas dataframe#select columns in pandas dataframe#select rows in pandas dataframe#set column names in pandas dataframe#set row names in pandas dataframe
0 notes
Text
what do u do when u tell ur parent in no uncertain terms Thank You For The Offer But I Do Not Want A Tutor For This Course It Will Not Help And I Am Deeply Uncomfortable With It Do Not Get Me One
and then they go and book u with an online tutor. without asking. what the fuck.
#25 but being treated like im fucking 12#didnt even WANT help with courseworki went out there just looking for some goddamn emotional support#and i didnt even get it!!!!!!#theres 'problem solving instead of listening & supporting' and then theres THIS#i hate college#but rn i hate this family more#ANYWAYS#if any1 knows how 2 use python 2 'use file i/o on startup to open and read the dataset; initializing a few record objects with data parsed#from first few records in the csv file. the record objects should be stored in a simple data structure (array or list). use exception#handling in case the file is missing or not found'#i know how to open the file but idk how 2 'initialize a few record objects using data parsed etc. etc.'#like. i have a class so thats the record object. and ig i could have a list of instances of that class object#but idk how 2 like. combine the data from the csv file with instances of the class.#without having to individually list.append(()) 7000 rows bc eventually in this project u gotta use the whole dataset.
0 notes
Text
Wow, that's incredible. The go.dev article on slices states:
...The key step was the introduction of slices, which built on fixed-size arrays to give a flexible, extensible data structure. To this day, however, programmers new to Go often stumble over the way slices work, perhaps because experience from other languages has colored their thinking.
Indeed, my thinking has been colored (perhaps), because I think a slice data type should have some basic properties, like:
be a slice of a provided array
have an immutable size
and not:
allocate private buffer arrays for itself on demand
have a modifiable size
Because then that is not a slice. That is an array list. Worse, it's trying to be both, when the two are practically opposites. The job of an array list is to dynamically grow, and the job of a slice is to exclusively shrink. If your slice data type has an append() method at all then something has gone horribly wrong.
"greed breaks peoples minds and thats why finance people are all Like That" - wrong, thinking about slicing up cashflows is actually perfectly fine for your psyche, possibly even good. however, finance brings you into constant close contact with python and thats why they go crazy
#golang#ah yes. slices. the 'extensible data structure'#it's one thing if slicing returns the same type. slicing a python list returns a sub list (shallow copied of course). that's fine.#but if it's a bespoke slice type? we've got to lay down the rules#also this is exactly why array lists have a /private/ buffer. kind of fails as an abstraction otherwise
211 notes
·
View notes
Text
I'm really struggling here. There are so many things I want and need to be. SO many things I should study, so many career paths I need to take, so many things in life that I need to get to. By studying it all, I'm getting nothing done. How do I get myself together? I need to be able to prioritize what I'd like to study and where I want to be in life, so I'm writing this post to puke it all out and hopefully fix it with a little glitter. I'm making a list and categorizing them with Emojis for what I should put a longer-term pause on, what I should put up next, and what I should study now. Stuff I should study now: ✒️ Python for data analysis and machine learning ✒️ Using statistical models on python ✒️ JavaScript/React for web development ✒️ Azure AZ-900 exam prep Stuff I should get to soon but not now: 📜 Data structures & algorithms 📜 A new language Stuff that would be better to pause for now: 🤎GMAT, for my future MBA 🤎Blender, to create 3D images and interactive tools With things like my GMAT exam prep I can practice 30 minutes a day or 10 pages a day instead of actively making it a major focus of my day and missing out on the things that I really wanted to study right now. Thus, it may be better to turn my 150 days of GMAT prep into just 150 days of productivity ☕ I hope you'll understand and that hopefully, you guys are also coming to a position where you can truly focus on what you want to focus on in life
#study blog#studyspo#study motivation#daily journal#studyblr#to do list#coding#chaotic academia#chaotic thoughts#getting my shit together#realistic studyblr#studying#study tips
15 notes
·
View notes
Text
Jan. 16th, 2024
Starting my new position has been insanely busy as of late, and admittedly the only studying I've been doing is about the company. Theres so much more I'd like to learn, especially for this new position so I'm adjusting my "study priorities list" to account for the new changes
The "eat the frog" method needs to be its own category on my list, because there are a lot of impactful items that I'm putting off- but that could be done in a weekend. These for me are quick, high priority and high impact things (ie. a tool that could put me ahead at work)
My frogs:
🐸 Advanced power BI
🐸 Selenium (a tool for automated testing)
High priority (2-3 hours every day):
✒ Python + data structures
Medium priority:
✒ My portfolio (1 hour a day)
✒ GMAT prep (10 minutes a day)
Low priority:
🕰 Azure
#academic assignments#academic burnout#academia aesthetic#academic victim#academic validation#study hard#academic romance#study aesthetic#academic disaster#study blog#studyblr#codeblr#workblr#journaling#new year 2025#classic academia#academic weapon#chaotic academia#chaotic academic aesthetic#dark academic aesthetic#light academia#desi academia#dark academia#Spotify
13 notes
·
View notes
Text
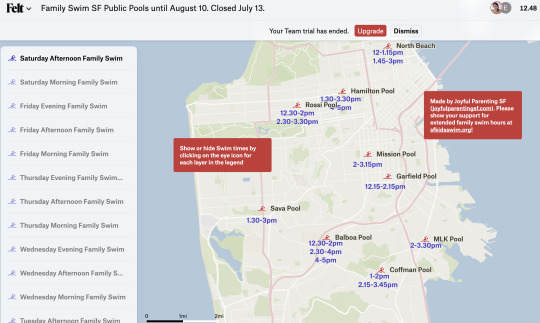
The making of the SF family swim map!
This is a technical blog post showcasing a project (swim.joyfulparentingsf.com) made by Double Union members! Written by Ruth Grace Wong.
Emeline (a good friend and fellow DU member) and I love swimming with our kids. The kids love it too, and they always eat really well after swimming! But for a long time we were frustrated about SF Rec & Park's swim schedules. Say today is Wednesday and you want to swim, you have to click on each pool's website and download their PDF schedule to check where and when family swim is available, and the schedules change every few months.
Emeline painstakingly downloaded all the PDFs and manually collated the schedules onto our Joyful Parenting SF blog. The way Rec and Parks structure their schedule assumes that swimmers go to their closest pool, and only need the hours for that particular pool. But we found that this was different from how many families, especially families with young children, research swim times. Often, they have a time where they can go swimming, and they are willing to go to different swimming pools. Often, they’re searching for a place to swim at the last minute. Schedules hence need to allow families to search which pools are open at what time for family swimming. Initially, we extracted family swim times manually from each pool’s pdf schedule and listed them in a blog post. It wasn't particularly user friendly, so she made an interactive map using Felt, where you could select the time period (e.g. Saturday Afternoon) and see which pool offered family swim around that time.
But the schedules change every couple of months, and it got to be too much to be manually updating the map or the blog post. Still, we wanted some way to be able to easily see when and where we could swim with the kids.
Just as we were burning out on manually updating the list, SF Rec & Park released a new Activity Search API, where you can query scheduled activities once their staff have manually entered them into the system. I wrote a Python script to pull Family Swim, and quickly realized that I had to also account for Parent and Child swim (family swim where the parents must be in the water with the kids), and other versions of this such as "Parent / Child Swim". Additionally, the data was not consistent – sometimes the scheduled activities were stored as sub activities, and I had to query the sub activity IDs to find the scheduled times. Finally, some pools (Balboa and Hamilton) have what we call "secret swim", where if the pool is split into a big and small pool, and there is Lap Swim scheduled with nothing else at the same time, the small pool can be used for family swim. So I also pulled all of the lap swim entries for these pools and all other scheduled activities at the pool so I could cross reference and see when secret family swim was available.
We've also seen occasional issues where there is a swim scheduled in the Activity Search, but it's a data entry error and the scheduled swim is not actually available, or there's a Parent Child Swim scheduled during a lap swim (but not all of the lap swims so I can't automatically detect it!) that hasn't been entered into the Activity Search at all. Our friends at SF Kids Swim have been working with SF Rec & Park to advocate for the release of the API, help correct data errors, and ask if there is any opportunity for process improvement.
At the end of the summer, Felt raised their non profit rate from $100 a year to $250 a year. We needed to pay in order to use their API to automatically update the map, but we weren't able to raise enough money to cover the higher rate. Luckily, my husband Robin is a full stack engineer specializing in complex frontends such as maps, and he looked for an open source WebGL map library. MapBox is one very popular option, but he ended up going with MapLibre GL because it had a better open source license. He wrote it in Typescript transpiled with Vite, allowing all the map processing work to happen client-side. All I needed to do was output GeoJSON with my Python script.
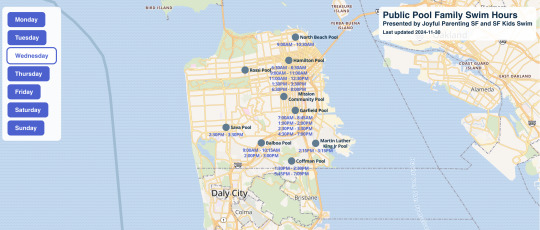
Originally I had been running my script in Replit, but I ended up deciding to switch to Digital Ocean because I wasn't sure how reliably Replit would be able to automatically update the map on a schedule, and I didn't know how stable their pricing would be. My regular server is still running Ubuntu 16, and instead of upgrading it (or trying to get a newer version of Python working on an old server or – god forbid – not using the amazing new Python f strings feature), I decided to spin up a new server on Almalinux 9, which doesn't require as frequent upgrades. I modified my code to automatically push updates into version control and recompile the map when schedule changes were detected, ran it in a daily cron job, and we announced our new map on our blog.
Soon we got a request for it to automatically select the current day of the week, and Robin was able to do it in a jiffy. If you're using it and find an opportunity for improvement, please find me on Twitter at ruthgracewong.
As a working mom, progress on this project was stretched out over nearly half a year. I'm grateful to be able to collaborate with the ever ineffable Emeline, as well as for support from family, friends, and SF Kids Swim. It's super exciting that the swim map is finally out in the world! You can find it at swim.joyfulparentingsf.com.
6 notes
·
View notes
Text
Free online courses for bioinformatics beginners
🔬 Free Online Courses for Bioinformatics Beginners 🚀
Are you interested in bioinformatics but don’t know where to start? Whether you're from a biotechnology, biology, or computer science background, learning bioinformatics can open doors to exciting opportunities in genomics, drug discovery, and data science. And the best part? You can start for free!
Here’s a list of the best free online bioinformatics courses to kickstart your journey.
📌 1. Introduction to Bioinformatics – Coursera (University of Toronto)
📍 Platform: Coursera 🖥️ What You’ll Learn:
Basic biological data analysis
Algorithms used in genomics
Hands-on exercises with biological datasets
🎓 Why Take It? Ideal for beginners with a biology background looking to explore computational approaches.
📌 2. Bioinformatics for Beginners – Udemy (Free Course)
📍 Platform: Udemy 🖥️ What You’ll Learn:
Introduction to sequence analysis
Using BLAST for genomic comparisons
Basics of Python for bioinformatics
🎓 Why Take It? Short, beginner-friendly course with practical applications.
📌 3. EMBL-EBI Bioinformatics Training
📍 Platform: EMBL-EBI 🖥️ What You’ll Learn:
Genomic data handling
Transcriptomics and proteomics
Data visualization tools
🎓 Why Take It? High-quality training from one of the most reputable bioinformatics institutes in Europe.
📌 4. Introduction to Computational Biology – MIT OpenCourseWare
📍 Platform: MIT OCW 🖥️ What You’ll Learn:
Algorithms for DNA sequencing
Structural bioinformatics
Systems biology
🎓 Why Take It? A solid foundation for students interested in research-level computational biology.
📌 5. Bioinformatics Specialization – Coursera (UC San Diego)
📍 Platform: Coursera 🖥️ What You’ll Learn:
How bioinformatics algorithms work
Hands-on exercises in Python and Biopython
Real-world applications in genomics
🎓 Why Take It? A deep dive into computational tools, ideal for those wanting an in-depth understanding.
📌 6. Genomic Data Science – Harvard Online (edX) 🖥️ What You’ll Learn:
RNA sequencing and genome assembly
Data handling using R
Machine learning applications in genomics
🎓 Why Take It? Best for those interested in AI & big data applications in genomics.
📌 7. Bioinformatics Courses on BioPractify (100% Free)
📍 Platform: BioPractify 🖥️ What You’ll Learn:
Hands-on experience with real datasets
Python & R for bioinformatics
Molecular docking and drug discovery techniques
🎓 Why Take It? Learn from domain experts with real-world projects to enhance your skills.
🚀 Final Thoughts: Start Learning Today!
Bioinformatics is a game-changer in modern research and healthcare. Whether you're a biology student looking to upskill or a tech enthusiast diving into genomics, these free courses will give you a strong start.
📢 Which course are you excited to take? Let me know in the comments! 👇💬
#Bioinformatics#FreeCourses#Genomics#BiotechCareers#DataScience#ComputationalBiology#BioinformaticsTraining#MachineLearning#GenomeSequencing#BioinformaticsForBeginners#STEMEducation#OpenScience#LearningResources#PythonForBiologists#MolecularBiology
4 notes
·
View notes
Note
hi. i had a very similar experince to trying to look through the code camp scams and everything online and not living near anything useful. if you can find an online real college thats what i did, granted its a community college and an associates but. other than that, don't sleep on utilizing chatgpt to teach you. thats how i learn all of my material. you can ask it questions or say "can you teach me about x", and if you dont like its response you can say things like "make that more simple" or "make that interactive". but helpful tip, all programming languages basically do the same things and work in very, very similar ways. if you just learn the fundamentals of programming you can just translate that to any language. in my opinion, the basics to learn are: the structures of programming (sequential, conditional, iterative), variables, datatypes (integer, string, float, etc)(in python those are it), conditional statements(these are those if-else things you see), iterative aka loops(do..while, for x in list, do until, etc), functions(keep em one purpose), passing data. i would say these are the fundamentals. every language does it (besides html bc thats not a programming language but just a mark up language), so once you know about the conditonal structure for example, just find out "how do i use this in x language". if you are learning python now, its a great language to learn about programming and you've probably realized by now that people most often use it in an object oriented way, but you don't have to and don't have to learn about classes or objects if you don't have the fundamentals down yet. i hope this helps and if you have any questions feel free to ask me

Oh I 100% agree with this advice. After looking for a long, long time, I realised the most legitimate courses were from 'real' colleges and education suppliers that offered 'brick n mortar' schooling as well as e-learning.
I'm definitely going to utilise the free resources online and then work towards building a profile and generally seeing what the jobs online look for and work towards that alongside the usual path of learning :)
Also, I love how supportive folk generally are in this area of learning. I knew it would be competitive, especially when it comes to getting a job in a year or so...but seeing folk lift each other up instead of put each other down is heart-warming on so many levels. It makes me think I've found my correct career path :)
#codeblr#supportive#thank you#advice#solid advice#good advice#lovely ask#thank you friend!#I love codeblr#programming#learning to code#learning programming#python#web development#coding
24 notes
·
View notes
Text
What is Data Structure in Python?
Summary: Explore what data structure in Python is, including built-in types like lists, tuples, dictionaries, and sets, as well as advanced structures such as queues and trees. Understanding these can optimize performance and data handling.

Introduction
Data structures are fundamental in programming, organizing and managing data efficiently for optimal performance. Understanding "What is data structure in Python" is crucial for developers to write effective and efficient code. Python, a versatile language, offers a range of built-in and advanced data structures that cater to various needs.
This blog aims to explore the different data structures available in Python, their uses, and how to choose the right one for your tasks. By delving into Python’s data structures, you'll enhance your ability to handle data and solve complex problems effectively.
What are Data Structures?
Data structures are organizational frameworks that enable programmers to store, manage, and retrieve data efficiently. They define the way data is arranged in memory and dictate the operations that can be performed on that data. In essence, data structures are the building blocks of programming that allow you to handle data systematically.
Importance and Role in Organizing Data
Data structures play a critical role in organizing and managing data. By selecting the appropriate data structure, you can optimize performance and efficiency in your applications. For example, using lists allows for dynamic sizing and easy element access, while dictionaries offer quick lookups with key-value pairs.
Data structures also influence the complexity of algorithms, affecting the speed and resource consumption of data processing tasks.
In programming, choosing the right data structure is crucial for solving problems effectively. It directly impacts the efficiency of algorithms, the speed of data retrieval, and the overall performance of your code. Understanding various data structures and their applications helps in writing optimized and scalable programs, making data handling more efficient and effective.
Read: Importance of Python Programming: Real-Time Applications.
Types of Data Structures in Python
Python offers a range of built-in data structures that provide powerful tools for managing and organizing data. These structures are integral to Python programming, each serving unique purposes and offering various functionalities.
Lists
Lists in Python are versatile, ordered collections that can hold items of any data type. Defined using square brackets [], lists support various operations. You can easily add items using the append() method, remove items with remove(), and extract slices with slicing syntax (e.g., list[1:3]). Lists are mutable, allowing changes to their contents after creation.
Tuples
Tuples are similar to lists but immutable. Defined using parentheses (), tuples cannot be altered once created. This immutability makes tuples ideal for storing fixed collections of items, such as coordinates or function arguments. Tuples are often used when data integrity is crucial, and their immutability helps in maintaining consistent data throughout a program.
Dictionaries
Dictionaries store data in key-value pairs, where each key is unique. Defined with curly braces {}, dictionaries provide quick access to values based on their keys. Common operations include retrieving values with the get() method and updating entries using the update() method. Dictionaries are ideal for scenarios requiring fast lookups and efficient data retrieval.
Sets
Sets are unordered collections of unique elements, defined using curly braces {} or the set() function. Sets automatically handle duplicate entries by removing them, which ensures that each element is unique. Key operations include union (combining sets) and intersection (finding common elements). Sets are particularly useful for membership testing and eliminating duplicates from collections.
Each of these data structures has distinct characteristics and use cases, enabling Python developers to select the most appropriate structure based on their needs.
Explore: Pattern Programming in Python: A Beginner’s Guide.
Advanced Data Structures

In advanced programming, choosing the right data structure can significantly impact the performance and efficiency of an application. This section explores some essential advanced data structures in Python, their definitions, use cases, and implementations.
Queues
A queue is a linear data structure that follows the First In, First Out (FIFO) principle. Elements are added at one end (the rear) and removed from the other end (the front).
This makes queues ideal for scenarios where you need to manage tasks in the order they arrive, such as task scheduling or handling requests in a server. In Python, you can implement a queue using collections.deque, which provides an efficient way to append and pop elements from both ends.
Stacks
Stacks operate on the Last In, First Out (LIFO) principle. This means the last element added is the first one to be removed. Stacks are useful for managing function calls, undo mechanisms in applications, and parsing expressions.
In Python, you can implement a stack using a list, with append() and pop() methods to handle elements. Alternatively, collections.deque can also be used for stack operations, offering efficient append and pop operations.
Linked Lists
A linked list is a data structure consisting of nodes, where each node contains a value and a reference (or link) to the next node in the sequence. Linked lists allow for efficient insertions and deletions compared to arrays.
A singly linked list has nodes with a single reference to the next node. Basic operations include traversing the list, inserting new nodes, and deleting existing ones. While Python does not have a built-in linked list implementation, you can create one using custom classes.
Trees
Trees are hierarchical data structures with a root node and child nodes forming a parent-child relationship. They are useful for representing hierarchical data, such as file systems or organizational structures.
Common types include binary trees, where each node has up to two children, and binary search trees, where nodes are arranged in a way that facilitates fast lookups, insertions, and deletions.
Graphs
Graphs consist of nodes (or vertices) connected by edges. They are used to represent relationships between entities, such as social networks or transportation systems. Graphs can be represented using an adjacency matrix or an adjacency list.
The adjacency matrix is a 2D array where each cell indicates the presence or absence of an edge, while the adjacency list maintains a list of edges for each node.
See: Types of Programming Paradigms in Python You Should Know.
Choosing the Right Data Structure
Selecting the appropriate data structure is crucial for optimizing performance and ensuring efficient data management. Each data structure has its strengths and is suited to different scenarios. Here’s how to make the right choice:
Factors to Consider
When choosing a data structure, consider performance, complexity, and specific use cases. Performance involves understanding time and space complexity, which impacts how quickly data can be accessed or modified. For example, lists and tuples offer quick access but differ in mutability.
Tuples are immutable and thus faster for read-only operations, while lists allow for dynamic changes.
Use Cases for Data Structures:
Lists are versatile and ideal for ordered collections of items where frequent updates are needed.
Tuples are perfect for fixed collections of items, providing an immutable structure for data that doesn’t change.
Dictionaries excel in scenarios requiring quick lookups and key-value pairs, making them ideal for managing and retrieving data efficiently.
Sets are used when you need to ensure uniqueness and perform operations like intersections and unions efficiently.
Queues and stacks are used for scenarios needing FIFO (First In, First Out) and LIFO (Last In, First Out) operations, respectively.
Choosing the right data structure based on these factors helps streamline operations and enhance program efficiency.
Check: R Programming vs. Python: A Comparison for Data Science.
Frequently Asked Questions
What is a data structure in Python?
A data structure in Python is an organizational framework that defines how data is stored, managed, and accessed. Python offers built-in structures like lists, tuples, dictionaries, and sets, each serving different purposes and optimizing performance for various tasks.
Why are data structures important in Python?
Data structures are crucial in Python as they impact how efficiently data is managed and accessed. Choosing the right structure, such as lists for dynamic data or dictionaries for fast lookups, directly affects the performance and efficiency of your code.
What are advanced data structures in Python?
Advanced data structures in Python include queues, stacks, linked lists, trees, and graphs. These structures handle complex data management tasks and improve performance for specific operations, such as managing tasks or representing hierarchical relationships.
Conclusion
Understanding "What is data structure in Python" is essential for effective programming. By mastering Python's data structures, from basic lists and dictionaries to advanced queues and trees, developers can optimize data management, enhance performance, and solve complex problems efficiently.
Selecting the appropriate data structure based on your needs will lead to more efficient and scalable code.
#What is Data Structure in Python?#Data Structure in Python#data structures#data structure in python#python#python frameworks#python programming#data science
5 notes
·
View notes
Text
ByteByteGo | Newsletter/Blog
From the newsletter:
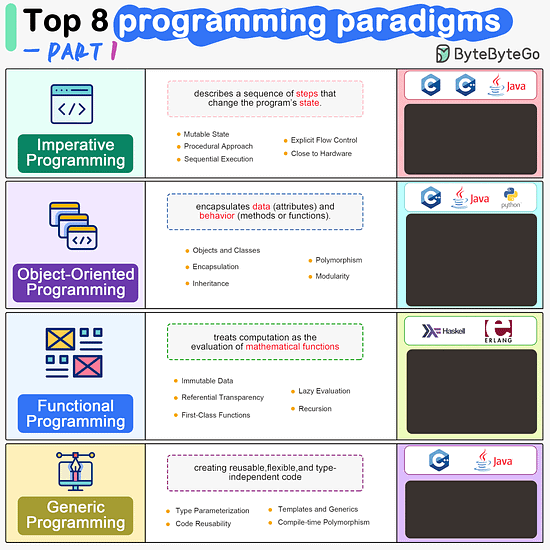
Imperative Programming Imperative programming describes a sequence of steps that change the program’s state. Languages like C, C++, Java, Python (to an extent), and many others support imperative programming styles.
Declarative Programming Declarative programming emphasizes expressing logic and functionalities without describing the control flow explicitly. Functional programming is a popular form of declarative programming.
Object-Oriented Programming (OOP) Object-oriented programming (OOP) revolves around the concept of objects, which encapsulate data (attributes) and behavior (methods or functions). Common object-oriented programming languages include Java, C++, Python, Ruby, and C#.
Aspect-Oriented Programming (AOP) Aspect-oriented programming (AOP) aims to modularize concerns that cut across multiple parts of a software system. AspectJ is one of the most well-known AOP frameworks that extends Java with AOP capabilities.
Functional Programming Functional Programming (FP) treats computation as the evaluation of mathematical functions and emphasizes the use of immutable data and declarative expressions. Languages like Haskell, Lisp, Erlang, and some features in languages like JavaScript, Python, and Scala support functional programming paradigms.
Reactive Programming Reactive Programming deals with asynchronous data streams and the propagation of changes. Event-driven applications, and streaming data processing applications benefit from reactive programming.
Generic Programming Generic Programming aims at creating reusable, flexible, and type-independent code by allowing algorithms and data structures to be written without specifying the types they will operate on. Generic programming is extensively used in libraries and frameworks to create data structures like lists, stacks, queues, and algorithms like sorting, searching.
Concurrent Programming Concurrent Programming deals with the execution of multiple tasks or processes simultaneously, improving performance and resource utilization. Concurrent programming is utilized in various applications, including multi-threaded servers, parallel processing, concurrent web servers, and high-performance computing.
#bytebytego#resource#programming#concurrent#generic#reactive#funtional#aspect#oriented#aop#fp#object#oop#declarative#imperative
7 notes
·
View notes
Text
Mastering Data Structures: A Comprehensive Course for Beginners
Data structures are one of the foundational concepts in computer science and software development. Mastering data structures is essential for anyone looking to pursue a career in programming, software engineering, or computer science. This article will explore the importance of a Data Structure Course, what it covers, and how it can help you excel in coding challenges and interviews.
1. What Is a Data Structure Course?
A Data Structure Course teaches students about the various ways data can be organized, stored, and manipulated efficiently. These structures are crucial for solving complex problems and optimizing the performance of applications. The course generally covers theoretical concepts along with practical applications using programming languages like C++, Java, or Python.
By the end of the course, students will gain proficiency in selecting the right data structure for different problem types, improving their problem-solving abilities.
2. Why Take a Data Structure Course?
Learning data structures is vital for both beginners and experienced developers. Here are some key reasons to enroll in a Data Structure Course:
a) Essential for Coding Interviews
Companies like Google, Amazon, and Facebook focus heavily on data structures in their coding interviews. A solid understanding of data structures is essential to pass these interviews successfully. Employers assess your problem-solving skills, and your knowledge of data structures can set you apart from other candidates.
b) Improves Problem-Solving Skills
With the right data structure knowledge, you can solve real-world problems more efficiently. A well-designed data structure leads to faster algorithms, which is critical when handling large datasets or working on performance-sensitive applications.
c) Boosts Programming Competency
A good grasp of data structures makes coding more intuitive. Whether you are developing an app, building a website, or working on software tools, understanding how to work with different data structures will help you write clean and efficient code.
3. Key Topics Covered in a Data Structure Course
A Data Structure Course typically spans a range of topics designed to teach students how to use and implement different structures. Below are some key topics you will encounter:
a) Arrays and Linked Lists
Arrays are one of the most basic data structures. A Data Structure Course will teach you how to use arrays for storing and accessing data in contiguous memory locations. Linked lists, on the other hand, involve nodes that hold data and pointers to the next node. Students will learn the differences, advantages, and disadvantages of both structures.
b) Stacks and Queues
Stacks and queues are fundamental data structures used to store and retrieve data in a specific order. A Data Structure Course will cover the LIFO (Last In, First Out) principle for stacks and FIFO (First In, First Out) for queues, explaining their use in various algorithms and applications like web browsers and task scheduling.
c) Trees and Graphs
Trees and graphs are hierarchical structures used in organizing data. A Data Structure Course teaches how trees, such as binary trees, binary search trees (BST), and AVL trees, are used in organizing hierarchical data. Graphs are important for representing relationships between entities, such as in social networks, and are used in algorithms like Dijkstra's and BFS/DFS.
d) Hashing
Hashing is a technique used to convert a given key into an index in an array. A Data Structure Course will cover hash tables, hash maps, and collision resolution techniques, which are crucial for fast data retrieval and manipulation.
e) Sorting and Searching Algorithms
Sorting and searching are essential operations for working with data. A Data Structure Course provides a detailed study of algorithms like quicksort, merge sort, and binary search. Understanding these algorithms and how they interact with data structures can help you optimize solutions to various problems.
4. Practical Benefits of Enrolling in a Data Structure Course
a) Hands-on Experience
A Data Structure Course typically includes plenty of coding exercises, allowing students to implement data structures and algorithms from scratch. This hands-on experience is invaluable when applying concepts to real-world problems.
b) Critical Thinking and Efficiency
Data structures are all about optimizing efficiency. By learning the most effective ways to store and manipulate data, students improve their critical thinking skills, which are essential in programming. Selecting the right data structure for a problem can drastically reduce time and space complexity.
c) Better Understanding of Memory Management
Understanding how data is stored and accessed in memory is crucial for writing efficient code. A Data Structure Course will help you gain insights into memory management, pointers, and references, which are important concepts, especially in languages like C and C++.
5. Best Programming Languages for Data Structure Courses
While many programming languages can be used to teach data structures, some are particularly well-suited due to their memory management capabilities and ease of implementation. Some popular programming languages used in Data Structure Courses include:
C++: Offers low-level memory management and is perfect for teaching data structures.
Java: Widely used for teaching object-oriented principles and offers a rich set of libraries for implementing data structures.
Python: Known for its simplicity and ease of use, Python is great for beginners, though it may not offer the same level of control over memory as C++.
6. How to Choose the Right Data Structure Course?
Selecting the right Data Structure Course depends on several factors such as your learning goals, background, and preferred learning style. Consider the following when choosing:
a) Course Content and Curriculum
Make sure the course covers the topics you are interested in and aligns with your learning objectives. A comprehensive Data Structure Course should provide a balance between theory and practical coding exercises.
b) Instructor Expertise
Look for courses taught by experienced instructors who have a solid background in computer science and software development.
c) Course Reviews and Ratings
Reviews and ratings from other students can provide valuable insights into the course’s quality and how well it prepares you for real-world applications.
7. Conclusion: Unlock Your Coding Potential with a Data Structure Course
In conclusion, a Data Structure Course is an essential investment for anyone serious about pursuing a career in software development or computer science. It equips you with the tools and skills to optimize your code, solve problems more efficiently, and excel in technical interviews. Whether you're a beginner or looking to strengthen your existing knowledge, a well-structured course can help you unlock your full coding potential.
By mastering data structures, you are not only preparing for interviews but also becoming a better programmer who can tackle complex challenges with ease.
2 notes
·
View notes
Text
Normally I just post about movies but I'm a software engineer by trade so I've got opinions on programming too.
Apparently it's a month of code or something because my dash is filled with people trying to learn Python. And that's great, because Python is a good language with a lot of support and job opportunities. I've just got some scattered thoughts that I thought I'd write down.
Python abstracts a number of useful concepts. It makes it easier to use, but it also means that if you don't understand the concepts then things might go wrong in ways you didn't expect. Memory management and pointer logic is so damn annoying, but you need to understand them. I learned these concepts by learning C++, hopefully there's an easier way these days.
Data structures and algorithms are the bread and butter of any real work (and they're pretty much all that come up in interviews) and they're language agnostic. If you don't know how to traverse a linked list, how to use recursion, what a hash map is for, etc. then you don't really know how to program. You'll pretty much never need to implement any of them from scratch, but you should know when to use them; think of them like building blocks in a Lego set.
Learning a new language is a hell of a lot easier after your first one. Going from Python to Java is mostly just syntax differences. Even "harder" languages like C++ mostly just mean more boilerplate while doing the same things. Learning a new spoken language in is hard, but learning a new programming language is generally closer to learning some new slang or a new accent. Lists in Python are called Vectors in C++, just like how french fries are called chips in London. If you know all the underlying concepts that are common to most programming languages then it's not a huge jump to a new one, at least if you're only doing all the most common stuff. (You will get tripped up by some of the minor differences though. Popping an item off of a stack in Python returns the element, but in Java it returns nothing. You have to read it with Top first. Definitely had a program fail due to that issue).
The above is not true for new paradigms. Python, C++ and Java are all iterative languages. You move to something functional like Haskell and you need a completely different way of thinking. Javascript (not in any way related to Java) has callbacks and I still don't quite have a good handle on them. Hardware languages like VHDL are all synchronous; every line of code in a program runs at the same time! That's a new way of thinking.
Python is stereotyped as a scripting language good only for glue programming or prototypes. It's excellent at those, but I've worked at a number of (successful) startups that all were Python on the backend. Python is robust enough and fast enough to be used for basically anything at this point, except maybe for embedded programming. If you do need the fastest speed possible then you can still drop in some raw C++ for the places you need it (one place I worked at had one very important piece of code in C++ because even milliseconds mattered there, but everything else was Python). The speed differences between Python and C++ are so much smaller these days that you only need them at the scale of the really big companies. It makes sense for Google to use C++ (and they use their own version of it to boot), but any company with less than 100 engineers is probably better off with Python in almost all cases. Honestly thought the best programming language is the one you like, and the one that you're good at.
Design patterns mostly don't matter. They really were only created to make up for language failures of C++; in the original design patterns book 17 of the 23 patterns were just core features of other contemporary languages like LISP. C++ was just really popular while also being kinda bad, so they were necessary. I don't think I've ever once thought about consciously using a design pattern since even before I graduated. Object oriented design is mostly in the same place. You'll use classes because it's a useful way to structure things but multiple inheritance and polymorphism and all the other terms you've learned really don't come into play too often and when they do you use the simplest possible form of them. Code should be simple and easy to understand so make it as simple as possible. As far as inheritance the most I'm willing to do is to have a class with abstract functions (i.e. classes where some functions are empty but are expected to be filled out by the child class) but even then there are usually good alternatives to this.
Related to the above: simple is best. Simple is elegant. If you solve a problem with 4000 lines of code using a bunch of esoteric data structures and language quirks, but someone else did it in 10 then I'll pick the 10. On the other hand a one liner function that requires a lot of unpacking, like a Python function with a bunch of nested lambdas, might be easier to read if you split it up a bit more. Time to read and understand the code is the most important metric, more important than runtime or memory use. You can optimize for the other two later if you have to, but simple has to prevail for the first pass otherwise it's going to be hard for other people to understand. In fact, it'll be hard for you to understand too when you come back to it 3 months later without any context.
Note that I've cut a few things for simplicity. For example: VHDL doesn't quite require every line to run at the same time, but it's still a major paradigm of the language that isn't present in most other languages.
Ok that was a lot to read. I guess I have more to say about programming than I thought. But the core ideas are: Python is pretty good, other languages don't need to be scary, learn your data structures and algorithms and above all keep your code simple and clean.
#programming#python#software engineering#java#java programming#c++#javascript#haskell#VHDL#hardware programming#embedded programming#month of code#design patterns#common lisp#google#data structures#algorithms#hash table#recursion#array#lists#vectors#vector#list#arrays#object oriented programming#functional programming#iterative programming#callbacks
17 notes
·
View notes
Text
#SamuraiSkirtsTCGvideoGame script/code
To proceed with scripting and writing code from the models you're developing. However, based on the instruction, I'll provide a general outline and a starting structure for modeling and scripting.
Step 1: Define Data and Source Code Models
The data models and source code would likely need to reflect the structure of the project you're working on. Based on your past projects and descriptions (like the #SamuraiSkirts TCG), I'll assume that these models might involve:
Agents: Each agent could represent a unique entity or unit, possibly in a game, system, or organization.
Data Models: These would store properties and attributes about each agent (e.g., stats, skills, or behavior).
Interaction Models: These could define how agents interact with each other or the environment.
Game Mechanics: Given that your TCG involves several intricate systems, we can model specific game mechanics that could interact with agent data.
Step 2: Outlining the Data Models
Here's a simplified structure based on your mention of "agents," game mechanics, and potential cards.
Agent Model (Python Example)
class Agent: def init(self, agent_id, name, role, stats, abilities, interactions): self.agent_id = agent_id # Unique identifier for each agent self.name = name # Name of the agent self.role = role # Role or class of the agent (e.g., Samurai, Healer) self.stats = stats # Dictionary for stats (health, power, defense, etc.) self.abilities = abilities # List of abilities (skills, spells, etc.) self.interactions = interactions # How this agent interacts with others (e.g., allies, enemies)
def perform_ability(self, ability_name, target): # Logic for using an ability pass
def interact(self, other_agent): # Interaction logic between two agents (ally or enemy) pass
Data for Agents
agents_data = [ { 'agent_id': 1, 'name': 'Agent001', 'role': 'Warrior', 'stats': {'health': 100, 'power': 20, 'defense': 10}, 'abilities': ['Slash', 'Charge'], 'interactions': {'ally': 'Boost', 'enemy': 'Attack'} }, { 'agent_id': 2, 'name': 'Agent002', 'role': 'Healer', 'stats': {'health': 80, 'power': 5, 'defense': 15}, 'abilities': ['Heal', 'Shield'], 'interactions': {'ally': 'Heal', 'enemy': 'Defend'} }, # Add more agents as needed ]
Step 3: Writing Basic Code Logic
Based on the provided model, here is a snippet for defining actions or interactions between agents (e.g., combat, healing).
Interaction Example:
class Game: def init(self): self.agents = [] def add_agent(self, agent): self.agents.append(agent) def start_combat(self, agent1, agent2): # Combat logic between two agents if agent1.stats['power'] > agent2.stats['defense']: damage = agent1.stats['power'] - agent2.stats['defense'] agent2.stats['health'] -= damage return f"{agent1.name} dealt {damage} damage to {agent2.name}. {agent2.name} now has {agent2.stats['health']} health." else: return f"{agent1.name} couldn't penetrate {agent2.name}'s defense."
Using the Code:
game = Game() agent_001 = Agent(agents_data[0]) agent_002 = Agent(agents_data[1])
game.add_agent(agent_001) game.add_agent(agent_002)
Start combat between two agents
result = game.start_combat(agent_001, agent_002) print(result)
Step 4: Iterate on Model Expansion
As we begin defining more data and functionality, I recommend:
Adding More Data: Additional attributes, such as experience points, level, inventory, or location in the game world.
Expanding on Abilities: Creating specific functions for the abilities each agent can use and how they affect other agents or the environment.
User Interface (UI): If this is part of a larger game or app, developing the frontend for users to interact with the data models.
Step 5: Defining Models for Source Code
If you have specific source code or APIs to integrate (such as an online TCG database or specific game mechanics), I can help you define models and scripts for data fetching, communication, or real-time interactions.
Please share more details about the source code or data you'd like to define so I can help expand or refine the models further. To further define the models for your project, we'll focus on expanding the Agent model, building out additional interaction models, and extending some game mechanics for your TCG system. Since you're working on a complex system like #SamuraiSkirts, we can enhance the models with more intricate attributes and behaviors for agents, abilities, and interactions. Let’s break down the models with a more detailed approach.
Step 1: Enhanced Agent Model
We can extend the Agent class with additional attributes such as leveling up, inventory, and status effects. This will allow agents to grow stronger over time, carry items, and be affected by various conditions during gameplay.
class Agent: def init(self, agent_id, name, role, stats, abilities, interactions, level=1, inventory=None, status_effects=None): self.agent_id = agent_id # Unique identifier for each agent self.name = name # Name of the agent self.role = role # Role or class of the agent (e.g., Samurai, Healer) self.stats = stats # Dictionary for stats (health, power, defense, etc.) self.abilities = abilities # List of abilities (skills, spells, etc.) self.interactions = interactions # How this agent interacts with others (e.g., allies, enemies) self.level = level # Current level of the agent self.inventory = inventory or [] # Items the agent carries self.status_effects = status_effects or {} # Current status effects (e.g., 'Poisoned', 'Stunned')
def level_up(self): """Increase agent's level and boost stats.""" self.level += 1 self.stats['health'] += 10 # Example stat boost on leveling up self.stats['power'] += 2 print(f"{self.name} leveled up to level {self.level}!")
def add_item(self, item): """Add an item to the agent's inventory.""" self.inventory.append(item) print(f"{self.name} obtained {item}!")
def apply_status_effect(self, effect_name, duration): """Apply a status effect to the agent.""" self.status_effects[effect_name] = duration print(f"{self.name} is now {effect_name} for {duration} turns.")
def use_ability(self, ability_name, target): """Use an ability on a target.""" if ability_name in self.abilities: # Example ability logic print(f"{self.name} uses {ability_name} on {target.name}") target.take_damage(self.stats['power']) # Apply damage from ability else: print(f"{ability_name} is not available to {self.name}")
def take_damage(self, amount): """Reduce health when the agent takes damage.""" self.stats['health'] -= amount print(f"{self.name} takes {amount} damage and has {self.stats['health']} health left.")
Enhanced Agent Data:
Here’s an example of more detailed agent data for the agents in your game:
agents_data = [ { 'agent_id': 1, 'name': 'Agent001', 'role': 'Warrior', 'stats': {'health': 120, 'power': 25, 'defense': 15}, 'abilities': ['Slash', 'Charge'], 'interactions': {'ally': 'Boost', 'enemy': 'Attack'}, 'level': 1, 'inventory': ['Sword', 'Potion'], 'status_effects': {} }, { 'agent_id': 2, 'name': 'Agent002', 'role': 'Healer', 'stats': {'health': 90, 'power': 10, 'defense': 20}, 'abilities': ['Heal', 'Shield'], 'interactions': {'ally': 'Heal', 'enemy': 'Defend'}, 'level': 2, 'inventory': ['Healing Herb'], 'status_effects': {'Poisoned': 3} }, # Add more agents as needed ]
Step 2: Interaction and Combat Models
Let's build out interaction models to handle combat, healing, and buffing (boosting stats of allies). These interactions will allow the agents to perform actions in battle or other scenarios.
class Combat: def init(self): self.turn_count = 0
def resolve_combat(self, agent1, agent2): """Resolve combat between two agents.""" self.turn_count += 1 print(f"--- Turn {self.turn_count} ---")
# If one agent is stunned or otherwise unable to act if agent1.status_effects.get('Stunned', 0) > 0: print(f"{agent1.name} is stunned and cannot act!") agent1.status_effects['Stunned'] -= 1 # Reduce stun duration else: self.attack(agent1, agent2)
if agent2.status_effects.get('Stunned', 0) > 0: print(f"{agent2.name} is stunned and cannot act!") agent2.status_effects['Stunned'] -= 1 else: self.attack(agent2, agent1)
def attack(self, attacker, defender): """Perform an attack from one agent to another.""" damage = attacker.stats['power'] - defender.stats['defense'] damage = max(damage, 0) # Damage cannot be negative defender.take_damage(damage)
def heal(self, healer, target): """Heal an agent.""" healing_amount = healer.stats['power'] * 1.5 # Example healing formula target.stats['health'] += healing_amount print(f"{healer.name} healed {target.name} for {healing_amount} health!")
Using Combat System:
combat_system = Combat()
Initialize agents
agent_001 = Agent(agents_data[0]) agent_002 = Agent(agents_data[1])
Simulate combat between two agents
combat_system.resolve_combat(agent_001, agent_002)
Step 3: Additional Game Mechanics
We can also build models for other mechanics like leveling up, status effects (such as poison or burn), and inventory management. These mechanics allow the game to dynamically change over time as agents grow and engage in combat.
Inventory System Example:
class Inventory: def init(self): self.items = {}
def add_item(self, item, quantity=1): if item in self.items: self.items[item] += quantity else: self.items[item] = quantity print(f"Added {quantity} {item}(s) to inventory.")
def use_item(self, item, agent): """Use an item from the inventory on an agent.""" if item in self.items and self.items[item] > 0: print(f"{agent.name} used {item}!") if item == 'Potion': agent.stats['health'] += 50 # Example healing self.items[item] -= 1 else: print(f"{item} not available in inventory.")
Example Usage:
inventory = Inventory() inventory.add_item('Potion', 3)
Use potion on agent
inventory.use_item('Potion', agent_001)
Step 4: Expanding and Refining the Models
Abilities: Extend abilities to include different types like buffs, debuffs, damage types, or status effects.
AI: Implement AI for agents that control their actions (e.g., attack, heal, use items) based on their current health or level.
Multiplayer: If your game involves multiplayer, expand models to handle turns, syncing actions, and managing multiple players.
By adding these layers to the game mechanics and data models, you'll have a richer system that allows for more complex interactions and growth for each agent in your TCG. If you have specific interactions, mechanics, or more advanced features in mind, I can continue expanding or refining these models. Let me know how you'd like to proceed!
To expand upon the initial agent models, we'll define agents 001 through 010 with unique roles, abilities, interactions, stats, and inventory. Each agent can represent a distinct character or unit in your game, with diverse attributes to reflect their role in combat, support, or other gameplay mechanics.
Let's start by expanding the previous Agent model to include more diversity for each agent. This will also involve assigning special abilities, inventory items, and unique traits for each agent to make them stand out in gameplay.
Step 1: Expanding the Agent Model
I'll first adjust the Agent model slightly for better expansion, ensuring that each agent has unique stats and abilities. This model will also handle more detailed interaction logic and inventory use.
class Agent: def init(self, agent_id, name, role, stats, abilities, interactions, level=1, inventory=None, status_effects=None): self.agent_id = agent_id # Unique identifier for each agent self.name = name # Name of the agent self.role = role # Role or class of the agent (e.g., Samurai, Healer) self.stats = stats # Dictionary for stats (health, power, defense, etc.) self.abilities = abilities # List of abilities (skills, spells, etc.) self.interactions = interactions # How this agent interacts with others (e.g., allies, enemies) self.level = level # Current level of the agent self.inventory = inventory or [] # Items the agent carries self.status_effects = status_effects or {} # Current status effects (e.g., 'Poisoned', 'Stunned')
def level_up(self): """Increase agent's level and boost stats.""" self.level += 1 self.stats['health'] += 10 # Example stat boost on leveling up self.stats['power'] += 2 print(f"{self.name} leveled up to level {self.level}!")
def add_item(self, item): """Add an item to the agent's inventory.""" self.inventory.append(item) print(f"{self.name} obtained {item}!")
def apply_status_effect(self, effect_name, duration): """Apply a status effect to the agent.""" self.status_effects[effect_name] = duration print(f"{self.name} is now {effect_name} for {duration} turns.")
def use_ability(self, ability_name, target): """Use an ability on a target.""" if ability_name in self.abilities: # Example ability logic print(f"{self.name} uses {ability_name} on {target.name}") target.take_damage(self.stats['power']) # Apply damage from ability else: print(f"{ability_name} is not available to {self.name}")
def take_damage(self, amount): """Reduce health when the agent takes damage.""" self.stats['health'] -= amount print(f"{self.name} takes {amount} damage and has {self.stats['health']} health left.")
Step 2: Define Agents 001–010
We'll now define agents 001 through 010 with varied roles (e.g., warrior, mage, healer), unique abilities, inventory, and stats. Each agent can have a special skillset that fits their role in the game world.
agents_data = [ { 'agent_id': 1, 'name': 'Agent001', 'role': 'Warrior', 'stats': {'health': 150, 'power': 30, 'defense': 20}, 'abilities': ['Slash', 'Berserk'], 'interactions': {'ally': 'Boost', 'enemy': 'Crush'}, 'level': 1, 'inventory': ['Iron Sword', 'Shield'], 'status_effects': {} }, { 'agent_id': 2, 'name': 'Agent002', 'role': 'Mage', 'stats': {'health': 100, 'power': 50, 'defense': 10}, 'abilities': ['Fireball', 'Teleport'], 'interactions': {'ally': 'Mana Boost', 'enemy': 'Burn'}, 'level': 1, 'inventory': ['Spellbook', 'Mana Potion'], 'status_effects': {} }, { 'agent_id': 3, 'name': 'Agent003', 'role': 'Healer', 'stats': {'health': 120, 'power': 10, 'defense': 15}, 'abilities': ['Heal', 'Revive'], 'interactions': {'ally': 'Heal', 'enemy': 'Defend'}, 'level': 1, 'inventory': ['Healing Herb', 'Potion'], 'status_effects': {} }, { 'agent_id': 4, 'name': 'Agent004', 'role': 'Rogue', 'stats': {'health': 90, 'power': 35, 'defense': 12}, 'abilities': ['Backstab', 'Stealth'], 'interactions': {'ally': 'Stealth Boost', 'enemy': 'Poison'}, 'level': 1, 'inventory': ['Dagger', 'Smoke Bomb'], 'status_effects': {} }, { 'agent_id': 5, 'name': 'Agent005', 'role': 'Tank', 'stats': {'health': 200, 'power': 15, 'defense': 50}, 'abilities': ['Taunt', 'Shield Bash'], 'interactions': {'ally': 'Shield Wall', 'enemy': 'Knockback'}, 'level': 1, 'inventory': ['Heavy Shield', 'Armor'], 'status_effects': {} }, { 'agent_id': 6, 'name': 'Agent006', 'role': 'Archer', 'stats': {'health': 100, 'power': 25, 'defense': 8}, 'abilities': ['Piercing Arrow', 'Trap'], 'interactions': {'ally': 'Hawk Eye', 'enemy': 'Silence'}, 'level': 1, 'inventory': ['Bow', 'Arrow'], 'status_effects': {} }, { 'agent_id':
To expand upon the agents' abilities and introduce AI, we need to focus on two main areas:
Ability Expansion: We’ll provide more variety and depth to each agent’s abilities (e.g., healing, debuffs, buffs, damage types, effects like stuns, poisons, etc.).
AI Implementation: Introduce an AI system that can control agents in combat, make decisions based on the game state, and choose appropriate abilities or actions. The AI will simulate behaviors such as attacking enemies, healing allies, or using items based on specific conditions.
Step 1: Expanded Abilities for Agents
Let's expand the abilities of each agent to include more nuanced actions such as status effects, damage types, healing, etc. We'll also add a resolve_ability() method to handle how abilities affect the game world.
import random
class Agent: def init(self, agent_id, name, role, stats, abilities, interactions, level=1, inventory=None, status_effects=None): self.agent_id = agent_id self.name = name self.role = role self.stats = stats self.abilities = abilities self.interactions = interactions self.level = level self.inventory = inventory or [] self.status_effects = status_effects or {}
def level_up(self): self.level += 1 self.stats['health'] += 10 self.stats['power'] += 2 print(f"{self.name} leveled up to level {self.level}!")
def add_item(self, item): self.inventory.append(item) print(f"{self.name} obtained {item}!")
def apply_status_effect(self, effect_name, duration): self.status_effects[effect_name] = duration print(f"{self.name} is now {effect_name} for {duration} turns.")
def use_ability(self, ability_name, target=None): """Resolve the ability and apply effects to self or a target.""" if ability_name in self.abilities: ability = self.abilities[ability_name] ability.resolve(self, target) else: print(f"{self.name} doesn't know that ability!")
def take_damage(self, amount): self.stats['health'] -= amount print(f"{self.name} takes {amount} damage and has {self.stats['health']} health left.")
def heal(self, amount): self.stats['health'] += amount print(f"{self.name} heals for {amount}, current health: {self.stats['health']}.")
Defining more complex abilities with effects
class Ability: def init(self, name, effect_type, magnitude, target_type, duration=0): self.name = name self.effect_type = effect_type # e.g., "damage", "heal", "buff", "debuff" self.magnitude = magnitude self.target_type = target_type # e.g., "single", "allies", "enemies" self.duration = duration # For debuffs or buffs
def resolve(self, caster, target=None): """Resolve the effect of the ability based on the type.""" if self.effect_type == 'damage': self.deal_damage(caster, target) elif self.effect_type == 'heal': self.heal_target(caster, target) elif self.effect_type == 'buff': self.apply_buff(caster) elif self.effect_type == 'debuff': self.apply_debuff(target)
def deal_damage(self, caster, target): if target: damage = caster.stats['power'] + self.magnitude target.take_damage(damage) print(f"{caster.name} hits {target.name} for {damage} damage using {self.name}.")
def heal_target(self, caster, target): if target: heal_amount = caster.stats['power'] + self.magnitude target.heal(heal_amount) print(f"{caster.name} heals {target.name} for {heal_amount} using {self.name}.")
def apply_buff(self, caster): caster.stats['power'] += self.magnitude print(f"{caster.name} gains a buff, increasing power by {self.magnitude}.")
def apply_debuff(self, target): target.stats['power'] -= self.magnitude print(f"{target.name} suffers a debuff, decreasing power by {self.magnitude} for {self.duration} turns.") target.apply_status_effect(self.name, self.duration)
Define abilities
abilities_data = { "Slash": Ability(name="Slash", effect_type="damage", magnitude=10, target_type="single"), "Fireball": Ability(name="Fireball", effect_type="damage", magnitude=20, target_type="single"), "Heal": Ability(name="Heal", effect_type="heal", magnitude=15, target_type="single"), "Berserk": Ability(name="Berserk", effect_type="buff", magnitude=10, target_type="single"), "Poison": Ability(name="Poison", effect_type="debuff", magnitude=5, target_type="single", duration=3), }
Add abilities to agents
agents_data = [ {"name": "Agent001", "abilities": ["Slash", "Berserk"]}, {"name": "Agent002", "abilities": ["Fireball", "Heal"]}, {"name": "Agent003", "abilities": ["Heal", "Berserk"]}, {"name": "Agent004", "abilities": ["Poison", "Slash"]}, ]
Instantiate agents
agents = [Agent(agent_id=i, name=agent["name"], role="Warrior", stats={"health": 100, "power": 15, "defense": 5}, abilities=[abilities_data[ability] for ability in agent["abilities"]]) for i, agent in enumerate(agents_data)]
Step 2: AI System
Now that we’ve expanded the abilities, let’s create an AI system to control agents. The AI will decide which action an agent should take during their turn based on the current game state.
We’ll implement a basic AI that can:
Choose an ability based on the agent's role.
Attack enemies if they are low on health.
Heal allies if they are injured.
The AI will have a simple decision-making system.
class AI: def init(self, agent): self.agent = agent
def decide_action(self, allies, enemies): """Decide what action the agent should take based on the situation.""" # AI decides to heal if an ally's health is low low_health_allies = [ally for ally in allies if ally.stats['health'] < 50] if low_health_allies: target = random.choice(low_health_allies) # Pick a random low health ally to heal print(f"{self.agent.name} decides to heal {target.name}.") self.agent.use_ability("Heal", target) return # AI will attack an enemy if its health is high if enemies: target = random.choice(enemies) # Choose a random enemy print(f"{self.agent.name} decides to attack {target.name}.") self.agent.use_ability("Fireball", target) return
print(f"{self.agent.name} is unsure of what to do.")
Example of AI-controlled agents
ai_agents = [AI(agent) for agent in agents]
Simulate AI decisions
for ai_agent in ai_agents: ai_agent.decide_action(allies=agents, enemies=agents)
Step 3: Simulate a Combat Scenario with AI
Now, let’s simulate a basic combat scenario where agents take turns based on their AI decision-making logic.
Initialize combat scenario
allies = [agents[0], agents[2]] # Agent 001 and Agent 003 are allies enemies = [agents[1], agents[3]] # Agent 002 and Agent 004 are enemies
Combat loop
turns = 5 for _ in range(turns): for ai
To implement a Turing Model, which simulates decision-making in a highly intelligent, adaptable AI, we’ll create an AI system that closely mimics the behavior of a Turing Machine, in which each decision is based on an internal state and specific rules that are evaluated during execution.
In this implementation, the Turing Model AI will evaluate various possible actions based on the current game state (such as agent health, enemy health, and available abilities). The AI will process this information through a series of decision-making steps akin to reading and writing on a Turing machine's tape, where each action is influenced by the agent's internal "state."
Here’s how we can approach it:
Step 1: Define the Turing Machine's State Transitions
We'll define several "states" for the AI. These states will correspond to different modes of action (such as "attacking," "healing," or "defending"), and based on certain conditions, the AI will transition between states.
For example:
Idle State: The agent waits and analyzes the situation.
Attack State: The agent will choose an attacking move.
Heal State: The agent will choose a healing move for itself or an ally.
Buff State: The agent will apply buffs to itself or an ally.
Defend State: The agent will defend or apply debuffs to enemies.
We’ll introduce a state machine that maps the current state to a set of rules determining the agent’s behavior.
Step 2: Turing Model AI Implementation
import random
class TuringAI: def init(self, agent): self.agent = agent self.state = 'Idle' # Initial state self.action_history = [] # To keep track of actions def decide_action(self, allies, enemies): """Simulate the decision-making process of the Turing Machine-like AI.""" # Step 1: Read current state and game environment (AI decides based on its state) print(f"Agent {self.agent.name} is in {self.state} state.") # Step 2: Transition based on internal rules and environment if self.state == 'Idle': self._transition_to_action_state(allies, enemies) elif self.state == 'Attack': self._perform_attack(allies, enemies) elif self.state == 'Heal': self._perform_heal(allies) elif self.state == 'Buff': self._apply_buff(allies) elif self.state == 'Defend': self._perform_defense(allies, enemies) def _transition_to_action_state(self, allies, enemies): """Determine whether to Attack, Heal, Buff, or Defend based on current conditions.""" low_health_allies = [ally for ally in allies if ally.stats['health'] < 50] low_health_enemies = [enemy for enemy in enemies if enemy.stats['health'] < 50] # Transition to Heal if an ally is low on health if low_health_allies: self.state = 'Heal' print(f"{self.agent.name} detected low health allies. Transitioning to Heal state.") return # Transition to Attack if there are enemies with low health if low_health_enemies: self.state = 'Attack' print(f"{self.agent.name} detected low health enemies. Transitioning to Attack state.") return # If no immediate action is needed, go to Buff or Defend if not low_health_allies and not low_health_enemies: self.state = random.choice(['Buff', 'Defend']) print(f"{self.agent.name} is transitioning to {self.state} state.") def _perform_attack(self, allies, enemies): """Perform an attack action on an enemy.""" if enemies: target = random.choice(enemies) print(f"{self.agent.name} attacks {target.name}!") self.agent.use_ability("Fireball", target) self.action_history.append(f"Attack {target.name}") self.state = 'Idle' # After attack, return to idle state def _perform_heal(self, allies): """Perform a healing action on an ally.""" if allies: target = random.choice(allies) print(f"{self.agent.name} heals {target.name}!") self.agent.use_ability("Heal", target) self.action_history.append(f"Heal {target.name}") self.state = 'Idle' # After healing, return to idle state def _apply_buff(self, allies): """Apply a buff to an ally.""" if allies: target = random.choice(allies) print(f"{self.agent.name} applies a buff to {target.name}.") self.agent.use_ability("Berserk", target) self.action_history.append(f"Buff {target.name}") self.state = 'Idle' # After buffing, return to idle state def _perform_defense(self, allies, enemies): """Perform defense action, debuffing enemies or defending the agent.""" if enemies: target = random.choice(enemies) print(f"{self.agent.name} debuffs {target.name}.") self.agent.use_ability("Poison", target) self.action_history.append(f"Debuff {target.name}") self.state = 'Idle' # After debuffing, return to idle state
Example: Simulating a combat scenario with Turing-like AI
def simulate_combat(): # Instantiate agents agent1 = Agent(agent_id=1, name="Agent001", role="Warrior", stats={"health": 100, "power": 15, "defense": 5}, abilities=[abilities_data["Fireball"], abilities_data["Heal"]], interactions=["attack", "heal"]) agent2 = Agent(agent_id=2, name="Agent002", role="Mage", stats={"health": 50, "power": 20, "defense": 5}, abilities=[abilities_data["Fireball"], abilities_data["Heal"]], interactions=["attack", "heal"]) # Initialize AI agents ai_agent1 = TuringAI(agent1) ai_agent2 = TuringAI(agent2) # Combat loop turns = 5 allies = [agent1] enemies = [agent2] for _ in range(turns): ai_agent1.decide_action(allies, enemies) ai_agent2.decide_action(allies, enemies) print("\n--- Next Turn ---")
simulate_combat()
Step 3: AI Decision Process - Simulation Walkthrough
Initial State: The AI starts in the Idle state. It examines the environment (e.g., health of allies and enemies).
State Transition: Based on the conditions (e.g., low health in allies or enemies), the AI transitions to Heal, Attack, Buff, or Defend.
Action Execution: Once in a chosen state (e.g., Attack), the AI performs the appropriate action, like using a "Fireball" ability on an enemy or healing an ally.
State Reset: After each action, the AI returns to the Idle state, ready for the next round of decision-making.
Step 4: Further Enhancements
Learning Ability: The AI can "learn" from previous decisions by keeping track of the outcomes (e.g., if healing an ally was successful or if an attack dealt significant damage). This could be implemented using a reinforcement learning approach.
Multiple Action Layers: Introduce more layers to the AI decision-making, such as analyzing multiple turns ahead or using more advanced decision trees.
Complex Environmental Factors: The AI could consider environmental factors like the positioning of agents or terrain effects (e.g., taking cover, avoiding traps).
Conclusion
The Turing Model AI operates by evaluating the current game state and transitioning between states (like a T
To implement a Draw Card Function and define the various card zones on the playfield, we will break down the system into several components that interact with one another:
Card Types:
Battle Dolls (Max 3 zones): These are units or creatures that players summon to the battlefield.
Item Cards (Max 2 zones): Cards that represent items the player can use.
Dressblade Cards (Max 2 zones): Cards that represent weapons or abilities tied to the "Dressblade" concept.
Artifact Cards: Cards representing powerful relics or items with long-term effects.
Field Cards: Cards that influence the battlefield itself (weather, terrain, etc.).
Miscellaneous/Utility Cards: This can include trap cards, event cards, power cards, fusion cards, upgrades, and other special cards.
Card Zones:
Graveyard (Discard Pile): The area where discarded or destroyed cards go.
Hand: Where drawn cards are kept until played.
Battlefield Zones: Where cards are summoned into play, including Battle Dolls, Item Cards, Dressblade Cards, etc.
Battle Dolls (3 zones max): The maximum number of dolls a player can have in the battlefield at once.
Item Cards (2 zones max): Items that can be equipped or activated in combat.
Dressblade Cards (2 zones max): Represents swords, weapons, or special abilities tied to specific characters.
Artifact Cards (as part of Item or Equipment): Equipment cards that grant passive or active effects.
Other Zones:
Field Cards: Cards that influence the environment.
Miscellaneous Cards (Traps, Events, Power, Fusion, Upgrades): For special actions, effects, or card interactions.
Card Structures
We will define the Card class and the Zone class to represent the different zones where cards are placed, and a Player class to manage the player’s hand and actions.
Code Implementation:
import random
Define Card Class
class Card: def init(self, name, card_type, effect=None): self.name = name self.card_type = card_type self.effect = effect # Optional effect to be used when card is played
def str(self): return f"{self.name} ({self.card_type})"
Define Zones for Cards on the Playfield
class Zone: def init(self, zone_name, max_capacity): self.zone_name = zone_name self.max_capacity = max_capacity self.cards = [] # Cards placed in this zone
def add_card(self, card): """Add a card to the zone if there's space.""" if len(self.cards) < self.max_capacity: self.cards.append(card) print(f"Card {card.name} placed in {self.zone_name} zone.") else: print(f"Cannot add {card.name}. {self.zone_name} zone is full.")
def remove_card(self, card): """Remove a card from the zone.""" if card in self.cards: self.cards.remove(card) print(f"Card {card.name} removed from {self.zone_name} zone.") else: print(f"{card.name} not found in {self.zone_name} zone.")
Define Player Class to Handle Draws and Card Management
class Player: def init(self, name): self.name = name self.hand = [] # Cards the player holds in their hand self.graveyard = [] # Discard pile self.battle_dolls = [Zone('Battle Dolls', 3)] # Max 3 battle dolls on the field self.item_cards = [Zone('Item Cards', 2)] # Max 2 item cards on the field self.dressblades = [Zone('Dressblades', 2)] # Max 2 Dressblade cards on the field self.artifacts = [Zone('Artifacts', 2)] # Max 2 artifact cards on the field self.field_cards = [Zone('Field Cards', 1)] # Only 1 field card can be played self.miscellaneous = [Zone('Miscellaneous', 2)] # Can include traps, events, power cards, etc. def draw_card(self, deck): """Draw a card from the deck.""" if len(deck) > 0: drawn_card = deck.pop(random.randint(0, len(deck) - 1)) self.hand.append(drawn_card) print(f"{self.name} drew {drawn_card.name}.") else: print("Deck is empty, no cards to draw.") def play_card(self, card): """Play a card from hand.""" if card in self.hand: print(f"{self.name} plays {card.name}.") self.hand.remove(card) self._place_card_in_zone(card) else: print(f"{card.name} is not in your hand.") def _place_card_in_zone(self, card): """Place the card in the appropriate zone.""" if card.card_type == 'Battle Doll': self.battle_dolls[0].add_card(card) elif card.card_type == 'Item': self.item_cards[0].add_card(card) elif card.card_type == 'Dressblade': self.dressblades[0].add_card(card) elif card.card_type == 'Artifact': self.artifacts[0].add_card(card) elif card.card_type == 'Field': self.field_cards[0].add_card(card) elif card.card_type in ['Trap', 'Event', 'Power', 'Fusion', 'Upgrade']: self.miscellaneous[0].add_card(card) else: print(f"Card {card.name} cannot be played.")
Define Game Setup
def create_deck(): """Create a sample deck with various card types.""" deck = Card("Fireball", "Battle Doll", effect="Deal 20 damage"), Card("Healing Potion", "Item", effect="Heal 10 health"), Card("Berserk Sword", "Dressblade", effect="Increase attack by 10"), Card("Dragon's Heart", "Artifact", effect="Gain 5 defense per turn"), Card("Thunderstorm", "Field", effect="Deal 10 damage to all enemies"), Card("Trap Card", "Trap", effect="Trap an enemy's action for 1 turn"), Card("Power Boost", "Power", effect="Increase attack power by 5"), Card("Fusion Elixir", "Fusion", effect="Fuse two cards together"), Card("Upgrade Armor", "Upgrade", effect="Increase defense by 5") random.shuffle(deck) return deck
def simulate_turn(): """Simulate a player's turn.""" # Create a deck and initialize a player deck = create_deck() player1 = Player(name="Player 1") # Draw phase: draw 5 cards for _ in range(5): player1.draw_card(deck) # Play phase: Player 1 plays random cards for card in player1.hand: player1.play_card(card) # End of turn - show the current state of zones and hand print("\nEnd of Turn:") print(f"Hand: {[str(card) for card in player1.hand]}") print(f"Battle Dolls: {[str(card) for card in player1.battle_dolls[0].cards]}") print(f"Item Cards: {[str(card) for card in player1.item_cards[0].cards]}") print(f"Dressblades: {[str(card) for card in player1.dressblades[0].cards]}") print(f"Artifacts: {[str(card) for card in player1.artifacts[0].cards]}") print(f"Field Cards: {[str(card) for card in player1.field_cards[0].cards]}") print(f"Miscellaneous Cards: {[str(card) for card in player1.miscellaneous[0].cards]}")
Simulate a turn in the game
simulate_turn()
Breakdown of the Code:
Card Class: Represents individual cards, storing their name, type, and any effect they might have when played.
Zone Class: Represents the various zones where cards can be played on the field. Each zone has a maximum capacity (max_capacity) and stores the cards placed in it.
Player Class: Manages a player's hand, zones, and graveyard. The draw_card method allows the player to draw a card from the deck, and the play_card method places the card in the appropriate zone based on its type. The _place_card_in_zone method decides where to place each card.
Deck Creation and Simulation: The create_deck function creates a shuffled deck of cards, and the simulate_turn function simulates a player's turn, drawing cards and playing them, updating the zones accordingly.
Output Example:
Player 1 drew Fireball. Player 1 drew Healing Potion. Player 1 drew Berserk Sword. Player 1 drew Dragon's Heart. Player 1 drew Thunderstorm. Player 1 plays Fireball. Card Fireball placed in Battle Dolls zone. Player 1 plays Healing Potion. Card Healing Potion placed in Item Cards zone. Player 1 plays Berserk Sword. Card Berserk Sword placed in To create a full-scale working game system, we need to refine the previous code into modular sections that work seamlessly together, including the integration of all previously outlined functions, card zones, and game logic.
Key Components:
Card Types: We will further refine the card types and their effects.
Zones: Define clear, interactable zones for card play, including the player zones and battlefield areas.
Deck: The deck will now be shuffled and managed at the start of the game.
Gameplay Phases: Implement phases like drawing, playing, and resolving actions for a seamless gameplay experience.
Game Loop: Simulate the start, turn-based system, and end-game conditions.
Full Game System Code:
import random
Card Types Definition
class Card: def init(self, name, card_type, effect=None): self.name = name self.card_type = card_type self.effect = effect # Optional effect to be used when card is played
def str(self): return f"{self.name} ({self.card_type})"
Zones for Cards on the Playfield
class Zone: def init(self, zone_name, max_capacity): self.zone_name = zone_name self.max_capacity = max_capacity self.cards = [] # Cards placed in this zone
def add_card(self, card): """Add a card to the zone if there's space.""" if len(self.cards) < self.max_capacity: self.cards.append(card) print(f"Card {card.name} placed in {self.zone_name} zone.") else: print(f"Cannot add {card.name}. {self.zone_name} zone is full.")
def remove_card(self, card): """Remove a card from the zone.""" if card in self.cards: self.cards.remove(card) print(f"Card {card.name} removed from {self.zone_name} zone.") else: print(f"{card.name} not found in {self.zone_name} zone.")
Player Class to Handle Draws and Card Management
class Player: def init(self, name): self.name = name self.hand = [] # Cards the player holds in their hand self.graveyard = [] # Discard pile self.battle_dolls = Zone('Battle Dolls', 3) # Max 3 battle dolls on the field self.item_cards = Zone('Item Cards', 2) # Max 2 item cards on the field self.dressblades = Zone('Dressblades', 2) # Max 2 Dressblade cards on the field self.artifacts = Zone('Artifacts', 2) # Max 2 artifact cards on the field self.field_cards = Zone('Field Cards', 1) # Only 1 field card can be played self.miscellaneous = Zone('Miscellaneous', 5) # Max 5 cards like traps, events, etc. def draw_card(self, deck): """Draw a card from the deck.""" if len(deck) > 0: drawn_card = deck.pop(random.randint(0, len(deck) - 1)) self.hand.append(drawn_card) print(f"{self.name} drew {drawn_card.name}.") else: print("Deck is empty, no cards to draw.") def play_card(self, card): """Play a card from hand.""" if card in self.hand: print(f"{self.name} plays {card.name}.") self.hand.remove(card) self._place_card_in_zone(card) else: print(f"{card.name} is not in your hand.") def _place_card_in_zone(self, card): """Place the card in the appropriate zone.""" if card.card_type == 'Battle Doll': self.battle_dolls.add_card(card) elif card.card_type == 'Item': self.item_cards.add_card(card) elif card.card_type == 'Dressblade': self.dressblades.add_card(card) elif card.card_type == 'Artifact': self.artifacts.add_card(card) elif card.card_type == 'Field': self.field_cards.add_card(card) elif card.card_type in ['Trap', 'Event', 'Power', 'Fusion', 'Upgrade']: self.miscellaneous.add_card(card) else: print(f"Card {card.name} cannot be played.")
def end_turn(self): """End the player's turn and move cards to graveyard.""" print(f"{self.name} ends their turn.") self.graveyard.extend(self.battle_dolls.cards) self.graveyard.extend(self.item_cards.cards) self.graveyard.extend(self.dressblades.cards) self.graveyard.extend(self.artifacts.cards) self.graveyard.extend(self.field_cards.cards) self.graveyard.extend(self.miscellaneous.cards) # Clear zones at the end of the turn self.battle_dolls.cards.clear() self.item_cards.cards.clear() self.dressblades.cards.clear() self.artifacts.cards.clear() self.field_cards.cards.clear() self.miscellaneous.cards.clear()
Define Game Setup
def create_deck(): """Create a sample deck with various card types.""" deck = Card("Fireball", "Battle Doll", effect="Deal 20 damage"), Card("Healing Potion", "Item", effect="Heal 10 health"), Card("Berserk Sword", "Dressblade", effect="Increase attack by 10"), Card("Dragon's Heart", "Artifact", effect="Gain 5 defense per turn"), Card("Thunderstorm", "Field", effect="Deal 10 damage to all enemies"), Card("Trap Card", "Trap", effect="Trap an enemy's action for 1 turn"), Card("Power Boost", "Power", effect="Increase attack power by 5"), Card("Fusion Elixir", "Fusion", effect="Fuse two cards together"), Card("Upgrade Armor", "Upgrade", effect="Increase defense by 5"), Card("Mystic Shield", "Item", effect="Block 5 damage from each attack") random.shuffle(deck) return deck
def start_game(): """Start the game and initialize players and deck.""" deck = create_deck() player1 = Player(name="Player 1") player2 = Player(name="Player 2") players = [player1, player2]
# Each player draws 5 cards at the start for player in players: for _ in range(5): player.draw_card(deck)
# Simulate Turns turn_counter = 1 while deck: current_player = players[turn_counter % 2] print(f"\n--- Turn {turn_counter} ---") # Draw phase current_player.draw_card(deck) # Play phase (players play all cards in hand) for card in current_player.hand[:]: # Iterating over a copy of the hand current_player.play_card(card) # End phase current_player.end_turn() turn_counter += 1
# End of game print("\nGame Over")
Start the Game
start_game()
Key Enhancements:
Zones Handling: Each Player has specific zones for their cards, and cards are placed in the appropriate zone when played.
Card Effects: Basic effects are included in the Card class (e.g., "Deal 20 damage", "Heal 10 health").
Turn Management: Each player draws a card, plays it, and then ends their turn. At the end of a turn, cards are moved to the graveyard, and the zones are cleared.
Game Loop: A simple game loop is implemented where players alternate turns until the deck is empty. During each turn, a player draws a card, plays all cards in their hand, and ends the turn by moving cards to the graveyard.
Output Example:
Player 1 drew Fireball. Player 1 drew Healing Potion. Player 1 drew Berserk Sword. Player 1 drew Dragon's Heart. Player 1 drew Thunderstorm.
--- Turn 1 --- Player 1 drew Mystic Shield. Player 1 plays Fireball. Card Fireball placed in Battle Dolls zone. Player 1 plays Healing Potion. Card Healing Potion placed in Item Cards zone. Player 1 plays Berserk Sword. Card Berserk Sword placed in Dressblades zone. Player 1 To create a full-scale working game system, we need to refine the previous code into modular sections that work seamlessly together, including the integration of all previously outlined functions, card zones, and game logic.
Key Components:
Card Types: We will further refine the card types and their effects.
Zones: Define clear, interactable zones for card play, including the player zones and battlefield areas.
Deck: The deck will now be shuffled and managed at the start of the game.
Gameplay Phases: Implement phases like drawing, playing, and resolving actions for a seamless gameplay experience.
Game Loop: Simulate the start, turn-based system, and end-game conditions.
Full Game System Code:
import random
Card Types Definition
class Card: def init(self, name, card_type, effect=None): self.name = name self.card_type = card_type self.effect = effect # Optional effect to be used when card is played
def str(self): return f"{self.name} ({self.card_type})"
Zones for Cards on the Playfield
class Zone: def init(self, zone_name, max_capacity): self.zone_name = zone_name self.max_capacity = max_capacity self.cards = [] # Cards placed in this zone
def add_card(self, card): """Add a card to the zone if there's space.""" if len(self.cards) < self.max_capacity: self.cards.append(card) print(f"Card {card.name} placed in {self.zone_name} zone.") else: print(f"Cannot add {card.name}. {self.zone_name} zone is full.")
def remove_card(self, card): """Remove a card from the zone.""" if card in self.cards: self.cards.remove(card) print(f"Card {card.name} removed from {self.zone_name} zone.") else: print(f"{card.name} not found in {self.zone_name} zone.")
Player Class to Handle Draws and Card Management
class Player: def init(self, name): self.name = name self.hand = [] # Cards the player holds in their hand self.graveyard = [] # Discard pile self.battle_dolls = Zone('Battle Dolls', 3) # Max 3 battle dolls on the field self.item_cards = Zone('Item Cards', 2) # Max 2 item cards on the field self.dressblades = Zone('Dressblades', 2) # Max 2 Dressblade cards on the field self.artifacts = Zone('Artifacts', 2) # Max 2 artifact cards on the field self.field_cards = Zone('Field Cards', 1) # Only 1 field card can be played self.miscellaneous = Zone('Miscellaneous', 5) # Max 5 cards like traps, events, etc. def draw_card(self, deck): """Draw a card from the deck.""" if len(deck) > 0: drawn_card = deck.pop(random.randint(0, len(deck) - 1)) self.hand.append(drawn_card) print(f"{self.name} drew {drawn_card.name}.") else: print("Deck is empty, no cards to draw.") def play_card(self, card): """Play a card from hand.""" if card in self.hand: print(f"{self.name} plays {card.name}.") self.hand.remove(card) self._place_card_in_zone(card) else: print(f"{card.name} is not in your hand.") def _place_card_in_zone(self, card): """Place the card in the appropriate zone.""" if card.card_type == 'Battle Doll': self.battle_dolls.add_card(card) elif card.card_type == 'Item': self.item_cards.add_card(card) elif card.card_type == 'Dressblade': self.dressblades.add_card(card) elif card.card_type == 'Artifact': self.artifacts.add_card(card) elif card.card_type == 'Field': self.field_cards.add_card(card) elif card.card_type in ['Trap', 'Event', 'Power', 'Fusion', 'Upgrade']: self.miscellaneous.add_card(card) else: print(f"Card {card.name} cannot be played.")
def end_turn(self): """End the player's turn and move cards to graveyard.""" print(f"{self.name} ends their turn.") self.graveyard.extend(self.battle_dolls.cards) self.graveyard.extend(self.item_cards.cards) self.graveyard.extend(self.dressblades.cards) self.graveyard.extend(self.artifacts.cards) self.graveyard.extend(self.field_cards.cards) self.graveyard.extend(self.miscellaneous.cards) # Clear zones at the end of the turn self.battle_dolls.cards.clear() self.item_cards.cards.clear() self.dressblades.cards.clear() self.artifacts.cards.clear() self.field_cards.cards.clear() self.miscellaneous.cards.clear()
Define Game Setup
def create_deck(): """Create a sample deck with various card types.""" deck = Card("Fireball", "Battle Doll", effect="Deal 20 damage"), Card("Healing Potion", "Item", effect="Heal 10 health"), Card("Berserk Sword", "Dressblade", effect="Increase attack by 10"), Card("Dragon's Heart", "Artifact", effect="Gain 5 defense per turn"), Card("Thunderstorm", "Field", effect="Deal 10 damage to all enemies"), Card("Trap Card", "Trap", effect="Trap an enemy's action for 1 turn"), Card("Power Boost", "Power", effect="Increase attack power by 5"), Card("Fusion Elixir", "Fusion", effect="Fuse two cards together"), Card("Upgrade Armor", "Upgrade", effect="Increase defense by 5"), Card("Mystic Shield", "Item", effect="Block 5 damage from each attack") random.shuffle(deck) return deck
def start_game(): """Start the game and initialize players and deck.""" deck = create_deck() player1 = Player(name="Player 1") player2 = Player(name="Player 2") players = [player1, player2]
# Each player draws 5 cards at the start for player in players: for _ in range(5): player.draw_card(deck)
# Simulate Turns turn_counter = 1 while deck: current_player = players[turn_counter % 2] print(f"\n--- Turn {turn_counter} ---") # Draw phase current_player.draw_card(deck) # Play phase (players play all cards in hand) for card in current_player.hand[:]: # Iterating over a copy of the hand current_player.play_card(card) # End phase current_player.end_turn() turn_counter += 1
# End of game print("\nGame Over")
Start the Game
start_game()
Key Enhancements:
Zones Handling: Each Player has specific zones for their cards, and cards are placed in the appropriate zone when played.
Card Effects: Basic effects are included in the Card class (e.g., "Deal 20 damage", "Heal 10 health").
Turn Management: Each player draws a card, plays it, and then ends their turn. At the end of a turn, cards are moved to the graveyard, and the zones are cleared.
Game Loop: A simple game loop is implemented where players alternate turns until the deck is empty. During each turn, a player draws a card, plays all cards in their hand, and ends the turn by moving cards to the graveyard.
Output Example:
Player 1 drew Fireball. Player 1 drew Healing Potion. Player 1 drew Berserk Sword. Player 1 drew Dragon's Heart. Player 1 drew Thunderstorm.
--- Turn 1 --- Player 1 drew Mystic Shield. Player 1 plays Fireball. Card Fireball placed in Battle Dolls zone. Player 1 plays Healing Potion. Card Healing Potion placed in Item Cards zone. Player 1 plays Berserk Sword. Card Berserk Sword placed in Dressblades zone. Player 1 plays Dragon's Heart. Card Dragon's Heart placed in Artifacts zone. Player 1 plays Thunderstorm. Card Thunderstorm placed in Field Cards zone.
Player 1 ends their turn.
--- Turn 2 --- Player 2 drew Trap Card. Player 2 plays Trap Card. Card Trap Card placed in Miscellaneous zone.
Player 2 ends their turn.
Refinements and Future Enhancements:
Card Effects: Implement specific logic for each type of card effect (e.g., healing, damage, power boosts).
Game Victory Conditions: Define win conditions (e.g., deplete opponent's health, empty deck, etc.).
AI Player: Add an AI player that can make decisions based on the current game state.
Additional Phases: Implement phases for battle resolution, special card interactions, and end-of-turn cleanup.
To implement a full game with a splash screen, story mode, game modes, save and continue functions, and the ability to view/edit decks and trade cards online, we need to break this down into several components. Below is a simplified example code that introduces these features using Python.
Key Components:
Splash Screen: Display a simple introduction screen.
Story Mode: Implement a story-driven campaign with dialogue and progress.
Game Modes: Different modes like normal play, story mode, or multiplayer.
Save and Continue: Implement game saving and loading.
Deck Editing: Allow users to view and modify their decks.
Card Trading: Add the ability to trade cards online (this is typically done through a server, but for simplicity, we'll simulate it here).
Full-Scale Game Code (Simplified):
Dependencies:
You'll need a library like pygame for GUI elements. Make sure you install it with pip install pygame.
pip install pygame
Code:
import pygame import pickle import os
Initialize Pygame
pygame.init()
Constants
SCREEN_WIDTH = 800 SCREEN_HEIGHT = 600 FPS = 60
Colors
WHITE = (255, 255, 255) BLACK = (0, 0, 0) BLUE = (0, 0, 255) RED = (255, 0, 0)
Story Texts (can be expanded)
story_text = [ "Welcome to the Samurai Skirts Battle Dolls!", "In this world, you fight to protect the kingdom using powerful cards.", "Each player has unique battle dolls and items to aid them.", "The adventure begins now…" ]
Set up display
screen = pygame.display.set_mode((SCREEN_WIDTH, SCREEN_HEIGHT)) pygame.display.set_caption('Samurai Skirts Battle Dolls')
Fonts
font = pygame.font.SysFont('Arial', 32)
Game Variables
player_deck = [] # Deck to store player cards game_save_file = "game_save.pkl" # File for save data
Card Class (to represent cards)
class Card: def init(self, name, card_type, effect=None): self.name = name self.card_type = card_type self.effect = effect
Deck Editing & Trading System
def view_and_edit_deck(): """Allows the user to view and edit their deck.""" global player_deck print("Current Deck:") for i, card in enumerate(player_deck): print(f"{i+1}. {card.name} ({card.card_type})")
action = input("Do you want to (1) Remove a card, (2) Add a new card, or (3) Exit deck editing: ") if action == "1": index = int(input(f"Which card do you want to remove (1-{len(player_deck)}): ")) - 1 removed_card = player_deck.pop(index) print(f"Removed {removed_card.name} from your deck.") elif action == "2": new_card_name = input("Enter the name of the new card: ") new_card_type = input("Enter the type of the card: ") player_deck.append(Card(new_card_name, new_card_type)) print(f"Added {new_card_name} to your deck.") elif action == "3": return
def trade_cards(): """Simulate trading cards with another player (or AI).""" global player_deck print("Trade Cards:") print("Your current deck:") for i, card in enumerate(player_deck): print(f"{i+1}. {card.name} ({card.card_type})")
action = input("Would you like to (1) Trade or (2) Cancel: ") if action == "1": index = int(input("Which card would you like to trade? ")) - 1 card_to_trade = player_deck.pop(index) print(f"Traded {card_to_trade.name}.") # Simulate getting a card in return traded_card_name = input("Enter the name of the card you received in trade: ") traded_card_type = input("Enter the type of the card: ") player_deck.append(Card(traded_card_name, traded_card_type)) print(f"You received {traded_card_name}.")
Save & Continue (Serialization)
def save_game(): """Save game data to a file.""" with open(game_save_file, "wb") as file: pickle.dump(player_deck, file) print("Game saved!")
def load_game(): """Load saved game data from a file.""" global player_deck if os.path.exists(game_save_file): with open(game_save_file, "rb") as file: player_deck = pickle.load(file) print("Game loaded!") else: print("No saved game found.")
Game Mode: Story Mode
def story_mode(): """Simulate story-driven gameplay.""" print("Story Mode:") for line in story_text: print(line)
input("Press Enter to continue your journey…")
Display splash screen
def splash_screen(): """Display the splash screen.""" splash_font = pygame.font.SysFont('Arial', 48) title_text = splash_font.render("Samurai Skirts Battle Dolls", True, BLUE) subtitle_text = font.render("Press Enter to Start", True, RED)
running = True while running: screen.fill(WHITE) screen.blit(title_text, (SCREEN_WIDTH // 4, SCREEN_HEIGHT // 3)) screen.blit(subtitle_text, (SCREEN_WIDTH // 3, SCREEN_HEIGHT // 2))
pygame.display.update() for event in pygame.event.get(): if event.type == pygame.QUIT: running = False if event.type == pygame.KEYDOWN: if event.key == pygame.K_RETURN: running = False
Main Game Loop
def main_game_loop(): """Run the main game loop.""" running = True while running: screen.fill(WHITE)
# Display game menu options menu_text = font.render("1. Play Story Mode", True, BLUE) menu_text2 = font.render("2. View/Edit Deck", True, BLUE) menu_text3 = font.render("3. Trade Cards", True, BLUE) menu_text4 = font.render("4. Save Game", True, BLUE) menu_text5 = font.render("5. Load Game", True, BLUE) menu_text6 = font.render("6. Quit", True, RED)
screen.blit(menu_text, (50, 50)) screen.blit(menu_text2, (50, 100)) screen.blit(menu_text3, (50, 150)) screen.blit(menu_text4, (50, 200)) screen.blit(menu_text5, (50, 250)) screen.blit(menu_text6, (50, 300))
pygame.display.update()
for event in pygame.event.get(): if event.type == pygame.QUIT: running = False if event.type == pygame.KEYDOWN: if event.key == pygame.K_1: story_mode() elif event.key == pygame.K_2: view_and_edit_deck() elif event.key == pygame.K_3: trade_cards() elif event.key == pygame.K_4: save_game() elif event.key == pygame.K_5: load_game() elif event.key == pygame.K_6: running = False
Start the game
splash_screen() # Show splash screen main_game_loop() # Run main menu and gameplay
pygame.quit()
Explanation:
Splash Screen:
A splash screen appears at the start of the game and waits for the player to press "Enter" to proceed.
Story Mode:
A simple story mode with predefined text that the player goes through as part of the campaign.
Deck Viewing and Editing:
The player can view their deck, remove cards, and add new cards to modify their deck. This is done via a basic console interface.
Card Trading:
Players can simulate trading cards with each other. This is just a simple system where a player selects a card to trade and receives another card.
Save and Load:
Players can save the game and continue later using Python’s pickle module to serialize the player's deck data. The save_game() function saves the deck to a file, and load_game() loads the deck from the saved file.
Main Menu:
A main menu with options to start the game in story mode, view/edit the deck, trade cards, save/load, and quit.
Future Enhancements:
Multiplayer: Implement a networking system using socket or other libraries for online trading and multiplayer functionality.
Advanced Story Mode: Add branching narratives, choices, and consequences.
Better GUI: Replace console-based interfaces with graphical UI elements using Pygame for buttons, text boxes, etc.
To enhance the game's GUI and introduce GitHub-like models and progressions, we can use Python’s pygame for the GUI elements and combine it with GitHub-style version control for tracking changes, player progress, and deck management.
Below is a more advanced approach for both a better GUI design and a version control-like progression model for tracking changes made to the player's deck or game state.
Step 1: GUI Enhancement (Using pygame)
We'll improve the game interface by adding buttons, custom-designed menus, and interactions for the game modes, story, deck editing, and save/load functions.
Step 2: GitHub-like Version Control (Tracking Changes)
To simulate GitHub-like progression and tracking, we'll store "commits" of the player’s deck state, which will allow them to "revert" to previous versions of the deck or save progress after each action.
Dependencies:
You’ll need pygame and pickle for GUI and saving data.
Optionally, we can introduce a file management system for “commit-like” progress tracking.
Code Example:
import pygame import pickle import os import time
Initialize Pygame
pygame.init()
Constants
SCREEN_WIDTH = 800 SCREEN_HEIGHT = 600 FPS = 60
Colors
WHITE = (255, 255, 255) BLACK = (0, 0, 0) BLUE = (0, 0, 255) RED = (255, 0, 0)
Fonts
font = pygame.font.SysFont('Arial', 32) button_font = pygame.font.SysFont('Arial', 24)
Game Variables
player_deck = [] # Deck to store player cards game_save_file = "game_save.pkl" # File for save data git_commit_file = "git_commits.pkl" # Git-like commit file
Card Class (to represent cards)
class Card: def init(self, name, card_type, effect=None): self.name = name self.card_type = card_type self.effect = effect
Deck Class with Git-like version control (Commit)
class Deck: def init(self): self.cards = [] self.commit_history = []
def add_card(self, card): self.cards.append(card) self.commit()
def remove_card(self, index): if index < len(self.cards): removed_card = self.cards.pop(index) self.commit() return removed_card
def commit(self): """Simulate a Git commit by storing deck states.""" commit_time = time.time() self.commit_history.append({ 'timestamp': commit_time, 'deck_state': [card.dict for card in self.cards] })
def revert_to_commit(self, index): """Revert to a previous commit.""" if 0 <= index < len(self.commit_history): self.cards = [Card(**card_data) for card_data in self.commit_history[index]['deck_state']]
Initialize Deck
player_deck = Deck()
GUI Functionality
def create_button(x, y, width, height, text, color, action=None): """Create a button and detect clicks.""" mouse_x, mouse_y = pygame.mouse.get_pos() mouse_click = pygame.mouse.get_pressed() button_rect = pygame.Rect(x, y, width, height)
# Draw button pygame.draw.rect(screen, color, button_rect) text_surface = button_font.render(text, True, WHITE) screen.blit(text_surface, (x + (width - text_surface.get_width()) // 2, y + (height - text_surface.get_height()) // 2))
# Button click detection if button_rect.collidepoint((mouse_x, mouse_y)): if mouse_click[0]: # Left mouse click if action: action()
return button_rect
Save & Load Game
def save_game(): """Save the current game and deck to a file.""" with open(game_save_file, "wb") as file: pickle.dump(player_deck, file) print("Game saved!")
def load_game(): """Load saved game and deck from a file.""" global player_deck if os.path.exists(game_save_file): with open(game_save_file, "rb") as file: player_deck = pickle.load(file) print("Game loaded!") else: print("No saved game found.")
View/Edit Deck
def view_and_edit_deck(): """View and edit the deck.""" print("Current Deck:") for i, card in enumerate(player_deck.cards): print(f"{i+1}. {card.name} ({card.card_type})")
action = input("Do you want to (1) Remove a card, (2) Add a new card, (3) Revert a Commit, or (4) Exit deck editing: ") if action == "1": index = int(input(f"Which card do you want to remove (1-{len(player_deck.cards)}): ")) - 1 removed_card = player_deck.remove_card(index) print(f"Removed {removed_card.name} from your deck.") elif action == "2": new_card_name = input("Enter the name of the new card: ") new_card_type = input("Enter the type of the card: ") player_deck.add_card(Card(new_card_name, new_card_type)) print(f"Added {new_card_name} to your deck.") elif action == "3": index = int(input(f"Which commit to revert to (0-{len(player_deck.commit_history)-1}): ")) player_deck.revert_to_commit(index) print(f"Reverted to commit {index}.") elif action == "4": return
GUI Game Loop
def main_game_loop(): """Run the main game loop with GUI.""" running = True while running: screen.fill(WHITE)
# Menu Buttons create_button(300, 100, 200, 50, "Start Game", BLUE, start_game) create_button(300, 200, 200, 50, "Edit Deck", BLUE, view_and_edit_deck) create_button(300, 300, 200, 50, "Save Game", BLUE, save_game) create_button(300, 400, 200, 50, "Load Game", BLUE, load_game) create_button(300, 500, 200, 50, "Quit", RED, quit_game)
pygame.display.update() clock.tick(FPS)
Button Actions
def start_game(): """Start the game (e.g., load story mode).""" print("Starting Story Mode…")
def quit_game(): """Quit the game.""" pygame.quit() exit()
Initialize the Pygame clock
clock = pygame.time.Clock()
Start the game loop
main_game_loop()
Code Breakdown:
GUI Enhancements:
create_button: A function to create buttons with text and color. It detects mouse clicks and triggers actions when the button is clicked.
Main Menu: The main menu allows users to start the game, edit their deck, save/load, and quit.
Buttons are displayed with user-friendly text centered on them.
GitHub-like Commit System:
Deck Class: Tracks all changes to the deck by "committing" each change. Each commit stores the current state of the deck with a timestamp.
Commit/Revert: You can add cards, remove them, and even revert to a previous deck state by selecting from the commit history.
Saving and Loading:
save_game: Saves the current game and deck state to a file using the pickle module.
load_game: Loads the saved deck and game state from the file.
Game Progression:
The game allows the player to progress through different game modes (e.g., story mode, deck editing) while being able to track changes to their deck (like a GitHub repository).
Players can view the commit history and revert to previous versions of their deck.
Future Enhancements:
Multiplayer/Online: Implement a multiplayer system for trading cards, possibly using networking libraries like socket or asyncio.
Improved Deck Interface: Create more interactive deck editing features, such as drag-and-drop card placement or a card catalog.
Story Mode Expansion: Add branching storylines based on player decisions, potentially integrating with a database for dynamic dialogue and choices.
This code provides a basic structure for your game with GUI and a GitHub-like commit system for managing deck changes. For full-scale implementation, you would expand each feature, particularly story progression, multiplayer, and enhanced card interactions.
{!----trying to build my game underneath my nose!!!!!!! Hehe----!}
#playstation7#deardearestbrands#ps7#digitalconsole#framework#python#SamuraiSkirtsTCG#VideoGame#tradingcardgame
2 notes
·
View notes