#5 benefits of water softeners
Text
Hair Removal Methods.
I was heavily inspired by a post I found on Reddit when making this post. I haven’t seen too many posts about hair removal methods on Tumblr, and I have quite a few asks in my inbox about that, so it made sense for me to make a small guide with tips, methods, and recommendations. If you want more information, product names, my sugar wax recipe, or just recommendations, please don’t hesitate to send me an email or just comment below for me to respond.
Shaving.
Cost: $
Speed: Average
Smoothness: Average
Discomfort: Low
Tips/Methods:
* Always buy men’s razors. They usually come with sharper blades that don’t clog as much as the blades on women’s razors.
* I only shave using hot water and when I’m in the shower. The hot water softens the hair and makes it easy to remove, and the flow of the water prevents my razor from clogging.
* The direction you shave is important. If you shave against the grain (the direction opposite the hair points), you can get a closer shave, but you risk ingrown hairs. Shave with the grain on sensitive areas and do multiple passes if needed.
* I personally use shaving cream from EOS and products from Topicals to lessen ingrown hairs and clear up dark marks. Shaving isn’t my preferred method or hair removal, but when I’m in a rush, it gets the job done.
Best for your whole body, especially large and flat areas like your arms and legs. It's cheap and effective but often time consuming. If you want to maintain a perfectly smooth body, you’ll have to shave or touch up at least twice a week.
Nair/Chemical Removal.
Cost: $
Speed: Medium
Smoothness: Smooth
Discomfort: Low
Tips/Methods:
* There are many brands but the basic idea is you apply the cream to your skin, wait 5-10 minutes while the hair “melts" off your body, then you wipe it off. You’ll definitely need to shower after using Nair to remove any excess cream and to avoid burning your skin. I would say this is mandatory unless your specific brand says otherwise.
* The process will probably smell pretty bad. You'll want to wipe the cream and hair off with something disposable to avoid ruining your regular towels. I personally use tissue, you can use anything easily accessible.
* PATCH TEST BEFORE USE. These creams and powders are made from very really strong chemicals and can absolutely mess you up if you aren't careful. Everyone's skin is different, so put a little on your arm first, see how it reacts, then use it on a larger area.
Best For: Armpits and pubic hair. I find these creams are best at getting hard to reach or uneven surfaces that your razor might struggle with. This is also a good option if you are in a hurry or don't have the option to try the options below.
Epilation.
Cost: $$
Speed: Slow
Smoothness: High
Discomfort: High
Tips/Methods:
* Epilators look kind of like foil shavers you'd use for your face, but the end has a roller with tiny clamps that essentially grab hairs and pull them out.
* Personally I think these hurt like a bitch, especially the first time you use them. You can definitely feel each individual hair get pulled out of your skin.
* The main benefit of an epilator (and waxing, discussed below) is that you're pulling the entire hair out, root and all. This means hair in that area will grow back significantly slower than shaving. It also means that if you're willing to commit to a routine, each future use with the epilator will be less painful.
* I highly recommend icing the area before and after to avoid swelling. That being said, the area needs to be completely dry for the device to work.
* Epilator performance has always been pretty hit and miss for me. They're good at getting coarse hair, but will struggle to get fine or short strands. Again, you will likely need to make a shaving pass to clean up anything left behind.
* Additionally, if your hair is too thick or the surface is too uneven, the epilator can get tangled and stop functioning leading to a super painful situation. As with any of these tips, definitely test on a small area and see how it performs for you so you can get a feel for the length/thickness your device can handle.
Best For: Flat smooth surfaces, primarily your arms, legs, and torso. Some people really love epilation, others don’t. I think epilation is an acquired taste and it’s not my favorite method.
Waxing.
Cost: $$ to $$$
Speed: Slow
Smoothness: High
Discomfort: High
Tips/Methods:
* When you need to get 100% smooth there is no substitute. I love the way my body feels after waxing or sugaring and it’s what works best for me.
* I'll do my best here as a general overview but please watch some video guides before attempting this. I'll cover the two most common options I have experience with: soft wax, sugaring, and hard wax.
* Soft Wax: Hot wax is applied to the skin, then bandage strips are applied over. Once the wax cools, the strips are pulled off, taking the hair with them. This method is probably what you've seen in movies. They're good for getting rid of finer hairs, but unlike hard wax, you risk taking off your skin if you do it wrong. If you're trying waxing at home (especially for the first time), avoid this option. Despite the name, hard wax is actually much safer and what I recommend
* Hard wax: Hot wax is applied to the skin. Once it hardens, you peel the wax off by itself, taking hair with it. Since hard wax only bonds to hair and not skin it's a much safer option for beginners and does just as good a job removing hair as soft wax. This is what I use when I don’t have time to make my sugaring solution and I've never looked back.
* Wax is warmed in a... wax warmer! It's a little pot with a heating element, kind of like a croc pot. Hard waxes come in pellets that you dump in, soft waxes usually come with their own container that pops into the unit. Look for a wax warmer that can adjust the temp, not just an on/off switch. Most but not all have this feature. Each wax brand is different so you'll need more/less heat to melt it correctly, especially if you're doing a longer session where the wax can begin to solidify in the pot.
* Popsicle sticks are a cheap, effective way to apply wax. You'll want something disposable as it can get quite messy.
* Waxing, like epilators, will slow down your hair growth. This means the more you do it in the same area the less hair will grow back, and the less painful each subsequent application will be.
* Your hair needs to be a certain length for the wax to catch, so check your brand and plan accordingly. My professional technician has mentioned 1/4th inch is a good guideline for when to start waxing.
* As with every method on this list, please test on a small part of your body first. The wax will be quite hot (like getting into a hot bath) but not so much that it burns your skin.
Best For: any area you want super smooth or silky.
Laser Hair Removal.
Cost: $$$$
Speed: Slow
Smoothness: Depends.
Discomfort: High
Tips/Methods:
* Getting started will take some time and effort. You have to set up a consultation beforehand before even scheduling a session where you'll talk to the professional, ask any questions, then work out your plan.
* Laser hair removal is a process over time, not a one and done. Considering each session can cost hundreds of dollars, we are talking a huge investment. It cost me $800 over 4 sessions just for a small area on my lower body. For larger areas, we could be talking thousands!
* On that note, the total cost is going to vary a ton. Not only will each area be priced differently, but most places require you to book multiple sessions in a row or packages of X sessions you can choose to use over a year.
* The pigment of your skin matters a lot. Generally speaking the darker your skin the harder/less effective the process will be. There are different types of lasers available that may make this irrelevant but you'll definitely want to do your homework.
Final Thoughts.
What matters most is time. If you have the time to wax or shave your whole body, go to a professional for laser hair removal or pro waxing, or epilate yourself, then you’ll have much better results than someone who rushes through everything. Learning, investing in quality products, and then actually investing time into the hair removal process will get you closer to where you want to be without wasting as much time or money as you would leaping in blind or with no effort.
Richarlotte x
#richarlotte x#hypergamous heaux#hypergamy#leveling up advice#leveling up tips#hypergamy advice#hypergamy tips#hypergamous woman#black women in leisure#black women in luxury#spoiled black women#spoiled gf#spoiled girlfriend#hypergamous mindset#hypergamy journey#hypergamous lifestyle#hypergamous#leveled up black woman#leveled up woman#leveled up mindset#leveling up journey#social climbing#high society advice#high society tips#black femininity#heaux advice#heaux tips#becoming an it girl#becoming her#becoming that girl
82 notes
·
View notes
Text
DRUNK DABI X READER

You hear the window to your bedroom open so you glance at it not too alarmed knowing that it's probably someone you know personally. It was Dabi.
You and Dabi have been having a problem trying to figure out what you guys mean to each other. So you both settled that you're "Friends with Benefits". Which is fine by you. Mainly because your ex has treated you like shit for the past 5 months and you needed a person to help you in your time of need. (Time of need meaning getting knocked up).
As Dabi is climbing into your window you look at him noticing something is off. Even under the moon's reflective light you could tell he was a bit wobbly and wonky, and has a pinkish hue to his cheeks and forehead. You suddenly add 2 and 2 together when you notice a bottle of booze rocking in his hand.
Anyone homeee~? Yells Dabi slightly slurring at his words. He leans against the wall. You walk over to him and caress's his cheek. "Dabi? What are you doing here? You would usually warm me before you decide to come?" Dabi blinks at you and glances at your hand that is placed on his cheek.
"Hello, pretty I'm just having a drink, thought I'd stop by and visit you!" His words were barely audible but I got little snippets of it piecing words together.
Dabi looks at you with a tired look in his eyes and leans closer near your ear mumbling something about your hair being soft.
You glance at the half empty bottle in your hand. "Yea your hella drunk" You swiftly walk over to your window to lock it, hoping no one had seen him come in. You then take the bottle of booze and throw it away. Making Dabi a little sad in the eyes. Chaperoning Dabi to bed, you push away the stuffed animals that spread onto your bed and let the man lay down. The man groans and rolls onto his back.
"Come here and lay with me pretty girl." The raven hair man says stretching out his arm to look for your thigh.
"Dabi stop, you don't mean that, you're just drunk talking" You say as you get up to head to the restroom.
Dabi has stated many many times before that what you guys have going on doesn't reflect your feelings. It's just a mere hookup is all. Although you said you agreed to those terms, you just couldn't help but to catch feelings for the handsome man. (Whoopsie #1)
You begin to walk to the bathroom to grab 2 Tylenol pills and a warm washcloth. As well as grab a cup of water from the kitchen. You then return back to where the man lay placing the items on the night stand next to the queen sized bed.
"I'm not drunk talking! I'm serious. I've wanted you ever since we've started this whole charade"
You ignore his comments and attend to nurse him back to health. "Are you hungry Dabi? I could make you something to eat to ease the hangover once it comes." You ask symptomatically looking into his cerulean eyes.
Dabi's eyes soften as he nods. "Yes please that would be great~" As he nods he attempts to lean over to give you a small peck on the cheek. But ends up tumbling off the bed instead due to his inebriated state.
"Tch" is the only sound that comes out of your mouth. You lean down to help the man back onto the bed. The sound of soft snoring hits your ears and you realize he fell asleep (Pun intended). You tuck the man under the blankets and place the man onto his side making sure none of the contents of the drink comes up to choke him.
You kiss the man on his cheek admiring his beautiful features.
"I love you Dabi"
A small smirk forms onto the man's face as he whispers the words back; "I love you Y/N"
#dabi x reader#league of villains#mha x reader#dabi my hero academia#dabi x you#dabi#dabi x female reader#touya todoroki#blueflame#todoroki touya#leauge of villians#dabi fluff#Drunk Dabi
151 notes
·
View notes
Text
color me purple ♡ part two


✄ - - - - part 1 , part 2 , part 3 - - - - soundtrack - - - - ♡
synopsis: it’s summer and you’re back at camp stillwater. as a counselor you mean serious business and you’ll do whatever it takes for your cabin to come out on top. the only thing in the way of that; ellie williams and her crazy antics.
| 𓆣 | pairing & wc: ellie williams x reader. wc: 3.3k
| ❀ | cw (by part): 18+ themes (MDNI), modern au, fem reader, some fluff but mostly angsty, HEAVY sexual themes on the verge of smut, swearing, slight mention of marijuana, ellie is kinda a perv, ellie calls foot fetishes weird so if u have one i'm sorry lol not trying to kink shame its just for the plot !!
a/n: happy wednesday y'all!! i was literally kicking my feet while writing this hehe. i love being a delulu lesbian on paper. also i've never played poker before so if i worded something wrong i am so sorry lolz. sending hugs and kisses 2 you all ♡~ lola
Mrs. Campbell seemed taller this evening as she stood waiting to confront you with your fate. The moon shone brightly casting her long, mangled shadow across the dirt. As she spoke, your gaze remained locked to it, avoiding the disappointed look you knew was written all over her face.
“What do you two think you’re doing?!?” she yelled. You struggled to form any words with the large lump consuming your throat. Your stomach would’ve dropped too but you were pretty sure you had lost it during your barefoot dash through the woods. Ellie stood next to you just as silent until your devastated face clued her into your current state. She quickly tried to rationalize, speaking for the both of you.
“Mrs. Campbell, we're so, so sorry. Seriously, it was all my fault, please don’t blame Y/n!” You softened hearing Ellie so quickly take the fall. Feeling compelled to finally join this tense confrontation, you looked up from the ground. Your eye’s met with the wardens but they were filled with concern rather than fury as you had expected. Your injuries had alluded to a situation that she felt needed a bit more context.
“I’m just trying to figure out how you two ended up here bloody, wet, and 2 hours past curfew!” she said. With the guidance of Ellie you calmly explained the situation. Of course, it wasn’t the full truth. You took extra care to leave out the part about your little smoke sesh. And after what felt like hours of questioning and nagging, you and Ellie were given the benefit of the doubt, remaining counselors for the summer.
Mrs. Campbell gave her final say, “You girls better count your blessings. I’m feeling nice tonight. But, I can’t let your behavior go unpunished. Neither of you will be participating in tomorrow's first round of games. I'll take your campers under my wing while you two think about your behavior back at the cabins. Alone.” Tears welled in your eyes as you came to terms with the consequences of your actions. Ellie shifted her gaze to your heartbroken expression and the corners of her mouth turned down. Sure it was just one day of sitting out, but she knew how much the competition meant to you and felt like a total piece of shit for making you miss out. Even if it wasn’t completely her fault.
“That’s final. Now both of you please go wash up and stop making me worry!” Mrs. Campbell concluded.
You and Ellie made the 5 minute walk to the showers in silence, still shaken up from the recent events. Despite the water’s icy temperatures, it felt nice to wash off the evidence of your night living on the wild side. However, Ellie showered one space over with little emotional relief, too consumed by you. She just stood idle as the sharp drops of H2O hit her back. Questioning how you felt about her, if you were mad, and what you were thinking but wouldn’t say.
She couldn’t take it anymore and quickly switched off the water, drying off with a rough gray towel. You followed in suit, stepping out wrapped in your pink towel. The textured fabric wrapped tightly over your breasts hoisting the mounds up to peak over the linen. They sat pretty like a Victorian woman in a tight corset. Ellie, now in a fresh pair of clothes, kept her head forward but eyed you from her peripherals before finally speaking.
“I’m so sorry… I don’t even know what to say. I never wanted to get you in trouble.” She looked absolutely miserable, so convinced you hated her. You’d never seen this side of Ellie before. A side that was real and vulnerable. You had always pinned her as this impenetrable tough guy, never seeming bothered by anything. And now here you were, bothering her. What was so special about you, why did she care?
“Ellie, I’m not mad at you, just a little sad. This was my choice as much as it was yours.”
Ellie turned to you, voice breaking, “Wait… really?” Part of her felt like an idiot for bringing it up now, considering it was all in her head, but you didn’t think twice about giving her the reassurance she seeked.
“Yes, really.” Ellie gave a timid smile slanting to one side and breathed a sigh of relief knowing that her assumptions were just a product of overthinking.
“Now please, stop being so melodramatic and help me patch up all these stupid cuts.” You took a seat on the long bench placed in the tiled bathroom and Ellie followed like a humble servant. She got down on her knees like she owed it to you. Taking a wet cloth in her right hand and carefully cleaning your cuts one by one. Her touch was gentle, almost too much, but she didn't want to hurt you. You took pleasure in Ellie’s tender care and couldn’t help but wonder if she’s like this with all her friends. Even more, you questioned if it’s something you should be enjoying as much as you did. Ellie took her sweet time rinsing out the dirt from your wounds that you had acquired as an unwanted souvenir. Tending to your injuries gave her more time to study all of your nooks and crannies. Something she had only dreamed of. Ellie enjoyed every second until she reached your thighs, your gorgeous plush thighs. She observed as your pink towel bunched at the abdomen before splitting down the sides of your legs in a triangle-like formation. Mind hazy with desire, she couldn’t help but yearn for the other body parts under that towel that she wished to tend to. Ellie internally slapped herself for the heat that followed her nasty thoughts and her tour of your body was cut short. Following the clean, she took some Neosporin to smooth across the bigger gashes that covered your knees and elbow. You winced at the friction.
“It really got you good huh,” she teased, “maybe you can lie and say you got attacked by a bear or something.”
“No, not a bear,” your eyes rolling, “just Ellie Willaims and her antics.”
“Oh shut up, you had fun.” You didn’t say anything back, just gave a smile, because you knew Ellie was right. As much as you wanted to be upset about how everything went down and how you were so easily influenced by her, you just couldn’t. Maybe because you knew she had no ill intent, or maybe you were beginning to realize that breaking rules wasn’t so bad- perhaps, it was even a little fun.
You woke up early the next day with everyone else, despite your impromptu grounding. Although you yearned for sleep, the sun shone too bright and the girls chatter, too loud. You pulled the scratchy covers of your twin bed up, making it semi-nice for your next sleep. A sleep you looked forward to, as it signaled the end of this awful day. But, with the cabin overcome by girlish excitement it was hard to remain in such a sour mood. You ventured to the top of an empty but rickety bunk bed to observe the members of team red from above. It was like watching a village of little ants running around prepping for the day ahead. Some flew out the screen door to shower, a few braided each other's hair, and all of them finished dressed up in color coordinating outfits.
As 9:30 am approached, you wrapped up your finishing touches to the last few stragglers with silky hair ribbons and red face paint. By 9:40, the once bustling room was empty and the silence was loud. In an attempt to occupy your wandering mind you cracked open a Nancy Drew book, the 3rd in its series. The crisp pages slid between your fingers as the mystery consumed you, but it wasn't long before your peace was interrupted.
A peculiar knocking sound tore you from the novel opened in your hands. Setting it down on your green and pink bedding, you ventured to your dirty window to scope out the inexplicable noise. On the other side of the glass stood Ellie, like a kid, throwing rocks at your window. You stared out the gray panes that divided her in four, rolling your eyes at the audacity of it all. She continued her little performance pulling out a janky sign written in dried out blue marker. It read I'm bored… You pretend to be distraught at the news, playing into her little game. Ellie then flipped the sign over to show you the back where she had scribbled the words Do U wanna hangout? and then some idiotic smiley face to complete the message. Ellie’s own face mimicked the emoticon as she displayed all her teeth like a child on picture day. It was stupid and cheesy and it was kinda working.
The sign continued to waver in the wind as you consulted the imaginary angel and devil that lurked on your shoulders. You finally answered Ellie (whose arms were getting tired) through the window with a simple middle finger and yanked the curtains closed knowing you weren’t supposed to be leaving your living quarters that day. And although you maintained a tough exterior for the sake of the bit, you felt just a little bit giddy being invited over by Ellie. That same giddiness nagged at your morals until finally you sided with the devil. Besides, everyone will be gone and too busy to catch you guys slacking off.
You rushed to the sink to brush your teeth aggressively and then changed into a red cropped shirt with a wide neck and black biker shorts that sculpted your ass perfectly. You weren’t sure why, but you had this sudden need to impress her. Her opinion now carried a weight that was foreign to you. That weight then influenced a smear of the same cherry flavored lip gloss from the night before, remembering Ellie’s thoughts on it. You slipped the tube into your bra just in case and then skipped over like the girl next door.
Ellie opened up with a smirk. Her hair was messy and despite waking up hours ago her lounge wear remained on. You didn’t mind though. Something about her toned body in a black wifebeater tank and gray sweats made you excited.
“Well hello there.” She gestured for you to come inside. You sat in the middle of the room on an old, sage green rug. Anticipating Ellie’s next move, you pulled your scuffed up knees to your chest. She plopped down next to you and began to poke.
“I was starting to think you weren’t gonna show up.”
You scoffed, “I mean, I hate you Ellie, but not that much.” You straightened out your right knee and gave her a little kick in the shin.
“Shut up dude. I know you love me.” Ellie nudged your shoulder and you gave a simple chuckle in response, but inside you were questioning the past feelings of distaste you once harbored for her and the new ones that replaced them. You needed a distraction.
“Sooo.. how are you gonna entertain me??” Your question sent Ellie’s mind to all kinds of places, some dirty most dirty.
“Oh? So you wanna be entertained? How about a little game of poker?”
“Poker?” you said, becoming suspicious of Ellie's seemingly normal answer but the tone of her voice was a dead giveaway to the mischievous plans.
“Well… not just any poker. I play a little differently.” You urged her to continue.
“Like different how?”
“Ever heard of strip poker?” she questioned, scrunching her freckled nose in anticipation of your response. She wouldn’t think twice about indulging in this game with other friends but it was something about you and the unspoken homoerotic nature of your relationship that made the request much more daunting.
“Oh my god Ellie,” you gave a long sigh, “Do you really wanna see me naked that bad?” Usually her face would go bright red at a comment like this but today she was prepared for your little quips, having taken the leap to propose such a game in the first place.
“No. I wanna watch you lose.” she stated bluntly. And with her words, a jolt of that familiar cutthroat attitude surged through your body along with a little arousal that you ignored, pretending it was just adrenaline.
“Oh you’re on.” you spat. What had Ellie Williams done to you? Just days ago you would have opposed such a scenario like sneaking over to play strip poker but her dangerously seeming presence was exhilarating to you. She was a drug you just couldn’t quit. And before you could even think twice, that drug was pulling out her playing cards and popping a mixtape ← into her old cassette player.
You grew quiet and the music grew loud as you anxiously waited for Ellie to shuffle the deck. She had a classic one with the red patterned backings. The cards slotted into each other as Ellie thumbed the split stack from bottom to top. It made a satisfying noise that repeated a few more times before she dealt them out between the two of you.
The rules were simple, each chip signified an article of clothing, whoever had the worst hand lost a chip and a little bit of dignity along with it. A stack of 4 old poker chips sat in front of you balancing on the ridges of the rug. 1 for your shirt, 1 for your shorts, and 2 for each sock. Ellie had the same. You could practically feel the sweat gathering on your brow as the game began. The first round was close, Ellie with a straight and you with 3 of a kind.
She quickly snatched up one of your chips before saying, “You lose!!”
“This is just the first round, don’t get used to it.” you replied, peeling off your left sock. Quickly you placed your other foot on top of the now bare one, hiding it from Ellie like it was something to be embarrassed of. She took note of your behavior and clarified her intentions.
“You know, I don’t have a weirdo foot fetish if that's what you’re thinking.”
“Oh my god. Shut. Up. I don’t think that, I just don’t want you looking at my feet.” You turned your face away from her, putting your hand up theatrically. Your embarrassment amused Ellie.
“Just wait till you have to take your top off.”
“That won’t be necessary.” You tried seeming confident in your reply but your face felt hot and your hands were clammy. You didn’t want to imagine being so exposed in front of Ellie. What if she doesn’t like it? Why did it matter if she did?
“Right, we’ll see how that goes…” Ellie’s voice trailed off, letting go of your stubborn ramblings. The game continued as so; round 2: you won, round 3: you won again, round 4: Ellie won. At this point there were no more socks to take off. Your stomach twisted and turned thinking of the next possibilities. Part of you wanted to give up and take off but the other part of you wanted to stay around and see what Ellie looked like without a shirt. This confused you.
During round 5 you could hardly focus, but luck was on your side when all Ellie could present was a pair against your straight, leaving you a winner. Without a second thought she crossed her arms grabbing at the hem of her tank. Her biceps flexed with motion as she pulled it over her head revealing a black sports bra. You stared unintentionally, mouth agape.
“Like what ya see?” Ellie remarked. Your cheeks flushed red and your head shot down into your lap like a reflex.
“Relax, we’re just friends having fun. You can look.” she continued. Right… friends. You took a deep breath in trying to calm yourself. There was still more of the game to play and a craving for victory that lingered.
The next round was brutal leaving you with a measly high card, the worst hand you could get. Before Ellie even revealed her hand, your mind was at war deciding if you should remove your pants or shirt first. This felt like so much more than a simple game of cards with a friend. I mean here you were in front of half-naked Ellie, questioning if she was more of an ass girl or if she liked tits better. After your losing cards were revealed you took a pause, twirling a stray thread around your finger that you had pulled off the rug. Just as you were settling on pants Ellie interrupted.
“If- If you dont wanna, you don’t have to. I don’t wanna make you uncomfortable.” Ellie was starting to feel guilty for roping you into her games. For her, this wasn’t about winning, it was about pleasure and that's what made her feel so bad. You were here to play poker and Ellie was just waiting to see what panties you wore that day. Such a perv.
“NO,” your voice raised, halting Ellie’s skewed thoughts like your life depended on it. “I want to.” You stood up slowly trying to steady your shaky hands. Gently, your long fingers rimmed around the waistband of the shorts. Ellie sat criss-cross looking up at you like a god. The black spandex peeled off your wide hips and down your thighs at an agonizingly slow pace for Ellie. Finally reaching your knees they fell the rest of the way down, pooling at your ankles. The cool air tickled your pantie-clad privates, sending you back down to the warm spot you left on the floor.
Ellie couldn’t even speak. It was like a wet dream seeing you dressed in nothing but a crop top and some lacey, pink underwear. The heat between her legs was almost unbearable and she could feel as her slick seeped straight through the plaid boxers hidden under her sweats. Too busy with her downstairs, she failed to give you any sort of sign that would hint to the pleasure your body was giving her. You felt stupid for even wanting that from her and flipped to lay on your stomach trying to hide your nakedness. Without Ellie’s approval or encouragement you felt ashamed.
Wanting this moment of awkwardness to pass, you reached for more cards to continue to the next round. Ellie grabbed the deck before you could even reach it.
“Actually uh- we should just stop.” she said, not even able to make eye contact from how overwhelmed she was with lust. Of course, you didn’t know this and a downward spiral of thoughts began. Have you done something? Said something? What happened?
You stuttered out a “Wha- why?” Ellie continued staring down at her crotch. Her stupid crotch- that was the reason why. She knew that if she lost the next round, her sweatpants that shielded her from embarrassment would have to be removed. The large and growing wet spot of your doing was something Ellie refused to let you see. She assumed that if you were to ever discover the amount of arousal a friendly game of poker caused, you’d be disgusted and never speak to her again.
“I just- I think you need to leave.” You blinked hard and fast, trying to swallow back any tears being provoked by Ellie’s response.
“So… I’m that ugly, huh?” you said, voice now shaking. You felt humiliated.
“No, no!! It’s not th-”
“Save it Ellie,” you yelled, tears beginning to run down your cheeks. “This is the last time I let you make me out to be some loser idiot who falls for all your tricks! I am not ending up like all those stupid girls who you’ve fucked over!” You kicked open the swinging door taking one look back at Ellie. Her face was dumbfounded, confused, hurt. What were you saying? What was all that supposed to mean? She thought of chasing after you but knew it would be no use. You were too stubborn and upset to be talked to by Ellie, and it was quite clear that neither of you had realized what this game had meant to the other.

✄ - - - - part 1 , part 2 , part 3 - - - - masterlist - - - - ♡
taglist...
@endureher @gold-dustwomxn @alexpritch @4rt3m1ss
(taglist is for all callmelola111 works, if you'd like to be removed just kindly lmk)
#wlw#ellie williams#ellie williams fanfic#ellie smut#ellie tlou#ellie williams fan fiction#ellie williams series#ellie williams smut#ellie williams x reader#ellie x fem reader#callmelola111#ellie williams fanfiction#ellie x reader#ellie x you#ellie williams tlou#tlou#the last of us#tlou 2#tlou 2 smut#tlou fanfiction#tlou2#tlou ellie#the last of us 2#tlou series#the last of us ellie
400 notes
·
View notes
Text
Detox Bath Recipe 🛁🐤


2 Cups Epsom Salt
2 Cups Baking Soda
2 Cups Sea Salt
5 Tsp. Ginger
1 Cup Vinegar
Combine all dry ingredients and store in an air-tight sealed container. At bath time, add 1 cup of dry ingredient mixture and 1 cup of vinegar into running hot water.
Optional: Add a few drops of your favorite essential oils.
Benefits
Epsom Salt draws out toxins from the body and helps relieve aches and pains
Baking Soda balances the acidic system, refreshing, energizing, and softening the skin
Sea Salt soothes and heals blemishes and wounds
Ground Ginger increases circulation
Vinegar soothes and softens the skin
#soft#soft coquette#softcore#dollete aesthetic#it girl#it girl aesthetic#sweetcore#that girl aesthetic#coquette#angel#bath#hygiene#hyper feminine#feminine#cottagecore#aesthetic#soft aesthetic#it girl tips#vanilla girl#strawberry girl#girlblogging#recipe
31 notes
·
View notes
Text
i've been playing a bunch of Pesticide Not Required recently and might do a more in-depth writeup soon going over the characters and weapons, but this game is fucking infuriating if you don't figure out the objectively correct strategy so im posting this to hopefully save someone some stress:
NEVER BUILD INTO CRITS. Crit Chance and Crit Damage sound good on paper but unfortunately due to human nature it works out that you actually get a way better build by picking every single levelup perk "balanced" out by reducing your crit damage/chance. there are like three perks and one weapon that maybe justify a crit build and none of them will get you past the massive difficulty spike on day 6 or 7 in higher difficulties
mine a few ores during the first day so you go into the first shop with around 600-800 gold
your top priority with shopping during the first few days is to fill out all 5 of your weapon slots so you'll only see those weapons in the shop (making upgrades easier). this is basically the only thing you'll ever need the rerolls for so don't be shy with them
although some weapons are better than others, all of them can be viabahahahahaha im just fucking with you! half of the weapons are straight up useless and should never be picked. when rerolling, you're looking for the following weapons in this order:
weed whacker. S-tier, unquestionably the best weapon in the game, you cannot get past day 6 on higher difficulties without this. like all other weapons that spin around you (i.e. the next two) this benefits highly from projectile speed and attack duration: faster spinning + spinning for longer = more hits per activation
scythe. "weed whacker at home". A-tier, hits the same area as weed whacker to keep enemies off your back while weed whacker is on cooldown. i know im making it sound boring but "slightly worse weed whacker" is still far and away the second best weapon in the game
sprinkler/water sprayer. "weed whacker but big". doesn't really hit its stride until level 4 or 5 but is essential in the late game to soften enemies up before they get in range of weed whacker + scythes. ALWAYS take the +4 amount upgrade on the left for level 5, ignore all of the buffs on the right side, shooting 8 beams out at once is the reason you took this weapon
toad oil. very mediocre early on but once you hit level 5 you can have pretty much the entire screen as a damage-dealing area
DO NOT BUILD CRIT. I MEAN IT. YOU WILL UNLOCK THE CRIT CHARACTER AND THINK "OH MAYBE THIS GUY CAN MAKE IT WORK" AND YOU WILL GO INTO WINTER 3 AND FEEL GOOD ABOUT YOUR BUILD AND THEN THE DAY 6 WAVE WILL TURN YOUR ASS INSIDE OUT EVERY SINGLE TIME WITHOUT FAIL BECAUSE YOU HAVE NOTHING BUT DAMAGE AND EVEN THAT DAMAGE STILL ISN'T ENOUGH. THIS IS A PSA.
14 notes
·
View notes
Note
yuki hcs !! why is she asking about other people's type of woman????????

:fingerguns: .
( 1 ) grew up being involved and a major proponent of physical boxing matches . she learned a lot of her movesets from fights like muhammad ali and his wins / losses & from old martial arts movies . she's got a myriad of broken bones and fights on her record from all over the world , and she likes the adrenaline that comes with getting violent , it's difficult to match ! she finds other ways to combat the need for exhilaration though , but at heart , she's a born & bred boxer .
( 2 ) she's only had one student to date , aoi todo . she's the one who gave him his infamous scar on his face , in fact , and after that she quickly realized she shouldn't be a teacher and enrolled him in kyoto's school for safe keeping . she figured someone there would be a better teacher than her , especially when it came to books and all that technical mess rather than physical sparring .
( 3 ) don't get mistaken though from that last one ; she's a learner herself and absorbs information at an insane rate , running up against gojo as far as fighting and techniques go . she's well versed in science as a way of finding out how to best utilize her shikigami & her technique together , and knows to train alone and in isolation as opposed to public places like tokyo or kyoto . after all , she's a special grade who can hit almost cartoonishly hard and that poses a threat to a city .
( 4 ) dog person through & through . she plans to get a dog one day when she does , finally , settle down somewhere . but she's known for being annoying to cats too on the occasion she finds them . living in japan , which is overrun with cats , she's partial to dogs but finds her heart softened by the feline population . she sometimes travels with the animals .
( 5 ) drinks like a damn fish if you let her . don't offer her alcohol unless you like amassing a terrible tab .
( 6 ) her apartment is a mess . tsukumo is very rarely in the area to care for her house , so it doesn't surprise her to come back from months on end and find the electricity or water is cut off or something from inactivity . she walks around in her underwear because she forgets to wash her clothes , loses stuff in her horrendous home all the time ...
... and has a living room full of research into souls & jujutsu techniques . she thinks she can find out a lot from incarnation and souls , and thus , she searches the globe for even tidbits of information .
( 7 ) tends to get loud without meaning to . exclaiming " damn it ! " or " shit ! " . voted the most likely to start a bar fight but also the most likely to win one .
( 8 ) her justice system is whatever gives her the most freedom . it only changes when she finds choso and begins to feel attached more to the students and their cause that she decides to maybe skew her fighting more towards whatever most benefits them personally .
( 9 ) ... she asks for a man's type of woman as a way of judging them . the less interesting the answer , the less interested she is , therefore , in them themselves . it's also a joke between her and her student , todo .
#psielapki#( ★ ─── inbox / your god is a no show ; can i help you ? )#( ★ ─── ooc / now we don’t have the time to get into all that . . . )
4 notes
·
View notes
Text
Okay, I could talk about each of these topics in greater depth, but I'll keep it boiled down or else I'll be typing for a loooong time. If anyone wants elaboration on the following steps or on any particular pieces I've done, let me know and I'll give more tips and tricks later :)
Apologies for the formatting, I'm still getting used to posting on Tumblr
-------------------------
Step 1: Clean up and prep
I start by sanding down leftover pieces and flaws in the model caused by the production process.
In traditional model kits, these are pour tabs, flash and seam lines.
For 3D printed, these would be pits or bumps left behind from supports and layers lines.
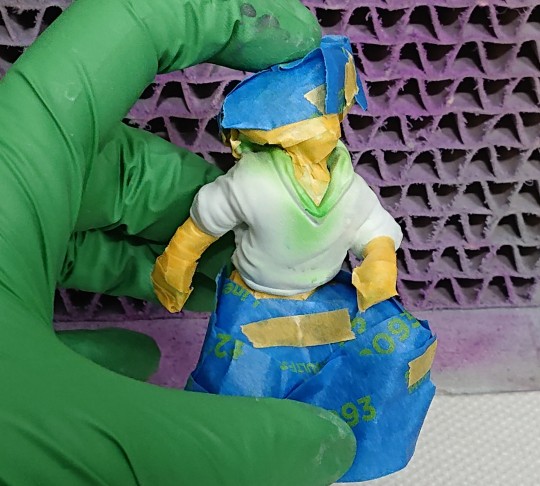
The arm and boots on the left are from a traditional model kit, and have visible tab chunks that will need snipping then sanding. S.H.E.L.L.D.O.N on the right needs his supports removed, then sanding.
Every piece (minus those with fine texture) gets buffed with 240, 320, 600 and 1000 grit sandpaper/sanding sponges (clear parts and any pieces intended to be painted with clear paints, such as character skin, are additionally polished with a melamine sponge, also known as a magic eraser).
This is to make sure the surface is level and uniform. Any bumps or scratches that aren't removed will show up in the final paint job.
(Note for beginners: It's fine to just remove production remnants and do a little clean up before going to the next step. All that prep is tedious! Just have fun with it for now!)
Step 2: Make sure the model parts fit well together.
It's very common for a model to not fit together perfectly right away. Dipping the model in hot water to soften it, then pressing the pieces together usually fixes this. Be careful not to burn yourself! Sometimes drilling and sanding is required.
At this point, larger model kits will require drilling and pinning, though most are fine being assembled later just with glue.
Step 3: Primer
I secure the pieces on clips to keep them elevated, and spray them in thin, even layers of primer. Primer is essential, as it is what makes the paint stick to the model.
- White primer: Best for anime and cartoon figures, makes colors pop
- Grey: For realistic characters, dulls colors down a little.
- Black: For metal or specialty products, like Armored Komodo pigments
Primer will make any unresolved blemishes become more visible, so I usually go back to step 1 until I get them all.
Step 4: Clear coat
For an even, level paint job, I spray a layer of Gloss clear coat on every piece, to smooth the surface even more. I skip this for finely textured pieces, so the details don't get filled in. Spray in a well ventilated area with protection!

There are many brands of clear coats. These are my favorites!
Step 5: Paint
I use three kinds of paint:
Lacquer: Expensive, take a little while to cure, must be thinned with a solvent. Sometimes hard to find. Offers lovely effects, is durable and sticks very well. Can be difficult to correct if something goes wrong. *HAZARDOUS, use in a well ventilated or outside area and use breathing protection!*
Enamel: A little easier to find, takes a long time to cure, which sometimes is a benefit, as it can level itself and provide a smoother surface. Must be thinned with a solvent, sticks very well. Most importantly, enamel can be used on top of lacquers and erased without damaging the lacquer layer. *HAZARDOUS, use in a well ventilated or outside area and use breathing protection!*
Acrylic: Great, vibrant colors, easy to find, very affordable! Dries very fast, even faster if you lightly use a hair dryer. Very delicate, prone to scratches and chips. Can be easily stained by other acrylic color. You only need water to thin it!
Left to right: Creos Mr Hobby Lacquers, Tamiya Enamel, Vallejo Acrylics
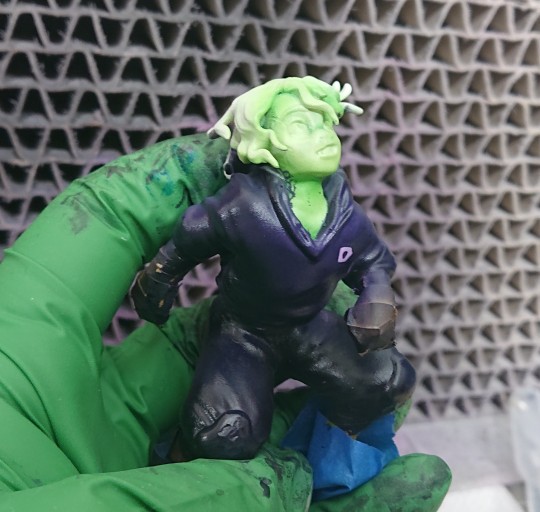
I usually start with the character's skin first. This is because I paint skin using built up layers of clear colors, to get a sort of 'glow' that shines through to the primer and differentiates the skin from clothing and hair pieces.
Afterwards and throughout the project, I 'save' my work by spraying a layer of clear Gloss or Matte spray. I use an airbrush, so to further protect other parts of my work, I cover the finished pieces in masking liquid and/or masking tape, before spraying the next color. Because Enamel can be easily wiped off of lacquers without affecting the lower color layers, I use this type of paint second. If you use Enamel first, you may run into issues with the underlying lacquer causing paint cracking in the future.
(Note for beginners: Using just acrylics is fine. :) I have painted entire models with acrylic paints obtained from craft stores and Walmart, and had very good results.)
Despite my masking, some enamel paint leaked through on Casey's neck. Masking is rarely perfect, so expect to do touch ups after removal.
Step 6: Face eyes and details
...this is an entire essay on it's own, which will require another post. But I use layers of enamel for eyes, water color pencils for eyebrows, chalk pastels for makeup/shading and acrylics for eye lashes.
I have shaky hands sometimes, so the ability to erase my work and start again is very helpful here, hence why I don't use lacquers for this part.
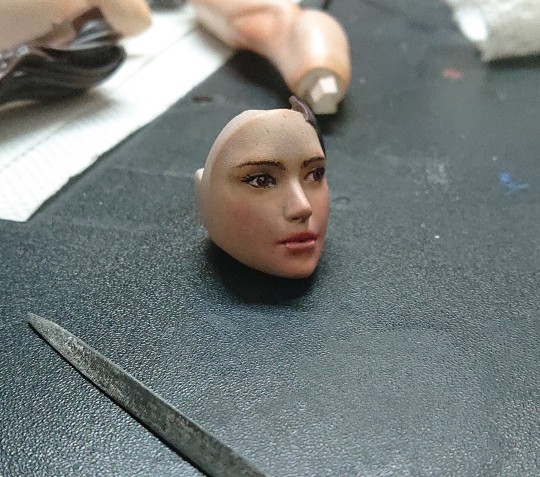
There are... So many products and colors in this one piece...
Step 7: Touch ups then gluing
I typically do touch ups as I go, but now is the last chance to correct anything. Once it's ready, 2-part epoxy or crazy glue (sometimes both) will be enough to get most models together entirely.
----------------------------
That's a basic breakdown for my process, though for things like effects, clear pieces and fancier/realistic models, it can get quite elaborate. I don't want to scare anyone away from the hobby, so I'll just say this...
You don't have to do allllll this stuff!! Find a model you love (repainting dollar store figures is a great place to start!), prime it, and slap some paint on it! Just have fun, and then go from there!! My first model was lumpy, and looked like she was painted with nail polish, but I kept going and just enjoyed myself, trying new tips and tricks along the way. The point is to have fun! Make sure to take proper precautions and read product instructions as well, if you choose to use the more toxic products.
If anyone decides to give figure painting a shot, send pics of your projects my way, I'd love to see them!! :D It's always great to have more people in the hobby! And I'm always up for more questions, they might just take me a little while to get to replying.
16 notes
·
View notes
Note
Hey, Taylor! Hope you’re doing good these days! I remember that some time ago you mentioned you wanted to change the way you make your gifs because they weren’t turning out the way you thought they would (or more like tumblr was helping decrease quality even when they’re in 4K? something like that) either way, I remember you were annoyed by the final result and wanted tips to change to another way to make gifs. I’m going through something similar so I decided to ask if you found a new way to gif that works well for you. And if so, is there a tutorial you’d recommend? Btw I love your gifs and think they look awesome, so there’s that! Take care 🫶🏻
HI ANON I LOVE YOU! I’m still not happy with the quality of my 540 px gifs but at this point I think it’s just a limitation of the programs I’m using (Photopea, mostly, but it’s still a REALLY strong substitute for Photoshop). It also might be the intensity of my coloring 🫡 but I can share some of the things I’m doing!:
Making my multi-column gifs 1 size larger than they need to be & adding a high pass filter (I go into both here)
Screencapping with MPVplayer (mpv.io) instead of uploading the clips directly to Photopea (tutorial on how to download it on Windows here) I think this has helped with my quality a bit but it also makes my editor crash if I use too many frames :’) Firefox seems to handle it best. Here’s a tutorial on how to upload frames as a stack in Photopea (about midway through the tutorial) and I’ve used a handful of the tutorials they list under “other helpful tutorials” as well! (take a drink every time I say “tutorial”)
And here are some of the ways I've been "correcting" blurry gifs:
*note: major flashing gif warning + in the actual set I used a raster mask to sharpen the middle scene more gently, I want you to mostly focus on the background here!
no sharpening: background scene taken from 4k footage

smart sharpen filter only: amount = 150%, radius = 1.0 px (this is the default for Photopea)

high pass filter only: radius = 0.2 (I usually stay between 0.1 and 0.2, otherwise you start getting dark, blurry edges)

smart sharpen + high pass: same settings as above and using this method here
smart sharpen + high pass + reduce noise aka my newest method: sandwiching! I prepare my smart sharpen and high pass folders using the above method then BEFORE MERGING duplicate the sharpened folder and apply a reduce noise filter, strength = 5, protect detail = ~70% and adjust the opacity as needed


this can help soften the sharpening, but I'm still seeing some colorbanding happening behind her in the middle scene. so when the tumblr size limit allows me my ideal method is...
smart sharpen + high pass + reduce noise + add noise: BEFORE MERGING, I take that "smart sharpen + reduce" folder and add a noise filter, 1%, distribution: uniform, monochromatic. Yes, this seems counterintuitive but compare the water behind her in this gif versus the last two!
I find that sandwiching the noise filter between my sharpening and high pass gives me some of the smoothing benefits of a normal noisy gif without the overwhelming grain (or file size)!
and here's how the gif turned out in my set! (I partially masked out the middle gif so it didn't get the full force of the sharpening + applied a smart sharpen filter to the painting before doing all that ^ but you get the gist!)
before & after

22 notes
·
View notes
Text
I did this before but I couldent edit it so ima just re write it:
Why tech did/should have survived the fall:
1. He apparently had THRUSTERS on his backpack which probably wouldn't be enough to fly him away but enough to soften the landing
2. Killing your autistic character in the season you confirm him to be autistic AND in autism acceptance month is pretty stupid and usually star wars writers aren't stupid
3. We have seen people survive worst like darth maul (who also fell from a great hight), echo, fennnic, palpatine, the list goes on.
4. High chance he just fell in some water or broke his fall on a tree
5. The whole phee and tech goodbye scene seemed unfinished on purpose like its gonna be continued and the camera seemed to zoom into techs face for way to long.
5. Tech also had a grappling hook and/or many gagites in his backpack that could help him
6. Hunter also fell from a hight like that was came out unscaved "oh but he had a knife" tech probably dose to or like a screwdriver he could use
7. Dave filoni doesn't do things on purpose. Most detailes aren't just for nothing which leads me into my next point.
8. Techs dealth seemed strangely ambiguous. Like with most star wars dealth we see usually end up engolfed in flames or we see some sort of a body but with tech, he just falls into the abiss with no indication of an actual dealth except for the googles (which could hounistly be hemlock lying)
9. Now the googles are interesting since tech records everything and hemlock gave hunter his googles, we can safely assume that some where there is some hard drive that could show tech surviving.
10. He is a trained solder and most military programes teach solders about how to survive a free fall and no doubt would shaak ti do the same.
11. Tech is undoubtedly one of the smartest people in the galaxy, he probably could cuclate the best way of survival while in the sky
12. Hemlock would obviously benefit greatly if tech worked for him, and since he recovered tech or what was left of him we can assume he would do some cool evil scientist experiments and turn him half cyborg
13. Denial
14. Even if he dosent show up in s3 I am certain (more of hoping) that tech will come back in another show since they left his dealth so open ended they could eseyly bring him back and no one would bate an eye.
#the bad batch#star wars#bad batch#tbb#tbb tech#star wars tbb#sw tbb#bad batch spoilers#bad batch s2#omega tbb#bad batch theory#star wars the bad batch#star wars theory#the bad batch theory#i will never get over this#forever in denial#hire me
30 notes
·
View notes
Note
hello please give us your soup recipes ( •͈ᴗ•͈)
apologies to anyone who has ever sent me an ask please know I read them and weep and then forget to answer them
if anyone has questions about these soups, please feel free to ask in the replies or dm me!! also, you are welcome to reblog and add your favorite soups, I would love to see what other soups y'all enjoy :)
ANYWAYS here are some of my favorite soup recipes (part one ? I may post more if people like them)
This soup. This soup. Several things to say about it. Firstly, it benefits greatly from buying the nice crushed tomatoes, like the $5-6 cans if you are able to. The tomato makes up a lot of the broth flavor, especially if you want to make it vegetarian and thus leave out the sausage.
Secondly, double the garlic cloves (eight garlic cloves? yes, I'm serious) and use canned brown lentils. A whole can. Two if you feel like it, I often do. It's really very little detriment to the recipe over dried ones, and the soup comes together much quicker when you're not waiting for them to soften. You will need to decrease the cook time, or it will become mush.
Lastly, replace the water with chicken or vegetable broth, it's just better, and the celery is optional, especially if you're allergic, since apparently that's possible.
I acknowledge that this one is a stew, not a soup, however...
This dish is a delicious cross between a more English beef stew (see: NYTimes Beef Stew if you're interested, I highly recommend) and french Coq au Vin. It calls for boneless pork shoulder, but if you can't find that, bone in is fine, just more work. You will need to cut out the bone, which can then be roasted in the oven, I like to use the preheat time (this recipe requires some oven braising) to do so -- just pat dry, coat with olive oil and salt. You can also save the bone in a zip lock in your freezer, for making tonkotsu ramen broth, if you're like me.
Martha uses a pound of "small shallots" which I really find to be a bit much. Use that many if A) they're on sale, B) you've replaced them with pearl onions, or C) you really really love shallots (I respect that.)
I like to add eight cloves of smashed garlic to this, and 4-5 yukon potatoes, washed (but not peeled) and sliced into 1.5 inch cubes (you can assess their size based on vibes and how long you want to cook them for, approaching two-bite sized is generally good).
You can reduce the garlic cloves by half if that's too much for you, or if you're adding a significant amount of shallots still. I've used only 3 large shallots ones before and found it to be enough, so use what you've got. The potatoes add texture and body to the soup, and something to chew on other than the pork, which balances the dish.
Also, Martha suggests you cut your carrots lengthwise, but I personally prefer medallions, as they're much easier to serve and eat. If you're very worried about overcooking your carrots, maybe do large chunks.
This recipe does call for hard apple cider, which it really does need, but if you have to leave it out due to allergies or food restrictions, I suggest adding an 1/8 cup or so (maybe less, that might be a bit sour) of nice apple cider vinegar, and substituting the rest of the liquid with more chicken broth. Serve with some nice crusty bread! Or maybe egg noodles, if you leave out the potatoes and want a really Coq au Vin-esque experience.

Alright, so I think I did the formatting correctly, and you should be able to click this image to access the recipe link, but just in case:
https://sharedappetite.com/recipes/rustic-tuscan-style-sausage-white-bean-and-kale-soup/
Anyways, this recipe calls for 2 cans of cannelini beans. If you can't find those, great northern beans are basically the same. For the sausage, it may also be sold as mild italian sausage, and you do not need to buy it in links, buying loose ground sausage is much easier.
It also calls for two bunches of kale, which is frankly a ridiculous amount, I would only put in that much if this is the only source of vegetables you'll be getting for a month. One (Large!) bundle of kale should be fine. After rinsing, you can simply rip the leafy parts away from the stems, and then discard the stems, or steam them if you really want to eat them. Personally, I don't think they belong in soup.
The onion you use for this should be a yellow onion, maybe white if you're desperate and fear no onion. It calls for 1 potato, you should use 3-4, medium to large sized (Russet!) potatoes. Use your heart to decide when it's enough potato for 52 oz of broth. Likewise, you should consider doubling the amount of garlic that goes into this.
If you don't want to do the math, 52 oz of broth is a little less than 2 whole packages of store bought broth. You may find that you want to add the last bit when you add the potatoes, just to give them a bit more liquid to cook in, since you should use more potatoes than the recipe calls for. If you make your own chicken stock (which is quite easy, and I do recommend it, but it's not essential here) 52 oz is about 6 and a half cups of liquid.
The serving suggestion is to top with cheese, which is really up to you. If your spice tolerance is in the negative, like mine, you may enjoy eating a nice cheese on the side with your bread. Port Salut is a very good spreadable option, or perhaps an aged gouda or white cheddar. Having bread alongside this is really a must.
I suggest making a garlic oil to top the soup, to replace the plain olive oil for drizzling. To do this, simply mince another 2-3 cloves of garlic (more depending on how much oil you want to make), heat generous amount of olive oil over medium heat, then add garlic and saute until fragrant. Do not let the garlic get completely golden brown, unless you really enjoy it crunchy. This is going in soup, and should be minced fine, so having slightly raw garlic will not be an issue. You can store this in an air tight container in the fridge, just scoop some out to top your soup before reheating.
#soup recipes#finally answering this ask after an eternity of debating which soups to choose#thank u so so much for ur patience#feel free to reblog and add your own soup recipes! I would love to see everyone's favorite soups
6 notes
·
View notes
Text
Chickpea and vegetable korma with brown rice.

Are you looking for a flavourful and nutritious vegan meal that is easy to make? Look no further than this chickpea vegetable korma with brown rice recipe. This dish is packed with protein, fibre, and a variety of colourful vegetables that provide essential vitamins and minerals. The creamy coconut-based sauce is spiced with a blend of aromatic Indian spices, making this korma a delicious and satisfying option for lunch or dinner.
Before we jump into the recipe, let's talk about some of the health benefits of the ingredients in this dish. Chickpeas are an excellent source of plant-based protein and fiber, which can help you feel full and satisfied for longer. They are also rich in folate, iron, and zinc, which are essential minerals for maintaining good health. Broccoli is a cruciferous vegetable that is high in vitamin C, vitamin K, and fiber. Red and yellow bell peppers are rich in antioxidants and vitamin C, while red onions are a good source of quercetin, a flavonoid that has anti-inflammatory properties.
Ingredients
For the korma:
1 can of chickpeas, drained and rinsed
1 head of broccoli, cut into florets
1 red bell pepper, sliced
1 yellow bell pepper, sliced
1 red onion, sliced
3 cloves of garlic, minced
1 tablespoon of grated fresh ginger
1 tablespoon of curry powder
1 teaspoon of ground cumin
1 teaspoon of ground coriander
1/2 teaspoon of ground turmeric
1/4 teaspoon of cayenne pepper (optional)
1 can of coconut milk
1 tablespoon of olive oil
Salt and pepper to taste
Fresh cilantro for garnish
For the brown rice:
1 cup of brown rice
2 cups of water
1/4 teaspoon of salt
Instructions
Step 1: Cook the brown rice
Combine the brown rice, water, and salt in a medium-sized saucepan and bring to a boil. Reduce the heat to low, cover, and simmer for 45 minutes or until the water is absorbed and the rice is tender. Fluff with a fork and set aside.
Step 2: Prepare the vegetables
Heat the olive oil in a large skillet over medium-high heat. Add the garlic and ginger and sauté for 1-2 minutes until fragrant. Add the sliced onions and bell peppers and sauté for 5-7 minutes until slightly softened. Add the broccoli florets and sauté for an additional 3-4 minutes.
Step 3: Make the korma sauce
Add the curry powder, cumin, coriander, turmeric, and cayenne pepper (if using) to the skillet and stir to combine with the vegetables. Add the chickpeas and coconut milk and stir well. Reduce the heat to low and let the korma simmer for 10-15 minutes until the sauce thickens and the vegetables are tender. Season with salt and pepper to taste.
Step 4: Serve
Serve the chickpea vegetable korma over the brown rice and garnish with fresh cilantro. Enjoy!
This vegan chickpea vegetable korma with brown rice is a delicious and nutritious meal that is easy to make at home. The combination of chickpeas, broccoli, red and yellow bell peppers, and red onion provides a variety of essential vitamins and minerals, while the creamy coconut-based sauce is spiced with a blend of aromatic Indian spices that will tantalize your taste buds. So next time you're looking for a plant-based meal that is both healthy and flavourful, give this recipe a try!
#food#plant based#vegan#what vegans eat#foodpics#vegancommunity#foodie#veganism#vegano#vegetarian#curry
29 notes
·
View notes
Text
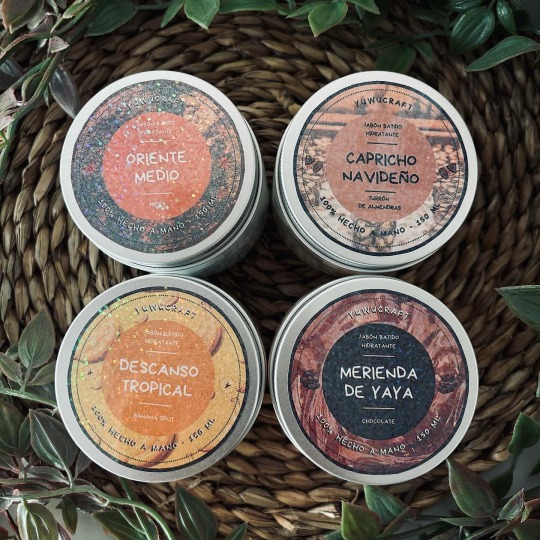
Whipped Soap
🫧 Whipped body wash is an excellent choice for cleansing and keeping your skin soft and moisturized. It has many benefits, from softening and exfoliating the skin to moisturizing and deep cleansing. Plus, it's easy to use and can be incorporated into your daily personal care routine.
In addition, these soaps have coconut oil which moisturizes the skin and leaves it soft.
The scents are:
-Merienda de Yaya: Chocolate
-Capricho Navideño: Nougat (Jijona)
-Oriente medio: Myrrh
-Descanso Tropical: Banana Split
The best way to use it is:
1-Moisten your skin with warm water.
2-Apply a small amount of whipped body wash to your hands or a sponge.
3-Massage the body wash over your skin, focusing on the dirtiest or most problematic areas.
4-Rinse thoroughly with warm water.
5-Dry gently with a clean towel.

7 notes
·
View notes
Text
Busting Common Skincare Myths: What Truly Works and What Doesn't
In the pursuit of radiant and flawless skin, it's easy to get lost in a maze of skincare myths and misconceptions. From homemade remedies to supposed miracle products, the beauty industry can sometimes leave us bewildered. Let's dive into some prevalent skincare myths, setting the record straight on what's effective and what's not.
Myth: The More, the Merrier
Reality: Layering multiple products may seem enticing, but quality trumps quantity. Overloading your skin can lead to irritation and clogged pores. A personalized routine catering to your skin type - including a cleanser, moisturizer, sunscreen, and targeted treatment if necessary - is the way to go.
Myth: Natural Means Safe
Reality: Just because something is labeled "natural" doesn't guarantee it's safe for all skin types. Allergies and reactions can still occur. It's crucial to read labels, patch-test, and consult a dermatologist before incorporating new products.
Myth: Pores Open and Close
Reality: You might have heard that steam opens pores while cold water closes them. In truth, pores lack muscles, so they can't change shape. Steam can temporarily soften debris, but a solid cleansing routine and exfoliation work better for maintaining clear pores.
Myth: Oily Skin Rejects Moisturizers
Reality: Hydration benefits all skin types, including oily ones. Skipping moisturizer can lead to increased oil production. Opt for a lightweight, oil-free moisturizer to maintain balance without causing breakouts.
Myth: Sunscreen Is for Sunny Days Only
Reality: Sunscreen is a must, no matter the weather. Harmful UV rays are present even on cloudy days and can penetrate windows. Consistent broad-spectrum sunscreen application safeguards your skin from premature aging and damage.
Best sunscreens EVER:
La Roche-Posay Anthelios Melt-in Milk Body & Face Sunscreen
LIVE TINTED Hueguard Invisible Sunscreen Stick SPF 50
Neutrogena Invisible Daily Defense Face Sunscreen + Hydrating Serum with Broad Spectrum SPF 60+
Myth: Exfoliating Daily for Perfection
Reality: Exfoliation aids in cell turnover, but excess can cause irritation. 2-3 times a week with a gentle exfoliant is sufficient for a smoother complexion without harming your skin's barrier.
Amazing Facial Exfoliants:
Dermalogica Daily Microfoliant - Exfoliator Facial Scrub Powder
TULA Skin Care So Poreless Exfoliating Blackhead Scrub
M-61 PowerGlow® Peel- 30 Treatments
Myth: Moisturizers and Oils Aggravate Acne
Reality: Acne-prone skin thrives with hydration. Seek non-comedogenic, oil-free options. Some oils, like jojoba or rosehip, can even regulate sebum and enhance skin appearance.
Moisturizers I personally love:
Paula’s Choice C5 Super Boost Moisturizer with 5% Vitamin C
e.l.f. SKIN Holy Hydration!
CeraVe Moisturizing Cream | Body and Face
TATCHA The Dewy Skin Cream
In conclusion, navigating through the world of skincare requires discerning fact from fiction. An informed approach, coupled with a streamlined routine, is the key to glowing skin. When in doubt, a dermatologist's guidance can be invaluable on your skincare journey. Remember, debunking skincare myths is an essential stride towards achieving your skin's best version.
#beauty#beauty products#skincare#skin care#skincare routine#skincare tips#skincareproducts#skincareessentials#moisturizer#exfoliation#exfoliant#healthyskin#glowing skin#glowingskin#skincarejourney#skincarejunkie#beauty tips
3 notes
·
View notes
Text
So today was the first day back for teachers (semester starts on Monday) and I was going over my notes from one of my classes and picking out things to share with another teacher who’s teaching the same class on one of our satellite campuses -
So anyway, does anyone want to read my lecture notes on thickening agents that I turned into a study guide (I wrote one up during the semester because we didn’t have any previously prepared materials because other instructors just skip or gloss over the chapter but I felt like it was worth the time to focus on the topic and also I’m a Nerd about stuff that makes things gooey).
You know what - I’m just going to post it under a cut below, because it’s fun and also an infodump.
**For context, even though my notes go into more specifics than the required reading, the book for the class is called How Baking Works by Paula Figoni (3rd edition, tbh needs an update but is a good reference), and the link I am telling them to refer to for more information on gelatin that includes conversion charts is here:
Thickening Agents Study Guide
1. Thickening vs. Gelling
1.1. Thickening = moving slowly, viscous, but still some movement while set
1.1.1. Either when sugars and proteins become loosely entangled or when water is absorbed and trapped by swollen starch granules, or when air bubbles in foams or fat droplets in an emulsion slow water movement.
1.2. Gelling = completely set, no movement whatsoever
1.2.1. When water and other molecules are prevented from moving around at all, usually when sugars and proteins bond or tightly entangle and form a larger network that entraps water and other molecules.
1.3. A number of thickening/gelling agents are interchangeable in different quantities.
2. Food-Grade Gelatin (Type A Gelatin) is produced by boiling or soaking pigskins in acid; the connective tissue breaks down into thick strands of collagen and thinner strands of gelatin
3. Powdered Gelatin is made from lower-grade pulverized sheets
4. For more information, take some time to view the attached link in blackboard and the conversion charts.
5. Vegetable Gums = polysaccharides that absorb large quantities of water and swell to produce thick liquids and gels. Veg Gums are a nice source of dietary fiber (think fiber one Powder added to drinks)
5.1. Pectin = present in all fruits
5.1.1. LM (low Methoxyl) Pectin = Also comes from citrus peels or apple. Used in low-calorie jams and jellies, relies on calcium rather than sugar to solidify. Suitable for dairy-based products. Becomes increasingly firm as calcium is added until it reaches saturation point, at which time it begins to reverse in process and soften.
5.1.2. HM (high Methoxyl) Pectin = Comes as Rapid Set or Slow Set; extracted from citrus fruit peels. Rapid-Set for products that require suspension; Slow-Set for recipes that require a smooth texture with no suspension (such as a jelly)
5.1.3. NH (Thermal Reversible) Pectin = Modified LMP; Requires sugar and acidity to gel (and less calcium), and can be melted, set and remelted – requires heat to activate properly. ‘NH’ because of the Ammonia Hydroxide treatment it receives to modify (NH3(aq))
5.1.4. Apple Pectin = Derived from apples. Usually sold as a powder, can be used as a gelling and thickening agent, as well as a stabilizer. Is high in healthy carbs, dietary fiber, sodium, manganese, copper, and zinc – which is why it is a common ingredient in health supplements and pharmaceuticals. Additionally used in laxatives for natural purgative qualities.
5.2. Agar = Is a polysaccharide extracted from either of two varieties of red algae (ogonori and tengusa); has gelling/setting properties that behave remarkably like animal protein. Less agar is required than gelatin, and agar has the benefit of holding shape at room temperature. Cannot be used to stabilize aerated products, and does not whip well.
5.3. Carrageenan = a family of sulphated polysaccharides, name comes from variety of red seaweed found off the Irish Coast termed “Irish Moss”. Typically used in conjunction with meat and dairy products, for which they work particularly well, in large-scale production for stabilization, thickening gelling and texturing.
5.4. Guar and Locust Bean Gum
5.4.1. Guar Gum = Extracted from the endosperm of Guar Beans (legume); does not self-gel like LBG, but is more soluble. Requires high temperatures, high ph and longer times to cause gelling. Low-cost alternative to many other agents and starches, and is 8 times more effective than cornstarch. Used commercially, and stays stable when frozen/thawed.
5.4.2. Locust Bean Gum = Extracted from endosperm of bean on Carob Tree. Dispersible in hot and cold liquid, and converts to gel with addition of minimal amount of sodium borate. Is naturally sweet and is typically used to sweeten foods and as a replacement for chocolate.
5.5. Gum Arabic = Acacia/Senegal/Indian/Sudani Gum = Harvested from Sap of two Acacia Tree Species. Primarily used as a stabilizer (such as in sodas and cosmetics).
5.6. Gum Tragacanth = derived from several species of legumes in the genus Astragalus (Tragacanth, lit. “Goat + Thorn”, which is common name). Largely produced/exported from Iran. Is viscous, odorless, and tasteless water-soluble sap. Traditional binder for pigments in artist’s pastels, and main gum used in fabricated Gumpaste.
5.7. Xanthan Gum = derived from a species of bacteria, Xanthomonas Campestris (same bacteria which causes a variety of plant diseases, such as black rot in brassicas and bacterial wilt in turf grass). Produced via fermentation of glucose and sucrose. Is used to stabilize emulsions (is not an emulsifier in itself). Also helps suspend solid particles in liquids. Commonly used as a thickener in egg white substitutes and to build matrix in gluten-free products where there is no gluten-development.
5.7.1. Shear Thinning/Pseudo-Plasticity: Non-Newtonian behavior of fluids who’s viscosity decreases under ‘shear strain’. Examples Ketchup and Salad Dressing.
5.8. Methylcellulose = “Modified Vegetable Gum” an emulsifier and bulk-forming laxative. Unique property of Setting when Hot and Melting when Cold – commonly used in ice creams for this reason.
6. Starches = Starch molecules are polysaccharides that are arranged in one of 2 ways: either as long, straight chains or as short, but highly branched chains.
6.1. Amylose = long, straight chain starches
6.1.1. Clouds when cooled
6.1.2. Firm, heavy-bodied gel when cooled
6.1.3. Not freezer stable
6.1.4. Thicker cold than Hot
6.1.5. Masks flavors
6.2. Amylopectin = short, branched chain starches
6.2.1. High Clarity
6.2.2. Thickens, but does not Gel
6.2.3. Less Likely to weep over time
6.2.4. Less likely to weep when thawed (more freezer-stable)
6.2.5. Same thickness hot or cold
6.2.6. Less likely to mask flavors
6.3. Cereal Starches = extracted from endosperm of cereal grains
6.3.1. Cornstarch
6.3.2. Rice Starch
6.3.3. Wheat Starch
6.3.4. Waxy Maize
6.4. Root Starches = Extracted from roots/tuber plants
6.4.1. Potato Starch
6.4.2. Tapioca Starch
6.5. Modified Food Starches = Starches treated with one or more chemicals to possess more desirable properties or results. (i.e. increased stability with excessive heat/acid, texture, speed of setting)
6.5.1. Corn
6.5.2. Potato
6.5.3. Arrowroot
6.5.4. Tapioca
6.5.5. Waxy Maize (clear and clearer tasting)
6.5.6. Instant Starches = pregelatinized or cold-water swelling (jello cold pudding mix).
6.6. Refer back to previous chapters about gelatinization of starches
6.7. Refer to chart 12.5, pg. 337 for a comparison of properties
Homework: 1-30, Ch. 12
7 notes
·
View notes
Text
Dill Pickles: An easy and delicious way to add flavor to your food!
Dill Pickles are a versatile and easy way to add flavor to your food. Whether you’re cooking for yourself or serving up a topping on a burger or sandwich, they make an excellent addition. Plus, they’re delicious! How can you go wrong?
How to Make Dill Pickles.
To make Dill Pickles, you will need some tools including a knife, a pot, and a jar. The most important tool in making best dill pickles is the knife- it is necessary to cut the pickles into small pieces so that they will not stick to the pot or jar. You can also use a fork to help with this process.
How to Assemble Dill Pickles.
Once you have your ingredients gathered, first put them all into the pot and bring it to a boil over medium heat. Once boiling, reduce the heat to low and let the pickles simmer for about 15 minutes. Then remove from heat and let them cool for about 5 minutes before transferring them to a jar or bowl.
How to Enjoy Dill Pickles.
After you have made your dill pickles, there are many ways to enjoy them! You can eat them straight up or in an appetizer or main course dish. You can also add them to your food when you are cooking or serving it as part of a meal.
How to Use Dill Pickles.
Dill pickles are an easy and delicious way to add flavor to your food. All you need is a small bag of dill pickles, some water, and some spices. To make a delicious Dill Pickles dish, start by adding the dill pickles to a pot of water and simmer for about 20 minutes. Once they’re softened, add them to your food and cook until they’re soft.
Add dill pickles to your menu as a side dish or as a recipe. For example, you can place Dill Pickles on top of pasta or rice dishes, or use them as an ingredient in recipes like gazpacho or chili. As a side dish, Dill Pickles are perfect for adding flavor to your food without spending a lot of money.
How to Enjoy Dill Pickles.
To enjoy Dill Pickles, first make them by boiling them in water for a few minutes. This will add a little flavor and make them easier to pickles.
Next, add them to your food. Use them as a sauce on burgers, hot dogs, or other dishes. You can also use them as a side dish on rice, noodles, or other foods.
Finally, make Dill Pickles as a recipe. This will involve cooking the dill pickles in water until they are tender and then adding them to your desired recipe.
What are the benefits of hot pickles?
Some people believe that hot pickles are an easy and delicious way to add flavor to your food. They say that they provide a great contrast against the blandness of many other foods, and that they can be used as condiments, side dishes, or even as the primary dish. There are a few key benefits of using hot pickles as a foodstuff:
They are veryudget-friendly: One of the best things about hot pickLES is their affordability. You can make them yourself with simple ingredients and no expensive equipment, making them a great option for beginner cooks.
They have a long history:hot pickles were first popularized in India centuries ago, so there is some history behind them. Plus, they taste delicious!
They are easy to store: Because they are so affordable and easy to make, you can easily store them away when not in use.
Why are pickles so tasty?
Pickles are a type of cucumber that has been soaked in vinegar or brine (water and salt). This process gives pickles their characteristic sour taste and smell. In addition, it helps to keep pickles food healthy because they lack the toxins that can cause food poisoning.
Pickle gifts are a great option
Dill pickles are a perfect way to add flavor to your food! They are easy to make and can be enjoyed by everyone, no matter their dietary restrictions. If you're looking for a unique and delicious gift, try giving someone a Dill pickle gift.
Why should I eat spicy pickles?
Spicy pickles are a great way to add flavor to your food and increase the overall appeal of your meal. They are easy to make and require very little effort, making them perfect for busy or on-the-go diners. Furthermore, they can be enjoyed in any number of ways – from as an appetizer before a main course to a condiment for your next barbecue!
Hot and spicy gourmet pickles
8.1. Preparation and Storage
Dill pickles are a delicious way to add flavor to your food! To make them, you will need:
-1 cup of diced onion
-2 cloves of minced garlic
-1/4 teaspoon of black pepper
-1 tablespoon of olive oil or cooking spray
-3 cups of water or cider vinegar (if desired)
-2 bunches of dill weed (about 2 cups), chopped into small pieces
The ingredients for Dill Pickles can be stored in a cool, dark place for up to two weeks. Alternatively, you can store them in a ziplock bag in the fridge for up to four days.
Best maid dill pickles
Dill pickles are an easy and delicious way to add flavor to your food! They can be used as a condiment, or as a snack, and are perfect for any meal. You can find maid dill pickles at most supermarkets, or you can make them yourself using this simple recipe.
Bread and butter dill pickles
Dill pickles are an easy and delicious way to add flavor to your food! Simply combine a few tablespoons of dill weed in a jar with some bread or potato flakes, and let them sit for at least two hours. The bubbly dill pickles will then give your food that unique Dill flavor.
The best gourmet pickles for your taste
There are a number of different gourmet pickles that can be made to add flavor and texture to your food. Here are some of the best options:
- bell peppers: bell peppers can provide a great amount of sweetness and flavor, making them perfect for adding variety to your food. Bell peppers are also easy to work with, so you can make a large variety of pickles in little time.
- cucumbers: cucumbers offer a unique texture and color that can be used to give your food a pop of flavor. Additionally, they are easy to grow and produce, so they’re a great choice for those looking for an easy way to add some extra flavor to their food.
- onions: onions provide a Saag paneer dish with its rich flavor and excellent texture. They also make an excellent addition to any taco or burrito bowl.
Conclusion
Making Dill Pickles is a great way to add flavor to your food and enjoy them on the go. However, it's important to take some time to prepare your listing and promotional strategy before you get started. By optimizing your product listing for SEO, creating attractive photos, and pricing your products competitively, you can give yourself the best chance for success. Promote your products through social media, influencers, and other marketing channels to reach more potential customers. By monitoring your sales and making necessary adjustments, you can ensure that your business is successful in the long run.
#hot pickles#spicy pickles#sweet pickles#dill pickles#best dill pickles#pickles food#gourmet pickles#hot pickle#spicy pickle#sweet and spicy pickles#spicy olives#beer pickles#spicy okra#hot okra#beer okra
7 notes
·
View notes
Text
The Top 5 Spa Ceylon Melbourne Products for Achieving Radiant Skin
In today’s fast-paced world, finding moments of relaxation is crucial. Bath time is no longer just about cleansing; it’s about unwinding, pampering, and indulging in some well-deserved self-care. For Australians, discovering a brand that elevates the bathing experience through the power of Ayurveda is a game-changer. Enter Spa Ceylon Melbourne, your go-to destination for luxurious, Sri Lankan-inspired bath and body products.
This article dives deep into how Spa Ceylon Melbourne’s offerings can transform your everyday bath into a ritual of relaxation and rejuvenation. We’ll explore their unique product range, how they can benefit your body and mind, and why these luxurious items deserve a place in your bathroom cabinet.
The Allure of Ayurveda in Modern Bathing
Ayurveda, an ancient Indian system of medicine, focuses on balancing the body, mind, and spirit. Spa Ceylon blends this 5,000-year-old tradition with modern-day luxury, creating products that harmonise the physical and mental states. This holistic approach sets Spa Ceylon Melbourne apart from other bath and body brands, offering more than just skincare—it’s about enhancing your overall well-being.
Why Choose Spa Ceylon Melbourne?
Spa Ceylon Melbourne offers a curated selection of bath and body products crafted with pure, organic ingredients sourced directly from Sri Lanka. Their blends of essential oils, herbs, and natural ingredients, based on Ayurvedic principles, bring a sensory experience like no other.
Key Benefits:
Authentic Ayurvedic Formulas: Each product follows traditional Sri Lankan formulations, giving you access to centuries of wisdom.
Natural Ingredients: Free from harmful chemicals like parabens and sulphates, the products are crafted with pure botanicals and essential oils.
Luxurious Feel: Spa Ceylon products aren’t just good for you; they also make your skin feel soft, hydrated, and nourished.
Eco-friendly: The brand is committed to sustainability, using recyclable packaging and cruelty-free ingredients.
Stress Relief: With a focus on mental and physical relaxation, the bath and body line includes stress-relief ingredients like lavender, sandalwood, and ylang-ylang.
Bestselling Spa Ceylon Melbourne Bath Products
Spa Ceylon Melbourne's bath range is designed to elevate your bath routine into a luxurious experience. Let's look at some of the must-have products:
1. Ayurveda Stress Relief Soothing Bath Soak
This deeply relaxing bath soak is a blend of Epsom salts and a fragrant mix of lavender, sandalwood, and patchouli. It’s perfect for calming both the body and mind after a long day. The essential oils work together to ease muscle tension while helping to relieve stress and anxiety.
How to Use: Add a generous amount of the soak to warm water, immerse yourself in the bath, and let the blend melt your stress away.
2. Sleep Intense Herbal Bath Oil
Struggling with sleep? This herbal bath oil is infused with calming ingredients like lavender and ylang-ylang to help you relax before bed. A few drops in your bath can create a tranquil atmosphere, ideal for those looking to improve their sleep quality.
How to Use: Pour a few drops into a warm bath and soak for 20-30 minutes before bed to help promote restful sleep.
3. Royal Lotus Cleansing Milk
A hydrating and rejuvenating bath product that gently cleanses your skin without stripping away essential moisture. Its infusion of lotus flower extract and pure coconut milk makes your skin feel silky smooth and soft to the touch.
How to Use: Apply directly to wet skin, massage gently, and rinse off for a smooth, glowing finish.
4. Ayurveda Hydrating Milk Bath
This hydrating milk bath is ideal for those with dry or sensitive skin. Formulated with natural oils and botanicals like jasmine and sandalwood, it helps to soften, nourish, and hydrate the skin while providing a calming aroma.
How to Use: Add the product to your bathwater and soak for 20 minutes to enjoy hydrated, glowing skin.
5. Ayurveda Relaxing Massage Oil
This multi-purpose oil can be used as both a bath additive and a massage oil. Infused with herbal oils like lemongrass and ginger, it helps soothe muscle tension and relaxes the mind.
How to Use: Pour into warm bath water or massage directly onto your skin to feel the calming effects of Ayurveda.
Benefits of Using Spa Ceylon Melbourne’s Bath Products
Using Spa Ceylon Melbourne’s bath products offers a wide range of benefits:
Stress Reduction: The essential oils used in these products, such as lavender and sandalwood, are known for their calming properties, helping you de-stress.
Improved Sleep: Ingredients like ylang-ylang and lavender promote better sleep quality, making your bath time the perfect pre-sleep ritual.
Hydrated Skin: The blend of botanicals and natural oils helps nourish the skin, leaving it hydrated, soft, and radiant.
Mental Clarity: The scents of lemongrass and ginger not only relax the body but also clear the mind, offering a perfect start or end to your day.
Luxurious Feel: Each product is crafted to give you the sensation of luxury in your everyday bath routine.
How to Transform Your Bath Time
Elevating your bath time goes beyond just adding products to the water. Here’s how you can make the most of your Spa Ceylon Melbourne bath experience:
Set the Atmosphere: Light some candles or dim the lights to create a tranquil setting. Playing soft music or nature sounds can also enhance your relaxation.
Prepare Your Skin: Use a body scrub before getting into the bath to remove dead skin cells. This allows the bath products to penetrate deeper, making your skin softer.
Take Your Time: The key to a luxurious bath is not rushing. Spend at least 20-30 minutes soaking to fully absorb the benefits of the products.
Post-Bath Ritual: Once you’ve finished soaking, follow up with Spa Ceylon’s body lotion or oil to lock in moisture and continue the relaxation.
The Importance of Self-Care in Australia
In the bustling cities of Australia, including Melbourne, self-care routines like luxurious bath experiences can have a significant impact on your overall well-being. Incorporating Spa Ceylon Melbourne’s Ayurvedic bath and body products into your self-care ritual ensures that you not only take care of your skin but also your mind.
Conclusion
Bath time can be more than just a quick routine—it can become an immersive, indulgent experience that benefits your mind and body. Spa Ceylon Melbourne offers Australians a luxurious, Ayurvedic-inspired bath range that transforms everyday moments into therapeutic rituals. With natural ingredients, rich formulations, and a focus on holistic well-being, these products are perfect for anyone looking to elevate their self-care routine.
FAQs
What makes Spa Ceylon Melbourne’s products different from other bath brands? Spa Ceylon Melbourne uses traditional Ayurvedic formulations and natural ingredients sourced from Sri Lanka, offering a unique, luxurious experience.
Are the products safe for sensitive skin? Yes, Spa Ceylon Melbourne products are formulated with natural, skin-friendly ingredients, making them suitable for sensitive skin.
Can these products help with stress relief? Absolutely. Many Spa Ceylon Melbourne bath products are infused with stress-relieving essential oils like lavender, sandalwood, and ylang-ylang.
How often should I use the products? You can use these products daily or as often as you like, depending on your personal preference and needs.
Are Spa Ceylon Melbourne products environmentally friendly? Yes, the brand is committed to sustainability, using recyclable packaging and cruelty-free ingredients in all their products.
Spa Ceylon Australia
Spa Ceylon Sydney
0 notes
Last Seen Blogs

felix-ravinstill
the real modern prometheus

acturianacademy
Acturian Academy

h00le
Art & Nature

dot9stuff-blog
Untitled

h-eeites
lua