#tipsandtricks
Explore tagged Tumblr posts
Visit Tumblr Blog
Explore Tumblr blogs with no restrictions, modern design and the best experience.
Last Seen Tumblr Blogs


Fun Fact
Mobile Tumblr US users spend an average of 4.04 minutes per session on the app.
Text
Lock Folder using CMD , बिना किसी सॉफ्टवेयर के फोल्डर लॉक करें , Folder Lock kaise kare Watch video on : https://youtu.be/iWyYJShObW4 #techalert #technical #howto #cmd #tipsandtricks #computer #course #computereducation #computerclasses #computerinhindi #teaching #lock #folder
#Lock Folder using CMD#बिना किसी सॉफ्टवेयर के फोल्डर लॉक करें#Folder Lock kaise kare#Watch video on : https://youtu.be/iWyYJShObW4#techalert#technical#howto#cmd#tipsandtricks#computer#course#computereducation#computerclasses#computerinhindi#teaching#lock#folder#watch video on tech alert yt#instagood#like#shorts#love#youtube#technology
2 notes
·
View notes
Text
Best tips and tricks for easier life #lifehacks #tipsandtricks #shorts #foryou ❓ "Did you know you’ve been doing this WRONG?👉 Here’s the RIGHT way!" **
youtube
1 note
·
View note
Text

In this book, Lynda Drake openly discusses her imperfect parenting tips and tricks for raising three children who have various disabilities and diagnoses, including Down syndrome, diabetes, ADD, dyslexia, anxiety, and eating disorders.
Visit https://www.lyndadrake.com/, and learn more about Lynda Drake and her other works.
8 notes
·
View notes
Text
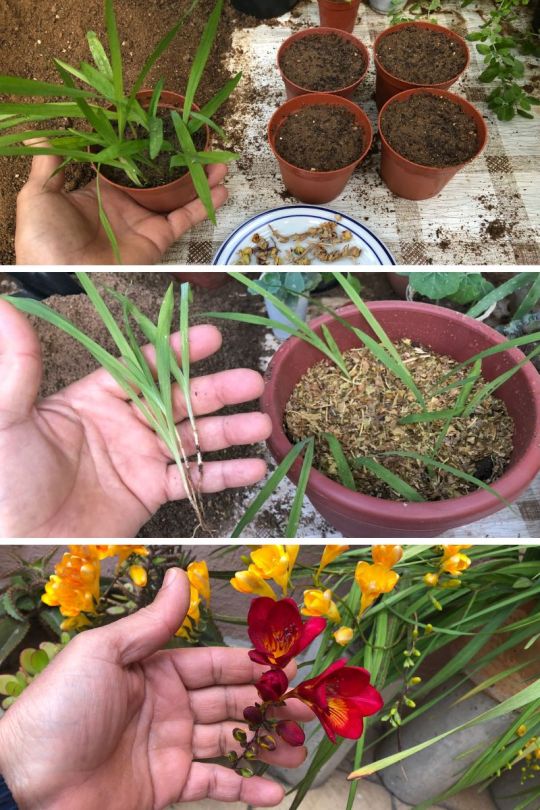
It is a gratifying and delightful experience to grow freesia 🌸 from seed, since it lets you tend to these alluring blossoms right from the start. I will lead you through the process of successfully growing freesia from seed indoors in this guide, so you may enjoy a colorful, fragrant, and blooming garden!
Read More!
How to Grow Freesia from Seed Indoors
#gardening#gardening tips#lovegardening#gyo#gardening uk#gardenchat#organic gardening#garden#backyard#gardeningtips#flowers#flowerlovers#flowersinstagram#freesia#freesias#gardeningtipsforbeginners#howtogrow#growyourownflowers#gardener#gardeners#gardenersofinstagram#guide#tips#tipsandtricks#tipstricks#gardenblr#gardencore#gardeners on tumblr#home and garden#flower garden
3 notes
·
View notes
Text
Okay, I could talk about each of these topics in greater depth, but I'll keep it boiled down or else I'll be typing for a loooong time. If anyone wants elaboration on the following steps or on any particular pieces I've done, let me know and I'll give more tips and tricks later :) Apologies for the formatting, I'm still getting used to posting on Tumblr
-------------------------
Step 1: Clean up and prep I start by sanding down leftover pieces and flaws in the model caused by the production process. In traditional model kits, these are pour tabs, flash and seam lines. For 3D printed, these would be pits or bumps left behind from supports and layers lines.
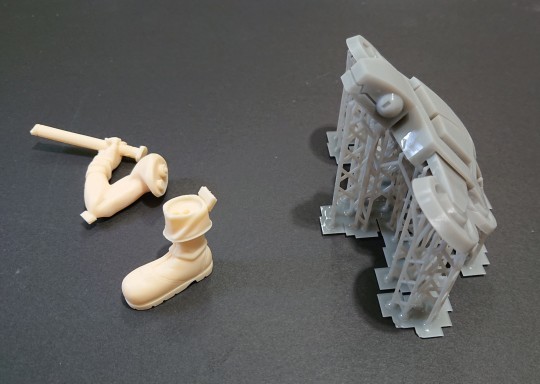
The arm and boots on the left are from a traditional model kit, and have visible tab chunks that will need snipping then sanding. S.H.E.L.L.D.O.N on the right needs his supports removed, then sanding. Every piece (minus those with fine texture) gets buffed with 240, 320, 600 and 1000 grit sandpaper/sanding sponges (clear parts and any pieces intended to be painted with clear paints, such as character skin, are additionally polished with a melamine sponge, also known as a magic eraser).
This is to make sure the surface is level and uniform. Any bumps or scratches that aren't removed will show up in the final paint job.
(Note for beginners: It's fine to just remove production remnants and do a little clean up before going to the next step. All that prep is tedious! Just have fun with it for now!)
Step 2: Make sure the model parts fit well together. It's very common for a model to not fit together perfectly right away. Dipping the model in hot water to soften it, then pressing the pieces together usually fixes this. Be careful not to burn yourself! Sometimes drilling and sanding is required. At this point, larger model kits will require drilling and pinning, though most are fine being assembled later just with glue.
Step 3: Primer
I secure the pieces on clips to keep them elevated, and spray them in thin, even layers of primer. Primer is essential, as it is what makes the paint stick to the model. - White primer: Best for anime and cartoon figures, makes colors pop - Grey: For realistic characters, dulls colors down a little. - Black: For metal or specialty products, like Armored Komodo pigments
Primer will make any unresolved blemishes become more visible, so I usually go back to step 1 until I get them all.
Step 4: Clear coat
For an even, level paint job, I spray a layer of Gloss clear coat on every piece, to smooth the surface even more. I skip this for finely textured pieces, so the details don't get filled in. Spray in a well ventilated area with protection!

There are many brands of clear coats. These are my favorites!
Step 5: Paint
I use three kinds of paint:
Lacquer: Expensive, take a little while to cure, must be thinned with a solvent. Sometimes hard to find. Offers lovely effects, is durable and sticks very well. Can be difficult to correct if something goes wrong. *HAZARDOUS, use in a well ventilated or outside area and use breathing protection!*
Enamel: A little easier to find, takes a long time to cure, which sometimes is a benefit, as it can level itself and provide a smoother surface. Must be thinned with a solvent, sticks very well. Most importantly, enamel can be used on top of lacquers and erased without damaging the lacquer layer. *HAZARDOUS, use in a well ventilated or outside area and use breathing protection!*
Acrylic: Great, vibrant colors, easy to find, very affordable! Dries very fast, even faster if you lightly use a hair dryer. Very delicate, prone to scratches and chips. Can be easily stained by other acrylic color. You only need water to thin it!
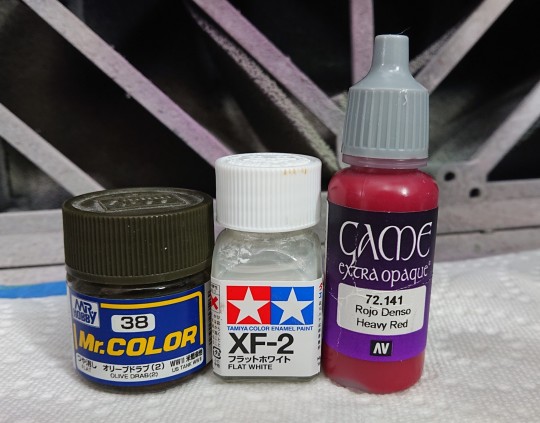
Left to right: Creos Mr Hobby Lacquers, Tamiya Enamel, Vallejo Acrylics
I usually start with the character's skin first. This is because I paint skin using built up layers of clear colors, to get a sort of 'glow' that shines through to the primer and differentiates the skin from clothing and hair pieces.
Afterwards and throughout the project, I 'save' my work by spraying a layer of clear Gloss or Matte spray. I use an airbrush, so to further protect other parts of my work, I cover the finished pieces in masking liquid and/or masking tape, before spraying the next color. Because Enamel can be easily wiped off of lacquers without affecting the lower color layers, I use this type of paint second. If you use Enamel first, you may run into issues with the underlying lacquer causing paint cracking in the future.
(Note for beginners: Using just acrylics is fine. :) I have painted entire models with acrylic paints obtained from craft stores and Walmart, and had very good results.)
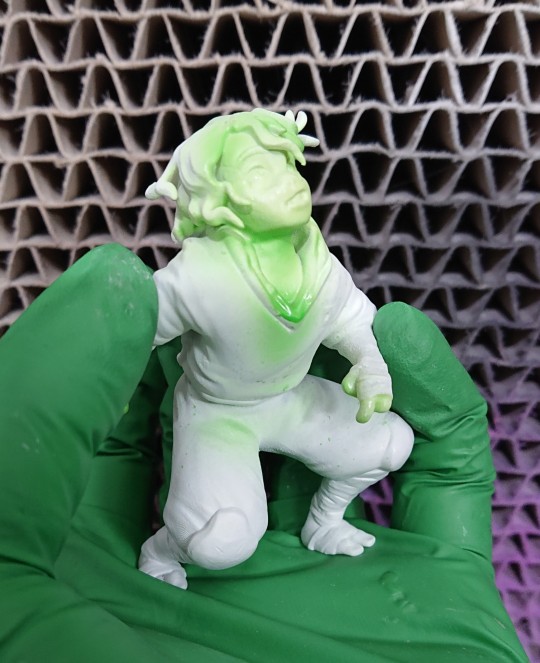
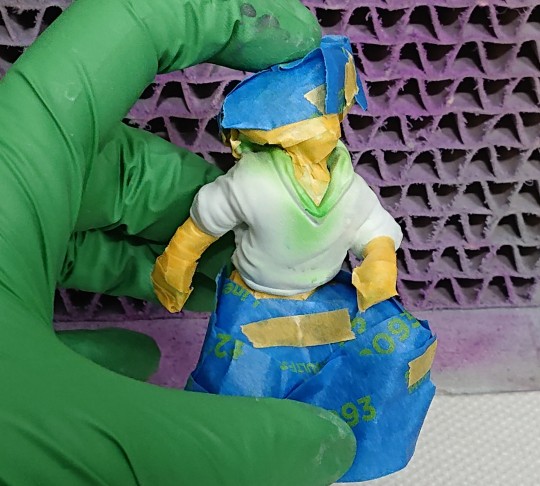
Despite my masking, some enamel paint leaked through on Casey's neck. Masking is rarely perfect, so expect to do touch ups after removal.
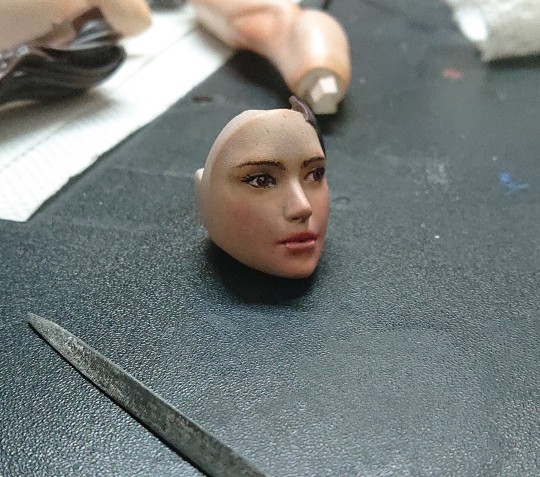
Step 6: Face eyes and details
...this is an entire essay on it's own, which will require another post. But I use layers of enamel for eyes, water color pencils for eyebrows, chalk pastels for makeup/shading and acrylics for eye lashes.
I have shaky hands sometimes, so the ability to erase my work and start again is very helpful here, hence why I don't use lacquers for this part.
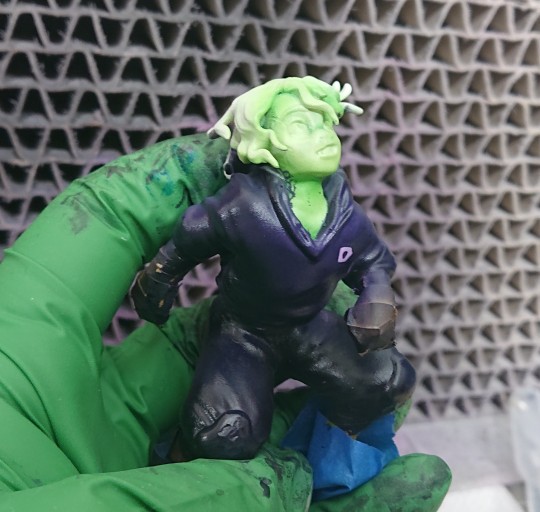
There are... So many products and colors in this one piece... Step 7: Touch ups then gluing
I typically do touch ups as I go, but now is the last chance to correct anything. Once it's ready, 2-part epoxy or crazy glue (sometimes both) will be enough to get most models together entirely.
----------------------------
That's a basic breakdown for my process, though for things like effects, clear pieces and fancier/realistic models, it can get quite elaborate. I don't want to scare anyone away from the hobby, so I'll just say this...
You don't have to do allllll this stuff!! Find a model you love (repainting dollar store figures is a great place to start!), prime it, and slap some paint on it! Just have fun, and then go from there!! My first model was lumpy, and looked like she was painted with nail polish, but I kept going and just enjoyed myself, trying new tips and tricks along the way. The point is to have fun! Make sure to take proper precautions and read product instructions as well, if you choose to use the more toxic products.
If anyone decides to give figure painting a shot, send pics of your projects my way, I'd love to see them!! :D It's always great to have more people in the hobby! And I'm always up for more questions, they might just take me a little while to get to replying.
16 notes
·
View notes
Photo
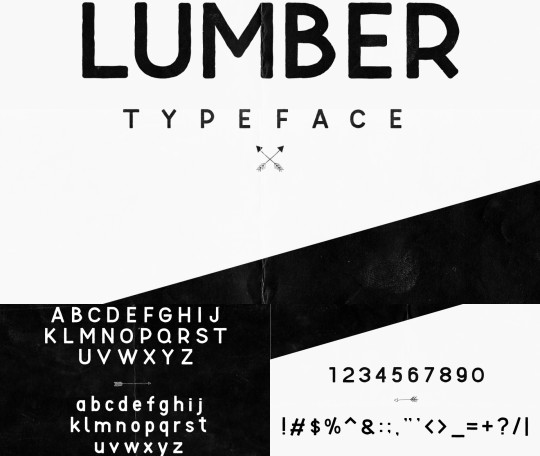
A quirky display font with a unique charm, perfect for versatile use across various projects.
Link: https://l.dailyfont.com/YJGS2
#aff#love#instagood#fashion#style#design#artistic#creative#inspiration#motivation#lifehacks#selfcare#mentalhealthmatters#wellness#beauty#makeup#skincare#lifestyle#tipsandtricks#unique
2 notes
·
View notes
Text
Top things you dont know released to the Netherlands in 2024
https://www.tumblr.com/jjixture-1/746364020886470656/top-things-you-dont-know-released-to-the
#LatestNews#LifeHacks#TipsAndTricks#NatureExploration#knowledge#inspiration#learning#growth#discovery#adventure#exploration#stayinformed#lifehacks#naturelover#nature
2 notes
·
View notes
Text
Why do people still use Tumblr?
Tumblr.It allows people to share content very effectively and people often spend a lot of time on Tumblr per session so you can constantly expose people to your content especially if people are reblogging your content as well. Are you still using Tumblr in 2019?

TUMBLR
#digital marketing#search engine optimization#seo#social media marketing#youtube marketing#facebookpages#story of seasons#linkedin#socialmedia#tipsandtricks#thebestadvice#facebook
5 notes
·
View notes
Text
Digital Marketing Challenges and Overcoming Them

It's a common understanding that digital marketers encounter similar challenges year after year. Although the external factors may change, the fundamental issues persist. If you were to inquire among various businesses about their primary digital marketing challenges, you'd likely discover a common thread in the responses. Despite the ubiquity of these challenges and opportunities, addressing them effectively remains a considerable task. The intricacies become less apparent when you're in the midst of the chaos, and gaining an external perspective often proves invaluable. As we examine the list below, take a moment to discern whether your main challenge aligns with any of the points. Escalating Expenses- Prevailing Digital Marketing Challenges In digital marketing, the reality of growing costs looms large. Whether it's grappling with the steep rates of industry experts, facing the upward trajectory of software package prices, managing the expenses tied to digital transformation, or contending with marketplace fees, businesses find themselves navigating an increasingly expensive landscape. Attempting to corral and control these mounting costs is a daunting task, pushing the boundaries of what seems feasible. However, amidst this financial challenge, strategic avenues for resolution emerge. Read the full article
3 notes
·
View notes
Text
3 Reasons why virtual meetings fail and what you can do to fix them @meetbee @marcchase https://www.meetbee.com
2 notes
·
View notes
Text
Your 🥝 fruit can last for months! Visit LoveFoodNotWaste.org for more tips like these.
2 notes
·
View notes
Text
Best tips and tricks for easier life
youtube
Make life easier check it out here >>>>
#lifehacks#tipsandtricks#shots#foryou#LifeHacks#TipsAndTricks#QuickTips#ProductivityHacks#SmartTips#TechTips#CreativeSolutions#TimeSavingTips#LifeImprovement#HelpfulTricks#TipOfTheDay#ProTips#HackYourLife#ExpertTips#SimpleTricks#EverydayTips#UsefulHacks#EfficiencyTips#DailyTips#QuickHacks#TrickOfTheDay#TipsAndTricksBangladesh#TechTricks#LifeHackers#DailyLifeHacks#LifeHackCommunity
1 note
·
View note
Text
How To Format YouTube Video Descriptions and Comments (Codes)
Here’s how to format your video descriptions and comments on YouTube. Listed below are sections describing how to format videos and comments.
Text Formatting
*this is bold text*
-this is strikethrough text-
_this is italic text_
Advanced Text Formatting
1). This is a numbered chapter
100). This is a numbered chapter
These are not mentioned on the official YouTube Help & Support Page, these are some other formatting styles that I’ve found on my own:
left arrow / less-than sign: & lt
make sure that the lt are next to the & sign

right arrow / greater-than sign: & gt
make sure that the gt are next to the & sign

Mixed Text Formatting
You can also mix them together like this:
-*this is bold strikethrough text*-
_*this is bold italic text*_
Chapters Section
You can also add numbers to add chapters into your video description:
==Chapters== 1). INTRO: 00:00
2). Chapter 1: 00:02
3). Chapter 2: 00:04
4). Chapter 3: 00:06
5). OUTRO: 00:08
Tags Section
You can also add hashtags to your video description, which is useful for video discovery:
==Tags== #example, Example, "Example"
Songs Tracklist Section
You can list songs as a tracklist separately from the Chapters list in your video description. This is how to do it:
==Songs== 1). SONG: “Example” by Example: 00:00
#warrenwoodhouse#codes#how tos#howtos#how to#howto#tutorials#tutorial#youtube video description formatting#youtube text formatting#tips & tricks#tipsandtricks#tips and tricks
2 notes
·
View notes
Text
Insurance Guru Ji – Insure Right, Live Stress-Free
At Insurance Guru Ji, we believe that the right insurance is not just a policy—it's peace of mind. Our mission is to help you understand, compare, and choose the best insurance plans that suit your life, your needs, and your budget.
Whether it’s health, life, term, vehicle, or business insurance, we break down complex terms into simple advice you can trust. No pressure, no jargon—just clear, honest guidance.
0 notes
Text
youtube
Google's new AI Mode delivers instant answers, but it could kill your website traffic. Learn how AI Overviews work and discover actionable SEO strategies to adapt and thrive in this new search era.
Introduction
You’ve probably seen it. You type a question into Google, and instead of a list of ten blue links, a polished, comprehensive answer appears right at the top of the page. It’s like having a super-smart research assistant who does all the work for you.
Google has launched AI Mode, and it's completely transforming how we search, shop, and solve problems. Now, instead of just links, you get instant answers, personalized shopping experiences, and even a smart assistant that can handle complex, multi-step queries. For users, it’s a remarkable leap forward—faster, more efficient, and incredibly intuitive.

#GoogleAI#AIsearch#techupdate#aitools#tipsandtricks#tech#googleai#aimode#smartsearch#BlogTraffic#contentcreators#aiassistant#techtrends#voicesearch#Youtube
1 note
·
View note