#tutorial
Explore tagged Tumblr posts
Visit Tumblr Blog
Explore Tumblr blogs with no restrictions, modern design and the best experience.
Last Seen Tumblr Blogs


Fun Fact
China blocked Tumblr because of pornography and censorship problems in 2013.
Note
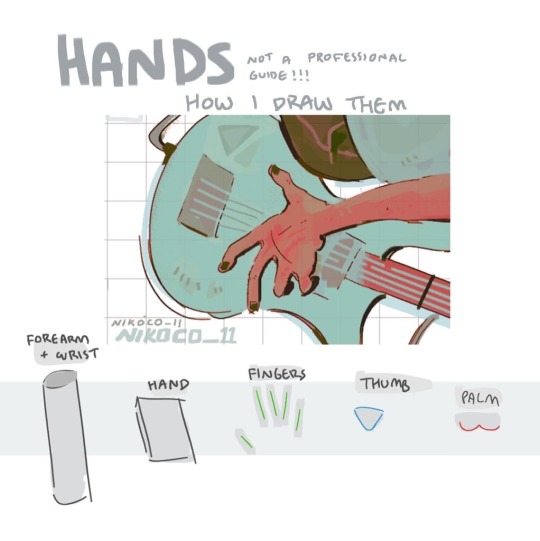
spec. spec. spec youve changed the game. i never realized your pointer finger and your wrist artery are the same. holy shit. im going to draw hands thank you


aasdjsd its not really an artery but its a useful landmark to facilitate the Flow of a pose imo
#nd then the thumb meat is just kinda tacked on there#u will notice also that i like to use the wrist as a tension point so the hand and forearm kind of drape off it#that has nothing to do with anatomy i am just gay#ask#doodle#tutorial#i gueass.
7K notes
·
View notes
Text
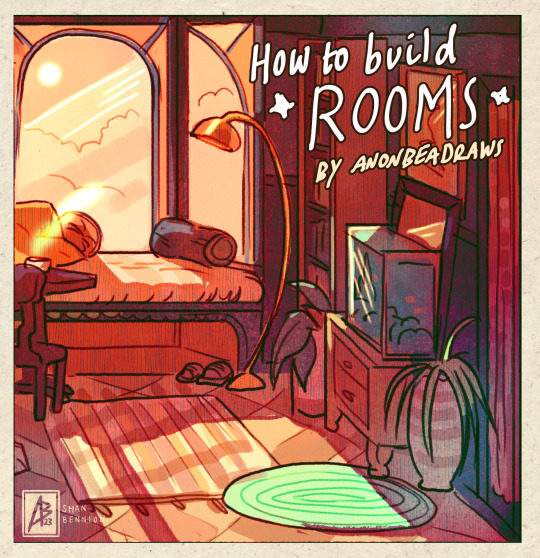
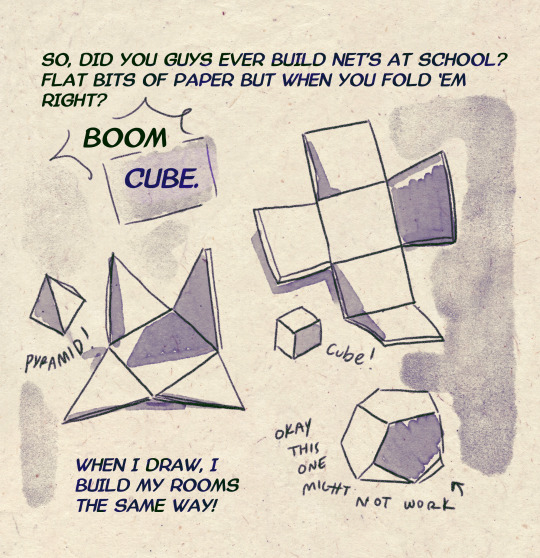
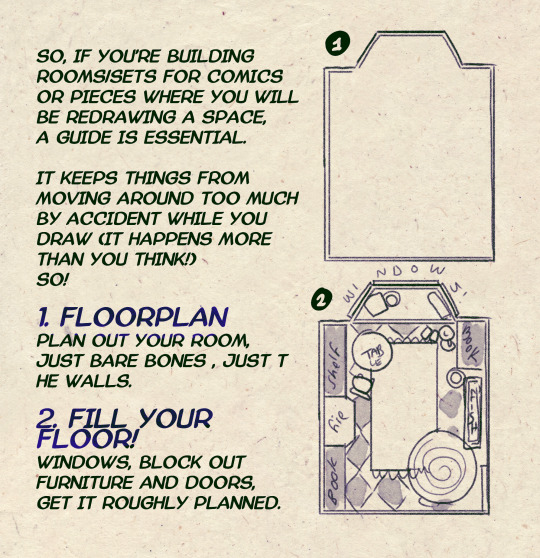
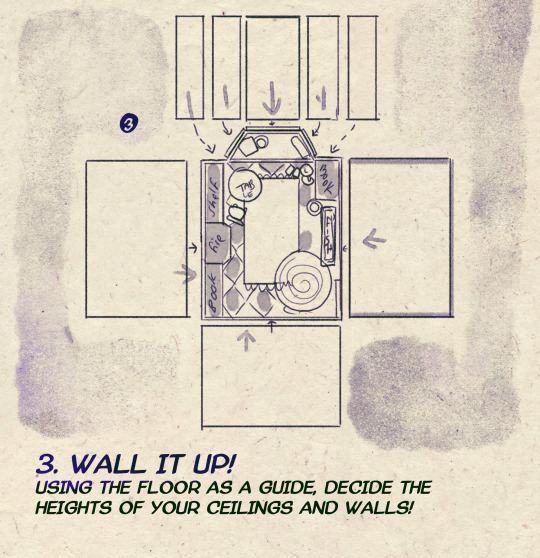


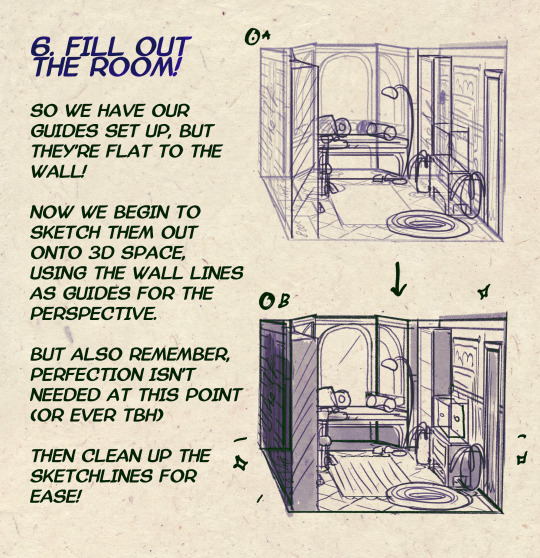

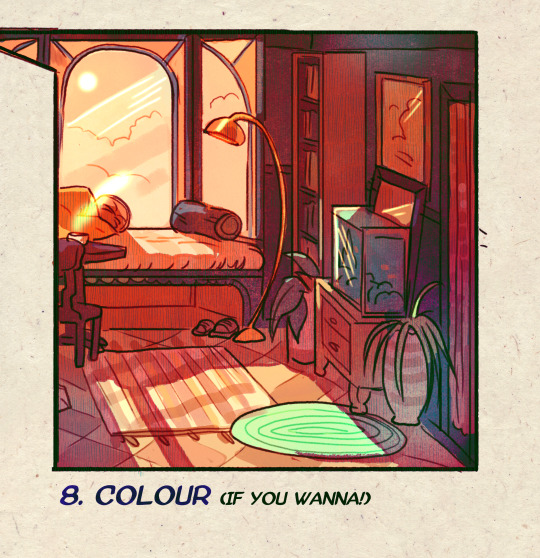
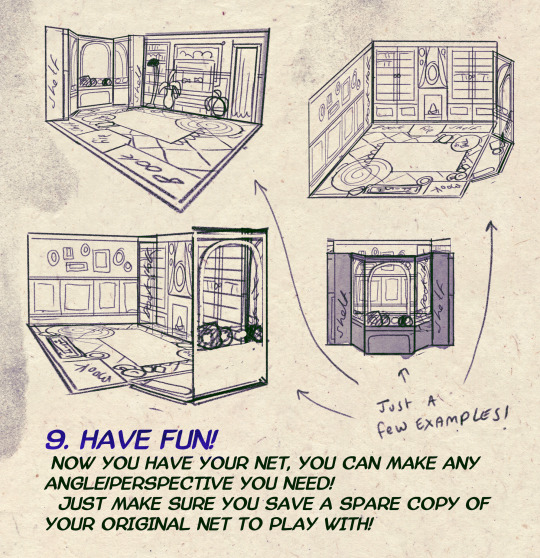
I made a Room Building tutorial! Lemme know if it helps! 🧡
Tip me here| Commission info here!
#anonbeadraws#digital#art tutorial#tutorial#room building#room design#illustration#gif#digital art#digital tutorial#art help#art resource#let me know if it helps!#tried to make it as simple as I could
41K notes
·
View notes
Text
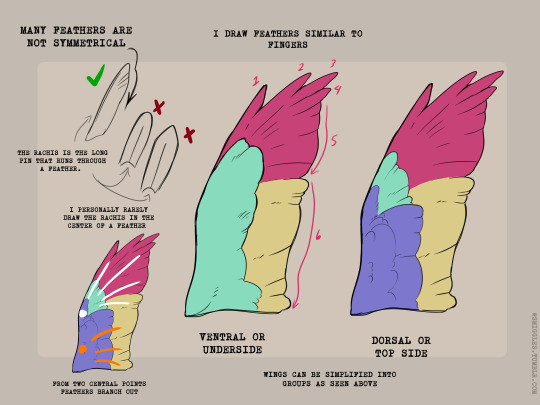

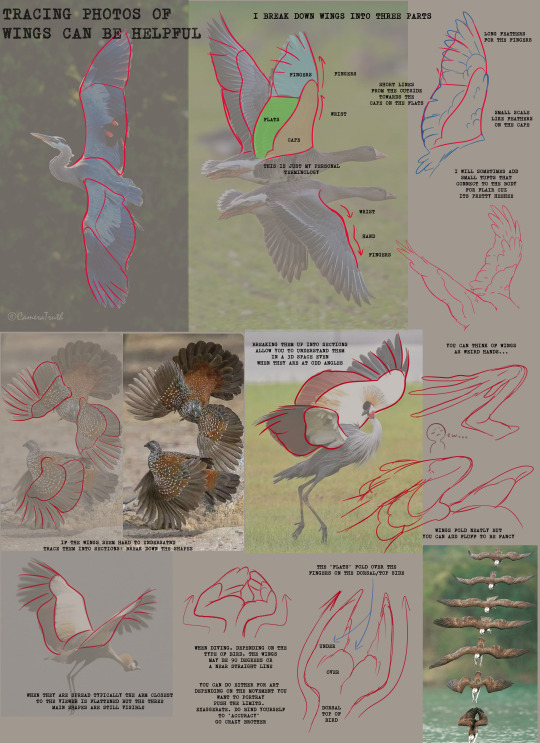
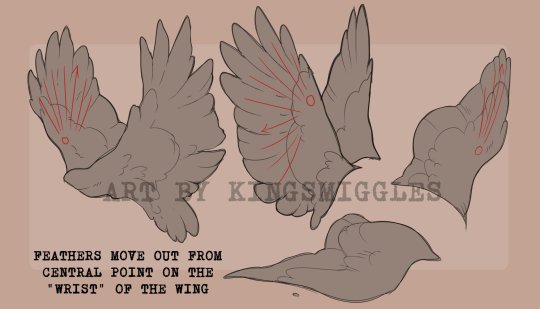
Wings anyone?
29K notes
·
View notes
Text


My shop is open with brand NEW NATURE Tutorials! They are also available as a BUNDLE, so you can get ALL 4 Nature Tutorial for ONE FLAT FEE! ✨️✨️✨️LAST CHANCE to get ALL Tutorial BUNDLE SALE is MAY 31st! 👈✨️✨️✨️✨️Shop link below! 👇👇👇
SHOP
174 notes
·
View notes
Text
While this might seem to be a case of "Ugh, why not just make a full on app instead?" for a vast majority of us, it's not as bad as it sounds! In fact, going this route for Pillowfort via mobile is literally no different than those of us who uses the Unofficial AO3 App called Authorial (before it ... you know ... got taken off of the Play Store).
It's also not that bad if you're like me and rely heavily on the Saved Passwords method for, say, Firefox because you have a shit load of accounts on a website like Tumblr or Pillowfort. Why? Because you can use that in this take of a Pillowfort app. Is it the most ideal way to go? No. But at least it's UI is mobile-friendly, so that's something.

We're thrilled to announce Pillowfort now has a mobile app! Unlike a native app, however, you will install our Progressive Web App directly from our browser site. Once you do it'll behave the same as any other app. Check out the following guide for installation instructions and more info about PWAs: https://www.pillowfort.social/posts/5881832
Interested in joining Pillowfort? You can get on our rolling waitlist, which sends out new invites regularly based on how many users have registered recently. The current wait is less than an hour to get your invite!
#shin's psa#shin's public service announcement#shin's public service announcements#shin's guide#shin's guides#pillowfort#tutorial#tutorials#how to#public service announcement#public service announcements#guide#guides#rpc#rp#tumblr rp#tumblr rpc#roleplay community#community#roleplay#roleplaying#roleplaying community#tumblr
1K notes
·
View notes
Text


my recipe for drawing hands!
(small note that this is a shortcut that is more abt style and ease than anatomical accuracy. it helps to take time to really properly study hands, makes it easier to bend the rules a bit like this and have it still look good!!)
(learn rules b4 u break them or whatevah)
#qna#tutorial#guide#drawing tutorial#digital art#illustration#drawing#artists on tumblr#my art#clip studio paint
59K notes
·
View notes
Text
Here's the tutorial that was promised! Not the best of the absolute best but this simplified tutorial is meant to be a starting point. This isn't the end all be all and if you guys have any suggestions or questions please don't hesitate to ask in the comments!
(P.S. compressed to hell and back to fit Tumblr's stupid 500 MB limit)
Image source: https://x.com/kumada_gaon/status/1908821987595551098/photo/1
#cardiophile#cardiophilia#heartbeat#female heartbeat#edit#xray#manga#fast heartbeat#fanart#notmine#tutorial
73 notes
·
View notes
Text
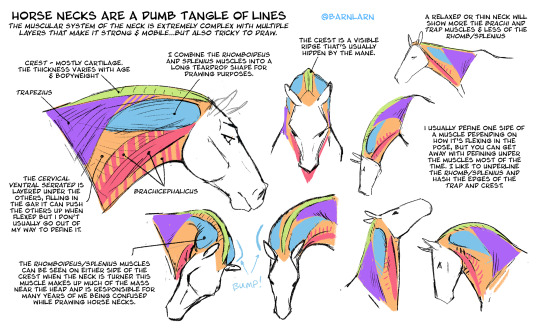
Revising some of my horse drawing tips pages, starting with necks!
Corrected some muscle names and added more explanation/ method.
11K notes
·
View notes
Text
Hey! So I mentioned a while ago that I have a custom workskin to make my Magnus Archives fics with transcripts look more like the transcripts at The Magnus Archives Transcripts Archive, and never got around to showing how. So now I am!
With this workskin, you'll turn transcript fics that look like this:

Into this!

Link to my fic "Just a Rumour" to see the live example, no content warnings in these first two chapters, but rating may eventually change.
Here's how you can apply this to your own fic. Steps are listed below the cut:
1. Make a workskin.
For this step, I'll refer you to the ao3 guide on how to create workskins. Make a new one, or add the following code between the dashes below to your existing skins.
---
#workskin .transcript {
font-family: "Libre Baskerville", Baskerville, "Book Antiqua", Georgia, Times, serif;
color: #586e75;
background: #fdf6e3;
padding: 1em;
width: fit-content;
margin: 0 auto 35px;
font-size: 120%;
}
---
Once you've made your workskin, follow the steps in the included link to add that workskin to the fic you want to apply this style to.
2. Tell the fic where to apply the style
The document above also explains this, but just so you can see the actual steps here:
In your fic, under the html editor view, add
<div class "transcript">
To the front of the text that will be in this format (it may not be the entire fic! You can have it in the middle of regular prose if you like).
At the end of the section that will be in the format, close it off with
</div>


Now just save your draft and confirm that it's working! If it looks off, double check your html, make sure it took and didn't delete itself or isn't misspelled.
And btw, readers who may not like this format can turn it off themselves with the Hide Creator's Style button, so this is optional for readers! It also works well with screen readers as-is.
Enjoy!
59 notes
·
View notes
Text

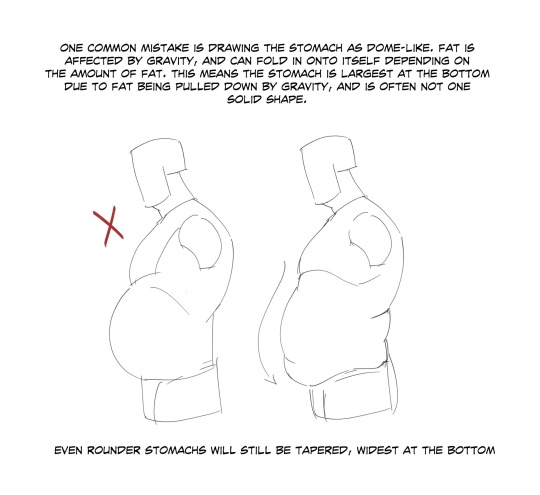

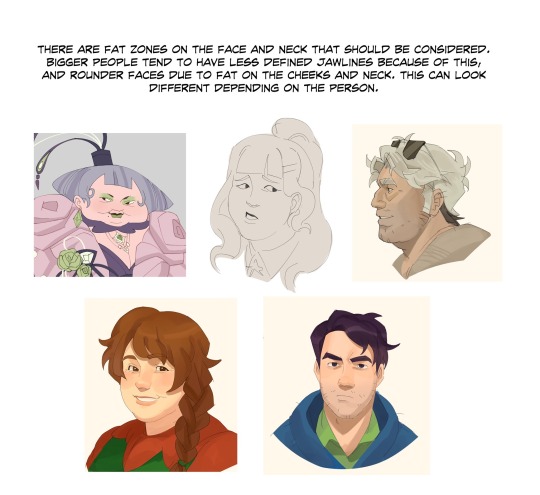
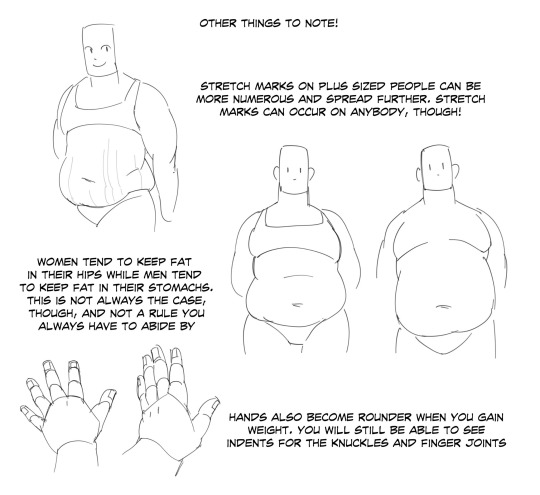
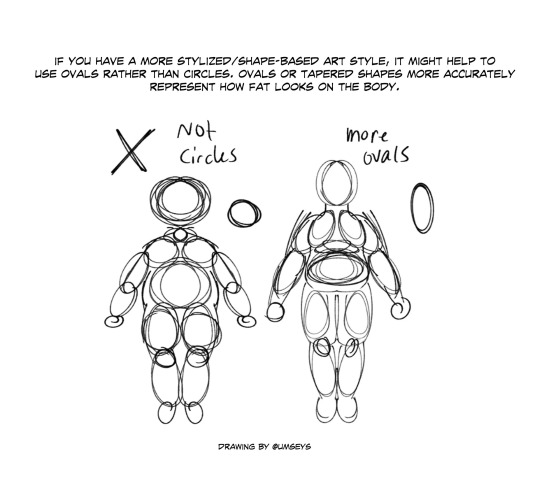
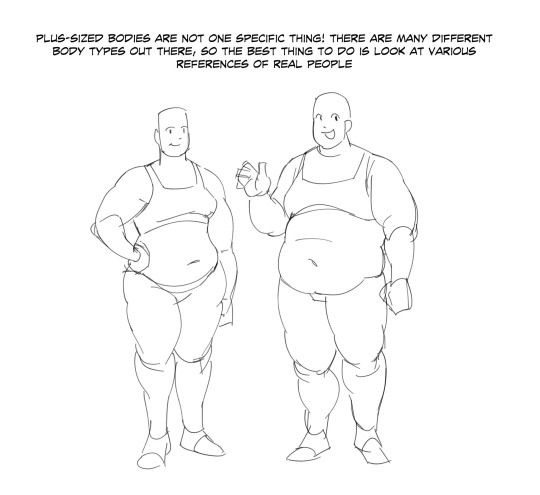
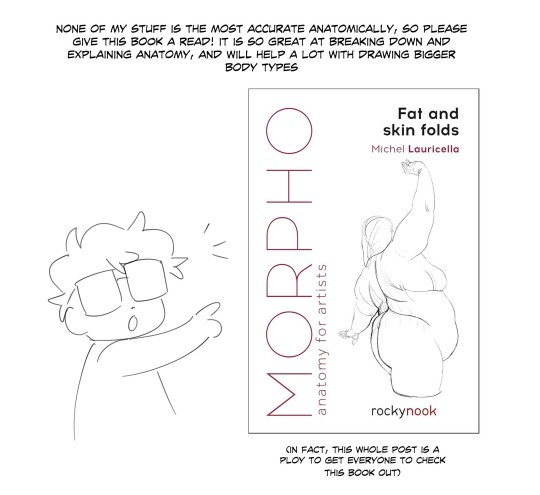
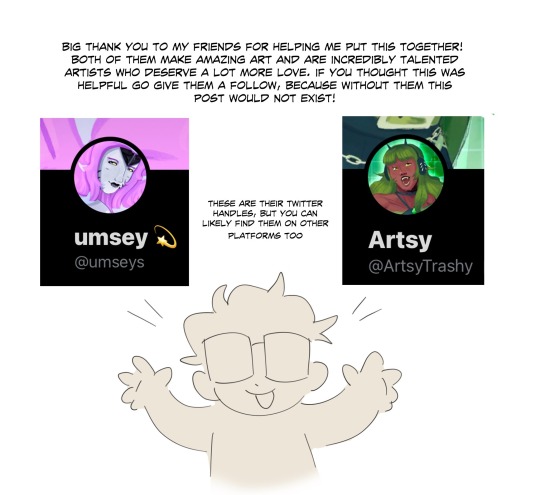
“small thread on drawing plus sized characters!”
Source: Ullaiin on Twitter
#art tutorial#digital art#art reference#tutorial#art tips#human anatomy#drawing anatomy#drawing tips#drawing plus side#plus side#anatomy
19K notes
·
View notes
Text
youtube
i've gotten a couple common questions now about how i do my camera stuff in gpose, so i hope this can answer questions for anyone else that's curious to do it themselves!
39 notes
·
View notes
Note
unsure if my ask went thru bc i didnt see the popup that said it sended over so i’m typing it out again
i NEEED NEEDD a tutorial on how you draw & design mechs bc the way you draw them is literally perfection in every way. this is from an anon who wants to make mech ocs but is unsure where to start theyre so complicated to design
dusting off my tutorial brain
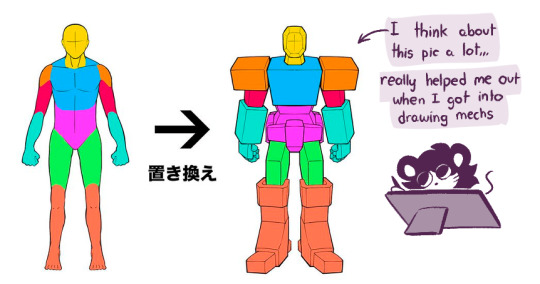
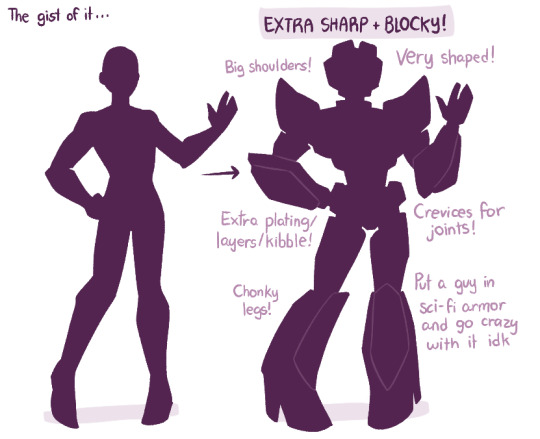
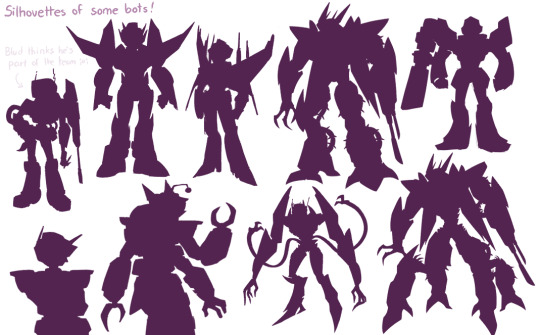
my style of mech is very influenced by transformers (mix of different continuities and tf artists that I like) so I look at a lot of characters for inspiration
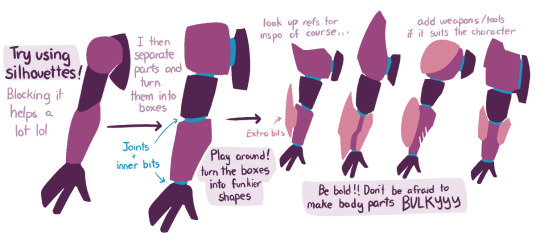
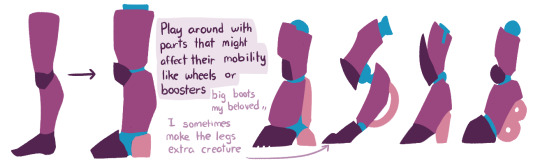
There's a lot of stuff you could add to it too like vents, pipes, antennas, fins, wires, joints, etc..
#in a mood to draw bots so weeeee#throws this and dies#am bad at explaining stuff so I try with visuals bleh#tutorial#mecha tutorial#i guess#asfjhasjh#my art
6K notes
·
View notes
Text
A bit of a tutorial of how I take my photos using bg3's photomode!
I suck at explaining things so I hope this makes a bit of sense to you guys 🙏
◈ ━━━━━━ ⸙ ━━━━━━ ◈
the finished product:

I edited the photo using the app Hypic 🙌
◈ ━━━━━━ ⸙ ━━━━━━ ◈
#tutorial#virtual photography#photomode#baldur's gate#baldurs gate 3#baldur's gate 3#bg3#baldurs gate#karlach#karlach bg3
34 notes
·
View notes
Text
Recent finds I really like: Different Colour Standards into hexes, here's RAL:
Royal Skies' fast tutorials for Blender. He has playlists full of knowledge, here's one.
Ambient CG, a website for free & ready to use materials. Has really good stuff.
Nvidia’s vMaterial Library, it's fantastic. It’s free but requires registration, 2gb~ of textures.
Free section at Poliigon has some good stuff as well.
Resources for Creating: My Go-To things.
Update: I’ll be updating the list on this page from now on, since Tumblr can’t handle so many hyper-links in one post, on Dreamwidth - right here, so I won't have to update it multiple times. Please note: I keep updating this list, and updates aren't showing up on reblogs. Please check the original post for the most up to date list.
Sooo this is going to be a long comprehensive list. I got back to this game after a long time and with a different computer, with a dedicated graphics card, hurray! It made me want to return to making things, so while gathering back all the necessary stuff, I've complied this list. It might be is updated as I go along, but these are the main things I use. Maby one day i'll even finish something. So here are my go-to resources & tutorials; I'm posting it here for safekeeping, and hopefully others will find it helpful. Everything that's listed is here free. So many wonderful things for free under the cut.
Programs – General:
Creating: Blender. Blender Addons: 3D Print Toolbox – comes with blender, enable it from within the program. Originally for 3d printing. Good for fixing flipped normals, and some quick general repairs. Source Tools And source tools wiki – for exporting as SMD!!!! (SimPe: to enable bump maps for the mesh on import). GMDC Addon for Blender 4.0+ by Nopke.
GIMP. GIMP Addons: G'MIC-Qt. Resynthesizer. Nvidia dds?. Doesn’t it come with Gimp?
Other: Nvidia Texture Tools Exporter (iirc it works with all graphic cards that are compatible, doesn’t require Nvidia). For making Normal / Bump / Cube Maps. For high quality compression.
NormalMaps - Online, For making all types of maps, has good setting menus. A very cool tool.
Converting: Umodel, for Unreal Engine (Static meshes: export as gtlf.2. Animated meshes: export as psk. Requires Add-on). AssetStudio, for Unity. AC Viewer, self implied (+ USD Addon for blender). QuickBMS* and support forum, for basically everything else. (don't forget the required scrips, down the same page). *I haven’t tested it fully yet, but it was recommended here. A tutorial for it is listed further down. Works like a charm.
UV Mapping: UV Mapper, Classic (free) and the most recent Demo (for visualization).
Programs – Sims:
Never Mind the Bollox, Here's Osab and MAGIkarp to the rescue!
Latest version of SimPe, works with a non-default installation path. Chris Hatch's updates.
Home Crafter installation, Post by Huge Lunatic at Sims2Artists.
Repository Wizard, by Pick'N'Mix Mods. A game changer.
DBPF Compare, by Pick'N'Mix Mods.
Object Relocator, also by Pick'N'Mix Mods.
SMD Tools, by Lazy Duchess.
The Compressorizer, by JFade – Lazy Duchess's edit.
Bulk Rename Utility, to change file names in well, bulk. As explained by io here.
Lot Adjustor, by Mootilda at MTS.
Tutorials:
Override the game's graphic settings via Nvidia, as explained by iCad. The settings to Nvidia Profile Inspector she linked to at MTS have been deleted for some reason, here they are via WebArchive.
Meshing in Blender:
Mesh Optimization Info (and links), by Crisps&Kerosene.
Additional - Reducing Polycount:
Tutorial, by Flaming-Chickens (another username on other sites perhaps?)
Edge – Un-subdivide, a quick one by CG Link.
Transfer high poly details to low poly object in Blender, by 3Dnot2D.
Shrinkwrap Modifier - Blender Tutorial for Beginners - Basics, by in2vert.
Placeholder for this Addon that I want to try but haven't found, something for AR that was on facebook's defunct AR.
Scaling tips, by Blender Secrets.
How to fix inverted/ flipped normals, by ipaintsmallthings.
Converting: How to Extract 3D Models, Textures, Music from Unreal Engine Games, by iwanMods.
Extract 2D/3D/SFX Unity Assets fast & easy from your Unity Game, by iwanMods as well.
How to use QuickBMS, by darkhorse.
Guide to Converting 3t2 and 4t2 Part 01 and Part 02, by Chiaroscuro/tenlittlepandas.
Converting TS4 Windows and Doors, by Crisps&Kerosene.
Using Different Material Maps as Shading/Details for Base Texture, in Gimp or Blender, by Pineapple Forest & Crisps&Kerosene: https://www.tumblr.com/crispsandkerosene/764893644571525120/great-info-thats-the-reason-some-conversions?source=share
Texture Editing in GIMP:
Using Gimp Add-ons: G'MicQT. Resynthesizer. Both by Davies Media Design. This guy's channel for Gimp in general – here's a good one to begin with. And another one about layer masks.
Making a texture Tile Seamless: 1. My favorite - How to Make Seamless Textures for Cinema 4D - 3 Levels of Photoshop Wizardry using iPhone Photos, by School of Motion.
2. Simple Trick for More Realistic Texture Patterns in GIMP, by Davies Media Design – Quick and simple, using the Resynthesizer plugin. Good for patterns.
Making walls in SimPe out of a square texture, with minimal quality loss. To be written.
SimPe: Cloneable Objects: A List of Good Objects for Cloning, by IgnorantBliss at MTS.
Huge Lunatic's Tutorials, Her website.
Object Creation for Absolute Beginners, by Moune.
Sims 2 start to finish Object Creation Tutorial, by JWoods, Numenor, Lethe_s & IgnorantBliss.
The Material Definition (TXMT) Guide, by PixelHate – very comprehensive. Part 5 is about Bump/ Normal maps.
Null (Texture-less) Groups, by Skell. For bodyshop, for Objects see an elaboration by Midge the Tree below.
Crisps&Kerosene discovered how to add specular maps to objects! It's incredible there are still new things to discover in this ancient game.
More on Specular Maps, by Pineapple Forest.
Making new flooring & walls with SimPE, by Charisa. Includes adding Bump/Normal maps. She added a file to clone from in the comments below. It works for normal maps as well. Here's cool discovery in the game files.
Expanding footprint: a mini tutorial, by Deedee.
How to add correct drop shadows to objects, by Yuxi, via Wayback Machine.
Making Objects Viewable in Neighborhood View, by iCad.
Making Objects Visible In Build/Buy Mode, Invisible In Live Mode, by Midge the Tree.
Making Seasons-Friendly Trees, by Echo.
Io/ Serabiet's resources list, mainly for Bodyshop but not just.
Pineapple Forest's Tutorials, useful tips for efficiency and optimization.
MTS modding forum in General.
The Sims 2 Tutorials, on Tumblr. A database, is more updated.
Sims2Artists tutorials section.
LeeFish modding forum.
Garden of Shadows, Tree of Knowledge section.
Troubleshooting: What to do if you get a System.OutOfMemoryException Error, SimPe Forum, via WayBack Machine. Thank you @fanseelamb for the find.
How to read object error logs: I just want to know what causes it!!, by Episims.
Common TS2 errors, by Midge the Tree.
General game fuckery: How to Stop Sims 2 Crashing (Memory Allocation Fix and 4GB Patch Repair), by Jessa.
Graphics card problems, LeeFish forum.
Graphics help - DIY, by Kiri. How to fix faulty Texture Memory allocation, and the problems that stem from it. Tumblr can't handle anymore hyper links so here it is: https://celebkiriedhel.tumblr.com/post/189431721483/graphics-help-diy
General: Switching between save folders without renaming them, by Nopke.
Resources:
3D Models Online*: Various furniture designers' websites: Porada, Zanotta, Muuto, Hay, Poltrona Frau, many luxury furniture designer basically.
3D Warehouse, belongs to Sketchfab (get the Collada files).
Scan the World.
Wikimedia Commons. And more.
*(NOT OPTIMIZED).
Textures: Architextures.
Fabrics & Wallpapers: Natural Stones: Wall Plasters:
iCad's Woods. Shastakiss's Cluedo Metals, Yeti Metals, Pirate Woods. Goat's Woods.
Textures from other games: Dishonored, Thieve and much more, by Saricoya at GoS. Dreamfell by io.
Resource sharing threads at Garden of Shadows.
SimPe - General: CEP Extras list, HugeLunatic at Sims2Artists.
TXMT settings for different materials, by Hafiseazale.
Extended SimStandardMaterial Shader for the Sims 2 + Optionally Brighter Sims, by Crisps&Kerosene.
Custom CubeMaps, by Crisps&Kerosene.
Shiny TXMT Settings & Cube Maps Packs, by Pineapple Forest.
Build/ Buy: Templates for Recoloring Maxis items; MTS Templates sction, Hafiseazale (+cc), ZeroDark.
Template for Seasonal Trees, Gwenke at Sims2Artists.
Making Roof Recolors, Tutorial & template by Numenor, great template by iCad.
Pack for making food clutter usable, by DeeDee.
CAS: Default Makeup Packages - BYO Packages, by Huge Lunatic.
Body shape, Io/Serabiet on Tumblr.
Skin template, Io/Serabiet on Tumblr.
Hair texture, iCad.
Color Actions, Pooklet on Tumblr.
That's it for now.
Edit: forgot about CEP extras. Added more links. Edit 02: Added Troubleshooting section under tutorials.
#ts2#ts2 resources#ts2 creation resources#ts2 resources for creators#the sims 2#sims 2#resources#sims 2 resources#the sims 2 resources#tutorial#blender tutorial#Colors#Color Hexes
63 notes
·
View notes
Text
how to wave magic wand by 街头尬术师【魔法披风】
17K notes
·
View notes