#drawing tips
Explore tagged Tumblr posts
Visit Tumblr Blog
Explore Tumblr blogs with no restrictions, modern design and the best experience.
Last Seen Tumblr Blogs


Fun Fact
In 2020, Tumblr had 29.4 million users in the US.
Photo


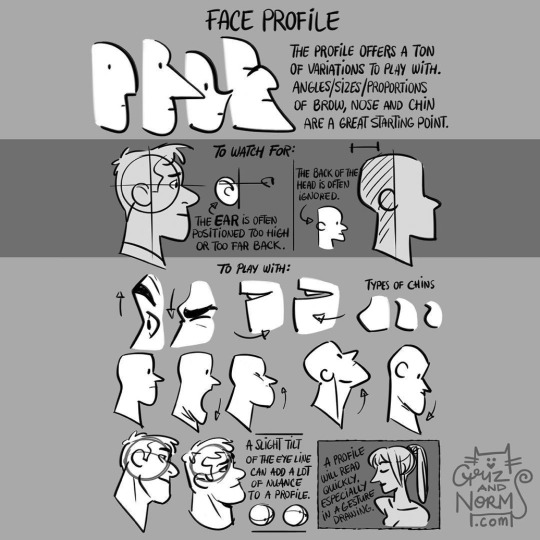

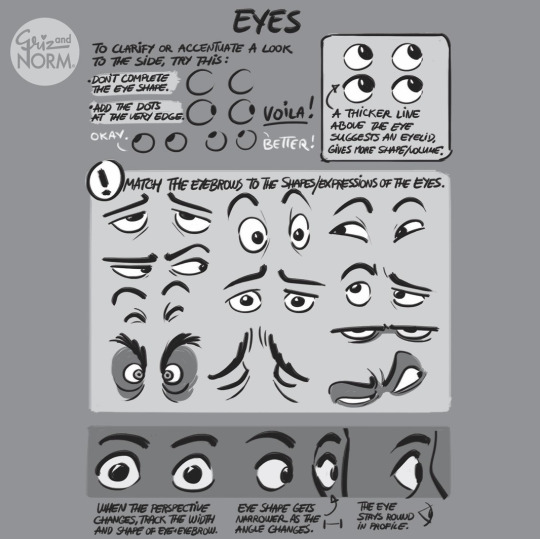
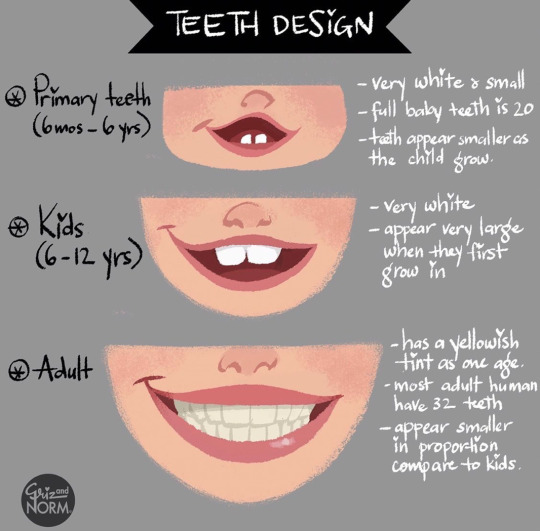
More drawing tips by Disney artists Griz and Norm Lemay
#art tutorial#drawing tips#Griselda Sastrawinata#normand lemay#not concept art#art ref#art reference#art references
6K notes
·
View notes
Text

I added this tutorial to the second episode of my webtoon GAENI. I'd appreciate your support there! ♥
I'll be doing more tutorials after other episodes, or maybe q/a or something else. You can request specific things in the webtoon comments section! Thank you! ≧◡≦)
| Webtoon | Bluesky | Kofi |
79 notes
·
View notes
Text
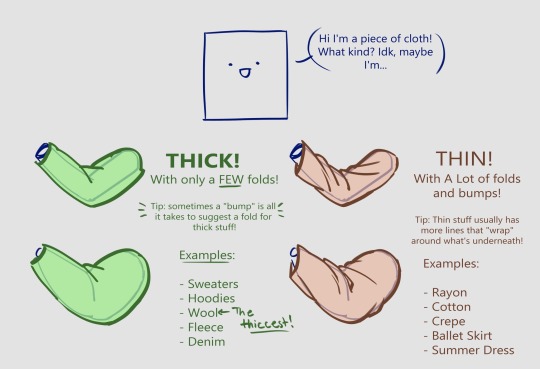
I forgot I have to be active here so here’s my Twitter tutorial on how to draw folds I made a while back to help a friend!


178K notes
·
View notes
Text


Overview of some topics when it comes to drawing characters who are burn survivors.
DISCLAIMER. Please keep in mind that this is an introductory overview for drawing some burn scars and has a lot of generalizations in it, so not every “X is Z” statement will be true for Actual People. I'm calling this introductory because I hope to get people to actually do their own research before drawing disabled & visibly different characters rather than just making stuff up. Think of it as a starting point and take it with a grain of salt (especially if you have a very different art style from mine).
Talking about research and learning... don't make your burn survivor characters evil. Burn survivors are normal people and don't deserve to be constantly portrayed in such a way.

Consider supporting me on ko-fi if you find this to be helpful.
edit: apparently tum "queerest place on the internet" blr hates disabled people so much that this post got automatically filtered. cool!
second way more important edit: How are people seeing this post where I specifically talk about burn survivors being normal, real people, and still tag this as "TW body horror"? Not a single one of these drawings or pictures is a fresh injury. All of them are healed. How the hell would you feel if someone tagged a photo of you as "trigger warning: gore"?
Disabled people are not your fucking body horror. Grow up.
#people who tag this as 'tw scary!!!' will be blocked for missing the point + being insufferable.#my art#disabled artist#artists on tumblr#digital art#id in alt text#art#personal art#digital illustration#art on tumblr#body positivity#body positive art#drawing#illustration#ccartshare#drawing tips#drawing disabled characters#disabled representation
44K notes
·
View notes
Text

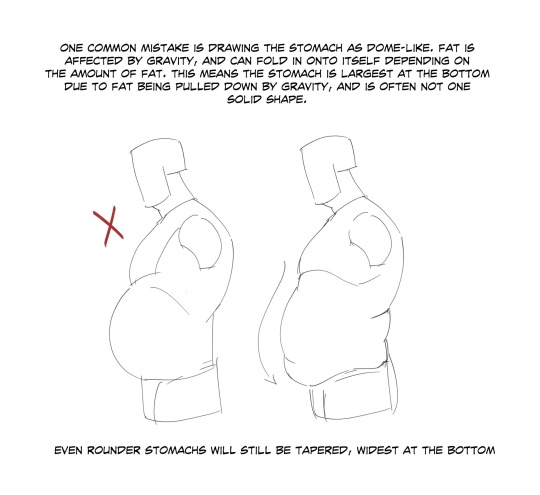

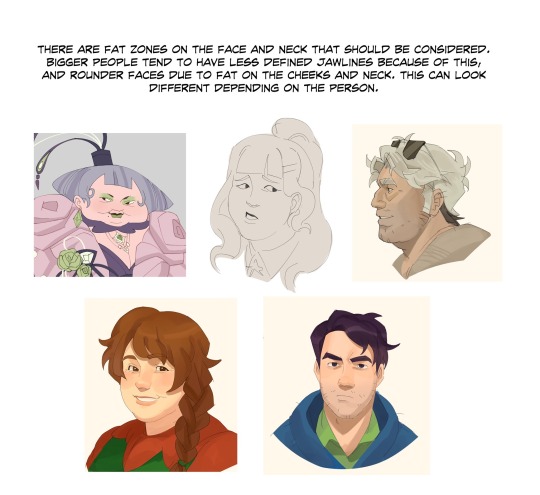
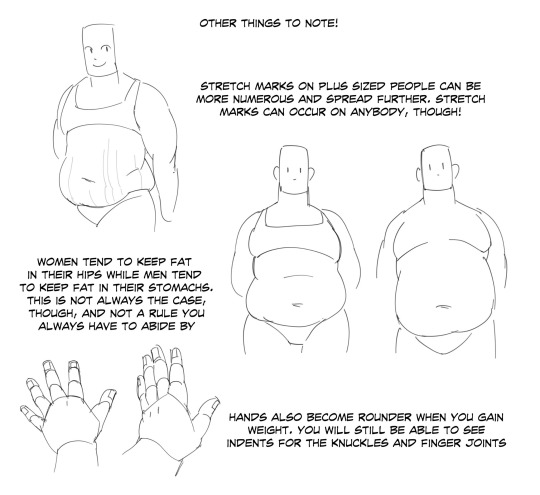
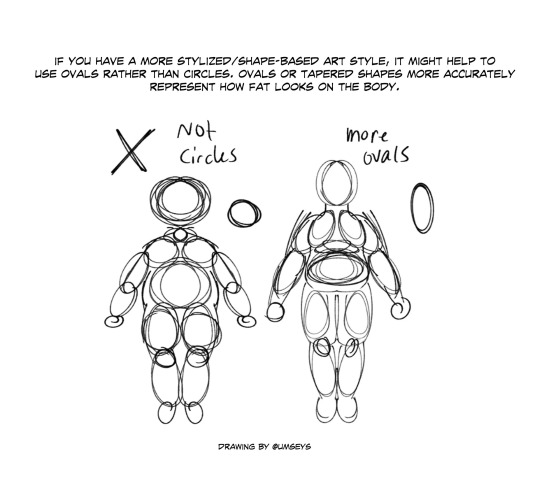
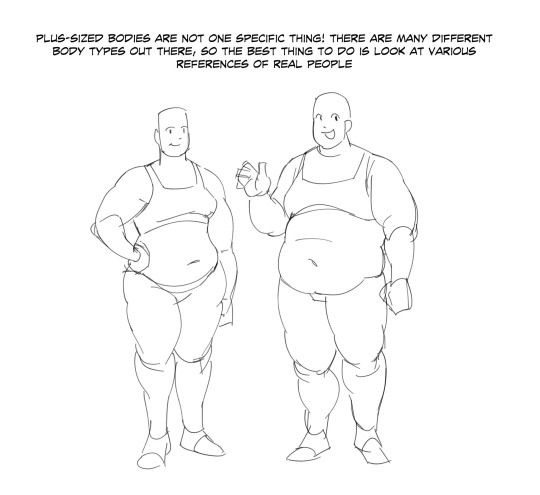
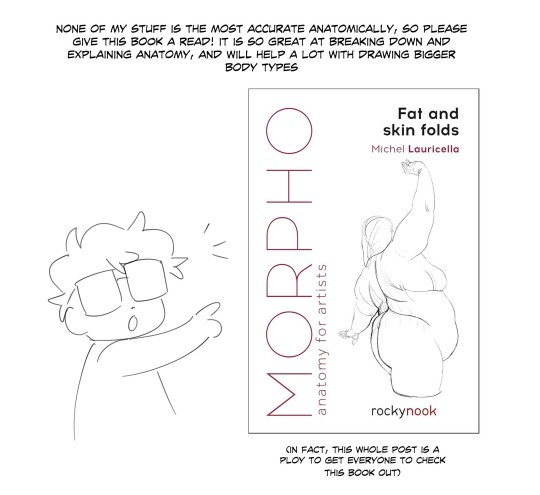
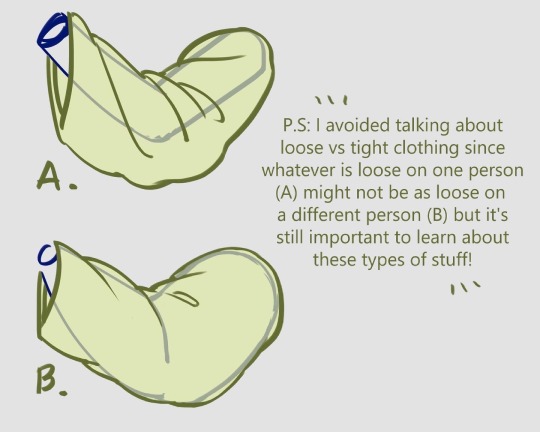
“small thread on drawing plus sized characters!”
Source: Ullaiin on Twitter
#art tutorial#digital art#art reference#tutorial#art tips#human anatomy#drawing anatomy#drawing tips#drawing plus side#plus side#anatomy
19K notes
·
View notes
Note
Hey what tips do you have for speech bubbles in a comic
A few, let’s see what I can come up with.
Okay number 1: If you are doing any kind of comic, DO THE TEXT BEFORE THE BUBBLE! Do not ever draw a bubble and then try to cram three long sentences into it. It doesn’t look good and the text ends up being illegibly small. Example:
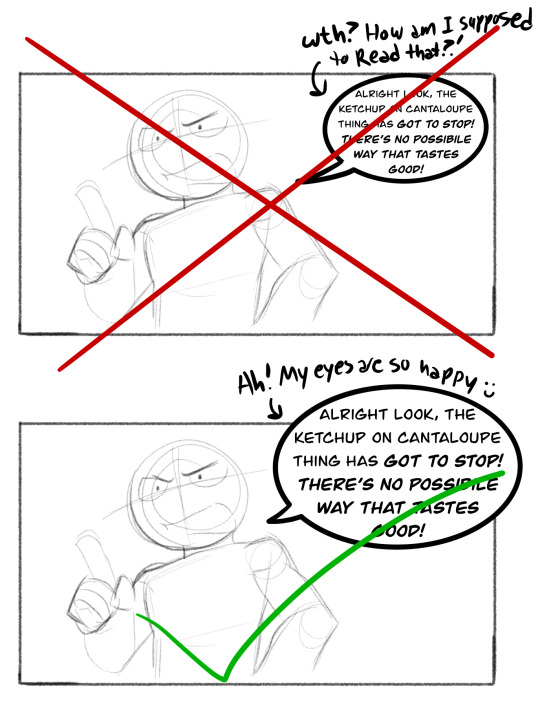
- Number 2: IT DOESN’T HAVE TO BE ONE BUBBLE! Sometimes when you’re character has a very long dialogue segment or you want there to be an audible pause, you can break their dialogue into pieces connected by tails.

This is a good tool for making sure people actually read the dialogue. A lot of people (myself included) have a subconscious reaction to big blobs of text that makes them want to skip it or just skim it. By breaking the long exposition into smaller chunks, people’s brains won’t see it as a ton of effort, and will remain focused on the story, even though it’s literally the exact same number of characters.
This works because of the way we perceive time in a story. Because I want this scene to feel like a slow tense moment, I split the dialogue so it takes longer for the reader to read the dialogue and thus, feel as though this moment is longer.
Number 3: PLAN FOR YOUR SPEECH BUBBLES! This is something I have had to learn the hard way! Do not draw the picture and add the speech bubbles later. The way you draw a picture without speech bubbles and with is very different. Example:
This is not good! The speech bubble is cutting out your picture! Now, everyone does their speech bubble differently, I do mine at 90% opacity, some don’t do any bubble and just draw the speaker’s tail, but many do 100% opaque speech bubbles and this is not good! How to fix it:

Plan where your speech bubbles will go and purposely leave empty space there or something that you don’t care about as much, like the tips of their hair, or their bandana tails, or the end of their scarf, etc. Just make sure that your image is small enough that you can still see it with the speech bubbles on top. If you can’t shrink the image enough to fit it and the speech bubbles, then you need to consult rule 2.
Alright, I think that’s it! As a recap: Do the text before the bubble, The text doesn’t have to be in one bubble, and plan for your speech bubbles!
Hopefully you found this helpful, if you have any further questions, I’d be happy to help!
Good question! :]
855 notes
·
View notes
Text
A general cane guide for writers and artists (from a cane user, writer, and artist!)
Disclaimer: Though I have been using a cane for 6 years, I am not a doctor, nor am I by any means an expert. This guide is true to my experience, but there are as many ways to use a cane as there are cane users!
This guide will not include: White canes for blindness, crutches, walkers, or wheelchairs as I have no personal experience with these.
This is meant to be a general guide to get you started and avoid some common mishaps/misconceptions in your writing, but you absolutely should continue to do your own research outside of this guide!
This is NOT a medical resource!!! And never tell a real person you think they're using a cane wrong!
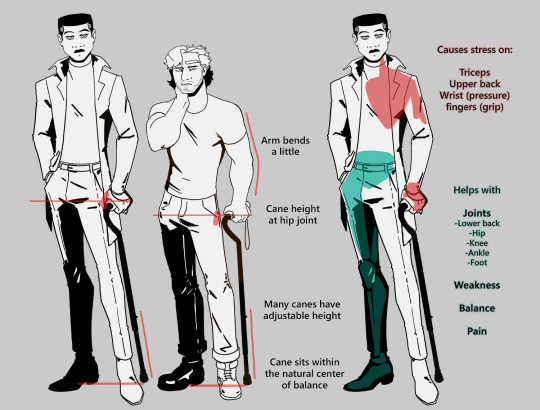
The biggest recurring problem I've seen is using the cane on the wrong side. The cane goes on the opposite side of the pain! If your character has even-sided pain or needs it for balance/weakness, then use the cane in the non-dominant hand to keep the dominant hand free. Some cane users also switch sides to give their arm a rest!
A cane takes about 20% of your weight off the opposite leg. It should fit within your natural gait and become something of an extension of your body. If you need more weight off than 20%, then crutches, a walker, or a wheelchair is needed.
Putting more pressure on the cane, using it on the wrong side, or having it at the wrong height can make it less effective, and can cause long term damage to your body from improper pressure and posture. (Hugh Laurie genuinely hurt his body from years of using a cane wrong on House!)
(some people elect to use a cane wrong for their personal situation despite this, everyone is different!)
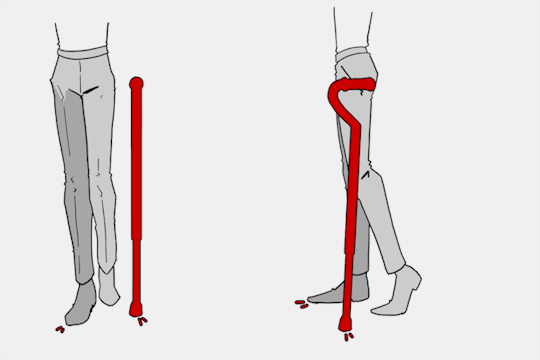
(an animated GIF of a cane matching the natural walking gait. It turns red when pressure is placed on it.)
When going up and down stairs, there is an ideal standard: You want to use the handrail and the cane at the same time, or prioritize the handrail if it's only on one side. When going up stairs you lead with your good leg and follow with the cane and hurt leg together. When going down stairs you lead with the cane and the bad leg and follow with the good leg!
Realistically though, many people don't move out of the way for cane users to access the railing, many stairs don't have railings, and many are wet, rusty, or generally not ideal to grip.
In these cases, if you have a friend nearby, holding on to them is a good idea. Or, take it one step at a time carefully if you're alone.
Now we come to a very common mistake I see... Using fashion canes for medical use!
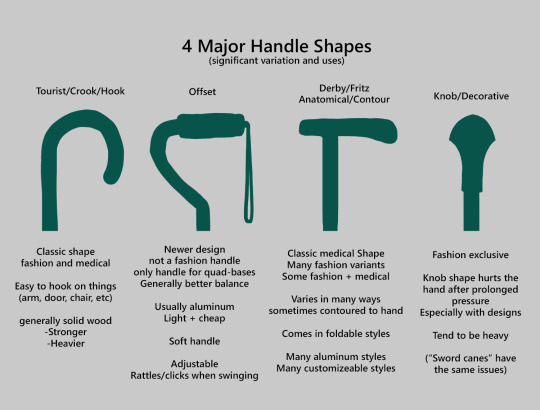
(These are 4 broad shapes, but there is INCREDIBLE variation in cane handles. Research heavily what will be best for your character's specific needs!)
The handle is the contact point for all the weight you're putting on your cane, and that pressure is being put onto your hand, wrist, and shoulder. So the shape is very important for long term use!
Knob handles (and very decorative handles) are not used for medical use for this reason. It adds extra stress to the body and can damage your hand to put constant pressure onto these painful shapes.
The weight of a cane is also incredibly important, as a heavier cane will cause wear on your body much faster. When you're using it all day, it gets heavy fast! If your character struggles with weakness, then they won't want a heavy cane if they can help it!
This is also part of why sword canes aren't usually very viable for medical use (along with them usually being knob handles) is that swords are extra weight!
However, a small knife or perhaps a retractable blade hidden within the base might be viable even for weak characters.
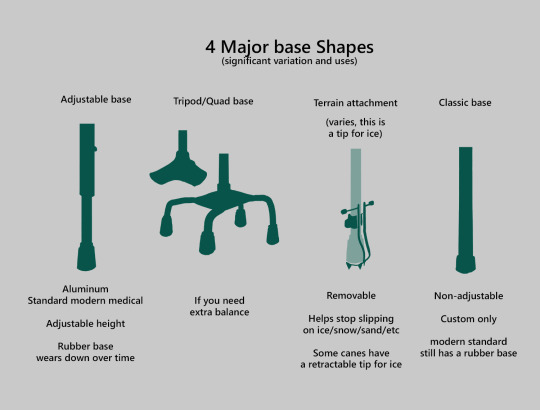
Bases have a lot of variability as well, and the modern standard is generally adjustable bases. Adjustable canes are very handy if your character regularly changes shoe height, for instance (gotta keep the height at your hip!)
Canes help on most terrain with their standard base and structure. But for some terrain, you might want a different base, or to forego the cane entirely! This article covers it pretty well.
Many cane users decorate their canes! Stickers are incredibly common, and painting canes is relatively common as well! You'll also see people replacing the standard wrist strap with a personalized one, or even adding a small charm to the ring the strap connects to. (nothing too large, or it gets annoying as the cane is swinging around everywhere)
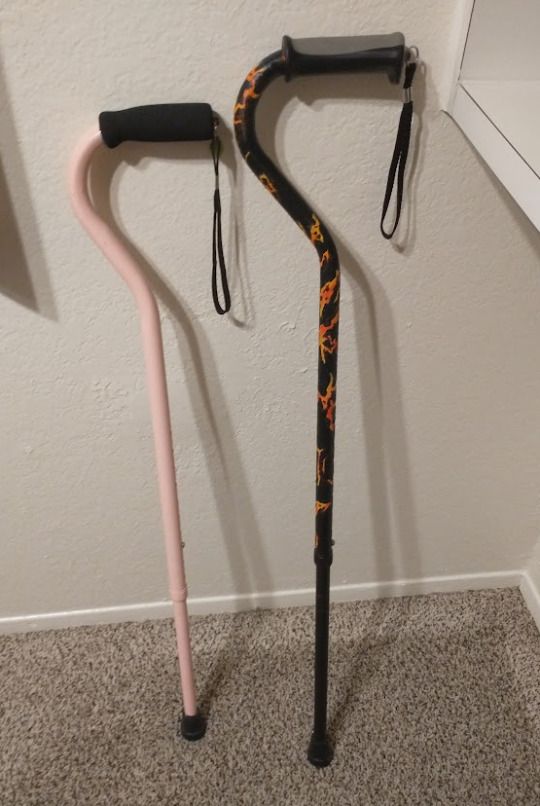
(my canes, for reference)
If your character uses a cane full time, then they might also have multiple canes that look different aesthetically to match their outfits!
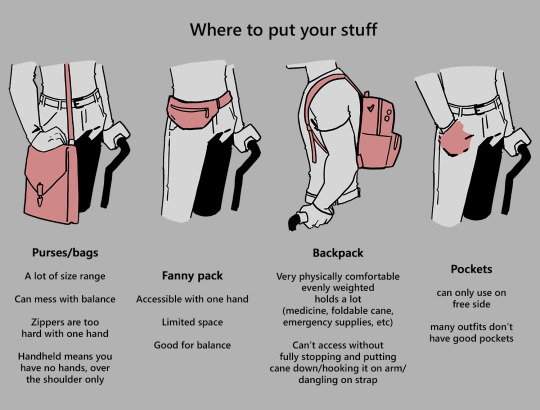
When it comes to practical things outside of the cane, you reasonably only have one hand available while it's being used. Many people will hook their cane onto their arm or let it dangle on the strap (if they have one) while using their cane arm, but it's often significantly less convenient than 2 hands. But, if you need 2 hands, then it's either setting the cane down or letting it hang!
For this reason, optimizing one handed use is ideal! Keeping bags/items on the side of your free hand helps keep your items accessible.
When sitting, the cane either leans against a wall or table, goes under the chair, or hooks onto the back of the chair. (It often falls when hanging off of a chair, in my experience)
When getting up, the user will either use their cane to help them balance/support as they stand, or get up and then grab their cane. This depends on what it's being used for (balance vs pain when walking, for instance!)
That's everything I can think of for now. Thank you for reading my long-but-absolutely-not-comprehensive list of things to keep in mind when writing or drawing a cane user!
Happy disability pride month! Go forth and make more characters use canes!!!
#mobility aid#cane user#writing tips#writing advice#drawing tips#art tutorial#art tips#art reference#art resources#art help#my art#long post
92K notes
·
View notes
Note
You probably get asked this a lot, but how do you draw hands? Even when I'm tracing, they look so weird 🙃


I could probably go on and on and on about hands, but here are some key points I compiled! I LOVE drawing hands, and I never hesitate to use my own as a reference
21K notes
·
View notes
Text


ive been wanting to make smth like this for a little while now and i finally finished it up ^_^ hopefully my tricks are helpful
EDITS: since this post is gaining a lot of traction, i want to highlight some of the suggestions and addendums that other people have made. i'm imperfect, which is why i recommend that you use references of real people along with my simple tips!
as many have pointed out, the yellow in the last diagram should cover the entire body, especially around the stomach area. the only parts of the body that are consistently bare are the palms of the hands and the bottoms of the feet
check out this reblog from @proxykiwi for a diagram of the distribution of hair on the back of the body
the texture of the hair can differ between the head and the body-- much of the time body and beard hair is curlier than the hair on the head
like when drawing head hair, its helpful to break up facial hair into descriptive shapes, and add lines for texture as needed. i tried to communicate that in the images, but i think its also useful to write it out
check out this reblog from @jodjuya for a detailed explanation of how beards tend to grow throughout teen-adult years
thank you to everyone who's suggested and added things! i encourage people to look through the replies and reblogs of this post for more information
11K notes
·
View notes
Text
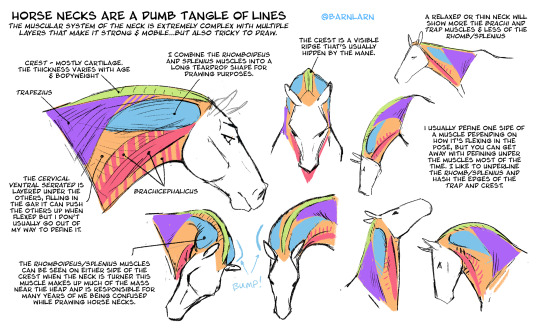
Revising some of my horse drawing tips pages, starting with necks!
Corrected some muscle names and added more explanation/ method.
11K notes
·
View notes
Text
DEAR ARTISTS, PLEASE READ THIS POST I STUMBLED ACROSS
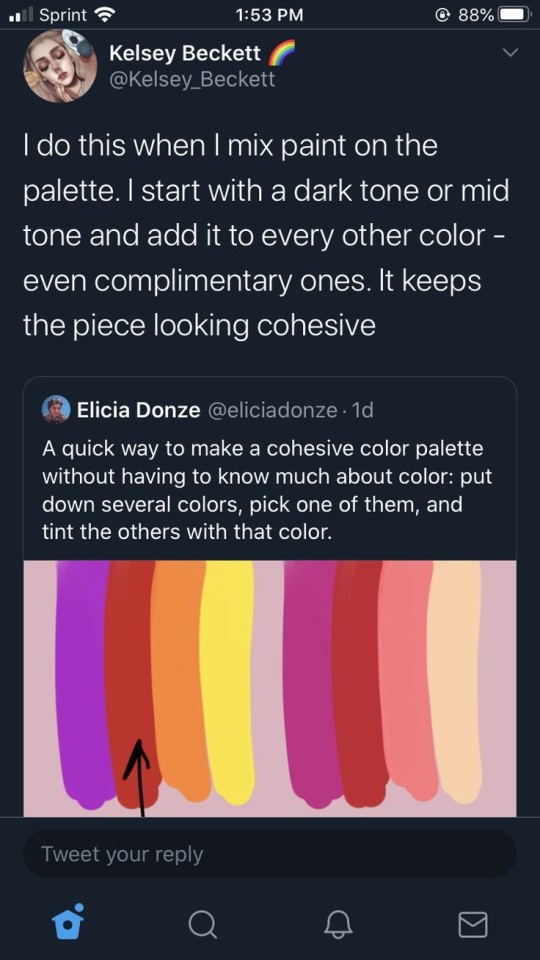
IF YOU ARE NOT DOING THIS ALREADY, YOU SHOULD TRY IT
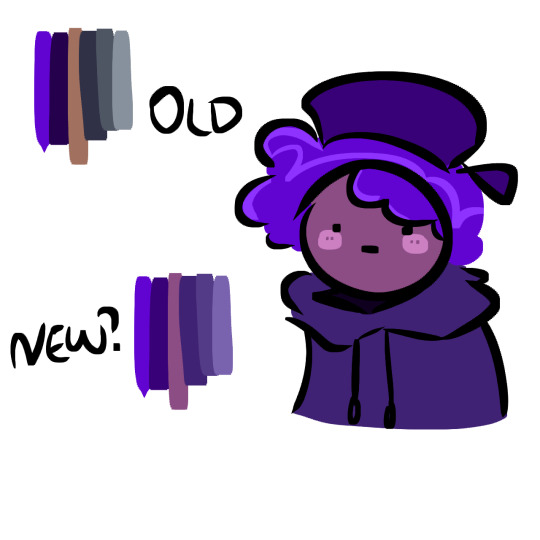
I even tested it out myself, it works great
#art#artist tips#artist tip#digital art#colors#color pallete tips#color pallete#art tip#art tips#drawing tip#drawing tips#digital art tips#digital art tip
68K notes
·
View notes
Text
Here’s a video on why I only use a pen to sketch ✅ Hope you try it out, it has helped me tremendously to streamline my process and improve faster ☺️💕
18K notes
·
View notes
Text
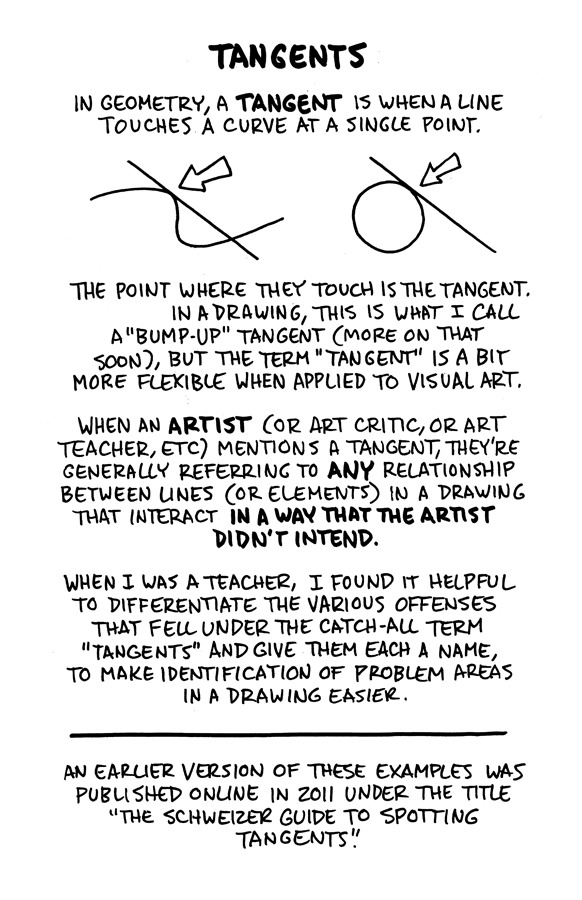
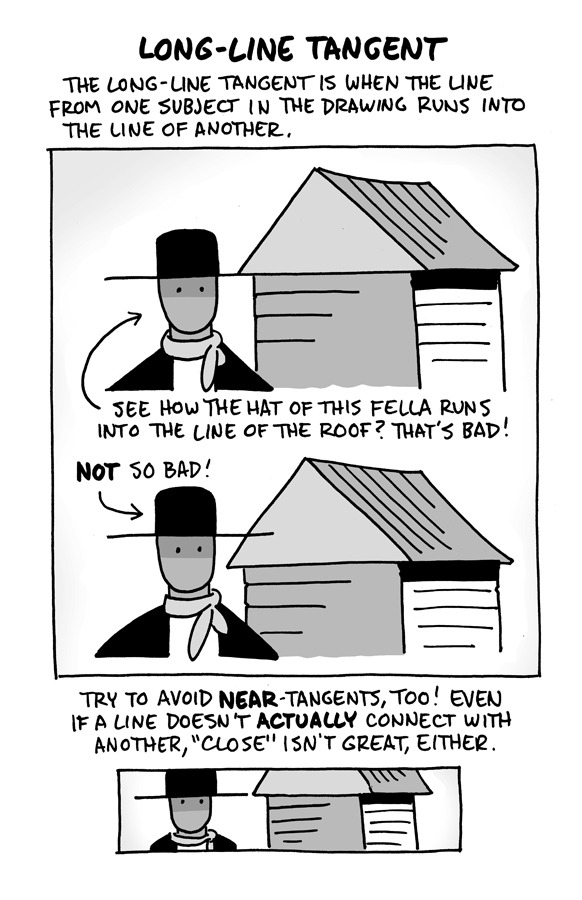
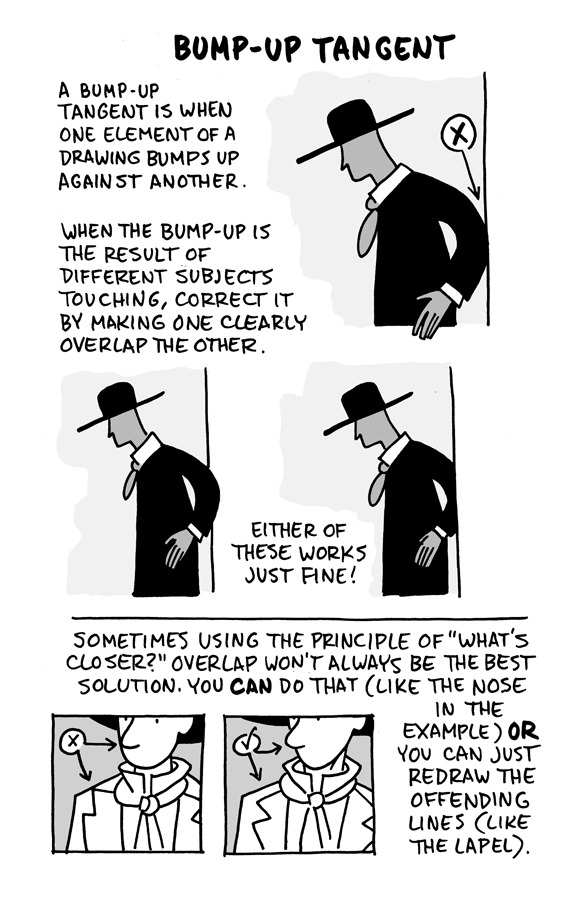
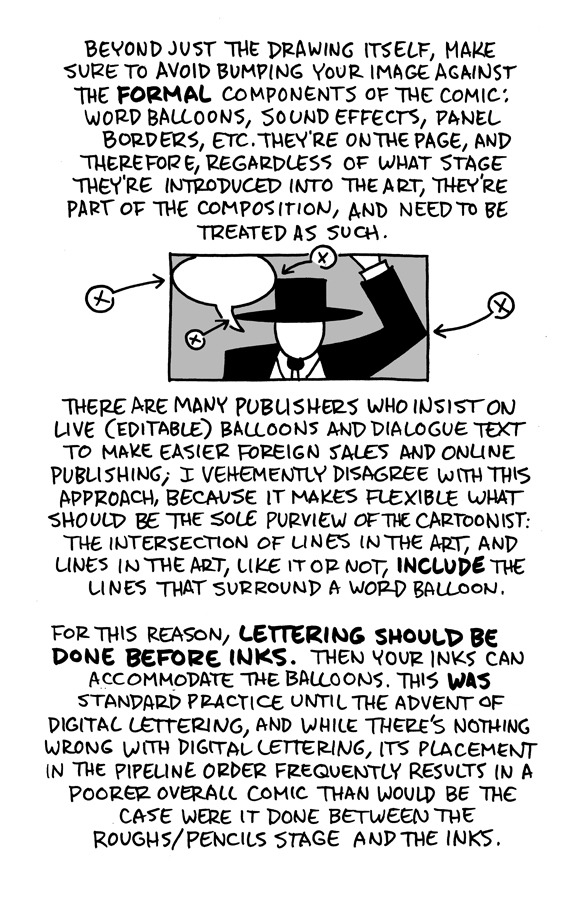
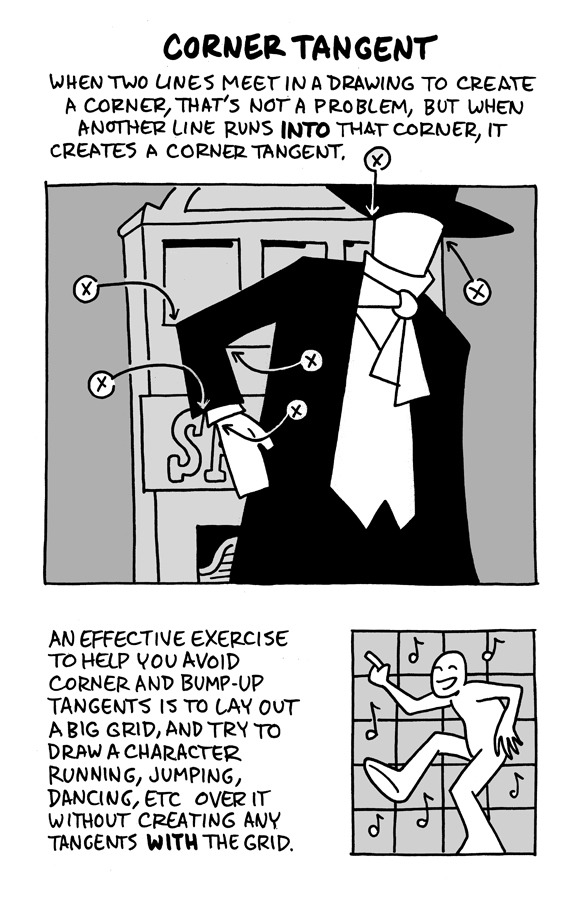
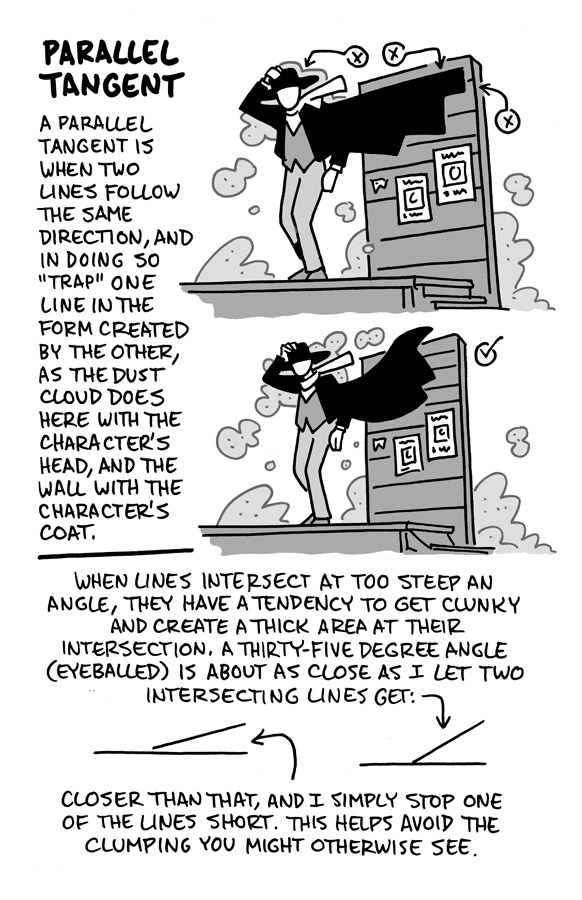
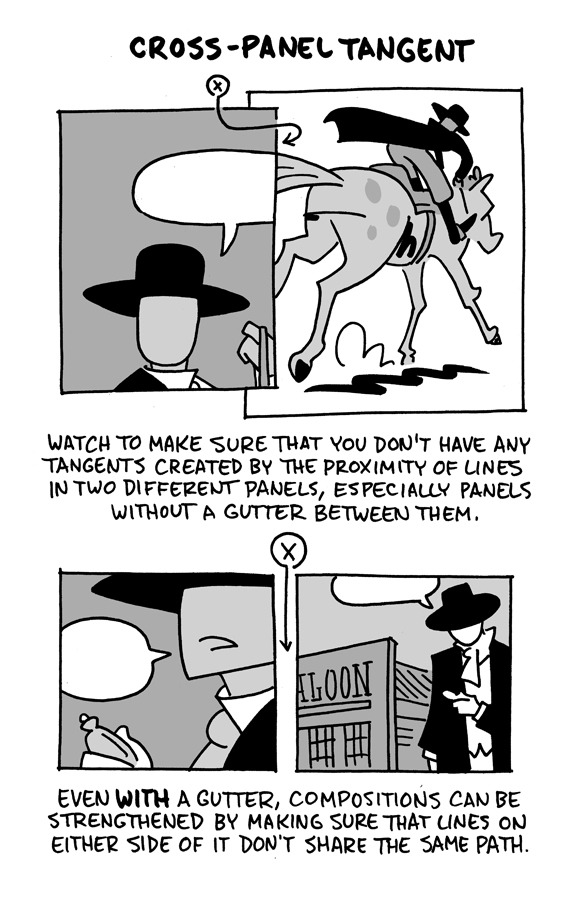

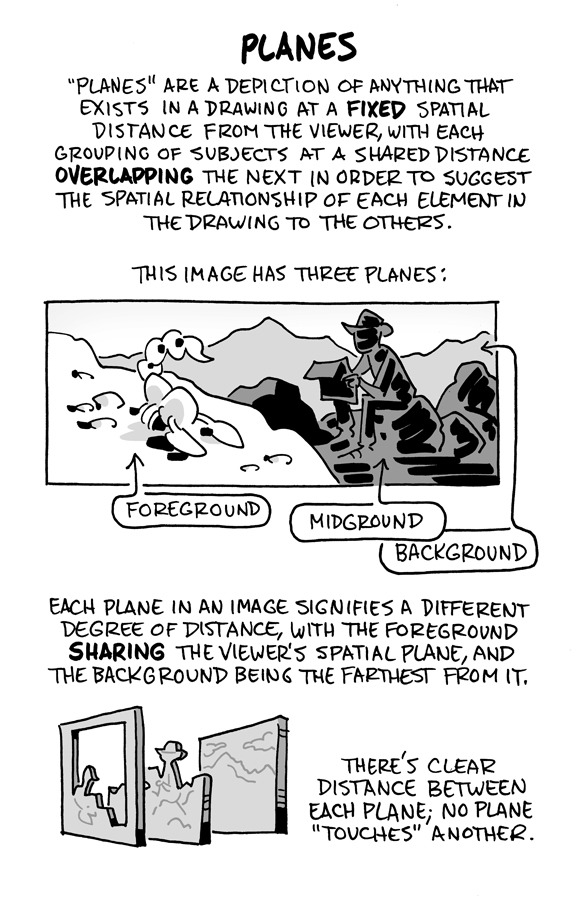
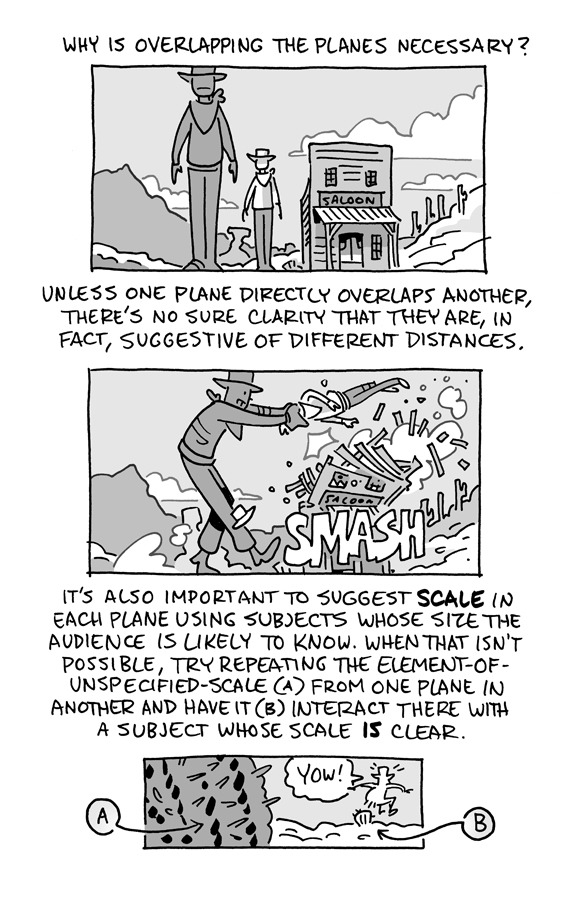
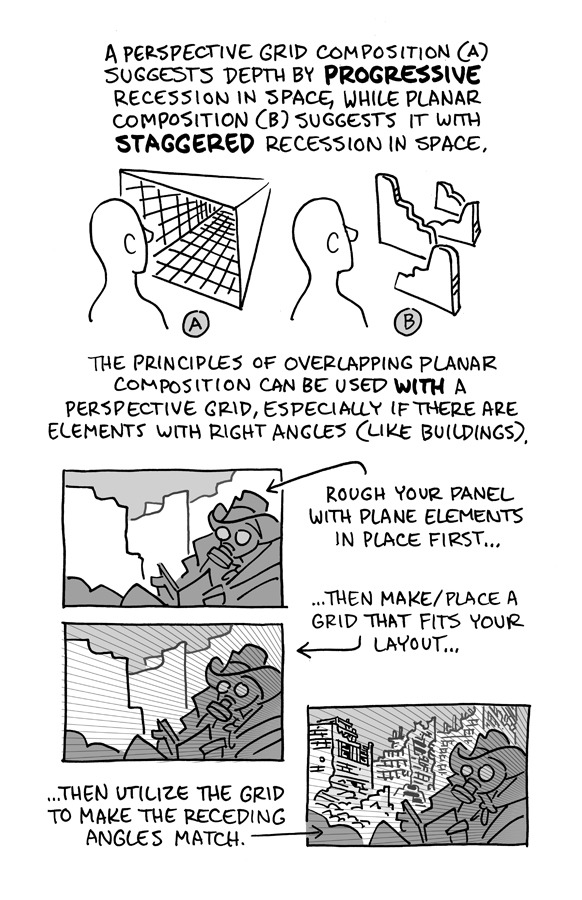
Hello, friends!
I reworked the ol' "Schweizer Guide to Spotting Tangents" lecture from my comics-teaching days, figured I'd share it here. If you want a free, printable PDF for yourself or to share (especially if you're an educator), you can find it at the bottom of this same lesson on my website.
-Chris
2K notes
·
View notes
Text


Tutorial for drawing characters with Down syndrome!
DISCLAIMER... Please keep in mind that this is an introductory drawing tutorial and has some generalizations in it, so not every “X is Z” statement will be true for Actual People. It's more of an overview of features that are common in people with Down syndrome, not meaning to imply that every person with DS has all of them 👍 thanks.
If you draw any characters using this feel free to tag me!
Consider supporting me on ko-fi if you find this to be helpful.
#my art#disabled artist#artists on tumblr#digital art#id in alt text#art#personal art#drawing#drawing tutorial#drawing tips#ccartshare
35K notes
·
View notes
Text
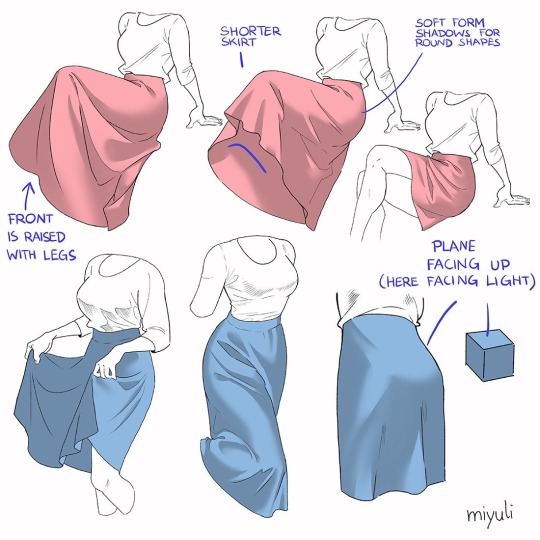
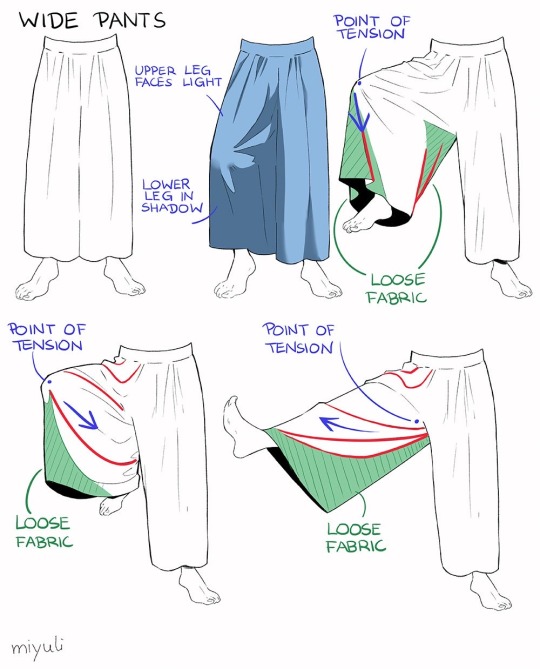
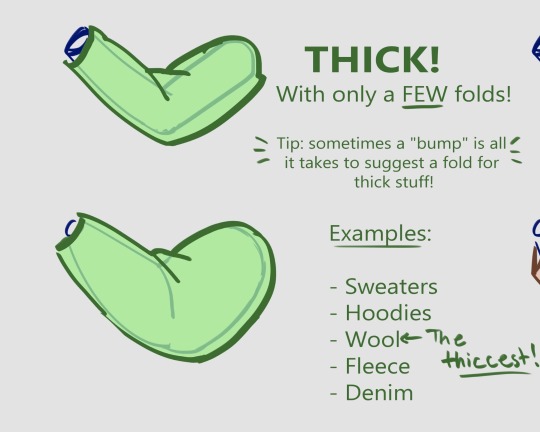
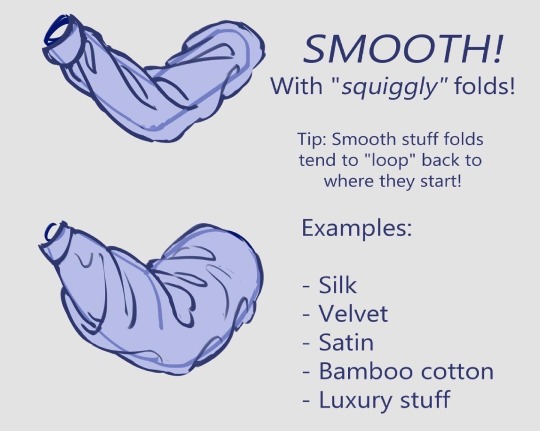
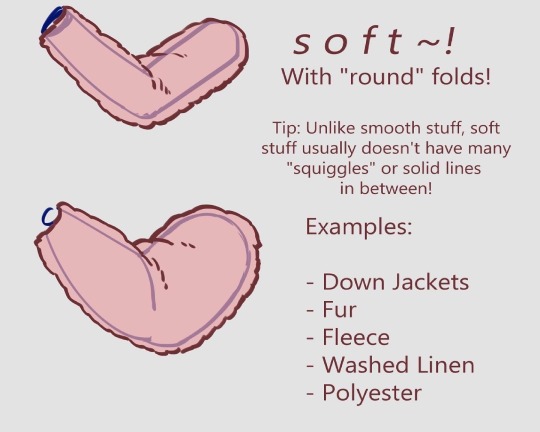
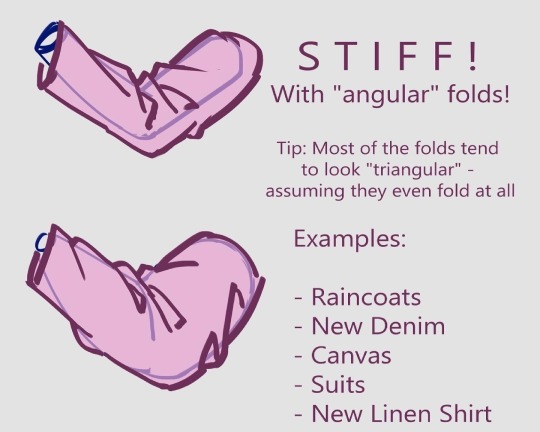
“Notes on skirts and pants”
Source: miyuli on twitter
#art tutorial#digital art#art reference#tutorial#art tips#drawing tips#drawing clothes#drawing pants#drawing skirts#drawing cloth#clothes#pants#skirts#clothing folds#clothing tutorial
62K notes
·
View notes