#drawing tutorial
Explore tagged Tumblr posts
Visit Tumblr Blog
Explore Tumblr blogs with no restrictions, modern design and the best experience.
Last Seen Tumblr Blogs


Fun Fact
Tumblr has 16.74 million mobile monthly users in the US.
Note
Question! How do you draw ur characters 👀 like tips tricks
hihi i hope i didn't misunderstand you meant this like, in generally and not specifically about each of my chara's!! sorry this is so messy LOL n please take everything i say with a grain of salt ive never learnt art professionally_(´ཀ`」 ∠)_


2K notes
·
View notes
Note
CHIPS send me your tips!
on how to draw legs, arms and hands.
please
You ask and you shall receive, my good anon. More chipstips (My advice has a name now yay) (let me know if that means something nauseating on urban dictionary)
Arms first. I separate them into 3 sections

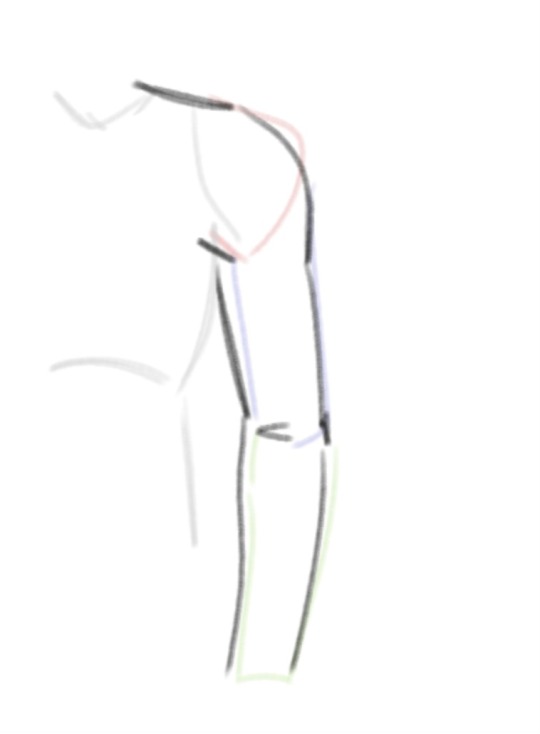
Shoulders are triangley, upper arm is a rectangle, and the forearm is more curved
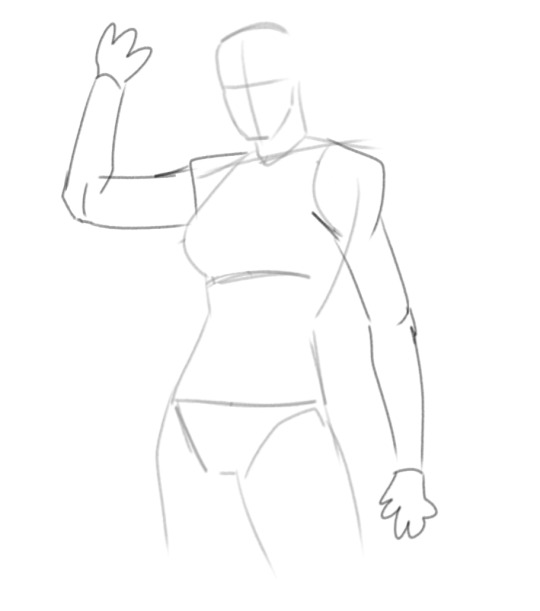
I tend to make my shoulders more blocky to start out, but I shave them down later

Map out where the belly button would be, then draw a roughly quarter/half circle from there. This is where the elbow should be
IMPORTANT NOTES:
-Most of the time, clothing will cover the arms, so they likely do not have to be perfectly detailed and anatomy-accurate. If the character is wearing a coat or a baggy top, all you have to rlly get down is the very rough shape of just where the arm is, and it will look believable
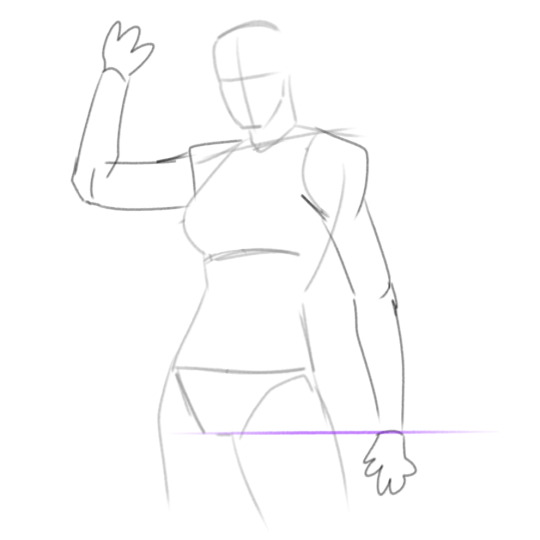
-The very tip of the forearm/beginning of the wrist should be in line with the bottom of the crotch:
-
Alrighty, on to legs.
And wow this has made me realize just how much I don't know how to draw legs.
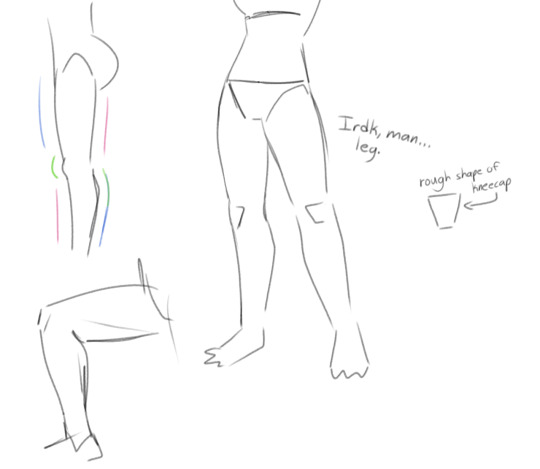
I only have a relatively consistent "way" I draw legs
In that little thing in the top-left corner, red is straighter lines, blue is more curved lines, and green is more "sharp" lines ig
I have a few leg positions memorized, but most of the time, I just wing it based off what I think looks right and go off a reference when needed
Here's some breakdowns using two full-body pieces I've done
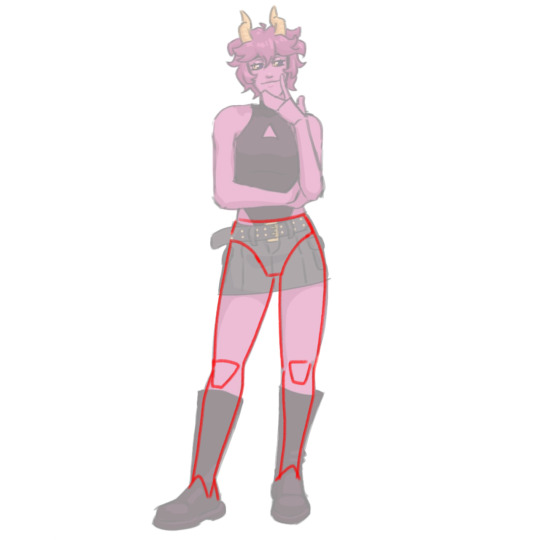
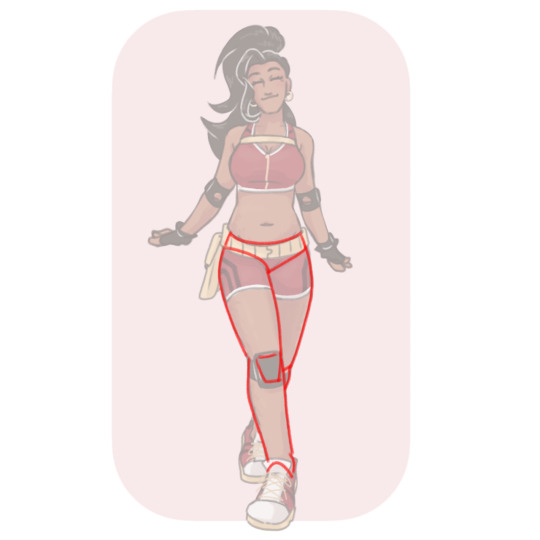
Only important things to note here is that (Length from top of head to bottom of crotch) = (Length from bottom of crotch to feet)
If that makes even a sliver of sense
This was probably shit, but I tried 😭
Hand tut coming soon 👍
#chipsdraws#art tips#art tutorial#how to draw#art#artists on tumblr#drawing tips#drawing tutorial#sketches
31 notes
·
View notes
Text
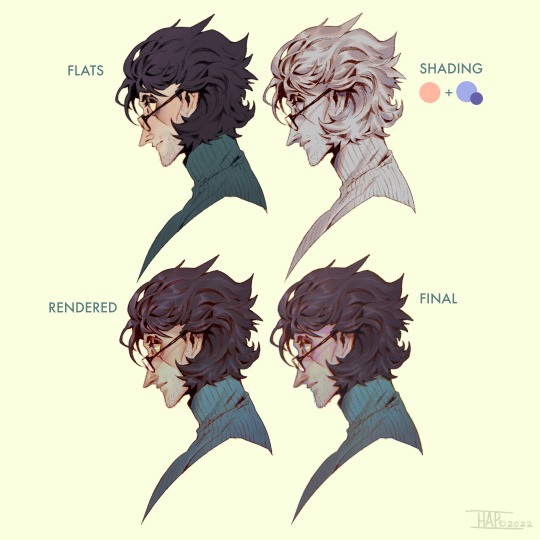
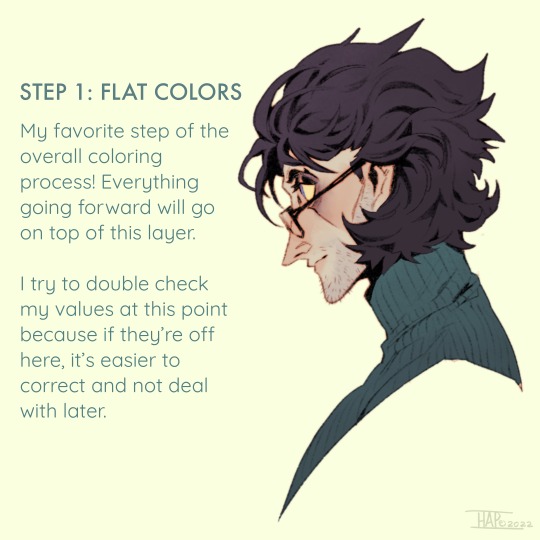
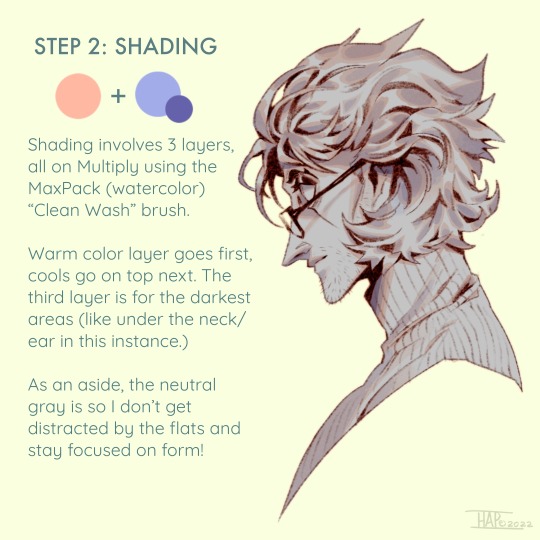
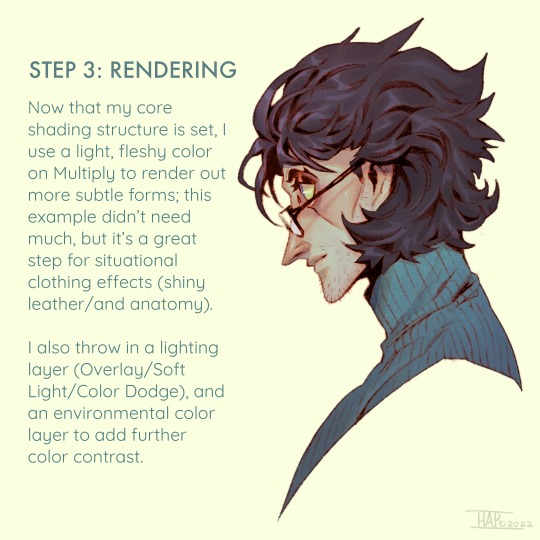
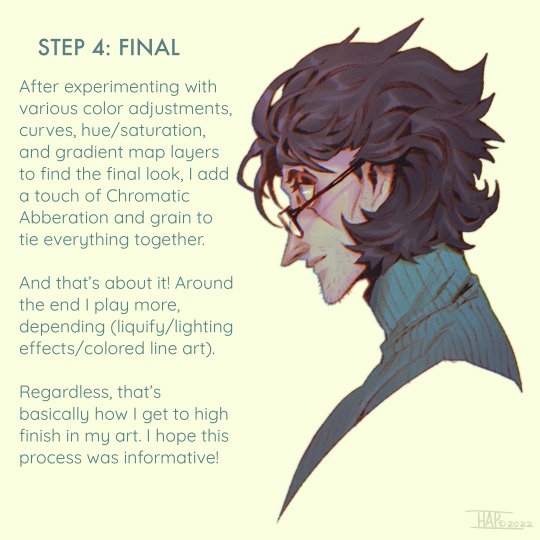
Rendering step-by-step (2022)
#kodasea#own art#2022 art#digital artwork#procreate art#art#artists on tumblr#art tutorial#step by step#shading tutorial#rendering tutorial#drawing tutorial#cold case crew#own character#cold case detective#lawrence#Still follow this basically! Although recently I've been playing with inching back the realism in the light logic/shadows a bit
4K notes
·
View notes
Text
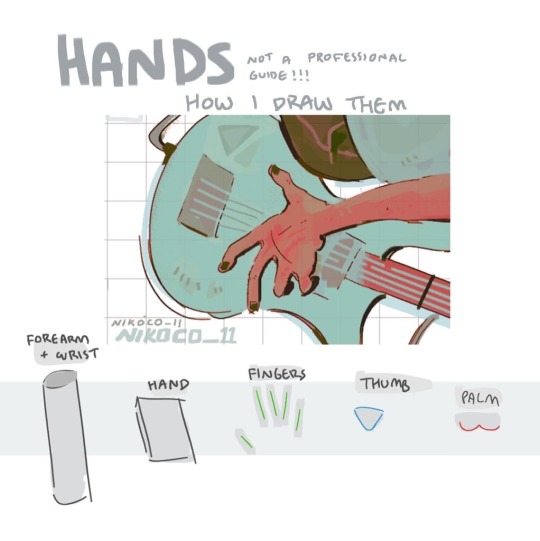


my recipe for drawing hands!
(small note that this is a shortcut that is more abt style and ease than anatomical accuracy. it helps to take time to really properly study hands, makes it easier to bend the rules a bit like this and have it still look good!!)
(learn rules b4 u break them or whatevah)
#qna#tutorial#guide#drawing tutorial#digital art#illustration#drawing#artists on tumblr#my art#clip studio paint
60K notes
·
View notes
Text
little visual for how i use pastel colors!!
2K notes
·
View notes
Text


Tutorial for drawing characters with Down syndrome!
DISCLAIMER... Please keep in mind that this is an introductory drawing tutorial and has some generalizations in it, so not every “X is Z” statement will be true for Actual People. It's more of an overview of features that are common in people with Down syndrome, not meaning to imply that every person with DS has all of them 👍 thanks.
If you draw any characters using this feel free to tag me!
Consider supporting me on ko-fi if you find this to be helpful.
#my art#disabled artist#artists on tumblr#digital art#id in alt text#art#personal art#drawing#drawing tutorial#drawing tips#ccartshare
35K notes
·
View notes
Text
This is just a personal pet peeve of mine but i feel like a lot of online art tutorials overstate the importance of stuff like guidelines to get “correct” anatomy every single time and while those are typically really good handgrips for beginners we should also tell beginners about gesture drawing. Like maybe i’m being too animatorbrained here but being able to pump out a pose in anywhere from 15 seconds to 2 minutes and quickly move onto the next drawing without lingering on every little mistake is a really really good way at getting good at drawing people proportions quickly. If you make mistakes fast you learn from them fast. So here’s a little exercise:
Sit down, grab some reference images, draw ten poses in twenty minutes (or do ten poses in ten minutes if you’re feeling adventurous or confident) and take a step back and look at your work after the fact. Be sure to move from drawing to drawing quickly once your timer is done. Pretend you’re in a model drawing class and the model has already changed pose whenever your timer hits - finish up whatever lines you were drawing, move on to looking at what the model is doing now.
You will make a lot of shitty drawings, of course, but that’s not so bad. You only spent a minute or two making each one. Focus on the drawings you do like, and look at them as a whole.
Look at all the drawings together and how they fit together on the page. Look at little details and lines you’re proud of. Take note of things you found difficult to get right in such a short time. Take note of the things you liked doing. Do the exercise again, and focus in on the things you want to improve or explore.
Maybe you want to focus on how the torso conveys its weight on the legs. Maybe you want to focus on how shoulders and arms bend around the neck. Maybe you want to focus on how to convey depth on the torso. Maybe you can learn something more about how to draw a body if you only draw using sharp lines and angles. Maybe you can learn something more if you only draw using squiggly, overlapping lines. Maybe you can learn more about how to draw a body if you only fill out the shadows with thick, quick lines. Congratulations! You’re not just learning how to draw a body, but you’re now also exploring your tastes!
This is a fine exercise to do alone, but it’s a lot more fun to do as an activity with a small group so you get to discuss the art you made together.
6K notes
·
View notes
Text
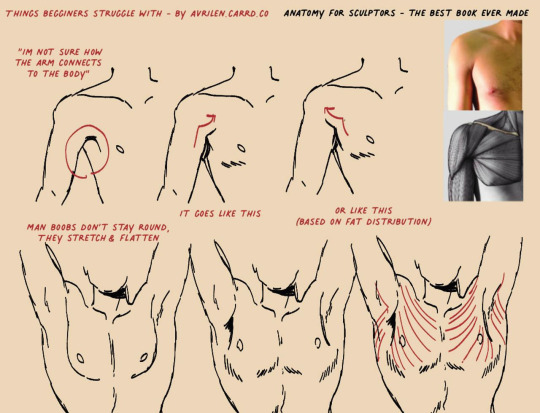
A small guide for people who struggle with this area
26K notes
·
View notes
Text
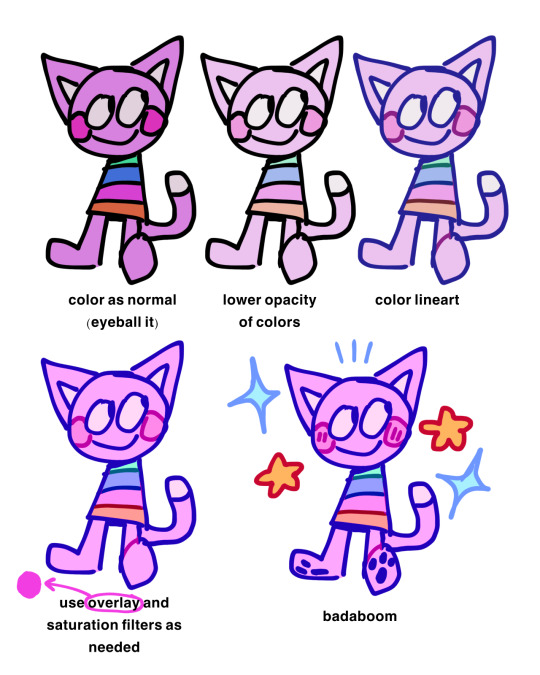
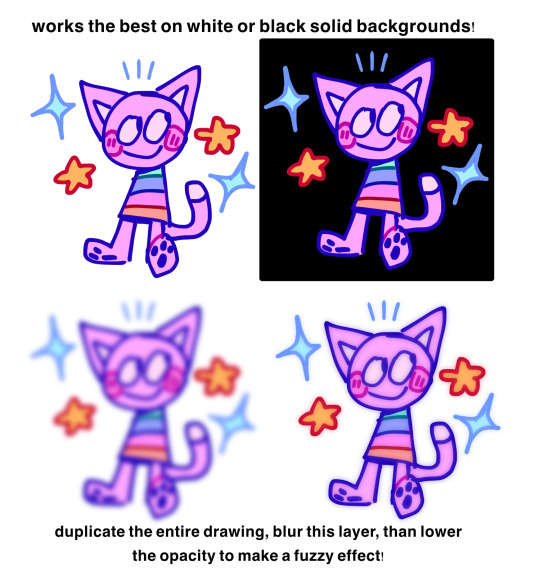
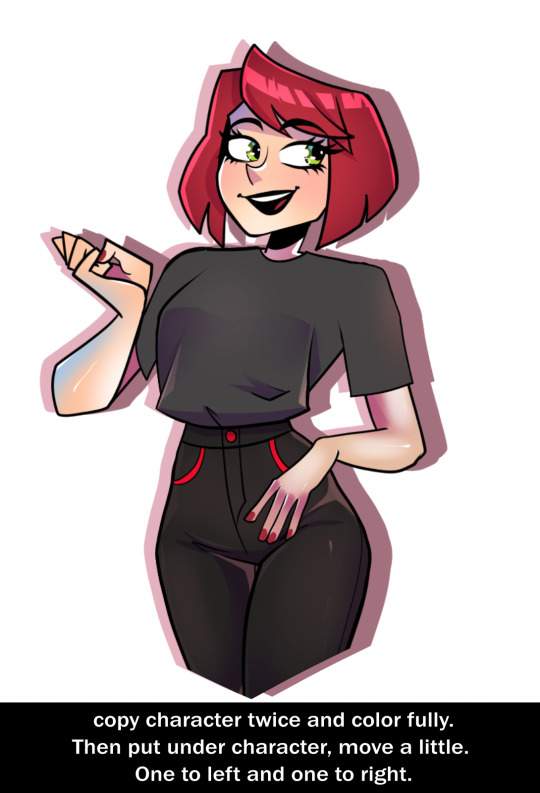
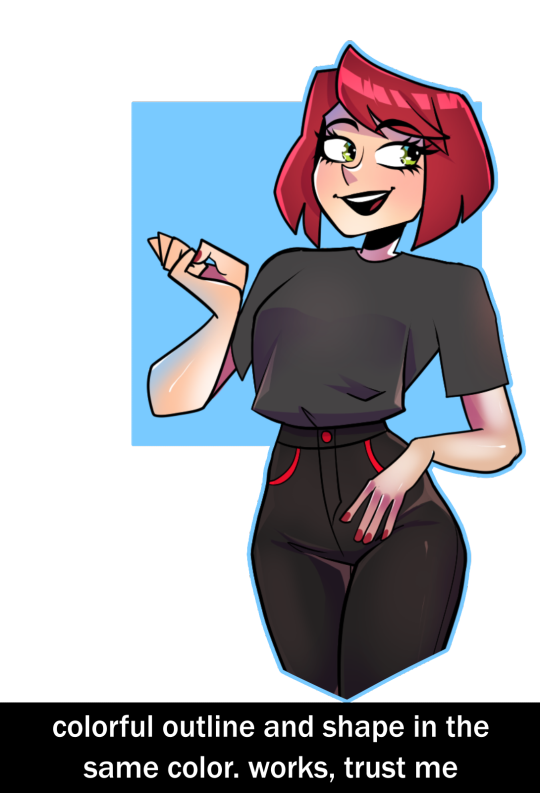
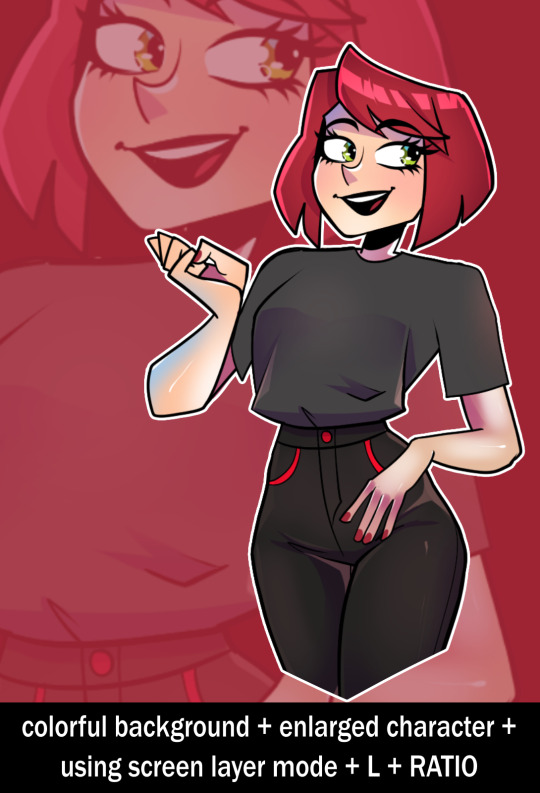
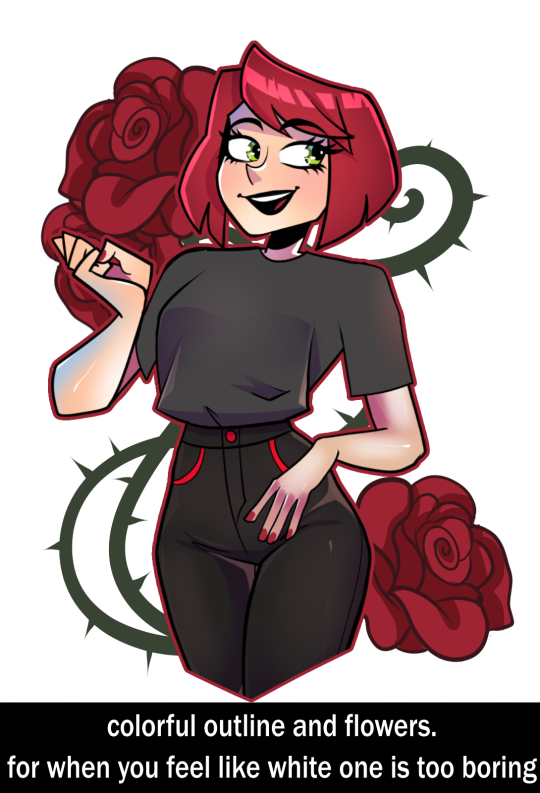
As promised, I deliver. The fastest few-second ideas to diversify a drawing when we can't draw a background and the character itself seems too lonely.
Especially since Artfight is now and not everyone has the time and desire to draw a full piece
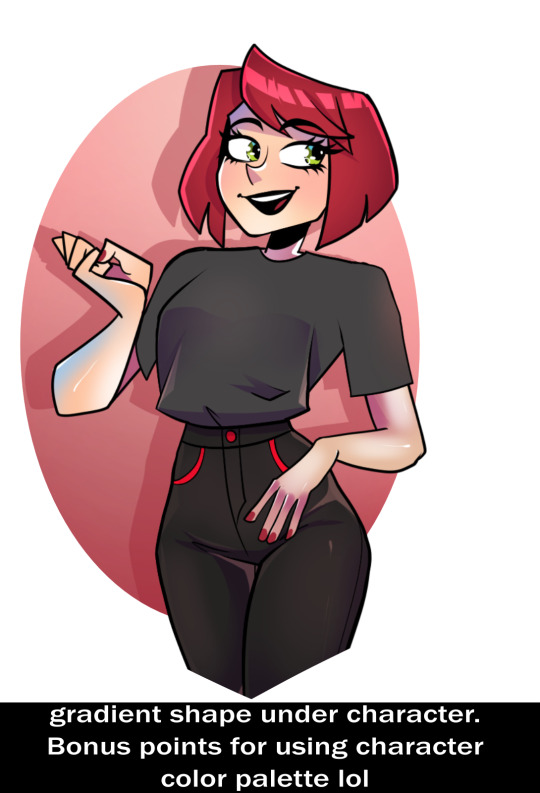
ft character i made for something weeks ago lmao
64 notes
·
View notes
Text
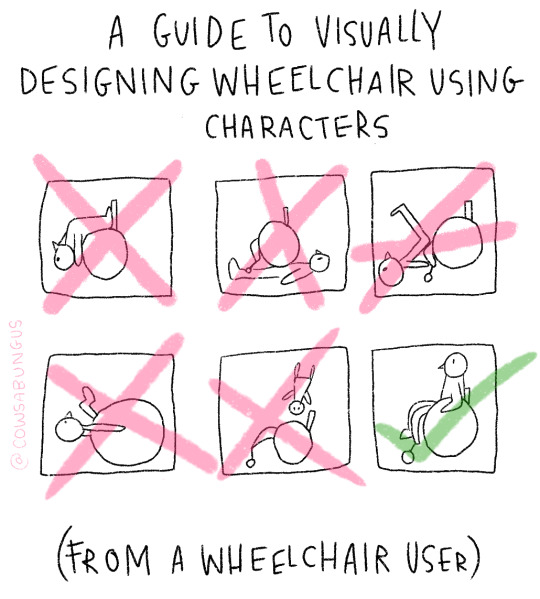
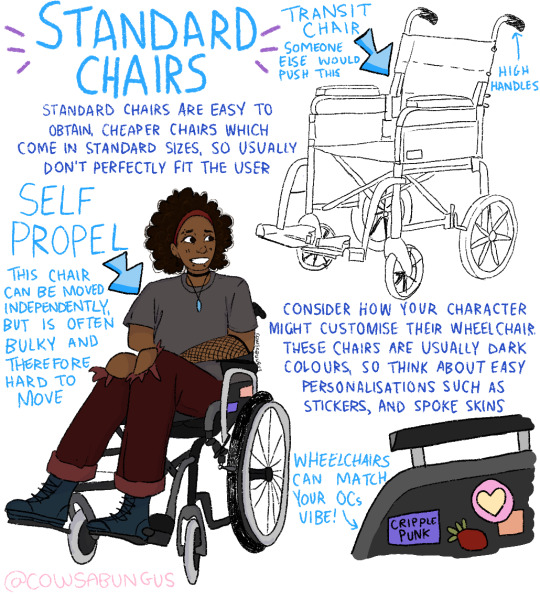
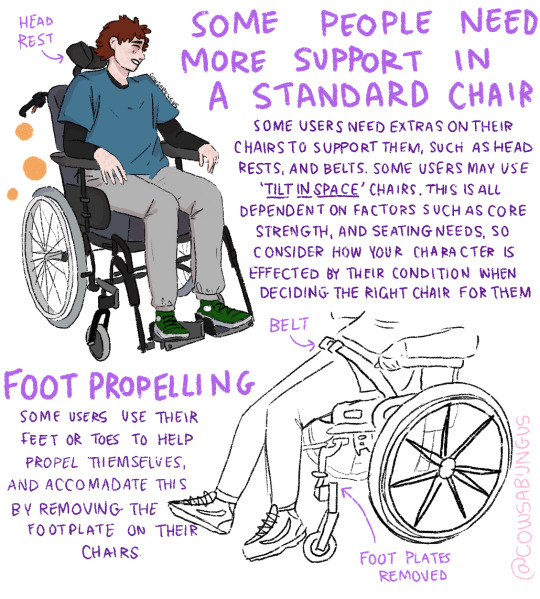

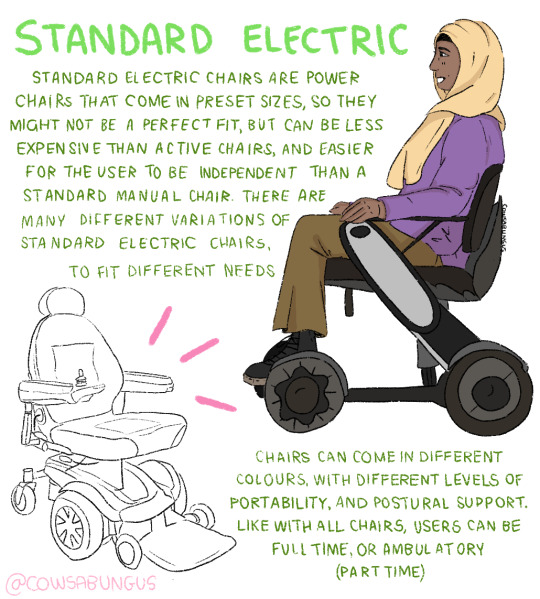

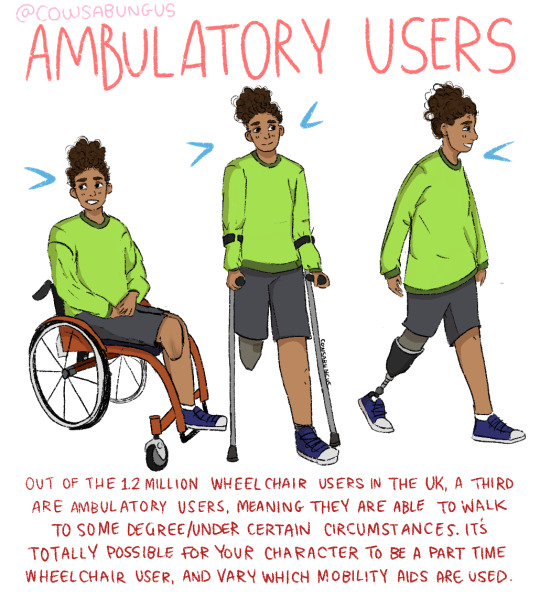
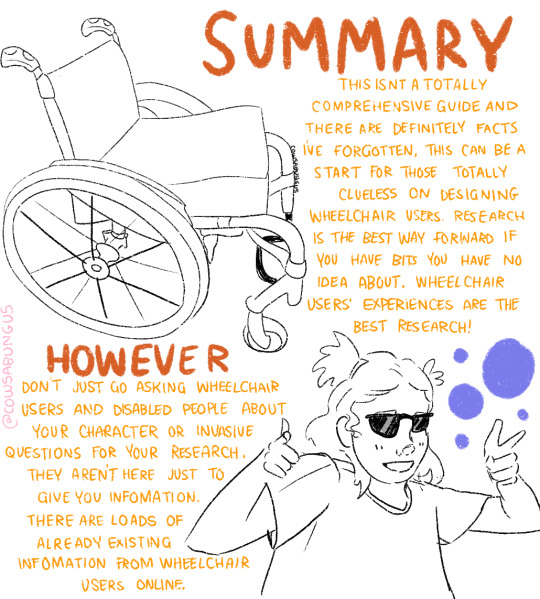
A guide to designing wheelchair using characters!
I hope this helps anyone who's trying to design their oc using a wheelchair, it's not a complete guide but I tried my best! deffo do more research if you're writing them as a character
#art#original art#artist#oc art#original character#queer#disabled#disabled rights#disability#disability pride month#tutorial#art tutorial#disabled character#design tutorial#drawing tutorial#Tumblr tutorial#character design#character illustration#concept art
115K notes
·
View notes
Text
A lot of people on twitter wanted me to explain how I draw expressions, so here you go
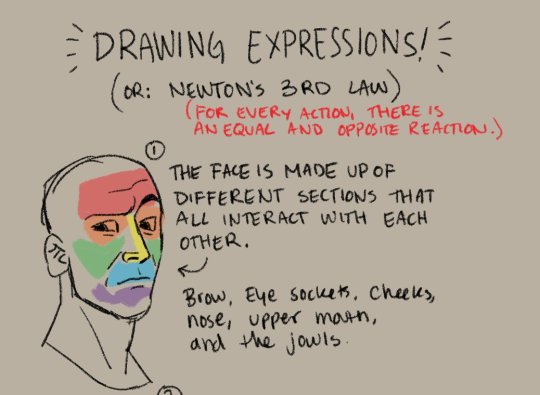
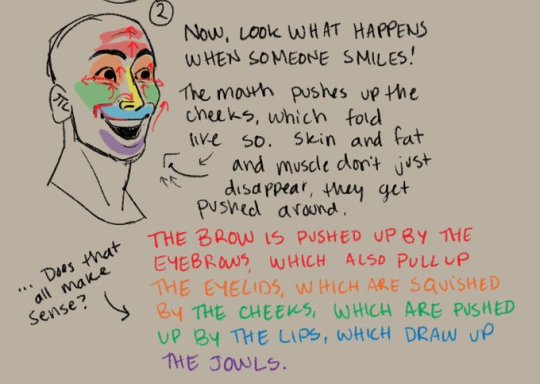

Unless you're drawing explicit realism, in my opinion, expressions should be exaggerated to some degree. If you aren't doing a 1:1 recreation, the point is to get the FEELING across. Try making the expression you want to draw and feeling how your face pinches and stretches.
Skin doesn't just "disappear" when your face moves it around --- that's where wrinkles come from! Pay attention to where your skin creases when you emote, and use it to your benefit. It's a fine line between overdoing it and underdoing it -- find your own balance.
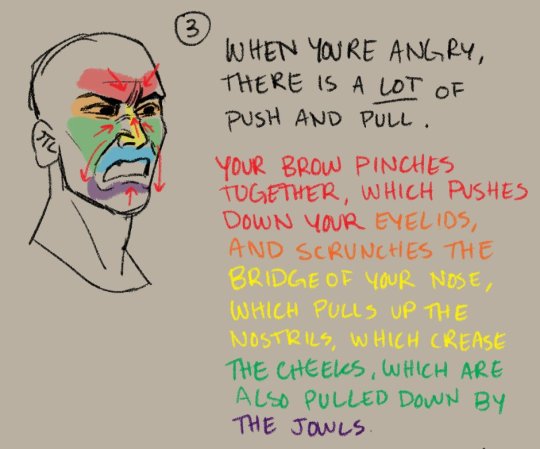
Ultimately, every expression has a little bit of push and pull, unless your face is completely neutral (and even then, there are still some wrinkles...). Learning to think of expressions as actions and reactions is VERY helpful in learning to draw them without needing a reference, and in learning how to stylize and push expressions based on references as well!
I think a lot of people end up with stiff or unexpressive emotions in their art because they're just trying to recreate a picture instead of understanding WHY and HOW the face is moving --- and it's a tough thing that takes a while to really pick up and learn. Hopefully is helpful in showing a way of thinking about it that can influence your process and approach to emotions!!!
Also, bonus: even without the lines, the planes alone still show a LOT of emotion.

4K notes
·
View notes
Text
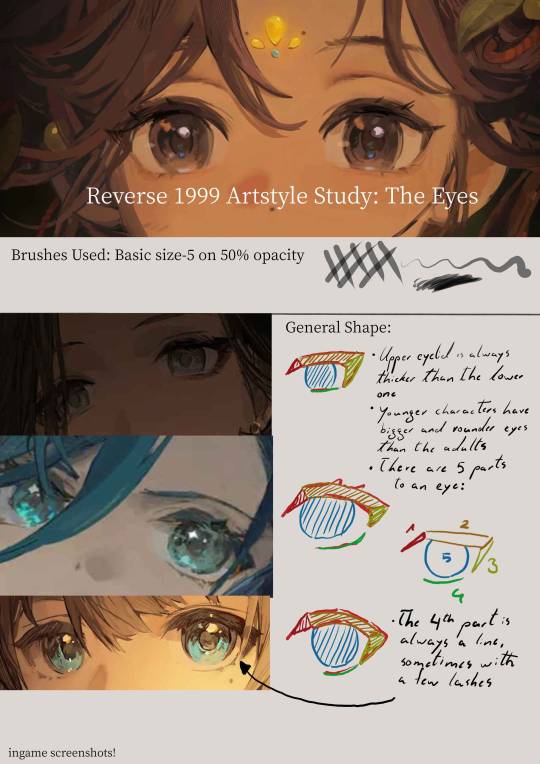
Disclaimer: I do not actually know how they paint the eyes,this is just me guessing their process purely from observations
Transcript:
General Shape:
- Upper eyelid is always thicker than the lower one
- younger characters tend to have bigger and rounder eyes than the adults
- there are five parts to an eye: 1. the upper eyelid corner(towards the nose) ; 2. the upper eyelid main part ; 3. the upper eyelid corner at the back ; 4. the lower eyelid ; 5. the iris
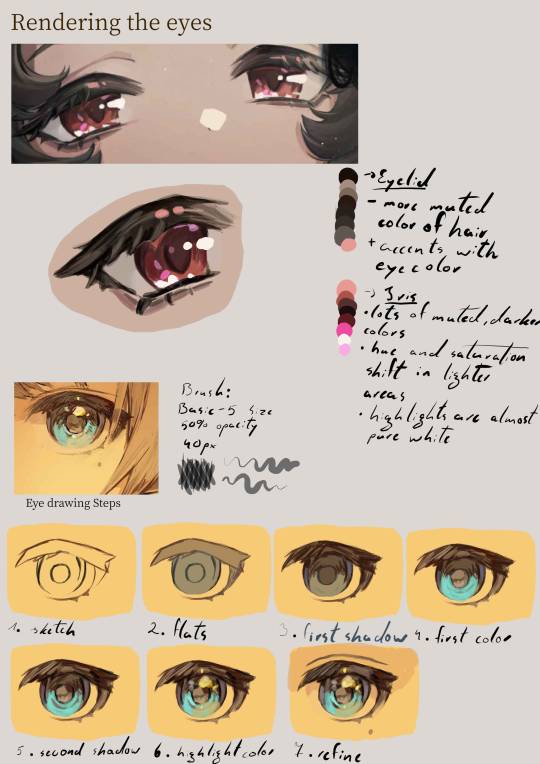
Eyelid:
- more muted color of the hair + accents with saturated eye color
Iris:
- lots of muted darker colors
- hue and saturation shift in lighter areas
- highlights are almost pure white
Eye drawing Steps:
sketch
flats
first shadow
first color
second shadow
highlight color
refine
#art style#art study#eye#eyes#anime eyes#godofart#r1999#r1999 fanart#reverse 1999#drawing guide#guide#art guide#art tutorial#drawing tutorial#fanart#art#digital art#illustration
2K notes
·
View notes
Text
legs tutorial
a female-centric tutorial for legs <3

we start with bones.
as you can see, the femur juts out, and there's a gap between it and the iliac crest-- this forms what ppl know as "hip dips". some women don't have them.
here's some legs with different fat and muscle contents for comparison

but why are they *shaped* like that? (I hear u ask). well, muscles. muscles can Bulge or Wrap. Think of it as a garter on a thigh-- the thigh bulges, the garter wraps. the thigh then bulges gloriously around it.

here are some simplified representations of the important muscle groups in the leg.
the gracilis/abductor magnus is the "inner thigh". it bulges.
the rectus femoris is a part of the massive bulges we see on muscular legs. it's the middle one
the vastus medialis and vastus lateralis are muscles on the lower inside and outside of your thigh, and are the other bulges you see on muscular legs
the sartorius originates at the hip and wraps around the rectus femoris to terminate at the medial femur (inner knee-ish). it's the garter in this example-- it causes those bulging muscles to squish in the inner thigh.
the anterior tibialis and some other muscles wrap around the shin area.
the gastrocnemius is what we know as the calf. it's the meat of your lower leg, the bulging muscle we all think of when we think "calf"


#maeellen#digital art#art#maetheellen#anatomy#anatomy tutorial#art guide#art tutorial#drawing tutorial#art tips#art help#art resources#art advice
3K notes
·
View notes
Text

Cecil tutorial that literally nobody asked for
#nobody asked for this#but here it is anyway#Cecil#cecil stedman#cecil stedman invincible#invincible cecil#cecil invincible#invincible#invincible fanart#drawing tutorial
525 notes
·
View notes
Text
lazy wing tutorial no one asked for
first you start with the general shape (you can modify it of course but this is the general structure of a wing)

add the feathers

and details

fill in with a base color and/or

render and shade as you please

#🫀.art#art tutorial#i was bored and made this#wings#angel wings#how to draw#drawing tutorial#art help#drawing help#avian#birds#digital drawing#digital art#my art#how to draw wings#angels#angel art
186 notes
·
View notes