#FingerFood
Explore tagged Tumblr posts
Visit Tumblr Blog
Explore Tumblr blogs with no restrictions, modern design and the best experience.
Last Seen Tumblr Blogs


Fun Fact
28.6 is the average number of monthly visits per US mobile user.
Text

https://pane-bistecca.com/2025/02/01/tortellini-spiesschen-mit-sauerrahm-pesto-dip/
#food#essen#italian#vegetarian#cheese#tomaten#tomatos#pasta#tortellini#mozzarella#kaese#fingerfood#snack#aperogebaeck
10 notes
·
View notes
Text
Haven’t talked about it on tumblr, but for the last month I’ve been making a visual novel demo for an in-depth media production assignment we had. Linking it so people can feel free to play it if they want😋
https://eggbuggy.itch.io/finger-food
Images and drawings related under the cut, you can guess who my friends favorite is.


#my struggle of being bribed and manipulated into drawing felix fanservice(/lh)#finger food vn#visual novel#itch.io#FingerFood#felix#Felix finger food#oc art#oc#art
23 notes
·
View notes
Text

" Paneer Popcorn . Here’s a recipe for Paneer Popcorn, a crispy and delicious snack perfect for any occasion: let's get on!
Read full recipe
https://foodrecipesoffical.com/wp-admin/post.php?post=4477&action=edit
#PaneerPopcorn#CrispySnack#IndianSnacks#Vegetarian#PaneerRecipes#QuickSnacks#Appetizers#PartyFood#EasyRecipes#FriedFood#PaneerLovers#SnackTime#SpicyFood#StreetFoodStyle#FingerFood
10 notes
·
View notes
Text
Greek Traditional Salty Koulourakia (Bâton Salé Cookies) By Mama Elsa
🥖

Greek Traditional Salty Koulourakia (Bâton Salé cookies) by Mama Elsa - Bâton Salé i Koulourakia Almyra tis Mamas Elsas
BY: Greek Cooking Made Easy
SUBSCRIBE TO MY YOUTUBE CHANNEL: https://www.youtube.com/greekcookingmadeeasy
Check My YouTube Video: HERE
Κοιτάξτε Επίσης Την Συνταγή Μου Σε YouTube Βίντεο, Το Λίνκ Είναι: ΕΔΩ
youtube
SERVES 🍴⃒ PREP. TIME 🕔⃒
About 40 cookies 40 min + 30 min. wait
COOK. TIME ♨ DIFFIC. LEVEL 👩🍳⃒
25-30 min. Relatively Easy
I grew up watching my Grandma and Mom preparing regularly sweet koulourakia and occasionally these Greek Traditional Salty Koulourakia (Bâton Salé cookies as they are otherwise known).
My grandma would shape them round-like balls (similar to small cheese pies) while my Mom made them fancier with different shapes. When they were done, I couldn't wait to gobble them up and take them to school as a precious homemade snack!
Their dough is oily, a bit crunchy on the outside and a lot flaky on the inside, thanks to the melted cheese!
Now every time I make them at home, their unique smell and taste transports me back to my past, innocent school time era.
Get ready, it's time for me to show you my Mom's beautiful salty Koulourakia.
Suitable for lacto-ovo vegetarians.
INGREDIENTS:
4 cups / 500 gr. / 1 lb 2 oz All-purpose Flour, sifted
1 ½ cups / 375 ml Olive Oil, light
2 large Eggs @ room temp.
2 tbsp. / 30 ml Greek strained Yoghurt
250 gr. / 9 oz Kefalotyri cheese, finely grated (altern: Pecorino, Regato)
1 tsp. Baking Powder
For glazing: 1 small Egg
Optional for garnishing: Sesame and Black Sesame seeds
Optional: Ground Salt and Pepper

METHOD:
A. Prepare the Koulourakia dough: 1. Place the oil in the bowl of a strong, electric mixer, break the 2 eggs and add in the bowl and start beating in high speed using the hook attachment. Beat them together for 5' or until you have a smooth liquid. 2. Next add in the dough the yoghurt and gradually the finely grated cheese. 3. Optionally, you can now season the dough with ground Pepper and just a pinch of ground Salt. 4. Adjust the speed to very low, and gradually add the flour, spoon by spoon, into the dough. Beat just enough to incorporate it in the dough. 5. Lastly, add the baking powder. Once these ingredients are in the dough, you don't want to beat much longer, in order to prevent it from hardening. Stop the mixer. 6. Check the dough: It should be fluffy, soft and buttery but should NOT stick to your fingers! If it does, add a bit more flour. 7. Cover the bowl with kitchen towel and leave dough to rest for at least 30', before shaping the koulourakia.
B. Shape the Koulourakia: 8. After 30', start shaping your koulourakia. Line 2 large oven trays with parchment paper. Divide dough in 2 halves. 9. Use a clean, flat surface and start rolling your koulourakia (you can also flour the surface if that helps). 10. With your palms first knead and then roll to make a long thin piece of dough. Fold it around like a snail and place the round cookie in the lined tray. Or make any shapes you like! 11. Continue with the rest of dough. Don’t forget to leave some space between Koulourakia in the tray. 12. The 1st tray with Koulourakia is ready. Reserve. 13. For the 2nd tray, first roll to make a long thin piece of dough, fold in half and then twist to shape it like a braid. Place the cookie in the 2nd lined tray and continue with the rest of dough to fill it.
C. Glaze the cookies: 14. When all salty koulourakia are shaped, whisk the small egg in a small bowl. 15. Brush a bit of egg on top of each cookie to help them glaze nicely, during baking. 16. Optionally, you could now use sesame and black sesame seeds as toppings. 17. The 2 trays with my homemade salty Koulourakia are ready to be baked.
D. Baking instructions: 18. Bake both trays together, in a preheated oven FAN @180℃/ 350℉ for 25'-30', or until cookies turn golden brown (depends on the oven). 19. Midway through baking, alternate the 2 trays to ensure equal baking. 20. After about 30', Koulourakia should be ready. Don’t be fooled that they are still soft to the touch; they will become firm and crunchy when they cool down. 21. Remove from the oven, and place both trays on the kitchen bench for cookies to cool down and dry completely. 22. These types of Koulourakia are crispy on the outside but soft, flaky and a bit chewy inside. And the house smells melted cheese, so appetizing!!

E. Serving suggestions:
After they cool down, place Koulourakia in a cookie box or jar to keep them crispy and fresh longer!
These little treats have a marvelous Greek cheese taste and are a very popular Greek snack. A word of warning: These are a guilty pleasure as you can't just eat one, you will keep coming back for more.

If you are planning a cocktail party, I recommend them wholeheartedly, as they go well with many drinks, cold beer especially, but also wine and many cocktails and spirits. And I shouldn't forget to mention that they are great with afternoon tea or High tea! So place them in a nice basket and serve them!!

Salty, cheesy, melt in your mouth and practically irresistible! Enjoy them with your family and friends!

F. Storage info:
Store them in a cookie jar or box to keep them fresh for several days. But honestly you won't stay away from them for that long. I know I couldn't!!
Check my YouTube Video: HERE

Bâton Salé η Κουλουράκια Αλμυρά της Μαμάς Έλσας
BY: Greek Cooking Made Easy
SUBSCRIBE TO MY YOUTUBE CHANNEL: https://www.youtube.com/greekcookingmadeeasy
ΜΕΡΙΔΕΣ🍴⃒ ΠΡΟΕΤΟΙΜΑΣΙΑ 🕔⃒
Περίπου 40 40 min + 30 min. αναμονή
ΜΑΓΕΙΡΕΜΑ ♨ ΒΑΘΜ. ΔΥΣΚΟΛΙΑΣ 👩🍳⃒
25-30 min. Σχετικά Εύκολα
Μεγάλωσα βλέποντας τη γιαγιά μου και τη μαμά μου να ετοιμάζουν συχνά γλυκά ��ουλουράκια και πότε-πότε αυτά τα παραδοσιακά αλμυρά κουλουράκια (ή Bâton Salé όπως είναι γνωστά αλλιώς).
Η γιαγιά μου τα έπλαθε σαν στρογγυλές μπάλες (παρόμοιες με μικρές τυρόπιτες) ενώ η μαμά μου τα έκανε πιο φανταχτερά με διάφορα σχήματα. Όταν ήταν έτοιμα, ανυπομονούσα να τα καταβροχθίσω και να τα πάω στο σχολείο σαν ένα πολύτιμο σπιτικό σνακ!
Η ζύμη τους είναι λαδερή, τραγανή εξωτερικά ενώ εσωτερικά θρύβονται ελαφρά, χάρη στο λιωμένο τυρί!
Τώρα κάθε φορά που τα φτιάχνω στο σπίτι, η μοναδική τους μυρωδιά και γεύση με μεταφέρει πίσω στα παλιά, αθώα σχολικά χρόνια.
Ετοιμαστείτε λοιπόν, ήρθε η ώρα να σας δείξω τα πανέμορφα αλμυρά Κουλουράκια της Μαμάς μου.
Κατάλληλα για χορτοφάγους.
ΥΛΙΚΑ:
• 4 φλ. / 500 γρ. / 1 lb 2 oz Αλεύρι για όλες τις χρήσεις, κοσκινισμένο
• 1 ½ φλ. / 375 ml Ελαιόλαδο, ελαφρύ
• 2 μεγάλα Αυγά @ θερμοκρασία δωματίου
• 2 κ.σ. / 30 ml Στραγγιστό Γιαούρτι
• 250 γρ. / 9 oz Κεφαλοτύρι, ψιλοτριμμένο (εναλλακτικά: Pecorino, Regato)
• 1 κ.γ. Μπέικιν Πάουντερ
• Για γλασάρισμα: 1 μικρό Αυγό
• Προαιρετικά για γαρνίρισμα: Σουσάμι και μαύρο σουσάμι (μαυροκούκι)
• Προαιρετικά: Φρεσκοαλεσμένο αλάτι και πιπέρι
ΜΕΘΟΔΟΣ:
Α. Ετοιμάστε τη ζύμη για τα Κουλουράκια:
1. Βάλτε το λάδι στο μπολ ενός δυνατού, ηλεκτρικού μίξερ, σπάστε τα 2 αυγά και προσθέστε τα στο μπολ και αρχίστε να τα χτυπάτε σε δυνατή ταχύτητα χρησιμοποιώντας το εξάρτημα γάντζο. Χτυπήστε τα όλα μαζί για 5' ή μέχρι να έχετε ένα λείο υγρό.
2. Στη συνέχεια προσθέστε στη ζύμη το γιαούρτι και σταδιακά το ψιλοτριμμένο τυρί.
3. Προαιρετικά, μπορείτε τώρα να καρυκεύσετε τη ζύμη με φρεσκοαλεσμένο πιπέρι και μόνο μια πρέζα αλάτι.
4. Ρυθμίστε την ταχύτητα στο πολύ χαμηλό, και προσθέστε σταδιακά το αλεύρι, κουταλιά-κουταλιά, μέσα στη ζύμη. Χτυπήστε τόσο όσο χρειάζεται ώστε να ενσωματωθεί στη ζύμη.
5. Τέλος προσθέστε το μπέικιν. Μόλις μπουν αυτά τα υλικά στη ζύμη, δεν θέλετε να χτυπήσετε πολύ ακόμα, για να μην σας σκληρύνει. Σταματήστε το μίξερ.
6. Ελέγξτε τη ζύμη: Πρέπει να είναι αφράτη, απαλή και βουτυράτη αλλά ΔΕΝ πρέπει να κολλάει στα δάχτυλά σας! Αν κολλάει, προσθέστε λίγο ακόμα αλεύρι.
7. Σκεπάστε το μπολ με πετσέτα κουζίνας και αφήστε τη ζύμη να ξεκουραστεί για τουλάχιστον 30', πριν πλάσετε τα κουλουράκια.
Β. Πλάστε τα Κουλουράκια:
8. Μετά από 30' ξεκινήστε να πλάθετε τα κουλουράκια σας. Στρώστε 2 μεγάλα ταψιά φούρνου-λαμαρίνες με λαδόκολλα. Χωρίστε τη ζύμη στα δύο.
9. Χρησιμοποιήστε μια καθαρή, επίπεδη επιφάνεια και ξεκινήστε να απλώνετε τα κουλουράκια σας (μπορείτε και να αλευρώσετε την επιφάνεια αν σας βοηθάει).
10. Με τις παλάμες σας πρώτα πλάστε και μετά ανοίξτε για να απλώσετε ένα κομμάτι ζύμης και να φτιάξετε ένα μακρύ λεπτό μπαστούνι. Διπλώστε το γύρω γύρω σαν σαλιγκάρι και τοποθετήστε το στρογγυλό κουλουράκι στο στρωμένο ταψί. Ή φτιάξτε όποια σχήματα σας αρέσουν!
11. Συνεχίστε με την υπόλοιπη ζύμη. Μην ξεχάσετε να αφήσετε λίγο κενό ανάμεσα στα Κουλουράκια στο ταψί.
12. Έτοιμο το 1ο ταψί με Κουλουράκια. Βάλτε στην άκρη.
13. Για το 2ο ταψί, απλώστε πρώτα να γίνει ένα μακρύ λεπτό κομμάτι ζύμης, διπλώστε το στη μέση και μετά στρίψτε για να το πλάσετε σαν πλεξούδα. Τοποθετήστε το κουλουράκι στο 2ο ταψί και συνεχίστε με την υπόλοιπη ζύμη για να το γεμίσετε.
Γ. Γλασάρετε τα κουλουράκια:
14. Όταν όλα τα αλμυρά κουλουράκια είναι έτοιμα, χτυπήστε το μικρό αυγό σε ένα μπολάκι.
15. Αλείψτε με ένα πινέλο λίγο αυγό πάνω από κάθε κουλουράκι για να γλασάρουν όμορφα κατά το ψήσιμο.
16. Προαιρετικά, μπορείτε τώρα να χρησιμοποιήσετε σουσάμι και μαύρο σουσάμι σαν επικάλυψη.
17. Τα 2 ταψιά με τα σπιτικά μου αλμυρά Κουλουράκια είναι έτοιμα για ψήσιμο.
Δ. Οδηγίες ψησίματος:
18. Ψήστε και τα δύο ταψιά μαζί, σε προθερμασμένο φούρνο στον αέρα @180℃/ 350℉ για 25'-30', ή μέχρι να ροδίσουν τα κουλουράκια (εξαρτάται από τον φούρνο).
19. Στα μέσα του ψησίματος, εναλλάξτε τα 2 ταψιά για να εξασφαλίσετε ίσο ψήσιμο.
20. Μετά από περίπου 30' τα Κουλουράκια πρέπει να είναι έτοιμα. Μην ξεγελαστείτε επειδή είναι ακόμα κάπως μαλακά στην αφή. Θα σφίξουν και θα γίνουν τραγανά μό��ις κρυώσουν.
21. Βγάλτε τα από το φούρνο και βάλτε και τα δύο ταψιά στον πάγκο της κουζίνας ώστε τα κουλουράκια να κρυώσουν και να στεγνώσουν εντελώς.
22. Αυτό το είδος Κουλουράκια είναι τραγανά εξωτερικά αλλά αφράτα, ελαφρώς θρυμματιστά και μαστιχωτά στο εσωτερικό. Και το σπίτι μυρίζει λιωμένο τυρί, τόσο λαχταριστά!!
Ε. Προτάσεις σερβιρίσματος:
Μόλις κρυώσουν καλά, τοποθετήστε τα Κουλουράκια σε κουτί ή βάζο για μπισκότα για να διατηρηθούν τραγανά και φρέσκα περισσότερο καιρό!
Αυτές οι μικρές λιχουδιές έχουν υπέροχη γεύση τυριού και είναι ένα πολύ δημοφιλές σνακ. Προειδοποίηση: Είναι μια ένοχη απόλαυση, μιας και δεν μπορείτε να φάτε μόνο ένα, θα συνεχίσετε να ξαναγυρίζετε για να φάτε κι άλλα.
Αν σχεδιάζετε ένα cocktail party, τα προτείνω ανεπιφύλακτα, καθώς ταιριάζουν με πολλά ποτά, κυρίως κρύα μπύρα, αλλά και κρασί, πολλά κοκτέιλ και αλκοολούχα ποτά. Και δεν πρέπει να ξεχάσω να αναφέρω ότι είναι υπέροχα με απογευματινό τσάι ή High Tea! Τοποθετήστε τα λοιπόν σε ένα ωραίο καλάθι και σερβίρετέ τα!!
Αλμυρά, τυρένια, που λιώνουν στο στόμα και πρακτικά ακαταμάχητα! Απολαύστε τα με την οικογένεια και τους φίλους σας!
Ζ. Πληροφορίες φύλαξης:
Αποθηκεύστε τα σε ένα βάζο ή κουτί για μπισκότα για να διατηρηθούν φρέσκα για αρκετές ημέρες. Αλλά ειλικρινά δεν θα μείνετε μακριά τους για τόσο πολύ. Ξέρω ότι εγώ σίγουρα δεν θα μπορούσα!!
Κοιτάξτε επίσης την συνταγή μου σε YouTube βίντεο, το λίνκ είναι: ΕΔΩ
#Youtube#meze#lunch#snacks#fingerfood#drinks#pie#pastry#yoghurt#cheese#party#kids#carnival#vegetarian#children#school#tyropita#Bâton Salé ή Κουλουράκια Αλμυρά της Μαμάς Έλσας#Bâton Salé#Greek Traditional Salty Koulourakia (Bâton Salé cookies) by Mama Elsa#Salty Koulourakia (Bâton Salé cookies)#Salty Koulourakia#Κουλουράκια Αλμυρά
1 note
·
View note
Text
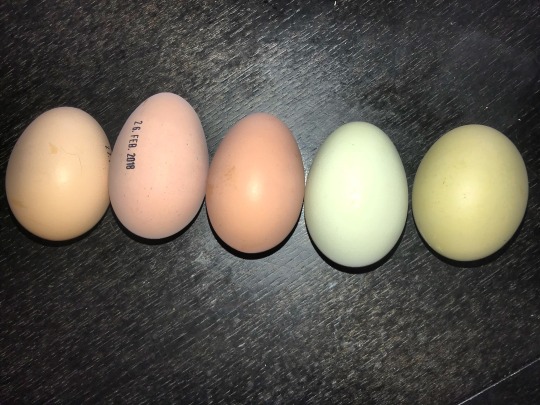
🍳🌿 Einfaches Rezept für süßsauer eingelegte Paradieseier! 🥚🥗
Instagram, Tumblr und Facebook:
#leckerschmeckerei @leckerschmeckerei
Zutaten:
- 6-8 hart gekochte Eier
- 250 ml Essig (Apfelessig oder Weißweinessig)
- 250 ml Wasser
- 150 g Zucker
- 1 Zimtstange
- 4 Nelken
- 1 TL Senfkörner
- 1 TL Pfefferkörner
- 1 TL Salz
Zubereitung:
1️⃣ Eier hart kochen, erkalten lassen, schälen und beiseite stellen.
2️⃣ In einem Topf Essig, Wasser, Zucker, Zimtstange, Nelken, Senfkörner, Pfefferkörner und Salz zum Kochen bringen. Gelegentlich umrühren, bis der Zucker komplett aufgelöst ist.
3️⃣ Hitze reduzieren und die Mischung etwa 10 Minuten köcheln lassen, um die Aromen zu entwickeln.
4️⃣ Eier vorsichtig in den Topf geben und sicherstellen, dass sie komplett mit der Essigmischung bedeckt sind.
5️⃣ Topf abdecken und die Eier mindestens 24 Stunden, am besten jedoch 2-3 Tage, im Kühlschrank marinieren lassen.
6️⃣ Die süßsauer eingelegten Eier als Beilage zu verschiedenen Gerichten servieren. Perfekt für Salate, Sandwiches oder als herzhafter Snack. 🥗🥪
Hinweis:
Die eingelegten Eier im Kühlschrank aufbewahren und innerhalb von 1-2 Wochen genießen. Funktioniert auch mit dem Sud, wenn ihr die groben Sachen heraus filtert in einem Schraubdeckel-Glas, um sie darin im Kühlschrank aufzubewahren. Ihr könnt allerdings die Paradieseier auch einkochen mit dem Sud, so wie bei Marmelade im Schraubglas einkochen verfahren. So habt Ihr die Paradieseier etwas länger für späteren Verzehr dann haltbar gemacht, um sie dann erst innerhalb einer Woche, gekühlt im Sudglas aufbewahrt, zu genießen.
Kennt Ihr diese Paradieseier auch mit anderem Namen? Und NEIN, es sind keine Sol- oder Senf-Eier, die werden anders mariniert, können aber auch haltbar gemacht werden im Sud durch Einkochen.
Guten Hunger!
©️®️CWG, 25.07.2023🌳🐩🐓🐩🌳
#Rezept #Eierliebe #Kochen #Lecker #SüßsauerEingelegt #Paradieseier #Selbstgemacht #EssenGenießen #Foodie #Kulinarisch #FoodBlogger #nordhessenkocht #nordhessenessenundtrinken #leckerschmeckerei #schmeckewöhlerchen #fingerfood #snackeier #süsssaureeier #eiersüsssauer #kalteküche #eingelegtes #eingemachtes #marinierteeier
#florianatopfblume#cwg64d#leckerschmeckerei#claudiaweidtgoldmann#essenundtrinken#nordhessenessenundtrinken#nordhessenkocht#oculiauris#tagesgericht#kalteküche#fingerfood#eingelegteeier#paradieseier#cwghighsensitive#tagesmenue#schmeckewöhlerchen#süssauereingelegt#süssaureeier#eiersüsssauer#süsssauereingelegteeier#eiersüsssauereingelegt#haltbarmachen#einlegen#deutschlandbleibtzuhausekreativ
7 notes
·
View notes
Text

15 notes
·
View notes
Text
Saftiger BBQ Pulled Chicken Burger: Grillparty Highlight
Lust auf einen saftigen Burger mit rauchigem Aroma? 🔥 Unser BBQ Pulled Chicken Burger vom Grill ist ein Muss für jeden Grillfan! Perfekt für Party oder Sommerabend. Jetzt ausprobieren! 🍔✨ #BBQ #PulledChicken #Grillliebe #Burger #Rezeptidee
Entdecke mit diesem saftigen BBQ Pulled Chicken Burger vom Grill das perfekte Highlight für deine nächste Grillparty. Durch das schonende Garen wird das Hähnchenfleisch besonders zart und lässt sich mühelos zupfen. Zusammen mit einer rauchigen BBQ-Sauce und frischen Toppings entsteht ein Burger, der sich ideal für warme Tage und gesellige Abende eignet. Überrasche deine Gäste mit diesem…
#BBQ#Burger#einfach#Fingerfood#Grillrezept#Hähnchen#Partyfood#Pulled Chicken#Rezeptidee#saftiger Burger#Schnell
0 notes
Text
🍣 Sushi-Torte 🥑
🎂🍣 Die ultimative Sushi-Torte – ein echter Hingucker für deine nächste Party! 🍣🎂 Du liebst Sushi und möchtest deine Gäste beeindrucken? Mit dieser selbstgemachten Sushi-Torte kombinierst du Geschmack und Optik perfekt! 🥑🐟 ✨ Was sie so besonders macht: • Schichten aus Sushi-Reis, Lachs, Gurke und Avocado • Kreative Dekoration mit schwarzem Sesam und Avocado • Perfekt für Partys, Geburtstage oder einfach so 💡 Tipp: Die Torte kannst du auch ganz einfach vegetarisch machen – ersetze den Lachs durch Tofu oder buntes Gemüse! 🌱 Probier es aus und teile dein Ergebnis mit uns! 📸 #SushiLovers #SushiTorte #DIYRezept #FoodInspiration #HealthyFood #PartyHighlight #AvocadoLove 🥢 Lust auf das Rezept? Schreib „SUSHI“ in die Kommentare, und wir schicken es dir! 🥢
Rezept: Sushi-Torte Zutaten (für eine Torte) • 🍚 500 g Sushi-Reis • 🍶 6 EL Reisessig • 🍬 1 EL Zucker • 🧂 1 TL Salz • 🐟 200 g frischer Lachs (Sashimi-Qualität) • 🥑 2 reife Avocados • 🥒 1 Gurke • 🧀 100 g Frischkäse (optional) • 🌟 Schwarzer Sesam zur Dekoration • 🟩 Nori-Blätter (optional) Zubereitung 1. 🍚 Reis kochen • Den Sushi-Reis nach Packungsanleitung kochen. • Den heißen Reis…
#Anlässe#Asiatische Küche#Avocado#DIY-Rezept#Essens-Dekoration#Feiern#Fingerfood#Foodtrend#Frische Zutaten#Frischkäse#Gekühlte Speisen#Gesund#Hingucker#Lachs#Lecker.#Leicht zu servieren#Nori-Blätter#Partyfood#Sojasoße#Sushi#Sushi-Reis#Sushi-Torte#Vegetarisch#Wasabi
0 notes
Text

https://pane-bistecca.com/2024/10/14/gefuellte-blaetterteig-rolle/
#food#vegetables#meat#essen#gemuese#fleisch#cheese#kaese#aperogebaeck#appetizer#blaetterteig#puffpastry#fingerfood#senf#mustard#kraeuter#herbs
13 notes
·
View notes
Note
Does Sam know he's a game character?? Like when chosen the option to flirt or invite to lunch he kinda have his own thought but still acts on it?
In my head I kinda saw it like Sam getting a really strong urge/need to do the choices, even if it goes against what he wants to do.
I don’t think he knows he’s in a game exactly, but he may think somethings up after a while. 😭

11 notes
·
View notes
Text

Air Fryer Asian Sticky Wings Recipe
1 note
·
View note
Text
Tirosalata Creamy, Greek Feta Salad/Dip
🍚

Tirosalata Creamy, Greek Feta Salad/Dip - Tyrosalata Dip/Aloifi (aleimma)
BY: Greek Cooking Made Easy
SUBSCRIBE TO MY YOUTUBE CHANNEL: https://www.youtube.com/greekcookingmadeeasy
Check My Short YouTube Video: HERE
Κοιτάξτε Επίσης Την Συνταγή Μου Σε Short YouTube Βίντεο, Το Λίνκ Είναι: ΕΔΩ
youtube
SERVES 🍴⃒ PREP. TIME 🕔⃒
4 pers. 10 min.
COOK. TIME ♨ DIFFIC. LEVEL 👩🍳⃒
- Super Easy
Tirosalata or Tyrosalata is a creamy, appetizing, Greek cheese Salad/dip. Its preparation may vary regionally, but ingredients most commonly include Greek Feta and Myzithra cheese, hot pepper, olive oil & Greek Yoghurt.
Its taste lies somewhere between Spicy Feta Dip (Tirokafteri) and Whipped Feta Sauce/Dip, having a less spicy flavor than the 1st while savoring the smoothness and tanginess of the 2nd.
A beautiful salty and mildly spicy spread that is popular at a party or any occasion, usually eaten as part of a mezze platter.
Suitable for lacto-vegetarians.
INGREDIENTS:
· 150 gr. / 5.5 oz Feta Cheese, cubed, at room temp.
· 150 gr. / 5.5 oz Myzithra Cheese, at room temp. (altern: Ricotta)
· 3 tbsp. / 50 gr. /1.75 oz Greek Strained Yoghurt 2% fat
· 3 tbsp. / 45 ml Extra Virgin Olive Oil
· 1 Hot Chili Pepper, pickled
· 1 tsp. / 5 ml Red Vinegar
· A pinch white Pepper powder
· Optional: 1/2 tsp. Garlic powder
· Optional: 2-3 Sundried Tomatoes

METHOD:
A. Prepare the Tirosalata:
1. First cut to remove the seeds and stem from the hot chili, pickled pepper. Cut it into smaller pieces.
2. In the food processor, pour the Olive oil and vinegar followed by the Greek yoghurt, white pepper powder and hot pepper slices.
3. Tip: Liquids should always be poured first at the bottom of the food processor to facilitate the blending process.

4. Blend ingredients for a couple minutes with the food processor until they become a thick mash with smooth texture.
5. Add the feta cheese cubes and myzithra cheese in the food processor next (and optionally garlic powder and sundried tomatoes, if using).
6. Blend all ingredients for a couple minutes until they turn into a thick dip with creamy consistency.

7. When ready, taste the dip. If needed, add a pinch of salt (depends on how salty feta cheese is).
8. Finish by emptying Tirosalata into a nice, round bowl.
9. Place it covered with plastic wrap in the fridge for at least 1-2 h to set and cool.
B. Serving suggestion:
Serve Tirosalata with plenty of warm pita bread to dip in.

It is usually eaten as part of a mezze platter, or by itself. You could spread it into sandwiches or on canapés or in the middle of a platter with vegetables to dip in. Perfect for a party for children and adults alike.
A super easy, very appetizing dip that you will notice, you simply can't get enough of.

Find any excuse to have a party so you can prepare it and enjoy it!

C. Storage info:
Tirosalata can be stored in a glass, sealed container in the fridge for up to 1 week.
Check my Short YouTube Video: HERE

Τυροσαλάτα Ντίπ/Αλοιφή (άλειμμα)
BY: Greek Cooking Made Easy
SUBSCRIBE TO MY YOUTUBE CHANNEL: https://www.youtube.com/greekcookingmadeeasy
ΜΕΡΙΔΕΣ🍴⃒ ΠΡΟΕΤΟΙΜΑΣΙΑ 🕔⃒
4 10 min.
ΜΑΓΕΙΡΕΜΑ ♨ ΒΑΘΜ. ΔΥΣΚΟΛΙΑΣ 👩🍳⃒
- Πανεύκολη
Η Τυροσαλάτα είναι μια κρεμώδης, ορεκτική σαλάτα τυριού/αλοιφή. Η παρασκευή της μπορεί να διαφέρει ανάλογα με την περιοχή, αλλά τα συστατικά συνήθως περιλαμβάνουν φέτα και μυζήθρα, καυτερή πιπεριά, ελαιόλαδο και στραγγιστό γιαούρτι.
Η γεύση της βρίσκεται κάπου ανάμεσα στην πικάντικη Τυροκαυτερή και τη σάλτσα/κρέμα φέτας, με λιγότερο πικάντικη γεύση από την 1η, ενώ έχει την κρεμώδη υφή και τη ελαφρώς αψιά γεύση της 2ης.
Ένα όμορφο, αλμυρό και ελαφρώς πικάντικο άλειμμα (αλοιφή) που είναι πολύ δημοφιλές για πάρτι ή και σε οποιαδήποτε περίσταση, και συνήθως τρώγεται ως μέρος μιας πιατέλας με μεζέδες.
Κατάλληλο για χορτοφάγους.
ΥΛΙΚΑ:
• 150 γρ. / 5,5 oz Τυρί Φέτα, σε κύβους, σε θερμοκρασία δωματίου.
• 150 γρ. / 5,5 oz Τυρί Μυζήθρα, σε θερμοκρασία δωματίου (εναλλακτικά: Ricotta)
• 3 κ.σ. / 50 γρ. /1,75 oz Στραγγιστό Γιαούρτι 2% λιπαρά
• 3 κ.σ. / 45 ml Εξαιρετικό Παρθένο Ελαιόλαδο
• 1 καυτερή πράσινη Πιπερίτσα, τουρσί
• 1 κ.γ. / 5 ml κόκκινο Ξύδι
• Μια πρέζα λευκό Πιπέρι σε σκόνη
• Προαιρετικά: 1/2 κ.γ. Σκόνη Σκόρδου
• Προαιρετικά: 2-3 λιαστές Ντομάτες
ΜΕΘΟΔΟΣ:
Α. Ετοιμάστε την Τυροσαλάτα:
1. Κόψτε πρώτα για να αφαιρέσετε τους σπόρους και το κοτσάνι από τη καυτερή πράσινη πιπερίτσα τουρσί. Κόψτε τη σε μικρότερα κομμάτια.
2. Στον πολυκόφτη (μούλτι) ρίξτε το ελαιόλαδο και το ξύδι και μετά το γιαούρτι, το λευκό πιπέρι σκόνη και τις φετούλες καυτερής πιπεριάς.
3. Συμβουλή: Τα υγρά πρέπει πάντα να ρίχνονται πρώτα στο κάτω μέρος του πολυκόφτη για να διευκολύνεται η διαδικασία ανάμειξης.
4. Χτυπήστε τα υλικά για λίγα λεπτά στο πολυκόφτη μέχρι να γίνουν ένας πηχτός πουρές με λεία υφή.
5. Προσθέστε στη συνέχεια τα κυβάκια φέτα και τη μυζήθρα στο πολυκόφτη (και προαιρετικά σκόρδο σκόνη και λιαστές ντομάτες, αν χρησιμοποιείτε).
6. Χτυπήστε όλα τα υλικά για λίγα λεπτά να ανακατευτούν και μέχρι να γίνουν ένα παχύρρευστο ντιπ με κρεμώδη υφή.
7. Όταν είναι έτοιμη, δοκιμάστε την αλοιφή. Εάν χρειάζεται, προσθέστε μια πρέζα αλάτι (εξαρτάται από το πόσο αλμυρή είναι η φέτα).
8. Τελειώστε αδειάζοντας τη Τυροσαλάτα σε ένα ωραίο, στρογγυλό μπολ.
9. Βάλτε τη σκεπασμένη με πλαστική μεμβράνη στο ψυγείο για τουλάχιστον 1-2 ώρες να δέσει και να κρυώσει.
B. Πρόταση σερβιρίσματος:
Σερβίρετε τη Τυροσαλάτα με άφθονες ζεστές πιτούλες για πολλές βουτηχτές.
Συνήθως τρώγεται σα μέρος μιας πιατέλας με μεζέδες, ή μόνη της. Μπορείτε να την απλώσετε μέσα σε σάντουιτς ή σε καναπεδάκια ή στη μέση μιας πιατέλας με λαχανικά για βουτιές. Ιδανική σε πάρτι για παιδιά και ενήλικες.
Ένα σούπερ εύκολο, πεντανόστιμο ντιπ που θα δείτε, απλά δεν έχετε ποτέ αρκετό!
Βρείτε οποιαδήποτε δικαιολογία για να κάνετε πάρτι ώστε να το ετοιμάσετε και να το απολαύσετε!
Γ. Πληροφορίες φύλαξης:
Η Τυροσαλάτα μπορεί να φυλαχθεί σε γυάλινο, σφραγισμένο δοχείο στο ψυγείο για έως και 1 εβδομάδα.
Κοιτάξτε επίσης την συνταγή μου σε Short YouTube βίντεο, το λίνκ είναι: ΕΔΩ
#Youtube#meze#lunch#sandwich#snacks#fingerfood#salad#dips#yoghurt#cheese#lowcost#party#mother#carnival#tsiknopempti#vegetarian#gluten#keto#Τυροσαλάτα Ντίπ/Αλοιφή (άλειμμα)#Greek Feta Salad/Dip#tirosalata creamy cheese dip#tirosalata#τυροσαλατα
0 notes
Link
#Appetizer#buffalocauliflower#cauliflowerwings#Crispy#easy#fingerfood#gameday#gluten-free#Healthy#partyfood#spicy#SuperBowl#tangy#thebrokenscale#thebrokenscalerecipes#vegan#vegetarian
0 notes
Text
The Self Serve Banquet


Hands as cutlery again, or rather the tooth pick. Excess not a luxury here - nothing refined about a swath of custard creams.
0 notes
Text
Kotleciki Szu szu

Kotleciki Szu szu z piersi kurczaka w cieście panierce. Kotleciki Shu Shu z fileta z indyka. Kotlety z piersi kurczaka szu szu Kotleciki z piersi kurczaka w panierce z jogurtu, mąki ziemniaczanej i żółtka
#kuchnia#kotleciki#szuszu#kurczak#pierskurczaka#przepis#domowe#obiad#prostepotrawy#kuchniapolska#pomysłnaobiad#kurczaknapatelni#szybkieprzepisy#dlanajmłodszych#chrupiące#kotlety#obiadzkurczaka#przepyszne#kuchniadladzieci#impreza#przekąski#fingerfood#partyfood#szybkieprzekąski#danieimprezowe#kotlecikinaparty#imprezowesmaki#przekąskinastół#kolacjazprzyjaciółmi#menuimprezowe
1 note
·
View note
