#mac pc icons
Explore tagged Tumblr posts
Text
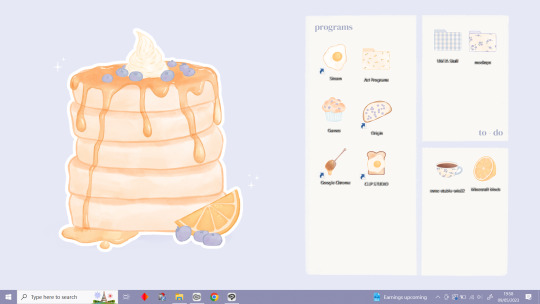
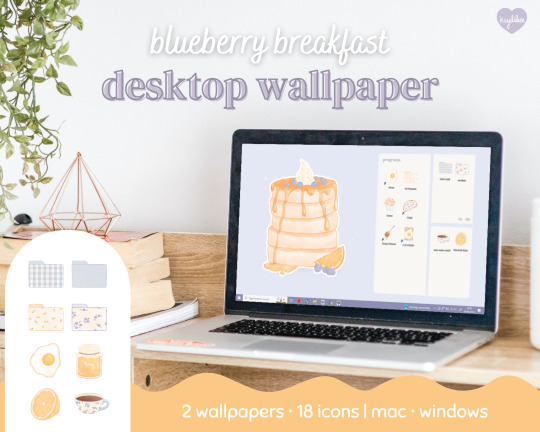
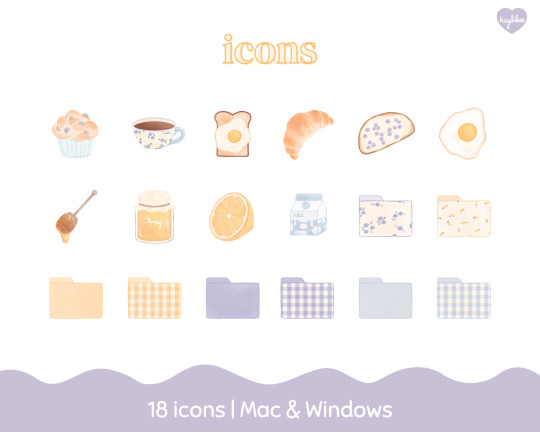
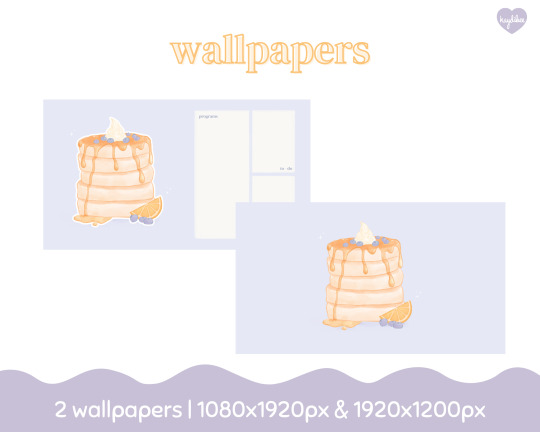
just wanted to share this desktop set I've been working on, as it turned out really cute, and I'm so proud of it!
If you'd like these, they are on my Etsy shop!
Etsy
Instagram
#aesthetic art#cottagecore#desktop icons#hand drawn theme#mac pc icons#cute app icons#desktop wallpaper#digital organizer#folder icons#cozycore#cottagecore aesthetic#cottagecore art#art
107 notes
·
View notes
Text
Semi-hiatus for a few days because my dog knocked a full glass of water onto my laptop and completely fried it 😐
Queue is running as always and hoping to get a new computer on Wednesday
#all my gifs are on my external hard drive thank goodness#but I definitely lost a lot of psds and icons 😫#going to see if someone can recover them for me somehow#also can’t afford another mac rn so I’m getting a pc which I’m sure I’ll get used to#but I’m going to have to learn how to go through my giffing process on it
10 notes
·
View notes
Text
Comment insérer des emojis sur Windows et Mac ?

Découvrez comment insérer des emojis facilement sur Windows et Mac, en vous aidant de ces raccourcis clavier d'émoticônes et de smiley.
© Image de rawpixel.com sur Freepik
#emoji#emojis#emoticon#emoticons#émoticône#émoticônes#smiley#smileys#icone#icône#icones#icônes#windows 10#windows 11#windows#mac#macos#smartphone#tablette#pc#ordinateur#information pratique
0 notes
Text
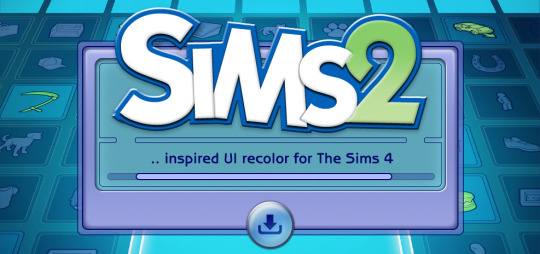
The Sims 2 Inspired UI for The Sims 4
After making my own UI override, I've been itching to look back in time and try to recreate The Sims 2 UI in TS4, and here it is!
I tried to capture the look & feel as best as possible, so I hope you can enjoy this mod and reminisce a bit c:




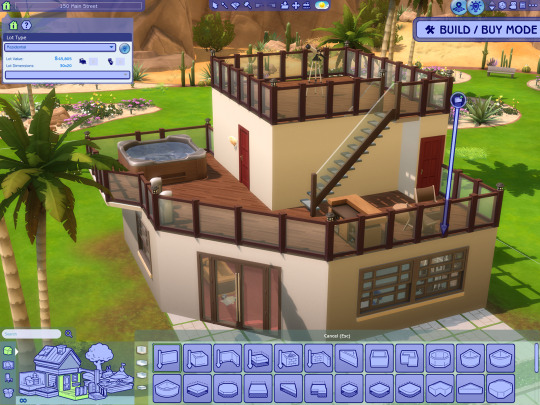
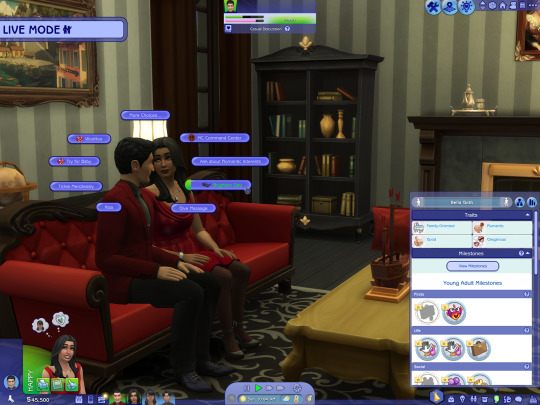

General Info
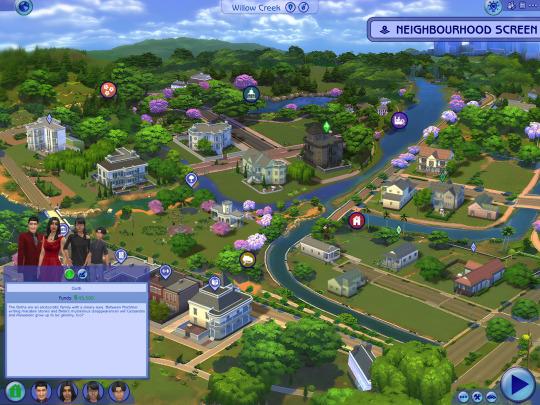
Changelogs Current version: updated for Businesses & Hobbies patch ✅ Latest mod update: 2 March 2025 PC/Mac: 1.113.277.xxxx Older game versions than the ones listed will not work with this mod.
UI overhaul in the style of The Sims 2's UI.
Over 500+ additional icons recolored for CAS & BuildBuy!
Sims 2 style cursor recolors.
Most text are kept in their original color, though they might get changed/updated down the line.

To install:
// Main mod
Before installing/updating, remove any old versions of Sims 2 UI whenever there's a new mod update and clear your caches.
Download & extract the zip file within your Mods folder.
Install the latest UI Cheats Extension mod and make sure it loads after the Sims 2 UI mod. Current version needed: v1.47
// Extras
Main Menu Override - now separated from the main mod.
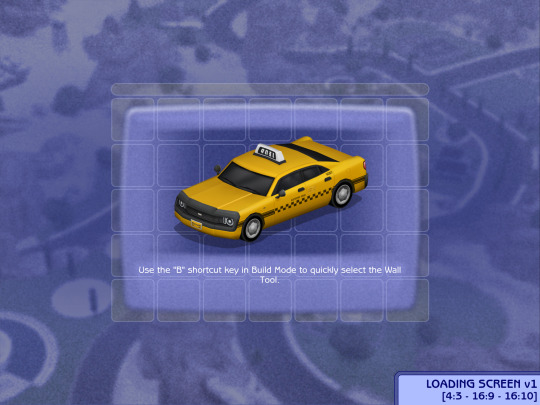
Loading screen: download only one loading screen file. Available in: 4:3 - 16:9 - 16:10 aspect ratio.
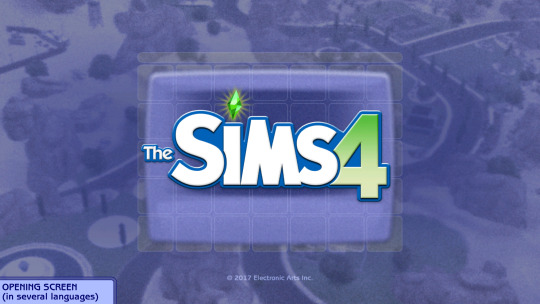
Opening screen: file to replace the intro TS4 screen. Choose the file that pertains to your game language.
Phone icon addons: pick & choose depending on which mod you use.
TS2 Cursor: recolored TS4 cursor to match with TS2's cursor. Unfortunately, some cursors are missing their recolors (rotate cam & grab+arrows in CAS).
EA Notif: optional file if you prefer to keep the notification in its original color scheme.

Mod-related Info
// Recommended mods for more immersion:
CAS overrides: bodyshop room & icon + CAS organizers, TS2 room by simsi45
buildbuy gizmo override (outline mesh + ts2 swatch)
TS2 buildbuy boundary box texture override
TS2 font & want sound replacement by thepancake1
TS2 music for TS4 by buurz
Map replacement by 20thcenturyplumbob
Taxi mod & sound override (same object as the loading screen taxi)
// Compatible Mods ✅
UI Cheats Extension by weerbesu - original mod required
Fully compatible w/ UI Cheats Extension v1.47. To avoid any issues, keep the original mod in your mods folder (both .package and .ts4script) and have it load after the Sims 2 UI mod.
Other major mods are also compatible (BetterBuildBuy, TOOL, More Traits in CAS, etc.)
// Known Conflicts ❌
UI overhaul mods (Chalk'd UI, Dskecht's UI mods)
Main menu mods (Minimalist Main Menu, Skip Main Menu, TMEX's Clean UI, and other similar mods)
Custom wrench icons
Searchable menu mods by TMEX (Better Inventory, Searchable Pose Player, Searchable Restaurant Menu, and Smarter Save Menu)
Smarter Pie Menu by TMEX (choose between standalone or compatible version)

Phone icon override

Credits/Resources
S4Studio, UI Texture Squasher (CmarNYC), Image Viewer (luniversims), JPEXS Flash Decompiler
Loading screen tut, splash/opening screen, UI/world map override tut, UI setup, phone icon resources by xosdr
Base files from the UI Cheats Extension mod (weerbesu)
📂 DOWNLOAD .zip
SimFileshare / Patreon
#ts4 mods#ts4 ui override#ts4#the sims 4#my dl#sims 2 ui#aahhh enjoy!#gonna sleep it off#let me know if there are any issues!
4K notes
·
View notes
Text

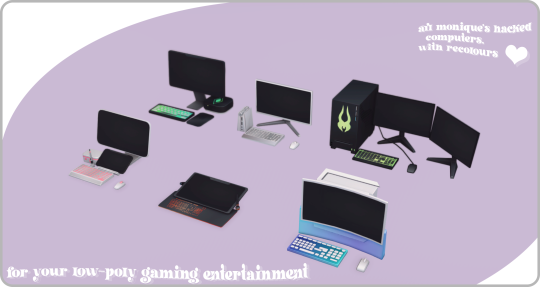
it's been ages since i made buy mode stuff... so back on the monique'd computers train we go 😎 here are six new pc's for ts2, originally from @lumenniveus's gamergigs collection for ts4! all of course function as monique's hacked computers, and have 2 recolourable subsets 🥰
close-up previews are below the cut, and a collection file is included for ease of browsing - plus a readme. everything is incredibly low-poly, which ik we all love! if anyone has any computers they'd like monique'd, hit me up.
DOWNLOAD: SFS | MF 🍎
credits of course go to @lumenniveus for this incredibly awesome set! i can never say no to more monique's hacked computers, and credits for those naturally go to monique herself 🥰
ITEMS INCLUDED


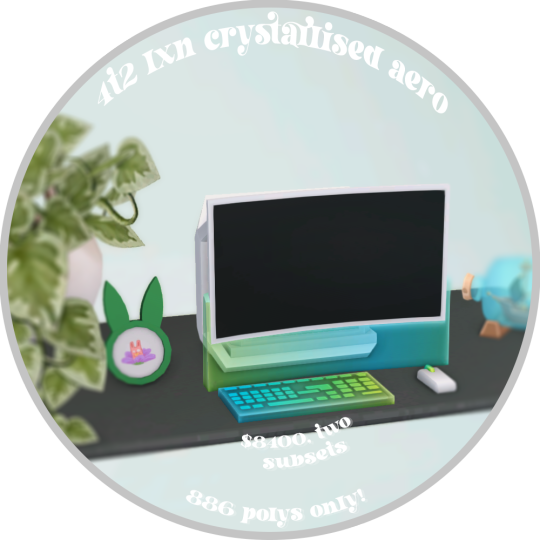

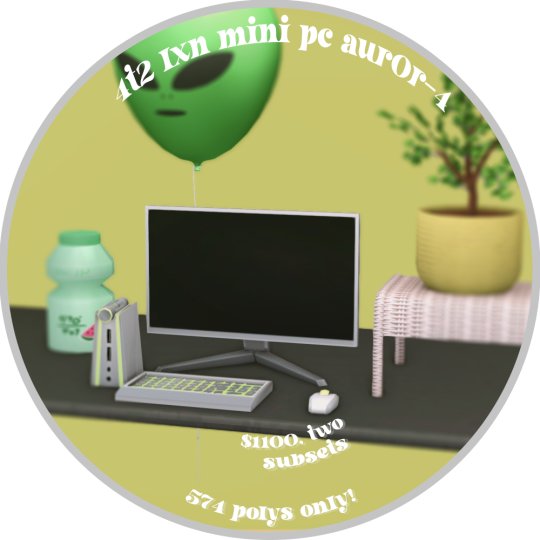
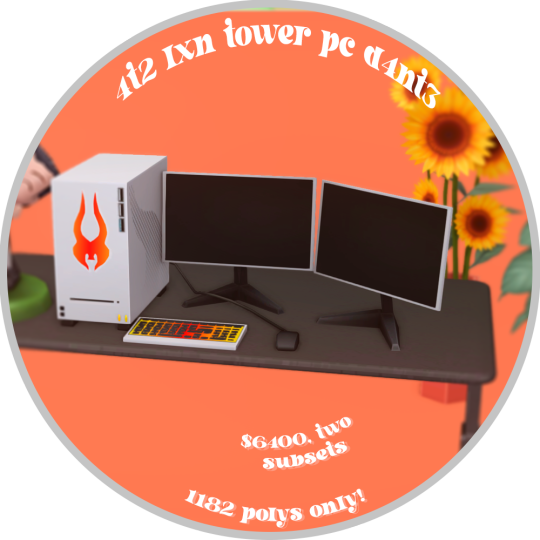
Artist's Setup AR1-3L - $1800, 837 polys Creative Display S1MTiQ - $880, 984 polys Crystallized AERO - $8400, 886 polys MAC Mini - $2800, 649 polys Mini PC AUR0R-4 - $1100. 574 polys Tower PC D4NT3 - $6400, 1182 polys
COLLECTION ICON

THINGS TO NOTE
All of the PC's are animated... or I at least tried to make them animated around the mouse area. LMK if that didn't really work!
These are compatible with screen replacements, as shown below:


if there are any issues that you find with this set, please don't be afraid to let me know! happy simming, and when you download this, do keep in mind,

Love, ~ Ky 🥰
[ @4t2ccdatabase ]
3K notes
·
View notes
Text

Bom dia, tarde ou noite para aqueles que estão vendo esse post! Como eu sou uma pessoa que adora fazer edições ou deixar um perfil cheio de coisinhas, eu resolvi fazer um post sobre onde acho tudo que eu costumo usar, mais uma maneira de eu, Emmett, compartilhar meus conhecimentos por ai, a Rosie também vai ajudar com alguns sites, então se preparem pra uma postagem grande Como também trabalho no campo da informática, vou trazer alguns sites que podem facilitar nossas vidas no dia-a-dia e que eu costumo usar bastante no trabalho e que são ferramentas em sua boa parte, gratuitas! Vamos lá? (Lembrem-se de sempre dar os créditos no perfil caso usem, hein.) 🧛🏻
🩸 PNGs, colorings, texturas, patterns, fontes e etc.
Nesses links, vocês vão encontrar criadores de tudo quanto é tipo, que vocês podem utilizar nos edits, nas fotos e no que precisarem.
✦ · coloursource ✦ · Siguo ✦ · chimiyaa ✦ · SammyObo ✦ · tzxico ✦ · Irwinsrxckme ✦ · thze-art ✦ · WskZ ✦ · Meri-Bubbly ✦ · Cottonete ✦ · auliachan ✦ · orangx ✦ · blxczswxn ✦ · Mondai-Girl ✦ · RADIANTWH0R3 ✦ · itsvenue ✦ · thatporcelain ✦ · tropicsong ✦ · LittleMirr ✦ · lovexlmost ✦ · sprxng-dream ✦ · wildfireresources ✦ · AdmireMyStyle ✦ · sneeuwstorm ✦ · acidmii-stock ✦ · VanAnh3621 ✦ · laodaodao ✦ · Xioelgji1911 ✦ · mun495 ✦ · MoonSober ✦ · PatyOOR99 ✦ · our-little-infinity ✦ · LittleDr3ams ✦ · MermaidTropics

🩸 Templates, carrds, google docs.
Nesse tópico aqui vou trazer perfis que disponibilizam tudo isso tanto de forma gratuita, como paga, então fiquem ligados.
✦ · @poohsources ✦ · @pucksources ✦ · @suncarrds ✦ · @lovjbini ✦ · @namphoria ✦ · @kinniebalism ✦ · @hellscommission ✦ · @zer0carrds ✦ · @lennons-ghost ✦ · @hexeddocs ✦ · @tragedynoir ✦ · @shinyswablu ✦ · @cellohum ✦ · @leeluvsu ✦ · @querenciadocs ✦ · @crowdits ✦ · @pinkfaire ✦ · @retrcmoon ✦ · @gordonramsei ✦ · @springdoy ✦ · @heartbeam ✦ · @soyeonzs

🩸 Icons e headers.
Nesse daqui, eu já vou deixar pra vocês contas que fazem icons e headers, sintam-se a vontade para pegar e cumprir a obrigação de curtir ou reblogar se usarem!
✦ · @d4myeon ✦ · @sailorjisunq ✦ · @tokyicons ✦ · @anygpacks ✦ · @antiherotaylor ✦ · @sabrinaicons ✦ · @amoxapina ✦ · @ursoobin ✦ · @gatopidao ✦ · @versegallery ✦ · @staincastle ✦ · @makomoto-chan ✦ · @loompa ✦ · @aestuantic ✦ · @popoocaicons ✦ · @awaregei ✦ · @ddaenig

🩸 Funcionalidades
Nesse tópico, vou trazer sites que considero funcionais e que podem ajudar em busca de imagens, alteração de arquivo, compressão ou até mesmo conversão.
✦ · Conversor de Mídias ✦ · Compressor de PDFs ✦ · Gerador de QR Codes ✦ · Gerador de links de Whats ✦ · Notion ✦ · Trello ✦ · Canva ✦ · Pixabay ✦ · Behance ✦ · Freepik ✦ · Flaticon ✦ · Mockup World ✦ · Google Fonts ✦ · DaFont ✦ · Adobe Color ✦ · UI Gradients ✦ · Color Hunt ✦ · Pinterest ✦ · Coolors ✦ · Font Squirrel

🩸 Symbols, emojis, fontes especiais e etc.
Por aqui você encontra sites que vão te ajudar a estilizar o seu texto da forma que você quiser:
✦ · Messletters ✦ · Piliapp ✦ · Cool Fancy Text Generator ✦ · LingoJam ✦ · Cool Symbol ✦ · YayText ✦ · Symbl ✦ · GetEmoji

🩸 Aplicativos e sites de edição
Vou finalizar isso com alguns aplicativos, tanto para PC (Windows e MAC) quanto para celulares (Android e IOS) e também alguns que podem usar online, no navegador sem necessidade de download!
✦ · GIMP (Windows, MacOS) ✦ · Photopea (Online) ✦ · Pixlr (Windows, MacOS, Android, iOS) ✦ · Snapseed (Android, iOS) ✦ · Canva (Windows, MacOS, Android, iOS) ✦ · DaVinci Resolve (Windows, MacOS) ✦ · CapCut (Windows, MacOS, Android, iOS) ✦ · Shotcut (Windows, MacOS) ✦ · VN Video Editor (Windows, MacOS, Android, iOS) ✦ · iMovie (MacOS, iOS) ✦ · Obsidian (Windows, MacOS, Android, iOS) ✦ · Notion (Windows, MacOS, Android, iOS) ✦ · Write.as (Windows, MacOS, Android, iOS) ✦ · Krita (Windows, MacOS) ✦ · Inkscape (Windows, MacOS)

Bom, esse post pode passar por alterações, inclusões ou até mesmo exclusões mas eu queria já tinha um tempo trazer esse tipo de conteúdo pra cá! Espero que gostem e aproveitem! 🩸
#krpbr#krp br#rpbr#rp br#rp talk#krp talk#talk tag#talk rpbr#rp help#rp helper#icons#headers#apps#sites#tumblr#carrds#templates
74 notes
·
View notes
Text

BOOM! IT'S FINISHED!!
after so long, it finally done and dusted and ready for public release :3c
LMK SIX EAR MACAQUE SHIMEJI VER 1.0!!
Just click on the big words and ya can download, ye :D
Contains 2 zipfiles: The normal version and less frames version
Read down below for explanations on that
if got any problems launching and stuff, dont be afraid to message me, i'll try to help ya out :>
but as seen in the quick lil poster i made there, it says extra animation + more more info about that underneath the read 👇
from the top,
EXTRA ANIMATION
Same like the SWK Shimeji, this one is has unique frames for each action of the Shimeji. best example is the walk, run, dash actions seen below

there are other actions that have unique frames like these, you are free to explore them :>
CUSTOM ACTION NAME
There are a few actions renamed in the shimeji code. Here is a guide for what they do:
Take Out Lantern = Mac takes out his lantern and admires it
Create Clone = Shimeji breeding 1
Visit Shadow = Shimeji breeding 2
disclaimer, I plan on making a full action guide list in the future so you can much easier reference what each action does :>, so stay tune when that happens
CUSTOM ACTION
Just like SWK, you may pet the Macaque!! >:3c give the lil bugger all the love he deserves~ (credit to Kilkakon for the original script)
as seen in this gif :3
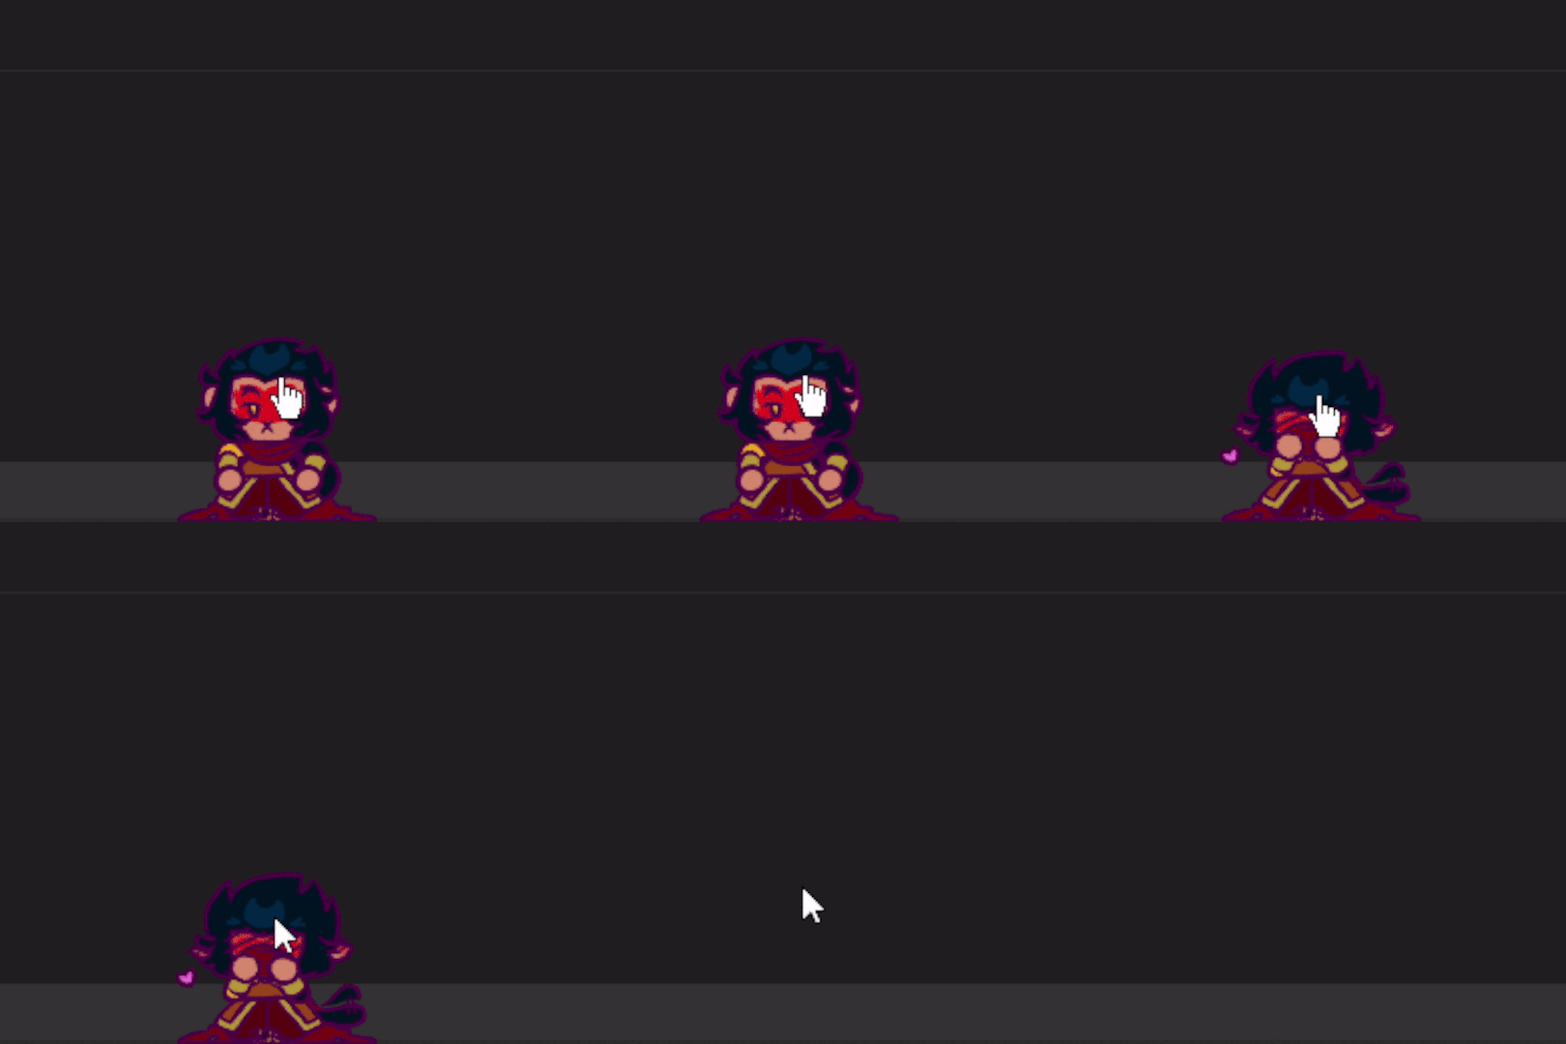
Steps to do this action is as followed:
Make the shimeji sit down (any surface is okay, ie work floor/window top)
Move the cursor to the shimeji's head
Make sure it is a hand cursor and not an arrow cursor
Pet away!!
If you want to pick up the shimeji without prompting the pet action, just move the cursor lower until it turns into the arrow icon
NON-SYMMETRICAL SHIMEJI
One more thing that causes this to be my fav Shimeji so far. HE HAS NON-SYMMETRICAL FRAMES. Meaning his black sleeve stay on his left, while yellow stay on his right.
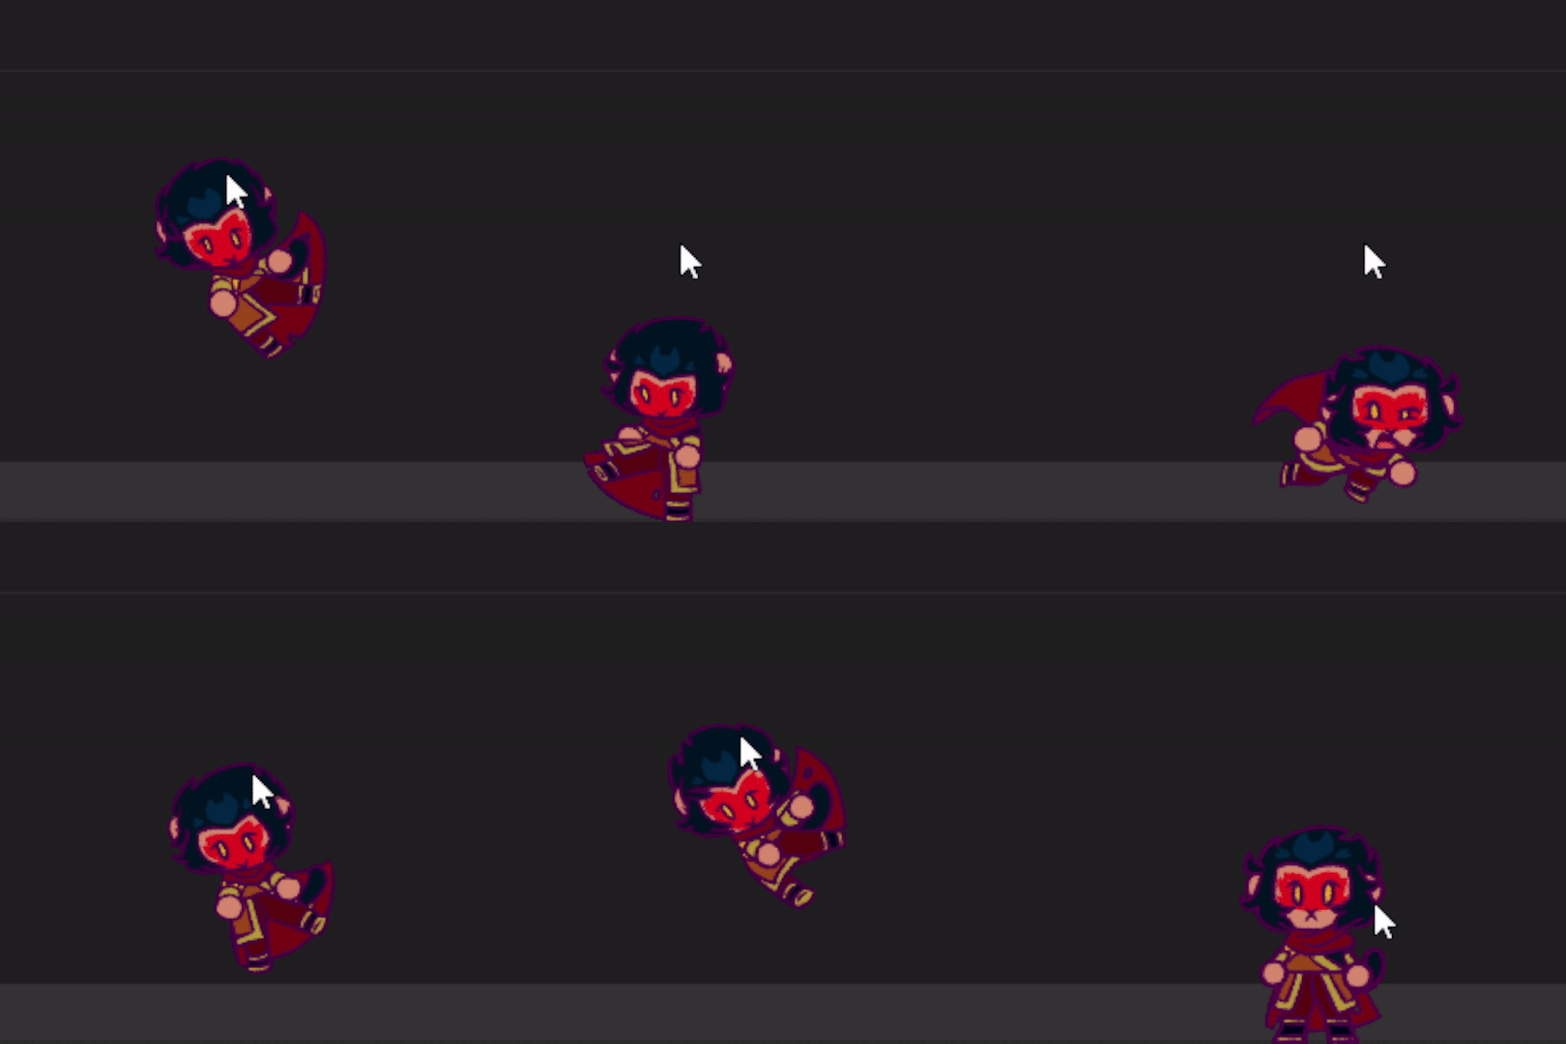
To do this, Mackie needed much more frames compared to SWK, which might cause him to lag on some devices. Hence why I prepared 2 versions of Mackie here. One with symmetry and one with none
PLEASE DOWNLOAD THE LESS FRAME VERSION TO NOT FRY YOUR PC'S!!
UPDATES WILL HAPPEN!!
just like SWK, this is version 1.0
updates will happen and I am at work working on the next csutom action. But it will not come out anytime soon since it requires me to draw a bunch of more frames again hhhh
BUT DO STAY TUNED >:3
~~~~~~~~~~~~~~~~~~~~~~~~~~~~~~~~~~~~~~~~~~~~~~~~
but for now that will be all for ver. 1.0
many thanks to anyone interested in this project and of course
BIGGEST THANKS TO THOSE THAT HELPED BETA TEST THEM
for privacy reason they shall stay anonymous but
❤❤❤❤❤❤❤❤❤❤ >:3
PLUS EVEN MORE HEARTS!! ❤❤❤❤❤❤❤
#monkiekid#lego#lego monkie kid#monkie kid#six eared macaque#6 eared macaque#lmk macaque#shimeji#monkie kid macaque#lego macaque#liu er mihou
306 notes
·
View notes
Text
LINDSAY ON YOUR COMPUTER‼️
That's right, Lindsay from hit show Total Drama on your pc.
*Video is outdated, you can get Lindsay on your Mac!
How to download:
You need Java for this, btw!
Windows:
Download the original Shimeji: https://kilkakon.com/shimeji/
Add this file to the img folder: https://drive.google.com/drive/folders/1kQJNGMfeN5xeF-37AGYlxH6U38idUa1s?usp=sharing
*You need to have the original shimeji or else the code will break. You can disable them in the hidden icons! (Right click on the icon, click choose shimeji, then uncheck the default.)
OR
Download this Zip file (Includes Noah, Tyler, and Alejandro!): https://drive.google.com/drive/folders/1KhKLHRxMz6uLoqhfOuk3LE_Ix56O3mgR?usp=sharing
Mac:
Download the port for mac: https://www.deviantart.com/lavendersnek/art/Shimeji-for-macOS-2021-ver-896442701
Follow the instructions here: https://github.com/LavenderSnek/ShimejiEE-cross-platform/releases
3. Any time it says the computer doesn't allow for it, then go to privacy and security, then close the window, then when the file it says you can't run pops up press allow for being able to run it, repeat process until it says won't run, then restart computer
4. Add this file to the img folder: https://drive.google.com/drive/folders/1kQJNGMfeN5xeF-37AGYlxH6U38idUa1s?usp=sharing
*You can delete all the default shimejis and just have Lindsay!
Again, this isn't actually a virus, lol. The most they can do is throw your screens around and windows users can disable that (Not sure about Mac, but I think they can't. RIP)
Here are some screenshots of Lindsay!
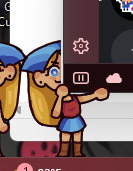


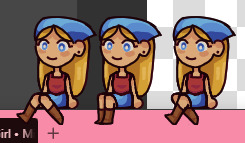
Bonus picture of Lindsay AND Noah. (Coming VERY soon! Like. Tomorrow soon.)
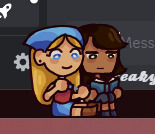
*THANK YOU PERP for telling me I forgot to say some stuff!! Spent three days straight making Lindsay forgive me </3
*Noah IS COMPLETED! Get a Schemer on your PC!
*Get your Lindsay a boyfriend too! Um. What was his name again?
#total drama#td noah#lindsay td#shimeji#td lindsay#noah td#they are so silly i love them#affectionately called Viruses btw
88 notes
·
View notes
Text

GUIA COMPLETO DE COMO EDITAR FOTOS EM ALTA QUALIDADE (HQ)!
oiê, bem vindos(as)! à pedidos, estou trazendo um tutorial bem abrangente sobre como editar fotos no geral para icons, headers, etc., em alta qualidade. neste guia/tutorial trarei dicas, truques e informações gerais sobre o que é preciso para editar em hq. lembrando que o conteúdo deste guia é sobre como eu edito, a maneira que funciona comigo e meu progresso e aprendizado ao longo de quase 12 anos editando icons, ou seja, o que contém neste guia pode — e deve — ser adaptado à sua maneira e ao software de sua preferência. aproveitem e se divirtam!
nota: este tutorial está bem longo, então, se possível, veja este guia pelo pc/notebook!
O QUE VOCÊ VAI ENCONTRAR NESTE GUIA
softwares necessários com links para download;
onde e como baixar as fotos para as edits;
métodos de edição e passo a passo;
como melhorar a qualidade de uma foto;
como salvar a foto corretamente para postar;
dicas de actions e outros resources.
clique em “continuar lendo” para ver o tutorial.
1. SOFTWARE
photoshop
eu recomendo fortemente o uso do photoshop cc na versão mais recente, ou outra versão com camera raw ou filtros neurais suportada pelo seu pc ou notebook.
você também pode usar o photopea como alternativa (eu particularmente prefiro o photoshop pois acho que as edits ficam com mais qualidade). se você preferir o photopea, algumas dicas desse guia poderão não funcionar devido à falta de algumas funcionalidades que o photopea não oferece (ex: camera raw, galeria de filtros, filtros neurais e outros).
eu uso a última versão do photoshop (atualmente, a versão 25.5.1) e uso a versão paga (obrigada adobe pelo desconto de estudante!!!!!), mas vou deixar alguns links para você baixar o photoshop gratuitamente caso você não seja estudante e/ou não tenha condições para assinar um plano.
atualmente eu uso um mac mini 2014 para editar, mas sempre usei windows, então, as dicas e os links valem para os dois sistemas operacionais.
links
macos: 1, 2 & 3.
windows: 1, 2, 3 & 4.
2. BAIXANDO AS FOTOS
galerias de fotos
muitos artistas têm fansites com galerias de fotos e você pode achar facilmente digitando no google: “nome da pessoa + gallery”.
o artista que eu quero não tem galeria própria e agora? tranquilo, ainda temos galerias de fotos de famosos variados como hqdiesel, hqsource, hq-pictures e até mesmo o theplace.
em último caso você pode usar o gettyimages e usar um removedor de marca d’água ou um site como o gettyimages downloader.
instagram
para artistas estrangeiros que tenham apenas instagram e/ou não tenham fotos em galerias de imagens, eu recomendo o instagram pessoal da pessoa.
você poderá fazer o download das fotos com extensões de navegadores como o image downloader for instagram (para firefox e google chrome), ou sites como o saveig, o snapinsta ou o igdownloader.
eu recomendo baixar pela extensão do navegador, pois ela baixa a foto direto do site do instagram no computador, diferente dos sites que você precisará ir foto por foto, copiar o link e colar no site para fazer o download.
mas, caso a extensão esteja indisponível, com algum erro ou pare de funcionar, o site é uma excelente alternativa (só precisa ter mais paciência).
nos sites para baixar fotos do instagram, geralmente eles dão a opção para você escolher o tamanho da foto. você deve sempre selecionar a resolução maior da foto (acima de 1000px é o melhor).
pinterest
em casos extremos de artistas low profile, sem instagram, sem aparições públicas, sem galerias de fotos, nadica de nada, eu recorro ao pinterest.
porém, é preciso ter muito cuidado ao fazer download de fotos do pinterest, porque são muitas fotos repetidas e muitas com baixíssima resolução e qualidade.
se você for baixar fotos do pinterest, escolha a foto com maior resolução (imagens maiores que 500px já são ok para editar icons), e depois de baixar a foto, eu recomendo fazer um tratamento na foto para melhorar a qualidade dela, como vou ensinar.
3. EDITANDO
3.1 importando a foto no photoshop
apertando ctrl+o ou cmd+o uma guia vai abrir no programa, onde você vai até a pasta onde a foto foi salva. selecione a foto e clique duas vezes nela para abrir.
3.2 cortando a foto nas dimensões desejadas
muitos tutoriais de edições de icons sugerem que você copie a imagem e cole ela em um documento novo já do tamanho da sua edit, mas eu não recomendo essa opção, pois ao redimensionar a foto com a ferramenta de transformar (ctrl+t), ela dá poucas opções para manter a qualidade da foto e se você não souber o que cada opção faz, poderá perder a qualidade da imagem. então, eu sempre faço o recorte na própria foto para não alterar muito a qualidade dela.
aperte a letra c no teclado para abrir o atalho da ferramenta de corte. (se o seu photoshop for alguma versão do cc, eu recomendo que você marque a opção para usar o modo clássico de corte, assim fica mais fácil e você tem um controle maior sobre a ferramenta!). para fazer essa alteração é simples, vá no ícone de engrenagem, clique e marque a opção “usar modo clássico”.
para fazer icons, você deverá cortá-lo usado dimensões quadradas, ou seja, 1x1, e para headers 15x5. você pode mudar as dimensões na caixinha da ferramenta de corte.
3.3 redimensionando a foto
nessa parte você precisará prestar atenção, pois ao redimensionar a foto, você poderá perder ou ganhar um pouco mais de qualidade na foto, e para isso você usará uma opção chamada reamostrar (ou resample se seu photoshop estiver em inglês). deixe a opção marcada para usar as definições.

3.4 explicando as definições do reamostrar e qual definição usar de acordo com o resultado que você quer





bilinear: a melhor opção para redimensionar gifs, mas para fotos não é tão bom pois dependendo da foto algumas partes ficam nítidas, outras mais suaves e se você for aplicar action de nitidez, pode ficar com um aspecto de “craquelado” com as bordas granuladas, o que eu pessoalmente acho que fica um pouco estranho.
bicúbico mais suave (ampliação): como o nome já diz, ele deixa a foto mais suave, ou seja, os pixels “craquelados” e granulados da foto ficarão mais suaves. é uma ótima opção tanto se você for aplicar actions de nitidez ou actions mais desfocadas e mais suaves.
bicúbico (gradientes suaves): pode parecer a mesma coisa do bicúbico mais suave, mas esta opção além de suavizar a imagem, cria um “desfoque iluminado” nas transições das cores da foto. é a melhor opção para fotos sem muita qualidade e principalmente se você for usar actions suaves e desfocadas, sem muita nitidez.
bicúbico mais nítido (redução): acentua os pixels e as arestas nítidas da foto, ou seja, essa definição redimensiona a imagem mas preserva a nitidez da foto. se você usa actions de nitidez que não tem desfoque nas configurações, essa é a melhor opção de reamostra. (mas cuidado, se sua imagem ficar muito nítida com essa definição, você precisará usar outra opção. caso contrário, quando você aplicar a action, a edit poderá ficar muito exagerada e/ou com aspecto áspero.)
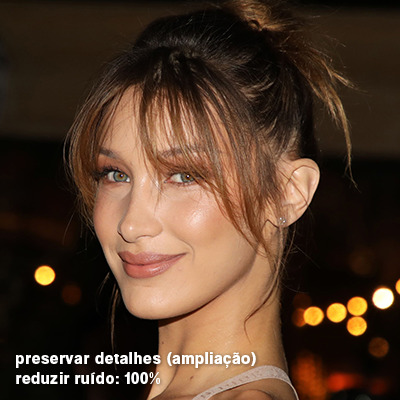
preservar detalhes (ampliação) com redução de ruído: esse em especial é ótimo para quando você precisar redimensionar uma foto para deixá-la maior sem distorcer tanto a imagem. você pode ajustar a redução de ruído para deixar a foto mais suave, sem perder muita qualidade. (obs.: essa opção não deve ser usada para redimensionar imagens muito pequenas, por exemplo de 200x200 para 400x400, ou a imagem vai ficar muito distorcida. ela deve ser usada quando a diferença de pixels não é muito grande, por exemplo, você cortou a foto e ela ficou no tamanho 370x370, aí sim você pode redimensionar para maior sem perder muito da qualidade. então você pode ir ajustando a qualidade com a porcentagem da redução de ruído).
pelo mais próximo (arestas sólidas): essa é uma opção traiçoeira, pois não fica bem em quase nenhuma imagem (a menos que seja um pixel art). essa definição redimensiona a imagem e mantém os pixels nítidos, ou seja, a foto fica menor mas tudo nela que tem aspereza vai prevalecer. é muito usada para redimensionar pixel art, pois preserva as bordas ásperas. pode ocorrer de ficar boa em uma foto aleatória mas não será possível aplicar action, ou a imagem ficará exagerada.
3.5 aplicando a nitidez depois de redimensionar
depois de escolher a foto, baixar, redimensionar de acordo com o estilo da action da sua escolha, está na hora de aplicar.
eu fiz duas versões para mostrar como fica com cada tipo de action:
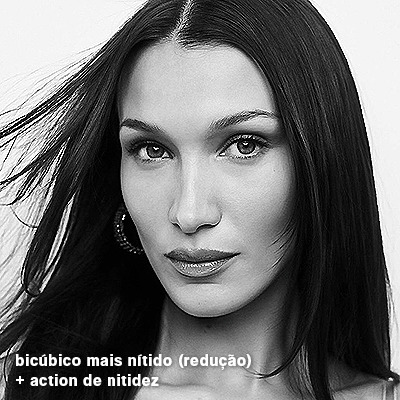
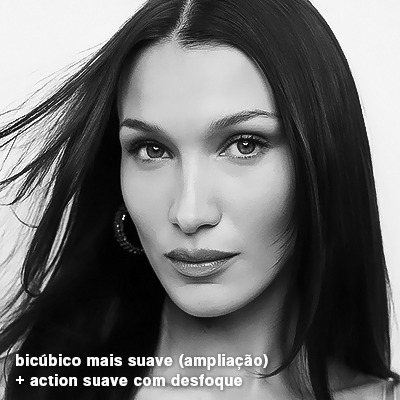
assim, os dois icons tem uma alta qualidade usando actions diferentes, graças a remostragem ideal para cada tipo de action :)
4. TRATAMENTO DE IMAGEM PARA MELHORAR A QUALIDADE
nesta parte, é muito importante que você tenha baixado uma versão do photoshop com neural filters e/ou com o camera raw, mas caso você não tenha, tudo bem também, vou ensinar como fazer uma melhoria na foto de três jeitos: com camera raw, com neural filters e com desfoques. a melhor forma vai depender de quão ruim está a qualidade da sua foto. em geral, apenas fazendo ajustes no camera raw você já tem um ótimo resultado na maioria das fotos.
camera raw
se seu photoshop tem o filtro do camera raw, ele vai estar em filtro > filtro do camera raw...
tudo que iremos fazer será na aba de “detalhe”, ali você deve dar mais atenção ao ajuste de redução de ruído, pois é ele que vai remover o ruído da imagem e melhorar a qualidade dela.
vá mexendo nas configurações de redução de ruído até que a foto fique mais suave. ajuste também o detalhe e o contraste da redução de ruído.
essa parte será mais no olhômetro mesmo, pois as configurações vão variar de foto para foto, mas eu recomendo muito você mexer também na nitidez para não deixar a foto tão desfocada, mas nada muito intenso para não interferir na action que você irá usar.
eu mexo também na redução de ruído de cores, porque dependendo da foto, algumas cores estarão saturadas ou com muito ruído. só cuidado para não colocar um número muito alto, pois esse ajuste pode tirar a saturação da sua foto e deixá-la apagada.
enfim, aqui está uma comparação da foto original com o tratamento feito com o filtro do camera raw e depois já com a action de nitidez aplicada:
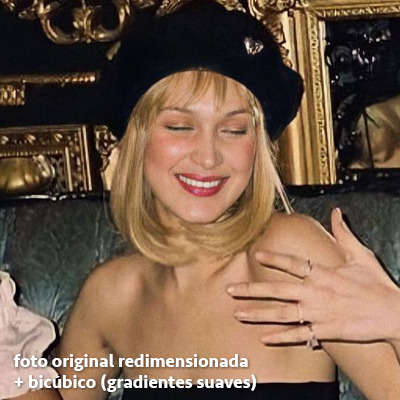
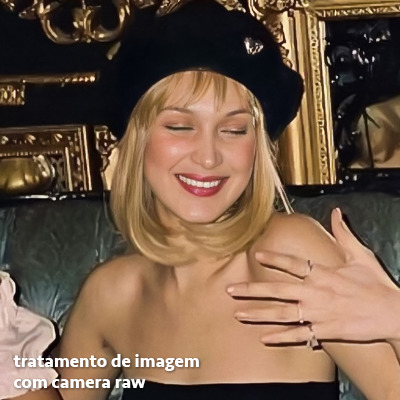
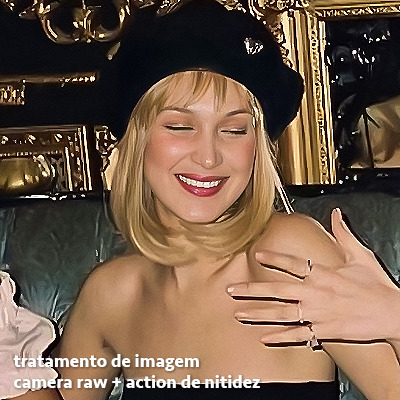
e essas foram as configurações que usei nessa foto em específico:
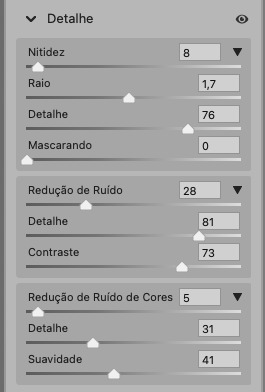
como eu disse antes, as configurações irão variar de foto para foto, a depender da qualidade de cada uma e de quão ruim a foto está, mas com essa configuração básica, você já vai conseguir melhorar algumas fotos.
neural filters
se a versão do seu photoshop vem com neural filters (ou filtros neurais), ele estará em filtro > neural filters...
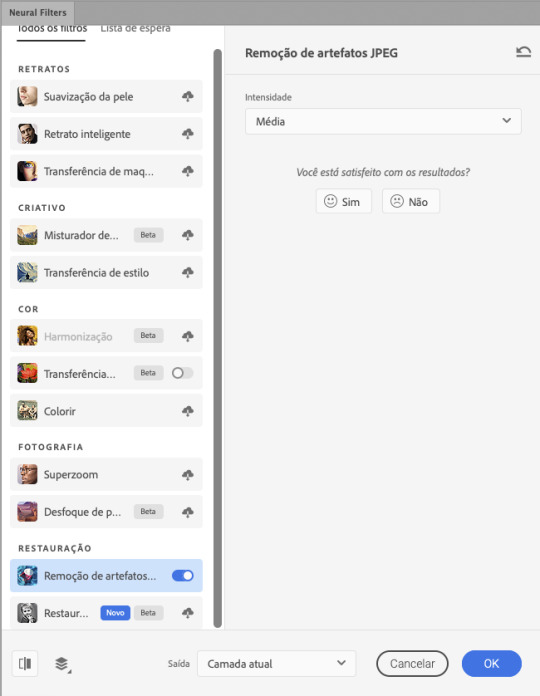
irá abrir uma janela com vários filtros mas o que a gente irá usar vai estar em “restauração”, com o nome “remover artefatos jpeg”. se precisar, faça o download do filtro.
eu recomendo usar a intensidade sempre média, a menos que a foto esteja muito ruim, aí você usa a intensidade alta. mas em geral, a intensidade média ou baixa já dá conta do recado.
a saída deve sempre estar na camada atual, ou seja, na camada da foto selecionada.
assim:
e aqui está uma comparação da foto original com o tratamento feito com o neural filter e depois já com a action suave com desfoque aplicada:
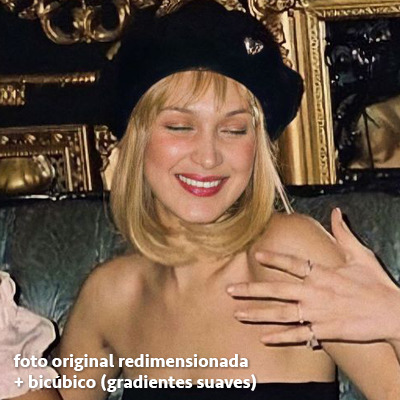
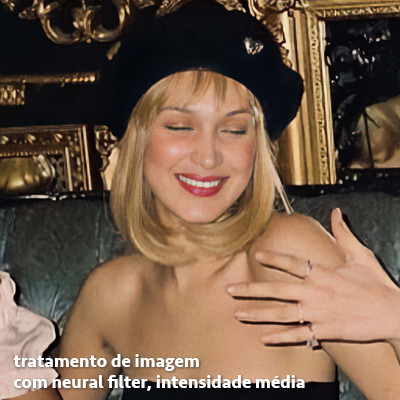
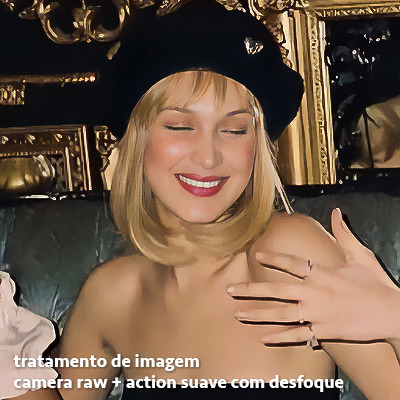
a opção do neural filter é uma ótima alternativa ao camera raw, o único contra é que ele deixa a foto com uma textura áspera, e quando você usa uma action de nitidez eles ficam muito visíveis e acaba não ficando muito legal.
porém, um bom jeito de contornar isso é adicionando ruído na foto. eu uso o efeito de granulação do camera raw para adicionar ruído no icon (você também pode adicionar o ruído em filtro > ruído > adicionar ruído..., mas eu prefiro o camera raw pois ele dá mais opções para ajustar o granulado do jeito que eu preferir).
no primeiro icon abaixo, dá para perceber a textura áspera que o neural filter deixa depois de melhorar a foto e adicionar nitidez; já no segundo icon eu mostro como eu adicionei o ruído e contornei esse defeito.
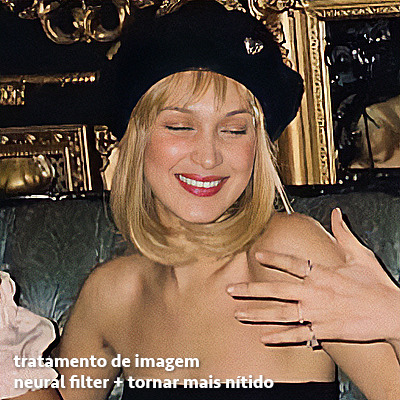
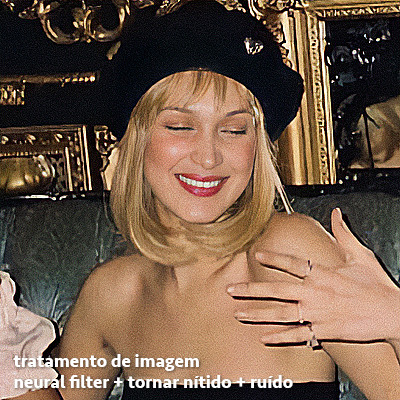
as configurações de ruído que usei no camera raw foi 12 de granulado, 35 de tamanho e 20 de aspereza.
lembrando que, se você for usar uma action de desfoque e/ou remoção de ruído, não será necessário adicionar a granulação, pois a própria action já vai suavizar a textura do neural filter (a menos que você queira adicionar o ruído, claro).
redução de ruído + desfoque
caso a sua versão do photoshop não tenha nenhuma das opções de camera raw ou neural filter, caso você use um photoshop mais antigo, photoshop portable ou prefira usar o photopea, essas alternativas podem ser úteis.
mais uma vez, irei me basear no olhômetro, de acordo com a foto e irei ajustando as configurações de acordo com o que eu quero e acho necessário.
vamos começar com a redução de ruído! ele está em filtro > ruído > reduzir ruído...
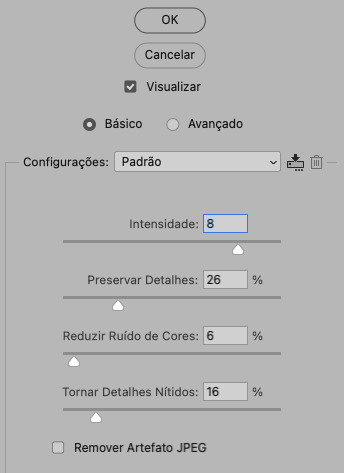
na janela de redução de ruídos você verá alguns ajustes que são: intensidade, preservar detalhes, reduzir ruído de cores e tornar detalhes nítidos e vou explicar cada um para que você possa saber ajustar eles de acordo com sua foto:
intensidade: o número de 1 a 10 irá definir a intensidade da luminescência, a intensidade do filtro e o quanto da imagem você quer preservar ou extinguir, sendo 1 o mínimo da intensidade do filtro e 10 o máximo;
preservar detalhes: o número digitado irá definir a porcentagem de detalhes a serem preservados. quanto maior o número, maiores serão os detalhes mantidos na foto, como ruídos, manchas e outras aberrações da foto;
reduzir ruído de cores: o número digitado irá definir a intensidade e reduzir o ruído cromático, ou seja, vai reduzir as aberrações cromáticas, como por exemplo, fotos que distorcem as cores. preste atenção na porcentagem inserida, pois quanto maior o número, menos saturação sua foto terá e poderá ficar com aspecto de foto envelhecida;
tornar detalhes nítidos: o número digitado vai definir a porcentagem de nitidez para restaurar pequenos detalhes da foto. quanto maior a porcentagem, maior vai ser a intensidade dos detalhes da foto. preste atenção na porcentagem inserida, pois se a intensidade da nitidez for muito alto, vai afetar a sua action, seja ela de nitidez ou de desfoque.
sendo assim, para a foto usada eu fiz estes ajustes:
obs.: se você for um usuário mais avançado do photoshop, poderá explorar a opção avançado, que possui as configurações básicas para melhorar a foto e também as configurações para remover ruído das cores primárias (vermelho, amarelo e azul) individualmente. mas, mesmo se você não for um usuário expert, eu recomendo você dar uma olhada nessa opção e explorá-la, mexendo nas configurações e ir ajustando e aprendendo, pois o resultado poderá ficar ainda melhor nos ajustes avançados.
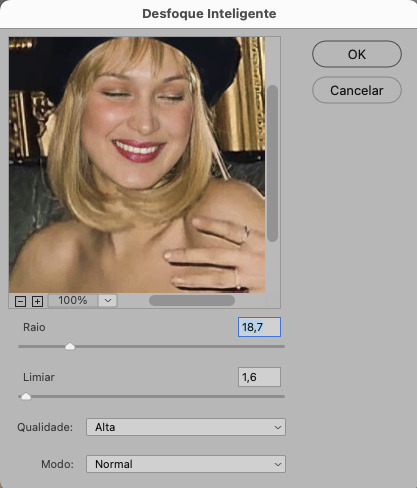
aplicado a redução de ruído, vamos partir para o desfoque! eu estarei usando o desfoque inteligente antes do desfoque de caixa. você vai achá-lo em filtro > desfoque > desfoque inteligente...
na janela que abrirá, você verá os ajustes: raio, limiar, qualidade e modo. vou explicar eles:
raio: vai determinar o tamanho da área que será considerada para o desfoque. quanto maior o número, mais detalhe serão preservados;
limiar: vai determinar a diferença dos pixels entre si antes de serem alterados pelo desfoque.quanto maior o número, maior será a área em que o desfoque será aplicado;
qualidade: vai determinar a qualidade e intensidade do desfoque. ao escolher a opção mais alta, mais partes da foto o desfoque atingirá;
modo: vai determinar o traçado das linhas de bordas que o filtro identificar. o modo normal aqui é o ideal, pois os outros modos “somente arestas” e “sobrepor arestas” irão identificar somente as bordas da imagem.
sendo assim, esses foram os ajustes:
após o desfoque inteligente, partiremos para o desfoque de caixa! ele está em filtro > desfoque > desfoque de caixa...
(você também poderá usar o desfoque gaussiano a depender da foto, mas para esta em questão, o desfoque de caixa funcionou perfeitamente)
a intensidade do desfoque de caixa, assim como do desfoque gaussiano, é medida em pixels e o mínimo é 1 pixel, e para icons é uma intensidade forte, então eu coloco o número mínimo (1, no caso) e depois de clicar em OK e aplicar o desfoque, vou em editar > atenuar desfoque de caixa... e ajusto a porcentagem de acordo com a foto. nessa foto deixei a porcentagem em 33% e ficou ótimo.
no entanto, infelizmente, por não ser o melhor método para melhorar a qualidade de uma imagem, ela ficará um pouco desfocada demais. mas podemos contornar isso usando o filtro alta frequência para devolver um pouco da nitidez e detalhes na foto. você encontrará esse filtro em filtro > outros > alta frequência...
o filtro de alta frequência, assim como os desfoques, é medido através de pixels e quanto maior o número, mais detalhes passarão despercebidos, ou seja, menos detalhes e menos nitidez sua foto terá. eu recomendo em torno de 2px se você quiser mais detalhes e em torno de 5px se você quer mais suavidade.
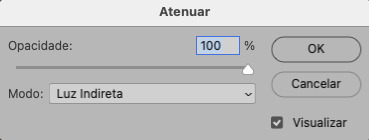
a primeira vista esse filtro parecerá estranho e distorcido, mas dará tudo certo, você só precisará mudar o modo de mesclagem. para isso vá em editar > atenuar alta frequência e mudar o modo de mesclagem para “sobrepor” ou “luz indireta” se você quiser que fique mais suave. se preferir, poderá também ajustar a opacidade para os detalhes ficarem mais ou menos intensos.
assim:
assim fica o resultado sem o filtro de alta frequência e com o filtro:
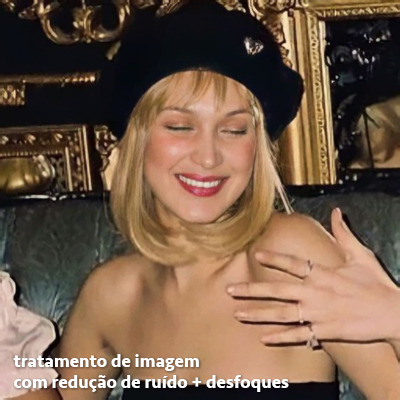
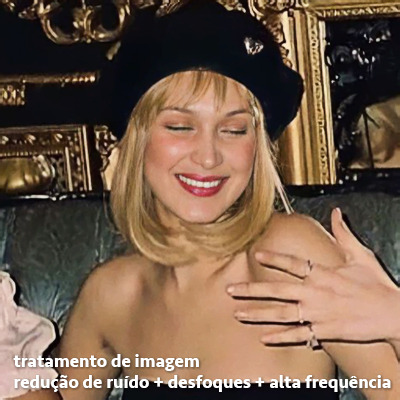
sendo assim, fica a seu critério usar o filtro ou não.
aqui está a comparação das fotos com o tratamento de redução de ruído + desfoque com e sem o uso das duas actions:

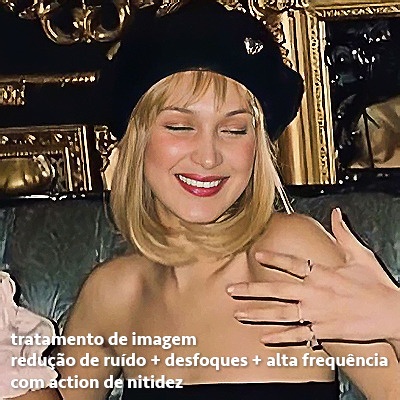
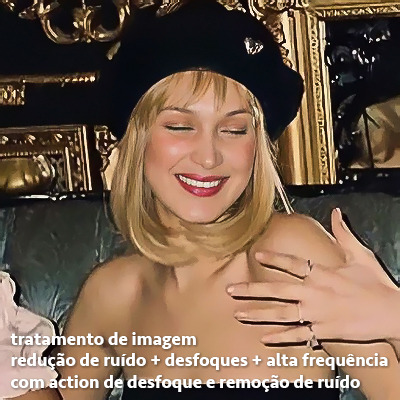
5. SALVANDO A EDIÇÃO
e chegou a melhor parte: salvar a edição para postar!
seja a edição um icon, uma header, ou qualquer outro gráfico estático (edições não animadas), a melhor opção é sempre, sempre, SEMPRE, salvar no formato PNG!
o formato jpg ou jpeg não preserva a qualidade original como o formato png preserva. então, sempre escolha esse formato ao salvar suas edições estáticas!
a melhor forma de salvar uma edição em alta qualidade é exportando ela. sendo assim, vá em arquivo > exportar > exportar como...
em “configuração de arquivo”, selecione o formato PNG e desmarque a opção “transparência” se sua foto não é uma imagem com fundo transparente; em “tamanho da imagem” deixe como a altura, a largura e a escola como estão, apenas mude a opção em “criar nova amostra” para BICÚBICO AUTOMÁTICO; e em “espaço da cor” marque a opção CONVERTER PARA SRGB, porque assim, independente da calibração do seu monitor, a foto ficará com as cores originais e não sofrerá alteração.
assim:
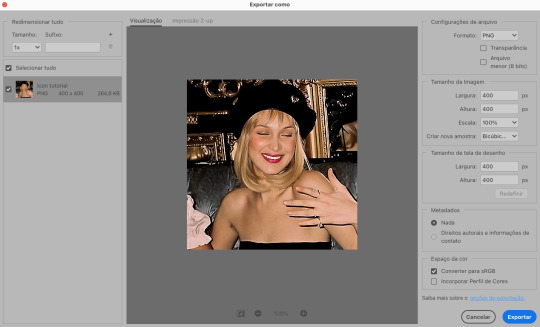
no entanto, se você tiver um pc ou notebook lento, ou apenas não tiver paciência para salvar sua edit em exportar, você pode salvar no modo normal, indo em arquivo > salvar como... OU arquivo > salvar uma cópia..., no entanto, se você for usar essa opção, não esqueça de marcar a caixinha para “incorporar o perfil de cores srbg”, essa opção geralmente fica na parte de baixo da janela que abre quando você vai salvar a edição.
6. ACTIONS & RESOURCES
para facilitar pra vocês, todos as configurações de filtros usados neste guia, estarão disponíveis para download em uma pasta de action. para fazer o download é só clicar aqui: ★. já a dupla de actions usadas (a de nitidez & a de desfoque suave) estarão disponíveis para download na lista de dicas abaixo.
dicas de actions de nitidez – premium & gratuitas (free)
lovie potion by @loviestudio [premium]
action #26 by @harupsds [premium]
action #25 by @harupsds [free]
01 action by @harupsds [free]
cherrie by @loviestudio [free]
action #11 by @miniepsds [premium]
face action by @miniepsds [premium]
crispy by @nebulies [free]
scarlett by @l-agallerrie [free]
eight action by @peachcoloring [premium]
bubblegum by @hisources [free]
kendall by @hisources [premium]
hekate by @hisources [premium]
sharpen by @l-agallerrie [free]
#01 action by @buntterflies [free]
dicas de actions “suaves” – premium & gratuitas (free)
teddy bear by @loviestudio [free]
action ten by @peachcoloring [premium]
caelestis by @miniepsds [premium]
fleuriste by @hisources [free]
angel by @loviestudio [free]
action #13 by @harupsds [premium]
action #12 by @harupsds [premium]
wild action by @hisources [free]
outras actions – premium & gratuitas (free)
denoise action effect — remove o ruído das fotos sem perder muita qualidade by @loviestudio [premium]
photopea quality action — action para melhorar a qualidade da foto no photopea by @loviestudio [free]
exclusive hq actions — um conjunto com as actions que foram usadas neste tutorial by @girasois, @loviestudio [free]
denoise and sharpen actions — conjunto de actions para melhorar a qualidade da foto automativamente by heavnsent
7. BÔNUS: DICAS EXTRAS
a adobe cc learn tem muitos tutoriais que você pode dar uma olhada e aprender muito mais sobre o photoshop e outros programas da adobe!
o youtube é outra fonte incrível para você aprender edição no photoshop, lá você encontra tutorial para quase tudo de edição de fotos e muito mais! se você entende inglês, eu recomendo muito os canais piximperfect e brendan williams tutorials.
para fonte de inspirações, o tumblr é o lugar certo! se jogue nas tags para se inspirar e nos blogs de photoshop para ver muito mais tutoriais e muito mais resources.
o blog @looksgreat infelizmente não é mais atualizado, mas você ainda pode encontrar muitos tutoriais sobre quase tudo de edição, e o melhor, todos os tutoriais são em português!!
ainda recomendo outros tumblr brasileiros de resources e tutoriais: @miniepsds, @harupsds, @peachcoloring, @gmfioart, @colour-source, @l-agallerrie, @wasirauhlpsds, @hisources, @opulenceps, @sunshinepsds, e @loviestudio; e no deviantart: jungrainsoul, rockjealous, heavnsent, aureangels e rohdossantos.
8. CRÉDITOS E INFORMAÇÕES
crédito colorings
off hearts + whimsy by @miniepsds ♡
informações
antes de tudo eu gostaria de pedir desculpas pelo tamanho deste guia, mas eu quis abranger o máximo de dicas possíveis para vocês e deixar o tutorial super completinho.
em segundo lugar eu gostaria de agradecer todo o carinho de vocês, isso me motiva muito a continuar. obrigada, de coração!
enfim, é isso! minha ask estará sempre aberta para dúvidas, sugestões, pedidos e mensagens fofas (sempre com educação e respeito, claro)!
#tutorial#photoshop tutorial#tutoriais#tutorials#resources#hq tutorial#tips#useful#ptbr#adobe photoshop#photopea tutorial#tutorial tips#dicas#dicas de edição#dicas de actions#guia completo#guia#guia de edição#guia de edits#edits tutorial#edit tag#masterpost#long post#editing tips#icon tutorial#header tutorial#hq edits
157 notes
·
View notes
Text
Ok so I talked about this in tags of a post earlier but I need to talk about it properly
So a couple weeks ago I finally pulled the trigger, I dual booted Linux Mint on my laptop
It has less of my vital files on it then my pc, but I use it more for videos and general Internet stuff, so I would know if I liked it
Installing was scary but after a bit of trouble shooting with disabling bit locker it was easy, and let me be clear, that's a windows thing, because Microsoft really really doesn't want you to have freedom over your machine.
So I booted in
And like
I literally love it so much
I knew people talked about how much better Linux is and how it speeds up literally anything it's put on over windows, but like WOW
It doesn't take 2 minutes to boot up or shut down, my CPU doesn't idle at 25% for no reason, the search for files feature doesn't take 40 minutes only to show me Internet results instead of files, its wonderful.
The default theme is (in my opinion) pretty ugly, sorry whoever made it, it's just not for me.
But that's the great thing, you can literally customize this almost however you would like.
Maybe you shouldn't trust my opinion on what looks nice because I instantly installed a theme that replicated Windows 7
But I got bored of the default colors so I literally found the files where the home bar is saved and changed them to be more "minty"
That along with some CSS color editing gave me this:

You just can't do anything like this in Windows 10/11. You can change the color on windows but if I wanted, in Mint, I could completely change everything, centered icons on the taskbar, icons left justified on the taskbar, no taskbar, make it look like windows 95, it's all yours to do with whatever you want.
There are issues, I won't lie, the biggest one that will probably haunt Linux forever is compatibility.
Simply put most developers don't make native Linux versions of their software, you are lucky if there is a Mac version.
Lots and lots of Windows software CAN work on Linux through compatibility layers like Wine and Steam's Proton, but it's not 100%
My biggest problem is FL Studio and Clip Studio, neither of these I could get working with Wine or Proton so far. I'm hoping in the future I will find a way to make this work, or transition to their free and open source alternatives, but for now I'm stuck with a win 10 pc.
The other issue I've faced is that Linux seems to have a hard time recognizing and remembering my wired headphones. Like sometimes it just works, but most of the time it fails to do so.
My solution to this until I have time to troubleshoot more is to use my stupid headphone jack to USB C dongle that I bought for my stupid phone with no headphone jack.
Luckily it works fine and the type C port on my laptop literally doesn't get used otherwise.
All in all, I'm like excited to use a computer again. I used to only be excited for the programs it allowed me to use, but for the first time in a long time, the "magic" of the PC has returned for me.
Once I save up the money, my next PC will be Linux, Windows doesn't cut it anymore for me.
Ok now I'm going to kinda just talk about Linux for a bit, unrelated to my experience because my brain has been buzzing about this topic lately.
I get why guys who run Linux are so annoying about it now, because it's me now, I love this stupid OS and everyone has to hear about it.
And chances are, you've used Linux before already!
Linux is used in a ridiculous number of places because of its open source nature.
Most servers and other cloud computing systems are running Linux, many public terminals and screens run Linux, every supercomputer in the world runs Linux, if you were in the education system for the past 13~ years you might have used ChromeOS, which is built on Linux, if you have ever used an Android device you have used Linux.
It's never going to take over Windows as the go to operating system in the home, most people don't even know they could switch, and if they don't know that there's no way they are willing to put up with some of the headaches Linux brings.
Although I've spent way more time troubleshooting Windows issues then I have Linux ones so far, so maybe Microsoft stuffing so much bloated spyware into their system is starting to cause windows to rip at the seams, idk.
When I try to explain Linux to people who literally don't understand any of this I use a car metaphor
Windows is like a hatchback SUV, you buy it from a dealer and it mostly works for everyone good enough that they don't complain.
Linux is like a project vehicle in a lot of ways, the mechanic can tune it up exactly to the specifications they want, tear a bit out and put a diffrent one in, it requires some work under the engine but once that mechanic gets it the way they want it, it's incredible.
It's not a perfect metaphor but I think it gets the idea across.
Uh IDK how to finish this post, please try Linux if you can, changed my life.
#Long post about Linux ahead don't click read more if you don't want that#Linux#Linux mint#open source#Mantis thoughts
23 notes
·
View notes
Text

What in Hell is Bad ? Erolabs IPA download ( IOS )
(A kind of helpful guide)
Note: This is based on my experience, I did this with a Macbook and an IPhone, if I’m not mistaken the process varies somewhat depending on the device.
Important Note: You need a pc or a laptop to download the Erolabs version of WHB through the IPA option. The app won’t download on the pc, it will be downloaded in your phone.
When you enter the WHB official site and enter the download page, you will find the IPA option, for this you have to click on download the IPA file.
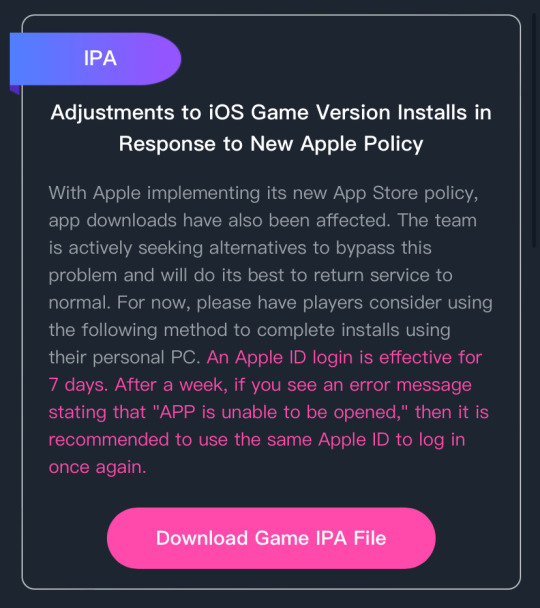
After you do this, you scroll down and you will se a page that says “Steps”
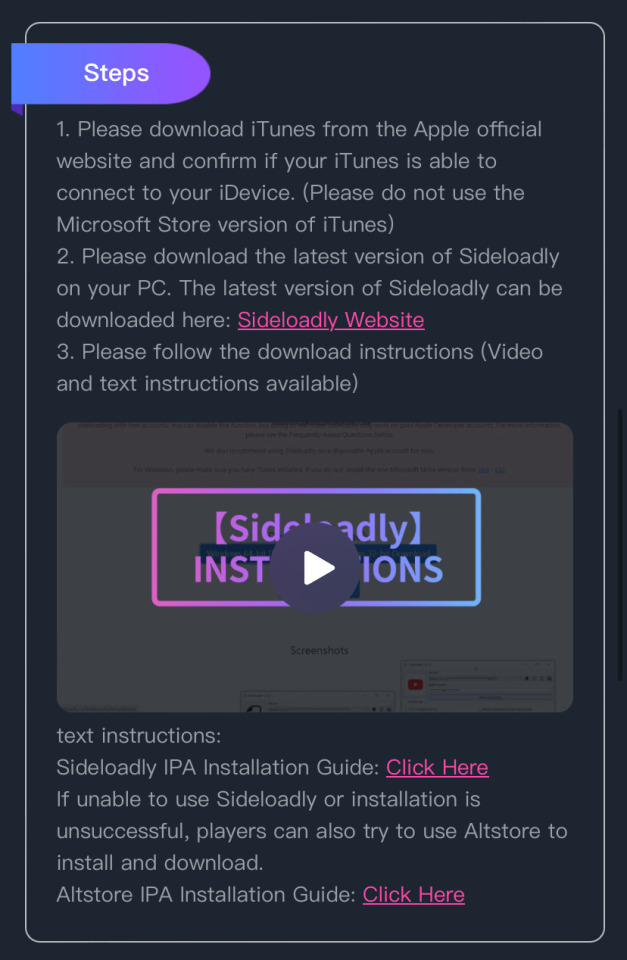
(The steps are very clear and there’s even a video that shows that you should do, but some things can be a bit confusing, that’s why I’m doing this guide)
On the “steps” page you will have a link to download an app called “Sideloadly” if you have a Mac device, ignore the first step that says that you have your download ITunes. iTunes is discontinued and even if you download it, it won’t work unless you have a very old Mac device (the last iTunes version is from 2016 I believe, Mac devices from that year and bellow might allow ITunes to work, I don’t know if it’s required tho)
Sideloadly is a safe app ! So you have no need to worry about viruses and stuff.
Once you download Sideloadly, something like this should appear.
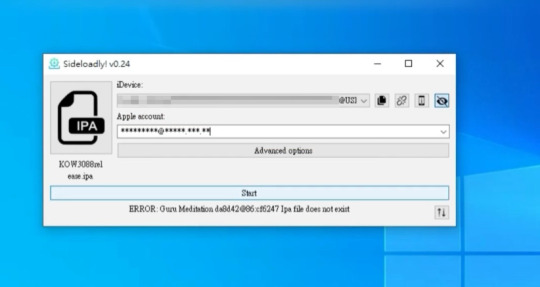
You have to enter your Apple ID (your mail direction that is linked to your Apple ID) where they indicate you, and you have to connect your phone to the pc through the charger.
Then, on this icon right here:
You have to drag the IPA file that you downloaded at the beginning, and the icon of WHB should appear there.
And then you click Start.
Once you click start, Sideloadly will download the game file, and once the download is finished, they will ask for your Apple ID password, you type it down (again, Sideloadly is a safe app) and press enter.
After a few seconds the game should appear on your phone, and once it’s fully downloaded you can disconnect your phone from your pc.
Once you open the game, they will ask you to allow the “Developer Mode”
You can find this option entering the settings of your phone, open the Privacy and Security page and scroll all the way down, and there should be the “Developer Mode” option.
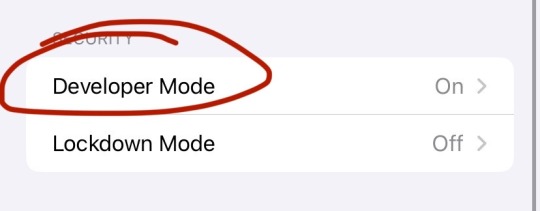
To turn on the Developer Mode, your phone will tell you that you have to restart your device to put it to work, and once your device is restarted, you should have What in Hell is Bad Erolabs version !
As far as i know, the process is still the same if you have a pc that is not Mac. Unfortunately i’m not sure if you need to download ITunes for this, you don’t with a Mac, but you probably do if you’re not using one. The steps guide tells you to not download the Microsoft version of ITunes tho, but again, I’m not sure how this works.
Also, the common questions and their answers are available in the q&a page, which is at the bottom of the IOS download site.
If I’m not mistaken, this Apple ID login only works for 7 days, after that you have to log in again, which I think is not that troublesome.
I hope this little guide could be of help for you ! Any doubts you can always DM me or ask through the notes, I’ll do my best to try to help !
Hope you have an amazing day !! ♡♡♡
#prettybusy what in “hell” is bad?#what in “hell” is bad?#whb#whb beelzebub#whb leviathan#whb mammon#whb satan#whb lucifer#whb download#useful pinkgy
160 notes
·
View notes
Note
So Warframe added a "Pom-2" Alternate 1999 computer (that's needed for weird void magic future science wizardry). Thoughts?
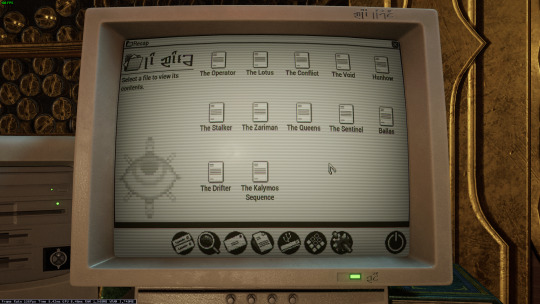

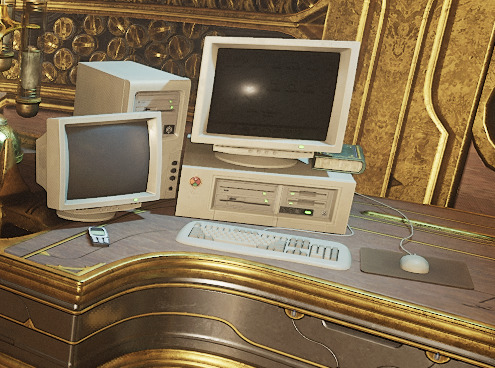
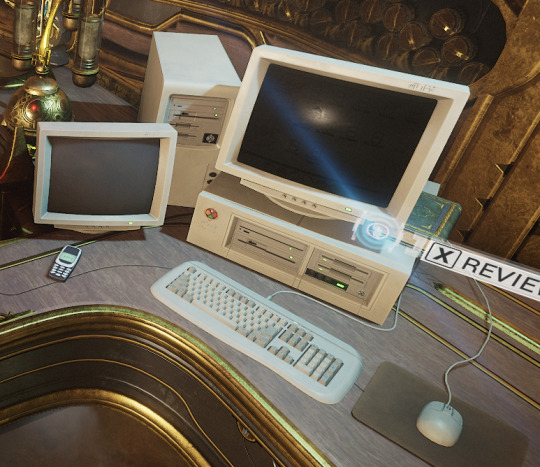
Only thing I have that's a sort of question mark is that I don't know of many setups that would have needed a 5 1/4" floppy in 99 (or why it has both the tower and the under monitor unit)
ugh. OKAY, so... the tower and desktop combination is just weird. I have, on one occasion, run a "server" that was two towers, and the original PC supported a DUAL-DESKTOP mode, but both types together? nonsense.
dual monitor was rare but possible in 1999 (win98 added native support), so I think the best interpretation here is that this is actually two computers. maybe the one on the left is missing the keyboard and mouse because it's being used as some kind of server for the other computer? I used a little case like that to run my first linux server, which was also acting as a router for my internal network.
The OS is weird. The icons above the menu-bar look like win98, the dialog box is windows 3.x, the menu-bar icons on the bottom are pure os X (although they remind me of like a web-TV kinda system, like hotkeys for email/internet/etc), but the greyscale is very classic mac system. Actually it kinda reminds me of C64's GEOS, but GEOS was very classic-mac.

Like most CRT-filters, they turned the scanlines up WAY TOO HIGH. No CRT I've ever seen looked that fucking terrible. The monitor buttons are a bit odd: You didn't get monitors with buttons on the front until long after they were all color... but maybe it's a color monitor that's showing a monochrome OS?
as for the floppies: yeah. There are multiple mistakes here.
5.25" in 1999 is just silly. If you still had 5.25" disk drives in 1999, you were intentionally doing some retrocomputing stuff. For reference, around 2001 my PC repair job would specifically ask me to copy data off 5.25" disks, because they didn't have any 5.25" drives anymore, and I was their only tech who did.
The other mistake is that they have THREE floppy drives. so the PC doesn't really support that, natively? You can do some tricks and make it work (The youtuber Tech Tangents did a video on how it could be done), but realistically two was the normal max.
The final mistake is that all the drive activity lights are on. Those are only supposed to be on while the drive is reading or writing... and I don't see any disks in those drives! Let alone a situation that would involve turning all three on at once (I don't think that's even possible on most floppy controllers!)
In fact, the main time you'd end up with the drive lights stuck on like that is when you've installed the drive cable upside down. That ends up with them getting stuck on and non-functional. So this computer looks, to me, like it was put together incorrectly and no one noticed.
I don't believe that font would be on a black & white retro computer. Nope. Too smooth and too big.
There's also a USB icon on that OS: I don't think there's ever been a monochrome OS that supported OS, and looking at that computer case I don't believe that it has USB. Maybe the tower would, but the desktop? no.
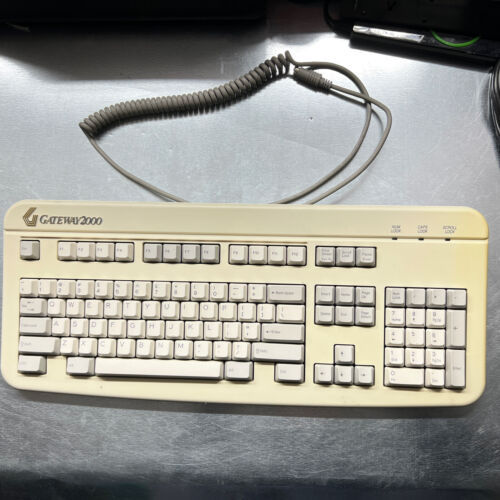
That keyboard is off a Gateway 2000 computer. Something like this:
162 notes
·
View notes
Text
i made my first gifset on my new laptop yesterday :)
#i must say i'm getting the hang of being a pc girl after being a mac girl for...well...10+ years#i've mostly been making icons to get used to it but yesterday someone sent me a request on another sideblog and i was like...why not#came out pretty good too#now all that's left is to recover the 48390517 gifs/footage/docs on my external hd#it's formatted for mac so my pc doesn't recognize it#but my husband <3 (he's the greatest) found a place nearby that does data recovery and is going to take it there#happy sunday everyone#.text
8 notes
·
View notes
Text
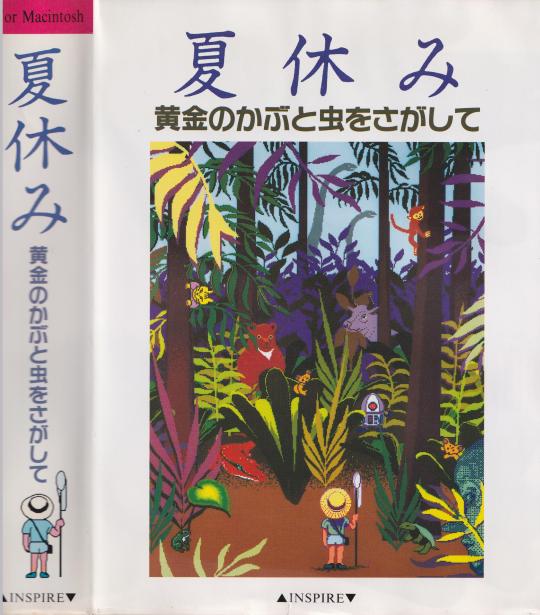
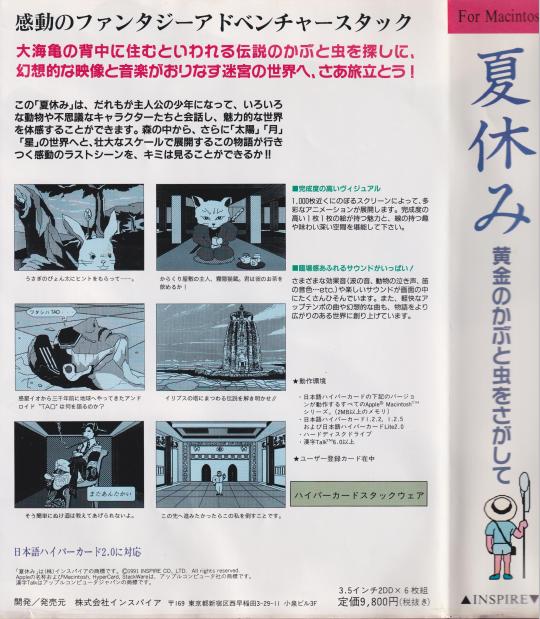
Natsuyasumi - kogane no kabutomushi o sagashite aka Summer Vacation - Search for the Golden Beetle (Classic Mac, 1991)
You can download it at Natsuyasumi.sit here; you can find the game's Japanese manual (and an alternate download for the game if the Internet Archive is still down) here. Important instructions below. I believe in you!


Instructions:
Drag the .sit file onto the emulated Japanese Mac desktop here.
Open the Outside World, then Downloads, then open the file you find and wait for it to be decompressed; then close Downloads and open it again.
Open the folder you'll find. Drag the six files in there onto Macintosh HD (they'll be copied). Open Macintosh HD if you haven't already; scroll and/or resize it if necessary.
Open Infinite HD, then Utilities, then Disc Copy (set language to English the first time to make things easier), then drag each of the six files from Macintosh HD onto it (since just double-clicking them won't work). A disk will appear on the desktop for each one.
Make a new folder in Macintosh HD (using the first item under the first non-Apple-logo menu) and name it anything or just leave the name there.
Open each of the six disks that appeared on the desktop; each will contain a single file. Drag each resulting file into the new folder you made (again, they'll be copied), then open the folder (scrolling/resizing as necessary) and run 'Natu key'. Click the white words to begin; you can click the NORMAL turtle first to switch to EASY mode.
If you can't read Japanese, use Google Lens, or on a PC browser, use Google Images via the 'Search by image' icon, and paste a screenshot (though you'll probably need to crop it down to just the text in Paint or similar first), then click Translate.
#internet archive#game#games#video game#video games#videogame#videogames#computer game#computer games#obscure games#adventure games#point and click#mac#macintosh#apple mac#apple macintosh#retro games#retro gaming#retro graphics#game history#video game history#gaming history#1991#1990s#90s
40 notes
·
View notes
Note
hi! Sorry to bug you wih a dumb question, but I gotta ask: what settings do you use on csp to get the emotes you made so dang smooth and crispy? I make emotes as well, but I can't make my lines to look that dang good.
ohh not dumb at all!! crispness makes all the difference for emotes but people rarely talk about how to actually achieve it
i use the default g-pen with level 2 anti aliasing. clip studio tends to default most brushes to level 3 or 4, which gives the brush a much softer look. you can change your anti aliasing level in the tool property menu (window > tool property to pull it up)

if you don't have this option, you can pull up the full tool menu by clicking the wrench icon. and if you want easy access to any of these settings, you can add them to your tool property window by clicking the eyeball box next to the setting.
(hiding settings you never use is also a really nice way to slim down your clip studio UI and make it less overwhelming)

if you're already using a weak anti aliasing setting or you want to improve lines you've already drawn, you can sharpen them! i used to have to do this to every single emote when i used photoshop and its fuzzy ass lines 😭
filters > sharpen > sharpen, or sharpen more. you can sharpen as many times as you like to stack the effect. unsharp mask is also a handy tool when you're sharpening more than just lineart, which lets you control the intensity and radius.
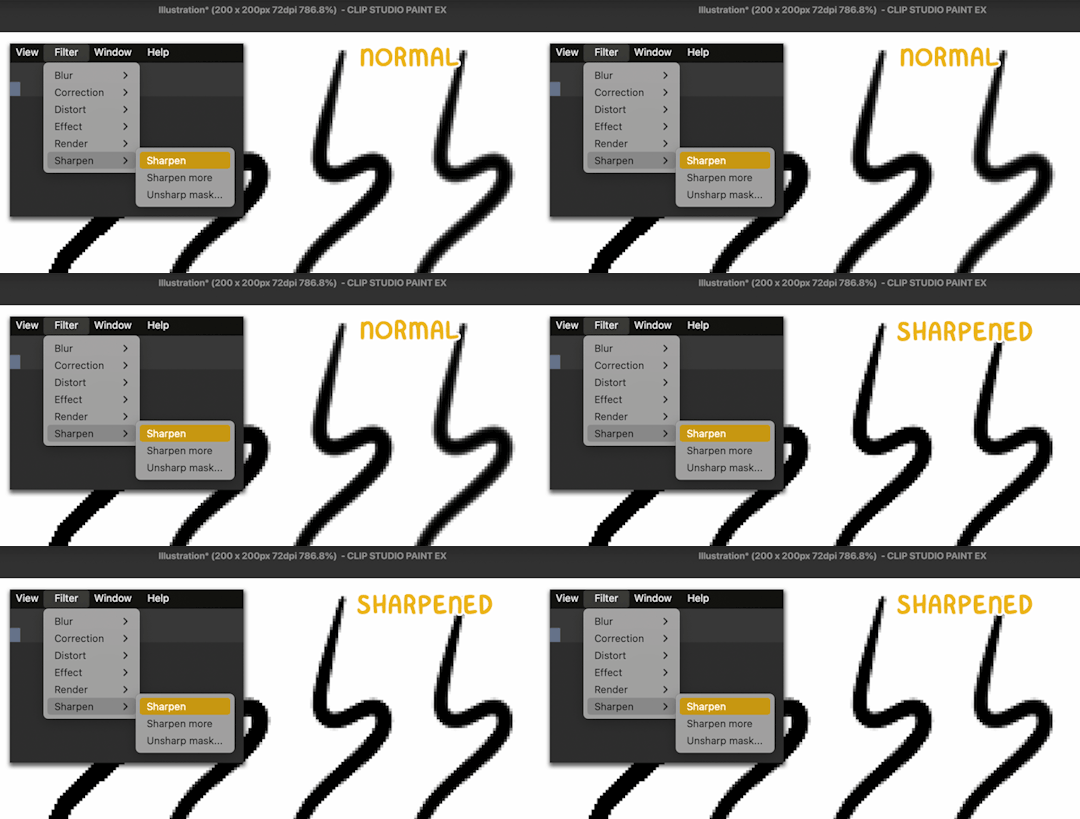
all these menus are the same on pc, mac, and ipad, and work in every version of clip studio :)
66 notes
·
View notes
Text
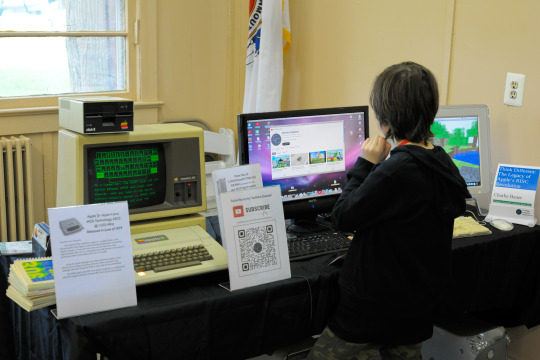
Think Different: The Legacy of Apple’s RISC Revolution by Charlie Bauer, Adam Bauer
"Step back in time and rediscover the roots of the tech revolution with three legendary Apple machines: the Apple II+, the Power Mac G4, and the Power Mac G5. Apple II+ – Where it all began. Remember the clacking of the floppy drive and the bright green glow of the CRT displays? The Apple II+ wasn’t just a computer, it was a portal to a world of possibilities. From text adventures and pixelated graphics to AppleWorks, the ][+ empowered a generation to code, create, and connect. Power Mac G4 MDD – Speed & Style take over. Also known as: The sleek beast that redefined power and design. The G4’s iconic curves housed a roaring processor that tackled video editing, music production, and 2000s gaming with ease. This wasn’t just a machine, it was a statement piece that declared, “the future is here.” Power Mac G5 – A peek into the future. The G5’s futuristic aluminum case housed a revolutionary 64-bit processor, making Apple one of the first to discover the next generation of computing. This wasn’t just a PC. This was a revolutionary innovation that inspired every modern PC or Macs. These Macs are much more than just machines, these are stories. Each click, whirr, and chime tells a story of creativity, innovation, and the evolution of technology. Come explore these iconic Apple computers, relive the past, and imagine the future. Join us on this journey through time and discover the magic that lives within these machines."
VCF East XIX
47 notes
·
View notes