Don't wanna be here? Send us removal request.
Statistics
We looked inside some of the posts by vyxated and here's what we found interesting.
Average Info
Notes Per Post
8K
Likes Per Post
6K
Reblog Per Post
1K
Reply Per Post
60
Time Between Posts
5 hours
Number of Posts By Type
Text
16
Note
1
Last Seen Tumblr Blogs


Fun Fact
When “GIF” was named word of the year in 2012, Oxford Dictionaries U.S.A. credited Tumblr for pushing the word.


Text

ph. Danko Maksimovic - Marseille, France (2025)
Film: Kodak Ultramax 400
906 notes
·
View notes
Text


if only there is a color wheel feature in build/buy ... 😵💫
#wip: cc#for the flat backdrop btw#sanity saved by the fact that i dont have to export these manually lol
17 notes
·
View notes
Text


more of that not-so-abandoned cottage.
296 notes
·
View notes
Text


just a couple edgy teens and their bald cringe uncle that they secretly think is cool as fuck
413 notes
·
View notes


Text


abby and raphael took whatever little money they had to turn their spare bedroom into a nursery. they'll be having a baby boy
723 notes
·
View notes
Text
New home


I love different сс materials.. all my sims houses are completely сс 💕


absolutely in love ❤️💖💕 @syboubou @atticwindowatdawn @gua-cc @awingedllama @maxsus @imfromsixam
Thank you for everything you do
196 notes
·
View notes


Text

yeehaw
#wip: cc#just a quick n dirty way to get quick swatches :-)#not going to fully use them obv#still need to curate the color selection
19 notes
·
View notes
Text
Automation tips for CC creation (using photoshop + other softwares)
As someone who had to deal with 2000+ files several times in different ways, I've come up ways to do the minimum amount of manual work and just let the 'puter do the heavy lifting 😆 gotta keep that wrist healthy, ok?

very long post ahead 👇

// Convert .DDS files to .PNG in bulk
Oftentimes, you can use S4S built-in export all feature to export all images/swatches at once and give you the .PNGs you need. Sometimes, you can only do so via the batch export button, which only exports them as .DDS files (and they usually need further tweaking if they have alpha/transparency and you want to further edit them). Here's a quick way to convert many .DDS files into .PNG!
tools used: photopea

Batch export all textures that you want to edit from your package file
Using Photopea > click File > Automate... > Convert Formats > select previously exported images and choose PNG as format
Save .zip file and voila! They'll all retain the filename structure that S4S uses for batch export/import :-)
// Convert .PNG files back to .DDS in bulk
Some textures can only work properly if the file format imported is in .DDS. Unfortunately, converting them into .DDS using Photopea's feature wasn't working for me, so instead I found and used this program that does it automatically! (here I am contemplating all the time spent on manually converting files one by one and complained all the way through :'))
tools used: DDS converter

Source Folder: where your .dds files are; Target Folder: where your .png files are saved
To input, just drag and drop the folders into each text box and it will automatically fill in for you their folder paths
Choose the Output Format and Options depending on what you need, and Convert! (Check via S4S to see which settings you need to input.)
For example, some UI-related textures must be imported as .DDS with RGBA8, w/ alpha/transparency and no mip maps. So I selected RGBA as the Output Format, enabled alpha in Options, and disabled everything else.
// Photoshop's Actions for anything that can be automated
I won't get too much into this since there are tutorials using Photoshop Actions for recoloring a base texture/making an all-in-one recoloring set, but it can also be used to apply a set of steps/actions to several texture files, which leads me to the next point/tip:
// Photoshop's Batch feature
Say you have 50+ similar looking but not 100% identical textures that you want to edit, but going to each file and editing them takes a bit of time of your day. Easy fix!

tools used: photoshop/photopea
Create/record actions as usual on one of the files (and make sure it works well/comes out right).
File > Automate > Batch
Select your recently made action > choose source files/folder you want to apply the action to.
⚠️⚠️ Make sure that you don't have the .PSD file of the texture you were editing on in the source folder, or else the batch feature will apply the action on your .PSD file as well and mess it up (guess who learned the hard way? haha)
Choose Destination as either Save and Close (will override) or Folder (makes a duplicate, can be renamed, more safe too).
examples of what I've used it for: - applying different backgrounds for my TidyCAS thumbnails - making previews for my CAS lighting mods - recoloring 30+ ts4 cursors into ts2 style cursors - editing 1000+ texture files for the club gathering icon (only took 20~ minutes) - recoloring 2000+ CAS/BB thumbnails for my Pastel UI by copying an adjustment layer for one color (manually) then letting the action do the rest to my existing icons (pasting and merging the layers together, all automatic)
// Export layers to files
Getting sidetracked a little bit, but if you use an all-in-one recolor action set that applies different color swatches to different layers, you can use Photoshop's Export Layer to Files feature to quickly export them into their own files! I wrote about its features >> here <<
// Photoshop's Layer Comps for everything in general
Honestly? Such an underrated feature and one I'm most excited to use/talk about. With S4S batch feature in mind, layer comps can be used to rename & export your files in the format that S4S uses to batch import them (so you don't need the hassle of manually saving textures, most of the work is done at the initial stage). What's great about this is that you can:
Utilize layer comps for recoloring instead of using photoshop actions + you can easily update them if you make any changes to the base texture/adjustment layer :D
(Better yet, you can create a base .psd file with layer comps for each swatch, then copy that base file whenever you start a new recoloring project. I've tried saving a psd with layer comps (pic below) vs a psd w/ all-in-one action set applied to the base texture then merged, and it's 28mb smaller in size! Very adjustment layer friendly and doesn't require you to make a complicated action set.)

Create multiple variations of your texture in the same .psd/project file and save them as layer comps, instead of trying to remember which layer to show/hide.
examples: - making my eye recolors where I've separated the iris, pupil, and sclera into different layers and enabling/disabling when needed so - making my highlighter set where I've separated different sections of the highlight (forehead, nose, cheeks) into diff layers that I can show/hide - making my custom texture for CAS/BB thumbnails for my Sims 2 UI mod in very few files instead of making different .psd files per icon.
Rename the layer comps to match with the original texture(s) file name, so that they can be used for batch importing later on.
(When you import multiple files into an opened photoshop document (not as individual files), it will keep the filename it has on, and you can copy those filenames as you create new layer comps.)

Last but not least, if you make a new layer or added a layer mask to the base texture, you can add those additions to the existing layer comps by selecting all layer comps > select only the layers you've modified, then click on the eye icon (third from the left) so that it shows up on all layer comps. You can reorder the layer comps anytime you want as well.
// Batch export Layer Comps into files
Now if you went 👀 at its features, then this one's as exciting, because the layer comps you created can be exported with the name that you gave the layer comps with! To export them:

File > Export > Layer Comps to Files
Enable Index if you didn't name the layer comps properly (but have arranged them in the order you want them to show up in). Useful too if you add new layer comps in between and don't want to rename everything else that comes afterwards.
// Bulk Rename Utility
On the occasion that I don't name my layer comps properly (like the hair swatch example), I just use the bulk rename tool to add the necessary prefix/suffix :-) and practically anything else you may need the tool for.

here's an example when the layer comps are exported with index # enabled (starts as 0000).
// S4S batch export & import

for importing/exporting CAS/BB items quickly
#vyx.resources#ts4 tutorial#tutorial#photoshop#dont mind the patrick 😭 otherwise the post looks weird on desktop theme#layer comps my beloved..#have you heard of layer comps? you should get to know her#layer comps the love of my life#it's me and layer comps against the world#(i am normal about layer comps)
246 notes
·
View notes
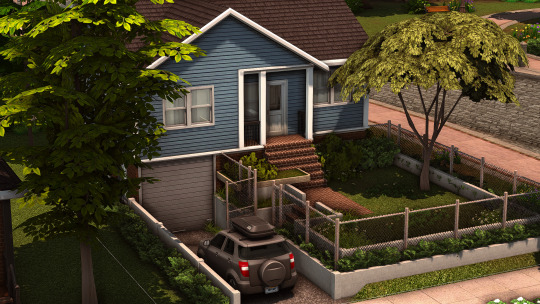
Text


The sound of kids playing and fishermen laughter by day, the sound of trains and dinner chatter by night; the sound of car doors closing and distant conversations; dogs barking; a worn out basketball hitting pavement; disgruntled construction workers swearing…
…in Stillwater, Foundry Cove.
I’m still working on adding some life to the neighborhood part of the North Hollow save. Some features have definitely changed since the last WIP. The trees, for one. (I’ve been super picky about trees). I also decided to embrace the small town vibe, and have since then combined my inspirations (a dash of northeast, a sprinkle of PNW, and anything that inspired my Pinterest board lol.) I’ve been practicing my building too. (I’m not a builder at heart. Oh and ignore the roofs. I hate roofing omg.)
1K notes
·
View notes
Note
wcif your talent? /790769796397531136/blender-modeling-painting-sesh prompted this ask, but like all your ui stuff is so cool too. how would i get started doing cool things like you?
🫣🫣 honestly evrything that I do started with a "what if I do an x" and then just.. start doing it haha. or I had an initial idea, be distracted by an even cooler idea and doing that instead (never imagined myself to do UI modding yet here I am lol). I had to learn stuff as I go because more often than not it's something that I attempted for the first time 😆
on a more serious note though, you can always start small and then work your way up to the more complicated stuff (bc the things you learn on the small stuff will be used in the complex stuff anyway, so by that point you'll be familiar with what you'll need to do, and figure out how to combine all those knowledge together)
it's probably better if you have a specific goal in mind as to not get overwhelmed by the amount of info out there. some ideas for consideration:
texture overrides or adding new recolors to bb/cas items: getting to know how to edit textures, how to find the objects/items you need in sims 4 studio, how to add swatches or clone an object/cas item in sims 4 studio.
3d modeling/creating an object/mesh by recreating real life objects you see around you/internet: learning blender program & its basic controls. you don't even have to do this with making CCs in mind! could just be for the fun of it. heck, you can just focus on the 3d modeling aspect and not bother with the textures (as this involves UV editing). most of my ccs (pet mesh bed, towel rug, wooden mannequin, coild headband, are all based on objects that I have irl)
editing/frankenmeshing objects/cas items: could be as simple as resizing something into a smaller version or combining two+ meshes into one. gets to learn other blender features like uv (for textures and morphing for cas), weight painting (make the clothes move with the body), vertex painting, etc.
those are just the few I could think of when it comes to CCs, not even including modding which is a whole different world 😆
in short: start something small > google search "how do i do insert problem sims 4 studio" > successfully creates something & be excited of the results > "now i wanna do x y z" > rinse and repeat 😼
9 notes
·
View notes
Text


Fun Fact: I have a 4'8 Vampire in my game and she terrorize everyone ( Her name is Penelope🦇)
135 notes
·
View notes
Text

just realized that I never made a BB version of my reflection CAS bg lol
anyone interested? 👀
135 notes
·
View notes