#for beginners learning tips
Explore tagged Tumblr posts
Visit Tumblr Blog
Explore Tumblr blogs with no restrictions, modern design and the best experience.
Last Seen Tumblr Blogs


Fun Fact
Tumblr has a low social media market share in South America.
Text
New to witchcraft? Awesome! Here's some things that you should avoid:
Divine [insert gender] or Sacred [insert gender]
Wicca (Especially "Wicca is ancient" bs)
Anything from Lewellyn Publishing
Visualization used as if it was energy work
Godphoning (talking to a deity for someone else, especially when it's non-consensual)
Spirit Animals
Spirit Shops
Spirit impreg
"Raising/higher Vibrations"
Contemporary/Western Reiki
New Age / Age of Aquarius
"Ascended Masters"
"Reptilians" (Aliens/pre-human terrestrials)
Emerald Tablets
Theosophy
New Thought
Anything related to Aleister Crowley
The Kybalion
"One True Way"
Witchcraft requiring a womb
"Men can't be witches" (Especially if they include trans women in this statement)
The Law of Attraction/Assumption
Spells purely with correspondences (Most spell candles/jars)
Appropriation (Dreamcatchers, Lilith, "Qabalah" or non-Jewish Kabbalah, Chakras, Kundalini, Yoga, Western Druidry, White Sage, voodoo, Hoodoo, etc outside of appropriate cultural context.)
"Black" or "White" magic
"Fae Council"
Claims of being a changeling
"Witchcraft requires sacrifice"
"Blood magic makes spells more powerful"
Reality Shifting
Magic/theology that requires self-harm
"Coven" (Especially if it's online)
If you see anyone endorsing anything on this list that is highlighted red, BLOCK THEM immediately.
Here is a list of things you should pursue!
#learn witchcraft#witch tips#baby witch#baby witch tips#beginner witch#witchcraft 101#witchcraft community#wicca#pagan#spiritual awakening#spirituality
833 notes
·
View notes
Text
I love new artists so much. I love going into the tags and seeing new people attempting to draw Ed's hair and beginner artists flailing to get Stede's nose just right and I love seeing these two drawn in new styles, in established artists' personal style that's sometimes a stick figure sometimes a little blob and sometimes super realistic. I love the creativity of this fandom in coming up with brilliant things like the snau. I love seeing their progress, I love seeing them gain confidence over time and share more, I love seeing them become friends with other artists and hyping other up. I love being reminded that "damn Stede's nose is still hard for me to get when I'm trying something more realistic" and "Jesus Ed's eyes are hard to get right aren't they"
I just really really like it when someone tries art for the first time because of our beautiful show.
#meow speaks#ofmd#our flag means death#I also love aotw for these reasons#because those tips that a lot of our beloved artists have shared are just so good#and they essentially tell you to say fuck off to people and just enjoy being a beginner#enjoy learning something new ♥️
119 notes
·
View notes
Text

ref material from the book "tomfoxdraws's anatomy for artists drawing form and pose" pg 12. completed 17.04.2025
#artwork#art#art practice#art study#practice art#sketch#digital art#anatomy#artists on tumblr#art process#drawing#illustration#ref#drawing anatomy#art tips#art style#art on tumblr#drawing tips#art history#beginner artist#sketches#study#art student#art school#art stuff#learning art#studyblr#studyspo#studyblog#study blog
25 notes
·
View notes
Text
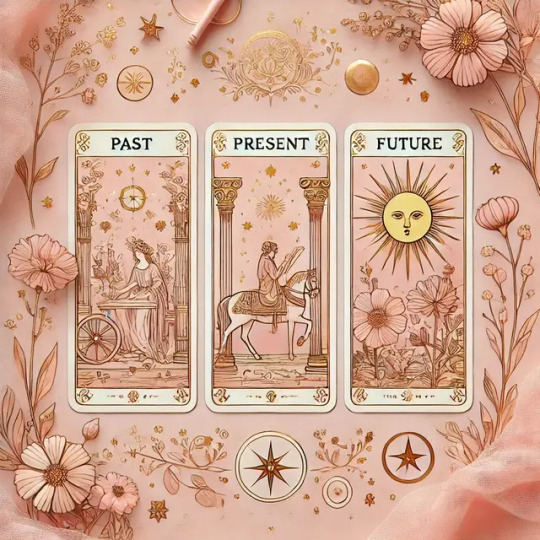
✨The Three-Card Spread
The three-card spread is one of the simplest and most versatile spreads. It can be used to answer a specific question or to get a general overview.
How it works:
Shuffle the cards while focusing on your question or situation.
Draw three cards and lay them out in a row.
Interpret the cards according to a simple structure, such as:
Past - Present - Future
Situation - Obstacle - Advice
Body - Mind - Spirit
💡 Example: If you ask how to deal with a work challenge and draw:
The Fool (Past): You embarked on something new with enthusiasm.
The Chariot (Present): You are determined, but you need to maintain control.
The Sun (Future): Success is just around the corner, but it requires optimism and clarity.
#tarot#tarot cards#tarot reading#tarot spread#three card spread#beginner tarot#tarot for beginners#easy tarot spreads#learn tarot#daily tarot#tarot inspiration#tarot community#mystical vibes#spiritual guidance#divination tools#past present future#tarot blog#tarot tips#tarot deck#intuition#pink aesthetic#golden vibes
31 notes
·
View notes
Text
rough art tips to learn and then break at your leisure.
the distance between your eyes is roughly one eye. the corners of your mouth dont extend past the middle of each eye. ears are roughly in the middle of the tip of the nose and the eyebrow. the eyes are in the very centre of the head. the neck is just a Little slimmer than the width of the head (varies with fat distribution, but fat tends to build up under the chin). hair is easier to draw when you plot out the hairline and then where it parts. leaving appropriate distance on the side of the face (cheekbone area and back to ear) contributes to making characters look more realistic/hot as hell. i dont know specific tips for that so use reference. an amazing reference/study site is lineofaction.com . if you think of the face in planes it makes it easier to construct (look up tutorials). if you draw a spiral like a tornado it can help you figure out awkward perspective for extended limbs (look up foreshortening coil technique). tangent lines are when two lines intersect and cause visual confusion (when it looks like a line that defines an arm is part of the line that defines a building, for example) and avoiding them makes your art way easier to comprehend. quick trick to good composition: choose a focal point (where you want your viewer to focus), detail that area the most, and make sure various elements of the piece are pointing to that focal point. you can use colours to contrast hue, saturation, and brightness and make certain elements of your drawing stand out. drawing in greyscale can help you figure out values. using black in a piece isn't illegal but you should know what you're doing when you do use it- it desaturates a piece and if used as a shading colour can desaturate and dull whatever youre shading too. if you use almost-black lineart and then add black to darken the very darkest areas it will do a lot to add some nice depth. the tip of your thumb ends just above the start of your index finger- your thumb also has two knuckles and all your other fingers have three. if you see an artist doing something you like (the way they draw noses or eyes or hair or anything else) you can try to copy that and see if you want to incorporate it in your style <- this is ENCOURAGED and how a lot of us learned and developed our styles. there are ways to add wrinkles to faces and bodies without making the character look a million years old, you just have to keep experimenting with it. The smile wrinkles around your muzzle dont connect to your mouth or to your nose; there should be a small space in between smile or nose and the wrinkle line. eyes when viewed in profile are like < aka a little triangle shape. think of the pupil like a disk and apply foreshortening to it (it looks like a line when seen from the side instead of a full round dot). subtle gradients can add a LOT to a piece. texture can also add a LOT. look up Tommy Arnold's work (his murderbot pieces are some of my FAVOURITE) and zoom in. find those random little circles he added and try to figure out why he added them there. light bounces. there's lots of way light bounces. sometimes it even spreads through the skin. i do not know these light tricks yet but i want you to know that they exist. draw a circle to indicate hand placement, draw a straight line between that circle and the shoulder, and then (normally at a right angle) draw a straight line on top of that line to find the placement of the elbow. elbows are normally placed Just above the hip when standing and your arm is at rest. there are no bad colour combos if you're brave enough about it, just fuck with the saturation and brightness until it works. keep playing. try new things. add your own tips to this post if you want or even expand on some ive mentioned here. good luck go ham etc
#look at this post#the sum of almost all of my art knowledge#all that i can remember rn anyway lmaooo#shit i didn't mention the tips for backgrounds that i know#eh that's environment most of this deals with character work anyway#i learned most of this from tutorials and kind artists who like to talk about their work#i would not know NEARLY as much about creative shit as i do if it weren't for the people who were willing to talk about their skills#and their tricks and their observations. id be nothing without them i dont remember most of them but i am so so grateful for that kindness#so ig here ill spread that a little further#if you have any questions go ahead and ask i am a NERD about art okay i do not know everything but i am always willing to talk about what i#do know#art tips#one of the most important things for you to do as an experienced or beginner artist tho#is to PLAY#experiment#figure out what's fun and what looks nice and what looks nice faster and just. whatever the fuck you want to learn#it is SUCH a joy
288 notes
·
View notes
Text
How to Sew Own Clothes for Beginners - Free Sewing Patterns
In this post, you will learn how to sew own clothes as beginner. Love what you see ? Support me by snagging some cool items from my shop! Every purchase helps me bring you more awesome content. Thank you! Shop Now Why Sew Your Own Clothes? Sewing your own clothes is a fantastic way to express your personal preferences and style. It offers the freedom to create unique pieces that fit you…
#Beginner-friendly sewing patterns#diy clothing#Easy Sewing Projects#free sewing patterns#How to Sew#Learn to sew#Personal preferences#Sewing journey#Sewing Machine Basics#sewing skills#Sewing Techniques#Sewing Tips for Beginners#step-by-step sewing guide
68 notes
·
View notes
Text
Art is NOT a talent. It's a skill.
Absolutely nobody picks up a pencil or paintbrush for the first time and creates a masterpiece.* Nobody is born automatically "talented."
*If you're trying out a new medium like say acrylic painting and have previously built up skill drawing with pencils there ARE transferable skills and some people can still make amazing artworks their first time but there is still a learning curve! Your mileage will just vary.
But so much of what we see online and in galleries and in textbooks is finished artwork from artists that have spent years or even decades developing their craft and their skills. It's not fair to compare beginner artwork to that but we do. It's easy to feel like some people are talented and some people aren't.

Image ID: A photo of The Starry Night painting by Vincent Van Gogh. The lower 1/3 of the painting depicts a small village. To the left is a large dark mass that stretches from the bottom of the canvas to the top. The sky is built out of thick black, blue and white brushstrokes that form swirling shapes. As well as yellow stars encircled by lighter brushstrokes and a big yellow crescent moon in the top right corner. End ID.
So how do we stay motivated to learn a skill when we don't feel talented?
Practice 1: Don't compare your work to anything else. This is ideal but really hard to do! Especially when the internet makes it so easy to access art from anywhere, anyone, and any time! And it's pretty impossible to go your whole life without interacting with art whether it's film, music, paintings, sculpture, posters, books, etc.
In practice this might mean going offline when you feel bad about your art or your work. It might mean avoiding engaging in art an hour or so before you begin work on something. Or avoiding the internet while you're working.
Practice 2: Compare your newer work to your older work. It can be really helpful to see how far you have come. But it can also still be frustrating if it's not at the level you want it to be. It can also be frustrating to see older work that's "better."
In practice this might mean keeping a folder or portfolio of work you are proud of that's easy to access whenever you need a boost of inspiration. You can also try sharing your work with friends and family if you can rely on them to express joy at seeing your work and lift your spirits when something doesn't turn out exactly as you wanted it to.
Side note: I have run into many cases on Tumblr where people say it's IMPOSSIBLE to get worse at your chosen craft. It's not. Skills aren't linear. If for any reason you have to take a break from your craft you will probably be rusty when you return to it. Sometimes trying something new with your craft won't have the results you want. And even if you practice every day and get really good at your craft, you're still human. Humans have bad days. It happens. But this is why even comparing yourself to your own art isn't perfect. (And if you are losing skills because of mental or physical health problems that can be uniquely frustrating but know that even if you can't create at the supposed "higher level" you were at before, any art you make is still wonderful and worth making and sharing!)
Practice 3: Seek out and enjoy different kinds of art! Seek out beginner art. Seek out different kinds of art!
In practice you can try following so-called amateur artists online with small follower counts and uplift each other in the comments. You can seek out new art forms and styles that don't meet the "perfect" or "highly talented" standards you set for yourself. (Hint: Linda Berry's art is great for this. She intentionally creates art the way a child might and has done small workshops at art schools demonstrating how freeing it can be to let go of notions of perfect anatomy, perfect proportion, etc).
I have one final thought:
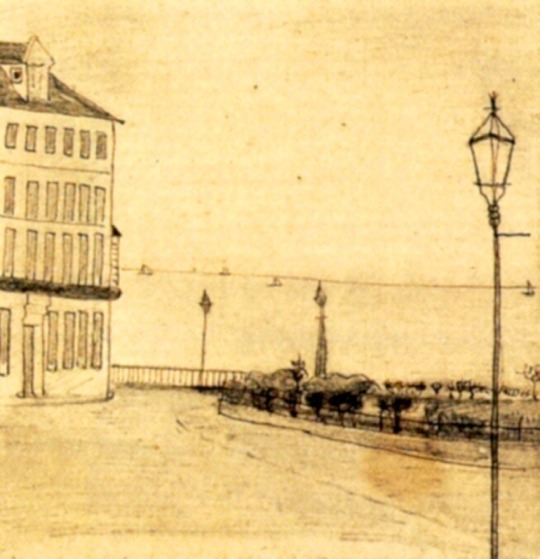
Image ID: A sketch on what looks like a yellowed piece of paper. On the left is a building constructed out of simple rectangles. Extending from the right of it is a simple line for the horizon with a couple tiny triangles and half circles representing boats in water. There is a flat railing made of two horizontal lines and many small vertical lines in-between that divides the water and the land. Roughly sketched plants in a gated area beside it. And a simple lamp post extending from the bottom right of the page towards the top. End ID.
If this were hanging in a museum across from The Starry Night would you think it belongs there? Do you think the artist that made this drawing is less talented than the one that made The Starry Night? What if this artist kept drawing landscapes? What if this artist took up painting? What if this artist tried experimenting with colour? What if this artist experimented with brushstrokes? What if I told you that Van Gogh was the artist that made this sketch called View of Royal Road, Ramsgate in 1876, thirteen years before he painted The Starry Night?
You can visit this page to see hundreds of his early works if you don't believe me: https://www.wikiart.org/en/vincent-van-gogh/all-works#!#filterName:all-paintings-chronologically,resultType:masonry
Practice 4: Look up old works from your favourite artists if you can. What they created when they started will likely be much different from what they're known for. And it might be something easier for you to aim for if you wish to practice to create like them.
Everyone starts somewhere.
-
TLDR:
Art is NOT a talent. It’s a skill.
Nobody is born automatically “talented.”
It’s not fair to yourself to compare your work to finished artwork made by artists that have spent years developing your craft.
So instead:
Try hard not to compare yourself to others. Minimize how much or when you engage with other art if needed.
Remind yourself of work you’ve done that you love and how much you have learned and accomplished. Work to enjoy the process of creating more than the finished product.
Seek out different kinds of art that’s made by beginner artists or that doesn’t look “perfect”. You'll be less hard on yourself for not meeting unrealistic standards.
Take inspiration from your favourite artists but not just the work they’re known for. If you can, seek out their beginner, rougher work. Their work that you admire will seem much more possible when you can understand how they got there.
Everyone starts somewhere.
My hope is that my new blog @start-your-art will be a good resource for anyone looking to start or continue their art journey.
#art tips#artists on tumblr#art#art motivation#artblr#art resources#art tools#art inspiration#art resource#art journey#learning art#beginner artist#art guide#art help#art advice
42 notes
·
View notes
Text
Full disclosure: I need to make $300 in sales today to make ends meet for me and the kiddo and the animals. So if you wanna book a reading, or take one of my upcoming classes, or even send a tip cuz you like my content and wanna support a disabled family, the link is in my bio.
(Sharing and interacting with this post would help too💕)
#tarotreader#shadow work#tarot#witchy#witchcraft#learning tarot#tarot tips#beginner witch#disabled#small business#disabilties#autism#adhd#audhd#fibromyalgia#chronic illness#chronic pain#chronically ill#migraine#endometriosis#witch community#community care
9 notes
·
View notes
Text
Mistakes I Made In The Beginning Of My Practice🦋
What Makes Something a Mistake?
How do we define a mistake? How do we know when we've messed up? These were questions that haunted me in the beginning of my practice. I was overly worried about doing things wrong and having to pay the price for those mess ups. The uncertainty of it all made me really hesitant to start experimenting in my craft. I would later come to terms with the fact that mistakes are inevitable, but as a beginner I was definitely intimidated.
The truth is, I'm not really sure there's a surefire way to know if something is a mistake until we've messed up. Spell work can be tricky in the sense that we often define our own parameters of success. This means that a spell can be failure to one person and a success to another based on their personal views of what success means. If a spell has consequences that we don't intend it to have or manifests in a way we weren't expecting, does that constitute as a failure? Sometimes yes and sometimes no. In my opinion the best way to determine if something's a mistake is to mess up. You won't know until things go wrong.
How I Rectify Mistakes:
To start, remember mistakes are inevitable. We can't avoid them and we shouldn't try to. Sometimes spell work isn't going to manifest in the way we were expecting. Sometimes our spells are going to force us to confront uncomfortable truths or set boundaries in order to get what we want, and there may be no other way around that. This is a reality that we should strive to accept rather than avoid.
But what happens when we actually do mess up? How do we go about fixing what we've done? I follow a few guidelines which help me determine what my next steps should be and hopefully these are helpful for you too.
Determine what has happened and if the spell is influencing the situation- the effects of some spells are relatively short lived so if the spell isn't currently influencing the situation then you're on damage control (and a good cleansing should be enough). However, some spells (often spells that are contained within a vessel or are tethered to you) need to be undone first.
Cleanse or banish- depending on the type of spell you may feel like cleansing just isn't enough. If that's the case, doing a banishment of the effects/energy of your previous spell should do the trick.
Mundane over magical- the effects of spell work often show up in our daily lives so taking the time to fix/heal from life events is super important.
Reflect- it's important to try and understand exactly what went wrong. Were you specific enough? What ingredients did you use? What order? What did your petition say (if you used one)? Where was your mind when you were casting? Going over how you did the spell can be helpful when determining what went wrong. It's important to reiterate that sometimes our spells are going to force us to confront uncomfortable truths or set boundaries in order to get what we want. Something that feels like a mistake now, could play an important role in you getting what you want later on so keep that in mind.
Mistakes I've Made:
I've talked about this before but I once did self-love spell for myself and a group of friends. This was fine, my mistake was trying to do them at the same time. I ended up accidentally binding myself to all of them. Months later we had a major falling out, which inevitably ended our friendship and was especially difficult on me. I was sick for several days and ended up doing several chord cutting spells to rectify the situation.
I was struggling with severe anxiety a few years ago and decided to do a spell to help with it. The problem was that I didn't define what I wanted from the spell. I kinda just said "no more anxiety" and lit the flame. When doing this spell, social situations had been the driving force behind my anxiety. However, it became health related after this spell. I should have been more clear in my intention when doing that spell but more importantly, I should have known that there is no "easy" fix for anxiety.
My first baneful protection was a blunder because it didn't work. I was nervous about messing up, which caused me to. Something I find influences baneful protections are boundaries (and our ability to set them). If you can't set boundaries in the physical world, then you aren't going to be able to set them energetically (in my personal opinion). I was an absolute pushover in relationships. I let people take advantage of my kindness and had trouble putting my foot down. My energy reflected that and the baneful protection did absolutely nothing, it was both a waste of ingredients and time.

🖤*All images are from Pinterest*
#witches#witch#witchcraft#witchblr#witchcore#witch blog#baby witch#book of shadows#beginner witch#baby witch tips#witch basics#baneful magic#paganism#pagan#wicca#learn from my mistakes#witch talk#witchy things#witches of tumblr#witch tumblr#witch tips#witch community#witch asks#hellenic polytheism#intuition#manifesting#magick#grimoire#spiritualpath
211 notes
·
View notes
Text
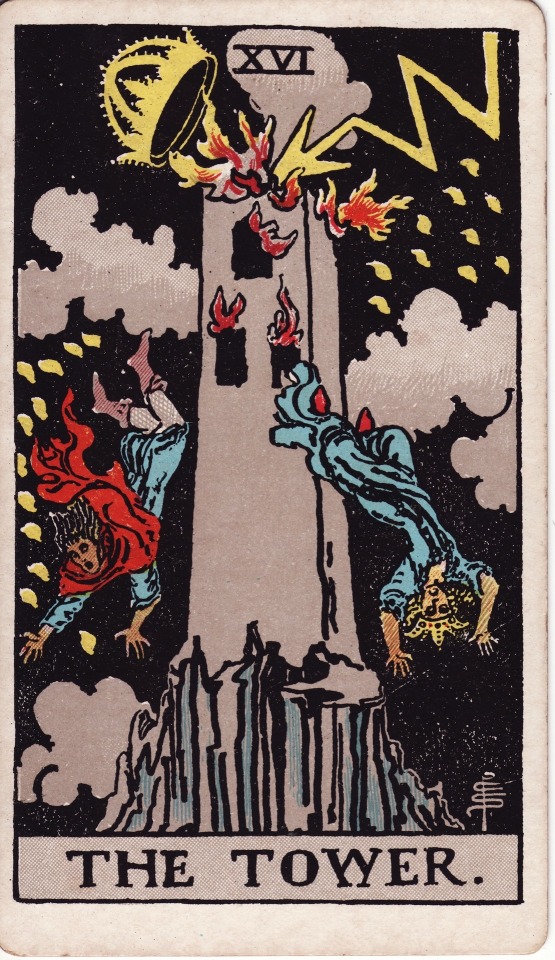
murphy’s law
“If there are two ways to do something, and one of those ways will result in disaster, he’ll do it that way.”
“Whatever can go wrong will go wrong.”
tower core 🫣
#tarot#tarotblr#tarot cards#divination#tarotcommunity#rider waite smith#tarot tips#tarot blog#tarot reader#the tower#tarot journal#learning tarot#beginner tarot
9 notes
·
View notes
Text
Learning to Cook Like a Witch: From Recipe to Spell
Cooking and spellwork have a lot in common. Just as a witch might craft a spell from disparate odds and ends, so too might a cook create a meal. It's not such a jump to consider that any food, no matter how simple, can become a spell.
In my practice, the thing that differentiates a mundane action from a magical action is the doing. If I'm doing something just to do it, it may have a magical effect. But if I do the same thing with the understanding that it may have that magical effect, it will have that effect.
Therefore, to go from recipe to spell is a simple act: Cook with purpose. The particulars are a bit more involved, of course, as most things often are as you become more advanced.
You have to know what your ingredients are for. When cooking, you can't just throw things together and expect them to taste good with no technique or thought. What does a particular ingredient add to the mixture? Is it for flavor? Does it add or change the texture? Does it bind the other ingredients together or provide a base to be added to?
The same idea applies to spellcrafting. You can't just throw random things together and expect it to work. There has to be a pattern, an understanding, a purpose to what you include. If your materials don't apply to your goal, how on earth will they work?
Success in spellwork comes from the intersection of purposeful doing and appropriate material selection -- just like in successful cooking.
The art of taking a recipe and turning it into a spell is rather simple when it comes down to it. It requires two fundamental cooking skills:
Recipe reading and comprehension
Understanding how and when to make substitutions
If you'd like the food you make to still taste good, as well, you have to also understand what various ingredients taste like. Rosemary and mint might both be good for cleansing or purification, but they taste so vastly different that replacing one with the other will wildly alter your food.
You've got to choose wisely and within the bounds of your tastebuds. Cooking up magic is no good if you can't eat what you make!
If you'd like to read the extended version of this post, including an inside look at my method for turning recipes into spells and an exclusive recipe, check out my Ko-Fi! For as low as a one-time contribution of $1, you can get extended and early access to my work.
Or, if you'd like me to take a recipe of your choice and turn it into a spell or write you a recipe spell from scratch, I offer commissions!
#home witchcraft#practical witchcraft#recipes#spell recipes#my spells#my recipes#witchblr#kitchen witch#kitchen witchcraft#hearth witch#witchcraft#witch community#learning to cook#witch tips#beginner witch tips#food magic#food spells#food#fireball apple fritters#aese speaks#a glimpse into my everyday practice#now i'm off to make a pork roast for dinnerrrrrrrrrrr#ok BYE
86 notes
·
View notes
Note
I think your art is spectacular and what I love most of all is when you make those mini comics, because everything about them is so stunning! So I've been needing to ask this for a while now:
How do you make those AMAZING compositions? The paneling, the placement of the bubbles, the whole thing leaves me awe-struck to be honest. Do you think about the layout a lot or do you just go for it? Just curious.
Thank you and I'm glad you like them ;w;
TBH I'm not the best person to give tips. I didn't really study comic making, but I do think my general instincts in laying out composition come from doing illustration and book design works in the past.
The best and most helpful (for beginners) post about it that I can tell you is Adrienne's comic tips which were my gateway to comic making. You can find it here. I still think they presented a lot of ideas very well in such a short thread. I really appreciate it! It helped me see how mangakas and comic creators panel their works which influenced mine too haha
#adrienne if u see ur tweet popping off again#it's me again#lolll#seriously tho#they give really good tips that beginners can learn
89 notes
·
View notes
Text

pose study. pose from the pose archive. completed 28.11.2024
#artwork#art#art practice#art study#practice art#sketch#digital art#anatomy#artists on tumblr#art process#drawing#illustration#ref#drawing anatomy#art tips#art style#art on tumblr#drawing tips#art history#beginner artist#sketches#study#art student#art school#art stuff#learning art#studyblr#studyspo#studyblog#study blog
22 notes
·
View notes
Text


youtube
#languages#spanish for beginners#spanish language#español#studyblr#study blog#study motivation#studying#creative writing#writing#writers on tumblr#writing community#writerscommunity#writers#writeblr#writer#writing life#writers of tumblr#student life#students#student#university#high school#school#college#tips#Youtube#ted talks#learning#learn spanish
14 notes
·
View notes
Text
the little tarot shop I like runs an eight week self-study tarot course (tho u can do it at your own pace) and it sounds cool and I'm thinking about signing up but I'm Nerbous
#hmmmmmmmb#its less abt learning specific meanings and keywords and such and more about like#intuition and learning how to read cards together as a story and such#i think it might have some good tips#I'm still a beginner even tho I've vaguely been reading for almost ten years LMAO
19 notes
·
View notes
Text
Not every highly-skilled or highly-experienced artist is a good teacher.
This isn't meant as an insult to amazing artists - being amazing at one's craft brings value to the world and the times we live in. But choosing to start a youtube series on 'how to draw', or dedicating your tiktok to art tips because a bunch of fans asked you about it so much is succumbing to peer pressure.
Highly-skilled/-experienced artists don't owe anyone a lesson plan. They make cool art that the rest of us are all inspired and dazzled by because they do what they love and dedicate themselves to it. They're invested in their craft, and it shows. It oozes from their pores and into their work.
BUT!!! ... if you choose to take up the responsibility of teaching others a craft, learn how to teach. Learn how to reiterate specialized terms or techniques in a simple, easily-digestible way. Encourage yourself to be curious about what you may not know or what's given a differing perspective. Practice an active understanding of the difference between disliking something and critiquing technique.
It takes a special kind of mind to be a good teacher. Ask computer scientists... Most of the higher levels of educators are actually research-oriented and don't do well with teaching (there often isn't someone better suited to fit a teaching position at that level). Doesn't make them bad at their field or a bad person; just means teaching isn't their forte.
If you're an artist, be an artist. If you want to teach, learn how. If you don't want to teach, don't succumb to fan/peer pressure. You're allowed to admit teaching isn't your forte and point people in the right direction, even for the seemingly smallest of tips. I take it as a convenience when I ask a fellow how they did something and they point me towards the books they studied instead of trying to teach me with terms that don't register.
#artist#art#artwork#creative#creating#art teacher#teacher#learning#skills#dedication#specialty#it's okay to stick to your own lane if you're already living your best life#artists do not owe beginners a lesson plan#art tip#art help
8 notes
·
View notes