#Simple Cooking
Explore tagged Tumblr posts
Text
Gut health 101
#tiktok#simple cooking#cooking#probiotics#prebiotics#self help#self healing#herbal remedies#herbal medicine#heal your gut#healthy lifestyle#food pairing
65 notes
·
View notes
Text
if ur ever looking for an easier, cheaper and more balanced meal ive got the "recepie" for you
it's just instant noodles with eggs and veggies but it fills me up, and while it is high in sodium, is helpful if cooking is a bit of a challenge for you/you'd eat something worse for you otherwise
basically all of this can be changed to taste/appetite, but i have a big stomach, so I'll be making a larger bowl. recepie can easily be cut in half.
ingredients:
- 2 eggs
i love eggs and they're good for you duh. i eat lots of eggs because they help meet daily nutritional needs and if you buy an 18 pack, they can be kinda cheap; as well as the fact they can be easily used up if they're about to go bad
- seasoning salt (optional)
can be found at dollar store, can be replaced with reg salt and spice of choice
- frozen variety vegetables
i buy frozen because they're already chopped, alot cheaper, won't go bad (unless you thaw and refreeze them), and obviously vegetables are good for you. pick any veggie you want, i usually go with carrots, broccoli, or parisian mix.
- 2 packs of mr.noodle
base of the meal, cheap as hell. especially if you buy a full palette of them.
- butter/oil/lard
to fry the eggs
- spices & herbs of choice
spices really make this bad boy. i usually use garlic, paprika, pepper, oregano and ginger but honestly, throw pretty much a little of anything in here. as i type this, im using a bit of curry powder and sage in addition to the other ones.
steps:
- begin with a frying pan or pot. ive even used a steel mixing bowl, get crazy with it. set the stovetop to low-medium heat, on my stove i use 3.5/9. add butter and once it's melted and spread out easily, wait a minute for it to heat up more.
-crack the eggs in, there should be a nice sizzle. i like my yolks runny, and it mixes better with the "broth" later, so take a fork and carefully try to grab the clear membrane around the egg yolk. attempt to pull it off slowly, but if it doesnt come off fully, no biggie. this is just so the egg cooks more evenly while leaving the yolk soft. i use the seasoning salt to sprinkle onto the eggs, the broth does not need it.
-continue to cook until the white is solid. the yolk should still be almost all soft by now, but even if it isn't, itll still go well with the rest of it.
-put them into a bowl from the pan. if there are egg bits stuck on the pan after, they'll come off.
-put water, ¼-½ the bag of frozen vegetables, spices, and flavour packets into the pan. crank that baby to max heat. once it's boiling, put the noodles in. could probably turn the heat down a bit now. cook until the veggies are soft enough to be poked by fork without much effort. if there's not enough water, just add a bit more.
we're done! put the noodles into the egg bowl, or if you're crazy like me, put the eggs into the pan of noodles.
now, this makes alot of noodles, so for some it should probably be halved, but it works for me, and it works if you haven't eaten all day and are ravenous.
enjoy! (i hope)
#this might be stupid but ive shared it with a couple friends and they said it helped them so why not post it#cooking#easy cooking#easyrecipes#adhd problems#adhd advice#easy#simple#simplerecipes#simple recipes#simple cooking#easy meals#easy meal#quick meals#cheap meals#cheap recipes#hope this helps someone and isnt just dumb lol
10 notes
·
View notes
Text
I struggle getting myself fed due to a combination of anxiety, depression, ADHD, and chronic pain. I cannot exaggerate what a fucking life saver my cheap, simple rice cooker has been. I think my rice cooker is six cups, so this won't work in a two or four cup one. I got my Oster one from Target, off sale it was $25, I think right now it's on sale for $15.
(FYI I googled "Oster zionist" and nothing came back connecting the two.)
I don't know more beyond the one simple recipe I use for it, but it's been emergency food multiple times the past few months. It's for coconut jasmine rice.
As someone who doesn't like coconut, I love this recipe.
Ingredients:
Jasmine Rice - 2 rice cups
CANNED Unsweetened Coconut Milk (possibly in the Asian foods section), about 13.5 ounces
1 Teaspoon of Salt
1 Teaspoon of Sugar (I think I use some sort of sugar substitute and it works fine)
1 1/4-1 1/2 normal cups of water
You will need one of those wire mesh strainer things (pictured), a can opener and a rice cooker, of course.

Steps:
1. Measure out two cups of rice into the strainer, then thoroughly wash rice until the liquid is clear. It doesn't take too long and I promise this is the most laborous part. When done washing, put the rice into the cooker.
2. Pour your water, coconut milk, salt and sugar into the rice cooker. Stir.
3. Hit start, wait for it to cook. Give it 10-15 minutes when finished cooking. Open it, stir it, if it's too wet for you, press cook again. My rice cooker just does an additional 3 minutes on its own when I press start, it doesn't do the whole time over again. Press start again if it needs additional time after that.
That's it! Feel free to eat it with some other stuff. Stir fry some frozen veggies to add in if you like. Eat it with your favorite style of cooked egg or some other protein.
I hope this can help someone like it helped me.
I also just learned how to make meatballs and it was shockingly easy and unstressful, so anyone would like me to talk you through that as well, I can. Fun fact: there are gluten free bread crumbs, so meatballs can be gluten free (if you don't want to use just egg). I also have my Bolognese cheat on here too...somewhere.
#riley cooks#riley's quick eats#quick eats#riley makes rice#food#cooking#simple cooking#rice#jasmine rice#gluten free#dairy free#soy free#lactose free#allergen friendly#cooking with ADHD#cooking with depression#cooking with chronic pain#cooking with anxiety#cooking with executive dysfunction
15 notes
·
View notes
Text
Adaptable Quiche
There is no such thing as the “Quiche Police”

Quiche was one of the first things I learned to make when I was 12 years old. My mother had just returned to the workforce and I was learning to cook to help her out. She said a quiche was easy, mostly assembling things rather than actual “cooking”. Over the years this is what I have learned.
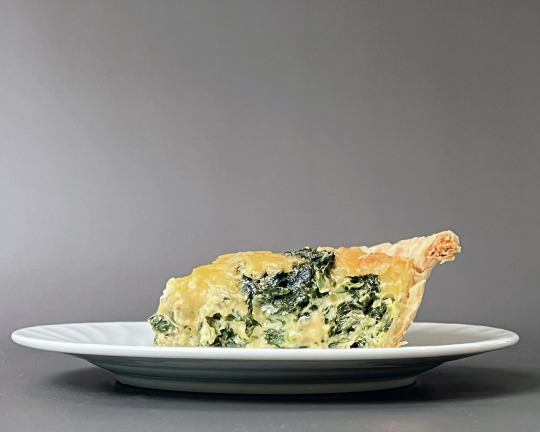
The basics of a quiche are pretty simple. As long as your egg-to-dairy-to-filling proportions are consistent, you can do anything you want. Our family’s “norm” was Spinach and Cheese Quiche but I soon realized that you could turn anything you found into quiche filling by peeking into your fridge and cleaning it out. There is no such thing as the “Quiche Police”. For a 9-inch pie crust, you just mix 5 or 6 eggs and ¾ cup of some kind of dairy liquid or dairy substitute for a base. Then you can go wild with 2 to 2 ½ cups of solid ingredients for flavor and texture. About 1 cup of this is usually cheese but relax, that’s not written in stone. Now all that’s left is the seasoning. You can increase or decrease according to your taste. It can be as simple as salt and pepper. Want to switch onion salt for regular salt? Perfectly acceptable. A couple of dashes of Tabasco? Sure. Now you get it. Go with what flavors you love.
So let’s begin. First, we need some ingredients. You look in the fridge and find some leftover ham from last night's dinner, a bag of shredded cheese you had planned to use for taco night but went out for pizza instead, and some scallions left over from the salad you made for lunch. Now, make a quiche.
Quiche
Preheat the oven to 375°F.
The Base:
1 refrigerated 9-inch pie crust (or homemade if doing that brings you joy)
6 large eggs
¾ cup any kind of milk (or dairy substitute)
The Flavor and Texture:
1 cup cooked ham chopped
1 cup shredded cheese (any kind you like best)
¼ cup of sliced green onions (or finely diced onions, any kind)
The Seasoning:
½ teaspoon salt
¼ teaspoon black pepper
Let's start with the crust. We always had a store-bought pie crust in our freezer, ready to go. I still keep them in my freezer, there is no shame in that. Store-bought pie crust has vastly improved over the years and you save more in stress and clean-up than you gain in saying it’s a homemade crust. If you are using the dough that comes in sheets and unfolds, unfold it and press it into a 9" pie plate, crimping the top edges if desired. This can be done by simply pushing the tines of a fork around the edge or the internet will offer many other ways if you want to get more fancy. If you have the kind that comes already crimped in its pie dish, you are set and ready to go.
The one cheffy thing I do is blind-bake the crust. It will make a world of difference and is a good skill to have in your back pocket for dessert pies.

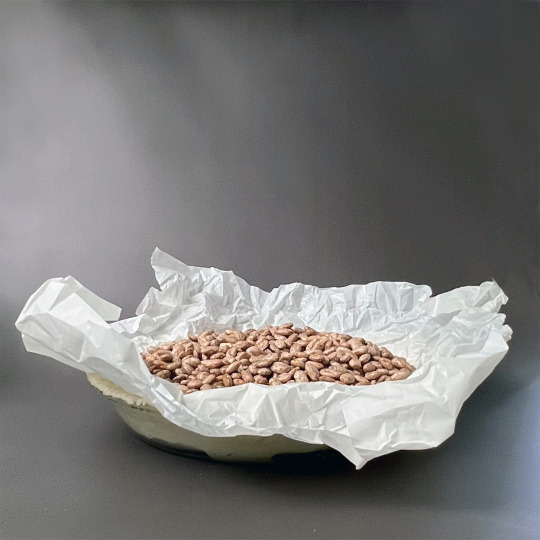
While the oven is preheating, cut a square of parchment paper or aluminum foil 2 inches wider than the pie pan you are using and place it on top of your crust. If you are using parchment paper, it can help to crinkle it up into a tight ball, and then open it up again. This will help it fit better into the pan. Gently pour pie weights, dried beans, or uncooked rice on top of the parchment paper or foil to fill the pan. This will hold down the crust and prevent the dough from puffing up during baking. I like to use dried beans, they are cheap, easy to pour, and spill less than rice. I keep them in a ziplock bag and use them all year. Bake the pie crust, with the weights for 10 minutes then lift out the parchment or foil along with the weights, and put the crust back in the oven for another 10 minutes. This whole process will give the crust a jump on the baking and keep the egg mixture from giving it the dreaded soggy bottom.
In a large bowl, whisk together your eggs, dairy liquid, and salt and pepper. A traditional or immersion blender will also get this done efficiently and leaves no trace of the unbeaten egg.
Evenly sprinkle the chopped ham, cheese, and green onions into the blind-baked pie crust. Pour the egg mixture over the top. You may find it easier to put your pan in the oven, on a cookie sheet, it will be pretty full.. Makes the transfer to the oven a lot easier.
With the pan on a cookie sheet, bake for 45-50 minutes until the center is completely set. A toothpick inserted into the center of the quiche should come out clean. Let cool for 10 minutes before slicing and serving. A quiche can be made the day before you need it and will keep for 2 to 3 days in your refrigerator. It’s delicious served cold.
Now here is the fun part.
Be brave, go crazy.
Remember, for a 9-inch pie crust, you want 5 to 6 eggs and ¾ cup of some kind of milk or dairy substitute for the base and 2 to 2 ½ cups of flavor and filling. About 1 cup of this should (or could) be cheese. If you are leaning towards the full 2 ½ cups of filling, go with 5 eggs so you don’t run over the sides.
Here are some other filling variations to try
A 10-ounce bag of chopped frozen (but defrosted) spinach, squeezed dry of all the water, this leaves 1 cup of spinach. 1 cup of shredded cheese. Total solid filling: 2 cups
6-ounce can (¾ cup) of drained crab meat, ¼ cup of thinly sliced scallions, and 1 cup of shredded cheese. Total solid filling: 2 cups
1 cup of sliced sauteed mushrooms. Saute in butter or olive oil. Be wild and add some crushed garlic, plus 1 cup of shredded cheese. Cook the mushrooms on high enough heat to dry them out and there’s no excess liquid. Total solid filling: 2 cups
4 ounces (½ cup) of Goat Cheese, a bunch of chopped chives, and 2 medium onions caramelized. Two onions slow-cooked in butter until golden brown, when properly caramelized will equal about ½ cup. Finally 1 cup of shredded cheese. Total solid filling: 2 ½ cups
2 medium sliced zucchini chopped and sauteed in butter or olive oil until some of the moisture is cooked away. 2 sliced zucchini will cook down to about 1 cup when sauteed.1 cup of shredded cheese.Total solid filling: 2 cups
1 cup of frozen chopped broccoli (defrosted and at room temperature) plus 1 cup of shredded cheese. Total solid filling: 2 cups
8 ounces of sliced and cooked breakfast sausage, with cubes of boiled potato plus 1 cup of shredded cheese.
Sliced Poblano Chili, a few sliced jalapenos (as many as the mood strikes you), frozen corn (defrosted and at room temperature) any combination can be used, as long as you stick to the ration.
Random Add-ins to be used at your heart's content as long as you stick to the ratio
½ cup chopped Artichoke Hearts
¼ cup Slice Green Olives
¼ cup Sliced Black Olives
2 tablespoons of Chopped Chives
2 to 3 tablespoons of Pesto
¼ cup Salsa (red or green)
Sprinkle of Old Bay Seasoning
Lemon Pepper (instead of salt and pepper)
When surveyed, people on the interweb like this in their quiche.
Purple Onion, Spinach, Goat Cheese
Basil, Smoked Gouda, New Potatoes
Caramelized Onions, Ham, Asparagus
Roasted Red Peppers, Mushrooms, Spinach
Artichoke Hearts, Feta, Greek Olives

#food#cooking#easycooking#easy cooking#simplecooking#simple cooking#creativecooking#creative cooking#learntocook#learn to cook#calmdownandcook#calm down and cook#joyofcooking#joy of cooking#cookbooks#recipe#homemade#quiche#juliefallone#julie fallone#foodpics#foodporn#foodies
4 notes
·
View notes
Photo


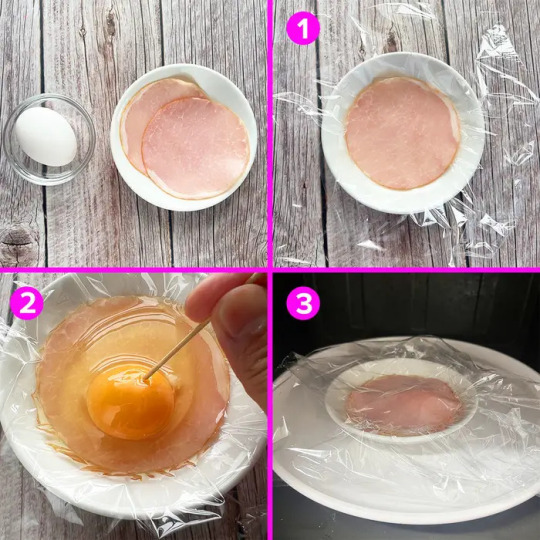
【たった2分で作れる!?】レンジで簡単!絶品ハムエッグの作り方とコツを伝授!
やってみよ🎵
14 notes
·
View notes
Text

Finally had enough stamina to actually cook today, nothing special, just some char siu fried rice.
4 notes
·
View notes
Text

Gonna try something new with the green peas! Onion, carrot, green pepper, and cucumber(!!) cooked with green peas, otherwise spiced with dill, thyme, paprika, dried ginger, dried mustard, salt, pepper, garlic, and bay leaves. It smells like it should have a good chunky parm or pecorino rind in there, but alas, I have not tested my tolerance to those yet... Maybe some nutritional yeast?? Well, maybe next time.
If I had planned better I'd have made it in the big cast iron, but I didn't anticipate how much veg I had bought. Ah well, at least I have something green to go with a slapdash dinner, since my frozen soup isn't thawed yet (oops).

#food#cooking#no recipe#bad food#ugly food#good food#simple food#simple cooking#low spoon cooking#low spoon food#meal prep#gluten free
2 notes
·
View notes
Text
Quick and Easy Garlic Mushroom Pasta
Preparation Time: 10 minutesCooking Time: 20 minutesServings: 4Skill Level: Easy Introduction This Creamy Garlic Mushroom Pasta is a comforting dish bursting with earthy flavors, creamy textures, and a hint of indulgence. It’s perfect for a cozy dinner or a special occasion when you want something quick yet elegant. Ingredients For the Pasta: 250g spaghetti or fettuccine Water for…
#comfort food#cozy meal#creamy pasta#creamy sauce#easy Italian recipe#family dinner#garlic mushroom pasta#gourmet comfort food#hearty dish#mushroom lovers#mushroom recipe#Parmesan pasta#pasta lover#pasta night#Quick Dinner#simple cooking#vegan option#Vegetarian Pasta#versatile recipe#weeknight meals
0 notes
Text
25 Quick Dog Meal Recipes That Your Furry Friend Will Adore
Feeding your dog a diet of homemade food is not only a cost-effective option but also a healthier alternative to processed kibble. By preparing meals at home, you have control over the ingredients, ensuring that your furry friend receives a nutritious and delicious diet. In this article, we will provide you with 25 easy and quick dog meal recipes that are sure to satisfy your pet’s taste…

View On WordPress
#animal nutrition#balanced diet#canine cuisine#delicious dishes#diy dog food#dog nutrition#dog recipes#dog treats#doggy delights#doggy dining#easy recipes#furry friend recipes#healthy dog meals#homemade dog food#mealtime ideas#nutritious meals#pet care#pet food#pet health#puppy meals#quick and easy#quick meals#simple cooking#tail-wagging recipes#wholesome ingredients
0 notes
Text
Chana Dal Fry Recipe: ढाबे जैसी चना दाल फ्राई बनाने के आसान टिप्स😵
Chana Dal Fry Recipe: ‘Simmo Kitchenwali’ की विशेष चना दाल फ्राई रेसिपी, जो आपको ढाबा जैसे स्वाद का आनंद घर पर ही प्रदान करेगी। इस आसान और विस्तृत गाइड के साथ, आप अपने परिवार और दोस्तों के लिए स्वादिष्ट और स्वास्थ्यपूर्ण चना दाल बना सकते हैं। आज ही ट्राय करें और घर का बना ढाबा स्टाइल खाना एंजॉय करें! मुख्य बिंदु आसान और सरल विधि: इस रेसिपी में चना दाल को बनाने की आसान और सरल विधि बताई गई है, जो…

View On WordPress
#Chana Dal Fry#Comfort Food#cooking#cooking tips#Dal Tadka#Dhaba Style Dal#Easy Dal Recipes#Family Meals#Healthy Recipes#hindi recipie#Home Cooking#Indian Cuisine#Indian Spices#K.G.N Digital#Quick Recipes#simmo kitchenwali#Simple Cooking#Traditional Indian Food#Vegetarian Cooking
1 note
·
View note
Photo

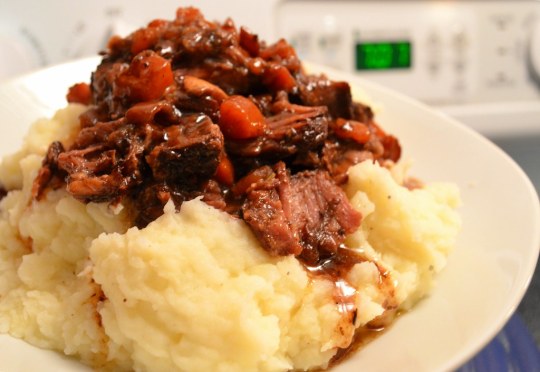
Spice up your culinary skills! Succulent Secrets is ready to reveal the best beef shank recipe ever - expect flavors that will thrill your taste buds. Don't miss out! #BestBeefShankEver
#foodie#recipes#food blog#cooking tips#homemade#beef shank recipe#food lovers#culinary secrets#simple cooking#home cooking#dinner ideas#meat lovers#comfort food#hearty meals#cook it yourself#succulent beef#food inspiration#mouthwatering#delicious#tasty#eat well#kitchen adventures
0 notes
Text
Yum!! Vegan sweet treat
44 notes
·
View notes
Text
look out for future you 👹
if you have a soda (root beer, dr pepper, cocacola, sprite, pretty much anything) you can pour it in a freezer ziplock bag and stick it in the freezer.
you can wait overnight, or just forget abt it until you have a bad day or want a slushie, then you just pull it out, stick it in a blender with some of those french vanilla coffee creamer shots, and bam!!! its like an ice cream float in shaved ice form! its like magic it gets all smooth and creamy and deliciouss ⭐️ or if you dont have creamer shots milk + sugar + vanilla works! deconstructed ice cream blend it all in with the soda and its almost the same thing, plus!! if youre 21+ you can add some spicy sauce in there and i hear thats also really good i think my parents use like a vanilla rum!
present you’s gotta look out for future you i promise this is one of those things you can just do it super fast and forget abt it until you need it and then its like !!! wow! a gift!! for you bc past you loves future you!! and it never even expires bc its frozen soda so it will stay good pretty much forever until you need it!
so yeah thats my protip of the day coming from a person who had a root beer in the freezer for like 4 days and is now very enjoying jt 😌👌
#life tips#tips#life hacks#adulting#cream soda#snow cone#look out for yourself#self care#easy recipes#easy cooking#simple#simple recipes#simple cooking#low effort#super easy#do it#try it#trust me#its so good#and so easy#and so much cheaper and easier than going out to buy a snowcone#you can actually just go to a gas station#buy a soda for like $3#and steal their coffee creamers#its to taste but i think 4-5 is good for one can#they wont care abt 5 missing creamers i promise
1 note
·
View note
Text


#i am a human of simple needs#all i need is a fat dude who knows how to cook#and softens as the years go by#heavyheavycream#feedism comics#vanilla comics#comics#male gaining
3K notes
·
View notes
Video
youtube
Healthy Simple Low Cost Quick Vegetarian Meal অল্প খরচে লাউ শাকের নিরামি...
0 notes