#simplecooking
Explore tagged Tumblr posts
Text
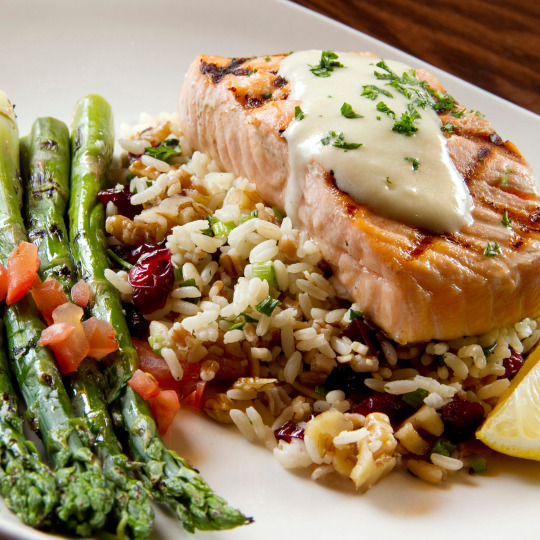
Simple Salmon with Asparagus & Brown Rice: A Nutritious Dinner!
This Simple Salmon with Asparagus and Brown Rice recipe is a quick and healthy dinner option that’s full of flavor! Tender salmon fillets are paired with vibrant asparagus and served over hearty brown rice, making for a balanced meal that’s easy to prepare. Perfect for busy weeknights or meal prep, this dish is both delicious and nourishing!
#SalmonDinner#HealthyEating#QuickRecipes#NutritiousMeals#MealPrep#EasyDinners#Asparagus#BrownRice#SimpleCooking#WeeknightMeals#recipes#eat#food#food recipes#kitchen#cooking#food and drink#eat clean#healthy food#quick dinner
8 notes
·
View notes
Text
Adaptable Quiche
There is no such thing as the “Quiche Police”
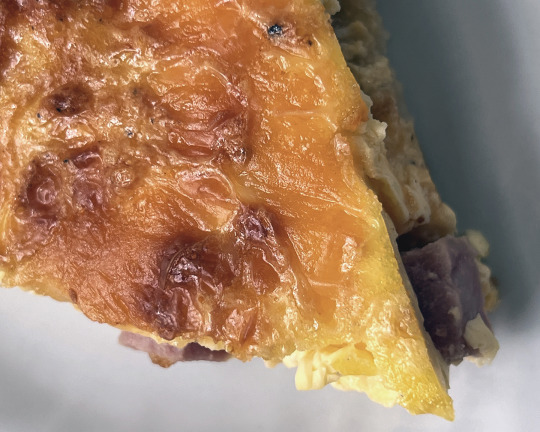
Quiche was one of the first things I learned to make when I was 12 years old. My mother had just returned to the workforce and I was learning to cook to help her out. She said a quiche was easy, mostly assembling things rather than actual “cooking”. Over the years this is what I have learned.
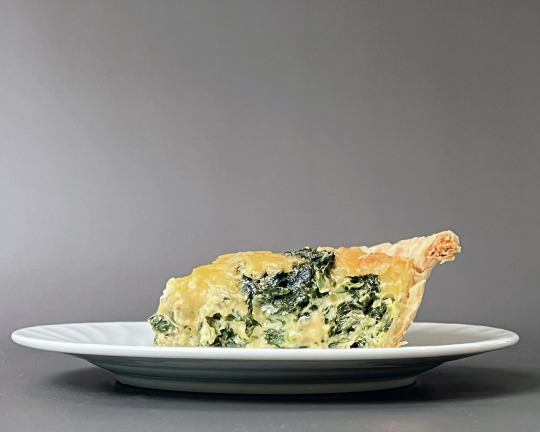
The basics of a quiche are pretty simple. As long as your egg-to-dairy-to-filling proportions are consistent, you can do anything you want. Our family’s “norm” was Spinach and Cheese Quiche but I soon realized that you could turn anything you found into quiche filling by peeking into your fridge and cleaning it out. There is no such thing as the “Quiche Police”. For a 9-inch pie crust, you just mix 5 or 6 eggs and ¾ cup of some kind of dairy liquid or dairy substitute for a base. Then you can go wild with 2 to 2 ½ cups of solid ingredients for flavor and texture. About 1 cup of this is usually cheese but relax, that’s not written in stone. Now all that’s left is the seasoning. You can increase or decrease according to your taste. It can be as simple as salt and pepper. Want to switch onion salt for regular salt? Perfectly acceptable. A couple of dashes of Tabasco? Sure. Now you get it. Go with what flavors you love.
So let’s begin. First, we need some ingredients. You look in the fridge and find some leftover ham from last night's dinner, a bag of shredded cheese you had planned to use for taco night but went out for pizza instead, and some scallions left over from the salad you made for lunch. Now, make a quiche.
Quiche
Preheat the oven to 375°F.
The Base:
1 refrigerated 9-inch pie crust (or homemade if doing that brings you joy)
6 large eggs
¾ cup any kind of milk (or dairy substitute)
The Flavor and Texture:
1 cup cooked ham chopped
1 cup shredded cheese (any kind you like best)
¼ cup of sliced green onions (or finely diced onions, any kind)
The Seasoning:
½ teaspoon salt
¼ teaspoon black pepper
Let's start with the crust. We always had a store-bought pie crust in our freezer, ready to go. I still keep them in my freezer, there is no shame in that. Store-bought pie crust has vastly improved over the years and you save more in stress and clean-up than you gain in saying it’s a homemade crust. If you are using the dough that comes in sheets and unfolds, unfold it and press it into a 9" pie plate, crimping the top edges if desired. This can be done by simply pushing the tines of a fork around the edge or the internet will offer many other ways if you want to get more fancy. If you have the kind that comes already crimped in its pie dish, you are set and ready to go.
The one cheffy thing I do is blind-bake the crust. It will make a world of difference and is a good skill to have in your back pocket for dessert pies.
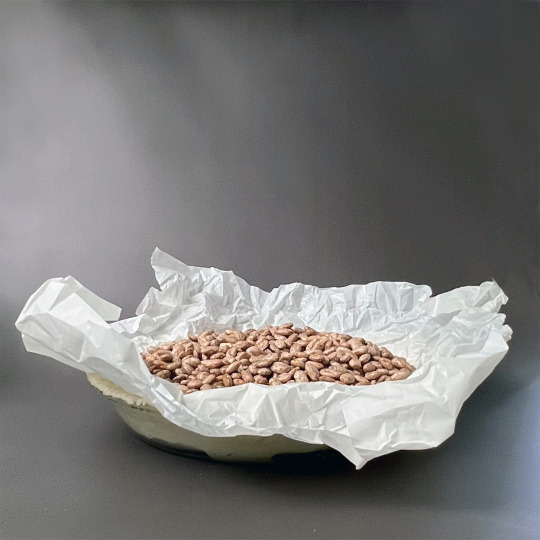
While the oven is preheating, cut a square of parchment paper or aluminum foil 2 inches wider than the pie pan you are using and place it on top of your crust. If you are using parchment paper, it can help to crinkle it up into a tight ball, and then open it up again. This will help it fit better into the pan. Gently pour pie weights, dried beans, or uncooked rice on top of the parchment paper or foil to fill the pan. This will hold down the crust and prevent the dough from puffing up during baking. I like to use dried beans, they are cheap, easy to pour, and spill less than rice. I keep them in a ziplock bag and use them all year. Bake the pie crust, with the weights for 10 minutes then lift out the parchment or foil along with the weights, and put the crust back in the oven for another 10 minutes. This whole process will give the crust a jump on the baking and keep the egg mixture from giving it the dreaded soggy bottom.
In a large bowl, whisk together your eggs, dairy liquid, and salt and pepper. A traditional or immersion blender will also get this done efficiently and leaves no trace of the unbeaten egg.
Evenly sprinkle the chopped ham, cheese, and green onions into the blind-baked pie crust. Pour the egg mixture over the top. You may find it easier to put your pan in the oven, on a cookie sheet, it will be pretty full.. Makes the transfer to the oven a lot easier.
With the pan on a cookie sheet, bake for 45-50 minutes until the center is completely set. A toothpick inserted into the center of the quiche should come out clean. Let cool for 10 minutes before slicing and serving. A quiche can be made the day before you need it and will keep for 2 to 3 days in your refrigerator. It’s delicious served cold.
Now here is the fun part.
Be brave, go crazy.
Remember, for a 9-inch pie crust, you want 5 to 6 eggs and ¾ cup of some kind of milk or dairy substitute for the base and 2 to 2 ½ cups of flavor and filling. About 1 cup of this should (or could) be cheese. If you are leaning towards the full 2 ½ cups of filling, go with 5 eggs so you don’t run over the sides.
Here are some other filling variations to try
A 10-ounce bag of chopped frozen (but defrosted) spinach, squeezed dry of all the water, this leaves 1 cup of spinach. 1 cup of shredded cheese. Total solid filling: 2 cups
6-ounce can (¾ cup) of drained crab meat, ¼ cup of thinly sliced scallions, and 1 cup of shredded cheese. Total solid filling: 2 cups
1 cup of sliced sauteed mushrooms. Saute in butter or olive oil. Be wild and add some crushed garlic, plus 1 cup of shredded cheese. Cook the mushrooms on high enough heat to dry them out and there’s no excess liquid. Total solid filling: 2 cups
4 ounces (½ cup) of Goat Cheese, a bunch of chopped chives, and 2 medium onions caramelized. Two onions slow-cooked in butter until golden brown, when properly caramelized will equal about ½ cup. Finally 1 cup of shredded cheese. Total solid filling: 2 ½ cups
2 medium sliced zucchini chopped and sauteed in butter or olive oil until some of the moisture is cooked away. 2 sliced zucchini will cook down to about 1 cup when sauteed.1 cup of shredded cheese.Total solid filling: 2 cups
1 cup of frozen chopped broccoli (defrosted and at room temperature) plus 1 cup of shredded cheese. Total solid filling: 2 cups
8 ounces of sliced and cooked breakfast sausage, with cubes of boiled potato plus 1 cup of shredded cheese.
Sliced Poblano Chili, a few sliced jalapenos (as many as the mood strikes you), frozen corn (defrosted and at room temperature) any combination can be used, as long as you stick to the ration.
Random Add-ins to be used at your heart's content as long as you stick to the ratio
½ cup chopped Artichoke Hearts
¼ cup Slice Green Olives
¼ cup Sliced Black Olives
2 tablespoons of Chopped Chives
2 to 3 tablespoons of Pesto
¼ cup Salsa (red or green)
Sprinkle of Old Bay Seasoning
Lemon Pepper (instead of salt and pepper)
When surveyed, people on the interweb like this in their quiche.
Purple Onion, Spinach, Goat Cheese
Basil, Smoked Gouda, New Potatoes
Caramelized Onions, Ham, Asparagus
Roasted Red Peppers, Mushrooms, Spinach
Artichoke Hearts, Feta, Greek Olives
#food#cooking#easycooking#easy cooking#simplecooking#simple cooking#creativecooking#creative cooking#learntocook#learn to cook#calmdownandcook#calm down and cook#joyofcooking#joy of cooking#cookbooks#recipe#homemade#quiche#juliefallone#julie fallone#foodpics#foodporn#foodies
4 notes
·
View notes
Text

Gulab Jamun. Gulab Jamun is related to Persia. According to Persian terminology, a rose is made up of gul and aab. In this, Read the full recipe
foodrecipesoffical.blogspot.com
#30MinuteMeals#EasyRecipes#SimpleCooking#WeeknightDinners#BusyDayBites#Bone Health:#Breakfast#BreakfastIdeas#LunchRecipes#DinnerInspiration#AppetizerIdeas#SnackTime#DessertDelights#ChickenDishes#SeafoodRecipes#VegetableDelights#QuinoaCreations#AvocadoLove#ChocolateIndulgence#Digestive Health:#Gluten-Free#Healthy#HeartHealthy#WeightLossFriendly#BrainBoosting#ImmuneSystemSupport#DigestiveHealth#EnergyBoost#HolidayFeast#PartyAppetizers
2 notes
·
View notes
Text

These Teryiaki Chicken Skewers are tasty and simple to make. They're great for a quick dinner during the week or a barbecue on the weekend. The marinade gives the chicken sweet and savory flavors, and grilling it gives it a great char and smokey flavor. For a full meal, serve with rice and steamed vegetables.
Ingredients: 500g chicken breast, cut into cubes. 1/2 cup soy sauce. 1/4 cup honey. 2 tbsp rice vinegar. 2 cloves garlic, minced. 1 tsp ginger, minced. 1 tbsp sesame oil. Salt and pepper to taste. Sesame seeds and chopped green onions for garnish.
Instructions: In a bowl, whisk together soy sauce, honey, rice vinegar, garlic, ginger, sesame oil, salt, and pepper. Add chicken cubes to the marinade, cover, and refrigerate for at least 30 minutes, or up to 4 hours. Preheat grill or grill pan over medium-high heat. Thread marinated chicken onto skewers. Grill chicken skewers for 5-7 minutes on each side, or until cooked through and nicely caramelized. Garnish with sesame seeds and chopped green onions before serving.
Prep Time: 35 minutes
Cook Time: 15 minutes
Karen W
0 notes
Text
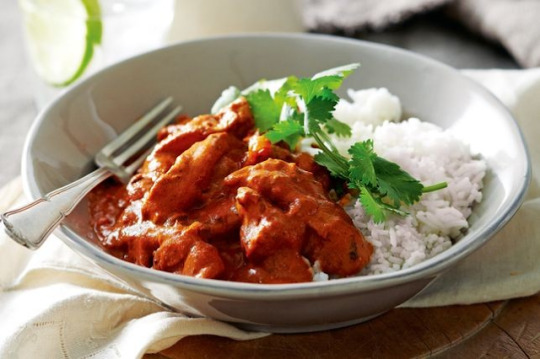
🍛 Indulge in the Ultimate Butter Chicken Recipe!
Craving rich, creamy, and flavorful butter chicken? 🧡✨ This beloved Indian classic, known as murgh makhani, is now at your fingertips. Perfectly tender chicken marinated in spiced yogurt and cooked in a velvety tomato-cream sauce—it’s comfort food like no other!
🌟 Why You’ll Love It: ✅ Juicy, marinated chicken bursting with flavor. ✅ A rich, creamy sauce with perfectly balanced spices. ✅ Simple steps to recreate restaurant-quality butter chicken at home.
🍗 What’s Inside the Recipe:
Aromatic spices like garam masala & cumin.
A luscious tomato-cream base for that iconic flavor.
Tips for marinating and cooking to perfection.
✨ Serve it with steamed basmati rice and warm naan for the ultimate Indian feast! 🥖🍚
📲 Get the full recipe here: Click to Learn More https://advartiso.com/foodrecipe
Don’t wait—treat your taste buds to this indulgent dish today! 🍴💛
#ButterChickenRecipe#EasyIndianRecipes#MurghMakhani#ComfortFood#IndianCuisine#CreamyChicken#HomemadeDelight#EasyFoodRecipes#QuickMeals#SimpleCooking#FastRecipes#BudgetFriendlyMeals#EasyDinnerIdeas#HomeCooking#FamilyMeals#HealthyRecipes#FoodInspiration#MealPrepIdeas#DeliciousAndEasy#BeginnerFriendlyRecipes#TastyMeals
0 notes
Text
youtube
Homemade Tomato Ketchup: Fresh, Flavorful, and Easy to Make!
Welcome to DesidineIn,where every dish tells a story! Join us as we explore a vibrant world of flavors, perfect for both novice cooks and culinary pros. From comforting classics to adventurous new creations, our recipes are crafted with love and high-quality ingredients.Our fun, step-by-step tutorials make cooking delightful experience,bringing joy to your kitchen. Become part of our foodie family and share your delicious creations with #DesidineIn. Lets's cook,share, and savor the magic of homemade meals together! Happy cooking, The DesidineIn Team Follow me on: Instagram: https://www.instagram.com/kadambari.n6?igsh=dzYzbW1oMmUyMzJh facebook : https://www.facebook.com/profile.php?id=61563593836476 For business enquires and collaborations , please contact us at ([email protected]) Thinking of Driving - by Kjartan Abel. Visit https://kjartan-abel.com/library to find free music for your next project. This work is licensed under the following: CC BY-SA 4.0 Attribution-ShareAlike 4.0 International.
#HomemadeKetchup#TomatoKetchupRecipe#EasyHomemadeCondiments#DIYKetchup#TomatoLovers#HealthyCondiments#FreshTomatoRecipe#KitchenHacks#NoPreservatives#CleanEating#HomemadeGoodness#SimpleCooking#FromScratchCooking#TomatoSauce#CookingAtHome#KetchupLovers#HealthyEatingIdeas#TomatoRecipes#ComfortFoodIdeas#CondimentRecipe#NaturalCooking#FoodieFavorites#HealthyFoodSwap#EasyRecipesForAll#SnackTimeStaple#Youtube
0 notes
Text
Onion Boil Recipe
There’s something magical about transforming a humble onion into a show-stopping dish that’s tender, flavorful, and packed with savory goodness. The viral baked onion boil recipe has been taking the internet by storm, and it’s no surprise why. With minimal ingredients, a simple preparation process, and a mouthwatering result, this recipe is a must-try for food lovers. Whether you’re a seasoned…
#aromaticherbs#boiledoniondish#boiledonions#ComfortFood#comfortfoodideas#EasyRecipe#Easyveganmeals#EasyVeganRecipe#flavorfulbroth#flavorfulveganrecipes#FoodBlogger#healthylivingenthusiast#heartysoup#hle#hle8424#homecooking#OnePotMeals#onionboilrecipe#oniondish#onionsoup#plantbasedrecipes#savoryrecipe#shorts#simplecooking#Vegan_food_8424#VeganComfortFood#vegandinners#Veganfood8424#veganonionboil#VeganRecipes
0 notes
Text
Elevate Your Cooking with These Simple Techniques
#CookingTechniques#HomeChef#FoodieAdventures#SimpleCooking#KitchenCreativity#CookingTips#RecipeInnovation
1 note
·
View note
Text

With this Slow Cooker Korean Beef recipe, you can make tender, flavorful beef with little work. When you mix soy sauce, brown sugar, and fragrant spices together, you get a savory-sweet sauce that goes great with rice. This tasty meal is easier to serve when you use a rice cooker.
Ingredients: 1.5 lbs beef chuck roast, sliced thinly. 1/2 cup low-sodium soy sauce. 1/4 cup brown sugar. 4 cloves garlic, minced. 2 teaspoons sesame oil. 1 teaspoon ginger, minced. 1/4 teaspoon crushed red pepper flakes. 2 tablespoons cornstarch. 2 tablespoons water. 2 green onions, chopped for garnish.
Instructions: In a bowl, mix soy sauce, brown sugar, garlic, sesame oil, ginger, and red pepper flakes. Place sliced beef in the slow cooker. Pour the sauce mixture over the beef. Cover and cook on low for 6-8 hours or high for 3-4 hours. In a small bowl, mix cornstarch and water to create a slurry. Stir the slurry into the slow cooker 30 minutes before serving. Cook until sauce thickens. Serve over rice, garnished with chopped green onions.
Prep Time: 15 minutes
Cook Time: 360 minutes
Jeffrey F
0 notes
Text

0 notes
Text
Boost Your Self-Esteem Through Simple, Soulful Cooking: Akari Hasegawa's Approach to Home Meals

0 notes
Text

This Slow Cooker Pumpkin Chili is a comforting and flavorful meal perfect for chilly days. The addition of pumpkin adds a rich and creamy texture while enhancing the nutritional value of the dish. It's easy to prepare and makes for a satisfying dinner option.
Ingredients: 1 lb ground beef. 1 onion, chopped. 3 cloves garlic, minced. 1 can 15 oz pumpkin puree. 1 can 15 oz black beans, drained and rinsed. 1 can 15 oz kidney beans, drained and rinsed. 1 can 15 oz diced tomatoes. 1 cup chicken broth. 1 tablespoon chili powder. 1 teaspoon cumin. 1 teaspoon paprika. Salt and pepper to taste. Optional toppings: shredded cheese, sour cream, chopped cilantro.
Instructions: Add the ground beef to a skillet with chopped onion and minced garlic. Cook over medium-low heat until the beef is fully cooked. Put the slow cooker on high and add the cooked beef mixture. In a slow cooker, put in diced tomatoes, chili powder, cumin, paprika, salt, and pepper. Also add pumpkin puree and black-eyed beans. Mix things together well. Put the lid on top and cook on low for 6 to 8 hours or high for 3 to 4 hours. Add shredded cheese, sour cream, or chopped cilantro to the top of the hot dish.
Stacy
0 notes
Text

This flatbread is based on recipes from the Mediterranean and is full of healthy ingredients and fresh flavors. It is simple to make and takes little time. It's great for a light lunch or an appetizer.
Ingredients: 1 pre-made vegan flatbread or pizza dough. 1/4 cup hummus. 1/2 cup cherry tomatoes, halved. 1/4 cup sliced black olives. 1/4 cup diced red onion. 1/4 cup chopped fresh parsley. 1/4 cup chopped cucumber. 1 tablespoon olive oil. 1 tablespoon lemon juice. Salt and pepper, to taste.
Instructions: Turn on the oven and heat it up to 400F 200C. Put the bread on a baking sheet that has parchment paper on it. Put a thin layer of hummus on top of the flatbread. On top of the hummus, put the cucumber, red onion, black olives, cherry tomatoes, and cilantro. Add lemon juice and olive oil to the toppings. Add pepper and salt. Put it in an oven that is already hot and bake it for 10 to 12 minutes, or until the edges are golden brown. Take it out of the oven and let it cool down a bit before cutting it. Cut into pieces and serve hot. Have fun with your Mediterranean flatbread!
Erin F
0 notes
Text

This Lemon Broccoli Pasta Skillet is a quick and satisfying dish perfect for busy weeknights. With the bright flavors of lemon and tender broccoli combined with pasta, it's a delightful meal ready in just 20 minutes.
Ingredients: 8 oz pasta. 2 cups broccoli florets. 2 tbsp olive oil. 3 cloves garlic, minced. 1 lemon, zest and juice. 1/2 cup grated Parmesan cheese. Salt and pepper to taste. Fresh parsley, chopped for garnish.
Instructions: Cook pasta according to package instructions until al dente. Drain and set aside. In a large skillet, heat olive oil over medium heat. Add minced garlic and saut for 1-2 minutes until fragrant. Add broccoli florets to the skillet and cook for 3-4 minutes until slightly tender. Stir in cooked pasta, lemon zest, and lemon juice. Cook for another 2-3 minutes, tossing to combine. Remove skillet from heat and sprinkle grated Parmesan cheese over the pasta. Season with salt and pepper to taste. Garnish with fresh chopped parsley before serving. Enjoy your quick and flavorful Lemon Broccoli Pasta Skillet!
Dylan
0 notes
Text

This Pistachio Herb Crusted Salmon recipe from Eat Spin Run Repeat is a delightful combination of nutty pistachios, fresh herbs, and savory mustard. It's an elegant yet easy-to-make dish that's perfect for a special dinner or a weeknight treat.
Ingredients: 4 salmon fillets. 1 cup shelled pistachios, finely chopped. 1/4 cup fresh parsley, chopped. 2 tablespoons fresh dill, chopped. 2 tablespoons Dijon mustard. 2 tablespoons honey. 1 tablespoon olive oil. Salt and pepper to taste.
Instructions: Preheat the oven to 400F 200C. In a bowl, mix chopped pistachios, parsley, and dill. Season salmon fillets with salt and pepper. In a separate bowl, mix Dijon mustard, honey, and olive oil. Brush the mustard mixture onto the top of each salmon fillet. Press the pistachio mixture onto the mustard-coated salmon fillets to create a crust. Place the salmon fillets on a baking sheet lined with parchment paper. Bake for 12-15 minutes or until the salmon is cooked through and the crust is golden brown. Serve hot, garnished with extra parsley if desired.
Sylvia
0 notes
Text
🍚 Master the Art of Fried Rice at Home! 🍳
Why order takeout when you can whip up this crowd-pleasing fried rice in your own kitchen? 🥢 Packed with smoky bacon, colorful veggies, and fluffy rice, this recipe is a game-changer for quick lunches, weeknight dinners, or even as a side dish.
✨ What Makes It Special? ✅ Uses everyday pantry staples. ✅ Golden, flavorful rice (not soggy!). ✅ Ready in no time and endlessly versatile.
🥕 Key Ingredients Include:
Cold, cooked long-grain rice 🍚 Smoky bacon 🥓 Eggs for that perfect omelette touch 🍳 Peas, carrots, and shallots for vibrant color 🌈 A splash of soy sauce for umami magic! 👩🍳 How to Make It: 1️⃣ Cook rice and let it cool completely. 2️⃣ Prepare a fluffy omelette and slice it up. 3️⃣ Stir-fry bacon, veggies, and rice to golden perfection. 4️⃣ Toss it all together with soy sauce and enjoy!
🌟 Sprinkle with sesame seeds and extra shallots for that finishing touch!
Ditch the takeout and impress your taste buds with this easy, flavorful fried rice recipe. 😍 Ready to try? Let us know how it turns out! 👇
[Get the Full Recipe on Our Website] https://advartiso.com/foodrecipe

#EasyFoodRecipes#QuickMeals#SimpleCooking#FastRecipes#BudgetFriendlyMeals#EasyDinnerIdeas#HomeCooking#FamilyMeals#HealthyRecipes#ComfortFood#FoodInspiration#MealPrepIdeas#DeliciousAndEasy#BeginnerFriendlyRecipes#TastyMeals#FriedRice#EasyRecipes#DinnerIdeas#HomemadeFood#RiceRecipes#WeeknightDinners#AsianCuisine#FriedRiceRecipe#FoodLovers#CookingAtHome#SimpleRecipes
0 notes