#i have once again learned new photoshop tricks
Explore tagged Tumblr posts
Visit Tumblr Blog
Explore Tumblr blogs with no restrictions, modern design and the best experience.
Last Seen Tumblr Blogs


Fun Fact
BuzzFeed published a report claiming that Tumblr was utilized as a distribution channel for Russian agents to influence American voting habits during the 2016 presidential election in Feb 2018.
Text

#joker out#kris guštin#you gotta pay to see him live#i have once again learned new photoshop tricks#to make memes#sigh#*my gifs
57 notes
·
View notes
Text


Moodboards: Three of Swords Trio
Once again sat way too long at something that was supposed to be simple and easy, and instead I made it all fancy for no reason. The close-ups also made me notice that Alex and Shay have very similar mole patterns, which I find rather funny. Honestly, sometimes I blame my overly indulgent edits on new Photoshop tricks I learn and immediately want to try out. These were so fun, though, I forgot how much I liked making moodboards. I really tried to bring as much personality into their boards as possible – the end result is them seeming so completely different from each other, yet are still making it work.
#sims 4 edit#sims edit#s4 edit#alexander goth#max villareal#elevensim: shay#sims 4 screenshots#sims screenshots#ts4 simblr#simblr community#story: three of swords#elevenedits#yes i reused a previous pose for alex bc he's just such a cutiepie with it#the way i was cycling thru so many poses#just to get the right vibes for them#and then taking way too many screenshots#nobody can tell but im obsessed with them [<- everybody can tell]
32 notes
·
View notes
Note
Hi! I wanted to know, how do you do typesetting for manga? What sort of tools do you use? I recently discovered a series that has text only translations, and wanted to learn how to typeset so I could combine them with the raw scans.
Hello! It's great to hear that someone else is getting into typesetting! I'm entirely self-taught (didn't even look at guides or anything, I just felt it out and it shows in my earlier work lol) but the nice thing about typesetting is that it's pretty easy to get a feel for. Honestly, Photoshop does most of the technical work; I would say a lot of typesetting has to do with art and visual aesthetics. It's your job to make things look right, and you can get really fancy with it (especially with sound effects).
I'm very slowly working on a very long PMMM doujinshi, here's a sample page of my work and what I mean about making things look "right" (in regards to text placement, cleaning bubbles, etc). My personal preference is to break up words as seldom as possible, which is a philosophy even a lot of official typesetters don't share lol (probably because a lot of typesetters value speed over little touches like that).
Anyway, Photoshop will be your best friend! I'll be honest, it's been a hot minute since I pirated my copy and I don't even think the method is valid anymore. From what I understand GenP (Windows) and AdobeZii (Mac) are the new methods of cracking Photoshop. Here are the GenP and AdobeZii subreddits for guidance. Also, if you have a Mac apparently downloading directly from Cmacked is the way to get Photoshop.
Anyway, I really can't get into all the tricks and intricacies I've learned over the years about typesetting. However, I found this AMAZING, comprehensive guide that I would strongly suggest using as a reference. They cover all of the fundamentals as well as a lot of the extras. There's even a few things in here that I wasn't aware of and will definitely be brushing up on!
I've also uploaded my font reference file to Google Docs. All the fonts show up as arial, but I've included screencaps of what they look like. These are all free fonts and can be found/downloaded if you just Google the name. Generally, Wild Words is considered the standard font in manga/doujinshi scanlations (although of course there are variants). It's what I use in all my standard text. All the rest are for sound effects, aside text, emotional text that is meant to be elevated, etc.
I would also suggest at least downloading custom heart and star shapes (or brushes) for Photoshop; there are a bunch of free ones available and those shapes tend to come up in manga speech bubbles a lot.
Oh, and make sure you make a credits page for your releases. Mine are super bare-bones (just white text on a black background for the most part) but you deserve to be credited for your labor! So does whoever translated the manga. Once you get the series up and rolling I would suggest starting to upload to Mangadex (the hub of scanlation where tens of thousands of people can see what you've made). If you need help figuring out how to do that, hit me up again when you get to that point. You'll have to create a group but it's super easy.
Am I forgetting anything else? This is such a near and dear hobby of mine and I feel like there's just so much to cover, lol. Please let me know if you have any other questions!
43 notes
·
View notes
Note
hi! do you have tips and advice for making gifs? i love your gifs so much!
awww thank you so much, that really means a lot to me as I'm still rusty and a bit insecure because I've learned how to make gifs like 10 years ago? things didn't changed that much in terms of method and yet it's still scary, but at the end people like you make it worth!! 🥺🥺🥺
a little disclaimer: I'm colorblind, I can see colors okay! but I just see them a little bit different than most people so sometimes my edits may seem a little weird and that's the reason
Okay It will definitely be a long answer so I'll put under the cut ☺️
My advices would be:
- Just go for whatever scene you like the most, and try to focus on things you enjoy. I like to gif what I love, things I find beautiful as it gives me so much joy to look at the final result 😌
- Fortunately tumblr is full of people willing to share their knowledge and skills and there is lots and lots of blogs with the main theme being tutorials or even inspo and sources, so I always try to follow them to keep up with whatever is trending and just to learn new tricks and tips, some of my faves are @completeresources @gifmakerresource @allresources and @chaoticresources
- Be patient with yourself, if you are trying a tutorial and it is giving you a hard fight you can always stop and try again another time. It happened to me more than once that a tutorial or a particular idea I was trying gave me such a bad fight that I ended up so frustrated, exhausted, angry and feeling shitty but then I would pick another time to give it try and the thing worked hahahaha, so don't forget to respect your time and wellbeing
In terms of tips and tricks:
- Always use high quality videos, like the best quality available as it really makes a difference in terms of the final result
- Oh always resize your gifs!!! I use the crop tool and then I adjust the image size to keep it high quality, I think this is BY FAR the best tutorial as it explains quite well if you are new to editing
- So far I have tried many many different methods over the years, my fav is to cut the scenes I want to edit and for this use any video editing software really and after choosing a couple of scenes I import all of them to Photoshop (my version is the 2022 edition) and then I use the video timeline method (i don't really remember where I learned it but I found this really good tutorial that might be helpful)
- I slow down the gifs I make (idk how to explain it in english I'm sorry) but I set the speed for something in between 50% to 70%, depending on the scene
- In terms of colouring I don't really have a specific preset or fav PSD, I adjust them one by one just trying to focus on what the scene gives and then I work my way around it depending on what I'm trying to achieve or how do I want my gifset to look like (a good example was the Ron one on my last gifset i didn't wanted to look so yellow as it would be too different from the other gifs, it was a nightmare) BUT I guess I tend to use lots and lots of adjustment layers like I start with brightness/contrast, curves, and levels and then I proceed to selective colors, hue, vibration and saturation, sometimes I even use gradients and/or solid color layers with different blending options like soft light, overlay, opacity and fill settings to correct colors (I always use the color wheel principles of opposites and/or complementaries)
- Use smart sharpening!!! Peopel are so brilliant that they gave us actions, it is literally just a click away from all the trouble to do it manually, and it speeds up my process. Personally I have been using this amazing one I found quite recently, and it's really doing wonders to my edits
anyway thank you so much for being so kind and supportive, my ask box and dm are always open if you have any doubts or just want to exchange ideas. Really hope it helps you ❤️
7 notes
·
View notes
Note
Well I'll be damned! It's nice to see a fellow Linux user in the wild! ... Well, sort of. Allow me to explain.
I've been daily driving a Windows PC for about a year because I wanted to maximize compatibility with VR software and devices. But my previous two PCs were both Linux machines. I started with Linux Mint on the laptop I used in college back in 2018. It was a hunk of junk I had been using since 2011 or so, but the lighter OS helped spruce up the ol' girl just long enough for some good friends of mine to gift me a better PC. I tried a couple other Ubuntu distros on that machine until settling on Arch.
Now, I wouldn't say I'm very tech literate, but I am a bit more comfortable with the hardware side of things than the software. Luckily, I've got an ace in the hole: a good friend of mine, a different one than those who bought me the PC, is a big fan of Linux and very skilled in it's use. He offered to set up Arch for me, for free.
That's a deal you can't shake a stick at, so naturally I accepted. It was the smoothest user experience I'd ever had, no exaggeration. I'll definitely be going back to Arch once I build my new PC later this year. I figured I'd pay my friend to set up the OS this time since it looked like a lot of work, but when I bought it up to him, he insisted that he do it for free, and that he enjoys that kind of stuff. What a madlad! Haha!
As for your PCs, definitely some impressive hardware. Both the Ryzen 7 in your desktop and the Intel i7 in your laptop are leaps and bounds better CPUs than anything I've ever used. If I had to guess, that's the linchpin to your incredible number of layers.
While we're comparing, my art program of choice is Krita. It's very down to earth compared to something like Photoshop, but still full functioning as an illustration program. At least as far as I know lol. The main reason I downloaded it was because it was free (monetarily) and because it was free (libre). The philosophy behind open source software is the whole reason I'm into Linux after all. Better to use as much Libre software as possible imo, even on a Windows system. Although, everyone has their reasonable limits.
I'm glad you brought up drawing tablets because that's something I definitely need to know more about. Perhaps I could trouble you for a bit of advice? Some tips and tricks perhaps? No pressure if you'd rather not!
I know you recommended against buying a Wacom tablet because there were other tablets with better value, but I actually already bought a Wacom Intuos last month. Whoops. Anywho, having never used a drawing tablet, I'm finding it pretty awkward. It's like learning to walk all over again. I'm sure that part of the process is just to hammer away at the problem. Practice makes perfect after all, but I was wondering if you had any tips about how to set up a device like this? I know you can assign the buttons to different things, adjust the scale between the screen and the tablet, and so on. Is there anything you think I should try? Or should I just experiment until I figure out something that works for me?
Thanks again!
I just saw the ask by slushysblog. In response you sent a gif that blew me away:

You see, I'm just getting into digital art, and my PC can only handle about 5 or 6 layers before my graphics environment crashes. (Ofc this forces me to restart my PC and lose anything not saved.)
I've learned to work around this, my art isn't nearly so complex as yours, but I know if I want to continue I'll have to get a better computer at some point.
I was hoping you could tell me a bit about the technical side of your work. What are your PC specs? What software do you use? That sort of thing.
Thanks in advance! I love your art!

My set-up is complete overkill for art. It's a heavy gaming-ready desktop PC I got a few years back that I've upgraded the RAM and storage on over the years. I was doing fine with 16GB of RAM but I always have open a lot in CSP and other stuff so upgrading was definitely something I needed to do. 16GB should be fine for most people though.
You can also see that I run Arch Linux and uh yeahhhhhh it's a long story. The short of it is that my old laptop broke its Windows install during an update and I was completely unable to fix it so I just.... switched to Linux lol. I started out on Ubuntu and switched to Arch after a while. I don't rec using Arch unless you know what you're doing, Ubuntu is way easier.
What you might find more interesting is my away from home set up on my laptop since it's an older gaming laptop.
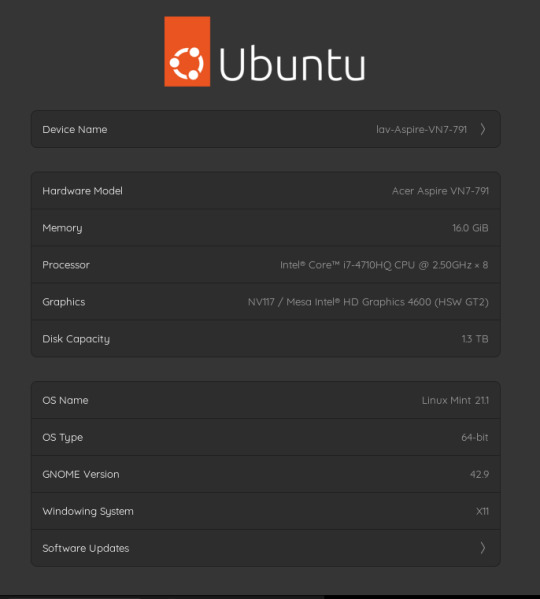
The graphics card is actually a NVIDIA Geforce 850 or something. It's so old that you can't play some games on it. However, I have no issues with it for art. I can open my comic project files in CSP fine on it. It's also running on Linux Mint, which isn't showing up on the little image for some reason. Both of my devices run Linux, but that's a me preference/need thing and I don't rec messing with your operating system if you don't know much about computers. It gives me a bit of an edge since the system doesn't use as much RAM as Windows but yeah don't touch unless you're committed to learn. Windows will serve you fine. Or MacOS even.
As for my program, I use Clip Studio Paint EX. I bought Pro a long time ago and upgraded to EX because of the extra tools for comics and animation (I've heard animators don't like CSP though, it's the BEST program for comics however). It's a really solid program but the recent changes to pricing and updates is really stupid. Fun fact: I use only default brushes and materials because getting it to run on Linux breaks the store. I also use an older version of it because of how I got it working on this system.
For my tablet I use an XP-Pen Artist 12 Pro. It's a pretty solid screen tablet on a budget (I bought it on a sale) and I have no issues with it. I actually partly got it because I thought it was cool that XP-Pen carries official drivers for Linux too, and this helped a bit since this was before Windows bricked on me and I switched to that. It was kinda weird how it played out lol. I would heavily not rec a Wacom tablet unless it's an older one for cheap. Wacom is stupidly expensive and you can get a better bang for your buck at other companies. My first tablet is a Wacom and it's still holding up pretty well but their quality on their new tablets isn't great. Check out XP-Pen, Gaomon, and Huion for better tablet options.
29 notes
·
View notes
Photo
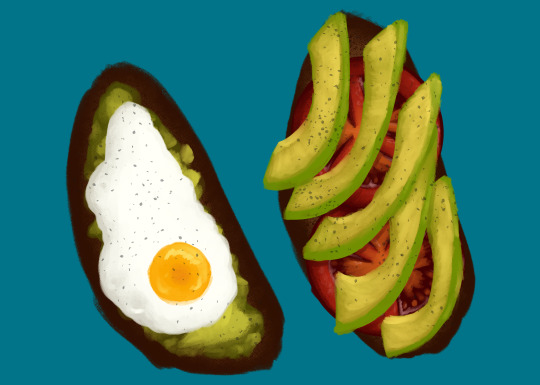
Eggtober 12 Avocado Toast (Featuring Tomato and, of course, Fried Egg.) Clip Studio Paint, Gouache Brush, Dry Gouache Brush, Airbrush (for the barely visible bread texture) and Freckle Pen (for the pepper.) 20 colors, 1 hour 30 minutes. Took a little longer on this one because I spent an inordinate amount of time lovingly rendering the tomato that I knew no one was going to get to see in the final product. (Don’t worry, I saved it to another layer since @quezify said last time that he appreciated the peek behind the curtain.) This was another request by a friend. I must say, I wake up every day excited to choose an egg from the many options I have available and just... have fun putting it down on (digital) paper. I’ve got some yammering about that, but since I’m already going to post a “behind the scenes” under the cut, I’ll shove the musings down there too. As always, big thanks to the Egg Master Supreme, @quezify for organizing this. It’s wonderful to see so many people getting into art again or branching out and drawing eggs for the first time, all because one zany dude said to Tumblr “You know what? Let’s paint eggs for a month.” And enough of us said “Hell yeah” that I get to see so many different styles and mediums. Loving every moment of it!
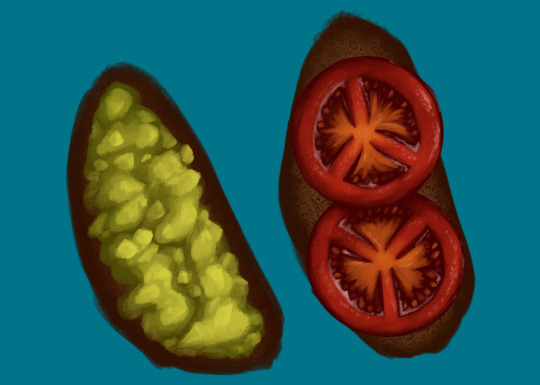
(Art first, because LOOK AT THOSE TOMATOES! I love how they came out, I want to shove them in my mouth! AAAH!) Now for the rambling musings. I’m starting to get really comfortable with the gouache brush, a tool which I previously never used, and I’m also getting more comfortable with art in general. My usual process from childhood, when I did much more art, was to slap down pencil work on real life sheets of paper, line it in pen or photograph/scan it and upload it to my computer to line with the pen tool, and then just do everything with pen for bright, solid colors. Most of my other techniques were one off flukes, like the fire I did in my icon’s background. And my newer process, as an adult who just started learning Clip Studio Paint, was fairly similar. (I just started with CSP recently because it came free with my newest tablet and my old standard, Photoshop Elements [I dunno the version, 7 maybe?], was too old and would resize on my new rig so all the buttons were SO GODDAMN SMALL it was a pain to use.) The only difference is that, as an adult who’s home more often than not, I skipped the paper. Sketch, linework with the pen tool, then color under the line art with pen. Or, for a certain other project, I color under the line art with the watercolor brush. I’ve always wanted to try gouache because I’ve seen it worked with IRL and it’s got such pretty results! Opaque like acrylics and oils but flows like watercolor. I suppose it never occurred to me to look for it in the toolset. The last time I even used brushes meant to represent real media before CSP was when Corel Painter was a thing and I had it with my very first drawing tablet. And even then I didn’t use it often. I mostly used the watercolors because that was my favored medium IRL. But I quickly started to prefer Photoshop Elements which also came with my first tablet. And slowly I stopped using anything resembling traditional mediums. But I figured, hey, Eggtober is already a time for me to learn some new tricks and get some practice in, watercolor will look too translucent and it has a paper texture to it that I’m not sure I want. Let’s see if this thing has Gouache. And it did. And now it’s my favorite brush. The way it blends naturally, the ease of pressure controls so the opacity is easy to alter stroke by stroke. It feels like laying down real paints. Once I got used to how it behaved it just... clicked. So yeah, now that I know how to work with it and now that I had the brain explosion necessary to figure out my new process of laying down the darkest colors first and working my way up, it was all too easy to go “Oh. I like laying down these colors. And instead of trying to predict where I’m going to put the avocado, I’m just going to draw the full tomatoes for fun and practice and then figure out the avocado slice placement.” And then I spent roughly 45 minutes just... adding detail to tomatoes. Because it was a genuine joy and I was smiling the whole time and I could just look at those juicy tomatoes forever. So yeah, I know I say it every time, but I for real owe quezify everything for giving me a reason to pick up a new tool and learn and just have fun with it. Kicking my depression’s ass, my ADHD’s ass, my artblock’s ass, and my (lack of) motivation’s ass, all with the power of “Egg fun, draw egg.”
#Eggtober 2022#Eggtober 12#Fried Egg#Avocado Toast#Tomatoes#my art#I'm just having so much fun with art#For these last 12 days I've fallen into a world where depression doesn't exist and COVID isn't floating around outside#For the last 12 days I've lived in a magical world that's just egg#no bad things#no sadness#just egg#I love Eggtober
60 notes
·
View notes
Text
Tutorial: Batch Creating Animated Gifs in Adobe Premiere
I figured out how to make gifs with Adobe Premiere and the results, surprisingly, do not suck ass.
Here’s a gif from photoshop. No effects or lighting etc, just resized to 540 width and exported with Selective Color & Diffusion chosen for export settings.

Here’s the same clip done with Premiere + Media Encoder, bypassing Photoshop entirely. I used the Animated Gif preset when exporting, and only changed the size.

They look pretty much the same to me, which is not something I’ve found from experiments in previous years. Edit after multiple additional experiments: the quality is not predictable. Premiere offers no options for dither or optimization of your gifs, so based on lighting, how strong your highlights are, etc, you can get results that have a lot of artifacts; dark indoor scenes with brightly lit actors seem especially bad. I’m finding about half of my gifs look good, and half have annoying white dots in them.
But this is all so fast that it’s worth doing anyway; worst case I’ve done my lighting mods in premiere, which is fast, and just have to export half of the mp4′s from photoshop for proper diffusion.
Why Use Cruel, Unfriendly Premiere?
Premiere has a steep learning curve, but it is full of good features. Good-quality batch GIF exporting is basically the holy grail of gif-related features, at least when your hobby is making giant shitposts full of gifs.

You also can use Premiere to apply the same lighting effects and whatnot to a series of clips. That’s a bit more advanced than this here tutorial, however. This here tutorial will show you everything you need to click in order to clip and export gifs from Premiere, without learning anything else about it.
Version
This tutorial is for Adobe Premiere 2021, Version 15.1.0, released around April 2021 and Media Encoder 2021, also version 15.1.0. It should be the same or similar for any newer versions, but older versions may not have these functions. Or they might have them but produce terrible gifs.
The Illustrated Steps Are Behind A Cut Because I’m Not An Asshole
The Steps
Note: These gifs are generally cropped to the relevant part of the workspace only, so you can see what I’m clicking.
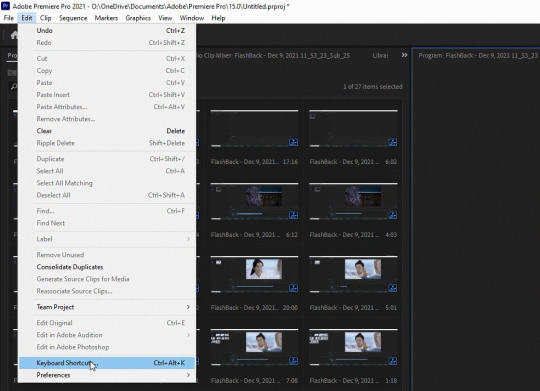
1. Open a new file in Adobe Premiere and save it to somewhere sensible, not the stupid location that Premiere thinks you want to save files in. You’ll probably never open this file again once you’re done exporting, but you should still save it in case the power goes out while you’re clipping.

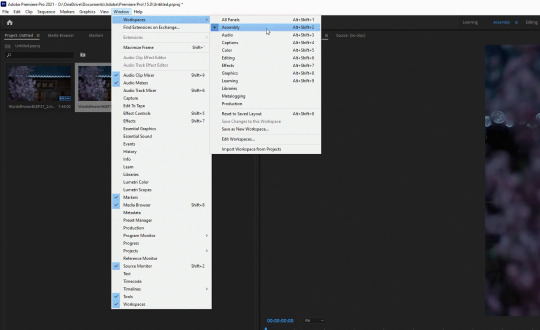
2. Switch to the Assembly workspace.
3. Right-click in in the media area and choose import media, or just drag an MP4 in from your file browser.

4. Drag the media to the timeline.

5. Unlink the audio and delete it, since it’s not needed for giffing.
5. Pick up the razor (Keyboard shortcut C) and get cutting. Go to the frame AFTER the break point, then cut on the line. You can use the right and left cursor keys to move between frames one at a time, if you don’t want to use the mouse to click like I’m doing here.
Use the bar at the bottom of the timeline to adjust its scale while you work. This only affects the visual interaction with the timeline, not the clip timing.

6. After you’ve snipped stuff, pick up your pointer (Keyboard shortcut V) to select individual clips. Delete the clips you don’t want by selecting them and clicking the delete key.
7. If you don’t like gaps, choose “close gap” from the Sequence menu.

For individual gaps (or clips) you can right click on a gap and choose “ripple delete” which deletes the gap and moves the next clip into place.

You don’t strictly need to know how to close gaps in order to make gifs, but if you want to combine two into one, this is useful.
The Magical Command
In order for it to export your clips correctly as single files, instead of as one big file, here’s the trick:
8. Use the “Make Subsequence” command. You have to do this individually for each clip that you want to batch export. Select the clip, right-click, and choose “make Subsequence.” (Note: earlier versions call this “nested sequence”)
You can also combine two clips into one by selecting them together and making them a subsequence.
9. To speed things up, define a hotkey for this command.
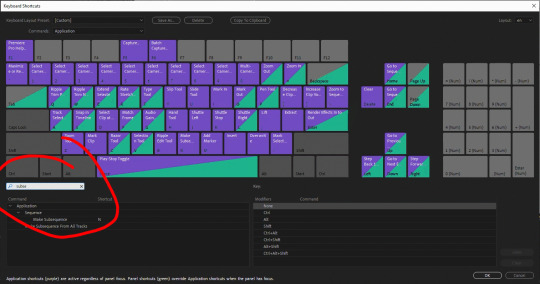
Here’s how fast it goes when you have a hotkey.
Export
10. When you’re done making subsequences, select all of the subsequences in the media area. That means all of the items in the media area except the first item (which is the original video file) and the second item (which is the entire timeline). Right-click and choose “Export Media.”
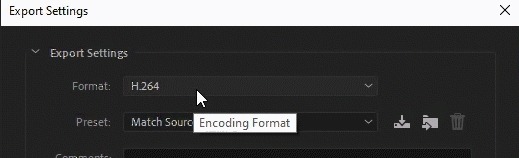
11. In the Export dialog, choose the “Animated Gifs” format - but don’t take the original resolution, because that will be huge. Set it to whatever you want it to be. Tumblr compression currently (in 2021) likes things to be 540 pixels wide. You can tweak a lot of other settings if you’re feeling adventurous.

12. Once you have your settings the way you want them for exporting, before you do anything else, save an export preset with these tweaks that you can use next time. Note: The preset will save the height as well as the width, so you can only use it unaltered if the next project has the same aspect ratio.
13. Click “Queue” to send everything to Media Encoder for baking. Always use “queue” instead of direct export, even if you’re only exporting one clip. (With multiple clips, queue is the only option).
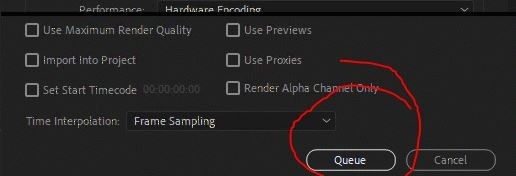
Premiere seems to forget my export settings if I export directly from Premiere, but if I choose “queue” it hands everything off cleanly to Media Encoder.
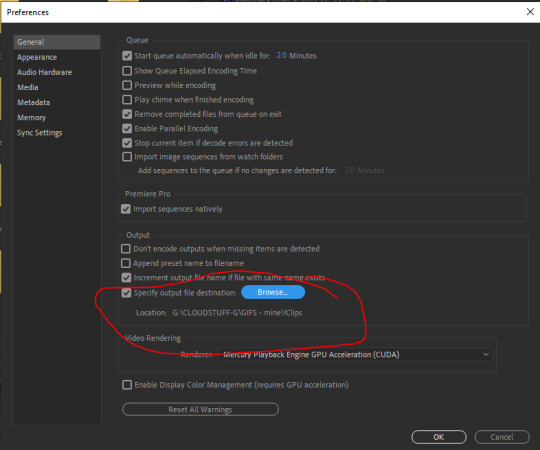
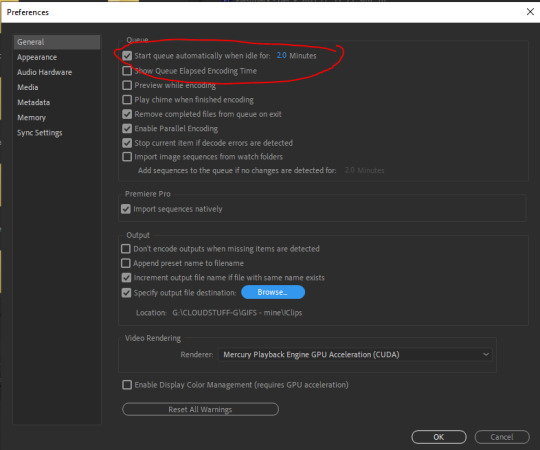
14. Hop over to Media Encoder (it will autolaunch when you click Queue). You can change the export location of the files here by right-clicking the file names in the queue. Even better, you can tell Media Encoder to always export things to the same folder, so that Premiere’s save location doesn’t affect it. Go to Edit menu --> Preferences to set this up.
15. Once the queue is loaded up in Media Explorer, click the green “play” icon to export the clips.
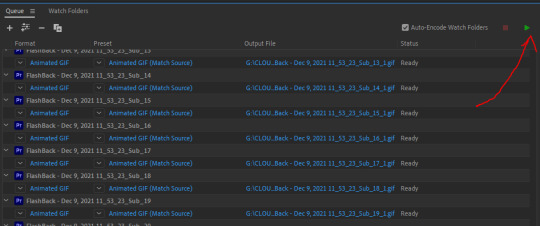
You can also set ME preferences to automatically run the queue after x minutes if you, like me, frequently forget to click “play” after queuing things.
16. While the queue is running, go back to Premiere and do another export; this time use the H.264 encoding preset to export (via the M.E. queue) a set of full-size MP4′s.
This way if any of your gifs look bad, you can use the MP4′s in photoshop to make better ones, or just store them for later adventures.
And that’s it! Happy giffing!
Bonus: Look at these dorks


60 notes
·
View notes
Text
my banner tutorial
I’ve seen a lot of people asking how us tumblr writers make banners for our writing/series, so I thought I’d share how I make mine.
For extra context: I do not know how to use photoshop (or even have photoshop) + had no background in web design/graphic design when i first started making banners for my blog. Everything in this tutorial is FREE to access and can be used in a web browser so you don’t need to download any extra software/programs to make banners!
link to the divider tutorial is here
Banners: Canva
1) Go to Canva (canva.com) You DO NOT need a Canva Pro subscription - I have never paid for Canva (and don’t plan to) and all my banners have been made using the free version of Canva. You can link your gmail, social media to an account for ease of access, or create a new account using your email of choice.

2) Choose a template, or create your own
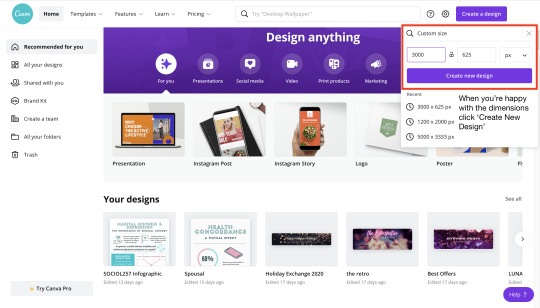
You can choose from Canva’s existing templates, but I usually prefer to create my own template to get a nice size for my banners. Click “Create New Design” (in the upper right corner). From there you can choose an existing template, or you can click “Custom Size”

For my banners, I usually do a 3000 px (horizontal) x 625 px banner (vertical). This size has had the best resolution on tumblr while still being the size ratio/dimensions that looks good to me on both mobile and desktop layouts.
3) Canva Presets/Templates in the editor // CREATE!
Once you enter the banner editing page you can choose from a lot of different things. Canva will generate existing templates for you that you can choose from. It also has a bunch of presets/images to choose from to help with creating a graphic. Since there really isn’t a set process/steps for making a banner beyond setting up the initial dimensions of your banner, here are a collection of tips/tricks I’ve learned while using Canva.

Some tips/tricks for using Canva:
1) Adding/using images
Canva Photo Library - Canva has TONS of free graphics available for you to use in graphics. You will see that some have watermarks + a crown logo - you can still use that image but the watermark will appear. However, there are still millions of images that are free to use with no watermark. I always look in the canva library first, since the images have a license that allows anyone to use them for free regardless of purpose.
AVOID using fanart/licensed images - Unless you have clear + direct permission from artists, I strongly encourage you to avoid using other people’s digital art! I know it may seem really beautiful/aesthetic, but fanartists have put a lot of time in to creating art for us to see. If you really want to use something for your banner, please check the artist’s blog/website/social media for their policy on using their artwork.
Other sources of free images: The two image libraries I use the most are Pixabay and Unsplash. Both libraries allow you to download photos under their license that makes their photos free for use without credit. Many of the photos in my smau + banners have come from these sites.
How to add images to your banner from your computer: if you are using images outside of Canva’s photo library, you will need to go to the ‘Uploads’ tab and upload your image from your device. From there you’ll be able to insert the image into your banner workspace.
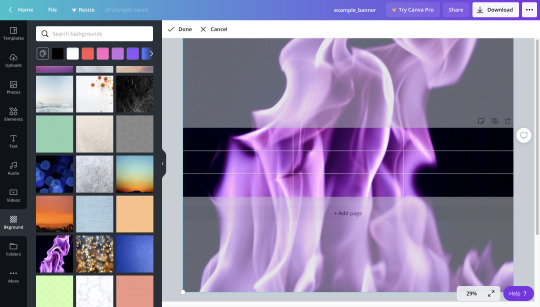
2) Changing Background Color - Use the background tab! You can click on the “New Color” button (the paint palette) to create a custom color.
Background tab + custom color:

You can also select from background image library - double click the image you want to make it the background. You can toggle which part of the image ends up as a the background by double clicking on it.
Selecting Image:

Image position toggle (double click on background):
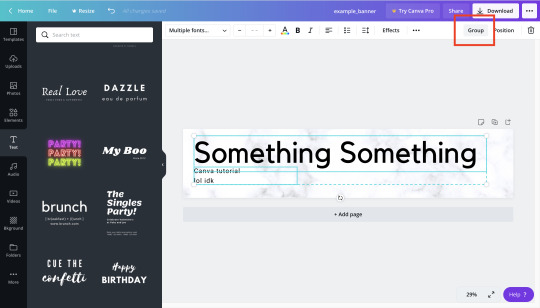
3) Grouping - This a really helpful function that groups different objects together to help you align them. I usually end up grouping all my banner text into one object so that it’s easy to move around and align with other images/graphics in the banner. All you do is select all the objects you’d like to group and click the “group” button in the upper right corner. (Drag your mouse across the graphic. you should see a blue square form - make sure the blue square is touching all the things you want to group together.)
4) Text/fonts -
Searching for fonts: Once again, there are going to be some fonts that you will not be able to access without Canva Pro, but there are so many that it doesn’t really matter (all my fonts are from the free font selection offered on Canva). You can also search for font style: some of the keywords I use are cursive (for loopy/pretty fonts), handwriting (for handwritten aesthetic), and corporate (for minimalist/clean fonts) and typewriter (for typed/typewriter aesthetic).
Text templates/presets: In the text tab of canva, you will see that they offer presets/templates of text (one of my favorites is the neon/halogen light font that I used for my 1k event). If you’re stuck on how you want to format your banner, this tab is always a really great place to start!
339 notes
·
View notes
Text
Selina Steals a Bug from Batman to get her Kitten.
blame this post here for this thing's inspiration, and a friend for encouraging this.
--
Selina paused when she saw ‘the lost Wayne’ news. She knew Bruce didn’t adopt another kid and forget to tell her—Dick kept her up-to-date on his new siblings and sent her pictures. No, her boyfriend Bruce Wayne would certainly not hide a new Wayne from her.
He absolutely would forget to introduce her to a new family friend or potential bat. She was still upset about how long it took him to admit that little Stephanie had been working with his son for months and he hadn’t thought to invite the girl over for a meal or two when Selina was over. It wasn’t like she didn’t already know Tim was dating another vigilante… it was that one of her not-technically-my-sons was not introducing her to someone who had saved his life multiple times and who happened to be another Gotham vigilante and another addition to the batfam.
Selina is their unofficial mother after all, she has rights. Any possible members of their little bat family, and she must assess them. at the very least, teach them more than just Bruce’s habits. The man was horrendous at showing his actual emotions, and the kids would need a counter example to that—herself obviously.
So imagine Selina’s surprise when she decided to surprise her boyfriend and his children with a visit, only to find a young teen drinking out of Tim’s favorite mug, wearing one of Dick’s more infamous Nightwing hoodie’s, and looking at one of Damian’s katana’s carefully.
“Who are you?” Selina had a feeling this was the latest “not a Wayne” and she would have to ensure her bats were safe from a fellow thief… again.
The teen looked up, almost startled by her appearance and nearly dropping the katana.
Selina raised an eyebrow.
The teen flushed. “Marinette.”
“And what,” Selina strolled over to the table and sat on its edge. “Exactly are you doing with all of these?”
The girl was smart enough to look a bit embarrassed, she'd give her that much. Not without shame. Good.
“Well, uh, kind of complicated, but, uh, the boys said that I couldn’t manage to grab their favorite things.”
Selina looked the girl over. She was probably the new one to the group, the spotted French girl Jagged Stone mentioned in a few of his songs. She was young, and clearly good at getting what she wanted.
“Where’s Jason’s?”
“Uh, how did you…”
“Answer the question.”
“… behind the gardener’s shed. He really needs to stop leaving his keys in easy access pockets.”
Selina nodded, looking over the girl. She was twisting a familiar looking ring… wasn’t that one of the Wayne family rings!?
“How did you get that off Bruce?” Selina feigned nonchalance.
“… don’t judge me.”
“Too late. Talk.”
“Accidentally, I swear, just, he left the safe open and mid-terms stress and then…” the girl gestured helplessly.
Selina could appreciate the honesty. She could also appreciate that the girl managed to get something off each boy.
But now came the real test.
“Kleptomaniac kind?”
The girl flushed harder. “Yeah… I was going to return it, eventually… I think.”
Selina looked over the girl once more, suddenly seeing an opportunity she should have taken back when she first saw Tim stalking her bats way back when. She could use her own mini.
“How do you feel about cats?”
Marinette shifted gears at that. “Real, memes, or Chat Noir?” Selina could feel there was a story there, one for another time. “If we’re talking real, they’re amazing, the memes are fun and Chat is…” the girl shook her head. “Complicated. And in London apparently, so he can’t judge me for my poor life choices.”
Oh, Selina likes this one. “I’m guessing you’re Brucie’s latest pet project?”
Marinette scrunched up her face at that. “I’m here to force a sense of fashion on this family if it kills me.”
Selina smiled at that. “Oh, I do believe we’re going to get along wonderfully.” She extended her hand. “I go by Catwoman in the field.”
Marinette paused for a moment before taking the extended hand with a grin of her own. “Ladybug—though we might want to go with something else for this... how do you feel about panjas bracelets?”
Selina’s grin grew. “Oh, we’re going to get along perfectly.”
-----------------------------------------------------------------------------------------------------------
In the Batcave there was a meeting being held by a distressed Nightwing, impatiently waiting for the others to finish arriving.
“Batgirl?”
“She’s not on tonight,” Red Robin answered, quietly sipping his espresso in one of his lesser mugs. It seems like his bean got to his favorite earlier…
“Black Bat?” Nightwing asked Batman.
“She’s running with the Birds of Prey tonight—Oracle’s idea.”
Nightwing seemed to accept this. “I’ll just forward them the power point.”
Red Robin groaned. “Another one?”
Red Hood shook his head. “Blame B. He got it in Dickie’s head that this is how you explain things to people. Bullet points.”
“No names in the field,” Robin snapped.
“No names in the field,” Red Hood mocked under his breath.
Robin glared at him for that.
“It’s a very effective method.” Batman stated defensively.
“Yeah, on the League,” Red Robin grumbled into his coffee. The Batfam is full of (not really) professional detectives—they are capable of understanding without the bullet points of doom. Mostly.
“Then I’ll just get started, Agent A, Lights!”
The batcave dimmed to show only the projection of a power point title slide ‘Marinette Cannot Meet Selina, Ever.’
“What the hell is this?” whispered Red Hood.
“I allowed you to delay patrol, for this?” Batman sighed.
“Silence! Nightwing is speaking.”
“Thank you Robin, now, Marinette is under no circumstances to meet Selina.”
“Why doesn’t he have to use codenames?” Red Hood wondered aloud. Only to be kicked by an aggressive Robin. “Ow! What the hell demon spawn!”
“Silence,” Robin hissed.
“As I Was Saying,” Nightwing loudly began. “Marinette is not allowed to meet Selina. It would be a disaster for us all.”
“Its not she’d adopt her like a certain someone is trying to,” Red Hood stated, pointedly ignoring Robin’s attempts to silence him with threats of violence.
Nightwing changed the slide with a sigh. “Exhibit A: Marinette enjoys shiny things, and so does Selina.”
The slide showed two pictures, one of Marinette in various miraculous while holding one of Damian’s daggers, and the other of Selina with a very large gemstone necklace.
“Exhibit B, they are both prone to theft.”
The next slide showed Catwoman stealing a necklace from a museum, and Marinette in Batman’s cape while using Tim’s phone and wearing one of Jason’s leather jackets, Titus laying at her feet.
“Marinette does not stop at shiny things, as we can expect of Selina,” Robin explained.
“You’re just mad Pixie managed to get past your security.”
Robin glared at Red Hood.
“That doesn’t explain why bean shouldn’t meet Selina,” Red Robin said. “Hm, maybe I should change the bean blend again? not getting enough of a buzz.”
Nightwing sighed, changing the slide again. “If the two meet, we lose all we hold dear.”
This time the slide showed a photoshopped Marinette and Selina sitting on a pile of miscellaneous objects.
Batman sighed, deciding his eldest was just being overdramatic again.
“Mari will learn new tricks from Selina.” Nightwing stated slowly. “Tag team with Selina, maybe even be the Robin to her Batman.” That got the room’s attention, albeit not the kind Nightwing wanted. “It would not just be Mari’s minor thefts anymore.”
Red Robin rolled his eyes while Red Hood snorted a “yeah right.”
Robin looked nervously as Nightwing finished his powerpoint.
“Mari would rule Gotham and no one, not even us, would be able to stop her.”
Batman decided that they wasted enough time on Nightwing’s bout of paranoia. “I highly doubt Selina would corrupt her.”
At that moment a beaming stripped heroine walked in, wearing a new string of necklaces, with Catwoman at her side with an amused look of her own.
“How dare you try to hide a kitten from me.”
Nightwing threw his hands up. “I told you!”
Batman stared while Robin began checking their systems… no alarms had gone off anywhere and they all knew the pair had stolen the necklaces that Marinette was sporting.
Nightwing was right.
“Holy shit is this really happening?” Red Robin half-whispered, looking back and forth between the pair and a shocked Batman. “Is Catmom pulling a Batdad?”
Catwoman flashed a smile. “Since someone wouldn’t let me take any birdies, I decided to take a kitten of my own.”
“Why didn’t you tell me I could have more moms here!” Marinette exclaimed.
At the groups growing look of horror, Catwoman’s grin grew. “Oh, I forgot to mention, Harley and Ivy are back. They want joint custody. She’s the Marigold Harley’s been tweeting about.”
---
first thing i do after getting real internet back plus have the time to think, and its write and post this. hope you all enjoyed!
783 notes
·
View notes
Photo


I know what it’s like to love dangerous people.
via: @circumstellars ➜ TUA fandom bang 2020 | Prompt: family, broken
[I cannot begin to describe the 15-20 hours of work this took. I was way too lucky when taako rolled such a clean and classic prompt for me, but once I finally imagined in my head what I wanted to do, executing it was a giant obstacle. It’s the most elaborate gif set I’ve made, in terms of number of effects and animation in one set. Photoshop puked on me halfway through this set, in my 3rd draft, glitching and bugging out for anything more than 100 frames long or so. I was so stubborn though. On my fifth(?) draft, here we are. It was most difficult because I had to figure this out never having done it, but also not seeing it done often, and not knowing any kind of related tutorials either. Really knocking around blindly. By the end, loading this in PS was pushing my laptop to the limits, omg it took PS 20 mins to open the document each time I started a fresh session. I do love that in all these processes, I’m recovering old tricks I used to know, and learning some new things I’ve never done in my graphic arts pursuits. It’s not perfect, but I wanted to make something worthy of this event, and to be worthy next to the mind-blowing entries by the others.
Thank you all who participated in this event, flooding our feeds with beautiful creations for us to enjoy. Fandom creators are so precious to me, I appreciate you all - and all of you who in turn consume and feedback with love! Let’s do this again soon, guys, what a treat it has been. We have shown that we are a better fandom when we’re all together. -Stellar (I tried to upload via submit like everyone else, but sadly, the submit function doesn't work for gifsets! wtf man.) ps. if it's out of sync - its not, refresh your browser! :D]
#tua#the umbrella academy#umbrella academy#klaus hargreeves#five hargreeves#luther hargreeves#diego hargreeves#Allison Hargreeves#ben hargreeves#vanya hargreeves#cw blood#gifset#submission#tuabigbang2020
152 notes
·
View notes
Text
Gathering FiKi’s Trick or Treat 2021 - Day 2
Trick
One of them lives in an old lighthouse AU. And when I say 'lives'… Does he really, or is he a ghost?
-
Not long after everything happened Fili applied to one of those jobs that appear every so often on your social media feed — “ HIRING [basic job title] ON [small, idyllic, remote community]. START IMMEDIATELY. GREAT PAY. GREAT BENEFITS. FREE HOUSING AND TRANSPORTATION.”
Fili had seen them before. Jason had always said that there must be some sort of catch—the house you are given to live in was the site of a gruesome murder-suicide; walls were painted an irredeemable shade of pink; well that was laced with toxic waste; absolutely no cell phone service or WiFi… You get the picture.
And Fili agreed with him. They’d had a few good laughs and a couple of fanciful dreams about moving to a small island and living together without distractions.
This time when one of those ads pops up in his feed while doing some late night scrolling after a few beers with a photo that was most assuredly a photoshop fabrication Jason is no longer around to shit all over the idea.
LIGHTHOUSE KEEPER NEEDED IN SMALL, TIGHT KNIT COMMUNITY ON ST. EDMUND’S ISLE. HOUSING AND BOAT FOR TRANSPORT PROVIDED. STARTING SALARY OF £--,--- WITH GREAT BENEFITS INCLUDING DENTAL AND EYE. START IMMEDIATELY. SERIOUS APPLICANTS ONLY.
Fili knew that he must be one of thousands of applicants. He knew that it is highly unlikely that he’d get the job. But he applied anyway. And then he forgot about it.
He’s had enough fanciful dreams—and plenty of perfectly ordinary, mundane dreams and desires as well—crushed lately to dwell on something he knows will never happen.
He’s trying to be practical and pragmatic, thank you very much.
So he was surprised when he sent a phone call from an unknown number while he was at his mind-numbing data entry job to voicemail and got an actual voicemail. Maggie Lakes the mayor of St. Edmund’s Isle asked him to call her back regarding a job that he had recently applied for. Fili stared at his phone for longer than he’d like to admit wondering what on earth Maggie was talking about.
It is only when he Googled St. Edmund’s Isle and saw that same ridiculous photo that he remembered.
He called Maggie back.
-
“Yes. I am very interested in the job.”
-
The first thing Fili learned upon moving to St. Edmunds was that the photo was most definitely not photoshopped.
And the walls of the lighthouse keeper’s house weren’t painted pink.
He loved the house and the work. The home needed small repairs and lighthouse maintenance was part of his job, but he’s always been handy and he loved working with his hands.
The first weird thing happened after he has been living on St. Edmund’s for a couple of months. Winter was fast approaching and Fili hung some drapes over the windows that faced the sea. He pulled a chair close to the windows. In the afternoons he read and propped his feet on the sill. He watched the sea, but once it was dark he was left with a dark reflective panel that leaked chilled air into the room. He drew the dark velvet drapes and went to bed.
In the morning they’re thrown back.
Fili frowned, shrugged and figured that he must have misremembered drawing them the night before.
Then it happened again.
The third time it happened the windows were opened and the hardwood floors beneath the windows were soaked. He swore.. Slammed the windows shut. Mopped the floor. And it all had to happen before he had his morning coffee.
That night he made sure that the windows are firmly locked before he tugged the drapes into place.
Everything was as he left it the next morning.
The following morning the drapes were open, and all of the curtains in the house had been pulled open. And Fili’s book looked as if it has been hurled across the room.
A new book was sitting on the end table with his bookmark carefully tucked between the pages. Fili opened the book to the marked page and found neat, but cramped handwriting in the margins. He flipped to the front cover and found a name written in the same hand--Kili Oakhurst.
Fili frowned and set the book on a shelf with the books he brought with him.
The next morning the book was out and the bookmark had been moved further into the book.
-
“I don’t know what’s happening, Ma. I’ve checked for drafts and I can’t find any,” Fili tells his mother on Sunday when they have their video chat. “And this morning I found a bunch of damp leaves by the door like someone had tracked them in.”
Dis hums and dunks a teabag in a mug of hot water. “Have you tried leaving the drapes open at night?”
“Why would I do that?”
“It sounds like someone wants them open.”
“You know I don’t…”
“I know you don’t believe in that sort of stuff, Fili dear. I’ve known you for a very long time. But when you have eliminated all which is impossible, then whatever remains, however improbable, must be the truth.”
Fili runs a hand through his hair. “Please don’t quote Sherlock Holmes to me.”
“It’s true.”
Fili groans and drops his head onto his folded arms.
“Your hair is quite long. Are you growing it out on purpose?” Dis says conversationally.
Fili groans dramatically into his arms.
-
From: [email protected]
2:03am
If it keeps happening you should call Gandalf. I’m attaching his contact information below.
I’ll send you some conditioner suggestions later since you plan on keeping your hair long.
Luv you!
-
Fili did not follow his mother's suggestions
Instead he shut the drapes and placed bricks he found in the shed on the edges. To keep the wind from moving them, or so he told himself.
The bricks were left in a neat little pyramid just outside his bedroom door; the perfect place to make sure that Fili would stub his toes on them.
Fili added more bricks the next night.
The pyramid was larger and this time it was at the bottom of the stairs.
Then lights were left on.
A bowl of popcorn was left beside his reading chair.
Fili decided to give his mother's suggestion a go and to call Gandalf.
-
“It seems like there is someone else living in the lighthouse with you.”
Fili tries not to roll his eyes. It’s ridiculous. He doesn’t believe in the supernatural, but he is at his wits end.
“Have you tried listening?”
“To what?”
“Well, usually when we have guests we cannot see they want something.”
Fili wants to tear out his hair. “Where do I start?”
“May I suggest leaving the drapes open?”
“Fine.”
“And ask their name. They already know who you are, but you don’t know them.”
“I guess I’ll give it a go.” Fili heaves a sigh.
-
That night Fili was sitting in his chair reading a book. The time when he normally goes to bed came and went. He sets down the book. He wasn’t really reading it anyways. He was checking his watch every line and getting lost in thought after he checked his watch. He had only read maybe two pages in the hours since he checked on the light.
He took a deep breath.
“Here goes nothing,” he mumbled to himself.
“I’m Fili. What’s your name?”
Fili nearly jumped out of his skin when someone answered. It sounded like they were sitting right next to him in the second chair.
“I’m Kili.”
a/n: I got serious Love is Blind and Being Human vibes from this. And it works a bit as an AU of WtWSGM.
14 notes
·
View notes
Photo

✧ TEXTURES – A TUTORIAL BY EVANSYHELP.
In this (long and image-heavy) tutorial, I’ll be showing you how I make textures, as requested by a very kind anon. I use Photoshop CC 2019 but you should be able to replicate my methods on most editing software. Please like or reblog this post if you find this helpful!
Index.
Ethically Sourcing Your Images.
Finding The Right Image.
Making Your Texture.
Other Tricks I Use.
Quick Recap.
Making Textures Without Images: Speedrun.
Outro.
Ethically Sourcing Your Images.
I will be explaining a couple quick ways to make textures without any images at the end of the tutorial, but since my personal favourite way involves images and that’s specifically what the anon requested, that’s what the majority of the tutorial will be focused on.
The first step, naturally, is finding an image to use. My personal favourite site is Unsplash, but there are plenty of options out there.
What you need to keep in mind is what kind of license the images have. Unsplash is free for personal and commercial use with no attribution required, which makes it perfect for things like this. There are more sites like this in my free for commercial use masterlist (linked at the end of the post), but unless you’re using them in products you’re selling (like graphic commissions), the commercial aspect isn’t something you need to worry about. Just check the site/photographer’s rules to make sure you’re allowed to edit the images for personal use, and whether attribution (credit) is required.
Another important thing to keep in mind is that these sites typically never allow you to redistribute the images as they are. That means you can’t just go to Unsplash’s texture category, save the images without any changes, and reupload them in a texture pack on Tumblr. That’s stealing. We don’t do that.
Finding The Right Image.
Knowing what kinds of images will make good textures is a learning curve. My first couple texture packs are rough compared to what I make now, because I basically taught myself with no guidance and learned through trial and error. But with practice, I learned what worked and what didn’t.
You want your images to be HQ, either with no ‘subject’ (ie. a person) or with a large background. Higher contrast is better but not super necessary. You should hopefully be able to envision what kind of texture you want to make before you even touch the image.
Making Your Texture.
For the majority of the tutorial, this is the image I’ll be working with. Credits can be found in the link at the end of the post.

Open your canvas. You can make specialised textures, like 100px for icons or 540px for Tumblr graphics, but I personally prefer to make them large for versatility. I’m using 800px in this tutorial. Once you’ve chosen your size, upload your full-size image into the canvas. This is where the fun begins!
Drag the image around into a nice position. Or use Edit > Transform to rotate, flip, and warp the image in different ways. Or use Edit > Free Transform (Ctrl+T) to change the size or the angle more precisely. Or probably some combination of all three! With Free Transform, make sure this aspect ratio anchor is selected so you don’t butcher the quality of the image, unless you’re warping it intentionally:

This is all very individual to each image you use. You might want to flip one, shrink another, put another at a 30 degree angle. Just experiment until you end up with something you think would look awesome as a texture. For the sake of providing a good example, I flipped this image vertically, shrunk it to 80% its original size, and rotated it until it looked like the smoke/cloud was coming from the bottom right corner. This is what we have:

Then we move onto enhancing. Textures work best when there’s a lot of contrast because it’s easier to manipulate the blending modes. So if your image isn’t already high contrast, these adjustment layers (Brightness/Contrast, Levels, and Selective Colour) are your new best friends:

If you don’t see this on your Photoshop, go to Window > Adjustments and it should pop up. Again, just experiment, because different images will require different things. Essentially, you want to make the darks darker and the lights lighter. Something I like to do is add a Selective Colour layer and use the Black slider. Pick out the primary colour of the image, and then Whites, in the drop-down menu, and move the bottom slider (left to lighten, right to darken) until you’re satisfied. Like so:
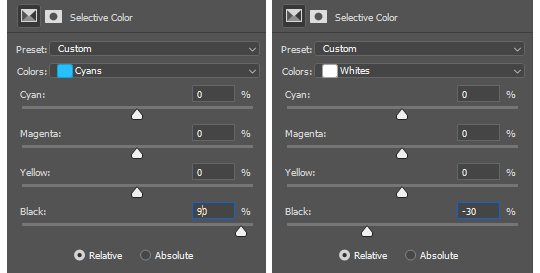
So with those Selective Colour settings and the following Levels settings, here’s the before and after of my image.


Much better contrast! If you want to end here, you can, but I personally prefer grayscale textures a lot of the time because it makes it more versatile. Instead of being forced to make a blue graphic because this image is blue, I can make any colour graphic I want with one simple black and white Gradient layer. Photoshop does have a default Black & White adjustment feature, but I prefer using Gradients.
Pro tip: if your image doesn’t have a pure black, you can keep the darkest parts of your image dark by using the left slider, shown below.


A lot of the time, I’ll also decrease the opacity of that Gradient layer, to somewhere between 80% and 95%, so just a hint of the original colour comes through. This gives it more dimension in my opinion, while still keeping it mostly neutral. Here’s 100% vs. 85%:

You may find that you want to add a little more contrast after. With this texture, I decided to grab another Selective Colour layer, pick ‘Black’ in the drop-down menu, and pull the Black slider up to +40. I also settled on 95% opacity for the Gradient. And here’s the final product!

Other Tricks I Use.
That covers how I make a lot of my easier textures, but here’s a quick run-through of other, slightly more complex tricks. I’ll be working with this image (again, credit at the end of the post):

This, of course, is not as obviously texture-worthy as the previous example, but I love textures with strong lines, so here’s how the magic happens! I wanted to get rid of the detail on the bottom half, so I used the Polygonal Lasso tool to select it:

Then I used the eyedropper tool (the 4th symbol under the polygonal lasso in the image above) to select the blue of the sky and, on a new layer, painted that selection completely blue. I decreased the opacity to 90% just so it wasn’t a total block colour, but not enough that you can really see the lines. I repeated this process for the sky, so it looked more consistent with the bottom half.
Then, using the eyedropper tool again and making a new layer for every colour, I went in with a small soft paintbrush and painted out the harsh vertical lines on each segment of the stripes. I didn’t want to make them totally perfect, but I painted over the bulkiest interruptions.
I added a black and white Gradient layer, using the slider tool I showed you before to darken the darks and lighten the lights, and decreased it to 50% so that it wasn’t totally black and white but still more neutral than the original. Here’s the result:

Another fun way to shake things up, which unfortunately will require Photoshop (CS6 should be fine, not sure about earlier versions), is the Filter Gallery. Go to Filter > Filter Gallery, and you’ll find a TON of effects that change your image drastically. Most of the default settings are nightmarish, but you can play around with the settings panel on the right.

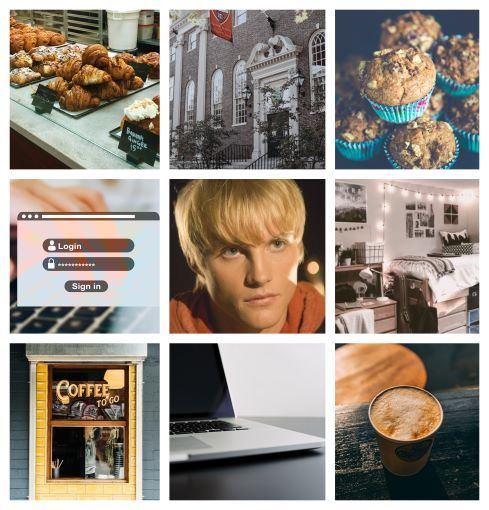
Here’s just a few results that are possible with the Filter Gallery, labelled for convenience. You can view the HQ versions in the link at the end of the post.

Quick Recap.
So you don’t have to reread this obnoxiously large tutorial every time you want to reference it in the future:
Choose a HQ image.
Resize, rotate, flip, and/or warp.
Enhance the contrast.
Black and white!
Paint over problem areas!
Filter > Filter Gallery.
Making Textures Without Images: Speedrun.
We’re almost done! There are some tools built directly into Photoshop that can allow you to make textures completely from scratch, and I’ll briefly cover my favourites here.
The first is pattern fill layers. I spent too many years not appreciating the patterns feature in Photoshop, but they’re great. Go to Layer > New Fill Layer > Pattern, click ‘OK’ on the box that pops up, and another box will pop up to let you choose your pattern.
By themselves, they are UGLY. It can take a while to figure out how to use them. But if you change the scale, change the blending mode, and change the opacity, you have thousands of textures at your fingertips. And if you add two or three together? Billions of possibilities. I can do a more in-depth tutorial on patterns if y’all are interested, but here’s two examples I just whipped up in a matter of minutes, using two patterns on each:

The next feature is gradient fill layers, and the gradient tool. Go to Layer > New Fill Layer > Gradient… to select a gradient (or make your own!) and an angle, OR use the gradient tool (featured below) to drag the gradient across your canvas manually. On its own, boom, that’s a gradient texture. Paired with a pattern or put through the Filter Gallery? Even better!


The last is brushes. Brushes can be great for textures because there are so many kinds. You want to make a paint splatter texture? Paint splatter brush sets are everywhere! You want to make a smoky texture? You can get brushes that look like smoke! Smudged? Scratchy? Grunge? Halftone? Light leaks? Torn paper? Brushes have your back.

With all of these features (and things like actions, too!), your saving grace is going to be this little cog wheel shown below, and the list you’ll find under the Reset/Save/Load section. There are SO many more options built directly into Photoshop that you don’t even see right away, because you have to add them manually from this little cog wheel.

And you can download countless more patterns, gradients, and brushes from sites like Brusheezy and DeviantART. A couple tutorials on downloading and installing them can be found in the link at the end of the post, but remember, download these things ethically. If you want to sell products that use a custom brush, it’s your responsibility to find brushes that are free for commercial use. If you don’t want to credit the creator, it’s your responsibility to find resources that don’t require attribution.
Outro.
I think that’s everything, guys! If you found this tutorial helpful or otherwise enjoy my content, please consider supporting me on Ko-fi! I offer exclusive rewards, like custom graphics, to everyone who donates.
Due to Tumblr’s latest rules about links, you can find the credits list, the promised bonus tutorials, other important links, and the full-size HQ versions of the textures made in this tutorial over here.
Thanks for reading!
#rph#allresources#completeresources#itsphotoshop#chaoticresources#photoshop tutorial#photoshop resources#photoshop help#ps resources#ps tutorial#eh#eh: tutorial#tutorial#ps help#texture#*100#*250
371 notes
·
View notes
Text
The Covenant: Tech Guy
Reid Garwin x Reader
Word Count: 3,826
Summary: After renting a laptop from your campus library, you run into a download problem. A call to Library Tech Services for help introduces you to Tech Guy. Good at his job, but with questionable people skills, you learn to work with him. It certainly helps that he has an attractive voice.
This was not good, not good at all. It was less than an hour to midnight, the sun long since having set, and time seemed to pas faster, not slower, the later it got.
Now, you considered yourself to be pretty good with technology, perhaps not a computer genius but good enough to be able to troubleshoot most of your problems. It was pure bad luck that the night your capabilities failed was the night before you had an assignment due in Graphic Design.
Your own laptop had been ruined after an accident in the library had left the screen nothing more than a web of shattered fragments, but thankfully the library also carried laptops for checkout which saved you from having to fork out money that you didn’t have to buy a new one. You thought that checking out a laptop would be a quick fix to your problem, but you underestimated how high their demand was.
The librarian you spoke with at the circulation desk put you on a waiting list much to your disappointment and you left the building empty handed, unsure when one would become available.
The answer was six days later, the night before you had something due.
When they left a voicemail on your cell phone around seven o’clock to tell you that it was ready for pick-up, you immediately hopped on a bus bound for the library. The anxiety should have been somewhat alleviated because you could actually start to work on it now but when you got back to your dorm room and opened it up, another problem presented itself: the program you needed wasn’t installed.
Bad luck 1 – You 0.
Every time you tried to install it a message would pop up prompting you to enter an admin username and password in order to start the process. You had never seen that message before and innocently tried your own username and password. When that didn’t work, you tried three more times just to be sure.
Next stop was the internet, everyone’s favorite place to ask questions. You ran a quick search describing the problem and read through a couple of chat room threads. Disappointingly, nothing really applied to the situation at hand.
In hindsight, you shouldn’t have spent so much time trying to fix it because all that came of it was a lot of wasted time and you still hadn’t installed the program. You really didn’t want to take another trip to the library tonight if you could help it.
Frustrated and stuck you opened up the library’s webpage to see if there were any answers to be found. They didn’t but you did find the phone number for Library Tech Services, which was miraculously open even this late in the night.
Punching in the numbers you dialed and waited for someone to answer and when they did, it was short and to the point. “Library Tech.”
“Umm, hi… my name is y/n and I’m having an issue installing a program on my laptop rental.”
“Hmm. What’s the problem?” Again, not much to go on but the you could admit that tech guy’s voice sounded attractive.
“Well. I clicked on the install button, but as soon as I did a message telling me that I needed admin permission to continue flashed on my screen.”
“Did you try your university username and password?”
“Yes.”
“Did you double check that you typed everything correctly?”
“Yes.”
“Did you try Google?”
“Of course, I did,” you answered with exasperation. He snickered and you felt your hackles rise. You called the number to get helped, not to get laughed at. Attractive voice be damned.
“I promise I exhausted every trick I know, I’m not stupid. But I do have something to finish tonight so if you can help me out here, that’d be great.”
For a split second you felt bad for being short with him but the aggravation was quick to return. He was the one providing terrible customer service… why should you feel bad calling him out on it?
He must’ve gotten the hint because he cleared his throat and started being serious. “The library puts restrictions on its laptops because they don’t want people downloading stuff willy nilly. What do you need to install?”
“Just Adobe Illustrator.”
You heard him typing on a keyboard in the background. “Sounds okay to me. I’ll just give you the admin credentials so you don’t have to make a trip over here tonight.”
You started to say thanks until you processed the end of that sentence. “Wait, what do you mean by that?”
“Normally we require people to come in person to fill out a form. Once the request is approved, a person is supposed to enter in the admin stuff, but I’m going to give it out over the phone to save you some time.”
His words left you speechless. You had no idea there was a whole process to do something so simple as install a program; you should’ve asked more questions before you walked out with it. It was a good thing to remember for next time. And the earlier guilt returned, too. He was being so nice now, bending the rules so you didn’t have to make another trek on the bus, which was quite frankly a gamble after dark.
You thanked him profusely, the tension draining from your shoulders. Once you told him the laptops id number and he was able to confirm that it was rented out to your account, he shared the username and password with you.
With baited breath, you typed in exactly what he told you to and couldn’t help the happy noise that escaped you when it worked. It was impossible that tech guy saw your chair dance through the phone but he laughed again, making you question if he somehow knew anyway.
“Thanks, you’re a life saver!”
He cleared his throat and said “Glad to be of service.” Then he hung up without another word.
You pulled the phone away from your ear and looked at it blankly. What the heck was that about? Thinking back on the conversation left you feeling very confused but you threw yourself into getting your images drawn up on Illustrator and soon lost yourself in the work.
You ended up staying up late well past your normal bedtime but the deadline was enough motivation for you to push through the drowsiness and yawns. Around 3:30 you finally finished and emailed it to the professor so you wouldn’t have to worry about it in the morning.
Sleep came easy that night and you vaguely remembered dreaming about tech guy’s voice which was utterly ridiculous. He hadn’t even mentioned his name, for goodness sakes! Plus, he was so hard to read, bouncing between jerk and nice on a whim. Nope. You were not going to stoop to finding out who he was. Not a chance.
After yesterday’s incident, your first course of the new day was to go grab a cup of coffee. You weren’t an easy riser on a good day, even less so after being up until the wee hours of the morning and caffeine was going to be essential for powering you through your classes.
Your go-to place was a campus coffee shop two blocks down from your dorm. It was still winter but you found that as long as you bundled up, the walk over went quickly and the cold air worked wonders for organizing your thoughts. But the real reason it was your favorite was not its closeness, it wasn’t even for the coffee; it was because of the heavenly pastries they made daily. The croissants, the eclairs, the danishes… they were all excellent. None was above their banana chocolate chip muffins.
A little bell chimed as you opened the door and the blast of heat from inside the shop felt nice against your chilled cheeks. The familiar worker at the register looked up and smiled when they saw you. “Hey, y/n! Should I start working on your cappuccino order?”
“Yes, please!” You approached the counter, removing your gloves to make it easier to take out your card from your wallet. A gleaming dessert case also caught your eye and you tried to glance over discreetly. As subtle as you tried to be, the cashier knew you too well after serving you for the past couple of years.
“Oh, sorry. We’re out those again.”
“Again?” you questioned sorrowfully.
He gave you a sympathetic shrug. “They’re very popular, they always go fast.”
It used to be that you could get your hands on a banana chocolate chip muffin whenever you wanted one but the secret must’ve gotten out to the rest of campus because you’d struck out for the past weeks. With a dramatic sigh, you settled for a chocolate croissant. It was no muffin but it was something to tide over your stomach until lunch.
“You know,” you started conspiratorially, “How can someone be so talented yet stupid simultaneously? If that no-good-baker bothered to make more of them knowing how fast they sell, this wouldn’t happen.”
You had never actually met the baker that was the source of the yummy pastries. In fact, you’d never even seen him and only knew that he was good at what he did and that he never came out to the front of the shop. There was really no reason why you ragged on him that morning other than you had major plans for that muffin that now had to be put on hold.
The cashier chuckled as he rang you up and looked back at the door to the kitchen for a moment. “I’ll pass along the message.” He slipped the croissant in a brown paper bag and handed it, along with the travel coffee cup, over to you. “Have a good day. See you next time.”
You accepted it with a “You, too,” and were out the door to catch the next bus to your class.
***
Later that week, you ran into a familiar problem with the laptop. This time you needed to add Photoshop but figured that it shouldn’t be an issue now that you knew the password. So when you typed in the exact same thing as last time and the computer told you it was incorrect, you dragged a hand down your face and groaned. Well, you weren’t going to make the same mistake twice.
Swiveling around in your chair you grabbed your phone and called the Tech Services line again. The only thing that would make this even better would be if tech guy answered again, that’s how your luck was going that week. And sure enough, “Library Tech Services.”
You refrained from groaning again. Out loud anyway. “Hi, it’s y/n again. I was the one who called about the admin credentials Monday night?”
“What’s up?”
“I’m trying to install Photoshop right now and it’s telling me the username/password is incorrect, which is impossible because it’s what I used the last time.”
“Right. We had to change the password for our monthly maintenance, it’s a security thing.”
“You’re kidding,” you said surprise coloring your voice. “Any chance you can share the new one with me?”
“Technically, I wasn’t supposed to give that to you last time.”
It was time to turn on the charm and convince him like you managed to previously. As you pleaded with him to do you this favor he interrupted you.
“How bad do you need it?”
What was wrong with you that hearing him say that put your mind in the gutter? He definitely hadn’t meant it that way when he said it! He was much chattier this time around so you were able to appreciate his voice better and his voice just did it for you.
You cleared your throat. “It’s not an emergency this time, no impending next-day deadlines, but I do want to get working on this new assignment…”
“Okay, okay. You’re lucky I like you.” That was news to you because you didn’t get that vibe based on the last call. It was nice to hear though. Some clicks sounded from the other end of the line and you waited silently for a few moments before he was ready to say the new password.
“Whew, we’re good to go,” you updated him as the Photoshop installation started. Another moment of silence passed.
Finally, he said a quick, “Good.”
You weren’t caught off guard when you heard the click that signaled he had hung up. Unlike the last call, he hadn’t seemed rude and he did mention that he liked you. Maybe he was just an awkward sort of guy, despite his killer voice. That might explain why he worked an IT job, weren’t those kinds of guys supposed to have terrible people skills?
You worked with Photoshop for a bit and when you reached a good stopping point, you got ready for bed. That night you laid awake for a while, unable to drift off to sleep. Instead, you replayed the conversation with tech guy over and over in your mind.
He was very helpful when he wasn’t giving an attitude and he this was the second time he had bent the rules for you. That pesky word ‘like’ kept rattling in your brain and you started to wonder if that nice voice belonged to a nice face. Furthermore, was there a chance that he found your voice attractive as well?
***
Sunday morning on a college campus seemed like a smart time to visit the coffee given that most of campus wasn’t up yet, which increased the chances of you getting your hands on a banana chocolate chip muffin. Maybe even two or three if you were honest, to make up for the past several failed attempts.
The sun hadn’t been up long when you opened the door, the little jingling bell announcing your presence. A barrage of delicious aromas caressed your nose and to your extreme delight, one of the scents you detected was a banana-chocolate combination.
You walked up to the counter and the cashier smiled as he told you good morning.
“So… can I get three banana chocolate chip muffins?”
He merely smiled and started working on your cappuccino. “Of course. Reid just finished them so they still in the kitchen, piping hot.”
Reid must be the baker that was responsible for the muffins as well as responsible for never making enough. “Finally! This is a long time coming for me.”
“I passed him your message, I think he took it to heart.” He handed over the drink and turned to go to the kitchen. “I’ll be back with the muffins.”
He pushed the door open and for a split second you caught a glimpse of a side profile belonging to a blonde guy. He was too far away to distinctly make out any facial features but he had nice shoulders framed by his black tee and obvious blonde hair that was hard to miss. He looked cute to you, at least from a distance.
Those two details were the only things you took note of before the door closed, effectively blocking you from more staring. Too bad. It was totally ridiculous to think about but tech guy’s voice would be a good combination with baker guy’s looks.
You picked at the lid of the coffee cup while you waited for the rest of your order already anticipating how they would taste. Your plan was to only eat one this morning and to ration the rest, but you were honest enough with yourself to know that you might enter a feeding frenzy and have all three finished by lunch.
When the door opened up again your eyes searched for the seemingly cute baker but there was no sign of him. There wasn’t a chance to get down about it, however, because a smile lit up your face as soon as you saw the medium sized brown paper bag that held the muffins.
“Reid says these are especially for you,” the cashier said as he lifted the bag over the register.
You were quick to raise your hands to take it from him and made sure to thank him as you left, not questioning why Reid, a person you’d never met, would make a comment like that, figuring that he was referring to how you complained that the muffins were always sold out.
The morning air was especially cold as you trekked back to your dorm, your breath condensing into a fleeting, frozen cloud around your face and the only thing keeping your hands warm was the cappuccino you held between gloved hands. Still, the trip to the coffee shop was definitely worth it and you were hoping that it was a good omen to start the day off with.
***
Perhaps you were still experiencing the high of the morning victory at the coffee shop, but later on that night while you were working on homework once again, you started thinking about tech guy again. There wasn’t any need to call him; you now had both Illustrator and Photoshop on the laptop and there wasn’t anything else that you needed to install.
Still, you debated calling him. Not because you needed to but because you wanted to. Which was weird, even to you, but you had missed him the past couple of days, bad people skills and all. After the second call, you felt even more confident that he wasn’t as condescending a guy as you had first thought him to be. And you wouldn’t mind getting to know that awkward version of him better.
The hard part was you literally knew nothing about him other than he worked the night shift at the library. You didn’t have a name, a face, not even a work schedule to confirm whether he was working tonight or not. Reid must’ve been serious when he told the cashier those muffins were made especially for you because there had to have been a secret dose of recklessness mixed in there. How else would you explain this strange, and potentially creepy, call you were about to make?
The dial tone rang and you took a deep breath, not sure how this would turn out. On the fifth ring, someone finally picked up. “Library Tech Services.”
You laughed in relief. Tech guy was the on the other end of the phone. “Hey.”
“Hey, y/n. Having another crisis?” On one hand you felt a little embarrassed that you no longer had to say your name for him to recognize your voice but on the other, the possibility that he enjoyed talking with you, too.
“It may come as a surprise but I can get through a day without having a tech issue that needs solving.”
“Oh, really?”
“I swear.” You crossed your heart even though he couldn’t see you.
“Well, what do you want then?”
Time to be brave. “Actually, I called for you.”
“I would hope so, I’m the only who works this shift meaning I’m your only option.”
“No, um, I meant I wanted to tell you thanks for helping me out with installing that stuff on the laptop. You were a lifesaver.”
“I try.”
“Seriously! I definitely would’ve missed one graphic design deadline, potentially two if you hadn’t come to the rescue.”
That seemed to get his attention. “Is that your major? Graphic Design?”
“Yep. Don’t I give off bumbling artist vibes?”
“Hmm you seem pretty confident to me but there’s nothing wrong with that. My grandma was—” He started that sentence but abruptly cut off and you couldn’t help but laugh.
“Are you saying I remind you of your grandma?”
“Shit,” he grumbled. “My friends told me to stop bringing her up when talking to hot people.”
“Don’t sweat it, she sounds like she was awesome so I’m honored. But back to the part where I’m hot… do you really think so?”
“Obviously. Do you think I hand out library secrets to every person who calls? Your voice is strong and you sound super smart so I tried my best to be cool with you.”
“Okay but future tip: hanging up on people and not telling them your name is rude, not cool.”
His embarrassment was tangible through the phone and you let him sweat momentarily before speaking. “Luckily for you, I like dorks such as yourself and am willing to look past it as long as I get your name.”
“It’s Reid. Reid Garwin,” he rushed to say.
Now that was interesting. You fell back on your bed, your brain trying to make connections. The name while not super common, wasn’t rare either and what were the chances that you met two of them on the same day. If Reid with the nice body and tech guy, er, Reid with the nice voice were one in the same, you wouldn’t be upset. Quite the contrary.
“Reid as in Reid who bakes my favorite sugar fixes on campus?”
“One in the same. You seen me there before?”
“Only once,” you reveal. “When I went to pick up some muffins this today.”
It was his turn to laugh. “Wait. Are you saying that you’re that customer who called me stupid the other day?”
“…Maybe.”
“They don’t let me out front cause I’m ‘too much’ for people but rest assured that the door isn’t that thick. I feel like an idiot for not recognizing that it was you though.”
The revelation that Reid was baking a tech hero, a winning mix by the way, thrilled you all the way from your head to your toes. At the moment you didn’t even care that he heard you calling him names at the coffee shop although you were sure the mortification would set in later.
“Would you like to go out sometime—”
“You do want to go out with me sometime—”
The two of you spoke at the same time and when you realized that the other had read your mind, you both giggled.
“After you,” you assured him.
“Shit, would you like to go out sometime? There’s a restaurant downtown that’s really good and I promise not to bring up grandma Garwin again.”
The plan was to pretend to think about it but your excitement overrode your brain and you said, “Deal as long as you promise to tell me more about her, not less.”
He started to answer you but stopped suddenly and you could vaguely hear him getting scolded by someone, reminding you that technically he was still on the clock.
“Sorry,” he grumbled, “The librarian on duty told me to stop flirting and get back to work. Stop by the coffee shop tomorrow though and we can talk more.”
You said your good-byes and rolled around your bed, the comforter thoroughly rumpled by the time you stopped. It seemed that your luck may be turning around for the better.
_______________
Thanks for reading my most self-indulgent piece to date. Also my longest! Reid may consider himself to be mister cool, but he is also an awkward bean who would make a great tech guy. It's also my first time experimenting with moodboards, let me know what you think :)
70 notes
·
View notes
Text
gif tutorial ✨🎥
I got a few requests to make a gif tutorial so here it is. hope it helps :) It’s quite long so I’ll put it all under a read more. If you have any questions, feel free to ask or PM me directly for help!
Alright....sooo, I don’t remember the last time I made a gif tutorial on this site, but I figured I would even though I use the same method a lot of gif makers have been using for years. I have never strayed from this process and I’ve been making gifs on this site for a decade.
There are a couple methods to making gifs. You can import your video directly into photoshop and cut your gif there. OR you can use a separate video player that has a screencapping tool, then import all your frames into photoshop; this is the method I use and it’s how I’ve adapted and perfected my giffing skills over time.
This post will be long, but I want to be as detailed as I can and explain it step by step. It’s really NOT difficult once you get the hang of it, which is probably why I’ve always done it this way.
Disclaimer: There are three programs I use and I highly suggest you look for reliable links yourself if I’m not able to provide one. I use pretty old versions of KMPlayer and Photoshop (I’ll explain why later), so be careful where you go looking for downloads. There are some photoshop downloads here, but I can’t vouch for them.
Let’s start :)
DOWNLOADING VIDEOS
I use a program called 4k Video Downloader to rip HD videos from Youtube. 1080p is the way to go, but obviously that’s not always possible. It’s ridiculously easy, all you do is click the “Paste Link” button and it’ll download your video. Clicking the “Smart Mode” button will let you set the default quality and the folder you want all your videos to be saved to.
As you can see, here are all the videos I’ve downloaded recently for my gif posts. You can clear this download history list at any time.
SCREENCAPPING
After your video is done downloading, I open the video in KMPlayer. Now, I use an OLD version of this program because this was exactly how I learned to do this back in the day. You can find old versions online, I don’t really know exactly which version mine is because I’ve had it forever, but it’s the old school one that looks like this.

When you open the video, it might stretch the player to full screen so I always adjust it by dragging the corner of the player inward so it shrinks to a more medium size. This will also make your screencaps not so GIANT, which will take longer to load into photoshop.
Anyways, you’re gonna open your video and right click anywhere on the video to select Capture > Frame Extract... (or Ctrl+G on Windows). This window will come up. Make sure all your settings look like this to ensure a really smooth gif.

The first thing you should do is click that little “G” button next to the window size at the bottom. That’ll lock in the dimensions of however big you’ve made your video window, and if you stretch it you’ll see these numbers change. If you start capping without remembering to push that and you make your window smaller/bigger, your caps might be a wacky size or look stretched and you’ll have to go back and do it again. Also note the extracting location at the top. All your caps will go directly to a default folder titled “Capture”.
Once all the settings are ready, go to your desired section of the video, pause it, and hit “Start”. Play the video, pause the video when you’ve got all your caps, then hit “Stop”.
Locate your “Capture” folder and doublecheck you got all the caps you want. This is where I take a moment to delete any caps I don’t want in my gif, that way you don’t bother loading them into photoshop and making it take longer than it needs to.
MAKING THE GIF
You’re gonna open whatever version of Photoshop you’re using. I hilariously still use CS3 to make gifs because the next script I’m gonna run doesn’t work in the free download that I have of CS5, but that’s what you get sometimes when you don’t pay for stuff. Hopefully whatever more recent version of PS you use, you have no problems.
Go to File > Scripts > Load Files Into Stack...
This window will come up.
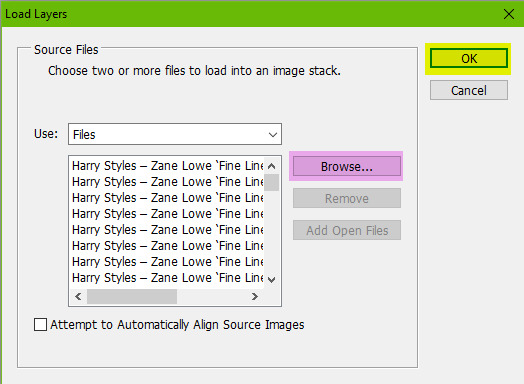
Hit “Browse” and locate your capture folder. Highlight all your caps and press OK. You’ll see them all come up in a list as shown above. Press OK again. Your caps will start to load into one big stack of layers. This will take a minute or so.
When it’s all loaded in, you’ll see them all stacked in your Layers window (Windows > Layers). You’re gonna open your animations timeline (Windows > Animation) and click the little drop down button in the top right corner of the window and select “Make Frames From Layers”.
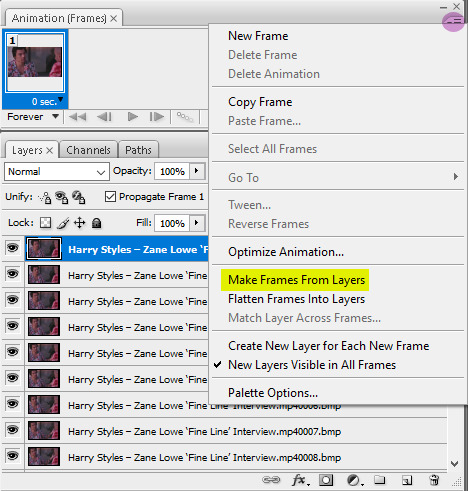
Click that drop down menu again and hit “Reverse Frames”. Click that drop down menu again and hit “Flatten Frames Into Layers” (this is so our sharpening action will work later). Click the drop down menu again and select “Select All Frames”. All your frames will be highlighted. This is where you’ll set your animation speed. Under each frame you’ll see “0 sec.” Click on that and select “Other”. Type in your desired speed. I usually go for 0.04 if it has a lot of frames. For less frames, 0.05 or 0.06. This is honestly entirely up to your preference. I actually made myself a photoshop action doing all these repetitive steps so it saves me a few precious long seconds of clicking around over and over. I just run the action after my caps are loaded. If you make gifs a lot, I recommend it.
Next it cropping. The reason I don’t crop right away after the files are loaded into a stack is because I like to see where the subject in the gif moves before I decide where I need to crop. I don’t want to accidentally cut anything off. The subject might sway in and out of frame or be off center if I crop it blindly before seeing exactly where the object moves around. So I’ll play the gif first to see exactly where to crop.
Anyways, you’re gonna set your desired width x height of your gif. I’m making this a big gif so you can see the details better. 540 px is Tumblr’s width for big horizontal gifs. If you’re making a photoset with two gifs side by side the width for Tumblr is 268 px.
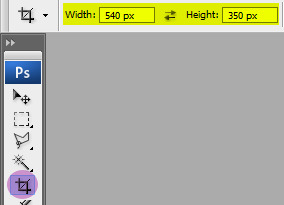
Go ahead and crop your gif. It’ll resize itself as well. Play the gif back so you can see if anything gets cut off or it’s not where you want it. You can undo the crop and do it again until you’re satisfied.
Here is what my gif looks like animated and cropped.

As you can see, it plays nice and smoothly due to our screencap settings from before in KMPlayer and with our set gif speed (I used 0.05 here).
Next is sharpening the gif. I use a sharpening action that can quickly sharpen up to 120 frames. You can download it here. Open the action by going to File > Open and locating the file. It’ll be added to your Actions window. (Window > Actions if you can’t see it.) In order for it to run correctly, you have to have the first frame selected on your animation window, as well as “Frame 1″ in the layers window. Just like this:
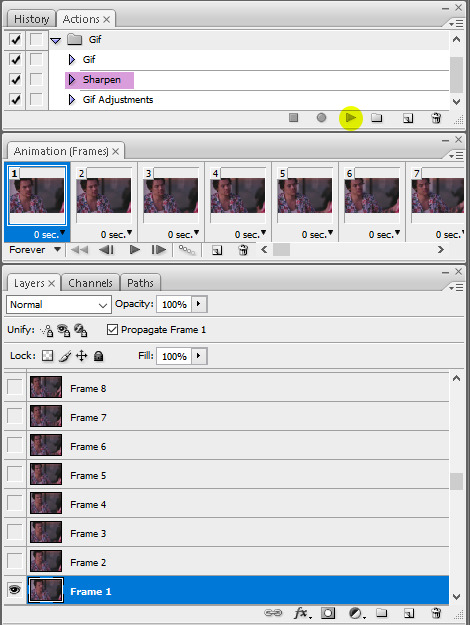
Click the play button on the action and wait a few seconds for all the gifs to finish being sharpened. For any gif with less than 120 frames (which I hope is always, good God) a pop-up will come up when it reaches the end of the frames asking you if you want to stop. Click “Stop”.
Tip: If you think you want to delete more frames, run the sharpening action before you do it. Otherwise you’ll have to flatten your frames into layers again. The first frame and the “Frame 1″ layer should always be the same (the little eye will appear to the left of the layer to let you know it’s visible when you have that specific frame selected) otherwise the action won’t work.
Here is what my gif looks like now that it’s sharpened.

COLORING THE GIF
This is where all the fun (or pain) comes in. All your coloring will be done by using Adjustment Layers (Layers > New Adjustment Layer). I usually go in the same order of adjustments, but this is where personal style comes in and you do no have to do it in the same order I do. You can practice with this part all you want and see how you like to do it.
I start with brightening the gif first and fixing the white balance if a scene needs it. I chose this video specifically so you could see this next handy trick that a lot of people don’t even know about. It’s a dark scene and the white balance makes the subject look quite blue.
I can fix this by starting with a Curves layer. By clicking the third eyedropper tool, you can go and click on a white point in your gif (in this case, I clicked on a white square on his shirt) and bumped up the input number a bit for a little contrast (optional). My curves look like this. Click OK.
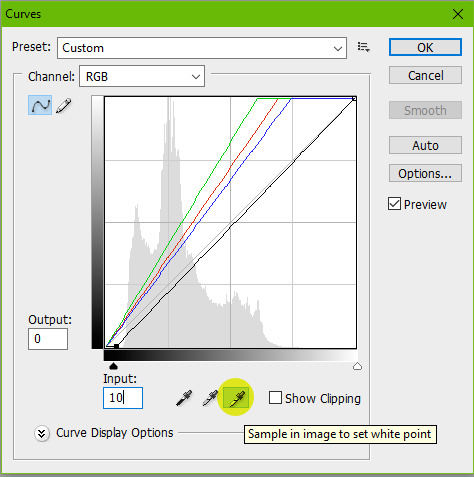
My gif now looks like this.

It’s much better, right? The white eyedropper tool will become a lifesaver sometimes, but it’s not always needed.
Next, I go in with a Levels adjustment to do some more brightening. This is all up to preference, but you can play around with this. I typically like to add more contrast with this layer. I just adjust the sliders until I’m satisfied.
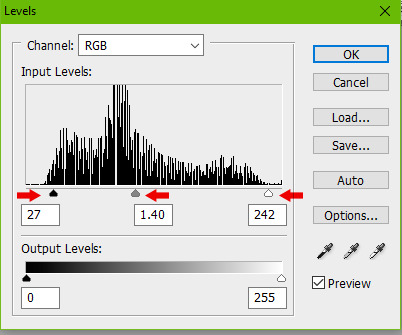
Here is my gif now.

Onto yet another brightening layer. Brightness/Contrast. A couple teeny tiny more positive numbers and I now have this.

Next is Selective Color. I wish I could explain this in a way that makes sense, but this is the layer that takes a bit of practice getting down and boils down to how you like the colors in your gif to look. I personally don’t like a lot of yellow in mine, so I focus a lot on the Yellow and Black sliders in each specific tab. I start in the Reds, then Yellows, Whites, Neutrals, then bump up the Blacks a tiny bit.
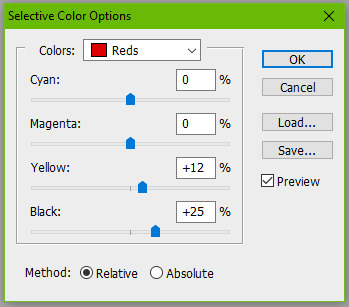
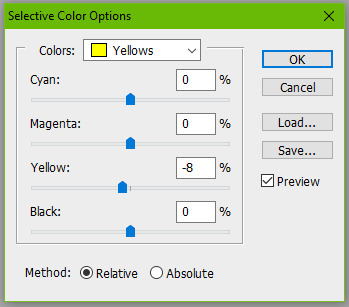

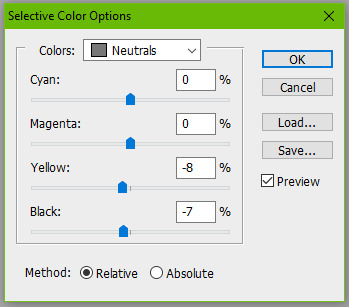
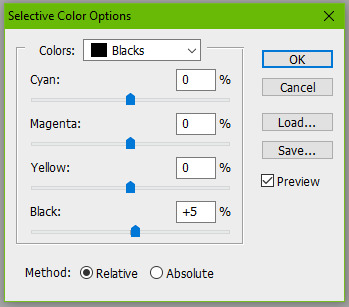
Here is my gif now. It’s a bit more cool toned, which is what I like.

Next I’ll go in with a Color Balance layer and play with the Midtones and Shadows.
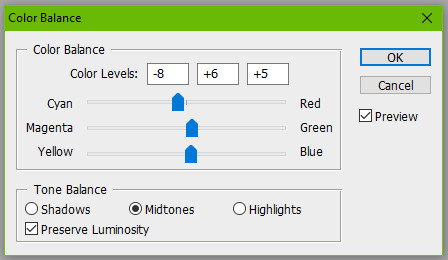
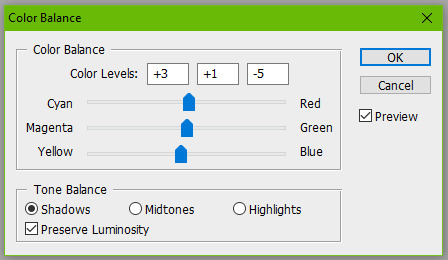
Here it is now.

This is usually my last step unless I want to adjust the brightness again (which I do), so I might go back into my Curves and Levels layers to bump it up.

And you can totally stop there, but I would like to mention a few more optional layers to add depending on your gif. If I wanted more saturation, I would add a Hue/Saturation layer at this point, but I think it’s colorful enough so I’m not going to.
Another layer you can use is Gradient Maps.
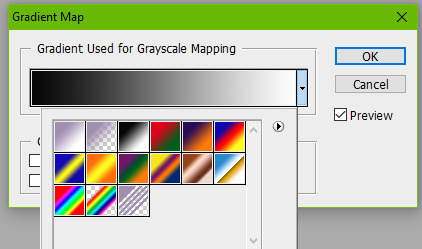
Setting a black and white gradient map overtop your gif and setting the layer to Soft Light and lowering the opacity to your heart’s desire (you might need to go to the little drop down menu in your animation timeline and hit “Match Layers Across Frames”) can give your gif a very contrast-y look like this.

Or you can change the black color to something else for a different tone, like a dark blue.
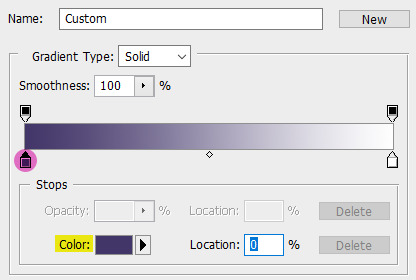
Here is my final gif.

If you want to add a caption to your gif, you can do so with your font of choice (Arial and Calibri are good) and add Stroke or a Drop Shadow to it by going to Layer > Layer Style. You can make sure the text is perfectly centered by clicking on your top frame layer under all your coloring adjustments, hitting Select > All, then clicking your text layer again and going to Layer > Align Layers To Selection > Horizontal Centers. Then hit Select > Deselect and go to your little drop down menu in your animation timeline and click “Match Layers Across Frames”.
Here is what it looks like with a caption.

SAVING YOUR GIF
Go to File > Save for Web & Devices...
A big window will come up where you can preview your finished gif by pressing the play button on the right hand side. In the bottom left corner will tell you what size your gif is. Tumblr’s gif limit is a whopping 10 MB, so we’re good.
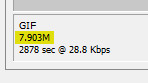
Your gif settings should look something like this.
We always want to keep all colors at 256 (the highest). Lowering this number will make our gif file size smaller, but also decrease the quality of the gif itself. If your file size is more than 10 MB, I recommend going back and deleting some frames or making some more curve adjustments. Some users also like to set their gif to “Adaptive” instead of “Selective”. This is up to you.
Click Save and you’re done!
#this took me all day and half the gifs dont even move when you view this post on my desktop theme#LOVE THAT#please view this on the mobile view
220 notes
·
View notes
Text
“Should I use InDesign to lay out my books?” - A Passionate Guide
Ok, if you are like me, you recently stumbled upon @armoredsuperheavy‘s brilliant blog about bookbinding and fanfiction, and now you are excited to throw yourself head-first into bookbinding.
This also means that you are about to invest a fair amount of time into figuring out how exactly to lay out books. What you end up getting comfortable with will most likely be what you end up using long term, so it is worthwhile giving it some thought. The question really comes down to this: who's name will you be cursing for the foreseeable future? Adobe? Or Microsoft?
Full disclosure: I only started using InDesign because I was forced to. I worked as an editor at a newspaper, and that was what we used. The beginning was hell. I won’t sugar coat it, it sucks. In the end it was worth it. Once you figure it out, InDesign’s potential far outstrips Microsoft Word (in my opinion).
That encouragement means very little when you open this treacherous program for the first time and see THIS:
“What?! I will literally give you $100 if you guess what all the buttons on the left are for. How the fuck do I make the margins disappear!?”
So, if using InDesign means figuring out what at least one third of the tools on the left are for, lets talk pros and cons.
Let’s get the cons out of the way.
It is expensive. Adobe is not fucking around. This puppy costs 20 bucks a month (Canadian) to RENT. If this is out of your price range, do you still have options? Yes. Do they range in legality? Also yes. I think I could potentially get in trouble for telling you to find your friendly neighborhood torrenting site and steal this software. I will say, outright, that no one should steal software ever. Got it? I would be very upset if someone were to message me for specifics. As you naturally wish to be law-abiding, there is also the quasi-legal option of repeating the 14-day free trial. My friend works at a professional print studio in Russia, and this is the tactic they use: every 14 days they uninstall all of the software from all of the computers, and reinstall it with a new trial. Every 14 days! At a professional operation! My friend hates working there.
It is not initially intuitive. I’ve covered this, but it bears repeating because it is a serious hurdle. Keep in mind, that with time, InDesign becomes more helpful than other software. Now when I use Word I find myself reaching for keyboard shortcuts automatically, and feeling bereft at the lack of my favorite tools. Nonetheless, expect a time commitment up front learning how to harness this glorious and confusing computer program.
It can run kinda slowly, depending on your computer. Up until two months ago, I had the world’s most precarious laptop. I bought it for $200 in 2015. It once took half an hour to restart. Inexplicably, when it got stressed, it would switch to Spanish. It was literally and figuratively falling apart. And yet, it ran InDesign. Granted, it worked slowly. If I asked it to process too many images at once it would panic (again with the Spanish), but for the most part, it worked. If you have a slow computer and are patient, then InDesign will probably work fine on your computer. If you are not willing to suffer, stick to Word.
You will also need Photoshop (sometimes). Part of what makes InDesign glorious is that it is professional software that is designed specifically to work with print and anything text-heavy. I love that about it. It even manages to do some handy things with images! But, inevitably, you will need to learn some Photoshop to punch up your graphics. I have, admittedly, only learned the bare minimum Photoshop in order to feed my InDesign addiction. It was a pain in the butt. For example, inexplicably, Adobe has not standardized keyboard shortcuts across the suite. As with InDesign, now that I’ve learned the tricks, I adore it. But you should go into this knowing that with Adobe, the fun never ends.
Printing signatures is the WORST. Adobe, please explain to me, in front of God and everyone, why the hell you would make this software specifically for laying out books etc. and not include a method of printing signatures?! I’m livid. This is absolutely where Word wins the day. It is almost worth using Word just to print the signatures so nicely and easily. I’m not kidding. Me—a person who has used InDesign professionally—almost wanted to switch software entirely just because of this. Hands down, InDesign’s biggest goof. Despite this crime against bookbinders everywhere, you have options. You can export your design to a PDF and literally print each signature separately (I am fucking livid) or you can complain enough to your friends that they offer to buy you a lovely program called BookletCreator for your birthday. It costs $20 bucks USD and it was worth every penny. However, Adobe, FOR THE AMOUNT THAT YOU CHARGE FOR YOUR PROGRAM, I SHOULD NOT HAVE TO PURCHASE ANY ADDITIONAL SOFTWARE IN ORDER TO PRINT MY BOOK. Did I mention that I am livid?!
But InDesign must be worth something, right?! Otherwise why would I be writing a long post encouraging people to use it? Let’s talk pros:
The horsepower on this baby will blow your mind. Forget what I just said about printing signatures; imagine using software that was literally made for this. You wanna do a thing? InDesign has got you. Are you a perfectionist? This software was designed by people as pedantic and obsessive as yourself. It gets you. Dream it, google how to do it, and InDesign will deliver. This is really the main reason to use InDesign; it is the professional standard for a reason.
There are so SO many resources available to help you learn. Almost everything I’ve learned about InDesign I learned from Google or YouTube. Honestly, if you have a question, I promise that other people have already asked and answered it. The advantage is that because this software is specifically for laying out books, there is lots of information available specifically about how to do what you want to do. (This may also be true for Word, but I’ll be honest, I only used Word for a book layout once, so I can’t say for certain either way.)
Once you figure it out, InDesign will give you back hours of your life. Things like master page spreads, clipping paths, tint, the eyedropper tool, and the one-hundred-percent adjustable text are just... lifesavers. My experience with Word is limited, so my frustration using it was probably due to my own ineptitude, but honestly, when putting together my thesis, the tears I cried trying to get page numbers to format correctly were some of the most bitter text-related tears I have ever shed. I can take care of the whole operation in InDesign in a matter of minutes. Hours. Of. My. Life. Saved.
This is an actual marketable skill. Ok, bear with me here. I have used InDesign for every single job I have had since I worked at the newspaper. That includes working as a bookkeeper and a kindergarten teacher. Hell, I even made my resume to get those jobs in InDesign. There is no job that I forsee in my future that doesn’t include some form of text-based design. Even when my work has absolutely nothing to do with layout (see: kindergarten teacher) I still found some way to use it. My previous boss was actually so thrilled about my InDesign skills that she had me run a 101 seminar for the other employees. (Did any of them end up using it? I suspect not. Did they look at me strangely for being so enthusiastic about design software? Absolutely.) I’ve even managed to use InDesign to branch out from freelance editing to take on design projects as well. In short: if you learn how to use InDesign, put in on your resume. You will be surprised at how much mileage you get out of it.
With Adobe, the fun never ends. I know I joked about it before, but really, I love seeing what this program has in store for me next. For example, thanks to bookbinding, I discovered that InDesign will do a lot of things that I had previously assumed were the domain of Word, such as spell check. I literally stumbled onto a measuring tool today that I wish existed irl to help me glue my covers together. Part of the beauty of this software being so intricate is that there is always something new you can do. I love learning how to harness a new feature, and then watch my design improve over time. Using this program you really get the feeling that the sky is the limit. Look, just the fact that I’ve now resorted to saccharine platitudes about computer software tells you that InDesign is remarkable. Considering that this program has made me suffer so significantly, I have either seen the face of God, or I have Stockholm syndrome. Take your pick.
TL;DR, at long last:
How complicated would you like to go? Either way, for bookbinding you’ve got to learn to use software in a new way.
Do you just want to get your book laid out reliably with little fuss? Word is for you! Are you interested in delving into the details? Do you have the patience of a saint? Try InDesign!
Both work. Both are good. But you can pry InDesign from my cold dead hands because I adore it.
#Honestly#No shame towards Word or anyone that uses it seriously#Like I said I have little experience actually using it for laying out books#But InDesign is very good.#Bookbinding#fic#fic binding#If people want I can start putting together tutorials about how to do all of this stuff#And all of y'all can learn from my mistakes and hopefully learn faster than I did.#Аня есть что нибудь здесь про тебя#заметишь?#InDesign
181 notes
·
View notes
Note
Hello! May I ask how you draw? I'm currently learning how to myself and would be highly interested into a step to step process by you! Like from sketch to the done thing (no color necessary)
Hello there!
I dunno how I feel about showing how I work/giving advice to someone who’s learning (and I say it as a pro artist who went through years of traditional art education) because when I do the illustrations you see here on my tumblr I BREAK THE RULES you’d learn though life drawing routine, and give in to bad habits, and my methods are rather unplanned and chaotic which makes it difficult to pinpoint significant stages. But I used my portable potato to take some photos during working on my last piece, so I’ll throw it here with a bit of an explanation of what’s going on.
Before I begin - and because you’re about to look at a mess of a WIP - I’d like to give you some general advice that generally makes life easier when you draw (again, things that I learned in traditional arts education - another artist might advise you the complete opposite, dunno!)
Work holistically. Forget them satisfying-to-look-at clips on instagram showing someone produce a hyperrealistic portrait starting from an eye, with each and every element emerging being finished before they proceed to another part. It takes a lot of talent, yes, but these are ppl redrawing a photo in a kind of a mechanical manner. Most artists don’t work this way. Especially if you’re working without a reference, or if you’re doing a life drawing - your process will be layering and changing and finding what works best to give an impression of what you’re drawing rather than reproduce the exact image, and your artwork is likely to look messy most of the time.That said: don’t start with the details. Don’t spend too much time on a particular part while neglecting others. Your goal is to keep the whole piece at the same level of ‘finished’ (even though it’s unfinished - do I make sense?) before you’re confident that everything is where it should be and proceed to the details. So sketch out the composition first. See how things fit, what’s the dynamics. You’ll save yourself from limbs sticking out from the frame, odd proportions etc etc.
Because it’s a game of relationships between different parts of the picture/scene. I ask you not to worry about finishing a single element before laying out the rest because you’ll find that said element will look different once the other part appears! For instance - you might think that the colour you picked for a character’s hair is already very dark. But once you’re done with the night sky background, you’ll find that it’s in fact too light, and doesn’t work well with the cold palette. You’ll have to revisit different parts of the image as you go to balance these relationships and make the picture work as a whole.
Give an impression of something being there without actually drawing it ‘properly’- because details are hard, mate. You’ll see that my lineart usually has hardly any, and my colouring is large unrefined stains, but the finished thing looks convincing. Like, fuck, I can never focus on how Crowley’s eyes are really shaped. So I just turn them into large glowing yellow ellipses crossed by a line, and heard no protests so far.
Don’t panic if you messed up (you probably didn’t anyway). It might turn out to be a completely unnoticeable mistake - because, remember, things work together to balance each other, so another finished off prominent element will probably drown that badly placed line that looked so visible and out of place a second ago.
It might not look good before it’s finished. I’m mostly immune to it after years of drawing, and my recent illustrations all follow a specific method (ykno, my sunset glow effects and all that) so I can kinda predict the next stage. But I do my linearts on a specially picked crap paper, I don’t bother erasing the smudged graphite, and it looks messy af until I make the background white in Photoshop. Conclusion: you might have a moment of doubt as you work through a piece, but try to break through it - I often suddenly start to like what I cursed a minute before! - and try to finish it even if it’s meant to be bad. This way, looking through your past pieces, you’ll see the progress. And trust me, I can’t even look at my art from literally three months ago. It’s normal.
Now, pics! The sketches are paler in real life, but I increased the contrast a little so you can see something.
1. Laying out the composition!
I wanted to just show them kissing, but I got carried away due to some Art Nouveau inspiration. As you might have noticed, most of my illustrations are quite self-contained (ykno - they look like a sticker on a plain background). So I wanted a tight swirl bordered by Aziraphale’s wings creating a sort of rounded, yin-yang like bubble around them. Consequently I made the whole composition revolve around their heads.

2. Adding more details to the sketch. It’s messy af. It will be messy until I’m done. It’s fine.
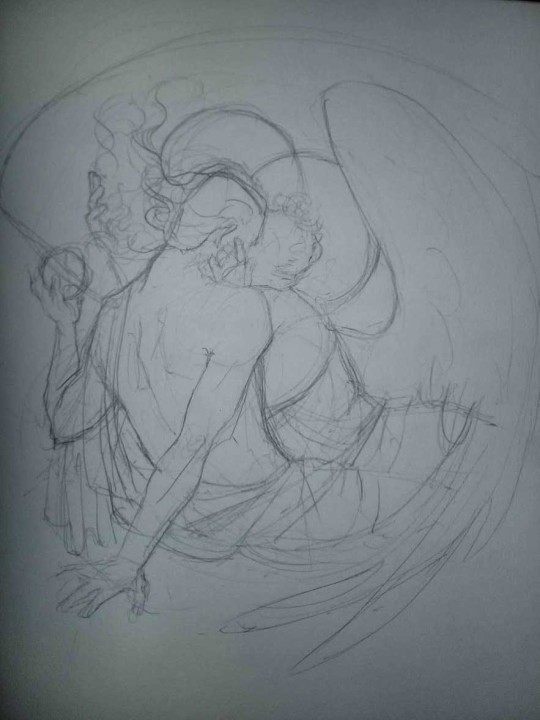
3. These are the fineliners I use for the linearts! They are made by Uni-ball and come in light and dark grey. I also sometimes use the guy on the left - ‘Touch’ sign pen by Pentel, when I want more brush-like, wider strokes. I work in grey because when I scan it and do my usual boring trick with sunlight highlights - which is an Overlay mode layer in Photoshop - the highlights ‘burn out’ the lines too and make them vanish a little, and the lighting effect gets more striking. I also like to use the light grey ones to make something look pencil-y without actually using pencil, because pencil fucking smudges.
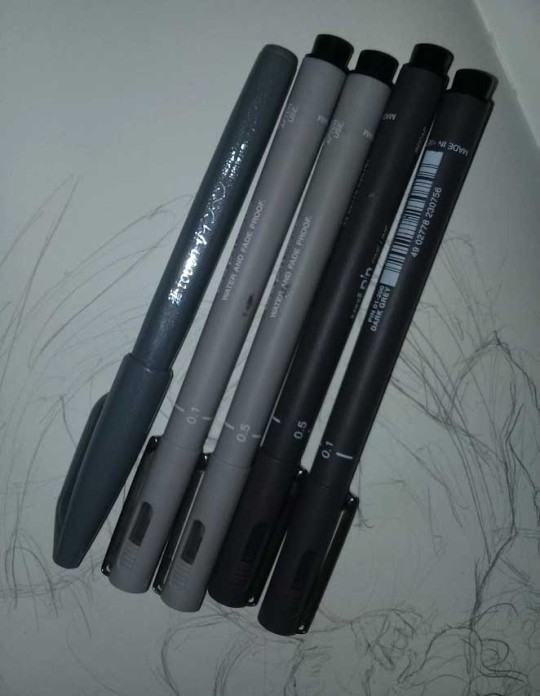
4. It smudges! So because I am right handed, I start inking from the right hand side, no matter how tempted I am to do their faces first.
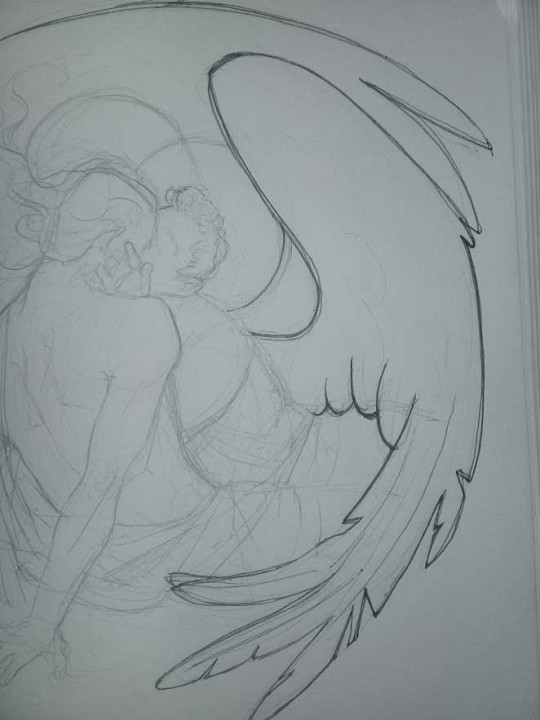
5. You can see the composition directions here. I made it intuitively, but ofc some ppl actually use grids etc to lay out their drawings.

6. See how pale ans thin the lineart was at first? I kept adjusting it as new inked parts were appearing. It starts to look nice and consistent now!

7. Finished lineart? There are some mistakes which I later corrected in PS. Notice that Aziraphale’s face has hardly any details on it - I tried to make the drawing suggest his expression rather than risk overdoing it.
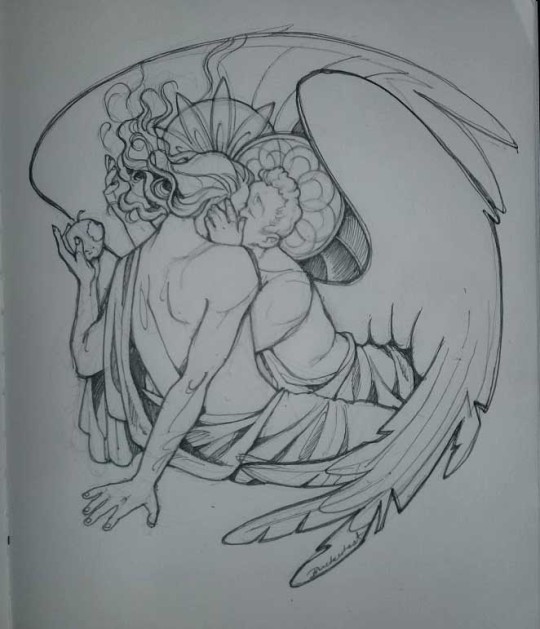
8. Photoshop time!! You can totally do what I did here even if you don’t have a graphic tablet. I used Curves tool to enhance the lineart, then Quick Selection Tool to select the background around around my sticker-like piece and filled it white (on a new layer ofc). I keep this white layer on top of the layer order so it works as a mask as I colour. I decided I did not like the hatching shading underneath Aziraphale’s halo, so I erased it with a Stamp tool (because I wanna keep the textured grey fill my crap paper naturally gives me!). It’s done roughly but won’t be visible once the thing is coloured.
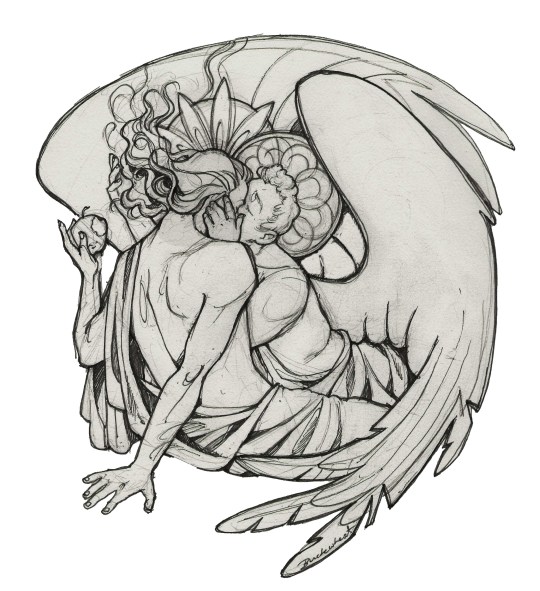
9. And the reason why I keep the grey shade instead of easily getting rid of it by using Curves/Levels is because when I set this layer to Multiply mode and colour underneath, it gives me this nice desaturated look like from an old cheap paper comic page. It works as a natural filter! But of course I can’t do bright colours this way, so all my glowing highlights happen ABOVE the lineart layer - on a separate layer in Overlay mode!
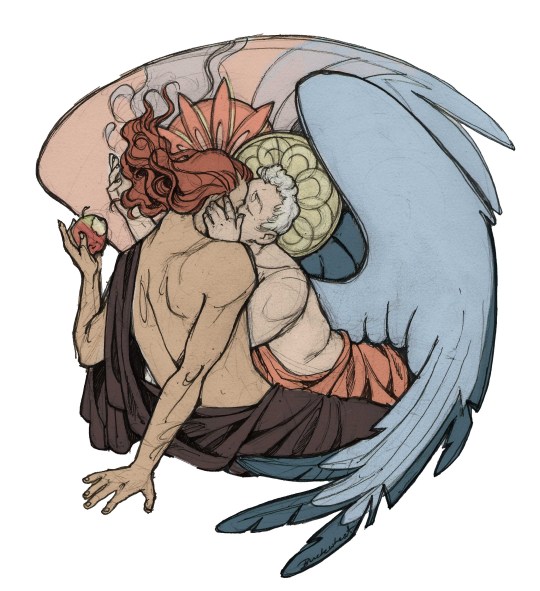
Finished thing here!
_____
Commission infoBuy Me a Coffee - help me with my transitioning expenses!Prints and stickers and things on my Redbubble!
#ask the buckwheat#long post#tutorial#drawing advice#drawing tutorial#good omens#ineffable husbands#good omens fanart#good omens art#my illustrations#doodles#toastedbuckwheat
1K notes
·
View notes