#i checked my browser settings etc and everything's as it should be
Explore tagged Tumblr posts
Visit Tumblr Blog
Explore Tumblr blogs with no restrictions, modern design and the best experience.
Last Seen Tumblr Blogs


Fun Fact
Tumblr was the first site to host the blog for President Barack Obama in 2011.
Text
Do you love the color of tumblr connected to a working wifi network
#EDIT: IT JUST TURNED BACK TO BLACK BY ITSELF LMAO#lord is testing me today#how am i supposed to work in these conditions#also i had black tumblr and then it randomly turned blue by itself???#it's not even the tumblr blue but the kind of blue when you highlight stuff#i checked my browser settings etc and everything's as it should be#*exasperated sigh*#dumblr#blmpff rumbles
10 notes
·
View notes
Text
VPN Guide
I’ve been asked to put together a VPN guide, especially since Emmerdale episodes are being uploaded to YouTube. This guide will also works perfectly well for accessing ITVX and the BBC iPlayer.
What is a VPN?
A VPN (Virtual Private Network) is a service that helps you stay private and secure online by creating a secure, encrypted connection between your device and the internet. For this purpose, we're interested in the fact that VPN's can bypass geo-restrictions and allow you to access things you wouldn't normally be able to.
Which VPN should I use?
There are plenty of VPNs out there. I'll be giving three options. Everything I mention here is something I’ve personally used or that my partner's used and tested. While there may be other great options available, I won’t recommend anything I can't vouch for.
As far as I'm concerned, if you can afford to invest in a VPN, I would because I think it's worth the money. I use it alot while out in public, when accessing public wifis, such as in cafe's and airports to protect my data. It does a lot more than just bypass geo locations.
ExpressVPN
I've been using ExpressVPN since 2014, long before I moved to the UK. This is the VPN I used during 2014-2019 era to watch Emmerdale. While it's not the cheapest option out there, I think it's worth every penny because the customer support is great.
Pricing: Starts around €6.40/month (billed annually)
Pros: Fast, reliable, great customer service
Cons: Pricier than others
ProtonVPN
ProtonVPN offers both a free and paid plan. While the free version is useful, it's very limited, you can't choose your server location, which makes it tricky if you're trying to access specific content. For streaming or location-specific browsing, you'll need the paid plan.
Pricing: Paid plans start around €4.99/month
Pros: Strong privacy reputation, has a free option
Cons: Free plan is very restricted
Surf Shark
My partner swears by Surf Shark. It’s the most affordable of the three, with plans starting at just €1.99/month. Despite the low cost, he’s never had a single issue with it so far.
Pricing: From €1.99/month (with long-term plans)
Pros: Budget-friendly, reliable performance
Cons: Slightly fewer server options than premium VPNs
** add on **
Windscribe
@srtazombie has recommended Windscribe, which has a free version, that let's you use up to 10GB monthly.
Tutorial
For this tutorial I'm going to use Surf Shark because it is the cheapest of the three options.
Open your browser and go to: https://surfshark.com
Click on “Get Surfshark” on the homepage.
You’ll see 3 plan options. The 2-year plan (€1.99/month) is the cheapest.
Click “Select” under your preferred plan.
Enter your email address.
Choose a Payment Method. You can pay with: Credit/debit card, PayPal, Google Pay and Apple Pay.
Enter your payment details.
Click “Complete Purchase”.
You’ll get a confirmation email right after purchase.
After payment, you’ll be directed to a page to download the Surfshark app.
Choose your device: Windows / Mac / Linux, Android / iOS or browser extension (Chrome, Firefox, Edge). You can also find Surfshark in the App Store or Google Play Store.
Open the Surfshark app.
Enter the email and password you used when signing up. If you didn’t set a password during checkout, check your email, Surfshark will have sent you a link to create one.
Connect to a Server. Inside the app, click “Connect” to use the fastest server. Or choose a country from the list (e.g., US, UK, Germany, etc.).
For the UK you can pick from: London, Manchester, Glasgow and Edinburgh. Then try it out and go to YT and see if it works. If one server is down, just change between them until one works.
Personally, I haven’t come across any free VPNs that work well for changing your geo-location to stream regularly. Most either don’t let you choose the country, or they have extremely limited monthly data, making it impossible to watch shows like Emmerdale, which airs five days a week. For that reason, free VPNs just don’t cut it for daily streaming.
I’ve also heard that Mullvad is also good and affordable option. However, I can’t personally recommend it since I haven’t tried it myself. If anyone has experience with Mullvad and wants to share more info, please feel free to add to this post! Also, if there are free VPNs which work, please let me know!
60 notes
·
View notes
Note
Hi! just wanted to ask on how you personally use Twine I've been a fan of OM, and wondered how u made the remake in that system lmao. I was wondering if you had any tips / tutorials u used, I've spent some time testing and have got the hang of variables and linking but i was really confused on how you designed it / removed the borders around the side bar and everything, along with how you made the intimacy system, Especially the notify / achievement bar system! No tutorials were helping me lol
Sure! I'll do my best to explain below; feel free to ask me to expand on anything if it's confusing.
Changing sidebar:
The way you do this is basically through CSS ("Story Stylesheet"). When your game is open in the browser, you can inspect elements to figure out what they're called, then change their styles. For example, I removed the border of the menu buttons by putting the following in the stylesheet:
(for the overall borders)
menu ul {
border: none;
}
(for the borders between each link)
menu li a {
border: none;
}
w3schools.com is a great website if you'd like to learn CSS - it's what will help you completely restyle your story. There are also plenty of Twine design templates for something easier to use without having to learn code.
Intimacy system:
This one is a little more complicated. I'm actually completely rehauling the intimacy system for version 1.1. Right now, it uses a lot of if statements to check the amount of intimacy the player has collected with a character - and this intimacy is in a variable initialized in the special StoryInit passage. However, that's bandaid code which is messy and easily runs into bugs, as has happened ever since release lol. To fix it, I've essentially created a proper levelling system using custom macros and JavaScript. That requires a good grasp on behind-the-scenes programming, though. If your game isn't a huge project, keeping intimacy in variables should work just fine. Just make sure to keep a spreadsheet or notes somewhere that list how much intimacy is possible to gain and in which passages. It will make your life easier in the long run.
Notifications:
This one I actually got from one of Chapel's custom macros! They're super easy to use and do a lot of cool things. I highly recommend checking these out because they can make your life easier: link
Achievements:
I'm going to assume you're talking about achievements that persist over different saves - for this, you'll need to utilize Twine's special StoryInit passage again. In case you are not sure of what that is, it's essentially all the variables that will be initialized when the game is first loaded into the browser. Your achievements and important story-spanning variables (like personality traits, intimacy counters, etc) will go here. To create an achievement, you'd put something like this in your StoryInit:
<<set $achievement1 to recall('achievement1')>>
If the player hasn't obtained the achievement, $achievement1 will automatically be set to false. To have them actually get the achievement, put
<<run memorize($achievement1, true)>>
<<set $achievement1 to true>>
in the passage where the achievement is gained. Also, be sure to have your players know that keeping saves and achievements like these relies on browser cache - if that's cleared, their progress will be lost.
Hope that helps! I wasn't sure how familiar you are with Twine beyond variables and linking as it's a pretty big engine with many things, so I just covered things without going into deeper mechanics like Twine's special passages, scripts/stylesheets, macros, etc. I'm happy to explain those too if you're having trouble. Also, everything I explained is specifically in the Sugarcube language - it won't work in Harlowe, Snowman, etc.
Helpful links:
Twine cookbook
Chapel's custom macros
Cycy's custom macros
Albie's Twine Tutorial with tons more resources
13 notes
·
View notes
Text
Sorry, I don't have any guides for these tools and didn't find any good one on the internet either. I made one myself for you this morning, super long and complete with screenshots and all, and then tumblr just... disappeared it... And I don't think I have the will to do it all over again with all the screenshots and explanations. I'll make a shorter one.
I'm assuming that you use Windows.
WizTree
The link to the installer is here. The wizard is straightforward.
You should run the disk cleanup utility as administrator first, so that you can rid of any unnecessary file (but please check that you don't have any important file in the recycle bin before having it emptied). You can just type up "disk cleanup" in the Windows search bar for it, then right-click instead of left-click, and select "run as administrator". You should definitely do this again every now and then btw.
When you open WizTree, what you want to look for is either big squares (single files that take up a lot of space, like movies or zip files) or many smaller squares all clumped together. The latter might be cache (Spotify, Telegram, all internet browsers, generate a lot of it. WizTree gives you the cue to open these programs and clean the cache from their respective settings), or some other thing (AMD Radeon for some reason likes to keep all past versions of its installer, even though only the most recent is useful). You might also notice some folders that are considerably bigger, for example all Adobe products are naturally chunky and so you might want to consider alternatives, like Photopea in lieu of Photoshop. Here I highlighted some examples on my laptop, files and folders which I would definitely check out first thing. And after deleting them, I would hit the "Scan" button again to refresh the graph.

It takes some effort to get used to the game the first time, but I think the immediate visual feedback of the colored blocks, the highlighting of the folder as you hover on it, the size proportion... They make WizTree a great tool. I also wish I could give you more precise information on what to look for exactly, but it really varies greatly from PC to PC, so I can't know for certain what might take up space on your machine.
Beware! Some big squares are best left untouched because they're Windows files: namely $MFT, hiberfil.sys, pagefile.sys, anything in "System Volume Information" or in "Recovery", and of course anything in the "Windows" folder.
If pagefile.sys is very big (say, bigger than 5 GB) and you're running out of storage space, you can reduce its size to something like 2 or 3 GB, following this guide.
Everything
Link to the installer here. This wizard is also pretty straightforward, you don't need to touch any of the default settings, just hit "next".
It takes just a few seconds to index all the files the first time you open it after turning your PC on, and then it's good to go. Instant search, system-wide, in milliseconds.
You should extend the "file path" column a bit so that you can clearly see *where* each result is located, and see if that's the file you were looking for or not.
Apart from the basic search, there are some useful options in the "Search" tab in the top row. Namely: case sensitive/insensitive search, including file paths in the search (e.g. if you want to look up a file called "Pamphlet" in folders called "Campus" instead of in folders called "Work". Then you would activate that option and search "pamphlet campus"), and including full words (e.g. if you know the file has the word "Boy" and you're not interested in files with "tomboy", "boyish", "flamboyant"). They're the top options in here (sorry that it's all in Italian, I'm a pizza pasta mandolino citizen):

In the lower part you can also see how you can filter the results based on whether it's an audio file, a zip file, an exe file, a folder etc. Neat, right?
any computer people wanna explain how the hell this works


it wont let me do shit bc i apparently have 81 gigs of apps clogging my c drive, but my largest app is 0.4gb?????? its not system applications either because system is its own segment of storage. wadda hell are you talking about
#again I'm so sorry that this is quite blunt and doesn't go into detail step-by-step... but I just spent so much time this morning and then I#lost everything... I just honestly don't feel like repeating it
57K notes
·
View notes
Text
Technology's Role in Self-Growth Pt.1
That's the goal for this post: Change the way you interact with technology to gain more positivity and mindfulness in your life!
My most prominent sources of technology is my computer, my tv, and my iPhone. Though I am grateful for these devices, I am still prone to overindulgence and need to step back from screens. I'll be writing this article surrounding these devices.
Phone:
We carry our phones with us 24/7. They go to school with us, to work, to the toilet, and even to bed. Everywhere, all the time. So why wouldn't they reflect our goals and aspirations? These little mini-minds carry our deepest secrets (texts and notes app), our entire social world (every communication platform, like, ever), and has the ability to keep us on track with our lives (timers, calendars, reminder apps.). And we pay dang good money for them, too. So why shouldn't we make the most out of them? It's time we use our phones to their fullest potentials, and here's how you can do that:
Limit your screen time - you won't experience life if you're always looking down at a screen.
Delete the photos of your old ex that you can't get over/Give your phone a makeover - Stop holding onto the past before it strips you completely of your future.
Delete your social media apps - minimize the reasons you have to go on your phone.
Apple Calendar is a great way to organize your life! You can customize your calendar: what day your week starts with, the number of days in a week, which calendar is your default (you can have multiple calendars), and you can even change the colors of your calendars.
Reminders is an app I hold near and dear to my heart. I've used it for everything, from vitamins to school payment alerts. I like to categorize the reminders based on 'personal' and 'school' usage.
Clock app is pretty self-explanatory. I like to use the focus setting on my phone with this app to help me wake up in a peaceful manner! The alarm I have is so calming and brings me to consciousness in a gentle, and less shocking way than the typical alarm sound.
Organize your apps into groups of related topics - school, finance, health, etc.
Remove your social media apps or anything else that's distracting from your home-screen. There's a way to put it in your app storage, so you can still use it and reach the app easily but without it being in a quick to reach area.
Organize your apps into groups labeled with affirmations! So social media platforms would be "I am connected" and school would be "I am educated," etc.
Clear out all the tabs in your browser. Keep this area of your phone clean as it can take room out of storage and make you feel more cluttered/overwhelmed.
Only keep the necessary apps on your phone - or on your home-screen. Apps that keep you functional, not entertained.
Follow the same creators on every app and keep your following count down. This will clear up your feed and prevent you from being overloaded with information.
Wattpad, Books, Audible, Goodreads, and Scribd - All of these are different apps for reading books, except for Goodreads which is a book review platform! Find one that works for you (Books on iPhones are free if you use Anna's Archive.com) and get to reading! Check out my recommend reads!
Headway - Book summaries! For us busy gals who still want to get a daily lesson in.
Shit You Should Care About Newsletter - This is a newsletter you can get in your email daily by signing up on their Instagram (under the same name), or you can follow their Tiktok. I recommend email because it will ease you into your use of email!
TED - This is the app for Ted Talks! I recently discovered it and I am so motivated to listen to them all!
Vision-board Wallpaper - Having a vision board can be really inspiring and motivating because it's a constant visual reminder that's in-your-face so you can't ignore it. I'd recommend making it yourself, however you don't have to. Pinterest, Canva, Shuffles by Pinterest, and Picsart are great platforms to create this on!
Affirmation Wallpaper - I'd recommend this for your home-screen and the vision-board for your lock screen! You can create this the same way as the vision-board wallpaper.
Morning Meditation Alarms - Growing as a person and becoming more successful both require you to be grounded and mindful of your life. The best way to accomplish this? Meditation. To start this habit, you should make your morning alarm a meditation recording!
#iphone#productivity#self improvement#girlhood#lifestyle#organization#meditation#wallpaper#screen time
0 notes
Text
Just a bunch of useful websites
12ft – Hate paywalls? Try this site out.
My Fridge Food – No idea what to make? Tell this site what ingredients you have on hand and it will give you recipes to cook.
Project Gutenberg – Always ends up on these type of lists and for very good reason. All works that are copyright free in one place.
Ninite – New PC? Install all of your programs in one go with no bloat or unnecessary crap.
Unchecky – Tired of software trying to install additional unwanted programs? This will stop it completely by unchecking the necessary boxes when you install.
Sci-Hub – Research papers galore! Check here before shelling out money. And if it’s not here, try the next link in our list.
LibGen – Lots of free PDFs relate primarily to the sciences.
Zotero – A free and easy to use program to collect, organize, cite and share research.
Car Complaints – Buying a used car? Check out what other owners of the same model have to say about it first.
CamelCamelCamel – Check the historical prices of items on Amazon and set alerts for when prices drop.
Have I Been Pawned – Still the king when it comes to checking if your online accounts have been released in a data breach. Also able to sign up for email alerts if you’ve ever a victim of a breach.
Radio Garden – Think Google Earth but wherever you zoom, you get the radio station of that place.
Just The Recipe – Paste in the url and get just the recipe as a result. No life story or adverts.
Tineye – An Amazing reverse image search tool.
My 90s TV – Simulates 90’s TV using YouTube videos. Also has My80sTV, My70sTV, My60sTV and for the younger ones out there, My00sTV. Lose yourself in nostalgia.
Foto Forensics – Free image analysis tools.
Old Games Download – A repository of games from the 90’s and early 2000’s. Get your fix of nostalgia here.
Online OCR – Convert pictures of text into actual text and output it in the format you need.
Remove Background – An amazingly quick and accurate way to remove backgrounds from your pictures.
Twoseven – Allows you to sync videos from providers such as Netflix, Youtube, Disney+ etc and watch them with your friends. Ad free and also has the ability to do real time video and text chat.
Terms of Service, Didn’t Read – Get a quick summary of Terms of service plus a privacy rating.
Coolors – Struggling to get a good combination of colors? This site will generate color palettes for you.
This To That – Need to glue two things together? This’ll help.
Photopea – A free online alternative to Adobe Photoshop. Does everything in your browser.
BitWarden – Free open source password manager.
Atlas Obscura – Travelling to a new place? Find out the hidden treasures you should go to with Atlas Obscura.
ID Ransomware – Ever get ransomware on your computer? Use this to see if the virus infecting your pc has been cracked yet or not. Potentially saving you money. You can also sign up for email notifications if your particular problem hasn’t been cracked yet.
Way Back Machine – The Internet Archive is a non-profit library of millions of free books, movies, software, music, websites and loads more.
Rome2Rio – Directions from anywhere to anywhere by bus, train, plane, car and ferry.
Splitter – Seperate different audio tracks audio. Allowing you to split out music from the words for example.
myNoise – Gives you beautiful noises to match your mood. Increase your productivity, calm down and need help sleeping? All here for you.
DeepL – Best language translation tool on the web.
Forvo – Alternatively, if you need to hear a local speaking a word, this is the site for you.
#lifehacks#life hacks#useful websites#websites#links#useful links 2022#2022#language learning#travel#useful programs#recipes#cooking#editing#free shit
87K notes
·
View notes
Text
Escape from Apple: Trying a Linux Laptop
For quite a few years my only computer has been a 12″ Macbook. Apple, for reasons unknown, discontinued that model which had the perfect form factor in terms of weight to size tradeoff. While my machine still works (with different keys getting stuck on occasion), I had been on the hunt for a non-Apple replacement for some time. Apple’s hypocritical stance on why they need to completely control their phones has long annoyed me and I would rather not buy their products.
I am writing this post on what will hopefully be my new machine for a few years, a DELL XPS 13 laptop running Ubuntu (I wasn’t going to leave Apple for Microsoft, even though they are at present the most benign of the big tech companies)

Here are my first impressions of the setup. On the plus side, the hardware is excellent with a super crisp screen (that looks good in several different resolutions), an amazing keyboard (I forgot how much I actually missed that on the Macbook) and a fingerprint reader in the power button. Also all the software that I really need is “readily” available: a web browser (the machine shipped with both Chrome and Firefox pre-installed), plus Zoom and 1Password. I put “readily” in quotation marks because both Zoom and 1Password required installation.
For both Zoom and 1Password that meant downloading a .deb file and finding the right command line incantation (”sudo dpkg -i package_file.deb”). Of course in both cases there were some missing dependencies (Zoom needed Curl and 1Password a bunch of things). I discovered that there is now a much easier way to fix this then when I had last mucked around with Linux, simply use “sudo apt --fix-broken install” (or maybe that was always a possibility and I just found it yesterday). All in all this part literally took less than half an hour before I was fully up and running. I am grateful that both Zoom and 1Password make Linux versions as I couldn’t have pursued this route otherwise.
But then I encountered what looked like a potential showstopper: the machine would not properly wake up after sleeping for more than a few minutes. If closed the lid for a short period everything was fine, but after more time something happened and it would not wake up requiring a power cycle instead. Given that I like to leave a lot of tabs open in the browser (who doesn’t?) that wasn’t going to work. So I spend a bunch of time searching for an answer, which is of course exactly what nobody really wants to do when setting up a brand new machine, certainly not a mainstream user.
Unless you have the same problem you can simply skip the following section. I discovered that a bunch of people had this issue and since I wasn’t going to be defeated this easily, I decided to delve in more deeply. The machine is a DELL XPS 13 9310 running Ubuntu 20.04. I first checked the kernel and BIOS versions and both were completely up-to-date. I also found that it only supports one kind of sleep mode at present which is a lighter sleep (meaning consumes more battery) but while a bit annoying that turn out not to be the cause of the problem. Finally, a bunch of people referred to being able to fix the problem by turning off the “sign of life” settings in the BIOS. Because I am a dinosaur, I actually knew what the BIOS was and wasn’t afraid of tweaking it, which on this particular machine requires pressing F2 repeatedly during startup until you get to a BIOS configuration screen. Then you need to click around using the arrow and Enter keys until you find the options, which are now under the “Boot” section. I have no idea what these options do, but turning them both off actually fixed the problem for me.
So while this works for me (for now), the simple summary here is: so close and yet so far. So close to a terrific combination of software and hardware and yet for the average enduser a complete nonstarter in terms of getting it to work. This strikes me as a terrific business opportunity. Laptop hardware has largely entered the flat part of the curve so that there isn’t a rush for faster processors, more memory, higher resolution camera, etc. every year. It would seem that the focus instead should now be on stability and ease of use. Someone (apparently not DELL so far) should focus on that.
339 notes
·
View notes
Note
Hello! Sorry to bother you but could you please teach us how to make achievements? Like, achievements notifications, an achievement list page containing all of them and a way for the game remember them if the player starts a new game. I have already looked tutorials on the internet but I am so slow, everything seems so complicated to me 😭
Hey anon!
You're asking for a number of different things, so I'll break this down into different parts. This answer is for SugarCube only.
Notifications
The easiest way to notify the player of changes to the game (skill checks, romance/approval changes, autosave, etc) is to use Chapel's Notification macro.
You can find the documentation here. Copy the JavaScript into your Story JavaScript and the CSS into your Story Stylesheet. You need both for it to work. If you want to change how the notifications look, edit the CSS.
On passages where the player unlocks an achievement, you can do something like this:
<<notify>>Achievement: Achievement Name<</notify>>
And it will trigger when the passage loads.
Achievement Page
If you want to add a separate page to store the player's achievements, you can either put it in a popup or create a unique passage. Make sure you add a link to it in your StoryMenu so the player can access it. The StoryMenu passage populates the default sidebar, so any links added there will show up in the sidebar.
As a Dialog/Popup Box
Create a separate passage titled Achievements.
In the StoryMenu passage, add a link:
<<link 'Achievements'>>
<<run Dialog.setup("Achievements");
Dialog.wiki(Story.get("Achievements").processText());
Dialog.open();>><</link>>
(Though you can use Chapel's Dialog API macro to clean up the code, I personally find it easier to edit large popups if I throw the popup's text in a separate passage and then call the passage.)
As a Unique Passage
Create a separate passage titled Achievements. In order to return the player to their previous passage, you'll need some extra code:
In your Story Javascript, add this:
// menu return //
predisplay["Menu Return"] = function (taskName) {
if (! tags().contains("noreturn")) {
State.variables.return = passage();
}
};
In case tumblr messes with the code, it looks like this:
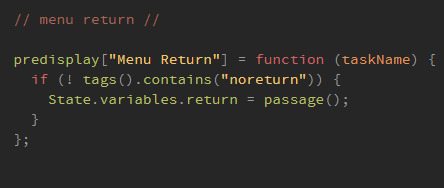
And then in the Achievements passage, tag it as "noreturn". It has to have this tag, otherwise the return button won't work.
Then, at the bottom of the passage (or wherever you want to have your Return to Game link), add:
<<back [[Return to Game|$return]]>>
It should look something like this:
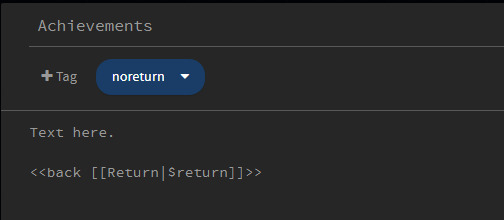
If you're working in the Twine editor it will generate a passage called $return. Delete this passage or the game will not redirect the player back to their original spot.
Then, to add the Achievements page to the sidebar, add this to the StoryMenu:
[[Achievements]]
or
<<link 'Achievements'>><</link>>
Storing Achievements Across Saves
SugarCube has two main ways of storing data: states and metadata. Very simply, states are created in a single playthrough and are typically updated using $variables. State history is stored in the player's save data and is not transferable across saves.
Metadata, on the other hand, persists across browser restarts and saves. It is stored and updated using the memorize(), recall() and forget() functions.
I'll be honest, I'm only just starting to understand metadata myself. It's one of the reasons I'm holding off on using achievements in my own game. I also think that achievements are best left to the very end of development so you know exactly how to lay them out and what to include. If you're in early development, I would maybe refocus on other areas.
There's definitely a more efficient way to make this work, but that's a bit beyond me right now. Here's a stripped back way of doing it for a single achievement:
In your StoryInit Passage:
<<set $achievement_01 to recall('achievement_01')>>
On the passage where the achievement triggers:
<<run memorize ('achievement_01', true)>>
<<set $achievement_01 to true>>
(I added the <<set>> here because otherwise the achievement only showed when I restarted the game.)
On the Achievements page:
<<if $achievement_01 is true>>
Achievement Name / Description
<<else>> Text the player sees when the achievement hasn't been unlocked
<</if>>
You'll have to figure out some kind of styling as well (putting it in a table, columns, lists, etc).
There's a few problems with this method, namely that you'll have to set each achievement individually. If you're planning on having dozens of achievements, I would spend some time experimenting with the memorize() and recall() functions and try out the examples. You may also want to ask the folks on the Twine subreddit, as they can probably explain this better than me.
68 notes
·
View notes
Photo

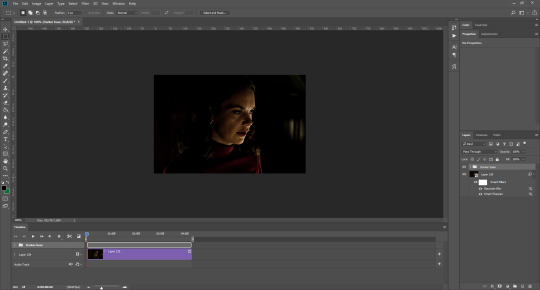
Hello! As requested, here is a tutorial on how I make my gifs. I would like to preface this by saying there are many ways to make gifs, and there’s no right or wrong answer imo. This is just how I personally go about doing so!
I will be using PS CC 2017, but as long as you have the video timeline option, it shouldn’t matter too much; on any version of PS, you should be able to adapt anything I mention here! You will also need some kind of screen recording software. I’ll talk a little more about that under the cut.
To start, you need the source material you will be making the gifs from! I get mine from snahp(.)it (avoiding links so tumblr hopefully doesn’t banish this from the tags lmao) and I always opt for either 1080p or 2160p. Not all laptops will support 2160p as it’s 4K, but either works great! You just want your gifs to be the best quality possible.
Next is where the screen recording comes in. I don’t use the screencapping method to make my gifs (where you use a program to cap a clip and then load those caps into a stack in PS). This isn’t for any particular reason… it’s just how my friends, (who very kindly taught me to gif), had always done it, so it’s now how I do it too. Personally, I find the quality to be just as good as the screencapping method, and have never noticed a difference between the two.
As I have a PC, I use the software built into it for screen-recording. If you go here: theverge(.)com/2020/4/21/21222533/record-screen-pc-windows-laptop-xbox-game-bar-how-to – you can see how to use the XBOX screenrecorder to record from files you have d*wnloaded. This also works on some streaming sites, but I think it depends on what browser you use. Personally, I recommend Firefox, as that seems to bypass a lot of the blocking and ads that occur when trying to do this sort of thing.
For MAC users, I have been told handbrake works well, as it converts MKV files to MP4, which can then be used to make gifs. You only need to convert part of the file to MP4 depending on how much you want to gif, and this also bypasses the screenrecording stage, as you can edit MP4 clips on Quicktime. I am told you can split them into smaller clips by going to edit > trim and it saves the new clip!
I have also used anyvideoconverter for small clips, but I can’t say what it does to the quality of your video, or how big of a file it lets you put in! With the XBOX screenrecorder, it doesn’t matter what type of video files you get, as the recording will save to MP4 anyway.
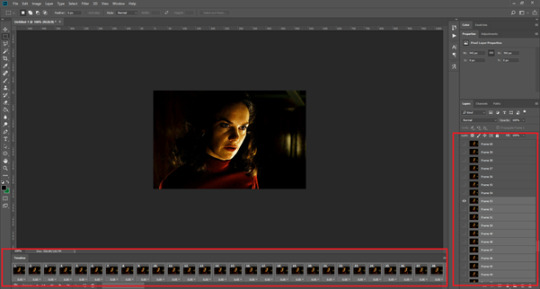
LOADING YOUR FRAMES
Now, go ahead and record whatever clips you want to gif. Make sure you have the video timeline open, by going to window > timeline. Then, go to file > import > video frames to layers.
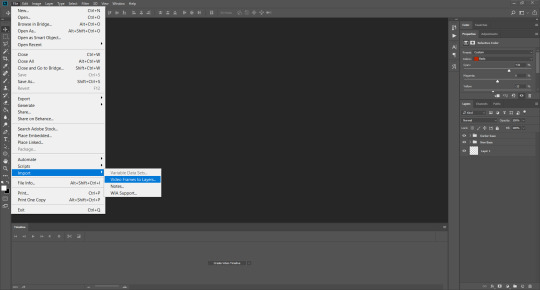
Next, select and open your clip from where it has saved (with the XBOX recorder, it saves in video > captures). You should see a little window pop up, where you can move the sliders back and forth to clip your recording to whichever part(s) you specifically want to gif. I recommend trying not to load a lot of frames into photoshop at once, but I would be a hypocrite to say that, since I do it a lot lmao. Just be patient if you do!
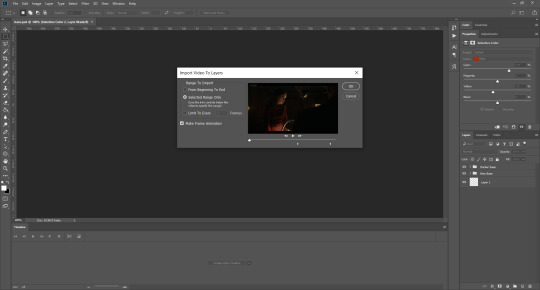
Once you have chosen the length, click okay. Never, EVER, I repeat NEVER click the button that says “limit to every __ frames”. This really ruins the flow and quality of your gif—it’s better to have shorter, but smoother gifs, I promise. And with tumblr’s new 10 MB limit, it shouldn’t be a problem anyway!
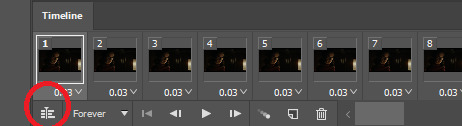
Then, your frames should open up. What we want to do is make them into a smart object, so we can edit all the layers at the same time. To do this, click the small button in the left-hand corner. ALWAYS click this first. If you don’t, it will only convert the first frame to a smart object and the gif won’t work.
Give it a second to sort itself out, then, on the right-hand side, select all your frames at once using the shift key.
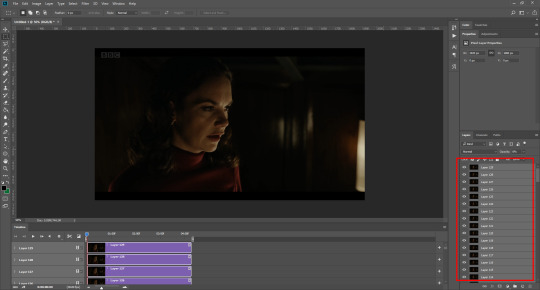
Then, go to filter > convert for smart filters. This might take a minute. Don’t click anything else in case PS gets angry lmao, just leave it for a second and it’ll do its thing. The more frames you have, the longer it takes! Now we have our gif, but it needs to be cropped, sharpened and coloured!
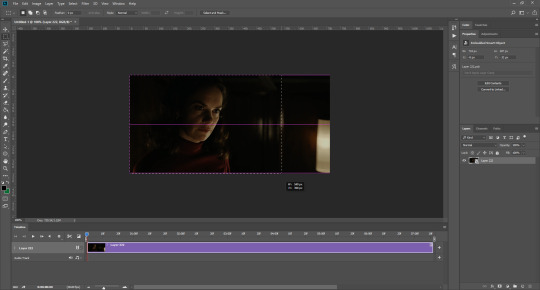
CROPPING
You want to start by selecting the rectangular marquee tool on the left-hand side, then drag it across by clicking and highlighting the area you would like to crop your gif to, like so:
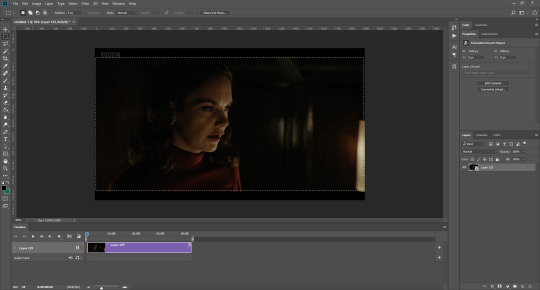
What I tend to do is select everything inside the black lines you sometimes get around your gif (this depends on what file you d*wnload), and also the tiniest bit inside the sides. This is because I’ve found if you crop it right up to the edge, you get a tiny bit of transparency on the sides of your gifs, which I’d rather avoid.
Once you have your desired selection, go to image > crop. Now, the dimensions for tumblr are 540px width, so all your gifs have to be that width. However, the length is up to you. I really like big gifs, so sometimes I even make a full square, or even longer. It’s entirely up to you, and what kind of set you want to make.
For the purposes of this gif, I will stick to what I usually go for, 540px by 350 px. This will mean you’ll have to crop some width off, but that’s okay, since Marisa isn’t central anyway. The cropping is always trial and error for me, as sometimes people move out of the frame within in the gif. The best thing to do is just try it, and then move the slider in the timeline window at the bottom to see if the person stays inside the gif, and if not, adjust accordingly.
Next, go to image > image size:
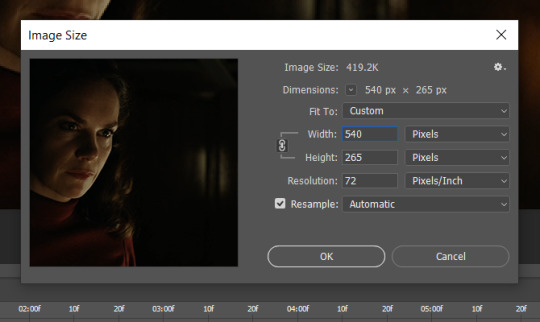
In this box, if I put the width as 540, the gif is a smaller height than I want, as it keeps to the dimensions of the gif when you load it into PS. That’s okay, just put the height you want instead, and we’ll crop off the excess.
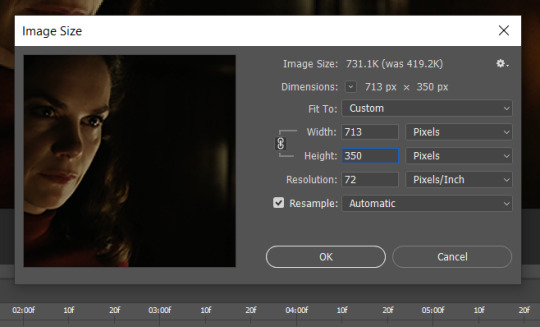
Then click OK. Using the rectangular marquee tool again, we need to remove the excess width. Part of the reason I like this version of PS is that it tells you the width of your selection as you do it, but you can always use the ruler as a guide, and check the size of your image by going to image > image size again.
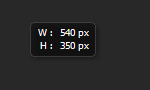
Again, use image > crop, and your gif should now be the correct size!
You can also use the crop tool in the timeline window to crop the length of your gif:
However, I tend to wait until later on to do this (which will be explained further down!)
SHARPENING
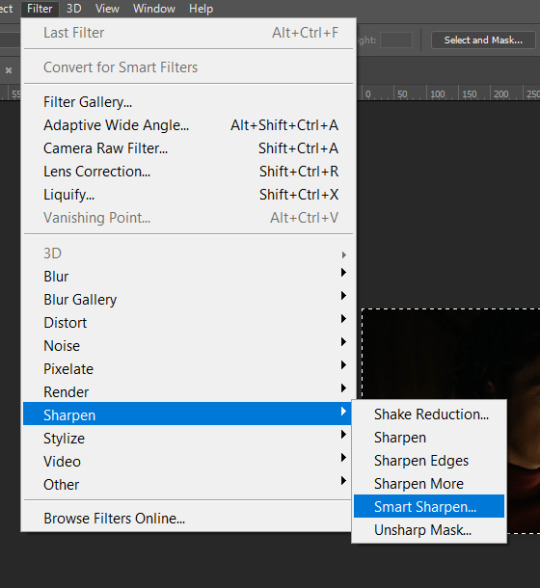
Next you want to go to filter > sharpen > smart sharpen.
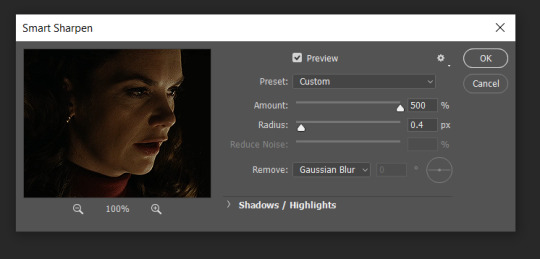
These are my settings. However, 0.4px is very sharp, too much so, but that’s easily fixed.
Go to filter > blur > Gaussian blur and then set it to 1.0.
Now on the right-hand side, we need to reduce the blur, so double click the little adjustment button, and change the opacity of the blur. I usually go for 20-30%!
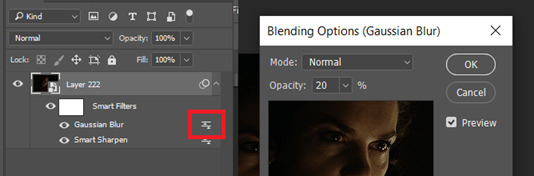
Then click OK, and that’s your sharpening done!
COLOURING
I picked this scene on purpose as it’s dark, so good for showing how to colour a gif. I have a base psd which consists of some very basic adjustments, but it mostly exists so I don’t forget what adjustment layers I like to use. I adjust them every time I make a gif, essentially colouring each gif from scratch.
In this case, the psd actually makes it darker. So, what I will do is turn each layer off, and adjust as I go. A lot of people say using lots of adjustment layers ruins the quality of your gif… I have never found this to be true, as long as you are gentle with them. If you whack the brightness right up to the top, it’s going to ruin your gif no matter if you use 1 adjustment layer or 100. I would just say use your common sense, and adjust a little at a time!
I start with a simple black to white gradient map set to soft light, because I think it helps you see depth once you add some brightness to it. I usually do this on about 10%, or more if needed. It’s probably unnecessary, I just like how it looks!

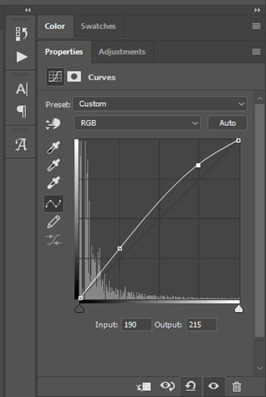
Then, I move onto using curves and levels. This is where things can diverge depending on who you’re colouring. If this person is white, it doesn’t matter too much. If they’re not white, you don’t want to white wash them. My best advice is to play around with it. By adding vibrance and other (usually the red) selective colour settings later, you can ensure you don’t change the person’s skin tone from what it originally was. You can also use layer masks at varying opacities (various shades of grey), on your curves and levels, to remove some brightening so that you’re not changing anyone’s skin colour. Just brighten slowly and check in with yourself honestly about how your gif looks.
Some people don’t like using levels, or curves. It’s completely up to you. I tend to use both because levels are good for bringing depth, even if not brightening (though I like to use them for that as well).
One thing you can do is use the white point of the gif to make PS adjust the curves itself, however I like to drag the sliders myself and see what it looks like. Just make sure it’s not too bright, as we will be using further layers to brighten more, after.

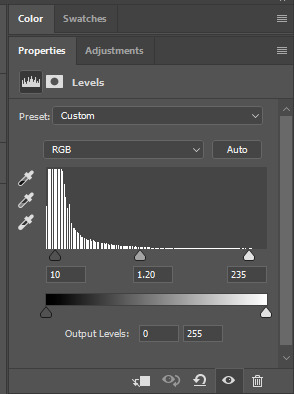
Next is levels. The slider on the left controls the black point, the one in the middle controls the midtones, and the one on the right controls the white points. The black brings depth, the midtones adjust the overall brightness, and the white points produce stronger highlights. Again, you’ll get a feel for how this works as you practice. Just don’t use the white point excessively, especially if your characters are not white.
Then I add vibrance (+20!), because we’ve removed a lot of it when lightening the gif. Next is exposure, which I find brings out the highlight and shadow areas more effectively:

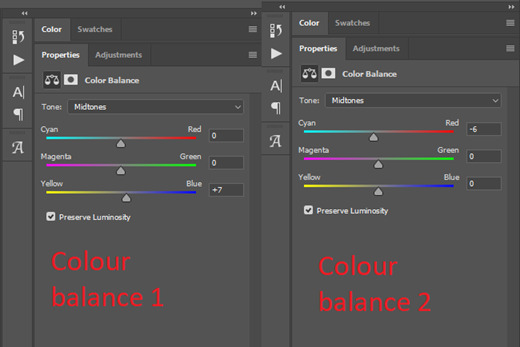
Then colour balance! This helps with scenes that might be a certain colour, i.e. too blue, too green, too red, etc. Moving the sliders in the opposite direction of the colour your gif is will counteract it. The best thing to do when accounting for different colours, is to make a new layer every time you change colour, so that you don’t get confused. I always add a new layer for colour balance and selective colour if I want to change more than one thing. So one for red, one for yellow, one for pink, etc.
A layer of brightness just to make the gif pop, and because the scene is extra dark, I added a very gentle extra curves layer:
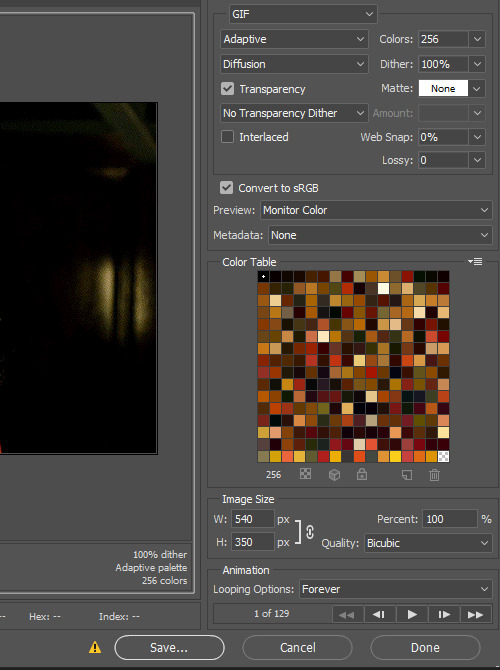
SAVING YOUR GIF
Time to save the gif. You can go ahead and file > export > save for web (legacy) now, but then you’ll have to reopen the gif to reset the frame rate from 0.07, to 0.05. Instead of doing that, I use a modified action. The original was made by the very talented @elenafisher! So I do not take credit for that at all. You can find the original here: elenafisher(.)tumblr(.)com/post/190817437374/gif-sharpening-action-2-preview-download and in my resources tag. Please reblog it if you’re going to use this!
To use an action, first make sure you have actions turned on in window > actions. To load in your action, go to the little lines circled, and then load the action from your downloads:
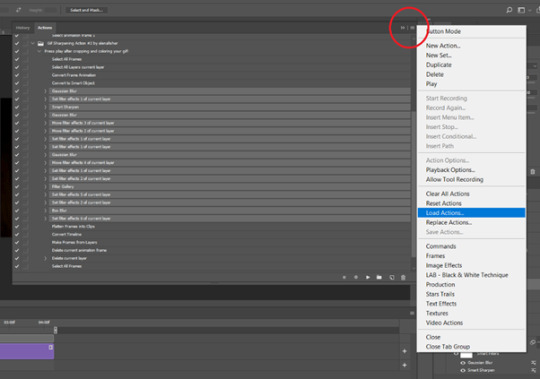
Obviously if you don’t want to sharpen your gifs yourself, you can use the action as it is, and it will give you a beautiful glowing effect. If you’d just like to use it to flatten your gif into frames like I do, make sure to take out all the items I have highlighted:
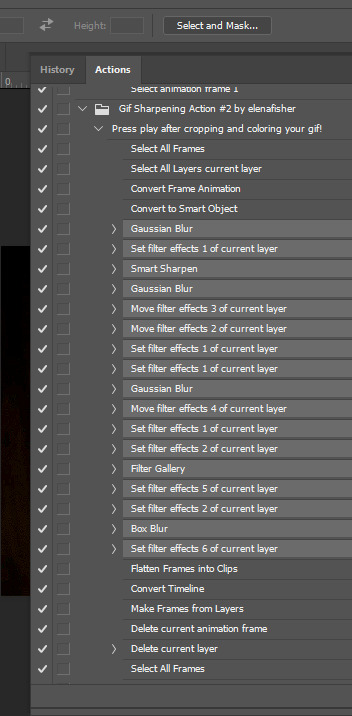
Until it looks like this!
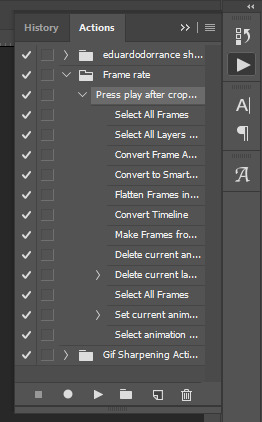
Make sure you have the layer under the file name highlighted, and then click the play button at the bottom! (If you get a screen saying select all frames cannot be found, don’t worry, just click continue!) You can delete the layer that does that if you want, I just keep it in case I realise I’ve forgotten to do something, because you can click cancel and edit your gif before you flatten it. Of course you can undo the steps to get back to the smart object version of your gif, it just takes longer!
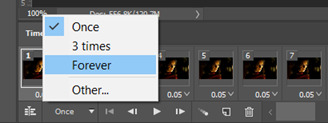
And now your gif is in frames and set to 0.05 already, so you don’t have to change the speed! All you need to do now before saving is change the gif cycle to “forever” in the bottom left-hand corner:
Then to save the gif go to file > export > save for web (legacy). Sometimes, the gif is bigger than the tumblr 10MB limit. You’ll be able to see this in the bottom left-hand corner of the gif save settings. If this is the case, I like to preview the gif, to see whether it would be best to cut frames off of the beginning or the end, or both. When you’ve decided, you can select the frames at the bottom, and in the right-hand side panel, and delete them both using the little bins/trash icons.
I keep checking and deleting frames until I get the gif under 10 MB! Just don’t delete frames from the middle, as then you’ll have the same issue as if you selected “every other frame” when making the gif: it won’t flow!
Lastly, these are my save settings:

So that’s it! That’s how I make all my gifs. Blending I do when the gifs are in the grouped, smart filter stage, whereas text I add on during the framing section above! Really hope this is helpful, please feel free to ask any questions you may have! 💖
#gif tutorial#tutorial*#completeresources#yeahps#chaoticresources#allresources#mikesmom#usergeo#userava#usertix#usersmile#usertom#if you'd like me to cover anything more advanced just shout#i wanted to show how i add text too but tumblr wouldn't let me add any more pics#but people can let me know if that's something you'd want!
521 notes
·
View notes
Text
Artist Resources (Part 1?)
This is basically just going to be a bunch of resources I have found to be useful. I can’t say that I’ve used all of them, but I’m sure they’re all worth checking out.
I’m also gonna try to put a detailed description for most of the links so you have a better idea of what you’re getting. I apologize in advance if some of them are redundant lol
(I put “Part 1″ if in the case I make another one)
~Links to Tutorials, Tips, Resources, etc~
Another Resource List -- Leads to another Tumblr post. Apparently, the post isn’t mobile-friendly, so it’s suggested to view this on Tumblr browser. Has a bunch of other links. I’ve checked out a few of them (mainly the copyright stuff lol), and it seems that some of the links may be a bit outdated. Still, it doesn’t hurt to check out the links.
Arms and Legs -- Leads to another Tumblr post. A handy tutorial on elbow and knee placement.
Art & Game Dev -- This leads to my personal playlist of a bunch of YouTube videos. Has a bunch of tutorials and interesting videos that I’ve collected over the course of a few years lol.
Blamblot -- A website that contains resources and tutorials on comic lettering. This is primarily in reference to western comics, but it doesn’t help to take a looksie.
Commission Calculator -- Leads to another Tumblr post. Helps artists to stop selling themselves short.
Comparing Heights (hikaku-sitatter) -- A height comparer for centimeters.
Comparing Heights -- A height comparer for feet and inches.
Mouth Shapes and Lip-Syncing -- Leads to another Tumblr post. Useful for... drawing mouth shapes.
Reference Angle -- Useful for when you’re trying to map out a face from an odd angle.
Soft Proofing for Printing -- Leads to another Tumblr post. Helps when you’re trying to make prints of your artwork.
Textures -- A website full of different and mostly free textures. While this website is made for 3D texturing, it can also be useful for 2D drawings. Signing up gives you 15 free credits everyday, and you can use those credits to download some textures for free.
The Models Resource -- A website of models ripped from a wide array of games.
The Spriters Resource -- A website of sprites ripped from a wide array of games.
The Textures Resource -- A websites of textures ripped from a wide array of games.
~Links to Stock Images~
Please check out whatever policies they may have for their images before using them!
(not sure if any of them are active anymore as I followed some of these accounts a long time ago when I used to be more active on Deviant Art lol)
adorkastock (formerly senshistock)
anatoref -- Leads to another Tumblr post. Has a bunch of hand photo references
charligal-stock
HumanAnatomy4Artist -- Does contain nudity
null-entity
PhelanDavion
RobynRose
~Links to Other Artists~
Akihito Yoshitomi -- Yoshitomi is a mangaka who has tutorials on manga making. He also has an insightful series in which he drafts and draws a 30-page manga in 18 days. Remember that every artist works differently and his process may be different from another’s.
Drawfee -- Drawfee is an improv drawing show of four artists: Nathan Yaffe, Jacob Andrews, Julia Lepetit, and Karina Farek. While they don’t have tutorials in a sense, their videos explain the different processes they go through as they draw. They also occasionally provide tips, tricks, and resources in their videos. They do have another channel and a Twitch channel where they host drawing classes in addition to other fun shenanigans.
EtheringtonBrothers -- Has a bunch of useful and eye-catching tutorials called “How to Think When You Draw”.
Mark Crilley -- Mark is a comic artist, specializing in manga, who has a bunch of tutorials about anatomy, perspective, comic making, and other things.
Miyuli -- Miyuli is an artist who posts tutorials on their Twitter. Their tutorials range from anatomy to clothing to other things. They even have a few books of art tips. Currently (as of the time of posting this), their 2018 version is free for download, so I highly recommend you download that. Some tips may be outdated, but they should still be helpful.
Whyt Manga (Twitter/YouTube) -- Odunze is a comic artist, specializing in manga, that has a bunch of tutorials on manga making and drawing characters of color.
~Links to Free Programs~
Blender -- A free 3D program if you’re into 3D modeling and such. I also personally haven’t used Blender (I use Maya lol), but I know it’s a respectable program.
Krita -- A free painting program if you can’t afford Photoshop or Clip Studio Paint. I personally haven’t used Krita, but I have recommended it to a few friends and they have positive reviews about it.
Paint Tool SAI -- Okay, this one isn’t free, but it’s a significantly cheaper painting program where you don’t have to pay a subscription. It’s 5,500JPY (~50 USD). I’m not sure how well it still works on modern computers (the last update was 2016), but I still use it here and there because I love the pen tool feature it has, and it still works like a charm for me.
~General Tips From Raine~
Raine admits that she’s guilty of not following her own advice, but Raine hopes that the tips that she does know will be beneficial to someone who will follow them. She’s also going to keep all her tips under the cut so as to not make this post a huge wall of text (even though it technically already is lol)
Also, if you have some resources, tutorials, tips yourself, please feel free to send them to me and maybe I’ll make a part 2 to this post!
ALWAYS LOOK FOR REFERENCE. This should really go without saying. You can’t draw from life if you refuse to observe life itself.
If you can’t find the exact thing you need, MAKE YOUR OWN REFERENCE. Time and time again, I can’t find something exactly that I need. So instead, what I do is that I take pictures of my own reference. Sometimes I even grab a friend and take pictures of them doing whatever it is I need.
Have a mirror handy when you’re drawing. Sometimes what you need is actually right there in front of you.
Having trouble drawing something? Do some studies. Take the time to understand what it is you’re drawing. I can’t remember the exact story, but I heard that the people who were working on Tarzan were having a hard time drawing his hands. So, what they did was spend a few hours looking at hands to try and understand how they work.
IT’S OKAY TO STUDY THE ART OF OTHER ARTISTS. Just as we look to the old masters as a reference, it’s definitely okay to look at modern-day artists for reference. Just don’t go copying exactly everything that they do, or worse, trace what they do. Just don’t do it... at all.
Not every line needs to be realized. The viewer of your work will automatically connect the dots.
DO NOT TRASH YOUR OLD DRAWINGS. Please, never ever do this. Your old drawings have value to them, even if they look terrible to you. Old drawings may hold ideas for things you could do for the future. They also serve as a way to see how far you’ve come as an artist.
GETTING BETTER AT DRAWING TAKES TIME AND EFFORT. You’re not gonna get better overnight. It’ll take months, or even years, to feel like you’re a competent artist, and even then, you’ll still have room for improvement.
DON’T LOOK DOWN ON YOURSELF IF YOU’RE TAKING A LONG TIME TO GET BETTER. It’ll be better for your mental health in the long run.
Alternatively, DON'T LOOK DOWN ON OTHER ARTISTS EITHER, ESPECIALLY TO MAKE YOURSELF FEEL BETTER. You know the struggles it took for you to get where you are, so don’t go putting down other people when you’ve been in their shoes once.
KEEP DRAWING. If you’re not making an effort to get better, then you’re not going to be better. I get that it’s hard to find the inspiration to draw (I’m very guilty of this), but just keep trying. It doesn’t have to be big or spectacular. You don’t even have to post it if you’re the type who likes to post their art stuff.
Try to find references from real-life. It’ll help you better understand form, lighting, shadows, etc., especially if you’re going for a more realistic kind of art style. Otherwise, finding reference from things like cartoons, anime, comics, etc. are just as good.
Try new things. Try new art mediums. Try a different art style. Switch up the way you do things. Maybe you’ll hate it, maybe you’ll like it. Who knows if you don’t try.
Watch time-lapses (or speed draws/speed paints) of other artists!
Pinterest and Google are your friends if you need tutorials or references or whatever.
If you’re offering commissions, DO NOT WORK UNDER YOUR LOCAL MINIMUM WAGE. You are literally devaluing the work you actually put into a piece.
I like to think I’m an aficionado of Photoshop, so feel free to ask me questions on how to achieve something! I’ve used Photoshop for about 11 years now and know my way around the program. On another note, I do recommend setting custom keyboard shortcuts in Photoshop because the default shortcuts are terrible (in my opinion), and because having custom shortcuts increases the speed of your workflow.
Because I’ve been seeing this a lot lately in Twitter, you’re never too old to start in art. Art is just one of those things that anyone can pick up at any age because the only thing you really need to get good in art is time, diligence, and patience.
Try not to post hi-res images of your artwork to prevent art stealers from selling your artwork in high resolution.
Always, always, always add your signature and watermark on your artwork. I like to add my signatures and watermarks in places that’ll be hard to erase or crop out. I’ve also seen people add their signatures and watermarks in creative ways (ex. on a character’s shirt). You need to protect your work in an era where people will just blatantly steal it and make profit off your work.
Tag List
@reality-is-often-disappointing
#artists#artists on tumblr#artist tips#artist resources#art resources#artists of tumblr#art tips#art tutorial#raine rambles and muses#raine can art
173 notes
·
View notes
Photo


For the anon who asked if I had a tutorial on how I make gifs! I made one that covers just about everything about my gif-making process 💖
A summary of things included in this tutorial:
How to rip videos from nearly everywhere
How to make a basic gif using videos
How to slow down a gif
How to color gifs

Stuff you need:
Windows 10 (for the built-in screen-recording program*) / Xbox Game Bar
Photoshop CS6 or higher
VLC Media Player
PC/laptop
*I like to use the Xbox game bar because it's straightforward and doesn't require any technical shit to make it work. It's plug and play! But if you don't have this, here are some alternatives:
OBS Studio - used for streaming and screen recording, free and open source! lots of tutorials on Youtube for beginners
VLC Media Player - all purpose media player and Youtube video-ripper, also free and open source
You’re gonna have to look elsewhere for OBS and VLC tutorials but they're not terribly hard to get used to. It's just gonna take a little extra work to make gifs that way.
I. Get a video of the thing you want to gif
High quality vids make high quality gifs so I like to source them directly from HD/Bluray digital copies as much as possible. This is how I do it 90% of the time:
1. Open the source video in my media player (I use VLC) 2. Open the Xbox Game Bar 3. Record a short clip from the source vid
I prefer to do this because it's easier to work on a short clip with a small file size in Photoshop.
If I can't download the videos, I rely on screen-recording from wherever it's available (Youtube, Streamable, Twitter, Instagram, etc.). Any video that can play in a browser is fair game.
How to use the Xbox Game Bar to record your screen
you don't need a microsoft or xbox account to use it
can record videos from media players and almost any video that plays in a web browser (not sure if this works with Netflix on a browser though)
How to use VLC Media Player to rip videos directly from Youtube
doesn't always work but it allows you to find the exact address of a Youtube vid and save it on your PC like you would with pictures
most videos aren't high quality when ripped like this but when I got nothing else to rip from, I can't be choosy ¯\_(ツ)_/¯
II. Make a standard gif file
youtube
1. Open PS. Drag/drop your video in PS. The 'Timeline' window should appear on your workspace. If it doesn’t, go to Window > check 'Timeline' near the bottom of the menu
2. Make a new file with the usual tumblr dimensions (Width: 540px for 1 column posts/ 268-268px for 2/ 177-178-177px for 3, Height: up to you)
3. Drag and drop the vid in the new file then close the video file.
4. On your new file in the Timeline window, click on 'Create Video Timeline'
5. In the Layers window, right-click on the video layer and select 'Convert to Smart Object'
6. Resize the video.
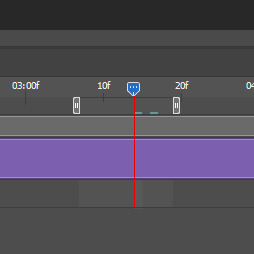
7. You can move the start/end bars on the Timeline so it only includes the part of the clip you want to gif. Skip this step for now if you plan to change the speed of your gif.
8. Save your new file. You don't have to keep the PSD and source video in the same folder but I recommend you do.
III. Adjust the speed
youtube
1. Double click exactly on the thumbnail graphic of the video layer--not the layer name or the gray area around it! It should open a new window with 'Layer 1.psb' as the filename.
2. Right-click on this video's Timeline. It should show a small tab that allows you to change the speed of your gif. 60-70% gives it a noticeable slow-mo effect.
3. Since we slowed the clip down, we have to lengthen it. Drag the arrow at end of it all the way to the right until the you can't extend it further.
4. Press ctrl + s to save the changes in 'Layer 1.psb' and then close that window for now.
5. Go back to your main file (LALO 01.psd in my example) and adjust the length of the clip on this Timeline like you did on 'Layer 1.psb'.
6. Readjust the start/end bars on the Timeline so they line up with the part you want to gif.
III. Make it pretty
youtube
There is one effect that makes a gif instantly prettier and that is Smart Sharpen. Look for 'Filter' on the top menus. Click on the video layer, click on Filter > Sharpen > Smart Sharpen.
If the scene you clipped is well-lit and if you are not doing anything fancy, this might be all you need to do. But if not, you can find every tool for color adjustment in the Layers window:

These are the ones I use often:
For adjusting brightness/contrast: Levels and Selective Color
For color correction: Color Balance, Selective Color, Photo Filter and Vibrance
For cleaning up artifacts and reducing noise in nighttime/dark scenes: I use Selective Color and turn up the black anywhere from +5 to +15
IV. Save the gif
youtube
I usually do a bunch of tweaks here and there before I save the final gif. I go back to adjust the speed, to recolor or change the length of the gif, whatever I feel needs retouching.
1. Press Alt + Shift + Ctrl + S all at the same time or click File > Export > Save For Web.
2. I use these settings:
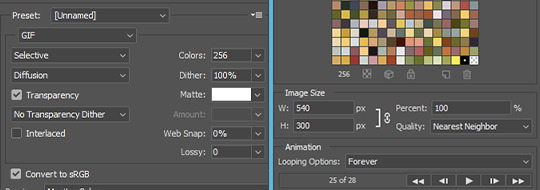
3. Check that the file size doesn't exceed 10mb
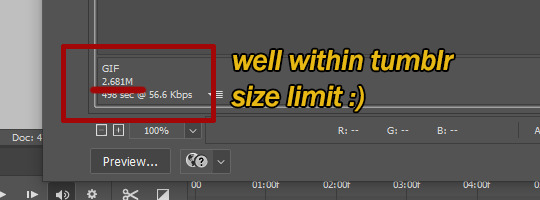
4. Click ‘Save’. And we’re done!


#my gifs#photoshop#photoshop tutorial#gif tutorial#tutorials#might as well tag this#better call saul#breaking bad#brba bcs gifs#my tutorials
229 notes
·
View notes
Text
Best Apps for School (Mac, Chrome Extensions, and iOS)
Something that I have loved doing is keeping my school work digitized throughout my entire high school and college experience, and there is a method to my madness! First of all, in the real world, as much as your teachers say that writing helps you learn more, for me, I have learned it to be a tremendous waste of time. When you work for organizations or you do personal work, it is more common than not to perform at a digital level. It is personally more effective and more efficient for me to digitize my life. Although hand writing notes and doing handwritten homework may scientifically make you learn more, I have learned that there are ways to expedite the process so that you can save time doing other things and save time by being focused on the computer.
______________________________________________________________
1. To-Do Microsoft (Mac, Chrome Extension, iOS)
This application was formerly Wunderlist, but it is a pretty convenient app. If you work best using and checking off lists, this is a highly functional tool in which you can not only make lists, have deadlines, reminders, etc., but you can also share lists with your peers. This can be an effective way in getting group projects done and delegating tasks.
2. Notability (Mac, iOS)
This app consistently comes out as a winner. You know why? It can be shared across platforms (ios and mac) and it also has the capacity to color code your notes, maintain organization for classes, insert pictures to abbreviate notes.
3. Zotero (Mac, Chrome Extension, iOS)
This app saves lives. I never did a single bibliography in college because I had this app as well as the browser extension. Not only will it do a works cited at the click of a button, but you can also do in-text citations easily in a word document or google doc. There is a function in which you can link your google docs or Word documents, and it will completely transform your life. Stop wasting your time on doing bibliography and in-text citations!
4. Kindle App (Mac, iOS)
Some of you may be wondering, why would you put the kindle app? First of all, even though you may like physical text, you read quicker on technology. It saves you time in the long run from doing some of those dreaded reading assignments for textbooks. Also, it is easier to interact with text through the Kindle App. Highlighting functions, note-taking, and other functions of this app make it very easy for students. You can make flashcards from your note-taking, and you can easily export annotations. Additionally, in college, a lot of professors require textbooks. It is often cheaper to rent or buy kindle book even for some high school lit classes. Plus, something that nobody tells you about is that your local library often has e-copies of books that you may read in your literature classes etc in which you can access through your kindle app.
5. Forest (Chrome Extension, iOS)
This is buy far one of my most used apps in college. It helped me stay productive by not using my phone. It is the only thing that kept me from not using my phone. It costs $1.99, but it is the best money you will ever spend to stay distracted from your phone. The concept is that you plant trees every time you stay focused for a certain period of time. You earn coins to grow different trees or you can put your coins towards planting real trees! Super dope if you ask me. You can also be productive with your friends by downloading the app together in a mode called plant together. It’s very aesthetic and lovely. You can also listen to different sounds like in the forest or you can just listen to the music of your choice.
6. Momentum (Chrome Extension)
This is an absolutely free extension in which is aesthetically pleasing, but it is also very functional. It gives you the ability to form a to-do list, customize your opening page, connect your accounts, and set daily goals. I really love this browser extension because it keeps me organized for my personal life.
7. iStudiez Pro (Mac, iOS)
This is a game-changing app. It does so many things for you for free like show your weekly schedule, create teacher information profiles, put due dates on your homework etc. Not only did this app keep me organized, but it enhanced my academic experience. I was able to know my teachers office hours from th click of a button. I could anticipate deadline more frequently. I am a physical planner girl, and it takes me forever to organize my work because I like to color-code everything. Plus, planners are expensive, so students on a budget will find this app extremely refreshing from this perspective.
8. Your Local Library App (may vary)
If you don’t have a card with your local library, the time is now. Save money on so many things like books, movies, and audiobooks. My library app let’s me access pretty much anything! If the resource isn’t available online, you can always place a hold and pick an item up at the library. I wish I had used this resource more often in high school, but I used it more often in college and it saved me a lot of money. Also check with your school or local library because they often have textbooks or can order textbooks that you may need for school!
______________________________________________________________
I hope this list can help in virtual learning as well as in-person learning. Just because your teacher or parent doesn’t teach you about these awesome resources doesn’t mean that you should make your life any harder without these tools! Good luck and happy studying!
#study#studyspo#studyblr#studygram#study tools#study tips#study motivation#study hard#homework#school#backtoschool#back to studying#uni#university#study aesthetic#study at home#study goals
81 notes
·
View notes
Photo
Everyone procrastinates. Even I procrastinated writing this article - it was supposed to be published two days ago!
No point in beating yourself up for procrastinating, but it’s important to be wary of it and not let it get too deep. Here are a few tips on how to avoid procrastination and become peak-productive.

There’s an energy spending for each decision we make during the day. Asking yourself “What do I need to do to today?” when you wake up is a welcome card to procrastination, believe it or not.
Asking yourself about what you need to achieve on a given day compels you to give yourself answers, which compels you to make decisions. This halts your self-control and makes you tired, leading to procrastinating on whatever it was that you had to do.
Tip. Plan your day ahead of time instead of at the last minute, or create habits around certain areas of your life. Once habits set in, you won’t even have to think about it anymore - it will be automatic, thus relieving you from making certain decisions.
For example, instead of deciding if you’re going to exercise today or not, decide in advance exactly which days of the week will be dedicated to exercising. Another example is to pick your clothes the night before rather than the morning-of. And so forth.

I’ve taken this one very deeply into my own life. Finishing your day before it starts basically means getting rid of tasks so that you can actually procrastinate.
“I get things done ahead of time so that I can be lazy afterwards.” You’ll likely hear me say this often whenever someone asks me why I complete projects one or two months in advance.
Take care of your tasks as soon as possible, not forgetting to make your decisions ahead of time whenever possible (previous tip), and you’ll see your life become a lot less stressed out!

Our mind plays tricky games when it comes to getting things done. It’s easy for you to focus more avidly on everything you have to achieve than on each of those goals individually.
For example, you might have a project you’re working on. This project involves researching, assessing information, drafting, double-checking, structuring information, maybe designing a presentation, etc.
Sounds like a lot, right? Dreadful. Well, it’s normal to focus on the bunch instead of the bits, but do practice that exercise.
Whenever something involves more than one or two steps to accomplish, focus on each step instead. The previous example could be broken down as: research and assess information for 1 hour, draft for 30 minutes, double-check for 30 minutes, structure information for 30 minutes, design for 1 hour, etc.
When you break tasks down and focus on the steps they involve, you realise that it’s not that much and it automatically becomes more doable than before.
It’s not easy to fight the tendency of thinking about everything you have to get done but you’ll get there with time.

Let’s put this simple. If you’re an alcoholic, you’re not going to keep booze in the house, right? The same applies to procrastinating.
Remove any cues that might trigger your procrastination habits. This might involve working away from where your TV is, installing specific add-ons to your browser that prevent you from checking websites that aren’t related to work (e.g. social media, YouTube, etc), activating your phone’s DND feature so you can focus properly, and more.
It might sound silly but the mere presence of stuff that you use to distract yourself will impact your productivity and you won’t be able to focus as effectively as you should.
Have you got any tips yourself? Keep up with my Blooming Through Life article series for more content like this, and feel free to suggest your own article.
26 notes
·
View notes
Note
Hi Julia! I was wondering if you had any tips on returning to the lab after a really long break? I've been out of it for a year, but I just got a lab tech position and I'm a bit worried about getting back into it. Thanks!
Hi! Congrats on the new position! I too also got hired as a lab tech after college with a few months in between (not by choice, thanks Recession), so though it was not a full year like you, I do know what you mean!
My advice for someone also nervous about starting a job in lab research
Advice on positions with lots of freedom in structure (so like in research labs)
And halfway down this post I have some ideas on how to make the most of an undergrad research experience, but I think a lot of it can also apply to anyone starting out in a new research lab, including lab techs, so could be worth a read!
But in general, my main points are:
Take it one day at a time. It will feel overwhelming at first, as is natural whenever we’re thrown into something new, but you’re not required to master everything right away. Just take your time, and trust in your ability to learn and grow. My favorite thing to do right now for my new job is to end each day by thinking: “What do I know now that I didn’t know this morning?” and it’s very fulfilling (to the point where I’ve gotten very comfortable with not knowing something, because it’s just one more thing I can learn!)
Set clear expectations with your supervisor. As you’re learning the ropes and figuring out how much time you need to take with each new skill, your supervisor is also getting a feel for your reactions to these things too. They’re trying to figure out what project and timeline will best suit you. So it’s best to meet regularly with them (maybe more than the other lab members, just for the first few weeks as you start) and set flexible goals together. You may also need to check in with them while you’re doing a new task to confirm you’re on the right track, and if not, then what changes can you make?
Remember as much as you can the first time it’s taught to you--part of the whole “work smart, not hard” mentality. For me this is taking copious amounts of notes, reviewing them/the steps of the procedure right after, and asking lots of questions. Embrace the phrases “I don’t understand this, can you explain it to me?” and “I need your help.”
Know it’s ok to make mistakes. Everyone starting out--and even those who are experts but are also human and thus are prone to error--makes mistakes, but then we must grow and learn from it, and slowly as time and effort goes on, we make that mistake less and less.
Be quick to create a system of organization for all your notes and resources. Research labs have a lot of moving parts, and it could be very easy to get lots in all of it if one is not organized. So bookmark those helpful links in your browser, create folders for all your training materials, make binders for your lab’s papers and protocols, etc. It’s absolutely ok for all of us to not know the exact answer to anything, but we should know how and where to go find the answer. Why use valuable brain space to remember all this when my computer can do that instead, right?
That’s all I can think of for now! Feel free to reach out if you have any other questions :) Once again, congrats on the new position, and good luck!
24 notes
·
View notes
Note
(Stupid anon who went through your blog twice)
Your navigation has never worked for me but i also cant search for things in your blog (dr, mh tags etc) so idk i think its just my tumblr maybe? I dont think anyone else has these issues?
you’re not stupid!
i need to figure out a better way to make it work, you’re right. the nav page never opens in the app, it just pushes to a browser window, right? i’ll copy everything over into a pinned post instead - that should fix the issues with the nav page.
as for the searching function - that’s all on tumblr proper, not just me. i can’t even search my main for anything either, even if i know the word-for-word tag. i’ll double check settings and all that to see if i can fix something on my end. sorry that it’s all clunky right now!
1 note
·
View note
Text
How To Make Your Own Website and Monetize it?

By following up with me in less than twenty-four hours, you will be ready to launch a Website that will undoubtedly earn you thousands of dollars every month! How to generate the money? Well, the website that we make will be offering SAAS service.
What is a SAAS service?
A SAAS (Software As A Service) service is essentially an online software or service that you pay to use.
For example, Mailchimp.com, which is a SAAS service, provides email marketing services that you pay for.
A SAAS service is anything you pay for to get an online service.
Now you can be the owner of a SAAS service, you will have your own Website, and people will subscribe to your service and pay you monthly recurring payments.
Let’s say you have 100 customers who use your SAAS service, and your service costs about $10 a month; you’d make $1000 per month!
All you have to do is sit at home and watch your passive income develop on your computer screen. It’s a fantastic and easy way to earn money.
How to get a SAAS service?

“How can I get my own SAAS service or software?” you might be wondering. The good news is that you don’t have to create one, learn to program, or even employ a programmer to do so.
You can simply buy it Online for $40–$60. You can buy software from a website called codecanyon
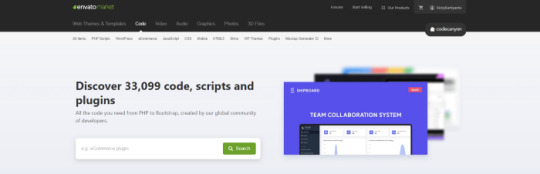
You can simply visit the website, click on the php scripts and search for SAAS and choose what kind of SAAS service that you preferred.
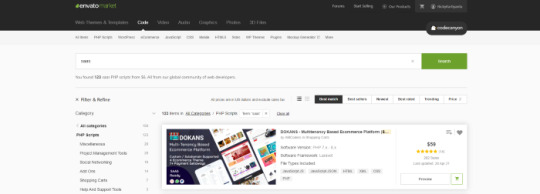
There are several types of SAAS applications available for purchase. Discount networks, accounting and billing software, email marketing systems, and employee management software are only a few examples. Take your time browsing the services and choose the one you like best, the one that fits you and you feel that you can be successful with.
Hosting Your Service
After you’ve created your SAAS service, the next move is to host it and make it public. To host it online, you’ll need a domain name and a server.
Now it is sounds hard since you don’t have any technical background in this term. Don’t worry, it is actually a simple and easy steps.
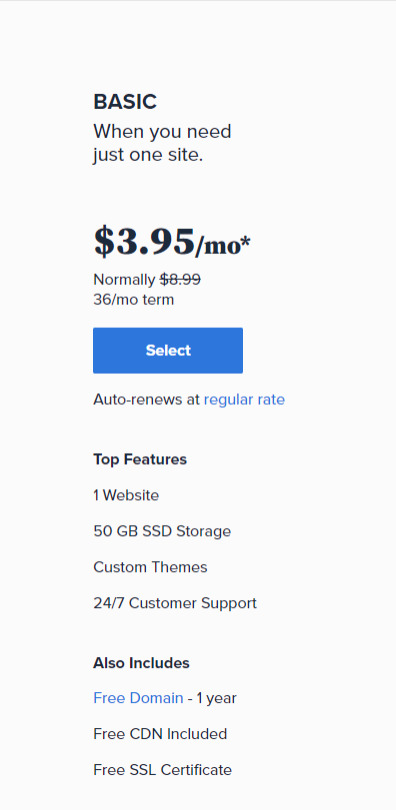
First you need a VPS server, you can visit and buy a cheap one from Bluehost. its only $3,95 permonth with and they give you free domain for 1 year! Check the price below. Buy the “LAMP” administration.
So What is VPS server? We do what we call “online hosting” when we want to publish a PHP page, script, or some other web application. This basically means uploading the files and database to a public server so that it can be accessed over the internet. On simple word, the place where you put the file is from VPS server.
In this tutorial we will used the shared server from Bluehost. Shared server only means that your server will be host with others website.
Now everything is ready, the only things that matter is how to install it. Let get to it.
Getting Started
After having your own server and domain on Bluehost, you need to connect them. Your VPS Server can be accessed now your Bluehost profile, but of course, we don’t want to access our website though an IP! we want to use our domain name. So simply, we are going to map the domain name to our VPS IP, so then we access the VPS and the WordPress website through both the domain and the IP.
Configure your DNS Records
Simply open DNS management zone in your Domain Provider and edit the main A record.
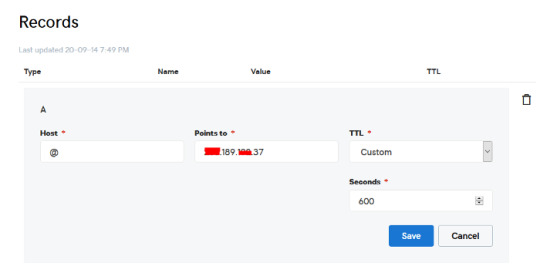
Than we need to create MySQL database for the application. So Let’s Create one. Connect to your VPS server using any SSH client like putty. and Let’s start!
Just open Putty and enter the Server IP or Name, and Press Open. It will ask you to login, just enter “root” as the user, then enter your password which is sent to you by email.
Note: while typing the password, putty will now show it for security reasons, but It’s there, just type it!
What’s nice, is that we have MySQL installed already as part of the LAMP Stack, but we need to create a database and a user for out application.
Note: Every MySQL statement must end in a semi-colon (;)
To get started, log into the MySQL root (administrative) account by issuing this command:
mysql -u root -p
You will be prompted for the root password, just write or paste it and press Enter.
First, create a separate database that your PHP application will use. You can call this whatever you want, but we will be using TestDb in this guide to keep it simple. Create the database by running this command:
CREATE DATABASE TestDb DEFAULT CHARACTER SET utf8 COLLATE utf8_unicode_ci;
Next, we are going to create a separate MySQL user account that we will use exclusively to operate on our new database. Creating one-function databases and accounts is a good idea from a management and security standpoint. We will use the name DbUser in this guide. Feel free to change this if you’d like.
We are going to create this account, set a password, and grant access to the database we created. We can do this by typing the following command. Remember to choose a strong password here for your database user:
CREATE USER 'DbUser'@'localhost' IDENTIFIED BY 'enter_a_custom_password_here';GRANT ALL ON TestDb.* TO 'DbUser'@'localhost';
You now have a database and user account, each made specifically for Your PHP application. We need to flush the privileges so that the current instance of MySQL knows about the recent changes we’ve made:
FLUSH PRIVILEGES;
Exit from it by typing :
EXIT;
Upload The Script Files To The Server.
To upload the files, you need an application called WinSCP.
It is a free tool and you can download it from here.
Connect to Your VPS Server using WinSCP, and Update the PHP Files to the server to this path: “/var/www/html”
In most cases, the files would be zipped, so we need to extract them.
Again to Putty SSH CLient and Let’s install the unzip utility using the following command:
sudo apt-get install unzip
Clear putty screen to make in clean using the following command:
clear
Change directory to /var/www/html using the following command:
cd /var/www/html
Unzip the “.zip” file using the following command:
unzip YOURFILENAME*.zip
*Note: the file name may be different in your case, so replace YOURFILENAME with your file name.
Now, Move the latest folder content to the upper directory so it can be accessed directly -> use WinSCP Just copy all the files inside “YOURFILENAME” folder and paste them directly in html folder.
Configure Apache to Publish PHP Website
Well Done, Now your files are uploaded and placed in the html folder, we just need to configure apache so we can our Publish PHP Website and access our script using our domain name. To do so, open WinSCP again and navigate to this directory: /etc/apache2/sites-available/
Now, create a new empty file and name it “yourdomain.conf” . You can replace “Scriptname” with any name you want
Open yourdomain.conf Then copy and paste the content below into the file and save.
<VirtualHost *:80> ServerAdmin admin@YOUDOMAINNAME DocumentRoot /var/www/html ServerName YOUDOMAINNAME ServerAlias YOUDOMAINNAME <Directory /var/www/html/> Options +FollowSymlinks AllowOverride All Require all granted </Directory> ErrorLog ${APACHE_LOG_DIR}/error.log CustomLog ${APACHE_LOG_DIR}/access.log combined </VirtualHost>
Replace with your own domain, in my case its “YOURDOMAINNAME”
Enable your script configuration in apache and restart the service.
Now simply, run the following commands to finish the setup:
sudo a2ensite yourdomain.conf sudo a2enmod rewrite sudo systemctl restart apache2.service
ALMOST DONE!
Connect to MySQL Database.
Open your web browser now and navigate to your server name.
Continue the setup by entering the database info and your admin login information. In our example, the database name is TestDb and the user is DBUser with the password set.
That simple!
Setup cronjobs.What are cronjobs?
cron is a Linux utility which schedules a command or script on your server to run automatically at a specified time and date. A cron job is the scheduled task itself. Cron jobs can be very useful to automate repetitive tasks.
For example, you can set a cron job to delete temporary files every week to conserve your disk space. Some PHP web applicaitons, may require you to set up a cron job to perform certain functions.
Setup cronjobs.
To setup cronjobs, you need to add all required jobs to the server. This depends on your script, so if you bought a script from code canyon, the script owner should provide the cronjobs.
To do this, open WinSCP and got to /etc Open crontab file using the editor And paste all the jobs from your script to this folder. (cronjobs are listed in the app documentation)
Make sure each job is on a line and an empty line in the end.
Secure with a Free SSL.
SSL certificates are used within web servers to encrypt the traffic between the server and client, providing extra security for users accessing your application. Let’s Encrypt provides an easy way to obtain and install trusted certificates for free.
Connect to your Server using Putty SSH client. and Let’s Start!
Install the Let’s Encrypt Client
Let’s Encrypt certificates are fetched via client software running on your server. The official client is called Certbot.
First, add the repository to install Certbot:
sudo add-apt-repository ppa:certbot/certbot
You’ll need to press ENTER to accept.
Then, Update the package list to pick up the new repository’s package information:
sudo apt-get update
Install Certbot’s Apache package:
sudo apt install python-certbot-apache
Certbot is now ready to be used.
Set Up the SSL Certificate
Generating the SSL certificate for Apache using Certbot is quite straightforward. The client will automatically obtain and install a new SSL certificate that is valid for the domains provided as parameters.
Simply run the following command: (change the domain)
sudo certbot --apache -d YOUR_DOMAIN_NAME
You will be asked to provide an email address for lost key recovery and notices, and you will be able to choose between enabling both http and https access or forcing all requests to redirect to https. It is usually safest to require https, unless you have a specific need for unencrypted http traffic.
That’s it!
Test your website now and it should be SSL encrypted.
This tutorial I used are originated and made by Hasan By H-educate, you can check his link Here : https://h-educate.com/ or check his youtube on H-educate.
Other tips to make money online, check here : https://ricky-kartiyanta.medium.com/
Cheers!!
#website#saas solutions#saas#monetize#passive income#business#workfromanywhere#easy money#gettingrichfromhome
2 notes
·
View notes