#doll tutorials
Explore tagged Tumblr posts
Visit Tumblr Blog
Explore Tumblr blogs with no restrictions, modern design and the best experience.
Last Seen Tumblr Blogs


Fun Fact
Kazakhstan’s Minister of Communications and Informatics has blocked the Tumblr site because it contained 60 sites of terrorism, extremism, and pornography in 2015.
Note
ik it's a bit of a big ask but, can you provide a guide of essential products/tools to have for someone new to doll collecting?
thank you!!
Hmm, for small doll repairs I'd say a melamine sponge, rubbing alcohol, cotton wipes, qtips, metal pet comb, nail scissors.
For collecting, i'd start with a small notebook or spreadsheet of what doll, how much and notes about it.
After that it's about deciding how you'd like to collect: how much time energy and money are you willing to put into each doll?
If you want to get into MyScene your options are buying mint condition for about 20-30$ more than buying used condition but probably needing hair plugs replacing. Ponies often require hair work, G1 Monster high need glue treatment and de yellowing, old Barbies will have stains or need body swaps. It can be very rewarding or very tedious if that's not your jam so finding that price/work point that works for you is a really important start. There are collectors who only get dolls that are in stores and enjoy the physical trips to go 'hunting', others thrift, others do ebay/mercari/mandarake with set budgets. If you're outside of the USA you might not get much in-store choice.
It's about figuring out what part of collecting is fun for you : redressing, hairstyling, making jewelry or miniatures, photography, sewing, crochet, doll repair, doll customizing, coming up with a backstory, completing a set?
The hobby is vast so the essentials are 1- some dedicated space and maybe a time slot to put your dolls and related crafts, 2- an idea of your budget then 3- playing with a bit of everything to see which direction you'd like your collecting to go.
I'm opening this up to anyone reading : what's a tool or supply that came in useful with your doll collecting?
I think I would have invested in a dust proof bookcase sooner and a heat pad instead of using a hair dryer but I'm glad I didn't invest in photography equipment as that's not my thing.
25 notes
·
View notes
Note
If you were still looking for a doll sealant, I use Testor's dull coat! It's a spray like msc but a decent bit cheaper. I get it from the like miniature section of the craft store
thank you! I’ll look into this for sure. I appreciate it a lot!
publishing this for future reference :D
5 notes
·
View notes
Text
youtube
Hi everybody happy Pride , to celebrate Pride Month 2025 I’ve posted a new video to my YouTube channel. The video has a little bit of everything doll restoration , a tutorial on how to make a Pride themed doll background and doll props like flags and signs as well as a doll photoshoot. Please check it out it would mean a lot to me. Image Description: a screenshot of a YouTube video featuring a photo of a Rainbow High doll with rainbow hair colour wearing a rainbow themed cheerleading outfit standing beside a Progress flag . Pride is written in multicoloured puffy letters above the Progress flag.
The text reads BC’s Doll Place: Pride 2025 DIY Doll Background, Props and Photoshoot (With Subtitles).
#dolls#amaya raine#pride#pride month#pride 2025#doll crafts#doll backdrops#doll tutorials#doll backgrounds#crafts#lgbt#pride decor#Barbie#Rainbow High#dollblr#doll photography#doll collector#doll collecting#1:6 scale dolls#Frankie Stein#Wicked#Gelphie#doll restoration#pride crafts#my youtube channel#my youtube video#BC’s Doll Place#Youtube
0 notes
Text


6.1.25 - made a felt shrimp doll pattern and rough guide just in case anyone would be interested in making one, too
7K notes
·
View notes
Text
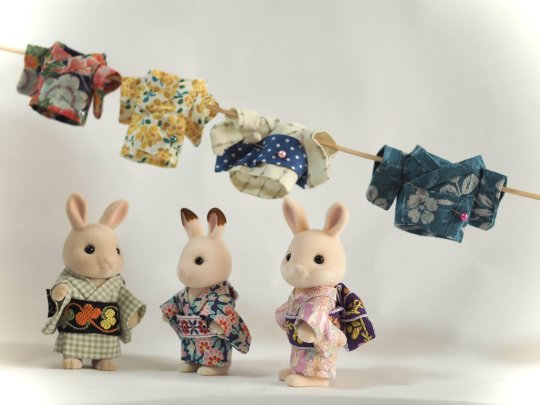
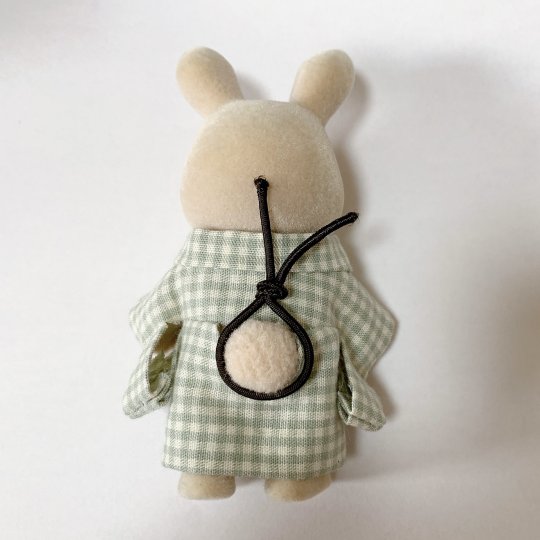
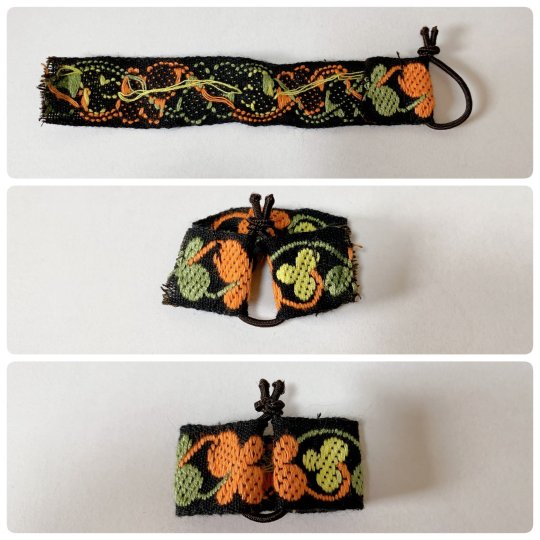
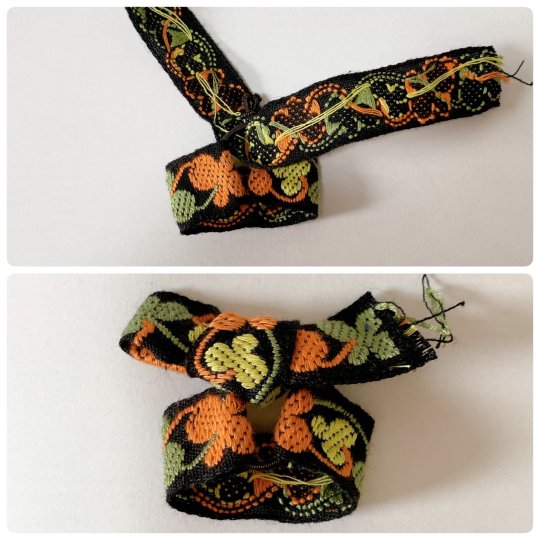
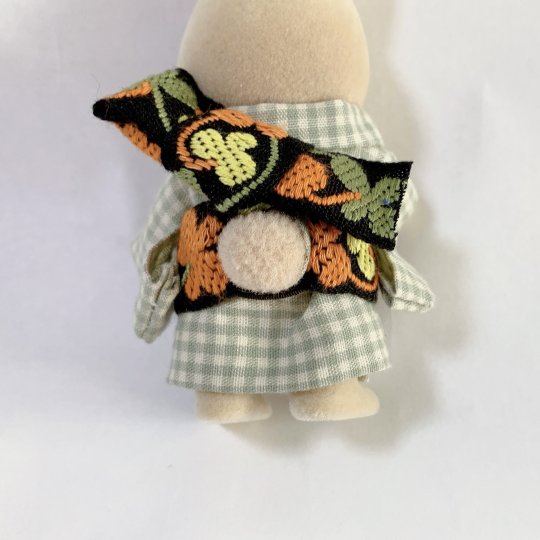
To complete past diy kimono dressing for Sylvanians Families/Calico Critters I shared before (see 1 / 2), here is a new step by step by @haluchobin to create cute easy to put on obi :
Tie a thin elastic into a loose loop around the tail
Slip both ends of a ribbon through the loop and sew into place
Tie another ribbon around the elastic covering the knot. Style it into a bow, you can try to mimic real musubi if you want
Put on the finished obi and enjoy!
#japan#art#craft#sylvanian families#doll#figurine#doll clothes#sylvanian family clothes#diy#step by step#tutorial#kimono#obi#着物#帯
1K notes
·
View notes
Text

TY GIGAI HIHIHI i love dem <3
#my friend kat (katwithak246) was headcanoning that kanade would visit saki sometimes in the hospital back then#LIKE...HELLO? COOK.#also funny thing was me watching eye art tutorials in the middle of rendering bc i thought my style for drawing eyes didnt fit the vibe KJD#like they were all dolled up in those outfits🥺the cutiepatooties need to look dolled up!!#kanasaki#sakikana#kanade yoisaki#saki tenma#project sekai#prsk#pjsk#artsdrop#25 ji nightcord de#leo/need#leoni#niigo#nightcord at 25:00
301 notes
·
View notes
Text
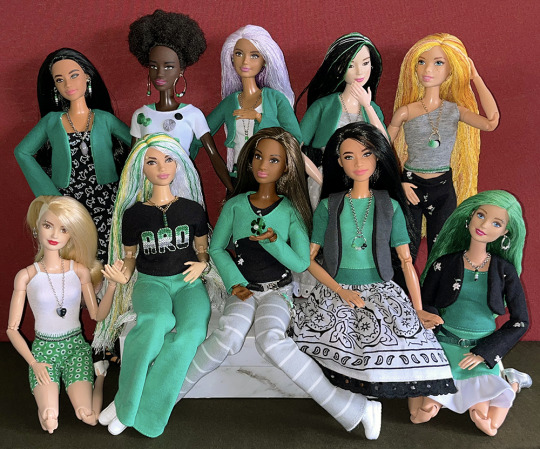
Over the past eighteen months, I've made enough green, white, grey and black clothing pieces to outfit ten Barbie dolls in aro colours. In addition, every doll has earrings, necklaces, belts or embroidery featuring pride stripes. Now I just have to figure out how to make a one-sixth-scale aro pride march display...
(More information about the making of aro-themed doll accessories and clothes is available on my website.)
#aro week#asaw 2025#aromantic#green aro pride flag#sewing#embroidery#cross stitch#pride crafts#needlework#needlecraft#fashion dolls#barbie#pride#link#aro worlds wordpress#image description in alt text#I'll be sharing a tutorial for the floss rehairs later this week
206 notes
·
View notes
Text
Shoe Stay Last the Broke Way
Or, you’re a cheap bitch like me and have only basic materials at your disposal.
Hello, beautiful people~
Let’s create a shoe stay together.
(I’ve been corrected in my terms, it’s a shoe last. My bad if I confused any of you!)
Most every crafter has - Glue, water, plastic wrap, paper bags (or whatever you may have on hand,) and hot glue; That’s it, that’s your list of supplies. Perhaps a sharp instrument to cut away the mold carefully.
If you are like me, my crew is chronically shoeless. Shoes are expensive! I consider myself a decent seamstress though, so why not try shoe making? When doing this it’s a good idea to have a shoe “last” or a basic mold to help shape the shoes. I’m not a huge fan of handling my dolls every time I try and make something to fit.
Enter shoe lasts stays, the broke way.
First you need a volunteer. I chose the boy who had the bigger feet to basically provide a mold to all my other boys of similar size. This is Harper. His body is an April Story Senior. He’s got his pantlegs rolled up and he’s ready to go.

Let’s get messy now and act like we are in kindergarten. You want to make sure your doll’s feet are wrapped securely in cling wrap, covering a little above the ankle. We are going to paper mache over his feet. There are many recipes online for a mixture, but I personally use a mix of wood and white PVA mixed with a bit of water.

I alternated thin Kraft paper and paper towel for a couple of layers. Make sure each one is thoroughly dry before applying the next. Try and fill out some of the area above the heel and the arch as we want to keep this basic shape but not totally form fitting.


All dry! Now you need to carefully cut off the paper Mache. This can be tricky. Much like the paper Mache dress form we want to avoid doing damage to the doll during removal. Go slow and separate as necessary. I cut down the back of the leg and heel and about halfway down the foot. I was able to wiggle the mold off at this point.


Yay! Now that it’s off, try and ease the split back into place. I use tape as a temporary closure until I can go back and cover it with a final layer of paper Cache. You don’t have to, but I just like the clean look.
This last part is totally optional but I like to fill the cavity with some sort of firm support just to ensure the longevity of the cast. My doll forms are stuffed firm with yarn scraps and dryer lint. These though, I wanted something more solid. I’m not familiar with expanding foam nor do I have any on hand but what I DO have is hot glue. In the past I’ve made hot glue gems for some kids out of molds, so I know what I’m working with.
I cut the molds to an even height and started filling from the toe up to the arch. I let it cool in that upright tiptoe position for a bit before placing it flat and adding my little handle and filling it up to the top. I tapped them on the desk a few times while doing this just to make sure the glue settled firmly. I added handles just because, but you don’t have to. I used a cheap dowel.
Depending on what kind of shoes you plan to make (either soft formed or modern shoes with a formed toe) you can build up the toe areas to give yourself that sleek shape that modern shoes have.
Credit to @dollsahoy for adding on the buildup tip!


There you have it. Let the glue harden and admire your work. If you are going to use these to shape damp leather, remember to seal them with a water resistant sealant!
I hope this provides inspiration to someone.
Cheers and happy crafting.

#bjd#dragonsdelightstudio#abjd#dolls#bjdoll#legit bjd#doll#bjdphotography#legitbjd#dollstagram#bjd tutorial#bjd shoes#shoemaking#doll shoes#miniature shoes
163 notes
·
View notes
Text


Hello everyone! I finally finished the swimsuit tutorial for the adult sized critters :D As always, i tried my best to explain the process but, if needed, i will still answer any questions to the best of my ability :3 Thank you to @quin-weasel for checking if its written clearly too!
The pattern:

#sylvanian families#calico critters#custom clothes#doll clothes#tutorial#doll pattern#ternurines#ansof
112 notes
·
View notes
Text
Making of Sprigatito 🍃
2K notes
·
View notes
Text


With one look, I'll be me!
Nicole Scherzinger and Tom Francis in Sunset Boulevard on Broadway (2024)
📷 @theriddletrades
#nicole scherzinger#sunset boulevard#andrew lloyd webber#pussycat dolls#the pussycat dolls#broadway#bootleg#slime tutorial#tom francis#musicalgifs
218 notes
·
View notes
Text
One Way to Repair a Broken Doll Arm

Today I'll be walking you through how I repaired this Ever After High Lizzie Hearts doll's broken arm. While I wouldn't call this a fool-proof method, and I'm not sure that this repair would hold up to being played with, if you've got a beloved doll you want to repair, this should be just fine for a doll that's mostly going to be displayed.
The best part is, this will retain the articulation of the arm and/or knee (this method will technically also work for knee joints, though knees are harder than arms to work with). So let's jump in.
Tools required: Craft Knife, Jewelry pliers, Wire (gauge depends on size of joint), Super Glue, Hot Glue, Patience.
Let's start with our patient.
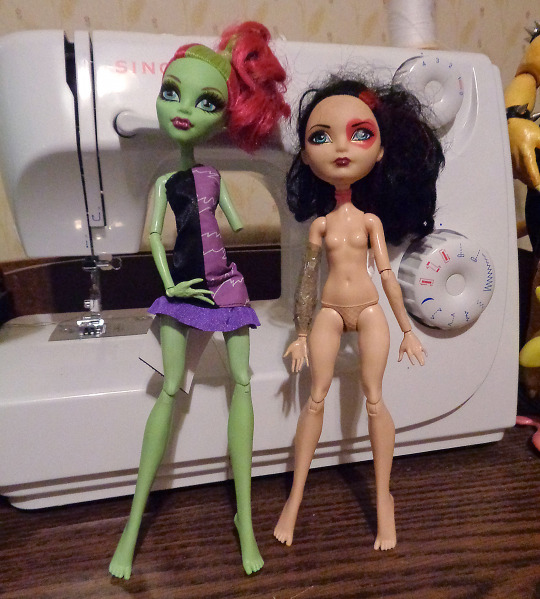
I thrifted this Lizzie doll a few days ago, along with a Venus McFlytrap, as shown in the above image. As soon as I saw the taped up arm, I knew the joint was broken, but hey, she was like 80c USD. I can apply some elbow grease for that cheap. Plus it gives me an excuse to finally make this tutorial.
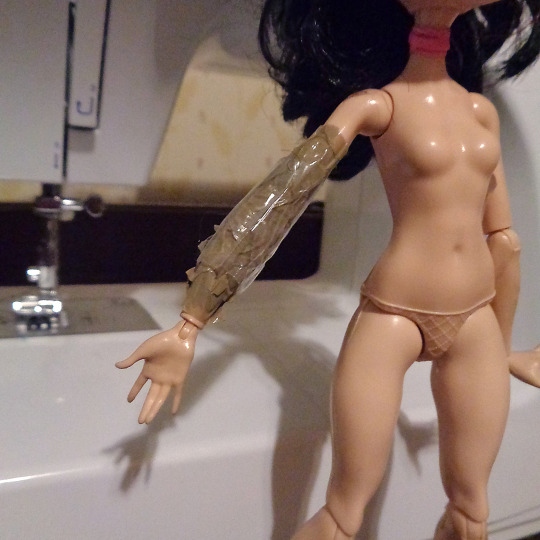

They went a little overkill with that much tape, but whatever works?
I cut the tape off carefully with a craft knife. I didn't take a pic of that, but I think you can image what a broken doll arm looks like. Unless you have aphantasia I guess, but that's getting off topic.
First thing I did was use the craft knife to slice along the seam lines, then pried the upper arm open (slowly. seriously go slow.) with a pair of jewelry pliers. It will leave marks on the plastic, but I can buff those out later.
Why am I doing this if the arm's already broken? I want to remove what's left of the peg that's in there. You could also drill it out if you have a dremel, but I wanted to avoid this tutorial needing power tools.
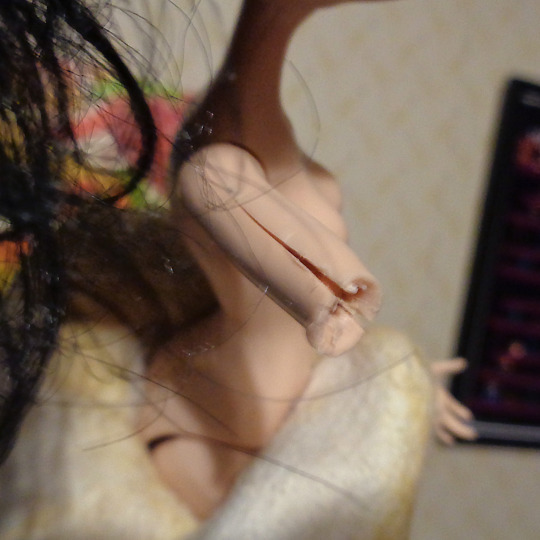
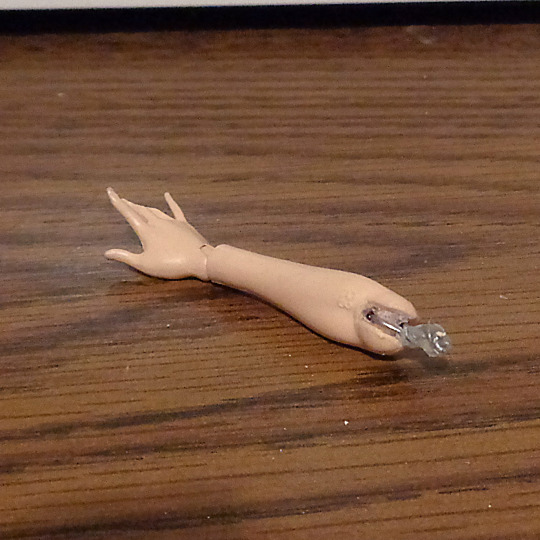
So here's the arm, pried open, with the peg removed.
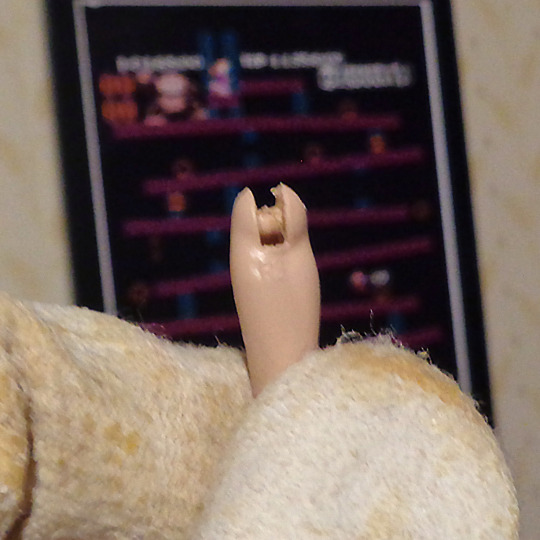
To close it back up, I used a tiny bit of acetone to melt the plastic at the seams, then held it together until it hardened enough to stay in place. Leave it for a few hours to make sure it's all fully cured, then you can sand the area smooth.

And here's the arm with the broken peg.
So what now? We need to remove the peg piece that's attached to the elbow. I couldn't get a photo of that since it's a delicate process and I only have 2 hands, but here's an artist rendering that would give you the idea.

Take a craft knife, and SLOWLY. CAREFULLY. cut into the ring that surrounds the elbow joint. YOU DO NOT WANT TO GO TOO DEEP, TOO QUICKLY. YOU DO NOT WANT TO ACCIDENTALLY CUT THROUGH THE ELBOW POST. Just go nice and slow. Just chip a little out at a time until you get to the center.

Use pliers as well to pull out the rest of the bits, though you might have to cut a good bit out before you can pull the rest out.
As for my doll, the operation went successfully.
This is what the elbow looks like with the joint peg removed.
Now we've gotten past the hard part, we'll cut off a few inches of wire and string that though the elbow joint. Once through, we'll twist it until it's reasonably tight to the joint. If that makes sense.

It should look like this. Give it a test fit and cut the wire shorter as needed so there's no gap in the joint.
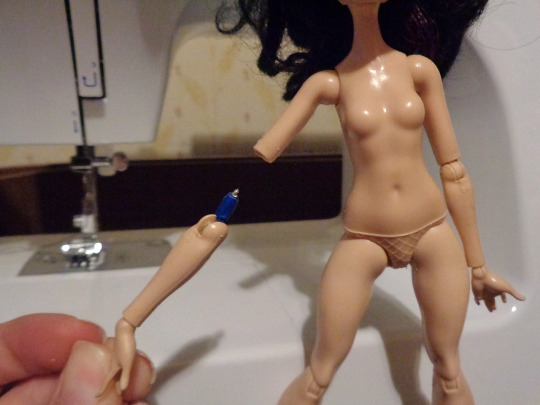
My test fit. Yep, I recycled this for the top photo as well. The blue is just painter's tape.
If you find you can't get it tight enough, and it feels too loose, I'd add a drop a super glue in there. Just keep moving the joint as the glue dries, and it'll add some friction so your arm will hold a pose.
Speaking of glue, I also add a dab of hot glue to the top of our new peg. The coating will add thickness that will help it stay in the upper arm. Tape works too, but hot glue holds up better.
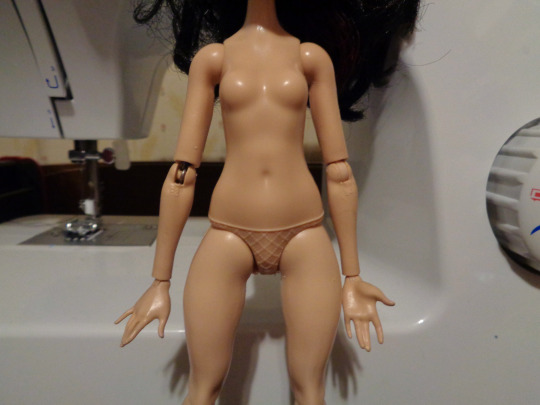

Here's our newly repaired arm back on the doll. Aside from a slight glimmer of silver, the repair is not very obvious I think.
Lizzie can now enjoy having two functional arms again. Whoo-hoo.
While not 100% a beginner repair, it's not particularly difficult either. Just takes some patience and a reasonably steady hand.
Before I go though, some disclaimers/notes: Some wires can rust overtime, so keep an eye on your doll to make sure the wire isn't degrading and discoloring them.
Also, if you do a repair like this, then sell the doll, do let the buyer know. I feel like I shouldn't have to say that, but don't be one of those sellers okay?
This same method can be used for knees, but thighs tend to be made of a harder plastic, and it can be more difficult to pry them open to take the old, broken peg out with out major damage to the upper leg.
Good luck with your repairs! Love y'all. c:
277 notes
·
View notes
Note
I love your robots!!! Do you have any advice for drawing those types of characters?
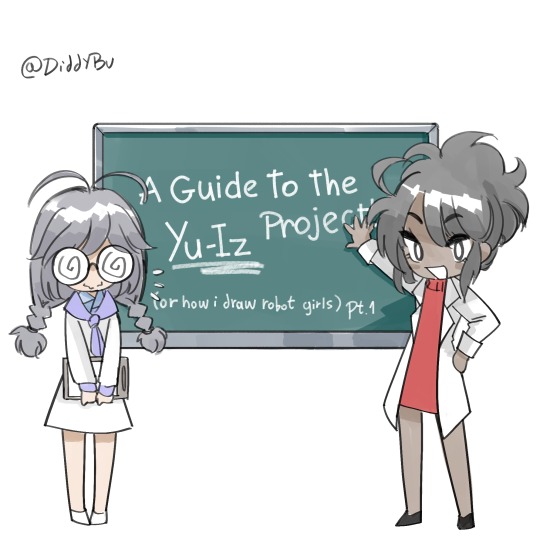

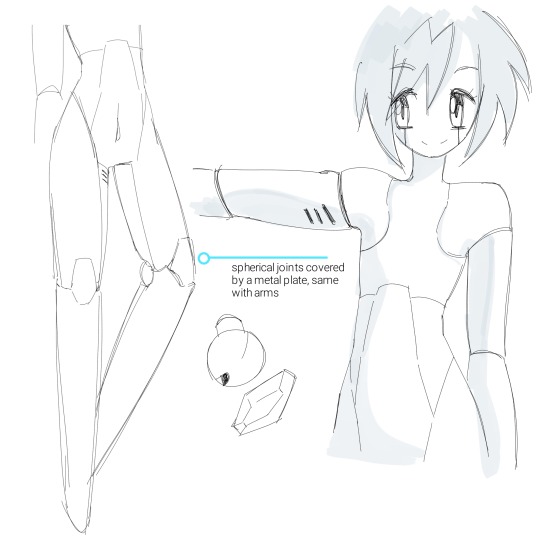
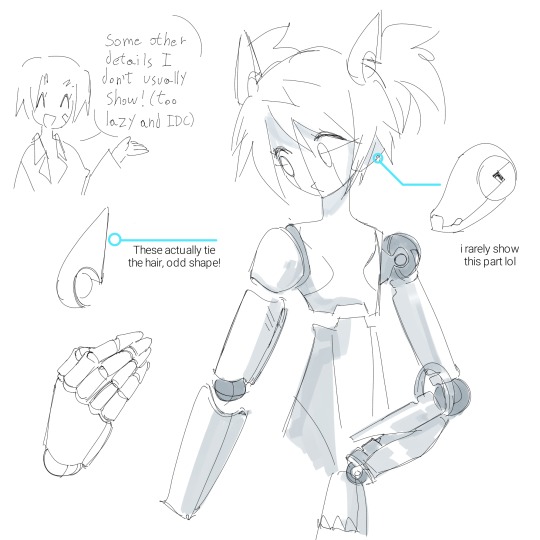
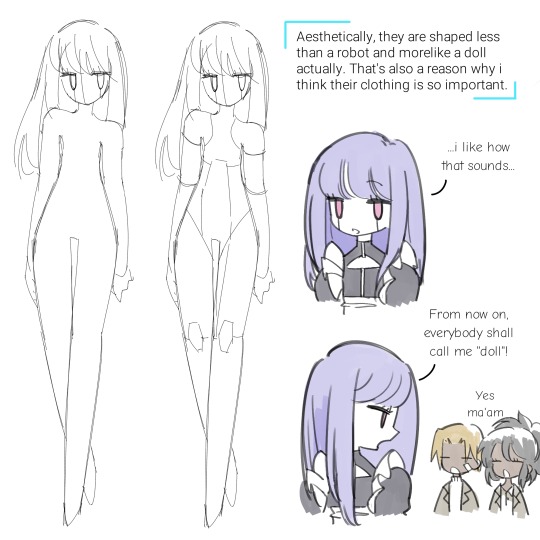
i hope that responds your questions (i didn't know what to say but then had a lot of fun doing this lol)
494 notes
·
View notes
Text
People asking for doll tutorials I see you
I’ll try to document the process next time I make dolls, I zoned out during this one so there’s not enough process pics for me to use :’]
But but I did document the entire process of making Courtney’s horn tho, those things drove me nuts I took so many pictures because I need it next time I make horns like those


They’re hollow on the inside so the head won’t be too heavy for the body, if anyone wants a tutorial of the horn specifically feel free to let me know!
#my art#art doll#hollow half horn is a very specific thing to make a tutorial of#I can’t think any other cases they can be used…
161 notes
·
View notes
Text
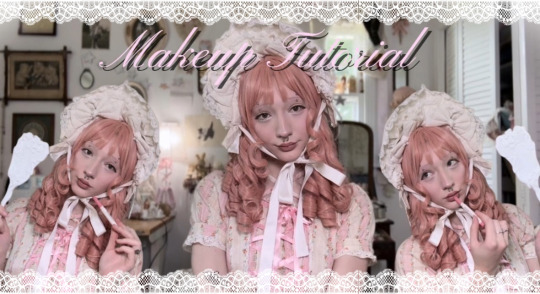
New vid is up on my YouTube! My everyday dolly makeup 🎀 I took a bit of a break but I’m hoping to start filming more videos soon. My channel is Odd-dolly 🤍
26 notes
·
View notes
Text


𝒲𝒶𝓃𝓃𝒶 𝒷𝑒 𝒴𝑜𝓊𝒯𝓊𝒷𝑒𝓇 𝓉𝓎𝓅𝑒 𝓅𝑜𝓈𝓉 (˶˃⤙˂˶)
(𝒜𝓁𝓇𝑒𝒶𝒹𝓎 𝒷𝑒𝒾𝓃𝑔 𝓈𝑜 𝒾𝓃𝓉𝒾𝓂𝒶𝓉𝑒 𝓌𝒾𝓉𝒽 𝓉𝓊𝓂𝒷𝓁𝓇 🙈 𝒷𝒶𝓇𝑒 𝒻𝒶𝒸𝑒 𝑒𝓍𝓅𝑜𝓈𝑒𝒹…. and this is cringy but eeee idk 😭 !!)
.
.
@tazcheriette <3


Dividers -
#girl blogger#actually mentally ill#coquette#lana del rey#sadgirl#doelita#dollette#fawn angel#fawnlette#lana del ray aka lizzy grant#hair tutorial#tutorial#girl blog aesthetic#men dni#just girly things#dolly aesthetic#irl doll#curls#heatless curls#girly blog#doellete#coqeutte#dolette#nymph3t#50s#my video#wholesome#hell is a teenage girl#cringe but free#girls of tumblr
28 notes
·
View notes