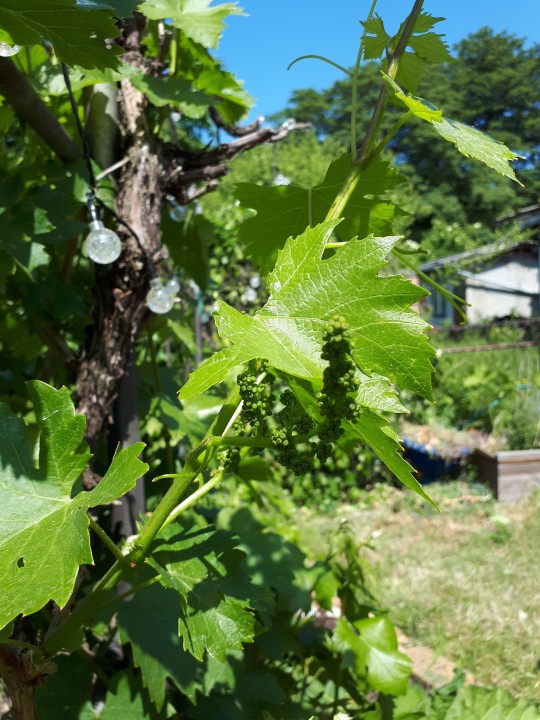
#vegetable garden health
Explore tagged Tumblr posts
Visit Tumblr Blog
Explore Tumblr blogs with no restrictions, modern design and the best experience.
Last Seen Tumblr Blogs


Fun Fact
Celebrities use Tumblr as well.
Text
Radish Growing Guide: Seed to Table in Just Four Weeks
Radishes are one of the quickest and easiest vegetables to grow, making them perfect for both beginner gardeners and seasoned green thumbs. Whether you’re looking to add a peppery crunch to your salads or a vibrant pop of color to your garden, radishes can go from seed to table in just four weeks. Let's dive into the essentials of growing radishes successfully.
Key Takeaways
Radishes can be harvested in as little as four weeks from planting.
Choose seeds based on the radish variety that suits your climate and taste preference.
Plant radishes in well-drained, loose soil with a pH of 6.0 to 7.0 for optimal growth.
Space seeds 1 inch apart and sow them at a depth of 1/2 inch for best results.
Ensure consistent watering, especially during dry spells, to prevent radishes from becoming woody.
Getting Started with Radishes
Before planting radishes, it's crucial to understand what makes them thrive. Radishes are cool-season crops, which means they prefer the cooler temperatures of spring and fall. They grow best in full sun, but they can tolerate partial shade, especially in warmer climates. Most importantly, radishes require well-drained soil to prevent root rot and other moisture-related issues.
One of the most exciting aspects of growing radishes is their rapid growth rate. With some varieties ready to harvest in just 25 days, they are ideal for gardeners who want quick results. Plus, their short growth period allows for multiple plantings throughout the season.
Choosing the Right Seeds
The first step in your radish growing journey is selecting the right seeds. Radishes come in a variety of shapes, sizes, and colors. From the classic red globe radishes to the elongated white daikon, there's a radish for every palate and garden. When choosing seeds, consider your climate, the space you have available, and your taste preferences.
Here are a few popular radish varieties to consider:
Cherry Belle: A classic round, red radish that matures in about 22 days.
French Breakfast: An oblong radish with a mild flavor, ready in 25 days.
Daikon: A large, white radish often used in Asian cuisine, taking 60 days to mature.
Watermelon Radish: Known for its vibrant pink interior, it matures in 60 days.
Understanding Seed Varieties
Different radish varieties have different growing requirements and flavors. For instance, if you live in a region with a short growing season, opt for faster-maturing varieties like Cherry Belle. Conversely, if you have a longer growing season, you might enjoy experimenting with slower-growing types like Daikon.
Besides that, consider the culinary uses of each variety. While Cherry Belle is perfect for salads and garnishes, Daikon is excellent for pickling and cooking. Knowing the characteristics of each type can help you make an informed decision and ensure a successful harvest.
Best Time to Plant
Timing is everything when it comes to planting radishes. They thrive in cooler temperatures, so aim to plant them in early spring or fall. If you’re planting in spring, sow seeds as soon as the soil is workable. For fall planting, start sowing seeds about four to six weeks before the first expected frost.
One key advantage of radishes is their ability to be succession planted. By sowing seeds every two weeks, you can enjoy a continuous harvest throughout the growing season. This technique is particularly useful for maintaining a steady supply of fresh radishes for your kitchen.
"For a continuous harvest, plant radish seeds every two weeks throughout the growing season."
Optimal Soil Preparation
Preparing the soil properly is crucial for growing healthy radishes. They prefer loose, well-drained soil with a pH between 6.0 and 7.0. Heavy clay soils can impede root development, so consider amending such soils with organic matter or sand to improve drainage.
Before planting, work the soil to a depth of at least 12 inches and remove any rocks or debris that might obstruct root growth. Adding compost or aged manure can enhance soil fertility and support robust radish growth.
Planting Techniques for Success
Once your soil is ready, it's time to plant your radish seeds. Planting radishes is straightforward, but following a few key steps can make all the difference in your harvest.
First, make shallow furrows in the soil, about 1/2 inch deep. Space the rows about 12 inches apart to give the radishes room to grow. Next, sprinkle the seeds evenly along the furrows, aiming for a spacing of about 1 inch between seeds. Cover the seeds lightly with soil and water gently to ensure good soil contact.
Sowing Seeds Correctly
Sowing radish seeds at the correct depth and spacing is essential for healthy growth. If seeds are planted too deep, they may struggle to germinate. Conversely, if they are too shallow, they might dry out or be disturbed by wind and rain.
Once planted, keep the soil consistently moist but not waterlogged. Radishes require regular watering, especially during dry spells, to prevent the roots from becoming woody and bitter.
Spacing and Depth Guidelines
Proper spacing is crucial for radishes to develop fully. If planted too closely, they may compete for nutrients and space, resulting in smaller, less flavorful roots. Therefore, thin seedlings to about 2 inches apart once they have two true leaves. This spacing allows each radish ample room to grow without competition. For more detailed planting advice, consider resources like The Self-Sufficient Backyard.
Timing for the Fastest Growth
Radishes are fast-growing plants, but certain factors can influence their growth rate. For the quickest harvest, plant radishes in full sun and ensure they receive at least six hours of sunlight per day. Additionally, maintaining consistent soil moisture and avoiding extreme temperature fluctuations can help radishes grow rapidly and uniformly.
As radishes mature, keep an eye on their growth. Most varieties are ready to harvest when the roots are about an inch in diameter. Harvesting promptly prevents them from becoming overgrown and woody.
Care and Maintenance
Once your radishes are planted, proper care and maintenance will ensure they thrive and reach their full potential. Radishes are relatively low-maintenance, but they do have specific needs that, when met, lead to a bountiful harvest.
One of the most important aspects of radish care is maintaining consistent soil moisture. Radishes need regular watering, particularly during dry spells, to develop crisp and tender roots. Uneven watering can lead to split or misshapen radishes.
Besides watering, keeping the area around your radishes free of weeds is crucial. Weeds compete for nutrients and space, which can hinder the growth of your radishes. Regularly check your garden beds and remove any weeds by hand or with a hoe, being careful not to disturb the shallow roots of the radishes.
Watering Schedule and Tips
Radishes require about an inch of water per week, whether from rainfall or supplemental watering. It's best to water deeply and less frequently to encourage roots to grow deeper into the soil. This practice also helps prevent the soil surface from drying out too quickly.
Water your radishes in the early morning or late afternoon to reduce evaporation and allow the plants to absorb moisture more effectively. Avoid overhead watering, which can encourage fungal diseases; instead, use a soaker hose or drip irrigation system to deliver water directly to the soil.
Fertilizing for Healthy Growth
Radishes are light feeders, so they typically don't require much fertilization. However, if your soil is lacking in nutrients, a light application of a balanced, slow-release fertilizer can support healthy growth. Apply the fertilizer at planting time or when the seedlings are a few inches tall.
Avoid high-nitrogen fertilizers, as they can promote leafy growth at the expense of root development. Instead, look for fertilizers with a balanced ratio of nitrogen, phosphorus, and potassium, such as a 10-10-10 formula.
Pest and Disease Management
Although radishes are generally hardy plants, they can still fall prey to pests and diseases. Common pests include flea beetles, aphids, and root maggots. To protect your radishes, consider using row covers to create a physical barrier against these pests.
If pests become a problem, try introducing beneficial insects like ladybugs or lacewings to your garden, as they can help control pest populations naturally. For disease management, practice crop rotation and avoid planting radishes in the same spot each year. This helps prevent the buildup of soil-borne pathogens. For more tips on sustainable gardening, consider exploring The Self-Sufficient Backyard.
Additionally, ensure good air circulation around your radishes by not overcrowding your plants. This can help reduce the risk of fungal diseases, such as downy mildew and damping-off.
Harvesting Radishes
Harvesting radishes at the right time is key to enjoying their crisp, peppery flavor. Radishes that are left in the ground too long can become woody and bitter, so it's important to monitor their growth closely. For those interested in sustainable gardening practices, The Self-Sufficient Backyard provides valuable insights.
Most radish varieties are ready to harvest when the roots reach about one inch in diameter. Regularly check your radishes by gently pulling back the soil to expose the tops of the roots. If they appear to be the right size, it's time to harvest!
Signs of Readiness
Besides size, another sign that your radishes are ready to harvest is the appearance of their tops. Healthy radish tops should be vibrant green and firm. If the leaves start to yellow or wilt, it's a sign that the radishes may be past their prime.
Remember, radishes grow quickly, so check them often. Harvesting them promptly ensures the best flavor and texture.
Harvesting Techniques
To harvest radishes, simply grasp the tops of the plants and gently pull them from the ground. If the soil is compacted or the roots are stubborn, use a garden fork to loosen the soil around the plants before pulling.
After harvesting, rinse the radishes under cool water to remove any soil. Trim the tops and roots to about an inch long to help them store better. Freshly harvested radishes can be enjoyed raw, cooked, or pickled.
Post-Harvest Storage Tips
Radishes are best enjoyed fresh, but if you need to store them, there are a few tips to keep them crisp and flavorful. First, remove the tops, as they draw moisture away from the roots. Store the roots in a plastic bag in the refrigerator's crisper drawer.
To keep them crisp, wrap the radishes in a damp paper towel before placing them in the bag. Stored this way, radishes can last up to two weeks. If your radishes become soft, you can revive them by soaking them in ice water for a few hours before using them.
Common Challenges and Solutions
Growing radishes is generally straightforward, but like any crop, they can face challenges. Whether it's slow growth, pest issues, or splitting, understanding these problems and their solutions can help you achieve a successful harvest.
Most importantly, addressing these challenges early can prevent them from affecting your entire crop. Let's explore some common issues and how to overcome them with insights from The Self-Sufficient Backyard.
Addressing Slow Growth
If your radishes are growing slowly or seem stunted, it could be due to several factors. Poor soil quality, inadequate sunlight, and inconsistent watering are common culprits. Ensure your radishes receive at least six hours of sunlight daily and that the soil is well-drained and nutrient-rich.
Additionally, check for signs of overcrowding. Thinning seedlings to the recommended spacing can improve air circulation and reduce competition for resources, encouraging faster growth.
Dealing with Pests Naturally
To manage pests naturally, consider companion planting. Certain plants, like marigolds and nasturtiums, can deter pests and attract beneficial insects. Additionally, rotating crops each season helps prevent pest populations from becoming established.
For an immediate solution, handpicking pests off your plants can be effective, although time-consuming. Regular monitoring and quick action can help keep pest populations under control and protect your radish crop.
Preventing Radish Splitting
Radish splitting often occurs when the plants receive irregular watering, causing them to absorb too much water too quickly. To prevent this, maintain consistent soil moisture throughout the growing season. Avoid allowing the soil to dry out completely between waterings, as this can lead to rapid water uptake when the plants are watered again.
Another factor that can cause splitting is over-maturity. Harvest radishes promptly when they reach the desired size, as leaving them in the ground too long increases the risk of splitting. Regularly checking your radishes and harvesting them at the right time will ensure they remain crisp and intact.
Culinary Uses and Recipes
Radishes are versatile in the kitchen, adding a peppery crunch to a variety of dishes. They can be enjoyed raw, pickled, roasted, or even sautéed. Their vibrant colors and unique flavors make them a delightful addition to both simple and gourmet meals.
Raw in Salads: Thinly sliced radishes add a refreshing crunch to green salads, slaws, and grain bowls.
Pickled: Quick-pickling radishes in vinegar and spices creates a tangy condiment that pairs well with tacos, sandwiches, and charcuterie boards.
Roasted: Roasting radishes mellows their spiciness and brings out their natural sweetness, making them a great side dish.
Sautéed: Sautéing radishes with butter and herbs creates a simple yet flavorful dish that complements a variety of proteins.
Besides these ideas, radishes can also be used as a garnish, adding visual appeal and a hint of spice to dishes like soups and omelets.
Simple Salad Ideas
One of the simplest ways to enjoy radishes is in a salad. For a classic radish salad, thinly slice fresh radishes and toss them with arugula, feta cheese, and a lemon vinaigrette. The peppery radishes and arugula are balanced by the creamy feta and tangy dressing, creating a harmonious blend of flavors.
Incorporating Radishes in Cooked Dishes
Radishes aren't just for raw dishes; they can also be cooked to bring out different flavors. Try roasting radishes with olive oil, salt, and pepper until they're tender and caramelized. Roasted radishes make a delicious side dish for roasted meats or fish.
Alternatively, sauté sliced radishes with garlic and butter for a quick and tasty side. The cooking process softens their texture and mellows their spiciness, resulting in a delightful dish that's sure to please.
Savory Snacks Featuring Radishes
Radishes can also be transformed into savory snacks. For a healthy and flavorful treat, spread a layer of herbed cream cheese on whole-grain crackers and top with thinly sliced radishes. The combination of creamy, crunchy, and spicy elements makes for a satisfying snack that's perfect for any time of day.
Frequently Asked Questions
As you embark on your radish-growing journey, you may have some questions. Here are answers to common queries that can help you cultivate a successful radish crop.
What is the fastest-growing radish variety?
The Cherry Belle radish is one of the fastest-growing varieties, maturing in just 22 to 28 days. Its quick growth makes it a favorite among gardeners looking for a speedy harvest.
How often should I water radishes?
Radishes require consistent moisture, so water them about once a week, ensuring the soil stays evenly moist. During hot or dry spells, you may need to water more frequently to prevent the soil from drying out completely.
When should I plant radish seeds?
Plant radish seeds in early spring as soon as the soil is workable, or in late summer for a fall harvest. Radishes thrive in cool weather, so timing your plantings to avoid the heat of summer will yield the best results.
What are some common pests of radishes?
Common pests that affect radishes include flea beetles, aphids, and root maggots. To manage these pests, use row covers, introduce beneficial insects, and practice crop rotation to reduce pest populations.
Can I grow radishes indoors?
Yes, radishes can be grown indoors in containers. Choose a sunny spot or use grow lights to provide sufficient light, and ensure the containers have good drainage. Indoor-grown radishes may take slightly longer to mature, but they can be a rewarding addition to your indoor garden.
#organic pest control#eco-friendly pest management#sustainable garden practices#natural pest solutions#vegetable garden health#enhancing fruit yield#ecological balance#educational workshops#interactive eco-education#physical removal of nests#sustainable gardening#organic soil#vertical gardening#drip irrigation#solar-powered pond pump#organic seed sourcing#raised beds#self-watering pots#quick-harvest vegetables#arts and crafts gardening#child-friendly garden#seasonal planting#decorative planters#hydroponic systems#urban micro-farming#fresh produce#rainwater collection systems#solar-powered grow lights#square-foot gardening#self-watering planters
1 note
·
View note
Text
We'll look later at what has ensued over the last 100 years in particular, but suffice to say, what a keen gardener knows now, they also knew in the late 1800s – that compost is king, complexity seems to create resilience, and that a well-grown vegetable tastes of the soil in which it was grown.
"Soil: The incredible story of what keeps the earth, and us, healthy" - Matthew Evans
#book quote#soil#matthew evans#nonfiction#history#gardener#gardening#1800s#19th century#soil health#compost#complexity#resilience#vegetables#quality products
69 notes
·
View notes
Text

One of my favorite additions to my weekend brunches, a tomato salad with avocado, onion, roasted garlic and cilantro. I simply call this, “Weekend Salad”.
#oh yeah im a chef too
#histhoughtslately#htl#foodporn#foodie#holistic health#healthy lifestyle#healing journey#food photography#food#love#mental health#self care#encouragement#empowerment#garden#vegetarian#vegetables#veggies#cook#cooking#chef#chef life#life path
9 notes
·
View notes
Text

Your daily dose of fiber
#lifestyle#vegetables#green juice#wellness#good health#self care#wellbeing#vegetable juice#juice#foodcore#energy#green veggies#veggies#fresh veggies#foodblr#healthy living#food aesthetic#green aesthetic#garden aesthetic#healthy lifestyle#gardencore#gardenblr#fresh juice#fruits#fresh vegetables#green vegetables#veggie juice
26 notes
·
View notes
Text
New Year's Resolution 2025 🩷
I did this for 2024 and it went great so here we go again! ☺️
•Focus on female friendships♀️
I would like to focus more on my female friendships, newer and older, maybe even completely new friendships. Spend time with women who I can learn from and have a great happy cozy time with
•1000 hours outside!🌳🌅
Let's see how it goes! Heck maybe I'll even do some hours barefoot(probably only on our yard 🤭)
•Grow tomatoes 🍅
We grew a lot of different things in 2024! We did great for our first time gardening but I really want tomatoes this year ☺️
•Do a declutter/minimalism challenge 🧹
After moving out and living together with my partner we realised we have a lot of things we do not really need or use. So I'm definitely doing some kind of challenge to make decluttering more fun for us.
•Grow out my hair even more. Taking even better care of it.💆🏻♀️
•Finally cut of the last bit of hair dye in my hair! 💇🏻♀️growing out hair dye seems to always take so long, just a few more centimetres ✨
•Make some dinner candles 🕯️
I still have a lot of soy wax and I don't want it to go to waste!
•Sell/donate all my old clothes with synthetic fibers. 👗
I've been enjoying the clothes I thrifted made from natural fibers! I'd like to do a full switch this year 🤞🏻
•Use up/sell/remove all products with perfume in it. In favour of more natural alternatives 🧼
Everyday you learn something new. I learned about the dangers of perfume/fragrance in products so those are not entering my home any longer 😅
•Quit! Drinking! Cola! 🥤
I feel so much better when I don't drink soda so I should really stop! We don't usually buy soft drinks, only when we have friends coming over.
•Continue Cycle Syncing 🌸
This past year has been great!
•Make Healthier Candy alternative 🍬
My partner seemed interested in trying some healthier alternatives. Gelatine and fruit juice?
•Start daily oil pulling for better oral health 🥥
Maybe I'll update this if I find some good things to add☺️🩷
#personal#feminine#femininity#traditional#homemaker#cute#homemaking#cottagecore#farmcore#homesteading#homesteader#homestead#crunchy#crunchy mom#reallyverycrunchy#1000 hours outside#holistic#holistic health#health#garden#vegetable garden#gardening#female friendships#decluttering#minimalism#haircare#candles#natural fibers#cycle syncing#new years resolutions
11 notes
·
View notes
Text
So… maybe kind of a weird question but does anyone know good plants to grow if you want to garden or keep houseplants but don't always have the energy/ability to keep on top of watering schedules and such?
I'm not gonna dump my whole life story and symptom list here but tldr I am a mentally ill individual who struggles often with having the energy to do things. I get depressive episodes that can last weeks or even months which often means that I'll take super good care of a plant and it'll do really well and then I suddenly stop watering it for weeks at a time because I'm using all my energy to do basic self care/necessities. Does anyone know a way to get around that??? Either tips on how to keep plants alive through periods of neglect, or plants that don't require much maintenance????? (If you're going to recommend any native plants, I live in east texas for reference) rn I'm just trying to salvage the plants I have, a very wilted succulent I forgot the name of, a very small zebra plant, and a parlor palm that has survived a shocking amount of things. I probably can't save all of them but I'm doing my best.
#plants#houseplants#gardening#garden#horticulture#home garden#greenery#foliage#succulents#parlor palm#zebra plant#mental health#mental illness#disability#depressive episodes#low energy#low maintenance plants#low maintenance garden#I'd love to grow a full on garden with vegetables and fruits in my yard someday but that's kind of a far off goal for me#plant care#plantcare#plantblr
62 notes
·
View notes
Text
6/7/24
So far so good! More to go!


Some of my plants were very sad before I had soil to transplant so please don’t judge me, I know!
I have some flowers blooming and that is really boosting my mood to see them!
I’m really excited to see the changes coming soon in these beautiful plants now that they have room to spread their roots and can breathe a bit better.
#vegetable gardening#flower garden#bloom#blooming#honeycombhank#transplanted#transplanting#i’m doing my best#mental health#health#back yard
8 notes
·
View notes
Text

Screw Walmart or Tesco ...... Food straight from my garden.
Get in my belly.
4 notes
·
View notes
Text


5/4/24 ~ Some new stuff I’m using this year. I’ve never used Coco Coir before today & I loooove it! So much product in a compact lil brick! And it’s repurposed natural material, so win win. I still used a little bit of my seed starting mix to mix in with it just because that’s all I know 😅😆
But I’m learning about the different medias/compost for planting!
I also got a bag of worm castings. Mixed some of it in there as well. We shall see how it does!
What do you use to mix in your media?
#soil health#soil#soil testing#horticulture#worm castings#coco coir#peat moss#compost#compost garden#organic matter#kiss the ground#microbes#indoor garden#sustainable gardening#container gardening#vegetable gardening#starting seeds#growing food#plant life#plant mom#veganuary#homesteading#gardening tips#organic garden
6 notes
·
View notes
Text
One of the healthiest ways to gamble is with a spade and a package of garden seeds
~ Dan Bennett
#gardening#garden life#grow your own#organic gardening#home grown#vegetable garden#herb garden#gardeninspiration#garden love#gardensofinstagram#healthylifestyle#healthy food#natural health#wellness#self sufficiency#garden#landscape#landscaping#nature core
8 notes
·
View notes
Text


Some may flowers from the backyard and the alottment 💐
#vegetables are slow as always#but the new no-dig bed is ready for the pumpkin#every year we need so much compost 😅#i should learn and just get a cubic meter from the specialized vendour#maybe that's a bit much but i could use it up i'm sure#wish me luck on tuesday#i am test-working for a gardener's job - it would be so ideal if i got it :')#maybe not more pay but hopefully more fulfilment?#better health?#better not get my hopes up though 😅#garden blogging
8 notes
·
View notes
Text

#farmers market#october morning#healing#recovery#mental health#witchblr#vegetable gardening#rainbow food#vision board#moodboard#health#october#autumn
5 notes
·
View notes
Text
Beautifully happy, healthy and sustainable 🌲🌳🤗
Good evening happy, healthy life seekers 🤗
There's no doubt, here at TOFF, our happy place is always outdoors.....we live in military cargo shorts and T's in Spring/Summer and military cargo pants and wool jumpers in Autumn/Winter merrily working and creating outside; turning our organic botanical day dreams into healthy food, animal shelter, flower power and natural products 😊
Budgets & Life Changes 💷🤔
Throughout the last few very turbulent years many of us have undergone huge, transformational life changes; personal relationships, work, homes, families, continents......and many find themselves in a position of 'starting over', a fresh, a new, in order to create a truly wonderful, happy and healthy new future.
With this in mind, budgets have become very constrained and some stress levels may have risen.
To calm our minds, bodies and to help with our financial pockets lifestyle changes can be made on a budget, always with health and happiness in mind 🤗
Here at TOFF our ethos is organic and this embodies; reuse, mend, recycle, rejuvenate, repurpose, relive!
Millions discard items considered no longer of use, this is great, we should all practice this..... a minimalist, clean, healthy home, man cave, sheshed, workshop which is organised and free of clutter actually helps those stress levels come tumbling down 🤗🎉🙌
It also presents an opportunity to acquire items for free or only very few pounds....... don't be afraid to barter or ask if the seller could gift them to you / reduce their price......you'd be surprised 🎉
Repurpose, Rejuvenate, Relive ,🤗
TOFF tips :-
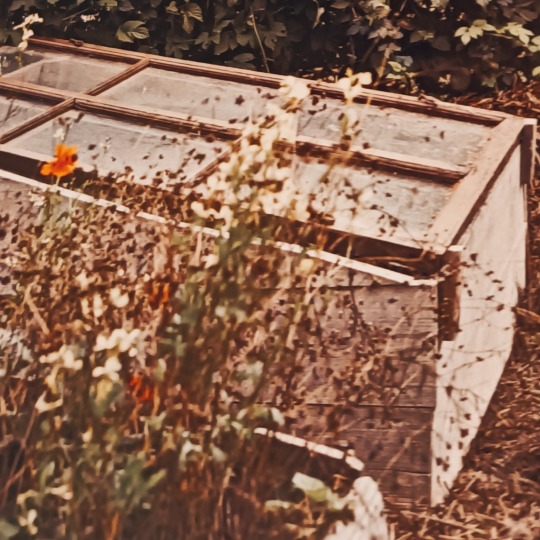
Old timber windows ~ often disused, left in a skip, at the side of the road or advertised on free cycle sites!
These make a great cold frame for growing your lovely organic foods ~ a complimentary mini greenhouse 🎉🥕
Very often soil and timber are also given away for free.
Your only financial outlay maybe a few screws, hinges and organic seeds then hey presto a weekend project will yield a happier you and food too 🥕🌿🎉

Cardboard egg cartons, toilet paper rolls, kitchen paper rolls ~ ideal for growing seeds 🌿
Fill the rolls with compost and place in the egg carton,
Sow the seeds directly into each roll, water and allow to germinate,
Ideally maintain a temperature of 18 degrees Celsius/ 64 degrees Fahrenheit,
As soon as the seedlings have germinated and are ready to plant out, the rolls can be planted directly into the soil and they will biodegrade, the carton can also be either reused or planted into the soil too 🎉🌿🥕🍒🍓
Go natural ~ make your own 🌴🪥😬
TOFF tips:-

Toothpaste ~
2 tablespoons of coconut oil
1 tablespoon of baking soda
6 drops of peppermint oil
6 drops of lemon oil
6 drops of teatree oil
Mix well, into a paste and place in a recycled, steralised dry jar with a lid 🙌🪥😬
Deodorant ~
500 ml bicarbonate of soda
500 ml potato flour / cornflour
500ml coconut oil
5-10 drops of your favourite essential oil......our favourite is Jasmine 🌸
Mix all the ingredients together, if the coconut oil is hard, melt it over a waterbath. Place in a recycled steralised jar with a lid, apply using a reusable cloth cotton pad or reusable spatula 🥥 🌸
We love sharing our tips and recipes with you, as always, if you have any top tips or questions we would love to hear from you 🤗 feel free to email us :- [email protected]
Take great care of you, don't be to hard on yourself or others, kindness always happy healthy life seekers 🤗
Much love,
TOFF x
🌳🌿🌲🌳🌿🌲🌳🌿🌲🌳🌿🌲🌳🌿🌲🌳🌿
#organic#health#healthy#deodrant#toothpaste#greenhouse#food#vegetable gardening#budget#happiness#natural
2 notes
·
View notes
Text
Balsamic Chicken Harvest Salad
Enjoy a burst of flavor with this Balsamic Chicken Harvest Salad. Crisp mixed greens, ripe avocado, juicy tomatoes, and crunchy sunflower seeds, all topped with succulent balsamic-drizzled chicken, make for a satisfying and healthy meal.
The Turning of the Seasons As we find ourselves in that magical time just before the full embrace of fall, when the days still carry the warmth of summer but the air whispers of the changing seasons, I’m reminded of a recipe that perfectly captures this unique moment – the Balsamic Chicken Harvest Salad. Imagine this: a late summer evening, the sun dipping low on the horizon, casting a golden…

View On WordPress
#easy recipes#eat the rainbow#flavorful#Food#food blog#fruits and vegetables#garden recipes#health food#healthy habits#healthy recipes#quick recipes#Recipes#salad#salad recipes#veggies
4 notes
·
View notes
Text
Yesterday my partner cooked for me!🩷
And he totally surprised me by cooking a full meal with only ingredients grown in our own garden! 🥕🧅🧄🥔
This was a beautiful milestone for us!
Our first try at a vegetable garden and already being able to make a full meal feels amazing.
It does make you so appreciative of the food. Knowing the time and work that went into it.
It's so beautiful ☺️🩷
#personal#garden#vegetable garden#moestuin#homemaker#homemaking#farmcore#cottagecore#cute#femininity#traditional#feminine#egalitarian#gardening#cooking#proud#organic#health#crunchy#healthy masculinity#I'm so proud of him!#anti misandry#misandry#traditional masculinity#traditonal relationship#complementarianism
11 notes
·
View notes
Text
Gardening Log 1
I've never done one of these before, but I'm really proud of this project and I wanted to share my progress.
BACKSTORY TIME:
My dream of several years has been to start a garden. It never really got off the ground (haha, ground... gardening puns are fun) until this past year. I started breaking the ground up and turning it into a dirt patch sometime this past winter, before The Big Cold, or afterwards on a really warm day-- I really don't remember because my sense of time is completely off. Anyways, now that it's warm and I'm currently unemployed, I have a lot of time to really focus in on that dirt patch. Really make something out of it. For a while it looked like this:

not pictured, but there was cardboard keeping the grass from growing in on those spots for a while. Twas a gardening tip I gathered from youtube. It's also a great way of killing your lawn! I read an article about that while writing this while I was trying to fact check what I did:
https://www.treepeople.org/2014/07/16/sheet-mulch/#:~:text=After%202%20months%2C%20dig%20through,remove%20it%20and%20the%20grass.
Today I set out to make the dirt patch dirt-ier. I don't have a fancy tiller like some folks, just a shovel, a rake, and some kind of hand-tiller I got ages ago. I don't have a good relationship with the hand tiller, it's a little annoying to use and I am not very strong. That said, I got a lot done using all three tools together. Perhaps, with time, we will learn to work together a little more harmoniously.
Anyways, here's the finished product:

I threw some seeds down in the dirt kind of haphazardly as an experiment a few days ago. They might not germinate, or they might. We'll see! I was feeling like an eager beaver. Trying not to be attached to the outcome of that particular pet project.
The other half of this project has been seed germination. I was really unsure of how this would turn out. The only plant I've ever kept alive before was a ficus and unfortunately I had a little bit of an oopsie (psychosis) and I neglected him until he died. RIP Killer Joe, you are missed.
But! I'm in a new chapter of my life and I think my emotional wellbeing is now somewhat tied to whether or not I can keep plants alive.
In all seriousness, if you're in a place where you can and you think gardening will help you, I recommend it. It gives me good feelings inside, which are not always easy to come by.
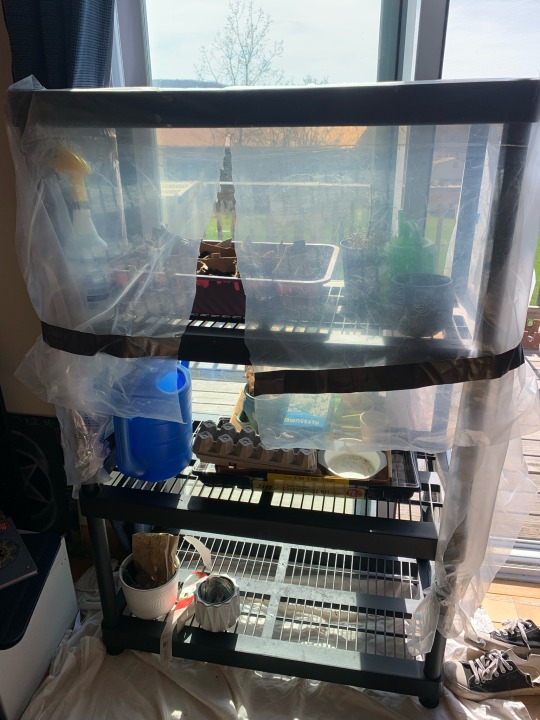
This is my seed germination set-up. Despite how discouraged I was feeling about this side of the project, I am happy to say my first seeds have sprouted! I would like to include a photo, but tumblr keeps changing that photo to another one. Not sure why... The sprouts are really hard to see anyways.
I am proud of my seeds. I'm not sure if anyone else has ever experienced this, but I find myself whispering when I'm talking to them. Like it I talk too loud, it might scare them (Silly as that may be).
Germinating seeds seemed really intimidating when I first started. I ended up using cardboard and an old cat litter tray filled with potting soil. Obviously, I had many anxieties about how this would go (and will go) given my history with plants, but today's sprouts filled me with joy I was not expecting. The best thing to do seems to be keeping the soil moist throughout the day. I forgot to for a day when I firs started and that sent me into panic mode, but my fears were unfounded.
I am also germinating a single seed using the wet paper towel in a plastic bag method. We will see how that one progresses. It actually sprouted in the tray, but I accidentally pulled it up and I felt bad about just discarding it.
Outside of The Big Project, I am also trying to keep a Lavender plant alive. I don't think she's going to hold on for much longer, but one can always hope.
My current plan is to grow a combination of flowers and vegetables. The first seed tray is all vegetables. The second one is going to be herbs. After the last frost date passes and as long as I can stay patient, I'll worry about flowers.
That about wraps it up! I hope you've enjoyed my first gardening log. I'll update more as I go along and talk more about my plans, which plants I'm growing, and anything else gardening related.
- Art-Marigold
#garden#gardening#seed germination#vegetable garden#beginner gardening#gardening blog#online diary#plant diary#schizophrenia#mental health#garden diary#cottagecore#nature
5 notes
·
View notes