#tumblr Tutorial
Explore tagged Tumblr posts
Visit Tumblr Blog
Explore Tumblr blogs with no restrictions, modern design and the best experience.
Last Seen Tumblr Blogs


Fun Fact
Tumblr was acquired by Yahoo for $1.1B in 2013.
Text
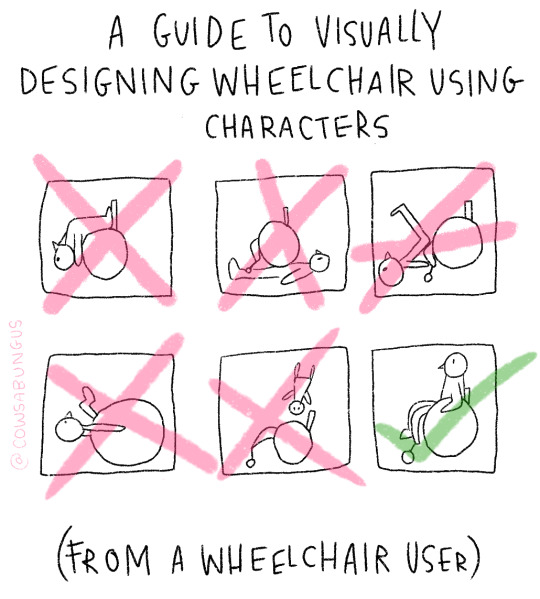

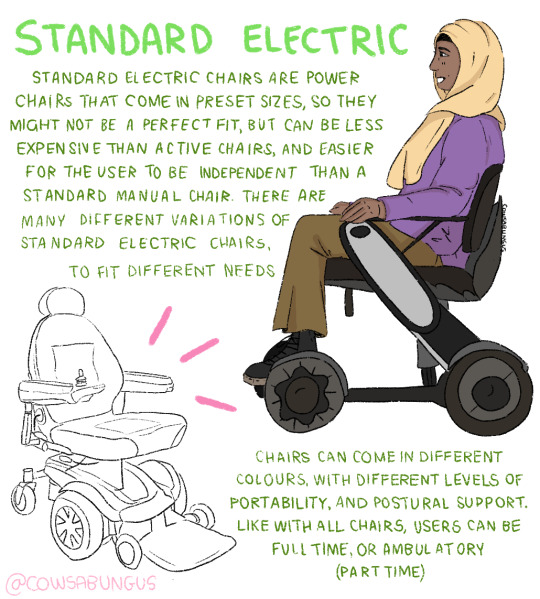

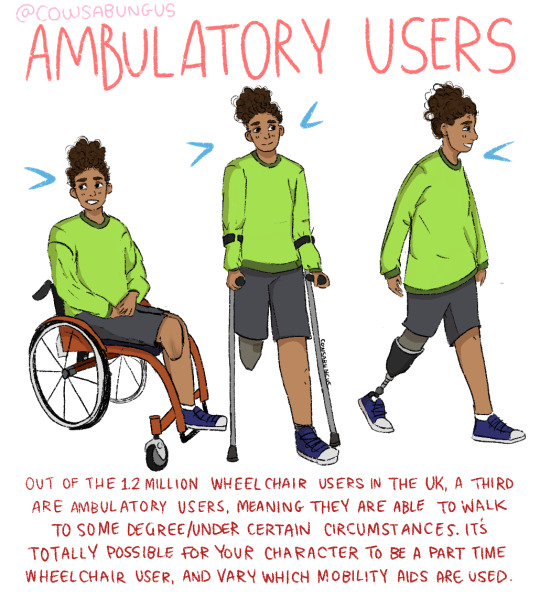
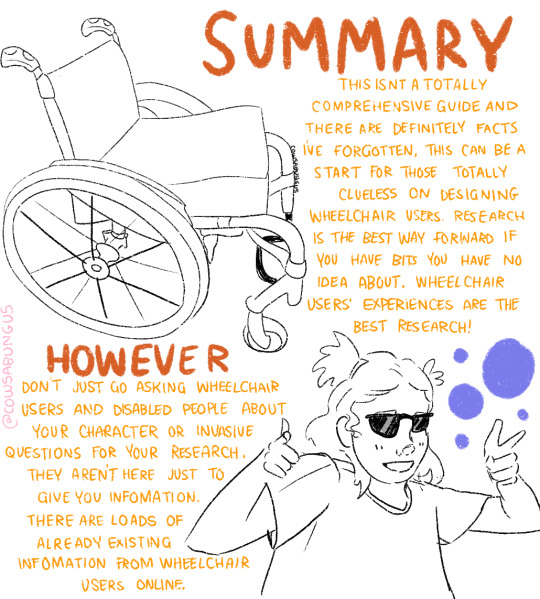
A guide to designing wheelchair using characters!
I hope this helps anyone who's trying to design their oc using a wheelchair, it's not a complete guide but I tried my best! deffo do more research if you're writing them as a character
#art#original art#artist#oc art#original character#queer#disabled#disabled rights#disability#disability pride month#tutorial#art tutorial#disabled character#design tutorial#drawing tutorial#Tumblr tutorial#character design#character illustration#concept art
113K notes
·
View notes
Text
Using this anon hate I got as a teaching example
So if you get anon hate like this, there is a few things you can do. (Also once again the person linked is totally innocent, anon is just using a link to them for some reason, do not bother them)
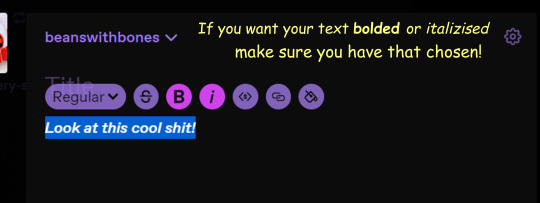
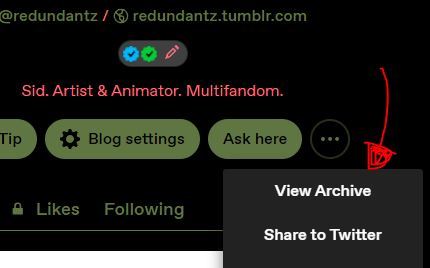
First of all, Tumblr made it so only people who have accounts and are logged in can send anons AT ALL. So if you want to you can click the three little dots in the upper right corner and report them

Anyways once you're there, select the type of harassment you're getting, after consulting a few people on discord I decided it was the second to last one.

Then of course you fill out the little form

Afterwards you can hit "Submit and Block"

Fun fact: when you block an anon you permanently (there is no way to reverse it) block their IP address and they can't send you any more anons, also as a bonus, if you've received a LOT of anon hate and then you block one of them, reload your inbox to see how many it got rid of, because it might have just been one loser spamming you. If you don't feel like reporting them then that's fine too, just block those suckers.
And finally, you can take solace in the fact that you could never be as big of a loser as the anons sending people hate.
7K notes
·
View notes
Text
Tutorial on how to edit graphics! (Or improve your edits! + tips!) Part 1..
Well firstly, if you’re entirely new to editing or a beginner. Then editing can seem very confusing and tricky, especially the intense psd, cluttered kind of edits, mine are also very cluttered but I think the best way to go as far as being a beginner is to figure out what style you want to do.. minimalistic? Cluttered? Eye strain? Gif/animated? I personally don’t do very many animated graphics and I also don’t do eye strain, so.. you’re on your own for that but it’s important to know what ur GOAL is. You need to know the basics of editing before doing anything else.
The editing apps I recommend are photopea and ibisPaint X, both are free. I really don’t recommend any paid apps other than ibispaint.. yes there’s ibispaint x then ibispaint. (The paid version has everything in it and is a one-time purchase, and has the same mechanics as the free version. If you are editing on pc or laptop, there is a version of ibispaint on desktop but you are only able to use it for 1 hour, if you are most comfortable with ibispaint then you can just delete it and re-download it. But if you don’t want to do that (you can use photopea!) I don’t use photopea so this will be a tutorial using only ibispaint! I can probably find a moot of mine that uses it LOL
So as far as resources go.. they’re everywhere.. I know @/lavendergalactic, @/llocket and @bydollita have a lot of good resources. (I didn’t fully mention the other two because well.. they’re not my moots so I felt awkward LOL) I can probably post some of my most used ones on a separate side blog like I did with my last account so.. also tell me if ur interested in that.
But for the basics of your resources: you want the character or person. An image then a transparent cut-out of them, a frame and/or pfp/image mask to use, and some decorative PNGs like bows, curtains, hearts, whatever you’d like. I can link some good resource rentries too!
Once you have all of that: find a reference/inspo, if you are taking HEAVY inspiration off of someone from tumblr or whatever, PLEASE check if they are okay with it, message or send them an ask in their inbox if it’s okay.. or they might have it somewhere on their pinned post if they allow it.
And now.. the question ur probably asking.. how do I do all of that?!
I had quickly made this. You can see the main components. The character cut-out, the inner image behind the frame, the decor, and the silly texts and textures behind the graphic to make it pop.
If you want ur graphics to be this cohesive there’s a few things to note. You need to know colours look best together, what style of editing looks best with certain art styles, and characters.
If you’re wondering “why does this character look so out of place?” Or just finding yourself in a rut with certain characters, you need to examine the character, like you can’t make a goth style graphic with a happy and cheery character like emu otori (depending on the card you choose) or like paimon from Genshin impact.. like that’s just gonna look SILLY. So take note of what this character looks like and what their original colour palette is. Are they a happy person? Are they emo and depressed? What colours do you usually see this person in?
Having range in your editing style will help you a lot, so branch out and edit different characters, and use different colours, and aesthetics!
Now for colours, you need to understand colour theory which quite frankly.. I am not about to teach out so probably at the end of this post I will have some videos linked for you to look at and watch that just overall will help you understand better how to edit that includes a video about colour theory!
If you are an editor and find yourself not being able to edit a certain style or can’t fulfill someone’s request for a certain aesthetic.. don’t be afraid to decline because a lot of the times you’ll have people who know nothing about what looks good with ur editing style or what aesthetics fit certain characters so it’s okay to decline stupid people… (/j.. they’re not stupid but ykw I mean..)
Using the stroke filter on ibispaint or photopea, aswell as the glow filter on ibispaint make ur edits look VERY good! (I use it on everything because it gives everything a little bit of separation yk? So you can see the different layers to the graphic!
Using textures over top of your graphics make it look very visually appealing aswell!
So as I mentioned I will link some videos, and I will also link some posts for good textures, and then add some photos for downloadable fonts to use on ibispaint (if you don’t know how to download fonts on ibispaint I can make a tutorial too! If you are also confused on how to use ibispaint they have a built-in tutorial, and it’s also best to learn as you go, look at all of the filters, the effects, the built-in images/materials)
Please for the love of god.. DONT over-do it with ur overlays and psds, unless that’s the style you like, don’t do it.. me personally.. I don’t like it but if you like it then go right ahead but over-usage of overlays and colourings make it look kinda bad 😭 and kind of confusing to look at, please make sure you can see the different components of your graphics and what is what.. if it’s too confusing to look at, chances are you’re less likely to have people like it or enjoy it. And don’t over-do it with fonts either… people need to be able to see whatever ur trying to say.. I wear glasses and people who over-do stupid fonts piss me off.. I literally block them, so keep that in mind aswell 🫶🏻
Photopea tutorial How to use a pfp/icon mask Colour theory If you needed a visual for how to make graphics here you go Some textures and overlays How to make a rentry How to use borders on rentries How to make blinkies
Some tags for reach: @frilliette @blinkndgone @hellhoundsdoth0wl @smilepilled @nomkiwi
#( ╹ ╹)? a post!#rentry stuff#rentry graphics#rentry#tutorial#tutorials#rentry tutorial#rentry graphics tutorial#tumblr tutorial#editblr#rentryblr#editors on tumblr
575 notes
·
View notes
Text
So you wanna make gradient text?
this was originally made just to help a friend but she suggested I post this publicly to help bcs the other tutorials out there aren't very straight forward. with that said pls ignore typos:
↓↓ Site Link ↓↓
↓↓ Site Link ↓↓
Note: you can still continue typing in the preview
Hope some peeps find this helpful
#tutorial#tumblr#tumblr tutorial#text art#text art tutorial#gradient text#art tutorial#I know its not exactly art but I wanan get this out there to help ppl
4K notes
·
View notes
Text
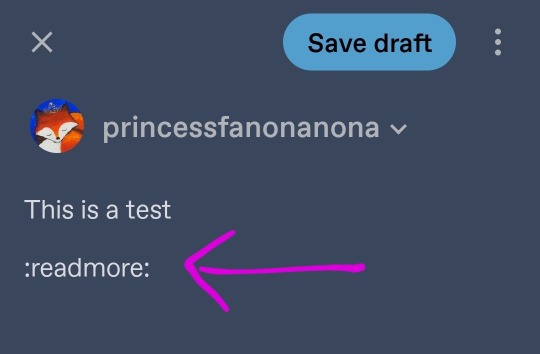
READ MORES ARE YOUR FRIENDS
I have noticed within the past few months a very large uptick in the number of fics that are posted without read mores. Which is not ideal or considerate of other users and, I believe, optimistically, that its due to the number of new users who have not learned what that is. Which is fine! It's always fun to learn how to do something new!
To start! It basically shoves everything under a cut so the post doesn't clog up the dash. Big long info dump? Read more! A 2k+ fic? Read more! The most complicated recipe known to man? Read more! Wanna april fools style prank someone? Read More!
So how do you do the thing?
The old school way was to start a new line, type : [the colon symbol] read more [no spaces] : [colon symbol], enter/new line. On the mobile app it looks like the below photo.
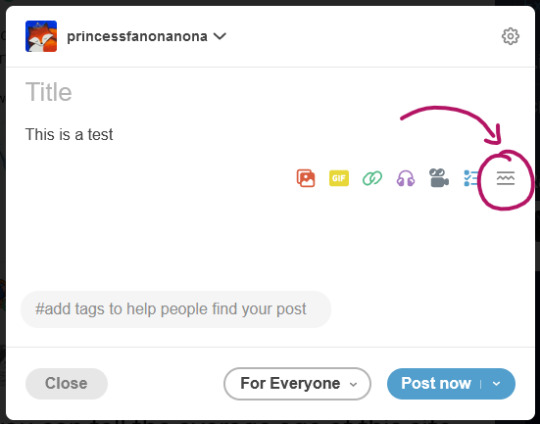
However! The updated app now has the fancy schmancy button in the style bar. Its second to last to the right, line squiggle line.

If you did it right, you'll get the below line break. And then you can type what ever you want after that! (Note: you can still type :readmore: to get the break)
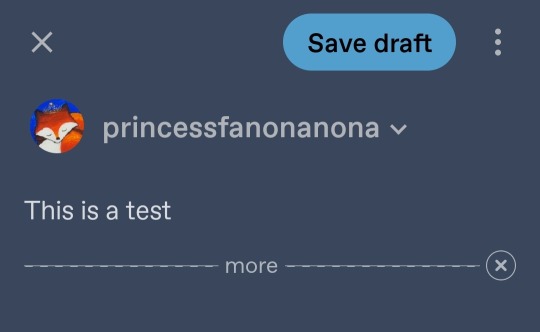
On desktop, you could type it out however the button is back! Start a new line and you get the add on bar. Its the last option in the line, and the same image as the app, line squiggle line.
Which results in the following line break
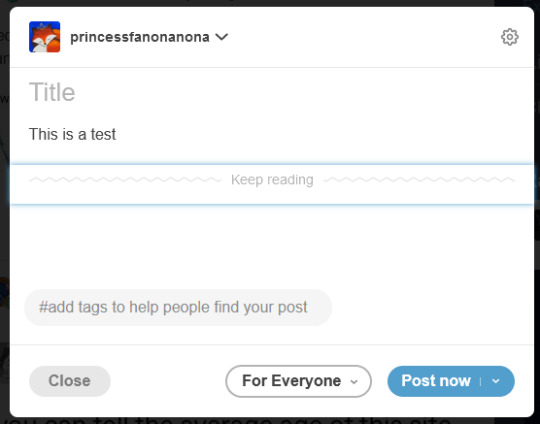
And there you have it! I hope this helps someone and this info can be shared. Thank you for reading this post and I sincerely wish you a lovely day.
362 notes
·
View notes
Text
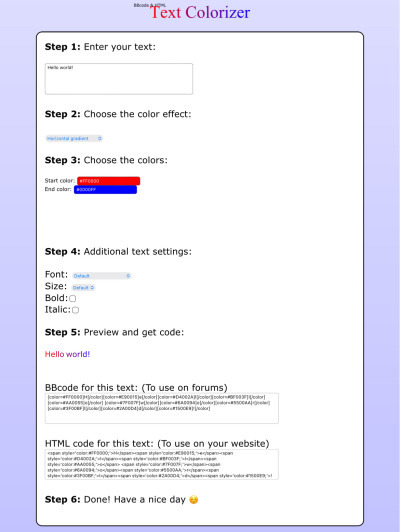
GRADIENT TEXT TUTORIAL

HOW TO GET OMBRÉ STYLED TEXT ON TUMBLR
𝜗℘ I got a request on TikTok asking to do a tutorial on gradient text — tumblr doesn’t have an in-app option on doing gradient texts. This is how.
𝜗℘ Sites you can use: image color picker / stuffbydavid (gradient text).
𝜗℘ People say that you have to use a computer for this, which isn’t true. I am able to make gradient text on my phone, but you can use a computer if you want.

color picking from an image is optional, but highly recommended.
one: put the text you want to color for your tumblr post.
two: change the color of the text to whatever color you want. there are several options on how you want it. pick whatever option you want. the text will automatically generate for you.
three: copy the entire code then press “copy”.
four: go over to tumblr (website, not the app) and click “edit post” (the pencil) or create a new post.
five: click the settings button and change it from “rich text” to “HTML.”
six: paste the code from the gradient text website in the HTML where you want it to go. (I paste it then just save the post to my drafts then edit the text on the app)
#jasper’s tutorials#tutorial#gradient text#ombré text#text#tumblr text#text post#colored text#text tutorial#tumblr blog#tumblr tutorial
179 notes
·
View notes
Note
Lost soul from Twitter, how do I use this app?
if you're an artist, use lots of hashtags, up to 30!! its not like twitter where you get punished for spam. don't use irrelevant hashtags its considered rly bad form. fandom and -core stuff works really well. search tags and you can see how active they are
also look into the tumblr queue. you can set it so it posts once every day between certain times so you dont have to input time/date EVERY SINGLE TIME !!!! it is SO NICE
if you're a follower, reblog all the stuff you like. that's how stuff gets shared on here cos there's no algorithm (unless youre in 'for you'). so its more important to boost what you like.
you can add tags in your reblogs so you can browse them later in different categories. this is a fucking amazing feature
you can also follow tags youre interested in and just browse a page of all your tags
also if you want you can customize your profile's html and css which is very fun, look up how to do that
if you want some artists to follow look on tofupixel.tumblr.com/tagged/follow that's my artist recommendation tag
have fun <3
181 notes
·
View notes
Text
To the migrants from r/196, here is how tumblr works.
Firt off, reblog, don't like. This can help the tumblr community know that you aren't a bot.
Second, make a profile picture. Once again, so we know you aren't a bot.
Third, there is no algorithm. Do not attempt to appease a god that doesn't exist.
Fourth, swear. There is no censorship, so cuss like a sailor.
2K notes
·
View notes
Text
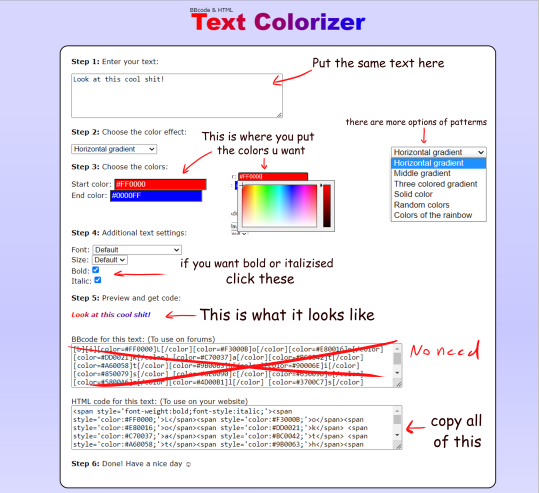
💫 HTML for pretty colors tutorial 💫
Hello sweet beans! Since my last tutorials have been yeeted into oblivion with deactivating my previous blog @/benkeibear I figured I repost them onto here! (Mind you, my old blogs are ahead)
I'm lowkey shocked to see blogs gatekeeping this knowledge but yeah. Make your blog pretty! Match your text to dividers or just have it as colorful as you'd like!
First of all, you can not do this on the mobile app! You need to either use a laptop or your phone / tablet's internet browser (in my case safari)
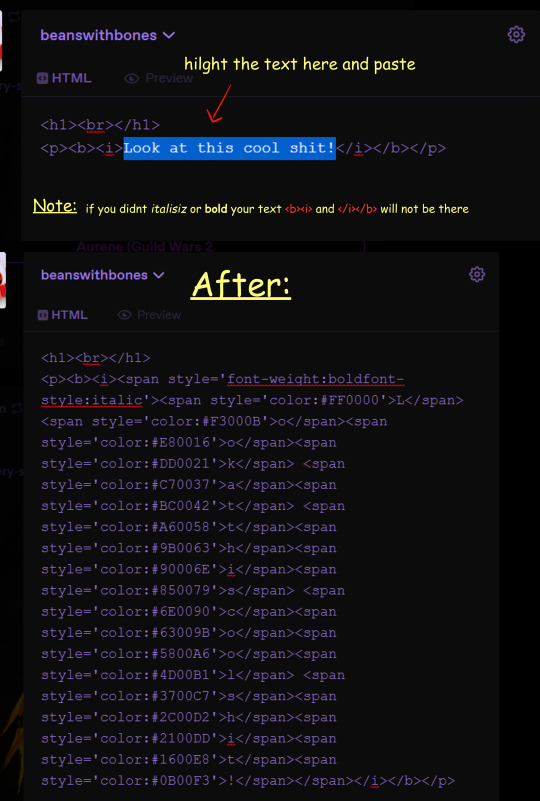
You start by logging into your account and either you make a post or you edit a post. I recommend making the post on the app first because editing is certainly faster & easier!
This is our starting point! For the fancy fonts you can use messletters


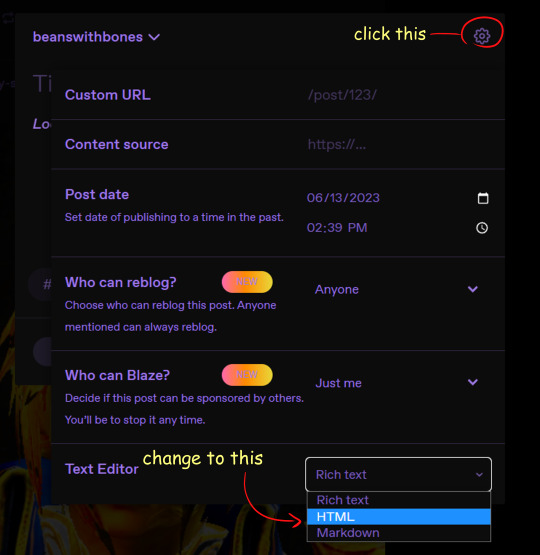
1. I will now log into tumblr on my web browser and click on "edit this post".
2. You then have to click on the little gear icon in the top right corner to change the settings on your post.
3. There you have to click on "rich text" to change it to "HTML"

Your post should now look like this:

A quick rundown on html.
You always start with a letter or code in brackets. to end what you're doing it's </>. The slash signals the end.
P= paragraph <p> and to end </p>
I= italics <i> and to end </i>
b= bold <b> and to end </b>
Now tumblr will automatically do this for you if you made a text bold/in italics on your mobile post but to keep this tutorial simple i left that out here. You can always edit your text in the app after! Just not the color.
And as you see, the fancy text is now in coding. But we get to that later!
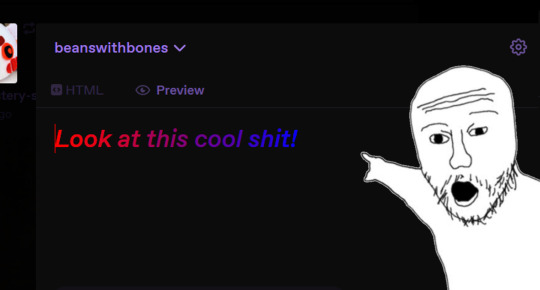
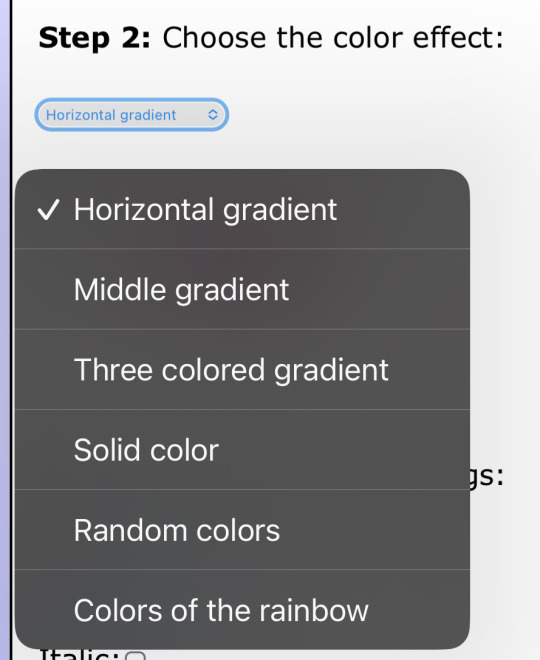
To colorize your text it's easiest to just use this website as it gives you lots of options!
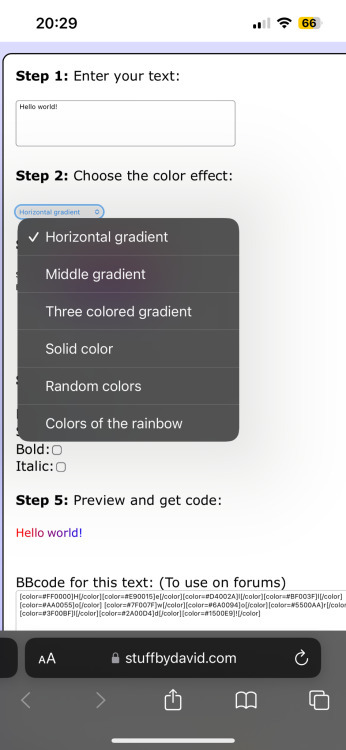
1. First i will be choosing the option of "solid color" and you can then put in the hex code of your desired color into the color box.
2. In the top box you will have to put the text you will color - for this tutorial it's "Testing"
3. Then you copy the box HTML code and paste it into tumblr where your word(s) are. Do not remove the <p> and </p> in front and after your word/ sentence!
4. For the sake of this tutorial I marked the html code for colors in pink and the words in blue
Your code will now look like this:

For the gradient you can simply choose horizontal gradient or three colored gradient on the website above and copy/paste the html text.
Mind you that every single letter will get its own color code now so the word gradient suddenly looks very long in html.

If you save the post it will now look like this!
Important to know is that you can color the fancy text only solid as the website can not color it as it is and putting the letter codes in the box above does not work either.
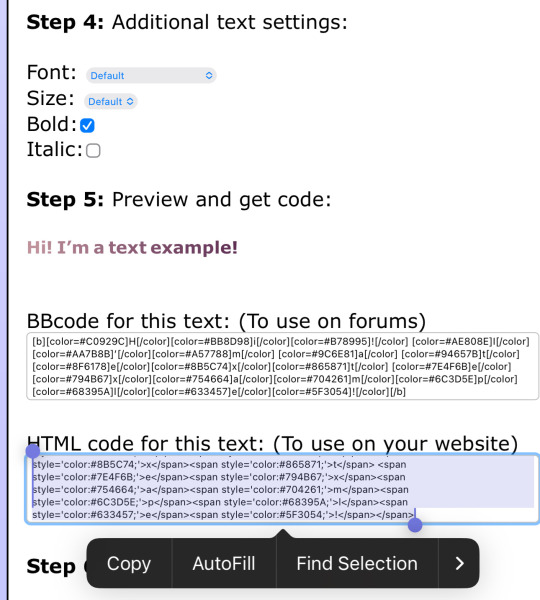
To color the fancy letters you simply copy the color code instead of the whole text - which looks like this:

Don't forget to add </span> behind the word/the codes you're coloring to signal that this is where the color stops! If you forget to add it, nothing will be colored.
If you decide you still want to have the fancy lettering in multiple colors you have to color letter code by letter code manually like this:

(I made a very poor choice on 2 different greens but oh well)
If you'd like to change your text, you can always do that on the mobile app like you usually would. You just can't change the color unless it's into a default color. But you can still change the size or make it bold for example.

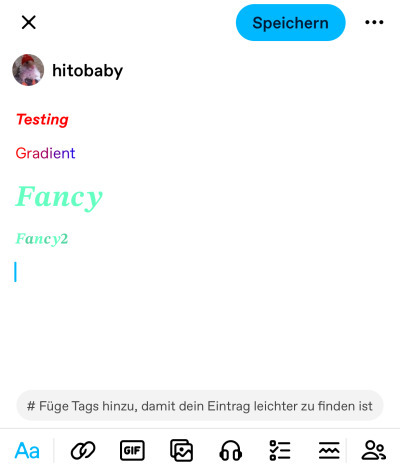
Anyhoot, this is the whole magic behind html. It's a lot and might be very complicated at first but you will eventually get the hang of it! Took me weeks and hours until someone sat me down and went through it step by step.
If you have any questions or something doesn't work as you thought it would please don't hesitate to reach out - I'm always happy to help!
#dividers by adornedwithlight#blog resources#writing resources#tumblr tutorial#html tutorial#gradient text#gradient text tutorial#gradient tutorial
187 notes
·
View notes
Note
Hey how do you do the color gradient thing for your dialog tags?
Assuming you mean these things, I've actually been meaning to make a guide of my own for a while lol.
For one, you can only do this on computer/the website of Tumblr! There's no option to select this stuff on the app.

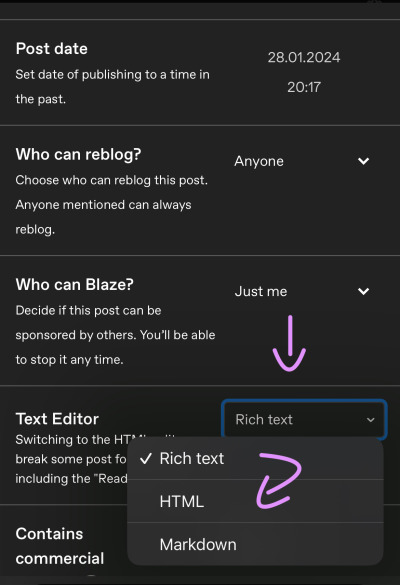
STEP 1: CREATE A NEW DOC / GO TO SETTINGS

It opens a dropdown menu/whole screen full of options!
From there, select the "text editor" dropdown, which starts as displaying "rich text".

Select "HTML"

And it should change how the entire post looks!

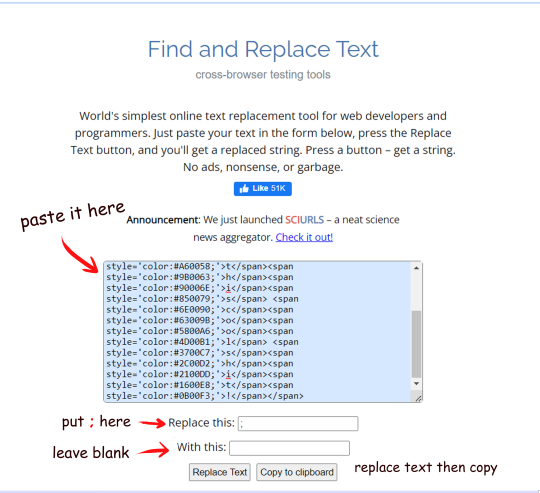
STEP TWO: CHEAT
Yeeeeeaaaaah, so I use a website for this lol

I inserted my colors for faeries (#30853C) and Cloud (#6DC1B4) for my example of "these things" earlier. To make this easier, I most often have two windows open at a time while working on uploading my scripts to Tumblr.

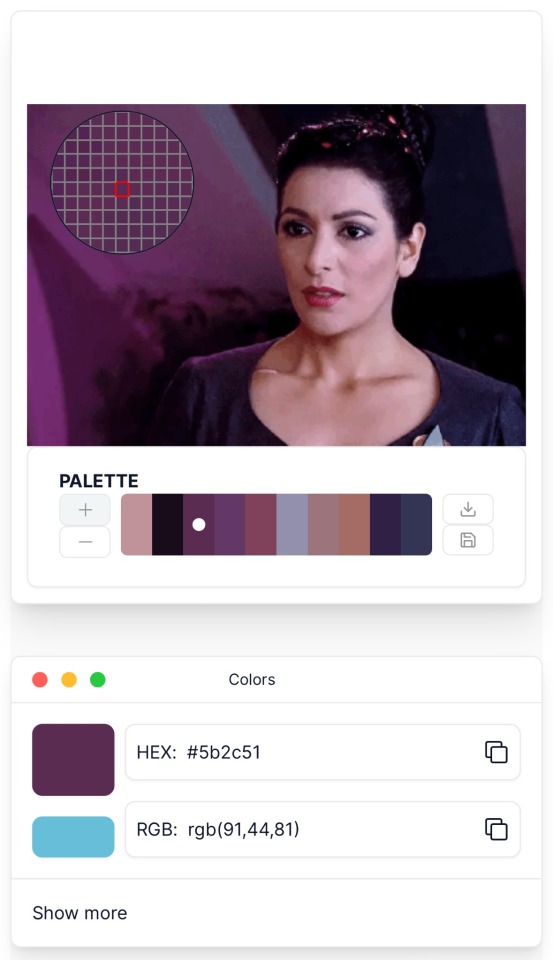
To get colours to insert into the Text Colorizer website, you can use any kind of hex color picker or even this one website I've used to yoink "thematic" colors from photos!


Personally, I've developed a massive library of colors over time for this exact purpose lol. Using my old colors as a "base", I can change it accordingly to the kind of "new color" that I want for a specific character or thing!


(I'll use the website to also make gradients for "in-between" colors lol)
STEP 3: INSERT TEXT / DESIRED COLORS
To make Nova's gradient, I start with #A600D9, my color for Magic, and end with #F56745—their individual color. However, being as it's short, I'll use a quote from them instead lol.

Once you've inserted your text and colors, you will click in the text box I highlighted in red, ctrl+a and ctrl+c to copy it all, and go back over to your new tumblr post tab!
From there, you'll ctrl+v to paste the entirety into the HTML area, which pastes the code into your post!

AND VOILA!

You have gorgeous gradient text!
However, I want to give a fair warning and a bit of advice! If you didn't notice wayyyyyyy back when...

Tumblr warns that this all can break your formatting!
It doesn't do it too often, but take it from someone who does an obscene amount of formatting... it's 100% true.
STEP 4: CHEAT SOME MORE!
For this reason, I personally have a whole separate draft post full of my characters' colors (and names lol) that I use to copy-paste them in from rather than using the "html" text editor on every post!
I mentioned earlier I often have multiple windows open while editing? Here's what that looks like!

Additionally, I'll use a separate tab off on the left (my "current wip post" side) with the "html editor" enabled for me to copy-paste stuff!
(Also here's yet another example of how many colors I have)

Once again, you can ctrl+c these things to paste them into another tumblr post with the correct colors!
And it's ONLY possible to do on the website!!!
EXTRA INFO!
WARNING:
Tumblr will only allow each "paragraph's html to be so many characters long, so you can't have too big of anything in a gradient!

And by "anything"... I mean you really can't have that big of a gradient in general. RIP lol.
It straight-up won't save the post so long as you have that "overflow" in the character block! MAKE SURE YOU'VE FIXED IT, OR YOU CAN AND WILL LOSE ALL PROGRESS ON YOUR POST!
SINGLE-COLOR TIP:
You don't need the website for a single color! If you'd like, you can just change the "color code" within the html editor to change specific colors!

MAKE SURE COLORS CAN WORK ON DIFFERENT BACKGROUNDS!
On desktop, you can use shift+p while not on any sort of textbox to change the color pallet! I always do tests to see which colors work best before settling on any!

(Tho, the blue background SPECIFICALLY is nightmarish to work around. So if that's the ONLY thing I can't make work, I often ignore it and let you guys who use it suffer lmao)
(Hopefully this'll give you guys some respect for me and how much I do to make my posts aesthetic af lol)
Also hopefully this all helps???
divider by @cafekitsune
62 notes
·
View notes
Text
Give credit to gif makers on tumblr.
If you ever need to use a gif that is on tumblr this post explains really well how to use a gif from the creator, following this will help to:
Give credit to the gif maker.
Notify the give maker that you use their gif.
Puts a link to their original post.
Making gifs takes a lot of time to do, it can take even hours just to inmortalize a few seconds of a moment. Please have that consideraction and give the credit that they deserved, don't download them and post it as your own. Also if you think you have seen that gif before from a gif maker don't reblog the reposter.
If you still have doubts after reading the tutorial send me an ask and I will explain and solve any question. You can also do this the same steps of the tutorial from your phone, if you need me to explain it how let me know. Please boost this.
#please boost this#I had seen this happen recently that they download it and post it#we need to change that don't do it please#gif making#tumblr#tutorial#tumblr tutorial#give credit#gif makers#creators#boost#signal boost#is very important#fandom#fandom dynamics#how to tumblr#gif#s
49 notes
·
View notes
Text
custom font colors tutorial
note: this is for my bb @tobaccosunbxrst but also just wanted to post it to public for anyone curious on how to do custom fonts w html on tumblr. i originally made this tutorial privately for my mutual @certainlysyko so apologies for the silly choice of example text that i used lol. anyways.
so as we know, tumblr only has the following default color options for text:
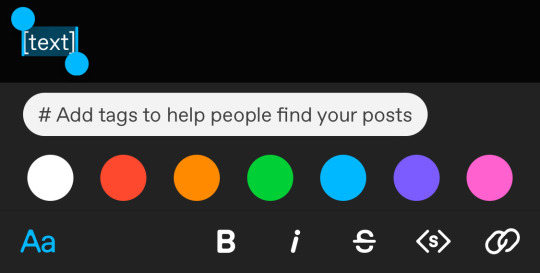
but what if we want some other cool colors like coral pink or cerulean blue or barf green?
to do custom fonts, it’s very simple, but it needs to be done on pc/laptop (cannot be done on app). we are going to start with a post:
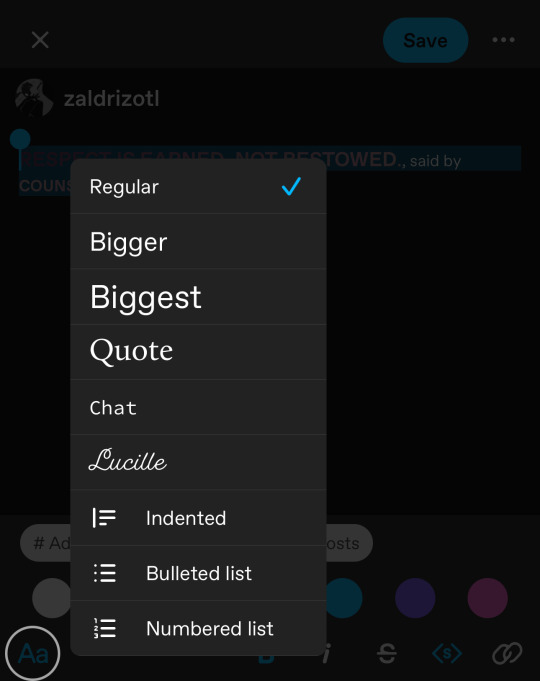
then, you’re just gonna change whatever word that you want the custom color for into one of the tumblr defaults. you do this by just selecting the text with your cursor and then tumblr’s default colors pop up. you can change into any of them, this just establishes the code in the html and makes it easy to spot
then you're going to go to the little settings thingy at the top right of the post (the settings wheel) and click on this drop down, then click on "html" which will switch it to html

now it's in html. this looks very simple bc there is only one statement here. i’ll touch on how to deal with more lengthier blocks of html code later. but for now, note this section only:
<span class="npf_color_rachel">
this is ALL we need to work with in the code
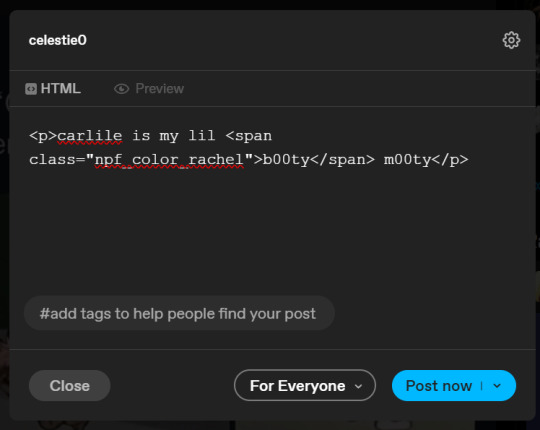
we're going to change it from
<span class="npf_color_rachel">
to
<span style="color: #[hex code]">
so, for example, something like
<span style="color: #81b7ce">
note. you can also just copy paste the lines above so you don’t have to type it out
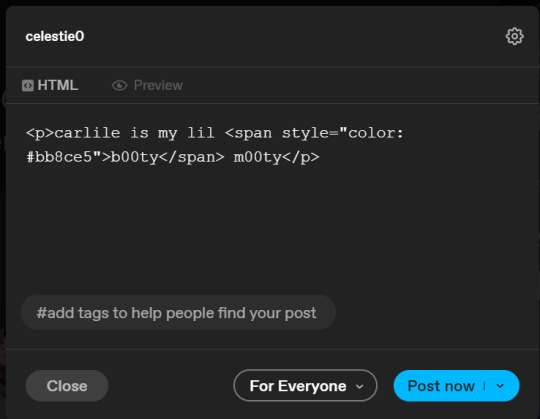
soooo all we did was delete the class=npf_color_rachel part and just replaced it with style=“color: #[hex code]
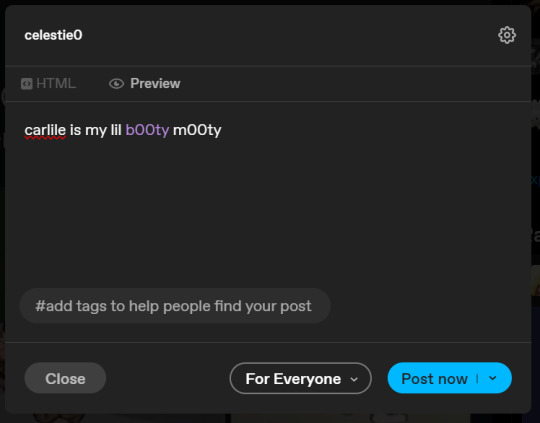
and here's the preview! all done :)
this is the website i use to find the hex codes. a hex code is basically those codes after the hashtag so like #81AACE (don't forget to input the hashtag)
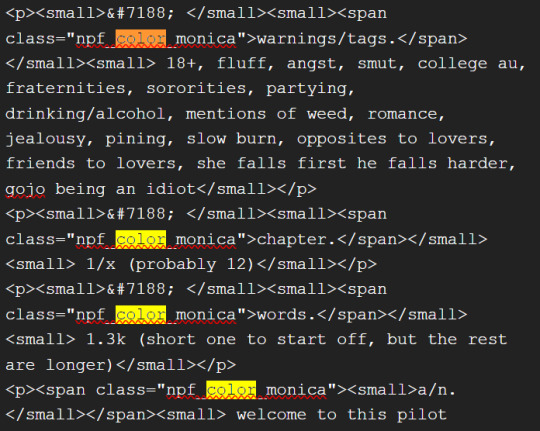
now, for those lengthier posts i mentioned, you can use ctrl+f and search the word "color". it will show up any place on the post where you have a colored font (so do this after you’ve already changed all the places you want custom colors into default tumblr colors, like in the 1st step)
this way, you can easily find the places with <span blah blah> that you need to edit
here is an example of that in one of my posts:
and yeah! that’s basically it. disclaimer, i’m not a software engineer nor so i know much about tech haha, this is just for tumblr aesthetics
alright peace out! 🧚♀️✨ hope this is helpful
#tumblr#tumblr tips#tumblr html#tumblr hacks#tumblr colors#html#tumblr custom colors#tumblr girls#custom colors#tumblr tutorial#custom colors tutorial#html tutorial#hacks
186 notes
·
View notes
Text
Divider tutorial (kind of)
An ode to @luciwell 😭😭
This is very sped up.. but this is what my usual process of making dividers is/looks like
Also ur welcome for the wicked reference.. shoutout all my wicked loving fans and Cynthia Erivo
I often use the brush “airbrush” on literally everything, make a clipping layer or alpha lock ur layer and if you want things to just POP or make shadows.. pls use it, i use it all the time on my text
Im also using a 2000x843 canvas
I’ve cut out all of the times I’ve imported stuff from my gallery because of yk… privacy! So no.. all of my images and stuff did not appear out of thin air 👅
Dividers are my favourite things to make and they’re so fun and silly
If you are struggling with putting cool overlays on ur dividers, import ur overlay and click on ur layers, at the bottom there should be a little arrow pointing downwards that you can click (make sure ur image is selected and over the other layer that you want it on) and click that button! It’s very simple, you can adjust how you want and everything else but that’s how you get those cool textures on ur dividers 🫶🏻
#( ╹ ╹)? a post!#rentry dividers#rentryblr#rentry decor#editblr#editors on tumblr#tutorial#tutorials#rentry graphics tutorial#rentry tutorial#tumblr tutorial#divider tutorial
161 notes
·
View notes
Text
Tumblr Tips!
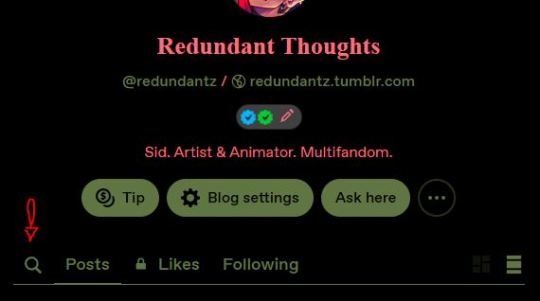
A fun feature tumblr has is when you go to people's tumblr archives located through their blog page. You can search by tags they have recommended! It makes searching super easy. ✨

and of course the second way (especially on mobile) is of course our little magnifying glass friend!
A third way to search directly on peoples blogs is Typing /tagged/insert tag here

Most people (artists especially) do not mind if you go back and reblog and like old art. In fact its encouraged!
So be sure to tag posts appropriately everyone, and feel free to share/like older posts!
#tutorial#how to#tumblr tips#tags#sharing#redundantz speaks#hope this helps!#tumblr tutorial#tumblr migration
427 notes
·
View notes
Text
First of all, I would like to both welcome and thank everyone here who came from Tiktok! You are all so lovely and I am kissing you on the forehead <3
Second, I recently got a new art display tablet, so I can now draw more comfortably and efficiently. Hopefully this means faster art for both me and you (^w^)
Third, I'm kinda thinking about incorporating a bit of a manga style, especially for future comics. I just think it loos cool. That, and because I started reading Chainsaw Man and I like the artstyle.
On that note, I used my tablet to test drawing in that coloring style somewhat. There's both my usual style and the manga style


I really like how the manga look came out. Could use some work, but we'll get there :)
As for who that character is...
.
.
.
shh ;)
(Also, for those who may be new to Tumblr here, likes are very much appreciated, but reblogs are how posts, and especially art, gets spread. If you like what you see, consider hitting the reblog button so that Tumblr not only shows it to other people, but shows you more of that type of content. <3)
#undertale#undertale au#digital art#utmv#aidtale#tumblr tutorial#also#extra little thoughts can go into tags
33 notes
·
View notes
Text
— TUTORIAL DE COMO FAÇO MEUS ICONS PELO CELULAR
Olá! Como vocês estão? Eu espero que bem. Há um tempo atrás, recebi uma ask me perguntando como eu faço meus icons e decidi trazer um tutorialzinho aqui pra quem também tem esse interesse.
⠀
Vale ressaltar que, se você procurar direitinho, conseguirá encontrar diversos outros tutoriais de iconmakers ensinando seus métodos. Digo isso porque a forma como eu produzo meus icons pode ser considerada um pouco mais estendida do que os demais costumam fazer. Não quero dizer mais elaborada! Na verdade, é como se eu fizesse as mesmas coisas que os demais, mas pegando um caminho mais longo. De qualquer forma, foi o jeito como eu aprendi a fazer quando me interessei em criar icons e continuo ainda assim pela comodidade.
⠀
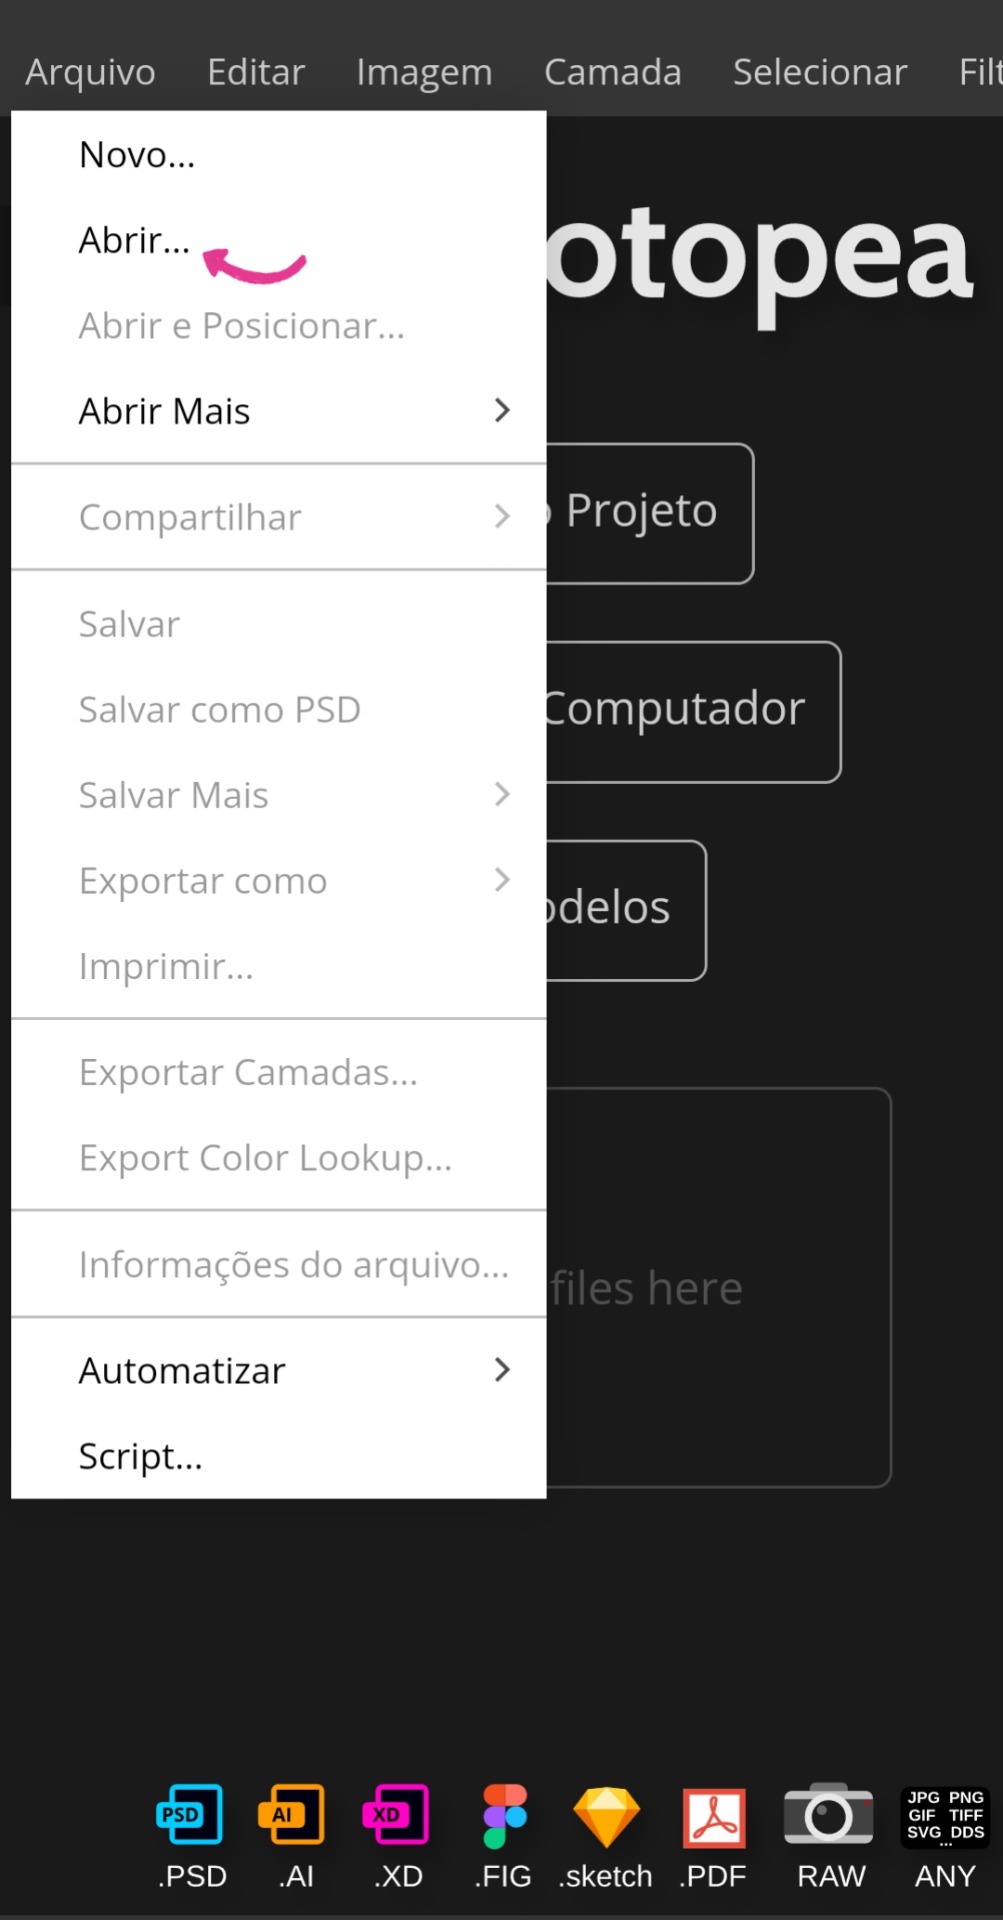
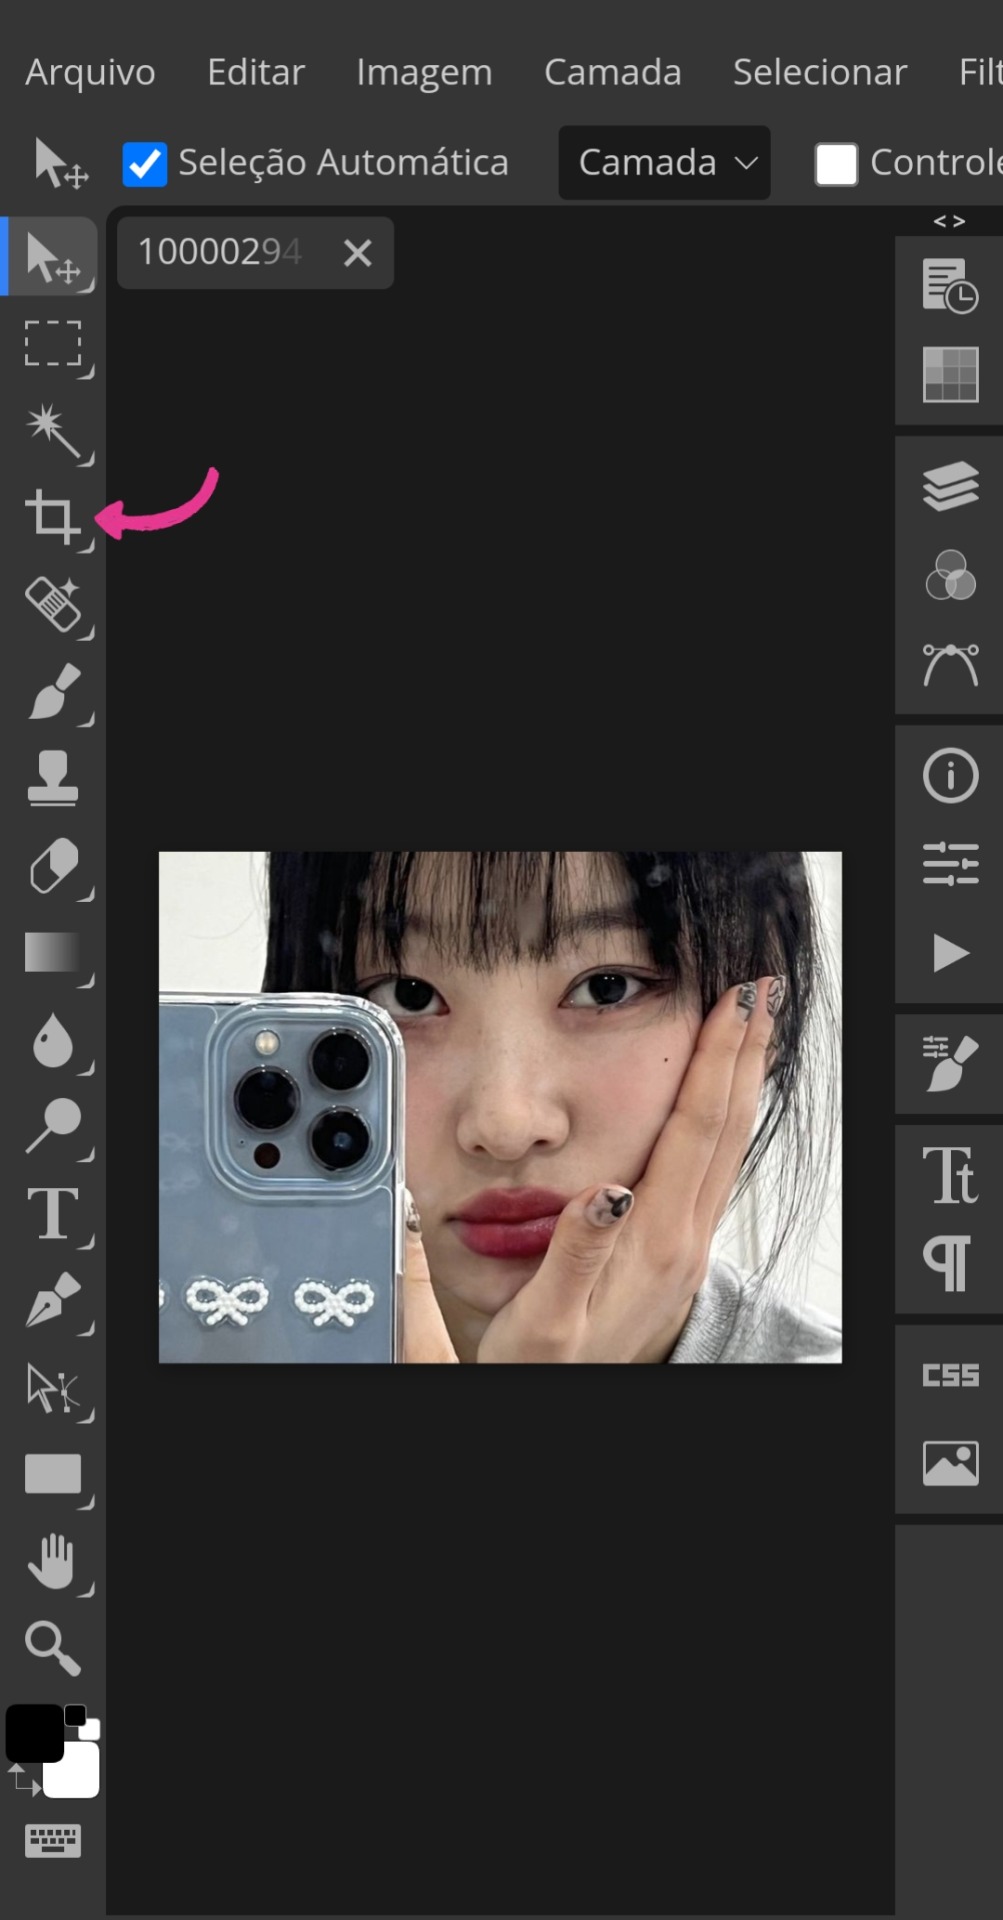
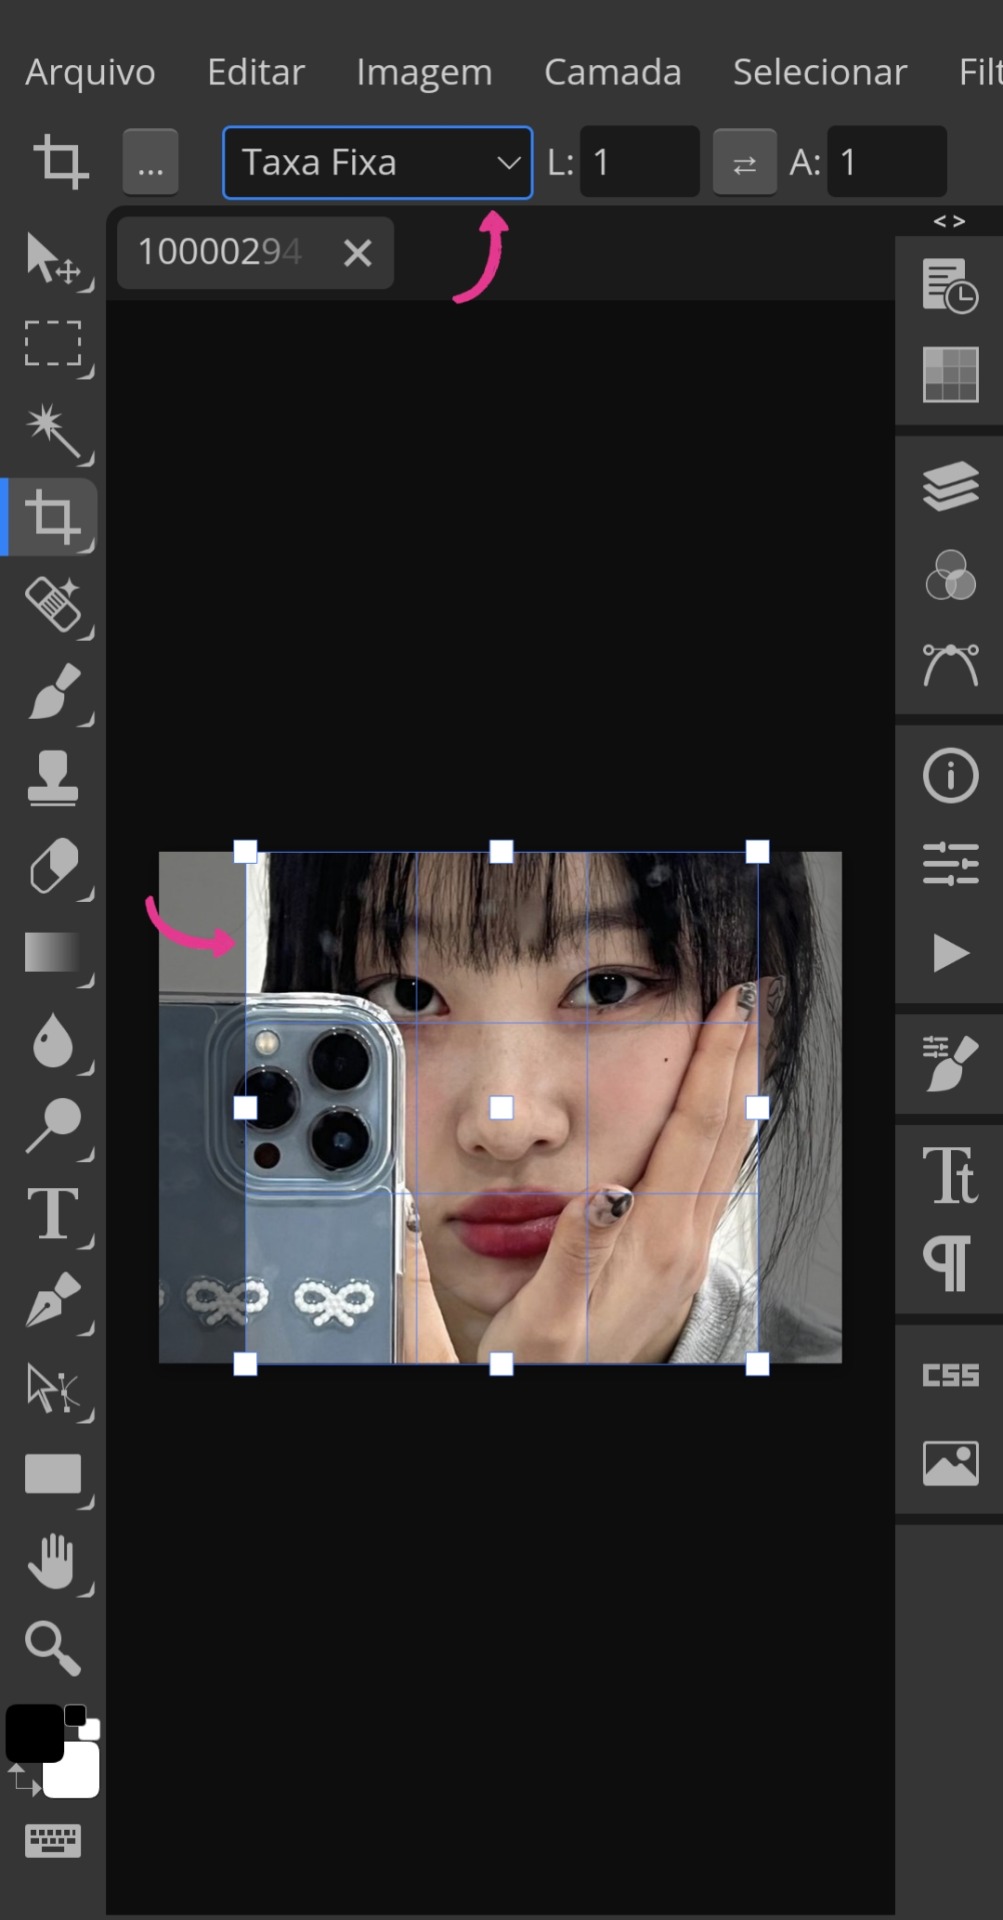
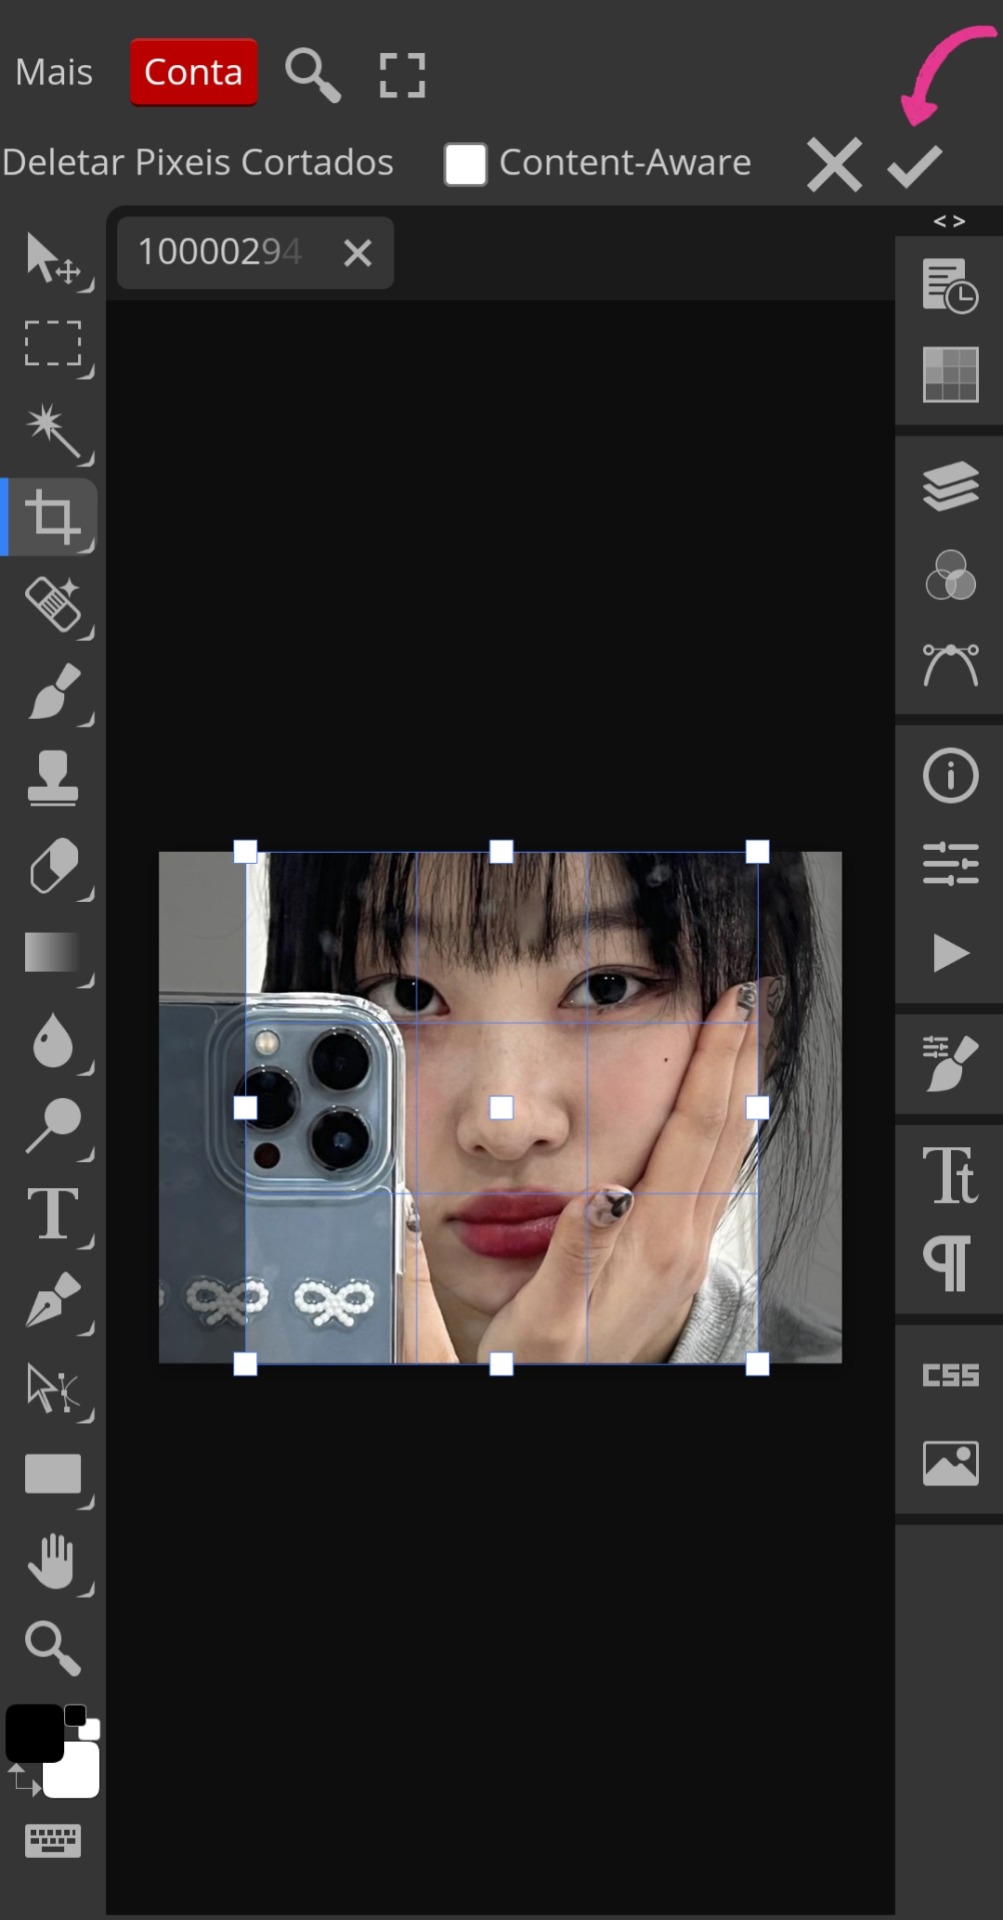
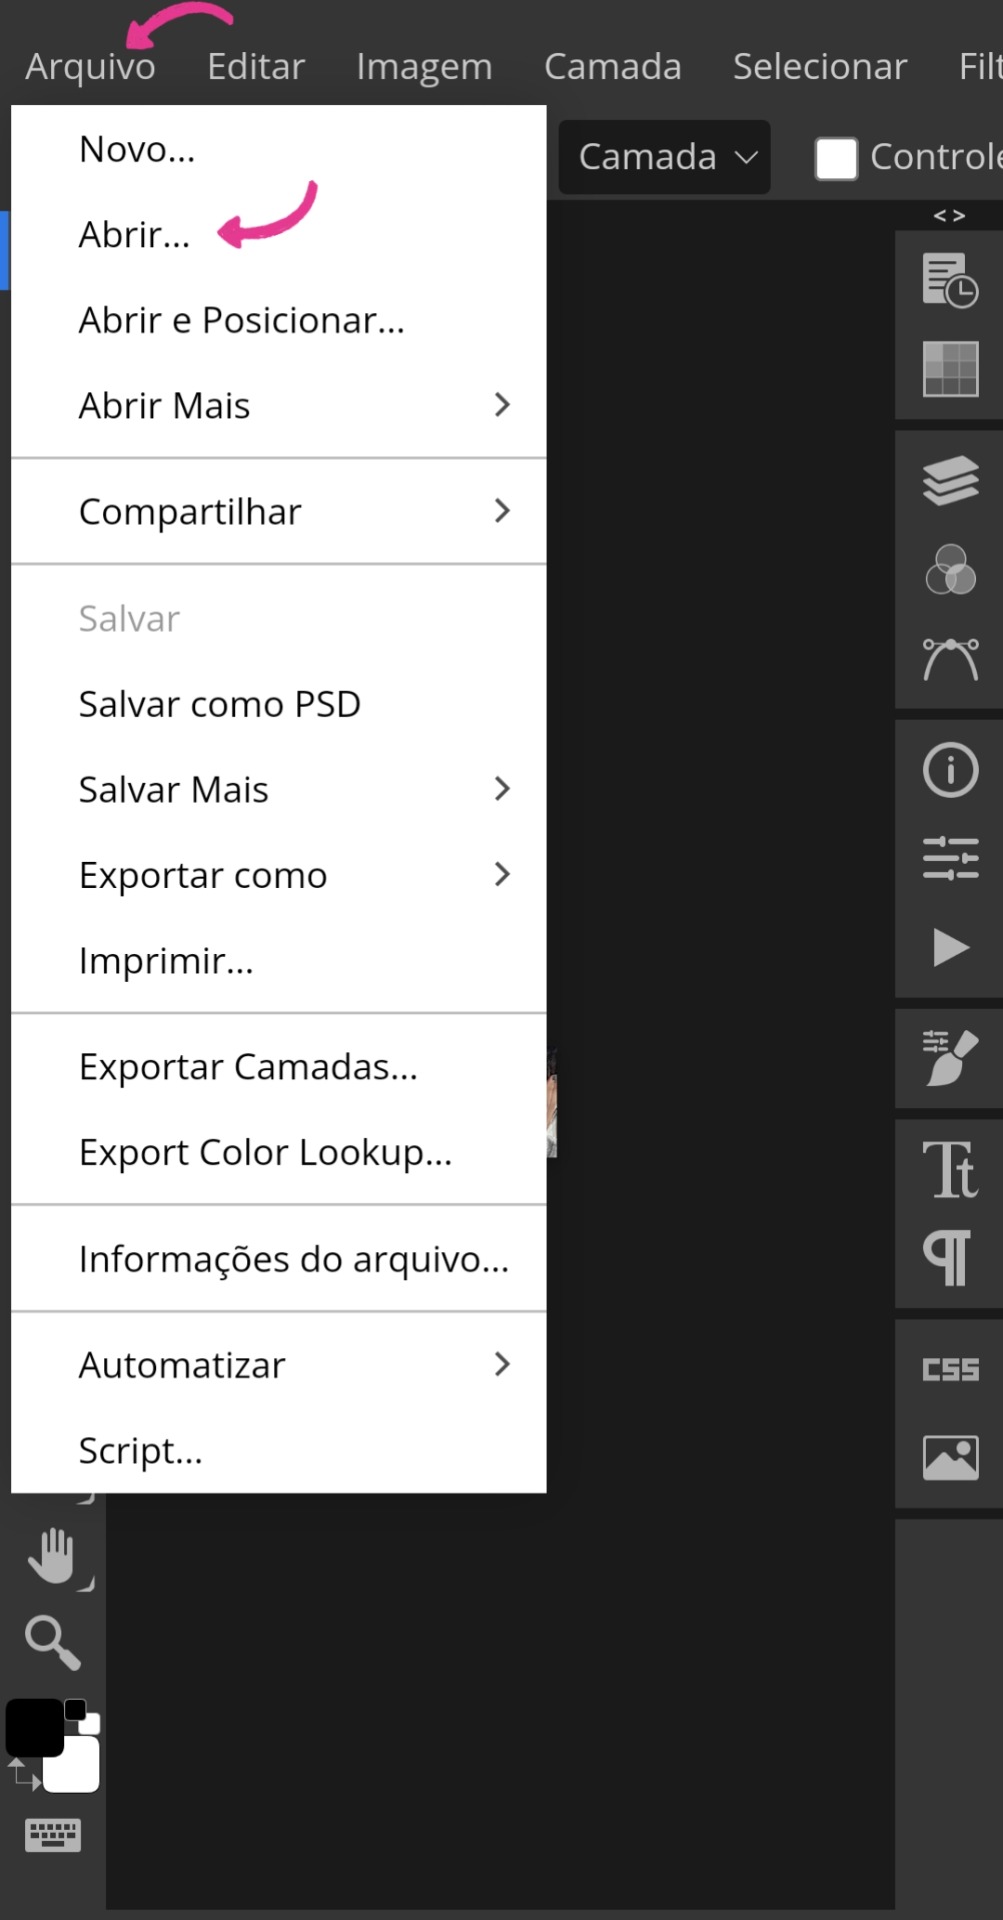
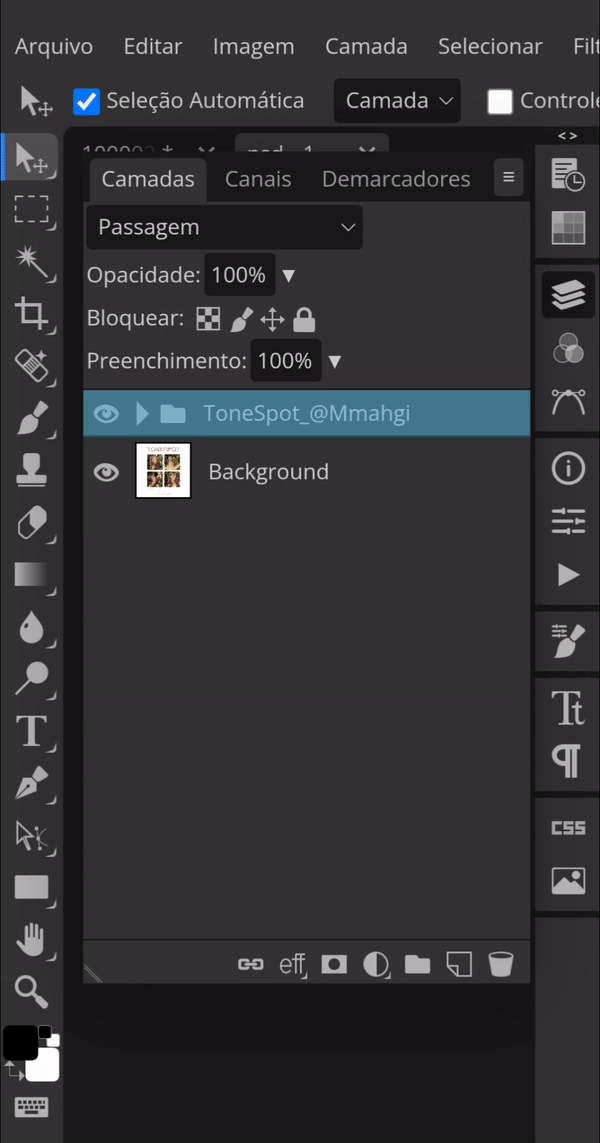
• Para começarmos, você usará o site Photopea. É lá que será feito tudo. Entrando no site, vá na aba lá em cima escrita "Arquivo", depois clique em "Abrir" e selecione a imagem que você irá usar. Com a imagem pronta, vamos para os primeiros passos da edição. Recortar a imagem para que ambos os lados tenham a mesma largura e altura é importante mais para frente. Então, ao recortar a imagem, selecione aquela tabelinha e troque "Livre" por "Taxa fixa". Ao arrastar as abas de cima para o lado (assim como na imagem 4), você só precisará clicar em "✓".
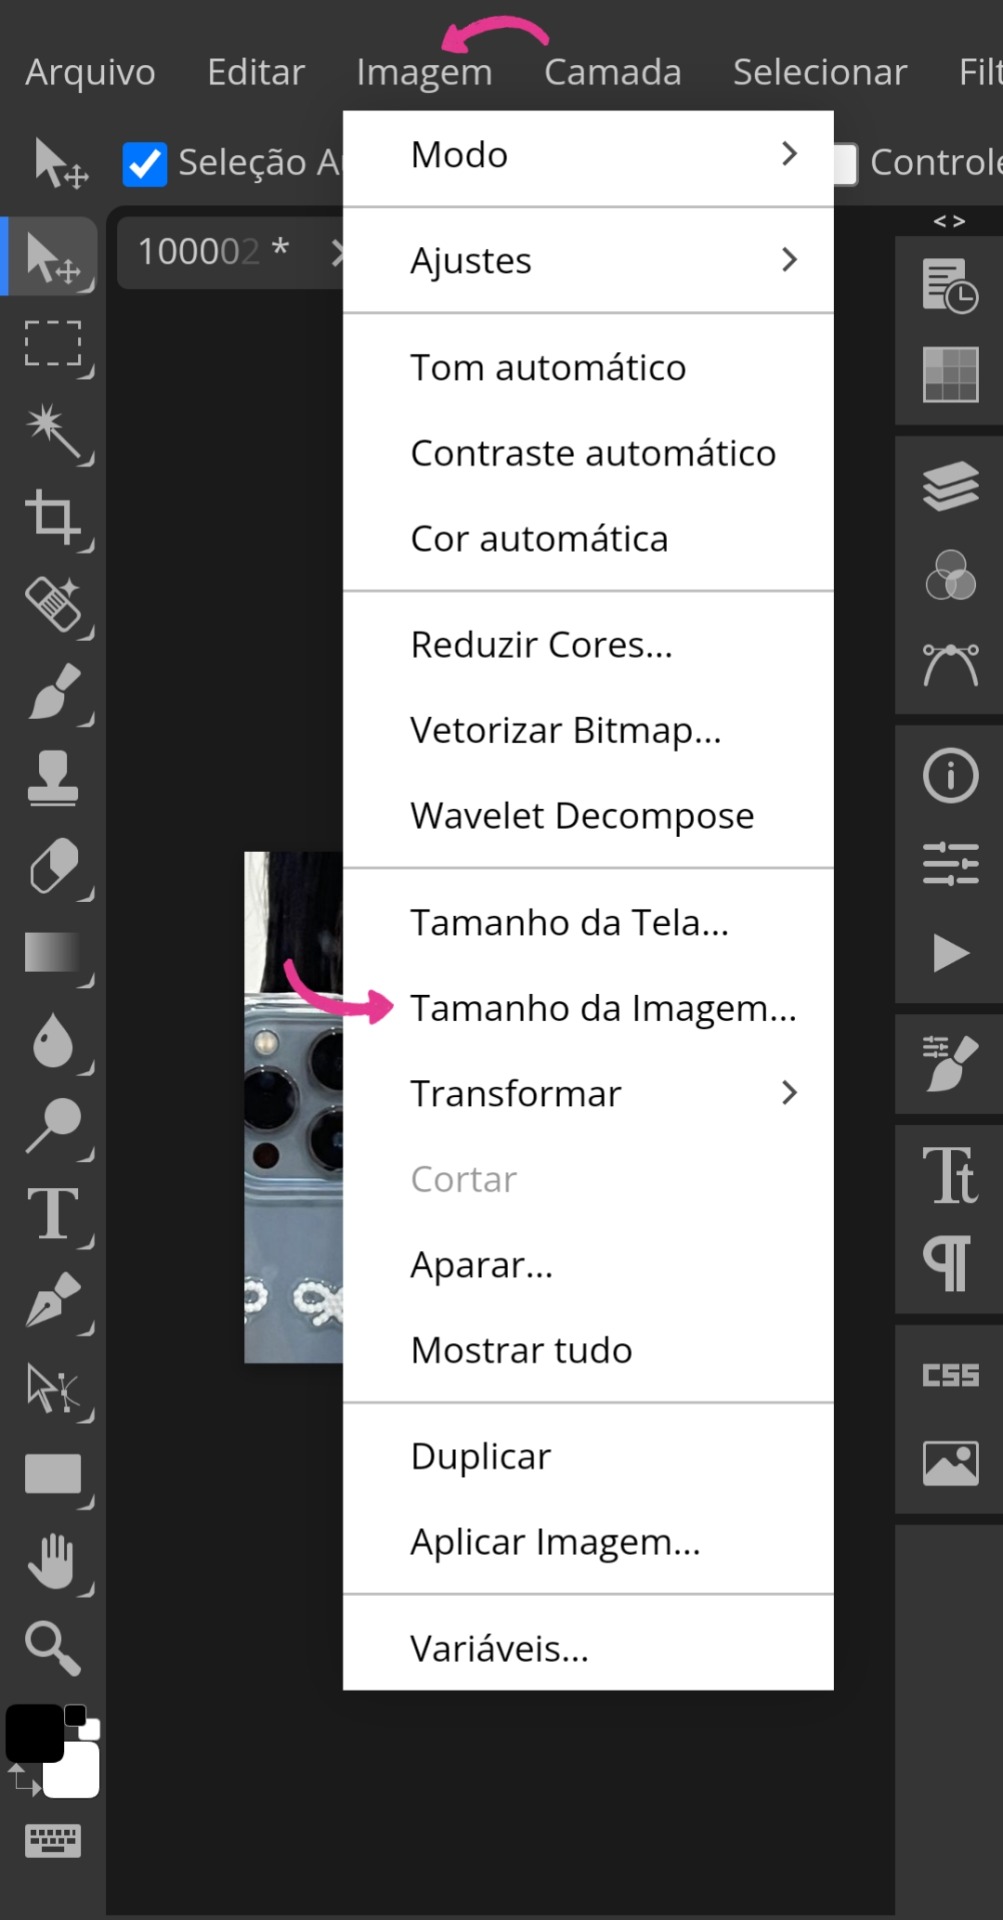
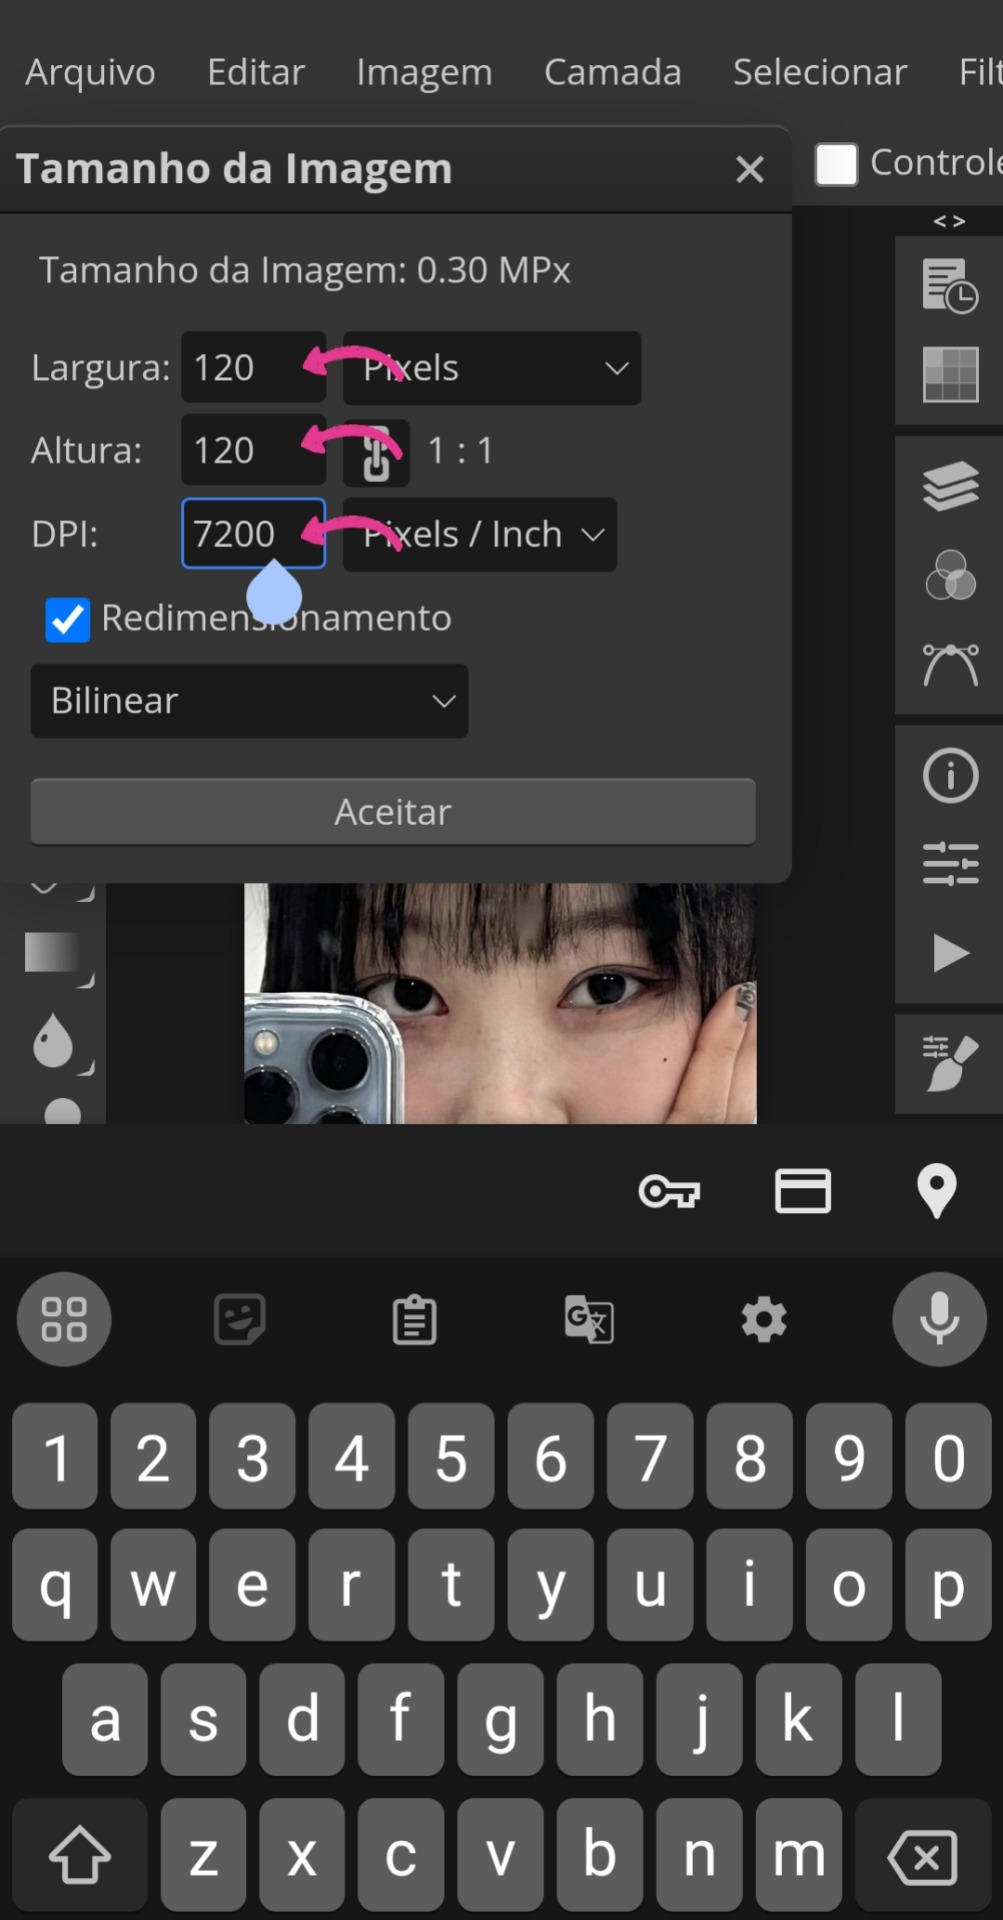
• Depois, você irá encontrar a aba "Imagem" também ali acima e, ao clicar nela, irá procurar por "Tamanho da imagem". Feito isso, aparecerá uma tabelinha onde você usará as seguintes medições: largura → 120, altura → 120 e DPI → 7200. Aí você só aperta em "Aceitar" para concluir.
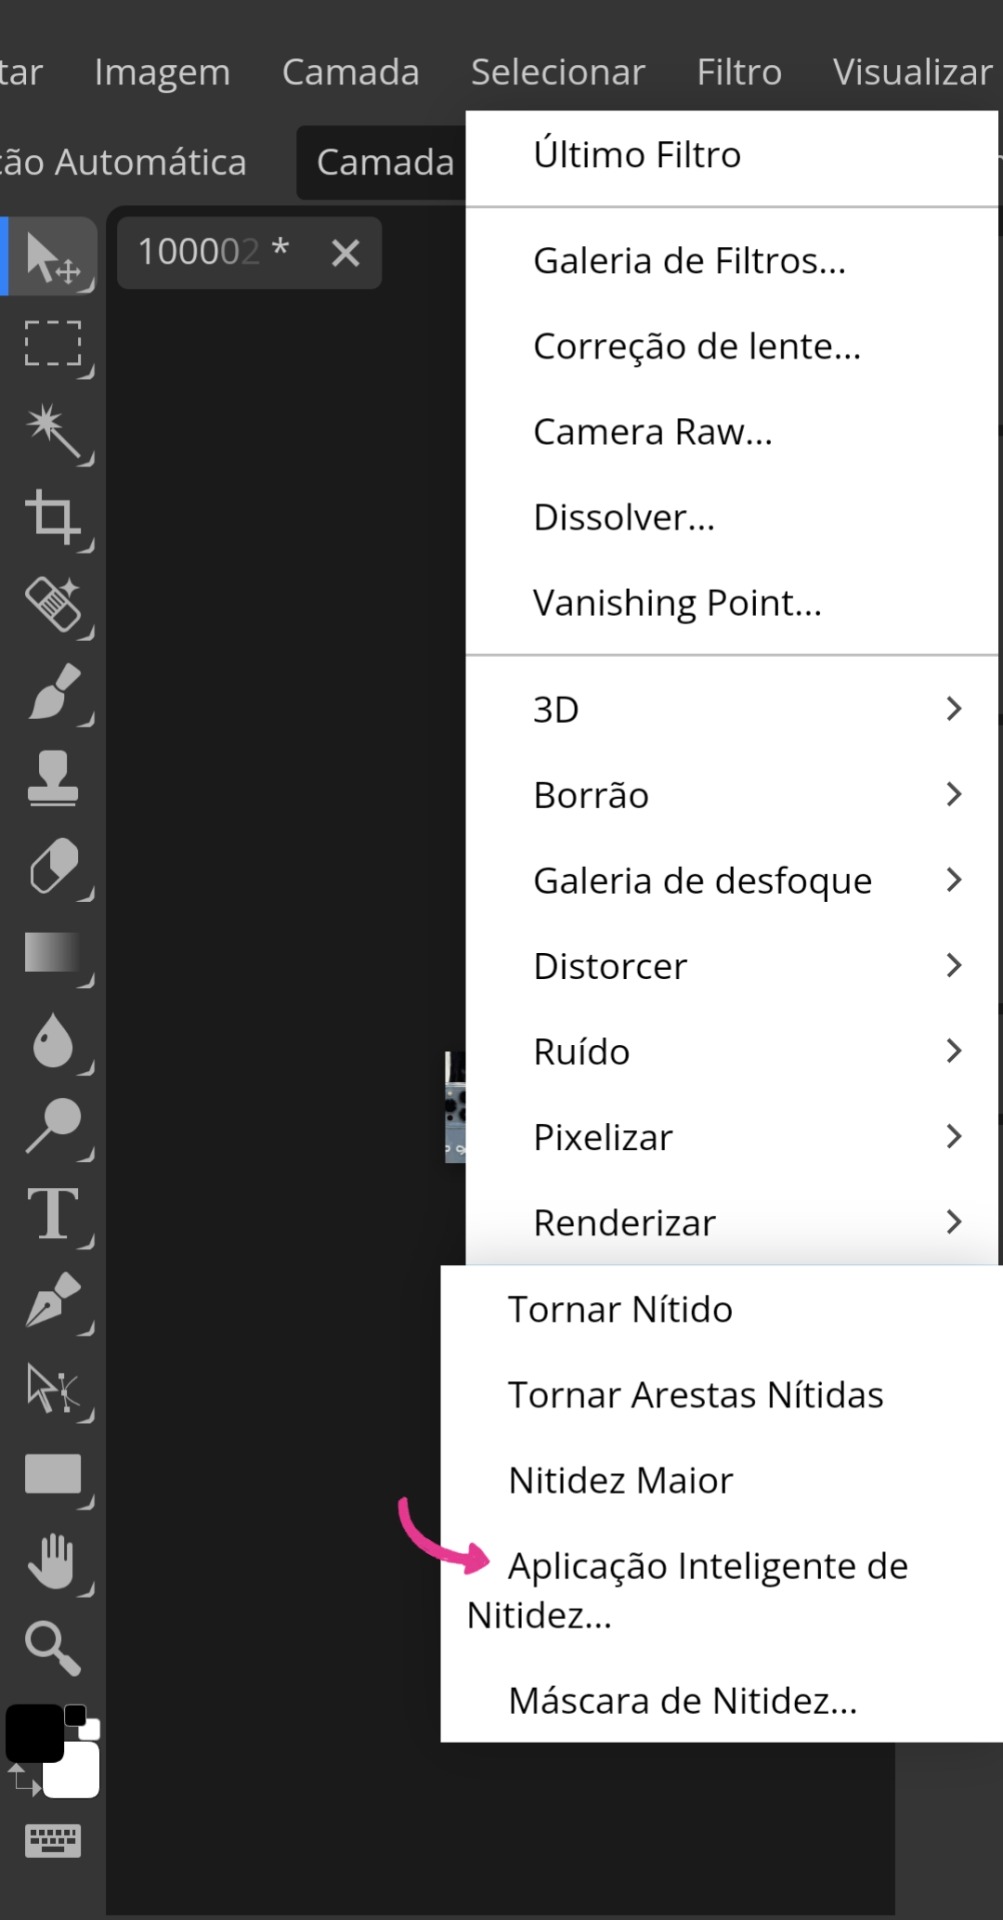
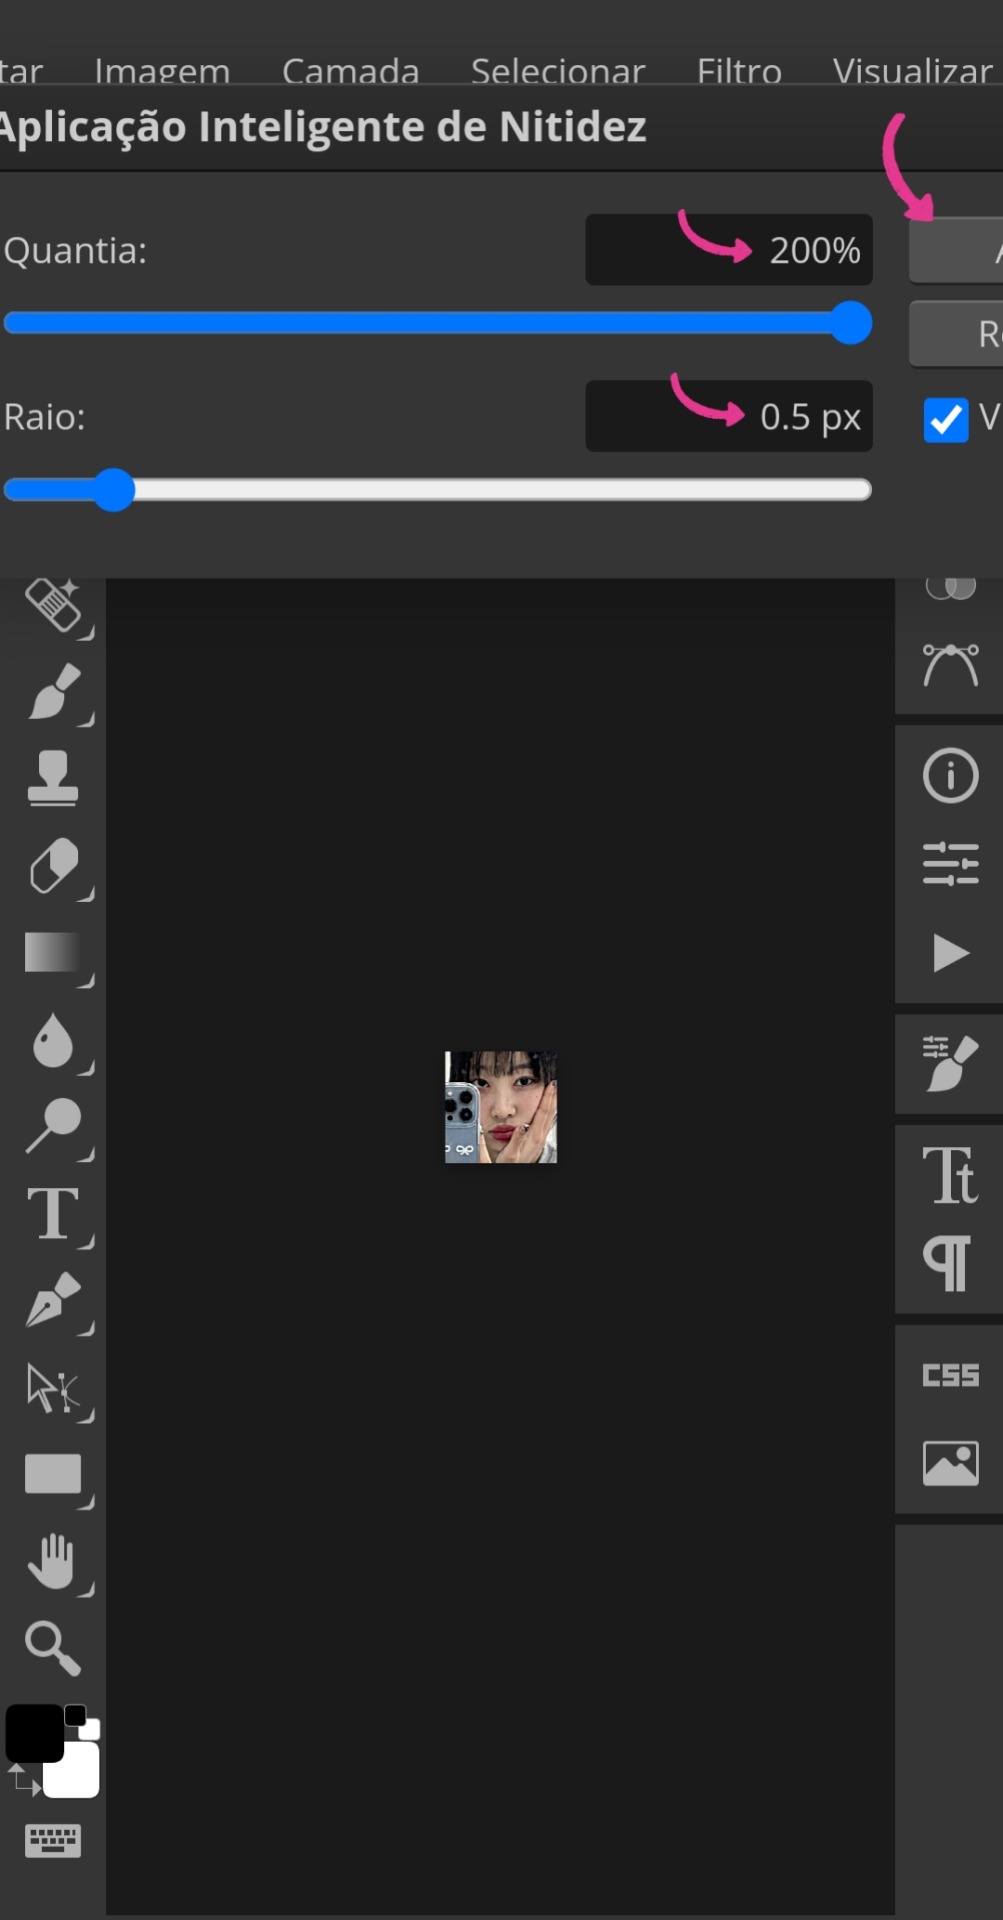
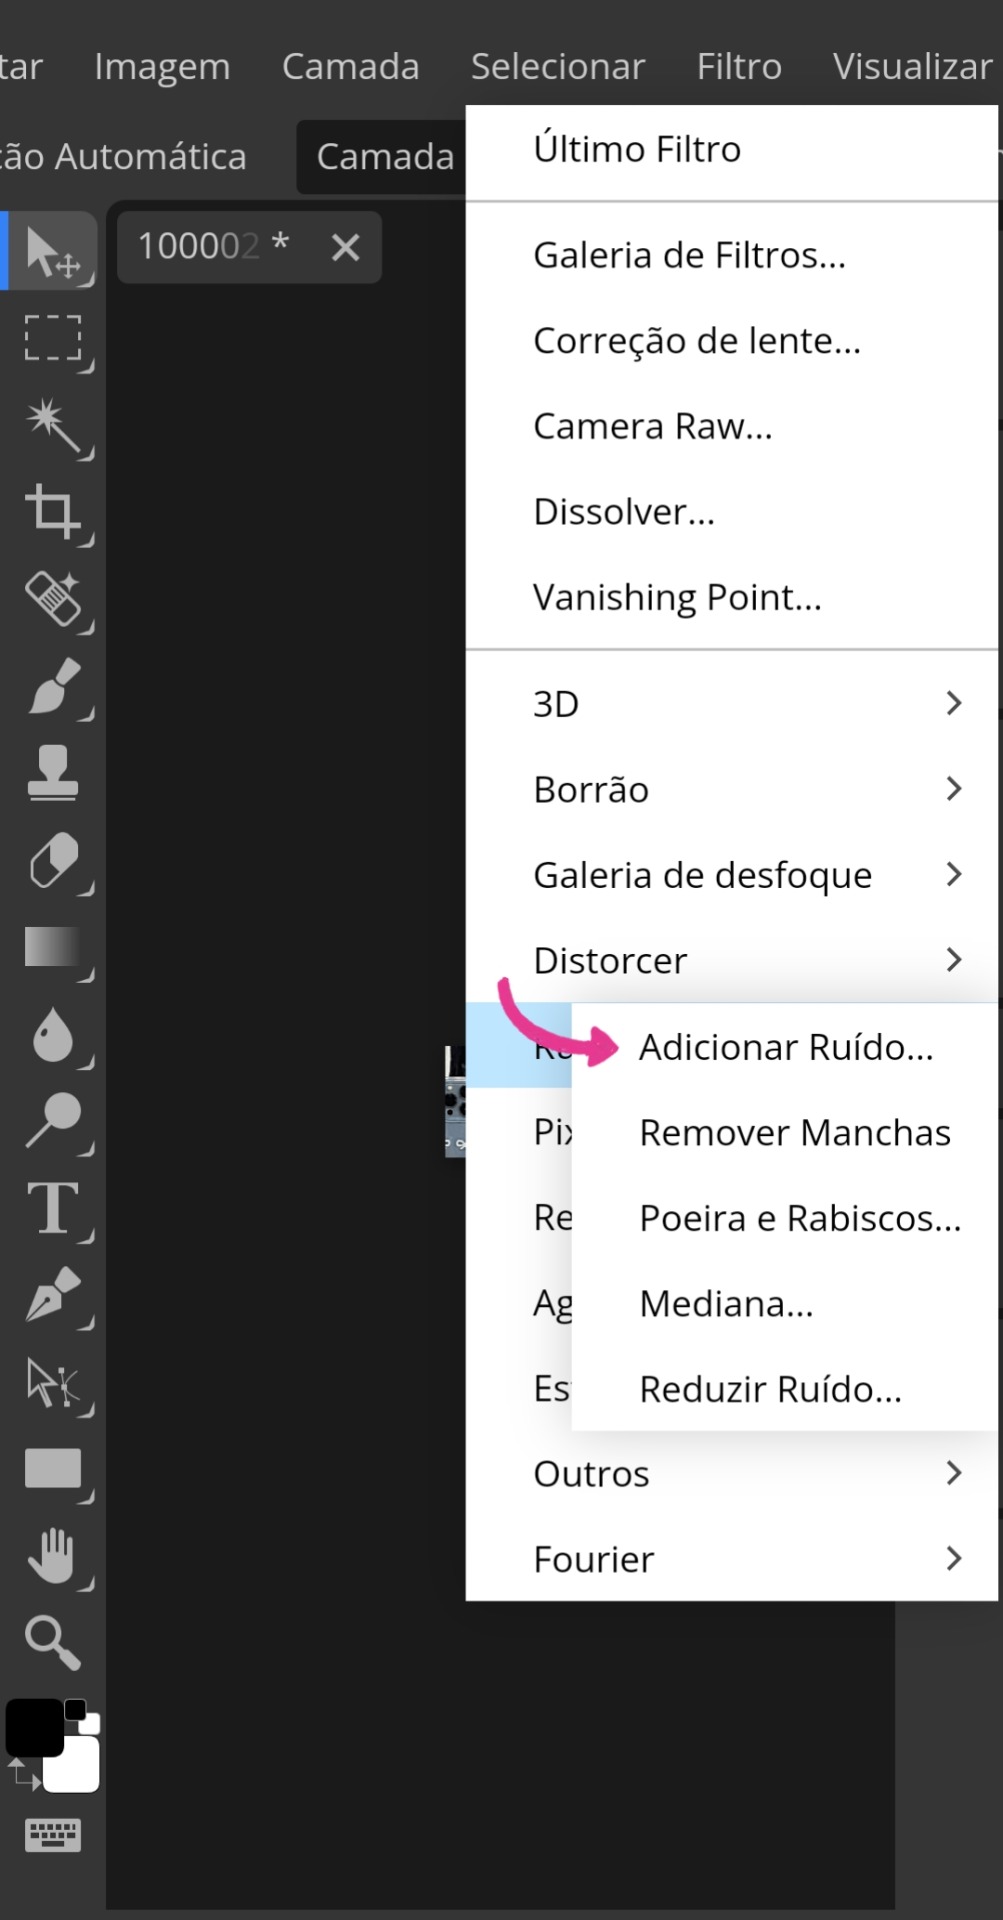
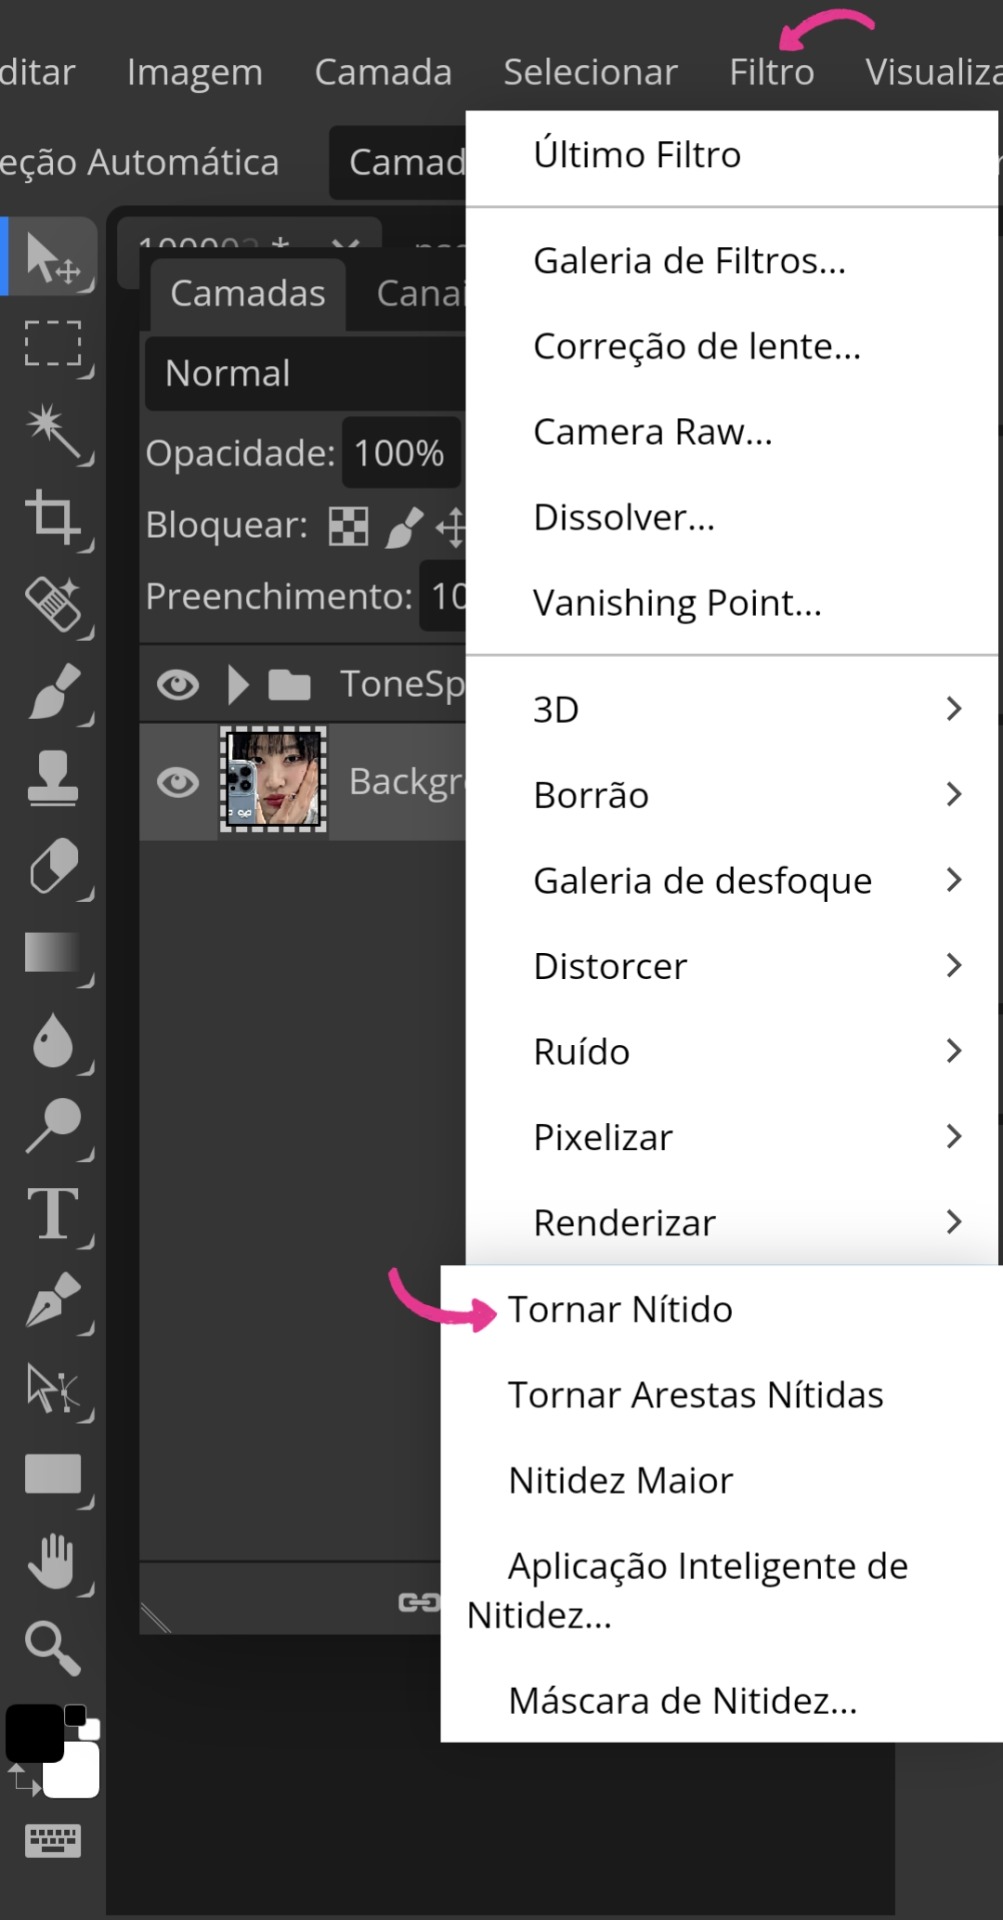
• Ainda nas abas superiores, você as arrastará até encontrar "Filtro". Ali, você irá em "Aguçar" e, em seguida, "Aplicação inteligente de nitidez". Depois, ajuste a Quantia para 200% e o Raio para 0,5 px.

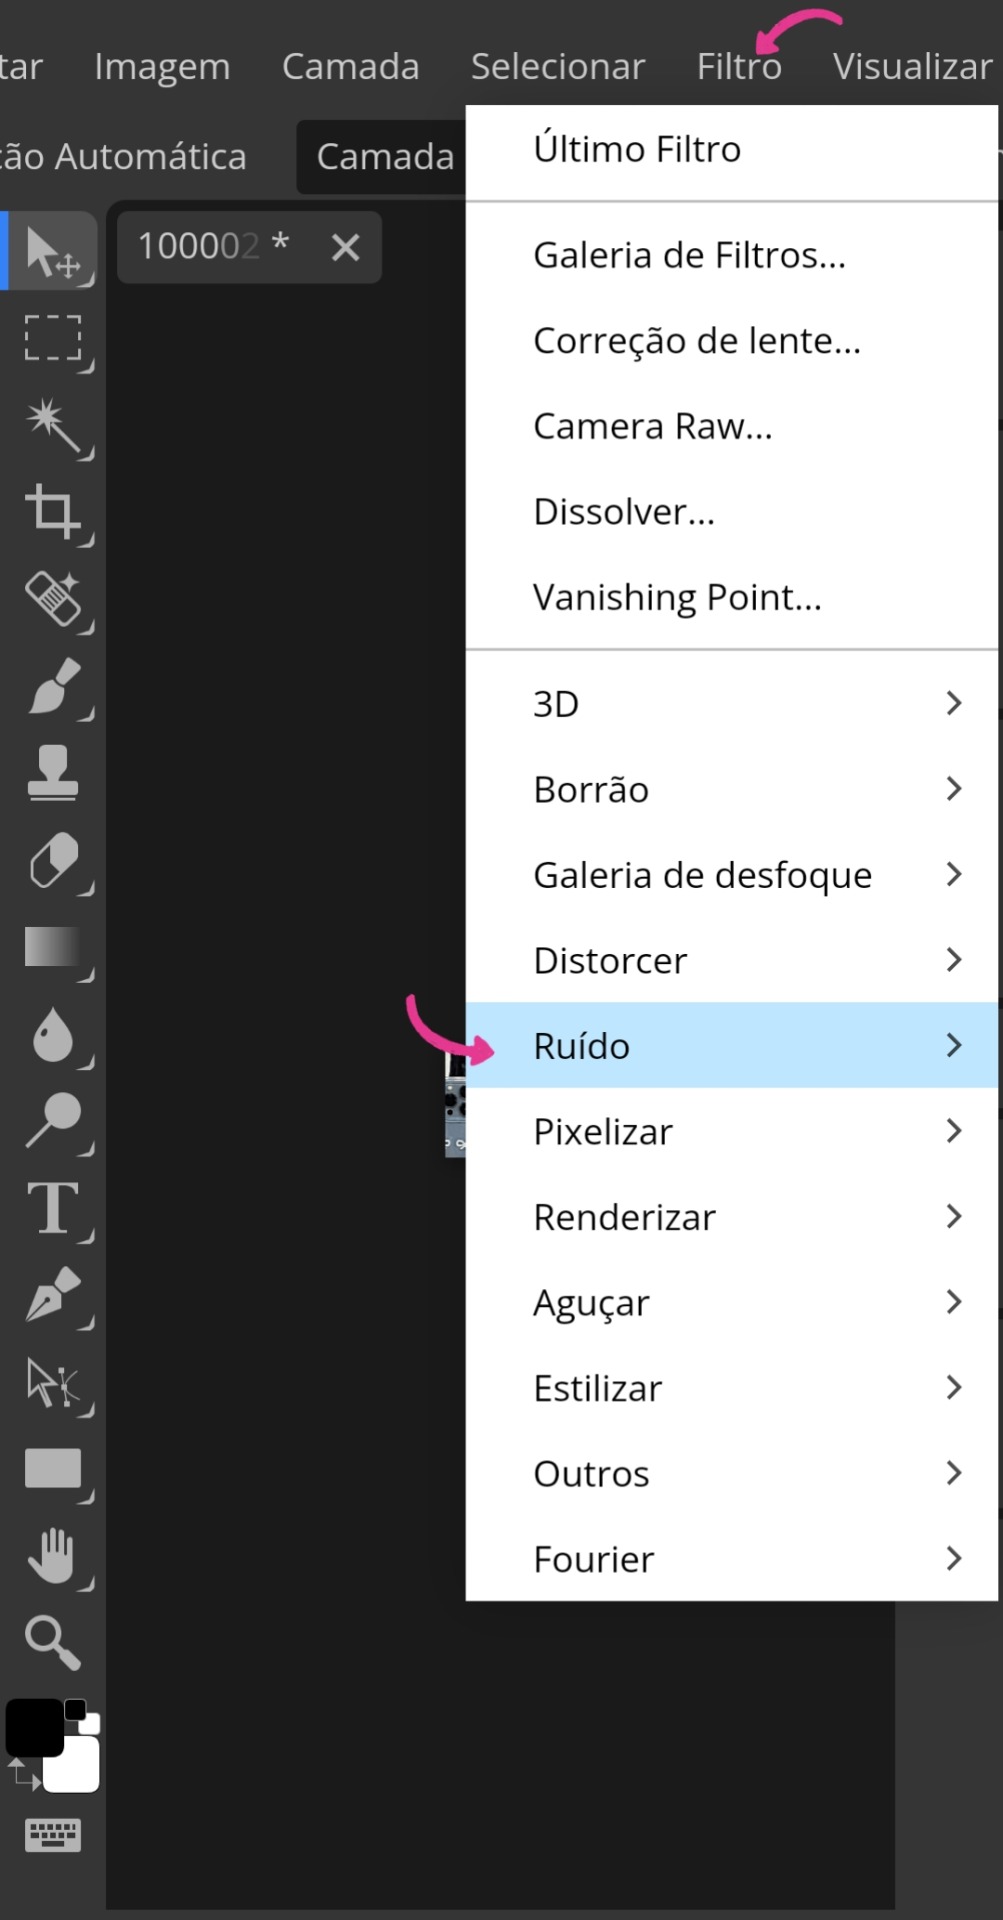
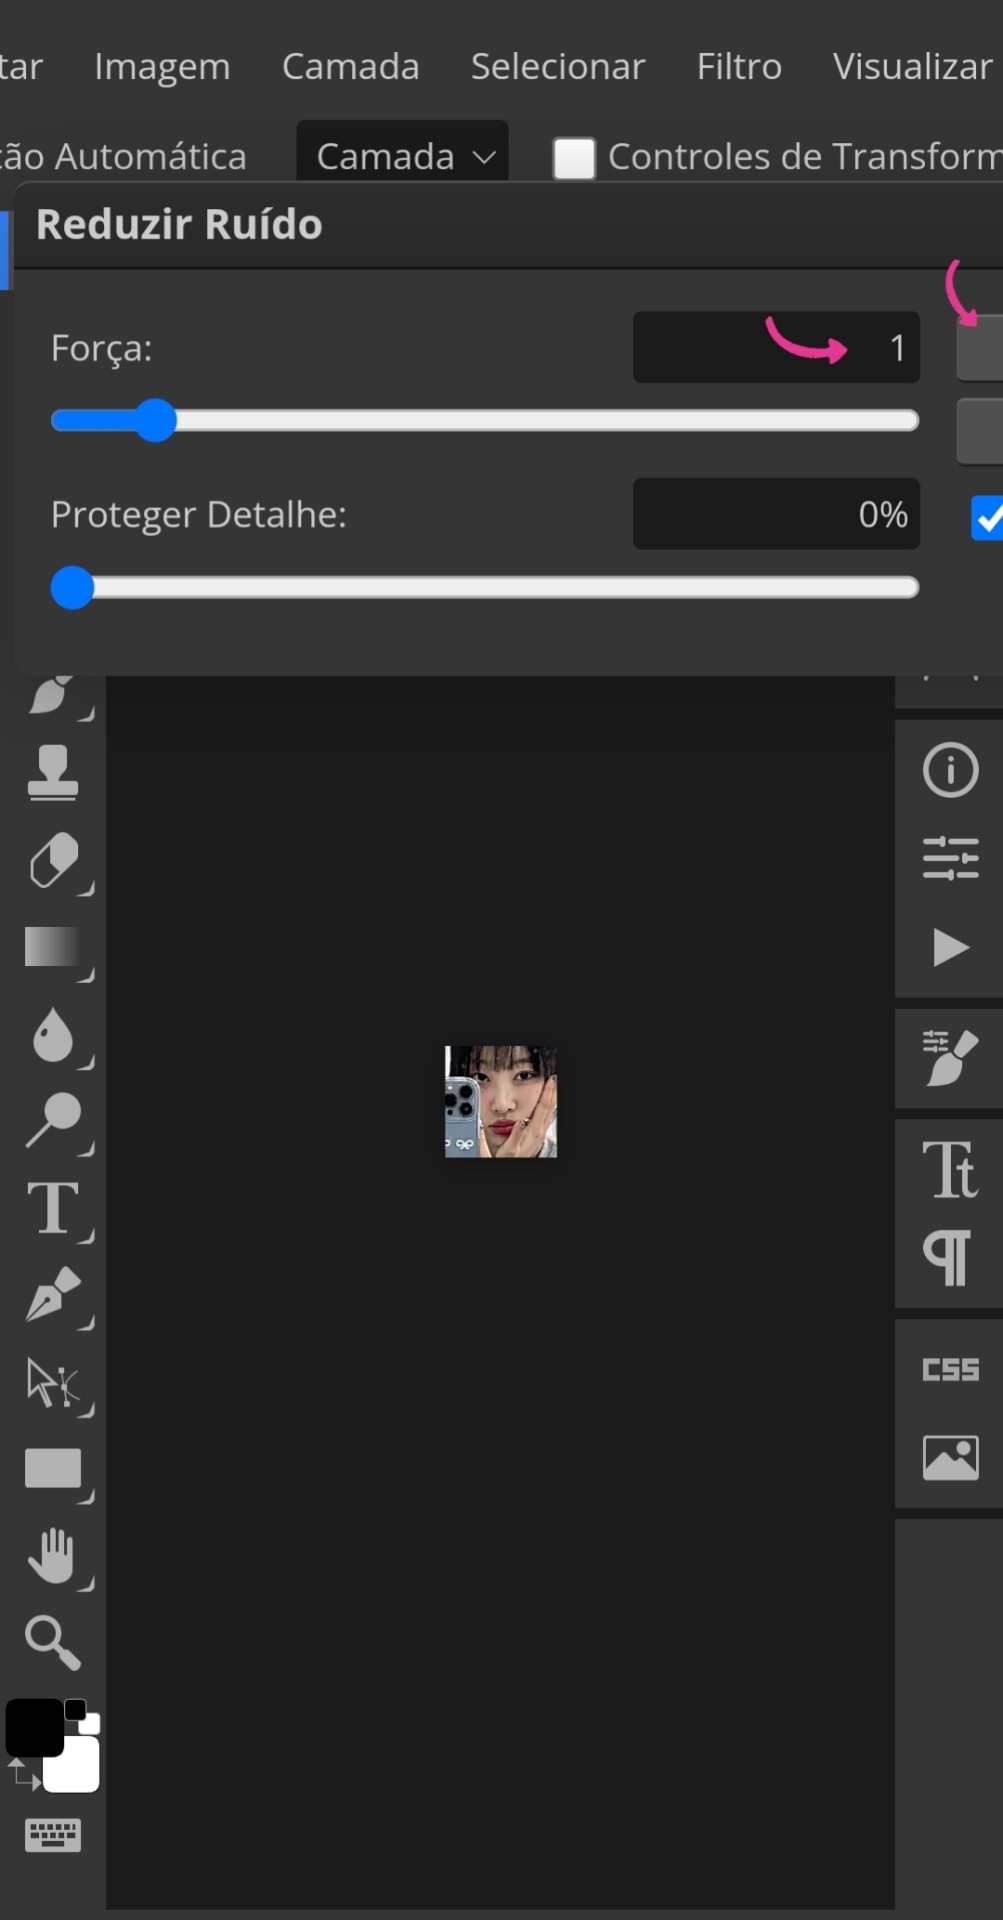
• Após aceitar e, ainda em "Filtro", você irá até "Ruído" e selecionará "Reduzir ruído". Nessa outra tabela, você deixará a "Força" em 1. (Vamos ignorar que eu marquei o errado na imagem 11)
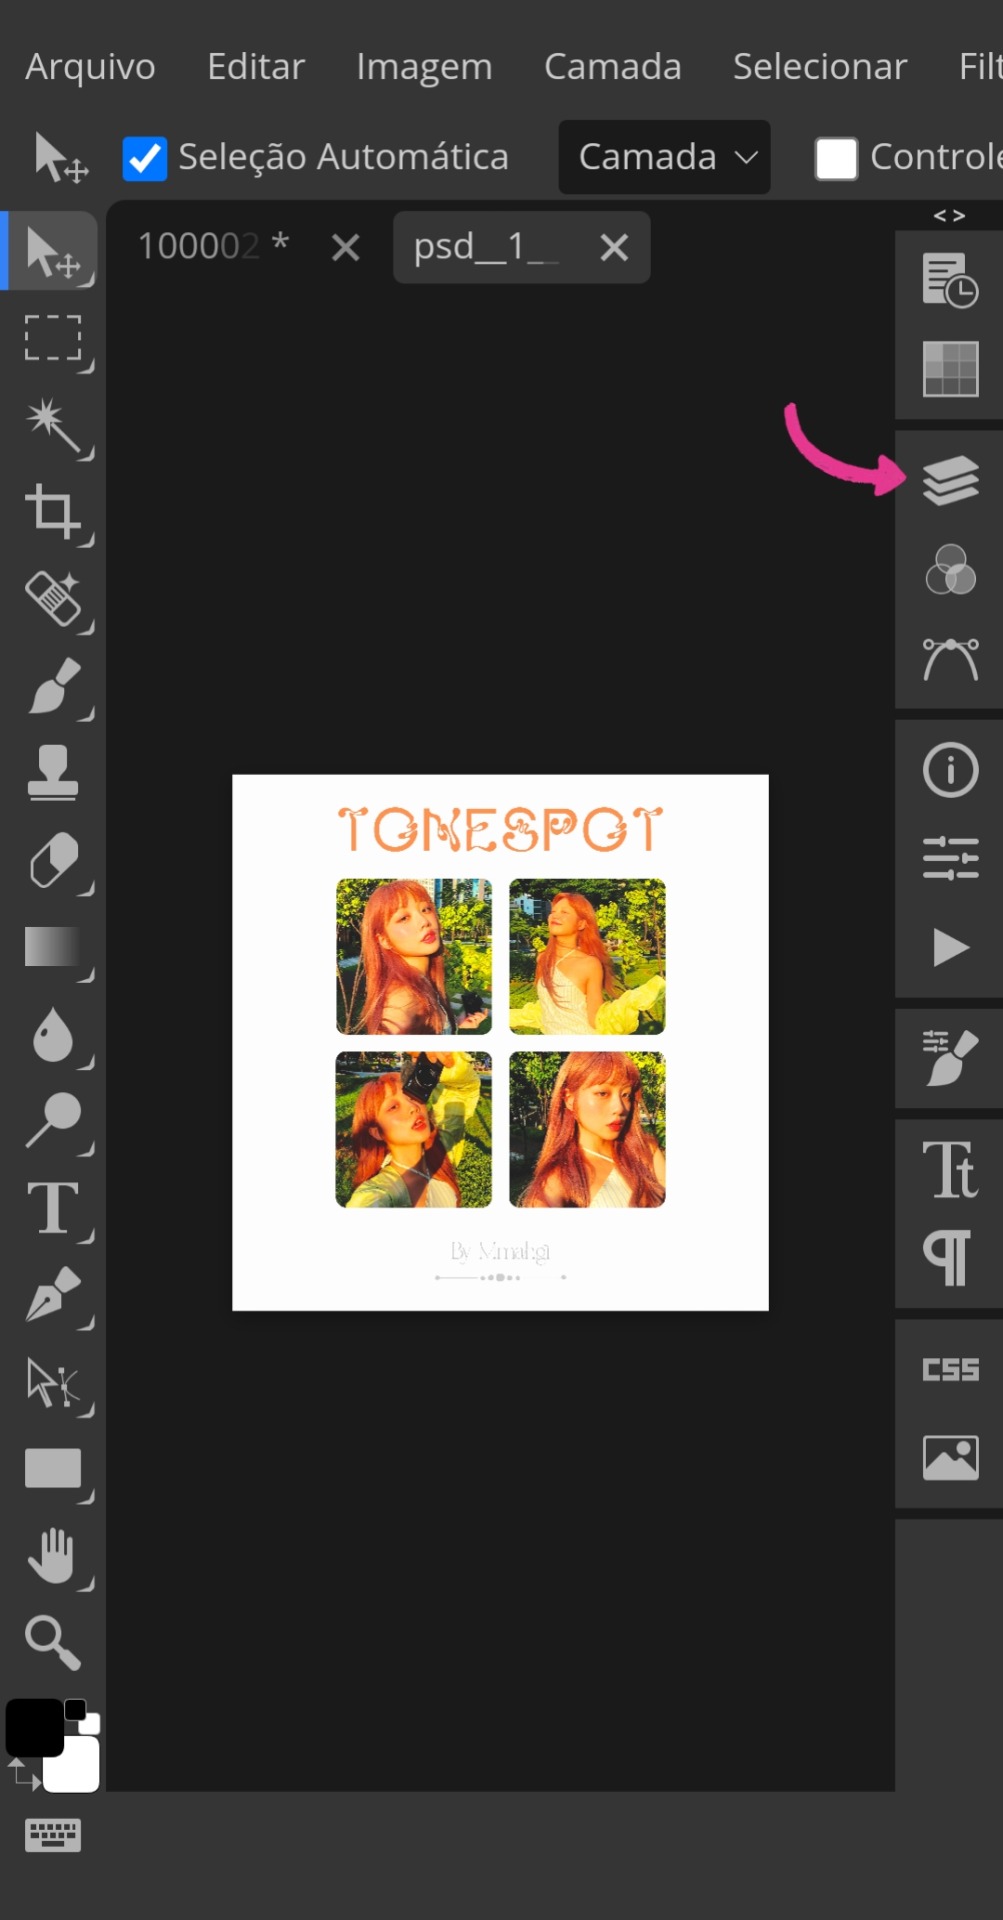
• Com esses ajustes agora prontos, você voltará para as abas acima e irá até "Arquivo" novamente, mas dessa vez para buscar seu PSD (essa parte da aplicação do PSD é opcional. Caso não queira, pule para a imagem 16). Com o PSD em mãos, clique naquele ícone indicado ali no canto da imagem 14 e faça exatamente o que está sendo feito na imagem 15. Aproveitando para informar que meu PSD está disponível para uso no DeviantArt.
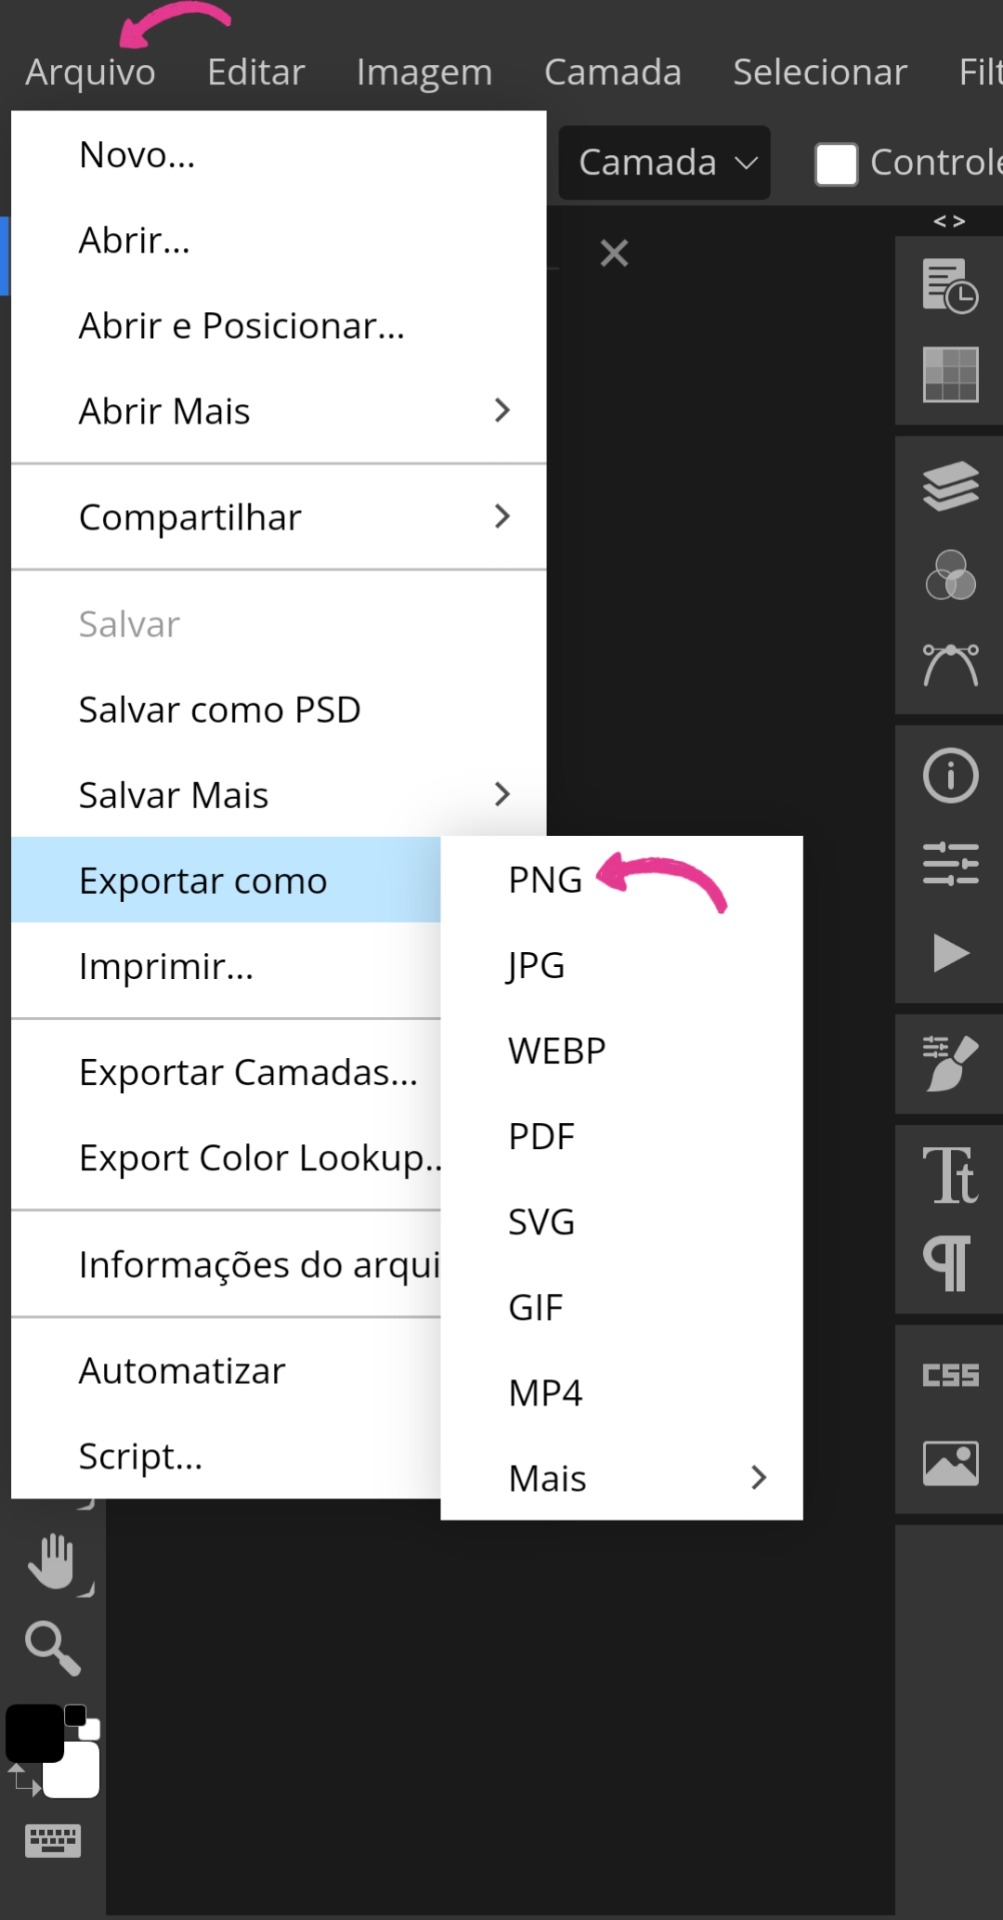
• Com o PSD ajustado na imagem, clique na mesma novamente para o último ajuste. Voltando à aba "Filtro", vá novamente para "Aguçar" e dessa vez selecione "Tornar nítido". A última etapa é a exportação, encontre a aba "Arquivo" novamente, mas agora selecione "Exportar como...". Para usar no Spirit, você precisa exportá-la como PNG ou JPG.

Geralmente, eu termino por aí, mas de vez em quando gosto de adicionar uma camada 3D. Então, faço o seguinte:
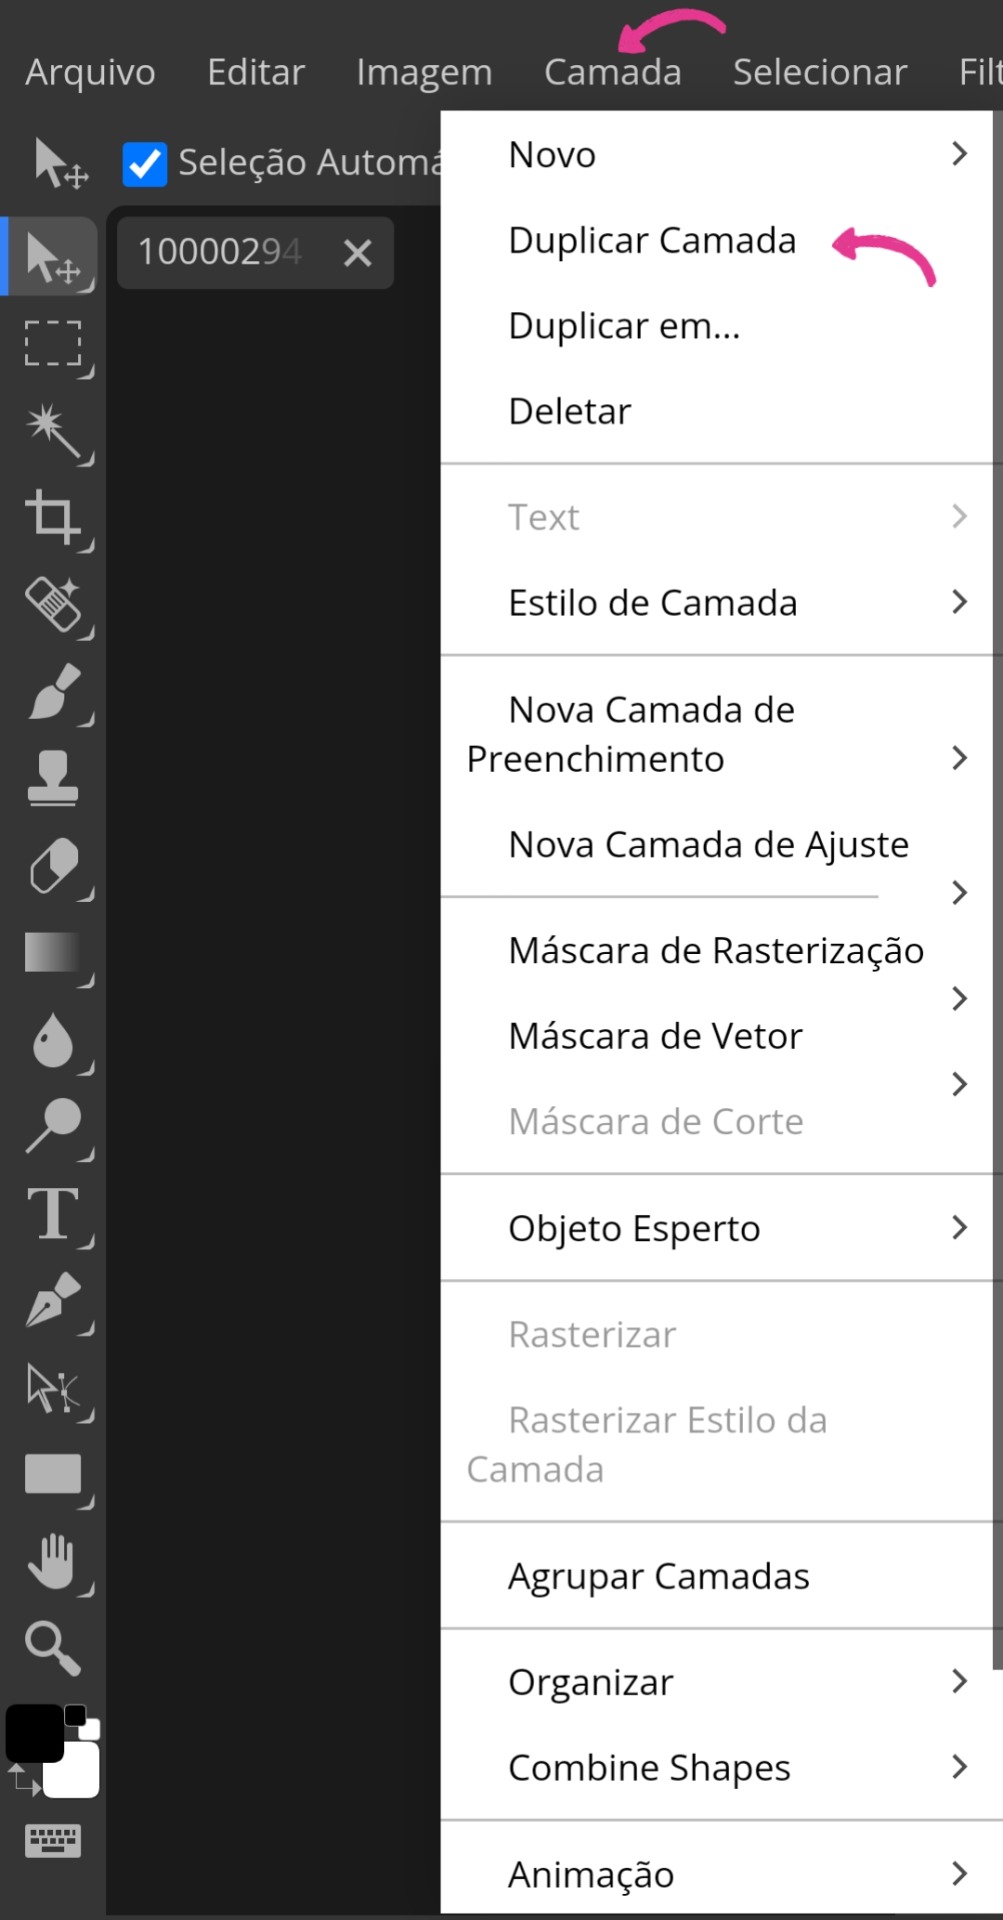
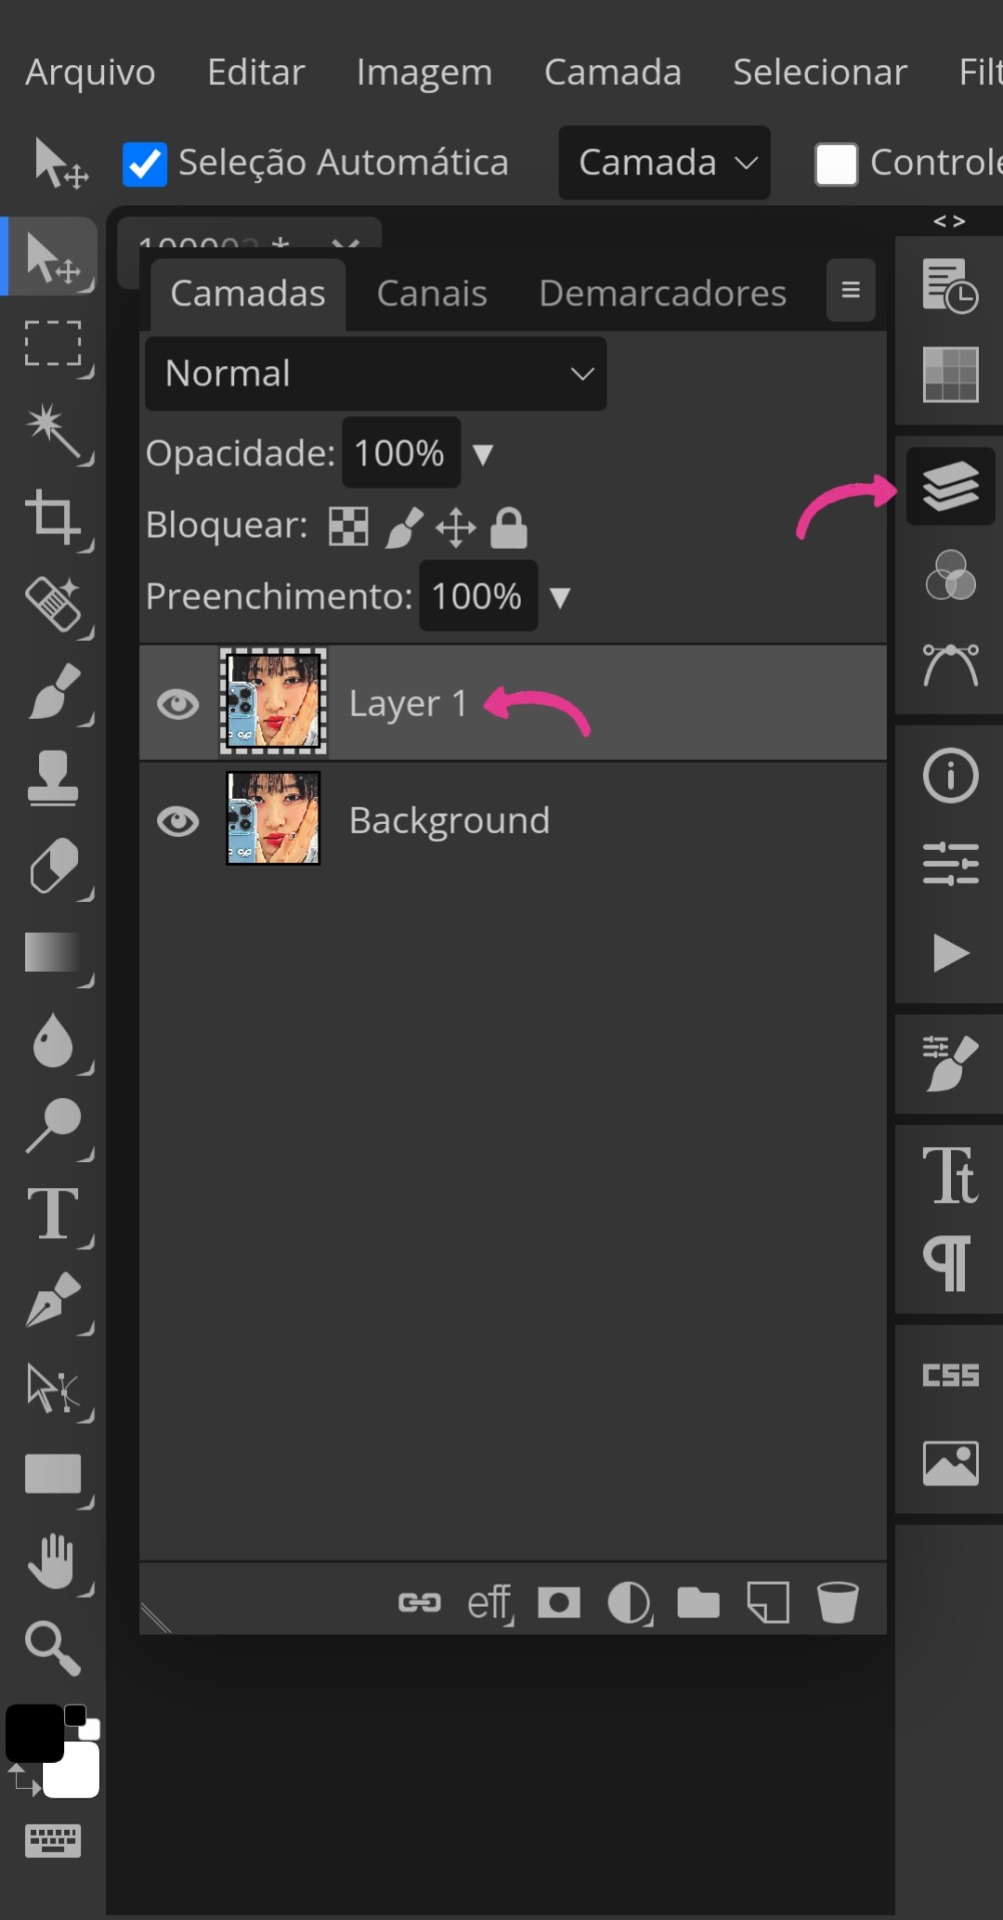
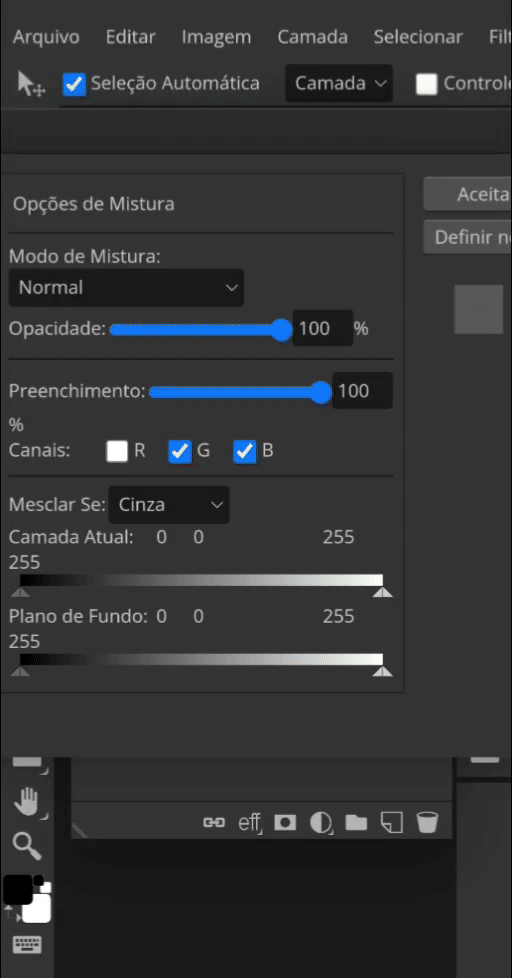
• Repito o mesmo esquema da imagem 1, mas desta vez pego o icon pronto. Vou até a aba "Camada" e clico em "Duplicar camada". Abro novamente aquele ícone (imagem 20) e clico duas vezes seguidas em "Layer". Feito isso, outra tabela maior aparecerá e, ao arrastá-la para o lado, surgirão essas três letras marcadas: R, G e B. Quando desmarcadas, cada uma delas dará cores diferentes para o efeito 3D. A letra R é vermelho com azul, a letra G é rosa com verde e a letra B é amarelo com roxo.
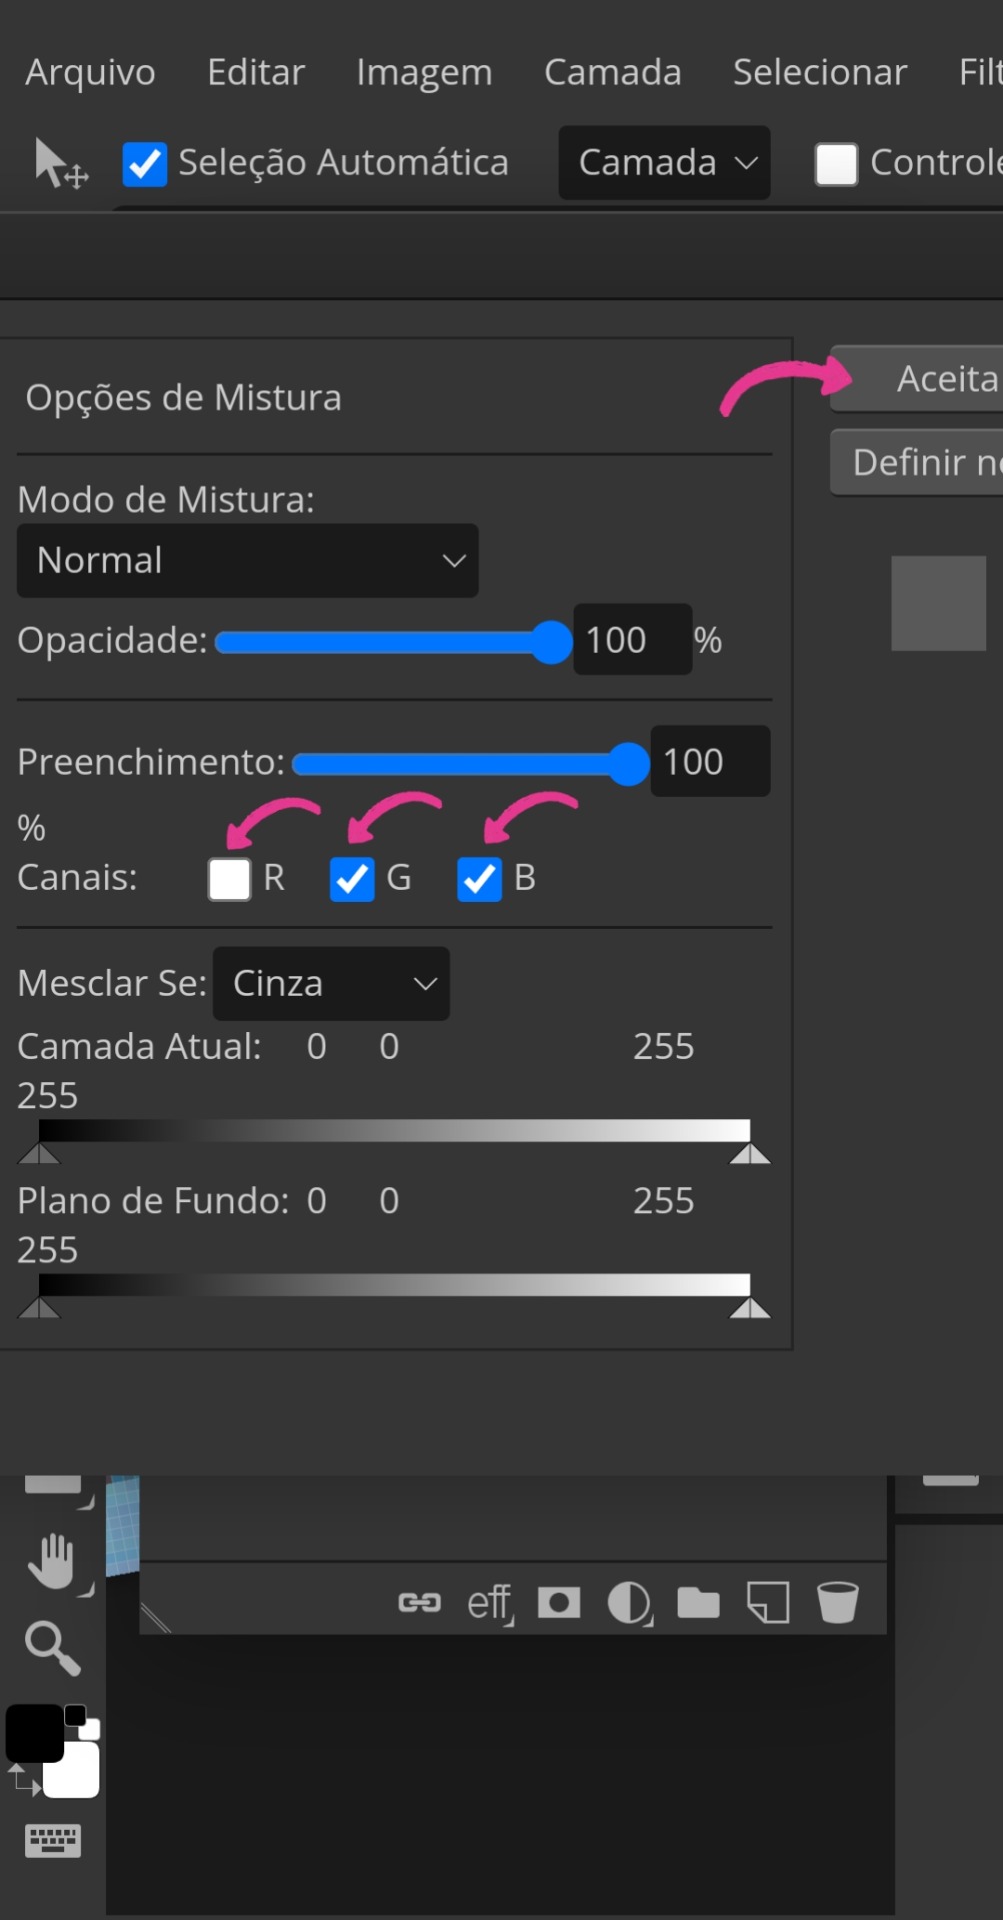
• Ao desmarcar a escolhida e aceitar, você dará um zoom bem próximo na imagem e, certificando-se de que ainda está na layer, puxará a mesma minimamente para o lado para então "ativar" o efeito 3D, conforme a última imagem ensina. O processo de exportação é o mesmo explicado anteriormente.

Não vou mentir, acabou sendo mais longo do que eu esperava kkkkj, mas pelo menos está detalhado para que vocês não tenham dúvidas. Espero sinceramente que seja útil para vocês e me deixem saber o que vocês acharam comentando aqui. Lembrando novamente que meu PSD está disponível para uso (não se esqueçam de me dar créditos se usarem).
Tchauzinho <3
#mahgi#icons 120x120#120x120#icon 120x120#120x120 icons#spirit icons#icons spirit#icons para spirit#social spirit#120×120 icons#spirit fanfics#icon maker#tutorial tumblr#tumblr tutorial#spirit
68 notes
·
View notes