#gradient text tutorial
Explore tagged Tumblr posts
Note
How do you make these Gradient texts in your post? and the different colored texts? I wanna know 😭😭
HOW TO MAKE GRADIENT TEXTS ON TUMBLR:
✦ . ⁺ . ✦ . ⁺ . ✦ ✦ . ⁺ . ✦ . ⁺ . ✦✦ . ⁺ . ✦ . ⁺ .
Hi love! thanks for your question, here's how:
1- go to this website: www.stuffbydavid.com/textcolorizer
2- once you've typed your text and chosen the colors copy the HTML code for your text (just scroll down the website a bit & you'll see it, it's hard to miss)
3- then go back on tumblr and create a post, click on the gear (top right corner), when you see the "text editor" part, click on it and choose "HTML" then paste and HTML code you copied on the website
4- then click on "preview" and you'll see the gradient text! hope this helped <3

#gradient text#gradient text tutorial#help#tumblr#loa#loa blog#loablr#shifting motivation#reality shifting#shifting antis dni#shifting blog#shifting script#shifters#shiftblr#shiftinconsciousness#shift#shifting consciousness#shifting realities#shifting#shifting community#shifting diary#visualization#loassumption#grounding
53 notes
·
View notes
Text
💫 HTML for pretty colors tutorial 💫
Hello sweet beans! Since my last tutorials have been yeeted into oblivion with deactivating my previous blog @/benkeibear I figured I repost them onto here! (Mind you, my old blogs are ahead)
I'm lowkey shocked to see blogs gatekeeping this knowledge but yeah. Make your blog pretty! Match your text to dividers or just have it as colorful as you'd like!
First of all, you can not do this on the mobile app! You need to either use a laptop or your phone / tablet's internet browser (in my case safari)
You start by logging into your account and either you make a post or you edit a post. I recommend making the post on the app first because editing is certainly faster & easier!
This is our starting point! For the fancy fonts you can use messletters


1. I will now log into tumblr on my web browser and click on "edit this post".
2. You then have to click on the little gear icon in the top right corner to change the settings on your post.
3. There you have to click on "rich text" to change it to "HTML"

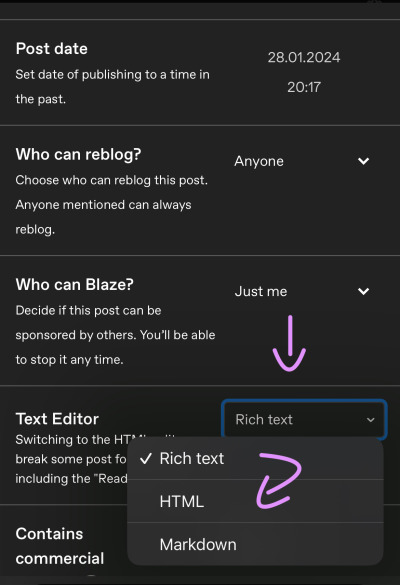
Your post should now look like this:


A quick rundown on html.
You always start with a letter or code in brackets. to end what you're doing it's </>. The slash signals the end.
P= paragraph <p> and to end </p>
I= italics <i> and to end </i>
b= bold <b> and to end </b>
Now tumblr will automatically do this for you if you made a text bold/in italics on your mobile post but to keep this tutorial simple i left that out here. You can always edit your text in the app after! Just not the color.
And as you see, the fancy text is now in coding. But we get to that later!
To colorize your text it's easiest to just use this website as it gives you lots of options!
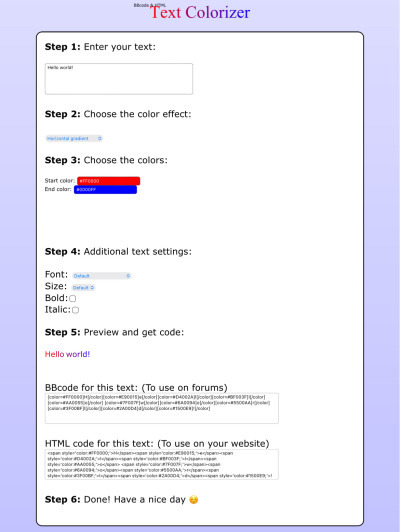
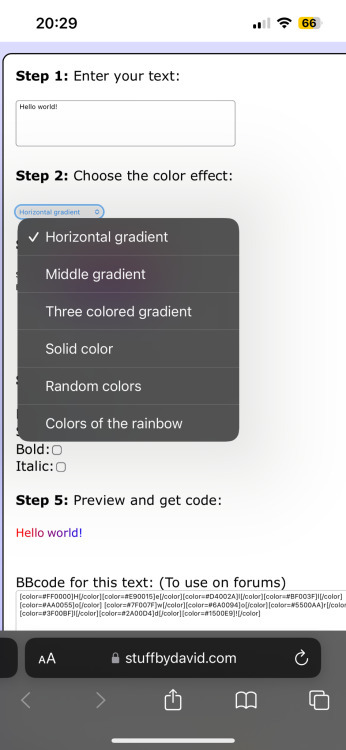
1. First i will be choosing the option of "solid color" and you can then put in the hex code of your desired color into the color box.
2. In the top box you will have to put the text you will color - for this tutorial it's "Testing"
3. Then you copy the box HTML code and paste it into tumblr where your word(s) are. Do not remove the <p> and </p> in front and after your word/ sentence!
4. For the sake of this tutorial I marked the html code for colors in pink and the words in blue
Your code will now look like this:

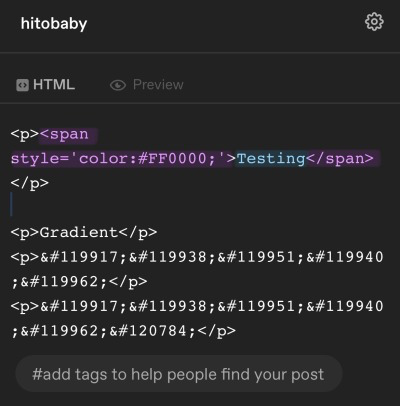
For the gradient you can simply choose horizontal gradient or three colored gradient on the website above and copy/paste the html text.
Mind you that every single letter will get its own color code now so the word gradient suddenly looks very long in html.
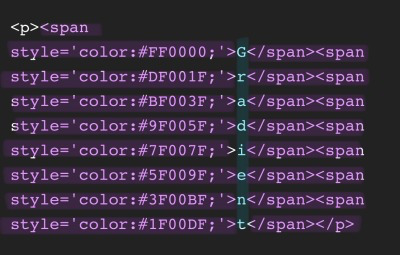

If you save the post it will now look like this!
Important to know is that you can color the fancy text only solid as the website can not color it as it is and putting the letter codes in the box above does not work either.
To color the fancy letters you simply copy the color code instead of the whole text - which looks like this:

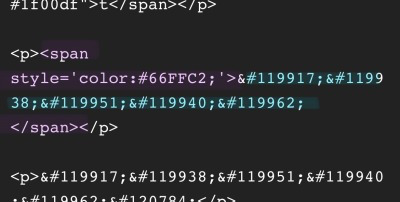
Don't forget to add </span> behind the word/the codes you're coloring to signal that this is where the color stops! If you forget to add it, nothing will be colored.
If you decide you still want to have the fancy lettering in multiple colors you have to color letter code by letter code manually like this:
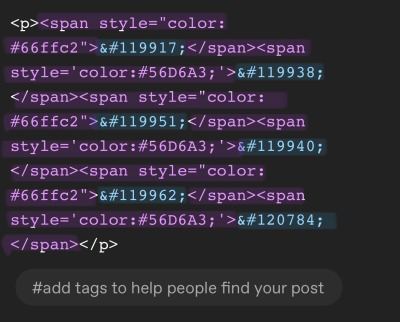

(I made a very poor choice on 2 different greens but oh well)
If you'd like to change your text, you can always do that on the mobile app like you usually would. You just can't change the color unless it's into a default color. But you can still change the size or make it bold for example.

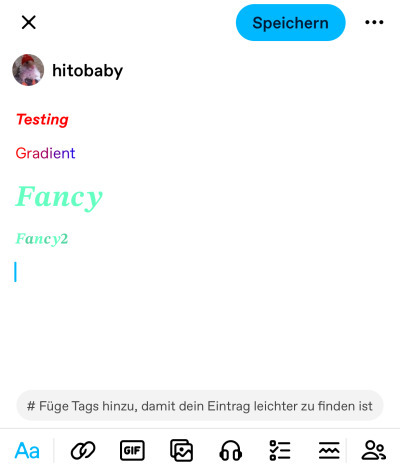
Anyhoot, this is the whole magic behind html. It's a lot and might be very complicated at first but you will eventually get the hang of it! Took me weeks and hours until someone sat me down and went through it step by step.
If you have any questions or something doesn't work as you thought it would please don't hesitate to reach out - I'm always happy to help!
#dividers by adornedwithlight#blog resources#writing resources#tumblr tutorial#html tutorial#gradient text#gradient text tutorial#gradient tutorial
169 notes
·
View notes
Note
Hi!! I saw your blog and it's beautiful! I'd like to ask if you could share some tips about editing posts, specifically changing the font color and doing that cool effect where it has more than one color on the same font ☺ if you're not comfortable teaching that's okay too! Have a good night

Hello Siren,
Thank you for the compliment. Yes, I can teach you. Just follow a tip from Auntie here: do it because you genuinely like the aesthetic. The time you spend writing the post is sometimes the same as editing it, and in my experience, this won't necessarily translate into more likes or reblogs. So, do it because you think it's beautiful.
As comical as it sounds, I won't be using HTML in this post because using the codes could cause problems. I've seen some tutorials, but I just really learned when I searched on my own.. I also do all my editings on my notebook. So, here's everything I use:

Websites I use for editing:
HTML Code Editor: While you're creating your HTML, you can simultaneously see if it's working
BBcode & HTML Text Colorizer: This is where you'll create the gradient
Browserling: I use this site to make the gradient code compatible for Tumblr
Aesthetic Symbols: this is for that cute symbols
Piliapp: more copy/paste symbols
Fontes e Letras: copy/paste fonts
Canva: This is where I create some of my designs. I also use Photoshop
Deviantart: a lot of material for Photoshop like templates, PSDs and Renders (PNG image with a good resolution), you can see the ones I use the most in my sources
@animatedglittergraphics-n-more: dividers
@saradika: dividers
@engrampixel: cute material
Color Hunt: if you don't have a color pallete in mind, here you can find a lot of options
Adobe Color: if you want to create your own HTML color palette this site can help
DaFont: where I download my fonts, the ones I use the most are: Betterfly, Arcadepix, Starborn, Lemon Milk, Cursive Sans and BubbleGum
EmojiTerra: as I use tumblr on my notebook, this is where I get my emojis

HTML Text Editing
Important:
Go use the HTML Code Editor in this part and your life will be way easier.
Some things I do right here in the tumblr editor, like putting the images and different fonts like Lucille.
All HTML code starts with < > and ends with , that is, when you start a paragraph you will write <p> and when you finish you will write </p> (HTML Code Editor ends your coding automatically)
I'm teaching all this because if you want to make gradients in your entire text and not just in the title, you'll need to know about html
To start your HTML you will need to go to the gear that appears on the right side when you are writing your post, go to the bottom until you find the Text Editor and switch to HTML.

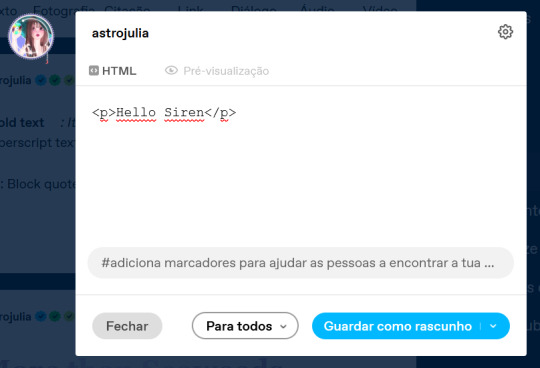

The Codes
<p> start a paragraph </p>
<br> to make a space between text less than a paragraph (good to use in indented text) you don't need to put </br>
<b> make the text bold </b>
<i> leave the text in italics</i>
<strike> leave the text crossed out </strike>
<small> make the text small like this </small>
<h1> make the text large like this </h1>
<h2> make the text large like this </h2>
<ul> Create unordered list (dotted) </ul>
<ol>Create lists with order (numeric) </ol>
*instead of making paragraphs you will create new items in the list using the code <li> </li>
<blockquote class="npf_indented"> make the text indented </blockquote>
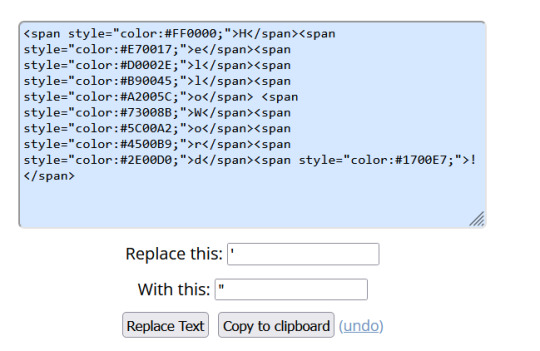
<span style="color: #HTML"> Code to color your texts, pay attention that it uses (") instead of (') and doesn't use (;) </span>
Tutorial on creating invisible spaces, just like I use to do the navigation, if I put it here everything bugs. PT-BR
<a href="URL">Link Text</a>: Creates a hyperlink

Making your Gradient
Go to BBCode and HTML already with your HTML text and colors in hand. Write or copy your text in the box, choose the gradient type (I use middle) and select your colors (from one to three different colors)
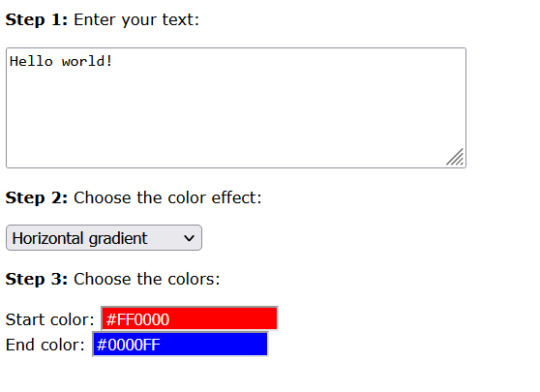

Now copy the text in the "HTML code for this text: (To use on your website)" box and go to the Browseling, you will replace the (') to (") and the (;) for nothing
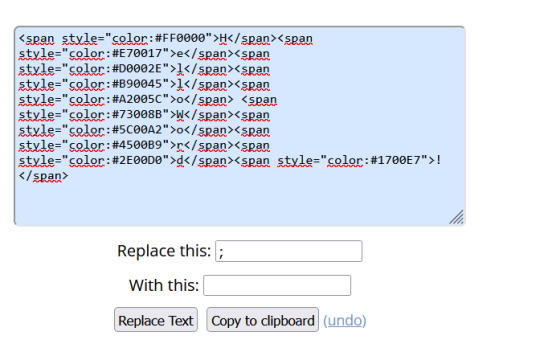
Copy and paste your new code direct in your tumblr post editor or in the HTML Code Editor. Success!!
I think that's all. Kisses from the Sea! 🐚

187 notes
·
View notes
Note
Hello!
I just wanted to ask how did you get your text color to fade like that? Thanks!
hello hello
so you go to this website
this is what you will see

but you're only gonna work with this:

so in the top box, you will write the text you want. then change the two colors you see to the ones you want. in my case, it should be smth like this:

then you will click run, and you should get a link in the lower box. copy the link cause that's what you will use
then go back to the post you're working on in tumblr. click the cog or settings of the post
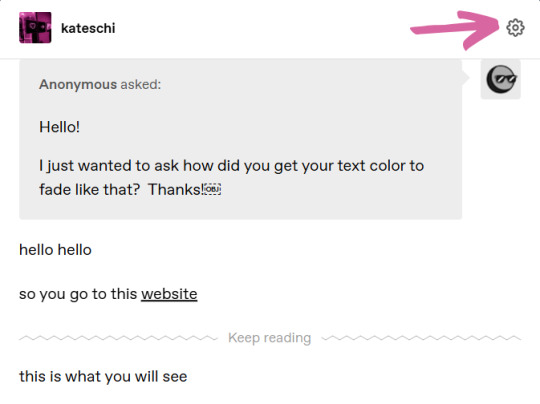
then scroll to text editor

click on rich text and choose HTML instead. it should show you the post again but in HTML format
just paste the link you got from website before onto the post and switch back to rich text and it should look like this:
the final result!
sorry i took a long time to respond it's cause i wanted to give as clear of a guide as i could
hope this helped!
6 notes
·
View notes
Note
Random questions if you don't mind! <3
1- How you do these gradient colours in the title?
2- Where you do these headers for your hcs?
Thanks if you answer! You are very creative! :D
Heyy! thank you for the asks<3
1- the gradients is something very complicated to explain but ill try my best to just give a quick summary.
I first go and create my title without writing anything else, just the title, go to chrome and open the Tumblr website (make sure its in "PC version" if ur on mobile or else it wont work)
i edit the drabble and go to the settings, there are a "rich text" box, click on it and then click HTML.
ok, this is where it gets complicated
you will open another page called "text colorizer" write the title you want in the writing box.
there will be a box with "one color" click on it and there will be alot of options, click on the three or the other version you desire of the type of gradient.
there will be two codes when ur done picking the colors.
(tip: if you have a specific banner with specific colors, sometimes to make the title match the banners colors i go to color picker website and upload the image that i used on the banner)
ok, back to the code, you copy the last one.
i recommend you to go to text replacer and put ";" to replace with nothing, but its just a recomendation because it can bug :C
then you copy the replaced text go back to the Tumblr page, there will be a "<p> TEXT <p>" replace that with the code
and boom! ur done.
(it may appear a little "code not supported" but dont worry, it still works)
after that you can go back to the Tumblr app to add some details.
2- i do it on Alight Motion, i go to the custom size and put "1500 x 500" and then i put the images i want with some details! ✨ (i use the transparent background)
thats all and thank you for the compliment, i appreciate it<3
the websites i talked about:
if my explanation is too confusing about the gradient, theres a tutorial on YouTube! if your on mobile just do everything the person says in the "Pc version" option that chrome has.
xoxo<3
12 notes
·
View notes
Note
bestie i wanna know how you did the gradient thingy for the edits (writing part) i read it somewhere and then FORGOT
so go to this site then:
write what you wanna write on the upper box of the white section

2. select the colors by clicking on the color thingy

3. click on run and you'll get the code which you have to copy

then how to use this on tumblr
click on setting at the top of the post and there in text editor select html

2. paste your code

3. then go back to rich text

4. and there you have it! (you might have to change the size of the text)

the text: go to sleep
#i hope this is what u were asking and i didn't make a complete fool of myself hasdf#nandini<3#asks#the loveliest mutuals💕✨#gradient text#gradient text tutorial
16 notes
·
View notes
Text
THIS WAS SO HRLPFUL THANK U LOVIE
「 Gradient Text Tutorial for Captions 」
i'm sure there's several of these already out there, but here's a rundown of how i make the gradient text for my gifset captions! (example)
𖥻 tutorial below cut <3 | screenshots + bold/italic/small/color text included for my fellow adhders who can't sit through long blocks of text

websites used: color picker, text colorizer, text replacement
step #1: pick your colors (optional) when making gradient text for a caption, i usually use an image color picker to get exact hex codes! this just helps me match everything even better than i could when manually inputting colors! (this is completely optional, but i like doing it, so i thought i'd include it here!)
step #2: making your gradient now the fun begins! open the text colorizer linked above, and enter the text you want to be a gradient into the text box:

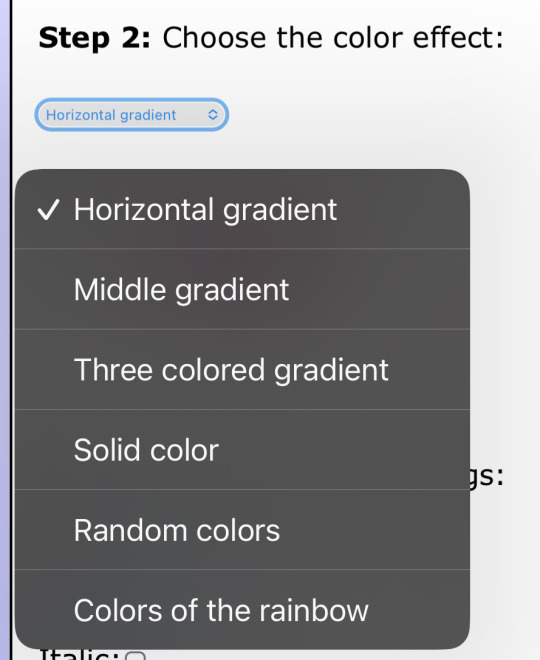
(all caps is by no means necessary! i'm just doing it to make the gradient stand out even more, since i'm going to have a decent amount of text in my caption.) after entering your text, choose the type of color effect you want using this drop-down menu! color effect is essentially the type of gradient/how many colors it uses, etc. play around with this to find the one you like best!

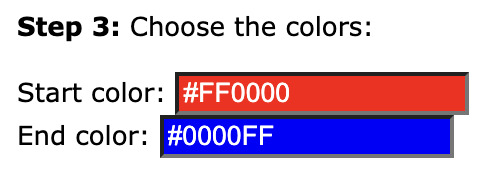
i'm sticking with horizontal gradient, but you can choose whichever one you like! (there's also a solid color option if you want to just use a color that isn't available in the tumblr text options.) after color effect, you can choose your colors using this section - if you did use the color picker from step one, you can just paste the hex codes into the boxes.
if not, click on the colored bars, and this hue picker will pop up:
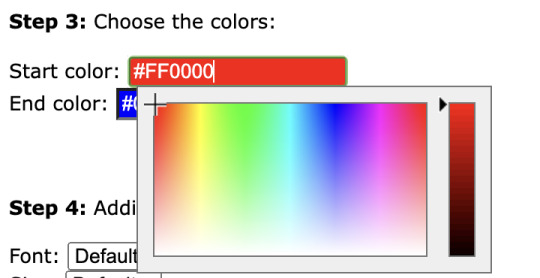
drag your mouse around in the left box to choose your color. the bar on the right can be used to modify shade.
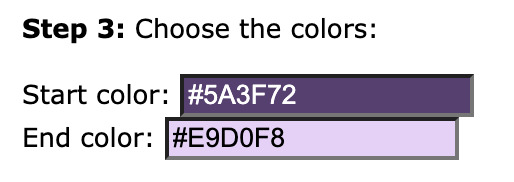
(these are the colors i'm using)
skip over the "additional text settings" section (these options mess with the html code and cause issues when you try to use it on tumblr) and check the preview to make sure you like how your gradient looks.

if you're having a bit of trouble seeing the gradient properly, you can scroll back up to "additional text settings" and turn on bold to see it better. just make sure you turn it back off before copying your code.

now you're ready to copy your code!
after making sure any additional text settings are returned to their default/unchecked states, scroll down and copy the HTML code (NOT the BBcode). select the text and copy it using command/ctrl + C or right click and click "copy".

step #3: replacing
the text colorizer used here is great, but it does add unneeded semicolons to the html code that mess with tumblr's settings and cause formatting problems.
open the text replacement site (linked at top), and paste the code you copied into the text box:

in the "replace this:" box, type ; (leave the "with this:" box blank)

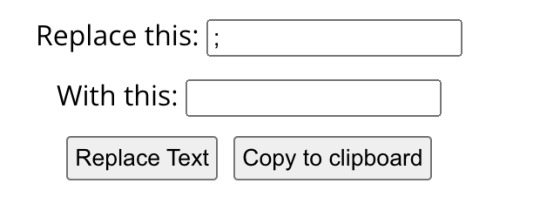
click "replace text". skim over the new code to make sure the semicolons are gone (sometimes you've got to click "replace text" a couple of times for it to work), and then either click "copy to clipboard" or select and copy the text manually.
step #4: writing your caption now that you've got your code, open tumblr and make a new photo post. look in the top right-hand corner of your screen, and make sure "legacy editor" is turned on. if it isn't, click the toggle to turn it on.

next, you need to make sure your text editor is set to html. to do this, click the little gear in the top right corner of the new post. select "html" from the drop-down menu next to "text editor", and then close the settings. [07.27.23 update: if, like me, you're stuck using the new editor, you can still set your post type to html, and gradient text will still work. the post editor will just turn your files into code when you're editing, and you'll have to fix the spacing in between your gifs (if you're using this for a gifset caption) in the preview tab. it looks super weird and alarming at first, but it does still work with the new post editor.]

upload your gifs and then move down to the caption. open the html tab and then paste your code! once you've done that, click on the preview tab to check how it looks.
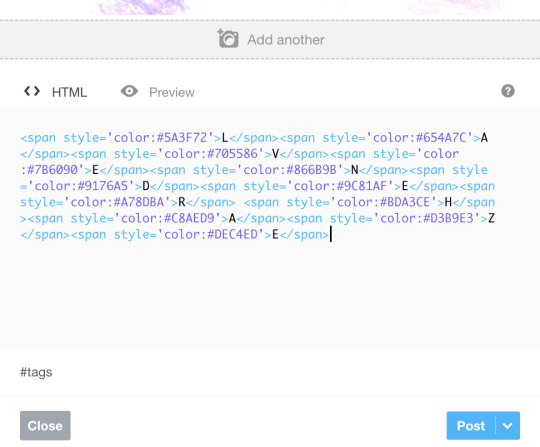

my gradient looks pretty good, but i'm going to bold the text to make it more visible. here's how to use html to do that:
<strong>code goes here</strong>
here is a list of other html codes you can use to stylize your text! (they use <;b> for bold text, this is another way to do it, either method works fine!)
if you want to have another line of text under/above your code you need to add <br> at the end of the top line to create a line break (just pressing enter won't work). here's an example of how to format that:
text text text<br> text text text<br> text text text
write the rest of your caption, and then you're done! here's my end result and my final code:
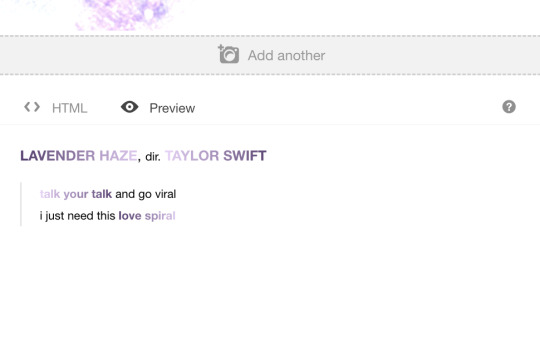
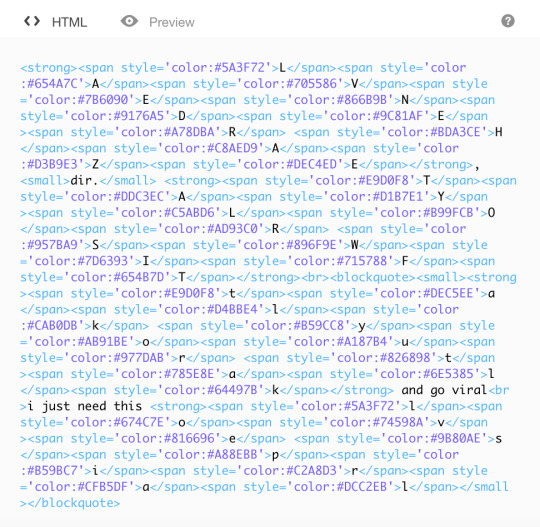

i hope this was helpful! feel free to send me an ask if you have any questions! happy giffing <3
850 notes
·
View notes
Note
Hi! I love your account, can I ask how do you do your gradient texts on your posts? I used to do them a few years ago but I think tumblr updated a lot and I just can’t seem to be able to do it anymore😭
thank you sm! and yes this is how i do it, im not super tech savvy or whatever so this in my opinion is the easiest way to do gradient text posts.
first go to https://www.stuffbydavid.com/textcolorizer . you should be able to type in whatever you want to be gradient text in the box that says "Enter your text", and then pick whatever colors you want in the little color finder box things (?) that say "start color" and "end color". from there you should see your text under it typed out with the colors you chose. copy the HTML code, NOT the gradient text. Go back to tumblr on your computer and hit the settings wheel on your post and change the post type by the Text Editor label from rich text to HTML, and then copy and paste your html code from the text colorizer into where the phrase was that you wanted to be gradient text (remove the original phrase and copy paste the code, does that make sense?). then just save your post and it should have saved as gradient just fine :)
im really bad at giving tutorials btw so if that didnt make sense, click here or here to read some other tutorials for the same method i use.
0 notes
Note
hey how's it going ? Could you tell me how you make your text colored in a gradient?
example: https://www.tumblr.com/mcbride/711317108307509248/melissa-schemmenti-vs-barbara-howard-abbott
hey nonnie!!! doing good! how's you doing?
i'm horrible at it, but thankfully, there are good people out there who already made tutorials on gradient text for captions. i'm a simple gal so, I go easy - you can check the tutorial HERE. But you can also use this other method that may seem a bit more complicated, but will allow you to make gradients with more than 2 colors for example.
#questions#anonymous#hope it helps nonnie!#this looks difficult but its actually pretty easy standard stuff once you get used to it#once you understand how it works#its easy peasy lemon squeezy#gradient text tutorial
1 note
·
View note
Text
So you wanna make gradient text?
this was originally made just to help a friend but she suggested I post this publicly to help bcs the other tutorials out there aren't very straight forward. with that said pls ignore typos:
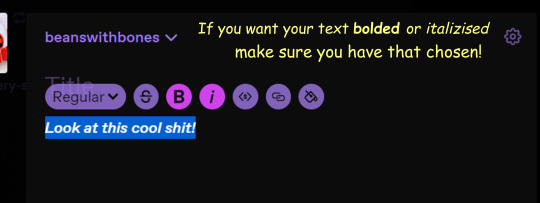
↓↓ Site Link ↓↓
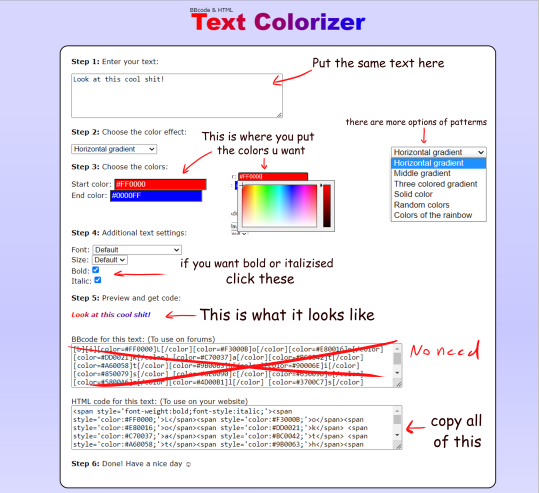
↓↓ Site Link ↓↓
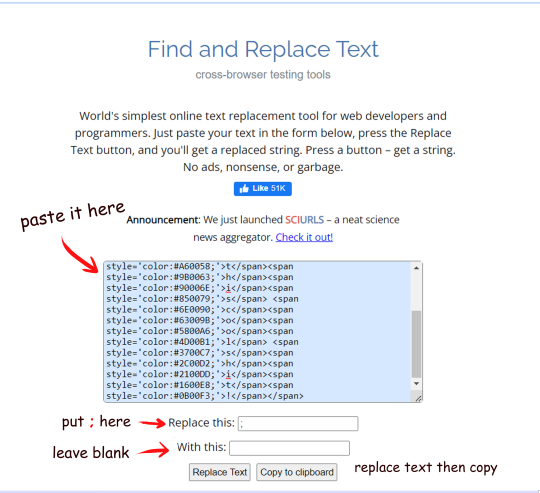
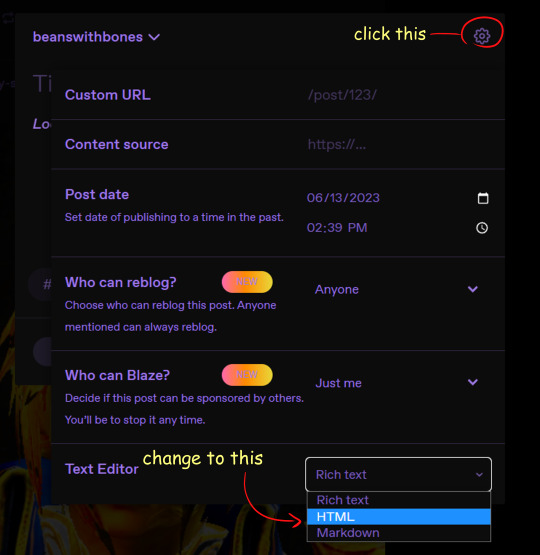
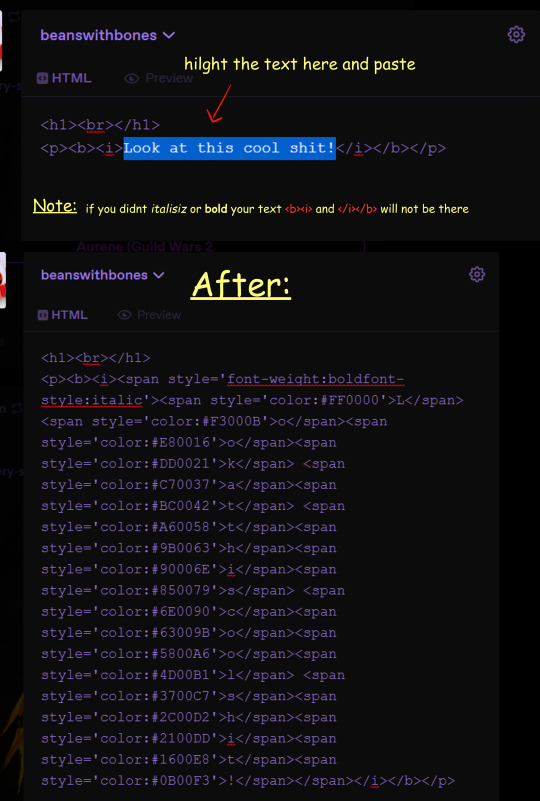
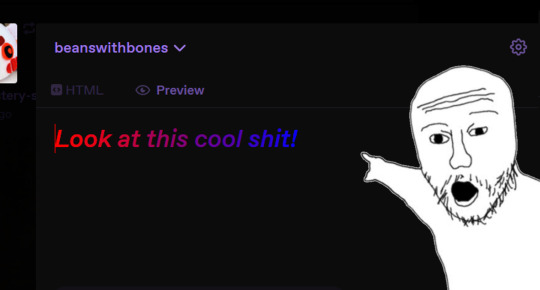
Note: you can still continue typing in the preview
Hope some peeps find this helpful
#tutorial#tumblr#tumblr tutorial#text art#text art tutorial#gradient text#art tutorial#I know its not exactly art but I wanan get this out there to help ppl
4K notes
·
View notes
Text
GRADIENT TEXT TUT

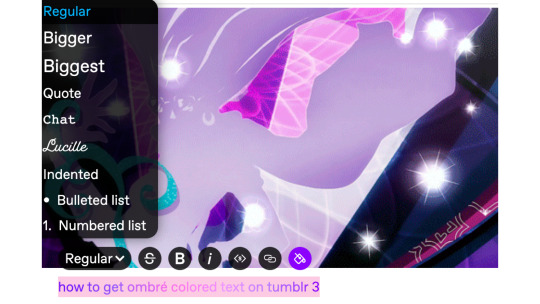
how to get ombré colored text on tumblr <3
꧞ i get a lot of dms and comments asking about how to change the color of your text to colors that tumblr doesn’t have or to an ombré text. this is how
꧞ sites you can use: the one i use // two // three
꧞ you can use your phone for this, but i prefer using the computer. just go to safari to do it instead of the app if you wanna do it on the phone


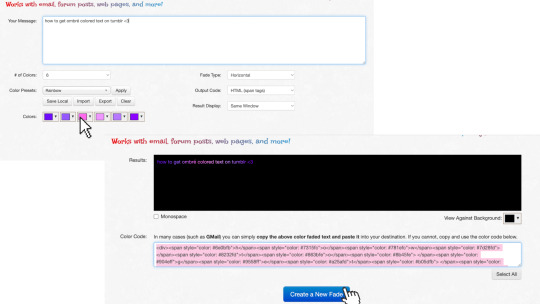
one: copy the text you want to color from your tumblr post then paste it into the websites text box
two: change the color of the text to whatever color you want. with the website i use it allows you to pick presets or you can also customize your own then click generate
three: click the “select all” button and copy the code
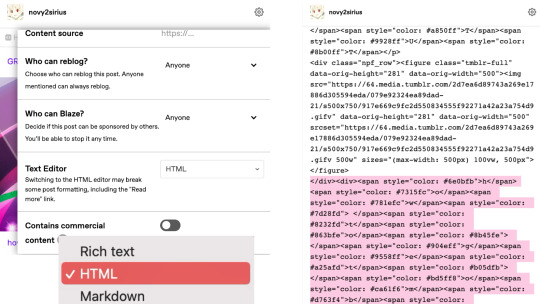
four: go over to tumblr and click the edit button on your post
five: click the settings button and change the text editor to "html" then find the html section at the top and click on it
six: paste the code from the color fader website in the html where you want it to go (i paste it at the top and just edit it on my phone by holding text down and moving it)

175 notes
·
View notes
Text
GRADIENT TEXT TUTORIAL

HOW TO GET OMBRÉ STYLED TEXT ON TUMBLR
𝜗℘ I got a request on TikTok asking to do a tutorial on gradient text — tumblr doesn’t have an in-app option on doing gradient texts. This is how.
𝜗℘ Sites you can use: image color picker / stuffbydavid (gradient text).
𝜗℘ People say that you have to use a computer for this, which isn’t true. I am able to make gradient text on my phone, but you can use a computer if you want.

color picking from an image is optional, but highly recommended.
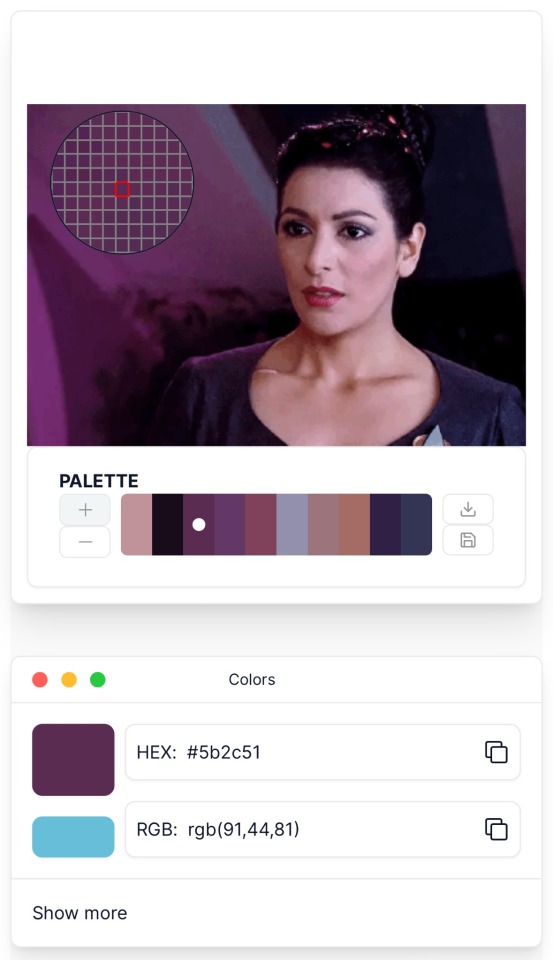
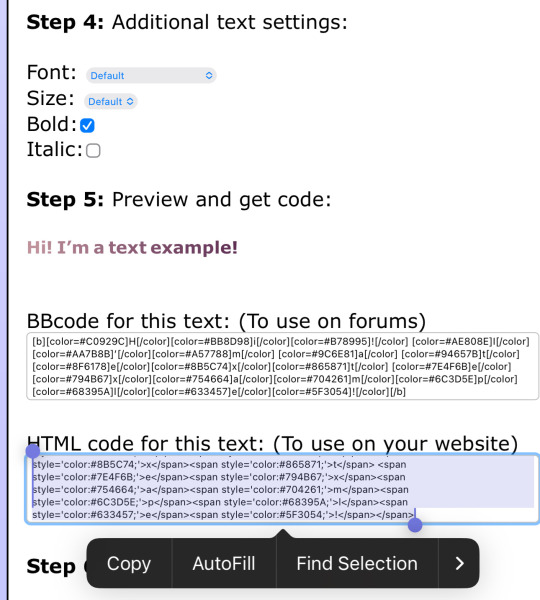
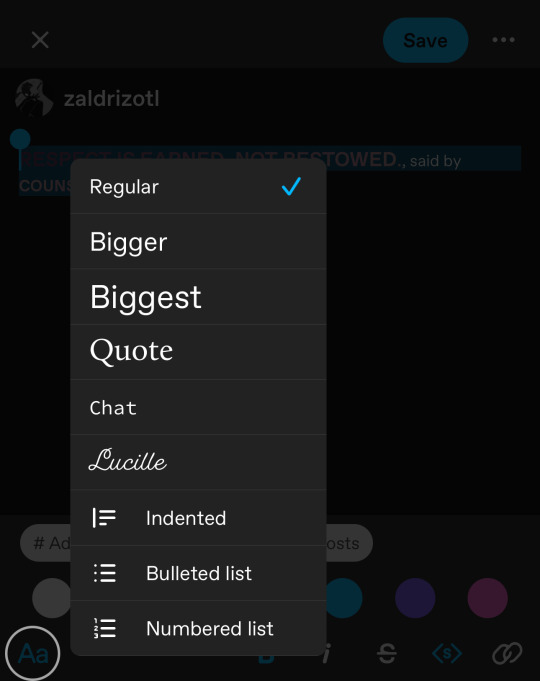
one: put the text you want to color for your tumblr post.
two: change the color of the text to whatever color you want. there are several options on how you want it. pick whatever option you want. the text will automatically generate for you.
three: copy the entire code then press “copy”.
four: go over to tumblr (website, not the app) and click “edit post” (the pencil) or create a new post.
five: click the settings button and change it from “rich text” to “HTML.”
six: paste the code from the gradient text website in the HTML where you want it to go. (I paste it then just save the post to my drafts then edit the text on the app)
#jasper’s tutorials#tutorial#gradient text#ombré text#text#tumblr text#text post#colored text#text tutorial#tumblr blog#tumblr tutorial
115 notes
·
View notes
Note
Hey how do you do the color gradient thing for your dialog tags?
Assuming you mean these things, I've actually been meaning to make a guide of my own for a while lol.
For one, you can only do this on computer/the website of Tumblr! There's no option to select this stuff on the app.

STEP 1: CREATE A NEW DOC / GO TO SETTINGS

It opens a dropdown menu/whole screen full of options!
From there, select the "text editor" dropdown, which starts as displaying "rich text".

Select "HTML"

And it should change how the entire post looks!

STEP TWO: CHEAT
Yeeeeeaaaaah, so I use a website for this lol

I inserted my colors for faeries (#30853C) and Cloud (#6DC1B4) for my example of "these things" earlier. To make this easier, I most often have two windows open at a time while working on uploading my scripts to Tumblr.

To get colours to insert into the Text Colorizer website, you can use any kind of hex color picker or even this one website I've used to yoink "thematic" colors from photos!


Personally, I've developed a massive library of colors over time for this exact purpose lol. Using my old colors as a "base", I can change it accordingly to the kind of "new color" that I want for a specific character or thing!


(I'll use the website to also make gradients for "in-between" colors lol)
STEP 3: INSERT TEXT / DESIRED COLORS
To make Nova's gradient, I start with #A600D9, my color for Magic, and end with #F56745—their individual color. However, being as it's short, I'll use a quote from them instead lol.

Once you've inserted your text and colors, you will click in the text box I highlighted in red, ctrl+a and ctrl+c to copy it all, and go back over to your new tumblr post tab!
From there, you'll ctrl+v to paste the entirety into the HTML area, which pastes the code into your post!

AND VOILA!

You have gorgeous gradient text!
However, I want to give a fair warning and a bit of advice! If you didn't notice wayyyyyyy back when...

Tumblr warns that this all can break your formatting!
It doesn't do it too often, but take it from someone who does an obscene amount of formatting... it's 100% true.
STEP 4: CHEAT SOME MORE!
For this reason, I personally have a whole separate draft post full of my characters' colors (and names lol) that I use to copy-paste them in from rather than using the "html" text editor on every post!
I mentioned earlier I often have multiple windows open while editing? Here's what that looks like!

Additionally, I'll use a separate tab off on the left (my "current wip post" side) with the "html editor" enabled for me to copy-paste stuff!
(Also here's yet another example of how many colors I have)

Once again, you can ctrl+c these things to paste them into another tumblr post with the correct colors!
And it's ONLY possible to do on the website!!!

EXTRA INFO!
WARNING:
Tumblr will only allow each "paragraph's html to be so many characters long, so you can't have too big of anything in a gradient!

And by "anything"... I mean you really can't have that big of a gradient in general. RIP lol.
It straight-up won't save the post so long as you have that "overflow" in the character block! MAKE SURE YOU'VE FIXED IT, OR YOU CAN AND WILL LOSE ALL PROGRESS ON YOUR POST!
SINGLE-COLOR TIP:
You don't need the website for a single color! If you'd like, you can just change the "color code" within the html editor to change specific colors!

MAKE SURE COLORS CAN WORK ON DIFFERENT BACKGROUNDS!
On desktop, you can use shift+p while not on any sort of textbox to change the color pallet! I always do tests to see which colors work best before settling on any!

(Tho, the blue background SPECIFICALLY is nightmarish to work around. So if that's the ONLY thing I can't make work, I often ignore it and let you guys who use it suffer lmao)

(Hopefully this'll give you guys some respect for me and how much I do to make my posts aesthetic af lol)
Also hopefully this all helps???
divider by @cafekitsune
57 notes
·
View notes
Text
COLOUR TEXT TUTORIAL ⋆౨ৎ˚⟡˖ ࣪

go to this site ➤ follow the instructions & copy the code from the bottom box (the HTML one) ➤ open tumblr on a desktop browser ➤ create new post ➤ click the gear icon in the top-right corner to access settings ➤ scroll down and find the “text editor” option; switch it to “HTML.” ➤ paste the HTML code into the post editor ➤ scroll back up and switch between “HTML” and “preview” modes to edit the code and see how your post looks ➤ save draft :)
step-by-step pictures under cut :
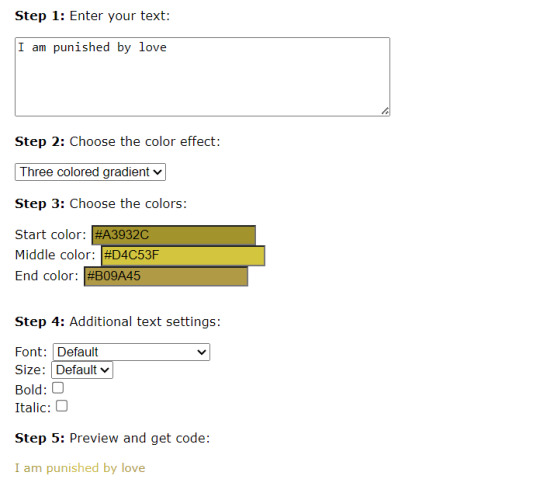

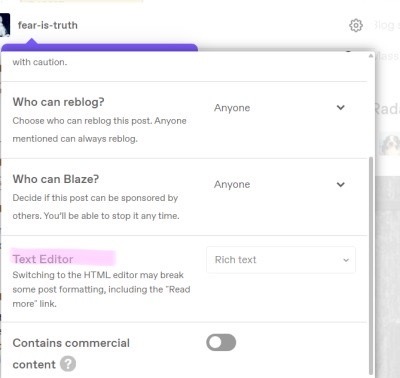
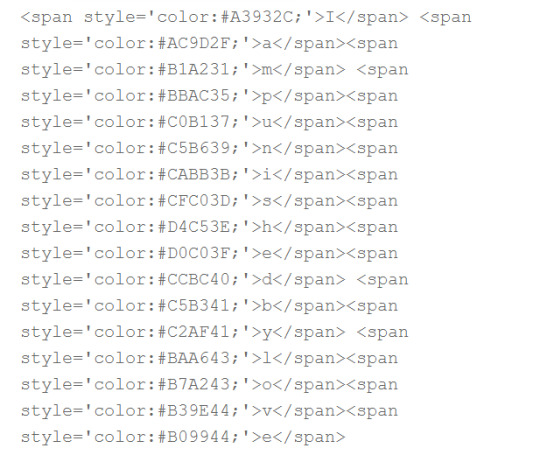
final result : I am punished by love
46 notes
·
View notes
Note
how do you add the color gradient thingy to your text? i've been trying to look up tutorials but i cant find anything :(
GRADIENT TEXT TUTORIAL ꣑ৎ

hii!! i made a video cause idk how to explain!!!
here's the code website i used !!!
hopefully this makes sense!!!
enjoy jacqueline taieb in the background too lol

37 notes
·
View notes
Note
hi !! i saw that you use gradient text and just wanted to ask for an example of the html on how to do it ? online tutorials haven't been helping me but i really wanna use it .. it's ok if you don't wanna share ^_^
Haiii sweet anon ! ! The Idol isn't the best at explaining , but che will try to do so to the best of her abilities. (( remember , this is only on desktop ))
step 1 ;; go to this page & insert the txt uu want 2 be gradient

step 2 & 3 ;; select the colors uu want for the gradient , then copy the second box of cnp text
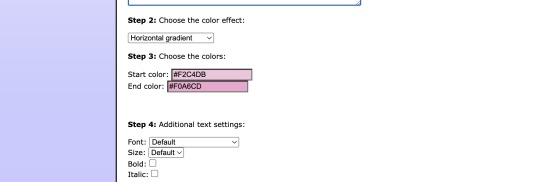
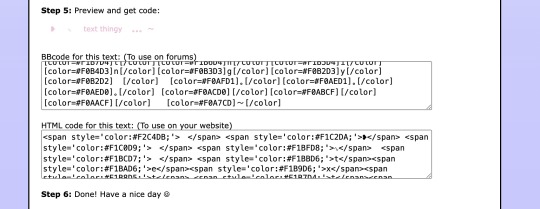
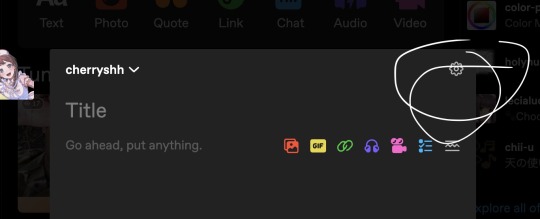
step 4 ;; do a post like u normally would & click on the lil' settings icon
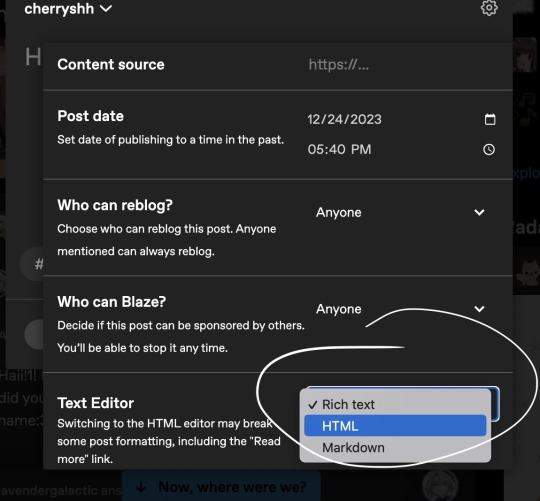
step 5 ;; uu should see a screen that allows you to switch from rich text to html.
step 6 ;; just go back to where you insert the text for uur post and paste the html you got from the website earlier.
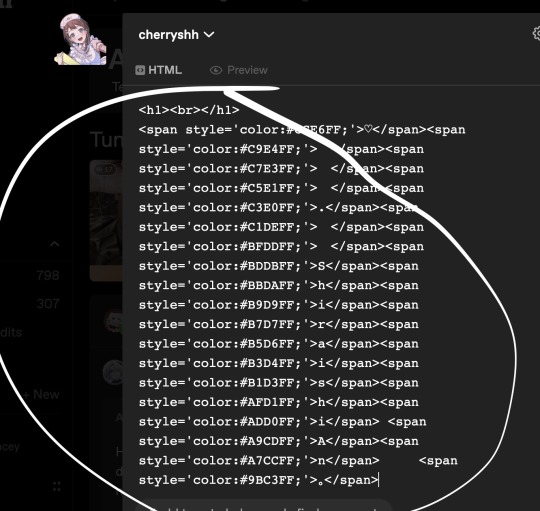
step 7 ;; click on the lil' settings icon again and switch the text editor back to rich text, and done ! < 3
67 notes
·
View notes