#solarpunk crafts
Explore tagged Tumblr posts
Text

Patched up some holes in my shoes with embroidery floss! I enjoy visible mending and I refuse to get new shoes because these should last longer. They're not old! The insides of the heels are starting to wear as well, I'll have to reinforce those next...
300 notes
·
View notes
Text
Let go of the idea that diy will inherently look shit. All your clothes are handmade you just don't see the people doing it.
#ecopunk#solarpunk#diy patches#repair#sewing#sustainable fashion#visible mending#patchwork#patches#crochet#diy or die#diy goth#punk diy#diy craft#diy punk#diy projects#battle vest#battle jacket#alt fashion#alternative fashion
3K notes
·
View notes
Text
I made some solarpunk soda tab jewelry!! Again. And I'm making more. (Image ID at the bottom of he post)
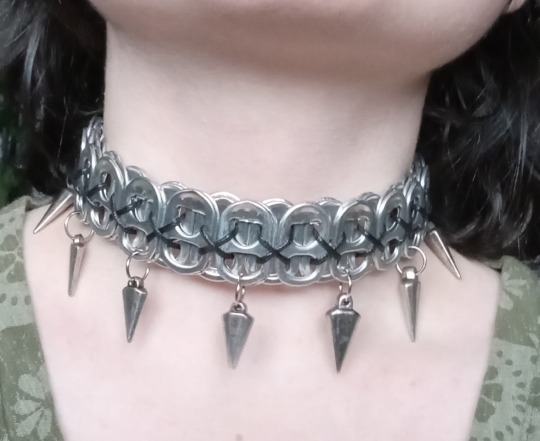
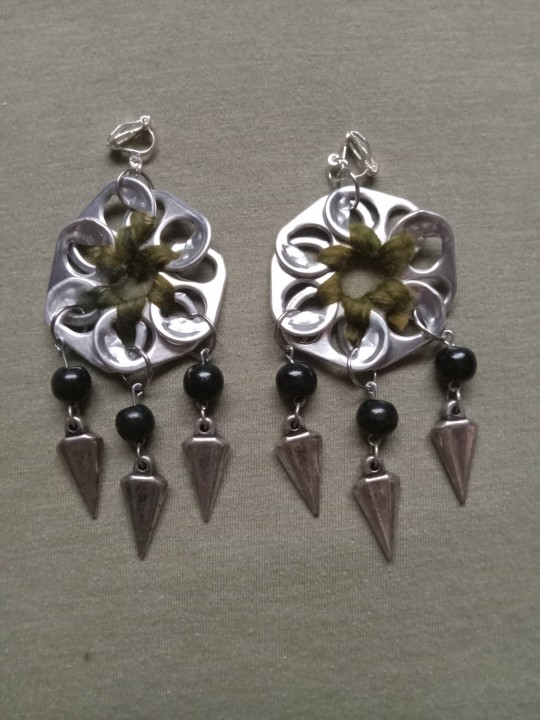
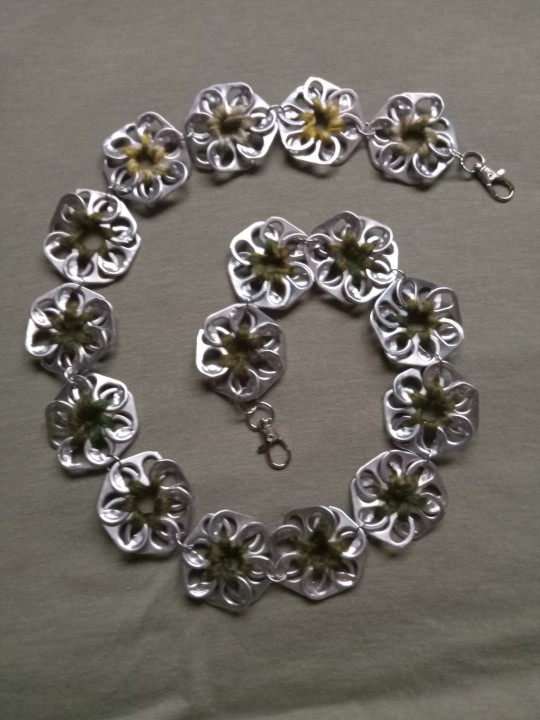
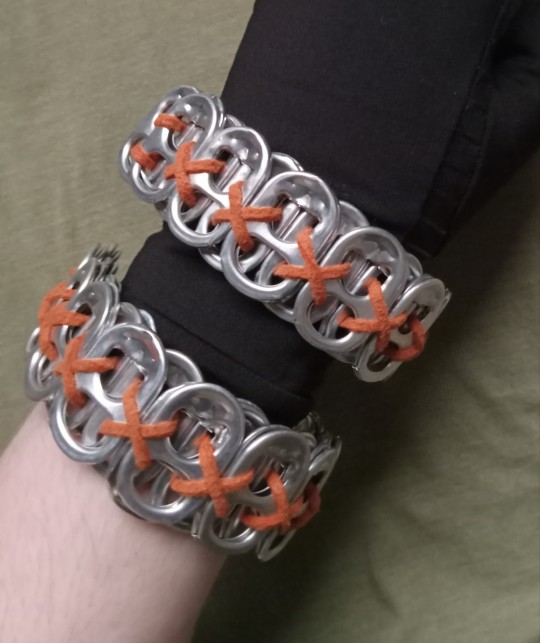
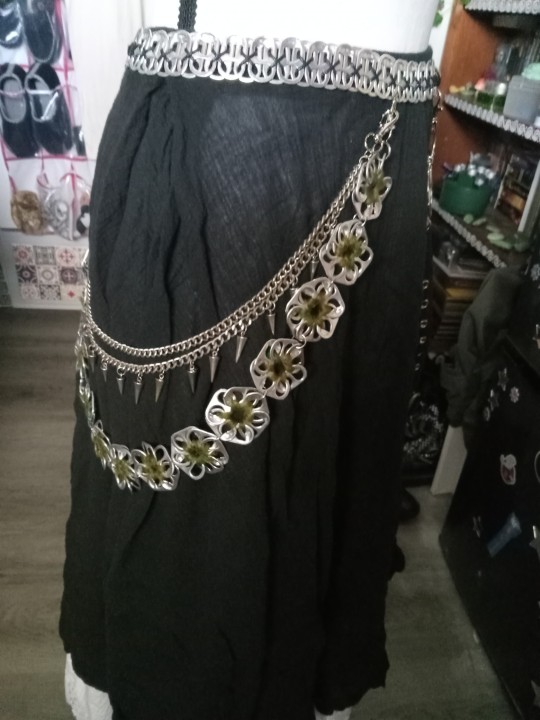
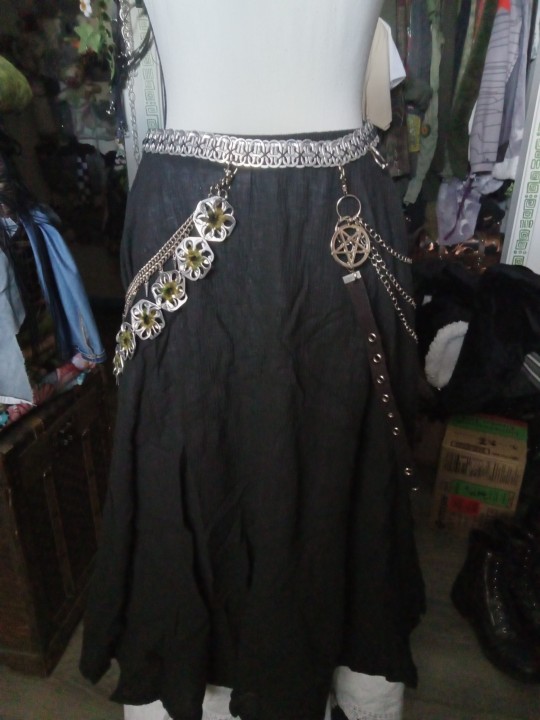
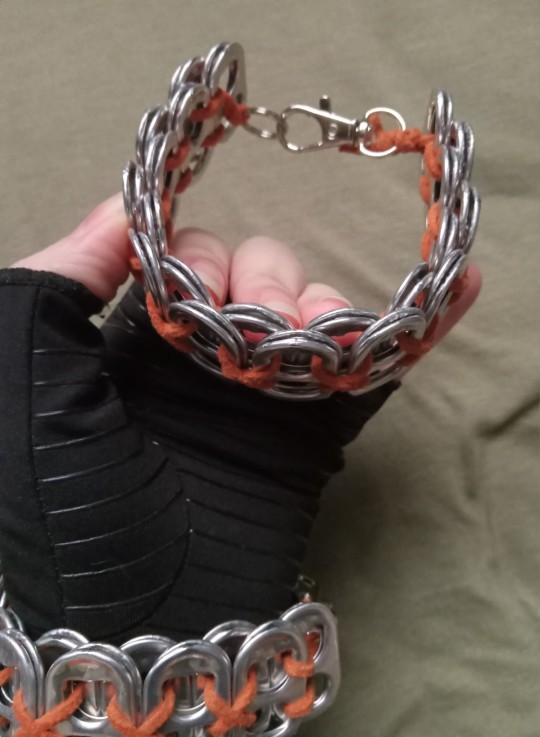
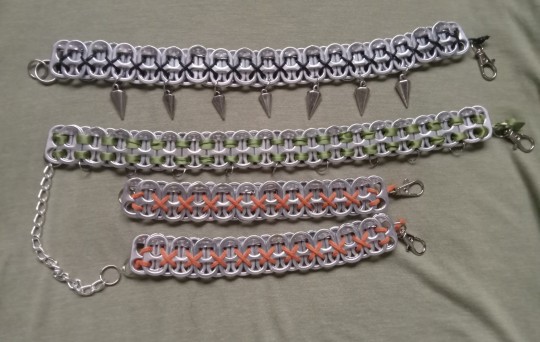
A choker, a pair of earrings, a belt/waist chain and some bracelets using 100% thrifted/recycled materials! The choker and the bracelets have two layers so that the sharp aluminum edges on the back of the tabs aren't making contact with skin, you can kinda see it in the pictures. Here are more pictures:
[Image ID: 8 images. The first one shows a choker made out of soda tabs, with black cord weaved through it forming x shapes. There's a silver spike charm hanging from every other tab about an inch apart from each other. Im in the picture wearing the choker, my face is not in frame but my pale as fuck neck is visible and so is my dark brown hair.
The second image shows a pair of clip-on earrings laying on a sage green background. Each earring is made of 6 soda tabs weaved into a flower shape with green yarn, and three dangles hanging from the bottom. The dangles are made of a wire link with a black bead on in and a silver spike charm hanging from that. The same spike charms I used for the choker.
The third image shows a 2 ft 7 inch long belt chain made of the soda tab flowers from the earring image. Each flower is made of six tabs weaved together with the same green yarn but they yarn fades to yellow towards the end of the chain. 16 soda tab flowers are linked together with large jump rings and there are large silver clasps on each end to attach to a belt.
The forth image is my hand wearing a black compression brace and two soda tab bracelets. They are weaved together the same way as the choker, with the cord forming x shapes, but the cord is orange and not black. The bracelets are the same size, 8 inches long when laying flat including the clasp. There are two layers of soda tabs which makes the bracelet a little thicker.
The next 2 images shows a dress form wearing the belt chain from two different angles. It had a black skirt with a soda tab belt, with various spikey chains hanging from it. There's a black strip of grommet tape hanging on the right side of the belt and my soda tab flower belt chain hanging on the left side.
The next image shows one of the bracelets at and angle so the double layers are visible, and the last image shows the bracelets, the choker, and an unfinished soda tab choker with green ribbon weaved through it all laying flat on a sage green background. End ID]
#solarpunk#punk#solarpunk fashion#solarpunk diy#punk diy#punk fashion#fashion#diy#jewelry#upcycled jewelry#jewelry making#handmade jewelry#hatchet makes stuff#punk jewelry#solarpunk aesthetic#hopepunk#ecopunk#recycling#sustainable fashion#sustainability#soda tabs#pop tabs#tabistry#art#crafting#goth diy#goth jewelry#goth#goth fashion#described
1K notes
·
View notes
Text
Free sewing resources:
#diy#diy projects#sewing#crafts#creating#hobbies#sustainable#solar punk#solarpunk#do it yourself#upcycling#upcycle#fashion#creative process#design#punk
415 notes
·
View notes
Text

Shrimps is bugs.
#embroidery#hand embroidery#diy#shrimp#shrimps is bugs#sewing#shitpost#shitpost embroidery#shitpost sewing#visible mending#solarpunk#bucky crafts#bucky sews
4K notes
·
View notes
Text
hey. look me in the eyes.
do your craft with love. with intentionality. with fun.
kill your inner judge.
i love you.
245 notes
·
View notes
Text
in honor of the economic boycott today, i picked up an old shirt of mine and used some scrap fabric to mend a cat scratch hole :)


127 notes
·
View notes
Text
Oh, I just realized I may have forgotten to show you a new craft project (or more like part of a larger one) of mine!
Crocheted wisterias!

This is very much still a work in progress. I plan on crocheting bunch of purple and pink (and maybe white and light blue?) flowers before making a green garland/vine thing and adding them to it and then hanging the whole thing above my bed.
As usual, I don't really have a pattern I could share 😅 I studied how others have made similar things, did some testing on what works for me, and basically created "a pattern" myself...
759 notes
·
View notes
Text
A collection of things I've made so far this year

Memory keychain - made from several keepsakes, including a stone from a friend, a moose tooth, and sea glass collected from a beach. Inspired by Waterworld movie. There is space to add a few more items


Japanese knot bag - made with cotton yarn

Several crochet winter hats - made to use up several scrap yarns and some mohair I got from the thrift store

water bottle holder - made with cotton yarn. The end of the strap will be connected to the bag with a carabiner, which I have yet to get

Mohair scarf - made only to use up some thrift store yarn I wasnt in love with.

Alpha pattern bracelets

Finger crochet blanket - the yarn was a Christmas gift from my sister
#solarpunk#anticonsumerism#cottagecore#fiber crafts#homemade#crochet#blanket#Alpha bracelet#keychain
65 notes
·
View notes
Text
How I mended a hole in knit fabric!
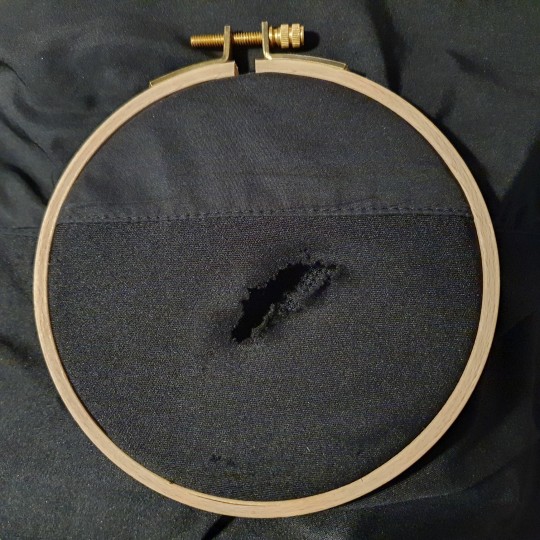
I patched yet another big hole in my reckless partner's sportswear and decided to document how I did it! I used an embroidery frame to help keep the fabric in place, but it can be done just as well without one. Other supplies are just a needle and some yarn. Here I'm using three strand embroidery floss.

I start by securing the fraying edge. Just stitching around the egde, all around the hole! If the edge is not straight, the parts sticking out will fold a bit when you tighten the stitch, but that's fine.
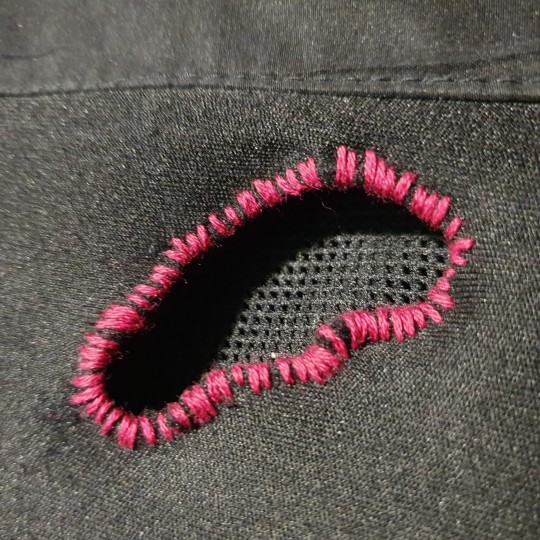
Here is the first step finished. Next, I stitch the two edges together!


There are a few different ways to do it, but the idea is to use the stitches around the edge to pull the two sides together with a ladder stitch. (This means that there's no tension on the fraying edge, just around it on the intact fabric!) I put the needle through two stitches on one side, then two on the other side and so on, always taking either the next two stitches or one previous and one new. Pull tight!
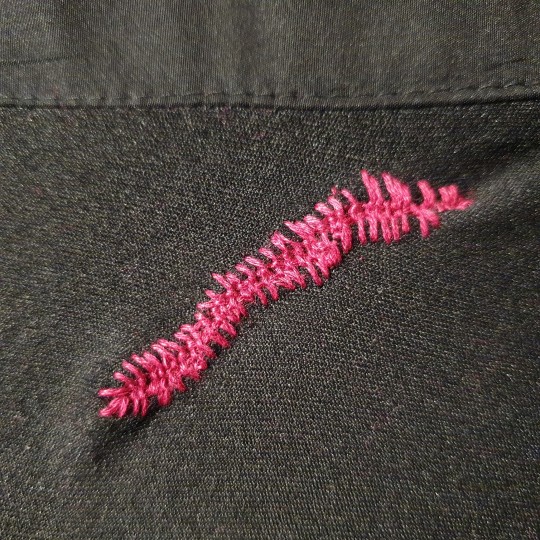
And voilà, the tear is fixed!

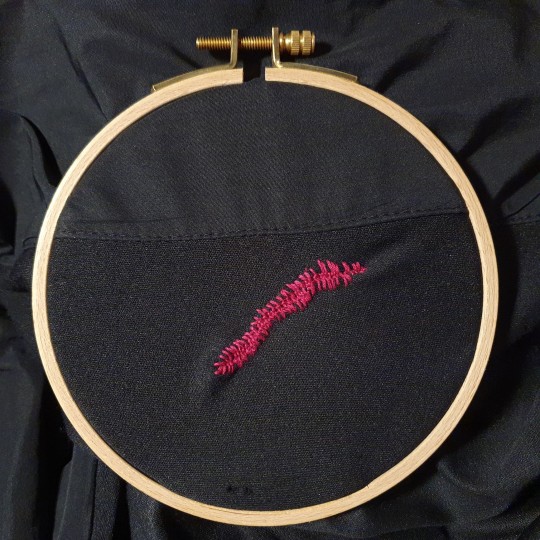
And here's another example with matching colours and finer thread.

#mending#visible mending#embroidery#craftsofsiri#tutorial#fiber arts#yarn crafts#solarpunk#solarpunk crafts
584 notes
·
View notes
Text


Some pages for an upcoming solarpunk zine...
56 notes
·
View notes
Text
my bag 🌿⛓️🌻⚙️ more details in the image ID and more pics below
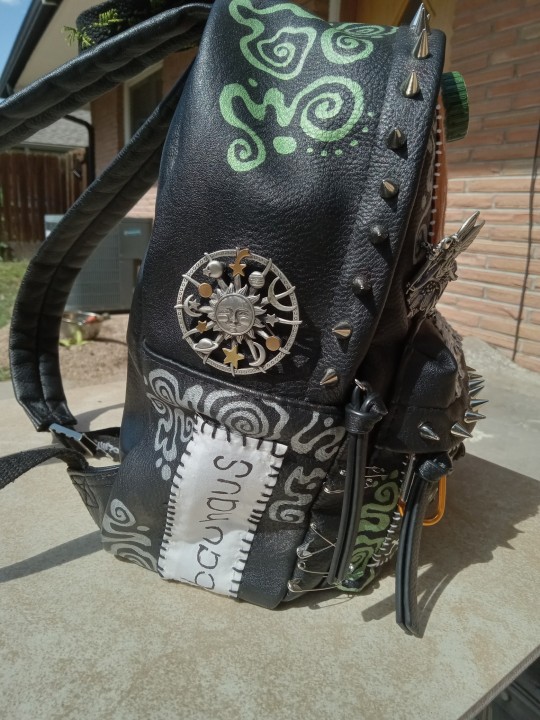
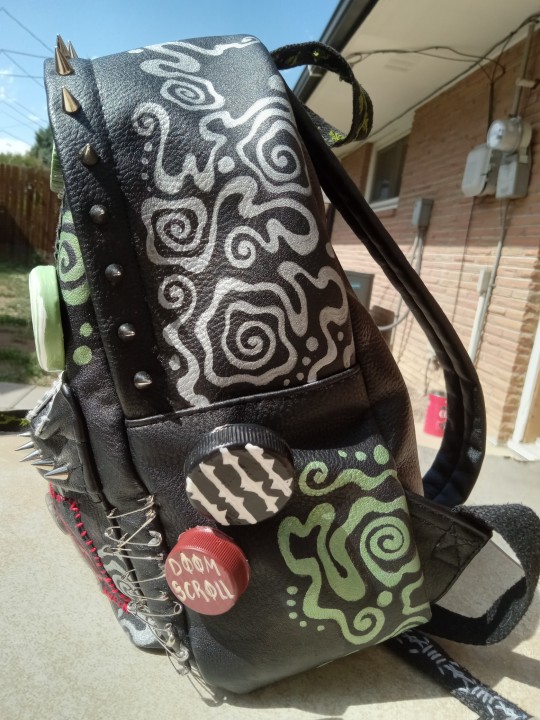
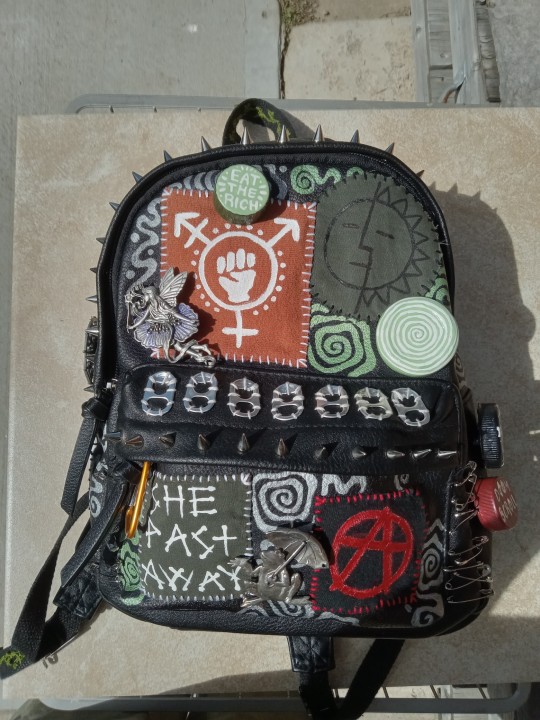
I found a small plain black leather backpack at the thrift store for $6 and made it my own :) I used silver sharpie for the swirls and made the buttons all myself with the exception of the metal ones
[Image ID: a small black leather backpack covered in patches, buttons, safety pins, studs and silver and metalic green spirals in the spaces with no patches. There are four patches on the front, an orange patch with a white trans rights symbol sewn on with white thread, and a circular green patch with a simplistic sun and moon drawin on it in black (a mirrormask patch) sewn on with black thread. And on the front pocket on the bottom, theres a dark green band patch with white lettering that says "she past away" sewn on with white thread and a black patch next to it with a red anarchy symbol sewn on the bag with red thread. There are silver spike studs lining the edges of the bag along the zipper and on the front pocket as well as soda tabs sewn onto the front pocket flap with off-white thread. And on both sides of the pocket there are safety pins decorating the empty space next to it. There are four pins on the side of the bag, a light green and white spiral pin, a light green and white "eat the rich" pin, and a metal fairy pin on the top half, and theres a metal frog with an umbrella pin on the front pocket in-between the two patches. Theres also a small orange carabiner on the pocket zipper.
On the left side of the bag, there is a patch on the bottom where a side pocket would normally be. An off-white band patch that says "bauhaus" in black lettering and it's sewn on with black thread, and there are silver spirals around it filling the space. There are some areas I left blank to make the swirls/spirals look like they're hanging down or growing up the bag like vines. There's a horizontal seam above all this that makes the area look like a pocket, and above this seam there's a metal pin with a sun, moon and stars on it.
The right side of the bag, there's no patch where a pocket should be, I instead filled this space with some spirals and more handmade bottle cap buttons. Two buttons, a larger type o negative band button that's black with white thorny vines, and a smaller red band button that says "doom scroll" on it in off-white lettering. Above the seam on this side I drew a bunch of silver spirals that look like they are growing out from behind the seam.
All thread mentioned in this post is embroidery thread, and some groups of spirals drawn on the bag are metallic green. End ID]
Here's the top of the bag as well as the straps that hang down
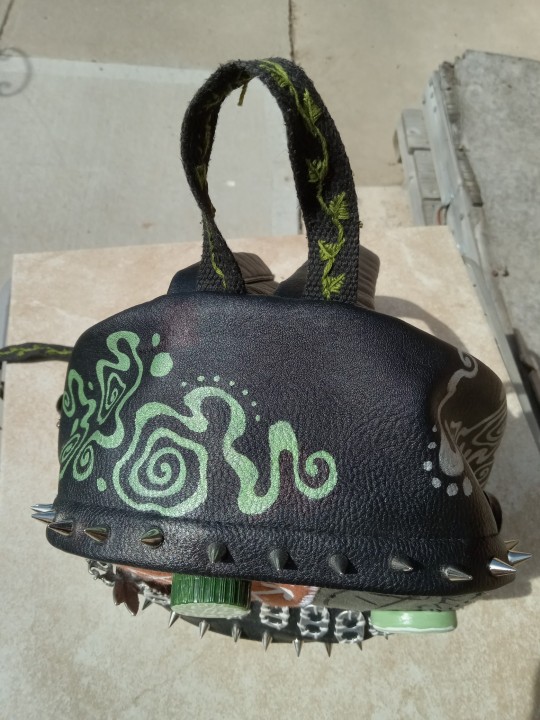
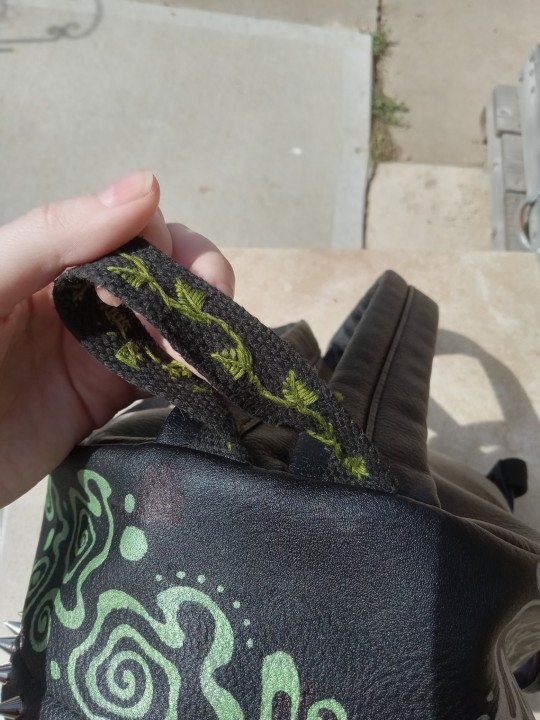
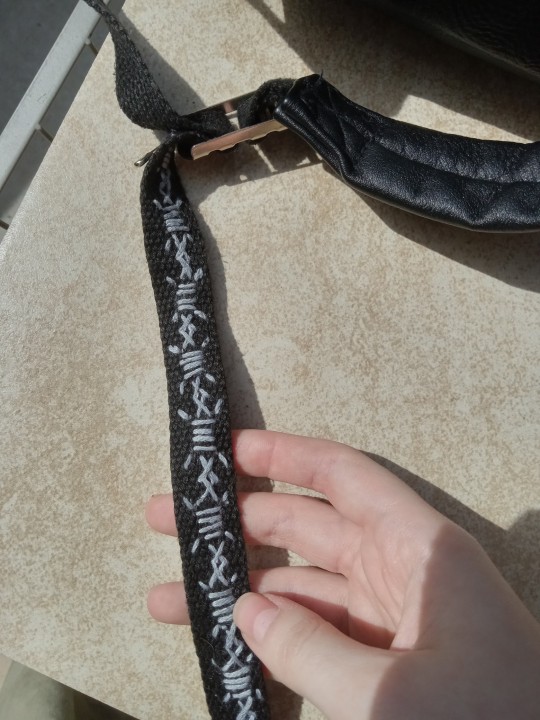
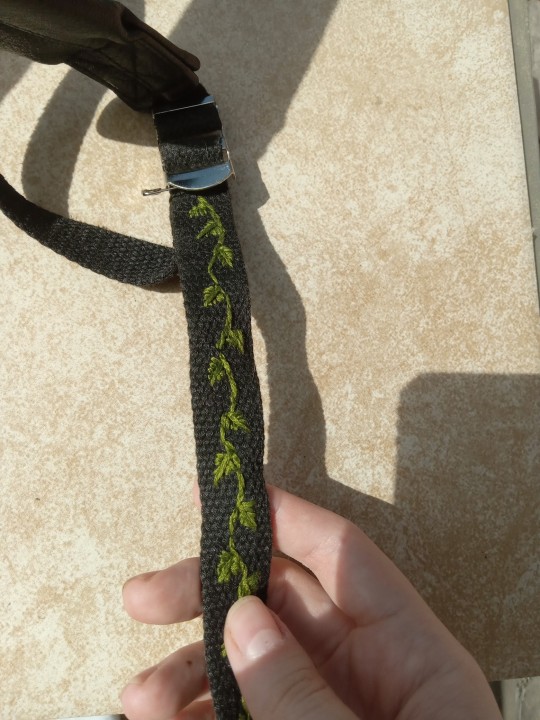
[Image ID: the bag has a rounded arch shape, and across the top of the leather I drew a cluster of green spirals in between the silver spirals I drew on the sides. There are some blank spots to avoid making the bag look busier than it already is. The loop at the top for hanging the bag is embroidered with a green leafy vine pattern. The same pattern is embroidered on the right strap that hangs down from the bottom of the bag, and on the right one, a gray barbed wire pattern is embroidered. I plan on sewing some more soda tabs onto the top of the bag at some point for the sake of adding more shiny things and also fill up some of that space I mentioned because while I don't want the bag to be too busy, I think the blank space i left on the top is a little too much blank space. End ID]
#punk#punk diy#punk fashion#solarpunk#solarpunk diy#solarpunk fashion#ecopunk#hopepunk#hatchet mends things#hatchet makes stuff#upcycled fashion#upcycling#sustainable fashion#sustainability#recycling#sewing#embroidery#crafting#diy#fashion#patches#customization#thrifting#art#goth#slow fashion
995 notes
·
View notes
Text

textile collagey embroidery piece 🐻
all w scrap materials i had laying around. trying to practice using from my supply stash to gain inspiration, rather than buying new supplies.
took inspiration from visible mending, collage, and the fun textures involved in textile work!
planning to sew a cropped tee and apply this like a graphic on top :)
(link to my crafting streams)
#artists on tumblr#my art#my crafts#textile art#embroidery#sewing#cute art#hand crafted#crafting#crafts#craftblr#diy craft#diy#handmade#naturecore#animal art#hopecore#solarpunk#visible mending#hand sewn
257 notes
·
View notes
Text


i succeeded in making my first ever pair of mittens. they are slightly uneven, but my partner loves them :)
105 notes
·
View notes
Text
I've been more quiet this Solarpunk Aesthetic Week than I planned, partially because I've been TIRED (I've been more social than usual and that's always draining for me), but also because I've been busy finishing my cardigan. By principle I never admit any of my bigger, personal craft projects are 100% finished, but this one is "finished for now"
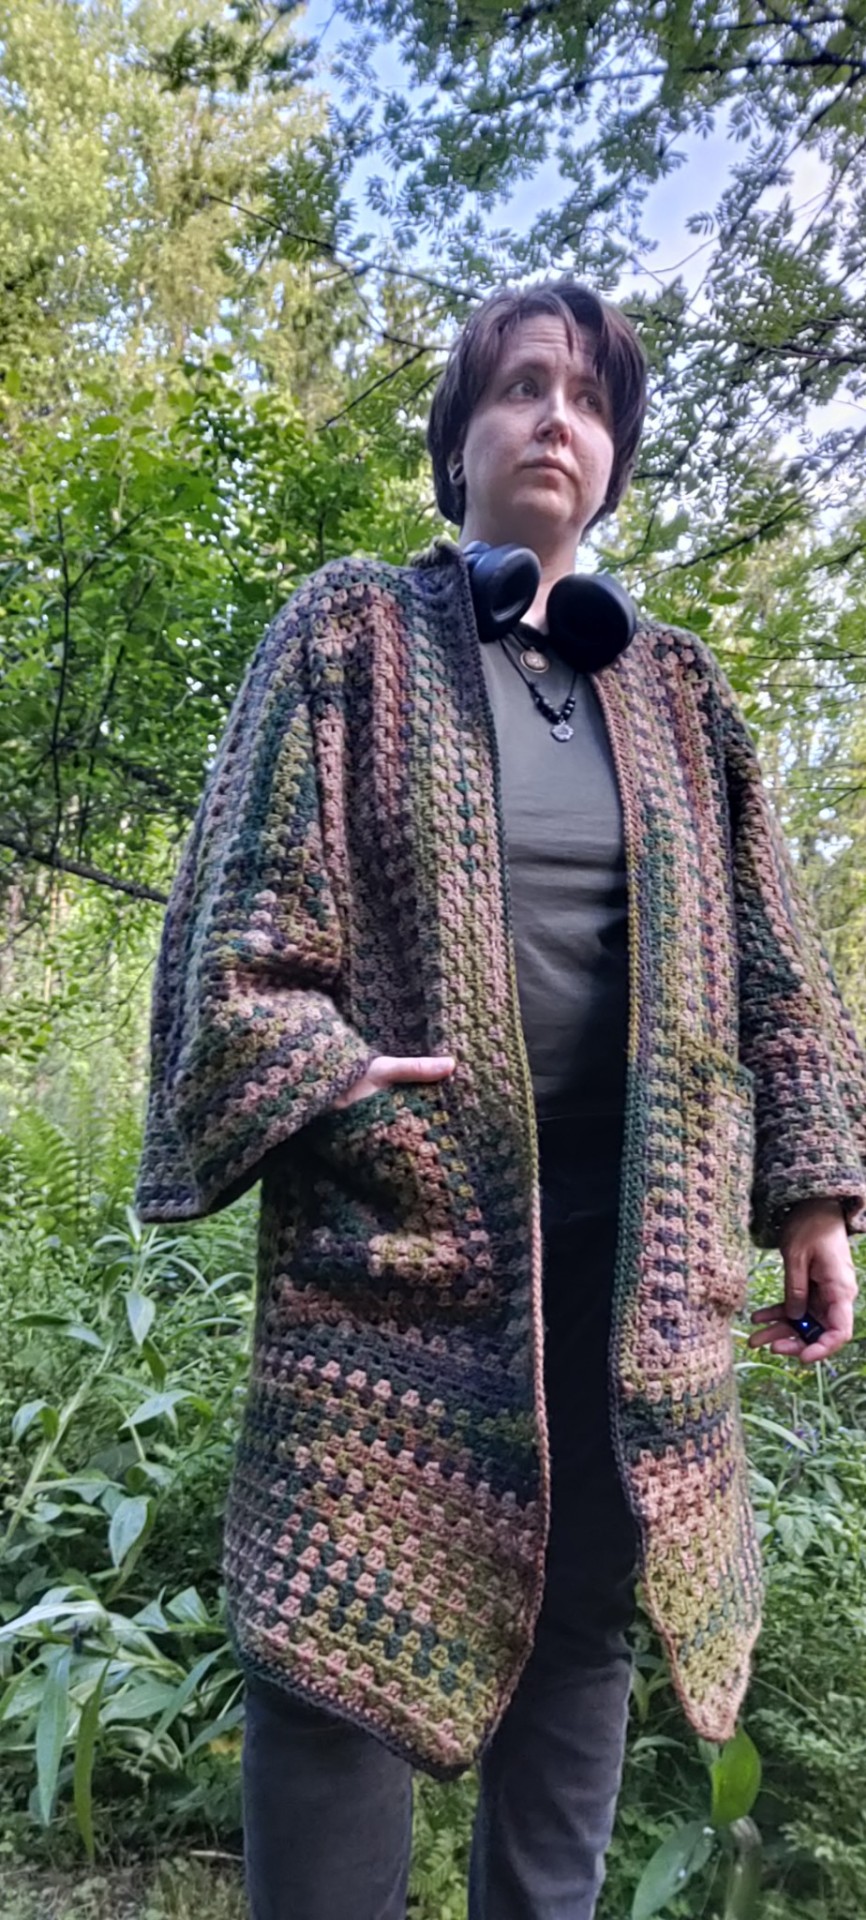
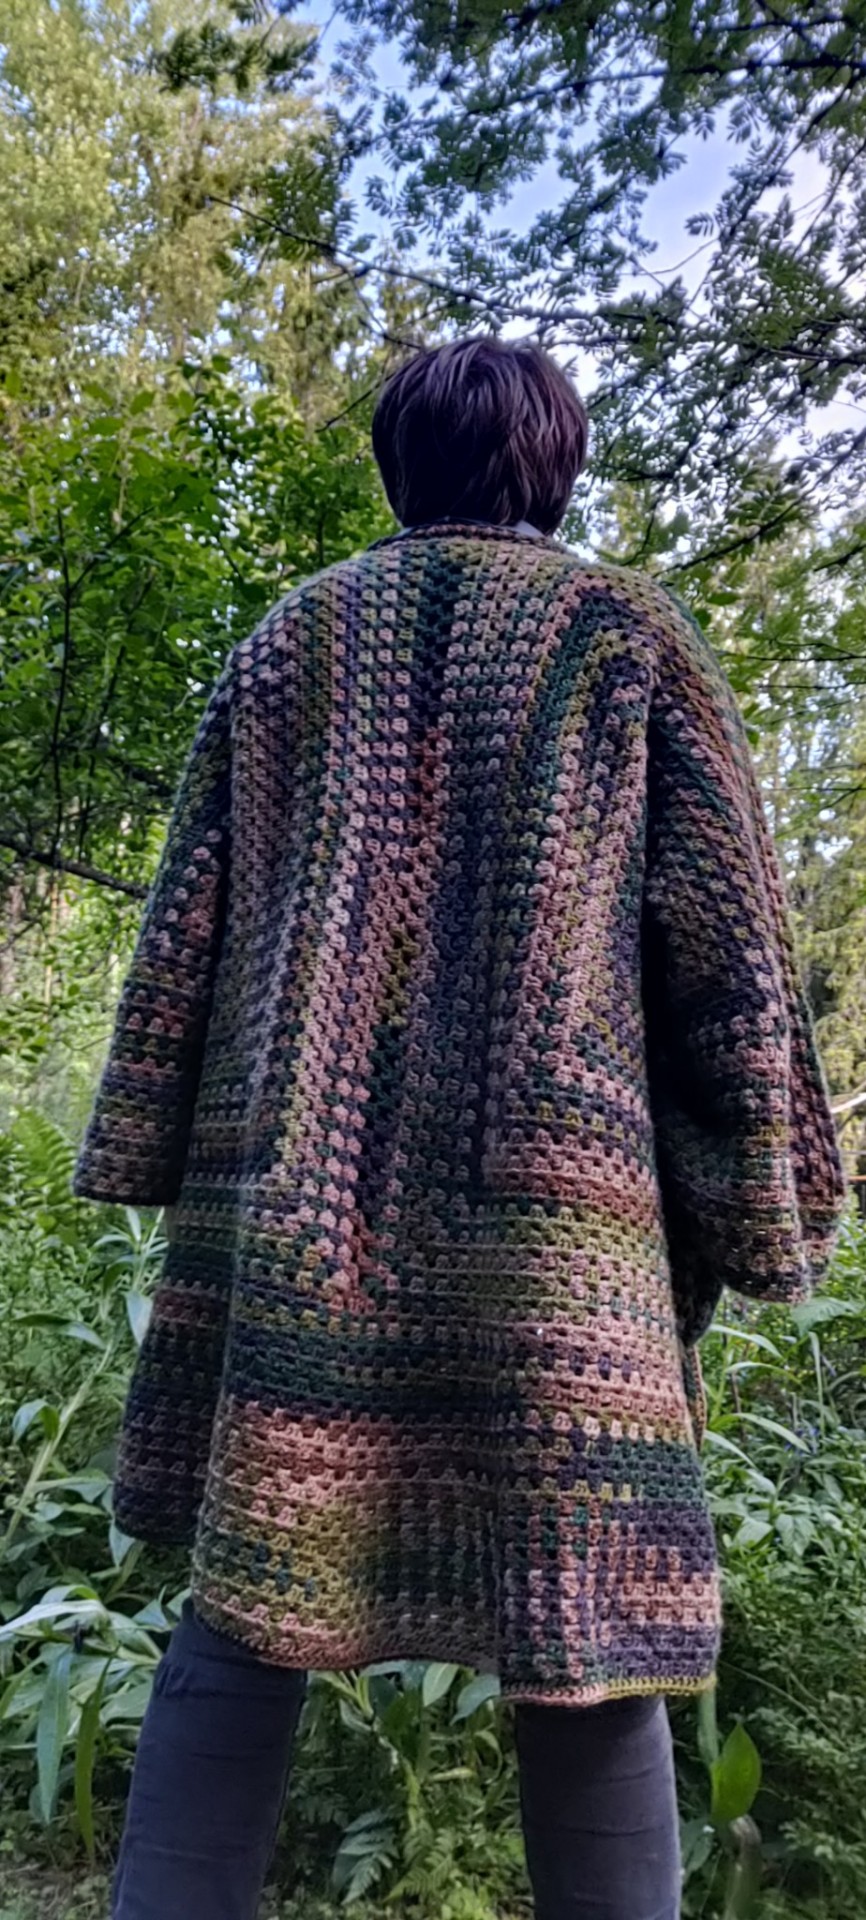
It's the classic hexagon cardigan pattern, with two lined granny square pockets. It also works excellently as a throw blanket 😂
This was my first hexagon cardigan, so it's tiny bit wonky and I love it so much 🥰
197 notes
·
View notes
Text
After:


Before:
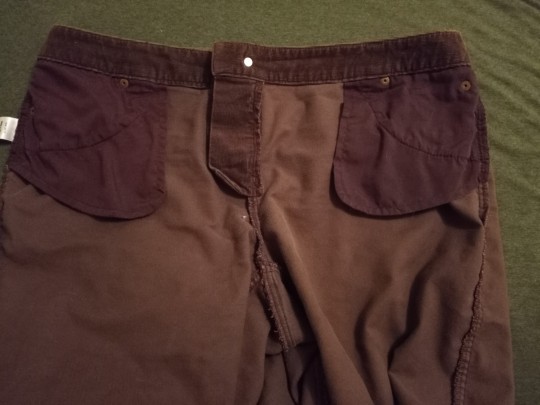
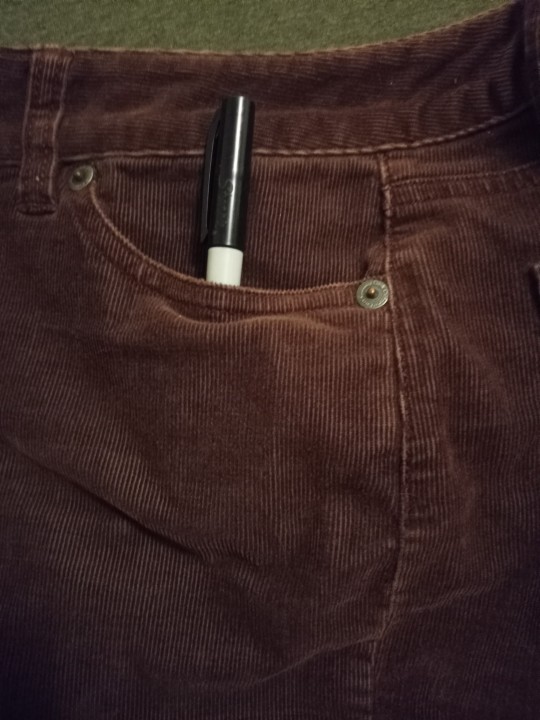
Fuck tiny pockets!! I finally got around to extending the pockets on these corduroy pants I thrifted over a month ago! My handsewing looks like shit but they're functional
365 notes
·
View notes