#so I could use better tutorials!
Explore tagged Tumblr posts
Visit Tumblr Blog
Explore Tumblr blogs with no restrictions, modern design and the best experience.
Last Seen Tumblr Blogs


Fun Fact
Post activity is at the highest at 4:00 pm EDT; notes peak at 10:00 pm EDT.
Text
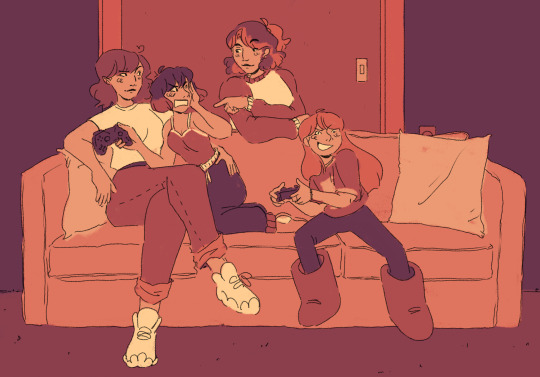
Did you guys know about line stabilization?
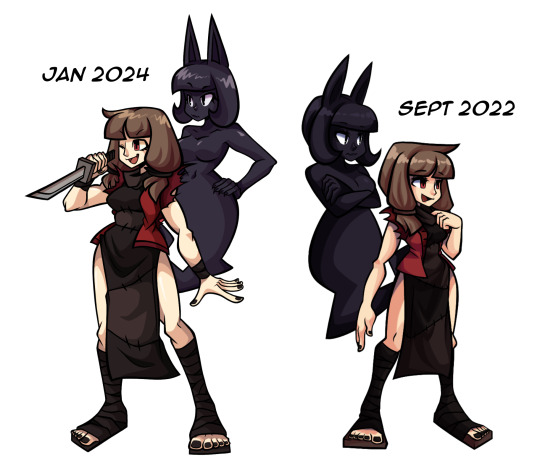
#in stars and time#parks and recreation#i watched like 2 ten minute tutorials and used an app that's actually meant for drawing and#like wow this did not turn out half bad at all#i drew a quick little siffrin from memory with no sketch then realized he could fit in the scene so i cleaned him up and kept him :)#they look waaaay better than the last digital Siffrin i drew lol#I'll do odile's white hair lines better next time#still figuring things out#but I'm having a surprisingly good time i must say#my art
26 notes
·
View notes
Text
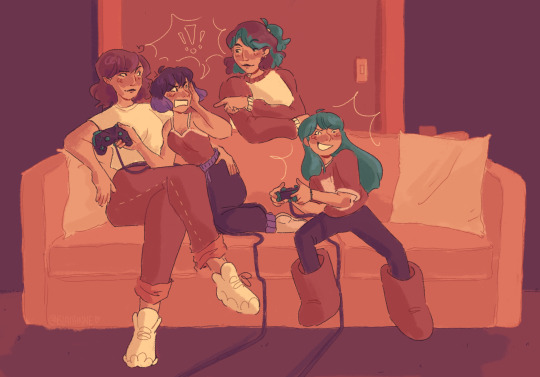
still working on tweening and etc but small self-indulgent sneak peek hehe
#my art#wip#bocchiposting#i wholly underestimated the amount of tweening needed and the amount of layers#originally i wanted to cover the entire song with parts for kita and bocchi#but given my current health condition + having work i think i'll just finish small chunks first and then see how much i can do b4 school#i can definitely finish the intro but i really want to draw in bocchi for a specific part sdjfhdskfjks#unfortunately i currently have the constitution of a sick victorian child! Any stress or strain sends me to the bed!#so i cannot crank this out within 5 hours like i used to be able to#the song is mesmerizer obv credits to that#it really has been a process of oh im just gonna do something small for fun oh no this needs more for a better streamline#halfway through i was like. would this have been easier if i just used. live 2d. probably. but i am too far in.#i need a good video editor program so bad but all the tutorials online are for AE and i do not have the money for that </3#and the next best option is apparently blender and i've done a few tutorials but i have never been able to retain the information <3#the learning curve is seriously hard and i don't have the time for that either </3 time is money fr#i tell myself to not feel guilty for drawing when i could be studying bc this is needed <3 this is self indulgent <3#self care!!!!!! rahhhhhhhhhh!!!!!!#kk rambles
52 notes
·
View notes
Note
If I may, how do you typically approach choosing colors in your art? It always has just a lovely feel to it, so I was a bit curious; don't feel pressured to answer ofc :]
I’ve been using a lot of gradient maps lately, they work by switching the greys in your piece with a corresponding colour according to its value. Basically, I colour in black and white, grab a gradient map, and then I adjust the colours by hand until I’m happy with it. This isn’t the only kind of colouring I do, but it works great if you’re in a rush or you’re struggling to find a good starting point for your colours. I’ve been operating under a time crunch for these Sketchbook Week drawings and the Plenism promo stuff I made, so for all except one I used gradient maps. I’m actually in a bit of a funk with my colours right now soooo I’ll come back and do a proper colouring tutorial for my style once I’m happier with how my non gradient mapped colours are looking !
#after sketchbook weeks over I wanna sit and do some colour studies to find palettes I’m more happy with#even these gradient map ones I’m not thrilled with#they’re fine! but I could do better#in terms of other tricks I use I’ll often adjust the hues and saturations if the whole piece to give things more unity if I’m struggling#and/or add a new layer on top of everything and fill it with one base colour#and play around with different layer settings and opacities on top#I’ve found a luminosity layer on a low 5-10% setting is quite nice#basicslly I fuck around and find out#and if I’m in a rush I use a gradient map#they’re not neccesarily a quick fix! if you’re like me you’ll still want to do some tweaking after it’s been applied#and you need to pay attention to your values when you’re colouring in black and white#but that’s another good thing about gradient maps - they force you to focus on value over hue which is an important skill to build#so yeah I’ll come back to this and make an actual colouring tutorial once I feel like I have actual good advice to give#cause rn I’m just very meh in my colouring and I don’t think I have anything very helpful to add#need to find some tutorials myself first !#ty for the ask!#ask#art#my art#bpcol-reblogs#textpost#blethering#for this piece the adjustments were minimal in comparison to what I usually do btw#because I was rushinggggg lol#I did more for my Plenism posters n such#but I can’t really show good comparisons because I. didn’t save them like that#I usually smush all my layers together when I’m drawing sooo yeah makes it hard to go back my bad whoops#but I saved as I was going whilst drawing this so I could provide examples yipee!#if I’d been smarter and remembered more I could’ve had more process screenshots butttt oh well lmao
17 notes
·
View notes
Note
Every time I see your sprite work, it just makes me want to make a sprite edit of Akane with the design I made for her in my "She Was Saved" AU (An AU based on the idea of Akane surviving the events of DRA), but I've never done any sprite work so, do you have any tips?
Ok ok so, first things first, i wanna make it clear that none of my sprites are made from scratch, they're sprite edits, hence why i always tag them as such. Every single one of them used some canon character as a base for the base sprite (that one fitst sprite where the character is just standing there with a simple expression) and a handful even have canon sprites uses as bases for poses. Just figured i should make that clear so there's no confusion here.
While I'm not sure if I'm the best at giving tips n stuff, here's what i could think off;
I think the most important tip i can give anyone who wants to get into sprite editing is MAKE A BUNCH OF LAYERS‼️Save things separately just to be sure rather than merging them because that almost always leads to more time spent later down the line. While the amount of separate things certainly varies from artists to artists here's the one i use for my edits.

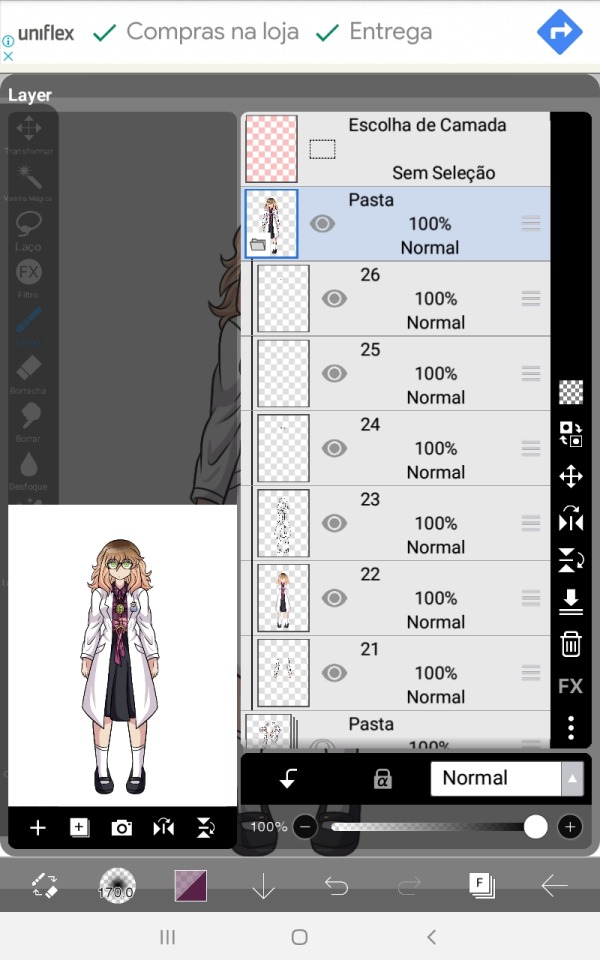
The app i use (Ibis paintX) allows me to make folders with a bunch of layers to them so i use them to keep stuff more organized.
On the first pic well have a folder with the base sprite, one for the different poses and in Beni's case two for the different eyes she has (one for the normal eyes and one for the ones that are part of the glasses, normally i only have one layer with all the eye variants)
On the second image I've opened the folder that holds the base sprite, or should i say just sprite since it's in this folder that i organize everything that belongs to one specific sprite when I'm making them as to not get myself confused. Anyways, you can't see in the screenshots but the first layer has her glasses, second has her eyebrows and mouth and the third has the eyes.
Fourth has the main body lineart and fifth has the main body colors, please keep those separated as by doing so you make it easier to add those lil effects onto the character's faces on certain expressions + having the lineart of the main body always helps when sketching and connecting the different arms to the main body.
Lastly you got the arms, but ideally you should make the arms/poses in a way they can be placed over the body layers since that just makes things easier to put together, i just have this habit of placing the no pose arms under everything else.
When editing i make the different arms and eyes in advance so that when i start making the different sprites i can just duplicate the canva with the first one a thousand times and everything will carry along with those. Saves time in the long-run + you don't need to separate all layers on them (lineart, colors, shading) since they're just parts there's no problem in just merging them together.
A very important thing to note tho i that if the character has glasses or any accessories that you plan on removing or moving around in some pose/sprite this accessory should be made in a different layer from the main body, this makes editing easier than if you had to just erase and refill the part where the accessory was in the sprite you don't want it to be in.
A similar rule should be applied to the character's hair, if they have short or mid length hair you can just add the whole thing to the main body sprite, but if the character's hair is long you should make this bluk/back part of the hair in a separate layer placed under the main body layers. This also apllies to any back accessories.
Here's Akira as an example; she has one layer for her glasses, one for the back/bulk of her hair and one for the guitar case she carries.
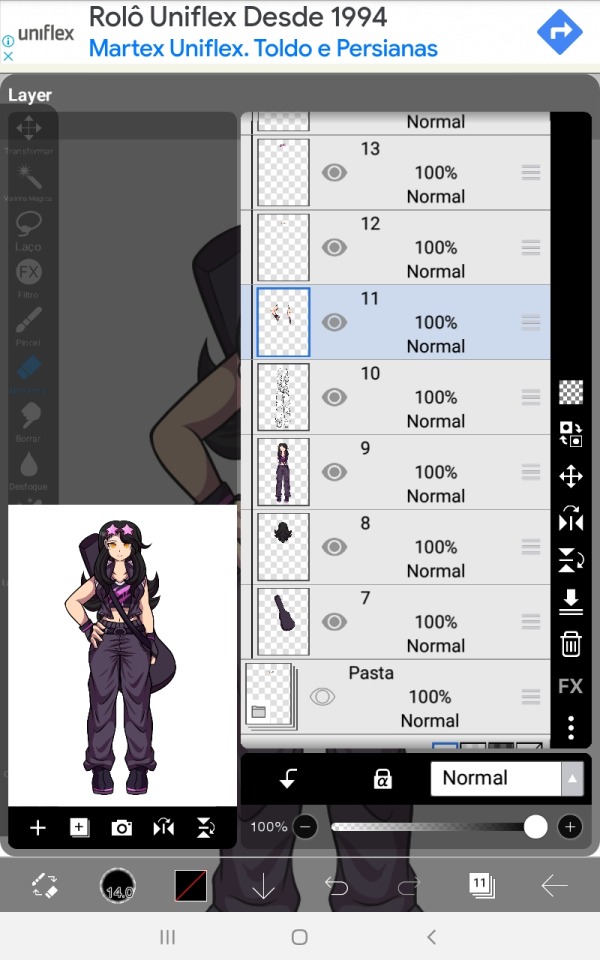
These are essentially the basics of if, so let's go over to some actual tips.
Make the sprites on a small canvas.
Since the Danganronpa another games are made on game maker the size of the character sprites is surprisingly small, while I don't think you should just do it on the same canvas size as the actual sprite, it's good to have a smaller canvas so that the lower amount of pixels gives it a look similar to the in-game sprites + as you can see by mine, they don't actually look low quality at all.
(if curious, the go-to canvas size i use for most of my edits is 773x1020)
Use other sprites as references/bases
Especially if you're just starting on making sprites, use the canon ones for bases, references or even just straight up trace them. This will make the sprite look closer to canon and will start making you undertand the elements that make up the style of the sprite, do it enough times and soon enough you'll be able to make poses on your own without needing a sprite from the game as a base.
Remember! What's wrong about tracing is not the act of tracing itself, as the act of doing so is a great exercise to help you learn, the problem is when you do it and claim you made it 100% on your own. Since these are sprite edits, there's not a problem in doing so.
Observe and learn what makes up the style you're trying to replicate
This is hard to talk about since it really is something that comes with practice, I've been making sprite edits for like 5 years now so this stuff is like written on the walls of my brain by now. Just try to look and analyse the sprites and slowly you'll start seeing patterns and small onto them that you didn't noitce before, like how Linuj's sprites have a bit if line weight to them but are still on the thinner side, how he tends to make the hands a bit on the smaller side, how when he color the character's skins he makes the area near the top of the head a lighter shade than the rest of the skintone, the way he usually makes the character's mouths, and even some more complex things like how the male characters will have very little to no eyelashes while the female characters tend to have a whole lot of them, etc.
At the same time, there's no shame in deliberately ignoring some of these things. Personality the small hands REALLY bother me in a few cases and i tend to just make mouth shapes on a whim instead of trying to stay 100% close to the style. It's just a question of messing around and figuring stuff out, it won't look perfect on the first go, but overtime you'll start to get the hang of it.
#i hope this small sprite editing tutorial helps! if you have more questions feel free to send them#these are sorta all i could think of for now#you did mention that these are for an Au Akane so you could also try editing these out of her sprites themselves#instead of making a whole base and multiple parts just pick the sprites and edit the new design over#it could possibly be easier for a beginner? i do feel like making them in this form leads to better results tho#anyways. fun fact! i used the eyelash thing as a subtle form or trans coding on Akira's sprites :]#i love you small details that people won't notice unless pointed out ❤️#hyena ramblings#sprite edit#edit#sprite editing tutorial
21 notes
·
View notes
Text
I’m playing A Plague Tale: Requiem and I think it takes the cake for the dumbest plot convenience escape I’ve ever seen.
Because not only did the villains not restrain Amicia and Lucas, they also just so happened to take all their stuff EXCEPT the one item Lucas could use to escape.
Lazy writing! Drives me nuts. I don’t care if you’re a video game and need a way to progress gameplay; write a solution that makes sense, not the easiest one.
#sorry for the rant#this was so incredibly dumb that I could not fathom it#the game used it as tutorial for a mechanic but there were better ways to do it#I’m not very far into the second game and it’s already apparent that its writing is much weaker than the first#a plague tale: requiem
5 notes
·
View notes
Text
the next thing i want to concentrate on in my art is space and composition, which is gonna be soooooooo annooyiinggg without a formal education. im gonna have to watch tutorials and stuff uugghh
#good thing i love art so much nd its the only thing i will never abandon#i change and change but it will always be there for me#if any of you draw and have some tutorials you like lmk. i never even watched speedpaints. self-taught to a fault lol#my sister uses the same program as me and she keeps teaching me how to use it. i only use 2 brushes and the blend feature occassionally#im quite happy with my lines right now#i used to think of it in terms of 'i need to work on x aspect of the human form'#(hair. clothes. faces. anatomy. a few of which i could stand to revisit actually. hair especially hair is horrible)#but a few years ago i dedicated myself to composition and pose a little more#best decision ive made i think my stuff is so much better than it has been#but it is 2d. i need planes#and as anyone who specialises in only figures will tell u ppl who do backgrounds are ur greatest envy#they say progress isnt linear... but i disagree.. i am better every year :)
3 notes
·
View notes
Text
maybe i should try my hand at typesetting/bookbinding with my bang fic from last year... 🤔
#//juri speaks#the last thing i need is to try to start another hobby but...#i DO wanna learn more/get better than the one little spellbook i made#but i remember trying to look for resources before and being SO intimidated#bc it wasn't like. ''here's the basics'' it was ''here's everything ever'' and i simply could not sort through it all#and it had an air of if you don't have all the best stuff you're not doing it good enough#very scary coming from crochet tutorials where everyone is like ''do NOT buy the expensive shit just spend like $5 at walmart here you go''#and its easy to start there and work up and not have a billion new terms thrown at you at once#anyway this means nothing i am just whining about something bc i'm bored out of my skull at work#and disappointed with myself that i can't learn things like i used to#i can't just DO things anymore and i don't know how to teach myself and i don't know how to ask questions bc i don't know what i don't know#and PTTTTTTTTTTHHHHHHHHBBBBBBBBBBBBBBBBBBB#should just get a punch needle instead and make coaster sets with some of my yarn stash
3 notes
·
View notes
Text
Process is processing!🌟
#genshin impact#genshin impact fanart#genshin impact caribert#who knew that symmetry tool could make life THAT much easier especially w genshin designs#also fill tool is amazing i'm so glad I watched some tutorials on how to use it Faster#anyways#digital art#clip studio paint#illustration#from thormanick's to do list#the abyssal font almost got me though#why. just why#if anyone translates it I'll give you a metaphorical 🌟#i'm also revisiting anatomy. bc we're barely acquaintances BUT it's getting better. kinda. hopefully#artists on tumblr
3 notes
·
View notes
Text
would love to try fallout 4 sometime for the sole reason that it’s set in boston. even tho it im not even that familiar with boston i’m like omgggg massachusetts 💖💖💖 however i was only able to play fnv because of a mod that replaces all the insects with other monsters and there is no mod for fallout 4 that replaced EVERY bug
#so many that are like ‘all except [this one that doesn’t bother me]’ well it bothers ME#i bought fnv on sale in high school and was so excited to play. had not thought about the bugs.#got to the first bugs you fight in the tutorial and literally thought i would never be able to play it#bc they make me feel so fucking freaked out and sick to my stomach#the mod i use replaces all bugs with ghouls so it does fuck with the difficulty a bit#but i don’t really care about that i’m not playing to get the authentic gamer experience#i’m playing so i can imagine i’m dating arcade#ugh on a slightly related note i wish there was an alternative no spiders mod for bg3#the one that exists is perfectly serviceable and i personally don’t mind them being replaced with dogs but that doesn’t work for everyone#and also i just kind of wish the mod was better maintained#i haven’t had i not work for me YET and i’m always careful to check it after updates but#ppl are frequently having issues and the creator is always like uhhhh idk ¯\_(ツ)_/¯ i haven’t checked it in that act#and it��s like i get that and i appreciate them making it at all#but it’s the only option out there so of course they’re going to be hounded bc it’s the only way some ppl can play#like i just wish someone else would make one#like who cares if it’s redundant you could make it slightly different#r.txt
3 notes
·
View notes
Text
hmm. im getting the feeling that carth is kinda completely useless after taris
#el plays kotor#he's like.. a glorified tutorial companion#he can open a few locks until you get mission but after you get mission theres no point in investing in his security skill#he's good to have along in combat on taris but after taris.. canderous is simply the better soldier companion of the two#and carth doesnt have enough non-combat skills to make up for his squishiness like mission or t3-m4#i wonder if i should give him a rank or two in toughness or sth.#also i wonder how he would feel abt this. respected war hero finds himself completely overshadowed by uhhhhh#four jedi one mandalorian super soldier one genius kid and her wookiee buddy. even the droids#oh well. i like to think hes still the best pilot in the team and thats why they keep him around <3#hes also 80% of liah's impulse control after the two get over their issues with each other. a vital role to have#but fr its a shame bc i do like him. yes hes kinda preachy and complains a lot etc but idk. hes a good lad#also liah likes (arguing with) him so for liah roleplaying purposes. i gotta have him in the party#curse kotor for only allowing 2 companions instead of 3 !#not only bc i wanna drag carth along#i could also really use a 3rd companion against the fuckin kath hounds on dantooine when i accidentally aggro a whole pack of them
2 notes
·
View notes
Text
...
#for some reason it never occured to me that i could just like. take an art class if i wanted?#idk if id enjoy it. i probably would bc i like prompts so much but idk ive just not had much formal art training#i mean i took a lot of art classes in hs but my art teacher just made us paint realistically and i HATED that#so idk. i think i just wanna b better at framing/composition idk#idk y that never occured to me. i prob wont do it bc like with what fucking time. it would distract from my narut0 drawing lol#but its a nice thought. i just really need to memorize the cloud species bc im very Normal than u v much#while im being a slacker. i say on my day off where i spent 8-1.30 in the lab. sigh...#ugh but i wanna finish drawing a thing. ugh. also i need to work on a paper. ugh. im tired#maybe i could find tutorials online or something. ugh no i would need a class to hold me to actually trying what they recommend lol#unrelated#one of my lab mates took an art class. she does art stuff too. from what ive seen i think im better than her#i say bc im a competitive bitch. but she has way more confidence in her stuff bc she sells it and stuff#i tend to be more. oh u like want to buy my stuff? uh thanks but cringe. like come back in a month and i could do the same thing better#u just dont understand how bad this is in comparison to what i could do in the future. which is slightly baffling lmao#not only am i competitive. im self competitive
11 notes
·
View notes
Text
Saving My Fanfiction Work
First. Side note: This post was only intended to give resources to fanfiction writers and enjoyers. My talk on recent political events was a context/reasoning on why I made this post. Also I’ve had to add more information to this post over time due to people’s confusion in my comments. Explaining it was to make sure that this post didn’t come off as out of the blue for my followers and this community. Which is fanfiction.
Also, why I made this post was from people asking if they could download my fanfiction because of the recent political events in America hence why I named it “saving my fanfiction work” and added my context. So this was also a post to tell people that liked my fanfiction they could download it as long as it was for their personal collection. I merely just wanted to list resources to people who wanted to download fanfiction and don’t know where to start or don’t have the immediate resources. I’m not here to fear-monger. I am just giving resources and the reasoning on why I’m giving them along with urging people to look into those information/recent events as staying aware is important. I respect everybody who’s given their opinion and yes, some of my grammar in this post is not adequate as this post was merely made for giving/stating resources.
Lastly, I will no longer update this post with comments as I’ve said my peace, nor will I pay attention to the notifications as they are muted. As my page is for fanfiction not politics. Thank you for the people in this community who share this post for the resources see you around the tags! Stay safe friends!!✨ Remember I love you! And you are loved!💛
-
Due to the recent events in the United States. To clarify the recent events being Trump becoming president of the United States, Project 2025 more than likely going to be integrated. If you are not familiar with Project 2025 I urge you to look it up.
Along with the KOSA bill that has many problems and it has passed the senate now needing the finally vote in the house, which both are majority red. Go here to learn more on why it needs to be stopped and how you can. This is another component that will harm our communities. Go to: stopkosa.com
With all of its harmful plans some of the plans are to take down/restrict internet sites that have LGBTQ+ communities that means communities like the fan-fiction communities/sites in the United States.
I am only giving resources to those inside and out of the US in case they banned sites that hold fan-fiction. Better safe than sorry.
Being that I live in the US the possibly of mine and many others Fanfiction has the possibly of being in danger. Therefore I'm giving you recourses. (I'm not leaving or stopping my writing, I'm here for the fight!)
For those wanting to save my fanfiction, I give you permission to download them off of AO3 and to be used for your personal collection. Meaning, your eyes only. To clarify I’m saying this as others have asked if they could download my fanfic so for those who would like to you can.
If you do not know how to download them many others on online have tutorials on how to download them and add them to our phone libraries.
Here are some links to tutorials:
Downloading Fanfic
Adding to Iphone & Android Library
Adding to Kindle Library - Video on How (On TikTok)
Adding Book Covers (At the bottom) - Good EPUB Cover Changer (I use this)
Types of Files and What they mean

Please stay safe out there! Remember to follow the rules below.

DO NOT share the downloaded file anywhere online.
DO NOT repost the downloaded file under your name.
Fanfiction is protected under copyright law when plagiarism is involved. If you plagiarize my work, either a piece or whole in any language, I will take legal action. Inspiration or the same idea does NOT apply to this, only word-for-word plagiarism in any language.
♥ mx-pastelwriting does not consent to their fanfiction being copied, copied & credited, translated, used in videos and/or audios, screenshotted, used in AI, or reposted on any other platform without permission.
♥ mx-pastelwriting does give consent to "reblog," sharing links to direct work, and being in recommend lists.
Please stay safe out there friends! I love you so much! Know that there will always people that love you and in for the fight to make sure you are loved!
And here are some resources in case you don’t feel okay! Resources here
#tony stark x reader#carlisle cullen x reader#daryl dixon x reader#eddie brock x reader#remus lupin x reader#severus snape x reader#charles smith x reader#hosea matthews x reader#hank anderson x reader#dutch van der linde x reader#thomas hewitt x reader#thomas shelby x reader#hannibal x reader#cardinal copia x reader#negan smith x reader#cooper howard x reader#klaus mikealson x reader#john price x reader#silco arcane x reader#viktor arcane x reader#vander arcane x reader#papa emeritus iii x reader#papa emeritus iv x reader#papa emeritus ii x reader#papa emeritus i x reader#tumblr fanfic#fanfiction writer#fanfic writing#fanfiction#ao3 fanfic
5K notes
·
View notes
Text
── ࣪ ˖ ❛ 𝓜𝑎𝑘𝑒𝑢𝑝 𝓥𝑜𝑖𝑐𝑒𝑜𝑣𝑒𝑟𝑠.
‧₊˚ 𝓼𝐲𝐧𝐨𝐩𝐬𝐢𝐬: they do the voiceover for your makeup routine 𝗽𝗮𝗶𝗿𝗶𝗻𝗴 : enha x 𝑓.𝗋𝖾𝖺𝖽𝖾𝗋 𝗴𝗲𝗻𝗿𝗲 : fluff , crack 𝗿𝗲𝗾𝘂𝗲𝘀𝘁𝗲𝗱 : no 𝘄𝗮𝗿𝗻𝗶𝗻𝗴𝘀 : jokes, profanity, pet names, this was shorter than i intended, some of these are kind of inspired by some tiktoks i saw.
— ( 𝓂𝑖𝑙𝑎𝑛’𝑠 𝑛𝑜𝑡𝑒𝑠 ) : pls leave reblogs, they are much appreciated !! ♡︎
✿ member’s headcanons under the cut !!
⊹ 𝓁ℎ𝑠.
asking hee to do this was a piece of cake
he agreed to it immediately
he lovesssss watching you do your makeup
so when you asked him he was like, “well.. yes!”
gonna keep it real with you, he has absolutely no idea what ANYTHING is
he just knows the things that he buys for you and that’s it
flirty mcbirdy over here, he’s barely even watching the makeup, mostly watching you
“hi guys, today i’m doing my girlfriend’s makeup voiceover.” he says into the mic, the video starting with you priming your face as you’ve already did skincare prior to starting the video.
you were next to him while he narrated your routine, holding in your giggles as he began naming the products that you were using.
“okay so now she’s uhm.. damn she’s gorgeous..” he paused for a moment, watching you through the screen as you applied the first product of your base.
you nudged him, urging him to stay on topic as your face began to warm up.
“she’s applying, uh— the— the..” he thought for a moment, the product seemed familiar but he couldn’t think of the name.
it was foundation.
“and then she’s.. wiping it all over her face.” he mumbled, still not paying attention to what you were doing but admiring you instead.
“it’s blending, hee..” you whispered, not wanting the mic to pick up your voice.
expect the comments to go insane about hee’s little flirtatious comments.
⊹ 𝓅𝑗𝑠.
ngl, he’s a bit confused as to why you asked him to do this but he says yes anyway
why does this man actually know what the products are??
quite literally does the whole voiceover better than any beauty influencer you’ve ever seen..
compliments you throughout the video
he’s literally so polite
“hello everyone, today y/n has asked me to do her voiceover, so here i am!” he says excitedly, watching you apply the first product.
“so here, she’s putting some of the foundation in her t-zone.. she has really great skin.” he explains.
you’re sat next to him, shocked at how he’s able to understand the whole routine.
“after she blends, she goes in with her.. concealer, i think.” he was right again.
as you blend that out, jay begins talking about the product that you’re using.
“yes, i pay attention to my girl’s routine.” he says, knowing everyone’s gonna wonder how he could even know all of this. you bite back a smile, his comment making your heart warm.
now the whole internet wants a boyfriend like jay.
⊹ 𝓈𝑗𝑦.
he is very eager to do it. why? because he loves you and is so down bad for you
ummm he knows NOTHINGGG about makeup 😫
another flirty one
count how many times he says he wants to kiss you or compliments your lips challenge (jake is so weak for kisses, you cannot convince me otherwise)
he’s so giggly throughout the whole thing ??
he definitely gets flustered over your beauty, esp your bareface <3
he’s lowkey your hype man even though he has no idea what he’s talking abt
“hey guys, it’s jake! today i’m gonna give you all a tutorial for y/n’s everyday makeup.” he beamed confidently. he watched you start your routine, already giggling at the small things you do throughout the first 30 seconds.
“so she’s gonna start with, um..” his giggles cutting him off. “she’s starting with the putty stuff. it kind of looks like play-doh!”
“jake!” you nudge him a bit, rolling your eyes playfully.
“sorry, sorry!” he laughs. “now she’s putting on.. powder? wait, no, that’s definitely bronzer.”
“yeahh, apply that bronzer, babe!” he exclaimed.
it was powder foundation ??
“she looks so good already, wanna give her a kiss..” he said, watching you pat the product onto your skin.
⊹ 𝓅𝑠ℎ.
bro is so impatient
he can’t think of any of the name of the products that you’re using which frustrates him to the MAX
pls don’t laugh at him, he will sulk 😕
cracks jokes abt how long you take
“now she’s applying.. uhm, glitter?” he tilted his head, watching you apply highlighter to the inner corners of your eyes.
“highlighter, babe.” you corrected him, holding back your laughs.
“whatever it is, it’s very shiny. and she’s putting it on so do whatever she’s doing if you want this look.”
you snorted a bit, finding his impatience hilarious.
“watch as she puts on her favorite mascara that she made me buy her.. because she doesn’t care about my pockets or if i go broke.” he sighed.
you landed a playful smack to his shoulder, scoffing.
“anyways, she takes forever.” he huffed. “she told me she was gonna be ready in 10 minutes but 10 minutes turned into two hours, so i guess im gonna have to wait.”
please don’t ever ask him to do this again.
⊹ 𝓀𝑠𝑤.
like jay, he knows what everything is
he’s actually really excited to do this
he pays attention when you do your makeup and pays attention when he gets his makeup done so
he basically knows what everything is he just.. doesn’t know how to do it
he knows all of your favorite products
count how many times he calls you pretty challenge:
“look at how pretty she is!” he exclaims as you prime your face. “i did her skin care by the way.”
he watched as you applied your concealer, telling the viewers exactly what brand it was and what it did for your skin.
“i’m pretty sure this is her favorite product.”
“okay! next she’s gonna set with this one powder that she absolutely loves.” he giggled.
you chuckle at his excitement, not expecting him to like this as much as he did. you just knew people would want more of him narrating your routines and grwms.
“and now, she’s putting on her blush.. I love this part.” he said, mesmerized by you and your features.
“isn’t she so pretty?”
⊹ 𝓎𝑗𝑤.
he’s so confused
tbh he just yaps the whole time
you don’t know what he’s talking about, he doesn’t know what he’s talking about..
he just knows that he buys some of the stuff
he gives random facts throughout the video ??
“okay, so i’m not really sure of what she’s putting on her face right now..” he said, scratching his head slightly.
“did you guys know that dolphins name each other?”
“jungwon..?” you furrow your eyebrows, looking at him confusingly.
“oh, right! sorry, now she’s applying some.. nose.. stuff?”
you mentally face palmed at his attempt to name the products, which he ended up wrong every time.
“if it wasn’t already obvious, i know none of these things, i just get whatever she tells me to buy.” jungwon giggled, watching you apply your blush.
please DO NOT let him do this ever again 😭🙏🏽
⊹ 𝓃𝑟𝑘.
bro does NOT wanna be here
he doesn’t wanna do it at all 😭
but somehow you convince him (you told him you’d buy him robux)
he guesses everything
some of it he gets right somehow
gets so triggered when you laugh at him 😭
“um, okay, she’s applying concealer.. that’s concealer, right?” he looked over at you, as the video showed you applying the product.
you looked at him, giggling.
“why are you laughing? is that not concealer?” he asked again, becoming irritated.
“yes.. just keep going, ki.” you cover up your laughs.
he rolls his eyes playfully, “anyways, now she’s putting on some powder shit.. i don’t know.”
“and she’s.. beating it on her face..? why are you punching yourself?” he quirks an eyebrow.
you shake your head, sighing at his confusion.
✿
TAGLIST: @haechansbbg @contyynishimura @sasfransisco @kgneptun @jungwonderz @enha-stars @dioll @jakesangel @cupidscourt @violetwitchmcu @haohaoshoe @randomgirl02228 @wonsdoll @powerpuffstuts @flwrstqr @elysianiki — send an ask to join.
#𝒮𝑖𝑔𝑛𝑒𝑑,ℳ𝑖𝑙𝑎𝑛 ⊹ ₊˚#kairoot#enhypen#enhypen x reader#enhypen fluff#enhypen imagines#enhypen sunghoon#niki enhypen#enhypen jay#enhypen heeseung#jungwon enhypen#enhypen scenarios#jake enhypen#enhypen reactions#enhypen fic#enhypen ff#sunoo enhypen#enhypen fanfiction#enhypen x female reader#enhypen x y/n#enhypen x you#enhablr
2K notes
·
View notes
Text
New Mature Content Warning Overlay (And How to Get Rid of It)
More fun community label "features"! Unlike the new mandatory label for #NSFW, this one is a bigger deal to me because it affects my entire blog and it can't be avoided by just using a different tag.
Apparently on custom blog layouts, if you happen to post or reblog even a SINGLE post that's been flagged with the mature content community label, a full-page warning overlay will appear blurring out your entire blog that must be manually clicked through every single time the page is refreshed. At first I thought this was just a bug due to my older layout but I've come to realize it's not. It's a feature (as confirmed by this recent changes post) that affects all custom themes. The formatting will vary based on your own theme but here's what it looks like on my blog:

I don't know about you but I find this is stupid and annoying. If it could be dismissed once and never seen again that might be one thing, but that's not the case. The vast majority of my blog is not "mature" enough to warrant such an aggressive and invasive warning. I also think pop-ups are obnoxious in general and I'll be damned if tumblr's going to force me to have one on MY blog.
After some desperate googling for a known workaround and being unable to find even a single mention of it, I decided to take on the challenge myself. I'm not a theme coder, so apologies if there's a better way to do this, but luckily it only took me like 10 minutes to figure out a simple fix, which I'm now sharing with anyone else who may want it:
.community-label-cover__wrapper {display: none}
Just copypaste that somewhere in your CSS and goodbye pop-up!
If you're not sure how to access your theme code, check out this help article. You can also add the code via the Advanced Options menu, which is actually even better (if you can get it to work, it depends on how your theme was coded), because it will then automatically be reapplied to a lot of themes without having to remember to manually add it every time if you change your theme in the future.
Obviously this will only remove it from your own blog for anyone who may visit it. If you never want to see this warning again on other people's blogs you can also add this custom filter to your ad block:
tumblr.com##.community-label-cover__wrapper
Unfortunately I do not have an easy tutorial on hand for this one as the method will depend on your specific ad block app or extension.
Some additional notes:
After adding the theme code and saving the changes, give it a minute to update as it sometimes takes a little while for the page to refresh.
The warning overlay only seems to appear if a "mature" post is on the FIRST page of your blog, which is still annoying and makes the whole thing even more pointless and stupid because what if someone visits any other page of your blog, and oh no, happens to see "mature" content they weren't warned about?!
The warning also appears on direct links to "mature" posts.
This hack has NOTHING to do with entire blogs that have been flagged as NSFW. It only works for non-flagged blogs with custom themes that happen to have individual "mature" posts.
#I'm not letting my entire blog be penalized for a couple rare singular posts that may or may not even be 'mature' enough to warrant it#tumblr may force us to use community labels#and they may have full control over the new blogview#but MY custom blog layout has always been and always will be MINE to format and present however I want#that's the whole point#tumblr#psa#tutorial#my words#tumblr themes#wendy's help desk
17K notes
·
View notes
Text
from classmate to boyfriend, jungwon has always been attentive towards you ୨୧ yang jungwon x fem, wc 0.4k
⠀⠀ ͏⠀⠀ ͏ ⠀ ͏⠀⠀ ͏⠀⠀ ͏⠀ ͏· · ୨୧ · ·
classmate!jungwon who you always find quietly saving you a seat, even if he acts like it’s just a coincidence. he smirks slightly when you thank him, but the pink dusting his ears gives him away.
classmate!jungwon who never stammers but still gets a little flustered when you catch him staring. he always remembers the little things—like how you take your coffee or which pens you prefer for notes.
classmate!jungwon who notices when you're tired and casually pushes a coffee toward you, acting nonchalant but tapping his fingers against his cup as he waits for your reaction. "thought you might need this."
classmate!jungwon who always offers to walk you back to your dorm, his voice steady but warm.
"it’s getting dark," he says, eyes holding yours this time. "i’d feel better if you weren’t alone."
bf!jungwon who always has a hair tie on his wrist, smoothly handing it over when you need one. he even stayed up all night watching tutorials and practicing how to tie hair just so he could do it for you if you ever needed help.
one evening, as you're cooking, he gently gathers your hair and ties it back without a word, his fingers careful and precise. "don’t want it getting in your food," he murmurs, a small, proud smile on his lips.
bf!jungwon who gives you a small bottle of pepper spray one day, his ears turning pink as he says, "just in case. i’d worry too much if you didn’t have it."
bf!jungwon who insists you use his name whenever you order food for pickup because he thinks it’s safer.
"but why yours?"
"because it's safer to use a guy’s name," he shrugs, but the way he fiddles with his sleeve betrays how much he’s thought about it.
bf!jungwon who instinctively pulls you closer in a crowd, his hand easily finding yours like it belongs there, his cheeks slightly pink but his grip firm.
bf!jungwon who melts when you rest your head on his shoulder, tilting his head slightly so he can rest against you too, pretending it’s no big deal but secretly loving every second.
bf!jungwon who gives you his hoodie even when he’s freezing, rolling his eyes playfully but still nudging it toward you. "i’ll be fine, just take it."
bf!jungwon who never lets you doubt how much he cares about you. who makes sure you’re safe, warm, and loved every single day.
"i don’t care what happens, i just need you to be okay."
he has and always will put you first.
© legomaster333, all rights reserved.
letters from author here comes the poll winner! ill post the jake draft i have like tmrw or the day after (or whenever i finish my actual english essay..)
#love letters ⭐️#enhypen#enhypen scenarios#enhypen oneshots#enhypen imagines#enhypen headcanons#enhypen drabbles#enhypen soft hours#enhypen timestamps#enhypen soft thoughts#enhypen fluff#enhypen x reader#enhypen yang jungwon#enhypen jungwon#yang jungwon#jungwon#jungwon enhypen#jungwon imagines#jungwon scenarios#jungwon drabbles#jungwon oneshots#jungwon headcanons#jungwon x reader#jungwon fluff#jungwon soft thoughts#jungwon soft hours#enhypen angst#jungwon angst#enhypen headcannons
809 notes
·
View notes
Text
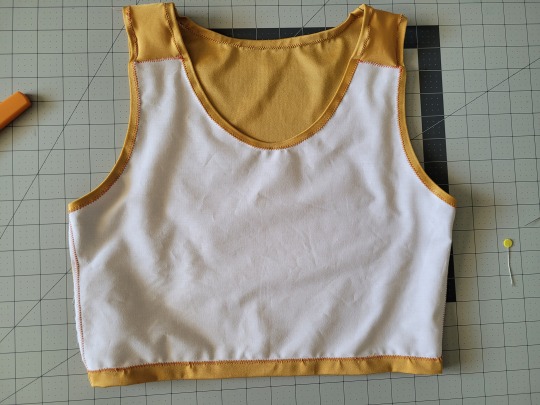
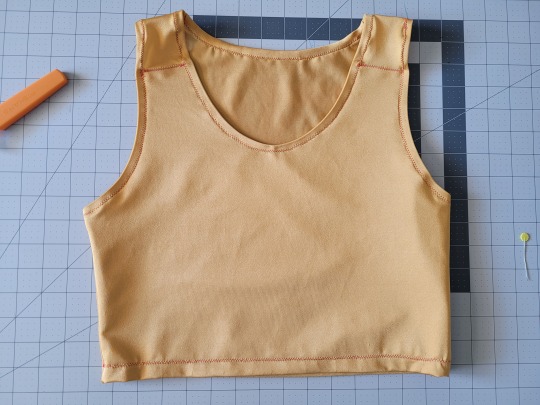
How to Make Your Own Binder that Fits Well and Looks Good
A while back I was in need of some new binders and thought hey, I bet I can make one way cheaper than buying it from somewhere (especially cus some of the ones I’ve bought in the past didn’t really fit right). Except when I started looking for a binder patterns online, I was very surprised that I really… couldn’t find many that looked very nice lol. Most of them had really wrinkled necklines, or didn't bind well, or just overall looked weird. A lot of the patterns also required a serger, which I don't have.
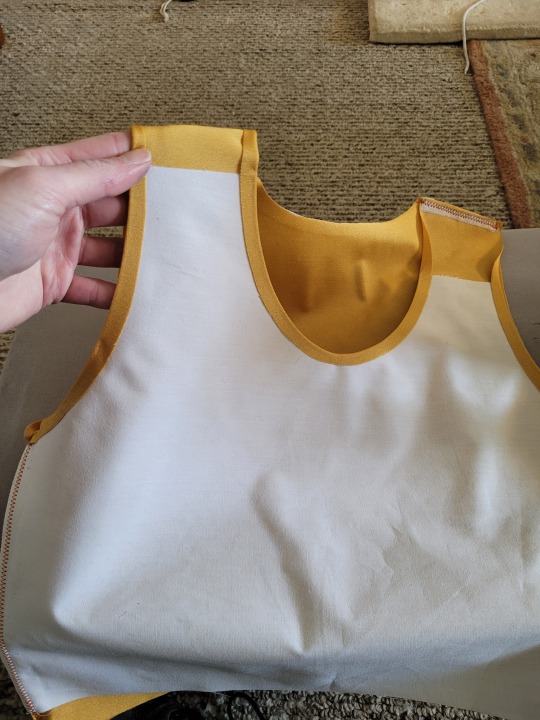
So I just said fuck it and made my own pattern! And it ended up being relatively easy! And the binders fit REALLY WELL and are comfortable to wear, even for long periods. The neckline doesn't show under shirts with loose collars, and the bottom hem doesn't gap or stick out. Here's me wearing one:
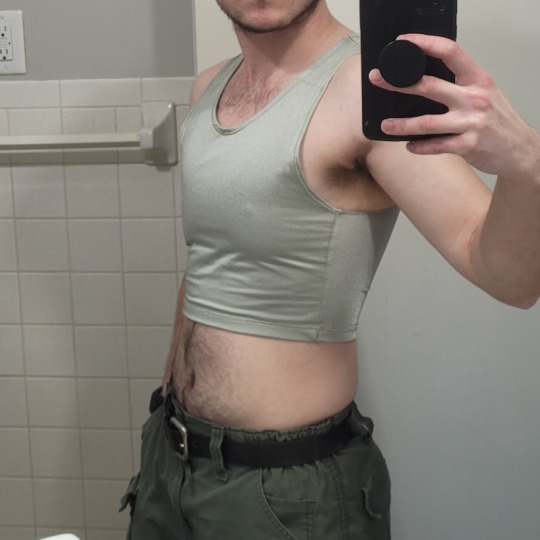
(plus I was able to make myself 5 of them for a total of like ~$50.)
So I figured I could throw together a guide to help out anyone else who wanted to make their own binder but was dissatisfied with the patterns available!
Disclaimer: This tutorial is going to assume a baseline level of sewing experience, and also will require access to a sewing machine. It is not a complicated pattern, but it will most likely require some tweaking and adjustments after you make the first one. Don’t be afraid to make alterations to make it fit better!
This tutorial is for a gc2b-style half-tank binder. It could be altered to be a full-tank binder, but all instructions will be for the half-tank design.
Materials needed:
Stretchy fabric, probably listed as 'athletic fabric' (I use this kind from Joann’s. Most athletic stretch fabrics should work, look for around 80% nylon/20% spandex blends)
Stiff fabric (I use this shirting cotton because I like how lightweight it is. If you want something a little stiffer with more structure, you can use a cotton or cotton/poly blend twill like this. gc2b binders use twill for theirs.)
Lightweight fusible interfacing (I use this kind) (get FUSIBLE not sew-in)
Fusible webbing like Pellon Wonder-Web (this is technically optional but it WILL make your life easier when you’re sewing - just make sure to get the kind with the paper backing!!!)
“But kiwisoap thats 4 whole kinds of materials, surely I don’t need that many!” Ok sure, you can probably get by without the fusible web and interfacing, but consider: they are both dirt cheap (im talking like $1-2/yard), they will make it much easier to sew the final product, and will give you an overall better-looking result. This tutorial is written with the assumption that you’ll use them.
"How much fabric will I need?" Measure the circumference of your chest below your armpits. Add 6 inches just to be safe. This is the yardage of stretch fabric you’ll need, and should give you enough material to make at least 3 binders without much excess left over. You will need around half as much stiff fabric.
Other supplies:
Big Paper (for drawing the pattern)
Flexible measuring tape
Sewing machine
Iron
Pins
Step 1: Measuring
You will need 4 main measurements for this pattern.

A) Measure the circumference of your chest just below your armpits, then divide the number in half. This will be the widest part of the pattern.
B) Measure from the top of your shoulder down to where you want the binder to end. For most folks, this will usually be around the natural waist (narrowest part of the torso), about 3-6 inches above the belly button. This will be the overall height of the pattern.
C) Measure the distance from below your armpit to where you want the binder to end. This will determine where the arm hole starts.
D) Measure the circumference of your waist where you want the binder to end, then divide the number in half.
So for example, after dividing A and D in half, my measurements are 17", 15", 7", and 14.5".
Next:
Subtract one inch from measurement A - This will help provide some compression. You might need to take it in even further depending on how it fits, but one inch is a safe starting point. I take mine in around 1.5 inches.
Subtract half an inch from measurement D. This will help prevent the bottom edge of the binder from gapping. Again, you may need to take it in more or less, depending on your own body.
Add 1.5 inches to measurement B and one inch to measurement C. This is to account for the hems and armhole placement.
This makes my final measurements
A = 16"
B = 16.5"
C = 8"
D = 13.5"
From here on out, we are only going to be working with the measurements that we have added/subtracted to, NOT the ones we initially took.
Step 2: Drawing the Pattern
You will need a piece of paper large enough to accommodate the entire pattern. This may involve taping multiple pieces together, or using a piece of newsprint, etc.
I recommend folding the paper in half to ensure that you get a symmetrical pattern. However, this means you will need to divide measurements A and D in half again, or else you’ll end up with a pattern that’s twice as wide as it should be!
Also note: the pattern is drawn with the seam allowance built in! You don’t need to add any seam allowance.
To draw the pattern:
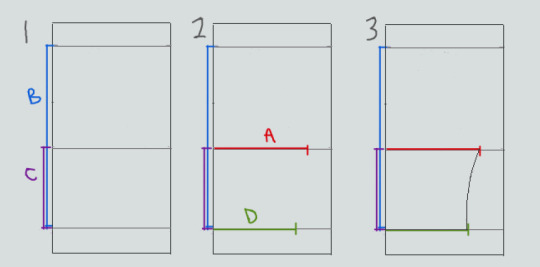

Begin with your folded paper. Measure and mark B and C on the paper, and draw a line extending across the paper. These will be your guidelines.
Measure and mark A and D along the middle and bottom guidelines, respectively. Remember, the paper is folded, so you only use half of the measurement for A and D.
Draw a loose curve connecting the endpoints of A and D. If needed, you can also just draw a straight line between the two.
Mark the opening for the neck hole. Depending on your size, it will measure around 6-8 inches across at the top (remember to divide this in half for the folded paper) and about 5-6.5 inches deep. (mine is 6.5" across and 5.5" deep) Draw a curve to connect the two points. This part will take some tweaking and adjusting to get it to look right lol.
Measure the width of the strap - this should be somewhere between 2.5 - 4 inches wide. They will end up about 1/2” to 3/4” narrower once you sew them. Draw the line at a slight angle, as shown.
Connect the endpoint of the strap to the endpoint of line A with a curve like in the diagram.
This will be the pattern for the front piece.
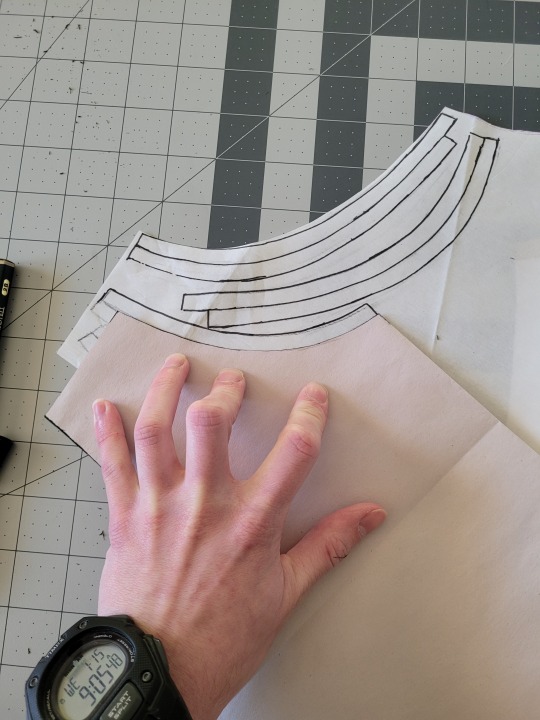
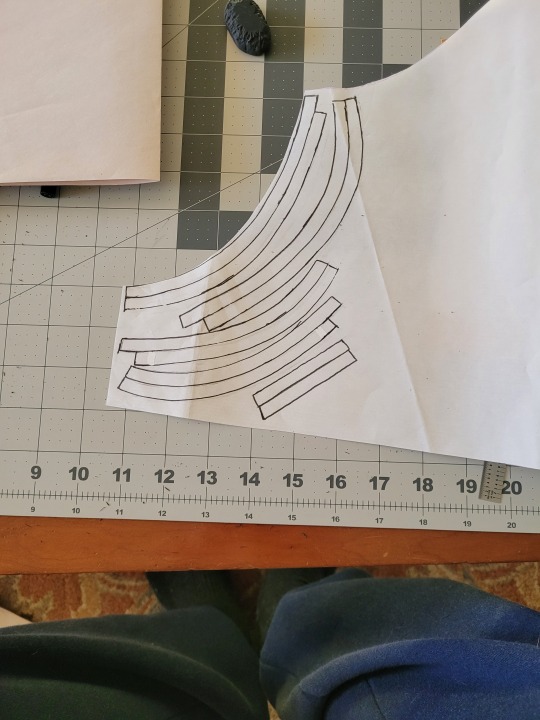
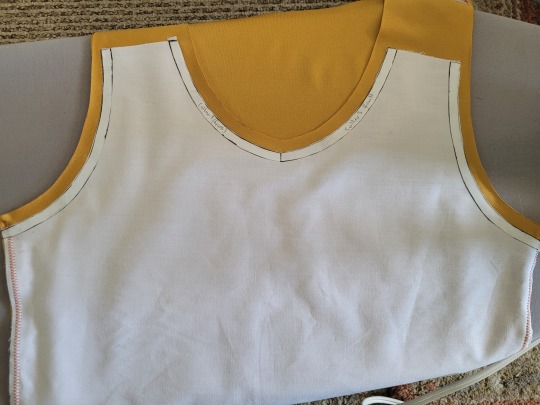
To make the back piece, trace the front pattern, but make a very shallow curve for the neckline instead of a steep one, as shown:
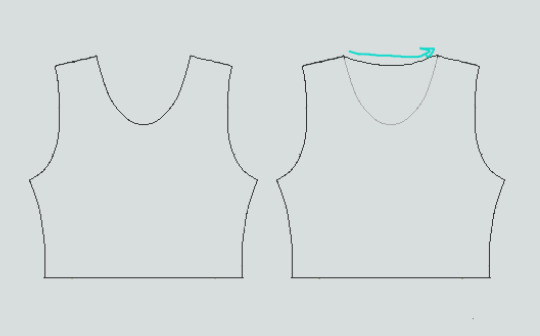
The last piece is the stiff front panel. This is what provides the flattening effect of the binder. To make the pattern, trace the front pattern again. Trim 3/8” in on the sleeves and neckline, and 3/4” to 1” along the bottom. This gives a flatter hem. Then trim the straps shorter by a few inches. This helps the binder lay flatter along the shoulders.
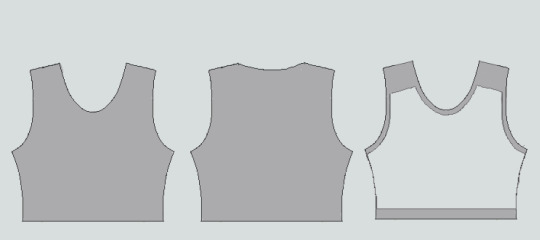
When you're done, you should have 3 pattern pieces that look approximately like this (stiff panel shown overlaid on the stretch fabric to show how it fits together).
NOTE: If you want more compression or just want to make it a bit sturdier, you can add a second panel of stretch fabric to the back piece. Just use the bottom half of the back pattern (from the widest part down to the bottom hem) to cut out another piece of stretch fabric. Attach it to the back piece with a strip of fusible webbing and a zig-zag stitch along the top.
Step 3: Putting It All Together
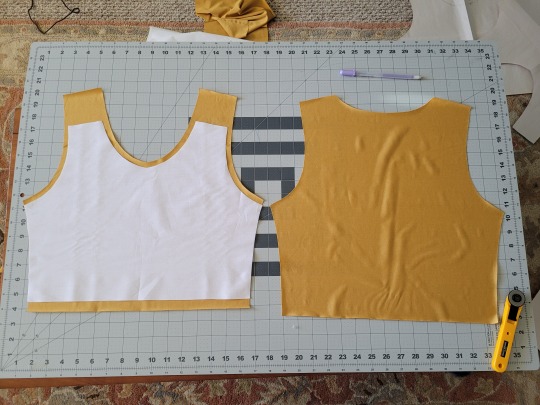
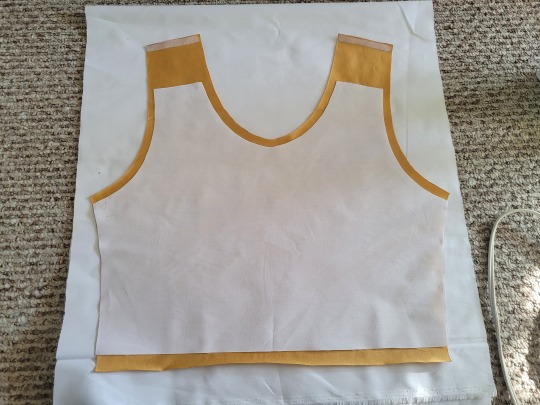
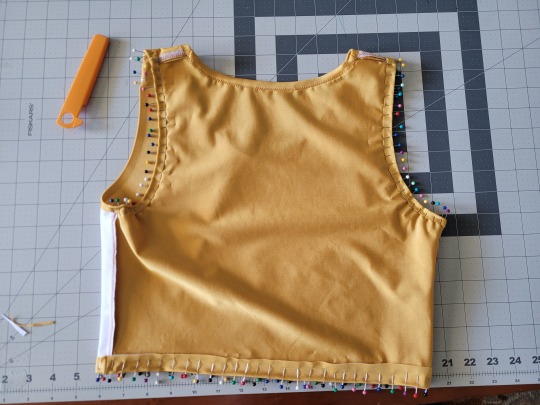
Once you’ve made the patterns and cut out the pieces of fabric, you should have something that looks like this:
The next step is adding interfacing and fusible webbing. Use your pattern to cut out 3/8" strips to fit on the top of the straps for both pieces, and to the neckline, sleeves, and bottom hem of the back piece, as shown:
If you want to add it to the bottom hem of the front piece, it will help keep that hem flat when sewing it down later, but it's not essential.
If you choose to also use fusible webbing (WHICH I RECOMMEND), you will apply it to the stiff front panel similarly to how the interfacing was applied, ~3/8” strips along the neckline, sleeves, and top of the straps. Cut out two strips for the neckline and sleeves, because we'll use those later too.
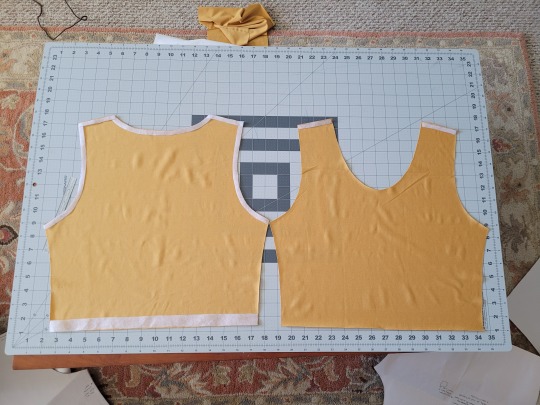
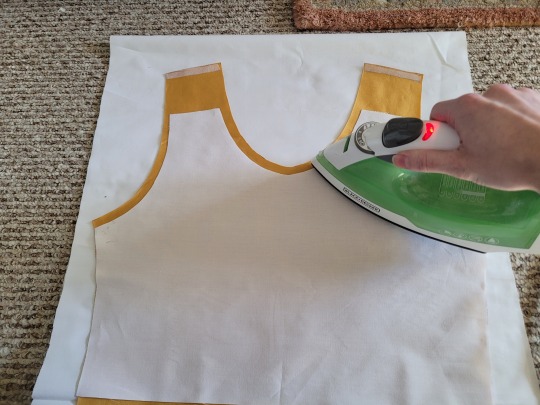
Iron the strips onto the front panel as shown:

Once it's on, just peel off the paper, position it webbing-side down on the stretch fabric, and iron it to fuse the two pieces together so everything stays in place while you sew. THIS MAKES IT WAY EASIER TO SEW.
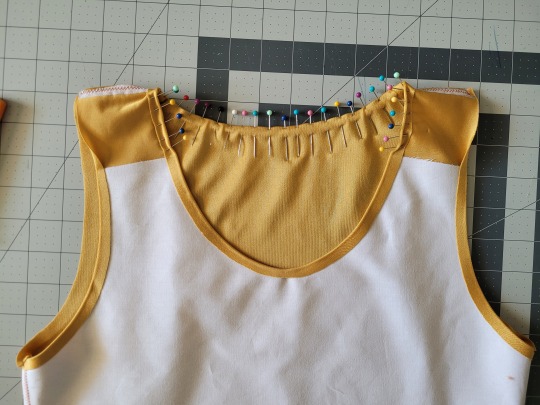
After the stiff front panel is fused to the stretch fabric, you’ll sew the straps of the front and back pieces together, then join the pieces along the sides. Pin the hell out of it to keep everything in place -this type of material is VERY prone to puckering.
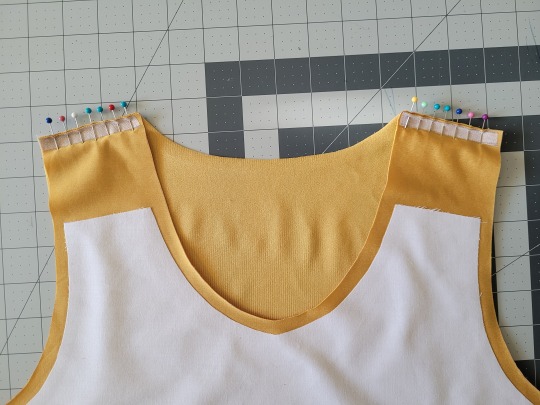
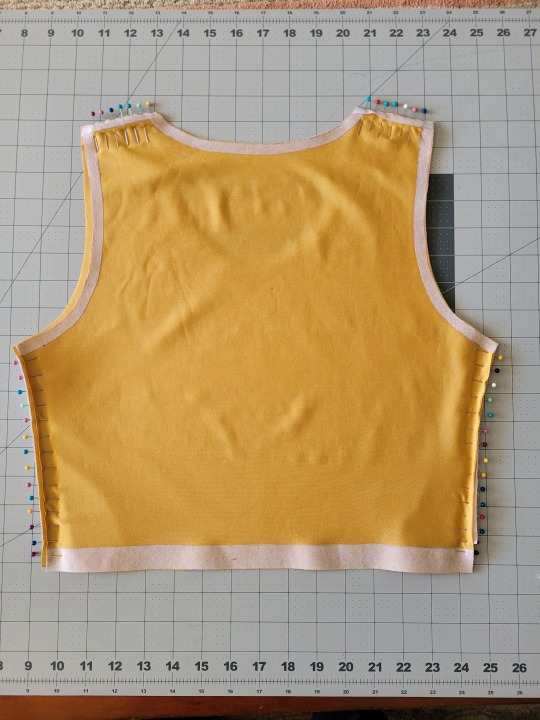
When sewing, USE A ZIGZAG STITCH. A straight stitch will NOT WORK for stretch fabric. I adjust mine to 1.3mm long and 3.5mm wide which has worked well. If your machine doesn’t let you adjust stitch length or width, well. That sucks, I don’t really have any advice.
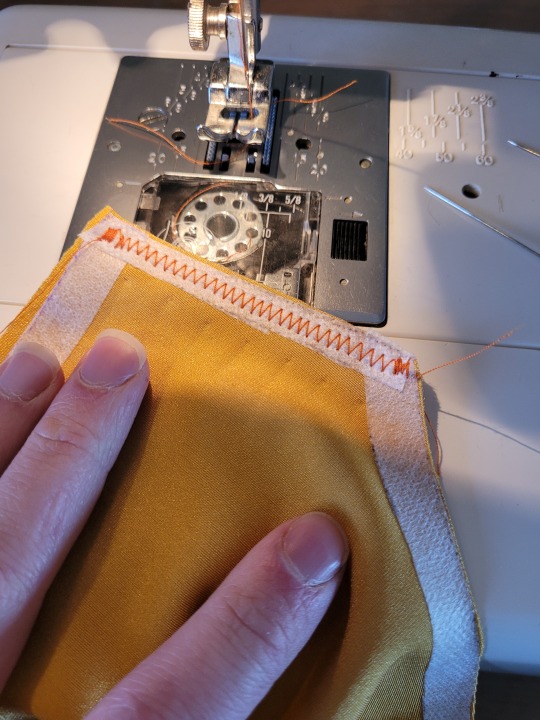
After you sew the front and back pieces together, you can add more fusible webbing to the front panel to help hold the hem down flat and prevent it from puckering while you sew it. Just add the strip, peel the paper off, then fold the hem over and iron it down. This part isn’t really necessary, but it does make the hems look nicer. If nothing else, I would recommend adding it to the neckline.
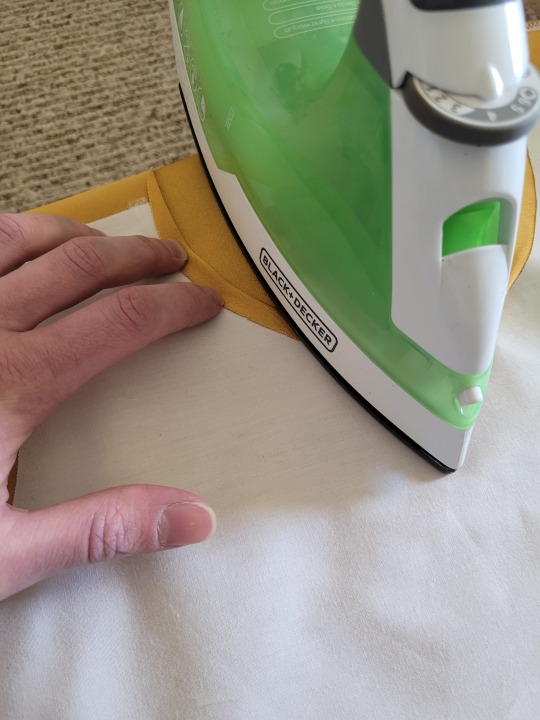
After that, you just fold & pin all the hems and sew them up with a zigzag stitch, then go over the raw edge at the top of the stiff panel (where we cut the straps shorter).
And that’s it! You’re done! And now you can make your own binders whenever you want!
And hey! If you used this tutorial and wanna throw me a dollar or two on ko-fi, I wouldn't complain.
920 notes
·
View notes