#rope tutorial
Explore tagged Tumblr posts
Text

Let's tie my favorite hip harness for self-suspension + the top vote of my recent diamond hip harness poll: The Diamond Back
This build is a sort of hybrid between a Swiss seat and a hip harness and it's my go-to for extended aerial play. It can be modified easily to accommodate different body shapes and sizes and it's an amalgamation of many different builds I've studied over the years from many great minds in rope
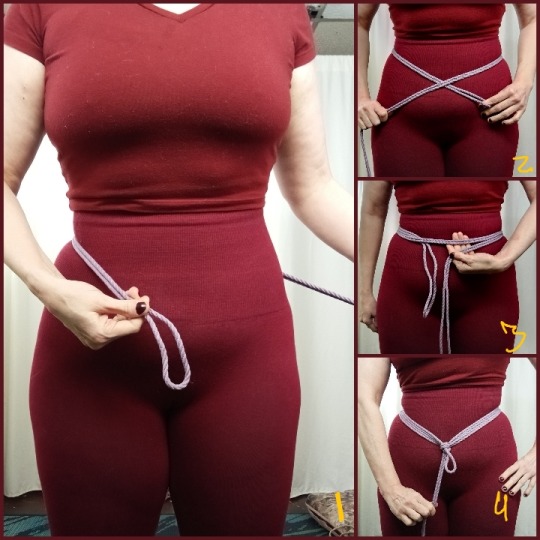
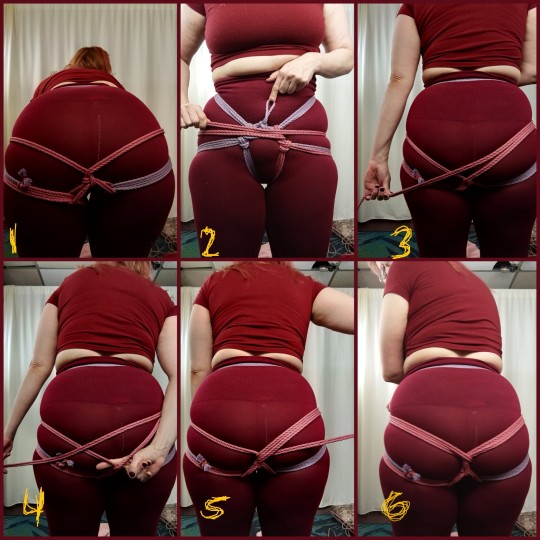
1-3) To begin, I will tie a single column tie (SCT) around my low waist - I can begin with my bight on either side of my body
*take note of which side your bight enters from*
4) I have secured my SCT in line with my belly button using a Somerville bowline, you make whatever SCT you prefer. I pull my SCT downward in a slight V shape
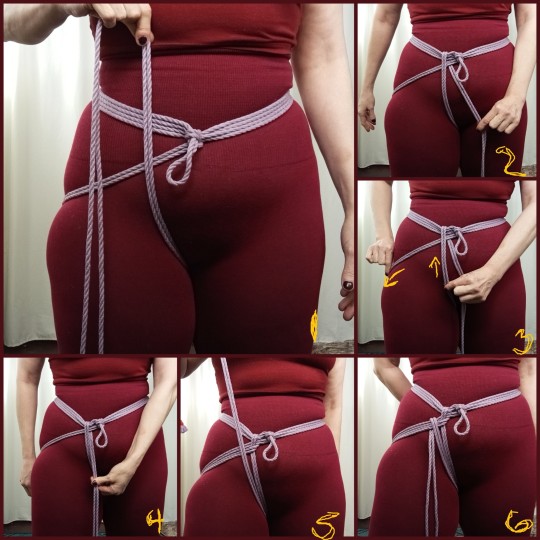
*whichever side of your body you started with your bight to build your SCT, that is the same direction we will begin tying our first leg wrap*
1) I make my first leg wrap nice and high running just beneath my butt cheek in the back
2) I friction over and behind my hip lines and my diagonal leg line exiting toward my crotch and approximately 1/2" from my SCT knot
*experiment with the placement of this friction for your individual comfort*
3) To adjust the tension in my leg wrap, I feed slack behind me with one hand and receive it in the front of my body with my other hand
4) I pull my working lines downward eliminating my transferred slack
5) I make a second wrap of my leg tracing below my first wrap
6) I friction up and over my leg lines, exiting toward the outside of my body
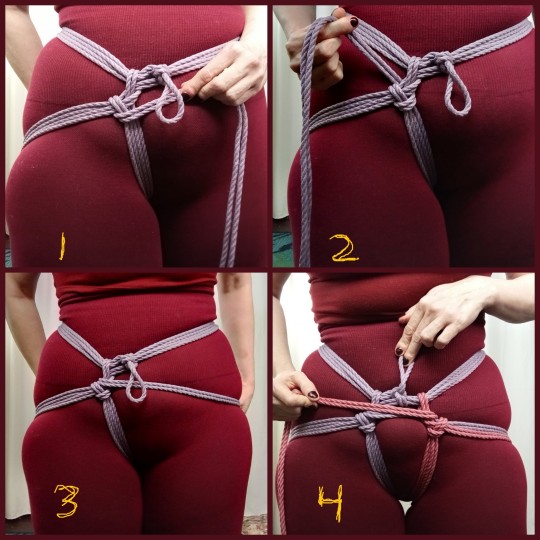
1) I equalize the tension in both my leg wraps and move over my inner leg wraps
2) I move behind my leg stem
3) And I move across my leg stem, ensuring I compact down all of my frictions
*you can see I've created another intentional upside-down V shape in the angle of my leg bands, and this will allow for more freedom of movement in my hip flexor*
4) I added another rope in another colour for clarity, and I mirrored my pattern on my other leg, exiting across my front and utop the last friction knot of my first leg to encourage it to stay nice and compacted
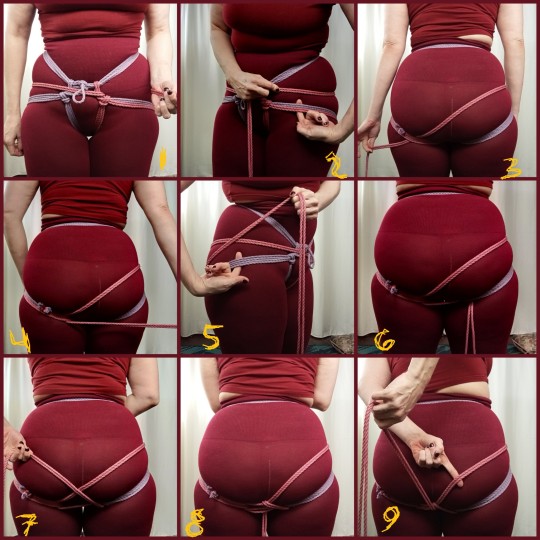
The next element we will build is a booty rope bridge which will capture both my leg wraps in a munter hitch
1) I run my line along the lower half of the space between my leg wraps and waist wraps all the way around my backside, and to the opposite side of the front of my body
2) I run my lines from tip to base of my finger, at the front of my body where I can better see what I'm doing
3) I shift my tensioned line back and under my butt cheek
4) I cut across my butt moving lower than my previous band
5) I move from tip to base of my finger again at the front of my body where it's easier to see what I'm doing
6) I slide that line back under my other butt cheek
7) I move up diagonally across both of my standing booty lines
8) I friction over and behind both lines exiting towards my crotch
9) to complete my munter hitch, I move my line from tip to base of finger again, exiting toward the front of my body
I take time to equalize the size of my booty bridge loops by adjusting my munter hitch, as well as flattening my leg wraps so they lay nice and flat like bands which will be much more comfortable when we take this harness into the air later
2) I move straight across the front of my harness running right above my previous pass
3) I continue to trace my previous wrap to the back
4) I make a simple twist around the top of my booty bridge friction moving my lines from tip of finger to base
5-6) I exit above my standing booty bridge band, pulling up slightly to maintain tension, exiting toward the front of my body
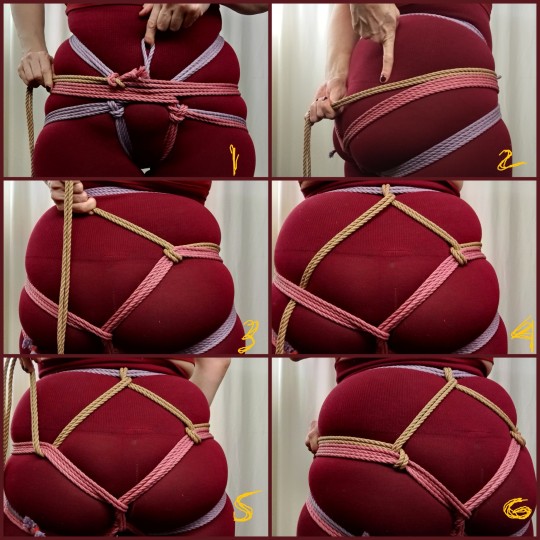
1) I added another scrap of rope in a third colour for clarity, and I continue the build by moving directly across the front of my harness again utop my previous pass
2) I make a half hitch (HH) around my booty band placing it in my natural gluteal divot
*experiment with placement of your HH here for individual comfort*
3) I tension my HH by pulling slightly upwards as I exit diagonally up toward my hip lines
4) I capture my hip lines with a simple twist, pulling downward into another slight V shape, I exit beneath my opposite booty band to create a mirrored HH on the other side of my butt
5-6) I maintain firm tension and pull these bands upwards slightly before completing my second HH and exiting toward the front of my body
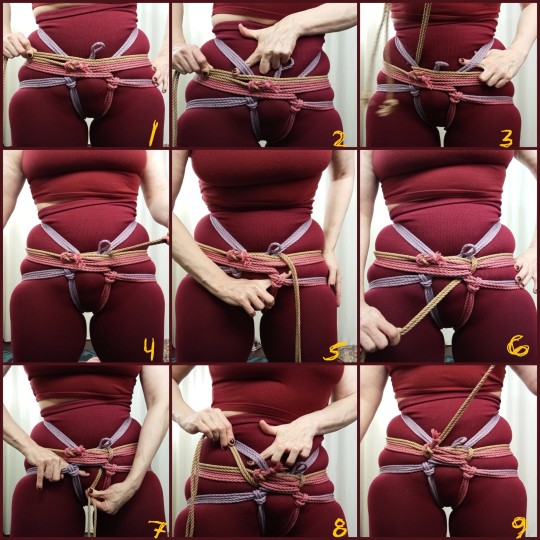
1) Now we will perform a very tight weave and create a reverse half moons friction to incorporate our mid bands securely into our front harness bar. To begin, I move across the front of my harness running my lines above all of the previous passes
2) Weave from tip to base of finger
3) Continue behind the other side of my hip lines from tip to base of finger
4) I carefully cinch and compact the top of my half moons friction, careful not to overly tension my top midline pass as I cinch, and ensuring I don't accidentally nip up flesh or clothing in my ropes as I weave
5) I move over all of my midline bands, and under my leg stems following tip to base of finger
6) I carefully cinch and pull my working lines away from my flesh and leggings
7) continue behind my other leg stem moving my lines from tip to base of finger
8) I move over all of the midlines again, and back under my hip lines following tip to base of finger
9) With my half moons weave completed, all I need to do now is finish with my rope ends
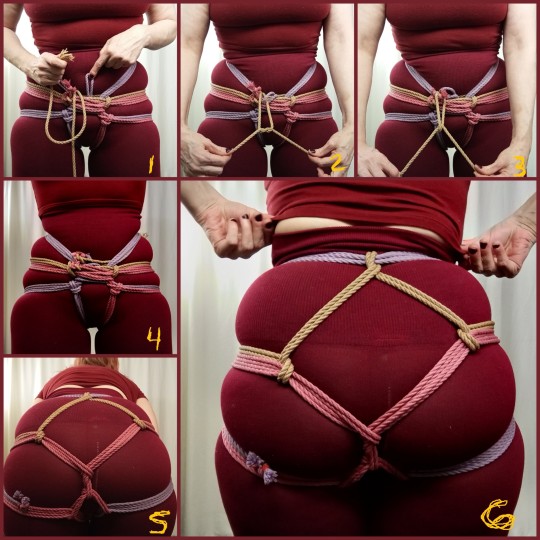
1) You can finish your ends as you see fit, here I'm simply splitting my working ends and running one is them through my original SCT bight
2) half a square knot
3) the second half of a square knot
4-6) a look at the completed diamond back hip harness
Click here for a video guide to tying this harness as well as a look at how it maintains during transitions in suspension
If you give this build a go, I would love to hear about it! Feel free to tag me here or on any other platform we're grooving together on ❤️
Knots of love from me to you 💋🪢
#shibari#rope#self tie#rope tutorial#kink education#suspension#diamond harness#learning the ropes#hip harness#pictutorial
617 notes
·
View notes
Text
Updated March 31st, 2024
If you want to see me uncensored or want custom pics, DM me - $5 bucks
Hiya! I'm Narcissius (Narci for short - if we're friends you can call me Rose), 22, they/them. verse switch, leaning towards sub bottom - but I've been feeling more dommy lately. read my DNI (below); my gender is Complicated (see below); and my tags have only recently begun to be a thing (see below).
Mutuals feel free to message me; I get way too nervous to initiate text, but I love making new friends!
☆DNI☆
MINORS/AGLESS BIOS
Racists/homophobes/transphobes/ intersexists/etc. I know it's a baseline of human decency to *not* be one of these, but whatever.
Transphobes INCLUDES detrans, sissy play, futa shit, whatever.
I don't care if you're cishet at all! But don't be creepy, I'll block you
♡Gender/Pronouns/Other Complications♡
Gender-nebulous nonbinary, been on hormones since July 2021. They/them with some light she/her is alright. mutuals may call me a boy (especially with praise 🤭) and anybody can call me a guy when joking around (but be respectful), but don't call me a man.
Not a thing I want to be called all the time, but if you're going to call me a queen for jokes or whatever, call me a king instead. 🫶
Part-time goddess, full-time dog :3
Gender is a poem, and I am Emily Dickinson.
◇Tag System◇
#tender - stuff that is tender To Me, is still usually sexual tho
#sex ed - sex ed stuff
#my content - pics I take
#narcissius writes - idk new tag, for when I write stuff (rare)
#rope tutorial - posts i found that have rope tutorials that i would like to save ^.^
#narcissistic musings - posts that aren't all that but i wanna ramble a bit
#🐶 tag - for dog coded stuff. you know how transfemmes are 💅🏼
#pinned#about me#tender#sex ed#my content#narcissius writes#rope tutorial#narcissistic musings#🐶 tag#lover boy tag#for 🐇#puppyboy tag#<-last three are about lovers (most of whom are parttime at best) irl that i am fond of#🐶 tag is also for my bf to be clear
13 notes
·
View notes
Note
Trick or treat 👀💓
Happy Halloween, Salty!
You get... a quick and easy knot tutorial!
Here's how to tie a loop in the middle of a rope: it won't slip up or down, and it won't tighten or loosen without extreme effort. You don't need access to either end of the rope, so this can also be used to shorten a rope that's already in use!
Step one: make a couple of loops by twisting the rope twice. It should look like a figure eight here!

Next, take the top of the loop and bring it down over the bottom of your rope

When you finish, it should look like a pretzel if you're hungry, or a heart if you're feeling romantic


Now, tuck that end up through the center loop from beneath and pull it tight


And, there you have it! You can make the loop as large or as small as you like. This knot is stable, and can also be used to take stress off a weak part of the rope if you're worried about it snapping.

#inbox trick or treating#this one is sfw#(mostly)#but if you include a request in the ask#then it doesn't have to be!#rope tutorial#saltaccountonphone
1 note
·
View note
Text
A quick (silent) demo for the heart-shaped friction from my last tie
1K notes
·
View notes
Text
Basic Wrap & Cinch Tutorial
As requested here is a tutorial for our go-to tie. It can be used to tie two things together, like your arms and legs, in almost any combination, we will show a wrist tie. It is a great beginner tie because of how easy it is to slip out of when needed, and we would recommend it to any newcomer to Shibari.
Step 1 - Coil
The first step is to wrap (coil) a length of rope around your wrists. We are using a 10ft rope, but almost any length works. Start in the middle and wrap each tail around until even, leaving a comfortable amount of rope to work with. Do not over-tighten, especially with wrists you should be able to comfortably fit a few fingers between the rope and skin.

Step 2 - Cross
Take the tails cross the top and bottom rope over each other holding the coil in place and leading each over and to the other side.


Step 3 - Cross Again
On the other side cross each rope over each other then back the way they came to the front side. It should look like a chain link.

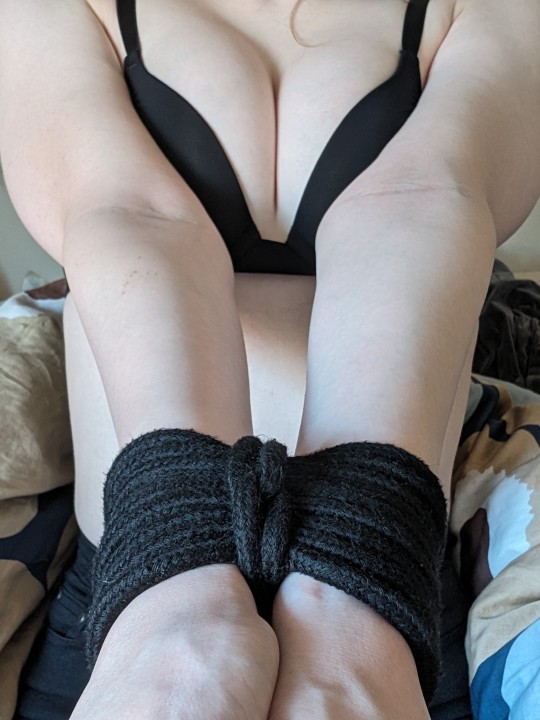
Step 4 - Cinch & Enjoy
On the front, tie any knot of your choice to cinch the ropes. We use a simple knot (one tail wrapped around the other once then pulled tight) that relies only on friction to make it easier to escape.

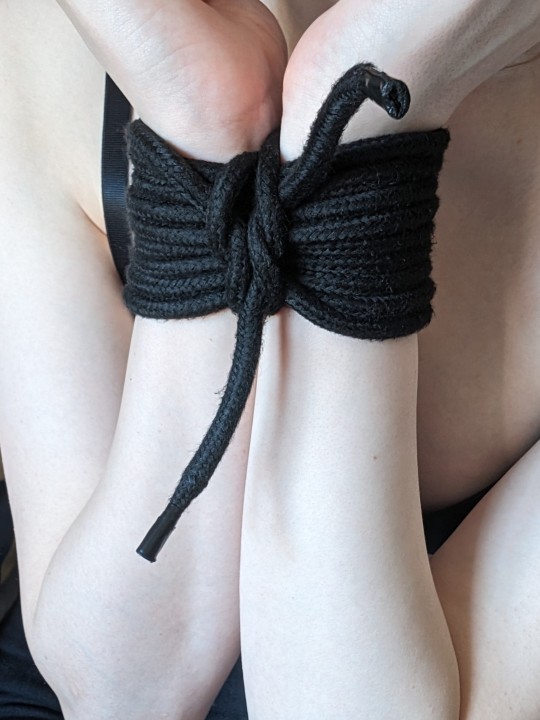
This is our first time doing a tutorial, let us know if there is anything we can improve on. 💋
474 notes
·
View notes
Text
One thing I will never forget about unus annus is during the Definitely not shibari video of Ethan tying Mark “the bear” up they briefly pan to the site that they’re using and I IMMEDIATELY recognised it as a site I browsed through when I first hyperfixated on kink and found out about shibari and the proper ropes to get and proper ties
#I don’t remember what the site was called? but they were a popular seller or jute rope and had a bunch of tutorials#unus annus#markiplier#mark fischbach#ethan nestor#crankgameplays#unus anuus#mark and ethan#cw suggestive#cw kink#tw kink#only mentioned#and not really in the context of kink explicitly? but ya know#🪲
97 notes
·
View notes
Text
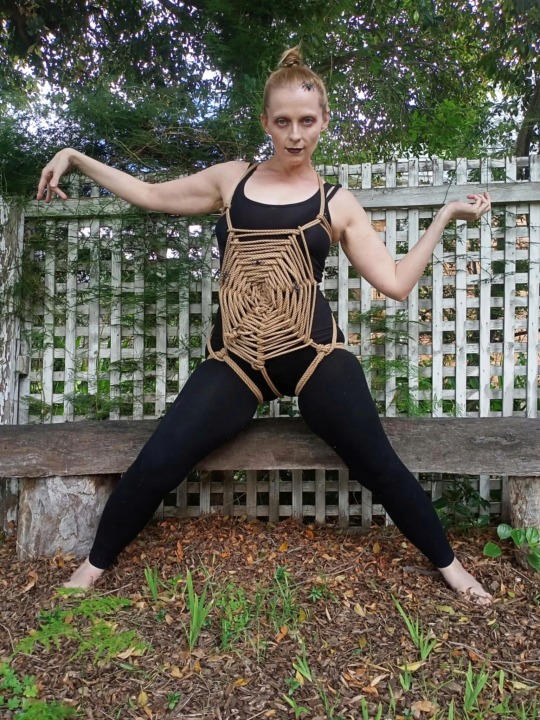
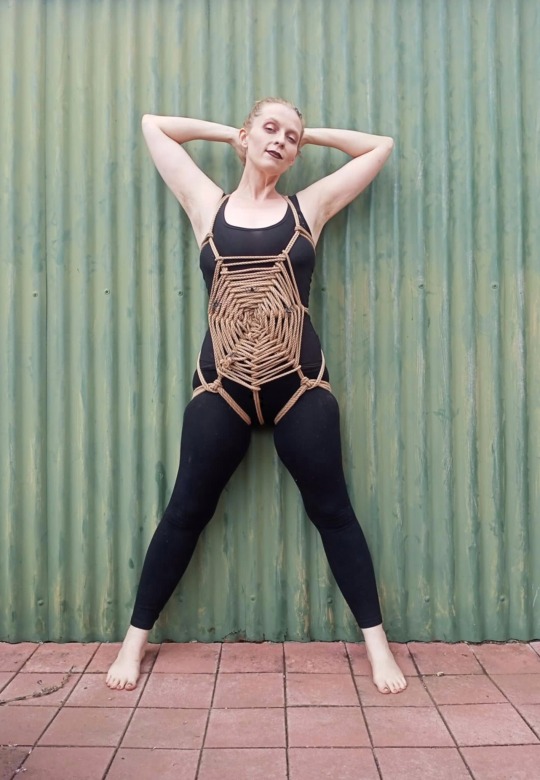
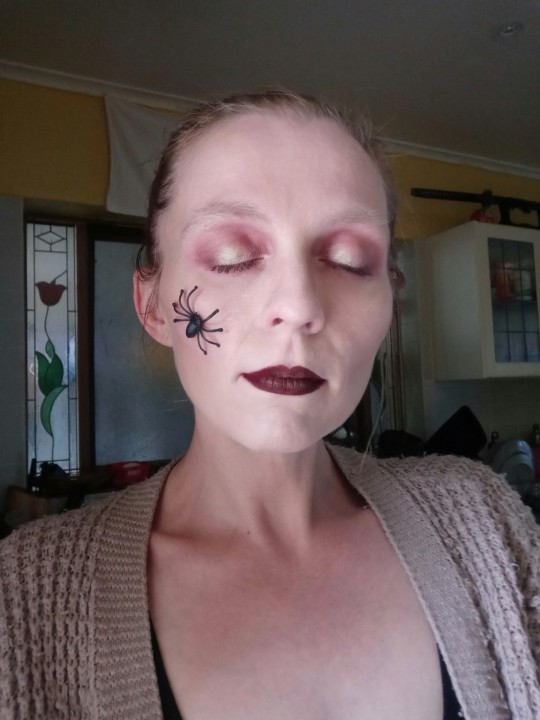
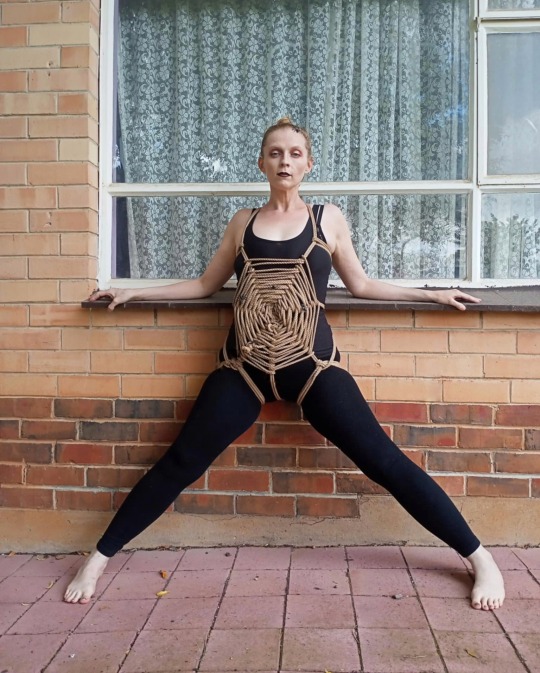
Let's tie this full body spider web harness just for the helloween of it 🕸️🪢
#shibari#rope#decorative tie#spider web#rope web#rope tutorial#spiedher#shibari tutorial#web#Karada#Halloween#Halloween costume#diy Halloween costume#shelob#little plastic spiders#weaving#fiber art
42 notes
·
View notes
Text

"Hope is a fickle, dangerous thing. It steals your focus and aims it toward the possibilities instead of keeping it where it belongs—on the probabilities"

#bd/sm rope#ropeart#ropeplay#shibari#shibari art#shibari tutorial#self tie#self care#self love#bondageart
15 notes
·
View notes
Text
I should be asleep but instead I'm desperately trying to find out how they knotted the ropes for shrouds on 17th century sailing ships.
Lord help me I need to know how this fucking rigging got made. It's for a crucial... two lines of writing.
#it's probably slightly more important than that but still#All of these other great tutorials on how to tie a rope ladder are great#but no I need this one specific thing#someone out there has to know#do not make me invent a time machine to go learn how#please
12 notes
·
View notes
Text
Thought about it in a stream yesterday when I posted a reference for something similar, but for anyone interested in some good visual refs for shibari to use for art or fic this place has some pretty fantastic step by step guides on how various sorts of ties and harnesses are applied
There’s even some detailed information on rope care and maintenance if you really want those details to be right and as it’s intended to be instructional all the images (in the tutorials anyway) are fairly tame in presentation with the emphasis being on the ropework more than the subject.
#NSFT#kink refs#shibari#shibari isn’t even a big thing for me but I know finding refs for any kink content can be difficult#so I figure some folks will find this useful#the tutorials even have tags wrt to what part of the body is being bound which is nice#now go forth and draw fancy rope/write people who are knowledgeable about it with confidence
79 notes
·
View notes
Text
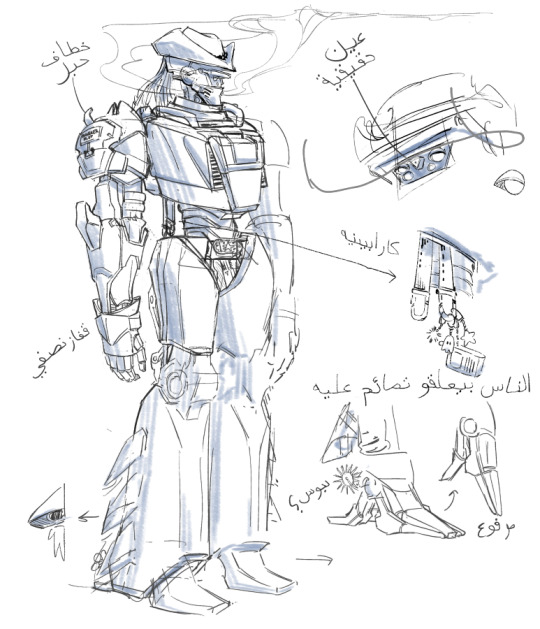
mods asleep post new oc thought of in a fugue state. it's kind of like a vet and rancher combined, and he hates cleatus.
i still want to mess around with its design a lot, but the important elements are there ^_^ i am taking name suggestions. longhorn was one my friends gave me, but because i already post about foghorn leghorn.... i'm not so sure about that one lmao
#sketches#cowboy#mecha#oc#mecha oc#translations from left to right‚ top to bottom: rope hook‚ true eye‚ half-glove‚ carabiner‚ people hang charms on him‚ spurs?‚ raised#in typical fashion i have lore for an oc before i have a name. but i will not overwhelm the first post#seeing the design evolve will be cool i hope. and he is what my brain wanted to draw today after commission work so he's what you get#given the likes on the post about making a tutorial for faces i will have to make that one my next between-commission doodle
11 notes
·
View notes
Text
youtube
"Building Blocks - Junctions - TheDuchy ®" by Lazarus Redmayne
4 notes
·
View notes
Text
Rosette hitch demo 🌹 (silent, apart from rope sounds)
600 notes
·
View notes
Text
my current project: jump forever!

this is the first of those scheduled posts i mentioned earlier!!! i figured i would start by talking about my current project - that way i can start posting updates about it without confusing you, Michael. The next post is gonna be about the beginning of this whole Godot thing i've been on, and then i'm thinking about maybe doing a Before Godot post as a bonus once i've talked about all my godot stuff (i love saying this as if anybody cares (besides you, Michael)). setting all that aside, though: this one's gonna need some backstory, so you should buckle in.
around this time last year, me and my little cousin (he's still in high school, but we've always been pretty close) got really competitive about a little game called Jump Forever. it's a side minigame from WarioWare Mega Microgames (the GBA one) where you just jump over a little rope until you fuck up. it's really fucking fun as an addictive little mobile game, and with a quick lil emulator it was one. thus, the addiction began.

truth be told, the phase last year didn't even last that long, but i had a long bus ride a couple of weeks ago and found myself opening the GBA emulator on my phone to pass the time. that led to a little bit of playing at home, which led to beating my cousin's score, which led to getting even more into the game than i was before. as our scores get higher, we've turned to better controllers than a phone touch screen for serious record attempts - i use a ds lite i had lying around (that i reshelled! it was very fun) and he emulates on pc with a controller (i think). this got me thinking about a potential "definitive edition" of the game - probably still on mobile, but with controller support, better touch controls (the game only needs <-, ->, and A!), faster resets, selectable skins, and maybe even unlockable skins? of course, when i finished my work on fnaf (ooh foreshadowing), my sights were immediately set on a Jump Forever remake.
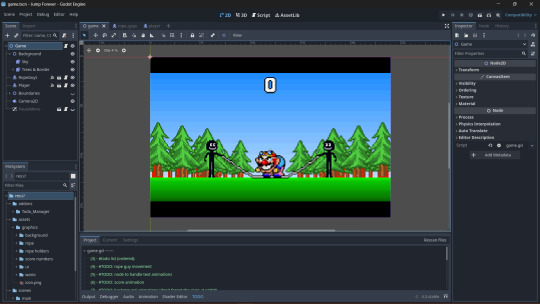
with all that said, welcome to the game as it currently stands! at the moment, i've got wario, the rope swingers, and the score all just about set up, with one exception; the characters have collision, the rope swings (at varying speeds, even!), and wario's speed and physics feel very accurate - but i'm still working on the ai (if you can call it that) of the rope guys as they walk back and forth. i want it to work exactly the same way as it does in the original but i always overthink random mechanics like this. hopefully the next update i give will be about how i cracked it! even if the implementation ends up jank, though, it wouldn't be the first: the rope guys check if wario is too close to them to make it over the rope with an Area2D that just checks for wario when the rope hits the ground. it works! i could just like check wario's position in the code (and it'd probably be way more efficient), but this way just... works.
i still have a buncha crap i still gotta implement before the game's even really playable - the walking ai, the title screen, the little "Ready?" animation, etc. - but that's only the beginning of my work. firstly, i'm probably gonna enlist chloe (oooh foreshadowing) to help me out by drawing some new assets (if she's free, it is finals season), and then changing the game's native resolution from 240x160 (the GBA screen) to something not fucking insane. i've got "reworking all the sprites into easy to read spritesheets" on my to-do list, and after that, making the new assets (and then maybe the skins?) will be as easy as drag & drop. once it's got the new assets and all the polish that needs to come with a shiny new resolution, i'm gonna transition into the next phase - researching how to release a game!!!
[hi, not to ruin my own amazing transition but: it's 5am and i'm running back to edit this because i completely forgot to mention that i have currently implemented a 2 frame input delay on all inputs, because that's how the emulator appears to behave when i go frame by frame. every single day i rethink this decision more and more. surely there's no way that's how it's supposed to be, right? but i feel so weird changing it now!!! i definitely fucking have to though. next time i work on it. ok anyways]
now. i've posted games to itch.io before. but even then, i kind of fucked it up (i could never get the resolution of my web games to work right???) - so it's no surprise i've always been completely daunted by the idea of "releasing a game". when you post it on real stores, that's when it becomes... real. i'm excited about the new challenges it'll pose, though! now, a mobile release means a couple of things - bite sized fun, simple progression, and fun customization. i've already got the first part nailed down, and i figured i could nail the other 2 at once with a currency system based on how many points you get (or maybe even an xp system? that goes up 1 for each jump? maybe even both???) and skins (purchasable with said currency) that let you customize the player, rope swingers, background, and maybe even the rope itself.

pictured above is my stupid ass skins mockup (i literally just made this). the rope is rainbow, the background has a snow effect and a bunch of snow on the trees/ground (isn't it great?), wario is a lil version of the rope guys, and the rope guys have santa hats. i'm not sure how many different ropes you could really make with how i'm planning the rope to move, so i'll probably end up prototyping the graphics with chloe to figure out how to lay out the sprite sheets, and if they should actually have a seperate hand-grabbing-the-rope sprite for skin purposes. it'll definitely make things really confusing, but if i go for a mobile release i don't want to run ads, and so a currency you can buy with real money (and maybe one or two goofy supporter skins that cost real money, like a solid gold guy or something, as a form of donation) is a good way to make a lil bit of money from people who like the game.
all of this is fun to think about, but it's important to remember that the next thing i have to do is that walking ai. i've gotta Make The Fucking Game before i can do all this crazy other bullshit. i'm sure the ui design for all this is gonna be soooo fun, but i need a game to attach it to first :p
this went on reeeally long but i figure if this is a dev diary or w/e it's gonna end up running long no matter what, and the more info, the more i have to look back on fondly and say "oh shit, i know exactly when this was!", which is kind of the end goal of the project. of course, these incredibly long posts about shit that only matters to me are also incredible content for you, Michael, so i'm sure you're just eating this shit up. enjoy, you weird little man.
#game dev#jump forever#godot#yeah yeah i got some real tags too. just in case i actually need em.#also michael's still here. i think he's funny#it's only been like an hour for me soooo#remember when i said it was 1am in my first post? it's 4am now lol#i looove tags i love rambling under my post where people don't feel obligated to read it#nobody ask me why i have the stickmen swinging the rope instead of kat/ana like it is after you beat them#(he said as if anybody would've noticed)#i think the stickmen are so much more awesome and the fact that you can't get them back is SO FUCKED UP#and lowkey one of the things that got me thinking about Jump Forever Definitive Edition#kat and ana are awesome the stickmen just resonate with me deep in my soul#i'm not proofreading this i'm just hoping it sounds good. really putting the “diary” in “dev diary”#man. im so glad michael is the hypothetical ideal viewer. because that means he's reading all the tags too#hi michael! ur the best :)#scheduling this for saturday at noon (it is currently friday at 4:30 am)#i hope i get the chance to write the next one (about that 2D platformer tutorial!) before like. monday.#god knows i'm not doing my homework lmaooo#when's my next therapy appointment?#that's crazy deep lore we can't get into that on post 2 (honestly post 1)#but it's okay because nobody reads the tags#and that's not even considering that nobody is ever gonna read this post. ever.#besides michael.#but michael knows all about that ;)#or maybe he doesn't... and it's a sexy mystery?#my my i am such an enigma#okay fuck i can't keep adding tags i need to sleep#i really hope tags are collapsed by default or michael's timeline is gonna be in shambles
2 notes
·
View notes
Text
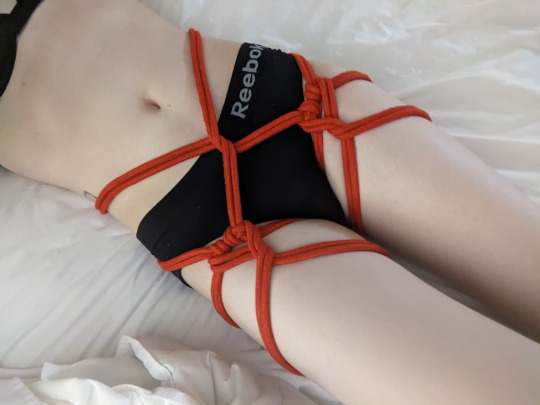
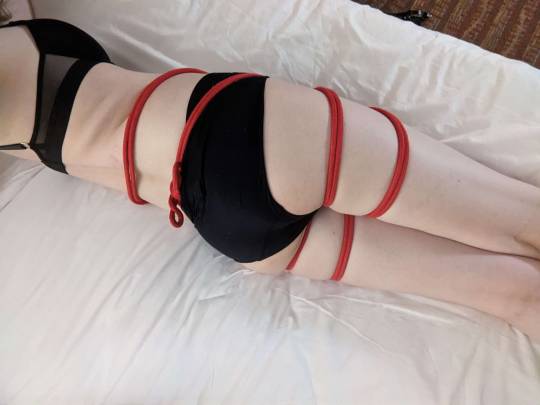
Heart Thigh Garter
We found this lovely tie on @kinkyfemqueer's blog, the tutorial can be found here alongside our other resources. We used a 30ft length of rope but weren't able to finish the last few ties around back to secure it all, so it might be smart to use a 50ft length if you follow the tutorial. I love how this felt, nice and snug hugging my hips without being too tight anywhere. It shifted easily with my movement and felt nice to tug on. Plus the hears are absolutely adorable. It is going to be super fun to revisit this with a prettier set of clothes to match.

#shibari#ropeart#black and red#has tutorial#heart tie#hip harness#red rope#black clothes#first thoughts
698 notes
·
View notes
Text
People really seem to like my breakdown of ropes and braids, so I'll share my basic process:

1 note
·
View note