#i did use tutorials to learn crochet
Explore tagged Tumblr posts
Text
I taught myself punch needling! I got a kit from kmart and went ham. I don't like looking up tutes, I have more fun when I just get the materials and figure it out myself - which was great for punch needling!! it's so simple but I did struggle a bit, it's hard to get good at I guess. but I made some fruit coasters and I'm gonna go get more fabric and thread on wednesday and I'm gonna make my first design (the fool, ofc)
.....problem is that's days away and I REALLY want to do it NOW. I do have a cross stitch to work on, but cross stitch was a lot less forgiving of my no-tutorial ways. I... enjoy it, but I don't think it's for me lol, the threads tangle and upset me. it's weird, whenever I look at my half done cross stitch dog I have this wounded feeling like it hurt my feelings lmao. she was mean to me :((( but I have to get past it and finish the dog. I have to
#ed mumbles#i just made too many mistakes in cross stitch in my hubris#made lots of mistakes w punch needle too#but she forgave easily#one of the coasters just has bald patches from the fabric fraying away under my attempts lol#i did use tutorials to learn crochet#but thats bc i would have no idea where to start
4 notes
·
View notes
Text
Halloween costume hint:
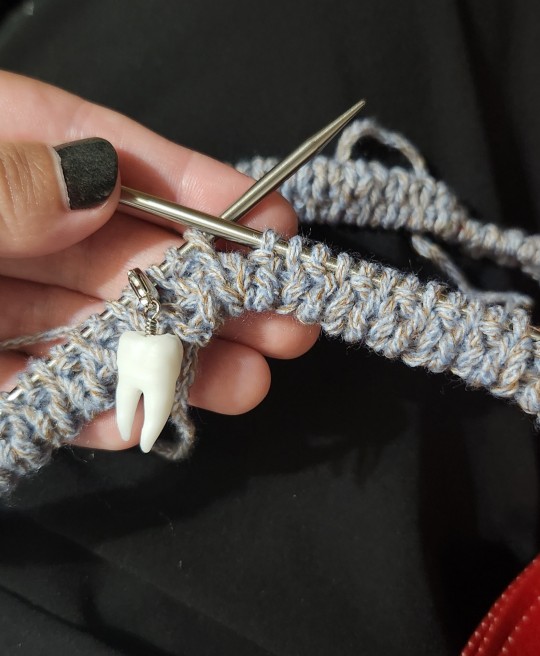
(The stitch marker and the word that describes this colour-pattern of yarn [or fabric] are 2 more hints.)
#i make no guarantees of finishing in time for halloween tho im going thru a lot rn#i DID finish a second pair of Scream yarn socks today tho!!#i just wanted to give my fingers a little break from knitting socks but i have other halloween sock yarn i plan on working on#(november is halloween 2 for me)#but yeah i saw a sample of yarn using this type of seamless cast on (provisional cast on / circular tubular cast on) last night...#...while half asleep and was immediately like Oh. I HAVE to do that costume idea now.#i flubbed the crochet part bc the way i did it made the stitches twisted when i knitted it...#...and i had to pull out every crochet stitch one by one. lol. but at least i know for next time how i gotta crochet it to be open stitches#also i knit backwards (mirrored) so i was surprised i managed to figure out the tutorial on the first go...#...bc the person filming described their actions instead of just showing it so i only needed to listen. it makes a world of difference to me#anyway. now that i got that started i have been shaking in pain all day i gotta try n shower before it gets too late#apparently my new back xrays show that my back does have an issue. but not on the spot thats hurting lmao.#so i get to do an mri and see a back specialist ughhh. also the pharmacy is refusing to fill pain meds for me. it sucks.#AND i finally got a physical therapy appointment.... for the middle of december.... guys i injured my back and#....have been trying to get in to PT since fucking MAY. its OCTOBER.#like fuck my life man i can barely fucking walk. i can barely take care of myself. the pain had been SO bad since i recently reinjured it#so yeah i gotta try n shower before i pass out from the pain.#knitting#Cori.exe#Image.exe#fiber art#horror#halloween#also like this yarn is the closest i could get to colour accuracy that i have in my yarn bin and i only have 1 skein of it which is perfect#bc it means i get to use up probably the whole skein and it makes a difference in the amount of yarn i need to use out of my bin lol#especially bc what other use am i ever going to get out of one skein of yarn? nothing but socks take one skein.#my worst yarn habit is seeing a cool yarn and then buying just one or two skeins. like thats fine for a hat or scarf...#...but i need to learn to knit and crochet more things. id like to make a sweater at least once in my life lmao#((sweater yarn gets so expensive tho bc u need so much. and we're back to me wanting to reduce my yarn stash))#personal
3 notes
·
View notes
Text
30 Days of G/t Self Care

I'm not fully sure where this idea came from, but here we go! I do enjoy a fun little daily challenge, and like most things my mind went to “but how can I make it G/t?” And here we are! Just in time for the new year, a 30 day self care challenge but… sizey. I wanted to make an actual calendar thing, just in time for the new year (though it can be started at any time, it's not specific to January). Check the days off, spread them out over a longer time, pick out just the ones that speak to you, whatever you want to do 😊 Here's the guide to go with it.
Day 1. Set aside a few minutes to take some deep breaths and focus on the present moment. To help ground yourself, perhaps wrap yourself in a blanket and imagine you are in a large, lovingly grasping hand, or hold a small item and imagine it's a tiny friend.
Day 2. Revisit some nostalgic G/t media. What first got you into this? Let yourself reminisce and remember why you love this in the first place.
Day 3. Make G/t art. It can be anything! Drawing, writing, crochet, pottery, you name it. No need to hold yourself to a certain standard or show anyone else, just take some time to be creative. Even if you don't deem yourself an artist, give it a shot and see if you enjoy it!
Day 4. Relax with a word search puzzle. I made a G/t themed one for you right here!
Day 5. Try out this journal prompt. If you could be tiny/big at will, what types of things would you do to relax? How might you extrapolate from this and apply it to your real life?
Day 6. Stretch your body today. What imaginary setting could you give yourself to make it G/t? Are you surrounded by gigantic furniture in your mind’s eye? Perhaps the yoga video on your phone helps you pretend you have a tiny instructor?
Day 7. Listen to some G/t music. This could be anything, from sizey music videos to songs with sizey lyrics to the Arietty soundtrack.
Day 8. Practice gratitude by listing out all the little things you're thankful for. (See what I did there?) Add some big things to the list for good measure.
Day 9. Practice stepping out of your comfort zone a little bit by talking about G/t, out loud if you’re able. Whether it's discussing with a friend (you brave soul), recording yourself on your phone (you can immediately delete it), or just mumbling to yourself in the shower. Maybe you’ll realize you want to make a G/t podcast and we all win!
Day 10. Here's a little creative prompt. Arrange everyday items to make a G/t scene (use toys, miniatures, or even fashion a tiny person out of paperclips or paper). Take a picture, share it if you like!
Day 11. Create a cozier space today to enjoy your G/t content. Grab some blankets, make yourself a snack or some tea, light some candles, whatever sounds nice to you. Sometimes it's making a mundane moment special!
Day 12. Make yourself something healthy to eat. While you prepare it, imagine how different the task might be to carry out if you were very big or very small. Maybe even have some fun making your snack in miniature too.
Day 13. Try out some affirmations today and see if you can make them both sizey and relevant to your life. Ideas of mantras could be “I am allowed to take up space,” “I choose to appreciate the little things today,” “I will achieve great things through small steps.”
Day 14. Go out into nature for some fresh air. Lean in close and pay attention to the small details, perhaps imagining a shrunken version of yourself or a small friend exploring.
Day 15. Challenge yourself to learn a new skill today to bring your Gt ideas to life. Maybe it's learning how to code, or making your own VR avatar, or learning a new art tool or technique. It's finally time to watch that tutorial you've been saving!
Day 16. Pull out your dream journal, or start up a new one! Maybe we’ll figure out the whole lucid dreaming thing and come close to experiencing Gt, wouldn't that be the dream~ If this doesn't resonate with you, maybe start a journal to jot down your Gt daydreams instead!
Day 17. Relax with a crossword puzzle. I made a G/t themed one for you right here!
Day 18. Try to cross a few to dos off your to do list someday. Make it more fun by adding in some joke tasks in there, like “leave out a snack for the fairies” or “prep for borrowing trip tonight” or “meet with giant friend for coffee.” Maybe even schedule some real life Gt tasks - such as “work on chapter 2 of (Gt story you're writing)” or “plan a VRC hangout”.
Day 19. It's time to dress the part! Is there any way you can dress up or accessorize yourself in a sizey way? Maybe you have an oversized hoodie, or a necklace of a tiny Eiffel tower, or an old shirt with Tinkerbell on it. Did you know you can actually buy Arietty’s giant hair clip thing? Or if this better scratches your creative itch, maybe your objective is to make tiny accessories for a toy or figurine.
Day 20. Take some time to rest. Just allow yourself to lay down in a quiet, cozy setting for at least a few minutes and have some dedicated G/t daydreaming.
Day 21. Try out a new exercise routine and use your G/t imaginings to make it more fun. Watching a new workout video? You’re a giant visiting the gym and that's your human instructor on the screen. Spontaneous dance session in your room? You're a fairy frolicking in a field of enormous wildflowers. Going for a swim? You're actually crossing a vast ocean, or maybe a small glass of water.
Day 22. Check out a new G/t story. Not a big reader normally? Just give it a shot!
Day 23. Give yourself a pamper night, whatever that means for you - face masks, cucumber water, a warm drink, candles, the works. Pamper night (face masks and stuff)
Day 24. Make or buy something for your G/t interests (miniatures or toys, “max”iature like a giant flower pillow, fairy-themed stationary, make a giant paper mache strawberry, etc)
Day 25. Relax with a coloring page. You can use any of your favorite artist’s lineart (just make sure to get permission and/or proper attribution if you want to post it). Here's an example option from me.
Day 26. Make a list of all the things you love about G/t. It's always nice to remember the various ways this interest might benefit our lives.
Day 27. Motivate yourself to try out a new hobby by making it G/t. Take that pottery class you've been meaning to take and make a giant acorn-shaped mug. Get into cosplay so you can dress up as a borrower. Dabble with watercolors and you may end up becoming a G/t artist. Study a new language and enjoy new sizey media you couldn't understand before. Whatever speaks to you!
Day 28. Do a favor for your future self and make a self care kit for when you're having a hard time. This could include a journal or affirmation cards, or perhaps some grounding items like fidget toys, stress balls and mints. Add a little something G/t in there too. Perhaps some kind of miniature with an interesting texture, or a fidget toy in the shape of a person, or a stuffed animal of a giant ladybug to hug.
Day 29. An act of kindness can do wonders for our mental health. Send someone in the G/t community a kind comment today, whether it's a long-time friend, someone you just met in a Discord group, or a comment to your favorite G/t artist.
Day 30. Reflect on all the activities you’ve tried during this self care challenge and journal about it. What have you learned about yourself? What might you incorporate more into your self care routines going forward? Pat yourself on the back for investing some time and attention into yourself - you deserve it!
198 notes
·
View notes
Text
Types of crafty hobbies I think the vamps would have
Lestat: knitting. He knits like full blankets and uses them as gifts for people. Like he learned from some random old women in the French alps as a kid and then got back into it during his time in NOLA, def knits on the tour bus. Makes his band mates fingerless gloves and scarves with their band logo on them.
Louis: cross stitch, his sister and mother did it and when he was a kid he learned from his mother so he would have something to keep his hands busy. Stopped as he got older and now he does it as a form of relaxation in his rock garden. Also learned embroidery, just cause it came up in a cross stitch tutorial he was watching and he just liked it.
Claudia: when she was a little girl she would sew and make little doll clothes. A women in the boarding house taught her to hand sew. When she’s with Madeline in Belgium, she takes up tatting, aka a style of lace making, and makes the lace details for dresses Madeline makes. She was making a lace choker for Madeline before going to visit Louis
Madeline: knitting but also jewelry making, like wire wrapping, and finding little pieces to repurpose. She was in the process of making Claudia a ring and necklace to purpose with before going to visit Louis.
Daniel: weirdly got really into like model building, before the shakes from Parkinson’s made it hard to do smaller parts of the models. Moved onto puzzles and also, finds gardening relaxing. Has a small herb garden in his house. He named it Berniece. Don’t ask me why.
Armand: crochet. And weaving. He does crochet while laying in bed has so much yarn he orders off Amazon and random yarn shops. He started looking into dying his own yarn but was stuck on if he wanted alpaca or if he should start with acrylic before going big game with expensive yarns. Weaving, he started and realized he remembered somethings because he has flashes of memory of who he thinks was his mother weaving something in Delhi.
#interview with the vampire#iwtv#amc iwtv#armand#louis de pointe du lac#lestat de lioncourt#daniel molloy#claudia eparvier#madeline eparvier
49 notes
·
View notes
Text
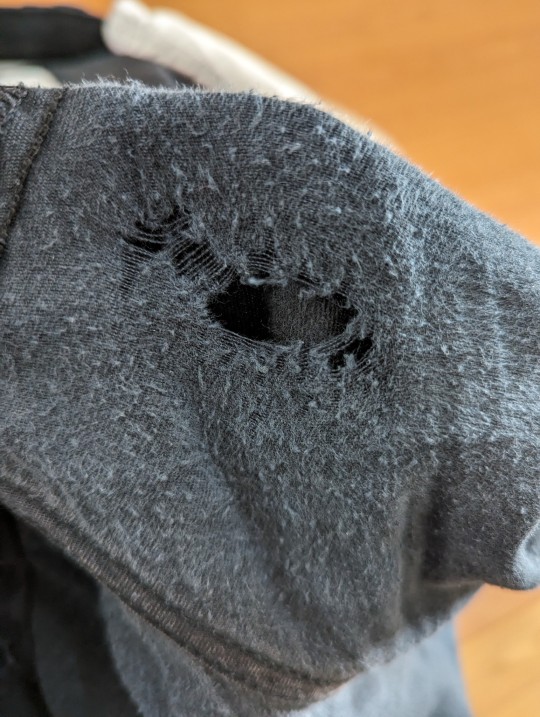
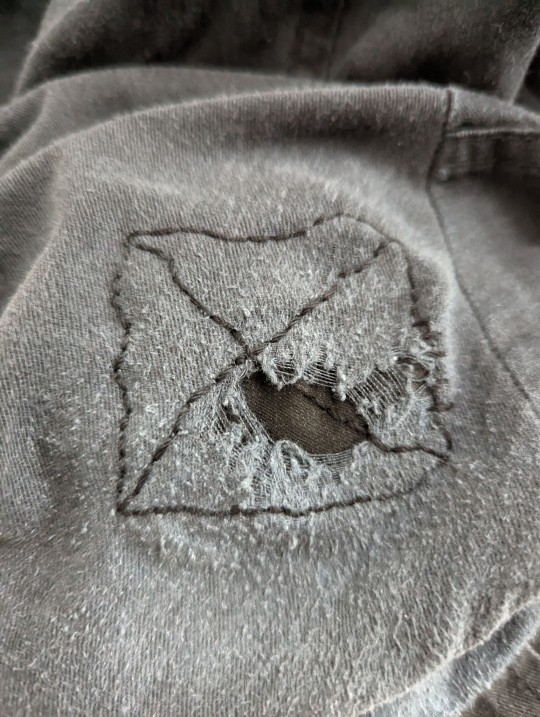
Just a silly reminder that u do NOT have to throw out ur favorite pants when u wear a hole in the thighs. This took me about 15 minutes (if that, idk exactly how long it was) to fix and I can't feel it when I wear the pants, nor can you see it when I have them on. I'll also link a video (it doesn't have added captions but I watched it through with YouTube's auto-generated captions and they seemed nearly exactly correct. And even without them you could probably learn it just from the visuals) about how to do the stitch I used below the cut and do a brief explanation of my process:}

Backstitch tutorial:
https://youtu.be/sjHm8CL9WDA
Steps for mending:
1) Pin the patch to the inside of the hole-
I used safety pins because I find regular pins endlessly annoying. Since we'll be sewing from the front (you usually want to be looking at the side you want to be the neatest when you sew) you might find it helpful to hold your fabric up to the light and mark where the edges of the patch are, but I was able to figure out that sewing from end to end of the pins would keep me on the fabric.
2) Thread your needle-
I used crochet thread because that's what I had on hand. If you're using regular thread you might want to double it up so it's stronger. If you're mending something white or if you don't care whether the color matches, you can also use dental floss for something very strong. Here's a video on how to thread a needle (again with no official captions but good auto-generated ones)- https://youtu.be/S6u173Ap2mc If you want to use your thread as-is just tie a knot in the long end after threading. If you want it doubled up you can pull your needle to the center of the length of thread (so your tail and your working thread are equal lengths) and tie the two strands together to essentially create a big loop through the needle.
3) Backstitch around the edges of the patch (backstitch tutorial above) -
A backstitch isn't the only strong stitch you could use, but in my experience it's the easiest to learn and keep track of. You can also stitch across your patch in an X like I did, or in lines across it or on any other pattern you want. Your patch will be perfectly secure without these extra stitches, but I like to do them because they hold it flatter against the fabric.
4) Tie off your thread-
Video tutorial for this (same caption situation as the other videos) https://youtu.be/f3Hqv9n95R4
5) Done!!!-
That's it! Enjoy your newly repaired clothes and be free:}
#mending#visible mending#sustainability#sustainable fashion#slow fashion#anti fast fashion#sewing#b1rdie's room
232 notes
·
View notes
Text


Marcille's frog suit is complete! This was my third-ever project using a sewing machine, so I've put a bit on my process for suit and staff-making below.
The Body: I drafted a pattern from a loose sweatshirt and sweatpants (somewhat following these tutorials: 1 2). From this I made a truly terrible mock-up from a fitted sheet -managing to sew the arms on inside out (twice, in two different ways). I also learned that the back panels need to be larger than the front panel, to accommodate the butt.
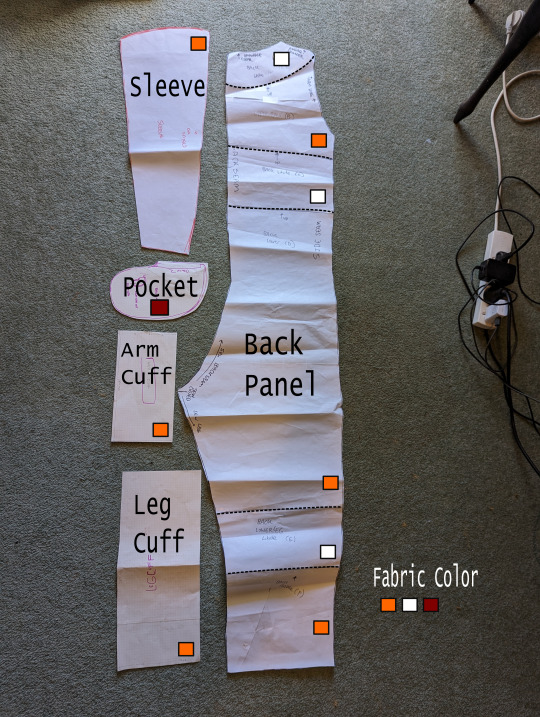
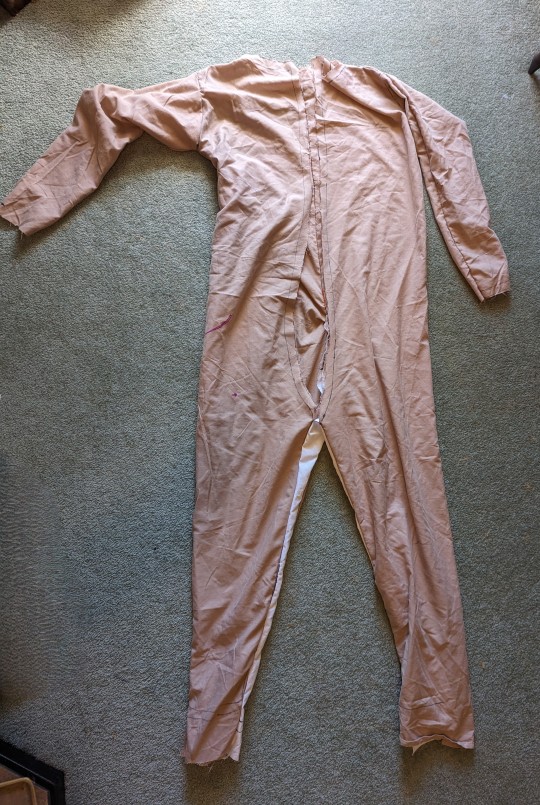
Originally, I wanted to make this out of raincoat material or pvc fabric to get that slimy frogskin look. I couldn't find any in the right color (or price), so I went with a cheap polyester satin. I think latex might have been also been a good alternative, but I've never worked with it before.
To get the white patterns on the frog, I just eyeballed where I thought the stripes should go on the paper pattern and cut it into smaller pieces (which I had to tape back together when I made the lining - this time out of blue bed sheet).

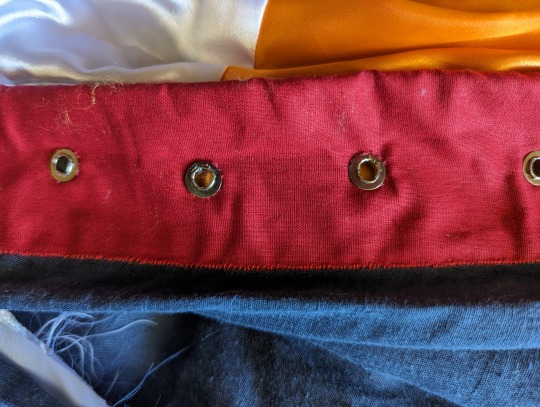
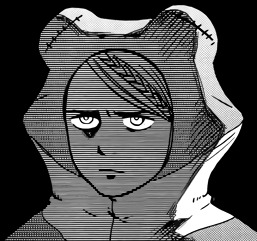
In the manga, there are large visible stitches in front. To mimic this, I decided to have the front lace with a thick cord. This meant I needed to install gromets on the front opening - but I was worried the hardware would tear right through the fragile satin. To prevent this, I reinforced the opening with a strip of denim encased in red cotton.
The smart thing to do would make the front zip up, and add a panel of fake lacing over the top. Since I didn't, 1) it takes a while to put on, and 2) the suit gapes open in places.

Frog Head: I spent a lot of time trying to figure this out - but in the end, I went with a very simple construction.
The hood consists of four main panels: the frog-shaped front and back panels of the outer hood, and two red panels for the inner hood. I 1) attached the white and orange parts of the outer panels 2) sewed the outerpanels together, and the inner hood panels together 3) cut a hole for my face out of the front outer panel, 4) sewed the edge of the inner hood panels to the face hole, 6) stuffed with batting from an old pillow, 6) added some extra fabric to close the hood under the chin.

I didn't quite get the shape right - the eyes should be rounder/ protrude less, and the cheeks/marcille's ears should sit lower down on the head. I think adding an extra panel to the back of the head would help it sit better. It's pretty 2D in profile, so my face sticks out of it too much.
Finally, using a stretch fabric for the inner hood (or a drawstring, that could tighten the hood itself) could make the hood fit snugly around the face. My hood was too loose, and I constantly had to adjust its position.

The frog eyes were also a bit tricky. The satin frayed to much to add large decorative stitching, so I had to sew little pieces of cord individually to the eyes. I probably should have made these smaller and more numerous...but my fingers were pretty sore form hand sewing.
The Shoes: I decided to make some boot covers for my docs, because making shoes from scratch is beyond my skill level.
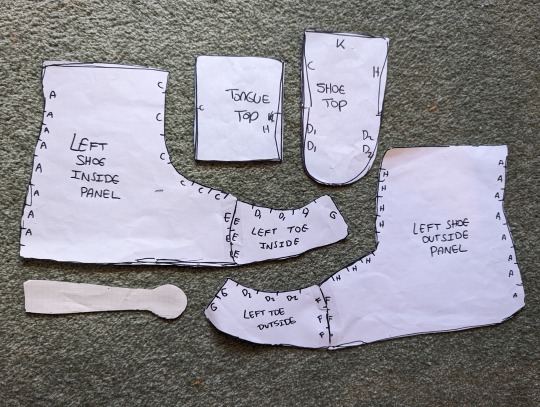

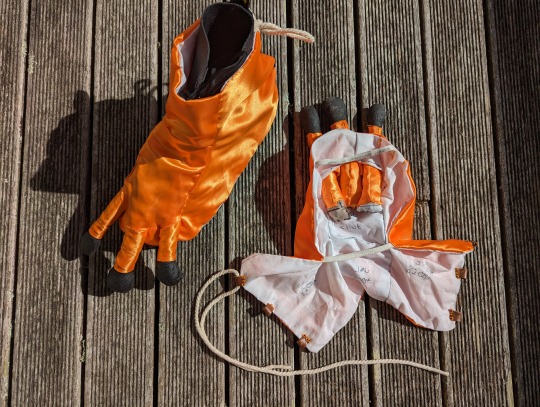
I made a pattern by wrapping one shoe in a plastic back, then masking tape, and tracing out what looked like some important seam lines. I sewed all the pieces together except for top of the shoe, which I left open so 1) bagline the show cover, and 2) sew in the frog toes.
The toes themselves were sewn out of cotton and, stuffed with batting and old crochet squares. Then everything except the toe-tip was covered in orange satin. I did this since I was worried that the satin would not play nice with paint (foreshadowing). The toe-tips were then painted with a mix of black acryllic and liquid latex (for flexibility).
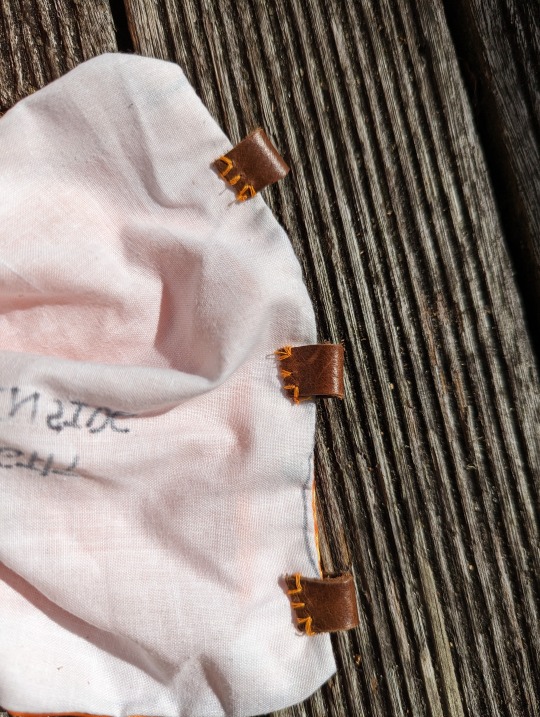
To keep the shoe covers on the shoes, I added some elastic around the bottom (salvaged from a fitted sheet). They also needed to close in the back - but I didn't have and velcro or zippers and I was running low on gromets. Instead, I made some loops out of scrap leather to run the lacing through. This looked cool but it was really hard to lace up myself!
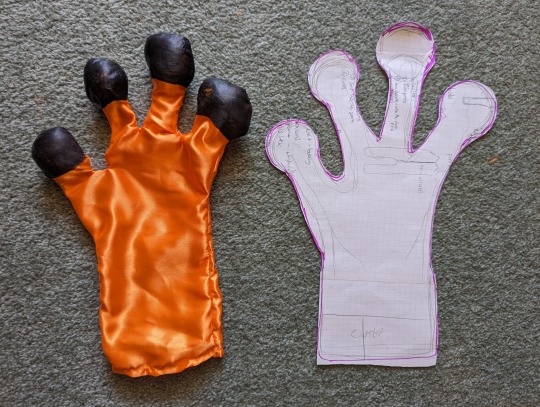
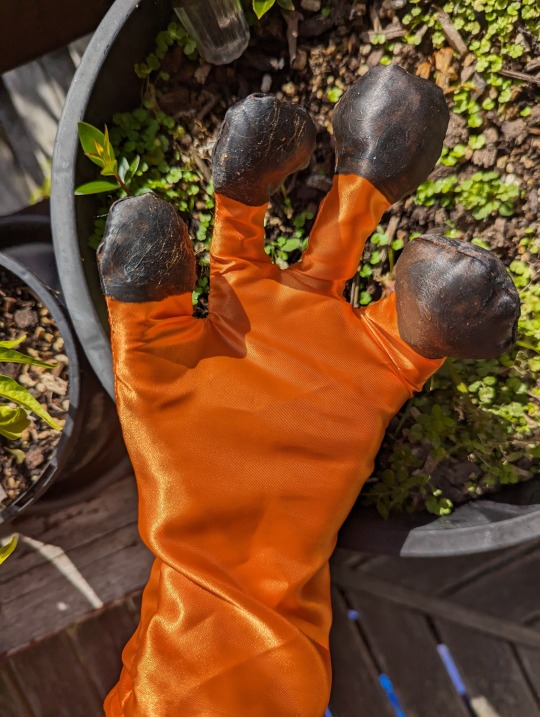
Gloves: These were made the day before the convention, and are terribly slapdash.
Normally when you make gloves out of non-stretch fabric you need to add gussets to allow your hands bend, without the gloves being too loose. I did not do that. I just traced my hand on the fabric, and gave myself big finger pads and plenty of ease. They turned out pretty meh!
One issue was the finger pads themselves: it's hard to sew in a circle, so they were lumpy in shape. This lumpiness was enhanced by the way I stuffed them: just shoving stuffing into the finger tips. which is also where my fingers have to go. So every time I took the gloves on and off, the fingertips would get out of shape. I think hollowed foam balls would have been a better choice for the finger tips.
In addition, I painted the fingertips with the same latex/acrylic mixture I used on the toes. While it dried just fine on the cotton, the paint remained really sticky - so they picked up dust and peeled rather badly.
The gloves only had four fingers in the manga, so that's what I went with. But it was pretty uncomfortable with the pinky+ring finger sharing a home, and it didn't even look good.

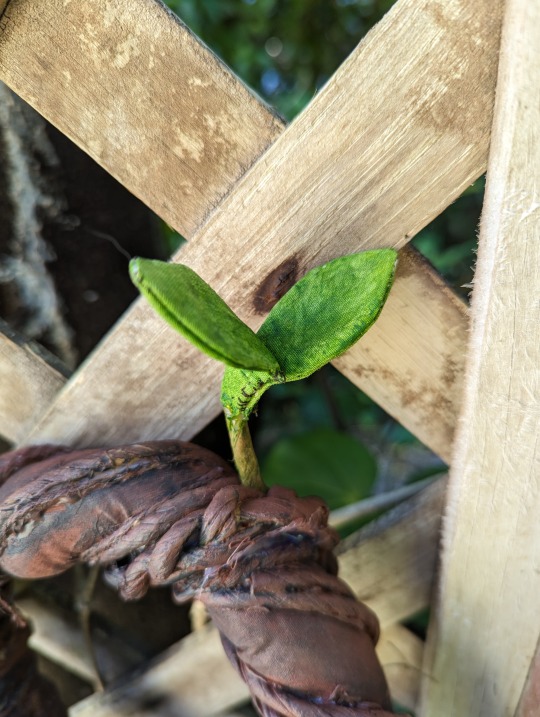
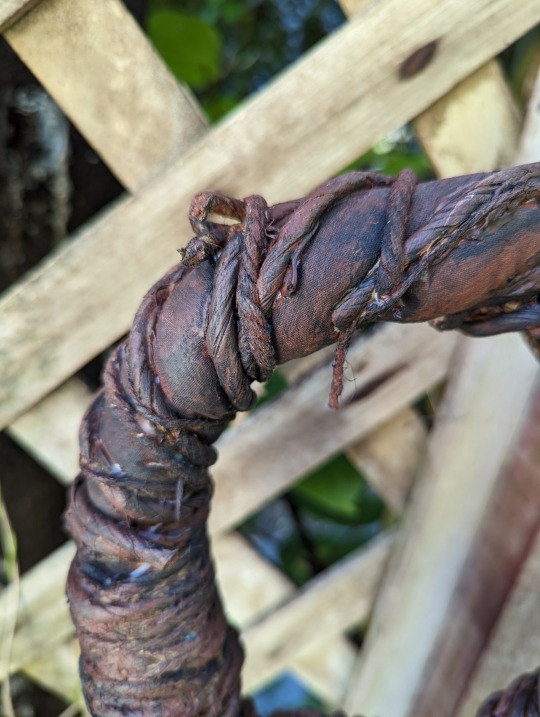
Ambrosia (the staff): This was a real last-minute addition to the costume, done the night before the convention.
The base is a wooden dowel, and the hoop in a long tube of cotton fabric that I stuffed very firmly. I anted to make sure the hoop wouldn't fall off, so I "drilled" a hold near the tip of the staff (I.e. I shoved a screwdriver through the soft wood like an animal), and added grommets to each end of the stuffed cotton tube. I then created a tight mechanical join by running leftover cord though one grommet, then the dowel, and then the other grommet before tying it off.
Next, I wrapped a ton of different materials around the hoop and body of the staff: coord, twine, paper florist "rope", and paper-covered florist wire, etc. This was secured with an ungodly amount of hot glue. When possible, I tried to new strands under pre-existing ones for some extra security. I really like how wrapping the cord around the soft-hoop created the impression of vines growing around a living branch.
I painted the staff in three layers: base coat of red-brown, then a "wash" of watery black acrylic , and a dry brush of a lighter brown. I did not do a good job getting the paint evenly over the surface! From some angles the white cotton is still very visible, and I probably should have painted it before wrapping anything around it.
The sprout was made by sewing two leaf-shapes out of cotton, hot gluing it to a small snip of florist paper, and then hot gluing the stem to the hoop. Not bad for a rush job!
Overall: I think the feet and staff came out the best! People recognized me at the convention too, which is always the real test.
43 notes
·
View notes
Text
Let's Track Shit With Yarn Together!
Why
I learned to crochet in November 2023 watching youtube tutorials, making a pair of uneven and godawful socks, and from there, i went forward full speed ahead and decided to make a weather blanket for 2024. The thing with weather blankets is that it's a year-long project, and to stay motivated, it is suggested you gather your yarn loving friends and support each other.
Well I don't know anyone who knits/crochet but dammit i live on tumblr and for sure at least one of yall does. Statistically. And, statistically, there's probably a few of yous in the same boat as I. So let's do this thing together in 2024!
Okay, but like. What is it?
A tracking project can be many things. I'm making a weather blanket using crochet: each row is 1 day of the year, and the color of the yarn is the temperature it was that day.
It does have to be temperature; you can track the amount of words you, or your friend gas written that day, or price of gas if you like that, it can be "yes/no" things, such as "did i succeed in [not drinking alcohol/going to the gym/taking my pills/writing/painting/going outside] today". You don't even need to make a blanket; it can be a scarf. It can be patchwork or embroidery. Whatever boats your float. The important thing is that you're tracking.
I gotta do this every day?!
Yes and no. Tracking what you want to track will need to be at least written down somewhere everyday, but a lot of people choose 1 day a week to do a few rows, or 1 day per month. You can do it everyday and catch up the next day if you missed one; up to you. Go your speed. The important thing here is to have fun, and support each other.
Okay but the year has already started and i planned nothing!!!
You can definitely do a March-to-March blanket or check up what happened during the days you missed and catch up once you're ready to start; no problem. Welcome to the project!
Sounds great, but idk how to knit/crochet/other
Well, like i said, i learned crocheting from youtube 3 months before i started on this. 100% if you start learning on a reacking blanket; by the end of the year you'll not only have a blanket/scarf, but you'll be able to see your progress in skill, on top of whatever it is you're tracking. Join us, it's free (minus the equipment), and if you don't like it, well, you tried it. No judgement.
I'll be following the "tracking blanket 2024" hashtag; if you want to join i suggest we all use that to easily find each other and I'll be reblogging the ones i see (and hopefully not miss anyone.)
Can't wait to see your projects!!!
55 notes
·
View notes
Text
Cosplaying Salomé (1922): A How-to
Seeing as my cosplay of Nazimova as Salomé is one of the more ambitious projects I’ve done for the blog, it seems fitting to give you all a little BTS and how-to. Because I didn’t fully document my process, this isn’t necessarily as full a tutorial as my Century of Glamour Ghouls series, but you could definitely recreate this yourself (and learn from my mistakes) as this would make a great Halloween costume!

a full-length shot of my cosplay of Nazimova as Salomé
Part one of “CtC: Nazimova as Salomé” goes into more detail on Nazimova & Rambova’s creative choices for the character and her design, but to be brief about it:
Nazimova’s Salomé is heavily informed by young women and girls of the early 1920s, so there is a dynamic conflict created between the baby-fication of young women and pop-culture sexualization of the same group. So, this first look from the film communicates unsophisticated youth with an impetuous edge. The pearled wig is not only a dazzling visual, but also emphasizes Nazimova’s brazen pantomime—amplifying every flitting gesture. It also gives the character a more childlike silhouette, which Nazimova pairs with an immature, sometimes bratty body language.

my gif of Nazimova in Salomé
The rest of the costume is quite simple: a shimmery/sparkly sleeveless, belted tunic and flat shoes. (Contrasted with Rose Dione’s costuming as Heriodas, flowing and heavily adorned.)
Get the Look!
(below the jump!)
What’s below covers the materials and methods I used, but improvements could definitely be made. I would love to see others take this on!
The Wig

My recreation of the wig in natural light


my gif of a closeup of Nazimova in the wig & gif of my cosplay wig in motion
Materials:
Black wig cap
Black yarn
Springs (I used the plastic ones sold as cat toys)
Black thread
Curved sewing needle
Rug Hook (This is a tool I already had on hand. If you have a small enough crochet hook, that might also work!)
Baubles (maybe: pearlescent paint for the baubles)
Craft glue (I don’t own a hot glue gun, but that would have been better!)
Optional: black bangs/fringe track
The Process
Note: my finished product is scaled up a bit from the wig used in the film largely because I was also working with a mix of items gifted to me from my wishlist and things I already had around the house. The springs were 1 inch in diameter as were the baubles. If you are buying everything new, you might want to try and track down .5-.75 inch materials!
Thankfully, about 10 years ago, the original wig was recovered in a trunk in Georgia, so I had a modern photo to reference for how the wig was constructed. [You can see it here!]

Some of the materials I used to create the wig
I started by wrapping the black yarn around the springs, which I had stretched out slightly. Once a spring was fully covered, I cut the yarn with roughly 3 inches extra length to fasten the spring to the wig cap.
After I had a significant amount of covered springs—I did it in waves of ~20—I used the rug hook to pull the extra yarn through the mesh of the wig cap. Then, I knotted the yarn tightly and pulled the extra yarn back to the topside of the cap using the rug hook, crossed it over the opposite side of the spring and back through the cap to knot it again on the underside of the cap. This way the spring is fastened at two opposite points of its circumference.
Once a wave of springs were loosely attached to the cap, I went in with a curved needle and black thread to sew the springs more tightly in place. This also gave the whole headpiece more stability. (This is important because the baubles will weigh the springs down a little!) I repeated this process in waves until I ran out of materials (and thankfully the cap was covered).

detail shot of the springs, the arrow is indicating the support stitching I added to the backside of each spring
At this point, my springs were a little droopy, so I reinforced them with a little bit of thread from the base to the end. This also allowed me to fine tune where each spring would sit in relation to its surrounding springs to get an even spread.
All the loose yarn inside the wig cap I roughly french braided together so it would sit flat and also add a little extra stability. It’s not a pretty sight, but it’s surprisingly comfortable!
The glass baubles I had on hand were not pearlescent, but multi-colored, so I had to paint them before gluing them to the springs. If you’re buying new, you can try and pick out the finish, size, and material you want.
That’s basically that. I adjusted two of the springs so that their baubles wouldn’t clatter into one another too much, but the wig is finished!


unfiltered cameraphone photo of the cosplay & final edit of the cosplay
I’m fairly certain that in the film Nazimova is wearing fake bangs under the pearl wig, but I just cut my own bangs bluntly and ran some gel mixed with black eyeshadow through them with a spoolie. (I don’t have any special feelings for my hair, so I tend to just cut/trim it whenever I cosplay. I understand this is unusual! You all don’t need to remind me! Thanks!)

my gif of a closeup of Nazimova as Salomé
——— ——— ———
The Tunic


my gif of Nazimova as Salomé & my cosplay recreating the moment above
For the tunic, I chose red sequined velvet. I don’t know what the screen-used fabric was though it certainly wasn’t this! I chose this fabric as it was affordable and I thought it might give off a similar effect in the finished photos. In a happy accident, I think the sequins give off a scaled-up look that matches the wig.
I don’t think the screen costume was black, but something that photographs dark on 1920s black-and-white film stock. That’s why I chose red, though I think a deep purple would also have worked.
Since I’ve followed The Closet Historian’s 1920s One-Hour Dress Tutorial twice before, that method was my baseline for making the Salomé tunic.
Using my hip measurement as the primary guide and adding .5 inch of allowance, I folded the fabric in half and cut it into a long rectangle—the fold being where I would cut the neckline. After I cut the neckline in, I put it on and pinned and tucked the shoulders, bust, and bottom hem to where it would sit right. My body is not rectangular, so the bust/shoulders had to be brought in a bit. Very professional, I know.
Then I sewed the edges of the whole rectangle and the neckline. I only attached the front to the back on one side, from bottom hem to hip, as that appears to be how the tunic was sewn in the film. (When I wear this out as a costume, I will likely sew up both sides!)

my cosplay with the belt featured over my left hip
I used scrap fabric to sew together the belt and some velcro (repurposed from an old ribbon) and fastened it to a plastic ring (repurposed from the last new scarf I bought). I then hung some beaded necklaces that I already owned to finish it (tho it wouldn’t be a great expense to buy some cheap strings of faux pearls if you want it to look closer to what’s on screen).
The slippers weren’t a match for the film, but I already owned them and thought they fit the vibe. What Nazimova seems to be wearing in the film are some simple light/white satin-ish flats.
——— ——— ———
The Makeup


unfiltered cosplay cameraphone photo & finished cosplay photo
Since this is such a high-contrast look, I personally opted not to use contouring for this cosplay. Also, I didn’t use any kind of blush because if you are photographing in black-and-white or for B&W editing, blush and warm colors register darker than they look in color.
For the base, I mixed a lighter pigment into my foundation to achieve a mask-like quality and set it with the lightest powder I own. (I think if you are “Portland Tan” like me, you could legit use white face paint for this and it would look pretty cool!)

my gif of a closeup of Nazimova as Salomé
For the brows, Nazimova’s are rounded but elongated, so I drew mine in a slightly rounder shape than they naturally grow.
For the eyeshadow, I used the old garage-door strategy with a purple-y taupe shadow from my lashline to the browbone with a small gap between the end of that shade and the brow. As it’s done in the movie, the shadow covers the inner corner all the way out to the end of the liner wing and all the way up to the browbone.
For the eyeliner, Nazimova’s eyes are fully rimmed in black, but with a flatter shape along the bottom. I drew a line straight back from the lowest point of my lower lid, drew a line down from my upper lid to that first line, then filled in the triangle made at the outer corner. I used black eyeshadow with a wet brush to both fill in my eyebrows and draw on the eyeliner. I also tightlined my eyes, though if your eyes aren’t quite as round you might want to skip the tightline! I finished it off with a plain black mascara, false lashes are not really a necessity for this look.
For the lips, I covered the outside edges of my lips with my base makeup to get Nazimova’s pout. Then I used a dark pink lipstick and a lip brush to paint on the pouty shape (that Nazimova was born with) making sure to overemphasize the top lip. (I didn’t overline my top lip, because that looks a bit extreme on my face, but it might suit you really well!) I then went in with a slightly darker shade of lipstick at the center of my lips to further emphasize the pout.
Here are some photos from my Irena Dubrovna/Cat People cosplay tutorial that illustrate the difference tightlining makes and what lip re-shaping looks like before blending and adding lipstick:


Irena process photo showing the effect of tightlining & unblended lip re-shaping
If you’re only accustomed to 2020s makeup, keep in mind that this is a 1920s makeup look. If it looks too blended, too sharp, too smooth, it’s just not going to look authentic. (Which is perfectly fine if you’re not going for authenticity but rather a 2020s reimagining!)
——— ——— ———
Bonus: The “Backdrop”
This isn’t necessarily useful for putting together a Halloween costume, but I thought it might be a fun curiosity to share how I made my “backdrops.” Basically, I wanted a black background as the film’s terrace set has a void-like quality, so I roughly brushed black paint over black 12x9in construction paper.


natural light photos of my drawings of the gate, the moon, and the black backdrop
Using the same size construction paper, I drew the decorative metal fencing from the film with colored pencils on yellow paper and used a black felt tip marker to fill in the gaps. Likewise, I drew out the clouds and moon on construction paper in yellow, blue, and purple—as I knew how those colors would register in B&W—and cut them out. I then attached them to clear plastic to photograph them with directional lighting similar to what I used for the cosplays.
I cleaned up the drawings digitally and then composited the elements with my cosplay photos.


cosplay photos composited with the moon, the gate, and the black "backdrop"
Conclusion
Thank you all for reading, following along, and supporting my work! If you decide to use this guide or any of my previous how-tos this Halloween, please share. I’ve loved seeing your Asta Nielsen Hamlets over the past few years!
Stay Tuned for Postscript to Cosplay the Classics: Salomé and Orientalism! For now, check out Part One: The Importance of Being Peter and Part Two: Artists United?
——— ——— ———
☕Appreciate my work? Buy me a coffee! ☕
——— ——— ———
Other Costume/Cosplay How-Tos:
Theda Bara | Pola Negri in The Wildcat (1921) | Asta Nielsen in Hamlet (1921) | Musidora in Les Vampires (1915) | Conrad Veidt in The Cabinet of Dr. Caligari (1920) | Gloria Holden in Dracula’s Daughter (1936) | Simone Simon in Cat People (1942) | Vampira in Plan 9 from Outer Space (1959) | Yvonne Monlaur in Brides of Dracula (1960) | Daria Nicolodi in Deep Red (1975) | Amanda Bearse in Fright Night (1985) | Fairuza Balk in The Craft (1996) | Barbara Stanwyck in The Lady Eve (1941) | Barbra Streisand in The Way We Were (1973)
#1920s#1922#1923#nazimova#alla nazimova#film costume#costume design#halloween costumes#costume#halloween#how-to#makeup tutorial#tutorial#cosplay#film#cinema#silent movies#silent film#silent cinema#classic film#queer#queer artist#queer film#classic movies#classic cinema#old hollywood#classic hollywood#film stars#natacha rambova
19 notes
·
View notes
Text
Want to learn something new
Want to learn something new in 2022??
Absolute beginner adult ballet series (fabulous beginning teacher)
40 piano lessons for beginners (some of the best explanations for piano I’ve ever seen)
Excellent basic crochet video series
Basic knitting (probably the best how to knit video out there)
Pre-Free Figure Skate Levels A-D guides and practice activities (each video builds up with exercises to the actual moves!)
How to draw character faces video (very funny, surprisingly instructive?)
Another drawing character faces video
Literally my favorite art pose hack
Tutorial of how to make a whole ass Stardew Valley esque farming game in Gamemaker Studios 2??
Introduction to flying small aircrafts
French/Dutch/Fishtail braiding
Playing the guitar for beginners (well paced and excellent instructor)
Playing the violin for beginners (really good practical tips mixed in)
Color theory in digital art (not of the children’s hospital variety)
Retake classes you hated but now there’s zero stakes:
Calculus 1 (full semester class)
Learn basic statistics (free textbook)
Introduction to college physics (free textbook)
Introduction to accounting (free textbook)
Learn a language:
Ancient Greek
Latin
Spanish
German
Japanese (grammar guide) (for dummies)
French
Russian (pretty good cyrillic guide!)

Jan 2, 2023
Want to learn something new in 2023??
Cooking with flavor bootcamp (used what I learned in this a LOT this year)
Beekeeping 101
Learn Interior Design from the British Academy of Interior Design (free to audit course - just choose the free option when you register)
Video on learning to read music that actually helped me??
How to use and sew with a sewing machine
How to ride a bike (listen. some of us never learned, and that's okay.)
How to cornrow-braid hair (I have it on good authority that this video is a godsend for doing your baby niece's black hair)
Making mead at home (I actually did this last summer and it was SO good)
How to garden
Basics of snowboarding (proceed with caution)
How to draw for people who (think they) suck at art (I know this website looks like a 2003 monstrosity, but the tutorials are excellent)
Pixel art for beginners so you can make the next great indie game
Go (back) to school
Introduction to Astronomy (high school course - free textbook w/ practice problems)
Principals of Economics (high school course - free textbook w/ practice problems)
Introduction to philosophy (free college course)
Computer science basics (full-semester Harvard course free online)
Learn a language
Japanese for Dummies (link fix from 2022)
Ukrainian
Portuguese (Brazil)
American Sign Language (as somebody who works with Deaf people professionally, I also strongly advise you to read up on Deaf/HoH culture and history!)
Chinese (Mandarin, Simplified)
Quenya (LOTR fantasy elf language)

Dec 26, 2023
Want to learn something new in 2024??
Beginner-oriented video on how to sail
This guy has so many videos on baking different types of bread. SO very many.
Coding in Python - one of the most flexible and adaptable high-level programming languages out there - explained through projects making video games
Learn to swim! (for adult learners. I don’t care if you live in Kansas or Mali or wherever. LEARN TO SWIM.)
Learn how quantum mechanics works. Then read some more about it
[Learn about quantum mechanics again, but in a more advanced engineering/mathematics class. Then read more about the math and physics of it]
Poetry Handbook, by Mary Oliver
Something I learned this year: how to sew a quilt (Here’s a very easy beginning pattern that looks amazing and can be done with pre-cut fabric!)
How to hit the ball in softball
Tutorial video on what is under the hood of most (gas) cars + weird engine sounds and what they mean
Full beginner mechanics technical training, if you want to go more in depth
Playlist on how car engine physics work if you want to go ultra in depth
Lecture series on architecture design through study of buildings
How (American income) taxes & tax law work (choose “audit course” at checkout for free class)
Pickleball for beginners (so you can finally join your neighbor/friend/distant cousin who is always insisting you join their team)
+ Para-Pickleball for beginners (for mobility aid users!)
School is so much more fun when there’s no tests:
American Law - Contracts
Shakespeare’s Life and Plays
Fairy Tales: Meanings, Messages, and Morals
Modern Poetry
World History [Part 1, Part 2]
Learn a language:
Arabic + Resource Guide compiled from Reddit (includes info on different dialects)
Chinese (Cantonese) (audio)
Urdu (frequently recommended course on Reddit) + Resource Guide
Yucatec Maya
22 notes
·
View notes
Note
pls recommend a true beginners first crochet project
I really like washcloths because they're small and you can start with a single crochet stitch and work your way from there. Cotton yarn is pretty cheap too, though it isn't stretchy. If you're struggling too much with cotton, blanket squares are another option that can use any yarn.
This tutorial has good pictures.
What I did to learn each crochet stitch was use wikihow because each step is in gif form. Videos were too fast for me and still images didn't make sense. They have guides for everything from making a chain to more complicated ways of starting a project like Magic Loop.
#you can also get white or natural cotton yarn for this#and learn dyework while you're at it!#pro chemical and dye has good samplers that have the basics in small jars
28 notes
·
View notes
Text
Amateur sewing - The Goddamn Pirate Poet Shirt
So. I made a thing.
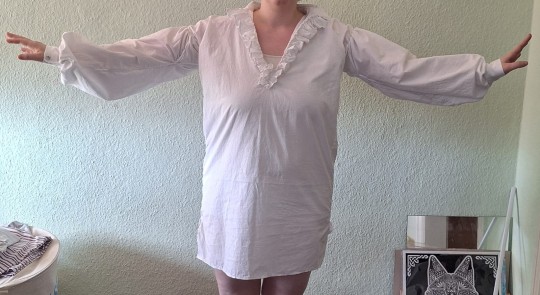
A vaguely late-18th / early-19th century-style shirt. And I'm saying vaguely because, while this has about the right look, I took a few liberties in construction.
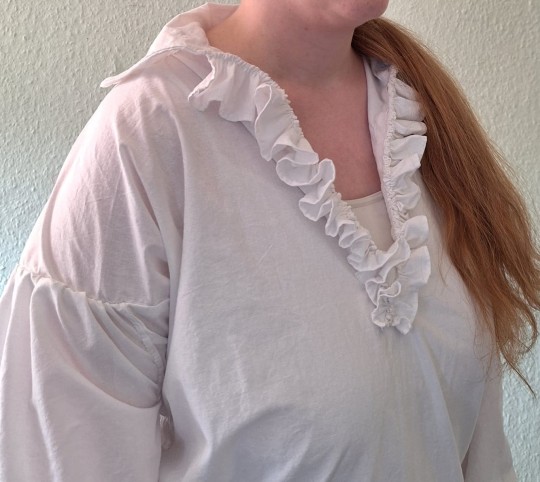
First of all: I wanted ruffles. None of the tutorials I used added ruffles because, frankly, that's a whole lot of hemming work for not that much length of fabric, but I wanted the frill. Behold. Also visible in this picture: The dropped shoulders, which are in fact according to the historical references.
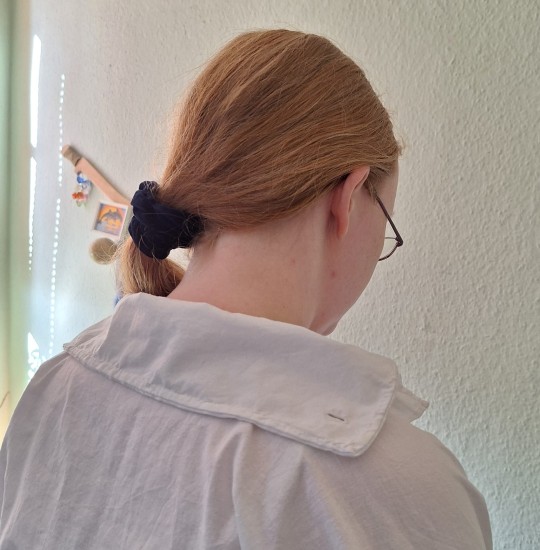
The collar from its better side. The other side, I had to extend with a little placket as this shirt has two modes: slutty pirate (open cleavage) and 18th c decency (closed with a cravat), and for the latter option I wanted to be able to shut it with buttons. For which I apparently took the wrong measure from my neck. Problem-solving!
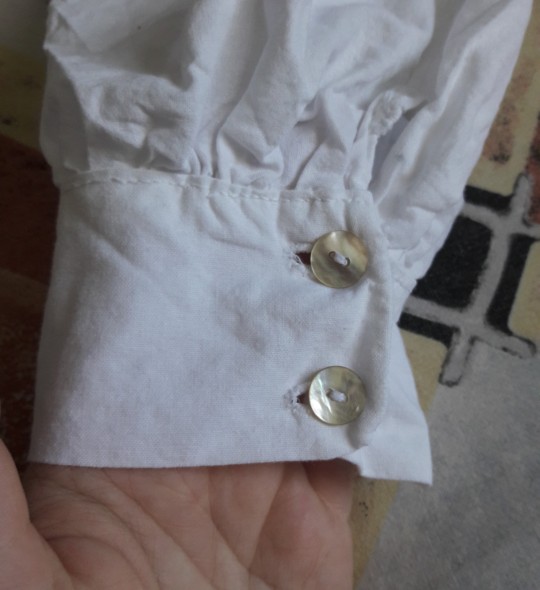
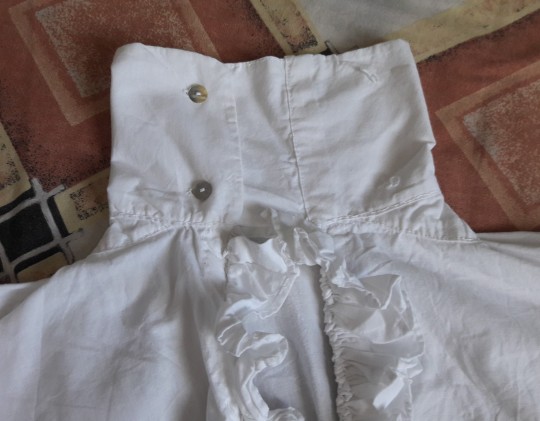
The front placket isn't the prettiest thing in the world, but the closed collar is meant to be covered by the cravat anyway. And check out my darling nacre buttons! I love them so much that I used two on every cuff despite that not being strictly necessary. Probably would have gotten away with one on each side. But. Look. Shiny.
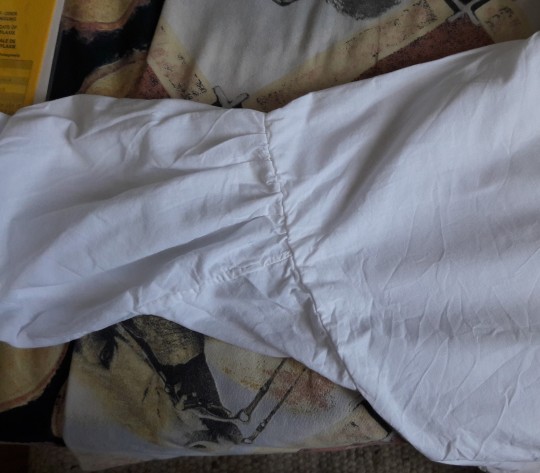
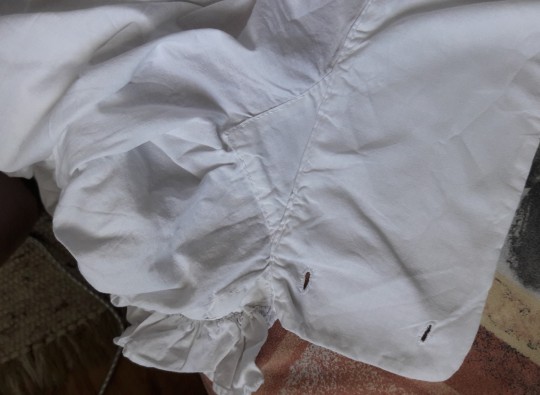
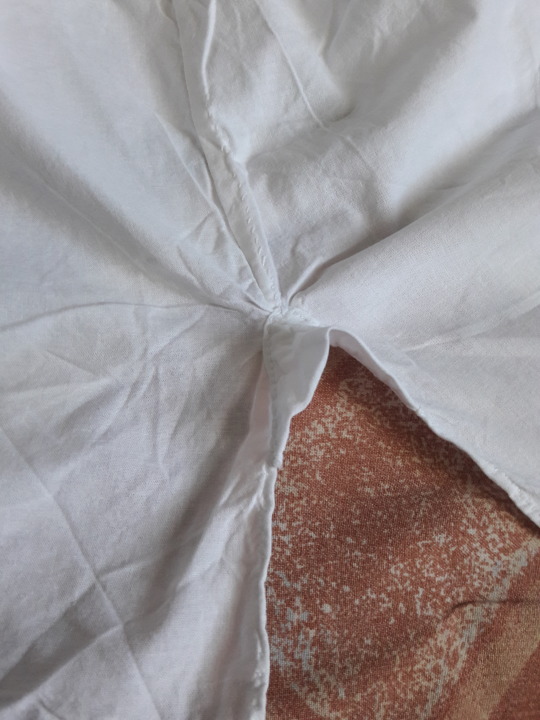
Altogether, I think I used up, like, 70 meters of linen thread? Which is not super economical, but 1st, I backstitched really everything, except when I was felling over the (already backstitched) hems. 2nd, there were the underarm gussets, and wherever a reinforcement patch / strip could go on, I put one in, such as both sides of the collar, the slits to both leg sides, the shoulders and cuffs. And 3rd, there were my neat lil' additional bits such as the long, long ruffles, the tie I added into the cleavage, and the cravat.
I learned that linen thread is a bit tricky; it's very strong, but it's not super even, and it knots easily. It also cannot be used in a machine, but I did this entire thing by hand anyway, so that didn't bother me all that much. Not because I'm a stickler for historical practice, but because sewing machines are scary. I may have to tackle this fear for the sake of my fingertips.
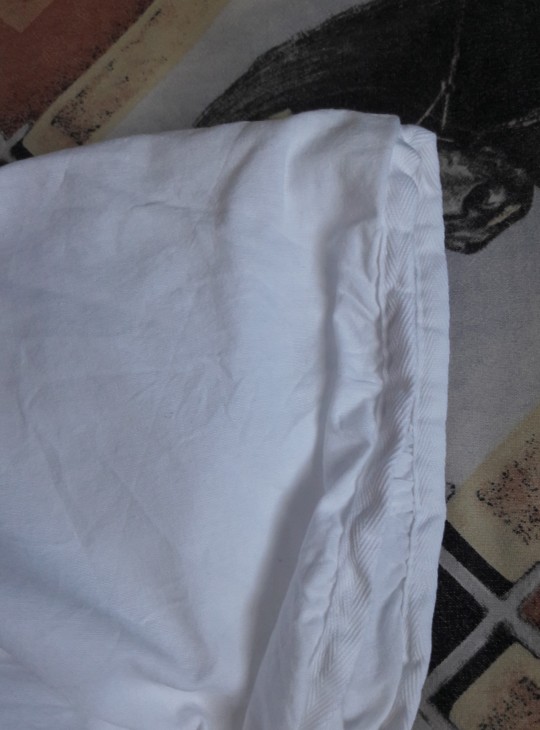
I need to work on my estimation of seam allowance, because I had to clean up the edges on the inside of my shoulder/sleeve seam with twill tape, because I hadn't left enough seam allowance to hem over all that scrunchy, ruffly bit. Twill tape is probably not historical practice for such a shirt; I think this only became a thing after Spinning Jenny was invented, but it served me well. I also need to work on my sewing vocabulary, because I learned most of it online - and thus, English, confusing the hell out of my friend when I didn't understand my mother tongue's term for "seam allowance" because I had literally never heard it XD
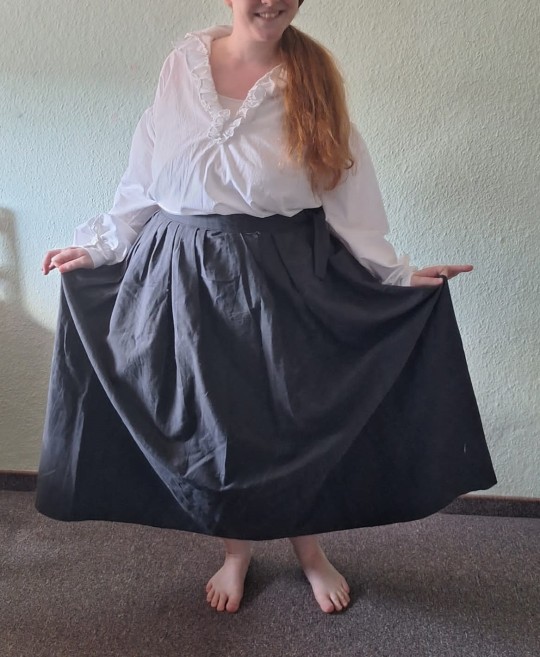
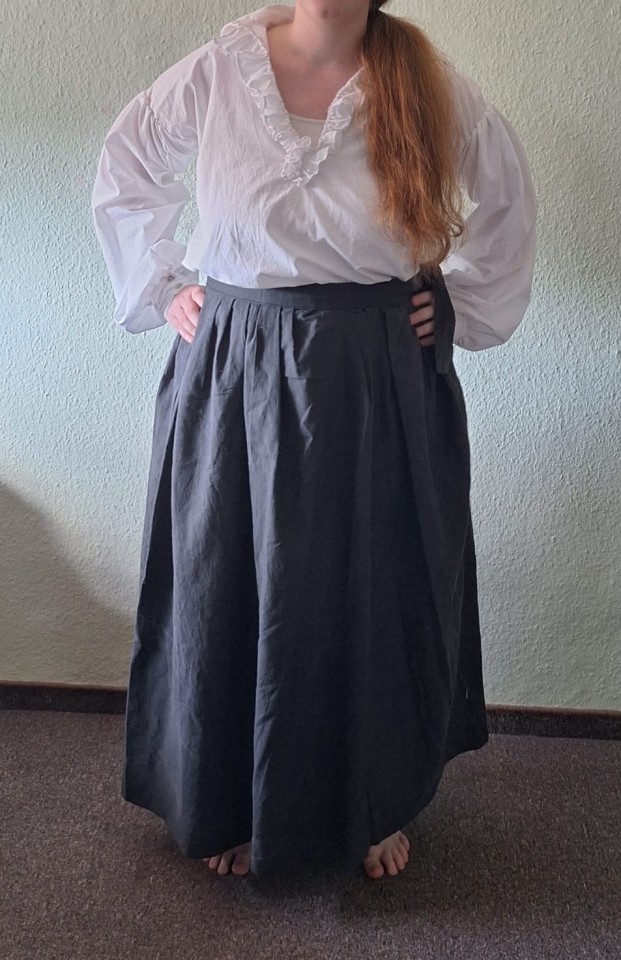
Fun fact: I bought the linen for this literally years ago (a bed-set, because it's a lot of yardage for a relatively cheap price; I still have lots leftover). But only now did I sit down and make a shirt out of it, and I love it. The sleeves are so poofy! And all that seaming was worth it; the shirt already had a round in the washing machine, and it's perfectly intact. I think I did a good job!
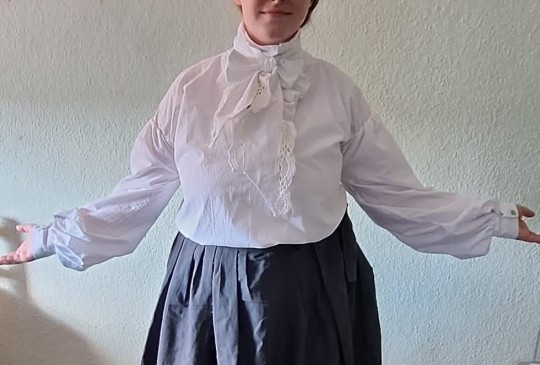
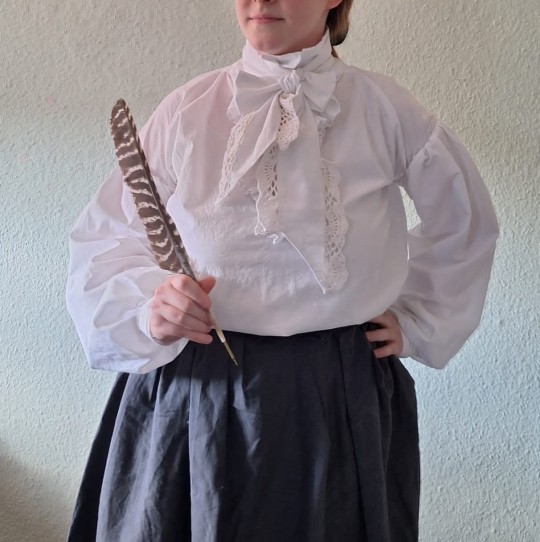
The cravat is, aside from the twill tape inside and the buttons, the only thing that's not 100% linen, because my mom crocheted the lace trim for me from cotton yarn. My draft is not quite how a historical cravat from the 18th / 19th century turn would look, but I honestly don't care; the combination makes the shirt so goddamn fabulous! I love this; it was super worth the work. Time to get on a snazzy waistcoat to go with this <.<
#sewing#needlework#the goddamn pirate poet shirt#amateur making a piece of clothing#also behold probably the last pictures of my long hair before I get it chopped off XD
8 notes
·
View notes
Note
Can we please have some luke fluff hc’s?🙏 from any era idc i just love your writing💗
Thank you so much, anon!!! <33
I'm so on board for more lighthearted Luke content to warm our hearts, it's what he deserves🤝🏻
Also I veered into kinda new territory for me; while many of these take place in the Star Wars universe as normal, I included some modern day AU ones too
• the Jedi are taught to take extra care of their clothing and appearance because whenever they're out and about they take on a mostly representative role, whether they want to or not
• this also includes learning how to correctly mend and take care of their belongings
• I don't think that this was at the very front of Luke's education though, Obi-Wan and Yoda really had more pressing conditions to work with
• however, as everyone can clearly see, nobody had to specifically tell Luke about this
• (just look at the man)
• not only did he grow up with maybe one (1) relatively good fitting outfit, I'm also sure that because of this he was taught how to fix holes and re do seams as well as sewing his buttons back on himself
• I'm even convinced he's able to make a simple pair of pants and a shirt from scratch should it be really necessary
• something about the picture of you and Luke sitting together on a warm summer evening or during a winter night and you watching him silently working away is just the peak of domesticity
• he enjoys fixing clothes, especially if by doing so he can do a favor to those he loves
• I think in a way it calms him too
• he'd definitely help out his Padawans with it as well
• I firmly believe he owns a small sewing kit, complete with a thimble
• (maybe two: one he's actually using and a second hand made one out of porcelain because he thinks it's really pretty)
• maybe, in addition and if he has the time, he'd try out similar activities like crocheting, knitting, stitching, etc.
• I don't think he'd be very good at it but everything he crafts is made with love and there is no one around who doesn't appreciate his efforts
• imagine him knitting little socks and hats and scarves for all of his students
• for some reason he really struggles with online tutorials though
• they're always going too fast, he can't see what exactly it is they're showing, and often times they're just overcomplicating really simple steps
• he finds this to be very frustrating
• he probably uses a very (very!) old fashioned book to learn instead
• its margins are full of scribbles of its previous owners and Luke adds his own
• he draws smiley faces next to the patterns he likes most
• Luke is a DIY king
• something that really comes in handy as a Jedi master
• at the very beginning, just at the start of his own academy, he definitely did most of the occurring tasks himself, also including preparing the meals for everyone
• he's a decent cook but I think he'd get really into baking
• baking bread is one of his favorite free time activities
• my sister insists upon the fact that he'd make the absolute best focaccia
• (or its Star Wars equivalent at least)
• he really likes trying out new recipes, especially those he never heard about before
• with varying degrees of success, as some of them are not meant to be made by humans
• but worry not, nothing is getting wasted
• Luke's collection of little fish friends is always happy to eat the remaining crumbs
• (for those that don't know what I'm talking about, check out my other random Luke headcanons if you'd like)
• he has special outfits for his training sessions, including many different shoes
• depending on what or where it is he's practicing, he chooses them carefully
• inside he's wearing soft slippers and soft slippers only, boots are a no go
• it's very much established that Luke is wonderfully emphathetic and always ready to stand by your side, may it be during your period or when you're struggling mentally
• he's still wonderfully emphathetic and caring when you're sick but like, only from very far away
• he'll refuse to come near you if you so much as mention you're not feeling well
• if you have to sneeze or cough even a little bit he's immediately asking whether you've fallen ill or are about to
• just say you feel like you're getting a cold and he's on retreat immediately
• he can't get sick as well!
• he's working with children!!!
• at least one of them is always sick anyways, he can't be contagious under any circumstances!
• he'd feel so bad if he were to be responsible for even more of them suffering
• he feels horrible for not being there for you too though
• so he still does his best
• he prepares warm meals and tea every day and let's R2 deliver them
• he always checks in on you when you're asleep
• he changes your bed sheets while you take a shower or a bath
• he'd totally make a doctor's appointment for you if you're too scared to make the phone call yourself
• he makes sure you're taking your medications
• he pats your back and strokes your hair using the Force
• Luke would absolutely hate quarantine
• at first he'd still be pretty optimistic, thinking it won't be that bad, maybe even fun?
• he'll just meditate a lot, right?
• after all he has mastered his temper now, his patience renowned among his friends and students
• this mindset works at the beginning and for a while he's happy to sleep in for as long as he wants to
• however he forgets about the concept of time quickly enough and soon has no idea what day it is
• when was the last time he had breakfast?
• since he's a very outdoorsy person, always on the move, always doing something, it wouldn't take long until he's getting kinda antsy too
• and while he does enjoy the calm and quiet, he's mostly used to being the center of bustling activities
• soon he takes desperate measures to pass the time, even trying out things he before swore to not be interested in in the slightest
• I see him taking lots and lots of Buzzfeed quizzes
• he texts you about every single result
• one of his first ones was about what kind of animal he'd be and he absolutely hated the outcome
• he eventually ended up making his own quiz because of it
• he likes watching you play video games more than playing them himself
• it's very relaxing to him, especially after a long day at work
• plus he gets to hold you extra close under the pretense of being very interested to see what's going on on screen
• he dozes off pretty quickly though
• while he's happy to let you play whatever you want, I think he has his favorites as well
• Animal Crossing being at the very front
• he loves when you show him your town or island, how you decorated your house and which villagers you're best friends with
• he too would have the newest game, simply because you were missing a few items and he was determined to get them for you
• it would totally escalate during quarantine though, and suddenly he'd have a fully decorated five star island
• (Luke Skywalker plays Animal Crossing with a passion and I'm ready to fight anyone about it)
• for some reason he gets really competitive during Mario Kart and Just Dance
• he unapologetically wins at every single Wii Sports mini game and no matter what you do and how much you practice, he's always better and not in the least bit sorry about it
• he is a Macher™ (please let there be some German fans who know what I'm talking about)
#ask#luke skywalker#luke skywalker x reader#luke skywalker x you#luke skywalker fanfiction#star wars#luke star wars#star wars fanfiction#fanfic#star wars a new hope#star wars empire strikes back#star wars return of the jedi#star wars headcanons#luke headcanons#fluff#lots of fluff
33 notes
·
View notes
Text
Crochet community, please answer a question for me.... how did ya'll learn when all the tutorials I've found are dogshit. Like no hate to these people, I dont think they realize where they're lacking in their videos but damn, they suck pretty bad a lot of the time.
Like seriously, so many people will title things as "easy" or "beginner" but don't explain terminology at all. Or they go fast... all the time. Like if I'm a beginner I need snails pace to actually be able to see what's going on so I can understand exactly what I'm doing. Just going slow compared to what you're used to is not enough, it needs to be EXTREMELY slow.
.......This frustration may have to do with me following my first pattern and immediately needing to learn to treble crochet into a magic circle... which I can't because nobody seems to show clear enough how to do that.
Like where do I hold the circle the keep its shape EXACTLY. Show me specifically what threads and why. How do you get that first chain after the circle done so easily? And then, how do I actually treble into the damn circle?
Im totally not frustrated crying rn after trying over and over and over and over and.....
32 notes
·
View notes
Text
so i decided im going to use this color work piece i did to make a tote bag (mainly bc i thought it would be cute but also i wanted this to be like a prototype for future bags i might make)
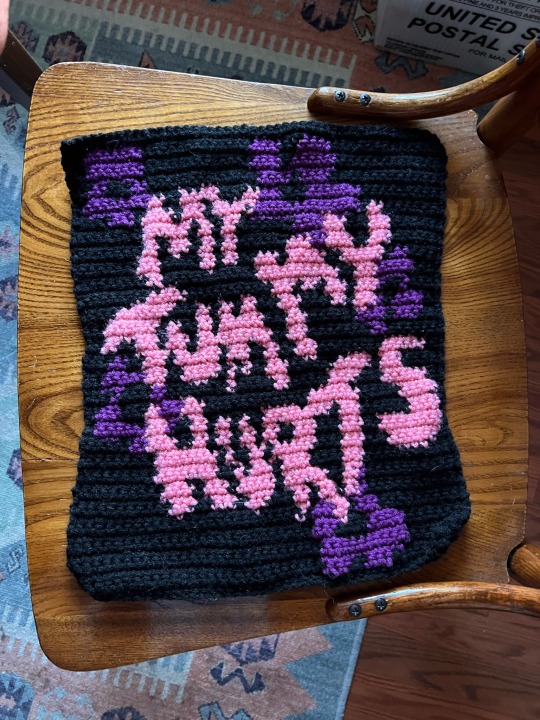
i learned a very valuable lesson which is to always fucking make a gauge swatch lmao. i knew from the alpha chart i used that the front panel was 56 rows of 46 sc each row, so i figured if i used the same yarn and hook and did a big 46x56 square of sc it would come out to be the same size. luckily, about halfway through i thought it might actually be a good idea to hold the two panels up to each other and make sure it was actually the same size…
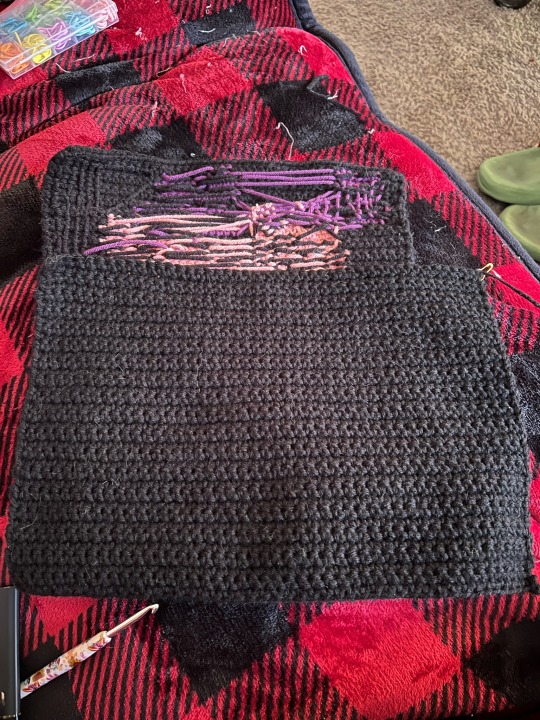
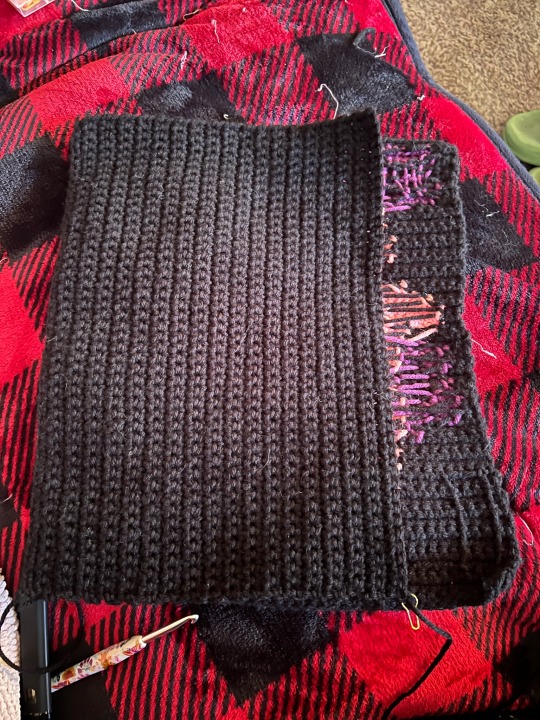
it wasn’t! but luckily somehow my tensioning was fucked up in just the right way so it happened to be just the right height to use. so i didn’t waste 4 hours of my life crocheting all of this because im just going to put the back panel on sideways. might look a little wonky but i’m new at crocheting so who cares if it looks perfect. i would much rather it look a little wonky than have to redo this entire back panel.
BUT! — lesson learned. do a gauge swatch. ideally before you get 4 hours into crocheting.
i finished the back panel up and then decided to take a break from actual crocheting and try to figure out how to weave in the ends of the front panel. the two bits of black yarn at the corners were pretty straightforward and i just weaved them in like normal at the corners
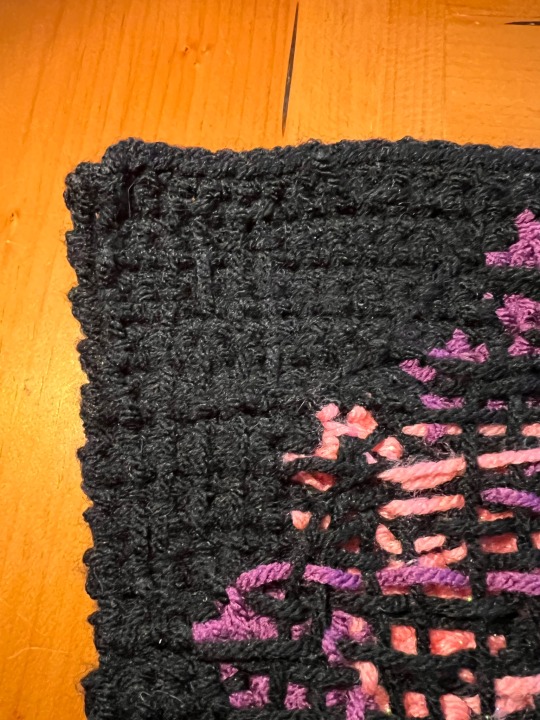

the ends left from the purple and pink yarn were a bit trickier. as you can see , the backside of this piece is a bit of a fucking mess:
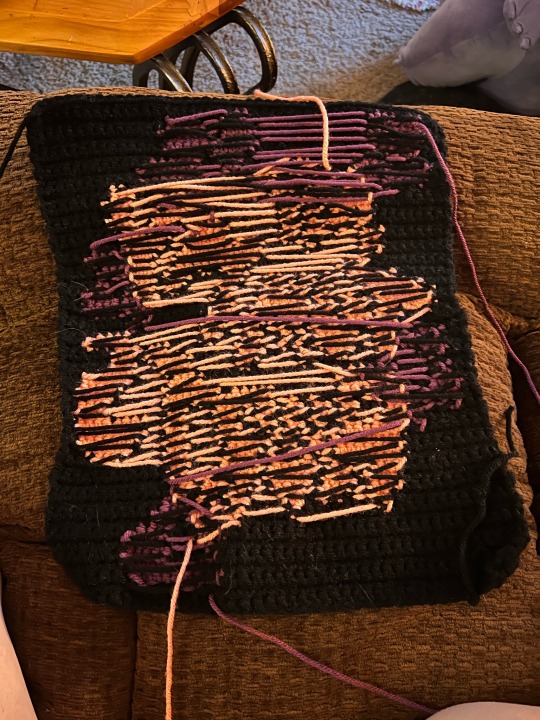
i’m honestly not sure if this is actually how you’re supposed to do intarsia crochet. (i found a tutorial on a blog i don’t remember, read like the first few sentences, and then my adhd kicked in and i got bored so i decided to just try to figure it out on my own). but there are all these loose pieces of thread from when i dropped a color and had to carry the yarn i wasnt using across the back of the piece. plus i didn’t want the colors i was weaving in to show through the front side. so i decided to basically weave the pink and purple ends into the loose bits of yarn on the back, and then tied them off to secure at the ends
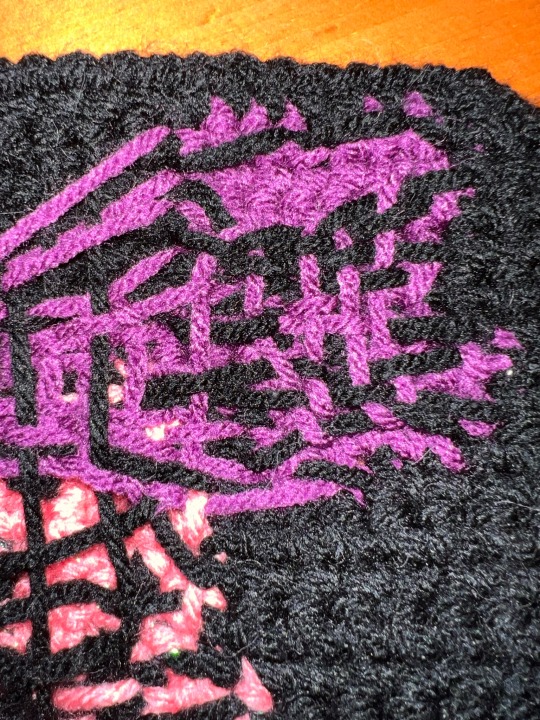
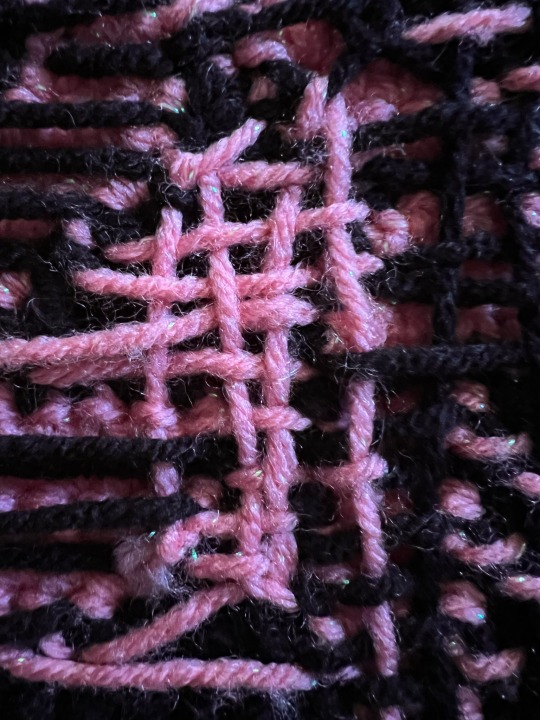
it looks messy, but this is the inside of the bag so who cares. but there were still some more long loose threads of yarn on the back, and i liked how weaving these ends in had sort of secured the extra yarn down against the bag. so i took my tapestry needle and a big piece of black yarn and decided to try weaving across the whole back of the bag
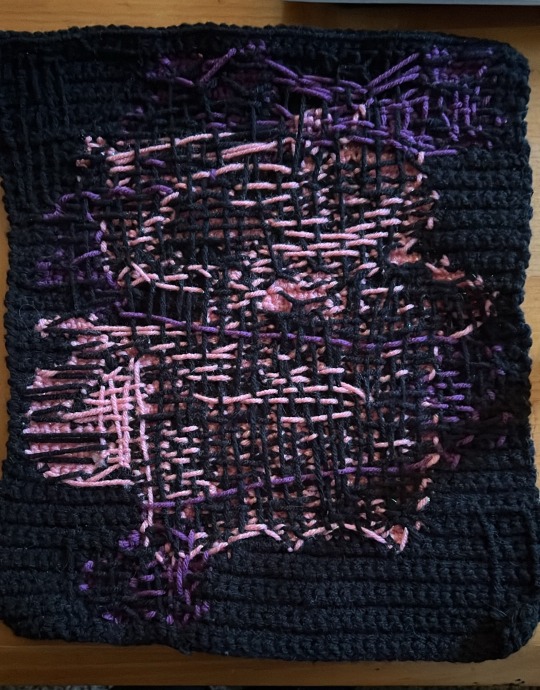
again, messy, but it did what i wanted it to do. i was originally thinking i would line the inside of the bag with fabric, but i think if i weaved over this one or two more times it might not need a lining. but idk, i have read that it’s good to line crochet bags with fabric to like reinforce them and make them stronger. still thinking about it for now.
#beginner fiber artist#beginner crochet#crochetblr#fiber art#fiber crafts#crochet project#colorwork crochet#intarsia crochet
8 notes
·
View notes
Text
I finally did it, and now I present to you:
Pho's Scuffed Mini Minecraft Axolotl Crochet Pattern! (as seen in this post)
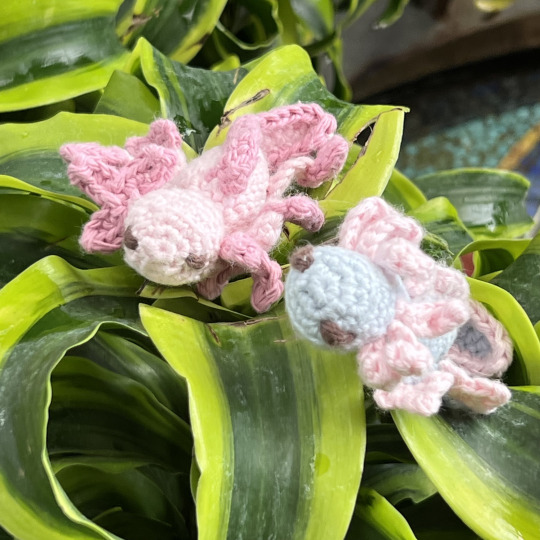
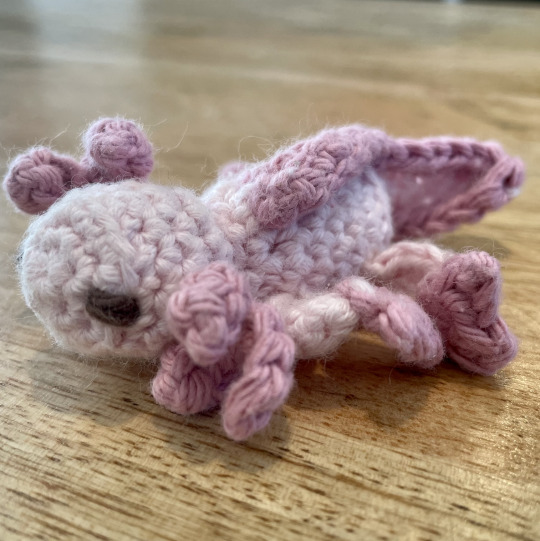

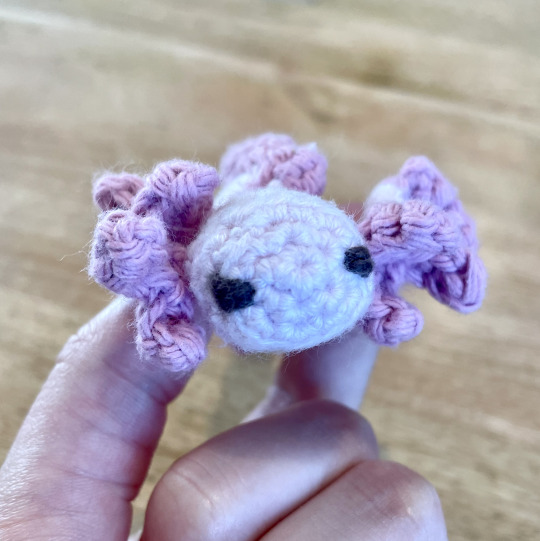
(I'm going to transcribe the pattern I used for Sir Strawberry/the pink axolotl because I personally think it looks better/he's just cuter sorry)
(US) Abbreviations + Tutorials
These are the main stitches/techniques used in this pattern, nothing too hard for a beginner to learn :)
mc: magic circle sc: single crochet stitch inc: increase stitch dec: decrease stitch ch: chain sl st: slip stitch hdc: half double crochet dc: double crochet BLO: back loop only pic: picot stitch
And here's some tutorials to learn how to do them! (I looked at first results, but there are absolutely more out there haha)
Working in the round (magic circle)
Basic stitches (ch, sl st, sc, hdc, dc)
Increase + Decrease stitches
Back Loop Only
Picot Stitch
The Head
Round 1: 5sc in mc (5 stitches)
Round 2: inc around (10)
Round 3: (sc, inc) x5 (15)
Round 4: BLO around (15)
Rounds 5-7: sc around (15)
Round 8: (sc, dec) x5 (10)
Round 9: dec x5 (5)
Slip stitch, tie off end.
The Body
Round 1: 5sc in mc (5)
Round 2: inc around (10)
Round 3: (sc, inc) x5 (15)
Round 4: BLO around (15)
Rounds 5-9: sc around (15)
Round 10: (sc, dec) x5 (10)
Slip stitch, tie off and leave a long yarn tail to be used to attach the body to the head.
The Tail
Start by chaining 8.
Starting in the 2nd stitch from the hook, 4hdc and 3dc to the end. Tie off, leaving a long yarn tail to attach the tail to the body.
For the colored fin edge on the tail + back:
Join at one end of the base of the tail, hdc around, chain 12, and sc back under the chain. (Image in the assembly section of what this piece should look like.)
Legs (x4)
Chain 6, turn and sc back. Tie off, leaving a tail for sewing.
For the toes, 3 picot in mc, tie off and weave ends through arm.
Frills (x2)
Chain 3 in magic circle, sc back and slip stitch into mc. Repeat twice (to make three points) and tie off, leaving a tail for sewing.
Assembly
When you have finished making the pieces, they should look something like this, ignoring the frills and eye pieces.
(Image from this pattern I based mine off of. I did not purchase the pattern and plagiarize it, I only looked at the pictures and experimented until I made something I liked, but if you want to buy a professional pattern with better images/instructions, there you go lol)
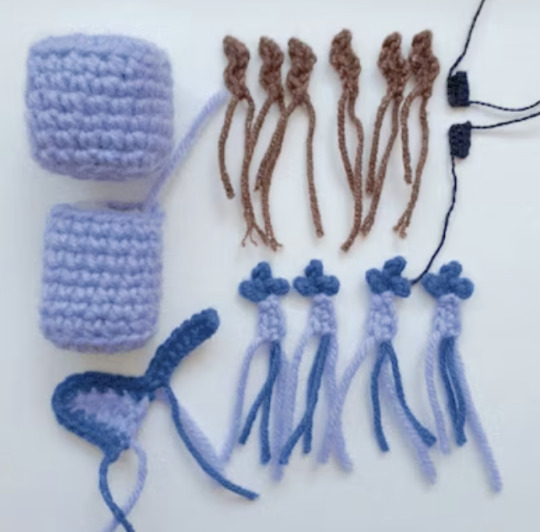
A lot of this assembly is intuitive/based on vibes alone. If something doesn't look right, try something else and see if it looks better! Have fun with it. Make it silly :)
First, sew the body and head together. Use a dark thread or other eye color to wrap around a few stitches to make eyes in front. Attach the frills to the sides of the head.
Sew the tail on the back so the back fin can go up and get sew along the back. Put the legs wherever feels right.
Tuck all the yarn tails from sewing into the body, or leave them hanging out so it looks like an eldritch string monster.
And that's it!! You have a cute baby axolotl for all your nefarious purposes :)
#I've never done a proper pattern before I hope it works okay haha#enjoy!!!!!#pho.posts#pho.doodles#crochet#crochet animal#axolotl#minecraft axolotl#mineblr#minecraft#ldshadowlady#empires s1#(since that's where the inspo is from)#amigurumi#i still don't know how to tag these things ahdsjkfsdfsa#pho.crochets
49 notes
·
View notes
Text
Remember my first crochet sweater from forever ago? The one that turned out like shit?

Frogged it and now it's a knit 😎
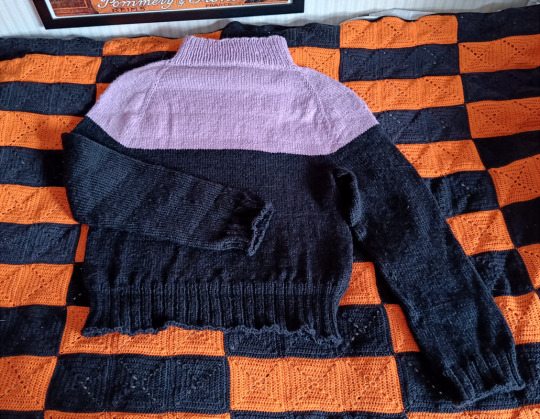
So to recap; I tried making a crochet sweater based on a YouTube tutorial like years ago, and although while making it I could tell it didn't seem... right... I just kept on telling myself to "trust the process" and that "it'd turn out okay in the end"
It did not
The sweater ended up being so square-ish and massive I could've fit three of myself inside of, going well beyond "comfy oversized sweater" straight into "clown clothes" territory. It was bad. On top of that, although I tried to get the same yarn to do the top of the sweater in a pastel purple, I ended up leaning about this thing called "dye lots" the hard way, as the yarn I had needed to finish the sweater ended up being a completely different shade from what I had used for most of the sweater.
So yeah. The sweater turned out like shit, and I wore it maybe once before putting it into my closet and refusing to even look at it for like IDK two years.
Now I have some nicer yarn that I'd like to make something with, something preferably knit because I like knit fabric more than crochet, but I don't want to practise knitting clothes with that nicer yarn. And so I figured, if I frogged this crochet sweater I could then practise knitting sweaters, reuse the old yarn (=don't have to buy jack shit), and maybe remake this failed sweater into something I'll actually wear
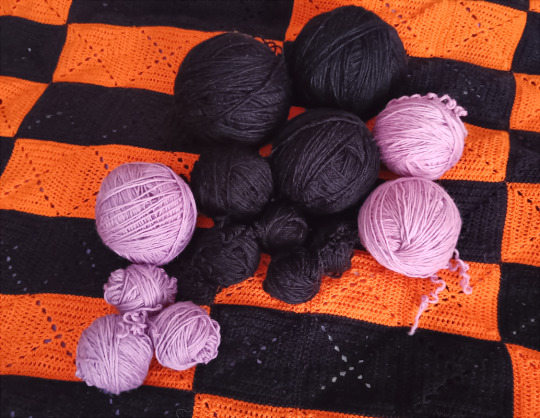
And so the sweater was frogged, this being all the usable yarn from the project. Pastel purple dyelot on the left while the more pinkish yarn (the stuff I had originally used while trying to convince myself it wasn't pink)
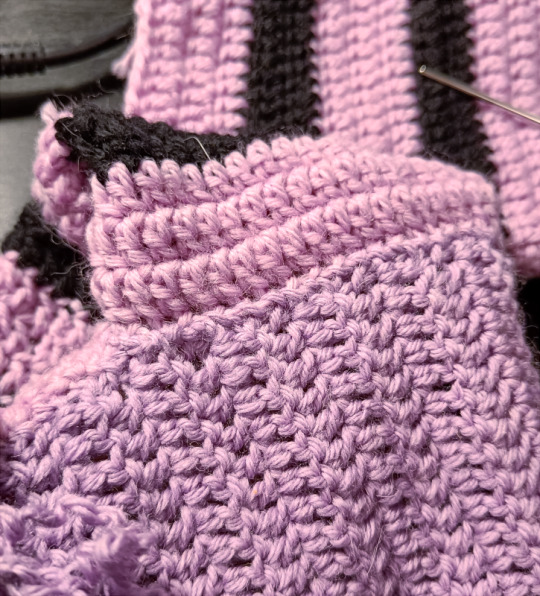
You can see the difference in the hue better here
So yeah. Now admitedly after frogging the sweater I did lowkey think about just trying to re-crochet the sweater and did kinda start on that, but I very soon realized that I probably wouldn't have enough yarn to remake the sweater the way I wanted to, and just trying to crochet with it made me double down on how much I just I don't like crochet fabric as clothes. It's just so bulky, man
So I got to knitting instead. And because I'm deranged I chose to... mostly wing it. I did look at a few YouTube tutorials for top-down raglan sweaters to get an idea of what I was supposed to be doing, but in the end, I do kinda learn the best by just winging it. But what I did make a big note of while remaking the sweater was just trying it on as often as possible, just to make sure I didn't make it as oversized this time.
I did want to make this process relatively simple though and because I didn't want to risk losing out of yarn at an inconvenient point I chose to skip the stripes of the original sweater and just make it a simple two-color sweater. This also had the added benefit where I was able to use up all of the purple yarn on the yolk and just go as far as I could go with it before switching to black.
But yeah, the end result?

It's decent!
Like let's be real, my raglan increases are an absolute fucking mess and the shaping on the yolk is a little funny, AND I did make the collar too big (I was so worried my giant head wouldn't fit through so I made it way bigger than it needed to be, but honestly it's better that way than it being way too small. It looks a little silly but it's not the end of the world), and the sleeves ended up being like maybe 4-5 centimeters too long they could've been a smidge shorter.
But aside from that?
I'm honestly really happy with it
Because the fabric is super soft and nice, it's not too bulky, and most importantly, it fits me. It's not obscenely massive on me, it's just the right size.
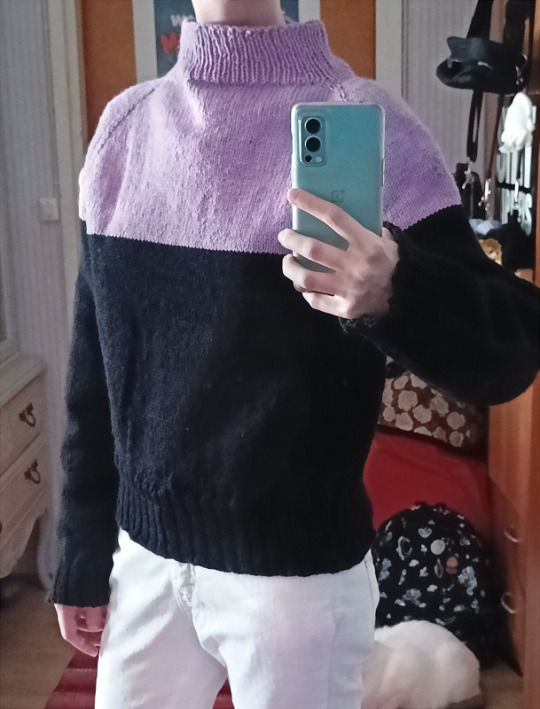

And really, that's all I wanted. A sweater I'd actually USE, and yeah, I'm gonna wear the hell out of this next fall/winter when the weather gets cold again. It's not perfect, but it's more than good enough for me. And most importantly, I now feel infinitely more confident in maybe using that nicer yarn sometime soon to knit something
Now what the fuck am I gonna do with the leftover yarn 'cause boy howdy do I have a ton left
#Moon posting#Yarncraft Diary#Yarnblr#They really weren't joking when they said crochet eats up more yarn than knitting does#Perhaps I will knit a little pink pillow for my cat with the leftovers
10 notes
·
View notes