#free photoshop templates
Explore tagged Tumblr posts
Text
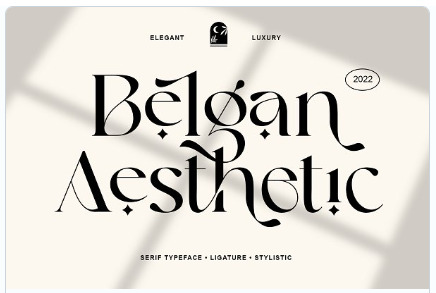
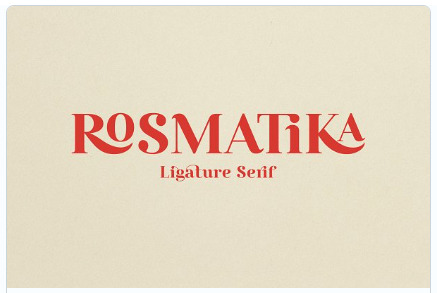


Here's the latest offering of free graphic design assets from Creative Market. The files this month are 3 fonts and a Photoshop template that gives you instructions to make a vintage Risoprint effect which is a kind of retro offset screen print style. It's coolio :)
I believe these are available for free for the month of November. Free type and graphic design files from Creative Market.
#free fonts#slab serif font#free slab serif fonts#free photoshop templates#free typefaces#typography#graphic designers#free commercial clip art#illustrators#typeface#fonts#graphic design#graphic art#graphic designer
22 notes
·
View notes
Text
— 𝐌𝐘 𝐅𝐀𝐕𝐎𝐔𝐑𝐈𝐓𝐄 𝐏𝐒𝐃𝐒
this is a masterlist, of sorts, of all of the psds i have personally used - and wanted to use - over the years. whether it be templates for promos, or the colouring for an avatar i have made, i will list them all && specify if they are free or paid. they will be in alphabetical order, for your convenience.
— 𝐓𝐄𝐌𝐏𝐋𝐀𝐓𝐄𝐒
about tomorrow by apocalypseresources (free)
alicent hightower by mrins4nity (free)
angels and demons by iconholic (paid)
comic book style by niixzee (paid)
concert flyer by niixzee (paid)
cover by 666psds (paid)
dark hemisphere by svintbass (free)
duty by draconicgraphics (paid)
fight for by creationcolor (paid)
game over by jungrainsoul (paid)
graphic template 027 by vc-recourses (paid)
holy mother by kaiserscomms (paid)
hunter by calisources (free)
josephine by cavalierfou (paid)
lady gemma by calisources (free)
lilypads by vileflowers (paid)
melody by apocalyseresources (free)
midnight by kaiserscomms (free)
more than human by rpstars (paid)
murderous by kaiserscomms (paid)
myriad by maplecoded (paid)
nu waves by polarizerps (paid)
paper strips by apocalypseresources (free)
pretence by plutocommissions (paid)
promo template #1 by darkpsds (paid)
protocol by apocalypseresources (free)
shards by iconholic (paid)
snowfall by apocalypseresources (free)
spill the feels by luvsbot (free)
spilled by jessource (free)
template 03 by thisisrawr (paid)
template character by lucegraphic (free)
template promo by faustgraphs (free)
we call him the alpha by calisources (free)
— 𝐂𝐎𝐋𝐎𝐔𝐑𝐈𝐍𝐆𝐒
addicted by tigeredits (free)
devil by tigeredits (free)
disintegration by tigeredits (free)
how not to drown by tigeredits (free)
lightning by tigeredits (free)
starlight by somresources (free)
voidhearted by destinyfaces (free)
wait until dark by somresources (free)
wish by sanctuxryz (free)
#masterlist#rp help#gfx help#psd#roleplay resources#rp resources#rp templates#rp template#rp psd#psds#free psds#paid psds#psd coloring#coloring psd#psd download#psd template#template psd#promo template#promo templates#photoshop#photoshop help
1K notes
·
View notes
Text

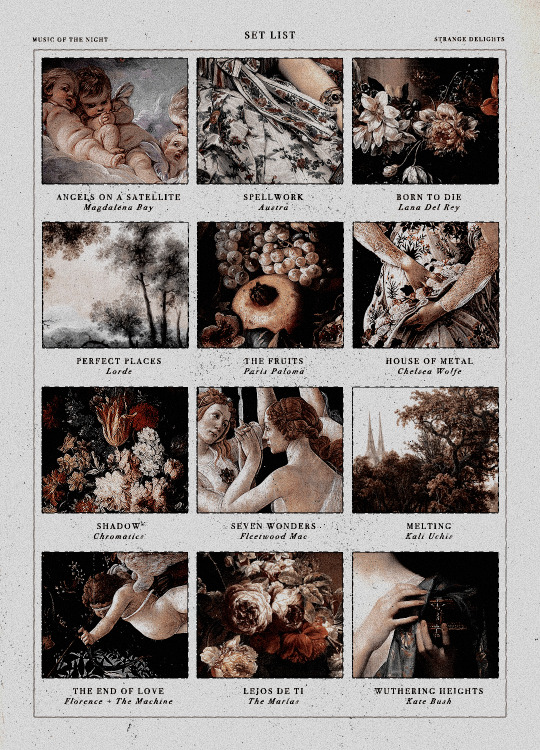
DEATH & ROMANCE, playlist template (free resource)
Here's a super simple, vintage-ish Photoshop playlist template. This was made using pictures in the public domain or that are free of use.
The coloring is included. Text is easy to edit, but if you wish to keep the same look as the preview, you will need to download the following fonts: Canela Deck, Bodoni 72, Art Nuvo, BlackKnightFLF, Rumble Stone, Times, Arial.
Please like or reblog if you decide to download this resource!
Do not repost, redistribute or claim as your own, and remember to CREDIT ME when using this template.
DOWNLOAD: DEVIANTART or PATREON
+ KO-FI, donations are optional! Please do not feel any pressure to sub or donate, I just hope you enjoy the resources I post. If you decide to tip or subscribe to a tier, I thank you from the bottom of my heart for supporting me ! ♡
434 notes
·
View notes
Text
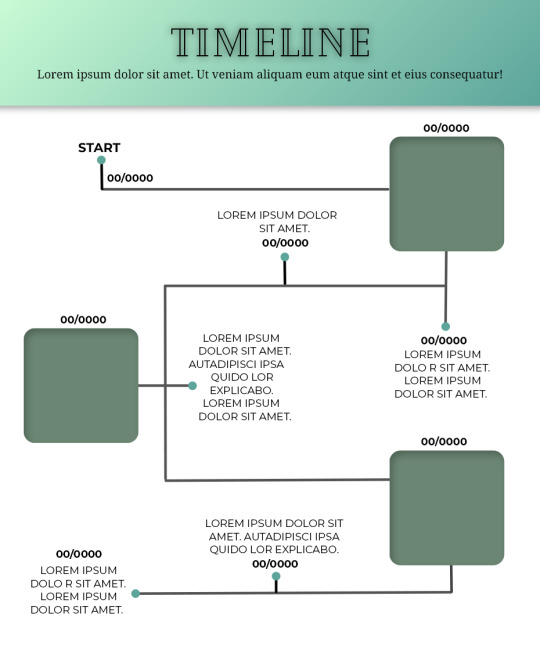
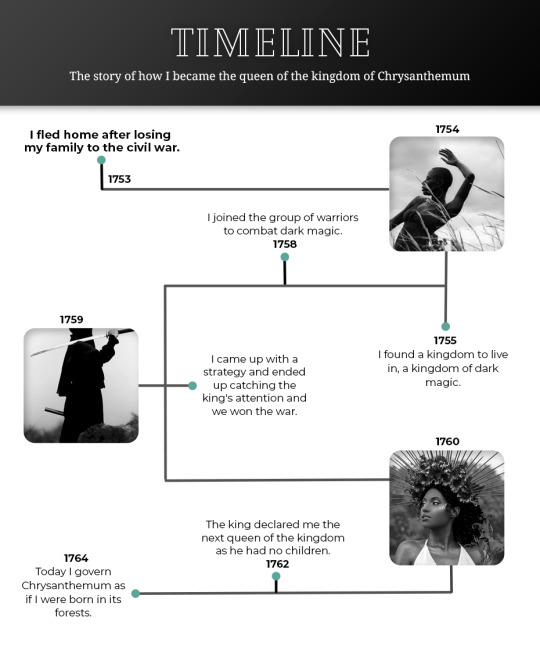
Template #008 by dailyresources
— Timeline Template
Please do not repost / redistribute or claim as your own.
Please, like or reblog if you download.
You may edit as much as you like, it is fully customizable.
This is a free template. PSD File.
Credit is very much appreciated.
Photos by pexels.
Any issues, don’t hesitate to contact me!
Fonts: Cheque, Noto Serif and Montserrat.
Enjoy ❤
Download Link: [mediafire] or [payhip] Support me on [ko-fi]
#templates#timeline template#timeline#free template#psd template#free resources#graphic template#photoshop template#photoshop resources#evansyhelp#dearindies#chaoticresources#allresources#hisources#yeahps#my creations#*mine#*
665 notes
·
View notes
Text
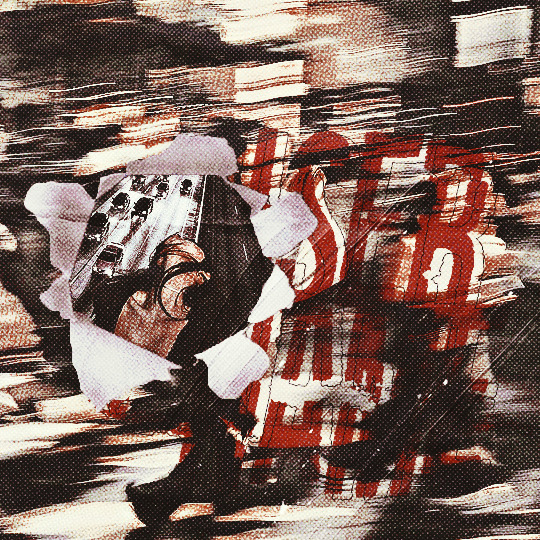

#42 “ SPILLED ” template by jessource.
original and free template. if using please like / reblog and don’t forget to leave credit somewhere visible. fonts used: i tell you all my secrets + 04b03.
inspired by olivia rodrigo's guts (spilled) album cover. the ripped paper has come directly from her album i just turned it into a png. texutres included.
don’t redistribute, steal or claim as your own.
any issues, don’t hesitate to contact me.
[ DOWNLOAD FREE FROM PAYHIP ]
#rp resources#rp template#photoshop template#free rp template#aesthetic template#psd template#promo template#character psd#character graphic#free template#olivia rodrigo#guts deluxe#guts spilled#mytemplates.#template.#*
686 notes
·
View notes
Text
( 04 template )﹕ editable texts

➜ descarga/download ﹕( link )
( esp )
me volví loca y decidí liberar unos cuantos textos que he usado para gráficos (? En un solo archivo psd encontrarán seis carpetas, las mismas contienen los textos que ven y están nombradas según las fonts utilizadas. Pueden descargarlas de Dafont o utilizar otras. Son libres de utilizar los textos como quieran, combinarlos o usar solo unas partes. Recuerden que en algunos casos necesitarán modificar un poco las formas.
﹗ reglas
no pasar como tuyo.
créditos no son necesarios, pero se agradecen.
no es para uso comercial.
( eng )
in a single PSD file you will find six folders, they contain the texts you see and are named according to the fonts used. You can download them from Dafont or use others. You are free to use the texts as you wish, combine them or use only parts. Remember that in some cases you will need to modify the shapes a little.
﹗ rules
do not pass as yours.
credits are not necessary, but appreciated.
it is not for commercial use.
92 notes
·
View notes
Text
TEMPLATE SET GHOSTFACE

⠀⠀⠀If in doubt, send me a DM ⠀⠀⠀Qualquer dúvida, me mande uma DM ⠀⠀ENGLISH ——— IMPORTANT 1. don’t repost/reupload 2. don't reuse my resources 3. don't claim it as yours 4. personal use only 5. credit is MANDATORY ⠀⠀⠀⠀⠀@GRANDSILIATO on twitter ⠀⠀ENGLISH ——— INCLUDES 1. 1 icon template 2. 1 header template 3. textures (and a mini tutorial) ⠀⠀DOWNLOAD ⠀⠀⠀ Buy it on PAYHIP ⠀⠀⠀ Se for brasileiro, me mande mensagem no Telegram.
#indie rph#roleplay#rp resources#icon psd#rp psd#character template#photoshop template#free psd#photoshop resources#rp help#layout#twitter#header#icon#sydney sweeney#ghostface#scream#horror rp#supernatural rp#rp graphics#rp template#rph#roleplay resources#discord rp
101 notes
·
View notes
Text
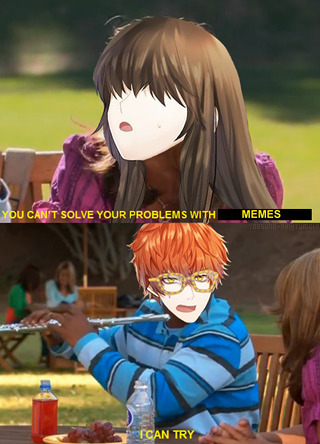
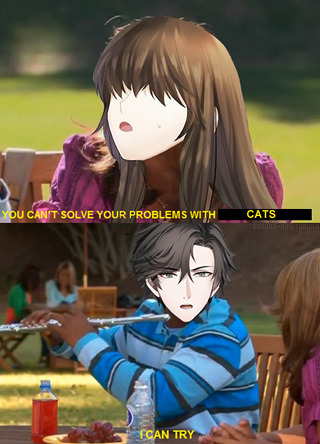
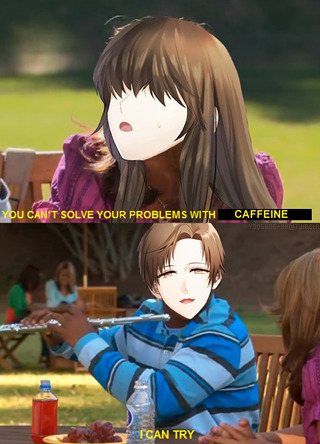
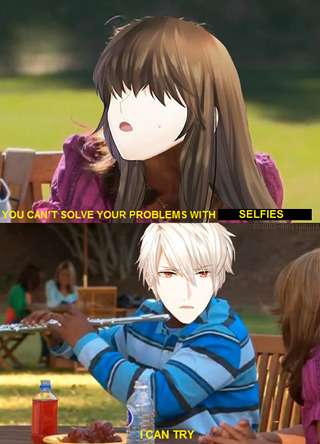
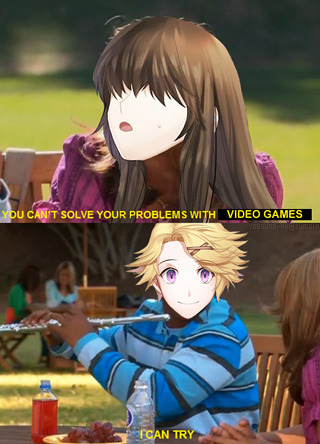
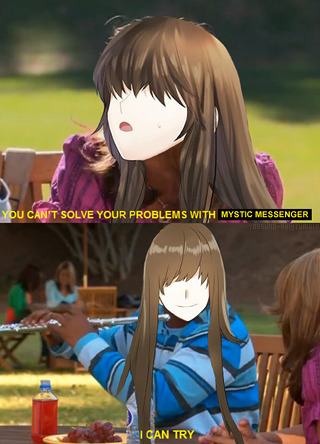
a brief summary of Mystic Messenger (OG edition) x
#mystic messenger#saeyoung choi#jumin han#jaehee kang#hyun ryu#yoosung kim#look what i found in my drafts from yesteryear#i don't have photoshop on this computer atm so unfortunately i couldn't add my take on our AS boys#but feel free to add your own#what would their overly-simplified summaries even be?#cheritz really stepped up their game in creating characters with poor coping mechanisms there#i included the template above for inquiring minds#and yes it is from zoey 101#i guess you could say this post itself.. is mysme 101#707#jumin#jaehee#zen#yoosung#mine#**#idk why i'm even posting this in the year 2024 lol#i guess why not since past me made it?#for some reason#what was going on in her head at the time when she was doing this instead of studying is beyond me#oh well#my blog became a dumping ground long ago#the last pic with us as the mc makes me think some things never change tbh
76 notes
·
View notes
Text
𓈒༷♪˚.✧ How to make a mockup like this for smaus, ocs, etc. (step-by-step tutorial ☆ no Photoshop, easy, free) (requested by @lovebittenbyevans) ✿
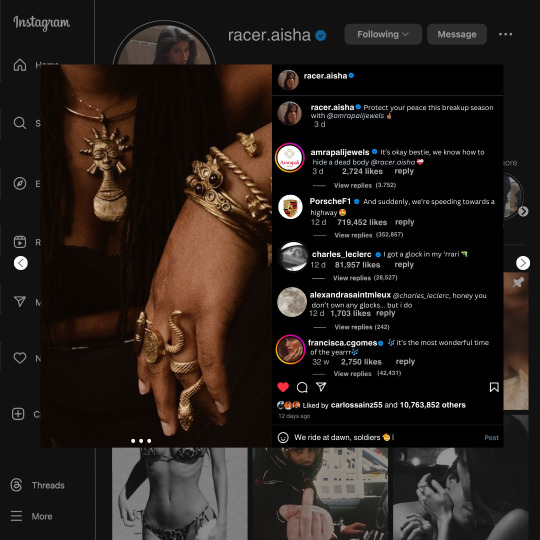
guys this took me two hours to make and you could probably get this done in like, 30 minutes :) I hope this is coherent <3 Please look back this image for comparisons, if my explanation is not well explained, etc.
first of all, if you dont already have one, make a free canva acount. once you're signed in, hit the purple "create design" button on the sidebar. A pop-up will appear with different design template options. For this design, we want the dimentions to be 1080 x 1080, so you can either make a custom size or choose the instagram post (square) template by either searching or scrolling through the list.

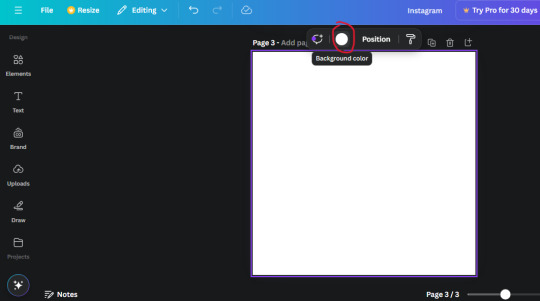
2. Now you have a blank page. Zoom in with the slider at the bottom of the page if you need to (Mine is currently zoomed in 41%). Click on the page and change the color to an off black (hex code #111111).
3. Now that the color is changed, click the "elements" tab and search "line". Click the shape and it will add it to the page automatically. These line are particularly hard to navigate and hard to get it at the right angle and length so this part might take a little longer than the rest.
4. stretch it from top to button and turn in a 90 angle so its straight on the left side of the page. Change the color of this as well to a grey tone (hex code #2F2F2F).
5. Now we'll add the Instagram logo. Click the "text" tab then click the purple "add text box" button. Write "Instagram" in the box and change the font to "apricots". This is the closest font I could find that resembled the logo font but if you find a better one, feel free to use that instead. Make the font size 19.3 (you can do this manually or do it in the text options). Change the color to grey color (hex code #707070). Add it to the upper left corner of the page like this:
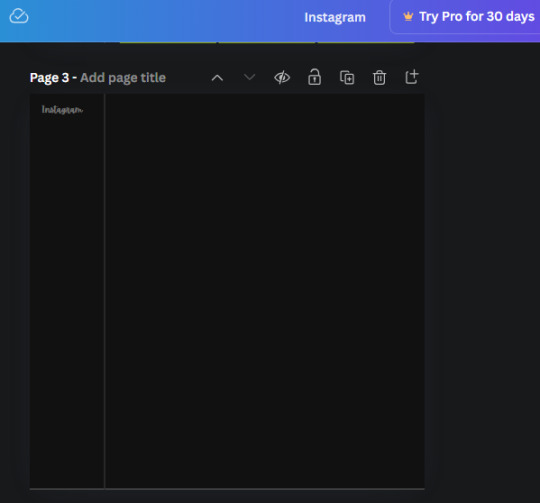
6. now we're adding icons and a menu inside the border we just made. Click the "elements" tab again and search for "instagram home icon" and add the element by sketchify to the page. Click the home icon, an options icon with pop-up above the page. Look for the "Position" button and click it. Scroll to find the advanced options and you can manually type in the width and height at 26.6 and 28.7.
Move it inside the border, under the logo (photo below). Change the color again (the hex code is #707070).
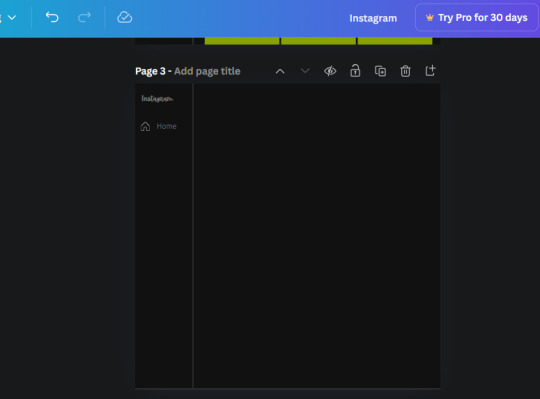
7. Open the text tab and add a text box. Change the font to Canva Sans and write "Home" in the box. Change the font size to 18.1 and align with with the house icon. It will look something like this,
8. Go into the elements tab again and search "instagram search icon". Scroll until you find the one by sketchify and add it to the page.
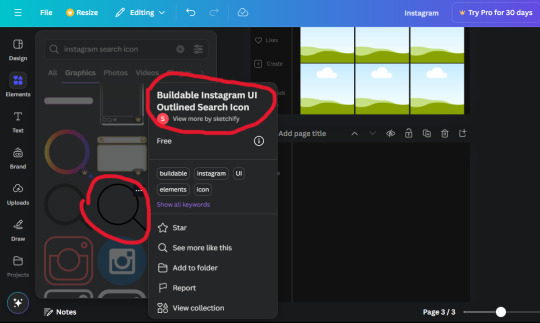
9. Shrink it so the W and H is at 36.6 and 31.3. Move it below the home icon until a purple "67" pop ups and aligns under it. Change it to the same color as the Home text and icon (#707070). Go ahead and Duplicate the the "Home" text box and clicking it and a pop-up will show up then edit the text so it says "Search" and align with the searcch icon we just added.
10. You know the drill. We are continuing to search up more icons in the "elements" tab. Search "instagram compass icon" and choose the one by sketchify (are u seeing the pattern?). Add it to the page and change the width and heigth to 33.1. align it under the search icon just like how we did before and change it to the say colors as the other icons.
11. Do the same as before and write "Explore" in a text box and align it with the icon. We're doing the same thing for all of these.
We'll be using the same search prompt for all of these icons so just change the type of icon you're looking for like we've done before hand. Next look for the Instagram reel icon and add the outlined one by sketchify and change the W and H to 31.2 x 30.9. Change the color to the ones we've used before, align it underneath the icons above and add your text ("Reels").
12. The next icon is an outlined, "sent" one. W and H is 31.1 x 27. The text will say "Send". Then an heart outline by sketchify; W and H is 34.2 x 29.1 and the text is "Likes". Next is the "create" outline icon by sketchify, W and H is 36.8.
(p.s if you are struggling to align the icons and text correctly, shoot me a message and I'll send you the X and Y positions ;D)
If you followed it through, it should look like this,
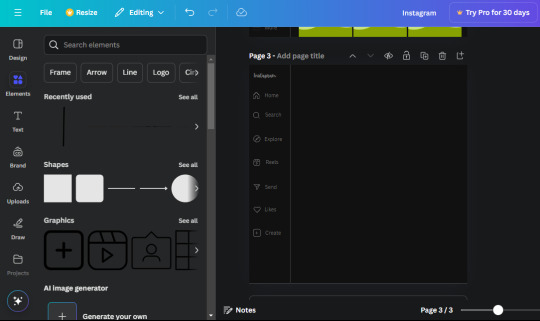
13. Now onto step 13, we'll be adding the Threads logo. You don't have to add this but to make it look more like the actual website, I will be adding it. Open the "text" tab and add a text box. Write an "@" symbol in the box and change the font to Nanum Sqaure and the size to 24.9. Add in the bottom corner below all the icons we just added to our page. We need another text box now (Color is still #707070), write "Threads" and align it to the "@" symbol.
14. We're adding another icon now. Search "Instagram menu icon" and find a wireframe menu icon by sketchify. the W and H are 42.5 x 24.6. Add a text box that says "More". It will look like this:
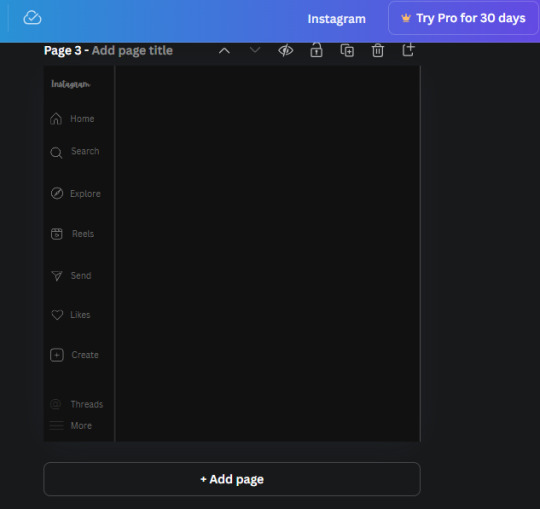
We are a quarter way done now :D
15. Search in the elements tab "circle frame" and look for the one with a little border around it.
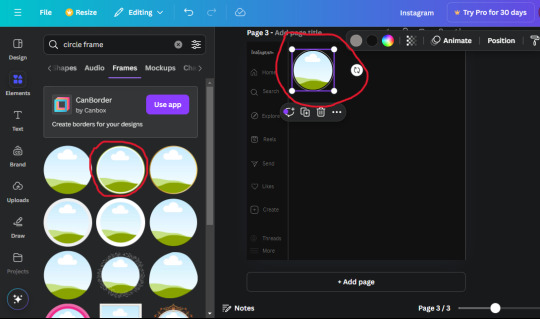
At first, the circle will be green and inside the circle will be white. Change the white to color of the background of the page (hex code #111111) then change the green to a grey color (#8D8986).
16. Add a new text box, change the font to Canva Sans and the size to 22.8 and the color is white. I just wrote "user.name" in the box. the W and H will be 153.3 x 35.7.
Enter the "elements" tab and search for a blue checkmark and find the icon by Victor Aguiar. The W and H is 28.1 by 28.
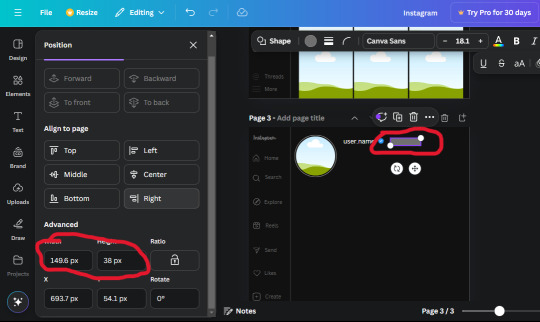
17. Search in the search box for a rectangular shape and add it to the page. Place it next to your username and checkmark icon and make the W and H to 149.6 x 38. Add another and place it next to the other rectangle shape. the W x H is 111.4 x 36.7.
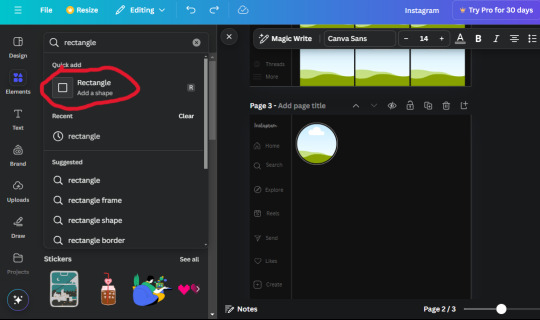
Change the color of both boxes to #2F2F2F. Add a text box and write "following" then change the W and H to 82.6 x 21.8 and fit it inside the first box. Add a second text box and write "message" in it then change the W and H to 77.8 x 21.8. Change both text colors to #7A7A7A

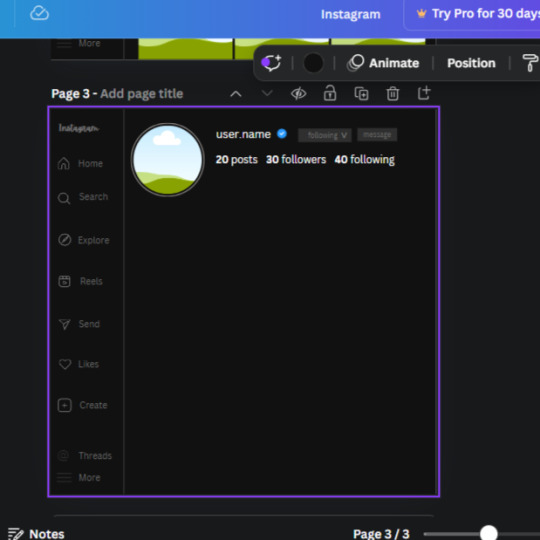
18. Add another text box. Write "<" and turn it upside down and place it beside the "following" text inside the rectangle. Adjust the size as you need to. I also like the round the corners to around 8 so its not so pointy and square.
19. Add 3 new text boxes. Write the amount of posts, the amount of accounts you're following and the amount of followers your have. Write "20 posts", "30 following" "40 followers". Bold the numbers and change the text W and H to 116.4 x 32.7. These are just place holders that I use.
20. Open the "elements" tab again and search "frame". Choose the first one.
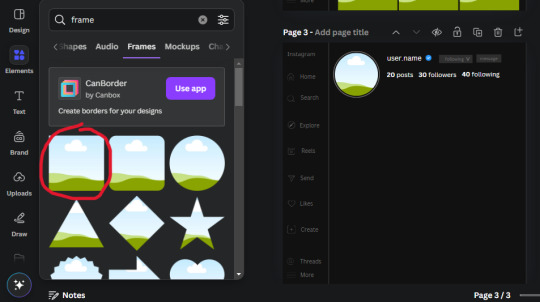
We want the height and width to be 268 x 252.4. Place it at the bottom of the page but we want some space between the frame and the page.
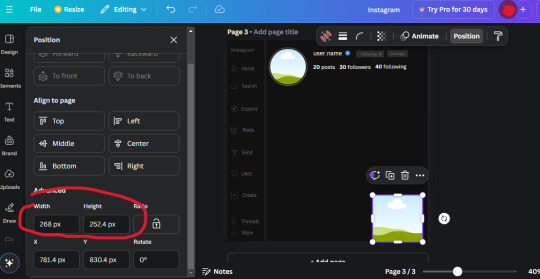
Now we'll duplicate the frame we just placed (the icon between the comment and trash can on the pop up above the frame). Place it next to the previous frame but we want to leave a bit of space between them like this:
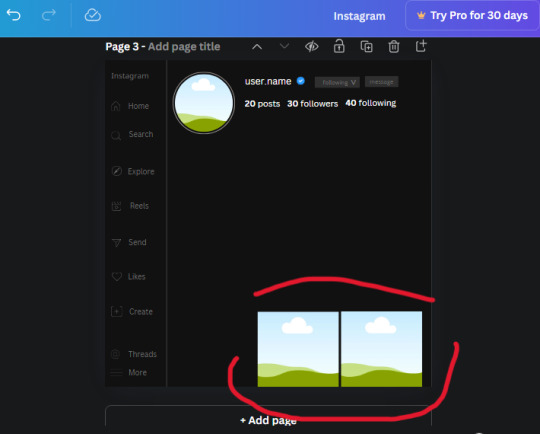
If its a little wonky, don't worry. You can always adjust it so it looks right.
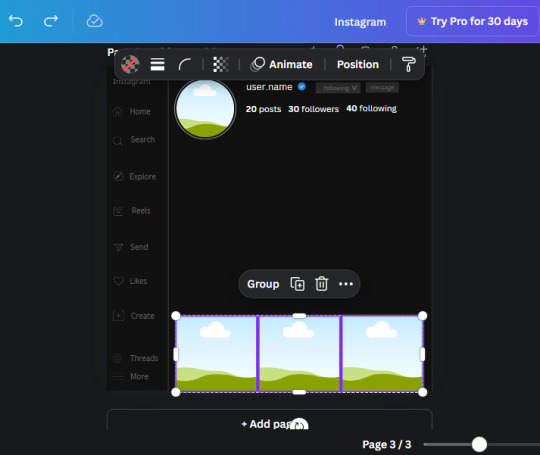
Duplicate the frame again and place it next the second frame you just placed, same distance between. Make sure they're even. Now we have a row.
Select all three frames and duplicate them. Move them above our original frames but leave a little space between them.
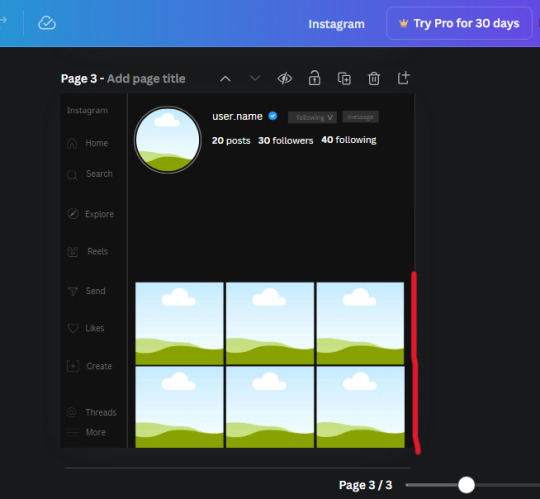
Again, if they're uneven, adjust them as you need to.
21. Select the line again from the elements tab. Stretch starting from the top frame to the last frame and make the color grey (#2F2F2F).
Because the line is stupid hard to navigate, use something like a text box to mark where you want it to end like this:


Delete the text box and the line with be where we want it.
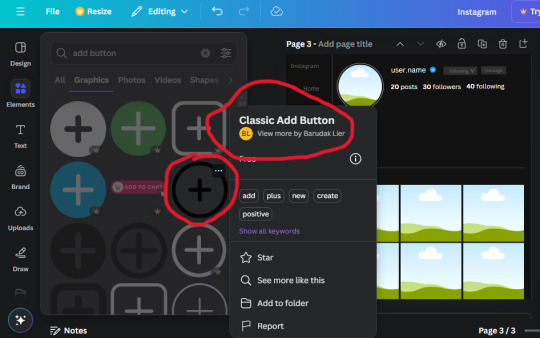
22. On to the highlight reels. Seach for "add button" and find the one by Barudak Lier.
Change the heigh and width to 81.1 and move it above the border.
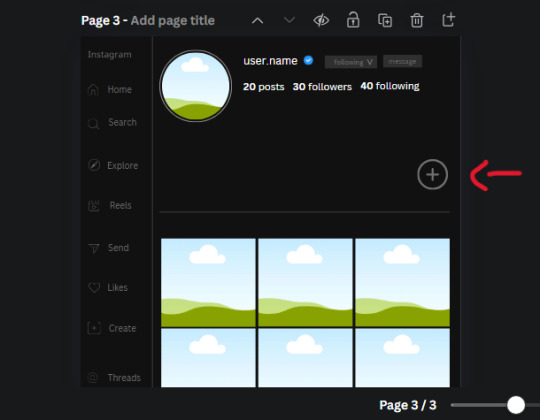
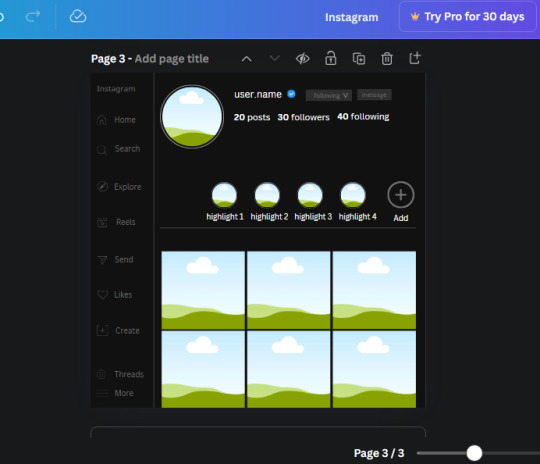
Search for circle frames now and add this one to the page (The same one we used for the pfp), change the width and height to 85.4 and move it next to the add button. Since this is a generic, blank template, I add about 4 of these highlight frames but you can do however many you want. You can change the border color to a gradient or leave it grey.
Add a text box now. The font will be Canva Sans, the size will be 18.1 and the color will be white. Change the text to "Add" and place it under our add button. Make more of these text boxes to place under the circle frames. Depending on which frame its under, write "Highlight 1", "Highlight 2", etc. etc. or you can give them different names and such.
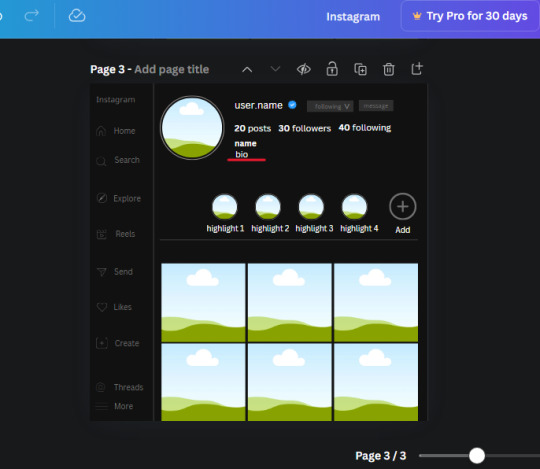
23. Add another text box, write "name" and bold it, change the size to 19.1 and the W and H to 69.2 x 28.8. The font will be Canva Sans and the color will be white. It will go under the amount of posts, followings and followers.
Add another box. The font is Canva Sans, font size to 20.1, the W and H is 40.8 x 31.3 and the color is white as well. This is our "bio". Place it under "name".
Yay!🎉🎉🎉 You're halfway done!
24. Search for a shape in the elements. Look for the rectangle again and add it. Change the width and height to 460 x 760.4 and the color to an off black/grey color (#191919), placing it like this:
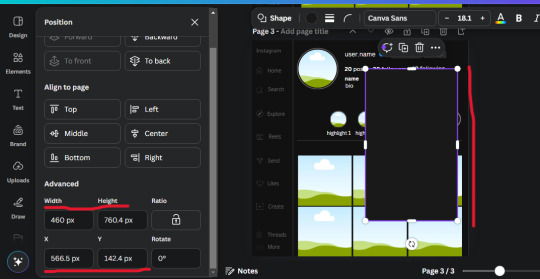
Get the same kind of square frame we used before to make the profile grid and make it the same size as the rectangle we just added. Place right up against the rectangle like it's its other half. Add another line like before and span across the upper half of the black rectangle as a border then add a circle frame inside the border.
Add a text box, "user.name" and align it with the frame. The text is white and the W and H is 111.5 x 25.9
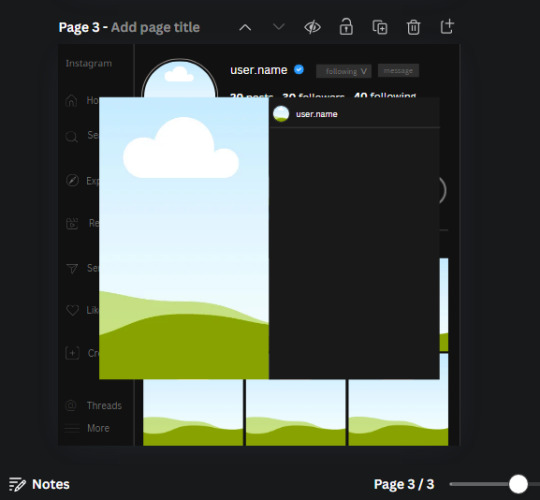
25. Add more circle frame along the inside of the rectangle to resemble the comment section. Make sure the W and H of the frames are 46.1.
Add more text boxes that align with the frames you just made and write "username" again and bold them. Add even more text boxes that align with the usernames and write "comment". These are place holders for when you decide to use this template.
Add another rectangle on the lower part of the rectangle and make the color black. and search for "instagram heart icon", "instagram comment icon" and "instagram send icon". Make sure the lines are thick. Find the heart icon by sketchify, and the the comment and send icon are by Mirazz Creations. Make the lines white and make sure the W and H are the following:
Heart icon: 38.7 x 32.9
Comment icon: 35.2 x 35. 8
Send icon: 35 x 32
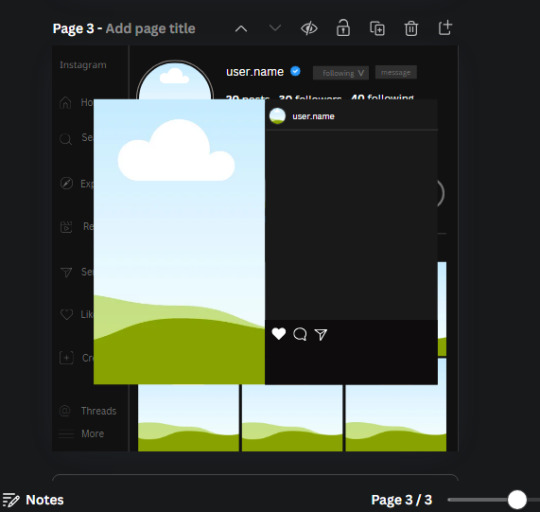
Next, look for "instagram bookmark icon" and find the one by Adricreative. Change the color to white and the W and H to 29.7 x 40.2. Move it to the other end of the rectangle.
26. Now add three circles frames and change the W and H to 37.2. Move them below the heart icon and have them overlap each other some. Then, add a text box and write "liked by username and 1000 others". Change the font size to 13.6 and change the font to Canva sans. the color will be white. Align this with the three overlapped frames.
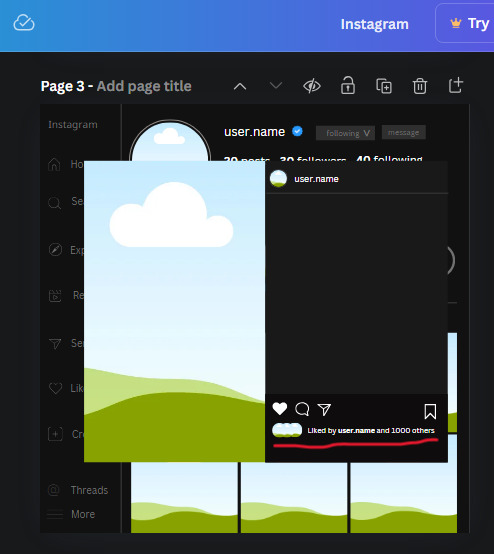
27. Look in the elements tab for an emoji icon and choose the one by Soni Soukell from Noun Project. The W and H will be 32.8 and the color is white.
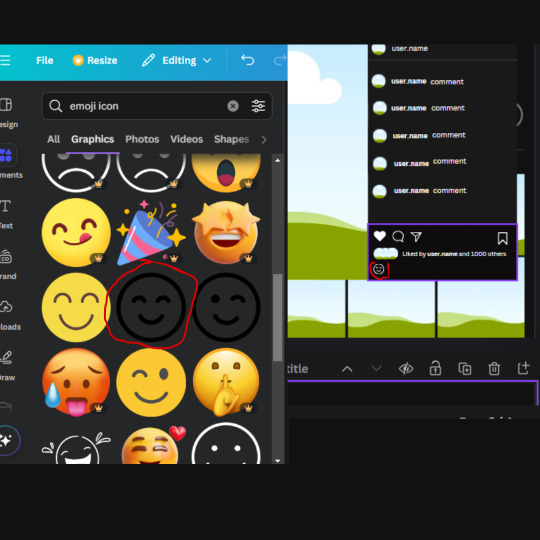
Now add a another text box and write "Write a comment". The color will be white, the font size will be 14.2 and align with the emoji icon you just placed.
Search for "next arrow button" by Pixeden and make the W and H 42.8 then add it to both sides of the post.
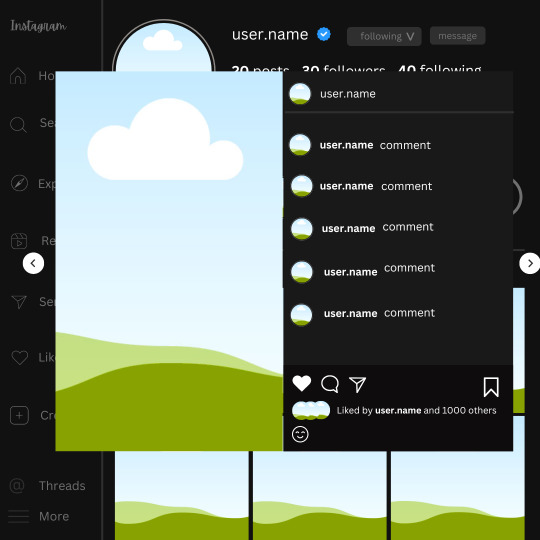
And you're all done with your template! All that is left to do is fill it but before doing that, duplicate the page so you always have an extra blank mockup if you want to use it again.
To fill the frames, upload an image (or use a Canva stock photo), drag and hover it over the frame and it will fill the frame.
Hope this was helpful and you you successfully made one :D <3
#requests#text#smau#template#mockup#moodboard#instagram#instagram moodboard#instagram mockup#graphic design#canva#psd#free tutorial#tutorial#instagram au#social media au#free psd#photoshop#resources#fanfiction resources#graphic design resources#graphic design tutorial#psd tutorial#photoshop tutorial#au#au ideas#mockups#digital design#digital design tutorial
90 notes
·
View notes
Text

— SUPER, psd template
ENG.RULES: Don't claim, repost, copy, get inspired or share on other platforms and packages; It is strictly prohibited to remove credits from the template; Changes to the template can only be made in the folders indicated in the psd file; Please contact us if you have problems downloading/using the material. (dl.link)
#coloursource#resources#free resources#Photoshop resources#resource pack#aesthetic#moodboard#icons#psds#psd#psd coloring#effect#filter#psd filter#psd effect#template#templates
222 notes
·
View notes
Text

by clicking here or on the source link, you will be redirected to a page where you can download over forty custom shapes for photoshop. they vary from hearts to scribbles.
this is a pay what you want item. please do not claim as your own, put behind paywalls, or use in paid content. reblog and like if downloading.
#psd template#psd#rp resources#resources#ps resources#photoshop#rp psd#psd download#free psd#templates#chs#ps shapes#custom shapes#theluzvre.
34 notes
·
View notes
Text

LETTERBOXD .PSD TEMPLATE
I tried to make this as easy to edit as possible, but you will need knowledge of Photoshop in order to navigate it, specifically how clipping masks work. Edit only the layers labeled with green and you'll be fine. It's not perfect but it's good enough. This was made for bestie Katherine. Enjoy.
[GOOGLE DRIVE]
#psd#free psd#editing resources#letterboxd template#letterboxd#photoshop template#photoshop resources
61 notes
·
View notes
Text
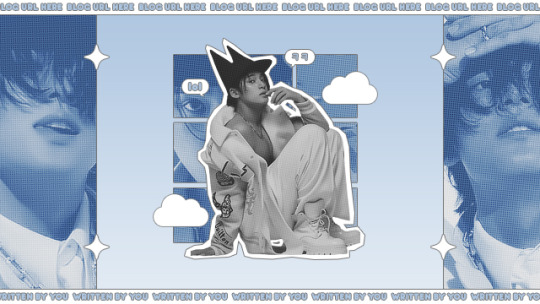
* ( ❀ ˆ꒳ˆ˵ ) ♡ Ꮺ 𝗧𝗜𝗡𝗬𝗧𝗢𝗪𝗡𝗦 — 𝖲𝖴𝖯𝖤𝖱 ੭

— introducing super , the latest psd template from tinytowns ! this template is supposed to be used for headers or pinned graphics + has been lightly inspired by comics + njz 's music video for hy.pe bo.y ❀ moderate photoshop knowledge is required to edit this template effectively , but it's really all just clipping masks + stroke layers : you are free to reach out at any point through ask for help ❀ download link is in the source code + under the read more along with some credits ❀ the font used is arista 2.0 alternate + has been linked below ❀ please like + reblog if you found this resource useful ❀ EDIT : updated 06/06/23 for no bars ver psd , prev + download under the cut ( ˘͈ ᵕ ˘͈ ♡) ~
❀ DOWNLOADS.
super template - here
super template ( no text bars ver. ) - here
arista 2.0 alternate - here
note: please be careful with the above link , i cannot remember where i actually got this font but i believe it was this source . if that's too much of a risk for you , i'd also recommend the font poppins which can be found here !
❀ EDIT.
coco from the future here letting you know that you must keep the top + bottom bars in order for your header to size correctly in the tumblr dashboard ! you can hide the text but don't remove the bars <3
UPDATE : bars issue solved with a resized version for people who want to use super as a header but without the bottom + top text bars. download this version here + look at the preview below !
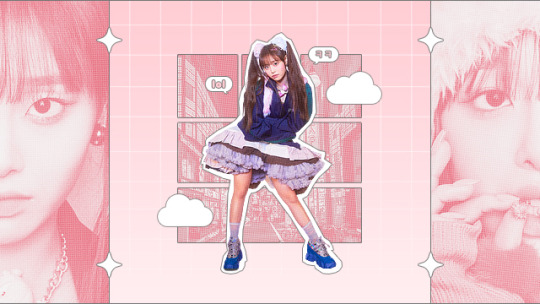
❀ CREDITS.
sparkle icon - Sparkle icons created by SeyfDesigner - Flaticon
cloud icon - Cloud icons created by Freepik - Flaticon
halftone pattern - sonicspeed123
#supportcontentcreators#photoshop#free rpc#free rph#rph#rpc#photoshop templates#muse template#photoshop template#header template#pinned template#ps template#template psd#template#resource#rph resource#rpc resource#free resource#free psd#rph template#rpc template#tinytowns#m: templates#m: resources#m: resource
410 notes
·
View notes
Text


holiday themed, rp avatar templates 🎄 (free resource)
This small pack includes 2 PHOTOSHOP TEMPLATES in a Christmas-ish theme. Their size is 400x640, which is the standard for rp forum avatars. You can also use them as promo templates for indie roleplay! The coloring used is CINNAMON STICK, which is included in the psd file.
These templates were made using images from the public domain and images that are free to use. For preview purposes, I've chosen images of Camille Yolaine and Nakajo Ayami, but they are not included in the pack and are replaced with free stock images in the files.
The fonts you might need to download before editing this pack are : Arial, Divine And Earthly Imperium, Parchment and Snell Roundhand. This is optional, the templates work with different fonts too, it's all up to you!
Do not repost, redistribute or claim as your own! Other than that, you do not have to credit me when using these templates. You may edit and customize them as much as you like. Consider liking this post or leaving a comment to support my work ♡
DOWNLOAD : DEVIANTART or PATREON
+ KO-FI, donations are optional! You can also subscribe to my Deviantart Tip Jar if you'd like. Please do not feel any pressure to sub or donate, I just hope you enjoy the resources I post ♡
#templates#photoshop template#photoshop templates#rp template#rp templates#promo templates#avatar template#avatars template#400x640#photoshop resources#free#free avatars#christmas
189 notes
·
View notes
Text
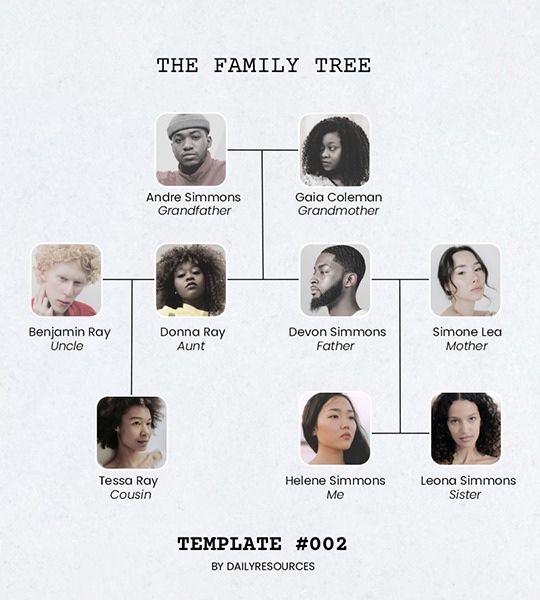
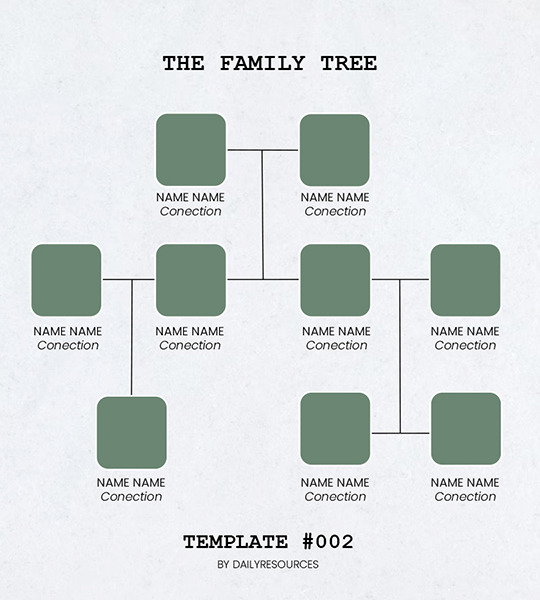
Template #002 by dailyresources
— Family Tree Template
Please do not repost / redistribute or claim as your own.
Please, like or reblog if you download.
You may edit as much as you like, it is fully customizable.
This is a free template, for personal and non-commercial use only.
Credit is very much appreciated but not necessary.
Any issues, don’t hesitate to contact me!
Size: 540x600px
Fonts: Poppins; Courier New.
Enjoy ❤
Download Link: [mediafire]
#templates#family tree template#templatepsds#template psd#free resources#photoshop template#photoshop resources#resouces#family tree#dearindies#evansyhelp#yeahps#my creations#my templates#*#*mine
846 notes
·
View notes
Text

#74 “ AS SEEN ON TV! ” template by jessource.
original and free template. if using please like / reblog and don’t forget to leave credit somewhere visible. fonts used: home video.
inspo: one, two.
extra: tv set colour is customisable, dimensions + textures included.
don’t redistribute, steal or claim as your own.
any issues, don’t hesitate to contact me.
[ DOWNLOAD FREE FROM PAYHIP ]
#rp template#rep resources#rp promo#rp graphics#template#free rp template#character template#aesthetic template#tv set#photoshop template#mytemplates.#template.#*
223 notes
·
View notes