#css sharing buttons
Explore tagged Tumblr posts
Visit Tumblr Blog
Explore Tumblr blogs with no restrictions, modern design and the best experience.
Last Seen Tumblr Blogs


Fun Fact
The total number of visits Tumblr.com received during January 2021 is 327 million.
Text
ao3 skins faq
Just a few answers to questions I've seen in the notes on this poll
What is a site skin? A site skin is CSS code that changes the way AO3 looks. This could be anything from changing the page colour to the font to the way tags look to hiding parts of the site - and more.
Where do I find site skins? There are a few places. The easiest one is in the site footer (that red band at the bottom of the page). There are four skins linked there under the word Customize, and you can click on them to see what they do. Another place to find skins is https://archiveofourown.org/skins?skin_type=Site Those skins were created years ago and loaded into AO3 for easy applicaiton. Just hit the Use button and they'll be applied to your account. Lastly, you can find skins created by other AO3 users. Some people post their code on AO3 itself, some use github or other code repositories. A lot of folks share their skins here on tumblr with images and then a link to the code itself.
How do I save them to my account? If you're using the ones in the footer or the ones linked on the Public Skins page, you don't need to save them. Those are built into AO3. If you want to create your own (or use one created by another user), that's when you save them to your account. Tap on your name at the top of the Ao3 page. Then select Dashboard, then select Skins. Tap the button labelled Create Site Skin and give your skin a unique name. Write or paste the CSS code into the big box, then hit the Submit button to save it. If you want to use it right away, hit the Use button on the next page.
What's the difference between a Work Skin and a Site Skin? A work skin changes the appearance of an individual AO3 work, and it changes it for everyone who looks at that work. This lets you turn your fic into something that looks like an email or a text chain or a newspaper, etc etc without having to use images. Work skins can also be turned off by other users, so if they just want to read the plain text of your work they still can. A site skin changes how the entire site looks - but only for you.
How do you have 100+ site skins?? I start a lot of skins that I abandon partway through. I also create skins for certain specific purposes - for example, changing the look of all of the buttons on the site - and then I can just grab that chunk of code and add it to any "full" site skins I create for the purposes of sharing. I have a lot of experiments that fail, but I keep the code around because maybe I'll learn how to fix it someday.
Can I create my own site skin if I don't know how to code? You can! AO3 has a site skin Wizard that will help you change the colours, fonts, and font sizes on the site. Go to your Dashboard > Skins > Create Site Skin and then tap on Use Wizard. Give your skin a unique title. Click on the ? bubbles to get examples of how to enter information into each box. If there's anything you don't want to change, you can just leave that box empty. When you add in colours, they must be hex colour codes, and they must include the # at the start. Any font you add need to exist on your device (so it might work on your computer but not on your phone because your phone doesn't have that font installed). You can add parent skins to Wizard skins, too. See below!
I wish I could have [X functionality] in [Y aesthetic skin] You can! If you create one site skin in order to block certain works or tags, you can add that skin on top of an aesthetic skin. To do so, edit your aesthetic skin, scroll down and tap on the Advanced button (lower left of the CSS box), tap on Parent Skin, type in the name of your blocking skin and Add Parent Skin. Then save your aesthetic skin, and the two are combined! You can also do this with those skins that are native to AO3. So for example, you want a Reversi (dark mode) skin that Shortens Long Tags and also hides the "you have muted some users" banner. Create a site skin with the muted users code:
p.muted.notice { display: none; } And add Reversi and Shortening Long Tag Fields to it as parents. (you can also copy/paste all of the code into a single site skin, if you'd prefer)
For more FAQs, you can check out the Skins & Archive Interface section on AO3's FAQ page. Or you can drop questions in the notes, too.
325 notes
·
View notes
Text
!!! my tag system is below all of this,,, I moved it under a cut because people reblog this post for the links :P
edit: thx for the love on this post. im going to try and continually update this!

⇩ ⠀sites FULL of web graphics ⇩
blinkie maker : make your own blinkies!
DOLLZ REVIVAL : a revival of pixel dolls where you can create and share your own. very cute!
GlowTxt : create glowing transparent text gifs that say whatever u want
HOARDER'S PILE : contains blinkies, buttons, stamps, and teddies
plasticdino.neocities.org : blinkies
Glitter Graphics : contains gifs, blinkies, dividers, and just sooo many web graphics
Cute Kawaii Resources : contains gifs, blinkies, stamps, favicons, dividers, buttons, fonts, literally everything you need. its an insane resource
Adrian's blinkie collection : collection of blinkies, stamps, and buttons
☆ (supplies.ju.mp) : blinkies, stamps, buttons, & favicons
twigbranch.carrd.co : blinkies
lallys.carrd.co : blinkies, stamps, dividers, and other resources
Bugleeblinkie.carrd.co : blinkies, and 3 very special gifs at the end ;)
unshinesblinkies.carrd.co : blinkies
The 88x31 GIF Collection : buttons. there are 5 parts! huge collection!
Bonnibel's Graphic Collection : blinkies
WELCOME TO GIFCITY : blinkies, dividers, favicons, stamps
cass-tastrophe.carrd.co : blinkies, stamps
kotatsuOS : blinkies
Cute web graphics : blinkies, stamps, dividers, and a LOT of other graphics, all very cute
⇩ some html tools! + tags below cut ⇩
MDN (mozilla.org) : if you're just starting out like me this is super helpful HTML Tutorial (w3schools.com): same here! (offers other programming languages as well!) Accessibility Checker(Free Scan) : a site you can use to check accessibility/ADA compliance when making your website! it will point out what needs to be changed. it is free, but they also offer paid services if you need more help imagecolorpicker.com : hex code picker. i use this one because you can upload an image, paste clipboard, OR type in the website and it'll grab a screenshot for you! something simple that was made really well. cssgradient.io : helps you make css gradients for backgrounds or whatever else you need them for smartgb.com : a free guestbook service FC2 Counter! : free "site visits" and "online now" counters. fully customizable Unclosed Tag Checker by Alicia Ramirez : does as it says, checks for unclosed tags (although I recommend using a program that does this as you write anyways. I use Visual Studio Code. Status Cafe : an updateable and embeddable status that you can stick anywhere on your site! it is mostly customizable with CSS but I have noticed a few small quirks with it
my tagging system :))
#graphics
#blinkies
#stamps
#buttons
#dividers
#html/css
#resources
#code
e10's web (neocities.org) <- shameless site plug. show it some love :P
#blinkies#stamps#favicons#gifs#old web graphics#old web aesthetic#old web stamps#old internet#old web#old webcore#2000s web#90s web#html#html css#html5#css#htmlcoding#web design#web resources#early web#early internet#neocities graphics#neocities#geocities#gifcities#web graphics#webcore
626 notes
·
View notes
Text
So I created an ao3 skin and I would like to share it for anyone who wants to use it 💞
Here’s the code >>>
•Wizard Settings
Can be overridden by custom CSS :
Background color:
#FCEBFC
Text color:
#AF7E98
Header color:
#B34A81
Accent color:
#EABEE4
•CSS:
:root {
--background-color: #f9e3f2;
--text-color: #4d494a;
--form-background: #fdeff5;
}
body {
font-family: sans-serif;
}
.wrapper {
background-color: white;
border: 2px solid #f3c2e3;
}
#header {
padding: 10px;
margin-bottom: 15px;
}
#header a {
text-decoration: none;
}
#header a:hover {
text-decoration: underline;
}
#header ul.navigation.actions.user.signed-in {
display: flex;
justify-content: flex-end;
padding: 10px;
}
#main {
padding: 20px;
}
.heading {
padding: 8px;
margin-bottom: 10px;
font-weight: bold;
}
input[type="text"],
input[type="date"],
textarea,
select {
border: 1px solid #f3c2e3;
padding: 8px;
margin: 5px 0;
}
input[type="radio"],
input[type="checkbox"] {
margin-right: 5px;
}
.button,
input[type="submit"],
button {
border: none;
padding: 10px 20px;
cursor: pointer;
border-radius: 4px;
margin-bottom: 5px;
}
.button:hover,
input[type="submit"]:hover,
button:hover {
background-color: #e687b0;
}
#new_work_form .actions .button {
border: none;
padding: 10px 20px;
margin: 5px 5px 5px 0;
cursor: pointer;
border-radius: 4px;
}
.actions .button.current {
border: none;
padding: 10px 20px;
margin: 5px 5px 5px 0;
cursor: pointer;
border-radius: 4px;
}
#work_search_form .submit .button {
border: none;
padding: 10px 20px;
margin: 5px 0;
cursor: pointer;
border-radius: 4px;
}
#work_search_form .submit .button:hover {
background-color: #e687b0;
}
I decided to write it down for easier access🌸
I’ll leave a Reddit link below ⬇️ that explains how to use the code if it’s your first time easily. Credit to @tired-library-ghost on Reddit for this amazing explanation ❤️

87 notes
·
View notes
Text
How I added "instant translation" to the non-english text on my fic: a very easy 3 step guide
Hello!
I recently posted a Wolfstar fanfic called Instance of Happenstance and received a lot of compliments on a small piece of code I used. Both @marigold-hills and @leavesthatarebrown suggested I share how I did it, so here I am, finally explaining it in a Tumblr post!
Before diving into the details, I want to clarify that I didn't write this code myself.
Initially, I tried following this tutorial, but I stumbled upon a better solution in the comments of that post. The code on the tutorial itself does work, but a) it's harder to use and b) it doesn't work as well if you're planing to have multiple paragraphs that you need to show the translation on the same fic.
The solution someone presented on the comments, however, is very simple and easy to use for as many paragraphs as you need, but the explanation there wasn’t too clear, so I decided to expand on it to make it easier for others to implement.
All credit to Ao3 users La_Temperaza (who wrote the orginal post) and Nikkie2571 (who posted this code on the comments).
What Does This Code Do?
This code adds an interactive feature to your fanfic, allowing readers to hover over a specific paragraph (or tap on it if they’re on mobile) to instantly change the text to something else — also set by you.
While this can be used for various purposes, I think it's particularly useful to display instant translations of non-English dialogue/text directly in the story. The code offers a much smoother alternative to the clunky “see end notes for translation” thing—which, let's be honest, can be a pain for readers, especially in long chapters.
For example, in instance of happenstance, Sirius discovers an old journal written entirely in French. I wanted to maintain the sense of mystery and intrigue that would be lost if I simply said the journal was in French, but wrote the text in English.
This solution let me keep the best of both worlds—retaining the authenticity and the immersion of the French, while still making the story easy to follow for the readers.
Now, I know this sounds complicated, but I assure you, it's not!
Down bellow is a quick, 3 steps tutorial on how to do it. I hope this is helpful! (:
(I'm doing this on the computer, if you're doing it on mobile, the layout of the website might be different from my printscreens)
Step 1 - Create The Work Skin
I'm gonna go right to the point here, but if you want to know about Work Skins in detail, I suggest this Ao3 Article.
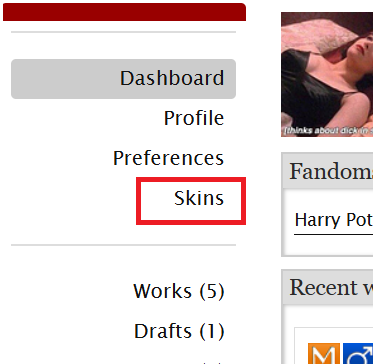
On your Ao3 Dashboard, click on the fourth link on the sidebar, which is "Skins".
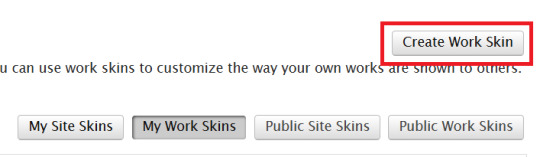
Then, on the page that opens up, click on "My Work Skins"

Then, on the top of the page, select "Create Work Skin"
Now, you'll see the form to create your skin, which looks like this:
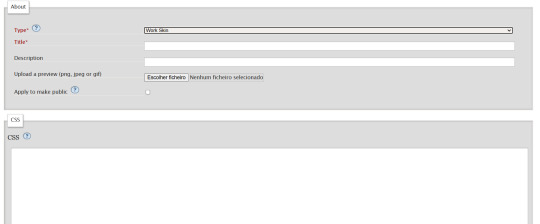
Leave the "Type" as "Work Skin". On the Title, you can give any name you want to your skin, but I suggest you choose the same title as your fic or something like "instant translation", so you'll know what it's about later.
You don't have to worry about any of the other fields, except for the CSS one, where you should copy and paste exactly what I'll put bellow:
#workskin .change_on_hover:not(:hover) .on, #workskin .change_on_hover:hover .off { display: none; }
So, now, you'll have something like this...
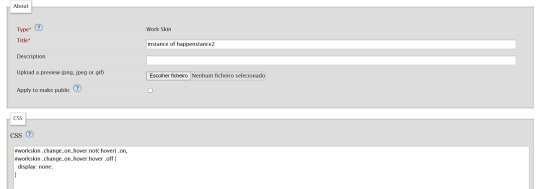
... and you just have to click "save" on the bottom of the page, and this step is done.
Step 2 - Apply the Skin you created to your fic
For a new work, click on "New Work" as usual. If it's a fic you're already posting, you can add this as well, just click the "Edit" button.
Now, on the form of your fic, on the "Associations" tab, right under the menu where you select the language of your fic, you'll see a "select a work skin" option.
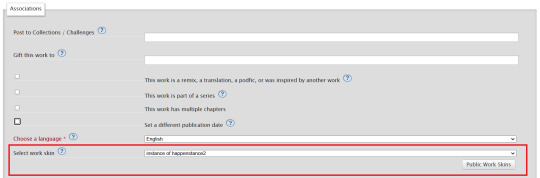
On this field, you should select the workskin you just created on the previous step, searching by the name you gave it on the "Title" field.
Step 3 - Insert the text
The code we're gonna use is this one:
<p class="change_on_hover"> <span class="off"> paragraph in foreing language </span> <span class="on"> paragraph in english </span> </p>
If you have no idea what this means, hold my hand, we're gonna get through it together!
First, copy your fic’s text into the AO3 text box as you normally would. Then, switch the text box to HTML mode so you can see the underlying code.

Now, scroll down until you find the paragraph you want to translate. After pasting, it will likely look something like this:

Note how each paragraph in HTML starts with <p> and ends with </p>. These tags indicate where a paragraph begins and ends.
Our goal is to modify that first <p> tag so it tells the browser, “Hey, this paragraph is different from those other ones. It should change when hovered over or clicked.”
To do this, we’ll change <p> to <p class="change_on_hover">. This marks the paragraph as special—one that should switch text when interacted with.

Now note how instead of having a single paragraph, we need two versions of the text:
In blue, the original (non-English) text, which will be shown by default.
In red, the translated (English) text, which will appear when the reader hovers over or clicks on it.
For the original text, wrap it inside a <span class="off"> tag, ending with </span> like this:
<span class="off"> insert here the whole text of the paragraph in the foreign language </span>
For the translated text, wrap it inside a <span class="on"> tag, also ending with </span>. This will replace the original text when hovered over or clicked:
<span class="off"> insert here the whole text of the paragraph in english </span>
And don't forget to end the whole thing again with </p>
Again, here's how it looks on my fic:

With the paragraphs that come before and after the translated text, just leave them as they are. They should still start with <p> and end with </p>. No changes needed!
You can use this method for as many paragraphs as you want, whether in the same chapter or across different chapters. As long as the Work Skin is active, the effect will work seamlessly throughout your fic.
#fanfiction#ao3#ao3 work skins#work skins#translation on text#ao3 fanfic#ao3 coding#tutorial#step by step#fanfic#wolfstar#marauders
82 notes
·
View notes
Text
Convert HTML to Image: A Step-by-Step Guide ✨

Do you want to turn some HTML code you've made that's on your website and have a way to convert it into an image for you to save?
Well, look no further! I too wanted to do the same thing but funny enough, there weren't any straightforward tutorials out there that could show you how! After hours of searching, I finally discovered the solution~!
This is an old tutorial I made 🐼

💛 Set your environment
Before we dive into the conversion process, I'll assume you already have your HTML code ready. What you want to learn is how to turn it into an image file. You should have a good grasp of HTML and JavaScript. For this tutorial, we'll use the following HTML code example:

We won't include the CSS code, as it doesn't affect this tutorial. The JavaScript file (script.js) at the bottom of the body element is where we'll add the functionality for the conversion.
Your page should resemble the following:

As you can see, the "Click me" button will handle the conversion. We aim to convert everything within the div.info-div into an image.
💛 Using the html2canvas JavaScript Library
The html2canvas library allows you to take screenshots of webpages and target specific elements on a screen. Here are the steps to include the library in your project:
The steps to put the library in your project:
Visit the html2canvas website for more information.
Copy the CDN link from here

and include it in a script tag in your project's head tag in the HTML file:

That's it for including the library on the HTML side. Now, let's move on to the JavaScript code.
💛 JavaScript Functionality
Here's the JavaScript code to handle the conversion:

In this code, I want to turn the whole div.info-div into an image, I put it into a variable in const div = document.querySelector(".info-div");.
I also put the button into a variable in const button = document.querySelector("button");
I added a click event listener to the button so when the user clicks the button, it will follow the code inside of the event listener!
You can find similar code like this in the documentation of the html2canvas library:

What is happening here is:
We add the div (or what the element we want to take an image of) into the html2canvas([element]).then((canvas)
Added the image file type url to a variable = const imageDataURL = canvas.toDataURL("image/png"); - You can replace the png to other image file types such as jpg, jpeg etc
Created an anchor/link tag, added the href attribute to imageDataURL
The download attribute is where we will give the default name to the image file, I added "dog.png"
Perform the click() function to the anchor tag so it starts to download the image we created
And that's it!
💛 The End
And that's it! You've successfully learned how to turn your HTML into an image. It's a great way to save and share your web content in a unique format.

If you have any questions or need further clarification, please comfortable to ask. Enjoy converting your HTML into images! 💖🐼
#my resources#coding#codeblr#programming#progblr#studying#studyblr#programmer#html#html css#javascript#neocities#coding tips#html5 tutorial#html tutorial
157 notes
·
View notes
Text
"Hotel Couches & Other Hail Marys" Fic Notes
These aren't the traditional format but I have enough Hidden Little Things I wanna do very loose an informal fics notes
The "Hotel Couch" was Catra's Hail Mary, but the shared bed was Catradora's, and Catradora's reunion was the fans' Hail Mary.
The way I do tweets was invented back in DITM and "perfected" in SaD, when I also invented how I do Instagram posts/stories/reels/DMs. I wasn’t reinventing shit for the changes Twitter has made, it’s ~historically accurate~ to when Dashcon happened. The one change I made was not using the block quote indent for all the digital posts I usually do, but that entire fic was digital, so I only ended up using it for indented reply chains on Twitter (which worked out better tbh) and on the Instagram chapter to distinguish the posts and the descriptions of the images/videos.
Fake tumblr posts/alternate reality dashboard simulators are already a popular format on Tumblr so there really was very little for me to do there. I made some tweaks by adding in the comment/share/like icons I use for Twitter, but overall that part was easy. The hardest part was getting the follow button blue. On Tumblr that's easy, colored text is a built-in option, but for AO3 I had to use a work skin to include some CSS for the color code. I ended up modifying the Reddit skin I had made using this tutorial because I was planning to capstone with a Reddit post anyway so I could just add on the blue on. Normally I don’t consider using colored text for many reasons (hard to read, might look great on my site skin and be invisible on others, etc), but in the case of the follow buttons they could just as easily not be there and contribute nothing but realism, so I wanted to have them in their standard blue.
Normally I don’t even consider using Tumblr when doing social media posts in a fic but considering this was inspired by Dashcon which was literally a Tumblr convention, I had to for this one. As such, the first chapter is mostly set-dressing for the disaster the convention is itself so when people complain in future chapters it makes sense. The rough outline was: Tumblr (convention background) Twitter (reconnect and beef background) Instagram (bond) DMs/texts (get together) Reddit (retrospective epilogue wrapping up the story)
Most of the usernames are just like. Random shit I could come up with. The ones on Tumblr are supposed to be random stuff on the site and the ones on Twitter lean more towards fandom-associated stuff for the She-ra fandom since it’s transitioning from the pool of All Con Attendees to the microcosm of their fans affected. Most of these can be found in previous fics such as DITM. That said, here are the name(s) with inspo behind them:
🍕nnlftbf: none pizza left beef. And no vowels. I have always desperately wanted to eat the none pizza
🦉pewpew4gloria: Star Siblings fan (reference to Starla’s bird)
🐍nagashed: this is a reference to both the plethora of (human animal hybrid)(bodypart) tumblr usernames (ex: dragongirlsnort) and a manga that my friend is reading.
🎃pumpkakitty: reference to a really cute hat in Pokemon Go 🥺 (okay it’s supposed to be a pikachu but it looks like a kitty tbh)
🌈edgeofgloria: another Star Siblings fan
He-Ro in the Freak Zone @frightzest: He-Ro is an actual MOTU character, frightzest is from DITM
Aside: the “looki loo” thing is a reference to Razz’s good ol pal Looki, hence the fandom in-joke
praying mantis wife @nineten02: nineten is a reference to my Stardew Valley chickens <3
Katastrophe @viviviolence: Vi’s shoulders you mean so much to me
Oh yeah Zeni is Zine just. Flipped. Also the original She-ra artist was one of the two sponsors who pulled out and the entire reason they were there. I mean what?
When Adora called Catra aggravating on camera she was doing it in a horny way but with Real Beef between them it didn’t come across that way. She also said they wouldn’t work together as a factual thing rather than spiteful. There was no way the studio OR Catra would let them.
When Catra said she’s “finally suing” she’s referring to the long-standing rumor that the previous showrunner “stepped back” because Catra was threatening to sue for the wage/credit theft, or the discrimination, or the abusive work environment, or the-
The dates Adora reached out to Catra via DMs were all significant ones for the real series — season 1 debut for when they were nominated, prompting the thank you story, season 2 debut for when they won the award (I didn’t look up and don’t care when the actual GLAADs are lol), and season 3 debut when ZeniCon is actually taking place. Almost three years have passed since Catra’s ousting from the show back between seasons 3 and 4, tho.
Given the NDA and general threat-level from the studio, Adora didn’t think she could mention Catra on her main page without getting a talking to even with Weaver officially departed, so she tried to do it on her story, but Catra did NOT want the heat that could bring.
The foam She-ra crown from the Instagram reel is the same one they gave out at cons in 2018 and 2019.
Adora calling it the “season 5” rather than “season 4” wrap part led to fan speculation that season 5 really was written by Catra except for the weakest parts — some stuff needing to be condensed, the insertion of a new storyline — which like. Well they are right. But she said season 5 rather 4 (which was wholly Catra’s) because it’s the part she’s most proud of even after they took it from her. It’s what she was building to the whole time.
Catra and Adora lasted like ten minutes lying next to each other in bed before they ended up kissing and when it started progressing they snuck into the bathroom. It was obvious Bow was asleep and they were just hoping Glimmer was too. Glimmer, too, wishes she was asleep.
Glimmer refers to Catra being “at her worst” because she got really aggressive and disparaging of her old cast out of bitterness after they wouldn’t back her up in the press (to keep their jobs). They all understand why, but it is still frustrating.
Melendy is from my fic lore, she’s a magicat character I use sometimes who is named after Catra’s VA in the 80s. She plays a recurring character on the show, though on the minor side.
I linked the Ohio con video because 1) that video is the ONLY time I’ve heard of it and I love the drama 2) to hammer home all the shit I say in this isn’t just from Dashcon, I am not here to libel people and 3) because I like my secret little links, BUT if you want to see a good video on Dashcon, watch this one and literally never watch Internet Historian he’s a POS: https://www.youtube.com/watch?v=ZAqy-KDJAUM
The behind the scenes shitshow for She-Ra itself was inspired by the TV show Lost (though Catra keeping her storylines secret was inspired by Real She-ra and ND Stevenson)
Like I said, I had been wanting to do a fic that was “just digital” for a while. The massive problem with that is getting across the shit people don’t post online because there is not a single trace of Catra and Adora potentially being a couple until after ZeniCon. Catra and Adora were basically wildly attracted to each other from the moment they met on the show but wouldn’t cross that barrier because they worked together (especially because of where they worked together). They ended up hooking up during some high-stress times for the show just to deal with how much they wanted each other. Catra felt really betrayed when the cast wouldn’t stick their necks out for her when she was ousted. Privately they were all on her side and told the studio so, but to publicly side with her was to lose their jobs, and the show was their entire life. They ultimately picked their passion & livelihood over showing public support they didn’t think would make a difference anyway and she cut all ties with them. They did what they felt they could, which was mostly never denying her version of events and deflecting questions when they had no other choice, but they all felt bad about it and tried to reach out to her privately. She didn’t want to hear it, but fans were right that the real beef was with the studio. She fell back into their arms eventually because she could see they were doing what they could while keeping their jobs, and she knew just how much being unemployed sucked. Adora was also telling the truth when she said they were fighting for her version of the story by staying on the show and no matter how much Catra calls it theft, that is what she wants for her characters. Being forced into the same room let them all remember what it was like to be friends, and that’s what led them to eventually giving their apologies.
I have no idea why, when presented with “lol dashcon au” my brain goes “rampant wage theft, behind the scenes abuse, disgrace and scandal, show extension hell a la supernatural, brrrrrrrrrr” but there we go
#ff 25#fic notes#hcaohm#I'll edit some things when I get home I have to run errands before things get rudely close to closing time
28 notes
·
View notes
Text
The Death Of A Website.
tl;dr click source to see an AU of my blog.
As many of you may not have heard, Cohost has gone read only. The website infamous for "Zero Discoverability" and its users "Not Being Funny." Servers will close down at the end of 2024, if not earlier, being backed up on the Internet Archive before that. Since their user counts were still low after 2 years (about half of all sign ups ever were from people evacuating twitter, which then didn't know how to use the site so most left almost immediately. Kind of hilarious) they didn't feel like anymore money bleeding OR the fact that a staff of only four people being on call 24/7 was worth it anymore.
However,
the people who DID use the site loved it. And they did some genuinely cool things on it, far cooler than anything I ever saw even in the glory days of Tumblr. You know, like Finn and Jake hi-fiving between 2 posts. Stuff like a playable maze, or a fully navigable 3d room you move around in with your mouse entirely within a post. They really did some cool stuff.
There were also a ton of really talented people, people like the composer Lena Raine(Celeste/Minecraft) who loved the site because you could just. Actually talk to people on it! Without an algorithm to boost their posts, the only people who saw it were genuinely looking for it.
Also some of them were just good posters, we did get Pikmin 18 billion and eleven from Cohost after all.
The point is, I think if anyone outside of Cohost actually knew what was being done on Cohost, it would of succeeded. There would of been enough active users for them to invest more. If I knew about all of this I would of been there way more!
But rather than just you blindly believing me, I decided to spend (almost) every hour I would of on Tumblr, on Cohost instead. Clicking that link, or the source, or the link on the source above in the tl;dr, will take you to my Cohost blog. At least while it's still read-only.
If you've ever wondered what people would post on a dying website,
If you ever wondered what some of the best posts people were making on Cohost that got shared again in its last dying moments were,
If you want some reference for what inside jokes would look like to an outsider,
If you're just bored and need something to scroll through,
if you ever wondered what I would of reblogged on that website if I remembered my password easily enough to log back in easily...
You should check it out. I reblogged a lot, but the first page or 2 (every 20 posts, I kept trying to stop but I got sentimental and reblogged more) is pretty much just people's last posts. I'd say give it 3 pages to see if you're interested or not in exploring more of what the website has to offer.
I reblogged all kinds of posts. Goodbyes, sarcastic hellos, mourning, long speeches about the spirit of Cohost set to sad music, nothing burgers, inside jokes I didn't understand, The New Garfield, posts I flat out didn't read past the title because they were too long and I just wanted to move on really there's a lot of posts to archive, CSS crimes, stuff I found funny, "Where to find me" and webrings and website posts for people I never knew, Love Honk, reviews for movies and games I never intend to play or watch, 88x31 buttons, music recommendations and history, entire games, signing up for RSS feeds, asks and answers related to other stuff I didn't share on accident, regular memes, Intern Secretary Eggbug, a post that's just an image hosted off-site so it'll update even after readonly, and so on.
(Nothing overtly NSFW. Tag search still works if you want that)
You could think of my blog as a small encapsulation of a small website. There's only 60 pages, including the ones from before the announcement from me just rarely using the site!
One that I, personally, am sad is gone. That I'm glad I got to see at least in its dying days. That I genuinely hope someone makes another attempt at creating.
#Cohost#The Death Of A Website#The Global Cohost Feed#The Cohost Global Feed#<- there was no algorithm or 'new' section so a lot of people just tagged everything with this to do that. Kind of funny tbh#I definitely did not mix it up and am just being thorough#yes btw the 4 people also handled all of the site moderation. This did in fact cause: problems sometimes#if it's not read only by the time this scheduled post goes up uhhhh. Go Hog Wild I Guess.#I would go through people's blogs and random tags whenever my following tab dried up#so post type can get kind of clumpy sometimes. Feel free to skip forward or back pages if that ever gets annoying.#If you genuinely want to buy Cohost go make them an offer it is absolutely for sale btw.
36 notes
·
View notes
Text

Advice; Where to Make Rules and About Pages
If you've read my advice post about the difference between about and rules pages and why they're both important, you may not be wondering the best way to make them. The good news is, there are plenty of options!
Tumblr
The simplest choice. In the past, people would make custom pages on their theme. However, since dash view has become popular (and you can't view custom pages via it, nor can you view them on mobile), most people simply post their about/rules page as a normal text post, and link to it in their pinned post. If you have a custom theme, make sure to link the pages in the navigation bar too!
Using a plain Tumblr post increases your page's readability, but reduces the amount of formatting you can do. If you make your pages elsewhere, you will be able to customise them a lot more.
Carrd
A free website maker. You can make a small site with a free account, and the prices are pretty reasonable if you need to make a bigger site. Carrd has a minimalist aesthetic, and it will also adjust what you make to fit a mobile browser (though this may break your formatting if you have designed something complicated).
Carrd is easy to use, but it is best used for simple designs. If you want to do something more complicated than a basic Carrd layout, you're going to spend a lot of time trying to make the formatting work. If you want multiple pages for your site, you're also going to spend a lot of time formatting as you can't clone pages, therefore have to recreate each one every time instead.
It uses markdown for formatting text. If you're familiar with it, this can speed up writing, but it may slow you down if you've never used it before.
One of the benefits of Carrd is that there are lots of free templates available within the rpc! Here are resources I found with a quick Google search, but there are plenty more out there if you look for them: [x] [x] [x]
Weebly
Another free website maker. You can make more for free here than you can on Carrd. Weebly sites should adapt to work on a mobile browser.
I've never seen anybody use Weebly for about/rules pages, but I do recommend it! It's very easy to use, and, unlike Carrd, you can copy and paste entire pages. This makes it ideal if you have lots of muses that you want to make individual about pages for.
It uses a more typical text editor than Carrd. Instead of markdown, it's more like Microsoft Word - where you highlight text and click buttons to add formatting. You also have HTML/CSS options.
Weebly does offer some free templates, but you're likely to want to edit them to suit your needs more. This is okay! It isn't difficult to do!
Google Docs
A popular, completely free option. As with Carrd, there are plenty of templates and resources within the rpc (here are three examples: [x] [x] [x]). These pages will be viewable on a mobile browser, but the theme may not translate well. Keep readability in mind if you use this option.
If you use this option, also make sure the link you share is viewer only and doesn't have editor permissions!
Other Options (WordPress, Self-Hosting, etc)
Don't feel you have to follow the crowd. If you like to use WordPress, use WordPress. You could also use Neocities, or any other website builder!
Personally, I already own a web domain because I have websites for other online activities, so I use about pages that I've coded from scratch and host them myself. For my rules page, I just use a Tumblr text post that's linked in my pinned post. In the past, I've used Carrd and Tumblr pages for about pages.
If you want to write your site using HTML, some free website hosters will allow you to do this (Neocities, for example). If you're interested in coding, I do recommend this! It allows you to have full customisability, and coding can be a really useful skill. However, one downside of this is it can make your pages hard to read on a mobile browser. It's up to you to decide how important this is.
If you're interested in learning HTML (as well as CSS, JavaScript, and other coding languages), this site is a great resource!
42 notes
·
View notes
Text
☽ ✦ Welcome ✦ ☾

Helloo. We're the Blackout System.
☉ You may call us Astra
☉ Collectively we use They/Them pronouns.
☉ Bodily 20
☉ Black, AuDHD
☉ Generally we identify with Alterhumanity, though some of us may not.
☉ We're fine with interacting with others, and accept DMs and Asks about things. However, if you are under 16-17, we will likely block you if you attempt to befriend us, interacting with anyone below that makes us very uncomfortable. Otherwise we don't care if you interact with our posts, and it's a 50/50 on if we block you from following.
BYF...
✦ We don't participate in syscourse. We're not here to get into arguments, and would rather just share our own experiences.
✦ We don't follow back/like posts. This blog is a sideblog to our main, which we'd like to keep mostly private. We'll occasionally reblog posts here, however.
✦ We liberally use our block button. Most of the time it's not because someone did something "problematic", and is generally just us not vibing with their energy or thinking someone is generally unpleasant. Though we do block people who are genuinely problematic, we're just not gonna say shit about it here lmao.
✦ We may use terms we've coined ourselves to describe our own system online.
✦ We will not share our headmates if they're not the one posting. Do not ask, you won't receive a headcount nor names. All names are replaced with an emoji and a letter, at most, if they feel like signing off.
✦ Do not ask for our Simply Plural/Octocon, or any other social medias.
✦ We are pre-diagnosis, if that is an issue for you. While we're not seeking to get it on our medical records, we are also in the beginning stages of working with a trauma specialist to hopefully get a second opinion. This also might not be possible for many years as we live in an incredibly conservative state with few mental health opportunities.
INTERESTS AND HOBBIES...
☄ HOBBIES ☄
Digital Art, Animation, Webdev [HTML/CSS/Javascript], Gamedev [Godot], Embroidery/Sewing, Music Transcription, Tarot
☄ GAMES ☄
Secret Histories [Cultist Simulator/Book Of Hours/The Lady Afterwards], Who's Lila, Warframe, FFXIV, Fields of Mistria, Risk of Rain 2, Splatoon 3, Hollow Knight, Rain World, VTM: Bloodhunt, Valheim, Terraria, Minecraft, Don't Starve Together, Dr. Robotnik's Ring Racers
☄ DIGITAL MEDIA ☄
Chainmail Chasers, Vita Carnis, Midwest Angelica, Interloper ARG, Emesis Blue
☄ MOVIES/SHOWS ☄
Arcane [Only seen 1st season], The Owl House, Spiderverse, Delicious In Dungeon, Frieren, The Apothecary Diaries
☄ BOOKS ☄
Blood Debts/Blood Justice, The Poisons We Drink
#astra.post#actually osdd#osdd system#actually did#osddid#did system#actually dissociative#did community#osdd community#sysblr#did osdd#dissociative system#osdd#sysconversation
26 notes
·
View notes
Text
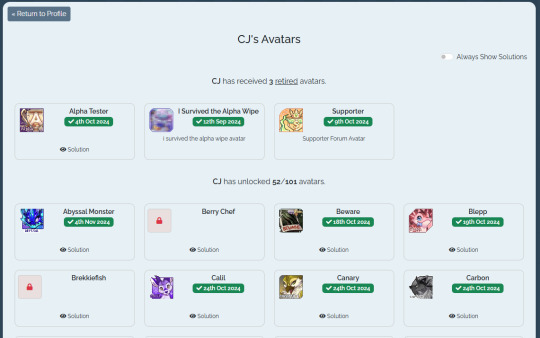
Quality Of Life Improvements Continue
Today's a big day for hidden avatar hunters across Santae. We have several updates to share that make it easier to track information about the avatars you've discovered -- and show off your favorite ones to others!
> Your Forum Avatar is now displayed above the HA on user profiles! Now you can show off your favorite avatar outside the forums, or select your forum avatar to perfectly match your HA. The number of avatars a user has unlocked is now also displayed on user profiles.
> For the coders among you, some inline styles on user profiles moved into CSS classes/identifiers to allow further profile CSS customization.
> Your user profile now links to a new Hidden Avatars page! This collection-style page has space to display all the hidden avatars on Santae. The art for avatars you haven't yet found is hidden, but you can see the titles -- along with the ability to reveal the solution for how to unlock it (if you wish!).
> Profiles have been improved on mobile. They should look ALOT better when viewing them on mobile - from the HA no longer spilling out of it's container, to the pet content being wrapped underneath to make it look better.
> Button added to profiles to view the avatars of the user you're looking at.
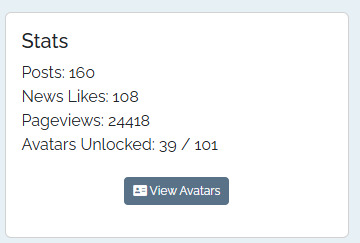
> Guess the Cup is now awarding the trophy upon winning all 10 levels. For the next week we have increased the odds of winning.
Thank you everyone for your valued feedback, without you, we would not be where we are today! <3
With Love & Gratitude,
~The Santae Team
8 notes
·
View notes
Text
i made this gay dumb bullshit (affectionate)
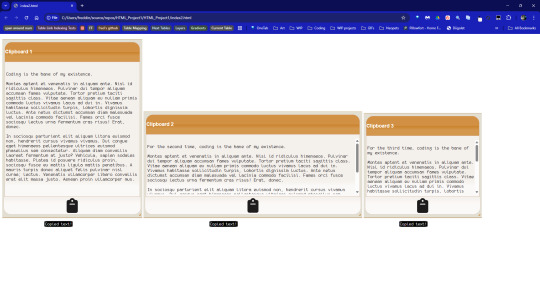
I couldn't immediately find some sort of node that allowed copying and pasting raw code with the click of a button, so I made one!
The icon is from fontawesome (so you can download a massive collection if u want) and can easily be replaced by another icon on the css page. The layout itself is fully customizable, but this one currently has classes added to the divs that automatically get themed with any jquery ui theme. It's resizable. All libraries you need don't need downloading, as google hosts jquery libraries and cdn hosts jquery ui themes. Pretty sure they also host fontawesome, but if they don't, you can get the links to the code on the fontawesome site.
What I'm most proud of is: You can have as many of them on the page as you want! The only limit is...well...ur computer? lol. What I mean by that is: copy and paste the divs that are a "blueprint", and the script will automatically add IDs/images necessary to keep everything all lined up. Every panel can be copied individually.
There's an indication as to whether copying was successful, as well.
Still have to do mobile testing, to see if the button works on devices, but after that, I'd be happy to share. It's not a plugin, per se (I still have yet to figure out how to make those), but I'm thinking abt making it into a regular ol Javascript function that you can still just plug in values.
Gonna take my afternoon nap firsttttt
#jQuery#javascript#im no professional#by any stretch#i just wanted to make one for personal use#and I like sharing shit
3 notes
·
View notes
Text
peachy keen ao3 site skin
If you'd like to add this site skin to your AO3 account, the code is under the cut.
Colours Used: pale peach: #ffeae4 darker peach: #f3c6ba yellow: #ffd7a8 orange: #ff9b75 reddish orange: #f44336 darkest orange: #8E0505
CSS:
#outer { background: linear-gradient(90deg, rgba(255,155,117,.9) 0%, rgba(255,215,168,1) 100%); }
#header .primary { background: #ff9b75; background-repeat: repeat; box-shadow: none; }
#search .button, #header .logo { display: none; }
#header .heading a, #greeting img.icon { visibility: hidden; }
#header #search .text { background: #ffeae4; border: none; box-shadow: none; width: 7em; }
#header h1.heading a::before { content: " 🍑🍑🍑"; visibility: visible; }
.splash .module h3 { border-bottom: none; color: #f44336; }
#header .menu, #small_login { background: #ffeae4; box-shadow: none; width: 20em; }
#greeting .user > li a { color: #8E0505; }
#header .menu li, .splash .news li { border-bottom: none; }
#header .actions a:hover, #header .dropdown:hover a.dropdown-toggle, #header .menu li a { background: none; color: #f44336 !important; }
#footer { background: #ff9b75; }
#main { color: #8E0505; }
#main a { color: #f44336; }
.splash .favorite li:nth-of-type(2n+1) a { background: #ffeae4; border: 1px solid #ffeae4; border-radius: 5px; }
.splash .favorite li:nth-of-type(2n+1) a:hover, .splash .favorite li:nth-of-type(2n+2) a:hover { background: #f44336; border: 1px solid #f44336; border-radius: 5px; color: #fff !important; }
.resp-sharing-button--twitter, a.resp-sharing-button__link { color: #fff !important; }
.listbox, fieldset, fieldset dl dl, fieldset fieldset fieldset, fieldset fieldset dl dl, dd.hideme, form blockquote.userstuff, .dynamic form { background: url("https://image.freepik.com/free-vector/vector-seamless-pattern-with-peaches_1015-1760.jpg"); background-repeat: repeat; border: 4px solid #fff; box-shadow: none; }
form dl { background: #ffeae4; border: 2px solid #fff; box-shadow: none; }
input, textarea { border: 1px solid #f44336; box-shadow: none; }
input:focus, select:focus, textarea:focus { background: #ffeae4; }
form dt { border-bottom: 1px solid #fff; }
form dd.required { color: #8E0505; }
.LV_invalid { background: #ffd7a8; border: 1px solid #fff; color: #f44336; box-shadow: none; }
.LV_invalid_field, input.LV_invalid_field:hover, input.LV_invalid_field:active, textarea.LV_invalid_field:hover, textarea.LV_invalid_field:active { border: 1px solid #8E0505; }
.autocomplete div.dropdown ul { background: #fff; border: 1px solid #f44336; color: #f44336; box-shadow: none; }
.autocomplete .dropdown ul li:hover, .autocomplete .dropdown li.selected { background: #f44336; color: #fff; }
.required .autocomplete, .autocomplete .notice { color: #f44336; }
.ui-sortable li { background: #ffd7a8; border: 2px solid #fff; box-shadow: none; }
.ui-sortable li:hover { background: #ff9b75; border: 2px solid #fff; box-shadow: none; }
.ui-draggable form { box-shadow: none; }
.notice, .comment_notice, .kudos_notice, ul.notes, .caution, .error, .comment_error, .kudos_error, .alert.flash, muted.notice, form.verbose legend, .verbose form legend, span.question, span.symbol, select { background: #ffeae4; color: #f44336; border: 2px solid #f44336; box-shadow: none !important; }
#modal { background: #ffeae4; border: 4px solid #ff9b75; box-shadow: none; }
#modal .content { border-bottom: none; }
.actions a:visited, .action:visited, .action a:link, .action a:visited { color: #f3c6ba; }
.actions a:hover, .actions input:hover, .actions a:focus, .actions input:focus, label.action:hover, .action:hover, .action:focus { color: #f44336; border-top: none; border-left: none; box-shadow: none; background: #f3c6ba; }
.actions a:active, .current, a.current, a:link.current, .current a:visited { color: #fff; background: #ff9b75; border-color: #fff; box-shadow: none; }
.actions label.disabled { background: #ff9b75; }
.actions .disabled select { color: #fff; border-color: #fff; }
.delete a, span.delete { color: #f44336; box-shadow: none; }
.secondary { background: #fff; border: 2px solid #f44336; box-shadow: none; }
.own, .draft, .draft .wrapper, .unread, .child, .unwrangled, .unreviewed { background: #ffeae4 !important; }
.draft { border: 2px dashed #ff9b75; }
span.unread, .replied, span.claimed, .actions span.defaulted { background: #f3c6ba; color: #f44336; border: 1px solid #fff; border-bottom: none; }
.actions span.defaulted { color: #8E0505; }
.draggable, .droppable, span.requested, .nominations .rejected { color: #8E0505; }
.nominations .approved { background: #ffeae4; }
.nominations .rejected { background: #f3c6ba; }
span.offered.requested { color: #ffeae4; }
.wrapper { box-shadow: none; }
dl.index dd { background: #f3c6ba; }
p.kudos { background: url("https://64.media.tumblr.com/14dd2ee05dbcc111dab41d6206985fe8/b1eb33fb168e0088-4b/s1280x1920/8fabca965895c42bae4d746506ffc96324eb2fd5.png"); background-repeat: no-repeat; }
.statistics .index li:nth-of-type(even) { background: #f3c6ba; }
fieldset fieldset.listbox { background: #ffeae4; border: 2px solid #ff9b75; box-shadow: none; }
.listbox>.heading, .listbox .heading a:visited { color: #f44336; }
.listbox .index { background: #ffeae4; box-shadow: none; }
dl.meta { border: 2px solid #f44336; background: #ffeae4; }
.actions a, .actions a, .action, input[type="submit"], button, .actions label, .actions a, .actions a:link, .action, .action:link, .actions input, input[type=submit], button, .actions label { background: #ffeae4; border: 1px solid #f44336; text-shadow: none; color: #f44336; }
.current, #dashboard .current { background: #f44336; border: 1px solid #fff; text-shadow: none; color: #fff; }
#dashboard.own { border-top: none; border-bottom: none; }
#dashboard a { color: #f44336 !important; }
#dashboard a:hover { background: #ff9b75; }
label { color: #f44336; }
li.blurb, fieldset ul { background: #ffeae4 !important; border: 2px solid #fff; }
#header h2.collections, .reading h4.viewed, dl.index { background: #ffeae4; color: #f44336; }
.comment h4.byline { background: #f3c6ba; border-bottom: 2px solid #fff; }
.comment div.icon { border-bottom: 5px solid #ff9b75; }
li.comment { border: 2px solid #fff; background: #f3c6ba; }
li.comment ul.actions { background: transparent !important; border: none !important; }
#stat_chart g[clip-path^=url] > g:nth-of-type(2) rect, #stat_chart svg g:nth-of-type(2) > g rect:last-of-type, #stat_chart g[clip-path^=url] > g:nth-of-type(2) rect:first-of-type { opacity: 50% !important; }
h5.fandoms.heading a, .fandom .tag, .work .fandom a.tag { font-variant: small-caps; }
.warnings .tag, .work .warning a.tag { background: #8E0505; border: 1px solid #8E0505; border-radius: 5px; color: #fff !important; padding-left: .5em; padding-right: .5em; }
.relationships .tag, .work .relationships a.tag { background: #f44336; border: 1px solid #f44336; border-radius: 5px; color: #fff !important; font-weight: bold; padding-left: .5em; padding-right: .5em; }
.characters .tag, .work .characters a.tag { background: #ff9b75; border: 1px solid #ff9b75; border-radius: 5px; color: #fff !important; font-weight: bold; padding-left: .5em; padding-right: .5em; }
.freeforms .tag, .work .freeforms a.tag { color: #f44336 !important; }
.commas li:after { content: none; }
ul.tags { line-height: 190%; }
1K notes
·
View notes
Text

Hey guys! 👩🏻💻 I’m excited to announce that I’m officially starting the 100 Days CSS Challenge! Over the next few months, I’ll tackle a new CSS challenge each day to finally check it off my to-do list (it’s been there for a while, but I never had the chance to dive in, even though it’s something I find fun and easy). And of course, I’ll be sharing every step of the journey with you!
What is the 100 Days CSS Challenge?
The 100 Days CSS Challenge offers a fresh CSS task daily, ranging from creating simple buttons to designing complex animations.
What to Expect: For each challenge, I’ll be posting a detailed blog entry where I’ll:
Walk you through the steps I took to complete the task.
Highlight the key CSS features and concepts you can pick up along the way.
Stay Tuned: Whether you're learning CSS alongside me or just curious about front-end development, I hope these posts spark your interest! Let’s make these 100 days count. 💻✨
Catch me every day at 8 p.m. CEST (GMT+2)!
#100dayscssChallenge#codeblr#code#css#html#javascript#java development company#python#studyblr#progblr#programming#comp sci#web design#web developers#web development#website design#webdev#website#tech#html css#learn to code
7 notes
·
View notes
Text
Sorry y’all my mom’s healths been bad this year!! Here’s that ao3 skin
I’ve never shared one before so please comment how it works! I can make you ones too- with special requests
CSS
#outer {
background-image: url("https://i.ibb.co/QDXwWNL/Butterfly-BG.png");
}
img.logo {
padding: 10px 70px 0px 0px;
background: url(https://i.pinimg.com/736x/8f/d0/8c/8fd08c806ed588386da54da72d7b6776.jpg);
background-size: 70px;
background-repeat: no-repeat;
width: 0px;
height: 0px;
}
#header,
#dashboard,
#main,
#footer .module {
background: #f4effc;
margin: 0.5em 2.5em;
padding: 1em;
}
#inner .region {
padding: 1.5em;
}
#header,
#dashboard,
#main,
#inner .group,
#footer .module,
fieldset,
.flash {
border: 4px solid #d9bfd9;
outline: 0;
border-radius: 2em;
box-shadow: 0 -10px 0 #b680c2, 0 10px #b680c2,-6px 0 0 #751b87,6px 0 0 #751b87, inset 0 0 5px;
margin-bottom: 2em;
}
.blurb .module,
#inner .group .group .group,
fieldset fieldset {
border: 0;
box-shadow: none;
}
.group .header,
.blurb ul.tags,
.blurb blockquote,
#outer .current {
background: #ddd;
border: 3px solid #fff;
border-radius: 1.5em;
padding: 0.5em;
}
.group .header {
width: 96%;
}
#footer {
background: none;
border: none;
}
#header h1 {
top: 0.5em;
left: 0.5em;
}
#header #greeting {
right: 2em;
}
#header h1 img {
opacity: 0.75;
}
#header li.search {
float: none;
display: block;
margin-top: 0.643em;
}
#header li.search input {
border: none;
}
#header ul.primary a,
#header ul.primary .menu a,
#header .dropdown .menu a:hover,
#header .dropdown .menu a:focus {
background: #ddd;
}
#dashboard {
width: 20%;
}
#main.dashboard {
margin: auto 1.5em;
position: relative;
clear: none;
float: right;
width: 60%;
}
#outer #footer .heading,
#outer #footer .actions a,
#header ul.primary a {
color: #751b87;
}
.blurb ul.required-tags li span,
.bookmark .status span,
.actions a,
.actions a:visited,
.action,
.actions input,
input[type="submit"],
button,
.current,
.actions label,
legend,
textarea,
input,
#header ul.primary a,
.icon {
border: 1px solid #ddd;
border-radius: 1.5em;
box-shadow: 0 0 2px #555;
}
.icon {
border-radius: 5em;
}
#main .index,
#header ul.primary,
#header ul.primary .menu {
box-shadow: none;
border: none;
background: transparent;
}
#header .primary .menu li {
border-bottom: none;
}
And then here’s a little more info to get it perfect
Text color:#751b87 Header color:#751b87 Accent color:#eecbf5
2 notes
·
View notes
Note
hey my bro (mutual) how did you . learn html . like is there a specific guide that helped the most or was it just whatever you could find
HAII OKAY SO these are all my useful site links but sadgrl.online & eggramen.neocities.org will be your best friend!!! Eggramen has a shit ton of templates to choose from & sadgrl.online has a bunch of really useful tutorials!
^ SUPER USEFUL FOR CSS!!! This makes a lot of your css code automatic.
Live coding of html css, i always use this thang...
Also just googling "how to ____ html css" is VERY useful lol. So eggramen and sadgrl to start... LET ME KNOW IF YOU HAVE SPECIFIC QUESTIONS!!! i can also share some of my code if you'd like!!!
12 notes
·
View notes
Text
stealing this list of early web & 90s inspired sites & adding a few of my own here:
🖥️ http://ita.toys
🖥️ http://syntaxmag.online
🖥️ http://dirt.fyi
🖥️ http://biter.ph
https://mutterbutter.neocities.org/main/
https://y2kstardust.neocities.org/home
https://sweetcharm.net
https://virtual-milk-2000.neocities.org
The original links (💻) feel, imo, less inspired by actual web 1-2 and more inspired by the print pubs of the same era. BUT it is impressive and deserves to be explored and shouted out.
a beautiful website in the late 90s would have likely been forced to about 600-700px wide reading area to ensure compatibility not w mobile, w small desk/laptop screens, bc we didn't have responsive sizing yet. layouts were often achieved with painstaking image slicing positioned with tables. exotic fonts were more rarely used bc css didn't support font sharing and it ate bandwidth. midi soundtracks fell in and out of favor & were scene dependent.
css animation wasn't a thing, and javascript was if you know you know. So gifs and sometimes flash were more common (flash being more 2.0 imo). Raw, boxy, grey element styling often poked through on forms and buttons etc. tho it was popular to color/style scrollbars for a bit
The 4 I picked hew closer to memory. They are all very high effort and maximalist examples tho. A new wave of the older form.
It's good I love this!!
7 notes
·
View notes