#crafting guide
Explore tagged Tumblr posts
Text

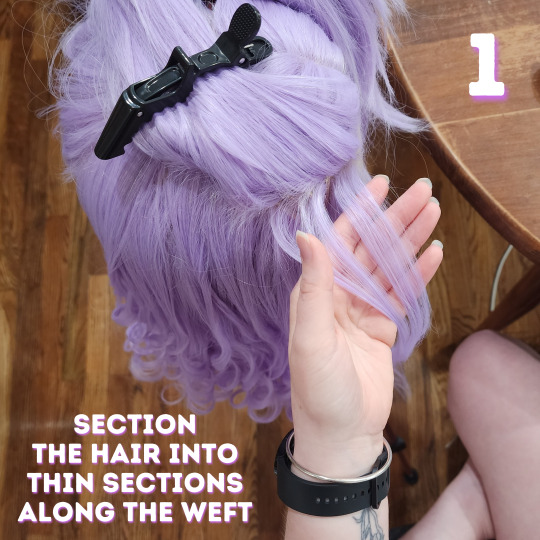


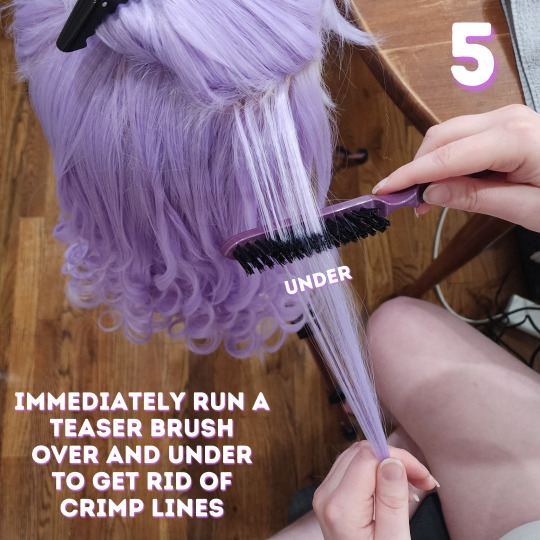


Here is our complete guide to curling a heat safe wig!
We specifically figured out this method worked best when styling this wig for my level 3 Imogen Temult cosplay. She's from campaign 3 of Critical Role. There are many other methods to curl wigs, but this is the one that got the best hold and our desired look on this particular wig! Of course, then I decided to cosplay Imogen at level 13 first and her hair is totally different so this wig is going in storage but at least we got to make a useful tutorial first.
We already have a video version of this tutorial up on our Tiktok and Youtube that we will move over to Tumblr, but honestly I struggle The Most with learning from video tutorials. I prefer things written out so we wanted to make this sort of tutorial as well for accessibility!
Additional tips & all of the products we use are under the cut. Feel free to shoot us a message if you have any questions or want more tutorials on wigs!
What We Use:
Wig: Pastel Purple Wavy Lace Front Synthetic Wig LF5110 from Wig Is Fashion. It technically comes with a curl but we straightened and recurled it differently. Whatever wig you get, just make sure you check that it's heat safe before attempting this!
Silicone Spray: Mane 'n Tail Detangler. Yes, this is technically for horses, but listen, it works SO WELL on synthetic wigs. It keeps it from getting all static-y and tangled. We've only ever used this brand but it works really well so we're def sticking with it.
Setting Spray: Schwarzkopf Got2b Glued Blasting Freeze Spray. This makes sure the curls you spent hours making actually hold!
Crimper: SixRiver Ceramic Waver Hair Tool with 4-in-1 Flat Crimping Iron Plates. This comes with four ceramic crimping plates and Nic uses the one with the "most wiggles" on the lowest setting (320). You can probably use any crimper that goes low enough. Crimp it fast, you aren't holding it like with curls.
Curling Iron: Conair 1 Inch Curling Iron. We use this on "19", whatever that means because it doesn't actually have temperatures. Any curling iron with low enough heat settings will do, you might need to play with settings to make sure you don't melt the hair. Test it on the bottom of the lowest layer of hair where you could cut it off if you melt it. As with curls on human hair, different barrel widths will give you wildly different curl looks.
Teaser Brush & Large Tooth Comb: Honestly these probably came with one of our first hair cutting or wig styling kits so ¯\_(ツ)_/¯ Apparently the teaser brush is Revlon branded.
We aren't sponsored by anyone, this is just what we use! Feel free to substitute in anything that you have / know works well with wigs. We hope this helps! Please let us know what other cosplay or crafting tutorials you'd like to see <3
#wigs#wig styling#cosplay#cosplay wigs#critical role#imogen temult#imogen temult cosplay#bells hells#cr3#imogen temult cosplay level 3#nic crafts#work in progress#crafting#craftblr#cosplay wip#buy list#crafting guide#tutorial#how to#cosplay guide#cosplayer#wig#polycraftory
75 notes
·
View notes
Text
🌸✨ Infinity Nikki fans! Are you ready to tackle the Kindled Inspiration: New Bloom's Outfit quest? Step into the enchanting New Bloom Festival! 🌈
Here's your quick guide:
1. Complete the "Sailing Through Lens" World Quest.
2. Find Yayin on the White Jade ship at Florawish.
3. Equip a paper crane accessory (Paired Flight Earrings or Star of Wishes Necklace).
4. Show it to Yayin and unlock rewards! 🎁
Rewards include:
- Shiny Bubbles x120
- Diamonds x30
- Bling x30,000
- Crafting your Cloudborne Cranes Sketch
⚠️ This quest wraps up February 25, 2025! Join in for exclusive rewards! 🎉
#Infinity Nikki#New Bloom Festival#Kindled Inspiration#Yayin Quest#Gaming Guide#Fashion Game#Quest Walkthrough#Mobile Gaming#In-Game Rewards#Paper Crane Accessory#Florawish#Game Tips#Shiny Bubbles#Diamond Rewards#Bling#Crafting Guide#Event Quest#Gamer Community#Gacha Game#Collectibles#Character Customization#Game Events#Limited Time Quest#Nikki Game#Fantasy Fashion#Virtual World#Quest Completion#Game Strategy#Accessory Crafting#New Bloom Outfit
2 notes
·
View notes
Text
youtube
The video that no cosplayer asked for, but most cosplayers need — let's talk about cosplay crafting safety!!
#Cosplay safety#cosplay crafting#crafting safety#cosplay crafting safety#cosplay#cosplay guide#guide#costume#costumes#crafting#crafting guide#cosplay tips#cosplay tricks#cosplay tips and tricks#tips and tricks#costuming#cosplay design#costume design#practical cosplay#sewing#cosplay sewing#cosplay props#prop making#cosplay armor#armor making#cosplay help#telekineticmaniac#Youtube
8 notes
·
View notes
Text
Villains vs. Antagonists (Guide For Writers)
Hey there, fellow writers and wonderful members of the writeblr community! 📚✍️ It's Rin here and...
Today, we're diving into a topic that's close to many writers' hearts: villains and antagonists. These characters often steal the show, driving our plots forward and giving our heroes something to push against. But here's the thing – while these terms are often used interchangeably, they're not quite the same. So, let's unpack this, shall we?
First things first, let's break down the difference between a villain and an antagonist. It's a distinction that can really elevate your storytelling game!
An antagonist is simply a character (or force) that opposes your protagonist. They're the obstacle, the challenge, the thing standing in the way of your main character achieving their goal. Here's the kicker: an antagonist doesn't have to be evil. They could be a rival love interest, a stern parent, or even nature itself.
A villain, on the other hand, is a specific type of antagonist. They're the bad guy, the evildoer, the character with malicious intent. All villains are antagonists, but not all antagonists are villains. Mind-blowing, right?
Let's look at some examples to make this clearer:
In "Romeo and Juliet," the feuding families are antagonists, but they're not villains. They oppose the protagonists' desire to be together, but they're not evil.
In "Harry Potter," Voldemort is both an antagonist and a villain. He opposes Harry (making him an antagonist) and he's also evil (making him a villain).
In "Cast Away," the island and the challenges of survival are the antagonists. There's no villain in sight!
Now that we've got that sorted, let's dive deeper into how to create these characters and use them effectively in your writing.
Creating Antagonists:
Define their opposition: What specifically does your antagonist do to oppose your protagonist? This could be physical, emotional, or ideological opposition.
Give them a reason: Why are they standing in your protagonist's way? Even if it's not justified, there should be a reason that makes sense to the antagonist.
Make them strong: Your antagonist should be a worthy opponent. They need to pose a real challenge to your protagonist to keep things interesting.
Consider their perspective: Remember, your antagonist is the hero of their own story. Try writing a scene from their point of view to understand them better.
Create contrast: Your antagonist should in some way contrast with your protagonist. This could be in values, methods, or personality.
Creating Villains:
Establish their evil: What makes your villain "bad"? Is it their actions, their beliefs, or both?
Develop their backstory: How did they become evil? A compelling villain often has a tragic or twisted history.
Give them dimensions: Pure evil can be boring. Give your villain some complexity – maybe they love their cat or have a soft spot for classical music.
Create a strong motivation: What drives your villain? Greed? Revenge? A twisted sense of justice? The stronger and more relatable the motivation, the more compelling your villain will be.
Make them smart: Your villain should be clever enough to pose a real threat. They should be able to anticipate and counter your protagonist's moves.
Now, let's talk about how to use these characters in different genres. Because let's face it, a villain in a romance novel is going to look very different from one in a fantasy epic!
In Romance: Antagonists in romance are often rivals for the affection of the love interest, or perhaps societal norms or family expectations standing in the way of true love. Villains are less common, but when they appear, they might be abusive exes or manipulative friends trying to sabotage the relationship.
Tip: In romance, make sure your antagonist's motivations are clear and relatable. We should understand why they're opposing the main relationship, even if we don't agree with their methods.
In Fantasy: Fantasy is ripe for both antagonists and villains. You might have a Dark Lord seeking to conquer the world (classic villain) or a rival magic user competing for the same goal as your protagonist (antagonist).
Tip: In fantasy, world-building is key. Make sure your antagonist or villain fits logically into the world you've created. Their powers, motivations, and methods should all make sense within the rules of your fantasy realm.
In Mystery/Thriller: In these genres, your antagonist is often the perpetrator of the crime your protagonist is trying to solve. They might not be evil (maybe they committed a crime of passion), or they could be a full-fledged villain if their crimes are particularly heinous.
Tip: In mysteries, your antagonist needs to be clever enough to challenge your detective protagonist. Leave subtle clues about their identity or motives, but make sure they're smart enough to almost get away with it.
In Literary Fiction: Here, antagonists are often more abstract. They might be societal expectations, personal flaws, or even time itself. Villains in the traditional sense are less common, but morally grey characters who oppose the protagonist are frequent.
Tip: In literary fiction, focus on the nuances of your antagonist. They should be as complex and flawed as your protagonist, with their own rich inner life.
In Sci-Fi: Science fiction offers a wide range of possibilities for antagonists and villains. You might have alien invaders, oppressive governments, or even well-meaning scientists whose creations have gone awry.
Tip: In sci-fi, make sure your antagonist or villain is consistent with the technological and social aspects of your imagined world. Their methods and motivations should make sense within the context of your sci-fi setting.
Now, let's dive into some tips to make your antagonists and villains the best they can be in your novel:
Make them believable: Whether you're writing a mustache-twirling villain or a morally grey antagonist, their actions and motivations should make sense within the context of your story and their character.
Give them a personal connection to the protagonist: The conflict becomes much more engaging when it's personal. Maybe your antagonist and protagonist used to be friends, or they're fighting over the same goal.
Show their impact: Don't just tell us your antagonist is a threat – show us the consequences of their actions. Let us see how they affect your protagonist and the world of your story.
Give them wins: Your antagonist or villain should have some successes along the way. If they're always failing, they won't seem like a credible threat.
Humanize them: Even if you're writing a truly evil villain, give them some humanizing traits. Maybe they have a pet they dote on, or a tragic backstory that explains (but doesn't excuse) their actions.
Make them adaptable: A good antagonist doesn't stick to one plan. When the protagonist foils them, they should be able to come up with new strategies.
Give them their own character arc: Your antagonist or villain should grow and change throughout the story, just like your protagonist does.
Use them to highlight your protagonist's strengths and weaknesses: Your antagonist should challenge your protagonist in ways that force them to grow and change.
Consider their presentation: How do other characters react to your antagonist? How do they present themselves to the world versus who they really are?
Don't forget about henchmen: If you're writing a villain, consider giving them some underlings. This can add depth to their character and provide more challenges for your protagonist.
Remember, whether you're crafting a dastardly villain or a complex antagonist, these characters are crucial to your story. They're the ones who push your protagonist to grow, who raise the stakes, and who often drive the plot forward.
But here's a gentle reminder: while it's important to make your antagonists and villains compelling, be mindful of the impact your writing might have. If you're dealing with heavy themes or traumatic events, handle them with care and sensitivity.
Now, I know we've covered a lot of ground here, and you might be feeling a bit overwhelmed. That's okay! Writing complex characters is a skill that develops over time. Don't be afraid to experiment, to try different approaches, and to revise and refine your antagonists and villains as you go.
One exercise I find helpful is to write a short story from your antagonist's or villain's point of view. This can help you understand their motivations better and ensure they feel like real, three-dimensional characters.
Another tip: watch movies or read books in your genre and pay special attention to how they handle antagonists and villains. What works well? What doesn't? How can you apply these lessons to your own writing?
Remember, there's no one "right" way to create these characters. What matters is that they serve your story and engage your readers. Trust your instincts, and don't be afraid to push boundaries or subvert expectations.
As you work on your antagonists and villains, keep in mind that they're not just there to make life difficult for your protagonist. They're an integral part of your story's ecosystem. They shape the plot, influence character development, and often reflect themes or ideas you're exploring in your work.
And remember, writing is a journey. Your first draft of an antagonist or villain might not be perfect, and that's okay. The beauty of writing is in the revision, in the gradual sculpting of characters until they leap off the page.
Lastly, don't forget to have fun with it! Creating antagonists and villains can be some of the most enjoyable parts of writing. Let your imagination run wild, explore the darker sides of human nature, and see where your characters take you.
I hope this deep dive into antagonists and villains has been helpful and inspiring. Remember, you've got this! Your unique voice and perspective will bring these characters to life in ways no one else can.
Happy writing! 📝💖 - Rin. T
Before you go, why not join us at The Write Right Society? We're a supportive Tumblr community where writers lift each other up. Whether you're a newbie or a pro, we'd love to have you! Share your work, get feedback, and connect with fellow wordsmiths, writers and aspiring authors.
#writeblr#writing#writing tips#writers block#creative writing#on writing#writers and poets#how to write#writers on tumblr#thewriteadviceforwriters#amwriting#writingtips#writing tips and tricks#writing craft#antagonist#morally grey villain#tropes#characters#heroes and villains#writing advice#romance writing#writing a book#writing blog#novel writing#writing community#writing guide#writing ideas#writing inspiration#writing prompts#writing reference
796 notes
·
View notes
Text
"We are going to defeat Dracula with two things: Garlic, and the ✨Power Of Friendship ✨💕💫😻😽😸🥳🫶🤩🥰🥰. Here, I made crucifix Friendship bracelets! 🥰✝️📿" - Abraham Van Helsing, Dracula
#he'd make a great girl guide methinks#also no spoilers pls i haven't finished the book yet 😌 I hope he makes crucifix friendship bracelets though#the power of friendship#friendship is magic#inspirational#quotes#van helsing#abraham van helsing#dracula#friendship bracelets#arts and crafts
741 notes
·
View notes
Text

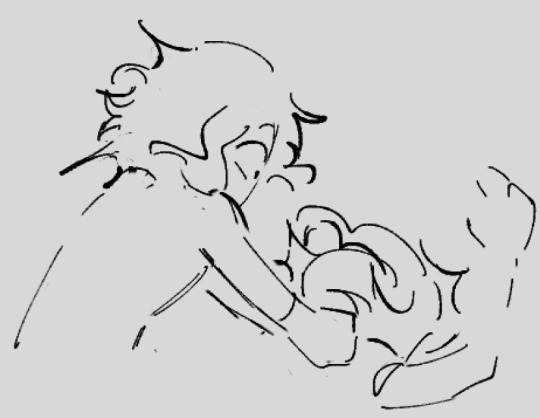
pov: eon tries to explain why eating a star was a good idea, [eon design by @the-bitter-ocean]
bonus:
#the consequences of your actions#in stars and time#isat#isat spoilers#a6se spoilers#isat odile#isat loop#odile loops au#set in: bonnie loops; eon and loop as guides#''look if wish craft trapped us in the loops then wish craft is the way to get out of it. the logic tracks. the loops going over-#to boniface; was in fact; not supposed to happen;''#loop beefing with eon will never be not funny to me#day 85#That's probably enough eon for now; back to working on asks#isat au
469 notes
·
View notes
Text
The summonings for residents of the Infinite Realms are constant. Across space and time they do not change. They require the same strokes in the sigil from past to present and the same breaths needed to chant from one edge of the universe to another.
Danny has always liked this as it has allowed him to see many wonders of history. And to visit many alien planets. He has met all sorts of people and experienced all sorts of events. But he has never experienced something like this. This time, he is summoned to a dying world. The planet exploding as its core devours itself. This time he is faced with two desperate parents pleading for him to save their son. But he can't. Living beings cannot be taken back through the summons. All Danny can do, is promise to guide their son to safety.
#dp x dc#dc x dp#dpxdc#dcxdp#winter's tales#danny guides a baby kal-el to earth where he knows he'll be safe#does he intentionally leave him with the kents?#or do they just happen to stumble upon the craft as he's deciding what to do next?#does danny remain a constant figure in clark's life?#or does he silently check in on the boy from time to time?#that's up to you
687 notes
·
View notes
Text
in the affini compact playing runescape would be banned. there's no floret cut version of it it's just vaporized outright
#hdg#human domestication guide#affini#hdg shitposting#floretposting#im currently trying to get a spicy stew to give me a 5 runecrafting boost on my ironman so that i can craft bloodbark#the problem is i don't have a grown up cat so i have to just chase rats#and this is causing me to rapidly go insane#whichever jagex mod invented cat mechanics needs to be put in the device#why the fuck is it the only time gated thing in the game aaaaaaAAAAAAAAAAAAAAAAAAA ok except farming i guess#i hate runecrafting so much i never want to see guardians of the rift again#“craft blood runes for 46k xp an hour” i would rather train agility#at least i got an abyssal lantern at only 250 pulls so gotr was less bad than it wouldve been otherwise#but fuck dude i am not grinding out 800k xp more to go from 76 to 81 rc fuck off#JUST GIVE ME MY GODDAMN BLOODBARK#I HAVE LITERALLY BEEN WORKING TOWARDS THIS FOR OVER A YEAR JAGEX JUST GIVE IT TO ME
86 notes
·
View notes
Text
Getting Started: Junk Journaling
So you want to get started with scrapbooking/junk journaling? This is a craft, like many others, that you can get started on with very little supplies! However, we'll get a little deeper into stuff as well for some additional tips and supplies that might be fun or helpful.
What You Absolutely Need
Scissors / Cutting Implements - If you can, buy a nicer pair of scissors for your own sanity, but any scissors will do starting out! Detail scissors specifically are really helpful. Exacto knives can also be helpful, but you'll also need a cutting mat if you don't already have one. This category is worth investing in because dull scissors are a nightmare.
Adhesive - ZipDry is designed for paper so it doesn't bleed through thin stuff and it dries quick and clear. Double sided tape rolls are also very helpful, especially with large areas or gluing a bunch of stuff quickly. This is an area worth investing in earlier! Thin paper and magazine paper will have bleed through with certain glues.
Notebook/Paper - Use what you have! If you, like me, have a million journals lying around, use that! As you get deeper in, you might find it helpful to specifically look for notebooks that lie flat when opened. You can also use sheets of art paper if you want to go more independent collage style rather than journaling. Watercolor paper/notebooks are nice because they are thicker, but you can use whatever.
Materials to Actually Cut/Glue/Use - Okay, here's where you really can do whatever you want forever and spend as little or as much as you want. You can cut up books and magazines you have on hand. If you have a printer, you can print stuff out! People sell really amazing curated mixed packs of materials (you can support some great shops on etsy doing very cool and niche stuff! If you are really on a budget, amazon sells some bulk packs as well).
Material Tip
If you don't have a husband that works in a mailroom (we are very lucky) and you don't have a lot of magazines on hand, try going to your local post office and dig through the recycling bin! A lot of people will throw out magazines/ads/catalogues there and you might find some gems. You can also get a free trial for some magazines and just cancel once they want to charge you money. Nic finds Vogue and GQ helpful for people. National Geographic can be helpful for backgrounds and animals.
Leveling up details below the cut!
Level Up
Slide Cutter - Make sure you get one with a replaceable blade! Super helpful for bulk cutting out big shapes.
"Okay, but I see people online with fancy stuff and I want to get in on that action!" you may say. Here is some fun stuff to play with!
If you see someone whose junk journaling content you like, you can also just reach out to them! A lot of people are happy to share links to the stuff they use and a lot of junk journalers online run their own shops/have affiliate links to the stuff they use!
Fun Junk Journaling Variety Packs - truly this is where a lot of people spend a lot of money because you can buy all sorts of fun niche packs depending on the vibe/focus you want to go with. You can also buy packs of quotes / letters / sayings. This can be helpful especially when doing character focused stuff. My wife really likes the packs from PengellyCrafts on etsy.
Washi Tape - People really like using washi tape, especially the transparent ones. These can be surprisingly expensive.
Transparent Stickers - These are fun because you can get a lot of detail and layering without intricate cutting. If you are careful with detail cutting you can cut the white border on normal stickers if you can't swing transparent ones.
Stamps - Like transparent stickers, this can add fun depth and layering, though with perhaps slightly less detail. The best part about stamps is that they are infinitely reusable and you can get all sorts of stamp pads. The downside is they are surprisingly expensive. You can even get stamps that help you make backgrounds like stars or wood texture. There are also "container" stamps like jars and bottles that you can put stuff in!
Embossing Powder - You can pair stamps with a glue stamp pad (or get glue markers) to use with embossing powder and a heat gun to create embossed details that add depth and texture. Make sure you are careful about what order you do things in when using heat!
Distress Ink (or Distress Oxide) & Blender/Diffuser - Make things look aged! This is a stamp pad you can use to make any paper or image look older than it is. Make sure you also get the little foam blender they also sell for application since it'll go on too thick if you try to use it directly on the paper.
Wax & Wax Seals - Wax can be fun to play with because it is both an adhesive and also adds dimension. Note: a lot of embossing or wax in a journal can make it hard to close a notebook.
Old Books - You can buy used books or use books that you don't want anymore for backgrounds to cut out words. Things like recipe books and encyclopedias can be especially helpful/vibe-y.
Fun Edges / Frames - You can get scrapbooking scissors or edge punches to add fun details and shapes to paper edge. It just depends on whether you like that look! Something like a simple round edge punch can be helpful.
Have Fun With It
Do you do other crafts, like painting or cricut? You can pair so many different crafts with junk journaling to make a cool multi-media piece. The most important thing to remember is to use what you have and have fun with it! Don't put off starting because you want all the bells and whistles or think you have to spend a bunch of money like the people who create junk journaling internet content! Create joyfully and lean into the chaos.
Please let us know if this guide was helpful and if you'd like a more specific buy list or tutorials on anything! We are here to help make crafting more accessible <3 You got this! Go junk journal!
If you want to see Nic's junk journaling, we are going to queue some in the next few days. Check our pinned post to find our junk journaling tag for inspiration!
#art journal#junk journal#scrapbook#scrapbook journal#mixed media#junk journaling#art journaling#scrapbooking#crafting#nic crafts#getting started#buy list#crafting guide#polycraftory
112 notes
·
View notes
Text
✨ Explore Infinity Nikki with the "Purify Scent in Cavern" quest! 🌿 Begin your adventure in Florawish, prove your skills to Eremita, and uncover the secrets of the cavern! Craft your very own Whim Fragrances and reap fantastic rewards!
Dive into our detailed guide for all the steps you need! 🎮💖
#Infinity Nikki#Nikki Quests#Purify Scent#Florawish#Heartcraft Kingdom#Whim Fragrances#Gamer Guide#Quest Walkthrough#Eremita Quest#Esseling Purification#Treasure Hunt#Cavern Exploration#Crafting Guide#Travelers Musings#Game Rewards#Gaming Community#Mobile Gaming#Adventure Games#Online Gaming#RPG Guide#Game Tips#Level Up#Discover Treasures#Gaming Help#Game Strategy#How To Play#Infinity Nikki Guide#Virtual Adventure#Role Playing Games#Gameplay Tips
2 notes
·
View notes
Text
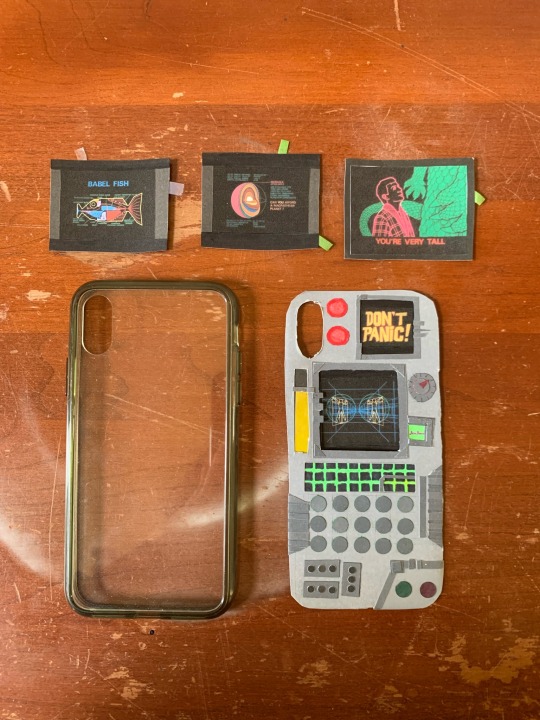
Last winter I made this Hitchhiker’s Guide to the Galaxy phone case and I’ve been waiting for today to share it!
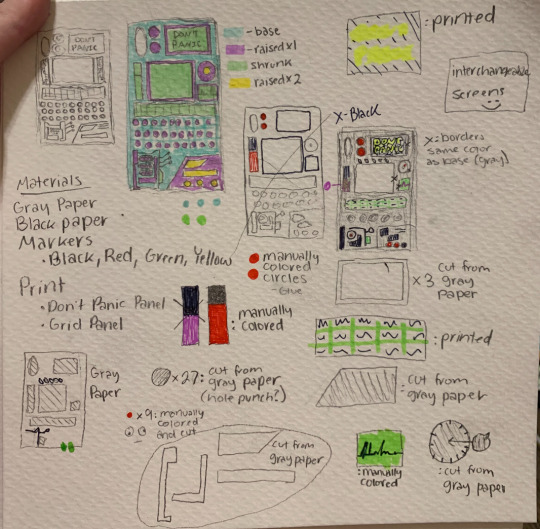
I started with this rough plan. I kinda based it off the one in the tv show but mainly pulled from my own imagination.
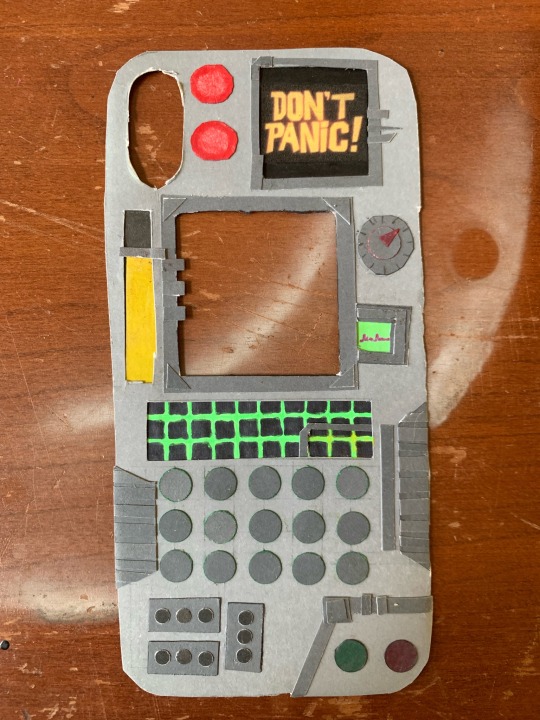
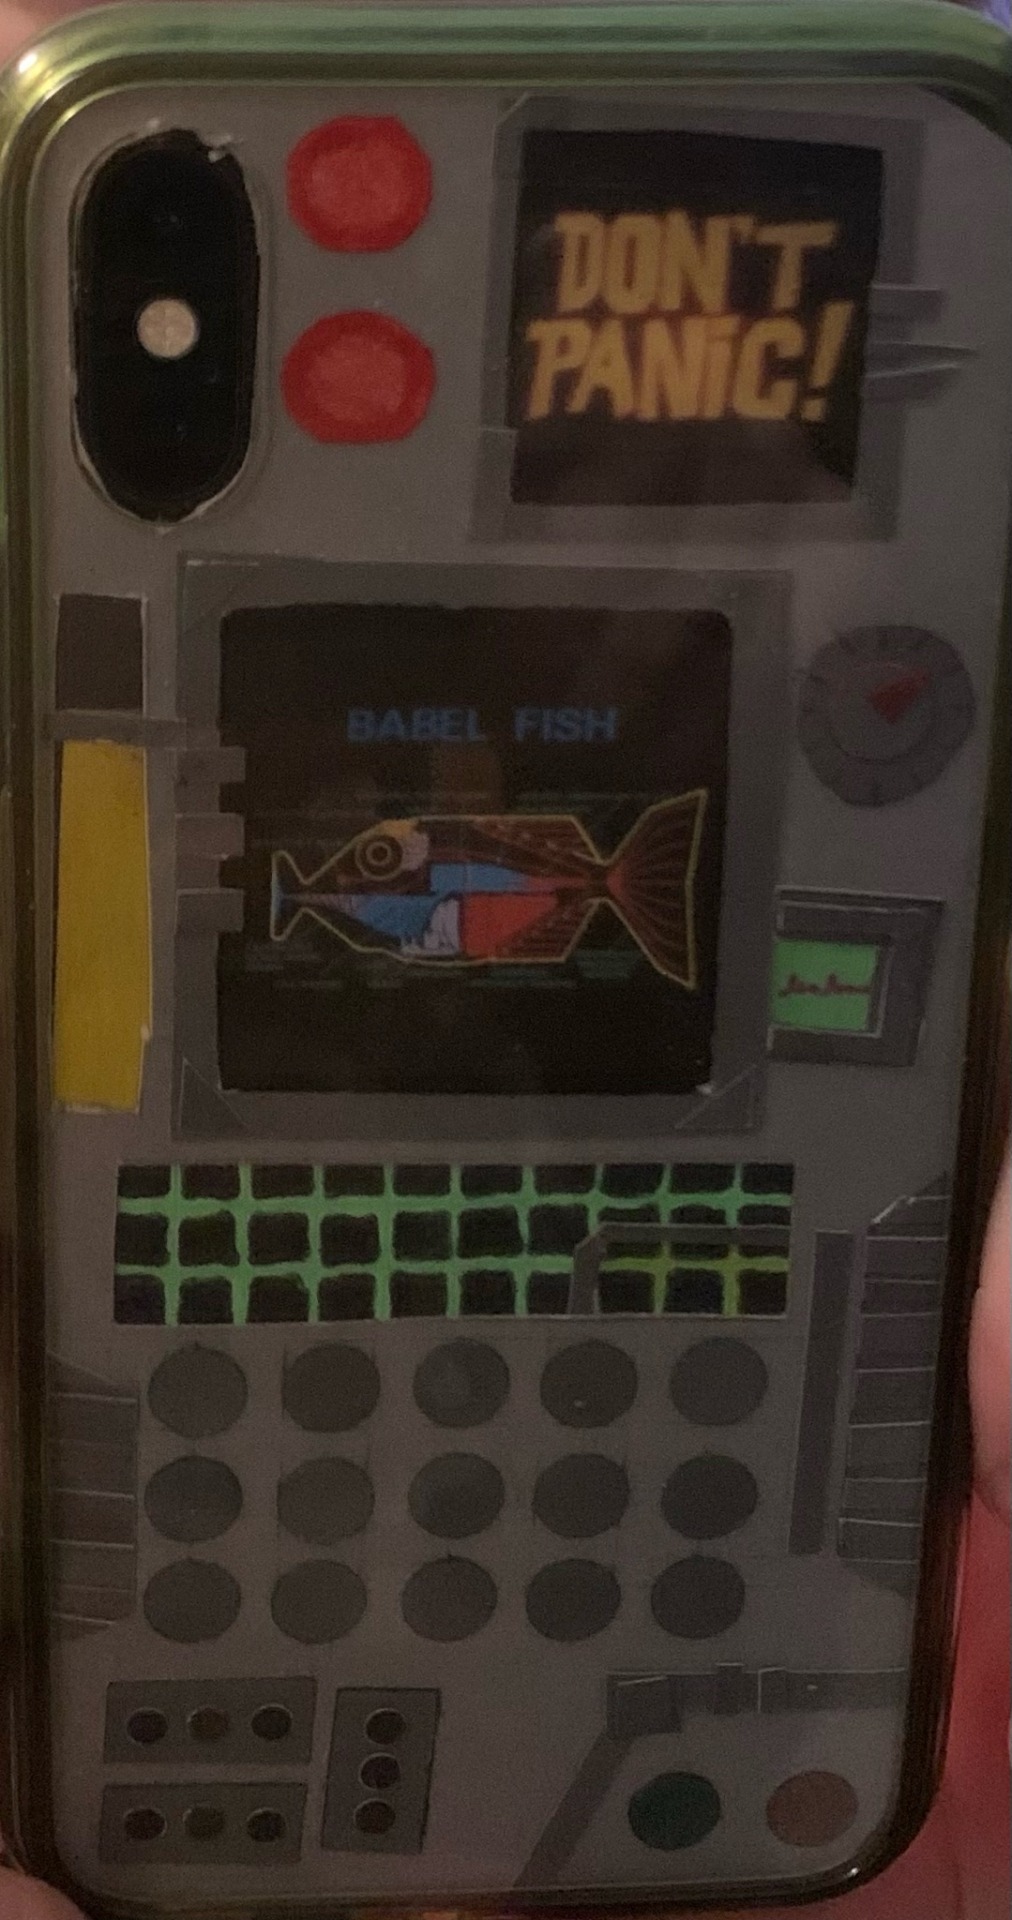

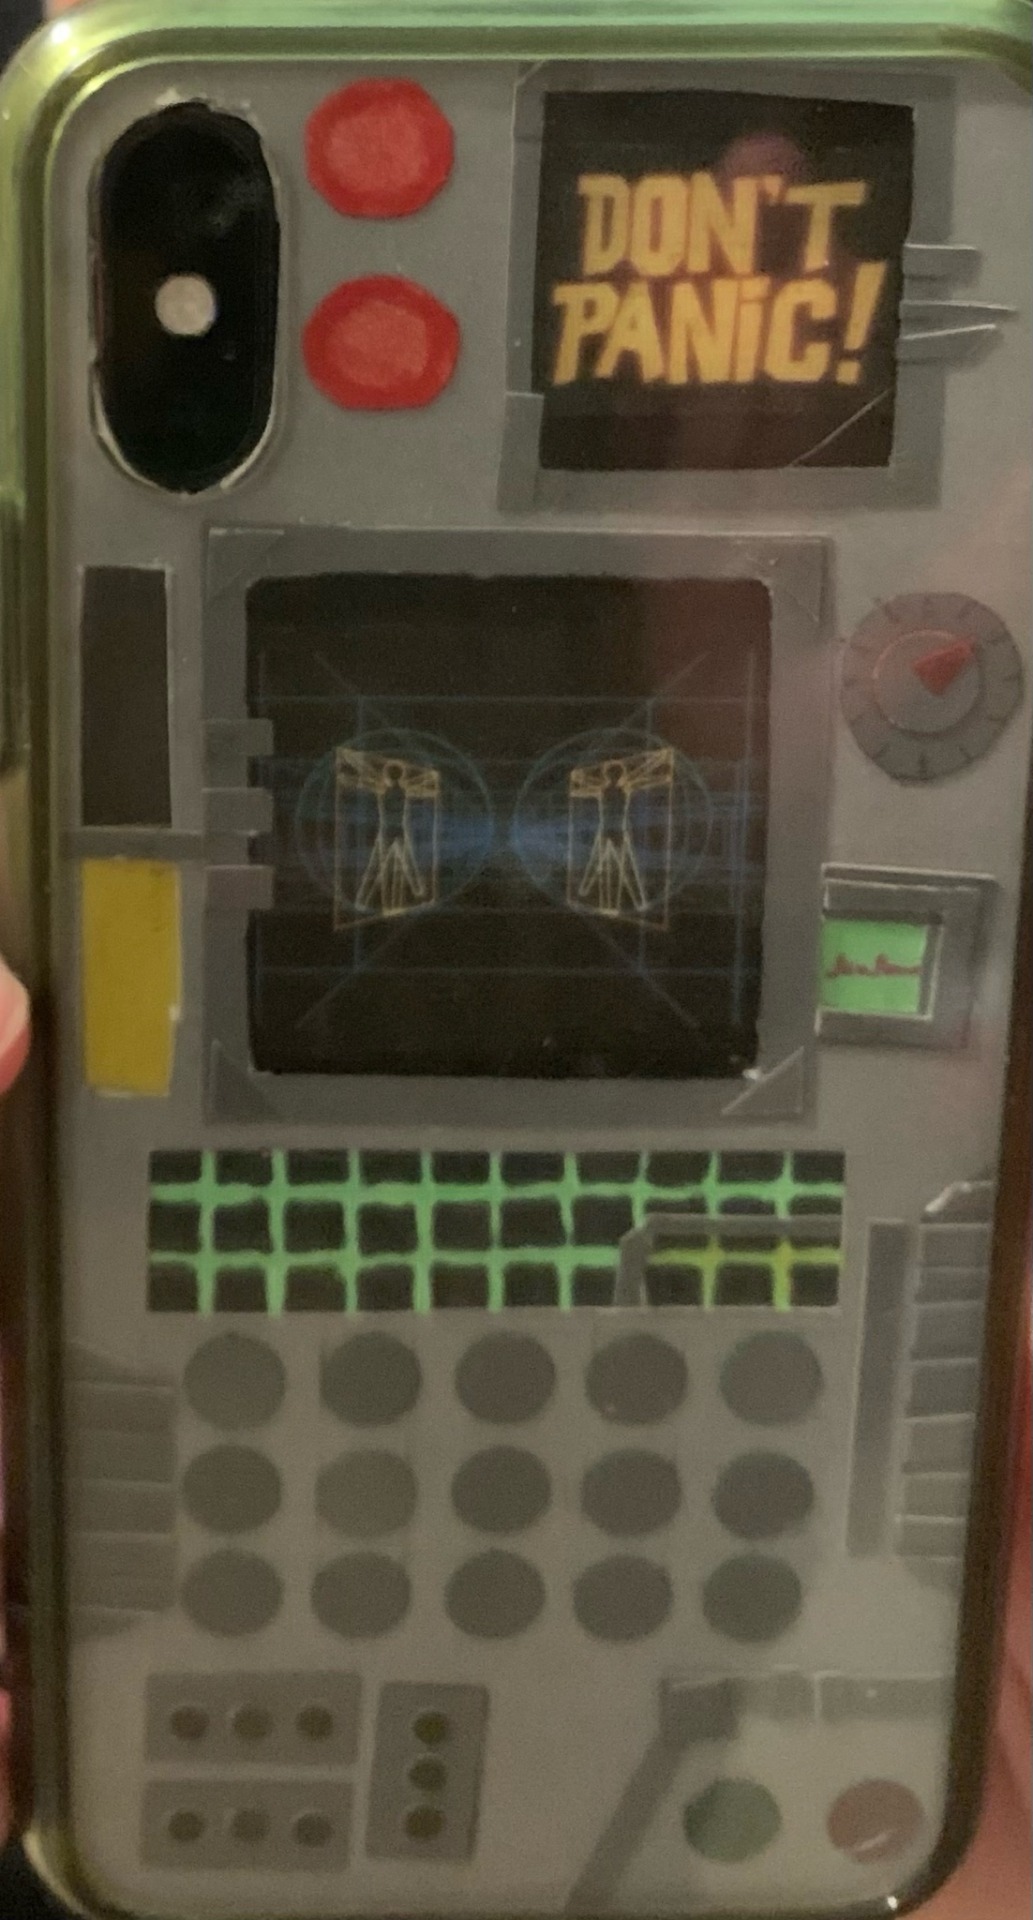
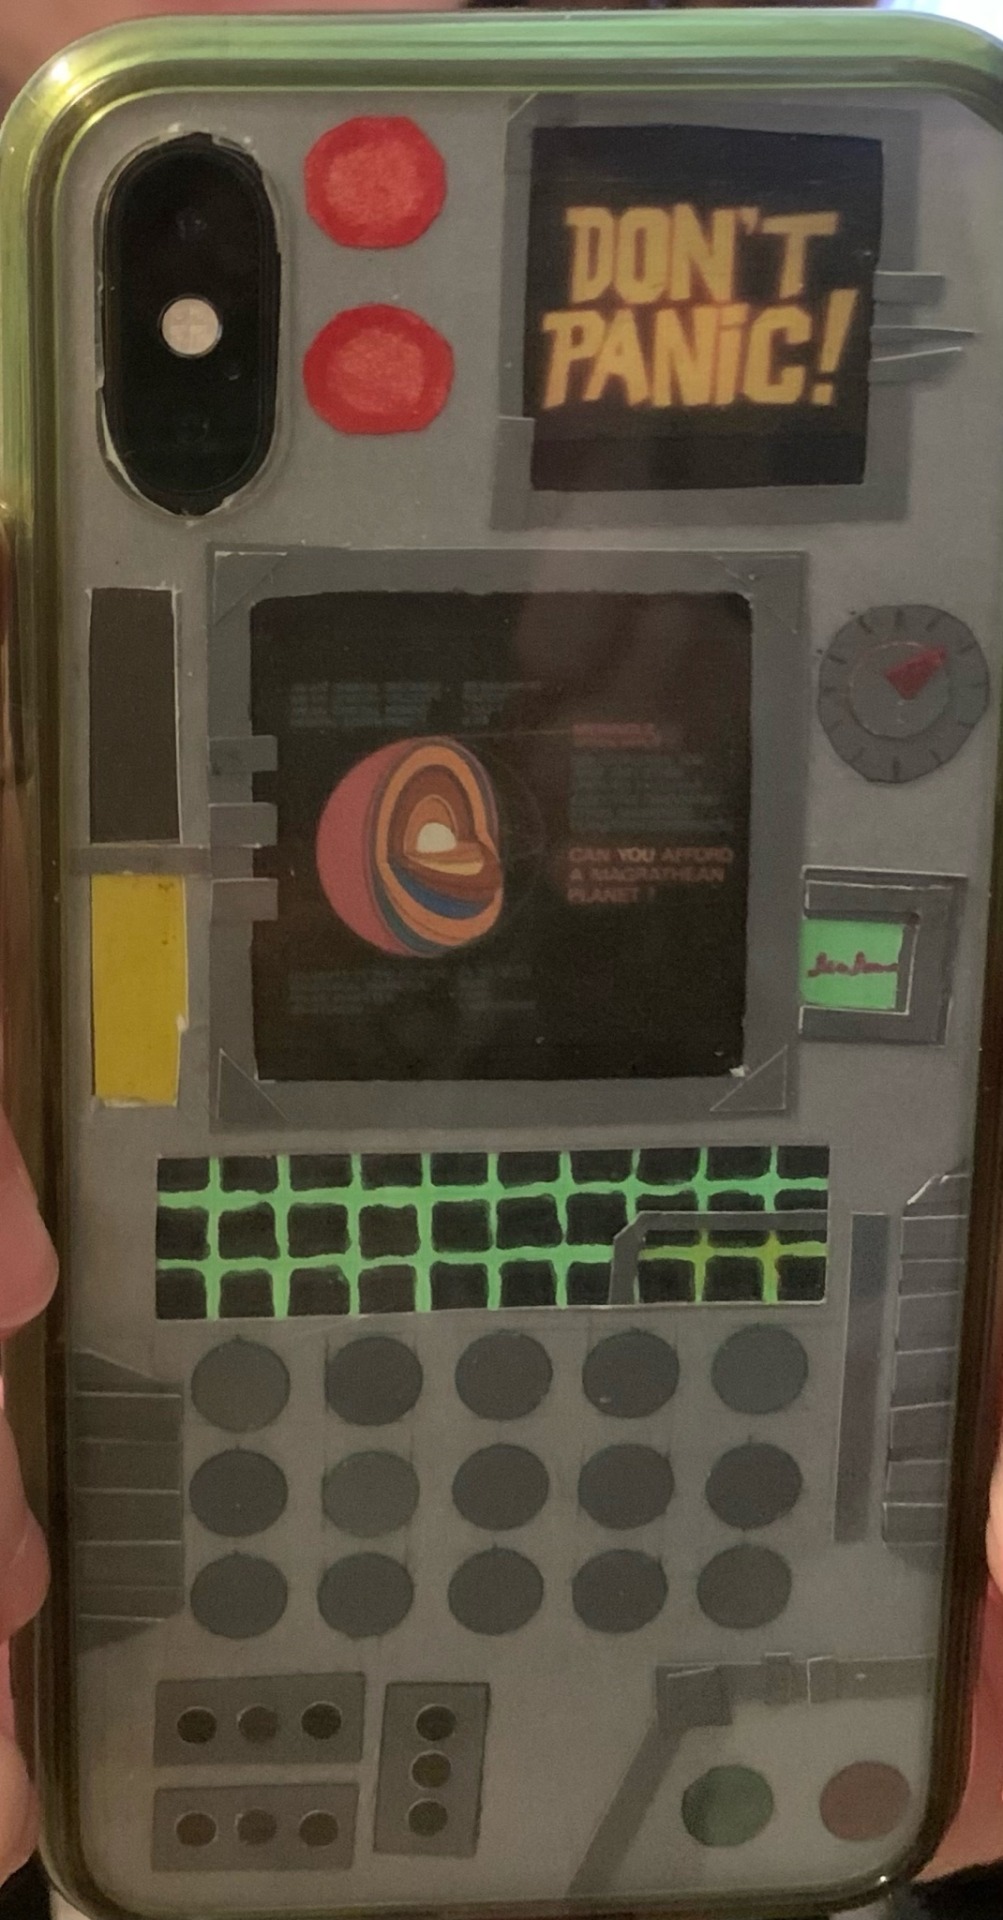
Best part! The interchangeable screen! Right now I have four screens from the tv show. Pinterest has a lot of high quality images of them. I have a few more saved that I’ll eventually size and print. My favorite is the babel fish.
You may also notice the bar on the right moves up and down. It doesn’t do so very elegantly but it was a last minute thought that I really like.
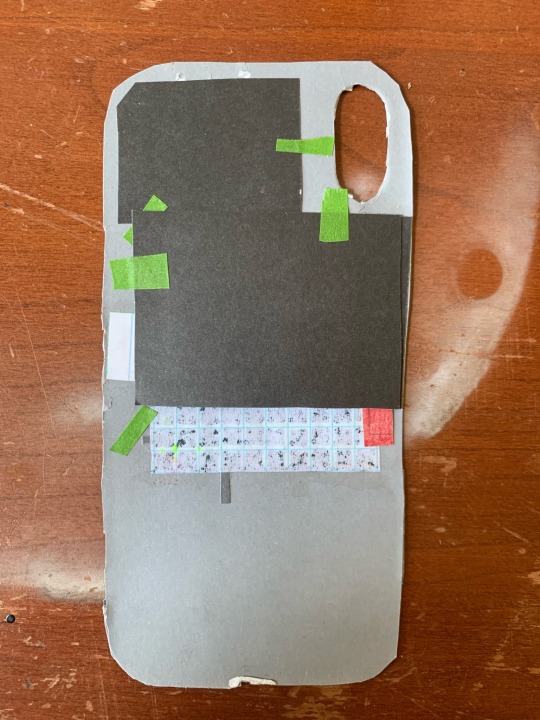
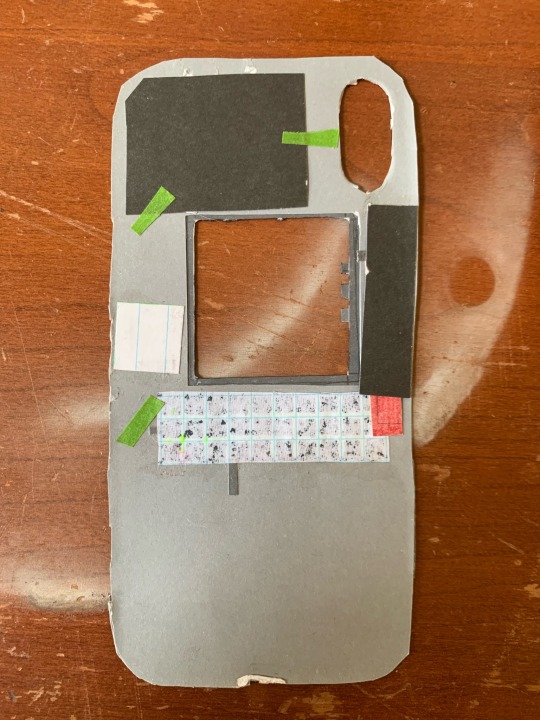
And here’s backstage! I have lots of layers for a more realistic effect. It was my first time doing a paper craft like this so maybe I’ll be able to make an even better one in the future!
Happy towel day!
#h2g2#towel day#may 25#papercraft#diy craft#diy tutorial#the hitchhiker's guide to the galaxy#thgttg#hgttg
203 notes
·
View notes
Text
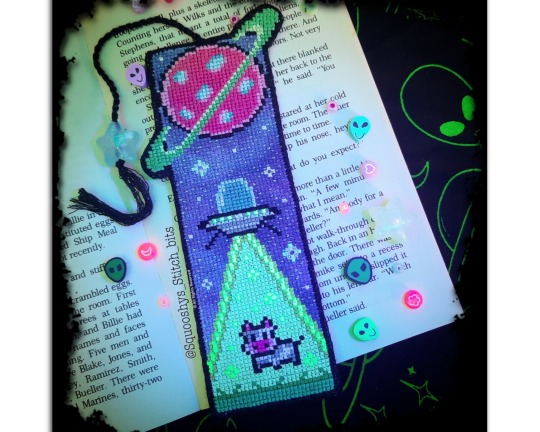
🛸🐄 Don't Panic! 🐄 🛸
Crossstitch designed and Stitched by me 😘
SquooshysStitchBits
#cross stitch#diy#crafts#handcrafted#homemade#etsy#fibre arts#pdf pattern#xstitch#counted cross stitch#pixel art#needlecraft#needlepoint#shameless self promotion#home decor#aliens and ufos#the hitchhiker's guide to the galaxy#bookmark#scifiart#booklr#fanart#glow in the dark
48 notes
·
View notes
Text
Shopping For Fabric Online
I wrote my own post on this bit ago but a pattern company I follow posted a link to this guide they wrote about how to shop for fabric online. It has some different suggestions than what I wrote, so I thought I'd repost it here: The Sew Liberated Guide To Buying Fabric Online
This one focuses more on specifics, but has links to some good resources at the end too.
And, in the Instagram post where they linked to the guide, they also added the advice to buy muslin for practice sewing, and that reminded me, I forgot to say that in my guide!
Look for cotton muslin, which is available in a number of widths and usually in either bleached or unbleached finishes, and buy whatever is cheapest. If you are making a woven garment, it is great practice to test-run the pattern and dial in the perfect fit by making a practice version in this inexpensive fabric.
I tend to make wearable muslins and if I get them right enough, I will finish them nicely and tie-dye them afterward! But if I don't, then it doesn't sting so much as having made The Dream Garment In The Dream Fabric and having it not fit.
Some people get thrift store bedsheets to use for muslins but I find myself being too precious with those. Muslin is more consistent.
(I also look for cheap knit fabric on sale to make muslins of knit garments now and then, but it's less important because knits aren't so picky about the fitting!)
38 notes
·
View notes
Text
hey (canadian) sticker enthusiasts. wanna learn how i got a huge box of blank ups labels for free??

here’s what ur gonna do. go on this website: https://www.ups.com/ca/en/shipping/order-supplies.page

ur gonna log in on this bad boy (or create an account, then log in.)
now. when u log in it will probably bring you to a new page. you don't care about this page. go away. go back to the previous page (or just open a new tab with the same link above). if it still asks u to log in just press the log in button again and it'll be like Oh Right hello yea! you're logged in my bad

next you're gonna be asked to select a UPS account, it's optional, just say "no account"
now: the motherlode
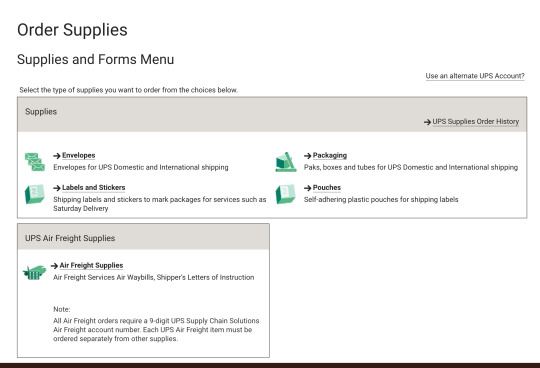
go to labels and stickers, then you're gonna have a bunch of options
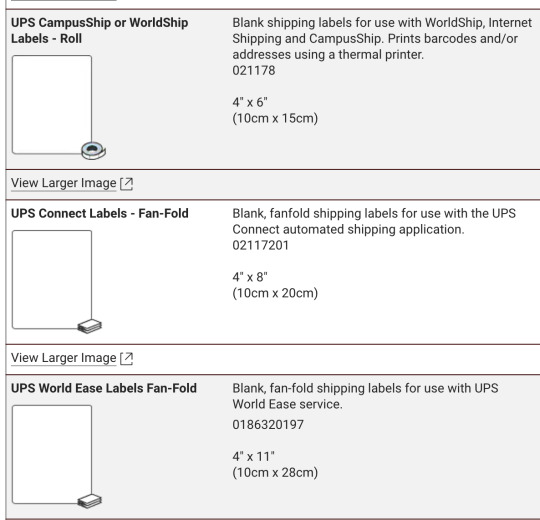
here's the three i got, i recommend the top two. the first option is a roll of labels, middle one is the box of labels at the beginning of this post, and i don't really recommend the bottom one. it's a huge amount of stickers (i cannot emphasize enough it was easily 5x the weight of the box of 4x8 stickers) but here's what they look like:

there's like. stuff on it. and the backing is weirdly cut? idk i do not like them i think it's more advantageous to get the first two!! anyways on the right ur gonna see checkboxes, just check the ones you want then scroll down and press "add selected to order". the page is gonna update and u will see this!!

view ur supplies order, then i wont take a screenshot of this part because it's just like. My Address, but just submit the order and bada bing bada boom it's on its way. i think theres a certain limit on how often u can order (for example i couldn't order more stickers because ive ordered some recently) but like. there's SO MANY who cares i have barely made a dent and i am using them like crazy and giving them to people.
ANYWAYS HAVE FUN! MAKE SHIT!
#punk#stickers#resources#free stuff#how to#guide#diy craft#streetart#remember kids graffiti's only illegal if they see u!#activism#canada#canadian punk#label 228#diy or die#graffiti#patches
38 notes
·
View notes
Text

Suggested Reading
Threshold Theory Energy Work Fundamentals The Subtle Body Spell Design Spell Dictation Sigils: How-to Intro to Gnosis Anchors

What is a Spell Circle?
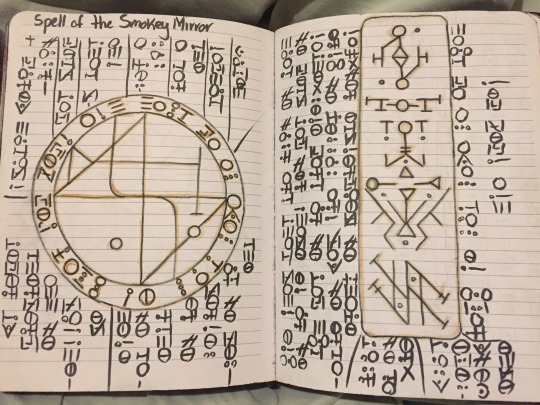
Spell circles, while they aren’t necessary, are a tool that is used as a focal point for a working. They are also very helpful in aiding in headspace via the implementation of aesthetics. Spell circles are technically hypersigils, or a complex sigil that is typically constructed of multiple sigils in tandem. They are typically constructed of three parts: Incantations, foundations, and root sigils. They are used in a ritual format, typically with each practitioner having a standardized approach to using them for spell work.
How do they work?
A spell circle is similar to a sigil in the way that there is an incorporation of intention, energy, passion, and focus in their creation. Spell circles operate most effectively within the energetic model or something adjacent. The psychological model will be entirely ineffective; at least as I have prescribed their creation in this article. They often contain sigils as well as some other elements that serve to connect the circle to the overall working. These elements include incantations, words, phrases, symbology, geometric/organic designs, numerology, etc.
Incantations, words, or phrases can be said out loud as part of the working (provided that doing so doesn’t break gnosis), or written out and burned into ash and incorporated into the working through that process. Though they can also be incorporated in other ways as well. As an example, you could write a song and record it and have the tablature or staff wrapped around the perimeter of the spell circle. You could then listen to the song while casting your spell using it as a centerpoint of your gnosis.
The other elements of a spell circle are used to enhance the threshold of the root sigil or purpose. Each additional element adds a node, or correspondence, to the threshold of the spell. Doing so helps refine the accuracy and potency of the working.
Designing a Spell Circle
If you have experience working with sigils, then designing a spell circle can be pretty easy. I highly recommend using programs like procreate to make these, or drafting tools! Freehanding them can be quite difficult without any experience with technical drawing. I use my tablet to draw them digitally and then trace them onto a burnable substrate such as paper.
Incantation(s)
An incantation is a phrase that is said that astutely states the intent of the spell. It is important to have this memorized, if you use them. Without having them memorized, using them will pull you out of gnosis by disturbing your focus. Incantations are like the thread that binds the spell circle to the rest of the working, especially if you use other tools, sigils, etc. When I construct my spell circles, I use the pronunciation of my sigils as the incantation, which are all aspects of a conlang that I developed. This can be seen as a sigil chain. So long as the incantation is written somewhere on or near the circle, then it is capable of being connected to the burning of those sigils via the incantation. I find that having the incantation encircle the root sigil is the most aesthetically pleasing for me.
Root Sigil
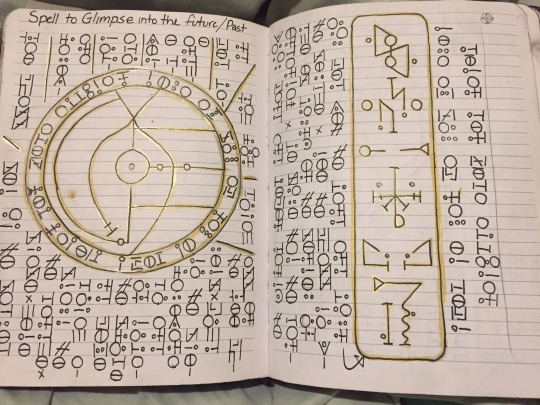
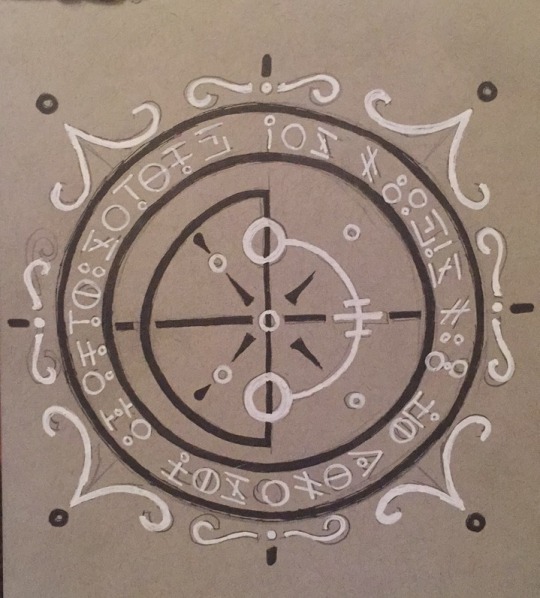
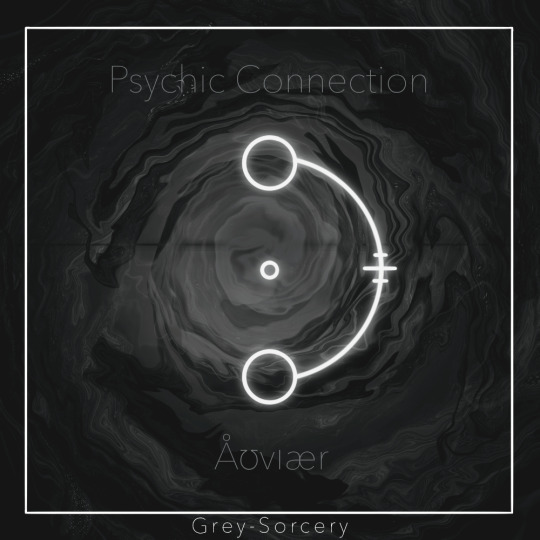
This is a sigil that is at the core of the circle. It should represent the base goal of the spell. This sigil is connected to the rest of the circle via the Foundation(s). Like all sigils, it is important that it is drawn while channeling its meaning through your mental state, emotions, and subtle body to be most effective.To create them, I will draw the enclosing circle first before drawing a grid within it. This grid is then used to ensure that the root sigil is centered and scaled appropriately. The sigil is always the first part that I draw. Here are a few examples of sigils I have used for spell circles:
Foundation(s)
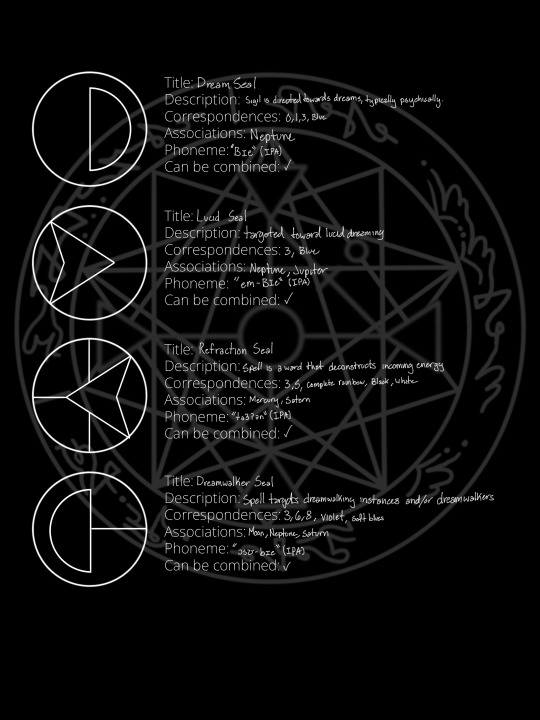
Foundations are simple designs that each have their own correspondences. Some foundations use numerology to derive their meaning, others are given their meanings based on how they interact with the root. The foundation(s) used should also align with the purpose of the spell; but more specifically, to describe the means of manifestation of the spell to some degree. They can also be used to expand the context of the root sigil, ex. Whether it is intended to be a blessing or curse. I am always sure that when I draw them in the grid, that they appear to be a part of the sigil, yet also behind it by having the lines stop and continue any shapes that are a part of the sigil, like circles, triangles, and squares. Here are a few foundations that I use:
Associative Symbology
These symbols are things I don't really implement in spell circles myself, but include things such as astrological symbols, alchemical symbols, magical alphabets, color, and imagery. These symbols are typically incorporated in equal distribution around the circle in radial fashion, but can also be used in other configurations. The number of symbols can be implemented with numerology in mind as well. Colored line-work can also be used to further the correspondences. Imagery such as pictographs can also be used, following similar implementation as other symbols.
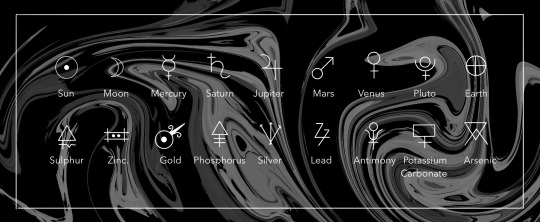
Applications
Spell Circles can be used for all sorts of workings, typically in a ritualistic fashion. However, they may also be used as passive sigils, meaning that they are placed and affect a specified space gradually over time. If they are used in this fashion, they will need to be revisited and charged periodically. When using a spell circle in a ritual, place them underneath the central spell elements such as cauldrons, candles, bowls, etc. Please use discernment. Fire safety is of the utmost importance. Once the spell is in motion, use the incantation that connects the circle to the working. I highly recommend rehearsing your incantation until it is memorized so that your spell’s effectiveness isn’t hindered. I highly recommend placing a spell anchor onto your spell circle as well so that there is a direct medium holding it. This way the spell can be recharged, broken, or altered as necessary.
Ritual Closing & Disposal
As part of closing any working, it is important to close off all energy that is connected to the working other than the anchor. Part of this is disposing of the spell circle in a responsible manner. This can be through responsibly burning it and burning the ashes, burying the spell circle itself (Provided it is on a biodegradable medium), soaking it in water to dissolve the ink and then cleansing the medium, or if it is drawn on a dry-erase board you can just erase it and cleanse it. When burying the ashes of your working, try to use your discretion as to which direction it is buried relative to your sleeping place or place of casting.
Identifying a Spell Circle
A few popular designs for spell circles have been misidentified in the past, specifically those of John Dee, who was a prolific cryptographer. These designs have a lot of the hallmarks of spell circles; however, they are enclosed with 72 latin letters, which don’t have any magical or mystical correspondences, but are very common in encryption wheels, and then are encoded through biblical reference. The influence his work had was very substantial in the development of spell circles and their design. While his encryption circles can be used for magic, like any other design drawn through intention, passion, and gnosis, it is obvious that it was not intended as such given the historical context of his life.
Interested in my other articles? You can find my masterpost here.
Patron Shoutouts!
Megan Kipp Jinsu
Thank you for your continued support! My patrons help me maintain the drive to create content and help me keep food in my pantry.
My patrons of Mystic tier and higher had access to this article a week before it was public! To see other perks of supporting me, click here!
#informational post#spellwork#spellcraft#spell casting#spell craft#spell circle#witchcraft#witchcraft resource#witchcraft guide#ritual#beginner witch#sigil#sigil creator#energy work#sigil magic
812 notes
·
View notes
Text
guess who just speedran through A Good Girl's Guide to Murder and One of Us is Lying, and now is gonna hyperfixate over pipravi, natewyn, addy mf prentiss as a whole, and ashton x eli (what's their ship name???) 😍😍😍
#no joke#these books were goddamn awesome#i didnt even like high school drama very much#that is until i read one of us is lying#sheesh.#also agggtm?#oh my fucking god#its SO GOOD LIKE HOLY SHIT MY FRIENDS WERENT LYING#the mystery is so well crafted in both of these books!#oml#imma go see where to get the remaining books from lmfao 😭#agggtm#a good girls guide to murder#a good girl's guide to murder#holly jackson#one of us is lying#oouil#karen m mcmanus#pipravi#pippa fitz amobi#ravi singh#natewyn#nate macauley#bronwyn rojas#cooper clay#addy prentiss#ashton prentiss#simon kelleher#lmao
93 notes
·
View notes