#Printmaking Tools
Explore tagged Tumblr posts
Visit Tumblr Blog
Explore Tumblr blogs with no restrictions, modern design and the best experience.
Last Seen Tumblr Blogs


Fun Fact
Tumblr posted its first advertisements in May 2012 and subsequently earned $13M in revenue.
Text
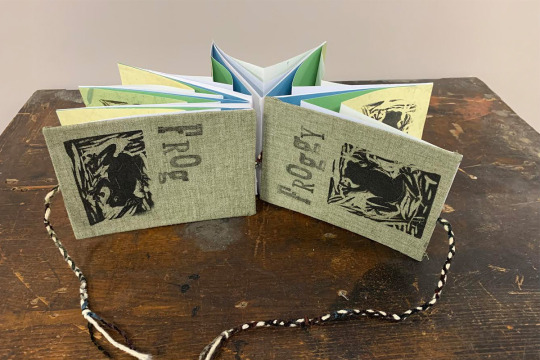
Star Book
Our Printmaking blogger, Rebecca, shows us a wonderful book that she created. She runs us through the steps that she took to create this book, and all of the different materials that she used to create it. Take a look at this fun, interactive book!
This was one of my favorite books to create. Not only was the process of this book fun, but there were so many steps to release built up creative freedom! I First made two linocuts of two frogs for the insides, and covers of my star book. The front and back cover have a dark sage green fabric binded onto the cover, with a mix of three colored strings twisted for a visual interest, and to tie the…
View On WordPress
#Art#Book Creation#Books#frogs#handmade#inspiration#linocut#Marywood Art#Marywood Art Department#Marywood University#Marywood University Art Department#Metal type#Printmaking#Printmaking Tools#Star book#Where Creativity Works
0 notes
Text
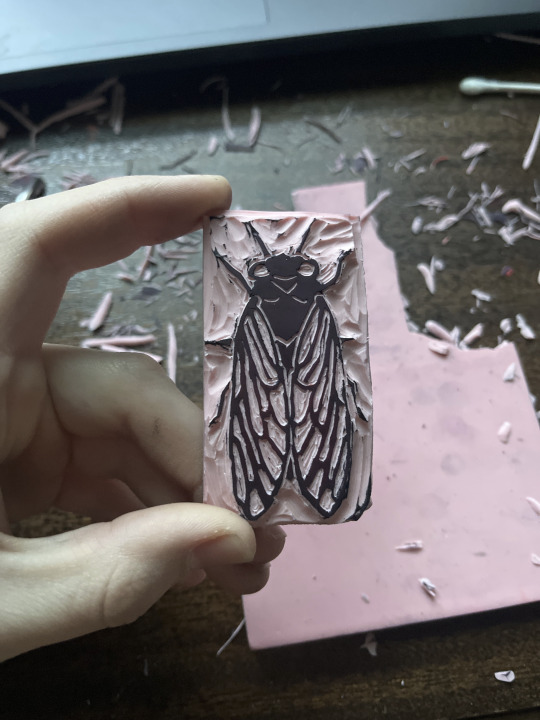
made a couple of background assets for my personal website. havent implemented them yet, and i plan to make a few more versions too, but im really proud of these so far and how they turned out.


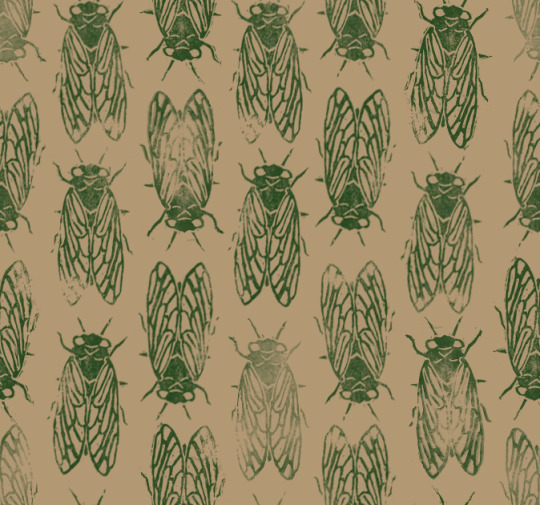
the cicada is a rubber stamp i made yesterday, which i stamped a few times and scanned in digitally. colors are from various blending modes. the scanner i used didnt have the best image quality, so theyre a bit grainy, but i intend to use them at such a small scale that it shouldnt be an issue.
the stamp itself and how it looks on paper under the readmore also featuring a few more stamps i made a while ago.

#cicadas#bugs#linocut#the stamp itself was rubber not linoleum but linocut is what the tool i used says on it LMAO so im counting it#printmaking#digital art#krita#spider_art#web revival#indie web#<- website assets. close enough
34 notes
·
View notes
Text

some ye olden day sheers
made in 2024
#linocut print#linoprint#linocut#block print#block printing#printmaker#printmaking#artists on tumblr#traditional printmaking#traditional printing#traditional art#small artist#lesbian artist#butch artist#trans artist#linocarving#original art#disabled artist#linogravure#art#antique#antique art#antique tools
15 notes
·
View notes
Text
my absolute dream house is a little bit midcentury (i saw a beautiful house on instagram) but ultimately minimalist but using warm materials (off white walls in warm grey or blue tones with hardwood floors is my rly rly favourite combination. airy). minimalist and highly practical design. storage and space for the colour in the room to come from things i already use , art stuff, hiking gear, plants, dishes. but space for clear surfaces, space for resting my brain and eyes and everything to be put away. big window that faces trees or a wide open space, not something overstimulating. i would love that
#kiddo say#basically airy. airy is the dream.#i love minimalism with warm materials so that your belongings are the decor . big pinecone enamel mug printmaking tools#hiking gear is colourful a lot of the time i love when people have their climbing rope on the wall. i love how it looks#i want huge mountain poster#and no dogs ever#(overstimulation sensory nightmare)#and basically it will be a studio with space to rest
26 notes
·
View notes
Text
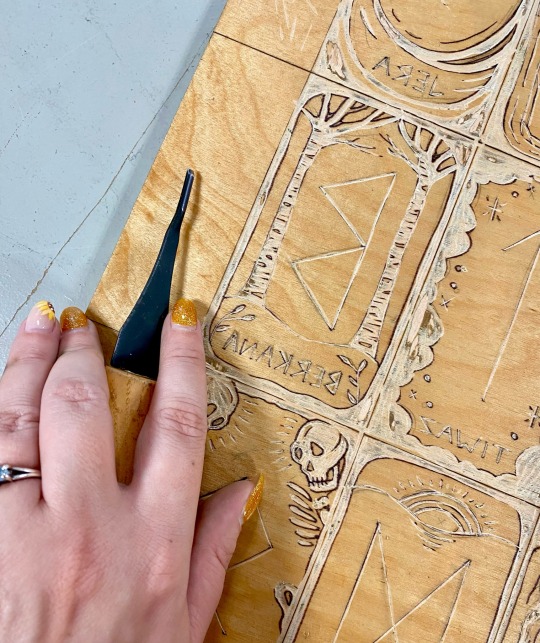
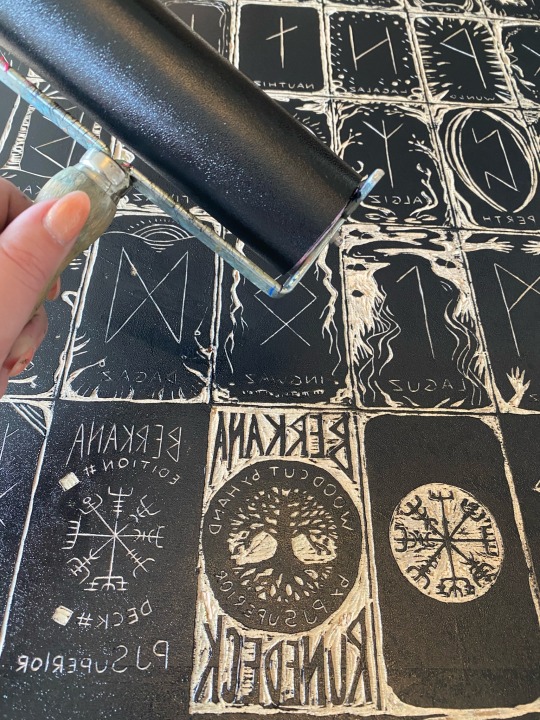
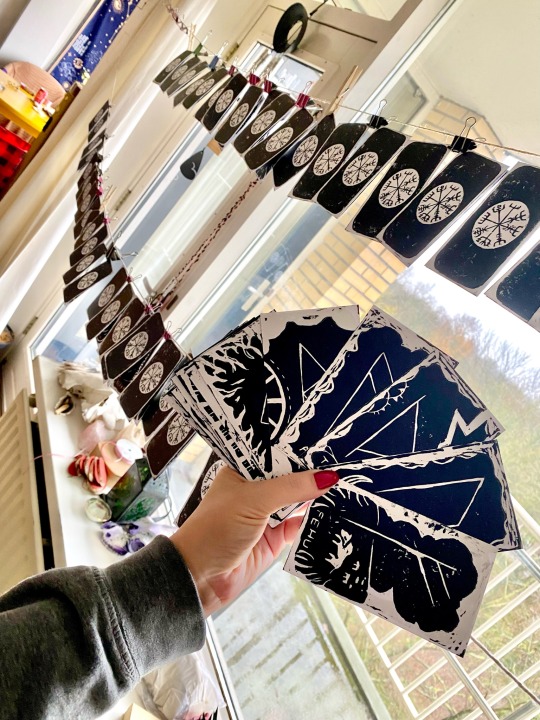
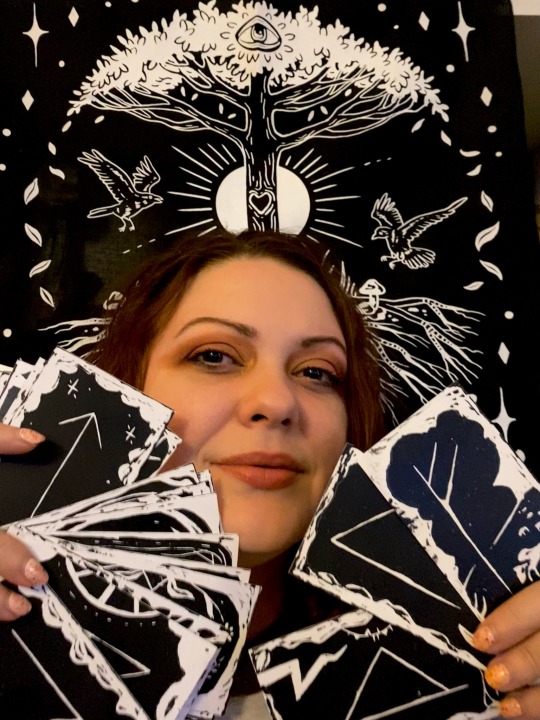
BERKANA woodcut print rune deck hand made by PJ Superior features each of the 24 Elder Futhark runes (plus a ”Wyrd” card) carved by hand into birch wood and printed in a hand cranked barrel press. (The backs printed with a spoon.) Along with the rune symbols, each associated Norse word along with a simple, deeply meaningful illustrative border is carved into the wood from which these cards are printed. The Norse rune symbols are still the main visual focus.
The woodcut print method used to create this hand crafted set of cards ensures that the wood carving typical of the most ancient sets of casting runes is still present in this contemporary deck.
I call this rune deck BERKANA after the 18th rune in the Elder Futhark alphabet, because it means “birch” which is the same type of wood used for the carving of this deck. In runic divination, Berkana represents growth, renewal, and hope.
A home made guide booklet, sewn by hand, is included to share interpretations for divination. The guidebook includes cultural background and history of the Elder Futhark runes, as well as insights into the inspirations and meanings of the artistic imagery accompanying each symbol.
Limited edition of 50 funded via Kickstarter
A handful of decks now available:
#norse runes#rune deck#divination tools#Viking#norse paganism#elder futhark#rune cards#woodcut#printmaking#vegvisir#rune magic#nordic#runes#tarot cards#oracle#fortune telling#folk witchcraft
122 notes
·
View notes
Text
ok 👍
#art tag#printmaking#i need to sharpen my stupid tools man#pink stuff so damn stretchy but i had a piece that was the perfect size :/#this is small it’s not even 2in tall. 3.75x2.75#but i’m doing it on small paper. gray#photo record#jk 1.75 tall. i can’t measure
44 notes
·
View notes
Text
This is in the category of annoyingly simple yet true advice but highly recommend doing/creating something with your hands as a strategy for hanging onto whatever remains of your sanity. Personally speaking I can particularly recommend linocut printmaking, because (1) surprisingly cheap as artistic hobbies go and (2) knives
#the amount of furious rage-carving i've done lately...#woodcut is even more satisfying if you really wanna stab something but it does require somewhat more expensive tools#my posts#art things#printmaking
16 notes
·
View notes
Text
Cat In the Bun Compartment (Lithograph)
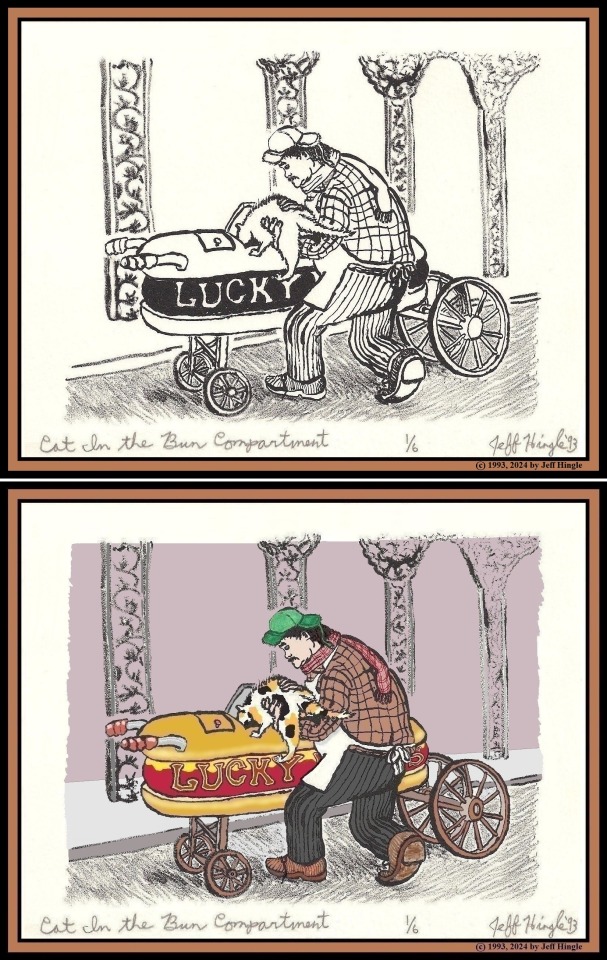
#art#artwork#illustration#lithograph#lithography#fanart#a confederacy of dunces#john kennedy toole#lucky dog#calico cat#printmaking#new orleans#nola#american literature#louisiana
7 notes
·
View notes
Text
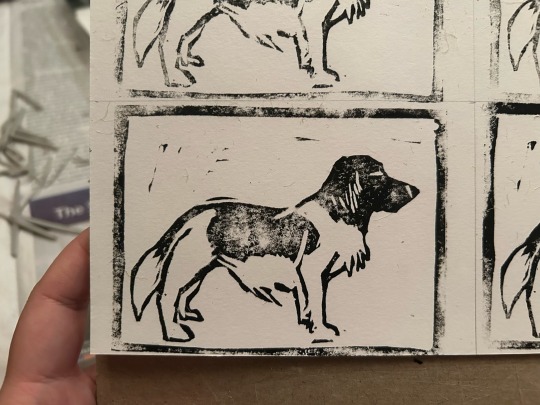
Doggust day 16 - Stabyhoun! Its name means “stand by me.” 🥹
#doggust#doggust2024#linocut#linoprint#print#printmaking#ID in alt text#I think my tools need a good washing and I need a better place to ink#sketchy sketch
13 notes
·
View notes
Text
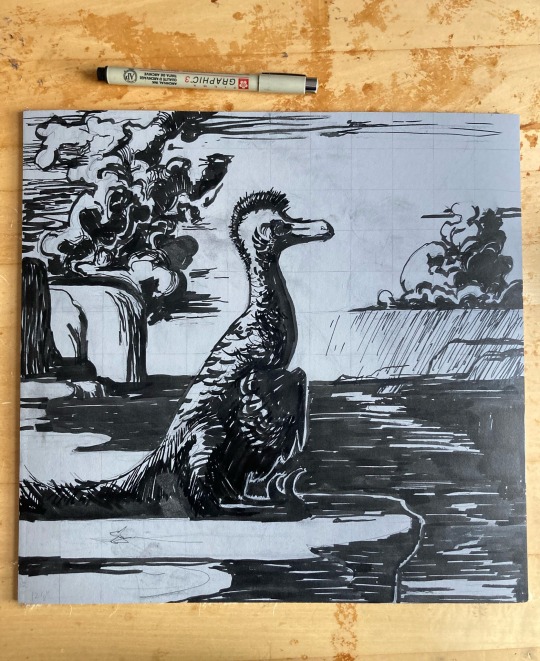
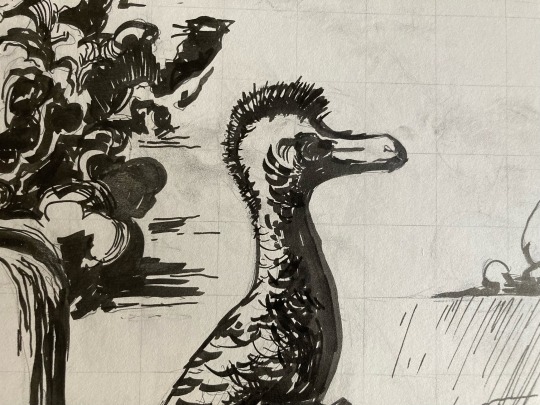
the block for the raptor linocut is ready to carve! can’t believe i gridded the whole thing but i don’t have access to a big enough printer to make the transfer LOL
73 notes
·
View notes
Text
In college I was never really a big fan of linocut (team copper plate intaglio here), but I’ve found myself doing it a lot more lately because of work and also because I don’t really have access to an etching tank at this moment (hopefully will soon). Was so tired of my raggedy speedball lino-cutters and ordered myself a this flexcut set and I’m super excited!
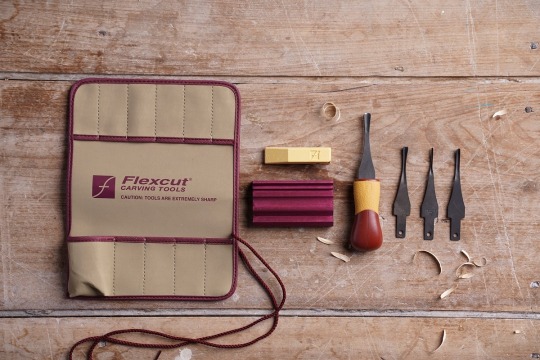
Kind of beautiful looking and also heard good things about them. Sharpener is a plus too.
5 notes
·
View notes
Text
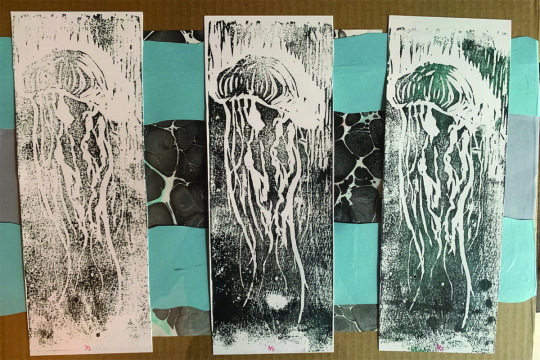
Lets Try Woodcut!
This week, WhereCreativityWorks is happy to introduce our new Printmaking Blogger, Becca, a graphic design major with a love for all things printmaking. In her first post, she shares about trying woodcut with acrylics. #MarywoodArt #Printmaking #DayOne
For my first blog post I would like to introduce myself as a free spirit when it comes to the processes of creating. I believe in repurposing things of all sorts to create something that speaks to me. I also enjoy printmaking of all types, and something I had never done but always had interest in was creating a woodcut! For my first woodcut piece I found inspiration from my summer trip to Aruba,…
View On WordPress
#acrylic#Art#artist proofs#carving tools#inspiration#jellyfish#Marywood University#Printmaking#repurpose#Where Creativity Works#wood#woodcut
38 notes
·
View notes
Text

Jake Muirhead (American, working in Maryland)
Oil Can - etching with aquatint
www.jakemuirhead.com
7 notes
·
View notes
Text
I frickin love printmaking because it is art MEANT TO BE SHARED
#printmaking is a recent development in my interests of mediums#but the ability to share art is much more accessible and awesome!!!!!#are some of the tools accessible depending on the form of printmaking? no not always#but gosh it’s so cool#art#printmaking#print
4 notes
·
View notes
Text
1 note
·
View note
Text
Literally earlier I was like wait I’m like fully stocked on art supplies I can make whatever art I want. And then I drew mushrooms for like 45 minutes it ruled.
1 note
·
View note