#Baking Tips
Explore tagged Tumblr posts
Visit Tumblr Blog
Explore Tumblr blogs with no restrictions, modern design and the best experience.
Last Seen Tumblr Blogs


Fun Fact
Tumblr Inc. is funded by 13 investors.
Text
cooking/baking tips
if you're making a recipe that's american/west european/anything that someone from the usa or west europe would think of as "normal," double the spices other than vanilla and salt. it doesn't matter what the recipe is for. cooking baking sweet savory whatever. double them.
get out all the ingredients before you start
keep the ingredients you haven't used yet in one spot, and move them to a different spot or put them away once they've been used
if you're making a lot of things at once or in sequence (eg making a bunch of different kinds of cookies) pay attention to the required oven temp. my preference is to order them from highest temp to lowest; that way the oven heats alllllll the way up while i'm mixing the first batch, and after that i only have to turn the heat down, so there's almost no wait time.
cleaning up as you go really does save time
if you're using stick butter and the recipe says "softened" and you have a microwave, then put the stick of butter in the microwave open-side-down for five seconds, flip it open-side-up, and heat for five more seconds.
if you're making something american/west european other than vanilla and salt double the spices
if you're making something liquid or semi-liquid that can burn easily and needs to be kept at a steady temperature, use a skillet, not a pot. it will heat MUCH more evenly (not such a big difference between top and bottom) and it's a lot easier to see more of it at once.
salt is what lets you taste other things. lifechanging when i found that out. this is why even recipes for things that don't taste salty at all still generally call for salt. salt makes other flavors taste more. something's bland? not enough salt. you're making up a recipe? include a pinch of salt.
speaking of salt: often, if you want something to taste more buttery, you don't need more butter; what you need is more salt.
a "rolling boil" is when there's no time lag between one bubble and the next (i'm not making this up. i just learned this. look it up.)
mmm that's all i can think of for now but i'm sure i'll remember more next time i cook something
52 notes
·
View notes
Text
Hello everyone. Thank you for your patience while I worked on transcribing this recipe. I tend to measure by eye and instinct, you see. So it took a bit to properly measure what I typically use and turn it into a usable recipe.
That being said, this is a recipe for a rather experienced baker, so don't be discouraged if it takes a few tries to get the hang of it. Feel free to leave me any comments or questions you may have.
As for the crust, any shortcrust recipe will work just fine. Pie crust or tart crust are acceptable alternatives as well.
Licht's Favorite Darioles
Ingredients:
1/4 cup blanched almonds
175 ml cold water
150 ml heavy cream
2 eggs
1/4 cup sugar
1 tsp rosewater
1 cup minced strawberries
1 recipe of shortcrust pastry
Method:
Press pastry into mini tart tins. Prick the dough and divide the strawberries among the tins (these will act as pie weights during the blind bake)
Bake the crusts in a hot oven at 425°F/220°C for about 10 minutes until just starting to brown.
Pound the almonds until finely ground. Stir in the water and let sit for 10 minutes. Strain through a cheesecloth.
Measure out 150 ml of the mixture and mix with the heavy cream.
Whisk the eggs and sugar in a saucepan until homogeneous. (Take care not to whisk so much it turns frothy.)
Set over low heat and slowly stir in the cream mixture. Continue cooking while stirring constantly until thickened.
The custard is ready when it reaches nappe, meaning the consistency where it can coat the back of a spoon evenly, like so:

At this stage, stir in the rosewater and remove from the heat. Pour into the cooled tart shells and shake a bit so the custard can properly coat the strawberries.
Bake in a moderate oven at 350°F/175°C for about 20 minutes until set. The center should still be a bit wobbly.
Cool completely and chill before serving.
Taglist: @floydsteeth @littlewitty @the12thnightproject @bubblesthegreat3 @anonymousnamedhera @5mary5 @otomedad @solacedeer @sh0jun @yvies-whore
Please let me know if you would like to be added or removed.
#ikemen prince#yves kloss#ikepri#ikepri yves#ikepri licht#licht klein#ikemen series#recipe tag#baking tips
100 notes
·
View notes
Text
Wilt-resist your whipped cream! (A cheat, by Doc)
Okay, the phrase "by Doc" is doing a lot of heavy lifting here--I actually learned this tip from a gal I was competing with years ago in state fair (she beat my ass) and I'm sure other aunts and grandmas know it. But, whomst else on tumblr will deliver it to your eyeballs?
Because you know the trouble with whipped cream and whipped cream frostings is they tend to wilt over time, especially if they have to deal with absolutely any level of heat. A simple room temperature can make your pie or cake look weepy and sad. Your bowl of fresh whipped cream now looks worse than the fuckin' cool whip. Tragedy.
Now, I assume you, erudite and exceptional readers of this blog, are already using powdered sugar/icing sugar instead of standard sugar to make your whipped cream, not only because of greater stability but because it functionally removes the possibility of graininess. This is a "I want to make this whipped cream the night before" tip. Other tips like milk powder, I find, just don't have the same longevity as what's below:
Professionals use gelatin or agar-agar, which I don't like for two reasons: 1) Gelatin is not vegetarian and in the US is often made from pork, so fuck your Jewish or Muslim guests and 2) you have to bloom the gelatin or agar-agar, and it can be tricky to work with, and if you aren't the 'working with high-level mousses and creams often" type, it may be a waste of space in your kitchen.
But gee whiz, did you know there's a very cheap and intensely easy solution for busy housewives to keep her man loving her whipped cream, and by extension, her? Tell her, Don!

Why little lady, it's Jell-O (tm) brand instant pudding mix! Don't tell the ladies at the church bake-off...we won't.
This is the easiest possible way to get nice, stiff whipped cream that holds up for, I think my record is three days. It can also tolerate sitting in a warm room much much better than whipped cream really ought to be able to.
"But Doc, isn't Jell-O, uh, gelatin?"
Jell-O itself is, but Jell-O pudding is actually kosher. I assume other brands are as well, but I don't know this for a fact--so make sure to check the label if you're using a different brand. What's doing the work here is 'modified food starch' which is a stronger version of cornstarch, which I find, added to whipped cream, to require too much to be added, and the texture gets odd.
This is cheap! Your grocery store may vary, but this small box was 99 cents.
This is easy! All you do is add about 1 tablespoon of pudding mix per one cup of heavy/whipping/double cream* and then whip as usual.
It does lightly flavor the whipped cream, which I've never found to be a problem--I use regular vanilla mostly, but french vanilla is nice for banana cream pie, I used coconut cream for the pie I just entered WHICH WON BEST IN SHOW I MIGHT ADD. Chocolate is great for chocolate whipped cream. You're smart people, you got this. The only ones I don't recommend are tapioca (pearls) and Oreo (having about three bits of oreo in the whipped cream looks dirty rather than intentional.)
Go forth, and set your whipped cream on the sideboard with confidence!
*I'm aware these all actually contain different levels of fat, but let's get real here, they are often used interchangeably and only the craziest among us is going to seriously get into "What cream should you be whipping?" discourse.
119 notes
·
View notes
Text
Baking gluten-free can be tricky. To ensure your gluten-free baked goods really are gluten-free, you need to pay careful attention to all the ingredients you use throughout a recipe.
If you're newly gluten free and want to start baking your own GF goods, you need to watch out for gluten in more than just the flour you use. King Arthur Baking Company goes over some common issues, tips, and tricks in this article.
25 notes
·
View notes
Text

before letting the yeast rise <3
#my photos#photooftheday#photo#picture#photographer#photoshoot#photograph#photography#photoshop#baking#baking blog#baking tips#baking recipes#baking adventures#baking therapy#dessert#recipe#sweden#swedish#lussekatt#lussekatter#christmas#christmas time#festive#merry christmas#happy holidays
11 notes
·
View notes
Text

5 notes
·
View notes
Text
Listen to me this is so important:
Put Actual Chocolate in your Brownies, not just cocoa powder
And I don't mean just swirl in some chocolate chips at the end (but feel free to do that too)
But what you want to do, is melt the chocolate with the butter, and make it one with the batter.
This is The Way, do not question it.
#baking#kitchen#brownies#baking tips#kitchen memes#i have strong feelings about this#brownies are a Very Serious matter
29 notes
·
View notes

Text
🍪 Cookie Tip 🍪
Just a quick cookie tip that I've learned, and that everyone else probably already knows lol.
When making chocolate chip cookies (or really any cookie with morsels in it) add a little less than you want to use.
I know what a horrible thing to say, but believe me, it will save you some trouble!
#things went a little sideways#baking#baking tip#baking tips#baking tag#homemade#homemade cookies#chocolate chip cookies#chocolate chip#cookie monster#cookies
5 notes
·
View notes
Text
yesterday i baked a brownie and it overbaked (stuck a toothpick in it and it came out almost clean, no crumbs attached, just a little moisture) so I pulled it out and... stuck it in the fridge so it wouldn't keep cooking outside the oven.
last time i overbaked a brownie, it came out chewy. like, texture hell chewy. like, teeth stuck together chewy. that thing was toffee, not a brownie.
this time it's... fine. it's not perfect, but it's edible. it's fine. some parts are a little chewy, but the center is soft.
so, uh. if you ever realize you just overbaked your brownie, maybe toss it in the fridge.

3 notes
·
View notes
Note
Prince Yves,
Thank you so much for this blog - I'm really enjoying reading it.
I've been baking bread and sweets for a few years now, with mixed success (happy to note that I actually managed a pie crust last year). I'm about to take the next logical step... grow my own sourdough starter.
Any words of advice? I'm a bit nervous about it. It seems like such a delicate process.
Thank you in advance, Your Highness.
Hello, there.
I'm so grateful to hear you've been enjoying my blog. I'm glad I can bring happiness to someone in any kind of way.
Congratulations on the pie crust, those can be quite difficult to work with. Especially without modern refrigeration.
(What's that?)
(... I have no idea, Licht. What did I just say?)
A-anyway. Don't be too scared. A sourdough starter is actually a very hardy thing once it's grown a decent size! Sometimes I forget to feed mine for weeks at a time, and it's just fine!
But, please make sure to feed yours regularly ^^;
My words of advice are:
Make sure your water is pure. Either spring water or distilled water. Any chlorine or other unwanted minerals can kill your starter.
(What's chlorine?)
(I don't know!! Now please get out of the kitchen before you start a fire, Licht. I'll start on your darioles soon.)
Also, use either bread flour or all purpose flour to begin with. You can phase it out for some other type of flour when it's matured. It's easiest to see the consistency and reactions when using the flours I recommended above.
Lastly, be careful of the water temperature. Lukewarm water will give you best results in the starting stages. Room temperature water will work fine when it is mature. Do NOT use hot water, it will kill everything.
As for general maintenance, I feed my starter once every two weeks or so. Make sure to discard some starter if you haven't used any, otherwise you might end up with an overflowing mess.
When you store it, it NEEDS to be in a container that is not airtight. It will shatter from the escaping gas otherwise. I use a jar with a wire clamped lid. If you remove the rubber gasket, it won't be airtight.
(What's-)
(LEON I SWEAR-)
You can also simply place the lid of a jar over the top.
And although it's not necessary, I recommend getting a Danish dough whisk.
...
No one this time? Good.
Anyway, it's quite helpful for mixing the started thoroughly when you feed it, and nothing will get stuck inside.
Oh, one more thing. Do you have a scale? If not, get one. Non negotiable. Your starter must be fed equal amounts of water and flour by weight once it has matured.
I think that's everything! Let me know if you have any questions.
Now, if you'll excuse me, I need to go lie down. All this breaking the 4th wall has got me very tired.
-Yves Kloss
20 notes
·
View notes
Text
Doc's Best In Goddamn Show Montana State Fair Coconut Cream Pie
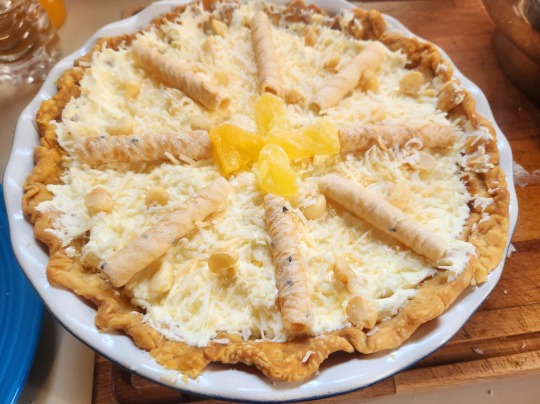
As promised, the baked good that did the best, I'll release the recipe. This is one of my favorite pies of all time, hewed into a perfect custard-based pie that won me my first Best in Show rosette in nine years. And pies is even a tough category!
The other shocking thing: This is one of the easiest pies I make. It's very much "don't worry about it." It even tastes better if you make everything but the topping the day before serving.
“Doc, why don’t you use cream of coconut for the custard?” Friend, I tried for years to get that to work, only to find out that cream of coconut just does not bake up as nice as milk and cream, so I use a nice extract and toast the coconut to get the flavors.
YOU WILL NEED:
A crust (I presume you can either make or buy a crust. I might even have a recipe here on the blog, I can’t remember)
Pie:
5 eggs
¾ cup caster/baker’s sugar
2 cups of whole milk
½ cup half and half (I believe this is called half cream in the UK)
1 tsp vanilla bean paste
1 tsp coconut extract (I like Olivenation or watkins. Also, bear in mind you may need to use more. I do this to taste and the tsp is a guess on my part. Don’t worry, I’ll tell you where to taste in the recipe)
Pinch salt
1 cup sweetened flaked coconut
Topping:
2 cups heavy cream VERY COLD (can use whipping or double also, but I prefer heavy)
2 tablespoons jello or jello style pudding mix, coconut
Powdered/icing sugar (this will be to taste)
Decoration: Most definitely toasted coconut. I really like Nuts.com’s organic dried coconut chips, but it depends on how flush I’m feeling--I did not use it in this competition. Macadamia nuts are great, dried pineapple, for this competition I used coconut rolls from costco. This is mostly for visual appeal, so be creative.
Toast your coconut: Put the oven at 350F. Put some parchment down on a baking sheet, and then put your sweetened flaked coconut on the sheet. Don’t forget to put in a bit extra for your topping decoration. Toast for about five minutes, it will probably need a stir and watch it closesy--coconut burns easy. When it’s a nice pale golden, pull it and up the temperature of the oven to 375F.
Blind bake your crust. If you haven’t done this before, I think it’s easy but admit maybe not everyone will. Roll your crust out into a pie plate, just like you always would, and then cover the bottom with tin foil, and fill with pie weights or beans, or rice--I’m a big fan of using sugar. Whatever you use. Bake it about 15-17 minutes, it should be lightly brown at the edges. Take out the pie weight you used. Bake it about 5 minutes more, just so the bottom gets very lightly toasted.
Make the filling! Beat your eggs in in a large bowl until they are very well combined but not whipped. Beat in everything but the coconut itself. NOW TASTE IT. Does it taste coconutty enough, or do you want to add a little more extract? Have an easy hand with the stuff, it’s powerful. Mix in the toasted coconut.
Yeah, I’m serious, that was the whole of the filling instructions. I told you this was ridiculously easy.
Bake: Pour your filling (carefully) into the pie crust, and cover the edges of your pie crust so it doesn’t burn (I use tin foil, but they do make fancy pie shields). I like to put it on a jelly roll pan so it’s easier for me to take in and out of the oven. You’re going to bake it at 375F for about 30-40 minutes, but the real test is: if you shake it a little, is it set at the sides but with a little wiggle in the center? That’s when it’s done.
Let it cool totally.
Topping! Beat your cold cream and pudding mix together, adding the powdered sugar slowly. I start with a quarter cup and work my way up until it’s as sweet as I like. I prefer a harder peak for this, but soft peaks are acceptable if you enjoy that more. Decorat with your topping choices!
GO WIN A FUCKIN ROSETTE

Please tell me if you made this! If you found this really helpful and would like to leave me a tip, my ko-fi is here!
89 notes
·
View notes
Text
Erin McDowell's Guide to All Things Buttercream (via Food52)
14 notes
·
View notes
Text
Remember kids, it only takes 65gr of CEO blood to replace a medium size egg
2 notes
·
View notes
Text
Almond Pastry

A delicately nutty pastry which will beautifully compliment your stone fruit bakes, this Almond Pastry is easy to make and pop in the freezer for your sudden pie and tart needs!
Ingredients (makes about 415 grams/14.6 ounces pastry):
1 1/2 cup plain flour
1/2 cup ground almonds
1/4 cup caster sugar
1 teaspoon salt
6 tablespoons cold unsalted butter
1/4 cup ice water
In a large bowl, combine flour, ground almonds, sugar and salt. Add butter, and rub it into the flour mixture between your fingers, until mixture resembles coarse meal.
Then, gradually stir in ice water until mixture comes together into a soft ball.
Flatten pastry into a disc, wrap in cling film, and chill Almond Pastry, at least one hour before using. You can keep it up to a couple of days in the refrigerator, or three months in the freezer.
#Recipe#Food#Almond Pastry#Almond Pastry recipe#Pastry#Pastry recipe#Flour#Plain Flour#Almonds#Ground Almonds#Almond Meal#Sugar#Caster Sugar#Salt#Butter#Water#5 Ingredients or Less#Quick recipe#Easy recipe#Baking#Baking recipe#Baking Tip#Baking Tips#Cooking Baking and No Waste Tips
5 notes
·
View notes
Text
So important if you want consistency.
#baking#dessert#bake off#bake#life hakcs#baking hacks#baking tips#good to know#get baked with natali#ysk#did you know#how to#adulting#cooking#cakes#butter
27 notes
·
View notes