#Aluminum frying pan
Explore tagged Tumblr posts
Visit Tumblr Blog
Explore Tumblr blogs with no restrictions, modern design and the best experience.
Last Seen Tumblr Blogs


Fun Fact
Tumblr has 16.74 million mobile monthly users in the US.
Note
Hi, been thinking about Detroit pizza lately and remembered some of your posts about pizza and wanted to ask a couple of questions. You’re using a cast iron pan instead of a non-stick aluminum as I’ve seen suggested elsewhere, is that because non-stick gets scratched too easily? And you’ve mentioned lack of bottom char as well as the middle not baking enough, and might that be because the cast iron heats more slowly than a thinner pan and maybe a baking steel or pizza stone under it would boost the baking? Or have you solved for the bottom char?
I’m in the ‘looking at pans to buy’ stage (prefer cast iron if possible) and would be grateful for your thoughts. Thank you!
Yay, time to talk pizza!
I actually was using a nonstick pan, a tart pan I was given ages ago, which is why I wasn't getting a good bottom char, at least I thought. The cast iron heats up slower but gets hotter and stays that way longer, which is why I swapped over.
Then the problem I was running into became that the cheese would burn before either the bottom crust charred properly or the very center of it cooked as thoroughly as I could wish (it got cooked, just not very).
I considered getting a baking steel/stone, which I really should do anyway, but I just can't justify the expense at the moment.
So there are two solutions to using cast iron to make Detroit pizza:
Give up on it being square and just make two smaller round pizzas. Smaller round pizzas cooked in cast-iron frying pans do get at least some char underneath, because there's less surface area to heat.
If using a larger square pan, before you put the pizza in the oven, cover the pan with aluminum foil. This keeps the cheese from cooking as quickly, so you can extend the amount of time the entire dish is in the oven. For example, the recipe I use calls for 18-20 minutes for a round pizza cooked in a cast iron frying pan. Using aluminum foil, I can bake it for 25 minutes with the foil on and then another 5-10 at least with the foil off, which gives the crust some char and also lets the dough cook fully, but keeps the cheese from burning.
For the rectangular pan I use, it also helps that I grease it REALLY thoroughly with Crisco, which also encourages the browning and keeps the pan from sticking, a very real peril with cast iron even when it's seasoned. I may try covering the square pan with a half-sheet baking sheet and see if that will waste less foil.
The pan I use currently is the Lodge 9x13" Cast Iron Casserole, which is bulky but does seem to work pretty well. That's a link to the sales page at Lodge, but I've noticed that other retailers (Target, Amazon) often have it discounted, so if you like the look of that one I'd shop around a little.
103 notes
·
View notes
Text
I am so fucking pissed. We’re hearing forecasts that we might get FIVE FUCKING INCHES OF SNOW overnight from Monday to Tuesday. In ALABAMA, where we have no snow removal equipment. Like I think we got one bag of sand for the whole town. No snow tires, I don’t even know what those are. This isn’t cute “Haha it’s just barely below freezing! Snowball fight!!!” snow. This is 14° Fuck (-11° Come the Fuck On) snow. FIVE INCHES? We get flurries and the city descends into madness.
What if we lose POWER. Everything runs off USB cord stuck in the outlet charging nowadays. This is why everyone used to run out and buy Milk Bread Batteries. Listen. I have this memory of the power going out during this wild snowstorm when I was a kid--I want to say it was Winter Storm '93. Ask anyone who lived in Alabama at the time. Like we had Desert Storm '92 the military operation one year and Winter Storm '93 the next. It was that serious in our minds, and I'm not sure you can blame us:
The storm dumped several inches of snow each hour on Birmingham, which ended up with officially 13 inches of snow.
Due to the high winds some parts of Birmingham reported drifts 5 to 6 feet deep. One state trooper reported that the roads were in the worst shape he had ever seen. "People can't tell what's road and what's not."
Low temperatures during the storm were in the 5-to-10 degree range on that Sunday.
IN A TOWN WHERE WE DON'T KNOW WHAT A SNOW PLOW IS. I think we had one for the entire county. Like I'm only kind of joking here.
And our power went out.
The snow was so heavy that it pulled down power lines either by its own weight, or by the tree branches its weight broke off. Meanwhile, the power at my house already went off every time a squirrel sneezed. I don't how many days this lasted; it was probably like, 2-3 days, but in my head, I was 14 years old boxed up with my family with no heat and it lasted two weeks. Maybe three years. The four of us slept in sleeping bags layered with quilts, huddled on the floor around a wood burning fire. (In the haunted house, no less.) The carpet was really nice, at least. We had a--do people still call them boomboxes? A big portable cassette player--battery-powered--with AM/FM radio. We listened to whatever TV shows were broadcast from the ABC station at night. We did have hot water; I took a lot of hot baths. We cooked food over the outdoor grill (which we moved to the comfortably large area under the deck, to hold off the falling snow), sometimes using aluminum foil as a kind of thin impromptu frying pan, and kept perishables like milk and meat in a cooler. Oh, did we have a bag of ice for the cooler? No, we used snow. God knows there was enough of it. Of course, I'm sure the refrigerator was perfectly serviceable even without power, because it was TEN DEGREES FUCK ALL.
I remember going outside a good bit and playing, as much as a teenager plays, in the snow with my seven-year-old sister. I remember that all the neighborhood kids got big rubber trashcan lids and used them as toboggans, going up to the top of the hill on our street and pretty successfully sledding down. Maybe it was "lmao snowball fight!!" snow when I was 14. I'm 45 now, and the cold makes me hurt. It makes me hurt all over. Maybe Winter Storm '24 will be a fun core memory for my nephew. I am pissed. And also charging all my electronics.
(ETA: It’s ‘24 now, isn’t it. My brain hasn’t clicked the date over yet. What is time.)
102 notes
·
View notes
Note
You know Quackity, there is a recipe that I really like and I wanted to share it with you :)
Ingredients for duck magret with orange !!
150g sugar
0.5 glass of water
1 glass of orange juice
400 ml of 100% Natural Homemade Meat Broth
30 g orange marmalade
1 splash of Cointreau
2 duck magrets
1 pinch of salt
1 pinch of black pepper
4 oranges
In a saucepan, add the sugar with a little water. Let it boil until it becomes caramel. When it is ready, add the orange juice and let it cook for a few minutes over low heat.
Add the White Chicken Meat Broth, the orange marmalade and the Cointreau to the caramel and let it cook until it thickens a little. Cut the magrets in half, then cut the skin into small squares so that it cooks better and releases the fat. In a frying pan without any oil, cook the magrets well on the skin side, then turn them over and cook them for 3 minutes.
Take them out, put them on a plate and cover them with aluminum foil for 5 min. Salt and pepper them. Peel the orange and cut it into segments. Serve the magrets with the sauce on top and some orange segments to decorate.
and that's it!! You have a delicious dish that only took you 20 or 40 minutes to make, I think you me should try it :)
atte: Dream To: the president of Las nevadas
. . you really think you're fucking funny, huh?
7 notes
·
View notes
Text
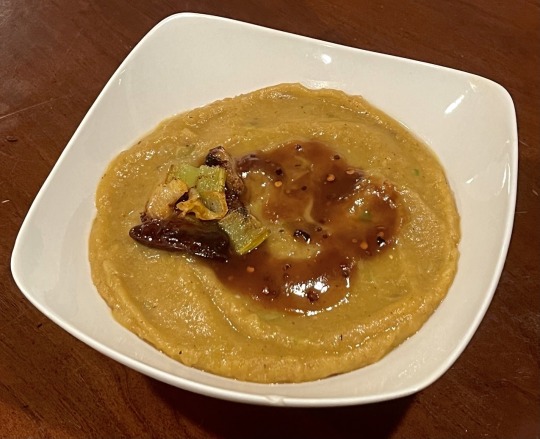
Roasted celery and potato soup
This soup is a great way to use up limp celery! It combines a base of roasted and puréed garlic, celery, and potatoes with a sweet, sour, and spicy tempering of chili, tamarind, jaggery, and lime. The result is an exploration of sour, citrusy, and nutty spices (mustard, annatto, fenugreek, coriander)—an earthy and savoury depth of flavor with a bright kick.
Recipe under the cut!
Patreon | Tip jar
Ingredients
For the soup:
1 head of celery (about 10 stalks)
4 medium yukon gold potatoes (800g)
1/2 head of garlic
About 1/4 cup of extra virgin olive oil
1/2 tsp black mustard seeds
1/2 tsp yellow mustard seeds
1/4 tsp annatto seeds
1/4 tsp fenugreek seeds
1/2 tsp black peppercorns
1/4 tsp coriander seeds
1/4 tsp ground ginger
Salt, to taste
4-5 cups (950 to 1000mL) vegetable stock
For the tempering:
1 Tbsp non-dairy margarine
1 dried red chili, broken in half
1/2 tsp black mustard seeds
2-3 Tbsp jaggery or brown sugar, to taste
3 Tbsp tamarind purée
1 Tbsp freshly-squeezed lime juice
1/4 tsp light Cantonese soy sauce (or substitute any other soy sauce)
1/2 tsp red pepper flakes, or chili oil
To replace the tempering, you could use anything sour, sweet and savoury—try vegeterian Worchestershire sauce, or usata sosu.
Tamarind purée, often in jars or cans labeled "tamarind concentrate," can be found at east, southeast, and east Asian grocery stores. Blocks of dried tamarind pulp can also be purchased, seed-in or seedless. Break off about a tablespoon of tamarind pulp; soak it in a couple tablespoons of just-boiled water for about 30 minutes; palpate the pulp with your fingers and remove any tough seeds that you feel; blend the pulp and water together in a blender; then pass the resulting liquid through a sieve to remove any stringy bits or seed fragments.
Instructions:
1. In a small, dry skillet on medium heat, toast the coriander seeds, black peppercorns, and fenugreek seeds until spices are fragrant and fenugreek is a couple shades darker. Remove. Toast black and yellow mustard seeds for a minute or so until fragrant. Grind all spices (including the ginger) in a mortar and pestle or spice mill (I would recommend the latter—annatto is tough to pulverize).
2. Cut off the base of the head of celery to divide celery into stalks, then wash and drain. Cut each one into halves or thirds. Include some of the leaves, if you have them; optionally, reserve some for a garnish.
3. Cut onion in half lengthwise (through the root), then cut each half into fourths or sixths. Halve a head of garlic; cut off the very top of it to expose each clove; drizzle about a teaspoon of olive oil over the exposed cloves; and wrap the whole in aluminum foil. This will allow the garlic to slowly roast without drying out.

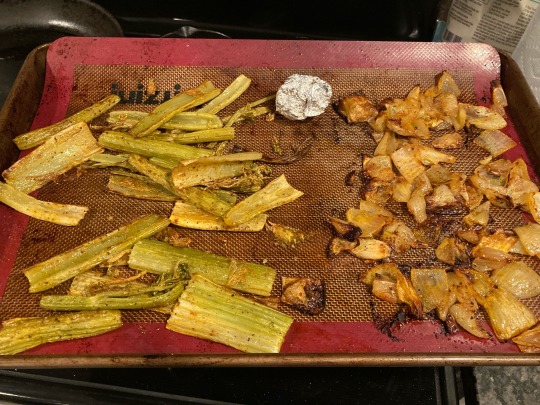
4. Coat celery and onions with a few tablespoons olive oil and about half of the spice mixture. Roast celery, onions, and garlic at 385 °F (196 °C) for 20-30 minutes, until onions are deeply golden. Stir and flip over every 10 minutes or so during roasting to ensure even cooking.
5. Peel and cube potatoes and coat with a couple tablespoons of olive oil and most of the remaining spice mixture. Bake in a shallow roasting pan at 425 °F (218 °C) for about 25 minutes, until browned.
If you don't have a second oven, or don't have time to wait until the celery and onions are finished roasting: dice your potatoes, heat olive oil on medium in a large pot, and add potatoes and spices. Fry, stirring every five minutes or so, until potatoes are golden brown on the surface, then continue with the steps below.
6. In a large pot, combine roasted celery, onions, and potatoes with salt to taste and enough stock to cover. Squeeze the roasted head of garlic to remove the garlic from the peels, and add the garlic to the pot. Add remaining spice mixture.
7. Raise heat to high to bring to a boil, then lower heat to simmer, uncovered, for about 20 minutes. Blend using an immersion blender, or in sections in a conventional blender. Taste and adjust spices and salt. Cover to keep warm.
For the tempering:
1. Heat margarine in a small skillet on medium until sizzling. Add chili and fry for a couple minutes, flipping occasionally, until fragrant. Add mustard seeds and fry for another minute or so, until popping.
2. Add jaggery or brown sugar and allow it to melt. Add tamarind, soy sauce, and pepper flakes or chili oil, and continue to heat until mixture returns to a slow boil. Remove from heat and stir in lime juice.
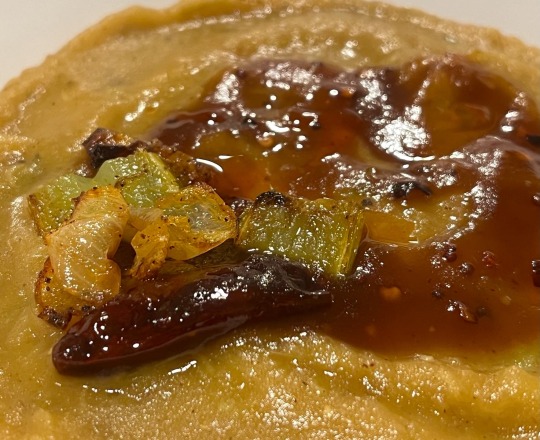
3. Divide soup into bowls and garnish with a spoonful of tempering sauce, celery leaves, sliced roasted celery, additional spice mixture or pepper flakes, etc.
#amongst all the research I do to recreate dishes it was fun to simply make something up!#though of course 're-creation' is never just re-creation and does always involve curation and decision-making#soup#cooking#US American#I guess?
74 notes
·
View notes
Text
Turkey Patties
Cooking options:
fry it in a pan (requires standing the entire time, monitoring cookedness, avoiding grease pops, dealing with over all heat, washing the pan, grease splash clean up)
grill it (requires live fire, direct heat exposure, heavy and hard to clean equipment, exposure to elements likely, standing the entire time, monitoring cookedness, dealing with grease popping)
Bake it (stick it on an aluminum lined baking pan, oven or toaster oven at 400°F for 30 mins. add 5 mins if using a conventional oven without preheat. when done, just throw out the aluminum foil for cleanup. minimal standing. Needs a timer.)
#disabilties#disabled#disability#adhd paralysis#adhd post#adhd problems#adhd brain#actually adhd#adhd things#adhd#executive dysfunction#efd#chronically ill#chronic illness#chronic pain#chronic fatigue#cooking#foodies#foodie#food#accessibility#meat#spoonie#spoonies
14 notes
·
View notes
Text
RECIPIES!!!!
from Alice Archives - Green Book
1. BY PETER: foil-baked fish and mushrooms
Ingredients (2 servings)
Fish fillet - 2 pieces Onion - half Shiitake mushrooms - 2 of them Enoki mushroom - 1 Shimeji mushrooms - 1 pack Butter - about 10g Soy sauce/Ponzu sauce - An Appropriate Amount Salt - a little Pepper - a little
Slice the onion thinly. Cut the mushrooms into bite-sized pieces.
Spread out the aluminum foil and spread the onions across it. Put the fish and mushrooms and butter on top of it. Wrap the foil.
Put about 100cc of water in a frying pan. When steam comes out, put the wrapped foil in the frying pan and put the lid on.
Steam for 5-10 minutes on medium heat.
Add salt and pepper to taste, put on soy sauce or ponzu sauce, and its done!
2. BY BLOOD: tea scones
Ingredients (makes 8 scones):
Cake flour - 200g Baking powder - 1 tablespoon Butter 70g Black tea leaves (earl grey, darjeeling) - 1-2 tablespoons or 1-2 teabags Milk - 100cc Egg - 1 Sugar - 1-2 tablespoons Salt - a little
Mix the cake flour, baking powder, salt, and sugar. Mix thoroughly.
If the tea leaves are too big, crush it finely. mix with the mixture from 1
Mix the butter, egg, and milk. Little by little combine it with the mixture from step 2. Mix lightly, dont overmix!
Wrap in plastic wrap and let rest in the fridge for about 1 hour.
Roll out about 1-2cm thick. Cut to a suitable size or use a cookie cutter.
Put in the oven on 180C for about 10-20 minutes, watching it.
Put on as much jam, cream, and other toppings as you like.
3. BY JULIUS: COFFEE SCONES
Ingredients (Makes 8 scones):
Cake flour - 200g Baking powder - 1 tablespoon butter - 70g milk - about 80cc coffee - about 20cc sugar 1-2 tablespoons chocolate chips- 50g salt - a little
Mix the cake flour, baking powder, salt, and sugar. Mix thoroughly.
Mix the milk and the coffee, then mix that with the mixture from step 1.
Mix what you have from step 2 with the butter. Add chocolate chips. Dont overmix, mix it lightly. Wrap in plastic wrap and let rest in the fridge for about 1 hour.
Roll out about 1-2cm thick. Cut to a suitable size or use a cookie cutter.
Put in the oven on 180C for about 10-20 minutes, watching it. Your bittersweet coffee scones are ready!
4. BY ACE: Rabbit Stew
Ingredients (2 servings):
Meat of a white rabbit similar to Mister Peter - 1/2 rabbit Carrots - 2 White mushrooms - 10 Onion - 1 Dried herbs (bay leaf, basil, rosemary, thyme, etc) - a little Parsley - 2 tablespoons Salt - a little Garlic - 1 piece Red wine - 2 cups Olive oil - a little Pepper - a little Honey - half a tablespoon
Cut the rabbit into easy to eat pieces, submerging it in red wine. Let it rest in the fridge for 1 hour.
Julienne the carrots. Cut the onion, mushrooms, and garlic into thin slices. Dice the parsley.
Put the olive oil in a pan and fry the rabbit until brown. Add and saute the onion halfway through
Add the red wine, carrots, mushrooms, garlic, and dried herbs to the pot from step 3. add salt and pepper and stew on low heat for an hour.
When the meat and vegetables are tender, put them on a plate and sprinkle with parsley.
Add honey to the juice left in the pot and heat for 1-2 minutes
Put on the sauce from 6 and it's ready!
5. BY BORIS: Herb Grilled Salmon
Ingredients (2 servings):
salmon - 2 slices panko crumbs - 1 cup pepper - a little olive oil - 2 tablespoons dried herbs (bay leaf, basil, rosemary, thyme, etc) - a little
Pat the salmon dry, and sprinkle on the pepper and herbs. If the salmon is raw, sprinkle on salt, too.
Mix the panko crumbs and herbs. Put one teaspoon of the olive oil into your mixture to moisten it.
Coat the salmon in the panko crumbs from step two.
Heat up olive oil in a frying pan, then cook on medium heat until golden-brown on both sides.
It's recommended to put on as much lemon juice as you'd like. Enjoy!
6. BY PIERCE: Cheese In Blue Cheese
Ingredients (2 servings)
Your preferred cheese - 1 block Sauce: Blue cheese - 50 g Milk - 100cc Fresh cream (low-fat) - 100cc Pepper - just a bit
Mix blue cheese, milk and fresh cream on your stove. melt blue cheese while stirring
Add cheese and simmer. It will be ready in a reasonable amount of time!
*If you're a person who ISN'T Pierce, it's recommended to put the cheese sauce on spaghetti or gnocchi.
ORIGINALS:


#hnkna#thoughtful honking#i made the boris one and can vouch for it being DELICIOUSSSSS#have yet to make any of the others but i doubt theyll surpass....#boris wins the cooking battle. beloved chef catboy. delicious. my mom and her friend loved it too#translated by me with the help of looking A LOT of words and phrases up and then ven editing for mistakes (:hearthands: thank youuu)#but like i do feel like i put work into it. effort! and i LEARNT things. for sure!!!!!#lmk if theres any more uncaught mistakes etc#also its a good joke to me that pierce never actually uses the pepper. squeak roughly to ur little boy etc#and REALLY funny to me that in the recipe about eating peter by name he's still -san.#anyway WOOOO I DID IT YAYYYY#translation tag
36 notes
·
View notes
Text
Restaurant Kitchen Cleaning
414-305-3074
www.facebook.com/efficientcleanin
Restaurant Degreasing Services | Professional Kitchen Cleaning Description: Highlight your restaurant degreasing services, emphasizing professionalism and kitchen cleaning expertise.: "Our restaurant degreasing services ensure a safe and clean kitchen environment. We remove stubborn grease and grime to maintain health code compliance. Contact us for expert kitchen cleaning today."
Keywords: restaurant degreasing, kitchen cleaning, grease removal, commercial kitchen cleaning, restaurant kitchen degreasing, professional kitchen cleaning Geo-Targeted Meta Tags (if you operate in a specific location):
Location: Insert the specific area or city you serve, e.g., "Serving Los Angeles, CA" or "NYC Kitchen Cleaning Experts." Service-Specific Meta Tags:
Services: "Deep Fryer Cleaning," "Exhaust Hood Cleaning," "Grill Cleaning," "Kitchen Appliance Cleaning" Contact Information:
Contact: "Phone: (Your Phone Number)" and "Email: (Your Email Address)" Unique Selling Proposition (USP):
USP: "Trusted by Restaurants for Over a Decade" or "24/7 Emergency Kitchen Degreasing Services" Call-to-Action (CTA):
Cutlery:
Knife Fork Spoon Teaspoon Tablespoon Cooking Pots and Pans:
Frying pan Saucepan Stockpot Dutch oven Wok Roasting pan Bakeware:
Baking sheet Cake pan Muffin tin Loaf pan Pie dish Cookie cutters Rolling pin Food Prep Utensils:
Cutting board Chef's knife Vegetable peeler Grater Mixing bowls Colander Measuring cups and spoons Small Appliances:
Blender Food processor Toaster Coffee maker Microwave Electric kettle Utensils for Mixing and Stirring:
Whisk Wooden spoon Ladle Slotted spoon Spatula Tongs Mixing spoon Baking and Cooking Tools:
Thermometer Oven mitts Basting brush Pastry brush Sieve or sifter Can opener Corkscrew Kitchen Gadgets:
Garlic press Nutcracker Egg separator Citrus juicer Potato masher Pizza cutter Ice cream scoop Storage Containers:
Food storage containers Plastic wrap Aluminum foil Plastic bags Miscellaneous Tools:
Timer Meat tenderizer Kitchen scale Trivet Mortar and pestle Kitchen scissors Serveware:
Plates Bowls Glasses Serving platters Salad tongs Gravy boat Trays Culinary Accessories:
Apron Oven gloves Pot holders Kitchen timer


3 notes
·
View notes
Note
For outertale, outerfell, farmswap, birdtale and fallout tale
They get Star's curse for a week
:)
Pff, for anyone who doesn’t know, Star is cursed so he cannot cook. Anything he tries to make seems to fail spectacularly
Pluto: it takes Pluto a good week to notice cause he’s one of those guys who would survive off take out if he could. When he does try to make some tacos finally, he winds up blowing up his frying pan somehow. The pan looks like an aluminum ball. He’s horrified but also fascinated
Jupiter: f*ck this sh*t. When every simple thing he makes seems to fail, he knows exactly what happened. He calls lilac immediately to whine about it lol
Orion: he’s like the least picky person ever. When he burns his cereal and milk, he shrugs it off and eats it anyways. When his coffee machine somehow spits out oddly smelling tea instead of coffee, down the hatch! Orion cannot be phased
Atlas: he briefly moves in with his brother when he somehow melted half the fridge putting in a jello to set. His parents are pissed right now and atlas still can’t explain what happened
Cider: thankfully the curse doesn’t affect simply just picking grapes or collecting his quail eggs. However it hurts not being able to make his wines and ciders until it gets sorted out. Cider watches on jealously as barley does his job.
Barley: hah! You mean he can’t make the drinks? Only pour them and gossip with customers? Barleys gonna just relax for a bit until his family forces him to get the curse removed. Damn he was enjoying his vacation
Quill: he doesn’t really cook so it takes him a wild amount of time to notice. Like months even. Quail is one of those grazing people who prefers several small snacks over a day instead of three meals. And he doesn’t eat much in general. It’s only until his pbj sandwich starts speaking Spanish at him that he realizes something is wrong
Crow: he makes the mettas their gasoline coffee. When the “coffee” suddenly starts coming out as actual coffee bean coffee, crow knows something is wrong lol. Poor mettaton can’t survive like this!! He sends crow to a mage to get sorted out immediately
Lens: as a chemistry major, lens knows there’s no physical way that he somehow froze that chicken breast in the oven. He’s quick to get this sorted and immediately hires a private investigator to find out who cursed him. Goodbye to whoever was dumb enough to cross lens. His revenge is quick and horrifically creative
Cricket: before he gets his curse removed, he cash and bruiser have a field day testing the limits of it. A huge heap of food and old kitchen supplies in crickets dump is destroyed. The threes personal favorite incident was trying to make Mac and cheese over a campfire and having the pan crumble into dust in crickets hands, the pasta burst into flames, and the fire itself somehow melting into an icy cold liquid
20 notes
·
View notes
Text
being married to a vegetarian is sometimes like "hey I found this new thing called the No Screams Burger from a local company called Ethical Flesh, it comes in an aluminum can" and you're like sure babe ok and then she's all "i tried to cook it in the frying pan but it turns out if you don't boil it like you're supposed to it dematerializes into its component grains and dusts but I hope it's still good with the veggie gravy i made" and you're like yeah it's wonderful i love you
15 notes
·
View notes
Note
hi there! your battle jackets are so cool, i love them!! if it’s okay for me to ask, what did you use to dye them in? was it like, a cooking pot or something? and how big was it, like how many ounces or gallons or whatever? i have soooo many fabrics/clothes that i want to dye but i’d need to get something to dye them in first and i don’t know where to start with that. thanks so much!! <3
Yayyyy thank you so much<3 Not only are they cool but they are also super super fun :)
For all the dyeing, I have a BIGASS 32quart / 8gal aluminum cooking pot that I got to boil a pig head lol but I only fill it up about halfway or 2/3rds most of the time. You could probably get away with something a bit smaller and still be fine working in batches!
Though I would recommend trying to find something stainless steel instead if you're going to be cooking with it also. The aluminum is not super sturdy and if I didn't already have regular giant soup pots that I cooked with I would have to be way more thorough about scrubbing it out and it's kind of a pain to do with such a big pot. :P
also then you can cook my sicknasy giant pot minestrone soup in it:
Ingredients:
3-4 cans of veggies- dealer's choice (corn, beans, etc-)
2 large can tomato (crushed, cubed, stewed,etc)
1 small can tomato paste
broth/bullion paste
2 onions
~5 stalks celery
2-3 carrot
several cloves garlic (to taste)
4-6 zucchini squash (half/half yellow & green)
Any other fresh veggies (green beans, peas, mushrooms, potatoes, etc)
rice or pasta if you want
1-3 lb mild Italian sausage
1-2 lb lean ground beef (and/or any mix of ground meats if desired)
Seasonings (to taste, but * = in the neighborhood of 2+tbsp each)
-garlic powder*
-celery salt*
-bay leaf
-thyme*
-oregano*
-rosemary
-salt
pan fry sausage / ground beef in LARGE pot until nicely browned, seasoned with ample salt & garlic powder.
once meat is cooked, add all canned veggies and tomatoes with enough water/broth to cover & boil
Rough chop onions, celery, carrot, garlic & any other veggies (sans zucchini) and add to pot. Add seasonings & cook until veggies are soft.
Lastly, add chopped zucchini squash and boil until cooked but not falling apart (about 20 minutes)
Pasta can be added as desired (but store leftover noodles separate from soup for best results)
<3
(serves one million)
3 notes
·
View notes
Text
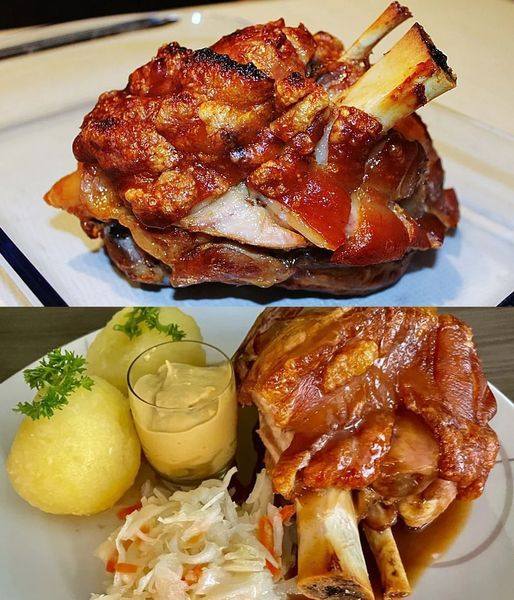
Crispy Fried Pork Knuckles are a Delicious Traditional Dish in German Cuisine.
Here is a simple recipe on how to make them:
Ingredients:
4 Pork Knuckles
Salt
pepper
Caraway seeds
2 onions
2 cloves of garlic
2 tbsp lard or oil
500 ml broth (e.g. vegetable or meat broth)
500 ml beer (optional)
Rosemary (optional)
Directions:
Wash the pork knuckles thoroughly and pat dry with kitchen paper.
Cut the skin of the Pork Knuckles several times with a sharp knife to make the crust crispy.
Season the shanks generously with salt, pepper and caraway. Let them sit at room temperature for about 1 hour to absorb the spices.
In the meantime, peel and roughly chop the onions and garlic cloves.
Preheat the oven to 200 degrees Celsius.
Heat the lard or oil in a large roasting pan or pan.
Fry the Pork Knuckles on all sides until they are golden brown.
Add the chopped onions and garlic cloves and fry briefly.
If desired, you can now add beer and/or broth to cook the Pork Knuckles.
The beer gives the dish a special taste.
Optionally place a few sprigs of rosemary on the shanks.
Cover the roasting pan or pan with a lid or aluminum foil and place the Pork Knuckles in the preheated oven.
Braise the Knuckles for about 2 to 2.5 hours, occasionally pouring broth or beer over them and making sure that they do not dry out.
The exact cooking time depends on the size of the shanks.
The shanks should be tender and well cooked.
Increase the temperature to 220 degrees Celsius and continue frying the knuckles uncovered for about 15-20 minutes until the crust is crispy.
Remove the Pork Knuckles from the oven and let them rest briefly before serving.
Traditionally, Crispy Fried Pork Knuckles are served with Sauerkraut and Potato Dumplings.
2 notes
·
View notes
Text
What Pans Do Gordon Ramsay Use
When it comes to cooking, the right equipment is essential, and no one knows this better than celebrity chef Gordon Ramsay. Known for his high standards in the kitchen, Ramsay's choice of cookware is a reflection of his commitment to quality and efficiency. In this article, we will explore the pans that Ramsay uses and why he favors them over other options.
Who is Gordon Ramsay?
Before diving into his favorite pans, let's take a moment to introduce the man behind the cooking. Gordon Ramsay is a Scottish-born British chef, restaurateur, and television personality who has gained worldwide recognition for his culinary expertise. He has been awarded multiple Michelin stars for his restaurants and has hosted several popular TV shows, including "Hell's Kitchen" and "MasterChef."
What Pans Does Gordon Ramsay Use?
So, what pans does Ramsay use in his kitchen? Here are some of his top picks:
1. All-Clad Stainless Steel Fry Pan
According to Ramsay, the All-Clad Stainless Steel Fry Pan is his go-to pan for cooking everything from scrambled eggs to seared steaks. The pan is made of tri-ply stainless steel with an aluminum core, which ensures even heat distribution and prevents hot spots. It also has a durable non-stick coating, making it easy to clean.
2. Scanpan Nonstick Fry Pan
Another favorite of Ramsay's is the Scanpan Nonstick Fry Pan. This pan features a ceramic titanium non-stick coating that is free from PFOA and PFOS, making it a healthier option. It also has excellent heat retention and is oven safe up to 500 degrees Fahrenheit.
3. T-fal E93808 Professional Total Nonstick Fry Pan
For those on a budget, Ramsay recommends the T-fal E93808 Professional Total Nonstick Fry Pan. This pan has a Thermo-Spot indicator that lets you know when the pan is preheated and ready to use, ensuring that your food cooks evenly. It also has a durable non-stick coating and is dishwasher safe.
4. Le Creuset Cast Iron Skillet
When it comes to searing meat, Ramsay swears by the Le Creuset Cast Iron Skillet. This heavy-duty cast iron skillet heats evenly and retains heat well, making it perfect for browning meat. It also has a durable enamel coating that resists chipping and cracking.
5. Mauviel Copper Fry Pan
Finally, Ramsay's most luxurious pick is the Mauviel Copper Fry Pan. Made of 90% copper and 10% stainless steel, this pan provides excellent heat conductivity and control, allowing you to cook your food precisely. It also has a beautiful polished finish that will impress any dinner guest.
View more: What Cookware Do Chefs Use
When Does Gordon Ramsay Use These Pans?
Ramsay uses these pans in his various restaurants and TV shows, as well as in his personal kitchen at home. He believes that using high-quality cookware is essential to achieving the best results in the kitchen.
How to Choose the Right Pan for You
Now that we've seen some of Ramsay's favorite pans, how can you choose the right one for yourself? Here are some factors to consider:
1. Material
Different materials have different properties that affect how they conduct and retain heat. For example, stainless steel is durable and easy to clean but is not the best conductor of heat. Cast iron is an excellent heat conductor and retainer but is heavy and requires seasoning to maintain its non-stick surface.
2. Size
Consider the size of the pan relative to the amount of food you will be cooking. A smaller pan may work for single servings or small meals, while a larger pan is necessary for cooking for a family or entertaining guests.
3. Non-Stick Coating
Non-stick coatings make it easier to cook without food sticking to the pan, making cleanup a breeze. However, some non-stick coatings may contain harmful chemicals, so choose a pan with a safe and durable coating.
4. Price
Quality pans can be expensive, but they are often worth the investment. Consider your budget and how much you will use the pan before deciding on a purchase.
Pros and Cons of Gordon Ramsay's Favorite Pans
Let's break down the pros and cons of using the pans that Gordon Ramsay favors:
Pros
High-quality materials ensure even heat distribution and retention
Durable non-stick coatings make cleanup easy
Recommendations from a world-renowned chef give confidence in their effectiveness
Cons
Expensive compared to other options on the market
May not be suitable for all budgets and skill levels
Not everyone may prefer the same type of pan for their cooking needs
Alternatives to Gordon Ramsay's Favorite Pans
While Ramsay's favorite pans are undoubtedly top-of-the-line, they may not be the right fit for everyone. Here are some alternatives to consider:
1. Lodge Cast Iron Skillet
The Lodge Cast Iron Skillet is a budget-friendly alternative to the Le Creuset Cast Iron Skillet. It is made in the USA and comes pre-seasoned, so you can start cooking right away. It also has excellent heat retention and is suitable for use on all cooktops, including induction.
2. GreenPan Ceramic Non-Stick Fry Pan
For those who prefer ceramic non-stick coatings, the GreenPan Ceramic Non-Stick Fry Pan is an excellent option. It is made with a diamond-infused coating that is extremely durable and scratch-resistant. It also heats up quickly and evenly, making it perfect for searing and sautéing.
3. Calphalon Stainless Steel Fry Pan
If you prefer stainless steel pans but don't want to splurge on All-Clad, the Calphalon Stainless Steel Fry Pan is a great alternative. It has an aluminum core for even heating and a brushed stainless steel exterior that resists fingerprints. It also has a stay-cool handle for added comfort and safety.
Step-by-Step Guide to Using Gordon Ramsay's Favorite Pans
Now that you've chosen your pan, here's a step-by-step guide to using it like a pro:
1. Preheat the Pan
Make sure your pan is adequately preheated before adding any food. This will ensure that your food cooks evenly and prevents sticking. For non-stick pans, wait until the Thermo-Spot indicator turns solid red before adding your ingredients.
2. Add Oil or Butter
Once the pan is hot, add a small amount of oil or butter to coat the bottom of the pan. This will prevent the food from sticking and also add flavor.
3. Add Your Food
Carefully add your food to the pan, taking care not to overcrowd it. Overcrowding the pan can cause the temperature to drop, resulting in uneven cooking.
4. Monitor the Heat
Adjust the heat as needed to ensure that your food cooks evenly without burning. If you're unsure, use a meat thermometer to check the internal temperature of your food.
5. Clean the Pan
Once you're finished cooking, allow the pan to cool before cleaning. For non-stick pans, avoid using abrasive sponges or cleaners, which can damage the coating. Instead, use a soft sponge with mild soap and warm water.
Tips for Using Gordon Ramsay's Favorite Pans
Here are some additional tips to help you get the most out of your new pan:
Don't be afraid to experiment with different types of food to see what works best in your pan.
Avoid using metal utensils on non-stick surfaces, as this can scratch and damage the coating.
Always use oven mitts or a potholder when handling hot pans.
Store your pans properly to prevent scratching and damage.
The Best Gordon Ramsay Pan for You
Ultimately, the best pan for you depends on your personal cooking style and preferences. Consider the factors outlined above, such as material, size, and price, and choose a pan that suits your needs. Whether you opt for one of Ramsay's top picks or an alternative, investing in high-quality cookware is sure to elevate your cooking game.
Conclusion
Gordon Ramsay's favorite pans are a testament to his commitment to quality and efficiency in the kitchen. From the All-Clad Stainless Steel Fry Pan to the Mauviel Copper Fry Pan, each has its unique properties that make it suitable for different cooking needs. By choosing the right pan and following some straightforward tips, you can elevate your cooking game and impress your dinner guests with restaurant-quality meals.
FAQs
Can I use Gordon Ramsay's favorite pans on an induction cooktop? Yes, most of the pans mentioned in this article are compatible with induction cooktops.
Are non-stick coatings safe to use? Many non-stick coatings contain harmful chemicals such as PFOA and PFOS, so it is essential to choose a pan with a safe and durable coating.
How do I know when my pan is preheated? For non-stick pans, look for a Thermo-Spot indicator that turns solid red when the pan is preheated.
Can I use metal utensils on stainless steel pans? Yes, stainless steel pans are durable and can withstand the use of metal utensils.
Do I need to season my cast iron skillet? Yes, cast iron skillets require seasoning to maintain their non-stick surface. To season your skillet, coat it with oil and bake it in the oven at a high temperature for an hour. Repeat this process periodically to maintain the seasoning.
2 notes
·
View notes
Text
a recipe for a fried egg so good i forgot to take a picture of it before i ate it
ingredients:
frying pan
bacon grease, can substitute with butter or oil but it wont taste as good
seasonings from the cupboard; i used garlic powder, ginger powder, salt, and pepper. you can use whatever you want, i think paprika might be good, but if you deviate from what i did and it tastes bad i take no responsibility
egg. can do more than one if you want
finely diced yellow (?) onion
baby tomato, you can use more than one or a full sized tomato but i didnt
tap water
paper plate or towel or something light and solid like that. maybe even aluminum foil
plate or bowl to eat out of
rice/potatoes/toast, rice would be best but pick your favorite carb honestly
there mightve been more i dont really remember
steps:
put your pan on the stove and turn it up to 7, or like, between medium and high
add a little scoop of bacon grease or more. think like 1 part grease to 2 parts egg
wait for that to get hot. doesnt have to be like smoking or whatever just hot enough to where if you put something in there itll hisssss and sizzle
add the egg(s)
quickly season your egg with shit from the cupboard that you think would taste good. i used salt, pepper, garlic powder, and ginger powder
while the egg cooks take your grease spoon and baste the egg with the hot grease so it cooks around the yolk more evenly. if you cant baste it for whatever reason maybe theres not enough grease, just move on to the next step and do it more
get your hand wet under the tap, sprinkle the water over the pan, and cover it with a paper towel or plate or something so it steams and the top part cooks. dont overcook the yolk though unless you want to for some reason
in the meantime prepare your carbs in the dish you plan to eat out of. i would recommend using reheated leftovers
once the egg whites arent slimy and gross anymore and you think the egg is ready to eat move it off your pan and onto the the dish with the farb
now in the same pan add your onions and baby tomato. i crushed the tomato with my hand would recommend. you can also add minced garlic or something i didnt have any though. you can also add more grease or fat or whatever if it looks like theres not enough.
now salt the onions. not too much though the egg is already salted remember
at this point just wait for the onions to cook and pick up that brownish bacon greasy color. make sure to jostle em so they dont stick and you can turn the heat down if you want to.
once the onions are pretty translucent and you think theyre ready to cook and eat pour them directly on top of the egg and carb
now its ready to eat. you can add sriracha or like. green onion if you have that shit on hand, i didnt though
4 notes
·
View notes
Text
Non-Stick Cookware Market Size, Share, Trends, Growth and Competitor Analysis
Global Non-Stick Cookware Market - Size, Share, Demand, Industry Trends and Opportunities
Global Non-Stick Cookware Market, By Product (Pan, Pot, Bakeware, Pressure Cooker, Skillet, Square Grill, Oven Tray, Dutch Oven, Loaf Tin, Sandwich Toaster, Wok, Egg Poacher, and Others), Raw Material (Base Material and Coating), Coating Layer (Single Layer, Double Layer, and Triple Layer), Distribution Channel (Supermarkets/Hypermarkets, Utensil Store, E-Commerce, and Others), End-User (Residential and Commercial) – Industry Trends.
Access Full 350 Pages PDF Report @
**Segments**
- **Material**: The non-stick cookware market can be segmented based on the material used for its production. Common materials in this market include Teflon, ceramic, anodized aluminum, and stainless steel. Teflon-coated cookware is widely popular due to its non-stick properties, while ceramic cookware is gaining traction for being eco-friendly and free from harmful chemicals. Anodized aluminum offers enhanced durability and even heat distribution, making it a preferred choice for many consumers. Stainless steel cookware, while not inherently non-stick, is often layered with non-stick coatings for versatile use.
- **Distribution Channel**: Another crucial segment of the non-stick cookware market is the distribution channel through which these products reach consumers. This segment includes online retail, specialty stores, department stores, supermarkets, and others. With the rise of e-commerce, online retail has witnessed significant growth in this market, offering consumers a convenient way to explore and purchase a wide range of non-stick cookware. Specialty stores provide a curated selection of high-quality products, attracting consumers looking for specific brands and features, while supermarkets offer a one-stop shopping experience for everyday cookware needs.
- **Product Type**: The non-stick cookware market can also be segmented based on product type, including frying pans, saucepans, stockpots, griddles, woks, and more. Each product type serves specific cooking purposes, catering to the diverse needs and preferences of consumers. Frying pans are among the most commonly used non-stick cookware items, suitable for cooking a variety of dishes with minimal oil or butter. Saucepans are ideal for simmering sauces and soups, while stockpots are designed for cooking large batches of stews or broths. Griddles and woks offer unique cooking surfaces for preparing pancakes, stir-fries, and other specialty dishes.
**Market Players**
- **T-fal**: T-fal is a prominent player inT-fal, a leading brand in the non-stick cookware market, has established itself as a household name known for quality, innovation, and durability. The company offers a wide range of non-stick cookware products, catering to the diverse needs of consumers across the globe. T-fal's product line includes frying pans, saucepans, cookware sets, griddles, and more, all designed to make cooking easier, healthier, and more enjoyable for consumers.
One of the key strengths of T-fal is its focus on innovation and product development. The company continues to invest in research and development to introduce new features and technologies that enhance the performance of its cookware. For example, T-fal was one of the first brands to introduce non-stick cookware with Thermo-Spot technology, which indicates when the pan is preheated and ready for cooking, ensuring optimal cooking results every time. This commitment to innovation has helped T-fal stay ahead of the competition and maintain a strong position in the market.
In addition to product innovation, T-fal has also been successful in building strong brand recognition and loyalty among consumers. The company's reputation for quality, reliability, and performance has earned it a loyal customer base that trusts T-fal to deliver high-quality cookware solutions. T-fal's branding efforts, including marketing campaigns, endorsements, and sponsorships, have further strengthened its position in the market and helped it stand out in a crowded industry.
Moreover, T-fal has a robust distribution network that ensures its products are readily available to consumers worldwide. The company leverages various distribution channels, including online retail, specialty stores, department stores, and supermarkets, to reach a wide audience of consumers looking for premium non-stick cookware solutions. By partnering with reputable retailers and e-commerce platforms, T-fal ensures that its products are easily accessible to consumers, further driving sales and brand visibility.
Furthermore, T-fal prides itself on its commitment to sustainability and**Global Non-Stick Cookware Market**
- **Product**: The non-stick cookware market is segmented by product type into pans, pots, bakeware, pressure cookers, skillets, square grills, oven trays, Dutch ovens, loaf tins, sandwich toasters, woks, egg poachers, and others. Each product category serves specific cooking purposes and caters to the diverse needs and preferences of consumers, driving demand and innovation in the market.
- **Raw Material**: Raw materials used in non-stick cookware production are categorized into base materials and coatings. Common base materials include aluminum, stainless steel, and cast iron, while coatings such as Teflon, ceramic, and enamel are applied to provide non-stick properties and enhance durability. The choice of raw material affects the performance, price, and sustainability of non-stick cookware products.
- **Coating Layer**: Non-stick cookware can feature different coating layers, including single-layer, double-layer, and triple-layer coatings. Each coating type offers varying levels of non-stick properties, heat resistance, and longevity. Consumers may choose cookware with multiple coating layers for enhanced durability and performance, driving product diversification in the market.
- **Distribution Channel**: The distribution channels for non-stick cookware include supermarkets/hypermarkets, utensil stores, e-commerce platforms, and others. Supermarkets and hypermarkets offer a wide selection of cookware products for convenient in-store purchases, while utens
Highlights of TOC:
Chapter 1: Market overview
Chapter 2: Global Non-Stick Cookware Market
Chapter 3: Regional analysis of the Global Non-Stick Cookware Market industry
Chapter 4: Non-Stick Cookware Market segmentation based on types and applications
Chapter 5: Revenue analysis based on types and applications
Chapter 6: Market share
Chapter 7: Competitive Landscape
Chapter 8: Drivers, Restraints, Challenges, and Opportunities
Chapter 9: Gross Margin and Price Analysis
Key takeaways from the Non-Stick Cookware Market report:
Detailed considerate of Non-Stick Cookware Market-particular drivers, Trends, constraints, Restraints, Opportunities and major micro markets.
Comprehensive valuation of all prospects and threat in the
In depth study of industry strategies for growth of the Non-Stick Cookware Market-leading players.
Non-Stick Cookware Market latest innovations and major procedures.
Favorable dip inside Vigorous high-tech and market latest trends remarkable the Market.
Conclusive study about the growth conspiracy of Non-Stick Cookware Market for forthcoming years.
Browse Trending Reports:
SWIR Market Biobanking Market Composite Materials Market Household Cooking Appliances Market Immunodiagnostics Market Automotive Heat Exchanger Market Aluminium Composite Panels Market Walnut Ingredients Market Lidding Films Market Commerce Cloud Market Rare Earth Elements Market Alcohol-Dependency Treatment Market
About Data Bridge Market Research:
Data Bridge set forth itself as an unconventional and neoteric Market research and consulting firm with unparalleled level of resilience and integrated approaches. We are determined to unearth the best market opportunities and foster efficient information for your business to thrive in the market. Data Bridge endeavors to provide appropriate solutions to complex business challenges and initiates an effortless decision-making process.
Contact Us:
Data Bridge Market Research
US: +1 614 591 3140
UK: +44 845 154 9652
APAC : +653 1251 975
Email: [email protected]
0 notes
Text
Triply Frypan with Lid: Your Kitchen’s Power Tool
Tired of food sticking to the pan or cooking unevenly? Or maybe you are just done with all the scrubbing after every meal. If that sounds familiar, you might want to switch to a triply fry pan with a lid — a real game changer in the kitchen.
Let’s explore why it’s worth it, what you can cook in it, how to take care of it, and what to keep in mind before buying one.
Why Regular Frypans Just Don’t Cut It
Let’s face it — most of us have dealt with frustrating frypans. Some heat up unevenly, leaving parts of your food overcooked while the rest stays raw. Others come with non-stick coatings that peel off in a few months. And don’t even get started on how they rust, scratch, or don’t come with a lid.
That’s where a triply frypan with lid steps in and makes life easier.
What’s So Great About a Triply Frypan with Lid?
A triply frypan is made using three layers of metal — stainless steel on the inside and outside, and an aluminum core in the middle. This clever combination gives you the best of all worlds:
Even cooking: No more hot spots. The aluminum core spreads heat evenly.
Faster results: Food cooks quicker, saving you time and gas.
Moisture locked in: The lid helps trap steam and flavor.
Strong and durable: It’s built to last for years without warping or damage.
Safe to use: No toxic coatings. Just pure stainless steel.
Works on any stove: Whether it’s gas, induction, or ceramic, it fits all.
What Can You Cook in a Triply Frypan with Lid?
This pan is super versatile. You can make:
Breakfast dishes like omelettes, toast, and pancakes.
Lunch and dinner items like sautéed veggies, paneer bhurji, or shallow-fried snacks.
Quick stir-fries, pasta sauces, or tempered spices.
And thanks to the lid, you can also simmer, steam lightly, or keep food warm.
It’s one of those tools that easily goes from breakfast to dinner.
How to Take Care of Your Triply Frypan
Good news — it doesn’t take much effort to maintain it.
Use a soft sponge and mild soap to clean it.
For stains or discoloration, try a mix of lemon or vinegar with baking soda.
Don’t leave it empty on high heat for too long — it can damage the layers.
Let it cool naturally before washing. Sudden temperature changes can warp the metal.
Treat it well, and it will stick with you for the long run.
What to Check Before Buying One
Not all triply frypans are made the same. Here’s what you should look for:
Genuine triply construction (all three layers — not just the base).
Food-grade stainless steel that’s safe for everyday use.
A well-fitting lid that seals in moisture.
A pan that’s compatible with your stove — gas, induction, or both.
Once you have these basics in place, you are good to go.
Final Thoughts
A triply frypan with lid isn’t just a fancy kitchen tool — it’s a reliable companion for everyday meals. Whether you are frying, sautéing, or simmering, it makes cooking smoother, faster, and more enjoyable. And with the right care, it can be part of your kitchen for years.
If you are thinking of upgrading your cookware, this might just be the one item that makes a big difference.
The Original Blog is Here : Triply Frypan with Lid: Your Kitchen’s Power Tool
0 notes
Text
Indian Recipes That Shine In Triply Cookware (With Cooking Tips)
When it comes to Indian cooking, the right cookware can make a world of difference. From deep frying to slow simmering curries, our recipes demand cookware that can handle high heat, retain flavor, and ensure even cooking. That’s where triply cookware steps in as a game-changer. In this blog, we’ll explore the best recipes for triply cookware, especially triply kadai recipes, and share expert tips to make your meals truly shine.
Why Triply Cookware Is Ideal for Indian Cooking
Triply cookware is made from three layers – stainless steel (inside), aluminum (middle), and stainless steel (outside). This triple-layered structure ensures:
Even heat distribution
No hot spots or burning
Excellent heat retention
Long-lasting performance
For Indian dishes that require slow cooking, sautéing, or deep frying, triply kadais and saucepans offer unmatched efficiency.
1. Paneer Butter Masala – Creamy & Flavorful
Best recipe for triply cookware: Paneer butter masala is perfect to cook in a triply kadai. The kadai’s even heating helps caramelize onions and tomatoes beautifully without burning.
Cooking Tip: Use medium heat to slowly cook the onion-tomato base. Let the masala thicken naturally. Triply cookware holds heat well, so you don’t need high flame.
2. Vegetable Biryani – Aroma in Every Bite
Whether you’re cooking in a triply handi or saucepan, biryani benefits from uniform heat. The rice cooks evenly, and the bottom doesn't burn – a common issue in regular pans.
Triply kadai recipe twist: You can even layer and slow-cook a biryani in a triply kadai by sealing it with a lid and cooking on low flame.
Cooking Tip: Always use a heavy bottom triply cookware and add a cloth or foil under the lid to trap aroma and steam.
3. Bhindi Masala – Crisp Yet Tender
Cooking bhindi (okra) in a triply kadai gives it a nice sear without excessive oil. The kadai ensures the veggies cook evenly and retain their crunch.
Best recipe for triply cookware: Toss the bhindi in mustard oil, sauté with onions, and sprinkle with dry spices.
Cooking Tip: Let the kadai heat up first, then add bhindi. Avoid stirring too much to prevent sliminess.
4. Chole – Slow Simmered Goodness
Punjabi chole made in a triply saucepan or deep kadai develops richer flavors as it simmers slowly. The aluminum core retains heat, perfect for long simmering without burning the masala.
Triply kadai recipe benefit: The kadai retains the heat so well that you can switch off the flame in the last 10 minutes and let residual heat finish the cooking.
Cooking Tip: Always soak chickpeas overnight and cook the gravy first, then add the boiled chole to soak in the flavor.
5. Halwa – Ghee Roasted Goodness
Sooji or atta halwa demands constant stirring and precise heat – ideal for a triply kadai. The thick base prevents sticking, even when using less ghee.
Best recipe for triply cookware: Roast suji until golden, then add warm sugar water and cook till it thickens.
Cooking Tip: Always keep the flame on low-medium and stir continuously for the perfect texture.
Final Thoughts
The best recipes for triply cookware are the ones that need patience, gentle heat, and deep flavors. From rich curries to dry sabzis and halwas, triply kadai recipes bring out the best in Indian cooking. The even heating and durable base not only improve taste but also reduce cooking time and effort.
So next time you step into the kitchen, grab your triply cookware, and try one of these recipes. You’ll taste the difference — and your cookware will thank you too!
Explore premium cookware options at Omichef and upgrade your kitchen the smart way.
0 notes