#AI Tutorials
Explore tagged Tumblr posts
Visit Tumblr Blog
Explore Tumblr blogs with no restrictions, modern design and the best experience.
Last Seen Tumblr Blogs


Fun Fact
Tumblr’s reach among the 26-to-35-year-olds in the US is 11%.
Note
I notice you never go into detail about the prompts,models or tools you use is this intentional?
Well, it's not intentional because I'd argue that assessment isn't correct. Go through my backlog and check under the folds.
But to address in general:
I don't think my tool sets are particularly mysterious, a handful of background removers, upscalers, and face-mod tools on huggingface, Midjourney for most of my direct image-gen, occasionally Dall-E3, ancient versions of photoshop, audition, and premiere, Suno (with audio remastering from bandcamp) for most of my music gen, and for video I mainly use Vidu and occasionally MinMax/HaiLuo (still not sure which one's the company and which one's the generator there).
When it comes down to most stuff I'm showing off there usually isn't a prompt, there's bunches, with the prompt changing as I iterate, as I inpaint, as I composite multiple images together, use others as character references, style references, etc.
At that point any single prompt isn't going to be representative. I don't run a local Stable Diffusion install or the like so I can't really go into models much more than indicating whether I've used Midjourney #6.1 or Niji-6. My prompts tend to be big, at least a full paragraph long, and quickly fill up a tumblr post.
For music and videos you don't just have to deal with a huge prompt or three, but very involved processes.

Each one of those little boxes is a clip or a merged sequence of clips that went into my Open Letter to the SCP Foundation video, each of which started with at least one image made of one of more prompts and manual editing, combined with the video prompts that went along with the starting frame and reference-to-video posts, which is then combined with a manually edited and refined soundtrack that was made using multiple suno passes and SFX elements added in post.
I don't think a novella of prompt information for my goofy 3 minute long comedy song is of interest to enough people to be worth spending all the time compiling it.
Especially since even the song was typically generated in chunks with both lyric-prompt and prompt-prompt changes at every stage, then remastered inside suno with another prompt entirely, and then covered, re-extended, etc, with dozens upon dozens of false starts and scrapped verses.
I left the specific prompts off a few of my recent Rom video tutorials because my focus was more on the general process and my thoughts around the creative exercise under it, but most of my blog's front page is tutorials right now, and my image posts almost always have full prompts.
4 notes
·
View notes
Text
The Ai Peel
Welcome to The Ai Peel!
Dive into the fascinating world of artificial intelligence with us. At The Ai Peel, we unravel the layers of AI to bring you insightful content, from beginner-friendly explanations to advanced concepts. Whether you're a tech enthusiast, a student, or a professional, our channel offers something for everyone interested in the rapidly evolving field of AI. What You Can Expect: AI Basics: Simplified explanations of fundamental AI concepts. Tutorials: Step-by-step guides on popular AI tools and techniques. Latest Trends: Stay updated with the newest advancements and research in AI. In-depth Analyses: Explore detailed discussions on complex AI topics. Real-World Applications: See how AI is transforming industries and everyday life. Join our community of AI enthusiasts and embark on a journey to peel back the layers of artificial intelligence.
Don't forget to subscribe and hit the notification bell so you never miss an update!
#Artificial Intelligence#Machine Learning#AI Tutorials#Deep Learning#AI Basics#AI Trends#AI Applications#Neural Networks#AI Technology#AI Research
3 notes
·
View notes
Text
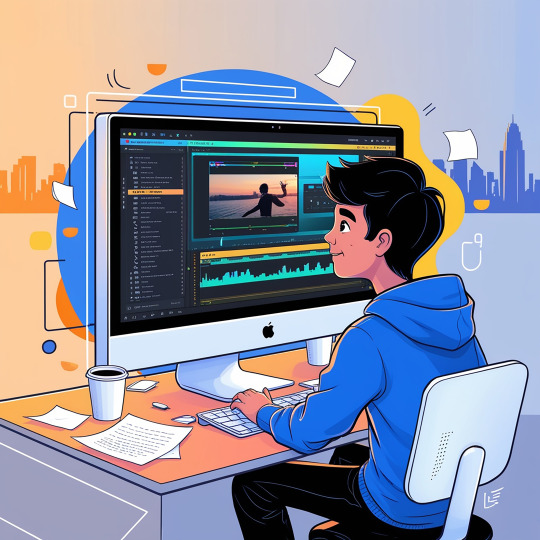
🎥 Beginner Tutorials: Using AI to Enhance Video Quality! 🤖✨ New to AI? Learn how to use cutting-edge tools to boost your video quality with easy, step-by-step tutorials. From sharpening visuals to perfecting edits, these guides will have your content looking professional in no time. Start your journey to better videos today! 🚀💡 Click this link : https://tinyurl.com/3tyr7c8x
#ai tutorials#video quality#content creation#ai for beginners#tech for creators#digital creativity#boost your content#video editing#ai innovation#step by step guides#better videos#learn with ai#content enhancement#creative tools#ai#digital#tech tools#youtube tips#content strategy#digital marketing#youtube growth#channel growth#creator community
0 notes
Text
Mastering Leonardo AI: A Comprehensive Guide to this Powerful Image Generation Tool
Introduction to Leonardo AI: Access and Understanding Basic Features
Those who journey into the world of digital art, beginners and professionals alike, are often seeking tools that can amplify their creative expression and simplify the creative process. Leonardo AI is such a tool and is rapidly making an impactful stride in the artistic arena. In this comprehensive guide, we will dissect Leonardo AI, highlighting the tool's exceptional features and capabilities. Inspired by one of the revered polymaths of the Italian Renaissance, Leonardo da Vinci, Leonardo AI embodies the union of art and technology, holding the potential to transform the way we create and perceive visual art. While it may seem intimidating at first glance, accessing and getting to know the platform can be a rewarding venture for anyone with a desire to explore image generation at its best. To access Leonardo AI, visit their official website as per the instruction provided in the YouTube tutorial referenced for this guide. On the homepage, you'll find an inviting button that reads 'Start using Leonardo'. This button is your gateway to entering a realm of innovative image generation. Upon clicking, you'll discover a stunning and intuitive interface that is remarkably user-friendly, even for those with limited technical expertise. The accessibility of Leonardo AI's platform makes it an ideal choice for artists, designers, and entrepreneurs who are keen on exploring the capabilities of AI in image generation. As this guide intends to offer you a deep understanding of Leonardo AI, we will delve extensively into various features and models available on Leonardo AI, predominantly showcasing a range of realistic and artistic styles you can play around with. For beginners stepping into digital art creation or image generation, this tool stands out as an excellent option. With a plethora of models to test, you will get the chance to experiment with different prompts, refine your creative skills and bring your artistic vision to life. One exciting feature of Leonardo AI that underscores its community spirit is the 'Community Feed'. From novices to seasoned professionals, Leonardo AI houses a community of avid users, continuously creating and sharing their work. By exploring this feed, you can gain inspiration from a variety of creations, recognize trends, and identify styles that resonate with your artistic aspirations. An added bonus for the creatively inclined is the option to create your own model based on a collection of images, introduced in the 'Training and Datasets' section. With this impressive feature, you can weave together a series of images, training the AI to generate output in your chosen style. This capability adds another level of personalization to your creations, ensuring your artistic voice shines through. To round out this introduction to Leonardo AI, let's briefly highlight the three main tools that will be your arsenal in this artistic endeavor. These consist of the AI Image Generation, AI Canvas, and Texture Generation. The AI Image Generation tool allows you to generate images from textual prompts. The AI Canvas is a platform to edit and add content to your images and finally, Texture Generation tool lets you create unique textures. In the chapters that follow, we will delve deeper into these tools, demystifying their functions and revealing tips and tricks to using them effectively. Keep in mind, Leonardo AI is as much a tool for novel experimentation as it is for accomplishing particular artistic goals. So let your imagination run wild and let Leonardo AI's capabilities guide your creative journey.
Exploring Leonardo AI's Suite of Tools: Image Generation, Canvas, and Texture
Now that we've highlighted the basics of Leonardo AI, it's time to dive into the heart of this platform's capabilities. Leonardo AI's suite of tools features AI image generation, AI canvas, and texture generation - each providing unique opportunities to elevate your creations. The tool that draws immediate attention in Leonardo AI's repertoire is the AI Image Generation tool. This tool is nothing short of revolutionary in the realm of digital art creation. The AI Image Generation tool transforms simple textual prompts into stunning visual representations. It might feel like magic, but it's pure technology at work. It brings your artistic vision to life with unprecedented ease and versatility. Picture this: you input the text "an autumnal landscape in watercolors," and Leonardo AI's tool generates a breathtaking image capturing your prompted scene in vivid detail. To utilize AI Image Generation, you simply navigate to the corresponding page on Leonardo AI's platform. Here, you are instructed to input your prompt in a provided text box. Prompt input is not limited to descriptions of scenes or objects. It could also contain instructions for stylistic approaches that the AI should consider while generating the image. With prompts input, your next step is to select the modeling option that best suits your requirements. Leonardo AI offers an array of models to choose from, enabling a wide range of aesthetic outcomes. There's a lot more to explore within the AI Image Generation page. A unique feature offered is a daily token limit and coin system. As a user, you need to be mindful of the number of tokens you consume based on the complexity of the image prompts and models you select. The coin system helps manage resource allocation, ensuring all users get fair access to AI's creative capabilities. Your journey of discovery within Leonardo AI's suite doesn't end here. An exciting tool that allows further refinement of your generated images is the AI Canvas tool. This tool is an in-built editor where you can make adjustments to your generated image or even add new elements to it. Think of AI Canvas as a finishing school for your AI-generated art, where you can fine-tune and perfect your creations. It is an artist's playground where you can play around with different features to enhance your images. Whether it's adjusting the brightness or contrast, cropping the image, or tweaking the color balance, the AI Canvas is your tool to make the final creative decisions. The third tool at your disposal is Leonardo AI's Texture Generation tool. This tool can generate distinct and intricate textures based on your prompts, further expanding the possibilities for your image creation. By adding unique textures to your images, you can imbue a sense of realism or even impart a stylistic effect. From capturing the grain of a tree bark or the roughness of a mountain range to creating an alien skin texture, the possibilities of texture creation are endless. Collectively, these tools offer a robust platform for any digital art creator or image generator. As you continue to explore and experiment with these tools, you'll find that they equip you with the capability to create remarkable outputs. Whether you are a novice artist, a creative professional, or an entrepreneur looking to experiment with digital images, Leonardo AI's suite of tools is poised to take your creative endeavors to new heights.
A Deep Dive into Leonardo AI’s Image Generation: Prompt Inputs, Models and Output
Having extensively explored Leonardo AI's suite of tools, it's time to dive deeper into its stand-out feature, that is, Image Generation. This chapter takes you through the core of Leonardo AI's Image Generation process: Prompt Inputs, Models, and Output. Before plunging into the depths of image generation, it's critical to establish a foundational understanding of the process that facilitates the conversion of textual prompts into visual illustrations. At its core, Image Generation is an AI-driven process that interprets the semantics of your input prompt, visualizes it, and renders generated images with impressive accuracy and creativity. The sea of creativity gets its first ripple when you input your prompt. This prompt can reinforce various ambitious creative expressions and can be as simple, abstract, or detailed as you like. For instance, you could use a simple prompt like "a serene sunrise," or something more specific like "a castle in the Scottish highlands at dawn." Leonardo AI's AI is flexible in interpreting your prompts, offering a wide array of visual outputs based on the information you have given. The models offered by Leonardo AI work backstage in this creative production, translating your words into images. Each model has been trained on a different dataset, allowing them to generate a wide variety of stylistic results. For instance, you can select from models that have been trained to produce realistic imagery or those that lean towards more cartoonish or abstract styles. On that note, while evaluating the models at Leonardo AI, keep in mind that experimenting with different models often leads to diverse and sometimes unexpected results. Such experimentation broadens your awareness of the tool's capabilities and helps you gain a more nuanced understanding of the impact of each model on your final output. The final leg of this deep dive is the output generation. Once you've selected a model and input your text prompt, Leonardo AI focuses its computational power and creative intelligence to provide you with a unique image. The generated image carries the narrative and style encompassed in your prompt, represented in the chosen aesthetic delivered by the model. Another praiseworthy feature Leonardo AI integrates into this process is a history of your generated images. This repository allows you to revisit previous iterations of your artistry, compare different outputs, and decide upon any adjustments or revisions in future creations. As previously mentioned, Leonardo AI is all about experimentation - this is precisely what harnesses the tool's immense power. Combining different prompts with various models allows you to create unique outputs that challenge conventional image generation norms. With time, as you become more familiar with how different prompts are interpreted by the different models, you will be able to better shape the AI's creations to align with your creative vision. Every great artist knows that exploration is the heart of creativity. That’s exactly what Leonardo AI offers - an endless landscape of creative exploration.
Leveraging Leonardo AI: Existing Image References and Creative Experimentation
With a solid understanding of how Leonardo AI's Image Generation works, it's time to take things a step further. Creative expression often involves more than just creating; it's also about reshaping, experimenting, and sometimes even re-imagining. Leonardo AI allows you to do just that by integrating existing image references into the generation process. Referencing existing images opens a world of possibilities, giving you the power to guide the AI's creativity based on established visual cues. By leveraging this feature, you can give further direction to the AI regarding stylistic nuances, object placements, color palettes, or overall thematic representation. Essentially, image references serve as blueprints, providing more context to the generation process. To use this feature, simply select an image using the file uploader on Leonardo AI's platform, adjusting the strength of the reference image's influence to guide your output. This adjustment is key to striking a balance between replicating the reference and maintaining the uniqueness of the image being generated. Thoughtfully leveraging image references can result in more than just aesthetically pleasing results. It can be a powerful tool in enhancing the expression of your ideas. For instance, referencing a Van Gogh's painting could guide the AI model's brush strokes, color schemes, and overall approach to image generation. All without cloning the original work, but rather applying its stylistic qualities to your new creation. Creative experimentation is at the heart of leveraging Leonardo AI to its maximum potential. While using an existing image as a reference, you are encouraged to adjust the strength of the influence according to your creative vision. Remember, every iteration offers a new learning experience. Revisiting your creations, comparing results, tweaking your prompts, or switching up your images will only deepen your understanding of the workings of this tool, hence, shaping your expertise as an AI artist. In addition, utilizing image references can greatly influence style transfers. Imagine applying the aesthetics of a classic painting to a modern cityscape, or imposing an abstract style onto a naturalistic image; the options are boundless. To sum it up, by leveraging Leonardo AI's feature to utilize a reference image, you greatly broaden the range of outputs you can produce. It's all about trial and error, risk and reward, just like any other form of artistic expression. So, keep exploring, experimenting and refining until you've crafted a visual masterpiece that's uniquely yours.
Advancing Skills in Leonardo AI's Canvas Editor: Achieving Artistic and Commercial Goals
In the landscape of digital art, image generation is only the first step. Adding your unique touch, refining the images, and adapting them to specific contexts are just as crucial. Realizing this, Leonardo AI brings you an additional component to advance your creative journey, the Canvas Editor. The Canvas Editor is a dynamic tool where you can manipulate generated images and add content, further personalizing your creations. This editing platform allows you to dive into each generated image and make changes tailored to your artistic or commercial prerequisites. Whether you want to remove elements, adjust colors, or integrate text, the Leonardo AI Canvas Editor provides all those functionalities. One major advantage of the Canvas Editor is how it aids in achieving consistency. For instance, if you are developing a series of images for a storybook or a comic, it's vital to maintain a consistent style, color palette, and character design throughout the series. With Canvas Editor, you can tune each image accordingly, ensuring a seamless flow across your series. Another strength of the Canvas Editor lies in its capacity to aid in commercial projects. You might be looking to create print-on-demand products, logos, or stickers; the Canvas Editor is your one-stop solution. This tool gives you the creative liberty to turn simple images into commercial products with value in the market. By integrating text or personalizing the color palette according to the brand's guidelines, you can convert an AI-generated image into a professional product suitable for marketing campaigns, packaging designs, web designs, or print media. In addition to these, the Canvas Editor can be instrumental in creating characters. With Leonardo's Image-to-Image generation, you can generate a number of images and then use the Canvas Editor to maintain consistency. You can refine facial features, tune the color palettes, and maintain uniformity in style across all the images. To achieve the best results, take your time while experimenting with the Canvas Editor. You might discover that making minor changes to elements such as saturation, contrast, or exposure can drastically affect the overall impact of the image. You can also play around with different layers, adding various elements for depth and complexity. Mastering the Canvas Editor of Leonardo AI not only aids in achieving your artistic goals but also equips you with a handy skill-set for commercial endeavors. So, step into the virtual studio and get creative with the Canvas Editor. It's the journey of exploring, experimenting, and creating that makes the final masterpiece worth all the effort.
Utilising Leonardo AI for Business: Creating Characters, Products and More
Leonardo AI, while undeniably a haven for artists, is more than just a tool to create impressive digital art. Its capacities extend far beyond, offering a wide array of business applications. With Leonardo AI, businesses can produce stunning visual content, create unique products, and even develop captivating characters, all while saving significant resources and time. Visual content is an essential component of any successful marketing strategy. Leonardo AI greatly simplifies the process of creating high-quality visual content. Whether it’s for social media, advertisements, product descriptions, or website branding, Leonardo AI’s AI-powered image generation allows businesses to create in-house visual content quickly and affordably. The ability to create products based on AI-generated images presents numerous potential business opportunities. For instance, print-on-demand businesses can leverage AI-generated graphic designs, creating unique products like T-shirts, coffee mugs, stickers, and more. By consistently creating and adding new designs using Leonardo AI, businesses can keep their offerings fresh and engaging. Moreover, Leonardo AI's powerful image generation and Canvas Editor allow businesses to create a range of merchandise with a distinct sense of uniformity and brand identity. By customizing generated images to fit their brand guidelines, businesses can effectively reinforce their brand image in a creative and visually appealing manner. For businesses in the entertainment industry, Leonardo AI offers unique opportunities for character creation. It can be used to generate a wide range of character images based on specific prompts. The consistency maintained through the Image-to-Image generation and subsequent refinement with the Canvas Editor can lead to a well-designed and standardized array of characters. These generated characters can be used in comics, animated videos, games, and more, offering visually appealing assets that elevate user engagement and experience. However, capitalizing on Leonardo AI's potential doesn’t end with creating characters and products. Exploring how it can be integrated into various business processes can further amplify its benefits. For instance, designers can use the AI-generated images as a creative starting point, saving them from the laborious task of creating base designs from scratch. In conclusion, Leonardo AI offers businesses a remarkable tool to boost their creative capabilities, broaden their product offerings, and achieve their commercial goals. With a little creativity and exploration, businesses can unlock the vast potential of Leonardo AI and reap significant benefits.
Understanding Leonardo AI Subscription Plans: Benefiting from Extra Tokens and Features
Just like any other feature-rich platform, Leonardo AI utilizes a subscription model to provide access to its extensive range of tools and features. Through various subscription plans, you can utilize extra tokens which elevate the functionality of the platform, providing additional benefits and added flexibility. A fundamental part of Leonardo AI's setup involves a daily token limit and a whimsical coin system. Tokens essentially act as keys to unlock the capabilities of the platform. They determine the number and complexity of images you can generate based on your supplied prompts and chosen models. The more tokens you have at your disposal, the more you can generate and experiment with your creations. Leonardo AI offers different subscription plans tailored to fit the varying needs of its user base. From individual artists playing around with digital art for the first time to creative professionals and commercial enterprises seeking extensive use of the platform, there's a subscription plan designed for everyone. Each subscription plan offers a specific number of tokens and access to certain functionality. Choosing the right plan depends largely on your usage patterns and goals. If you're an occasional user looking to familiarize yourself with AI-generated art, a basic subscription plan could suffice. However, if you're a professional artist or a business aiming to integrate Leonardo AI into your daily workflow, a higher-tier subscription plan offering additional tokens might be a more practical choice. Advantages of choosing a subscription plan are multifold. More tokens mean more freedom to experiment with different prompts and models, thereby broadening your learning curve and overall usage of the app. Higher-tier plans also tend to come with added features or advanced options that can further elevate your Leonardo AI experience. As with any other subscription service, it's important to carefully evaluate each plan, consider your usage patterns and requirements, and adopt a subscription that delivers the greatest value to you. Remember, it's not just about getting more tokens or access to extra features; it's also about ensuring you make the most of the incredible solution that is Leonardo AI. With the right subscription plan in hand, the world of AI-generated digital art awaits your exploration.
Tips and Tricks for Leonardo AI: Maximizing the Tool for Better Outputs
Diving into the world of Leonardo AI is an exciting journey filled with discovery and creativity. But, as with any tool, getting to know the tips and tricks can make your exploration even more rewarding. Following are a few insights that will help you utilize Leonardo AI to its fullest potential. The first tip revolves around the very essence of Leonardo AI, the prompt. Make sure your prompts are clear and descriptive. While it's okay to be abstract or imaginative, providing a little more detail can help the AI generate a more accurate image. For instance, instead of 'cat', you could use 'a blue-eyed cat sitting on a rug'. The more specific your prompt, the more control you have over your output. Another tip relates to using the whole page and leveraging the available props. Use the AI canvas area fully and try different arrangements of objects. The resulting complexity can often lead to more interesting and visually appealing results. Remember, the output is not limited to what is visible on the canvas. You can zoom, pan, or crop to focus on the most compelling part of your image. One of the most impactful tips is to experiment with different models. Each model interprets your prompts differently, leading to varied results. By experimenting with each model, you can learn their strengths and use that knowledge in your creative process. So don't hesitate to test out multiple models and see which one resonates the most with your style. When using the feature of existing images as a reference, it is beneficial to experiment with different strengths of the reference image's influence. Depending on your artistic vision, you might want the reference to serve as a delicate hint or a prominent guide for your output. Adjusting the strength of influence can help you achieve the desired balance. Lastly, make sure to regularly explore the Community Feed. Seeing the creations of other users is not just inspiring, it also allows learning. By exploring the community's outputs, you can pick up tips and gain inspiration for your own creations. You might find certain combinations of prompts and models that you haven’t thought of before. The journey with Leonardo AI is all about learning and growing. For every new experiment, there's a possibility of creating something distinctively captivating. So, unleash your creativity and let Leonardo AI be the tool that opens up new horizons in your artistic adventures.
#Leonardo AI#Image Generation Tool#Artificial Intelligence#AI Canvas#AI Image Generation#Texture Generation#AI for Business#Print on Demand#AI Tutorials#AI Tools#lucky clover's blog#lucky clover
0 notes
Text
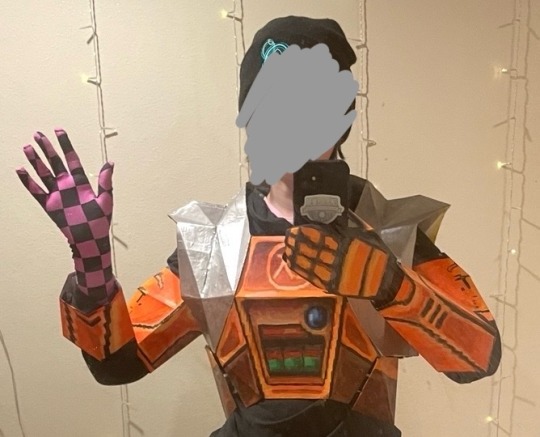
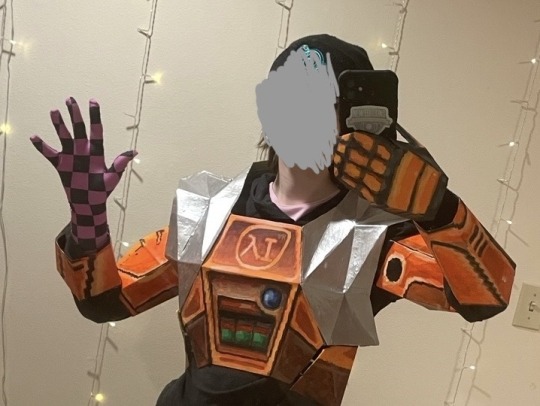
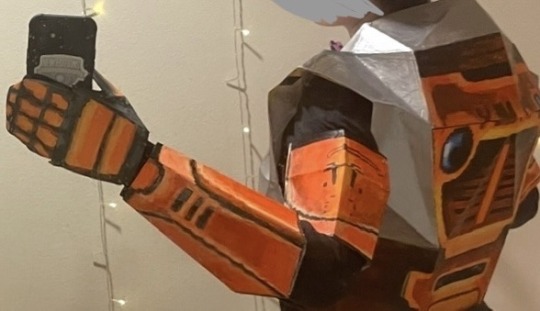
reveal of my gordon hlvrai costume project, now that about half of it is done! this is cardstock and glue and tape and more glue and paint and velcro. and 2 gloves (one hand-sewn)
i got started sometime in early-mid fall, but i committed to making it work with cardstock in january- it was originally meant to be a sizing test before construction with eva foam over the summer. then i realized how expensive thatd be, too much pressure for a form of craft ive never practiced. im pretty amazed with how its come together, even with the large seams! during that whole time when it was unpainted (started painting two weeks ago) there was no way to tell
#thank you sketchfab thank you blender thank you pepakura#school library printer… you were necessary but i dont appreciate that i had to pay per page despite my tuition#i started this because theres a tradition of wearing whatever you want to graduation at my college. ive thought abt how cool itd be to wear#an hev suit like gordon hlvrai.. hlvrai has been important throughout my whole time at college. that plus the stem degree im going for makes#hlvrai the most fitting thing to homage with my outfit#*so important to me#the support of my friends was the last push i needed before research#i havent seen anyone else go for the in-game low poly look for the hev suit! multiple tutorials out there (as expected)#but all i saw involve eva foam and molding. most of them were based on the half life 2 suit which. yeah. that one seems more desirable for#cosplay#lucky that this way was much more simple because its also the most in-theme!#hlvrai#half life vr but the ai is self aware
1K notes
·
View notes
Text
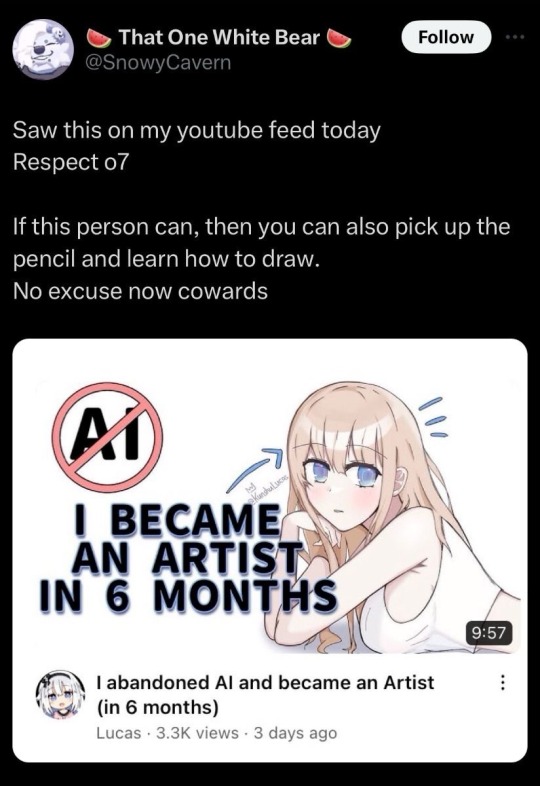
Needs to be said everywhere.
Gonna @ a bunch of ppl so this takes off
@maryland-no-rabies @maryland-officially @yes-im-youtube-kids @queen-eliz-2 @what-even-is-thiss @evil-apple-mail @randomitemdrop
Rb to spread the msg pls we need to kill ai art
755 notes
·
View notes
Text
AO3 now has a tag for AI works!!! That means you can filter it out!* To filter it from your account, and never see any of it again, follow these steps.
- First, log in to your AO3 account
- Click on this link or paste this in your browser bar
https://archiveofourown.org/skins/new?skin_type=Skin
- Set "Type" to "Site Skin"
- Set "Title" to whatever you want (Something like “No AI” so you'll know what Skin you just made)
- Then click into the large "CSS" box and paste all of the bolded text below - hit the "Submit" button
.blurb:has(a[href*="/tags/Created%20Using%20Generative%20AI/works" i]), .blurb:has(a[href*="/tags/AI-Generated%20Text/works" i]), .blurb:has(a[href*="/tags/AI%20Generated%20Text/works" i]), .blurb:has(a[href*="/tags/AI%20Generated%20Fic/works" i]), .blurb:has(a[href*="/tags/AI-Generated%20Images/works" i]) { display: none !important; }
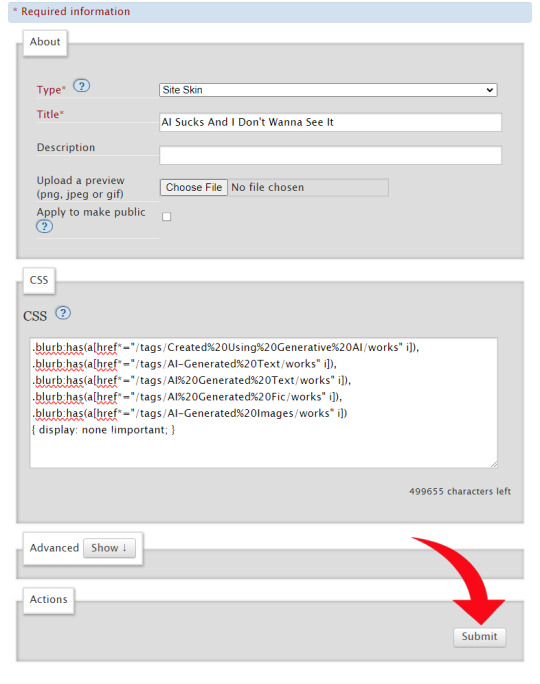
- Hit "Use"
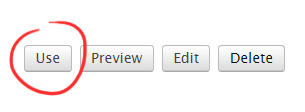
Presto!
No more AI fics or art in your results! (assuming everyone tagged properly and your browser has the flags enabled)
A blocklist to be used with the Permablocking Specific Tags - Site Skin tutorial by Eli0t
*browser dependent
1K notes
·
View notes
Text

Howdy everyone! How's the year going? I thought I'd start this January by comparing my new art to my old art, and thus I made this! I am quite happy with it, but I know I can do better in the future! Let's dust the artbooks and study hard this year!!
This is a redrawing of this old thing that I made back in 2016! It's been 9 years (wow, that's a lot) and I feel the improvement is majestic B)
And as a big bonus!
I made a TUTORIAL of the drawing process, plus some tips to help you with composition!! All my Patreon members, both paid AND free can have access to it. It's nothing fancy, but if you wanna check it out, you can just join my Patreon for free!
#free tutorial on my patreon#I hope you guys like it!#redraw#underfell#frisk#flowey#kaitogirl#digital art#illustration#redraw challenge#redraw of old art#my artwork#no ai#chara#asriel#flowey my boy I miss drawing you
223 notes
·
View notes
Text
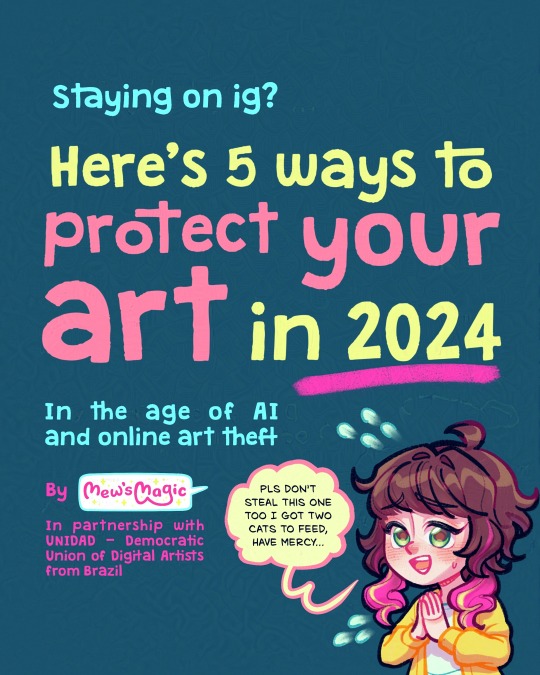
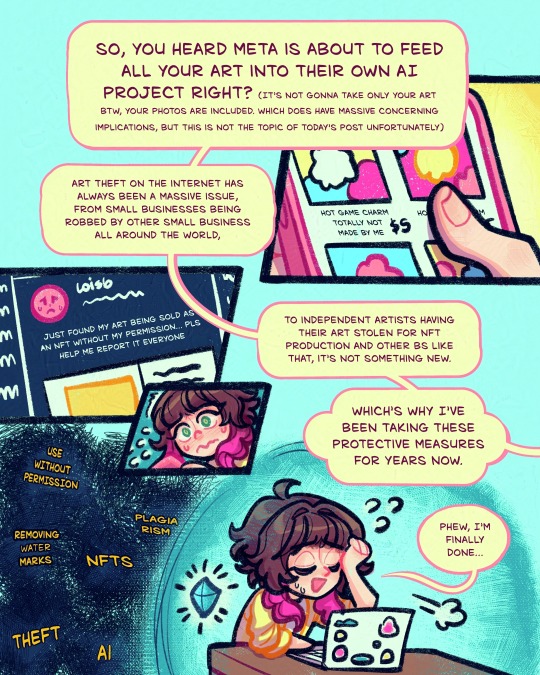
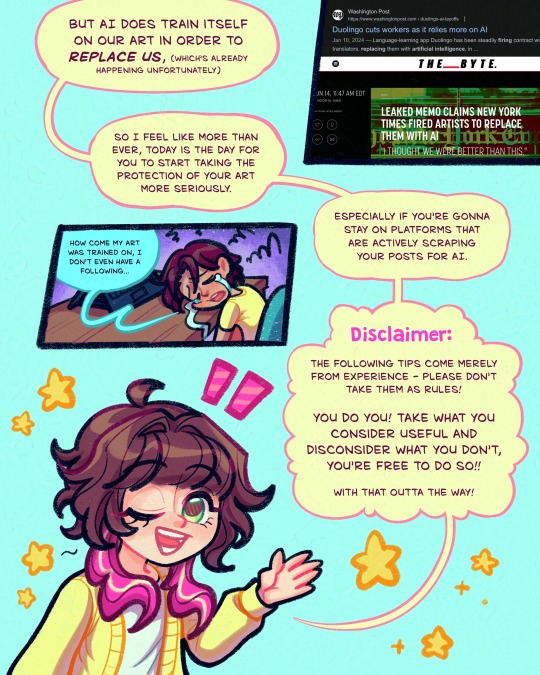
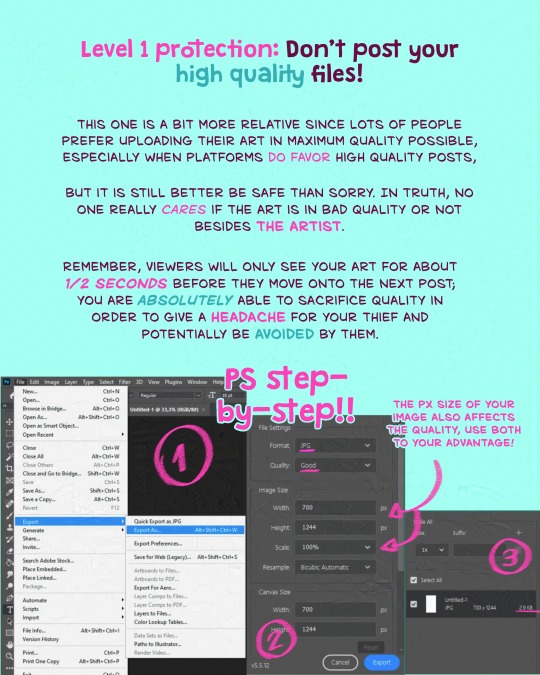
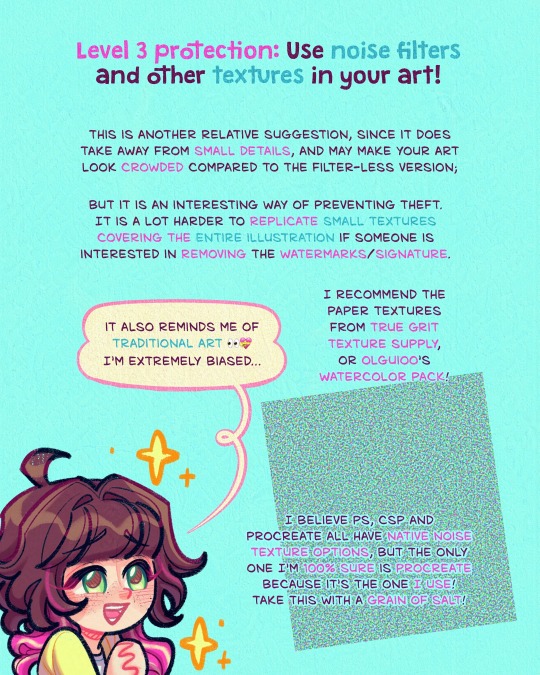
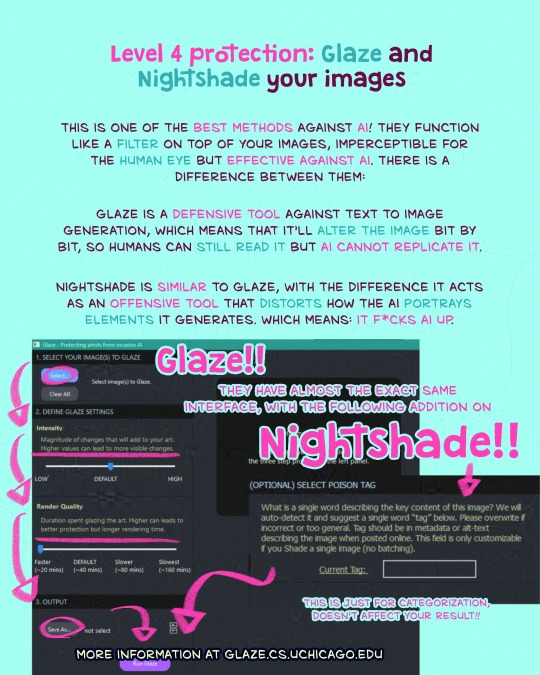
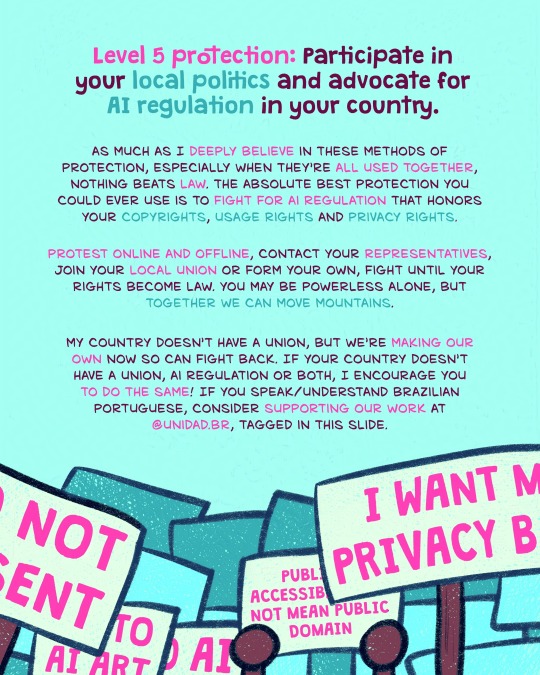
Here's a lil comic strip about how you can protect your art before sharing it to the public!!!
Against AI and against art theft too!
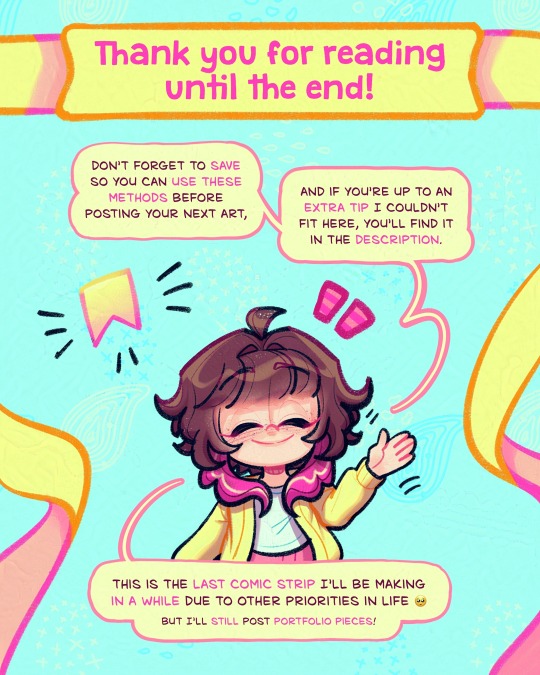
Click on 'read more' to see the extra tip I mentioned at the end!
Geez been working on this since the Meta AI things blew up but I only finished just now!!
Here's the extra tip I mentioned at the end:
you can use http://haveibeentrained.com to search for your images and find out if your work has been used for AI.
In there, you can choose to opt out, but AI companies are not obligated to respect it so it isn't too much of a protection unfortunately 😭
Also be aware that they are associated with AI and they did try to badmouth glaze so artists wouldn't protect themselves; which's very bad for a company that allegedly are on the side of the artists.
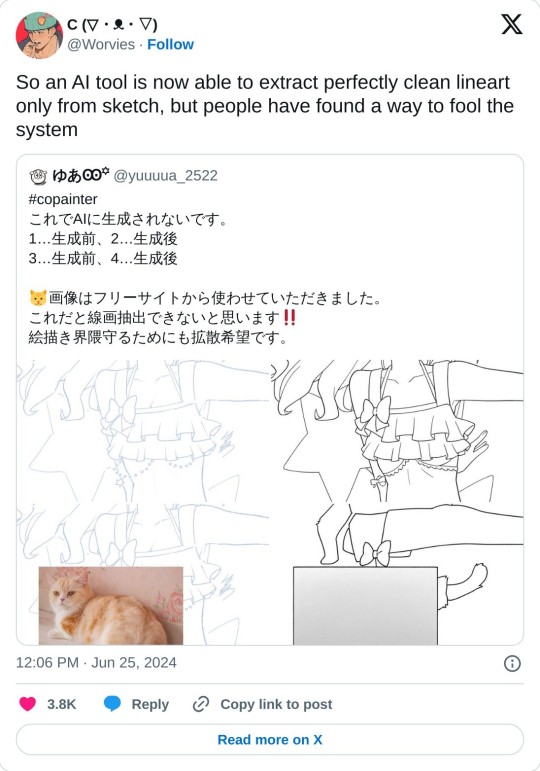
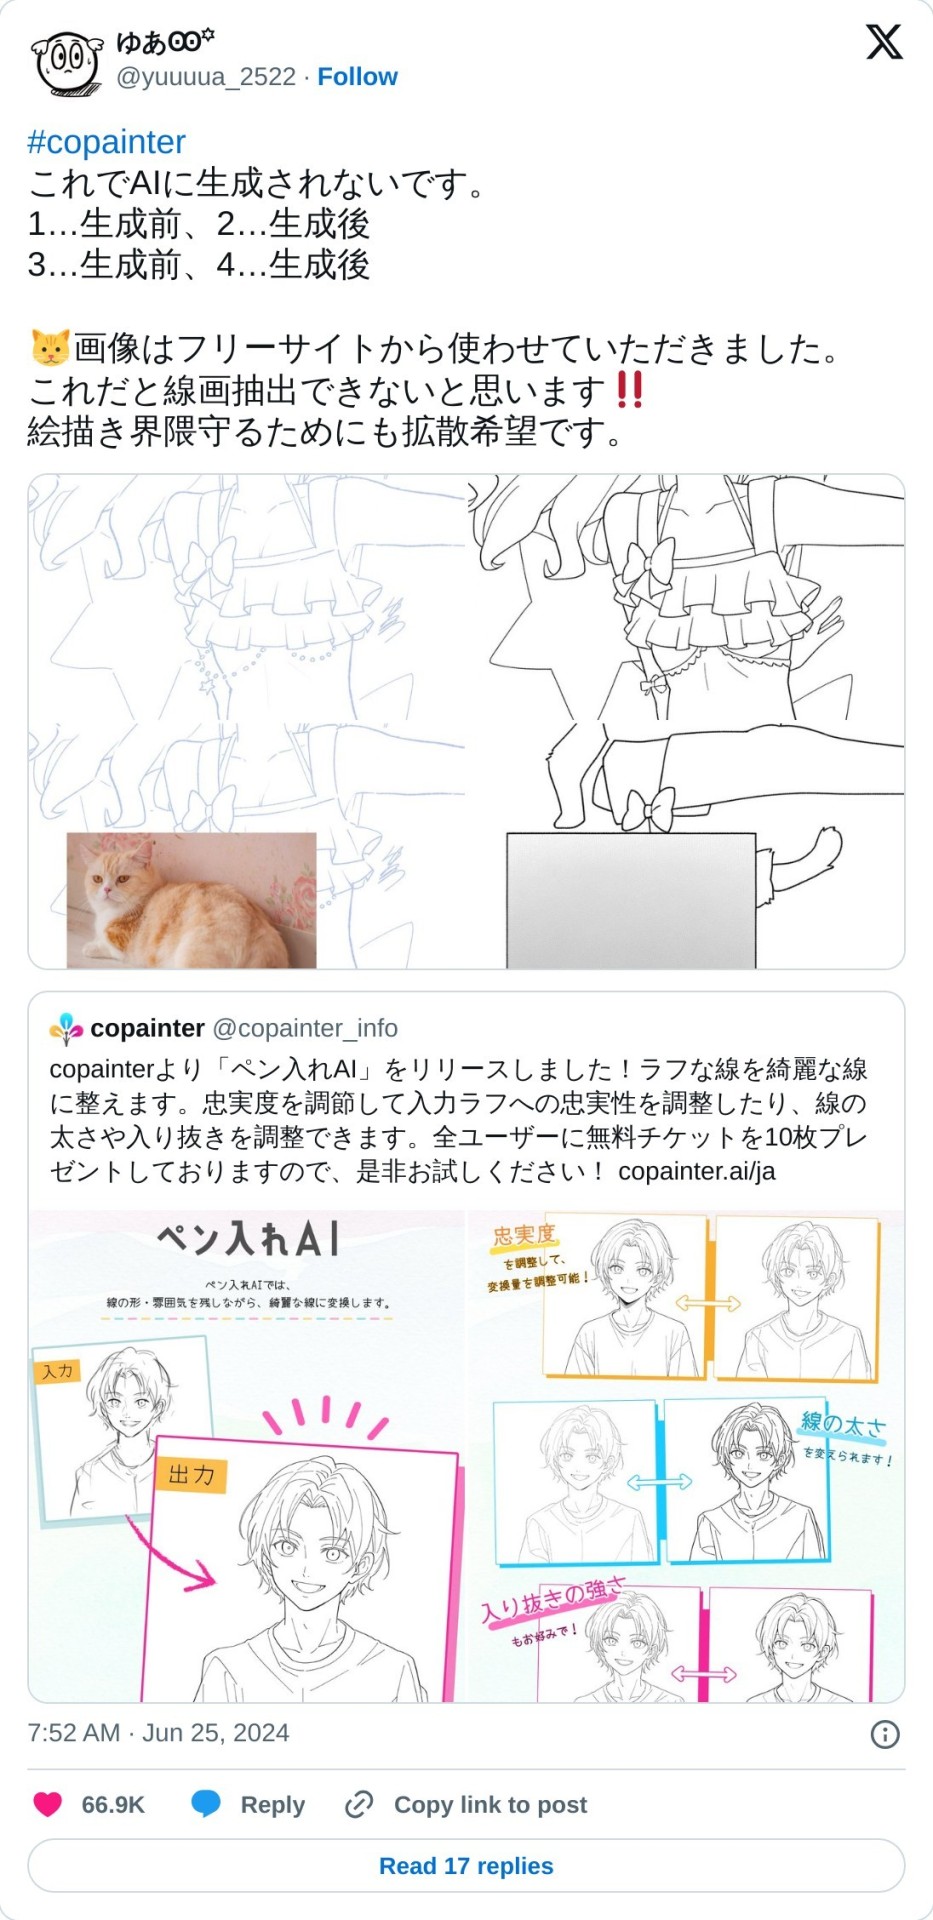
Also!!! There's a new type of AI that I was just made aware of last week, Copainter.
It completes unfinished work, which can be used for 'stealing and claiming it theirs', so put a cat picture in the next wips you post as well!
Funny protective measure I know LOLLLL but here's the tests for yall cynical people:
Perhaps I'll complete this comic with this info one day, but just these 10 slides took a looot of work so probably not happening anytime soon 😭
Thank you for reading everything though, I really appreciate it and hope this will help 🫶 be careful out there, privacy issues have been crazy recently!!!
#mews magical comics#comic strip#short comic#glaze#glazed art#nightshade#no ai art#no ai used#artists against ai#no to ai art#ai disturbance#how to protect your art#how to protect your art online#social media#social media is hell#art tutorials#tutorials#art resources#art tips#art help#art advice#support human artists#support small creators#support small artists#support small business#support artists#artist support
508 notes
·
View notes
Text
for my fellow silly geese –
go to 'settings' ->
pick the blog ->
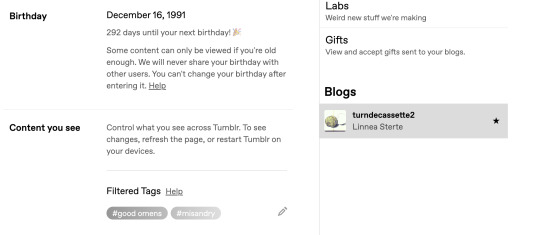
toggle, near the very bottom:
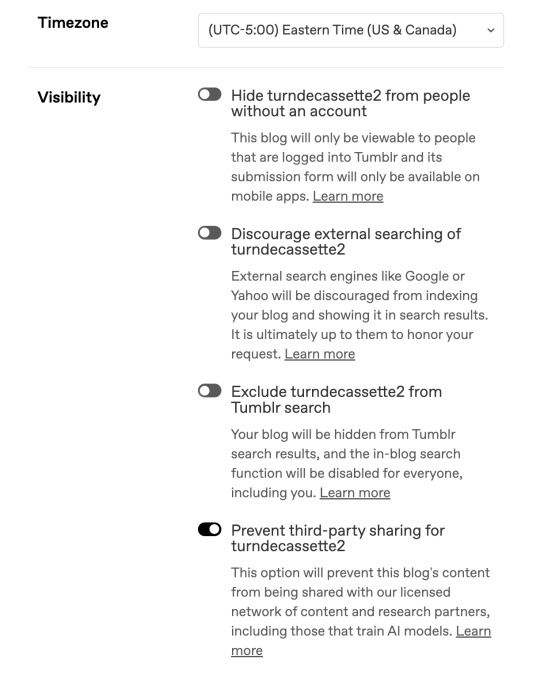
if you're tech-illiterate like me I hope you find this helpful
446 notes
·
View notes
Text
So with AO3 recommending locking your fics to help prevent scraping for AI use, I know a few people (myself included) who have locked down their fics. But it’s made me curious how many people are locking so…
Also reblog this and tell me in the tags why you do or don’t plan to lock your works.
For those of you that want to lock your works but don’t want to do each fic individually, here is a tutorial for how to lock all your fics at once.
1K notes
·
View notes
Text
Vidu 2.0 - First Reactions
I am in the Vidu Artist's program, so I've had a chance to play with version 2.0 before the official launch on the 15th. What I'm working with is a pre-launch build, and has improved day-to-day, so this may not reflect the final release.

I haven't yet had a chance to give it the full paces-run-through it deserves, but here's some early samples, and early thoughts. (Converted to GIF because you can only upload one video per post.)
The short version is that everything has been incrementally improved: Better coherence, better prompt responsiveness, better motion, and way, way better speed. Without doing exact time-tests it's say it's at least 25% the time to generate a video of the same dimensions.


While there's still some of the "smudge-blurring" that you got with 1-1.5, it happens less frequently, and is more mitigated with an image/animation that match.


Motion varies gen-by-gen, but impressive results seem to be the norm.

While his sticks are somewhat flexible at full framerate, the cat drummer's cymbal hit struck me as particularly nice.
Control and Coherence


While the roar may not seem particularly impressive, roars, howls, and other emotional outbursts didn't work well in previous versions. Aunt Acid's fumes and drips are are particularly fun, and while it still has problems with her tail, PteroDarla's crest and wings are actually working the way they should (after a number of attempts).

For a long time, I've wanted the last shot of the TMax opener to be Max starting with a zoom-in on the eye going out to a roar and pose. While this isn't quite where I want it, 2.0 is the first time I've gotten him to go through the whole sequence. Which is promising.
Weird Stuff Works
What remains impressive about Vidu is how well it handles concepts and characters that are off-the-beaten-path. Hailuo just released a character consistency feature that only works with humans, but here...
Here's my friend Cole's OC, the Waffler (Intergalactic Bounty-Hunter.) He's one unbalanced breakfast. He's also rather resistant gen AI replication because he's an SD space man with a waffle for head, a very specific waffle for a head turned at a 45 degree angle. Vidu 1.0 wasn't able to work with him, almost always giving him a mouth or rotating his waffle, if not completely glitching out. 2.0 is much better to handle it.
The numerous dino-anthros above are all in the "Tricky for AI" box. If I was into doing what could be gened easily, however, I'd just be pumping out an endless parade of pillowy waifus.


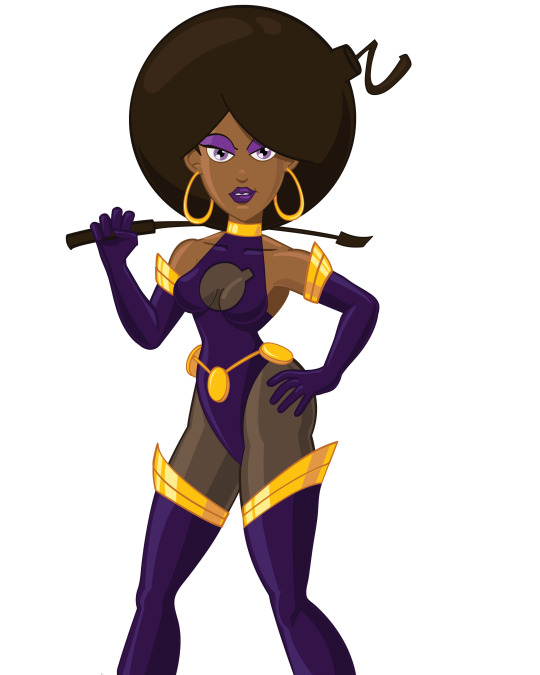
In my defense, I classify SexBomb as more of a 'strifu'. This particular one was an attempt to see if a toony image prompt could be rendered live-action with text prompting. Long story short it can't, but it can produce some interesting effects like the faux-posterized background.
I've had AI gen close to her costume before, but it never adds the fuse or does the boob-window right, and here we are.
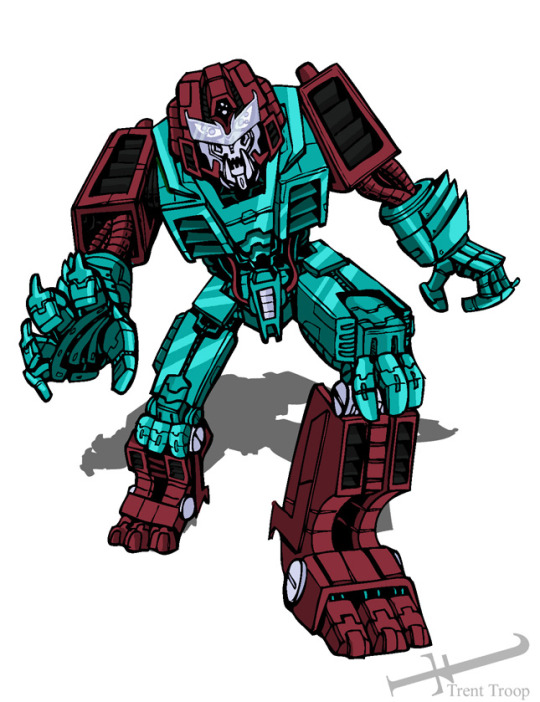
One of my old bits of Transformers fanart of the Pretender Monster Icepick served as the character model for the one on the right.
Fantastical Creatures in general are a lot easier to execute in this version as well.


And... Action!

Motion is a lot more natural this time around.


Weapons fire (though sometimes a bit literal) tends to come out of the barrel semi-consistently now, characters can fight the waves without melting themselves and...

A giant rubber monster can eat your protagonist (if you're lucky.)
Quirks and Flaws
Nothing is perfect, and all AI you see is curated. So lets talk areas to be improved.


A lot of stuff presently generates with multilingual gibberish captions sometimes, which I expect is an early model bug. Versions 2-3 of Midjourney would have similar artifacts, and that sort of thing isn't hard to correct for.
There are still issues with blurring/smudging, especially with things like tail-tips, hands, and any motion the robot doesn't quite get.
Sometimes stuff shapechanges or appears that ought not to, like the knight's floppy second blade.

Or speed gets off requiring being fixed in post.

And stuff just goes dumb sometimes, which one should expect (and in my estimation, desire) from any generative system, artificial or analogue. Should the water go on the fire rather than the firemen? Yes. Do I regret this gen? No.
One quirk of the system is how it resolves incongruous multi-prompts. I've been accustomed to Midjourney, which, when generating an image must blend everything requested. You can put two completely different backgrounds in as image prompts and it will blend them into something new and wacky.
Vidu resolves problems like having two background images at once by taking advantage of the 4th dimension. Confuse the robot too much and it will just cut/fade from one idea to the next.

And then there's stuff that just happens, like, a shot being perfect except a painted (and thus ought to be static) background object animating beautifully (going retro is a path wrought with irony) and the robot deciding it'd rather do CG-style than 2d.
And while it doesn't show up great in the gif of Max at the construction site there, 2.0 is more vulnerable to interpreting bad transparency-clipping as part of the character design, so be careful if you're using transparent PNGs.
Also, if you slap a character and a background together without elaborating on the setting with the text prompt, it will often slap the background back there as a static backdrop and produce a very "greenscreen-y" effect.
Rather than laden this post down with more animated GIFs, I'll be setting up a batch of them as posts for the upcoming days. At least, that's the plan.
#vidu ai#vidu#vidu speed#vidu 2.0#ai video#ai animation#tyrannomax#AI tutorial#AI review#animated gif
73 notes
·
View notes
Text
youtube
Discover 8 incredible AI animation tools that are completely free to use! From creating realistic depth animations to animating children’s drawings, these tools will revolutionize your workflow. In this video, we’ll explore powerful options like Minimax for text-to-video creations, Viggle for viral animations, and Immersity AI for immersive depth effects. Plus, find out how to upscale your animations effortlessly with tools like CapCut and Krea. Whether you’re a content creator, animator, or just curious about AI, these tools will unlock new possibilities for your projects. Don’t miss the bonus tool at the end—it’s a game-changer for animation enthusiasts! Check the links below to access these tools and stay ahead in the AI revolution. Tools Mentioned: Minimax: https://hailuo.ai Viggle: https://viggle.com Krea: https://krea.ai Hydra: https://hydra.ai Adobe Express: https://express.adobe.com Animated Drawings by Meta: https://animateddrawings.com Immersity AI: https://immersity.ai CapCut: https://www.capcut.com Remove.bg: https://www.remove.bg Futurepedia: https://www.futurepedia.io #AIAnimation #FreeAI #AnimationTools #AIArt #ContentCreation #AIHacks #DigitalCreators #AnimationTips #AIRevolution FREE AI Animation Tools That Will BLOW Your Mind published first on https://www.youtube.com/@TheAiPeel/
#Artificial Intelligence#Machine Learning#AI Tutorials#Deep Learning#AI Basics#AI Trends#AI Applications#Neural Networks#AI Technology#AI Research#Youtube
0 notes
Text
✨ AI Tutorials to Help Beginners Create Content More Efficiently! 🤖🎬 Just starting out? Discover how AI can simplify your content creation process with easy-to-follow tutorials. From quick edits to idea generation, these guides are designed to help you produce high-quality content faster and with less hassle. Unleash your creativity with AI! 🚀💡 Click this link : https://tinyurl.com/fbhea698
#ai tutorials#beginner friendly#content creation#efficient workflow#ai for beginners#boost your creativity#digital tools#content made easy#tech for creators#ai editing#productivity hacks#create more#step by step#tech tools#ai#digital#youtube tips#creator community#channel growth#content strategy#digital marketing#youtube growth
0 notes
Note
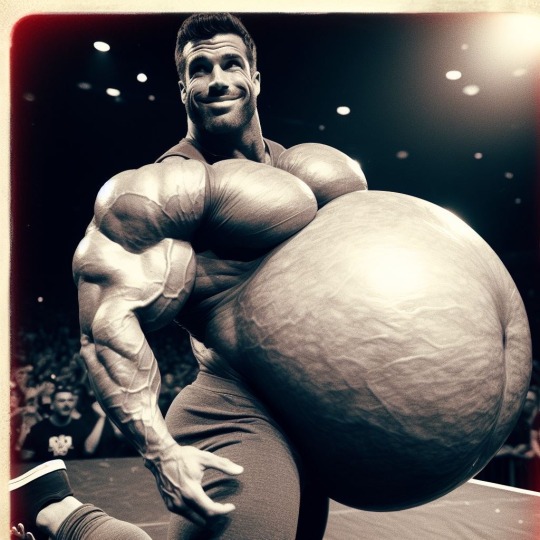
Really great stuff. What prompts do you use to get the great big pecs and huge roid guts?
Thanks! I use Bing’s image creator, and the tricks are constantly evolving. What worked three months ago may not work today. Currently, I use a prompt something like this:
shocking polaroid, gritty and desaturated image, side view, friendly masculine bodybuilder on stage at a roidgut convention flexing his disproportionately huge muscles for the crowd, handsome, confident, defined jawline, cleft chin, wearing a t shirt, jeans, sneakers, enormous octuplet pregnancy belly the size of an orb sticking out twenty feet, his belly is too big for him to reach around, his fans cheer for him as he pushes his belly toward the crowd
To get an image something like this:
#ai muscle#male muscle growth#ai muscle growth#muscle#musclegrowth#muscle in public#ai belly#hyper belly#muscle belly#belly growth#belly expansion#roidgut#ai muscle tutorial#ai muscle gut
180 notes
·
View notes
Note
Looking back at your aurora and sage besties comic (its one of my favorites, only being beaten by were amy and sonic being a Simp) and I've got to ask, HOW DID YOU DO SAGES GLITCHING SO FRANKEN WELL??? IT LOOKS AMAZING AND I PERSONALLY LOVE HOW THOSE GLITCHS TURN RED WHENEVER SHES ON NEFARIOUS TIMING ARVDGDBABA
YOU ARE MY FAVORITE SONIC ARTIST.
...just wanted to say and ask.
You are so kind, thank you! I'm so happy you like them!
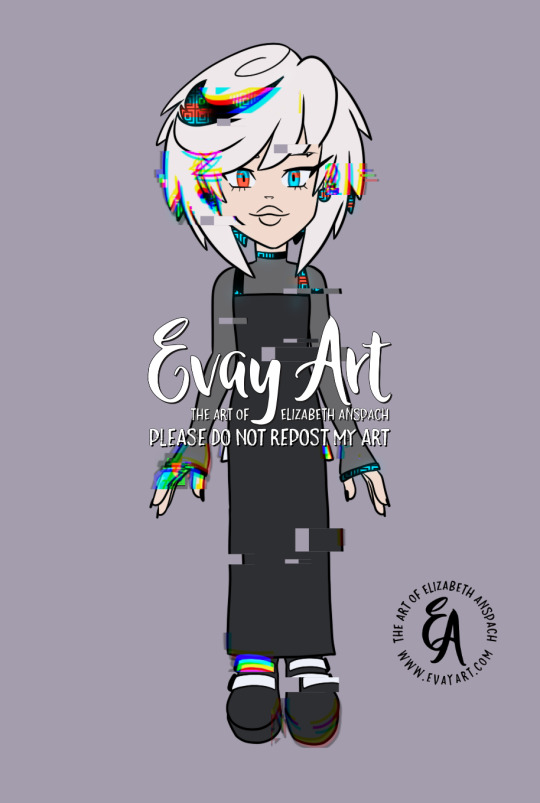
I do a lot of experimenting in Procreate until I find a technique I like. To achieve Sage's glitch, especially if she's doing something a little more wicked so her "red" side is showing, I'll start by drawing her in her blue version and her red version:

I'll select random rectangles from the red version and mask them/cut them out, so she's mostly blue but some red is showing:
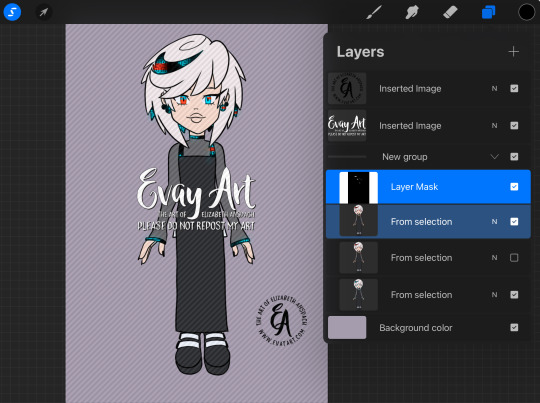
I'll duplicate this layer and keep a copy of the "clean version" and apply effects to the duplicate. In Procreate, I'll use the "Glitch" effect and use the “Artifact” setting and mess with it until it achieves a result I like:
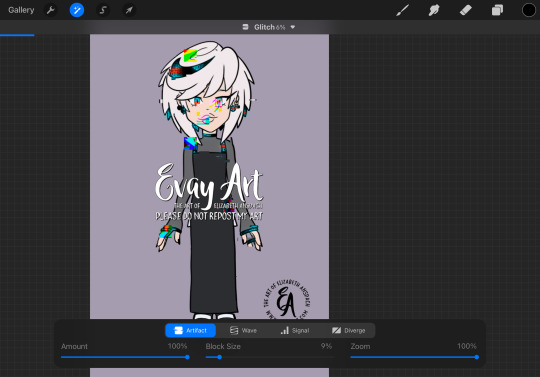
This may take several passes.
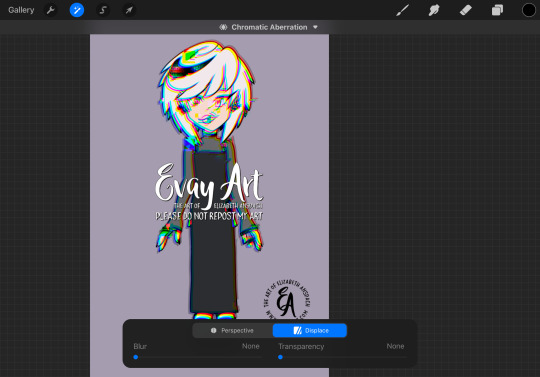
I duplicate the layers again, because again I always want to be able to go back if I don't like it. Then I'll play around with "chromatic aberration" under the “displacement” setting. She only needs a little for a subtle glitch effect, but if she's meant to look more menacing then I can go hardcore with it:
Then, I'll turn that original "clean" layer back on and I mask out the effect layer so only parts of it are coming through. When computers glitch, normally most of the image stays in tact and only some parts are scattered/messy so that's why I only have the effect in some areas.
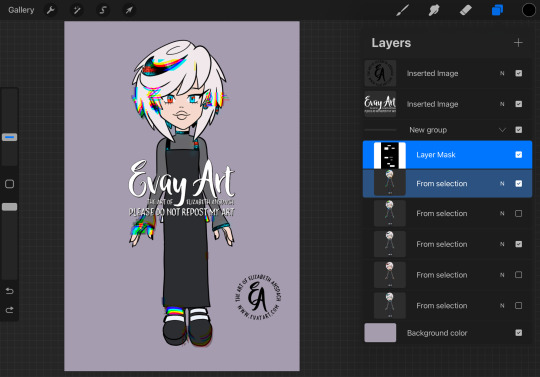
I might even slide bits of those rectangles to the left or right. It's just a matter of playing with it until I like how it looks.
I hope that explanation was easy enough to follow along!
Again, thank you so much! I'm really really happy you enjoy my art and stories 🥰 (and I'm delighted to hear you're a fan of Were!AmyXSimp!Sonic hehehe)
#ask me#evayQA#tutorial#procreate#procreate tips#sage the ai#sage robotnik#sonic trash#art tips#glitch effect
156 notes
·
View notes