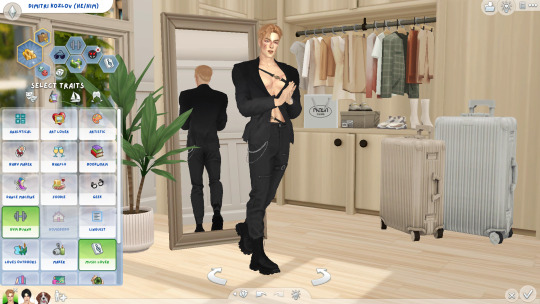
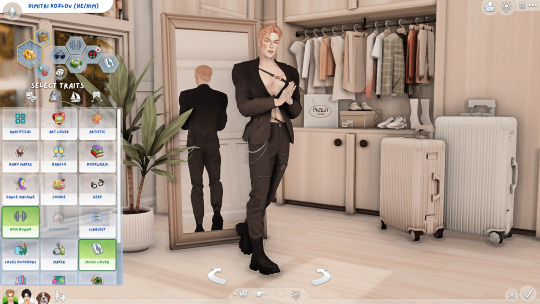
#was testing out different presets
Text


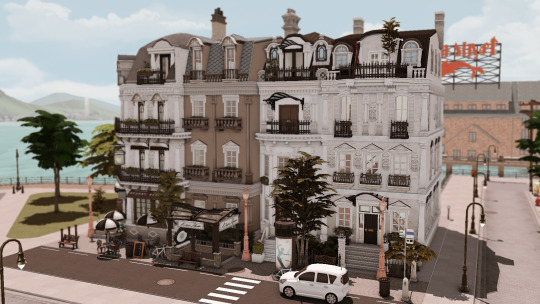
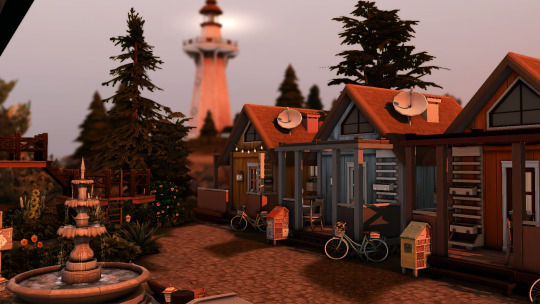
Update on my fav couple.
short explanation under the cut
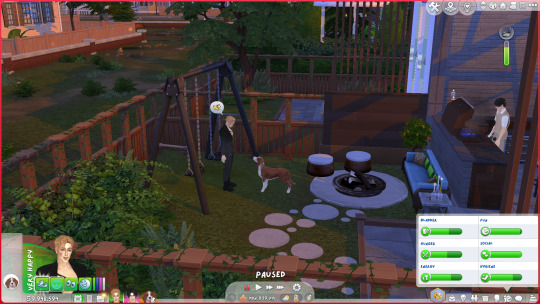
Patricia got laid off (she didn't even get a negative buff). I got tired of the city so decided to move them to a world I've never played in (Brindelton Bay). She fell pregnant with her second son (she wanted a girl lol). Decided I want her to try the law career again so, "they moved to brindelton bay for Patricia's career." She got a makeover and the couple hired an au pair to assist with the kids. Angelo...he quit the writers career to pursue becoming a novelist.
#ts4#ts4 gameplay#ts4 sims#my sims#simblr#patricia and angelo#excuse the messiness#was testing out different presets#oh angelo jnr is a toddler
37 notes
·
View notes
Text
so like. what's the deal with gshade??? i see a ton of presets for it and people saying it's easier to use than reshade but ive never heard of it before, because i was away for over a year?? but then i've also seen people say that the person who made gshade sucks and not to download it?? someone enlighten me please
#i'm curious!!!#ive seen some really pretty presets for it i want to test out#like do they work with reshade as well.......? what's the difference
10 notes
·
View notes
Text

tutorial: making slider-compatible earrings
this uses quite a new feature, the BlendID vertex colour layer, and as far as i know there's no complete tutorial or explanation of how it works out there, so this could probably still be improved. i still use old Blender, but feel free to translate this to other versions.
in simple terms it's a new vertex colour layer that gives each vertex of the head a unique colour, and you can use it on your CC mesh to attach it to a specific head vertex. for small detailed meshes like earrings it does this better than uv_1, which makes them go spiky.


to start, the earrings should be placed on the s4s rig's ear, even though it's way smaller than the smallest preset in-game. if you have several piercings close together, separate them (P) into different meshes because it makes transferring the colours so much easier.
there are some limits to this, each CC vertex can only be attached to one head vertex, so you can't do chains or anything that would need you to blend between two verts. the industrial does work because it's just two clusters of verts with nothing in the middle, and for this tutorial i'll treat it as two separate earrings. finally, don't expect it to perfectly preserve the placement - evenly spaced piercings will end up uneven, and on extreme occult ear presets the earrings will probably still come away from the ear.
selecting the source polys


check that the head mesh (head for mframe, head_2 for fframe) has a BlendID vertex colour layer. if it doesn't, re-export the CC from S4S or import it into a freshly exported blend file.
enable editing the head.
for each piercing, select a poly that contains the vertex you want to attach it to. for me it works best using the outside of the ear. it takes a lot of trial and error to find the best one, so don't expect it to be perfect first time.
(you need to do this for both ears, you can't just mirror the mesh after you're done because the colours are different)
duplicate (Shift+D, Esc) and separate (P) the polys into a new mesh.
switch to editing the new separated mesh.
move the source vertex for each earring as close to the middle of it as possible. the whole of each earring should be closer to that vertex than any other, this is why we separated the ones that were close together at the beginning.
move the other vertices well out of the way.
transferring data from the head


if your CC mesh doesn't have a uv_1 map and a BlendID layer, create them and name them.
transfer the BlendID layer from the separated head polys to the CC mesh. use Nearest Corner Of Nearest Face, not Nearest Face Interpolated like you normally would for uv_1 maps.
do the same for the uv_1 map. (this might not be necessary, but it won't hurt.)
in edit mode, select and assign the whole mesh to the head group and delete any other groups.
(side note: if you do this for face piercings you'll still need to transfer weights from the face as normal. i'd transfer them from the separated head polys using nearest vertex, so each piercing has uniform weights. you might need to do separate versions for both frames too.)
in vertex paint mode and wireframe view, check that each earring has a uniform red colour. in classic EA style some of them are impossible to tell apart, so use the colour picker (S) to check.
switch to the Col layer and paint the whole mesh (Shift+K) with #007F00.
bet you wish this was over
if you separated the CC into multiple meshes, do the whole thing again on the other mesh.
select all your CC meshes on object mode and join them together again (Ctrl+J).
hide the polys you separated from the head.
the mesh should be ready to import into S4S now! sometimes in my testing it was being weird though, and i had to import it several times or delete the BlendID layer then undo and reimport it. i'll try to update the tutorial if i figure out why.

trying it in game, you can see which parts still need tweaking, the higher stud is especially bad because it isn't that close to any of the head vertices. you can either try a different source vertex for them, or try moving them around. if you're designing an earring set from scratch, it might be easier to choose placements that are close to a vertex on the ears.
302 notes
·
View notes
Text


Fledgling - Gshade + Reshade Preset by Losieee


Salutations kindred 🦇
I finally got around to polishing off my shader preset Fledgling. It was created to make Sims 4 feel more like Vampire the Masquerade: Bloodlines, along with some general improvements to how the game looks.
To me this green/blue hue puts me right in the mood for some sneaky L.A. vampire buisness. and i added different some grain to boost that early 2000's game feeling!
This is the preset i use on all my Sims 4: Bloodlines posts, and i don't do any further editing to my pictures!
The preset has been tested and works on both Ghade and Reshade!
Grain and ADOF (blur effect) can be toggled on and off!
Grain Toggle: Shift + 3
ADOF Toggle: Shift + 2
Check out the rest of my Sims 4: Bloodlines project!
Before you install
If you use Reshade
Depending on your version of Reshade you need to follow THIS tutorial and add THESE files to your Reshade shaders folder.
AND change your RESHADE_DEPTH_INPUT_IS_REVERSED setting value from 1 to 0!
Other than that, simply install as usual:)
Credits/Resources
Procreate
Vampire the Masquerade: Bloodlines, VTM:B Unofficial Patch, Bloodlines VPK Tool
Gshade

Download (SFS free) Updated link!
If you use my Preset and upload screenshots, videos, edits or anyhting else, please @ me! I love to see them!
Please do not claim my content as your own, reupload my content or modify my content.
#sims 4 bloodlines#sims 4 gshade#sims 4 reshade#sims 4 preset#sims 4 gshade preset#sims 4 reshade preset#ts4 download#sims 4 vtmb#sims 4 vtm#vtmb#vtm#vampire the masquerade#vampire the masquerade bloodlines#sims 4 mod#sims 4 cc#sims 4 download#simblr#gshade preset#reshade preset#sims 4 preset download#ts4 mod#ts4 cc#sims 4 simblr
159 notes
·
View notes
Text
Some tips for The Sims 3 Buy/Build
Install LazyDuchess’ Smooth Patch to alleviate lag, esp in Buy/Build and CAS.
Keep your CC merged and organized, esp your patterns, this will also alleviate a lotta lag across all modes.
When building on community lots, or any lot rlly, avoid going to the edit world menu, and just put testingcheats enabled into the cheat window, then shift+click the ground of the lot to enter Buy/Build mode. This makes leaving it to save a lot easier, with less “preparing” screens to possibly get hung up in.
Lower your settings, you don’t need any adjacent lots loaded, and you certainly don’t need super water on either. You can always switch these back on when you’re done.
While you’re at it, remove your HQ mod, and turn off your Reshade/Gshade preset, or at least turn off your depth shaders. I only ever turn on my depth shaders when I’m taking screenshots for better fps while playing. The DoF shader esp requires a lotta resources your game could be using to simulate all those 78 townie sims instead.
Save as… vs Save, I Save as… at least every third save. It’s also just good habit to keep backups.
When using the CASt tool, set down everything you plan to CASt first, then switch to a category like the wall tool to avoid eventual lag and drag when using it a lot. Love yourself. You don’t have to suffer using CASt tool in an overpopulated category like misc deco.
Utilize the clone option through testing cheats to duplicate already CASted objects, it’ll keep your design just like the dropper tool, but it’s a lot less time consuming, I promise.
Don’t be afraid to use the swatch save tool for objects you use often, esp community lot objects, as it helps to keep your aesthetic consistent. I also keep all of my favorite streetlamps, benches, and public trash bins etc in a convenient custom collection folder to speed up the process of doing multiple lots in one sitting. These handy tools are there, use them.
The issue with custom counters. They mess up sometimes, if you can’t recolor it suddenly, here’s how to fix that. Now if you can’t place down a cupboard suddenly, even though nothing’s in the way, and you’ve got moveobjects on activated, try putting it on the wall a tile over, and then try adding it to your desired spot again. Lastly if you set down counters or cupboards at a corner, and it messes up the textures, but you can still recolor it, you could do what the video I linked above does, or you could simply pull out the CASt tool, and switch it back to any of its original swatches and click the check, then feel free to recolor it as you want.
Railings will also do the “can’t recolor” trick too, but this is a simple fix, just delete it, and replace it, and you’re good.
“Oh no, I switched between buy and build mode, and now my catalogue won’t load, and I can’t click on anything at all!” Don’t panic, hit F2 and/or F3 on your keyboard, these are shortcuts for switching between them, and if you’re lucky it’ll load properly again. Should you get the bug where you load a category and it’s somehow empty, don’t fret, just click on a different category and this should fix it. Then if you get the bug where all the objects you put down disappear suddenly, sorry your game is haunted. Call an exorcist, or just reload, they might reappear if you do.
Tbh, if you run into any kind of major bugs, it’s likely a sign to either save immediately or just restart your game. These only ever show up when you’ve been at it a while ( at least for me ), therefore starting fresh wouldn’t hurt. Probably also wouldn’t hurt to check whether you might’ve installed something the game didn’t agree with by running Dashboard, or put it through the ol’ Save Cleaner.
Honorable Mention: Keep an eye on the texture sizes and poly counts of objects. I know it’s tempting to build these ultra hyperrealistic lots with clutter at every inch, but unless you’re just doing it for screenshots, or for your story, or using it very sparingly, it is not by any means recommended purely for gameplay. This is just the truth when it comes to any Sims game. You don’t want lag, or max memory crashes, or save errors? The Sims 3 is a 32bit game, that’s almost old enough to drive, be easy on it.
463 notes
·
View notes
Text
Enhanced Horse Tail Slider
It's been a long time coming... the very first CC horse slider!
This is a replacement for EA's tail slider.
This is an all-in-one slider which includes 4 sliders total.
Tail Height (up and down, left view)
Tail Distance (left and right, left view)
Tail Thickness (left and right, back view)
Tail Length (up and down, back view)
I've done very little testing outside of CAS with this, so please feel free to let me know of any issues you run into! Everything seems to work quite nicely with CAS poses, which is a good sign. The only little issue I've noticed with them is when the tail distance is extended, it can stick out a bit unnaturally. This might be fixable on my end in the future.
Should anyone else create a tail slider, this mod will NOT be compatible - you will have to decide between them.
Are you working on any other sliders?
I have a whole list planned and in the works, however this was the easiest of them. Some of the other sliders I'm working on have had over 15 versions where I've just had to make constant tweaks. I'm open to suggestions below, but they're probably already on my to-do list.
Are you working on a height slider?
I cannot for the life of me get this to work, likely because I (honestly) have no idea what I'm doing, but also potentially because MorphMaker isn't 100% yet for horses. This one may have to be left to the experts, however I am working on sliders that will affect height slightly.
Are you making head or body presets?
The version of MorphMaker we currently have is experimental and therefore lots of things aren't working. I haven't been able to get the features I need for presets working yet, but I would like to make them in the future!
Enjoy!
Notes:
It can be difficult to grab the tail to use the sliders, especially when you're using certain tail styles. From my limited testing, you can usually grab it right at the base of the tail. You can slightly change the angle or swap to a different tail if need be.
When shortening the tail distance, it can distort the area it joins the horse's bum. I might be able to fix this in the future, but for now we'll just have to live with it.
When extending the tail length, the tail may clip into the ground if it's particularly long - have a play around with this, as sliders don't need to be used at their maximum!
Any other distortion is likely to do with the tail style you're using and not really the slider.
The GIFs help to demonstrate the angle you need to use these sliders, just like any EA ones.

Download - Patreon
#the sims 4 horse ranch#ts4#ts4 horses#ts4 horse ranch#ts4cc#ts4 horse cc#sims 4 cc#sims 4 horses#sims 4#s4cc#sims 4 horse ranch#ts4 equestrian#simblr#horses#equine#equestrian#sim#sims 4 horse cc#ts4 simblr#ts4 slider#the sims 4 slider#sims 4 slider#s4
274 notes
·
View notes
Text
[Reshade add-on] Clean UI for DX11
After so so sooooo many crashes later, I finally managed to create a working setting for this add-on for DX11 games by using an older REST version 🫠
You can read the whole post on Patreon here, or below the cut for those who can't access the site.

As using REST 1.2.0 and above cause crashes whenever I create a setting or attempt to use it for a brief amount of time, I decided to use a much older version of REST (1.1.0), which turns out to be more stable to configure and use. While this means being able to use the add-on for the DX11 game, it has its own set of problems, which may/may not be a dealbreaker for some.
I decided to make a new post since the original one is quite lengthy and I want to keep DX9 and DX11 versions separate due to the different information each version has.
➡️ For the DX9 version, find it here. And here for the Patreon post.
In short, with the help of REST (an add-on for reshade/gshade), you can block/prevent shaders from affecting the UI.
// Things to know if using this version ⚠️
Some shaders will not work properly and will cause some gamma issues. If your preset look different than how it normally is (a lot darker/brighter), enable/disable your active shaders and see which one is causing it. It's easily fixed by using an alternative shader that achieve a similar look.
Shaders affected (ones I've known so far): SMAA & MartysMods_SMAA (FMAA is not affected, use this instead), FilmicAnamorphSharpen, ArcaneBloom & NeoBloom, Glamarye_Fast_Effects, MagicHDR, CRT_Lotte.
You will not be able to change your window resolution, either via graphic settings or by using SRWE. This will cause your game to stop and eventually having to force stop it with the task manager. It is recommended that you have your game in Windowed Fullscreen to avoid issues and have the add-on disabled if you want to change the resolution in-game.
// Required Files
REST add-on v 1.1.0 (testing)
REST config for v 1.1.0 (simfileshare only)
// Installation
Have ReShade with full add-on support installed for this to work.
Download the REST_ x64_1.1.0 add-on from the github linked in the requirements section as well as the config.
Extract the ReshadeEffectShaderToggler.addon file into the game's \Bin folder where your TS4_64.exe is (where you had also installed ReShade).
If you use GShade: place the .addon file in the gshade-addons folder.
Still in the \Bin folder, drop the x.x_ReshadeEffectShaderToggler_DX11.ini file you downloaded.
If you use GShade: place the .ini file in the gshade-addons folder along with the .addon file. If my config doesn't show up in the add-on menu, move it back to the \Bin folder.
Rename the file and remove the prefix and suffix. Both .addon and .ini file should share the same name for the add-on to recognize my settings = [ ReshadeEffectShaderToggler.ini ]
Open up your game. If you see the same menu as below then you’ve successfully installed the add-on & settings! Restart if needed.
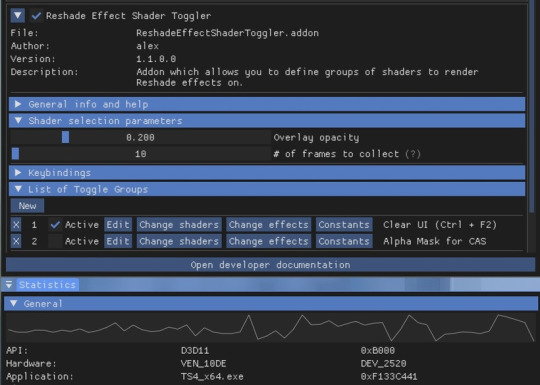
I've set the shortcuts for Clear UI to match with my Effect toggle key, which is Ctrl + F2. If yours are set differently, match the shortcut of this toggle group with your effect toggle key:
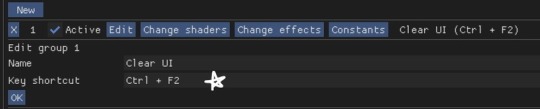
Reason being, having the toggle group active will prevent you from enabling/disabling your preset. Changing the shortcut will allow you to disable & enable your preset and toggle group at the same time.
To avoid the add-on from not working, make sure to do the following:
Enable post processing effects
Disable laptop mode & edge smoothing
Set 3d scene resolution to high
As long as all of the above are met, you should not encounter any problems. This has been tested to work on all graphics settings from low to ultra. External modifications (like Simp4Settings) may/may not have an effect, but from the testing I've done it has shown no problems so far.
178 notes
·
View notes
Text

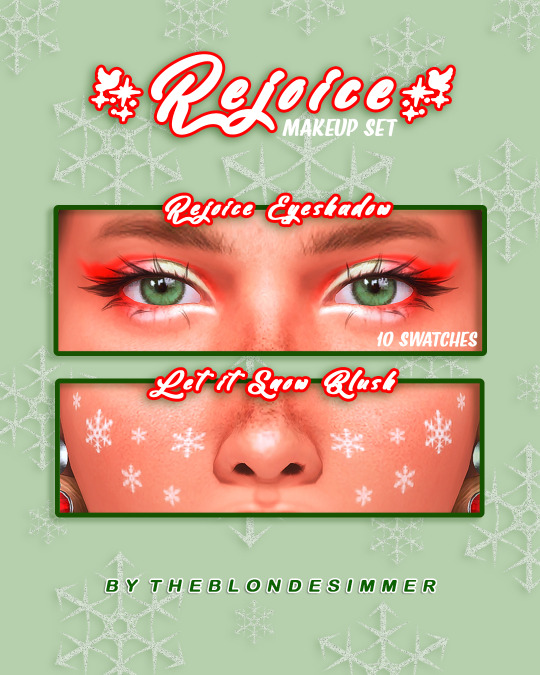
REJOICE - A Mini Make-up Set Out NOW!
Hello! I am so happy to be back with some holiday inspired makeup! This mini set comes with 1 eyeshadow (10 swatches) and 1 "blush" (one swatch). I hope you enjoy and happy holidays!
The eyeshadow comes in 10 swatches. The blush comes in 1 swatch.
It is available now for everyone! GET IT HERE!
INFO:
♥ 10 swatches (eyeshadow) / 1 swatch (blush)
♥ Do NOT reupload or claim as your own
♥ ALL genders, teen - elder
♥ Base game compatible
♥ Compatible with sliders
♥ Custom thumbnail
♥ Tested on different skintones
♥ Photos were taken with my up and coming Reshade Preset (Serotonin v2 - DOWNLOAD IT HERE!)
Note: There are two versions of the eyeshadow to download - CM2 or CM0. CM0 has more coverage. CM2 is more natural and compatible with eye overlays. I recommend trying both to see which one works best with whatever skin overlays/details you have on your sim. Please only put one version in your game at a time!
If you use any of these items on your sims, please use the tag #theblondesimmer or @the.blondesimmer! I would LOVE to see it!
Please check out my other socials - Instagram | Youtube | Tumblr | TikTok
If you have any issues, please message me! ENJOY! 😊
I hope you enjoy it! 💕
#ts4#ts4 maxis match#ts4cc#maxis match#sims#thesims4#create a sim#sims4#sims 4 custom content#sims4cc#sims 4 cc finds#sims 4 cc makeup#sims custom content#sims cc finds#ts4 cas cc#sim 4 cas#the sims 4 cas#sims 4 cas#ts4 cas#ts4 create a sim#sims 4 create a sim#createasim#sims 4 creator#theblondesimmer
247 notes
·
View notes
Text

my first 6ish months as a cc creator 💗🫶🏾
a little thank you note below!! pls read if you can 🙇🏾♀️
i honestly still cannot believe that i make hairs for this silly little game because i thought it would be so impossible for me to do so (as i said in my mariela post) and here i am 9+ hairs later (and even more in the works). it makes me so excited and proud to see my progress in the different hairs i make as it has gotten easier to navigate blender and gimp now. even tho i have learned so much and feel more confident in my cc making skills, there’s still so much i need and want to learn as there’s so many more black hairstyles i wanna make that are still outta my current skill set. hopefully, i can eventually make at least 40-50% of the hairs i have saved on my pinterest board. i also wanna make cc that is specifically for fat sims (maybe poses, body presets, skin details???) so here’s to so many more months of saturngalore cc! 🥂
i want to thank everyone that downloaded and used my cc in their games, edits, and/or lookbooks! i still cannot believe it whenever someone tags me or i see my hair in a cc haul youtube video (like wtf??!). im so happy to know that so many people like my cc and i hope that y’all will like my new hairs for 2024! last but not least, i also want to thank everyone who took the time out their day/week to load up their games, make such amazing edits and sims highlighting my hairs, and gave me such valuable feedback all to test my hairs!! it really makes me tear up from all the support and love that i have received so far and i will be forever grateful for all of you!! 🫶🏾
@invisiblequeen @riverofjazzsims @minaevesmoths @francescalater @kimorasimz @meoanii @browntrait @mmonetsims @eatasslikegrass @elomelos @koibish @simfuldelights @mokah @mangosimoothie @zohrou (they deactivated i think 😔) i hope this is everyone but im sorry if it’s not 🙏🏾
#before i show y’all my upcoming cc i just wanted to post this first!!!#i kept writing and erasing what i wanna say cause self praise is kinda hard to do but yasss here’s to me and my brain#i keep doing things rainbow now themed like my fault for being gay honestly#🪐 speaking
149 notes
·
View notes
Text

× NAVIGATION ×
patreon | TOU | instagram | download section
× FAQ ×
“This link is broken or doesn’t exist anymore” and “Where can I find X set”
head over my blog’s download section to have access to a list of all my free content; this is an easy-to-navigate list, with direct download links (mediafire or patreon) & includes all my older sets that had broken links.
→ download section ←
“This bed is broken”
when the game adds new features through updates, it can break certain type of content; to update my beds & have them work properly again, you will need to re-download them here :
→ beds update ←
“Where can I download your builds?”
my builds & rooms are not available for downloads because I do not keep them myself. I usually create simple rooms only to showcase my content & take pictures, I then delete them.
“What ReShade/GShade do you use & where can I download it?”
my GShade presets are all my own personal presets. I think that one’s preset is such nice way to add a unique touch to pictures & I won’t share any of my presets for that reason.
“Do you allow recolors & conversions to other Sims games?”
yes. I allow recolors & conversions (to Sims games ONLY), as long as my content is already released for free & out of early access. For more information, please read my terms of use;
→ terms of use / t.o.u ←
“I just downloaded X set, and my game won’t start”
this can happen for a few reasons; your game isn’t up to date, you have a lot of duplicate packages, or files got corrupted while downloading. If you download a lot of fully finished builds with merged cc (or into different files), you could end up with a lot of duplicates of the same object. This could cause your game to be slower or even not start at all. Secondly, downloading a lot of files at the same time, especially on patreon, seems to be causing problems & corrupting files. The corrupted files will cause your game to either crash at start or give you an error message. Try taking the last files you downloaded out of your Mod folder and re-downloading the set, or sets, only one part at the time. This seems to always work for me. My content is tested by multiple people (and me) before uploading & I would not upload broken content. If you are facing issues with an older set of mine, it is most likely a problem that occurred while downloading or with your game/mod folder. I am always happy to help when it comes to my content, but I will not “fix” any other creator’s content.
In short, make sure to check for:
- batch fix (e.g. broken beds updates)
- game updates
- cc duplicates
- corrupted files
Lastly, if you did all the above, and are still having problems, do not hesitate to send me a direct message (DM). When it comes to troubleshooting, I will not answer comments below posts for the simple reason that it makes it difficult to have a conversation. Going back and forth with replies into a comment section makes it too difficult since it will most likely require going through a few steps to solve any further issues.
"Do you do commission work?"
no, I dont. I often take suggestions or make small polls on my social media (insta & patreon), feel free to follow me & participate in those, send me pictures of things you like etc.
"Are you WCIF friendly?"
yes. I will do my best to remember where it was from, but since I don't keep any builds in my game, it can sometimes be difficult. Also, please note that I often write a small WCIF section at the end of my posts, take the time to read all the way down!
Thank you all for being here, supporting my work & taking the time to read.
S. xx
58 notes
·
View notes
Text


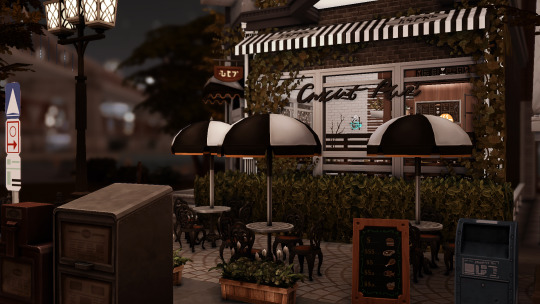
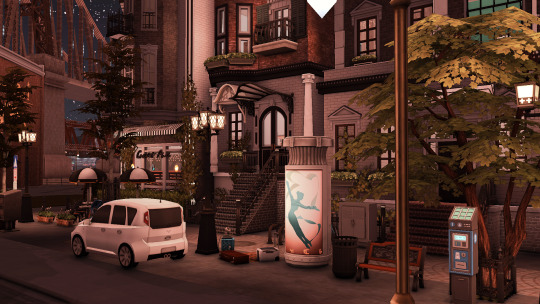
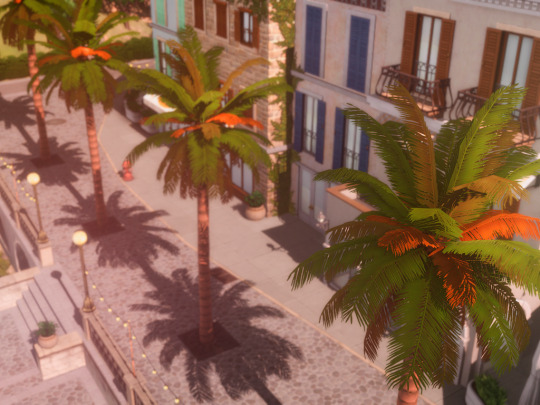
Amalfi Reshade Preset
Hello Simmers, I am so pleased to be sharing my first ever Reshade Preset. One thing i know is that i cannot play the Sims without Reshade. It adds so much warmth and colour into the worlds and our sims. For this preset, i was inspired by the Amalfi Coast and wanted something to brighten up the game. I hope you enjoy xx
Please note I am using the below lighting mods and i highly recommend them.
Softhaze- Sunblind
Lumia- No Blu, No Glow
NothernSiberiaWinds- Better in game lighting
To learn how to download Reshade please refer to this Tutorial.
I have also made a mini Video showcasing the Preset over on my Tiktok
GSHADE
For G-shade, you will need to convert it from your end. My dear friend @simmingwithabs (you guys need to check her out, Tumblr is linked!! ) was so kind to test this for me and provide instructions for the conversion.
Instructions for GShade- Plop the preset in a folder > open gshade > tools > launch converter > select folder > select preset back ups folder > then add that preset to your gshade presets.
Note- Please do not claim as your own, please also note depending on your device and lighting mods, the preset may look different.
Public Release - 18th of August.
Download
#simmervlogs#Image#Villa Vaiano- Free on Patreon#ts4 interior#sims 4 interior#the sims 4 build#sims build#sims 4 build#thecaptainsnest*#the sims#the sims 4#the sims community#sims#sims 4 maxis match#sims 4 screenshots#ts4 simblr#sims 4#thesims4#sims4#the sims4#ts4 screenshots#showusyourbuilds#sims 4 builds#ts4 gameplay#ts4aesthetic#ts4 maxis match
30 notes
·
View notes
Text
Guide on making custom coat presets. (Allows for better quality custom coats)
31/08/2023: The guide has been updated to reflect a step I missed - when exporting your custom textures, make sure to select "generate mipmaps", the step is reflected in more detail under the appropriate part. Ctrl+f and enter "mipmaps" to skip to it.
16/10/2023: Updated to add more info re: generating hash ID's.
Okay, I decided to throw this together. There's some things I can't figure out still, but oh well, we're just getting through this as we go.
To clarify what I mean - this is not a stencil or a brush.
This will appear here:
To preface this guide though, I cannot, for the life of me, figure out how to make it appear as an individual option in-game, so, these are considered SWATCHES of the original coats.
Okay, with that out of the way.
Things you'll need:
Sims 4 Studio
GIMP
Probably Notepad, but it's optional on how easy it is for you to track things.
Guide:
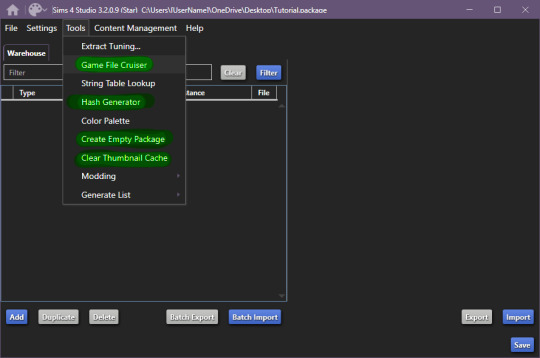
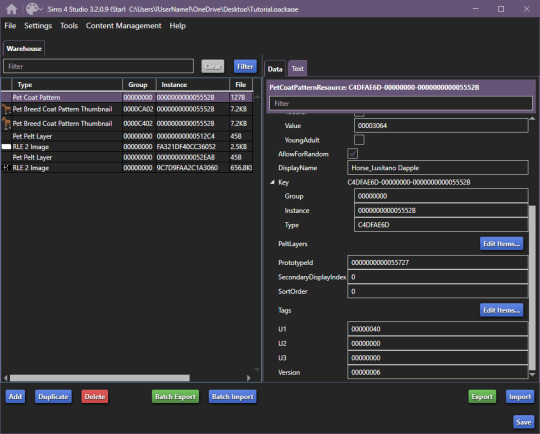
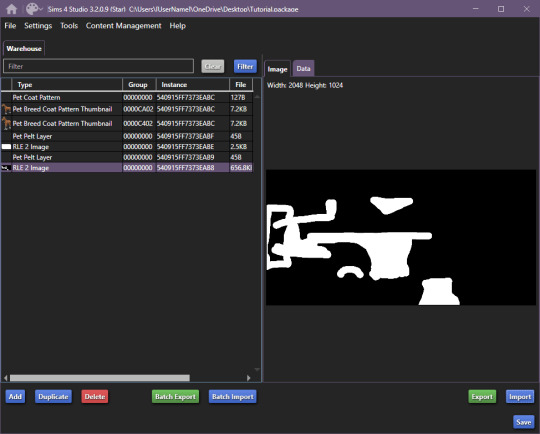
These are the tools we'll be using in S4S.
Start by creating your empty package, once you're done, open up Game File Cruiser:
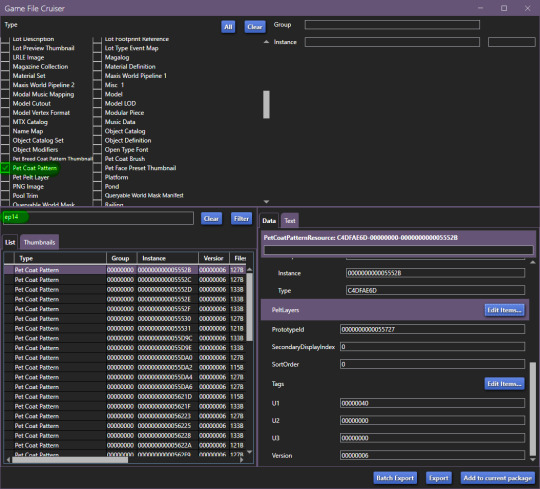
before you do ANYTHING, make absolutely sure that the search bar below the file list has "EP14" in it, otherwise you will 100% end up editing a cat or a dog coat pattern and that's now what we want, at all.
Add the first horse file to your package
In our case, it's the Lusitano Dapple coat, don't worry, if you're making a breed-specific coat, you can change this later.
Now that it's been added to our package file, it should look like this:

We now have two options, I'll explain this to those who don't care about creating a game-generated thumbnail and want to find it easier.
To make your "test" thumbnail, you'll want to copy the instance ID of the file we just added to our package:
It should look like this, the instance ID should be in 2nd from the top search bar, then, select all and click filter (it just makes life easier than finding the specific file type).

These are the current, in-game CAS thumbnails. We'll add both of them to the package, they're for ponies and adult horses.
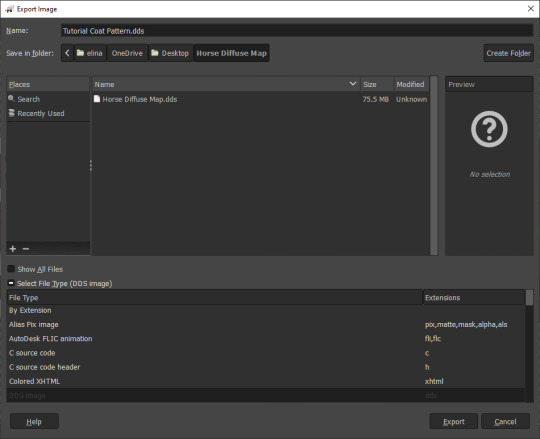
Now you can export these two pictures (They need to be saved as .png's), edit them as you'd like and then import them back into the package.
Now, you CAN add up to 5 different pelt layers that can be easily recoloured in-game, however, we'll only be working with two pelt layers in this tutorial, because it's a tutorial and you'll learn how to make more of them anyway.
Click on "Pet Coat Pattern" and then look over the data:

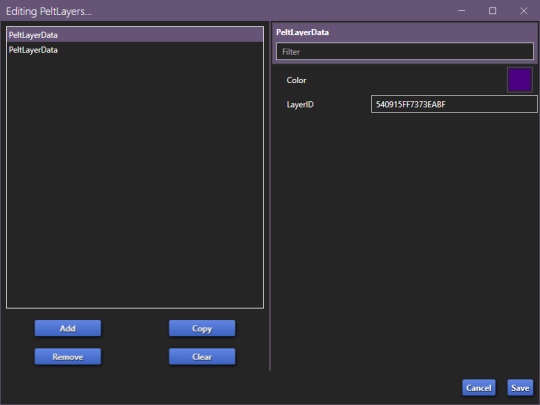
From there, Click on "PetPeltLayers":
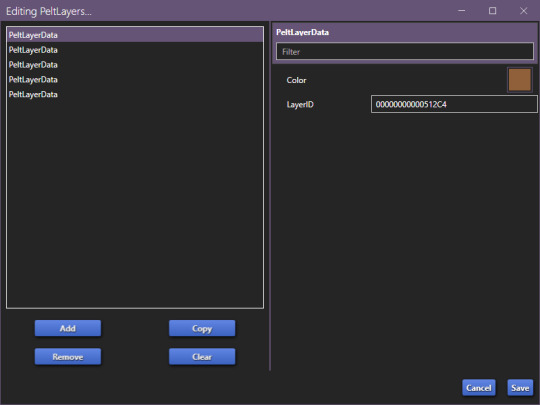
The first pelt layer is ALWAYS a solid colour, we'll begin by copying the LayerID (Instance ID) and going back to game file cruiser.
Just like previously, you should keep EP14 in the search bar and just use the instance ID bar to find things, as that's all we'll be doing.

Add the Pet Pelt Layer to your package file, then, copy the "texture key" from the Pet Pelt Layer:
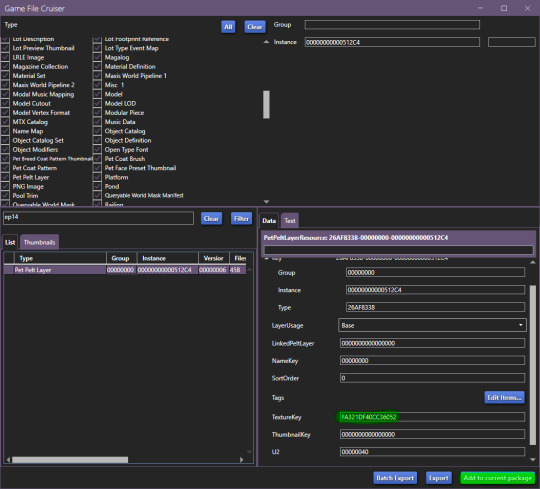
Then find the Texture Key:
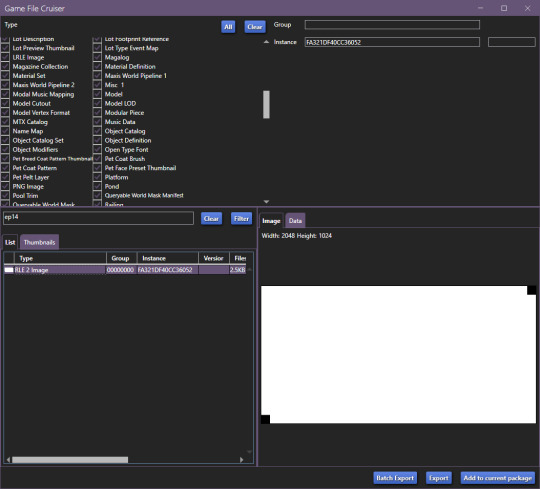
This is the solid colour layer, it HAS to be there as this is what will help you edit your base colour. Add this to your package file.
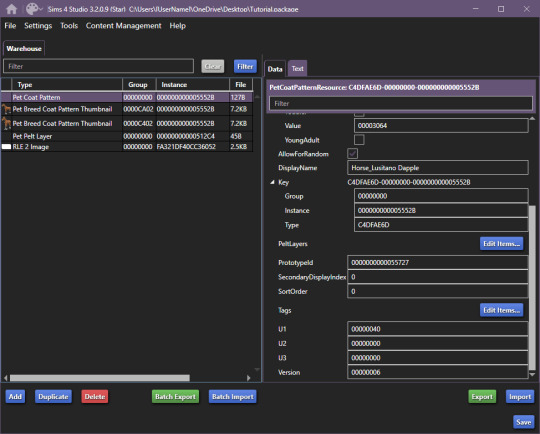
Now, our package file will look like this:
Unfortunately, we're not done, just yet, we'll want to grab at least the second PetPeltLayer:

Just like before, we're going to copy the ID and find the Pet Pelt Layer + the Texture for this layer:

Now, our package file will look like this:
You can now go ahead and close the Game File Cruiser, we won't be using it anymore.
Right now, this is our package file and we need to do some cleanup first.
We'll be opening up the PetPeltLayers once more and we'll remove the last 3 entries:
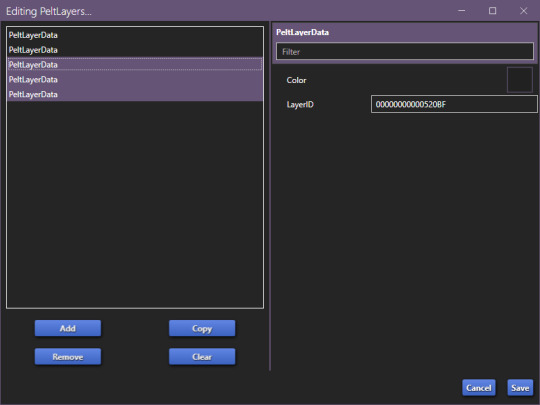
You should be left with only two entries, as that is what we'll be editing (leaving the other 3 will break the preset).
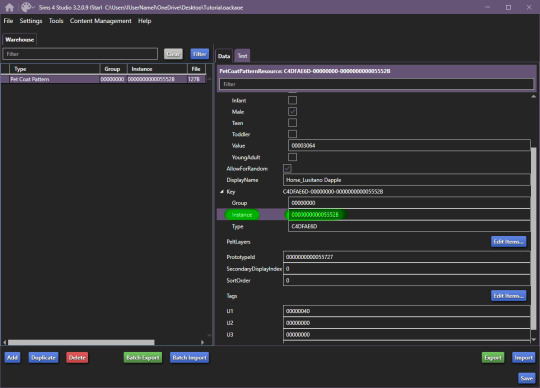
Now, we'll start generating new hash codes for everything:
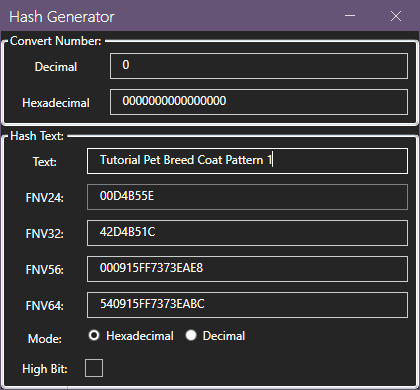
Edited 16/10/2023: When generating your hash ID's, please use your creator name ie.: "[YourCreatorName/Blogname]TutorialPetBreedCoatPattern11", this will give you a more unique hash code than hoping to be as descriptive as possible when generating the hashes (in this case instance ID's).
Thanks to Mizore Yukii for this advice, from Creator's Musings discord.
As in my previous guides, be descriptive with what you're typing there and then just change the last number.
The process is annoying and slow, so bear with the images, and follow along.
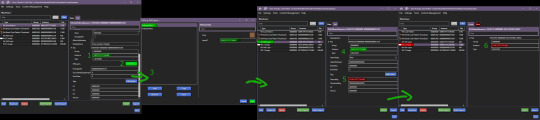
The TextureKey coloured in red is the 3rd ID you'll generate, it's what links the texture to the Pet Pelt Layer, which links it to the Pattern we're creating. (Sorry for the squished thumbnail, open it in your browser, I was running out of picture space for the rest of the tutorial lol).
And now we repeat this for the second Pet Pelt Layer.
Now, if you want the game to just generate the thumbnail for you, you can skip this step, if you want to make a custom thumbnail, then copy the Pet Coat Pattern Instance ID into the two Thumbnails we've added to our package file:
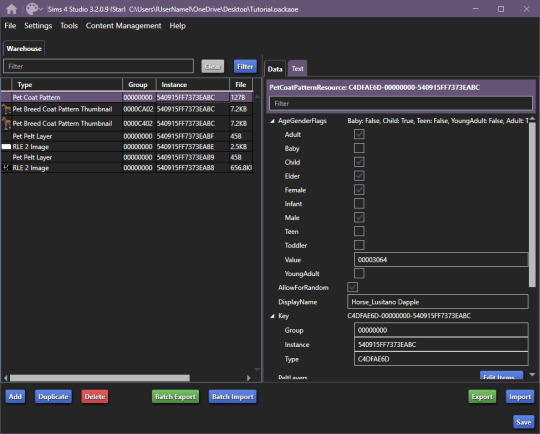
This is what the package file has to look like at this point.
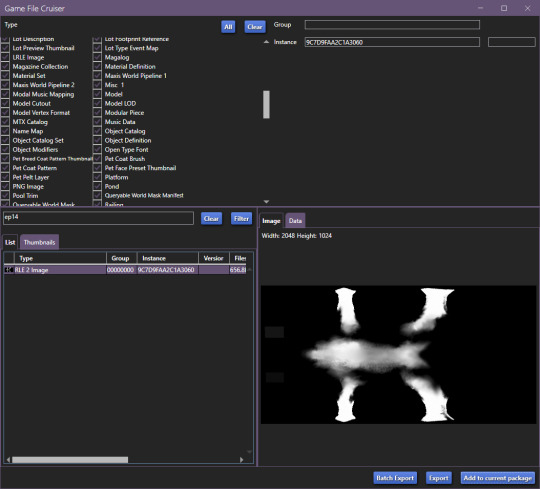
Now is the relatively easy part, editing the second RLE 2 Image. We won't touch the base, because it's not necessary.
I recommend using the Horse Diffuse Map as a base when you're drawing your pattern. It'll be easier to see what you're doing. You can download it here: Horse Diffuse Map.
Remember, that your pattern HAS to be white, black space is IGNORED by the game and considered a "transparent" layer, so that you can see the layer beneath the you're working on.
This is my quick, and lazy test one I've made, I use a PNG of the Diffuse Map as a base and on a separate layer I draw with white coloured brushes:
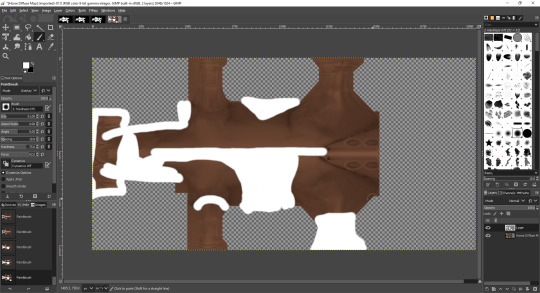
You may notice the very straight lines on the diffuse map - make sure to colour OVER them as if you do not, it will appear in-game because those are the seams where the mesh "meets"
Once you're satisfied with your pattern, you can go to export, just make sure that the white pattern is on a separate layer to the diffuse map. At this point you can add a black background underneath the white and export.
All you have to do is export the RLE2 Image you've edited as a DDS image in the L8 format and (edited 31/08/2023) select "Generate mipmaps" otherwise you will experience a glitch in-game where the coat disappears. You can leave the mipmap options as default, it should work correctly.
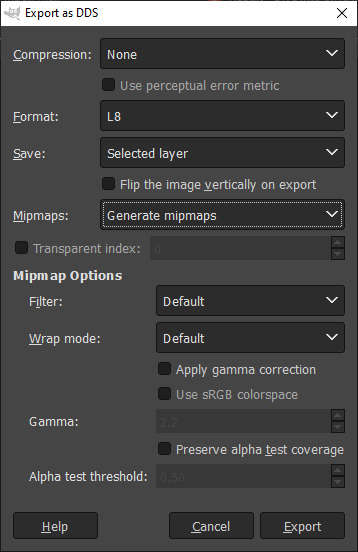
Then, we're going to import it into our package and save our package:
Remember to not touch the completely white base coat!
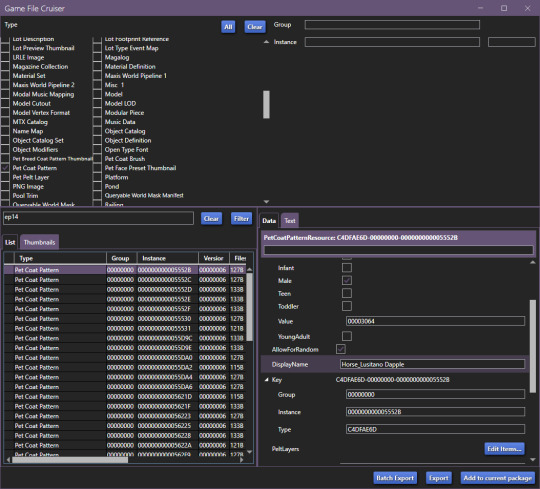
Now that this is over, we'll go back to Pet Coat Pattern and edit some settings.
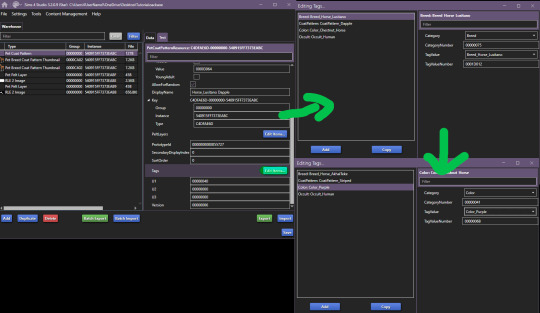
The first three settings is what I recommend changing around. The first setting changes the breed, the second setting changes how the coat pattern is labeled and the third setting changes the colour it's tagged under.
Only change "TagValue" - it will give you a dropdown menu, don't change anything else. The TagValueNumber changes automatically, so don't worry about it.
EDITED TO ADD:
Additionally, don't forget to go into "PetPeltLayer" and change the colours, this is what will show up as "base" colour that you can change in-game. You can change them for every PeltLayerData file you have.
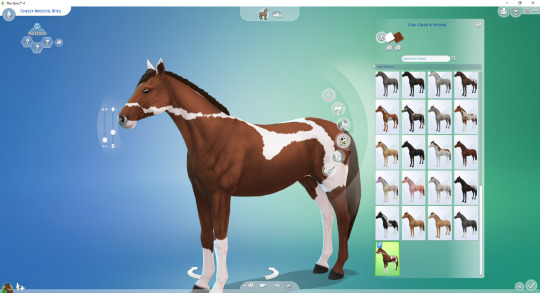
Now, save and go test it out in game:

Bada bing, bada boom we've got our "custom" coat preset.
If I've forgotten anything, let me know. This took me 2 hours to write, so forgive my typos. If anything is unclear, let me know. I ran into a struggle with the picture limit on Tumblr (found out that it's 30, I should move my guides somewhere else, but where?)
#The Sims 4#Sims 4#The Sims 4 Horses#The Sims 4 Pets#the sims 4 horse ranch#the sims 4 guide#sims 4 guide#sims 4 custom content guide#sims 4 horses guide
142 notes
·
View notes
Text


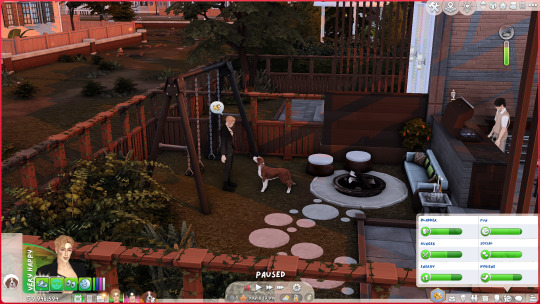
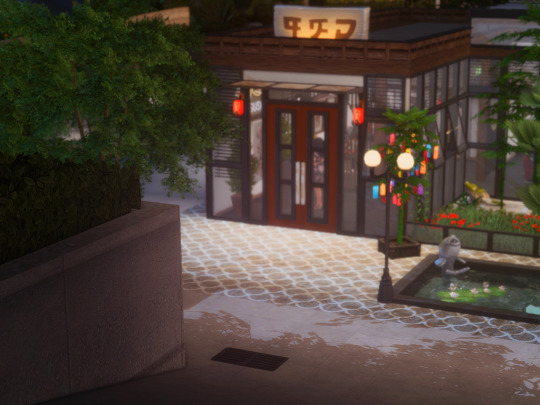
[oyasufeng] maple haze ✧.* a gshade 4.2.2 preset
—
maple haze is a gshade preset that mainly focuses on the theme of autumn, but disabling a few shaders also provides an alternative realistic look.
—
a week after releasing my new preset, i somehow impulsively ended up making another new preset. i initially wanted to release this a month ago but i was shadowbanned (still am, cause support ain't answering me at all). while adding builds based on autumn, i wanted to give a look that accentuates the orange vibe and the season.
i'm living in a country that doesn't have any seasons since childhood — only hot, hotter, haze (thank you, neighbouring country, for burning your bloody forest every year), durian, and monsoon season. so i actually have no idea when each season starts and ends, but coincidentally, it turns out that it's autumn now (it's monsoon season for me sobs).
the primary reason for making this preset is for autumn, but while testing around the shaders since it sometimes appeared too bright, it also gives a realistic look. this would be suitable for both gameplay and screenies!
click below to read more about it and for download links!

important
made on gshade ver 4.2.2, not tested on previous or future ver
since this is a gshade preset, i do not know if this will appear the same on reshade and i couldn’t help you with that
disabling some shaders will give you a different look and make it more realistic, it is also advised that you should make some edit to your own liking
may not appear the same as yours because of the changes i made in game files like graphicrules.sgr and the below
lighting mods used in this preset: better in-game lighting mod (bright pale), gentle cas lighting, sunblind
before using any of my presets, please make sure you have read this!!!
if you use any of my presets, consider tagging me, i would love to see how they look like in yours! ヽ(*´∀`)八(´∀`*)ノ
—
requirements
amoebae's summerdream & drift multiluts
—
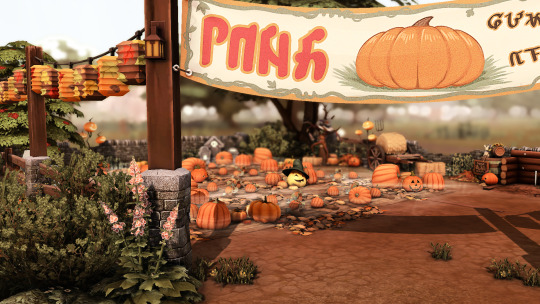
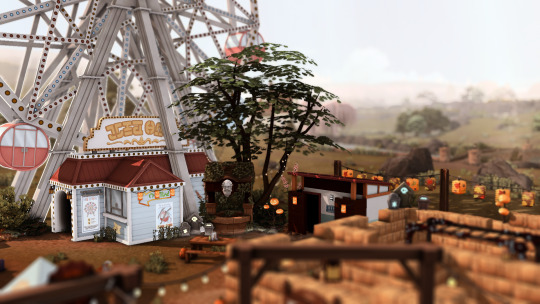
presets showcase - cas, gameplay & screenies
—
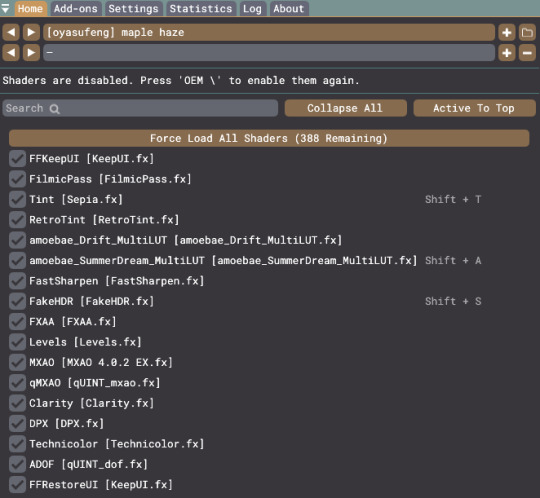
shaders + toggles
regarding tint, it's highly recommended that you adjust the colour in "edit global preprocessor definitions" based on your preference. it is best to test it around, depending on whether you want to use it just for gameplay or screenies. toggling this off will give it a more realistic look but less of the autumn theme.
all three shaders with toggles makes the preset brighter, so toggling off one or two makes it dimmer with different looks. this would also give a realistic look.
—
more showcase
the following shows alternative looks which provides a variety of more realistic looks:
with vs without keepui.fx (optional, can replace it with clear ui of shaders)
with vs without hdr
with vs without tint
with vs without summerdream
with vs without tint & hdr
with vs without tint & summerdream
with vs without summerdream & hdr
(i forgot to take before vs after pics sobs)


patreon ✧ kofi
81 notes
·
View notes
Note
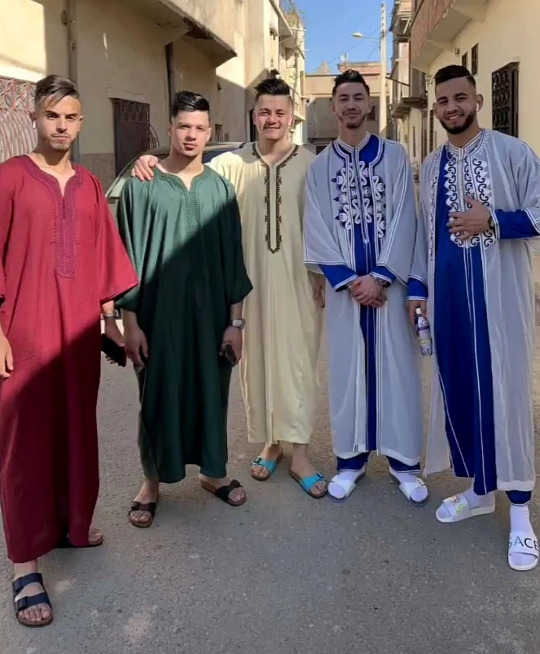
Chronivac Support! Help! I, out of curiosity, started tinkering with settings. I accidentally fucked up the range! It keeps saying “Error: Range at maximum, unable to decrease range at this time. Error code R-408, please contact Chronivac Support”. What’s the maximum range?!? Because I also accidentally hit the “alpha Arab” preset under the popular presets thing!
…so, how badly did I mess things up? Is everyone on my block going to change? Everyone in my neighborhood? Or did I really, really screw things up even more?
Well… What can I say… We already had a quite similar case…
However, I had hoped that after the experience we had there, the possibility of mass changes would have been deactivated… Obviously the automatic update did not work for you. And now we are in trouble! At least I was able to stop all pending transformations. And that were DAMN many!
Unfortunately, there are also a lot of transformations running within a radius of 5,000 km around your location. There are really many of them. In the meantime, I have found out that usually random people were selected for the transformation and this then "infected" people in their immediate vicinity. Here, for example, it hit the chess club of a small town in northern Spain. The transformation has progressed to different degrees. Not everyone has a beard yet… But all are already cut and are on the way to the sunset prayer. When the prayer is over, the man in the middle will be the muezzin of his congregation. And the four other students of a Koran school. With takke on their heads and bushy full beards.
These two guys here worked in Bavaria as social workers in a project for young people. The transformation on the body has only begun, in mind it is already quite far advanced. Neither of them speaks a word of German anymore. At most, they still speak a gibberish that is made up of German, Turkish and Arabic. And they are no longer interested in the socialization of young people. Their lives now take place only between the gym, the shisha bar and the car-tuning garage where they work. It won't be long before they're casually hanging their monstrous arms out of the windows while cruising in their show-off cars.

And really hard hit was this cricket team in Bath in southern England. Not much is left of the snow-white clothing. The audience has also been hit hard. Turkish oil wrestling is on its way to becoming the new English national sport.
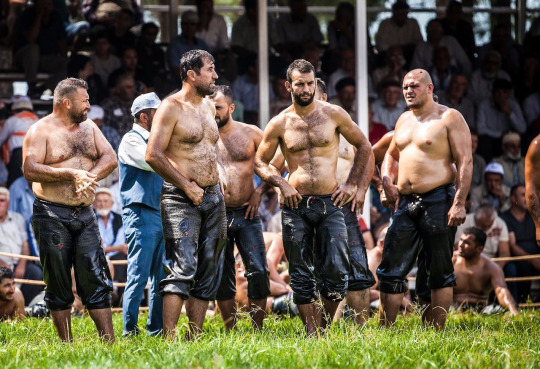
Amazing enough: you are obviously not a bit concerned…. But if you're into cut dicks of Arab alpha stallions, you'll have plenty to choose from in the near future. And I've got a hell of a lot to do to fix the mess you've made.
Pictures are from @lovelyangryheart and @kiffarab
92 notes
·
View notes
Text

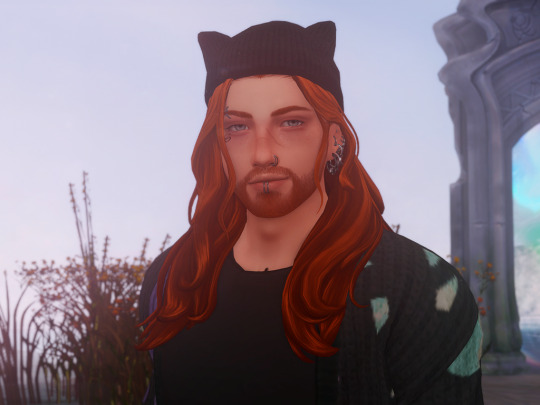
another g-shade preset (with a silly name)
get it 'cause it was a test and.. and testic-..? whatever, you guys asked for this, name and all so here it is! originally a preset i threw together back when werewolves came out, it's kinda grown on me.. and you too, apparently! so enjoi 🧡
download: patreon; free | sfs
all the below pics are unedited. but i do use a few graphic/lighting mods so if you don't have those, it might look a little different in your game.. here's what i use:
twinkle toes
no-glo
no-blu
graphicsrules override


also pls enjoy oscar in a cat hat and a shitty gif :)
#ts4#sims 4#gshade preset#ts4 gshade#the sims 4 gshade#extra#can't believe u guys talked me into using that name#shame on you#ugly baby judges you!#i literally haven't watched friends in years but the minute i said “shame on you” that popped into my head lmaoo
378 notes
·
View notes
Text
Donnie is still setting up the stream even though it's already going, and the audience is watching his model move around what little of the studio that was within the cameras view.
Some kept pointing out how weird it was that Donnies model had on only small black shorts with his tail hanging out, battle shell, purple wrist bands, his bandana and goggles, and a pair of purple tabi. Some were clearly simping for the nearly naked model.
"Alright everyone, I believe everything is set up properly. Now to announce what I am doing for this stream. Shelldon, River, Drumroll Please!" As his droid children pop in to play the sound effect, Donnie rolls in a stand on wheels with a purple cloth covering a box shape on top.
Donnie pulls the cloth off with a flourish at the last beat of the drumroll into some fanfare. Revealing a set of purple framed lightly tinted glasses. Which gained a large amount of confusion.
"Introducing, the prototype Genius Built AR Glasses! That I have been given permission to test out on stream." Donnie picks up the glasses, and puts them on. The lenses flash for a second before looking like regular tinted glasses. "Now give me a second to find out why the AR effects from the glasses are not showing up on the stream." Donnie moves his hands around in the air while looking around himself.
After a couple minutes a bunch of holo screens pop up around Donnie, one of them is showing the stream apparently, one with what looks to be the settings, and another with a graphic of the stream deck.
"There we go, I hadn't fully synced the glasses to my system in one minor way, and it didn't like that." Donnie adjusts how the glasses are sitting on his face, "Now I can't guarantee this will be very entertaining, but I'm sure there are some in the audience who will very very very much enjoy this test run of the Prototype Genius Built AR Glasses. Also want to know when they plan to release them to the public and how much... so stay tuned and find out!!"
Donnie continues on with the test and demonstrating what difference there was between the Genius Built AR Glasses and the other brands that he could find. In example he brought up various videos of people showing off other AR Glasses.
"The company didn't want to actually buy any of the competitors stuff, partially because of how expensive some of them are, and mainly to not have accusations of just ripping off their tech, by just taking it apart or something." Donnie brings up a small screen with the known prices of the other brands, along with pictures of the products.
"Besides, many of the techs really liked the challenge. If the rumors are true there was a bet between some of them to build the first working prototype then make it slimmed down. Amused Chuckle." He looks directly at the camera with a grin, "I heard the prize was quite a big want for all of them. They won't actually tell me what the prize is, but it's a big deal for them. Shrug"
Donnie brings up the environment simulator, turning the area around him into a concert stage with instruments sitting around with out a band to play, or any humans actually. Donnie moves around the environment a little, checking for any possible problems.
"Well this appears to be working well enough, let's try thi-" In the middle of him talking his model is suddenly missing his battle-shell, and is in black/purple thigh high boots, a black super cropped jacket, his goggles are replaced with cat eared headphones with a mic, and has a purple dragon on his plastron.
Chat is going nuts over this sudden change, with one notable message of, "HOW ARE THEY HOTTER WITH MORE CLOTHES ON!!!!"
Donnie looks at his model with mild annoyance, "While this isn't a bad look, I could do without the dragon. Well everyone, if you excuse me, I must quickly make a call to question the other techs about this. As this is not one of the presets for my outfits that I cued up for this demonstration. Be right back."
With a wave of his hand the screen changes over to and animation of a much bigger Raph sleeping while floating in water with his now smaller brothers taking turns climbing and jumping of his back, and swim around.
--------------
Masterpost
With some companies working on AR I figured Donnie would make his on.
#VTurtles!#rottmnt au#tmnt au#rottmnt donatello#rottmnt donnie#rise donatello#rise donnie#rottmnt fanfiction#tmnt fanfiction#rise of the teenage mutant ninja turtles#rottmnt#tmnt 2018#rise tmnt#rise of the tmnt#tmnt rise#teenage mutant ninja turtles#tmnt
18 notes
·
View notes
Last Seen Blogs

fewmile-com
fewmile.com
prizmbot
BOT'S FACTORY
feyestwords-blog
"Soon, all of this will be lost to the sea."

cookies-cream-reblogsupremacy
madethisjusttoreblog