#trans binders
Explore tagged Tumblr posts
Visit Tumblr Blog
Explore Tumblr blogs with no restrictions, modern design and the best experience.
Last Seen Tumblr Blogs


Fun Fact
Tumblr has been banned in Indonesia for providing people with access to pornographic content.
Text
I love you binders I love you breast prosthetics I love you packers I love you tucking I love you stps I love you top surgery I love you bottom surgery I love you hormone therapy I love you growing hair out I love you cutting hair short I love you shaving I love you experimenting with gender and presentation I love you transness I love you trans people I love you I love you I love you
#ftm#mtf#transmasc#transfem#trans#transmaculine#transfeminine#ftm binders#binders#trans binders#breast prosthetics#packers#packing#ftm packers#ftm packing#ftm packer#packer#tucking#mtf tucking#stp#stps#ftm stps#hormone therapy#if breast prosthetics are called something else pls let me know thats what it said when i searched it but it doesn't sound right so it#could be wrong#zen did a thing
633 notes
·
View notes
Text
Notes thing!
So I've seen people do this stuff and I figured I'd try it!
Soooo some goals!
200 notes- I'll actually finish writing stuff
300 notes-I'll try harder to fix my sleep schedule
400 notes-I'll try to stay on track with my homework instead of drawing during my extra time at school
1000 notes- I'll tell my mom that I'm genderfluid and explain what it is
1100 notes- I'll ask my mom for a binder
1200- I'll show my tumblr posts to my mom X3
thats. probably about it
Sooooo each person can tag as many people as they want and leave as many notes as you like!
@pepsi-overdose @h4z311 @kirbythesixth @kirbyhasadhd77 @winnie-likez-starz @th3-r4t-48 @w3r1d0 @imthetruealphahere @aiden-aka-thanos @sleepyezzy @ilikesmut1 @ink-sans0fficial
edit: ITS BEEN 26 MINUTES YALL ARE FAST
edit 2: LETS MAKE IT TO 1000 BITCHESSSSSSSSSSSSSSSS
1K notes
·
View notes
Text


Logan you nasty! (Please imagine I said that in Jenna's voice, thnx)
Anyway genderfluid Wade my beloved 💖
#my art#myart#artists on tumblr#my artwork#fanart#digital art#poolverine#poolverine fanart#wolverpool#deadclaws#deathclaws#deadpool movie#deadpool#deadpool and wolverine#deadpool fanart#deadpool 3#deadpool and wolverine fanart#deadpool x wolverine#wolverine and deadpool#wolverine x deadpool#wolverine#wolverine fanart#logan wolverine#trans wolverine#his binder is peeking through juuuust a bit if you look close enough#genderfluid Deadpool#genderfluid wade Wilson#trans logan#tw: slightly suggestive
3K notes
·
View notes
Text


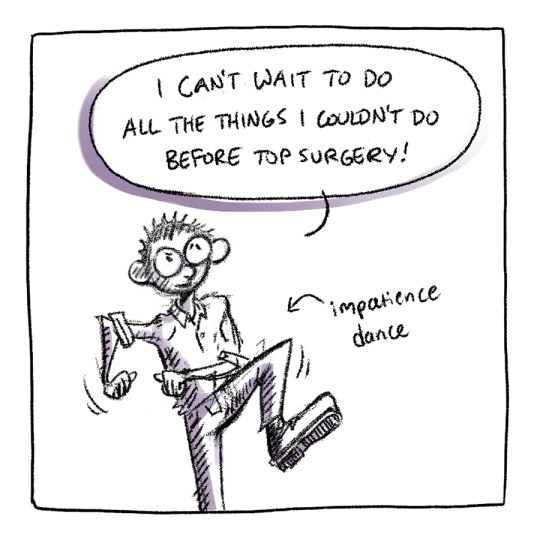
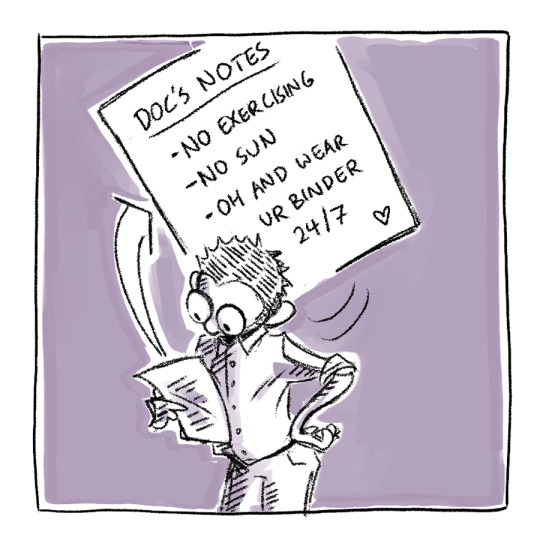
Top surgery journal #6: I may be stupid
#art#artists on tumblr#illustration#top surgery journal#top surgery#comic#trans#transman#ftm#cartoon#binder#drawing#artist#trans artist#queer artist#lgbtqia#queer#digital art#clip studio paint
9K notes
·
View notes
Text
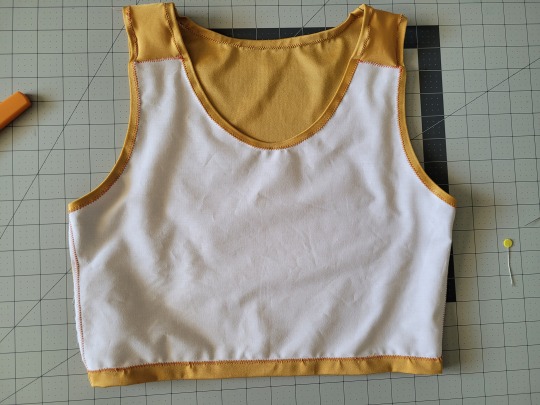
How to Make Your Own Binder that Fits Well and Looks Good
A while back I was in need of some new binders and thought hey, I bet I can make one way cheaper than buying it from somewhere (especially cus some of the ones I’ve bought in the past didn’t really fit right). Except when I started looking for a binder patterns online, I was very surprised that I really… couldn’t find many that looked very nice lol. Most of them had really wrinkled necklines, or didn't bind well, or just overall looked weird. A lot of the patterns also required a serger, which I don't have.
So I just said fuck it and made my own pattern! And it ended up being relatively easy! And the binders fit REALLY WELL and are comfortable to wear, even for long periods. The neckline doesn't show under shirts with loose collars, and the bottom hem doesn't gap or stick out. Here's me wearing one:
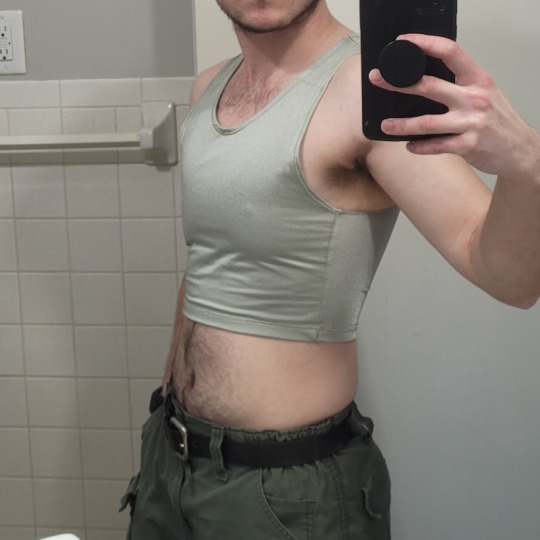
(plus I was able to make myself 5 of them for a total of like ~$50.)
So I figured I could throw together a guide to help out anyone else who wanted to make their own binder but was dissatisfied with the patterns available!
Disclaimer: This tutorial is going to assume a baseline level of sewing experience, and also will require access to a sewing machine. It is not a complicated pattern, but it will most likely require some tweaking and adjustments after you make the first one. Don’t be afraid to make alterations to make it fit better!
This tutorial is for a gc2b-style half-tank binder. It could be altered to be a full-tank binder, but all instructions will be for the half-tank design.
Materials needed:
Stretchy fabric, probably listed as 'athletic fabric' (I use this kind from Joann’s. Most athletic stretch fabrics should work, look for around 80% nylon/20% spandex blends)
Stiff fabric (I use this shirting cotton because I like how lightweight it is. If you want something a little stiffer with more structure, you can use a cotton or cotton/poly blend twill like this. gc2b binders use twill for theirs.)
Lightweight fusible interfacing (I use this kind) (get FUSIBLE not sew-in)
Fusible webbing like Pellon Wonder-Web (this is technically optional but it WILL make your life easier when you’re sewing - just make sure to get the kind with the paper backing!!!)
“But kiwisoap thats 4 whole kinds of materials, surely I don’t need that many!” Ok sure, you can probably get by without the fusible web and interfacing, but consider: they are both dirt cheap (im talking like $1-2/yard), they will make it much easier to sew the final product, and will give you an overall better-looking result. This tutorial is written with the assumption that you’ll use them.
"How much fabric will I need?" Measure the circumference of your chest below your armpits. Add 6 inches just to be safe. This is the yardage of stretch fabric you’ll need, and should give you enough material to make at least 3 binders without much excess left over. You will need around half as much stiff fabric.
Other supplies:
Big Paper (for drawing the pattern)
Flexible measuring tape
Sewing machine
Iron
Pins
Step 1: Measuring
You will need 4 main measurements for this pattern.

A) Measure the circumference of your chest just below your armpits, then divide the number in half. This will be the widest part of the pattern.
B) Measure from the top of your shoulder down to where you want the binder to end. For most folks, this will usually be around the natural waist (narrowest part of the torso), about 3-6 inches above the belly button. This will be the overall height of the pattern.
C) Measure the distance from below your armpit to where you want the binder to end. This will determine where the arm hole starts.
D) Measure the circumference of your waist where you want the binder to end, then divide the number in half.
So for example, after dividing A and D in half, my measurements are 17", 15", 7", and 14.5".
Next:
Subtract one inch from measurement A - This will help provide some compression. You might need to take it in even further depending on how it fits, but one inch is a safe starting point. I take mine in around 1.5 inches.
Subtract half an inch from measurement D. This will help prevent the bottom edge of the binder from gapping. Again, you may need to take it in more or less, depending on your own body.
Add 1.5 inches to measurement B and one inch to measurement C. This is to account for the hems and armhole placement.
This makes my final measurements
A = 16"
B = 16.5"
C = 8"
D = 13.5"
From here on out, we are only going to be working with the measurements that we have added/subtracted to, NOT the ones we initially took.
Step 2: Drawing the Pattern
You will need a piece of paper large enough to accommodate the entire pattern. This may involve taping multiple pieces together, or using a piece of newsprint, etc.
I recommend folding the paper in half to ensure that you get a symmetrical pattern. However, this means you will need to divide measurements A and D in half again, or else you’ll end up with a pattern that’s twice as wide as it should be!
Also note: the pattern is drawn with the seam allowance built in! You don’t need to add any seam allowance.
To draw the pattern:
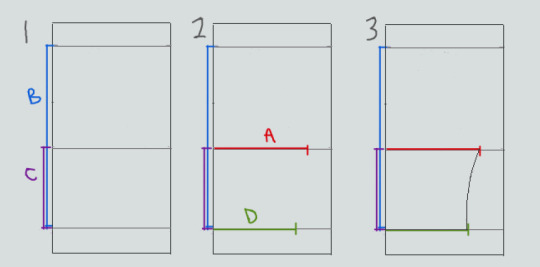

Begin with your folded paper. Measure and mark B and C on the paper, and draw a line extending across the paper. These will be your guidelines.
Measure and mark A and D along the middle and bottom guidelines, respectively. Remember, the paper is folded, so you only use half of the measurement for A and D.
Draw a loose curve connecting the endpoints of A and D. If needed, you can also just draw a straight line between the two.
Mark the opening for the neck hole. Depending on your size, it will measure around 6-8 inches across at the top (remember to divide this in half for the folded paper) and about 5-6.5 inches deep. (mine is 6.5" across and 5.5" deep) Draw a curve to connect the two points. This part will take some tweaking and adjusting to get it to look right lol.
Measure the width of the strap - this should be somewhere between 2.5 - 4 inches wide. They will end up about 1/2” to 3/4” narrower once you sew them. Draw the line at a slight angle, as shown.
Connect the endpoint of the strap to the endpoint of line A with a curve like in the diagram.
This will be the pattern for the front piece.
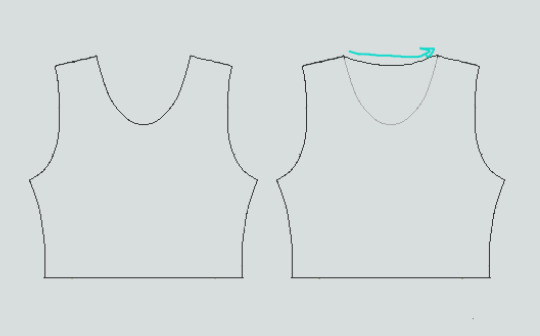
To make the back piece, trace the front pattern, but make a very shallow curve for the neckline instead of a steep one, as shown:
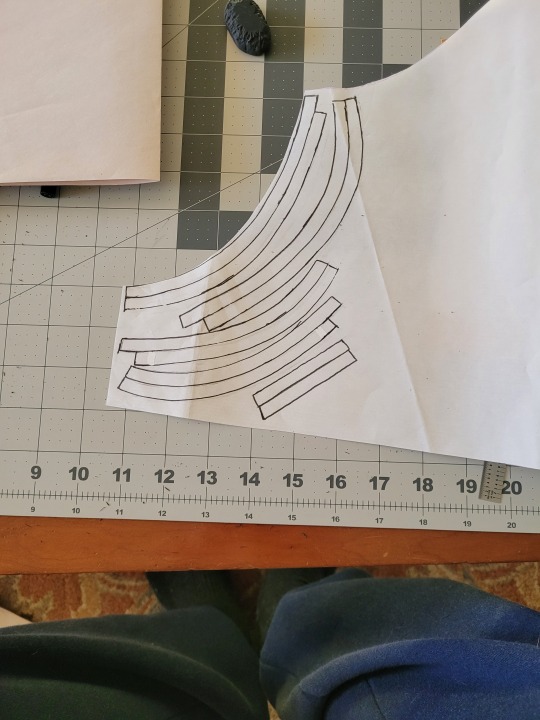
The last piece is the stiff front panel. This is what provides the flattening effect of the binder. To make the pattern, trace the front pattern again. Trim 3/8” in on the sleeves and neckline, and 3/4” to 1” along the bottom. This gives a flatter hem. Then trim the straps shorter by a few inches. This helps the binder lay flatter along the shoulders.
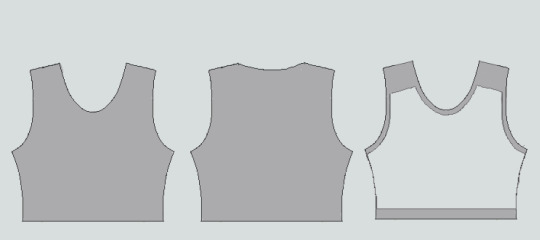
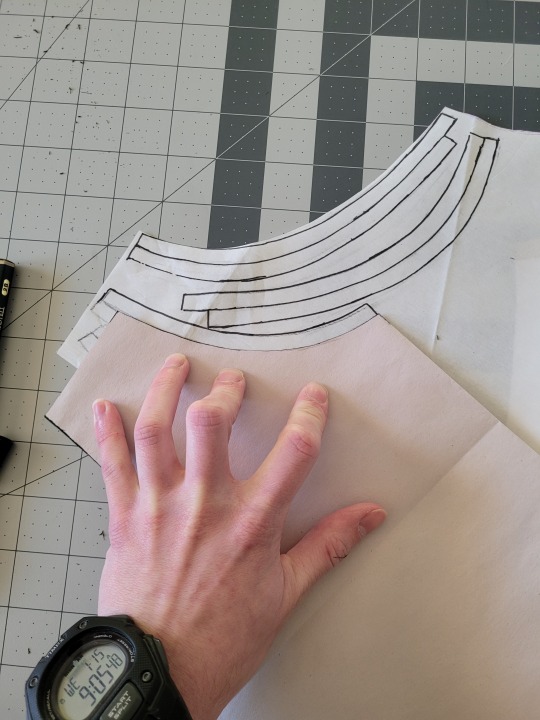
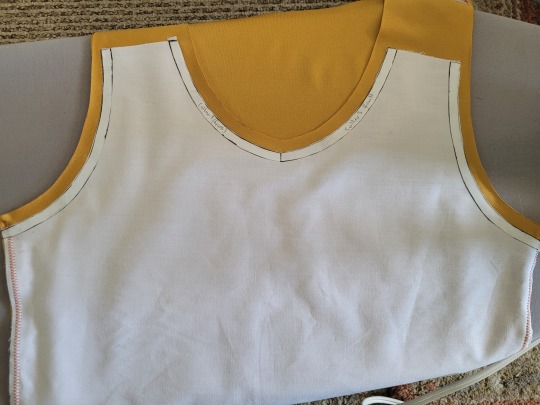
When you're done, you should have 3 pattern pieces that look approximately like this (stiff panel shown overlaid on the stretch fabric to show how it fits together).
NOTE: If you want more compression or just want to make it a bit sturdier, you can add a second panel of stretch fabric to the back piece. Just use the bottom half of the back pattern (from the widest part down to the bottom hem) to cut out another piece of stretch fabric. Attach it to the back piece with a strip of fusible webbing and a zig-zag stitch along the top.
Step 3: Putting It All Together
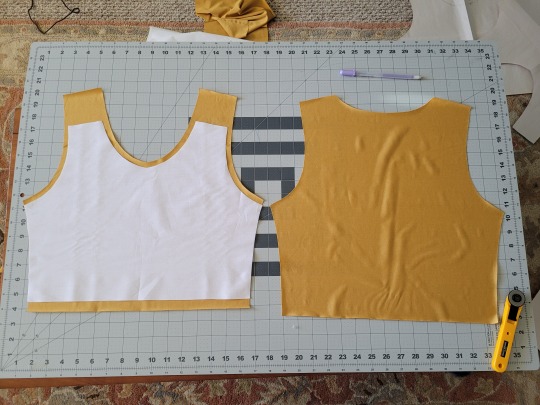
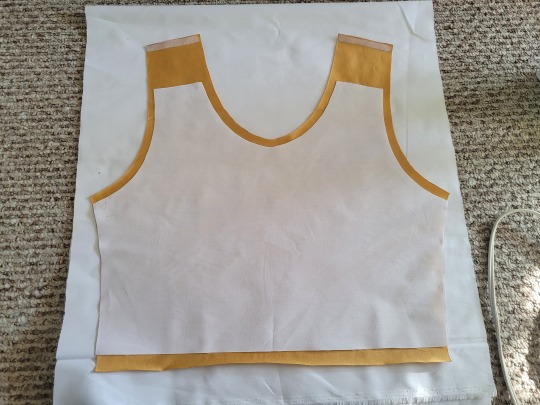
Once you’ve made the patterns and cut out the pieces of fabric, you should have something that looks like this:
The next step is adding interfacing and fusible webbing. Use your pattern to cut out 3/8" strips to fit on the top of the straps for both pieces, and to the neckline, sleeves, and bottom hem of the back piece, as shown:
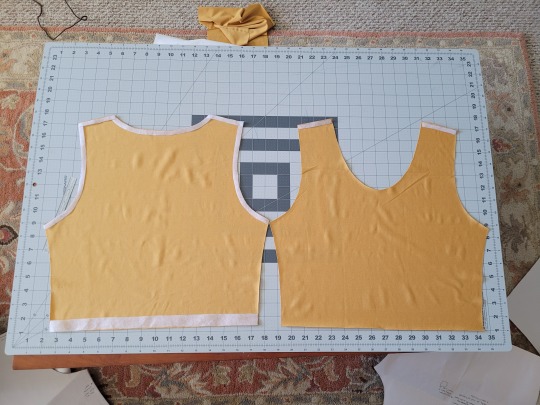
If you want to add it to the bottom hem of the front piece, it will help keep that hem flat when sewing it down later, but it's not essential.
If you choose to also use fusible webbing (WHICH I RECOMMEND), you will apply it to the stiff front panel similarly to how the interfacing was applied, ~3/8” strips along the neckline, sleeves, and top of the straps. Cut out two strips for the neckline and sleeves, because we'll use those later too.
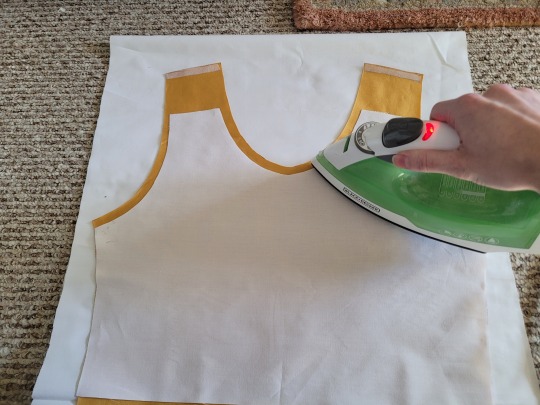
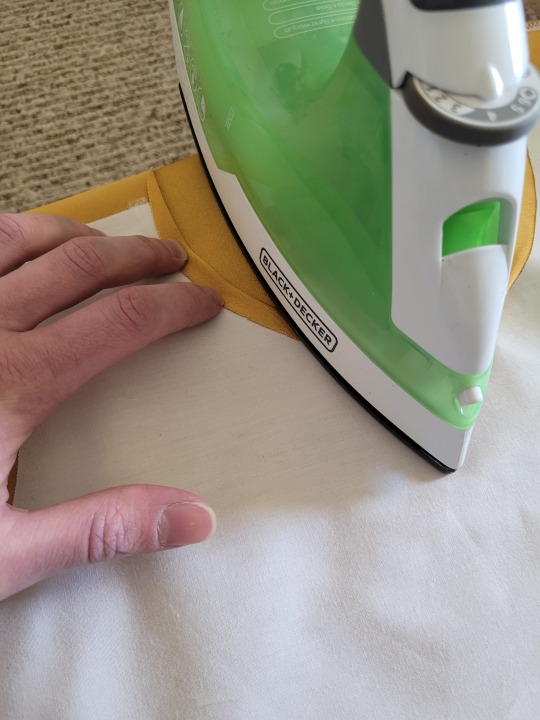
Iron the strips onto the front panel as shown:

Once it's on, just peel off the paper, position it webbing-side down on the stretch fabric, and iron it to fuse the two pieces together so everything stays in place while you sew. THIS MAKES IT WAY EASIER TO SEW.
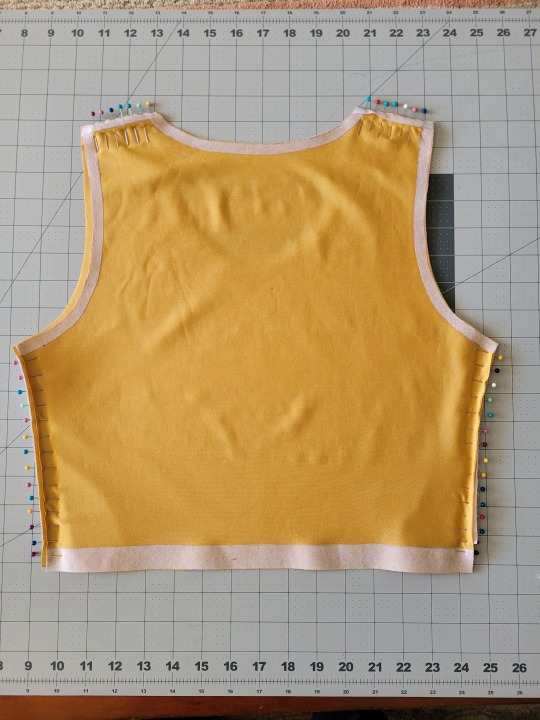
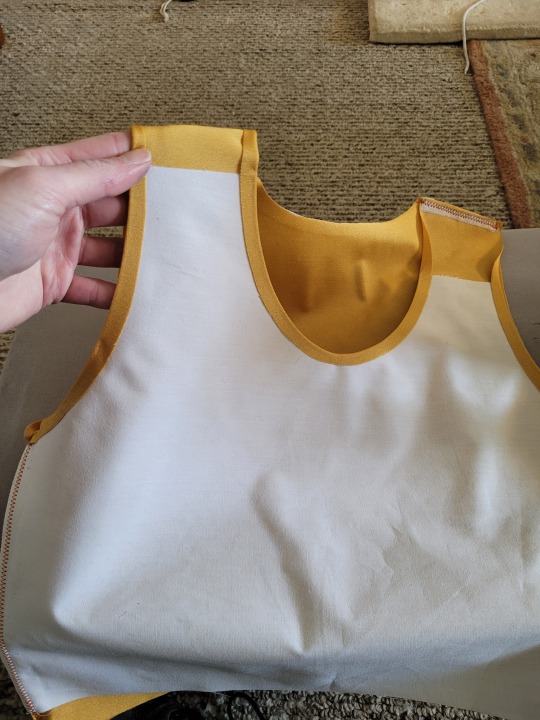
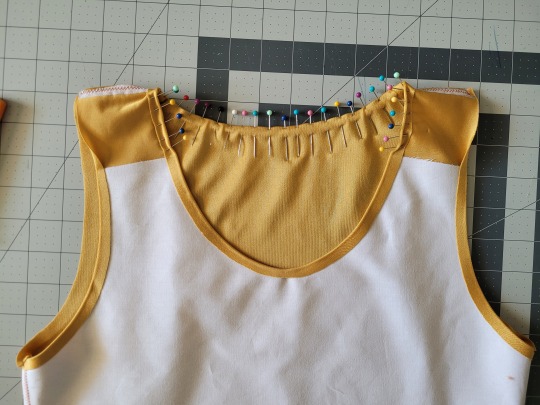
After the stiff front panel is fused to the stretch fabric, you’ll sew the straps of the front and back pieces together, then join the pieces along the sides. Pin the hell out of it to keep everything in place -this type of material is VERY prone to puckering.
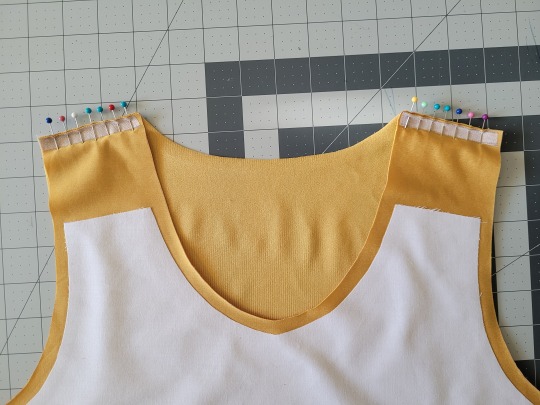
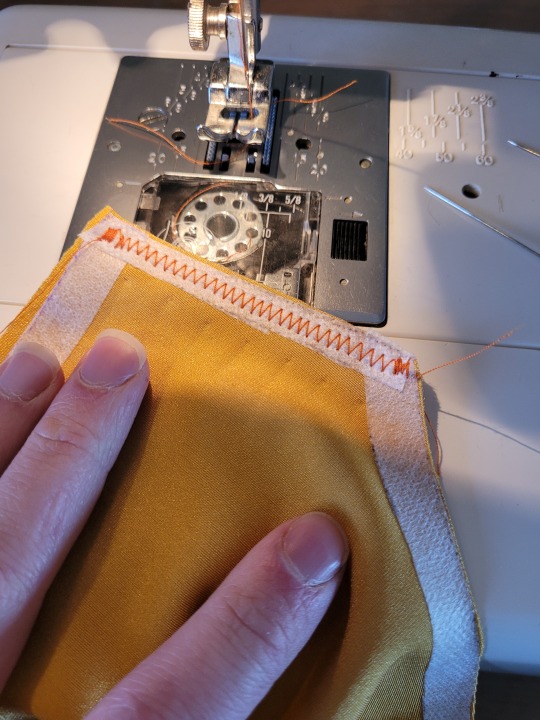
When sewing, USE A ZIGZAG STITCH. A straight stitch will NOT WORK for stretch fabric. I adjust mine to 1.3mm long and 3.5mm wide which has worked well. If your machine doesn’t let you adjust stitch length or width, well. That sucks, I don’t really have any advice.
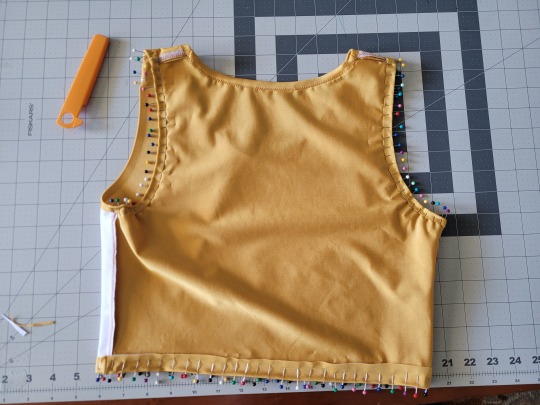
After you sew the front and back pieces together, you can add more fusible webbing to the front panel to help hold the hem down flat and prevent it from puckering while you sew it. Just add the strip, peel the paper off, then fold the hem over and iron it down. This part isn’t really necessary, but it does make the hems look nicer. If nothing else, I would recommend adding it to the neckline.
After that, you just fold & pin all the hems and sew them up with a zigzag stitch, then go over the raw edge at the top of the stiff panel (where we cut the straps shorter).
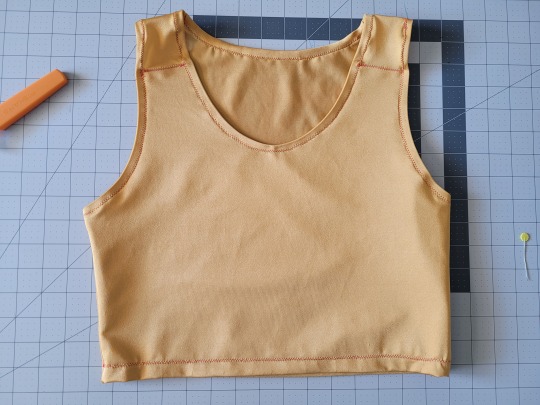
And that’s it! You’re done! And now you can make your own binders whenever you want!
And hey! If you used this tutorial and wanna throw me a dollar or two on ko-fi, I wouldn't complain.
911 notes
·
View notes
Text
if this gets 1000 notes ill ask my mum for a binder.
we did it! :DD i just woke up but ill ask today
ITS ORDEREDDDDDDDDDDDD!!!!!!!!!!!!!!!!!!!!!!!!!!!!!!!!!!!!!!!!!!!!!!!!!!!!!!!!!! :DDDDDDDDDDDDDDDDDDDDDDDDDDDDDDDDDDDDDDD!!!!!!!!!!!!!!!!!!!!!!!!!!!!!!!!!!!!!!!!!!!!!!!!!!!!!!!!!!!!!!!!!!!!!!!!!!!!!!!!!!!!!!!!!!!!!!!!!!!!!1

#nonbinary#binder#trans#nonbinary artist#genderfluid#queer stuff#lgbtqiia+#queer community#idk what else to tag#lol
2K notes
·
View notes
Text


hi *transgenders your lester*

#this is actually just me projecting onto Him#i think it would be interesting#like adding on to the body dysmorphia apollo is already dealing with in that body#you add on a healthy dose of gender dysphoria#i think it would be neat#and gods could you imagine dealing with a wildfire and drought infested socal with a binder??#literal nightmare#also yeah that last drawing looks sus but leave me alone i didn’t realize it looked like that until i finished it 😭#anyway i’ll probably make more of trans lester#trials of apollo#lester papadopoulos#toa#pjo hoo toa#toa apollo#my art
614 notes
·
View notes
Text

what if adam went back to vet school just to foster a bunch of kittens?
#i hate art and i hate effort this. took me too long#grayscale is evil incarnate#no binder 🤝 phallo rep duh#gonna just make everyone trans from now on ig#saw 2004#lawrence gordon#adam faulkner stanheight#chainshipping#cary elwes#leigh whannell#larry art tag
3K notes
·
View notes
Text

Senshi has received top-surgery! Congrats Senshi!
#i saw a post on twit saying he was wearing an ace bandage binder and got inspired#everyone say congrats senshi#senshi#senshi of izganda#dungeon meshi#delicious in dungeon#fan art#redraw#meme redraw#shitpost art#noroniko#trans#trans pride#yippeeeee trans senshi
1K notes
·
View notes
Text

published in FRUITSLICE
preorder my book
#poetry#trans poetry#bookbinding#book arts#letterpress#lgbtq#transgender#poem#poems#writing#queer#trans#queer art#spilled ink#quotes#chest binding#ftm#binder#literary magazine#trans poets on tumblr
540 notes
·
View notes
Text

Projecting my horrible curly wavy tangle hair and (former) tender head onto Leonardo
#he begged donnie to do his hair n then started wailing the second donnie came near him#dramatic ass#trans leo btw#not even a little relevant but idc he’s wearing. binder so#n it’s my fave head cannon ever#rottmnt#disaster twins#rottmnt leo#rottmnt donnie#tmnt
951 notes
·
View notes
Text
chest binding psa
guys srsly be safe with binding your chest, most binders when bought new come with care instructions specific to the binder and the company but just generally make sure to be careful and if ur currently wearing one just take a moment to reflect and make sure you haven't been wearing it for over about 8 hours (give or take) take it from me, ive nearly broken my ribs while binding and it SUCKS, and while my dysphoria isn't too severe safety should come first, just be aware that binding can go wrong sometime and PLEASE BUY FROM A REPUTABLE COMPANY because if a binder isn't made right it can potentially be more dangerous than a well made binder
#transgender#chest binding#transblr#transman#transmasculine#trans masc#binder#lgbtqia#be safe#psa#this has been a psa#nonbinary#demigirl#agender#bigender#demiboy#genderfluid#genderqueer#afab problems
472 notes
·
View notes
Text
The Gift
POV: It's Regulus' birthday and he's opening presents at the breakfast table.
Regulus: Okay, so far I got a journal that cannot be opened unless I'm the one holding it; thank you, Evan. The Cain's Jawbone book; thank you, Barty. A brand new stationary set; thank you, Pandora. And a silver snake ring that has a needle that injects poison to whoever it punctures; thank you, Dorcas.
Pandora: Happy birthday, Reg.
Evan: Happy birthday, buddy.
Barty: Yeah, yeah, yeah, happy birthday and all that. So which one is your favorite?
Dorcas: You kidding? I win by a mile.
Evan: Oh, I almost forgot *pulls out a small box* This is from Potter.
Dorcas: Why was James Potter giving you a gift for Regulus?
Barty: And why was he with you in the first place?
Evan: Calm down. We bumped into each other in the halls and he asked me to give it to Reg.
Regulus: *opens the box* oh wow.
Pandora: What is it?
Regulus: *shows it to Pandora*
Pandora: Aww, that's so cute.
Barty: What is it?
Pandora: It's like an small pin of the golden snitch but instead of a ball, it's shaped like a star.
Regulus: *reads the note* "Still can't believe I caught you. JP"
Dorcas: Aw, Now that's just romantic
Barty: If Potter wanted to be romantic, he'd realign the stars to say, "I am untterly, undoubtedly, and deeply in love with Regulus Arcturus Black. I say with with sound mind and body. Love, James Potter"
Regulus, putting the pin on his robe: So whose gift is that one? *points to a box*
Everyone:
Regulus: ...no one?
Evan: *inspects* Well, it's addressed to you. And it says Happy Birthday. Maybe it's from your parents?
Regulus: Unlikely. Give it? *takes the box* Really nothing written on here.
Barty: Open it.
Regulus: *opens it and gasps*
Dorcas: What is it?
Regulus: *looks over at the Gryffindor table* Nothing *packs up the gifts, stands and leaves* Thanks for the gifts.
At the Gryffindor table:
Sirius: Hey, the birthday boy himself.
James: Oh, hi, babe.
Regulus: Hey. Sirius, a word? *they move a bit farther away*
Sirius: So what's up? Did you need something?
Regulus: The gift.
Sirius: Yeah? What about it?
Regulus: ...help me put it on?
Sirius: ...*smiles softly* Yeah, okay.
In the bathroom:
Sirius: You okay in there?
Regulus: *comes out of the stall with a roll of bandage*
Sirius: What do you think?
Regulus: *runs his hands through his torso, looks at the mirror and turns to the side*
Sirius: It's not too tight right? I think I hooked it on the right row.
Regulus: *cries*
Sirius: *goes up to him* Hey, hey, c'mon, don't cry. It's okay. What's wrong? Is it too small? Does it hurt?
Regulus: *shakes his head* No. It's perfect.
Sirius: Aww, I'm glad. Feels better right?
Regulus: Mhm.
Sirius: *sighs* I told you to stop using bandages to bind. You're gonna hurt yourself.
Regulus: I didn't have a binder to use.
Sirius: Well now you do. And this is a lot safer and comfier. Right?
Regulus: *nods*
Sirius: Yeah. Now, you have to promise me that you won't wear it for too long. If I find out that you've been binding longer than what's safe, I'm confiscating them. Understand?
Regulus: Mhm. I promise
Sirius: Okay.
Regulus: *hugs Sirius tightly* Love you
Sirius: *kisses the top of his head* Love you, too. Now, let's get you to class.
#harry potter#marauders#the marauders#regulus black#sirius black#evan rosier#barty crouch jr#dorcas meadowes#james potter#pandora rosier#pandora lovegood#slytherin skittles#jegulus#starchaser#sunseeker#starseeker#sunchaser#trans regulus#trans reggie#transgender#binder#chest binding#harry potter incorrect quotes#incorrect quotes#marauders incorrect quotes#marauders era#marauder era#the maraunders map
757 notes
·
View notes
Text


Top surgery journal #7: OBVIOUSLY I expected it I just wish it weren't. two whole years before topless transman summer
#art#artists on tumblr#illustration#top surgery#transman#ftm#trans#comic#cartoon#trans artist#artist#queer artist#drawing#comic strip#top surgery journal#binder#digital art#clip studio paint#lgbtqia#queer
1K notes
·
View notes
Text
rb to tell my parents that getting me a binder is indeed safe and would be beneficial
fellow trans people add ur insight so i can prove things to them
EDIT 10 MARCH 2024: BINDER ACQUIRED!!!!!! THANK YOU ALL SO SO SO MUCH!!!!! :DDDDDD
#trans#transgender#binder#transmasc#nonbinary#non binary#enby#queer#lgbtq#lgbtq community#lgbtqia#queer community
1K notes
·
View notes
Text

eehehe happy pride everybody ☘️ from a gender-silly aroace lesbian creature
#art#ID in alt text#sona: pigeon#furry#anthro dog#trans pride#transgender#nonbinary#lesbian#doing some drawings like this as a ych on instagram and slots sold out crazy fast#thems meds and binder money yeehaw
3K notes
·
View notes