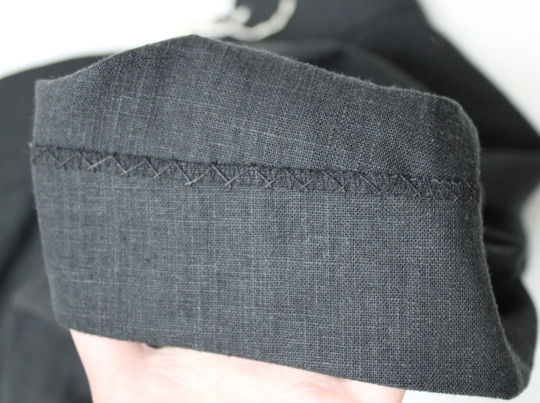
#to finish up the backstitch on this embroidery
Explore tagged Tumblr posts
Visit Tumblr Blog
Explore Tumblr blogs with no restrictions, modern design and the best experience.
Last Seen Tumblr Blogs


Fun Fact
When “GIF” was named word of the year in 2012, Oxford Dictionaries U.S.A. credited Tumblr for pushing the word.
Text
Oh I'm not really ok today I guess
#personal#i don't want to go#i don't concede#i don't want them to think they've won or they were right#i don't want to reopen the wounds#why don't i push backharder#i don't want to undo the grieving#i don't want to see the uncanny valley hell of a place i used to love#i don't want to be trapped in this body breaking down around me#i don't want to suffocate as all the windows close#i don't want to be afraid to wear a mask or be myself in public#i don't want to walk into the boiling cesspit of headassed fools#i don't want to fail at this thing i thought would be fun#ask i want to do is finish Baldur's Gate and play paleo pines or Stardew valley#to finish up the backstitch on this embroidery#to finally fix my lamp to try to save my big aloe
5 notes
·
View notes
Note
Any tips on learning to make buttonholes? I've been putting it off for.... *checks notes* like three years.... but better late than never and all that. I don't have any fancy machines so I gotta do it by hand but that seems right up your alley.
Thanks!
It IS up my alley, yes, I do most of my buttonholes by hand!
I'm actually part way through filming an 18th century buttonhole tutorial, but I expect it'll be a few more weeks before I finish that and put it on the youtubes, so in the meantime here's the very very short version. (The long version is looking like it'll probably be about 40 minutes maybe, judging by how much script I've written compared to my last video?)
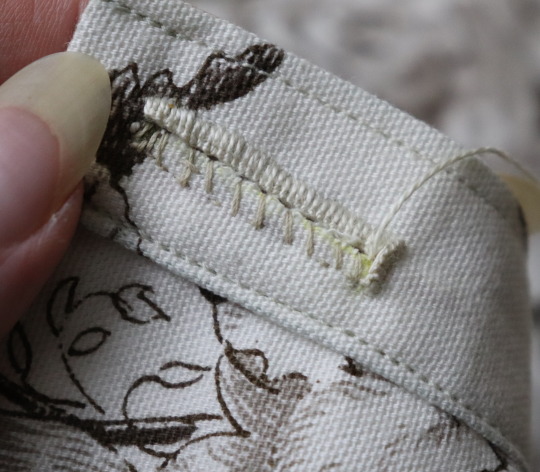
Mark your line, a bit longer than your button is wide. I usually use a graphite mechanical pencil on light fabrics, and a light coloured pencil crayon on dark ones. (I have fabric pencils too, but they're much softer and leave a thicker line.) You may want to baste the layers together around all the marked buttonholes if you're working on something big and the layers are shifty and slippery. I'm not basting here because this is just a pants placket.

Do a little running stitch (or perhaps a running backstitch) in fine thread around the line at the width you want the finished buttonhole to be. This holds the layers of fabric together and acts as a nice little guide for when you do the buttonhole stitches.

Cut along the marked line using a buttonhole cutter, or a woodworking chisel. Glossy magazines are the best surface to put underneath your work as you push down, and you can give it a little tap with a rubber mallet if it's not going through all the way.

I'm aware that there are some people who cut their buttonholes open using seam rippers, and if any of them are reading this please know that that is abhorrent behaviour and I need you to stop it immediately. Stop it.
Go get a buttonhole cutter for 10 bucks and your life will be better for it. Or go to the nearest hardware store and get a little woodworking chisel. This includes machine buttonholes, use the buttonhole cutter on them too. If you continue to cut open buttonholes with a seam ripper after reading this you are personally responsible for at least 3 of the grey hairs on my head.
Do a whipstitch around the cut edges, to help prevent fraying while you work and to keep all those threads out of the way. (For my everyday shirts I usually do a machine buttonhole instead of this step, and then just hand stitch over it, because it's a bit faster and a lot sturdier on the thin fabrics.)

I like to mark out my button locations at this point, because I can mark them through the holes without the buttonhole stitches getting in the way.
For the actual buttonhole stitches it's really nice if you have silk buttonhole twist, but I usually use those little balls of DMC cotton pearl/perle because it's cheap and a good weight. NOT stranded embroidery floss, no separate strands! It's got to be one smooth twisted thing!
Here's a comparison pic between silk buttonhole twist (left) and cotton pearl (right). Both can make nice looking buttonholes, but the silk is a bit nicer to work with and the knots line up more smoothly.

I've actually only used the silk for one garment ever, but am going to try to do it more often on my nicer things. I find the cotton holds up well enough to daily wear though, despite being not ideal. The buttonholes are never the first part of my garments to wear out.
I cut a piece of about one arm's length more or less, depending on the size of buttonhole. For any hole longer than about 4cm I use 2 threads, one to do each side, because the end gets very frayed and scruffy by the time you've put it through the fabric that many times.
I wax about 2cm of the tip (Not the entire thread. I wax the outlining/overcasting thread but not the buttonhole thread itself.) to make it stick in the fabric better when I start off the thread. I don't tend to tie it, I just do a couple of stabstitches or backstitches and it holds well. (I'm generally very thorough with tying off my threads when it comes to hand sewing, but a buttonhole is basically a long row of knots, so it's pretty sturdy.)

Put the needle through underneath, with the tip coming up right along that little outline you sewed earlier. And I personally like to take the ends that are already in my hand and wrap them around the tip of the needle like so, but a lot of people loop the other end up around the other way, so here's a link to a buttonhole video with that method. Try both and see which one you prefer, the resulting knot is the same either way.


Sometimes I can pull the thread from the end near the needle and have the stitch look nice, but often I grab it closer to the base and give it a little wiggle to nestle it into place. This is more necessary with the cotton than it is with the silk.
The knot should be on top of the cut edge of the fabric, not in front of it.

You can put your stitches further apart than I do if you want, they'll still work if they've got little gaps in between them.
Keep going up that edge and when you get to the end you can either flip immediately to the other side and start back down again, or you can do a bar tack. (You can also fan out the stitches around the end if you want, but I don't like to anymore because I think the rectangular ends look nicer.)
Here's a bar tack vs. no bar tack sample. They just make it look more sharp, and they reinforce the ends.

For a bar tack do a few long stitches across the entire end.

And then do buttonhole stitches on top of those long stitches. I also like to snag a tiny bit of the fabric underneath.

Then stick the needle down into the fabric right where you ended that last stitch on the corner of the bar tack, so you don't pull that corner out of shape, and then just go back to making buttonhole stitches down the other side.
Then do the second bar tack once you get back to the end.

To finish off my thread I make it sticky with a bit more beeswax, waxing it as close to the fabric as I can get, and then bring it through to the back and pull it underneath the stitches down one side and trim it off.


In my experience it stays put perfectly well this way without tying it off.
Voila! An beautiful buttonholes!


If you want keyhole ones you can clip or punch a little rounded bit at one end of the cut and fan your stitches out around that and only do the bar tack at one end, like I did on my 1830's dressing gown.

(I won't do that style in my video though, because they're not 18th century.)
Do samples before doing them on a garment! Do as many practice ones as you need to, it takes a while for them to get good! Mine did not look this nice 10 years ago.
Your first one will probably look pretty bad, but your hundredth will be much better!
Edit: Video finished!
youtube
And here's the blog post, which is mostly a slightly longer version of this post.
#ask#buttonholes#sewing#hand sewing#sewing tutorial#I've been procrastinating on the video this week#I want it done! I don't want to work on it I want new projects! I want to cut out more gloves!#currently forcing myself to do the last few buttonholes on these pants and then maybe I can cut out new gloves? as a treat?#but I hope I get some filming done tomorrow too
4K notes
·
View notes
Text
Embroidery updates : a Calcifer cushion cover


I love Calcifer, and so does my little sister, so I thought I would make her a cushion cover with the lil’ fire demon on it.
Details under the cut
I used a simple backstitch for the outline. For the filling, I started with the 2 little flames (“flames ! flames on the side of my face !” (sorry wrong movie)) with only 1 strand, and quickly realized it was very-time consuming ! So for the log, I used 2 strands – mostly, except for doing the finishing touches.


In theory, it was quicker this way. In reality, this project took so long because my schedule was not very consistent at all (I paused for, like, one month, and 2 days later ended up doing embroidery during 5 hours straight).
Colors (DMC) : 3031 & 801 for the log, and 738 for the left side of the log where it’s cut, to figure out the lighter wood ; White for the eyes and Black for the outline ; 740 & 742 for the little flames ; 766 & 721 for the mouth ; 666, 740 and 973 for the body.


My thread started to act weird once I finished the yellow and orange for the body… maybe I didn’t tighten my orange thread enough when pulling through the fabric ? It did make some stitches stand out, a little wavy and flowy. You can see it on the pictures. But once I noticed, there was nothing I could do but to try and secure them as much as I could by passing over them a little. In the end, I think it works, thematically : the fact that some stitches are more wavy than straight give a dynamic representation of a flame, wavering by its nature. Or at least that’s what I told myself lol
I used for the 1st time a plastic hoop I bought for myself at Christmas, and… look, I’m all for the natural stuff and think we use way more plastic that we should on the planet and in our everyday lives… but the plastic hoop does a better job at keeping the fabric stretched.
#not CR related#my adventures in embroidery#my work#embroidery#hand embroidery#fiber arts#needlework
9 notes
·
View notes
Text
Finally, I can post about a costuming project literally years in the making: my worldbuilding costumes!
I started this project a while ago, to combine two of my interests; costuming and worldbuilding/writing. I honestly have to say that I prefer worldbuilding to actually writing the story, and in one of my stories especially I’ve worked really hard on creating a complex high fantasy world with details and pieces of information that no one would ever really need. Of course, a part of this was figuring out clothes for all the different cultures of the world, and planning out how they were made, what textiles were available, how their clothes were made to work with the environment around them, how they reflect cultural norms, ect. And I decided that, if I’d done all this work to design the clothes, I might as well sew them to make sure that they worked and made sense the way they did in my head, right?
So, I did just that! I’ve been working on this intermittently, between other sewing projects and dependent on when I was feeling it, what I had planned and designed, and when I could get the things I needed or knew what I needed to know. I’ve learned so much over the course of this project, and my skill level and confidence in my costuming abilities has changed tremendously from my first costume of this project (fae) to my last (vampire). Additionally, while I may not yet have an actual plot that uses this world (I’ve done a couple little one-off things, plus it serves as the distant past for my more modern fantasy story Fires of Gor’thall and I’ve pulled a lot from it for other worlds for other stories, but no one big major story), this project has been endlessly helpful for figuring out how things work and how to describe them, as well as the fact that just having these costumes has been great. Sometimes, when I’m struggling with inspiration, I’ll just dress up in clothes from my world, and sometimes it helps
The guidelines I set for myself for this project were essentially “as accurate as reasonably practical”. I’ve used my sewing machine, but limited it to either cases where a straight running or backstitch would be used (ie construction seams) and hems (I did handsew a few hems on my vampire clothes, but not all of them), with the one exception of the sleeve embroidery on the blouse for my elven clothes, since my own embroidery ability is rather lacking and since it was white on white there was no need for the color mixes done in other embroidery. Seams were all finished in a historical method (binding or felling, mostly), and eyelets were sewn by hand. I did my best to keep the fabrics used as accurate as possible, although I did used polyfelt rather than wool felt in my demon clothes (wool is expensive. I was lucky enough to get the material for the vampire clothes at craft supplies exchanges and yard sales, but not so much with the felt) and some of the “linen” I used in my daemon clothes was actually a mock-linen cotton-Lycra blend that acts much like actual linen. I also sewed just about everything with polyester thread and most of the trims are either polyester ribbon, or, in the case of the ones that I wove, made with mostly acrylic and cotton yarn rather than linen and wool
A note on terminology: I know this is a fantasy world, and as such, there is no such thing as “historical accuracy”, but I will be sometimes using words like “historical” or “period” to refer to things, meant in the context of “accurate to this world”, because these are the terms I am used to using from dress history and historical costuming
The outfits will all have their own posts, talking about the making of them, the styles, the reasoning behind why I made the clothes the way I did, and other information about the clothes themselves and my worldbuilding about them
Linked below, in order of when I made them:
Fae
Elven (I have no idea why this got marked as mature, I’m working on it, please trust me it really isn’t)
Demon
Daemon
Vampire (this one’s going to take a while to get pictures of I won’t be able to wear it until like October)
#writing#fantasy#fantasy clothing#fantasy costuming#worldbuilding#absurd thing I do instead of writing an actual plot
2 notes
·
View notes
Text
Embroidery 101: Basic Tutorial, Part 2
Welcome back to part 2 of our easy introduction to embroidery! In Part 1, we learned the basics of transferring a design and setting up our hoop. Now it’s time to get down to business with the actual stitchwork. Pick up your hooped fabric, your needle, and your thread, and let’s roll.
Step 1: Thread Your Needle
One special thing about most embroidery thread is that it actually consists of multiple strands of thread - six-strand cotton embroidery thread is by far the most common you will find. The reason it comes with six intertwined strands is that embroidering with different numbers of strands produces a line of different weight - like drawing with a larger or smaller pen.


I often work with just one or two strands for my designs based on ink-drawn line art. On the other end of the spectrum, embroidering with all six threads is a bit too chunky for small projects and I only use that for work that needs to read clearly from a distance, like my Ketheric Thorm-inspired ribcage dress.

For this project, using four threads will be best. Cut a length of embroidery thread about two feet long and separate out four threads (but save the extra two for later use - waste not, want not). Thread your needle and put a big ol’ messy knot at the end.
Step 2: The Backstitch
We will embroider this design using one of the most common stitches: the backstitch. This is the go-to stitch for any kind of outline, and it is the stitch I use a good 75% of the time. You will still go far even if this is the only stitch you ever learn.

Begin the backstitch by bringing the needle up from the back of the work (Point A)
Insert the needle behind Point A, forming your first stitch (Point B)
Bring the needle up again in front of Point A (Point C)
Insert the needle back into Point A, forming your second stitch
Repeat thus, always coming up in front of your last stitch and going down into the same hole as your previous stitch.
Step 3: Go Forth And Conquer

Take that needle in hand and stitch, stitch, stitch until you’ve sewn over the entire design. Congratulations! You are now officially an embroiderer.
Next time on our 3rd and final segment of this tutorial, we’ll learn how to finish and frame our project.
5 notes
·
View notes
Note
Hi! I’m here from your quilt post. It was such a heartwarming story, and I wanted to thank you for sharing it.
I’m looking to get into hand sewing, and I wanted to dip my toe in by learning embroidery. When I was a kid, I embroidered a handkerchief for my dad, but I don’t really know anything about techniques or specific stitches or anything. I’ve looked online and there’s a lot out there, and I find it to be overwhelming.
How did you get into your craft, and could you perhaps share some resources you’d recommend?
I realize this is a strange ask; if it’s too weird, feel free to ignore it and thank you for your time.
That’s not a strange ask at all that’s a delightful one!
I’m actually pretty much entirely self taught. I had a special interest in the Oregon Trail growing up (I lived in Oregon so maybe a little less weird than it could have been) which meant I did a lot of pioneer things. My mom and gramma on that side also did a lot of sewing so if I didn’t get something I could ask them which was lucky for me because I was learning before the internet was an ‘at home’ thing for most people.
The fastest way to just dive into embroidery and play around a bit while learning stitches is to make a sampler. If you just google “embroidery sampler” you’ll find a lot of different options! There are some that have video tutorials included, there are kits you can buy that include everything you need, there are examples so you can just make your own that interests you! It’s a nice way to learn a lot of the basic stitches and have an item to reference when you’re planning other projects in the future. Me, being the big ol’ nerd I am found a vintage one that was similar to what Laura Ingles Wilder would have done in a very old library book that I no longer remember the name of. I think I ended up giving that to someone after I finished it 🤔 but you can really make a sampler into anything you want! Only want to embroider bees or flowers or strawberries? There will be options out there!
I’m currently doing an embroidery project where I make a lot of different Pokémon and I’m mainly using satin stitch for that, which is one of my favorites. Some basic stitches I’d point out as The Important Ones in no particular order: satin, running stitch, backstitch, split backstitch, chain stitch, cross stitch, French knot, and long and short stitch.
Here’s a website with a bunch of different pictures of stitches and how to make them. It also links to a pdf book you can buy, which I haven’t, but the site has plenty of options for playing around with. Just in case you wanted to see what you liked and just dive in! You could pick ten you think are neat and just try them out on some scrap fabric!
And here’s a link to an Instagram account I like and has posted examples of stitches before as well as selling embroidery kits, just in case you needed things narrowed down more :)
https://instagram.com/dkmoonfeather
18 notes
·
View notes
Text
learn to digitizing your embroidey designs
From Sketch to Stitch: A Comprehensive Guide to Digitizing Your Embroidery Designs
The world of embroidery has embraced the digital age, allowing you to transform your own unique designs into stunning stitched masterpieces. But how do you bridge the gap between a simple vector graphic and a complex stitching pattern? This comprehensive guide, crafted with 2500 words, will teach you the art of digitizing your embroidery designs, from software choices to stitch considerations and finishing touches. Before We Embark: Understanding SVGs and Embroidery Files Scalable Vector Graphics (SVGs): These text-based descriptions of images offer infinite scalability, making them perfect for digital design. Embroidery files: These contain specific instructions for your machine, including stitch types, colors, and placement (DST, EXP, JEF, PES formats are common). Step 1: Choosing the Right Software Consider these factors when selecting your digitizing software: Skill Level: Are you a beginner or an experienced digitizer? Some programs cater to novice users, while others offer advanced features. Budget: Free and paid options exist, each with varying capabilities and functionalities. Compatibility: Ensure the software outputs files compatible with your embroidery machine. Here are some popular choices: Free: Inkscape: A free vector graphics editor with the Ink/Stitch plugin for basic digitizing. Sewing & Embroidery Software (SERF): Free software with limited but beginner-friendly digitizing features. Paid: Wilcom Embroidery Studio: Offers powerful tools for advanced digitizing and editing. Embrilliance Enthusiast: User-friendly software with various features at a good price point. Brother PE Design: Ideal for beginners with Brother embroidery machines. Step 2: Preparing Your SVG Simplify the design: Remove unnecessary details or intricate lines that might not translate well to embroidery. Optimize colors: Limit your color palette to what your machine can handle (usually 6-12 colors). Convert to paths: Ensure all elements in your SVG are outlines (paths) for proper stitching. Step 3: Importing and Converting Import your cleaned-up SVG into your chosen software. Follow the software's specific instructions for converting to an embroidery file. This typically involves: Choosing stitch types: Select appropriate stitches for different parts of your design (satin stitch for filling, backstitch for outlines, etc.). Setting stitch parameters: Adjust stitch density, length, and direction for desired effects. Color mapping: Assign thread colors to different parts of your design. Step 4: Digitizing Tweaks and Adjustments Preview and test: Most software allows you to preview your design on a virtual embroidery machine. Check for stitching issues and adjust paths or settings if needed. Refine stitch types and parameters: Experiment with different stitch combinations to achieve the desired look and texture. Consider thread types and colors: Choose thread that complements your fabric and design aesthetic. Step 5: Export and Embroider! Once you're happy with your design, export it in a file format compatible with your embroidery machine. Transfer the file to your machine and prepare your fabric and thread. It's finally time to see your creation come to life! Embroider your design, following your machine's instructions. Bonus Tips for Success: Start simple: Begin with basic shapes and designs to get comfortable with the conversion process. Practice digitizing: The more you experiment, the better you'll understand how different stitches and settings affect your final outcome. Join online communities: Connect with other embroidery enthusiasts for tips, advice, and inspiration. Don't be afraid to ask for help: If you get stuck, consult software manuals, online tutorials, or seek assistance from experienced digitizers. Remember, with a little practice and this guide as your compass, you'll be well on your way to transforming your SVG dreams into beautiful embroidered realities! Further Resources: Websites: Needlework Tips and Techniques: https://www.needlework-tips-and-techniques.com/ Books: "The Complete Book of Digitizing" by Jeannette Douglas, "Digitizing Designs" by Laura Ashley YouTube Tutorials: CreativeBug Cutwork Embroidery Masterclass, Bluestone Creations Cutwork Basics Online Forums: Embroidery Forum With these additional resources and the knowledge you've gained, you Read the full article
2 notes
·
View notes
Text
Last Monday of the Week 2023-04-03
Quilt's done, let's watch some movies.
Listening: Finished catching up to 99 percent invisible, which only took me like five years of cooking, cleaning, commuting, sewing, video gaming and soldering. Admittedly it's only about half of all of those things, but hey.
There's a lot of good 99pi episodes although a lot of them are actually guest episodes, for example Finding Julia Morgan is actually from New Angle: Voice, about an early and prolific skyscraper designer.
For originals, there's the story of the Nikolai Vavilov and the Seed Potatoes of Leningrad although frankly The Anthropocene Reviewed did it better, and there's Miss Manhattan, which is the story of a prolific model who is as a result featured in a ton of architectural work, Audrey Munson.
Reading: Started qntm's Ra, spec fic hard science fantasy where magic is a precise scientific process which is primarily best understood through careful measurement and differential equations. Appealing to me as an electrical engineer, where most things are also best understood through careful measurement and differential equations.
I read the first couple chapters ages ago but didn't stick with it, it's hard to read on a computer, I ended up buying the ebook and I'm devouring it. qntm has a way with words and worlds, and an appreciation for the power of institutional knowledge and formal theory that makes his stories feel very real and grounded. Even if they open with a drunk mage blasting some muggers with a microwave thermal lance.
Watching: Triple feature, big show today. First, episode two of Dynamo Dreams is out, only a year after the first one, not bad for what is mostly a solo VFX project. Beautiful, grungy, greebled sci-fi.
youtube
My brother called me up at six in the evening like hey do you want to go see a movie, and I almost never turn that offer down despite his incredibly terrible taste in movies and TV. We saw Shazam 2, which was mediocre in uninteresting ways. If you want to enjoy it, walk out about 15 minutes before it ends and it'll at least do something bold and thoughtful. The most I can say is that it keeps track of all it's plot points and ties them all off neatly.
Finally The Edge of Tomorrow, the time loop movie from like 2014. I like time loops, they give you a lot of room to play with. Manages to handle its stakes really well and convey the exhaustion and investment of a time loop without actually playing out every loop, which is hard. Makes me want to play Elsinore.
Playing: Nothing much, I got a couple games of Valorant in with The Buds. Now that I don't have sewing to podcast through I might go back to Forza a few hours a week. It's a reliable option. That or Warframe maybe. Needs to be a game with minimal text and little strategy.
Making: The Penrose quilt is finally done, took a few months there huh.
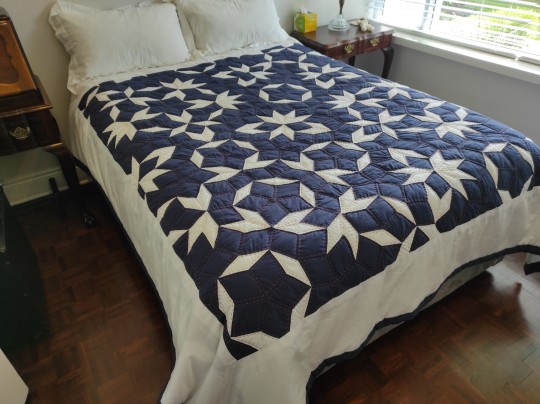
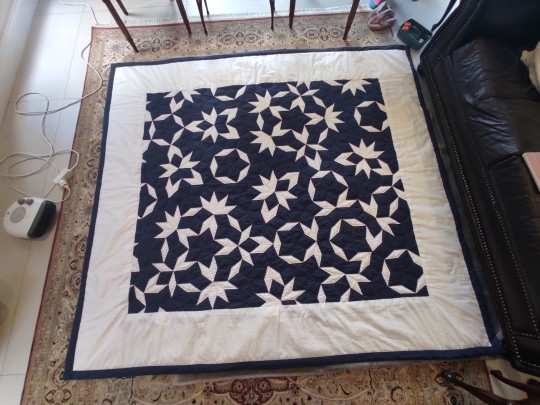
I'm really glad it's done, I'm looking forward to actually using it once I move out. Soon hopefully.
My sewing skill has really gone up over the course of this project, sometimes I'd read or watch someone's dressmaking project and I'd think there's no way you can do consistently tight backstitch by hand for that long of a seam but no, you totally can, it's not even that hard.
Tools and Equipment: If you're going to be working with Perle cotton you really want embroidery specific needles, they've got longer eyes that are better suited to the thicker floss than conventional needles.
9 notes
·
View notes
Text
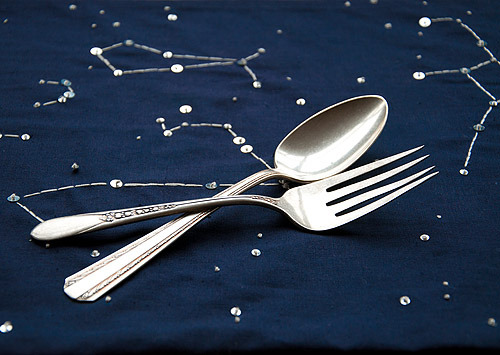
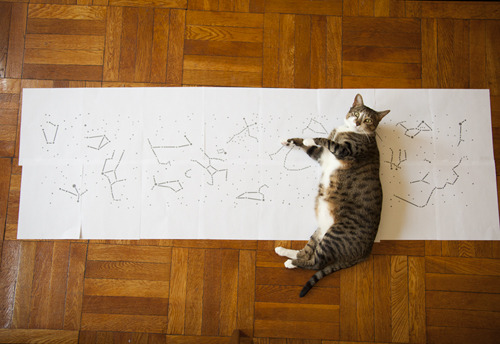
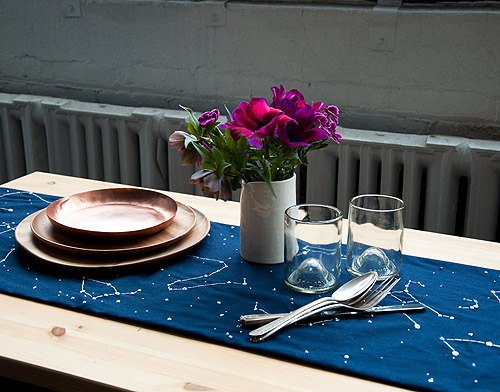
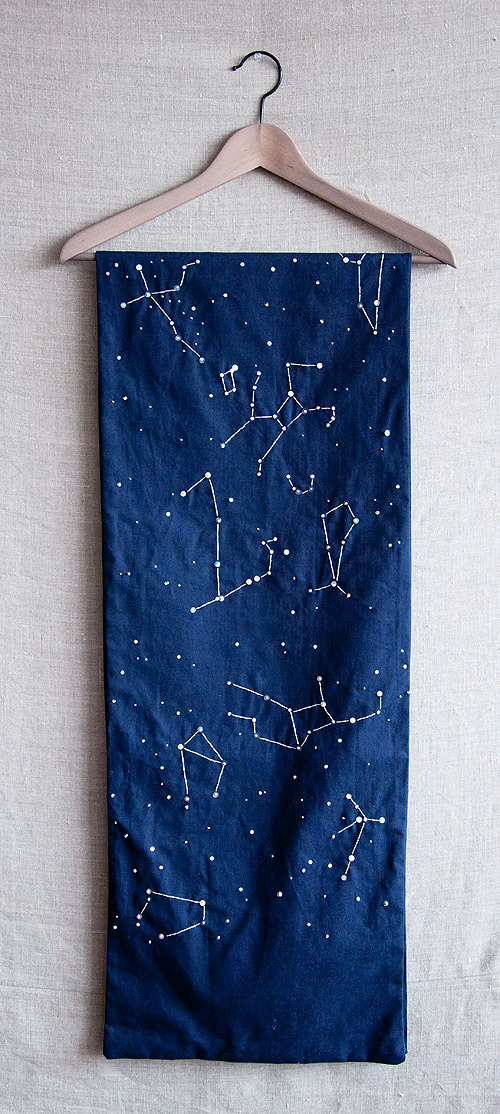
DIY French Dot Constellation Runner
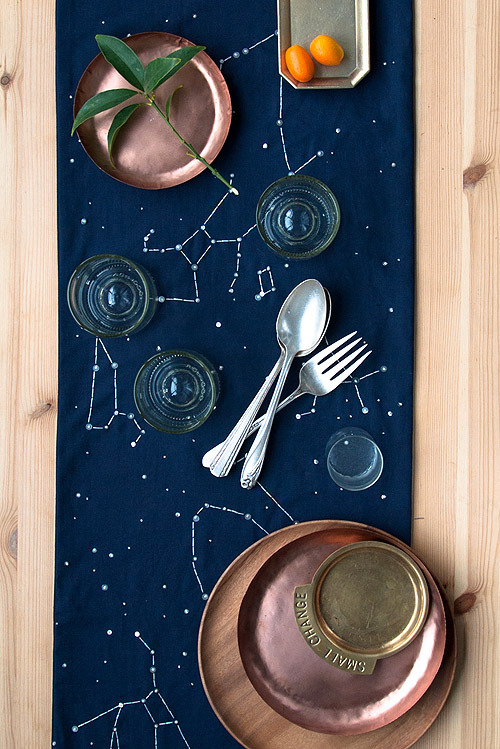
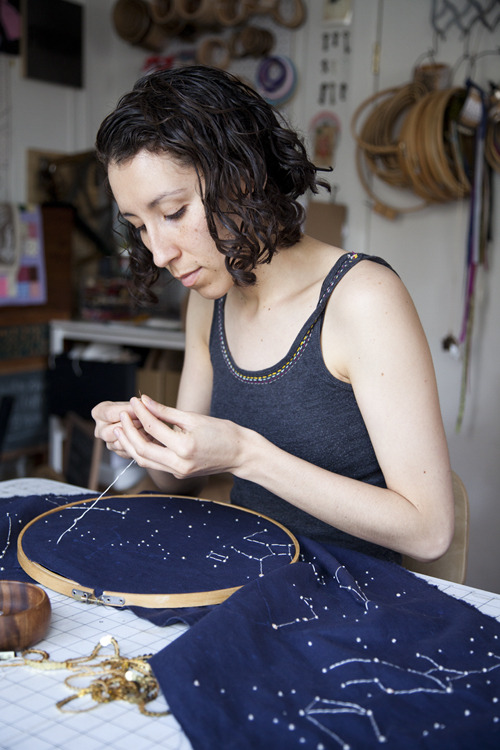
Project by Jessica Marquez:
Trying to invoke the Spring to finally arrive I made this table runner of stitched spring constellations. Stargazers will find Ursa Major and Minor, Cygnus, Draco, Virgo, Orion, Gemini and lots more. It’s definitely a statement piece that shines and shimmers with the addition of sequins held in place by french knots. One of the things I love about french knots is how three-dimensional they are. The little knots are raised, creating texture and here, stars that you can touch. This project might be large in scale, but the steps are super easy. You can also break up the pattern to make smaller pieces or work on a pre-made runner to keep things simple.
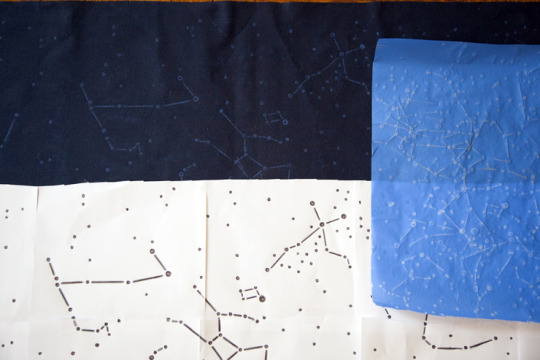
Materials:
Constellation Template (download here) (2) 15 x 72” pieces of linen, washed and ironed (or a pre-made runner) Tape Scissors Sewing pins Saral transfer paper Self-healing mat Pen DMC embroidery thread 3866 4mm Flat Silver Sequins 6mm Flat Silver Sequins Size 7 embroidery needle Large embroidery hoop, 12” hoop shown Sewing thread
Steps:
1. Enlarge template 600% for a 14 x 60 runner, or size to your desired dimensions. Tile print the template. You can do this is in Adobe: Print> Tile All Pages or Poster (depending on which version you have) > enlarge 600%> Overlap .075 with Cut Marks.
2. Trim pages to cut marks and tape template pages together. Trim edges and set aside.
3. Center pattern on fabric and pin the across the top to fabric. Layer a piece of transfer paper face down under the paper pattern and over the fabric. Begin tracing over the pattern with a pen. Apply a fair amount of pressure, but not enough to rip the paper. It helps to have a self-healing mat under your fabric for this step. Transfer section by section moving your transfer paper over as you complete a section. I used one piece of 12 x 15” transfer paper for the entire piece. Check your work as you go, lifting the papers to make sure your marks are coming through.

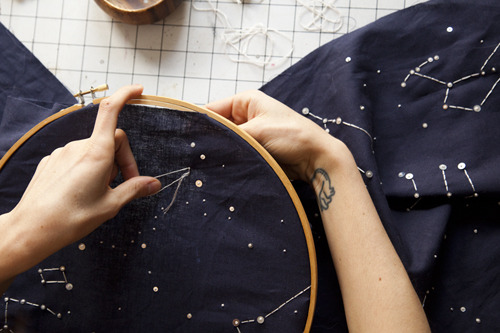
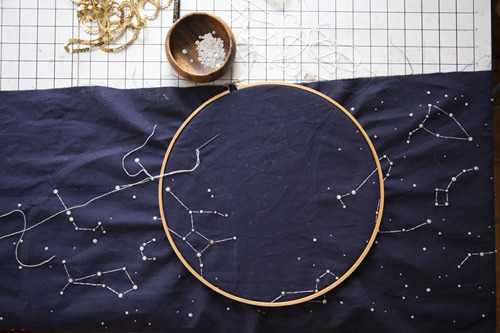
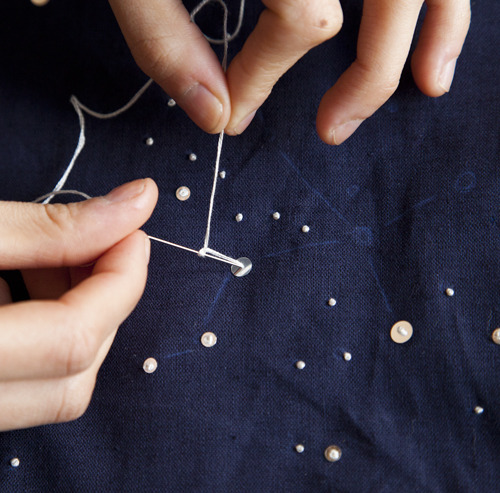
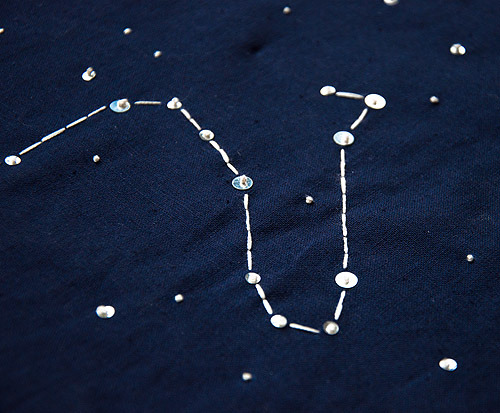
4. Stitch it! Hoop your fabric loosely and use the french knot for the star points and the backstitch or running stitch for the constellations. As you complete sections move your hoop around. You don’t want to apply too much pressure when hooping the fabric or you could disrupt the previous knots. Jump from stitch to stitch between points, but be careful not to pucker fabric by pulling too much.
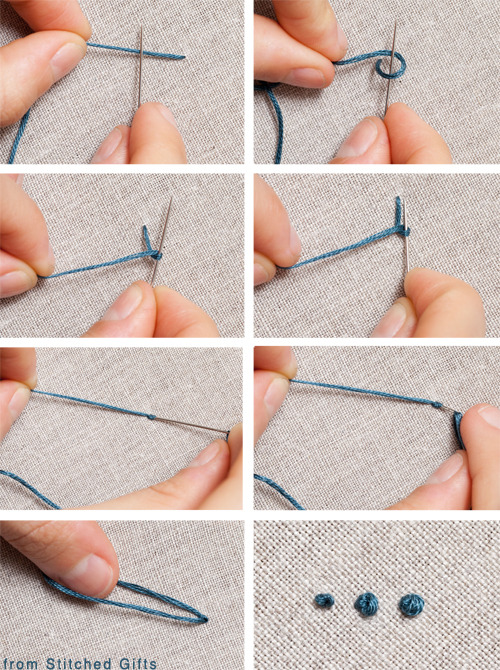
The french knot is all about getting the right tension. Come up through the fabric, and hold the thread taut about 1 or 2 inches from the fabric with your non-dominant hand. With your other hand, wrap the thread around the needle once, twice, or three times, for a larger knot. Insert the needle back into the fabric close to, but not in, the original hole. Slide the knot down to meet the fabric and hold the tension as you pull the needle through the knot. Pull slowly trying to keep the tension on the thread all the way as you pull through. (image of French Knot from Stitched Gifts)
I used 3 ply thread for the entire piece varying between french knots with no sequins and small and large sequins to help create dimension. Adding sequins to the french knots it super easy. After coming up through the fabric with the needle slide a sequin over the needle and down to the fabric. Make a french knot as usual the knot will hold the sequin in place.
5. To finish, without a backing: Fold over edges toward the back of the piece with a .25” seam. Press and then fold over again and pin in place. Sew a straight stitch with your sewing machine around the piece through the center of the fold.
To finish, with a backing: Layer the finished embroidered piece face down over another 15 x 72” linen piece. Pin in place and sew a .5” straight stitch with your sewing machine around the piece leaving a 5” opening. Snip away a small portion of the corner tops above the sewing. Pull the piece inside out, so that the embroidery is now showing. Iron the edges flat and hand sew the gap closed with sewing thread using the slip stitch.


2 notes
·
View notes
Text
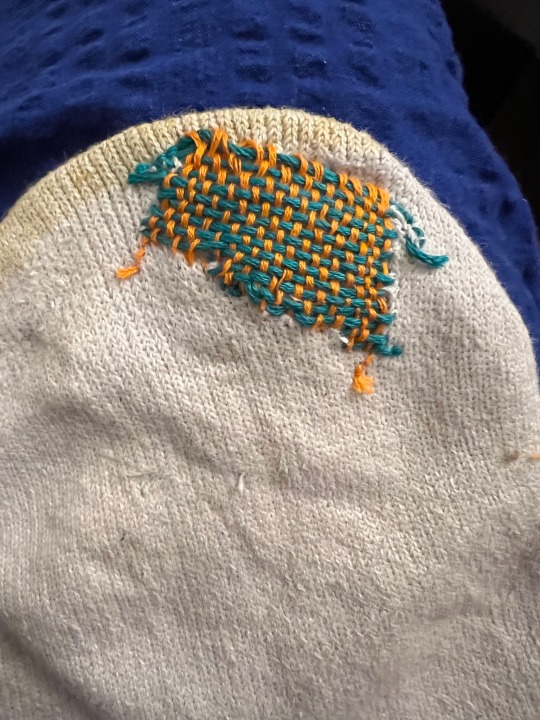
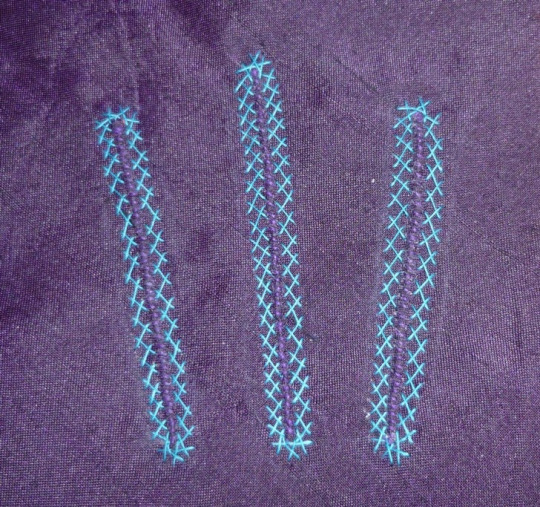
Third time using my speedweve, and I love it! This was a pretty big hole I had to cover up and I know if I’d had to free hand it then I’d have made a huge mess. As it is, I forgot to anchor the top when finishing the patch, so I had to do it after the loom came off, haha. Hence the top being a little wonky.
I used three strands of the orange embroidery floss and six of the teal to get this effect. I also avoid putting any knots in the fabric by backstitching the thread twice before starting and after finishing to anchor it in place. Hence all the little thread offshoots.
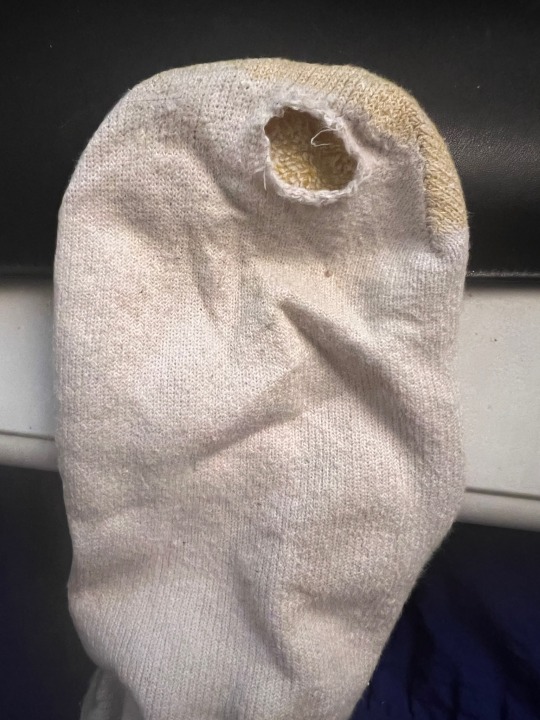
Here’s the sock pre-mend:
Now it’s all good and this sock will live to see another wear.
11 notes
·
View notes
Text
Chroma Conclave Biscornu Substitution Guide
Look look don’t judge me but I did this work and so I’m sharing it with you in case you too want to do some extremely specific nerdy cross stitch this month, with or without a certain 5th-edition-with-the-serial-numbers-filed-off cartoon.
How This Document Works:
1. This is not a cross-stitch pattern. This is instructions on how to adapt an existing cross stitch pattern from Tiny Modernist, an artist who is not me, using colour substitution. The pattern is for a biscornu, which is a funky shaped kinda dumpling looking decorative pillow/pincushion/whatever.
2. Below you will find five images, each containing six colours and numbers. The colours correspond to DMC embroidery floss shades. If you do not have DMC floss in your area I am not doing this again; if you google “DMC to [local brand] floss conversion tables” you can probably find some pretty close matches.
3. I know the pattern has four dragons and there are not four dragons in the Conclave, please don’t @ me. You will have to come to terms with choosing your four favourite dragons.
What You Will Need:
1. A copy of the original cross stitch pattern. Which you will purchase yourself, and pay real money for. It is available online at Tiny Modernist. I cannot stress this enough do not pirate this person’s pattern, do not email it to your friends, do not “share” it. The original pattern is the work of an independent artist who makes income from selling PDF cross stitch patterns that she’s designed herself. This is not Big Cross Stitch you’re sticking it to. If you steal her art, you’re being a rude jerk who hates fun. Don’t be that guy.
2. Supplies to make the biscornu. This is included in the pattern, but basically: cross-stitch fabric (14-ct Aida or 28-ct Linen/Cashel/whatever), a cross-stitch needle, a frame or hoop to stitch with. And then a sewing needle, stuffing, and two buttons to assemble the biscornu. If you are choosing to stitch a white dragon I would recommend not using a white fabric. There are some nice beige cloths (often called “tea” or something similar) available at your local big-box craft store that would work instead, these will make the colours pop more.
2a. You also don’t have to make the biscornu! Maybe you just use the chart for the top and make a cute little dragon wall hanging, live your truth!
3. A bit of stitching experience or some beginner cross stitch confidence. If you don’t know how to assemble the finished piece, Tiny Modernist has some great tutorials on her Youtube channel. Give her hits, don’t come to me with your questions. I think you could make this pattern as a fairly novice stitcher, since the stitching itself is two square charts and they’re not super complex. However, you will need to know how to read a chart well enough to substitute colours, and to understand the guidance below on colour substitution.
4. Gumption and a can-do attitude. These colour substitutions are me sharing my plans only, I have not stitched them or tested them. I feel pretty confident that they’ll look good but I don’t guarantee it, and you may have to make some substitutions from my substitutions to end up with a final project that pleases you.
OK so the original pattern Biscornu looks like this:

When we break down the chart, each dragon has: 3 body colours (green in this case), two belly colours, and a belly side colour. There is also a seventh thread used for the claws and for backstitching the details like the arms and wings.
Each of the images below contain 6 colours. Note: in the original pattern, the designer lists how many stitches you need to make with each colour. Depending on how you substitute, these may or may not be accurate. If you do four of the same colour dragon, these will apply. If you do four different-coloured dragons, obviously you will use less stitches.
When you substitute colours, I would recommend still having the original 9 shades she calls for, including the original dragon colours. These shades are used in other elements in the pattern (the scrollwork and castles) and I have not included directions for how to colour-swap those.
How To Read These Substitution Guides:
Top Row: Leftmost is the Body MC, this is the lightest of the 3 and should be substituted for the dragon shade with the most stitches. Top center is the Body CC1, this is the darkest and should be substituted for the darkest contrast body shade. This shade has the least number of stitches in the original pattern. Top right is the Body CC2, this is a medium shade fairly close to the Body MC. This shade uses 4 more stitches than the CC1 in pattern.
Bottom Row: The two shades to the left of the bottom row are Belly CC1 and Belly CC2. There is a light one and a dark one which correspond to the light and dark dragon belly stripes. There is also a shade to the far right, that is Belly Edging. You substitute this colour for the shade in the original pattern that goes along the edge of the dragon belly.
Backstitching: This pattern contains backstitching to highlight details. If I don’t think the original shade will work with my suggested substitutions, I’ve included a substitute backstitching shade to try.
Ok Show Me Some Colours
A Green Dragon You May Know:

A White Dragon You May Know:

A Black Dragon You May Know:

A Red Dragon You May Know:

A Blue Dragon You May Know:

That’s it. Go bananas, have fun kids.
#chroma conclave chroma cross stitch#tlovm season 2#tlovm spoilers#the legend of vox machina: the series: the cartoon#critical role fanart#i guess?#the matthew mercer dungeons and dragons twitch cinematic universe#fibre arts are the best arts#also sorry not sorry about the formatting i know it's very graphic design is my passion#but i wanted to spend an hour on it and then do other things with my life#so i did
9 notes
·
View notes
Text
Mom’s Art Day: August 2023
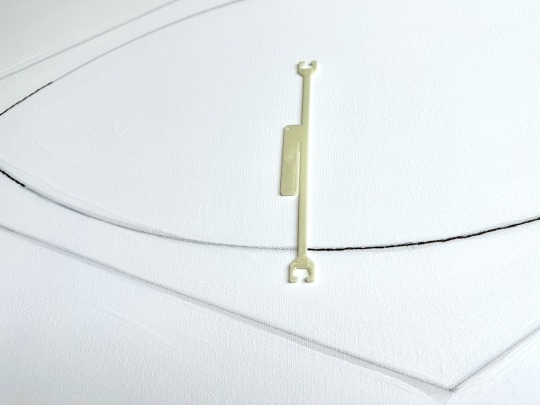
Today I worked on 3781 3371. First I sanded the gesso until I was more or less satisfied, and then I started stitching the outlines of the shapes! Usually when I make a stitched painting, I do needlepoint on the unstretched canvas—counting x threads over and y threads up or down to keep my stitches even, this requires wearing a magnifier—and then stretch it carefully to keep the lines straight, but this time I’m working on pre-stretched canvas so I needed to find a tool to help me keep my stitches even.
I settled on one of the plastic DMC thread organizers I bought about a decade and a half ago as a spacing tool for my backstitch. (Side note: I think these are an awful way to organize embroidery floss. Bobbin cards are way better, and you can even make them yourself!)
Here are photos of a single stitch being made:

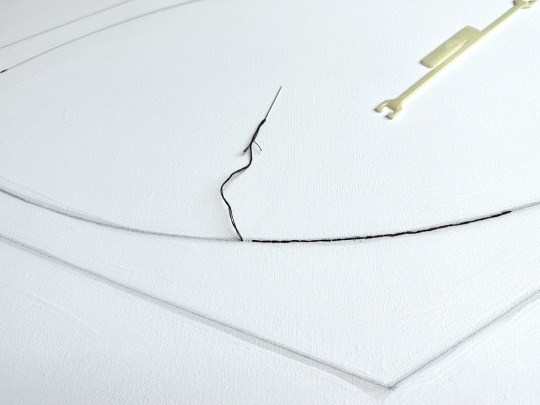

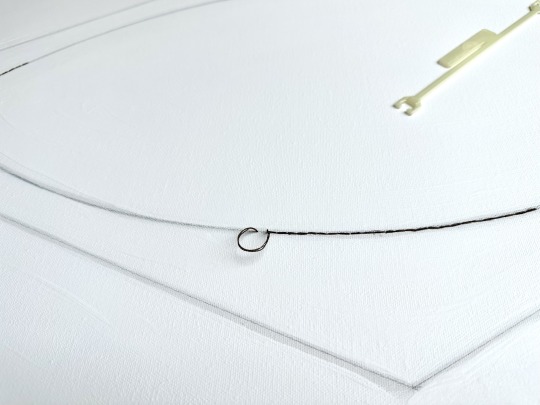

[Image Description: A series of close-up photos of a white canvas with shapes outlined in pencil, laid flat. The pencil marks are partially stitched over with brown embroidery floss. (1) The flat plastic spacing tool is laid perpendicular to the line of stitches, up against the previous stitch. (2) On the opposite side of the spacing tool, the needle is brought through the canvas from the back. (3) The spacing tool is put aside and the thread is pulled all the way through. (4) The needle is inserted down into the same hole the previous stitch came up through. (5) The thread is pulled through until (6) it is pulled taut, and the stitch is complete.]
It really wasn’t as difficult to stitch through the pre-primed, pre-stretched canvas as I had feared. I think using a fine tapestry needle (size 26, if I recall correctly) helped a lot, and I’m glad I had some on hand. Working around the support bar across the back of the canvas was annoying, and I had to use a second needle to make a guide hole from the front in those spots.
Here’s how it looked when it was time to finish up:
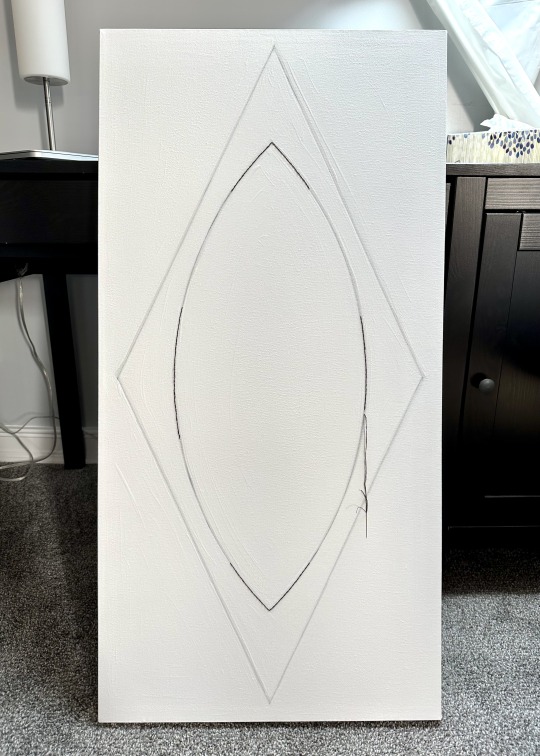
[Image Description: The same rectangular canvas, twice as tall as it is wide, now leaning against a desk. The canvas has a streaky white surface, except for a lens (pointy oval) inside a rhombus (diamond). The shapes are outlined in pencil, and the outline of the lens has been partially stitched in brown thread, at the top and bottom points, and the parts farthest to the left and right. At the bottom of the stitches on the right side of the lens, the needle and thread hang down.]
I love a good stitching day 😌
4 notes
·
View notes
Note
Top 5 hand-stitches
(I'm answering for construction stitches, my top 5 embroidery stitches would be different.)
1. Whipstitch. What can't it do? SO versatile! Felling seam allowances, doing narrow hems, putting linings in, etc. And there's other really cool stuff like the rolled whip gather, which is also basically just a whipstitch! (I considered putting le point a rabattre sous la main on this list, but I think I can just include it in the whipstitch category, especially since I often don't end up with the little pricks of stitching that go through all the layers and show a bit on the front, unless my buckram is really thin.)

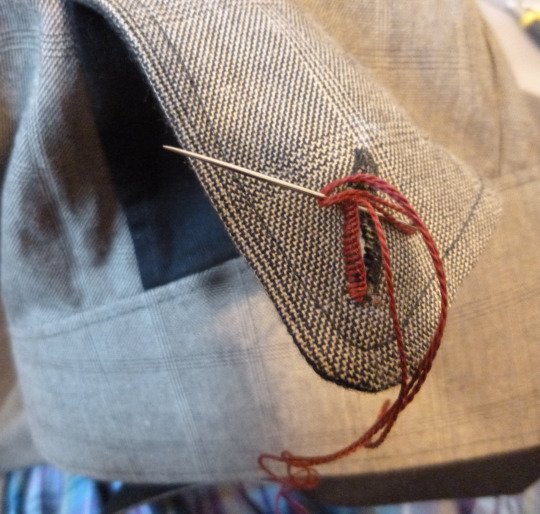
2. Backstitch. Strong! Useful! If I'm completely hand sewing a garment then the main construction seams will be backstitched. I also use it to do stuff like set coat & jackets sleeves, because some things are just annoying to do by machine. (image source)

3. Buttonhole stitch. I like the look of hand sewn buttonholes so much more than machine sewn ones. And it is useful for other things too, like bar tacks to reinforce the corners of openings. It's also used around the ring portion of Dorset wheel buttons, and you can do detached buttonhole stitch to do stuff like those Dorset knob buttons I've put on some of my shirts. (And yeah, detached buttonhole is arguably a different stitch, but whatever.)
4. Running stitch. I gotta be honest, I don't like running stitch for construction seams at all, it just feels too flimsy. (I can understand how it would be good for long seams that don't take a lot of strain, but still, the closest I'd be comfortable doing is a running backstitch.) But it's useful for lots of other things! I use it mostly for basting, and I do a lot of basting. I like to baste my seam allowances down before I flat fell them (wether I'm felling them by hand or machine), and it makes it so much easier, and I end up with a more even result. Same goes for narrow hems. It's especially great for felling the seams on shirt & nightgown sleeves, because having a tube of fabric wadded up around the presser foot while full of pins is awful.
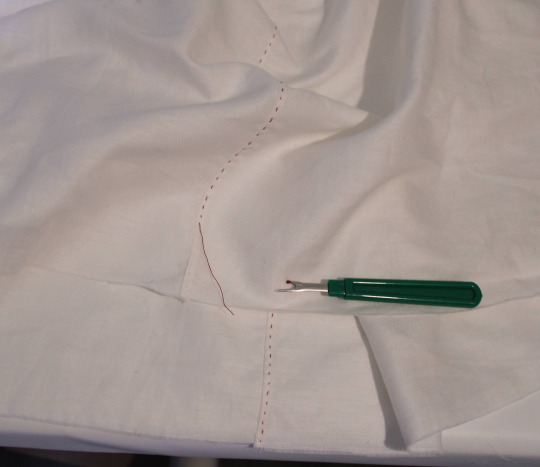
It's also great for gathers, and I like it for topstitching edges if I want it to be more subtle than machine topstitching.
5. Herringbone stitch. I don't use this one super often, but it's great for when you need something to still have a bit of movement. I used it to finish the seam allowances on my Nelson undershirt back in 2017, because they were done that way on the original, and it's held up surprisingly well. I've also heard that unlined summer linen coats can be finished that way, which would be neat to try. It's nice for pants hems if you have access to a serger, because it lies nice and flat and isn't very visible from the front.
It can also be decorative, like on these mitts I made back in 2013 holy shit that's 9 entire years ago oh my god. (Please ignore all the construction techniques in the linked blog post, they're awful.)
Thanks for asking!
409 notes
·
View notes
Text
Fashion on a Budget: Thrift Store Hauls and DIY Clothing Ideas
Fashion is often associated with high price tags, making it difficult for many to keep up with the latest trends. However, there are numerous ways to stay stylish without breaking the bank. Thrift store shopping and DIY clothing projects are great options for those looking to save money while still looking fabulous.
Thrift stores offer a treasure trove of hidden gems, from vintage designer pieces to unique finds that can be tailored to fit your style. DIY projects allow you to create unique custom pieces that reflect your individuality. In this blog, we'll explore the world of budget fashion, sharing our favorite thrift store hauls and DIY ideas to help you look your best without spending a fortune.
Thrift Store Styles
Classic Designer Haul
Classic designer hauls from thrift stores are a fantastic option for fashion-conscious individuals looking for unique, high-quality clothing at affordable prices. Thrift stores often stock pre-owned garments from luxury brands that are no longer available, such as Chanel and Gucci.
With a little searching, it's possible to find timeless pieces like blazers, trench coats, and silk scarves that can elevate any outfit. Moreover, purchasing from thrift stores helps reduce textile waste and promotes sustainable fashion.
Classic designer hauls are a perfect way to indulge in high-end fashion without breaking the bank while being environmentally conscious. These designer products will enhance your wardrobe and your style.
Traditional Clothing Haul
Thrift stores offer an excellent option for finding traditional clothing items, which are often expensive to buy new. You can score unique pieces that add character to your wardrobe with patience and searching.
From embroidered blouses to handmade shawls, thrift stores carry a variety of traditional clothing options from different cultures. Moreover, buying secondhand clothes is an eco-friendly and sustainable way of shopping, as it reduces textile waste and carbon footprint.
So, next time you want to update your wardrobe, consider visiting your local thrift store to see what hidden gems you can find. These traditional outfits will make you stand out from the monotonous designs and dresses.
Retro Athleisure Haul
Retro athleisure is a popular trend that blends vintage sportswear with modern style. It's comfortable, trendy and perfect for a casual look. Thrift stores are an excellent place to find retro athleisure pieces at pocket-friendly rates.
You can find sweatshirts, tracksuits, and sneakers from Adidas, Nike, and Reebok brands. You can create a unique, sustainable, affordable, fashionable style by shopping at thrift stores. So, if you're looking for a new style, go for a retro athleisure haul at your local thrift store.
Vintage Haul
A vintage haul is a great option for those who love thrift shopping. These treasures from the past offer unique and one-of-a-kind fashion finds that are often more affordable and sustainable than buying new clothing.
Vintage hauls can include anything from retro dresses, denim jackets, and band t-shirts to quirky accessories and statement jewelry. The appeal of vintage clothing is that it allows you to express your style while also contributing to reducing the industry's environmental impact.
So, next time you browse the thrift store, consider a vintage haul for a fun and sustainable shopping experience. Your vintage collection will outperform and offer you an aesthetic look wherever you want.
DIY Clothing Ideas
Embroidered Jeans
Embroidered jeans are a fun and creative DIY idea that can give new life to old denim. Choose a pair of jeans and gather embroidery floss in various colors to get started. Then, sketch your design onto the jeans with a washable marker or pencil.
Use embroidery stitches like the backstitch, French knot, and satin stitch to fill the design with your chosen colors. Once you're finished embroidering, gently wash the jeans to remove any markings and secure the embroidery.
The result will be a unique and personalized pair of jeans that show off your style and creativity. You can even go for a skilled embroidery artist if you want more specific designs. It will offer a luxurious look to the dress.
Fringed Tank Top
A fringed tank top is a trendy DIY clothing ideal for warmer months. To make one start with a plain tank top in a color of your choice. Cut the bottom hem off and then make a series of cuts up to the desired length of the fringe. You can use scissors or a rotary cutter for this step.
Once the cuts are made, pull each strip of fabric to create the fringe. To finish the look, add embellishments such as beads or sequins. This easy project can be completed in just a few hours and is a great way to update your summer wardrobe.
Upcycled Sweater
Transforming an old sweater into a stylish and unique garment is a great option for upcycled clothing and reducing waste. Choose a sweater you no longer wear, or find one at a thrift store. Cut off the sleeves and collar to create a vest, or turn it into a cardigan by adding buttons.
Use fabric scraps/patches to add embellishments, such as pockets or patches. If the sweater is too large, take it at the sides to create a more flattering shape. With a little creativity and DIY spirit, you can give new life to an old sweater and create a one-of-a-kind wardrobe piece.
Tie-dye T-shirt
Tie-dye t-shirts are an awesome way to transform plain white tees into colorful works of art. You'll need a white cotton t-shirt, dye, rubber bands, and gloves to create your tie-dye shirt. Start by twisting and tying the shirt in various places using rubber bands.
You can create different patterns and designs. Then, mix the dye according to the package instructions and apply it to the shirt using a squeeze or spray bottle. Let the dye set for several hours or overnight, then rinse the shirt in cold water until the water runs clear.
Finally, wash the shirt in the washing machine and enjoy your one-of-a-kind DIY creation! Youngsters readily use this DIY idea to look stylish. Startup businesses are also trying this idea in creating different types of comfortable and stylish clothing.
Conclusion
In conclusion, fashion doesn't have to come at a high price. Thrift store hauls and DIY clothing ideas are a great way to express yourself and stay on a budget. By learning how to style thrift store clothes, you can find unique and vintage pieces that make a statement in your wardrobe.
DIY projects allow you to transform old clothing into something new and personalized. Not only do thrifting and DIY save money, but it's also environmentally friendly. So next time you need a wardrobe refresh, consider checking out your local thrift store or trying out a DIY project.
You may be surprised at the amazing thrift store finds and creative possibilities that await you!
Original Source:
#Fashion on a Budget#Thrift store hauls#Diy clothing ideas#Tie-dye T-shirts#budget fashion#DIY clothing#Thrift Store Styles
1 note
·
View note
Text
How To Do A Detached Buttonhole Stitch By Hand?
To do a Detached Buttonhole Stitch by hand, follow these simple steps:
Materials:
Fabric (like linen or cotton)
Embroidery needle
Embroidery floss

Steps:
Prepare the fabric: Secure your fabric in a hoop for better control and tension.
Anchor your thread: Knot the end of your thread and bring the needle up from the back of the fabric at the point where you want to start.
Make the first stitch: Insert the needle back into the fabric a short distance away from the starting point, creating a small gap. Before pulling the needle all the way through, leave a loop of thread on the surface.
Catch the loop: Bring the needle up through the fabric inside that loop, near the starting point, catching the thread to form a loose stitch.
Continue stitching: Insert the needle back into the fabric a short distance away again, creating another loop. Repeat the process, working horizontally or vertically along the shape you want to fill. Each stitch should hook through the previous loop.
Finish the row: When you reach the end of the row, anchor the last stitch by pulling the thread tight and making a small securing stitch into the fabric.
Start the next row: For subsequent rows, bring the needle up just below the last row and continue forming loops in the same way, ensuring each new row is aligned with the previous one.
Secure the thread: Once you’ve filled the area or completed your design, make a small backstitch to secure the thread on the backside of the fabric and snip off the excess.
Tips:
Keep your loops even to ensure the stitch looks neat and consistent.
This stitch works best for filling shapes, creating raised textures, or adding decorative details to your embroidery.
Would you like a visual breakdown to go along with this?
#hand stitching#stitchcraft#stitch art#stitch day#backstitch#sewing book#tacking stitch#sewinginspo#sewinginspiration
0 notes
Text

[image description: This is a photo of a hand-stitched embroidered linen napkin in an embroidery hoop. It is a scene of a grandmother with her granddaughter sitting on her lap, and they are surrounded by flowers. It is primarily composed of satin stitches, and there are also lazy daisies used to make the leaves and flower petals, french knots to make some of the tinier, more delicate petals and parts of flowers, running stitches to hold parts together and create stems and outlines, and backstitches to create parts of clothing and stems. Below the scene is a piece of rose patterned cloth with writing that says: Nana & Maria, used from leftover fabric an earlier pattern two decades ago that the grandmother and daughter made of a pillow for the granddaughter's stuffed animal.]
✨Some Thoughts✨
This summer, I felt very moved by a piece I read called "Craft as Care-Full Correspondence" by Amber Ward and Jennifer Harness Wilkinson, where the two authors, who identify themselves as art educators and researchers, introduce craft as a "communal, political, and feminist art practice when pairing it with care-full correspondence as a method for artistic research and critical reflection." They embroidered their research reflections on old handkerchiefs and exchanged them back and forth with each other.
As someone who has been feeling the weight and speed of research within the academy, I felt my body yearning for this slowness. So, this summer, I decided to learn embroidery as I was continuing my research. Though I did not have a research partner engaging in the exchange with me, per say, I have been trying to learn more about what it means to take up a posthumanist methodology and practice, exploring slowly the works of theorists like Karen Barad, Rosi Braidotti, Donna Harraway, and others.
So, as I stitched, read, and listened, I found myself, as Barad writes,
"re-turn[ing] (to) the past", becoming entangled literally with my threads, and also entangled and re-turning within the "spacetime coordinate[s]" of Woodstock, NY, where my grandmother had first introduced my to the slow art of needle and thread. As Barad explores, the art of diffraction cannot bring one back to one specific spacetime coordinate- one moment, for example, the moment in time of sewing with my grandmother, "like all moments, is itself a diffracted condensation, a threading through of an infinity of moments-places-matterings, a superpositions/entanglement, never closed, never finished". It is for this reason that I feel so convinced by Ward and Harness's proposal of embroidery as a slow, care-full act. Through this embodied act of stitching, I was able to dialogue with my grandmother throughout time.
Barad, K. (2014). Diffracting diffraction: Cutting together-apart. Parallax, 20(3), 168–187. https://doi.org/10.1080/13534645.2014.927623
Ward, A., & Wilkinson, J. H. (2023). Craft as care-full correspondence. Visual Arts Research, 49(2), 19–33. https://doi.org/10.5406/visuartsrese.49.2.0019
0 notes