#embroidery tips
Explore tagged Tumblr posts
Text
This tip is a real life saver especially when you are working on a large scale project.
PLEASE NOTE: THIS ADVICE ONLY APPLIES TO DMC THREADS OTHER BRANDS MAY BE DIFFERENT
19 notes
·
View notes
Text
All about sewing tools
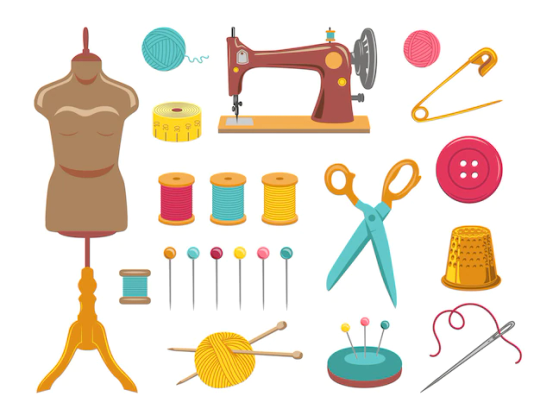
Sewing Tools for Professional Results As with any profession or hobby, using the right tools can make all the difference in the world and can make the difference between amateur or professional results. Even if you’ve only sewn a few projects and collected some basic sewing tools, it may be time to learn about some of the advanced sewing tools designed to give your project that professional edge. Most sewing projects can be completed without the following tools, but as you improve and fine-tune your skills and develop an affinity for quilting, home decorating or clothing construction, you’ll find these tools indispensable for saving time, increasing accuracy and simplifying tasks Cutting Tools Needlework Scissors and Snips Small, 3"- to 5"-long needlework scissors or snips are indispensable for clipping close to the stitching line or trimming intricate areas of a project. They can be used wherever your large bent-handled shears can’t reach. Snips have spring-loaded handles. Keep a pair alongside the sewing machine, at-theready to cut stray threads. Rotary Cutter Used with a self-healing mat and a clear plastic ruler, rotary cutters are ideal for straight cuts in one or more fabric layers. Look for blades that can be easily removed and replaced and a handle that is comfortable. Rotary mats and rulers are made specifically for rotary-blade cutting, and the materials don’t dull rotary blades as other products might. Both the mat and the ruler feature gridlines and angles for cutting accuracy. See more about: rotary cutters Measuring & Altering Tools Grid Board Use a large grid board under the fabric and pattern to align the fabric grain while pinning and cutting. A padded grid board allows you to pin into it when stretching or blocking fabric. Some have ironing surfaces that are also helpful for fusing large fabric sections. Consider a rotating grid board if your space is limited. Mats and wide rulers used for rotary cutting are actually modified grid boards used both underneath and on top of the fabric. See “Rotary Cutter” above. French Curve or Fashion Ruler These rulers have a variety of curves to mimic the body’s curves and are used when altering patterns. It’s helpful for the simplest length adjustment and indispensable when actually changing the style of a garment. Depending on how you turn the ruler and what segment you use, one ruler gives you all the curves necessary to complete pattern lines when altering or drafting patterns. Marking Tools FabricMarking Pens The space-age chemicals used to make these clever pens become more high-tech every day. The disappearing ink allows you to mark most projects at the exact location needed—even on the fabric right side— without fear of staining or discoloration. Look for an ink color that is in high contrast to your fabric, and for accuracy select a fine tip. Choose a water-soluble pen for long-term projects, when you want the markings to remain until you remove them with water. Air-soluble pen inks disappear within a few hours and are ideal for fabrics that can’t be washed or dampened. Some air- and water-soluble pen manufacturers caution against exposing marked fabrics to sunlight or the heat of the iron because heat may set the ink permanently. Always test the pen on a scrap of the fabric before using it on your project. Pressing Tools Tailor’s Ham Resembling a ham, this pressing tool is used as a base or a mold when pressing curved or shaped seams. It’s available in several sizes and should be covered on one side in cotton and the other in wool. The ham’s curves are designed to mimic garment curves and are used to set the shape of collars, lapels, sleeve caps and more. Point Presser & Pounding Block The raised points of this wooden tool allow you to press deep into a corner without creasing the surrounding fabric. The base is used as a pounding block, or clapper, to flatten seams. Needle Board A flat, flexible board with a bed of short needles placed very close together, a velvet board or needle board is used for pressing napped fabrics, such as velvet and corduroy, without crushing the fabric’s pile. A lessexpensive, and less-effective, version of a needle board features a canvas backed fabric with a raised pile front that takes the place of the needles. Sewing Tools SewingMachine Needles Sewing needles are designed for the type of fabric, thread and stitches you’re using. Using the right size and type of needle will greatly improve your sewing success. For more information on choosing the best needle for your project . Tip: A stitching problem, such as skipped stitches or looping or shredding threads, at firstmay appear to be a problemwith themachine when actually it’s a call for a new or better-suited needle. Bodkin Used for drawing elastic, cord or ribbon through a fabric casing, bodkins are available in several different styles. The pincer is usually the shortest with teeth at one end designed to clamp down firmly on ribbon or elastic and pull it through a tubular casing. Longer versions have a safety pin style closure at one end, and the slimmest version, designed like a large sewing needle, has a large eye for feeding narrow cord in narrow casings. A bodkin’s ball-point end comes in handy for turning fabric tubes right side out. Point Turner A point turner is a hand-held, pointed plastic tool designed to poke into tight corners. For crisp, sharp corners and points, use this tool to push out the corners of collars and cuffs before pressing. The opposite end is flat or rounded; use it to hold open seam allowances while pressing, so you don’t burn your fingers.Basting Tape Much faster than hand basting with needle and thread, use narrow, paper backed basting tape to hold zippers, bias tapes and trims in place while stitching. Fray Preventer A drop of this liquid on the cut edge of a woven fabric will bond the edges and prevent the fabric from raveling. Before using, test the product on a scrap of the actual fabric, or in an inconspicuous area of the project. Allow the test piece to dry thoroughly. Then wash, dry and press it as you would the finished project, to be sure the product doesn’t discolor the fabric. Read the full article
5 notes
·
View notes
Text
Satin stitch is a good filler stitch, but shouldn't be used for stuff that will take a lot of wear/might get snagged. It leaves relatively long strings of thread exposed, which can easily get caught on stuff. So for clothing, try brick stitch (which looks similar to stain but is more durable) or chain stitch. (which is easier than it looks and gives a cool folksy vibe)
Currently learning how to embroider so I can add stuff to my Friday the 13th vest
Tips would be appreciated
12 notes
·
View notes
Text

i embroidered a fish! my favorite fish: the redtail catfish! This was my first time doing embroidery like this (i believe its called thread painting?) but im pretty happy with the result
#embroidery#fish#fish art#redtail catfish#thread painting#fiber art#if you have any tips or anything please lmk!!#also ignore the wrinkly fabric lol
185 notes
·
View notes
Text
12Jul24
Three hundred and fifty-six days Since last we saw Harry on stage, But tonight a duet! For Ms. Nicks’ Hyde Park set, And a Songbird who’s now flown away.
#larry#harry#harry styles#stevie nicks#bst hyde park#the sun tipped us off that harry would join stevie nicks on stage during her bst hyde park set in london tonight#the fandom was a frenzy waiting to see if it would actually happen#things were pretty well confirmed when the usual suspects started to appear#spotted on the vip platform: rob stringer; kid harpoon and wife jenny; chloe burcham and gemma; tommy bruce#shit got real when we got a photo of harry side stage#jeff was seen with him#(worth noting here that irving managed fleetwood mac at some point)#there were reports that lloyd was there and that pham was taking photos on stage#the presence of the harry parliament made it feel HS4-y#but harry seems to have been there simply to support stevie for an emotional performance#it was christine mcvie's birthday#she passed away in 2022#harry paid tribute to her with a custom ss daley hand-embroidered songbird pin on his ss daley suit#the embroidery is green and blue#the songbird pattern is inspired by an 1800s lithograph and an accompanying scarf shows four different birds#and while it may not be explicitly about larry ...#i can envision harry's smirk when asked which of the four birds he wanted stitched on the jacket#they sang stop draggin' my heart around and landslide#there was also a super cute moment when harry slipped a 'it's coming home' into the mic#not unlike his husband recently#and harry is rocking the beginnings of a skullet mullet#which i'd like to see him fully commit to#limerick-hs#july 12#2024
138 notes
·
View notes
Text
Have y'all tried embroidery?
It's very therapeutic, and you get...
A Butterfly!
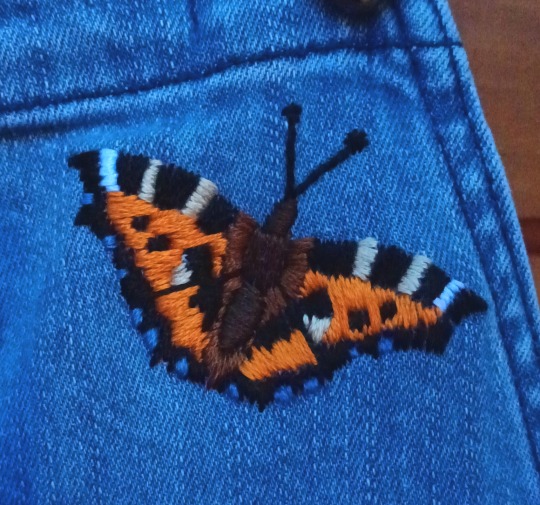
A Small Tortoiseshell to brighten the day.
#butterfly#embroidery#tortoiseshell#sewing#yah i know the white wing tips look blue it's the lighting i tell ya
216 notes
·
View notes
Text
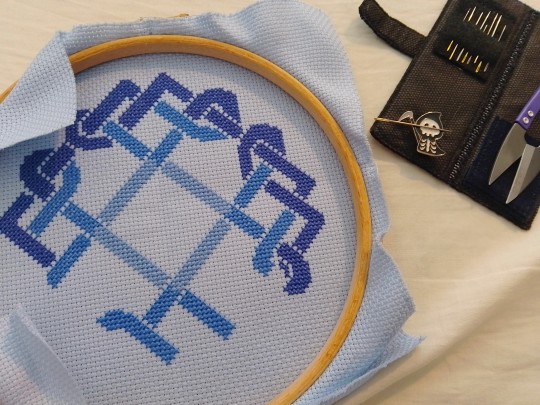
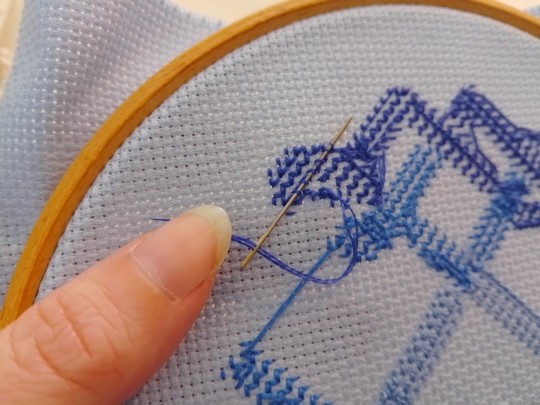
Further to a conversation with a friend, just posting this tip: if you're using an embroidery hoop, put your work into it so that the front is contained in the depth of the hoop and the back is the exposed side, not the other way around. It looks counterintuitive, I know, but it's so much easier to fasten off your ends on the back when the sides of the hoop can't get in the way of your needle or fingers.
38 notes
·
View notes
Text
Homesteading Resources Master Post
So, I have been really into homesteading lately, you call it a hyperfixation, I call it free dopamine. This is my masterlist of sources for different aspects of homesteading life. I plan on making a life in the city homesteading masterlist too. Please be careful when canning a preserving food, I am not an expert, but these sources seemed credible so be sure to can with caution.
Happy Homesteading!
General
Homesteading 101
Skills to Develop
Farmers Market Directory
Ways to make a Profit
Farmer's Almanac
Livestock
Livestock Pros and Cons
Meat Rabbit Guide
Pigs Guide
Chicken Guide
Ducks Guide
Goat Guide
Sheep Guide
Meat Cow Guide
Milk Cow Guide
Gardening
Composting
USA Planting Zones
Europe Planting Zones
Homemade Pest Control
High Yield Garden
High Yield Vegetables
Pollinator Garden
Canning
Canning 101
Fruit
Vegetables
Kitchen
Veggie Recipes
Bone Broth
Wheat to Bread
Sustainability
Self Sufficiency
Reduce, Reuse, Recycling
Clothes Mending
Crafts
Cross Stitch
Embroidery
Whittling
Crochet
Quilting
Knitting
#homesteading#nontrad homemaker#farmlife#farming#farm#plants#crafts#embroidery#gardening#livestock#masterlist#tips#canning#food preservation
82 notes
·
View notes
Text
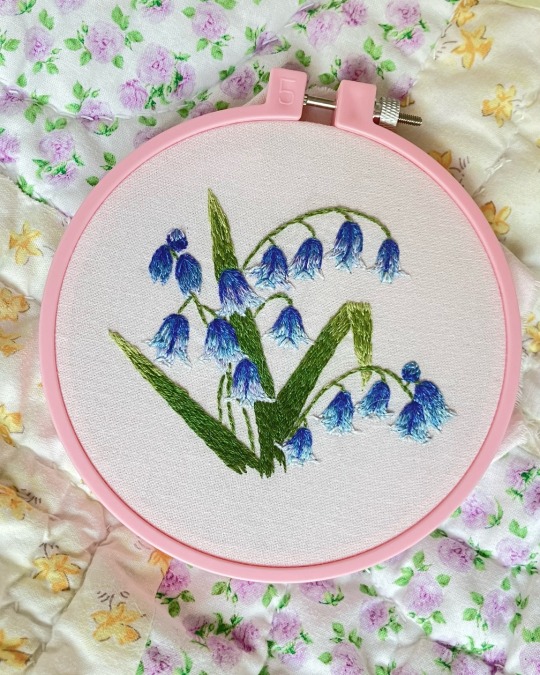
finished bluebell embroidery 💙
#embroidery#thread painting#fiber arts#flower embroidery#bluebells#spring flowers#cottagecore#I finished these a while ago but forgot to post oops#already working on the next one: rowan berries!#this one was really hard I struggled with the flowers#not 100% happy with it but I think it’s good enough?#on real flowers the petal tips turn up but that’s really hard to show with thread…#bluebells are sometimes also called harebells! what a cool name#mine
46 notes
·
View notes
Text
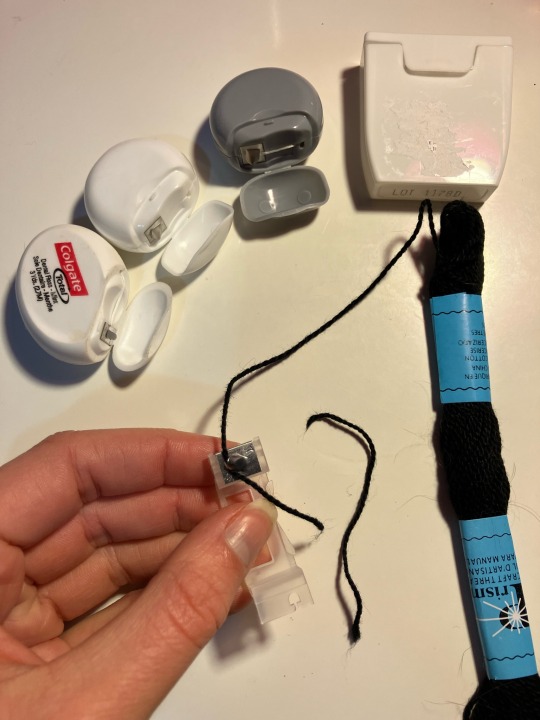
Hack I just came up with
Use the cutter on floss dispensers to cut string/thread quickly without bulky scissors
42 notes
·
View notes
Text
Pro tip : if you are going to use DMC light effects thread then for the love of God please coat your threads with beeswax it will save you time and frustration.
173 notes
·
View notes
Text
learn to digitizing your embroidey designs
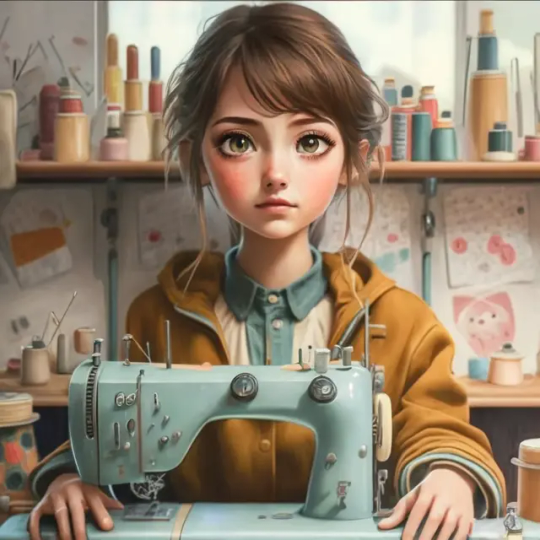
From Sketch to Stitch: A Comprehensive Guide to Digitizing Your Embroidery Designs
The world of embroidery has embraced the digital age, allowing you to transform your own unique designs into stunning stitched masterpieces. But how do you bridge the gap between a simple vector graphic and a complex stitching pattern? This comprehensive guide, crafted with 2500 words, will teach you the art of digitizing your embroidery designs, from software choices to stitch considerations and finishing touches. Before We Embark: Understanding SVGs and Embroidery Files Scalable Vector Graphics (SVGs): These text-based descriptions of images offer infinite scalability, making them perfect for digital design. Embroidery files: These contain specific instructions for your machine, including stitch types, colors, and placement (DST, EXP, JEF, PES formats are common). Step 1: Choosing the Right Software Consider these factors when selecting your digitizing software: Skill Level: Are you a beginner or an experienced digitizer? Some programs cater to novice users, while others offer advanced features. Budget: Free and paid options exist, each with varying capabilities and functionalities. Compatibility: Ensure the software outputs files compatible with your embroidery machine. Here are some popular choices: Free: Inkscape: A free vector graphics editor with the Ink/Stitch plugin for basic digitizing. Sewing & Embroidery Software (SERF): Free software with limited but beginner-friendly digitizing features. Paid: Wilcom Embroidery Studio: Offers powerful tools for advanced digitizing and editing. Embrilliance Enthusiast: User-friendly software with various features at a good price point. Brother PE Design: Ideal for beginners with Brother embroidery machines. Step 2: Preparing Your SVG Simplify the design: Remove unnecessary details or intricate lines that might not translate well to embroidery. Optimize colors: Limit your color palette to what your machine can handle (usually 6-12 colors). Convert to paths: Ensure all elements in your SVG are outlines (paths) for proper stitching. Step 3: Importing and Converting Import your cleaned-up SVG into your chosen software. Follow the software's specific instructions for converting to an embroidery file. This typically involves: Choosing stitch types: Select appropriate stitches for different parts of your design (satin stitch for filling, backstitch for outlines, etc.). Setting stitch parameters: Adjust stitch density, length, and direction for desired effects. Color mapping: Assign thread colors to different parts of your design. Step 4: Digitizing Tweaks and Adjustments Preview and test: Most software allows you to preview your design on a virtual embroidery machine. Check for stitching issues and adjust paths or settings if needed. Refine stitch types and parameters: Experiment with different stitch combinations to achieve the desired look and texture. Consider thread types and colors: Choose thread that complements your fabric and design aesthetic. Step 5: Export and Embroider! Once you're happy with your design, export it in a file format compatible with your embroidery machine. Transfer the file to your machine and prepare your fabric and thread. It's finally time to see your creation come to life! Embroider your design, following your machine's instructions. Bonus Tips for Success: Start simple: Begin with basic shapes and designs to get comfortable with the conversion process. Practice digitizing: The more you experiment, the better you'll understand how different stitches and settings affect your final outcome. Join online communities: Connect with other embroidery enthusiasts for tips, advice, and inspiration. Don't be afraid to ask for help: If you get stuck, consult software manuals, online tutorials, or seek assistance from experienced digitizers. Remember, with a little practice and this guide as your compass, you'll be well on your way to transforming your SVG dreams into beautiful embroidered realities! Further Resources: Websites: Needlework Tips and Techniques: https://www.needlework-tips-and-techniques.com/ Books: "The Complete Book of Digitizing" by Jeannette Douglas, "Digitizing Designs" by Laura Ashley YouTube Tutorials: CreativeBug Cutwork Embroidery Masterclass, Bluestone Creations Cutwork Basics Online Forums: Embroidery Forum With these additional resources and the knowledge you've gained, you Read the full article
3 notes
·
View notes
Text
A Treatise of Embroidery, crochet, and knitting with illustrations
By George C. Perkins, Anna Grayson Ford, and M. Heminway & Sons Silk co circa 1899.
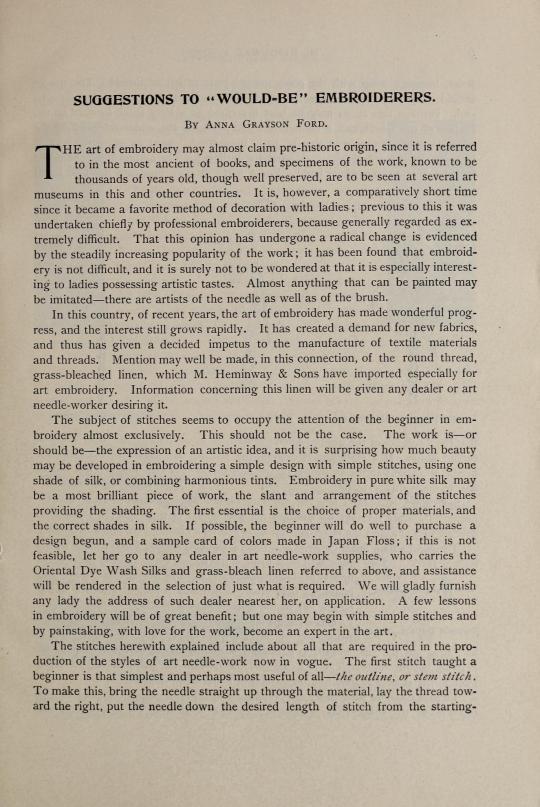
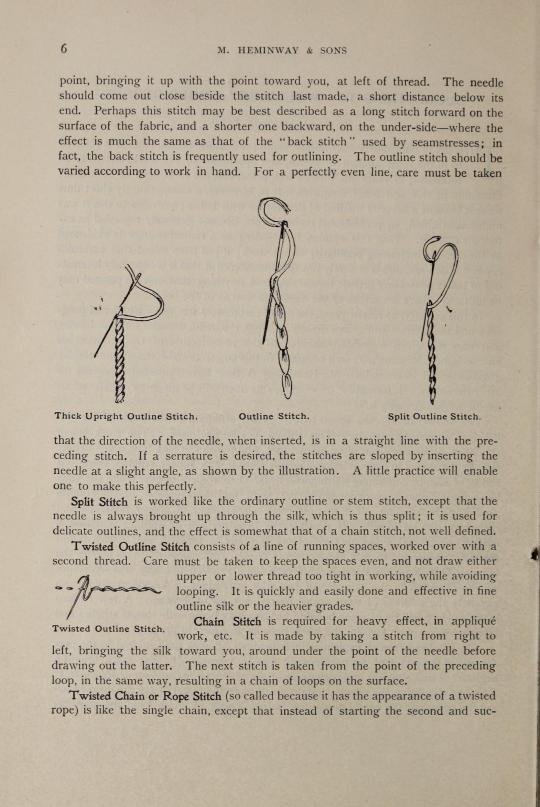
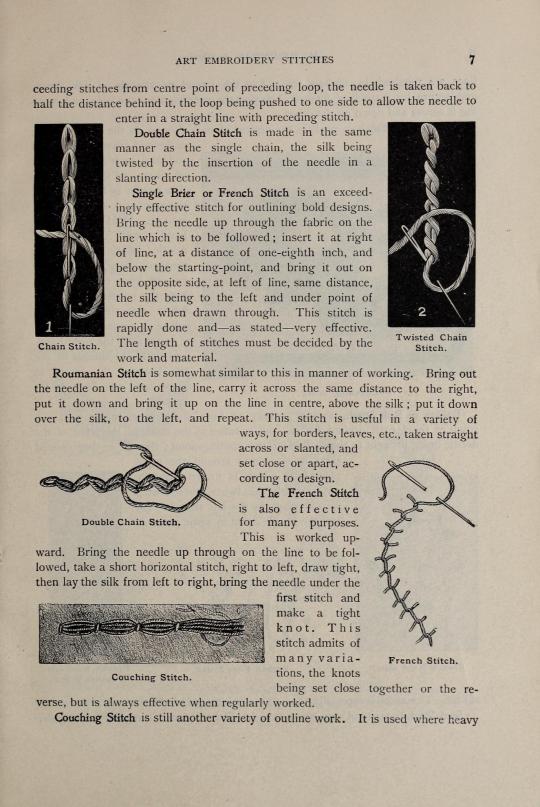
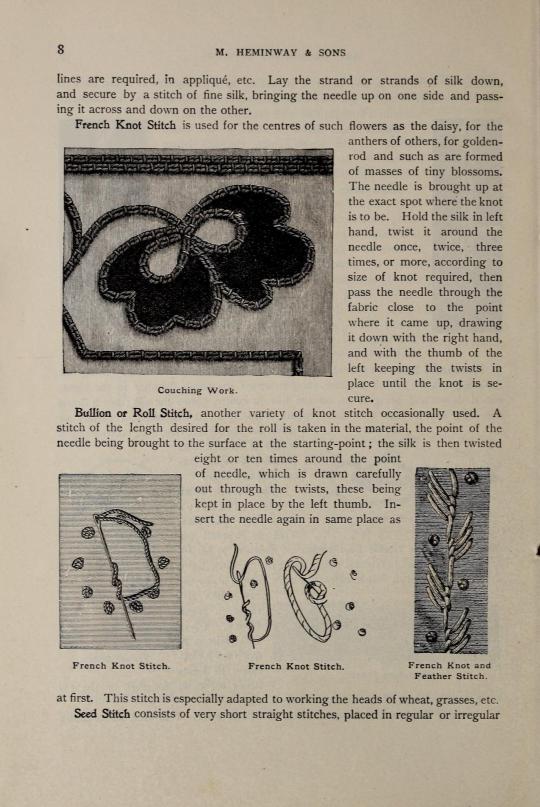
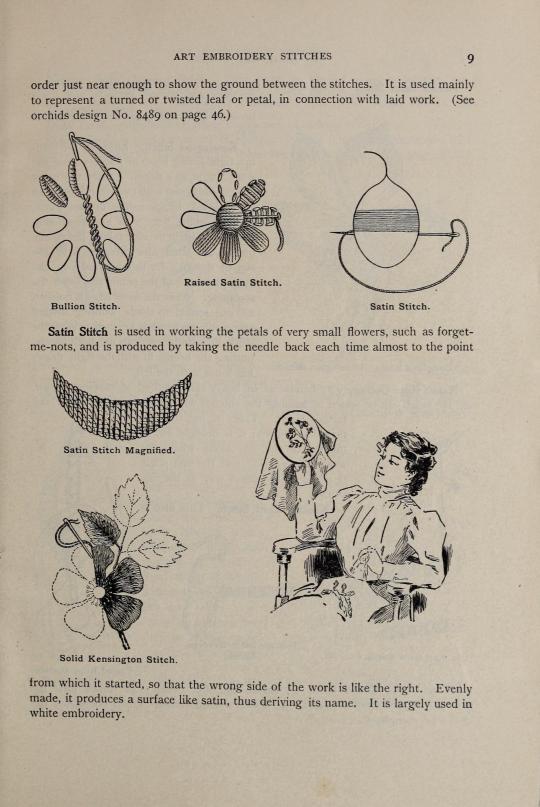
Part 1 of this series! Enjoy,
~Tweedle
.👒 .🦇💜
#historical sewing#sewing#sewing tips#embroidery#embroidery stitches#embroidery tutorials#1890s#1899
103 notes
·
View notes
Text
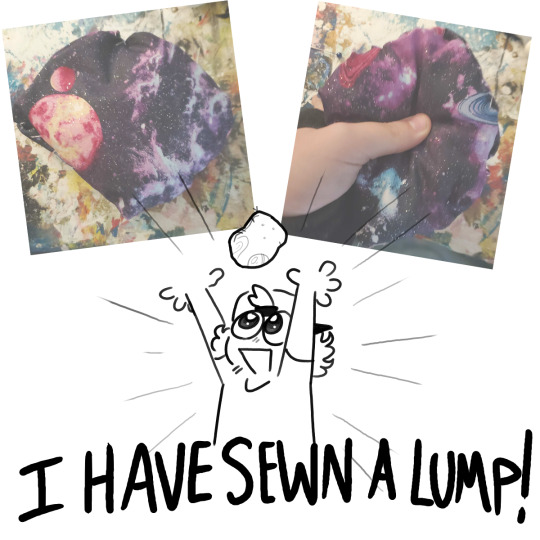
over my absence I committed myself to learning a hobby I've always wanted to do, sewing just to make plushies :J tonight I made my first successful plush if thats what you want to call it! MY LITTLE PURPLE LUMP I DO NOT MIND YOUR IMPERFECTIONS YOU ARE BUT THE START OF MY JOURNEY!!
#art#digital art#sewing#sewblr#hobby#I also did a embroidery art thing and it's also so much fun but the real thing is so unforgiving#like doing homework with your dad unforgiving#BUT IM NOT GIVING UP#THIS IS BUT THE BEGINNING!#MY LUMP IS MY START!#drop uh. sewing tips pls
12 notes
·
View notes
Text
"Everyone should be afraid of those who can embroider. We have the patience to keep stabbing the same thing over and over again."
"Mianmian," in Clash of Steel: A Treasure Island Remix by C.B. Lee
#embroidery#writeblr#writing#writing tips#so called womens work#novel writing#self defense#cb lee#queer literature#queer fiction#lgbtqia#fiction writing
5 notes
·
View notes
