#these are also full size (540 width) so you can click for full if you want sorry if the set causes the app to lag
Explore tagged Tumblr posts
Text
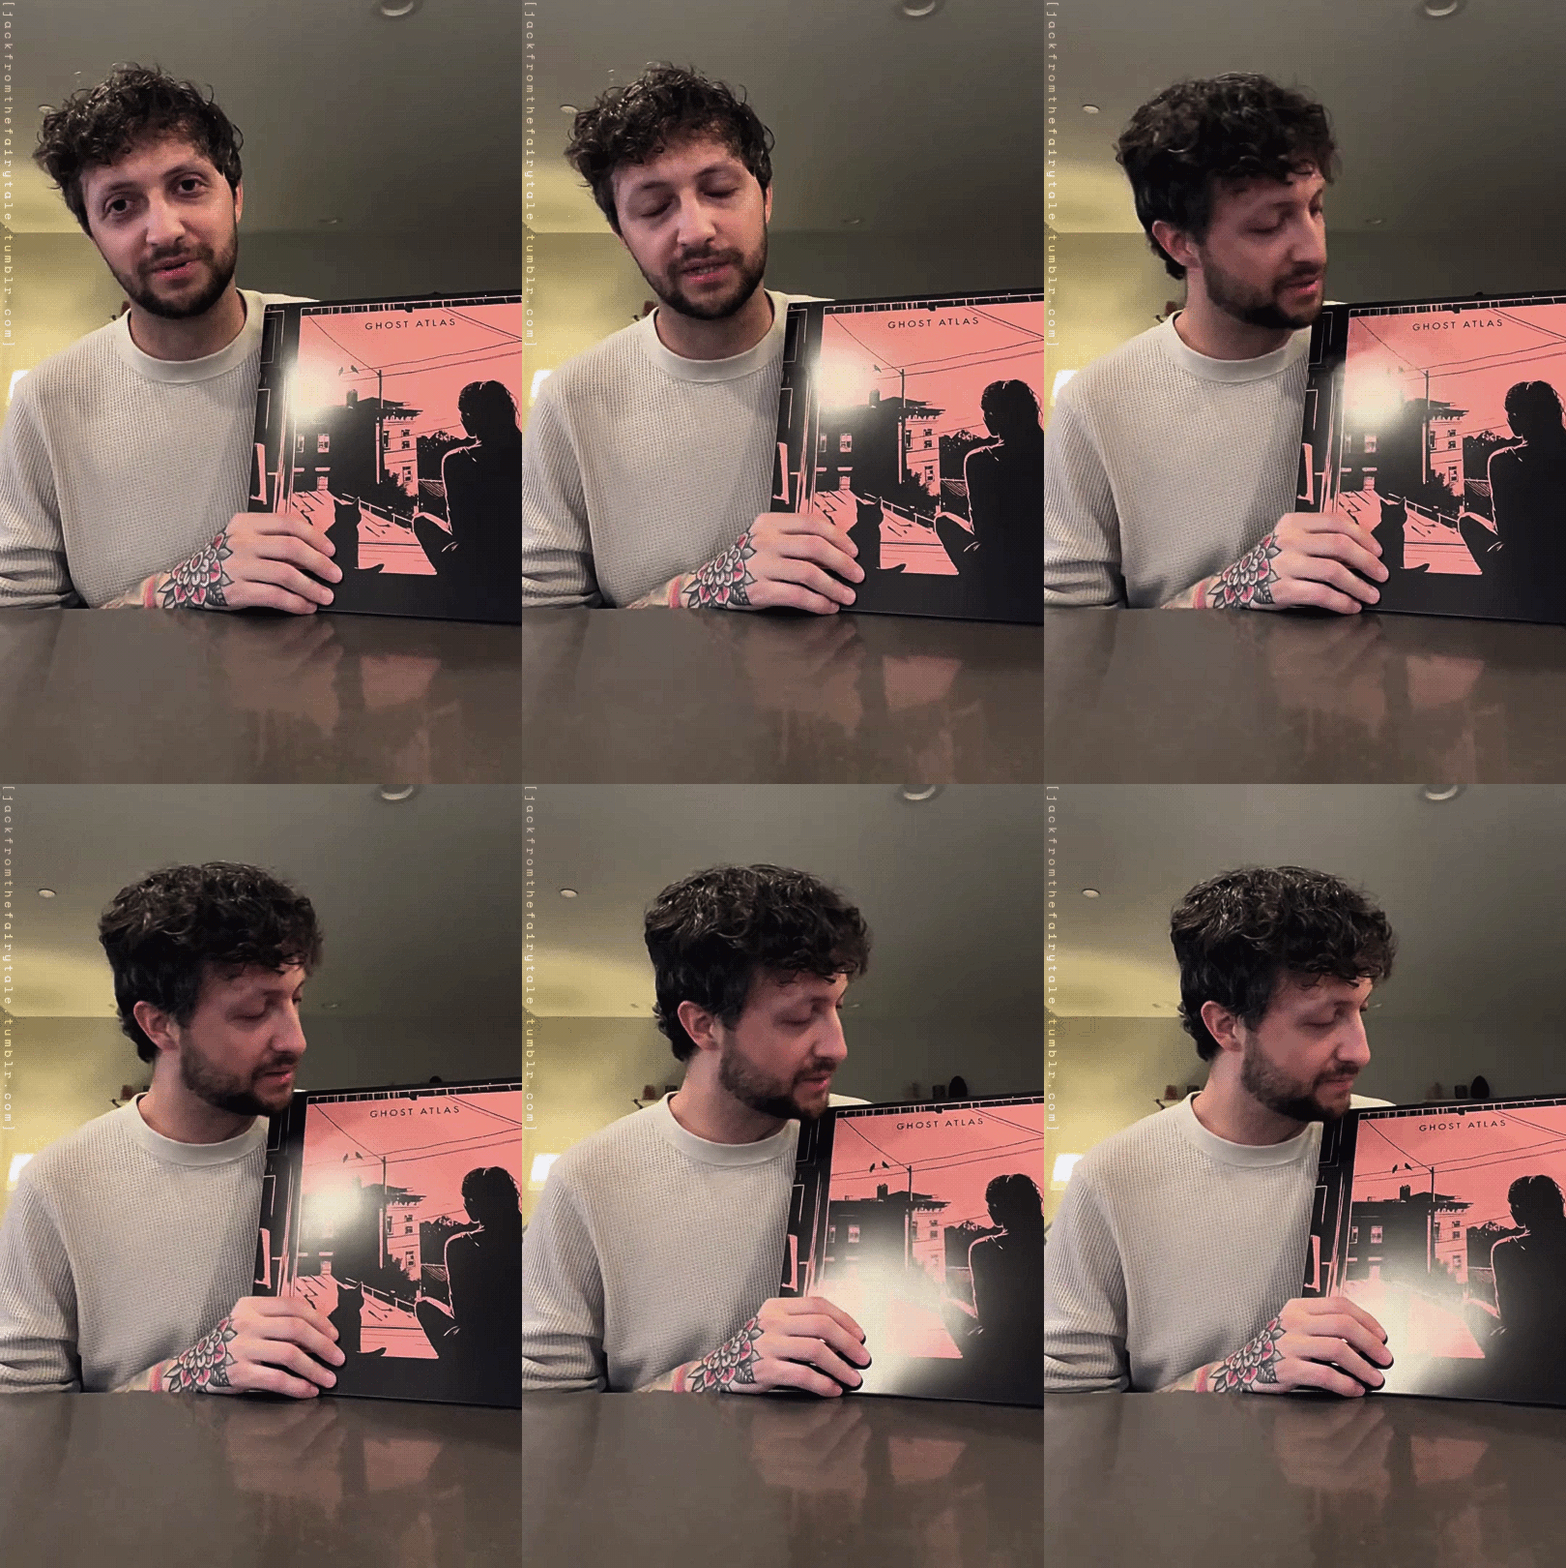
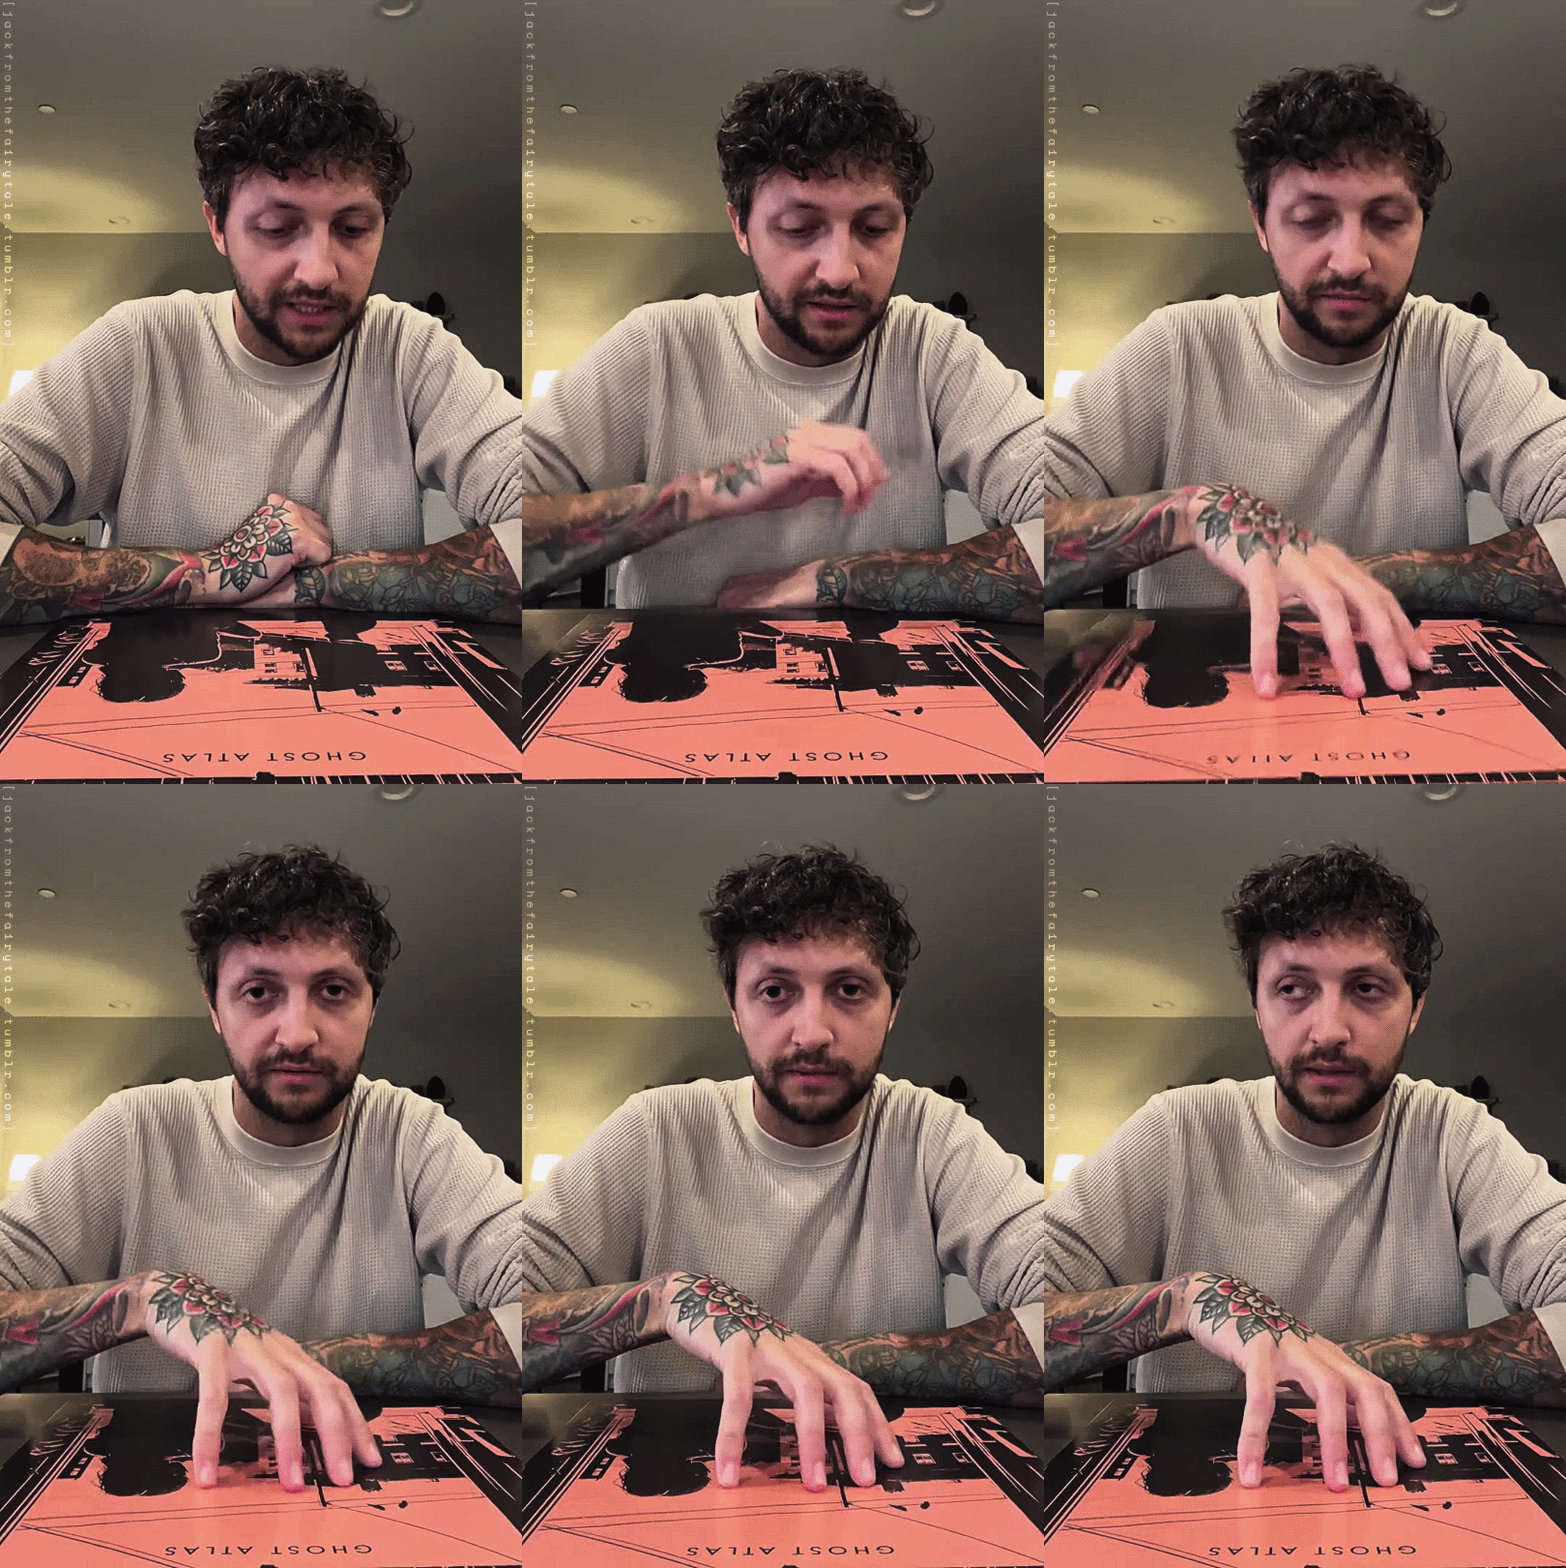
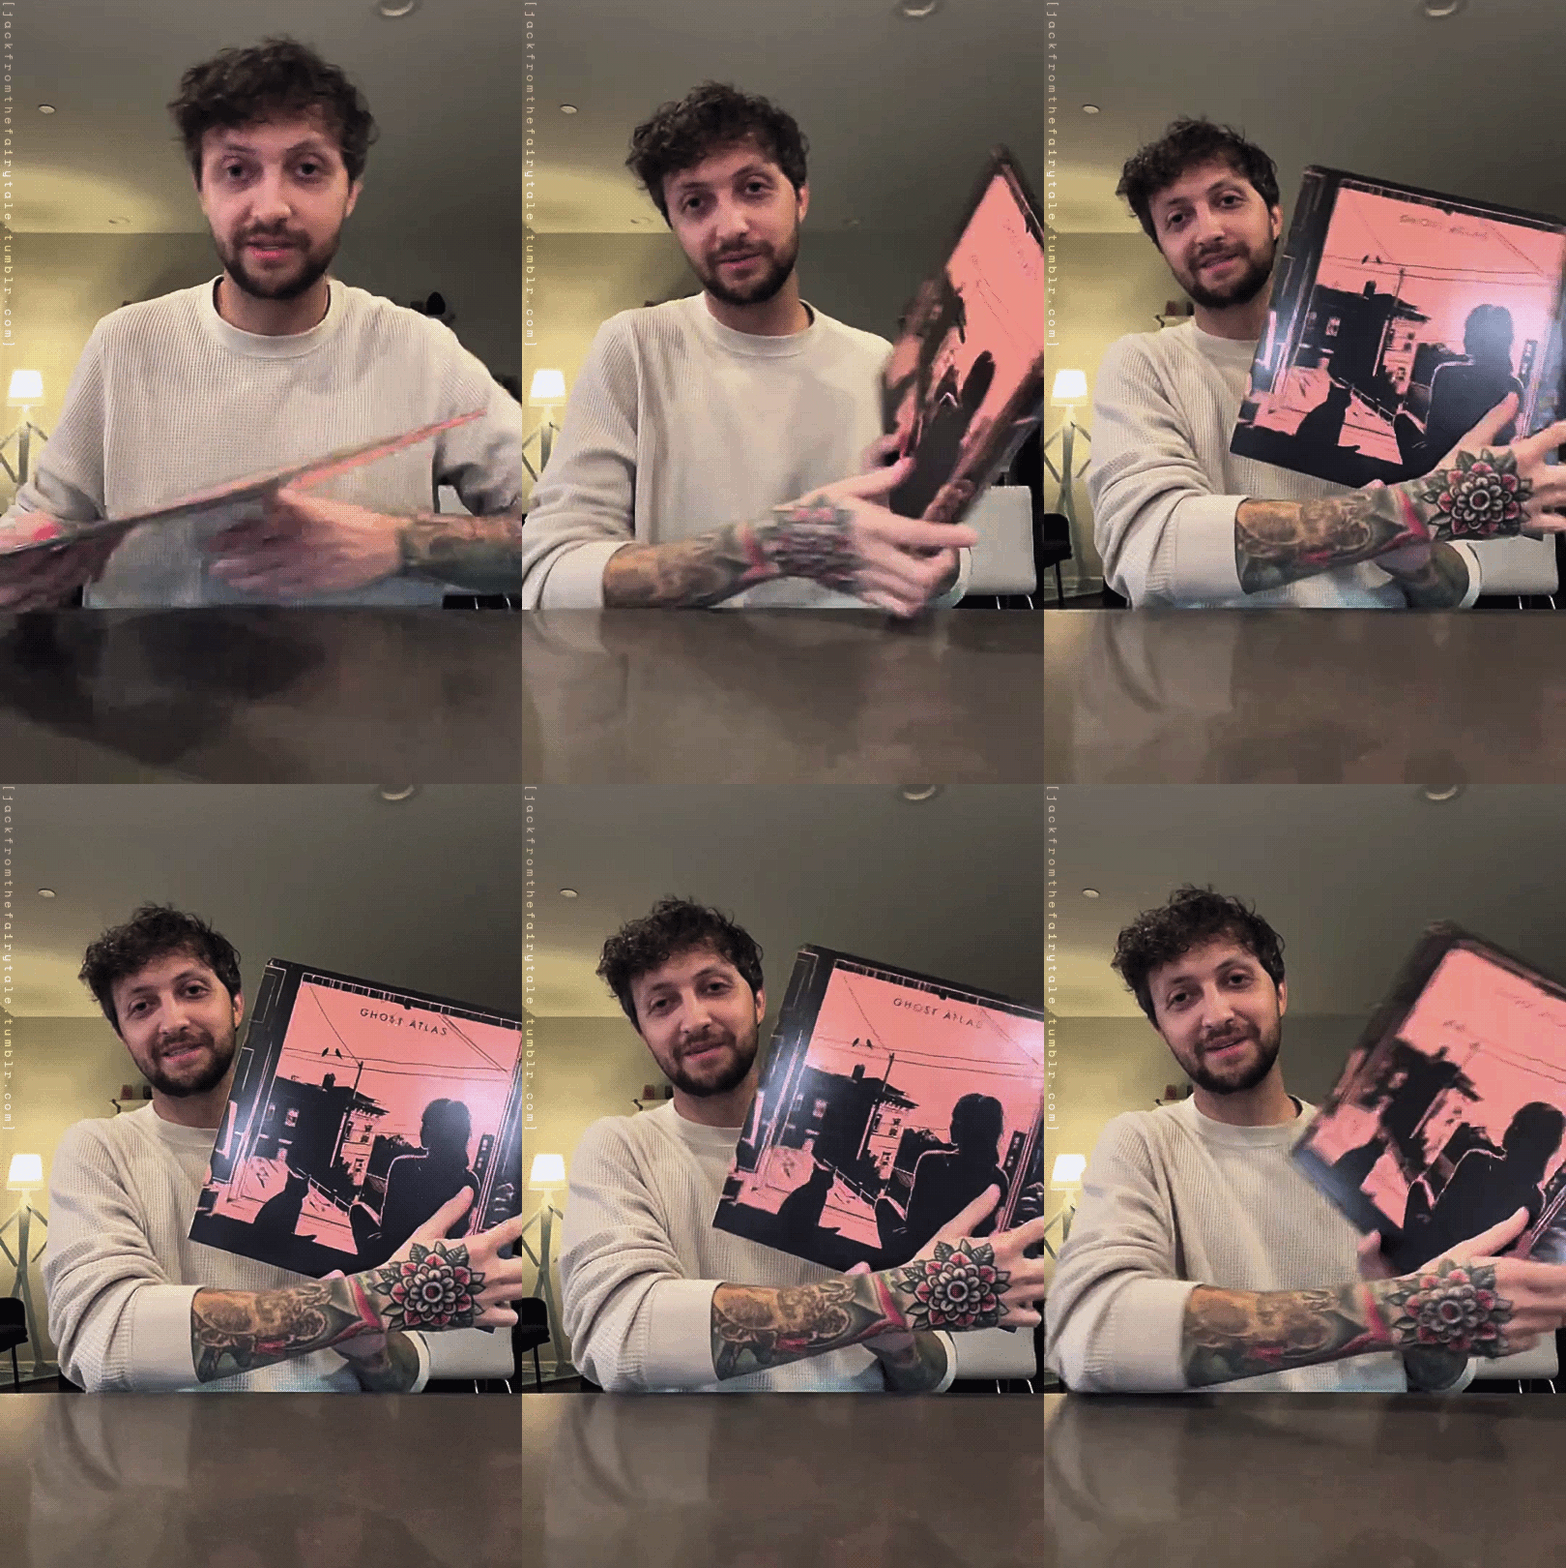


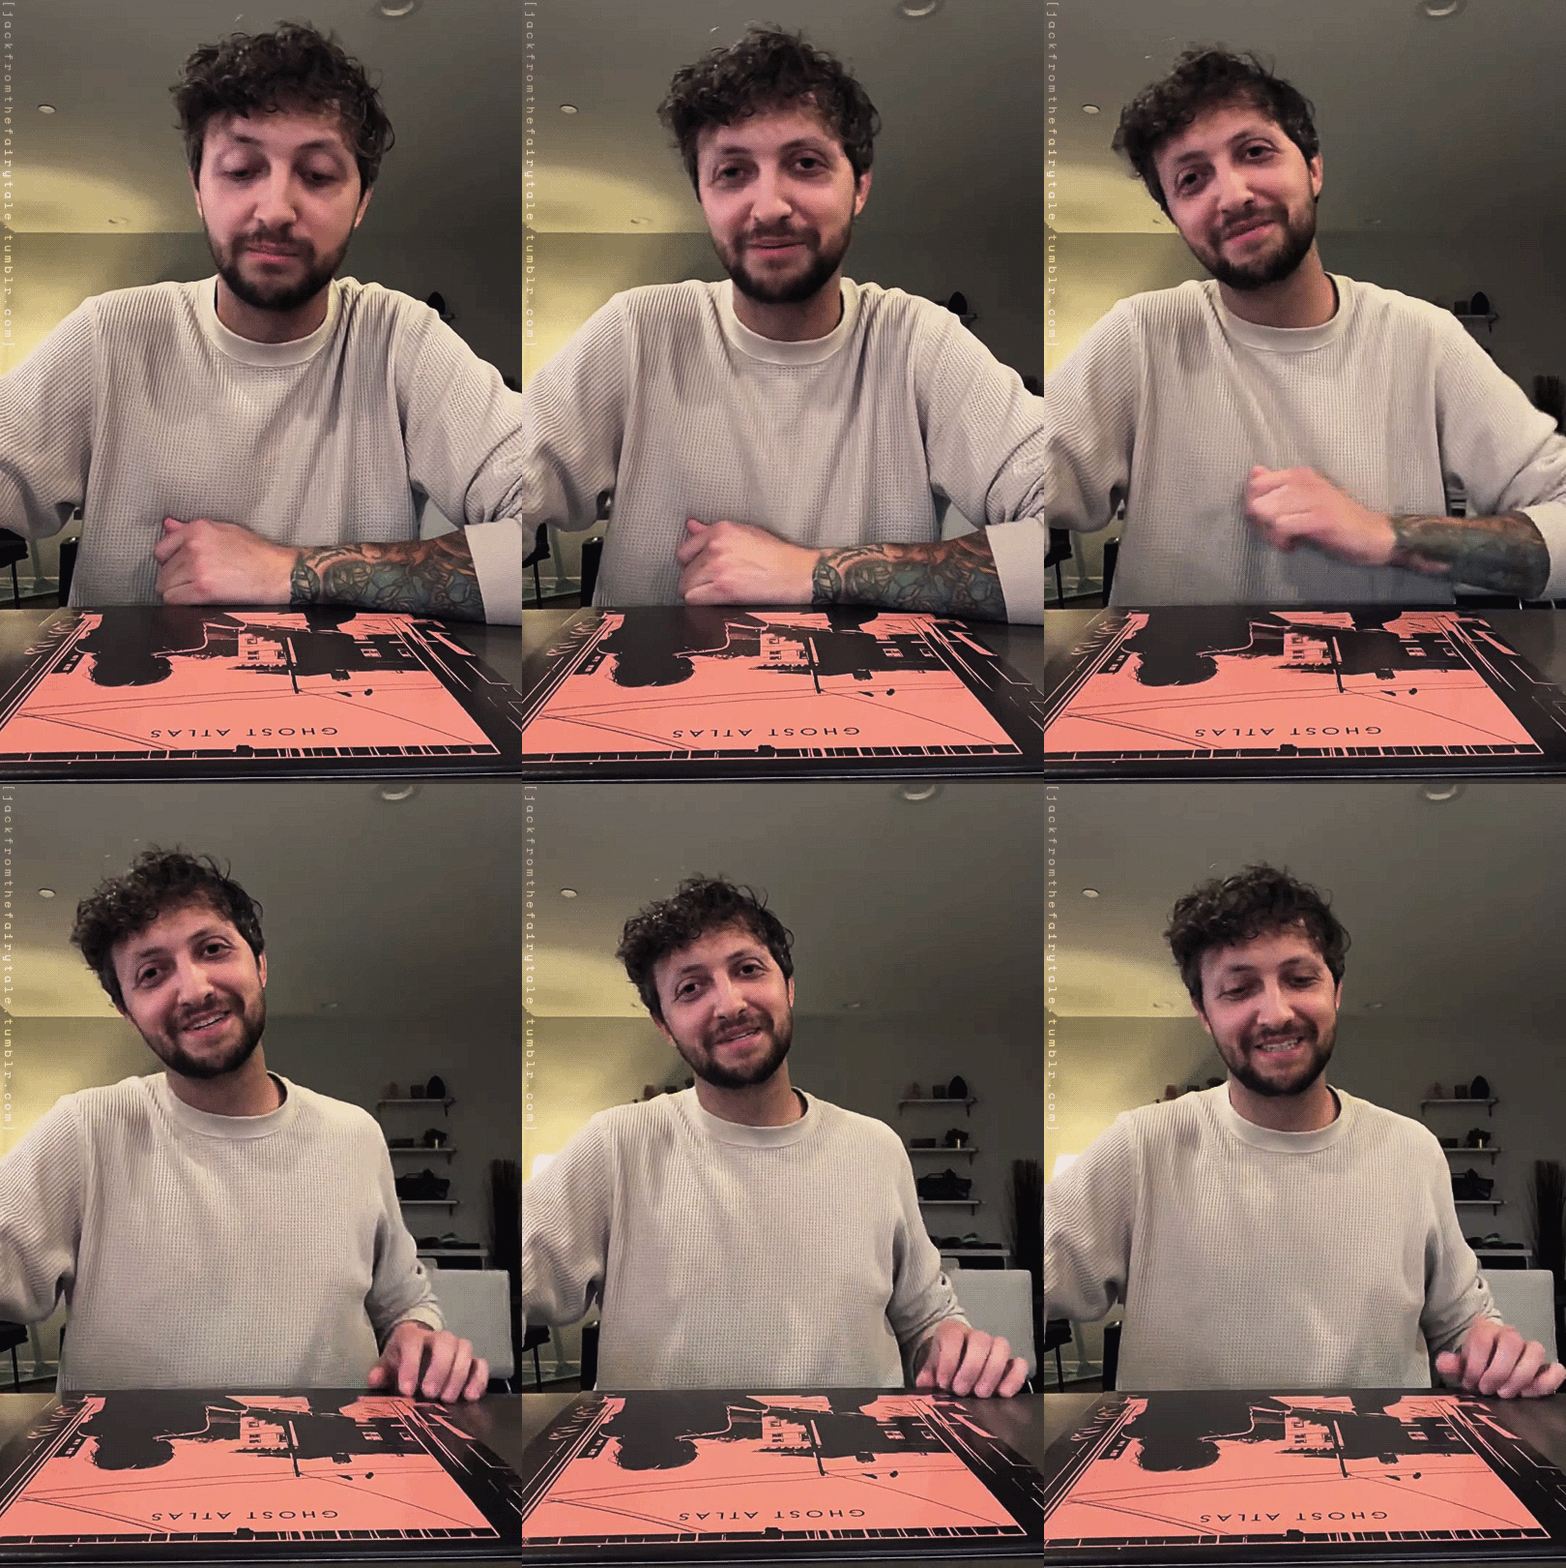
IG: jesse_cash/ghost.atlas - On releasing Dust of the Human Shape
#jesse cash#ghost atlas#kiran.gif#i listen to this album too regularly to not gif his 5 min long ramble on instagram reels#these are also full size (540 width) so you can click for full if you want sorry if the set causes the app to lag
93 notes
·
View notes
Note
how do you make your gifs?
hi!! I use photopea.com, which is a free version of photoshop. essentially my process is:
I have a mac, so I use screen record to get a shorter clip of the portion of the video I want to gif
then I trim the clip down to multiple clips that are about 3 seconds each. this is to deal with tumblr's size limit - if your clip is too long, the quality of the gif will be reduced when you upload it
I upload the .mov file to photopea; it'll ask for a frame rate, I typically put 20 FPS, but play around with what looks good to you. higher FPS means a smoother gif, but this does increase the size of the file
adjust brightness, contrast, vibrance, saturation, other coloring adjustments
crop the whole thing to fit tumblr's size requirements -- if I want it to fit the whole width of the post, it's 540 pixels width and 300 height if I want to keep the ratio of a youtube video. If I want it to fit half the width, it's 268 width 150 height, but obviously play around with it if I want a different shape/crop.
select all the layers and go to filter > sharpen > smart sharpen. this makes it look less blurry. I use 130% and 1.2 for the settings
then I add captions! I use open sans bold italic for the font, if it's a full size 540x300 gif, I use size 15 font. if it's a half-width gif, I use something like 11-13 size font. I move this to the center at the bottom and leave 15px of space at the bottom
I also add a little black border to the text so that it's easier to read. I do this by right clicking on the text layer and going to blending options. I select "stroke" and set size to 1 px, and I select "drop shadow" and set opacity to 100%, angle to 120, distance to 5px, spread to 13px, and size to 5px.
for watermarks I use 10px font size and reduce the opacity and fill of the layer to 50%
Then I go to file > export as gif. this will take about 30 seconds or so to load, and then you'll see a preview of your gif. I slow down the speed to about 70% so that it looks less choppy. and then depending on the final size of the gif, I go back and remove some frames from the beginning/end of the gif to make the gif size a little smaller. I try to stay within < 5MB so that the quality looks ok on tumblr. I think tumblr's limit is 3MB but if it's bigger than that they'll just compress it.
I've reblogged a few posts that helped me get started and I've pulled different steps from different posts that I use for my process. you can find all of those posts on my main blog here: floristjimin.tumblr.com/tagged/gifs
if you have specific questions about any of the steps or how to use photopea, feel free to ask, I am always happy to help!
4 notes
·
View notes
Note
Yo, what do you use to make your Gifs? Seems like everyone else has gifs that look amazing. Even on my highest "quality" setting. They still post looking like a bunch pixels that wants to know if it looks like it knows what a Jpeg is.
Hey! I'm not sure about the exact result just from the description lol but gifs can turn blurry or lower quality because of various reasons. On Tumblr, it might be caused by the dimensions of the gif. For one gif on a row, the max size used to be 500 pixels, now it's 540. (This post has a quick overview.) If it exceeds that width, the gif will appear more blurry. Tumblr also compresses gifs if the file sizes are between 5-10 MB, though I have no idea how/if that effects the quality tbh.
The size of the video/screenshots you work with is also important. Since I have a copy of HoA, I record my own gameplay of it with 2304 x 1440 dimensions. An 8 min video with those dimensions has a file size of like 1 GB, and 1 screenshot has a file size of 1-2 MB, but it helps being able to gif only a small part of a scene and with image quality in general. Tbh I'd love to freely share either video or screenshots with other folks for editing purposes, in a way where people can just nab them if they wanna, but the file sizes make it difficult.
Probably unnecessary to add, but anyway: within the game, you can also set various image quality options to a higher or lower quality, so if your computer can handle it I recommend putting those settings as HQ as they can go.
Another important factor is not to oversharpen or undersharpen the images. If I crop out a lot of the canvas I usually sharpen it once, and if I keep almost the full image in the gif I sometimes sharpen it twice (in steps, eg first reduce the image size from 1400 x 1400 to 950 x 950, sharpen, then reduce the image to 540 x 540 and sharpen again). But that really depends on how the final result looks. More advanced folks use more detailed ways of sharpening (such as Smart Sharpen... or Unsharp Mask... in Photoshop) but personally, I stick to regular sharpening since it looks nice enough too and it's 1 click, as opposed to sliding the bars around to find the exact result I want.
I don't think doing 1 of these points wrong will lead to a horrible quality, but combining all of the bad points may lead to very blurry or pixelated gifs.
For recording I use what Windows has (by hitting Windows + Alt + R), for screenshots I use VLC media player, and for editing PS.
And for anyone looking to get into editing or giffing without PS: Photopea is an online website that emulates a lot of PS functions. The gif and text functions are sadly still a bit limited compared to PS, but it's free, doesn't even require an account, and it does incredible work imo <3
Lemme know if anything's unclear or if you have any other questions. (Same goes for other folks, I love seeing people's HoA edits, and if I can help anyone looking to start with that process I'm happy to)
4 notes
·
View notes
Note
Hi Laurie! First of all, I LOVE your blog! One of my fav Jake blogs ever! I love your writing and your gifs too. I wanted to ask, if you don’t mind sharing, what program do you use to make gifs? How do you edit them? I’d love to learn to make gifs but I don’t know how. Thank you so much!
heyyyyyy! thank you so much, that's so sweet of you!!! 💖
i wish i could link you to an easy tutorial that would answer all of your questions, but i don't even remember what i used when i started to make gifs some time in 2020. it's a lot of work, it takes a mountain of patience, but ultimately it's so nice to make your own gifs. you create your own material of whatever you want (or well, whatever you find content of). and the little boost of pride when i post a fic i've written that includes a gif i've made too? oof, i like it 🥰
my method has just grown more and more archaic to try and adjust to tumblr's gif size issues, to new features and blah blah blah. let me try to roughly explain it though! i don't have the skills to write a proper tutorial of my own, i'm so sorry! but thank you for stopping by to say all of these nice words! 💗
i have like 3$ and a sticky caramel candy in my wallet so i don't use photoshop (there is a BUNCH of tutorials on how to make gifs properly using photoshop, i'd suggest googling it and seeing who on tumblr have posted about it if you have access to the good stuff) plus my poor laptop could never survive such a thing. my technique is definitely not the fastest or the most practical, it takes hours to make a handful of gifs. first, i prefer to use high quality youtube videos that i download (i tried screen recording but the website i used just died so back to youtube clips i go! rip making gifs of jake movies outside of the trailers it was fun while it lasted). then, i use ezgif to make gifs! you can edit gifs directly through ezgif, it's basically built for that. this is what i used at the beginning and it was very effective. now that i'm making so many more gifs and i'm a tiny bit more comfortable than i was at the beginning, i turn to photopea. after cutting my chosen youtube video into gifs, i'll take that gif into photopea to edit it.
the key element that i edit is the size, tumblr has very precise sizes for image content if you want them to display properly. 540 px wide for full width gifs or 268 px for gifsets that have 2 gifs next to each other. so i try to resize and crop the gifs to make them fit the proper sizes. BUT tumblr has a size limit of 10 mb per gifs, so it can get tricky. i also like to make a gif sharper or brighter. i'm not skilled to make beautiful colourings (plus, photopea isn't very suited for it since a lot of colourings use features that aren't working in photopea but they are present in photoshop) and i don't know how to use most features to begin with so i stick with what i know. like curves? what the fuck is a curve. so yeah, i stick to the features i use regularly. then i export the gif into, well, a gif and i can post them on tumblr.
obviously, using photoshop is best. ezgif is amazing for what it is, same for photopea, and they're both free!!! but they don't produce the highest quality content. i remember back in 2020 when i looked at different people's gifs that were made with photopea, there was a VERY clear difference. even for people with a lot more skills and experience than i do, i've noticed that the gifs always have a level of blurriness and a pixelated aspect that can't be erased. the gifs almost look fuzzy instead of crispy? i don't know how else to describe it, but it's a never ending grief of pretty, crispy gifs. i've learned a lot through googling every little thing and function, but also through trial and error. i'd click through different functions and features and i'd see what happens (do this one step at a time, take notes too! i used to take notes of many little details at first so my gifs stayed a bit consistent). sometimes it works, sometimes you've spent hours on something and you have to delete it and abandon the project. it happens and it's normal.
i'm absolutely NOT tech savvy, like it's actually depressing, so i genuinely mean it when i say that if i can learn to make gifs then anyone can. i wish i had the talent and equipment and money to make the cripsy gifs of my dreams, but i still try my very best with each gif i make. i try to respect the limits of my poor laptop that cries for help after an intense 15 minutes of work, but i also try to respect my own limits. i gif for myself first and foremost. i gif what i want to gif. i gif stuff that makes me happy because now i can look at this short little clip move on loop forever. i suggest you start small, like with a quick video, with a few gifs and see what happens! at best, it works! at worst, it didn't but maybe you learned one step and it will be easier next time! starting small is my best piece of advice. i was way too ambitious at the beginning and i highly regret it, you can get burned out so quickly just like with any other creative project. it's okay to struggle, it's okay if it doesn't look as good as you wished it did. making gifs is not easy, but it's absolutely worth it. i've got my pompoms out and i'm cheering you on! like i said, if i've managed to spend hourssssssssss making hundreds of silly little jake gifs during the last few years, then you can absolutely create one gif that you're happy with! good luck with your giffing journey and thank you so much for your sweet words in your message! 💖💖💖
1 note
·
View note
Note
your gifs are so good!!!! how do you make them?
thank you so much 🫶 the short version of the story is that i usually use 4k footage, cut the video into a 2-4 second moment, crop it close enough, resize it, turn it into a gif in photoshop, slow it down and post here
full guide under a read more
here i will be going into full detail on how i make gifs. do i need to do this? no. do i want to do this? yes.
i use a macbook and photoshop, so things will be different if you use a computer with some other operating system and/or an alternative to photoshop, but i will still give tips that might be applicable to all. i will first show you how i make a normal gifset with two adjacent gifs and then how i make one that's one clip in two gifs
individual gifs
find a video you want to make a gif out of. i mostly use videos i've filmed myself because i have an easy access to them in great quality. you can also use someone else's videos, but please remember to give credit and source it back to the original video. it doesn't hurt to ask for permission either.
cut the video into a 2-4 second clip, and crop it. some things i recommend taking into consideration when doing this are not cropping at joints, remembering the rule of thirds and preferably not cutting the clip mid-movement. for the ratio i like to use 3:2 vertical or square. i always save the clip as a different clip.
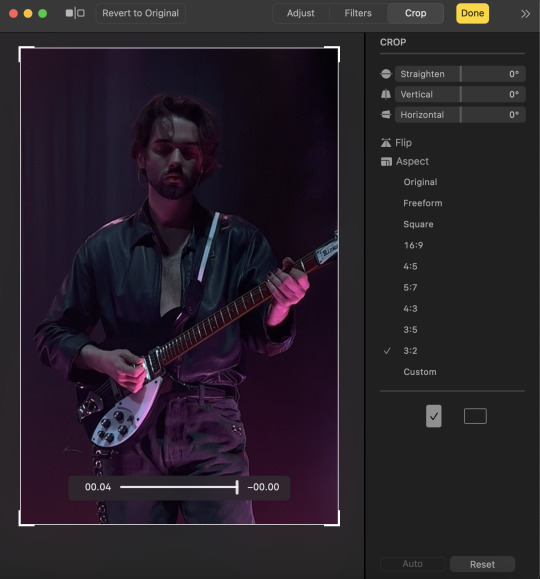
3. open your small video clip in photoshop. first of all go to image > image size. for the individual gifs the image size is not that important, but for the sake of this tutorial i scaled this to the optimal tumblr photoset size, in which the width is 268 pixels for two adjacent gifs/photos. (for three adjacent photos it is 177 | 178 | 177 pixels)
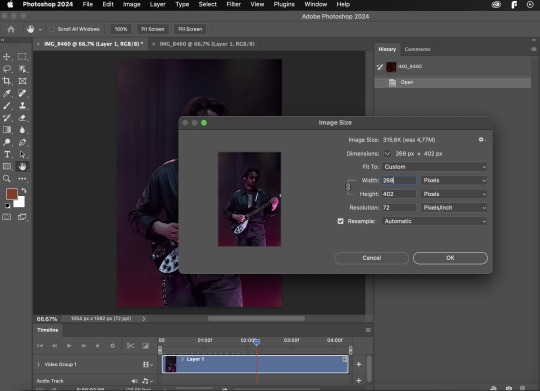
4. then go to file > export > save for web (legacy) to make it into a gif. now save it in this window.

5. close the file and open the gif you just made. now the bottom bar should look a bit different, there's individual frames instead of the video bar. i like to slow down my gifs, so i select all the individual frames, click at the three dots and the downwards pointing arrow, and adjust the delay from other. the delay for this gif on default was at 0,03 seconds, so i set it to double the time, 0,06. if you want to sync the gifs, make sure that the delay and the number of the individual frames match with all of your gifs. if not, just delete some of the frames from the ends.

6. i then went on and exported it again using save for web (legacy). there's no need to change any settings, just save it as is.
7. post your gifs on tumblr. i like to use an "x" to link the source video. use the tags you feel are necessary and remember to tag triggers like flash warning if needed.
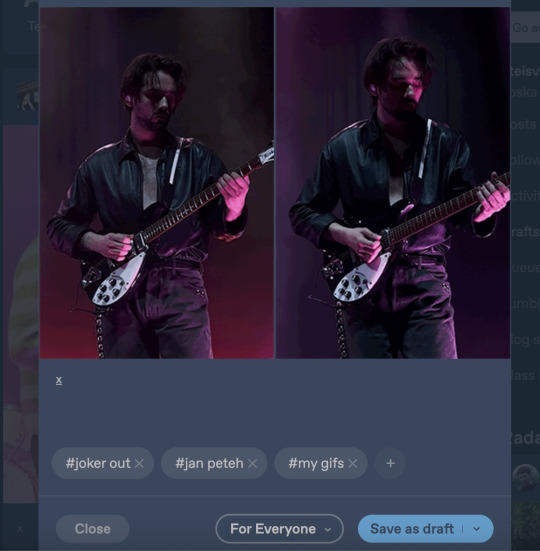
you can find the final look of the gifset right here
gifset out of one clip
now if you want to make a gifset out of one clip, it's mostly the same process. i don't want to make this any longer than necessary, so i won't be explaining the same things again. i'll just tell how it differs.
same as the individual gifs
mostly the same, but for this one i use horizontal 4:5 ratio
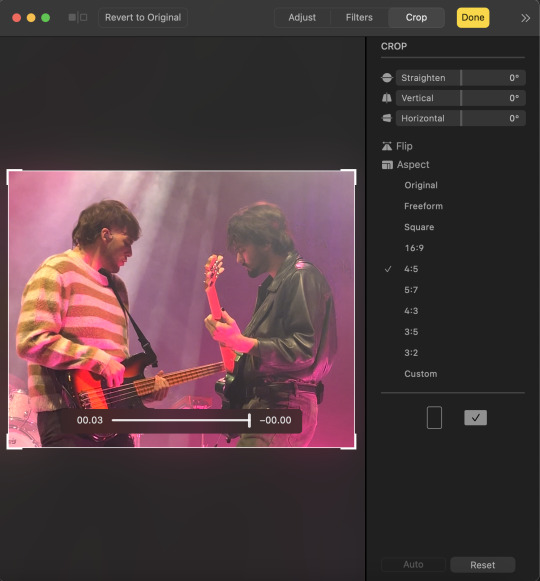
3. now the image size gets more important. for two gifs you need to scale the width to 540 pixels (268 times two + 4 pixels for the space between the gifs, the margin). the gifset will look wonky, if you don't scale it accordingly.

3.5. THIS IS A NEW STEP crop one side of the image to 268 pixels (the picture in half minus two pixels from half of the margin) and press done
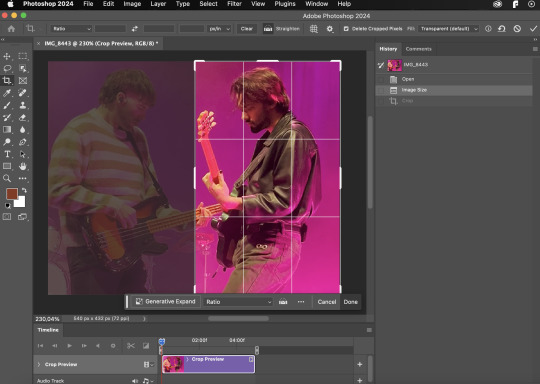
4. save for web the same way you would do in the previous guide. don't close the window under just yet

4.5. THIS IS ALSO A NEW STEP undo the cropping and now crop the other side, also the same 268 pixels and save it again the same way you did the first one.
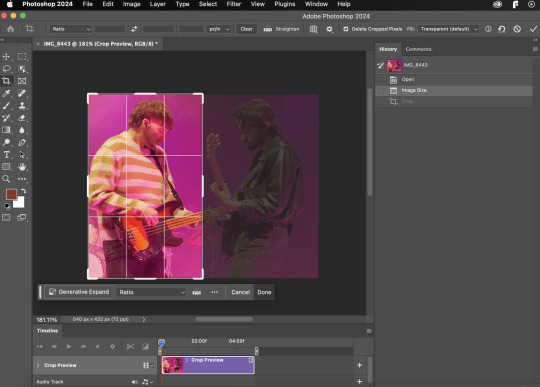
5. this step is also mostly the same as the first one. open the gifs you just made, not the original video. just remember that if you do delete some frames, delete the same amount of frames from each end so that it's still in sync. and the frame rate for this video was better, so the delay was 0,02 seconds per frame by default and i slowed it down to 0,04 seconds. repeat the process for both of the gifs.

6. same as in the first guide. export them both on save for web (legacy)
7. mostly the same as in the first guide. post it on tumblr. now at least on desktop you can see that the margin (4px) is now nicely in proportion with the pictures. if the gifs do go out of sync when you're posting it, it's no big deal. you can just save it in your drafts and go look at it and it should be in sync when both of the gifs have loaded.

you can find out how this gifset turned out here
i know this turned out long and i probably didn't need to do any of this, but i actually had fun doing it and i hope that at least someone found it useful! please feel free to comment or message me if there are any questions :)
1 note
·
View note
Text
in case more people want to know! 💖
optimal gif widths:
1 gif per row: 540 px
2 gifs per row: 268 px | 268 px
3 gifs per row: 177 px | 178 px | 177 px
gutters are 4 px.
generally, bigger gifs put into smaller spaces (e.g. two 540 px gifs next to each other in one row) will look just fine when sized into the smaller spaces by tumblr, and you can click to enlarge them. like here, i've put three 268 px wide gifs next to each other, and the quality is fine:


in browser, in-line gifs (or photos) wider than 300 px will be stretched to full post width (540 px) like the first example by op, affecting the quality, while gifs/photos with a width below 300 px will be shown as they are. in the app, they all get stretched (at least in my experience).
examples below: first gif (discord sticker) is 320 px wide and gets stretched, second gif is 268 px wide and stays original size. in my app, both get stretched.


heights don't matter in terms of quality unless you're putting gifs of different heights next to each other, in which case the taller gif will be cut off to the shorter gifs height (as you can see below, cutting off the subtitle of the second gif). you can still click the gifs to see the full versions.


so if you're making a gifset, it's better to have the gifs of the same height ✌️
also, tumblr's file size limit for gifs is 10 MB.
hope this is a little helpful to someone 💗
Not me finally realizing I could turn this:

To this:

Just by sizing it better for Tumblr😭😭😭😭 The only difference between those two gifs is that the 1st one is 350x350px, the second is 540x540px. The drop in quality from my computer to tumblr makes so much more sense, now. What a difference it makes, hot damn.
#sorry for hijacking your post op i hope it's ok#gifs#gifsets#every day i dream of a higher file size limit. like 15 MB#but at least we aren't in the max 2 MB days anymore
80 notes
·
View notes
Photo
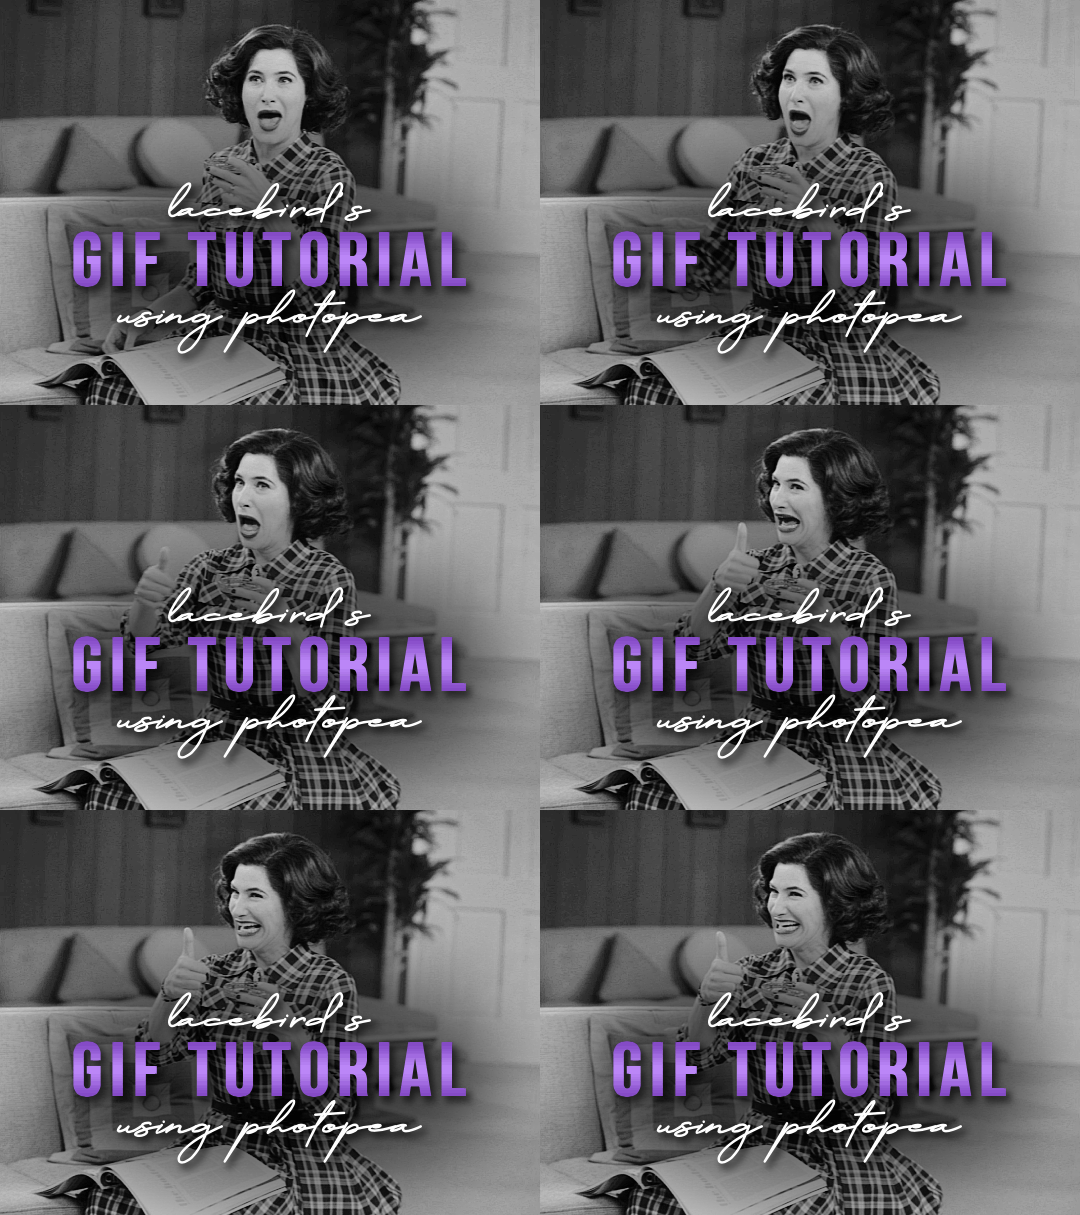
💜 HOW TO MAKE A GIF WITH PHOTOPEA 💜
Hey everyone! I recently got asked to do a tutorial on how I make my gifs. I know that many people (such as myself) don’t have access to Photoshop for various reasons but they’d like to get into gif making. When I started making gifs, I only had a free trial of Photoshop, but when that ran out, I had to find another way to make gifs. Enter Photopea! A free, web-based software that you can use anywhere and that works just like Photoshop!
In this tutorial, I’ll teach you how to make a basic gif like the one I did above. I use a macbook air, but it should be doable on a regular pc too!
If you found this helpful, feel free to share it with your friends! The tutorial can be found under the cut below 💜
THINGS YOU’LL NEED
A browser (I switch between Safari and Chrome, more about this later)
A screencapping software (like MPlayer OSX Extended) or, alternatively, a presentation program like Keynote or Powerpoint.
A program to screenrecord or a program that let’s you download from YouTube
Lots of patience bc gifs are annoying little shits <3
1. GETTING A VIDEO BY SCREENRECORDING
First things first, you need to have the clip you want make a gif out of. There are plenty of ways that you can get them. I’ve seen some gifmakers say that they torrent entire movies and gif from that. The way I do is I screenrecord the part I want to gif directly from where I’m watching the movie or show (like Disney+ or Netflix [or something like 123movies if you’re a pirate 🏴☠️)]). That way, I don’t have to download the entire movie and I have just the part that I want.
To screenrecord, I use my macbook’s built-in program called Screenshot.
Open the program by pressing ctrl + command + 5 on your keyboard and you get these funny little buttons.

Click on the button that says record entire screen. The program is now recording your screen. Play the scene and make sure you expand the video into full screen so you get a full resolution. When you’re done, click the stop button that is at the top right of your screen (next to the wifi and battery symbols.)

If you don’t have Mac, I suggest you look into how to screenrecord on your computer, as I don’t know how other operating systems work. Sorry!
1B. GETTING A VIDEO FROM YOUTUBE WITH CLIPGRAB
Another way you can get videos is from Youtube. I use a program called ClipGrab for this. Download and open the program. You’ll get this window

Simply paste the link and chose the highest quality, then click ‘grab this clip!’. Done!
2. SCREENCAPPING
After we’ve obtained the clip we wanted, we can do this two ways. The first way is to use the program MPlayer OSX Extended. Here’s a tutorial on how to set it up, make sure you do this if it’s your first time using the program. Make sure that you have a special screenshot folder!
Open MPlayer, then go to file > open and find the video of the scene you screenrecorded or downloaded. MPlayer will now play the video. Use the left and right keys (< and >) to go go backwards or forwards 1 minute, but try not to move around too much because the software crashes if you do. If that happens, just click the reopen button when the popup comes on, and reload the video again.
When you’ve gotten to the point you want in the video, press the command + shift + s buttons at the same time and the program will now take a screencap of every single frame until you stop.
If everything goes smoothly, you should find all your frames in your screenshot folder that you’ve made before when setting up the program!
2B. USING A PRESENTATION SOFTWARE TO MAKE A GIF
If you want to skip the screencapping part and you want to have a fully completed gif, you can do the second option. That’s what I used to do before I got MPlayer. In my experience, it’s a really fast way to make a gif, but the quality isn’t really good.
Here’s a tutorial on how to turn a slide into a gif in Keynote.
Here’s a similar tutorial on how to make a gif on PowerPoint.
Basically, you make sure that the size of your presentation is the same as your video, and that you make sure to export one slide into a gif. Also make sure that you export in the highest quality!
3. LOADING THE FRAMES IN PHOTOPEA
Finally, we can start giffing! As I said at the start, Photopea can be used anywhere, but I switch between Safari and Chrome. The reason why is that if I upload the frames in Chrome, the frames will be out of order. In Safari, that doesn’t happen, but the downside is that once I start editing, Safari will reload the page because it takes up too much memory.
So, first I go to photopea.com on Safari. I click New Project and put in the same dimensions as the screencaps (in my case, they are 1440x900 px). You’ll get an empty project.
Then click file > open & place and select your screenshots. Wait until Photopea has loaded all the frames, then, at the speed of light, quickly click file > save as psd before Safari reloads! You’ll find it in your folder where all your downloads are.
Next, I open Chrome (I use the incognito window because I have adblock on my usual Chrome, the program won’t work as usual if you have it enabled) and I click Open From Computer, locate your saved .psd file that you saved from Safari.
Now, you’ll see all the frames as individual layers. Select everything by clicking on the first layer, then golding the shift button and clicking on the last layer. Press command + G to group the frames into a folder. Here’s how everything should look after you’ve grouped the layers.
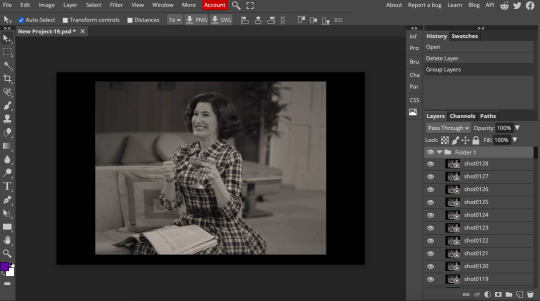
^^ See how Agnes approves! Agnes things you’re going a great job!
Now, it’s time to crop the gif and get rid of the black borders. Making sure that the folder is selected, click on the crop tool (or press C) and click on Fixed Size

W is Width and H is Height, write in your sizing here. Tumblr’s max width is 540, so I put the width as such. For the height, I use 405. Then you just drag the corners until you’ve selected the part that you want, like this
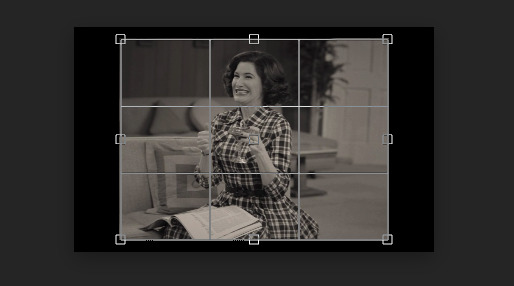
Press enter and the image will be sized down 540x405 px.
Now, our gif looks like this after cropping!
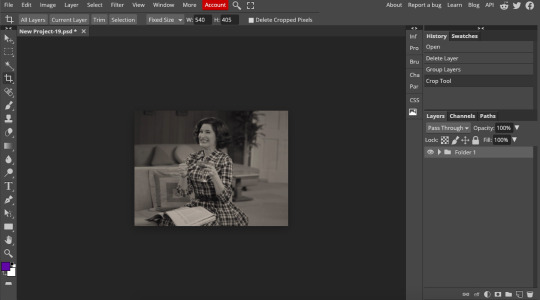
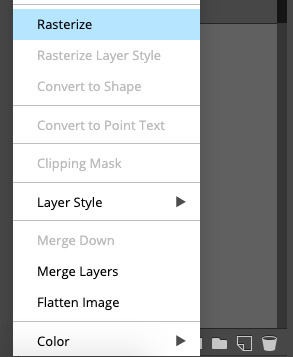
Open the folder so you can see all the layers. Select all your layers and right click on them, then click rasterize.
Then, go to layer > animation > make frames. You’ll now see that each layer begins with _a_ - this is crucial because this is how Photopea knows that the layers are part of a gif. If your layers don’t begin with _a_, then it will not play as a gif
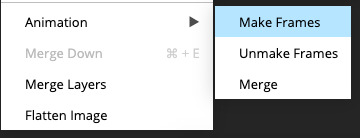
If you instead already have a gif done, all you have to do instead is simply click open from computer when you first open Photopea and load your already finished gif and it’ll have the _a_ at the start of every layer. You won’t have to go through the steps of loading your frames into a new project to make your gif as it’s already done and in a folder :) Just start cropping once you load it
You can preview your work by going to file > export as > gif. Make sure to change the speed in the preview window until your gif plays the way you want it! I put my speed at 500%
4. SHARPENING
Hooray, we now have our gif! But to make it look a little nicer, it’s good to sharpen it. I always use Smart Sharpen when I sharpen my gifs, and many other gifmakers use that too. It’s really good :D
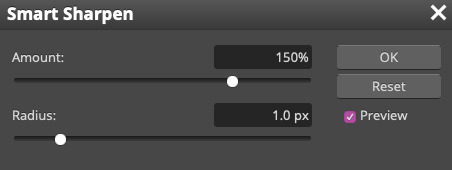
To sharpen your gif, again, make sure that all your layers are selected. Go to filter > sharpen > smart sharpen. I use two different settings for my gifs, it really depends on the gif.
Setting 1 (which is the default setting)
Setting 2
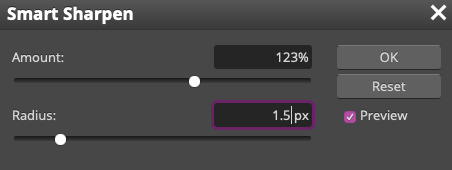
Again, it depends on the gif, play around until it looks good to you!
Here’s our gif after sharpening it
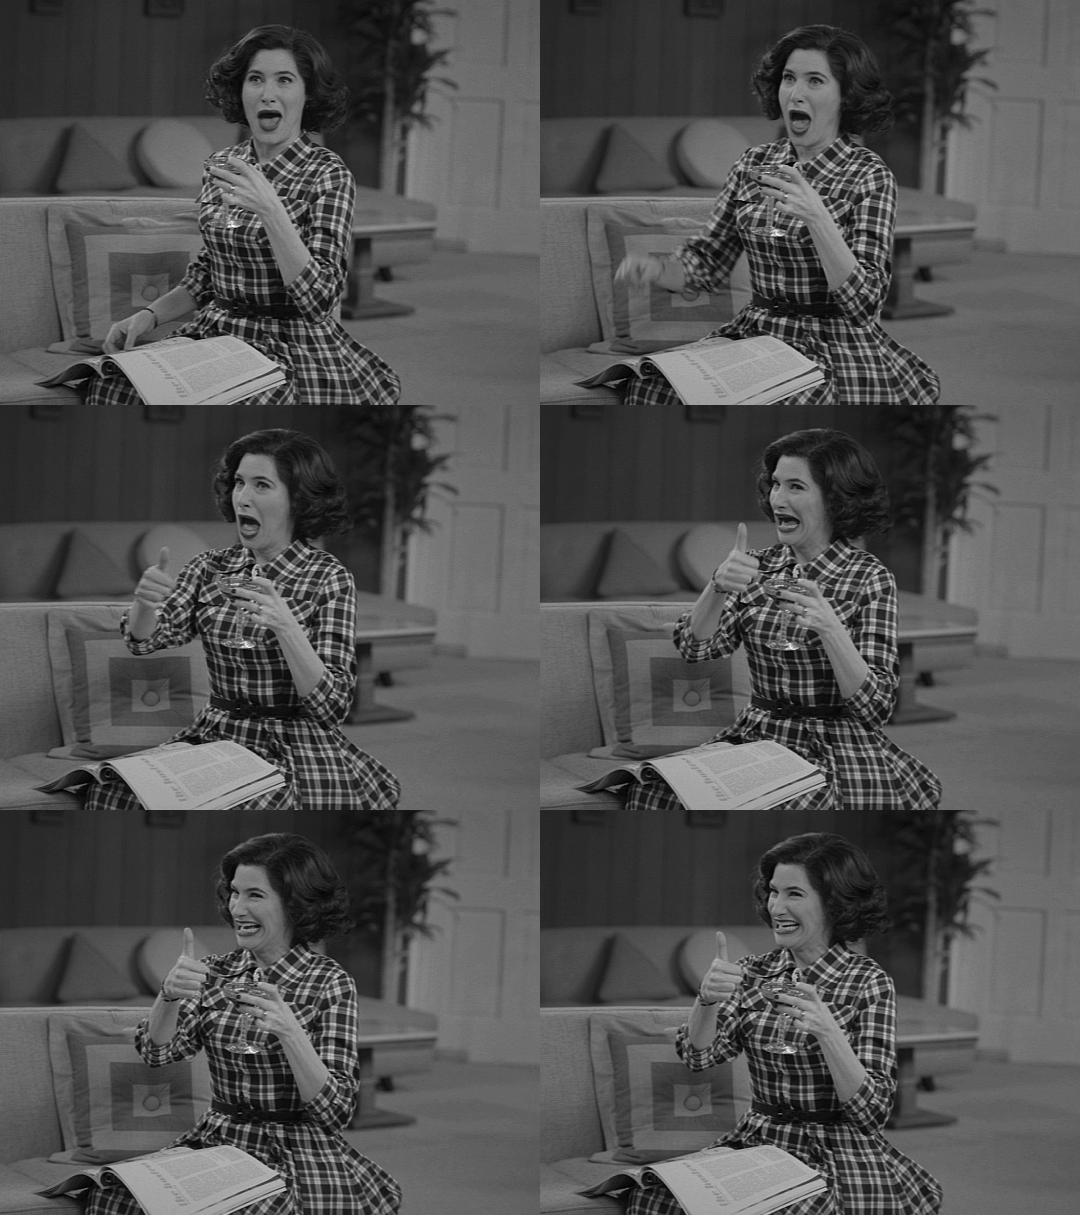
I ended up deleting the last few layers as the gif got bigger than 10mb (that’s Tumblr’s file limit, it your file is bigger than 10mb, it won’t upload). I also added a gradient map and it made the file size smaller, more about that in the next segment!
5. COLORING
Here’s the fun part! Now we get to play around with the gif, making it brighter and look Extra Nice™! Since this is a black and white scene, I make sure that the blacks and the whites really pop.
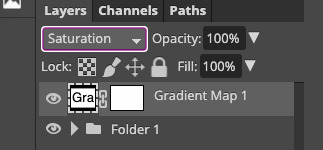
Notice how in the original scene it’s not actually b&w, it has a slight sepia tint to it. I want to remove this, so I add a gradient map by clicking on the white square with a black circle (I want to point out that we’ll be clicking on this button a lot in this step)

and I change the blending mode to Saturation
Then I add a curves layer using these settings
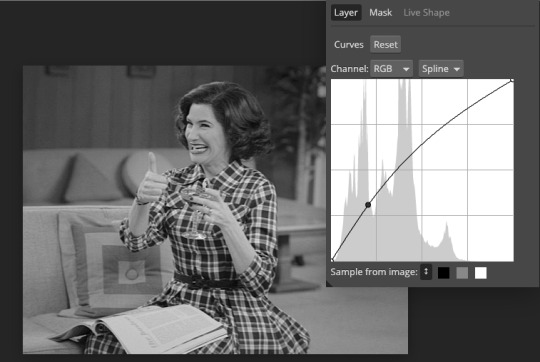
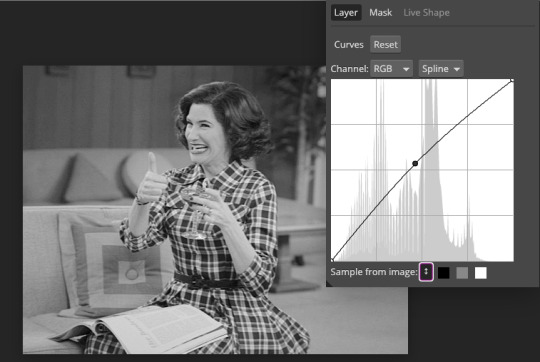
Then a second curves layer
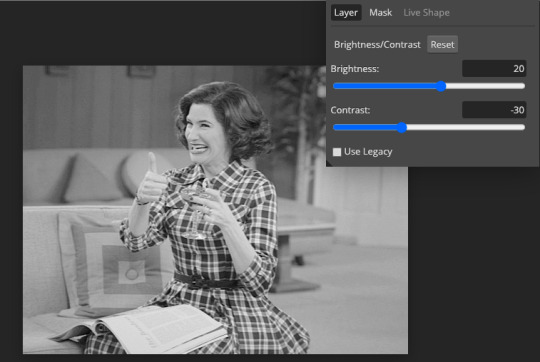
Brightness/contrast
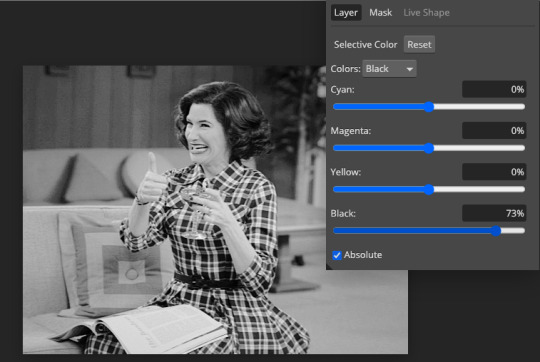
Then my favourite! Selective color! First layer, I deepen up the blacks
Then another selective color layer, this time the whites
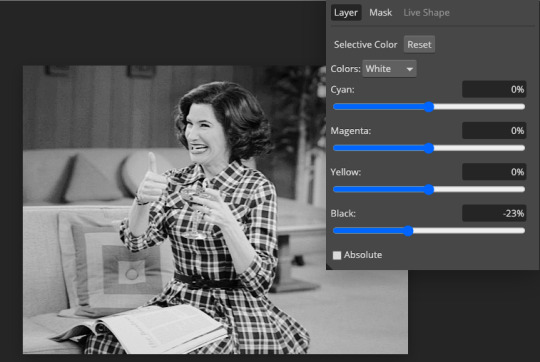
Lastly the neutrals
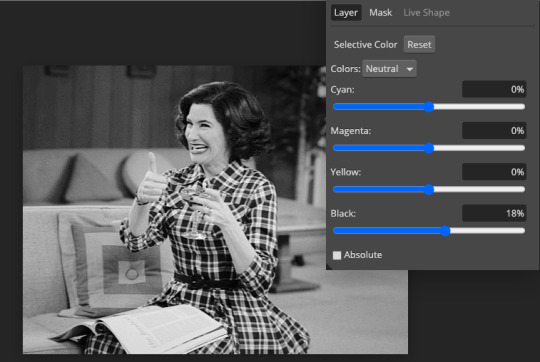
Here we have the final results!
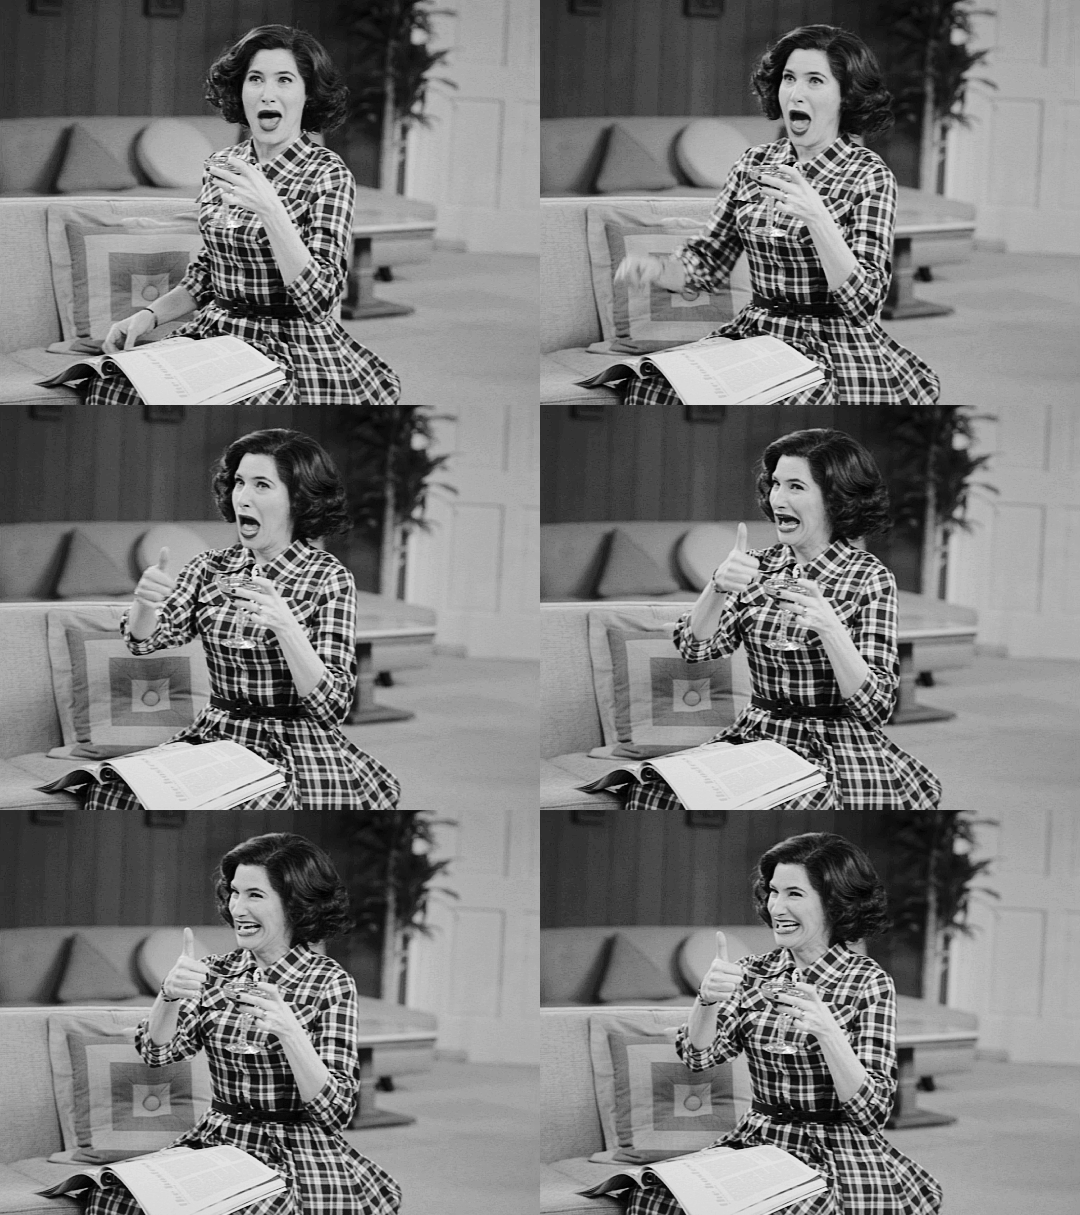
Wasn’t this a gas! I hope this helped you out, let me know if you want to know anything else about gifmaking, I’m happy to help! Also, sorry if I wasn’t very clear, I’m bad at explaining 🙈
MORE RESOURCES:
Here are some other tutorials that are really helpful in making gifs. These users use Photoshop, but you can still use their tips most of the time in Photopea too, you just need to play around and see what works for you!
Gifmaking for beginners by @chloezhao (this one saved my life)
Pale coloring tutorial by @itsphotoshop
Two-Toned Gif Background by @clubgif
Text with white outline tutorial by @anya-chalotra
#resources#tutorial#gif tutorial#photopea#photoshop tutorial#photopea tutorial#tuserfran#userlaur#userlaura#usermirna#(tagging mutuals if you wanna share :P)#my tutorials
1K notes
·
View notes
Text
Tutorial: Batch Creating Animated Gifs in Adobe Premiere
I figured out how to make gifs with Adobe Premiere and the results, surprisingly, do not suck ass.
Here’s a gif from photoshop. No effects or lighting etc, just resized to 540 width and exported with Selective Color & Diffusion chosen for export settings.

Here’s the same clip done with Premiere + Media Encoder, bypassing Photoshop entirely. I used the Animated Gif preset when exporting, and only changed the size.

They look pretty much the same to me, which is not something I’ve found from experiments in previous years. Edit after multiple additional experiments: the quality is not predictable. Premiere offers no options for dither or optimization of your gifs, so based on lighting, how strong your highlights are, etc, you can get results that have a lot of artifacts; dark indoor scenes with brightly lit actors seem especially bad. I’m finding about half of my gifs look good, and half have annoying white dots in them.
But this is all so fast that it’s worth doing anyway; worst case I’ve done my lighting mods in premiere, which is fast, and just have to export half of the mp4′s from photoshop for proper diffusion.
Why Use Cruel, Unfriendly Premiere?
Premiere has a steep learning curve, but it is full of good features. Good-quality batch GIF exporting is basically the holy grail of gif-related features, at least when your hobby is making giant shitposts full of gifs.

You also can use Premiere to apply the same lighting effects and whatnot to a series of clips. That’s a bit more advanced than this here tutorial, however. This here tutorial will show you everything you need to click in order to clip and export gifs from Premiere, without learning anything else about it.
Version
This tutorial is for Adobe Premiere 2021, Version 15.1.0, released around April 2021 and Media Encoder 2021, also version 15.1.0. It should be the same or similar for any newer versions, but older versions may not have these functions. Or they might have them but produce terrible gifs.
The Illustrated Steps Are Behind A Cut Because I’m Not An Asshole
The Steps
Note: These gifs are generally cropped to the relevant part of the workspace only, so you can see what I’m clicking.
1. Open a new file in Adobe Premiere and save it to somewhere sensible, not the stupid location that Premiere thinks you want to save files in. You’ll probably never open this file again once you’re done exporting, but you should still save it in case the power goes out while you’re clipping.

2. Switch to the Assembly workspace.
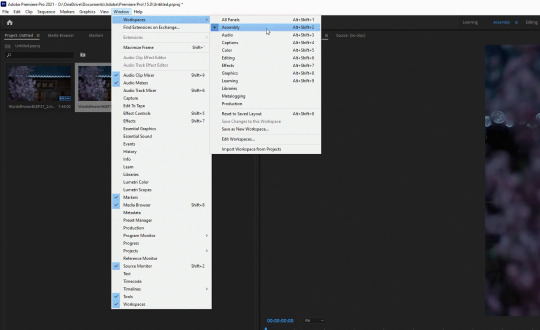
3. Right-click in in the media area and choose import media, or just drag an MP4 in from your file browser.

4. Drag the media to the timeline.

5. Unlink the audio and delete it, since it’s not needed for giffing.
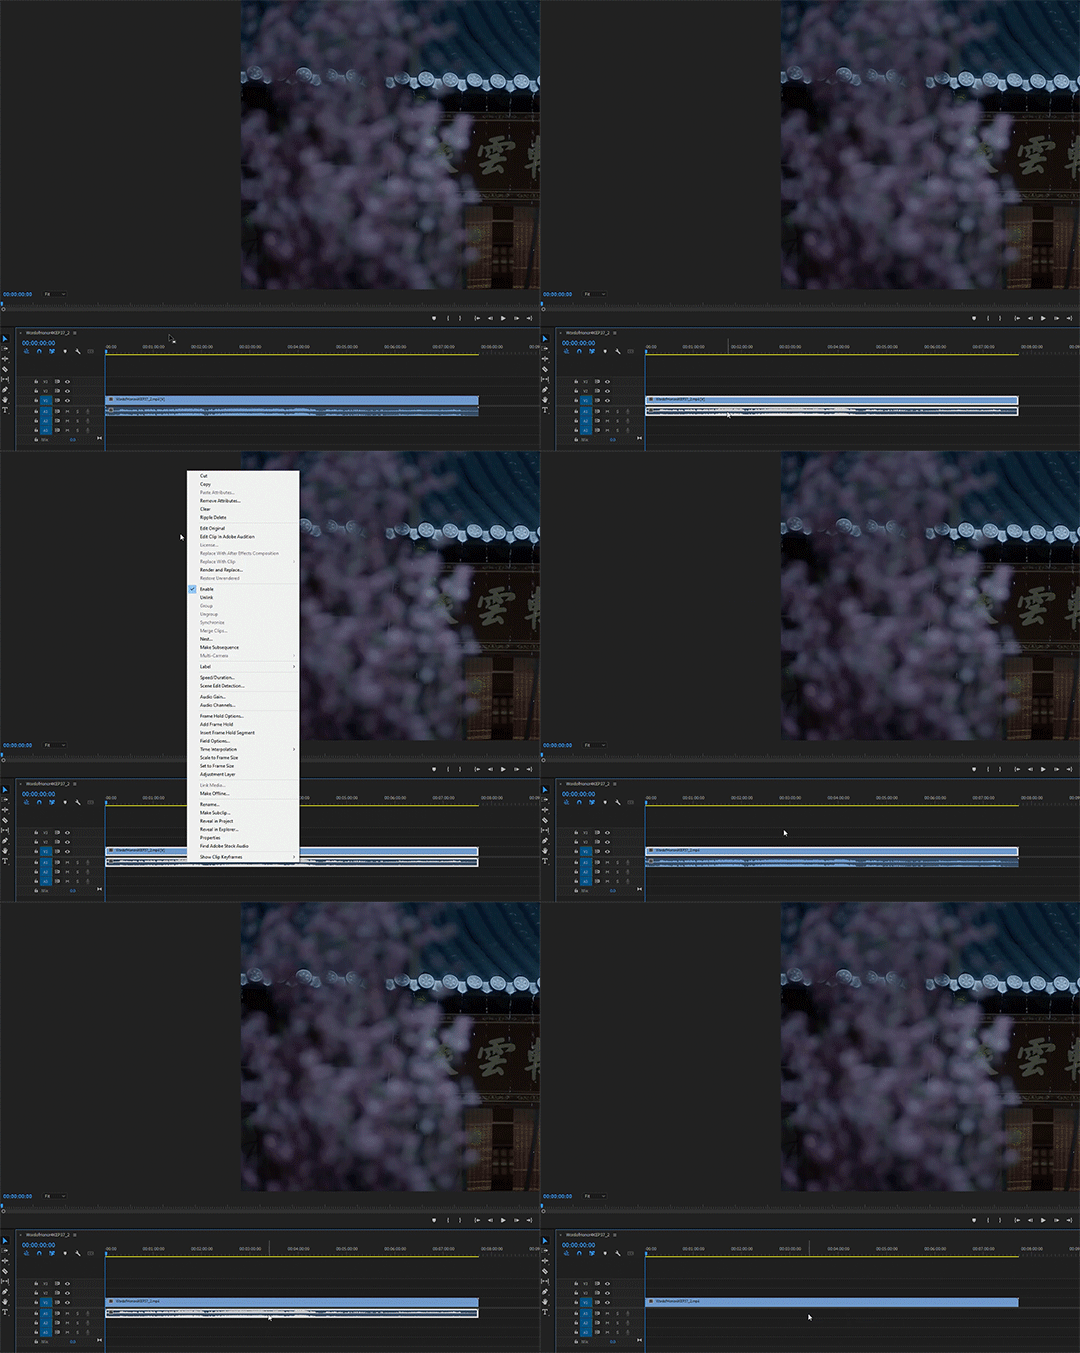
5. Pick up the razor (Keyboard shortcut C) and get cutting. Go to the frame AFTER the break point, then cut on the line. You can use the right and left cursor keys to move between frames one at a time, if you don’t want to use the mouse to click like I’m doing here.
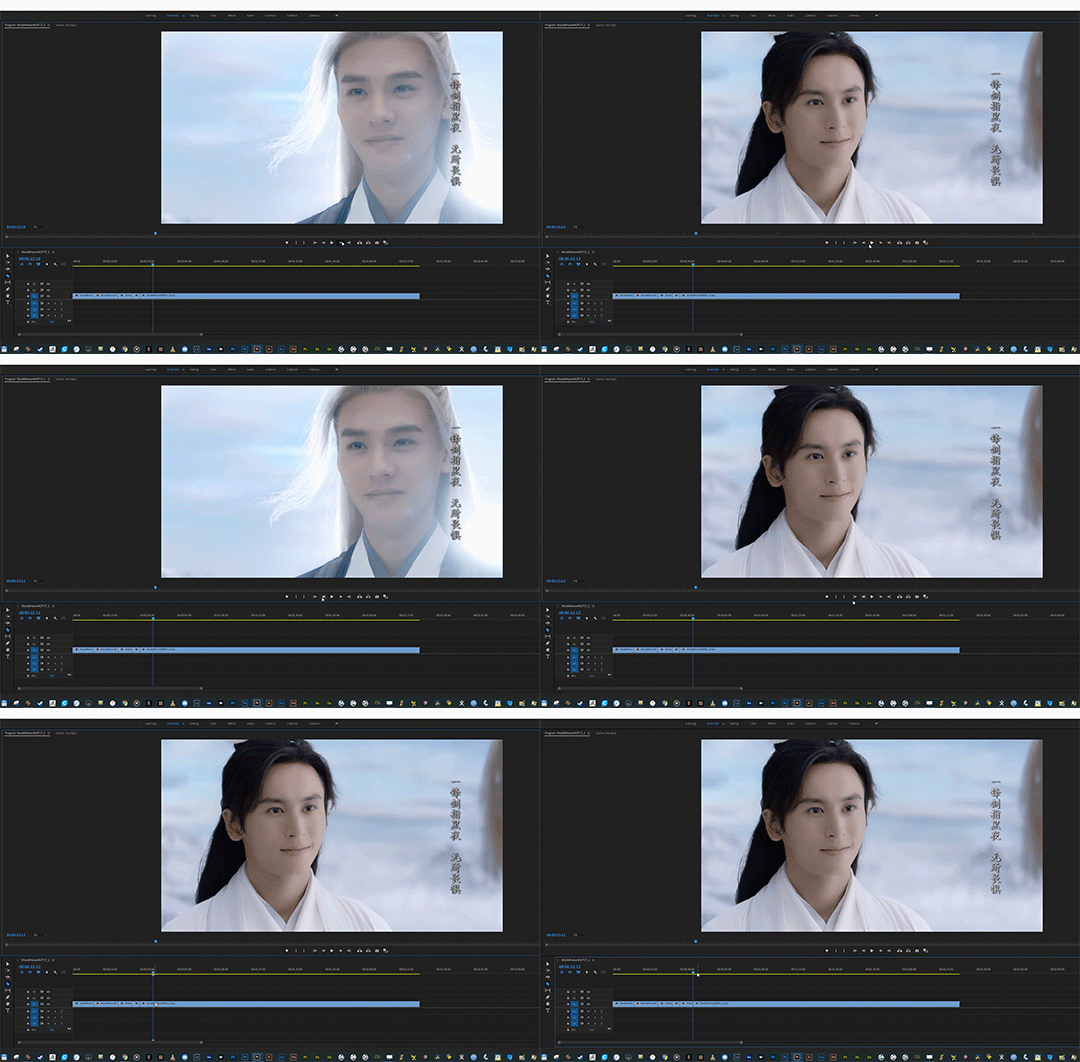
Use the bar at the bottom of the timeline to adjust its scale while you work. This only affects the visual interaction with the timeline, not the clip timing.

6. After you’ve snipped stuff, pick up your pointer (Keyboard shortcut V) to select individual clips. Delete the clips you don’t want by selecting them and clicking the delete key.
7. If you don’t like gaps, choose “close gap” from the Sequence menu.

For individual gaps (or clips) you can right click on a gap and choose “ripple delete” which deletes the gap and moves the next clip into place.

You don’t strictly need to know how to close gaps in order to make gifs, but if you want to combine two into one, this is useful.
The Magical Command
In order for it to export your clips correctly as single files, instead of as one big file, here’s the trick:
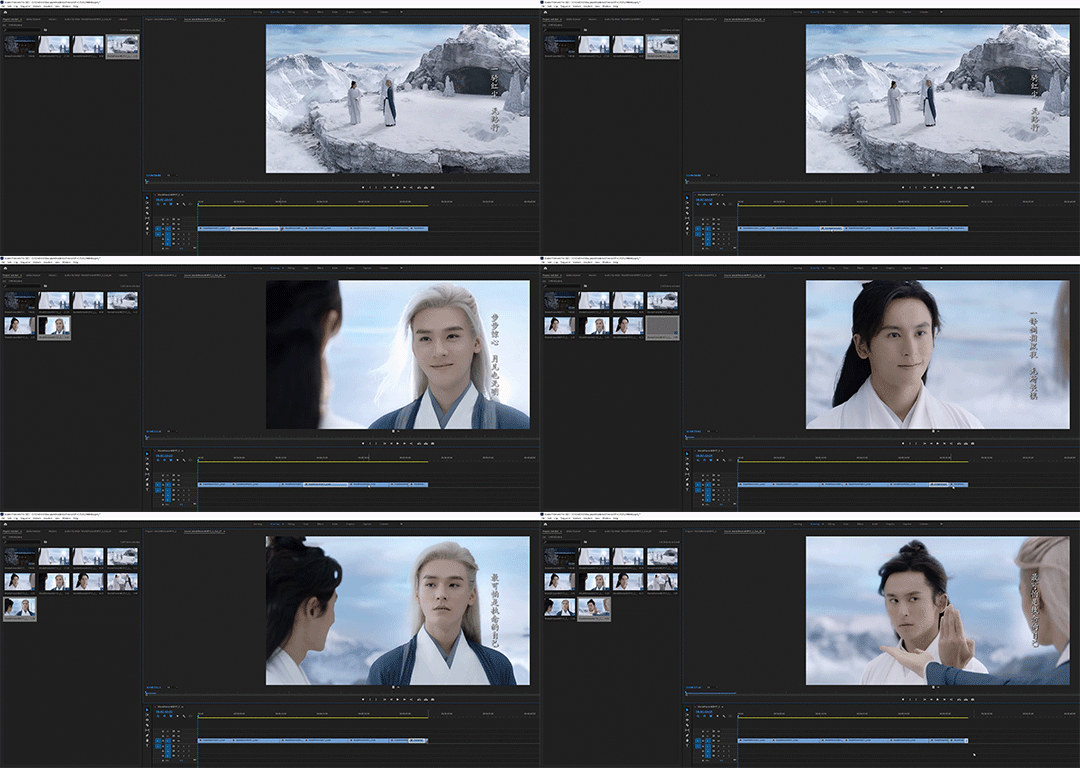
8. Use the “Make Subsequence” command. You have to do this individually for each clip that you want to batch export. Select the clip, right-click, and choose “make Subsequence.” (Note: earlier versions call this “nested sequence”)
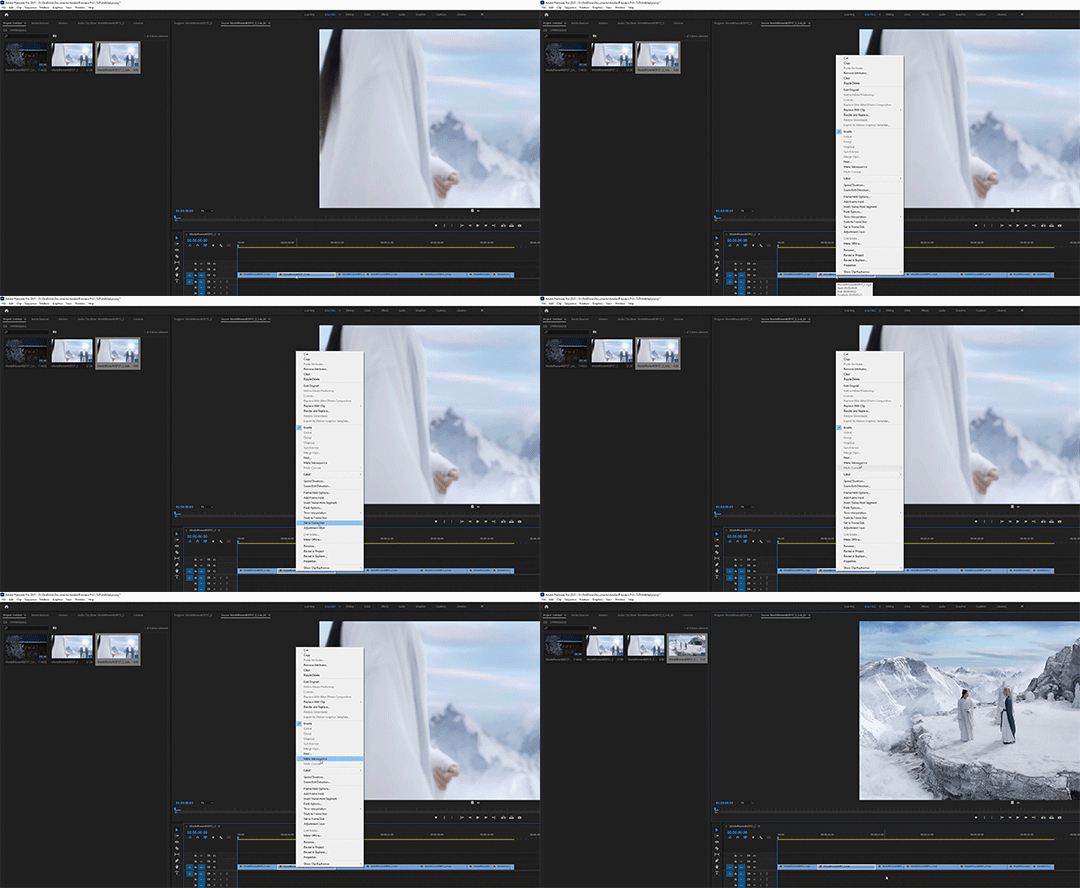
You can also combine two clips into one by selecting them together and making them a subsequence.
9. To speed things up, define a hotkey for this command.
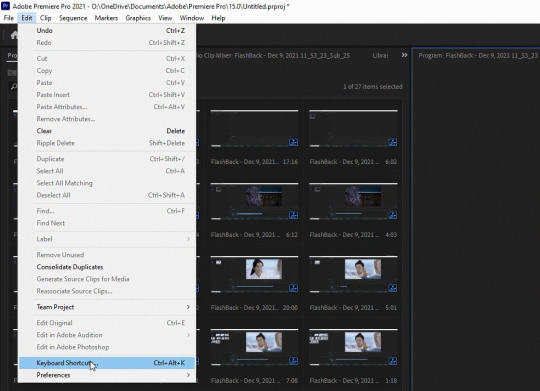
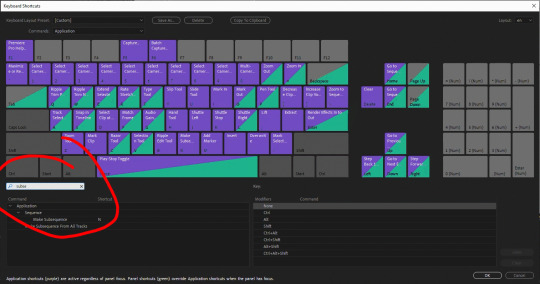
Here’s how fast it goes when you have a hotkey.
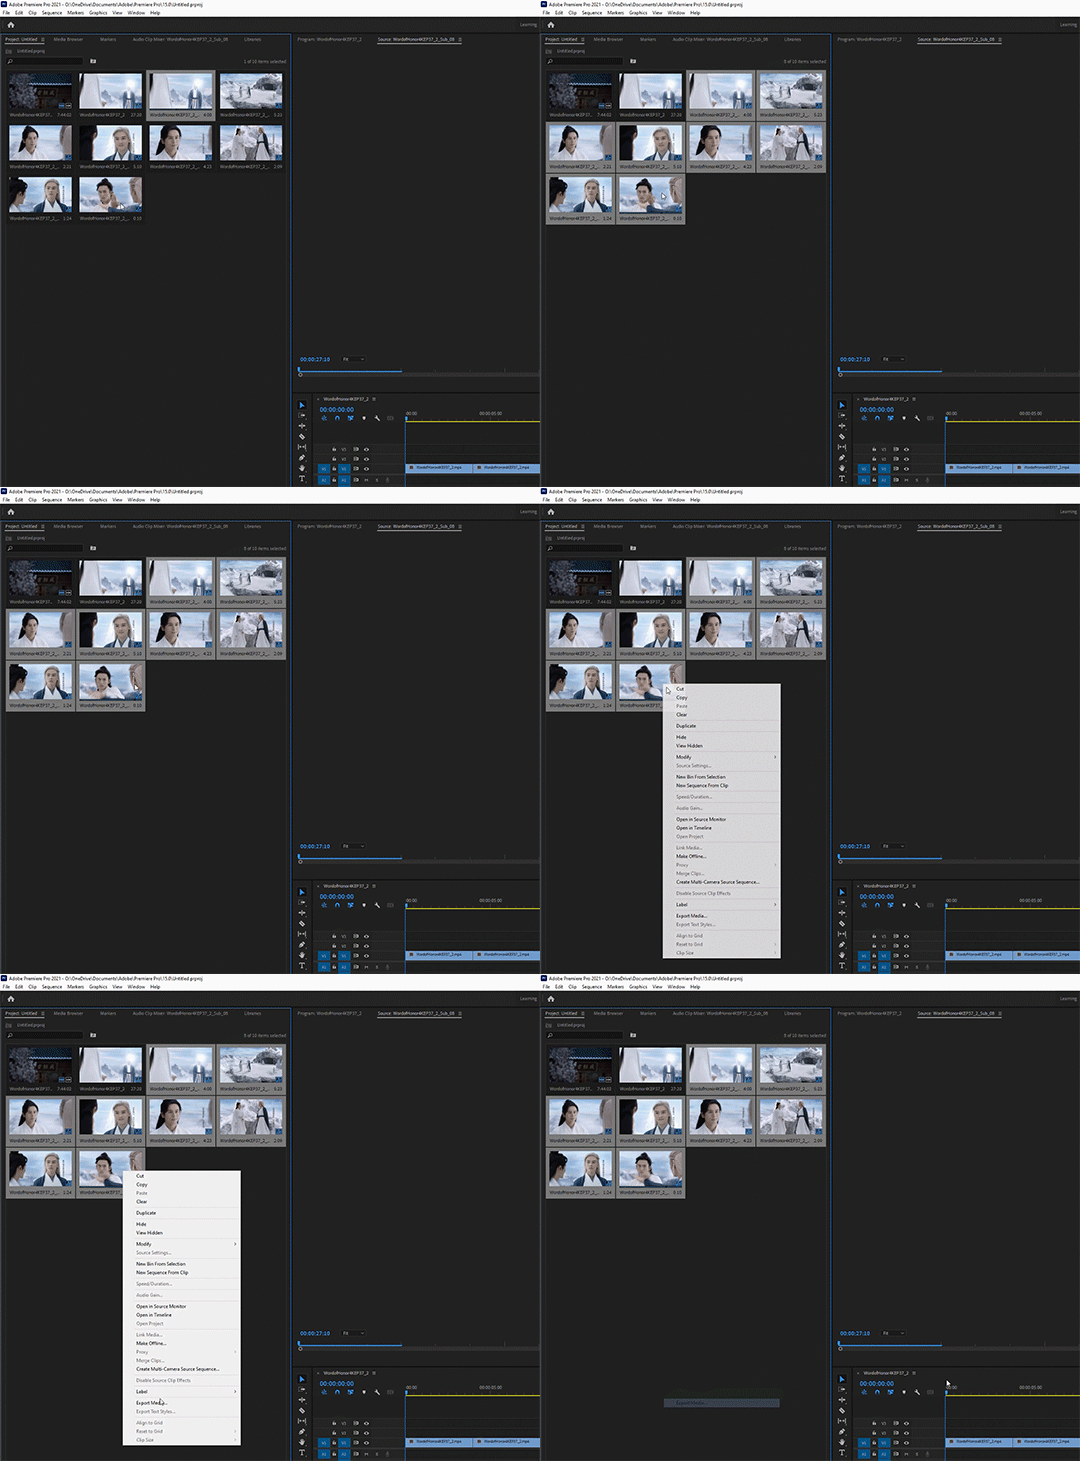
Export
10. When you’re done making subsequences, select all of the subsequences in the media area. That means all of the items in the media area except the first item (which is the original video file) and the second item (which is the entire timeline). Right-click and choose “Export Media.”
11. In the Export dialog, choose the “Animated Gifs” format - but don’t take the original resolution, because that will be huge. Set it to whatever you want it to be. Tumblr compression currently (in 2021) likes things to be 540 pixels wide. You can tweak a lot of other settings if you’re feeling adventurous.

12. Once you have your settings the way you want them for exporting, before you do anything else, save an export preset with these tweaks that you can use next time. Note: The preset will save the height as well as the width, so you can only use it unaltered if the next project has the same aspect ratio.
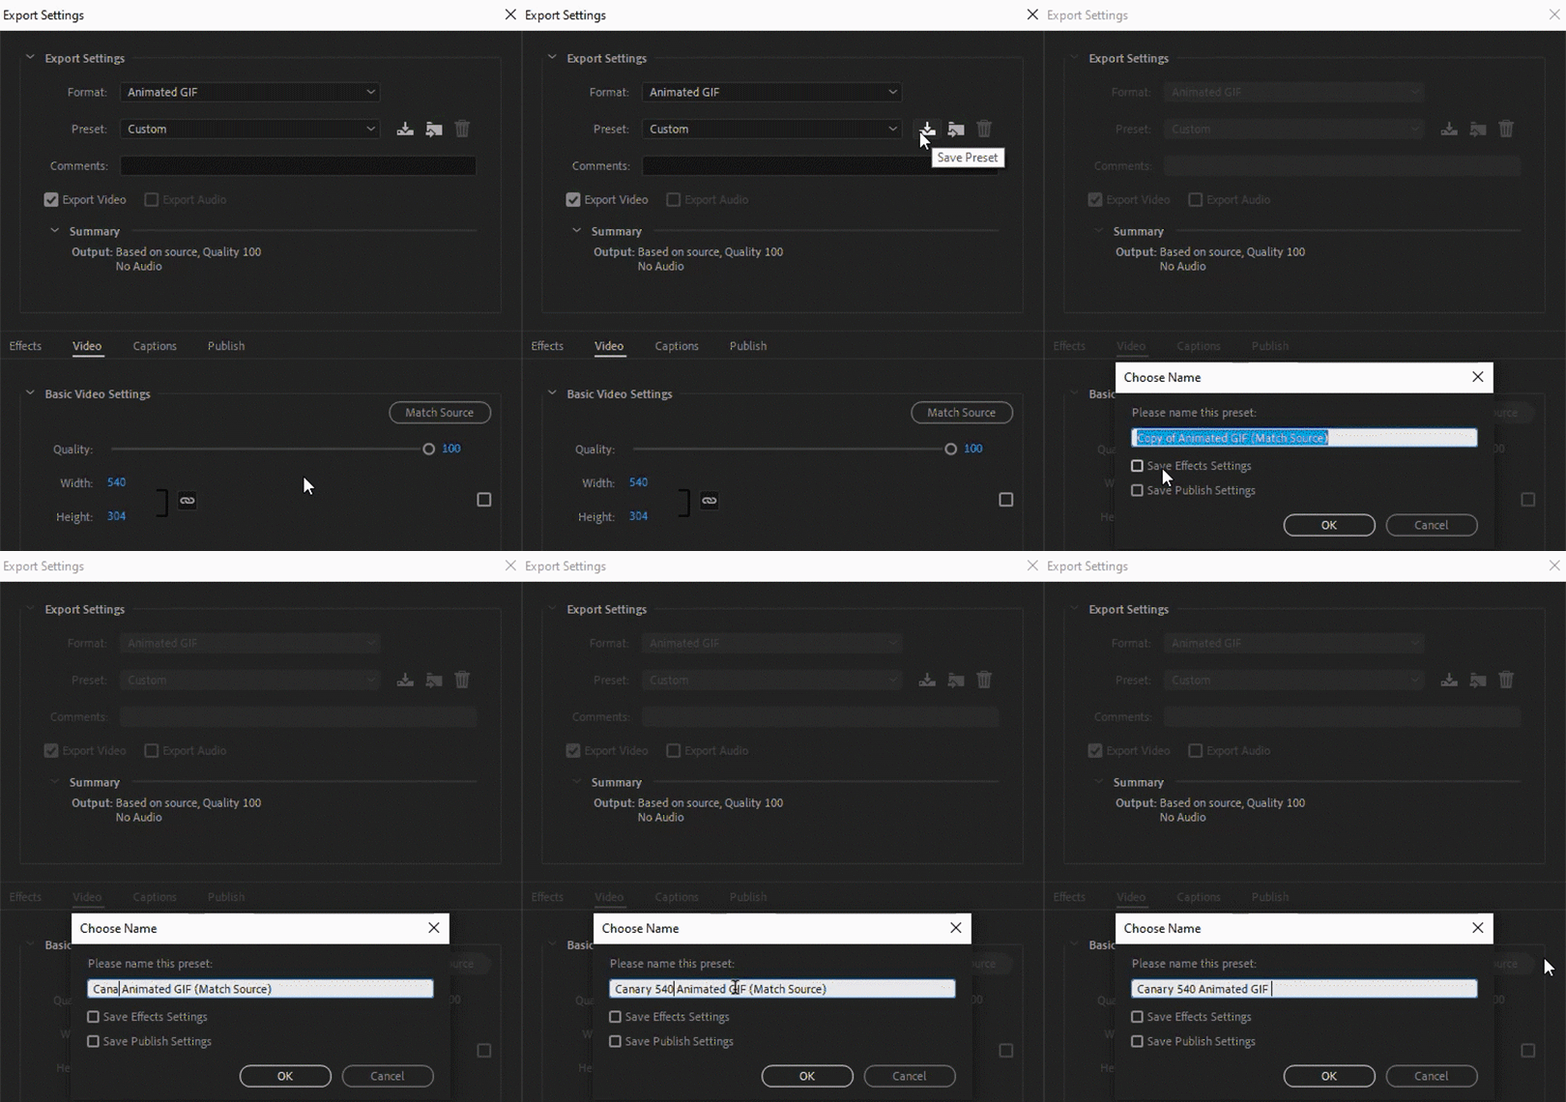
13. Click “Queue” to send everything to Media Encoder for baking. Always use “queue” instead of direct export, even if you’re only exporting one clip. (With multiple clips, queue is the only option).
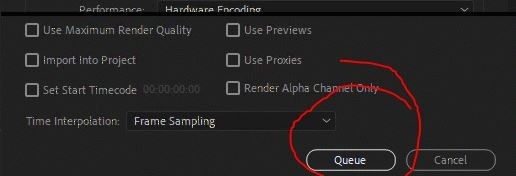
Premiere seems to forget my export settings if I export directly from Premiere, but if I choose “queue” it hands everything off cleanly to Media Encoder.
14. Hop over to Media Encoder (it will autolaunch when you click Queue). You can change the export location of the files here by right-clicking the file names in the queue. Even better, you can tell Media Encoder to always export things to the same folder, so that Premiere’s save location doesn’t affect it. Go to Edit menu --> Preferences to set this up.
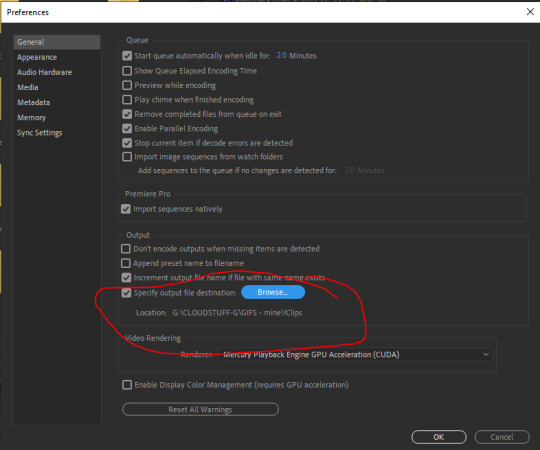
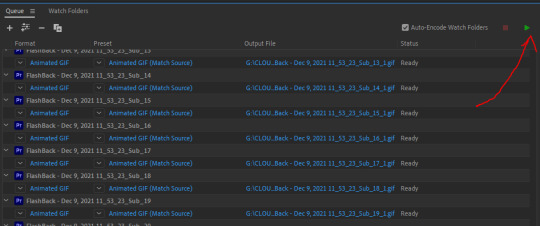
15. Once the queue is loaded up in Media Explorer, click the green “play” icon to export the clips.
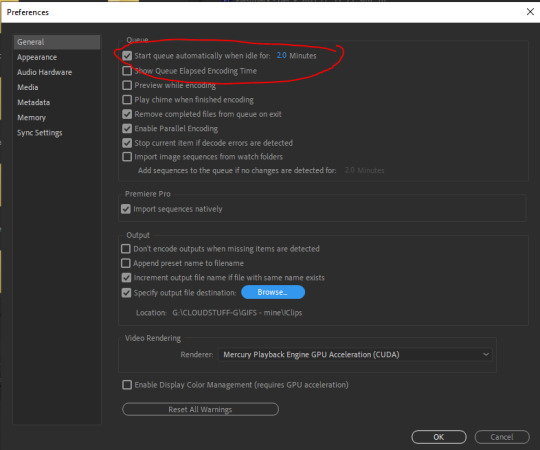
You can also set ME preferences to automatically run the queue after x minutes if you, like me, frequently forget to click “play” after queuing things.
16. While the queue is running, go back to Premiere and do another export; this time use the H.264 encoding preset to export (via the M.E. queue) a set of full-size MP4′s.

This way if any of your gifs look bad, you can use the MP4′s in photoshop to make better ones, or just store them for later adventures.
And that’s it! Happy giffing!
Bonus: Look at these dorks


60 notes
·
View notes
Text
GIF Tutorial for Beginners
People keep asking me to teach them how to make gifs and I end up writing them long confusing messages, so I figured maybe it’s time to just write up an actual clean tutorial instead! This is supposed to be for total beginners! (Or people who want to switch to a new process that I’ve curated and streamlined over 8 years of making gifs.) I’ll try to keep this as barebones as possible, and won’t include all the advanced stuff I usually add. I hope it’s easy enough to follow, and I’ll include some links at the end for more stuff. I really do think it’s better to make a few simple gifs before doing more complicated stuff though, just to get used to it!
There will be three sections in this tutorial: #1 Basics - How to make a gif in PS at all #2 Sharpen - How to use sharpen/denoise filters in an easy way #3 Colouring - Just a few very basic adjustment layers
What you need:
A video (most common formats should work, although .mkv doesn’t always)
Photoshop (I use PS CC 2018 - this one because I'm morally opposed to Adobe’s subscription model - but versions aren’t super different from each other)
In the end, you should hopefully be able to make something like this:
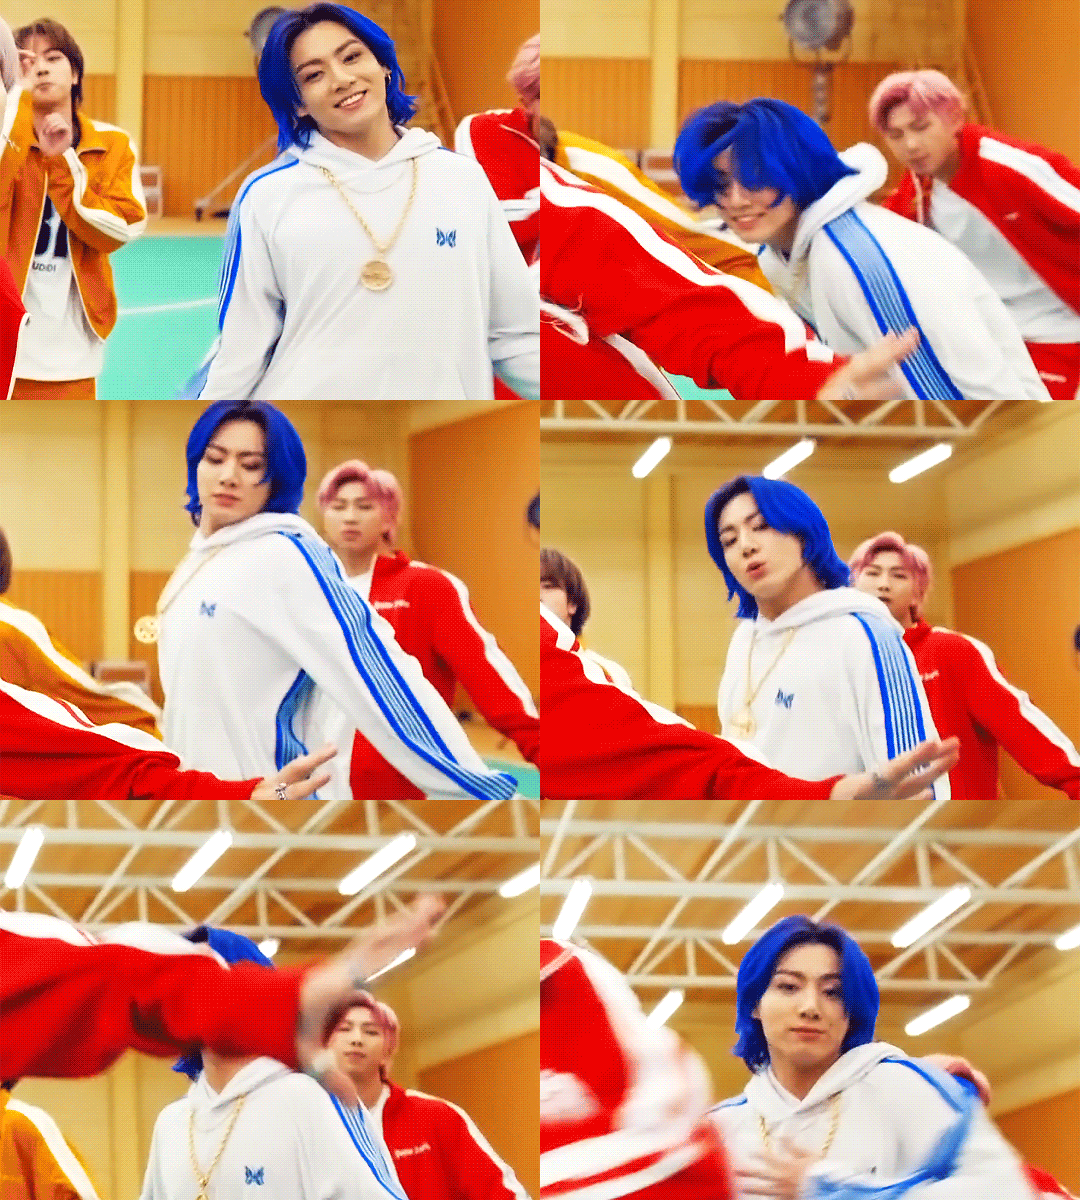
This is gonna be so long. Sorry. You can make a gif with just part #1! The rest is just to make it look better.
#1 Basics
If any of the tools/functions aren’t where they should be for you, your best bet is googling it, you might need to change something in your preferences!
Make sure to save your PS file... often. PS has a tendency to crash, especially on laptops.
First, you need to get the video file. I recommend a shorter video, a few minutes long, if it’s longer you might want to cut it into shorter parts beforehand. This is just because PS’s video import tool sucks.
I chose the Butter MV, specifically Jungkook’s body roll at 1:24 because that’s what I want to look at for the duration of this tutorial. No further questions, thanks.
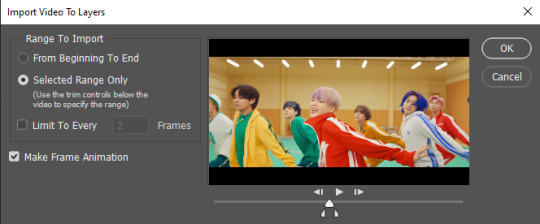
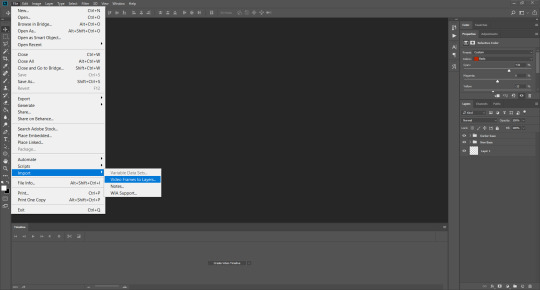
1. Open PS, go to File > Import > Video Frames to Layers

2. In the little pop-up, choose the part of the video that you want to gif. This will import every frame of the video into PS as a layer, so it has to be a relatively short part, or it’ll take ages (and gifs can’t be that big anyway). Now you can also see why it’s almost impossible to select the correct part if the video is too long.
The little controls at the bottom are for trimming, the one in the middle just for the preview. Make sure “Make Frame Animation” is selected! Then click OK.
3. Now you have your layers, and you have a frame animation! On the right are your layers, that’s where we’ll apply the colouring etc. later on. On the bottom, that’s your timeline or frame animation - that’s what the gif will be in the end! So if you delete frames, the layers will still be there, but they won’t show up in the gif. If you click on a frame, you can see the little eye checkmark on the layer that’s currently visible.
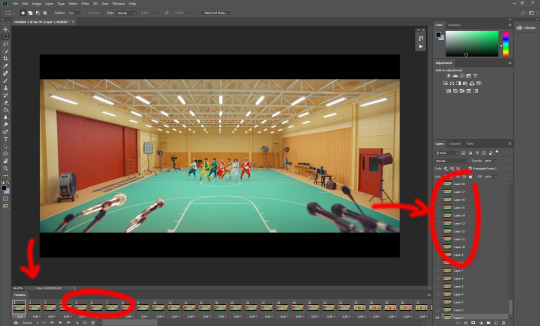
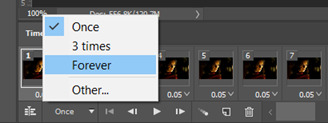
4. The timeline controls at the bottom that are relevant right now: set to “forever” so the gif will loop, you can play the animation with the play button, and you can delete the selected frame(s). The number on each frame is the speed of the gif, depending on the video I usually set it to 0.05 or 0.06 (photoshop lies to you when you play the animation, the only way to test this is to open the finished gif, preferably on tumblr or wherever you want to upload it).

5. As you can see, the animation starts a bit before the actual part that I want, so go ahead and delete all the frames in the animation that you don’t want! You can delete the corresponding layers too if you want, to make the PS file smaller, but it has no influence on the gif. (Hold Shift to select multiple frames as usual)
6. Next, we’re gonna crop the gif however we want! You can do this with the crop tool in the left sidebar, but with gifs like this where there’s a lot of moving parts, I sometimes just use the selection tool in the left sidebar, like so:
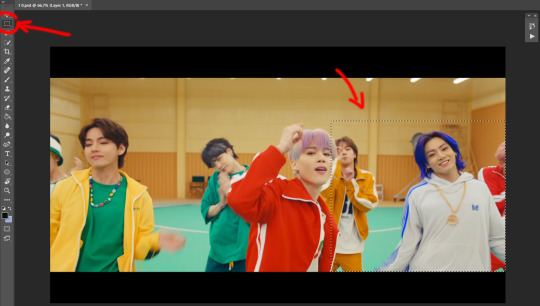
When you click on different frames, the selection stays, and you can check to make sure Jungkook doesn’t suddenly go out of frame if you crop it like that!
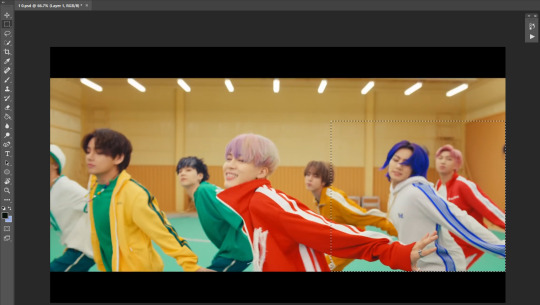
At this point, make sure the selection/crop isn’t smaller than you want the gif to be! For tumblr, what matters is the width (in pixels) of gifs. In the end, the width dimensions on tumblr should be 540px (1 gif per row), 268px (2 gifs per row), or 177/178px (3 gifs per row). Anything else will lead to very shitty resizing!
For this gif I’m going full sized, meaning 540px wide, so I made sure my selection isn’t smaller than that.
Then just go to Image > Crop, and it’s done!
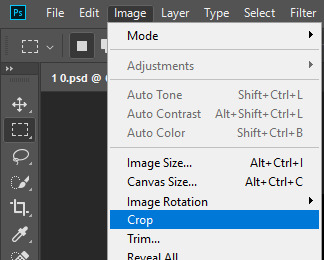
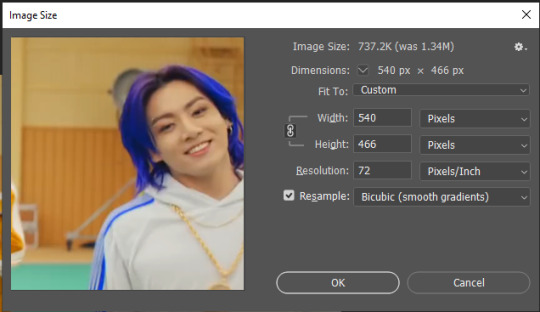
7. Check to see if this is what you want, then resize: go to Image > Image Size to resize the picture. Make sure the little “link” between Width and Height is active (to keep the same aspect ratio), then set the width to 540px or whatever you chose. I always set the resample option to Bicubic.
Once that’s done, set the zoom to 100% right above the timeline, to see what it really looks like.
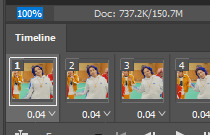
Almost done! A little note about the sizing: width is the important part for tumblr, but if you want to make a whole gif set (especially with more than 1 gif per row!!!) make sure to make all the gifs the same height, otherwise they won’t line up and tumblr will do whatever it wants.
I ended up making mine 540 x 400 and ended up with this:
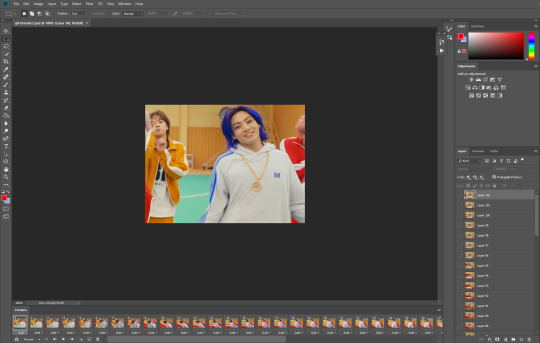
8. Time to save the gif!! Go to File > Export > Save for Web (OR just use the shortcut Ctrl + Shift + Alt + S) (or whatever it is on Mac).
In the pop-up, you can change things about the gif, but most things should already be the way you want it (Image size, Looping option forever). Selective should be the default, just like the rest.
You can choose between Pattern and Diffusion, some gif makers swear on one or the other, I go back and forth.
On the bottom left, you can see the size of your gif. Keep an eye on that! I believe Tumblr allows every single gif to be up to 10mb, but I try to keep mine under 5mb or close to it, because I think tumblr adds compression if it gets closer to 10mb?? Anyway back in my day you couldn’t upload anything over 1mb. You’ll never know our struggles.
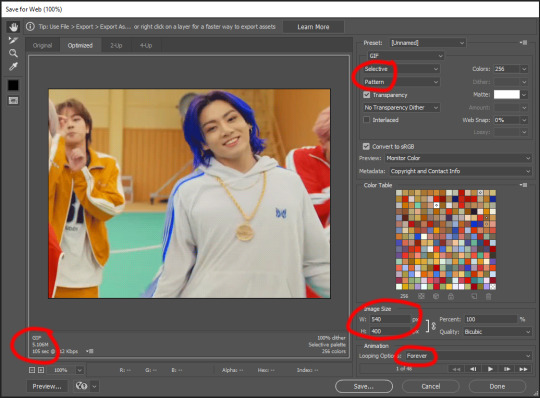
Then just save it, and that’s it, you made a gif! Well done!! Here’s the end result:
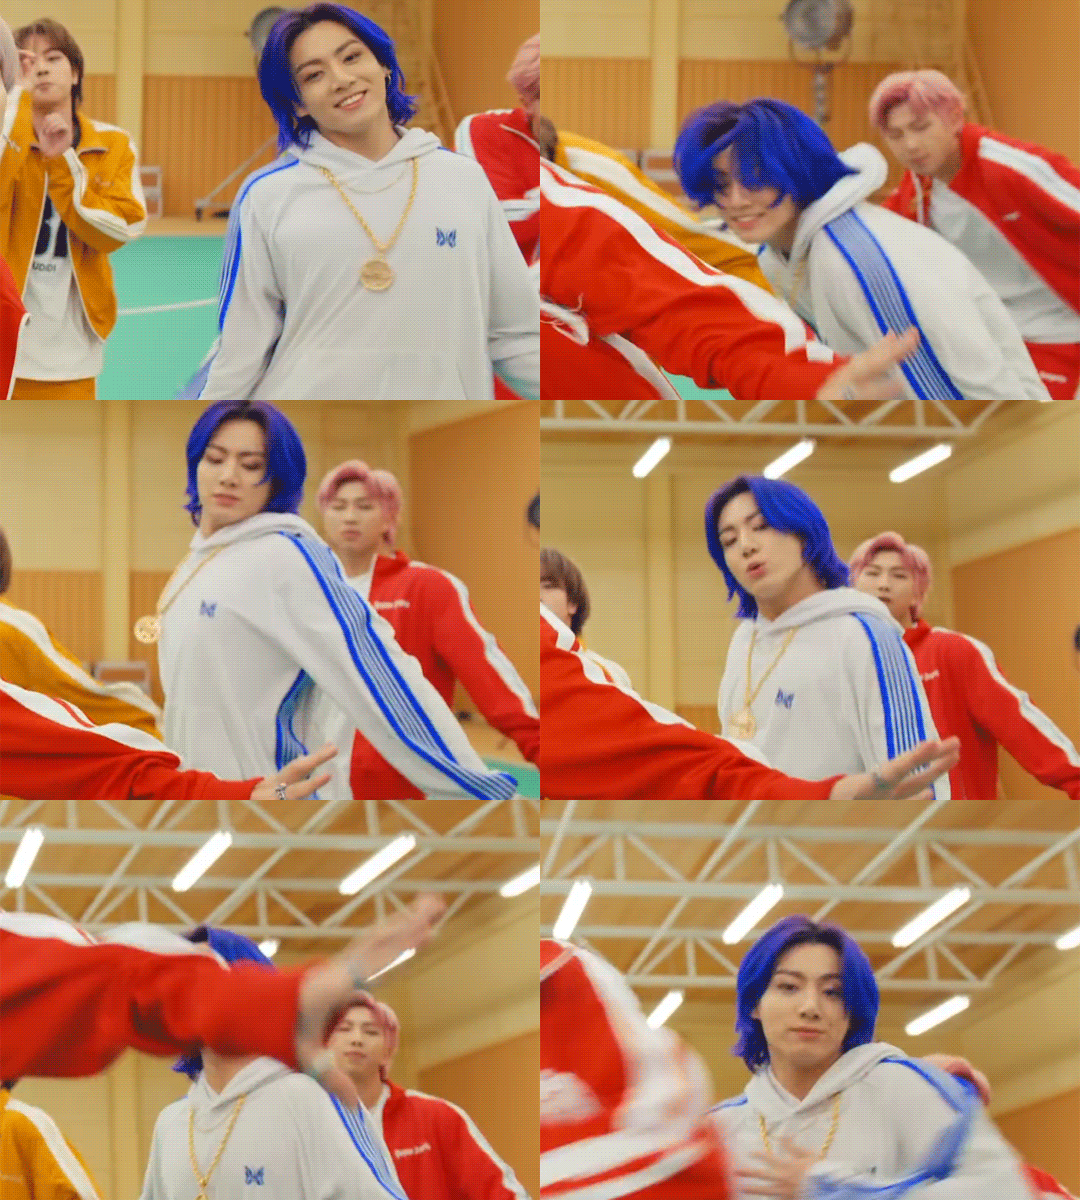
:)
#2 Sharpen
There are countless ways out there to make gifs as smooth and clean as possible! Here I’ll show you the easiest way, but it also provides a good basis for other methods. The main difficulty is that you you need to sharpen the layers, but you don’t want to 100 layers one by one. So what we’re gonna do is convert the layers into a Smart Object, which functions as one layer!
1. Convert the frame animation timeline to a video timeline with the little button right underneath on the left:
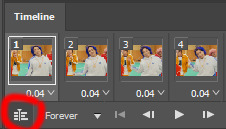
It should look like this, and I’m sorry but I can’t explain this one because I’m not an expert here, but you can just ignore it:

2. Select all layers: Select > All Layers, or just manually.
Then right click on the layers > Convert to Smart Object. Now there’s only one layer left, but don’t worry, the frames are still there!
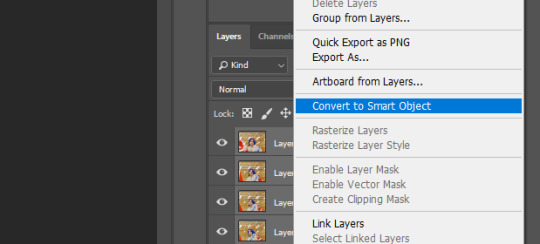
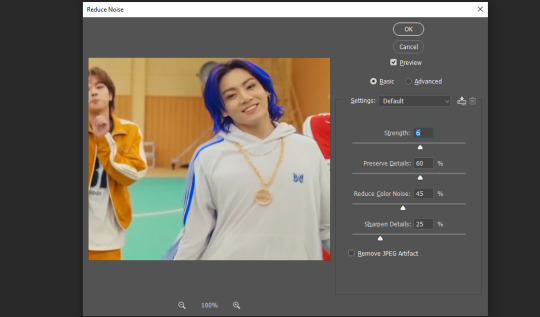
3. De-noise! It reduces noise, takes away some of that grain. More necessary in some videos. It also makes it less sharp, so I do this one first. Filter > Noise > Reduce Noise

My default settings are, Strength: 6, Preserve Details: 60, Reduce Color Noise: 45, Sharpen Details: 25, Remove JPEG Artifact: No. But you can play around, especially with the strength, and see how the little preview looks. Don’t apply too much of it! Or it will look weirdly smooth with no details in the end.
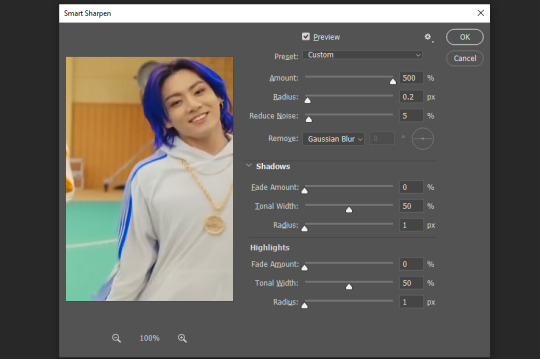
4. File > Sharpen > Smart Sharpen.
Settings: I usually have mine at Amount: 500, Reduce Noise: 5, and Radius at either 0.2 or 0.3, depending on the video. I’ll actually do 0.3 here, because I find it a bit blurry otherwise. If you sharpen more, it can quickly get grainy.
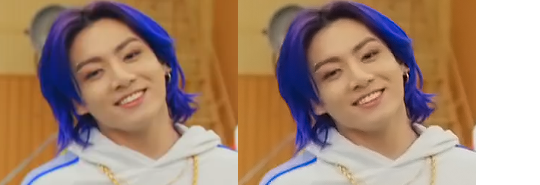
The difference isn’t huge, but here’s a little before and after denoise & sharpen:
5. Technically you can just save it as a gif (save for web) as shown above now, or you can convert it back to a frame animation, which I’d recommend especially if you use certain other sharpening methods (I’ll show you how to convert it back at the end of the colouring part), but for now, let’s go straight to the next part:
#3 Colouring
Now, you CAN do this part right after part #1, still in frame animation, without a smart object. I prefer it like this because sometimes PS acts weird, but if you want to skip the smart object stuff: select all frames, and add the adjustment layers at the very top, above all the other layers. (It only affects selected frames; and it only affects the layers under it.)
The adjustment layers should be above the layer tray, and these are the ones we’ll use today: Brightness/Contrast, Curves, Vibrance, Color Balance, Selective Color.
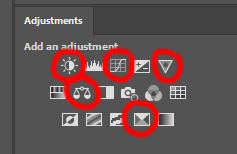
All of these are optional! You can do one, or all, or any combination. This is just the very most basic for me to get a gif to a point that I like. I’d recommend sticking to these for a start, but once you get the hang of it, definitely feel free to play around! It’s fun! Every gif maker has different preferences here, too, so there’s tutorials for everything.
1. Curves: Just click Auto, tbh. You can play around, but Auto works fine for me as a start, just to brighten or darken some parts as a base.
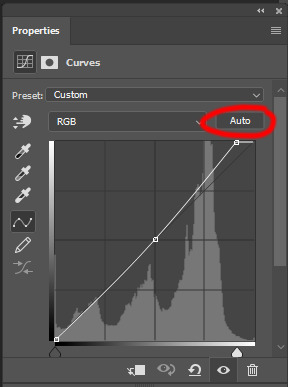
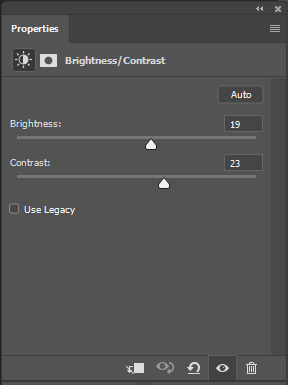
2. Brightness/Contrast: Usually videos are a bit dark, and contrast can help to make it seem sharper AND cut down on gif size, so I usually just up both of them a bit (but not too much! Or it’ll look cheap). Here I put them at B: 19, C: 23

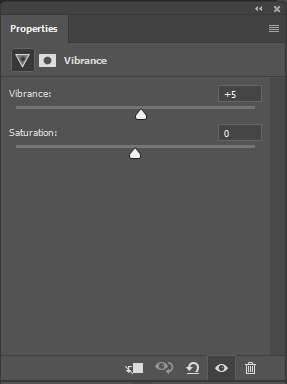
3. Vibrance: I love very vibrant and colourful gifs, so I usually up the vibrance (and sometimes the saturation). This one is already very vibrant, so I only put +5, but if you try to colour, say, a very moody tv show, this can help wonders, especially if you want to work with the colours more later.
If you prefer less vibrant gifs, you can also lower the values here!
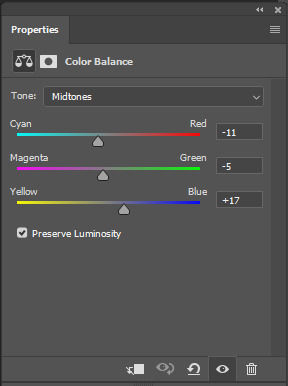
4. Color Balance: getting a bit more complicated now. Often, videos will have a slight yellow or green or blue tint, and this is where you can correct that. This video is a bit yellow, so I added +17 Blue. It was still too warm, so i added -11 Cyan as well. This neutralized the yellow tint, but I wanted some of the reddish tone back, so I added -5 Magenta. I usually do a similar process like that, depending on the tone.
Instead of Midtones, you can also do this for Shadows and Highlights individually.

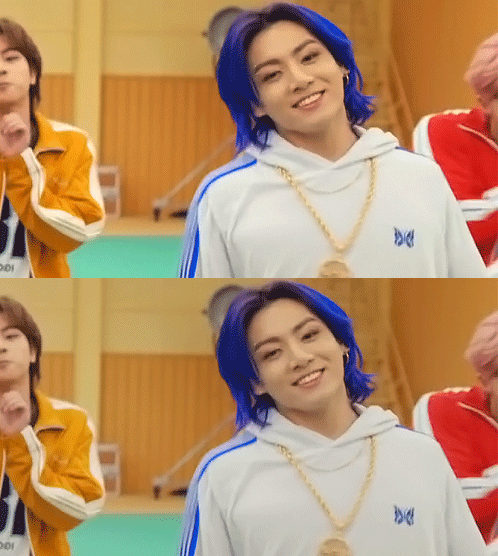
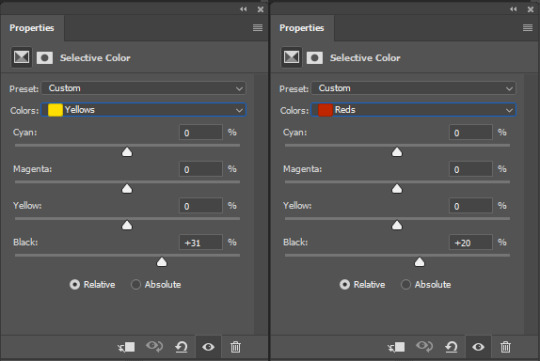
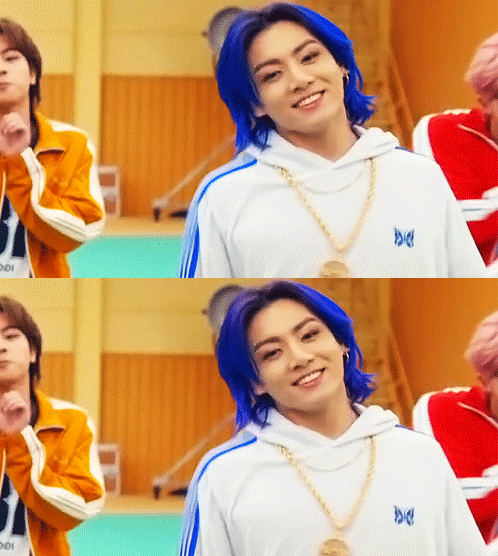
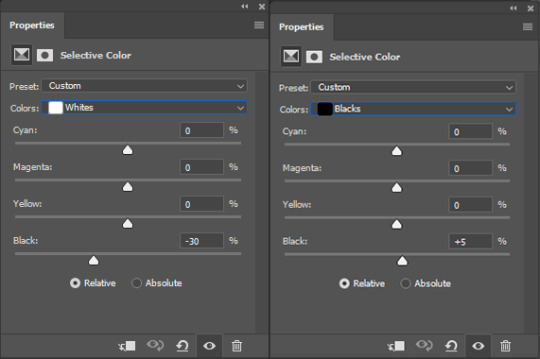
5. Selective Color: now this is the most complicated, but also the most fun to play around in my opinion! Be careful here, if you do something too extreme it’ll look like shit or make the gif super grainy. I some rough goals in mind here: make the blue hair as blue as possible, make their skin tone a bit less pale, and enhance the black and white (which I always do).
You choose a colour at the top, and then add or subtract cyan/magenta/yellow/black values for that colour.
Skin tone: yellow and red. For this gif, I just added black to both, making them darker. Sometimes, if you change one or both those colours for a different part of the gif (for example, if I wanted to make the background less yellow, I’d subtract yellow from the yellows - but then I’d add yellow to the reds, to make the skin tone natural again.)
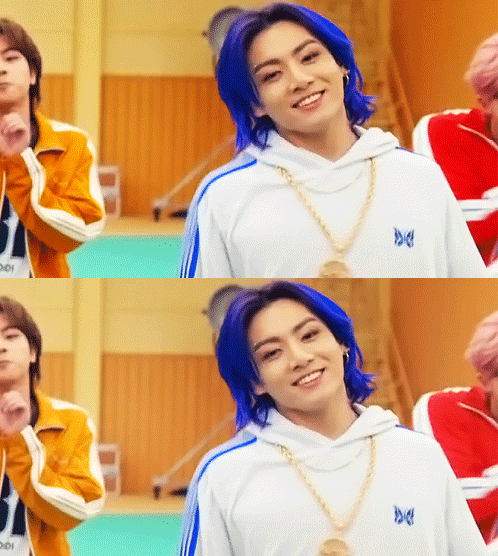
Blue hair: Just ramp up the cyan for the blues. Be careful with putting anything to +100, but here it’s already so bright that it should be fine. His roots are more purple, so I changed the magentas by adding cyan and black, and subtracting magenta and yellow. It’s not super clean, but fine for our purposes.
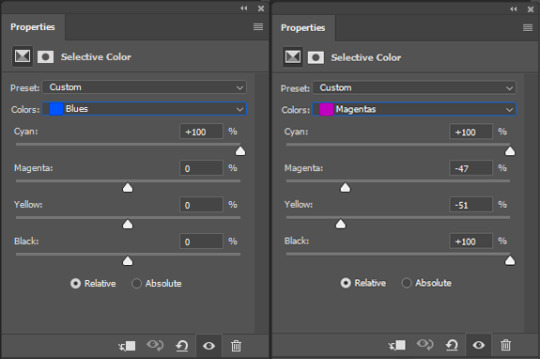
Black/white: depending on the gif, I often either add or subtract black to the whites. Adding makes the highlights less blinding, a bit darker, and flatter (I like to do that if one side of the face is bright white in the sunlight, for example). Subtracting creates contrast, makes it brighter, can wash it out. It can also lessen the gif size, and here it’s mostly just the tracksuit instead of important details, so I subtracted black. For the blacks, I almost always just add a bit of black, to make it more intense. Just like adding contrast, this can make the gif seem sharper and less grainy.

And done!
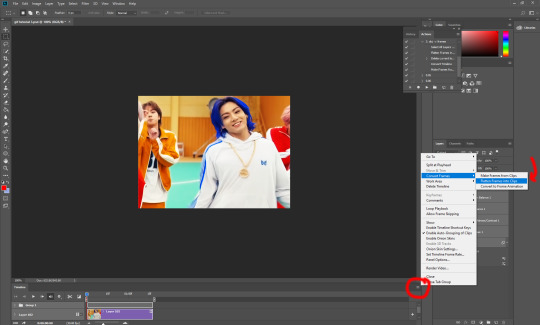
6. You could just save it as gif now, but as I said, I prefer to convert it back to frame animation timeline first, if only because I like to let it play through before I save it, and it works better for me there than in the video timeline.
Select all frames, then click the little menu on the top right of the video timeline > Convert Frames > Flatten Frames into Clips
7. When you scroll down to the bottom of the layers now, the old smart object + adjustment layers should be at the bottom, under all the new layers. Delete the old ones, we don’t need them anymore.
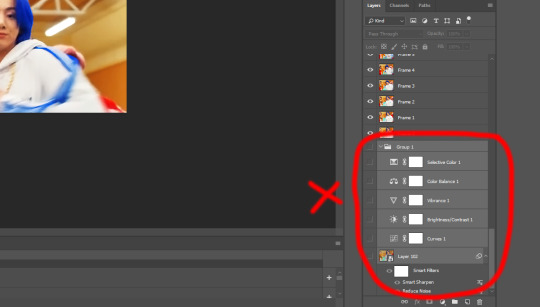
8. Convert the timeline back to frame animation, by clicking the little button at the bottom left of the video timeline:

9. Click on the menu top right of the timeline again > Make Frames from Layers
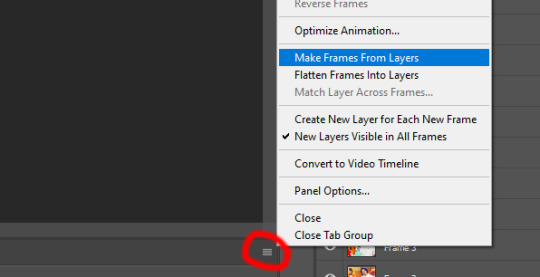
10. Now, just some potential cleaning left to do. Sometimes, there’s a doubled or empty frame or layer at the beginning or end, just delete those as necessary. The timing of the frames is probably off, too, just select all frames and set the delay time to 0.05 (or whatever).
Now your done! Save as gif, and you should get this:

I included some bonus links and tips after this but tumblr ate that whole part so I guess it’s going into a separate post. (Here is is)
Anyway, I tried to make this as easy to follow as possible for beginners, but feel free to send me an ask for clarification anytime. Hope this helps, now go make gifs and have fun!!
#photoshop#tutorial#gif tutorial#ps tutorial#btsgif#*#*tutorial#this took so much longer than i expected i'm not giffing for at least a week now
233 notes
·
View notes
Text
BASIC GIF TUTORIAL
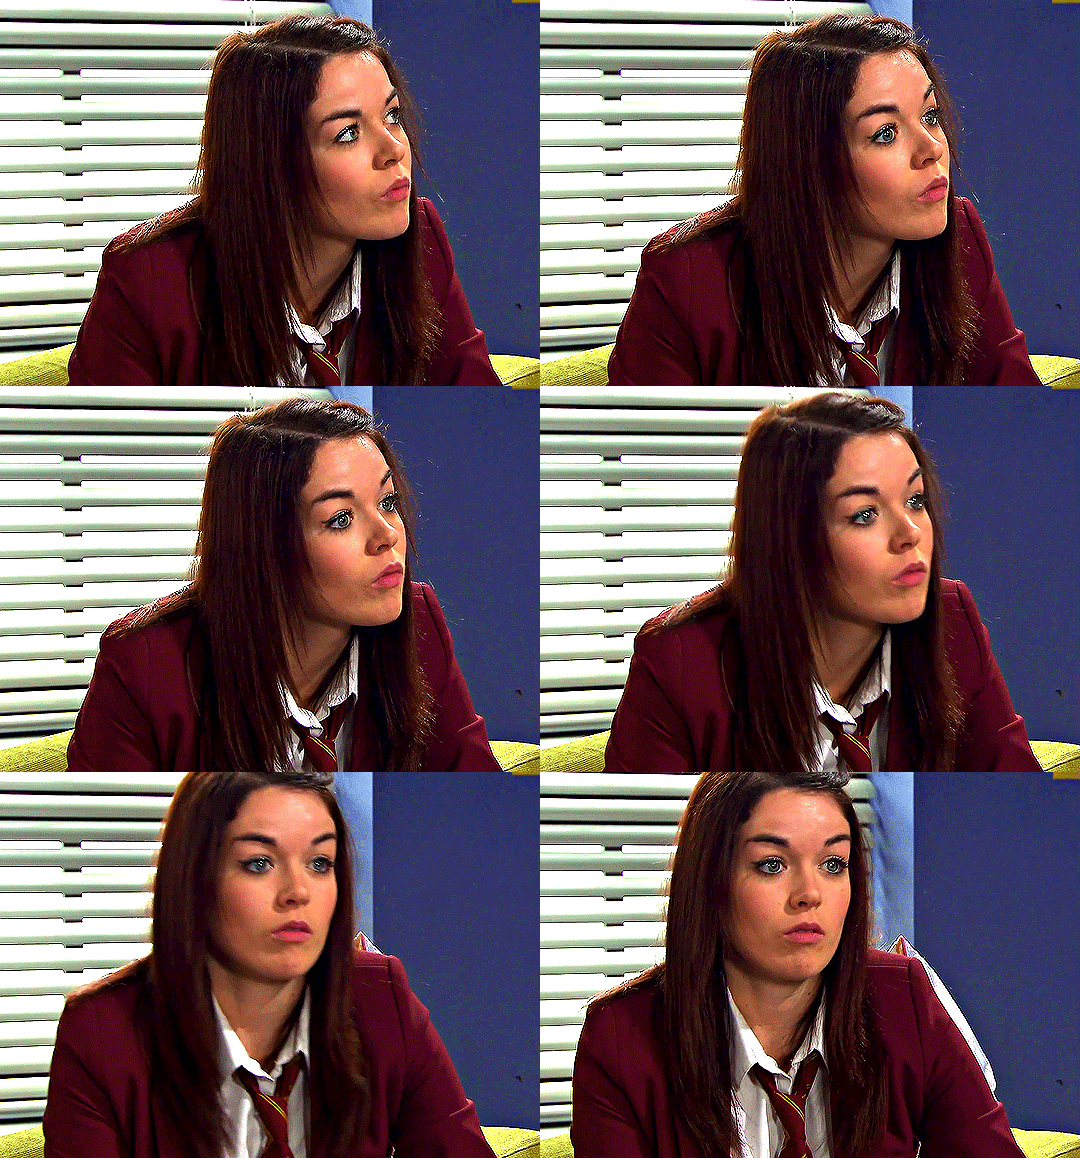
this is for umana but I’m making it public for anyone it might be useful for :) this tutorial is for a mac, but it could easily be followed for windows too. this is for making the nicest quality gifs in the quickest amount of time. this is just how I do it, it is not the only correct way, it’s just how I learnt.
to follow this, you will need to download the actions from here as I'm making this literally as simple as possible. read how to install a downloaded action here.
for this tutorial, you’ll need a version of photoshop with the timeline feature, and the video frames to layers feature.
I use photoshop v 22.2 as I think it’s the latest version with both features. to change the version you have installed, click other versions under the installed software section, hit the other versions option and press install on any version that has a timeline feature.

once you’ve done that, you’ll need a mp4 to make into a gif, preferably in the best quality possible. I do this by screen recording streaming services on google chrome on my macbook using quicktime player which is built in software. you can also just download stuff. for a big gif, like this, 0-3 secs is preferable.
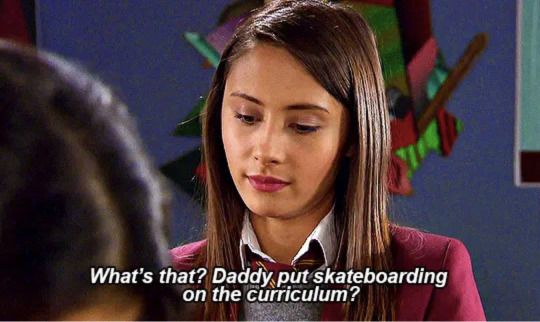
however, multiple gifs per line, like these, can be longer, between 0-6 (??) seconds.


I pre-crop my videos in length and ratio because I like to plan the individual gifs ahead. I tend to default to 5:3/7:5 for big gifs, 7:5 for medium ones and square for small ones, unless I make them 5:7. for tumblr, the width determines the amount of pixels, as there’s an overall width limit of 540 pixels. so therefore one gif per line is 540 pixels, two is 268 each and three is 177 pixels each. the gif however can be any height, which is great for full body shots like this.
next, open photoshop, and select file > import > video frames to layers and then select your video.
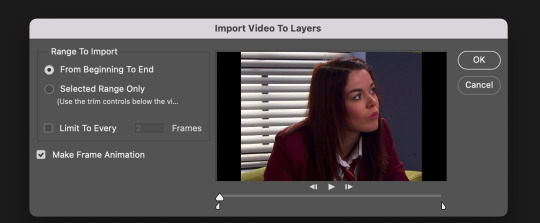
by pressing selected range only you can trim your video if you want. make sure make frame animation is selected and limit to every 2 frames isn’t as it’ll make the gif super jumpy. then press okay.
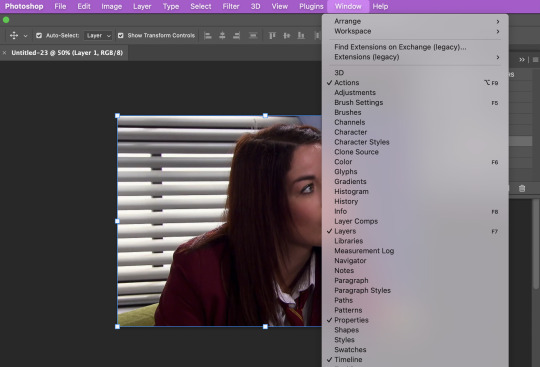
press window and make sure actions and timeline are selected. then go to the actions menu and press the dropdown arrow on the dowloaded action set FRAMES TO LAYERS.
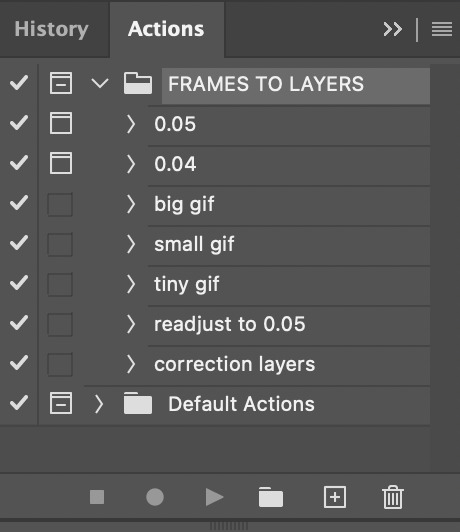
you now have the choice of either a frame rate of 0.05 or 0.04. personally I use 0.05 because I think it looks nicer, but 0.04 can look better if you want certain gifs slightly faster. then select the time you want and press the play button at the bottom. this will bring up a window that asks you to confirm the frame rate. press okay.
next, depending on whether you want a big gif (1 per row), small gif (2 per row) or tiny gif (3 per row), select the size you want and press play on that action. I’m going to make a big gif. this action changes the size of the gif in order to fit tumblr’s limits and includes my sharpening settings. if you wish to adjust these yourself, you can do so by double clicking on them in the layers menu here

now we need to turn it from this
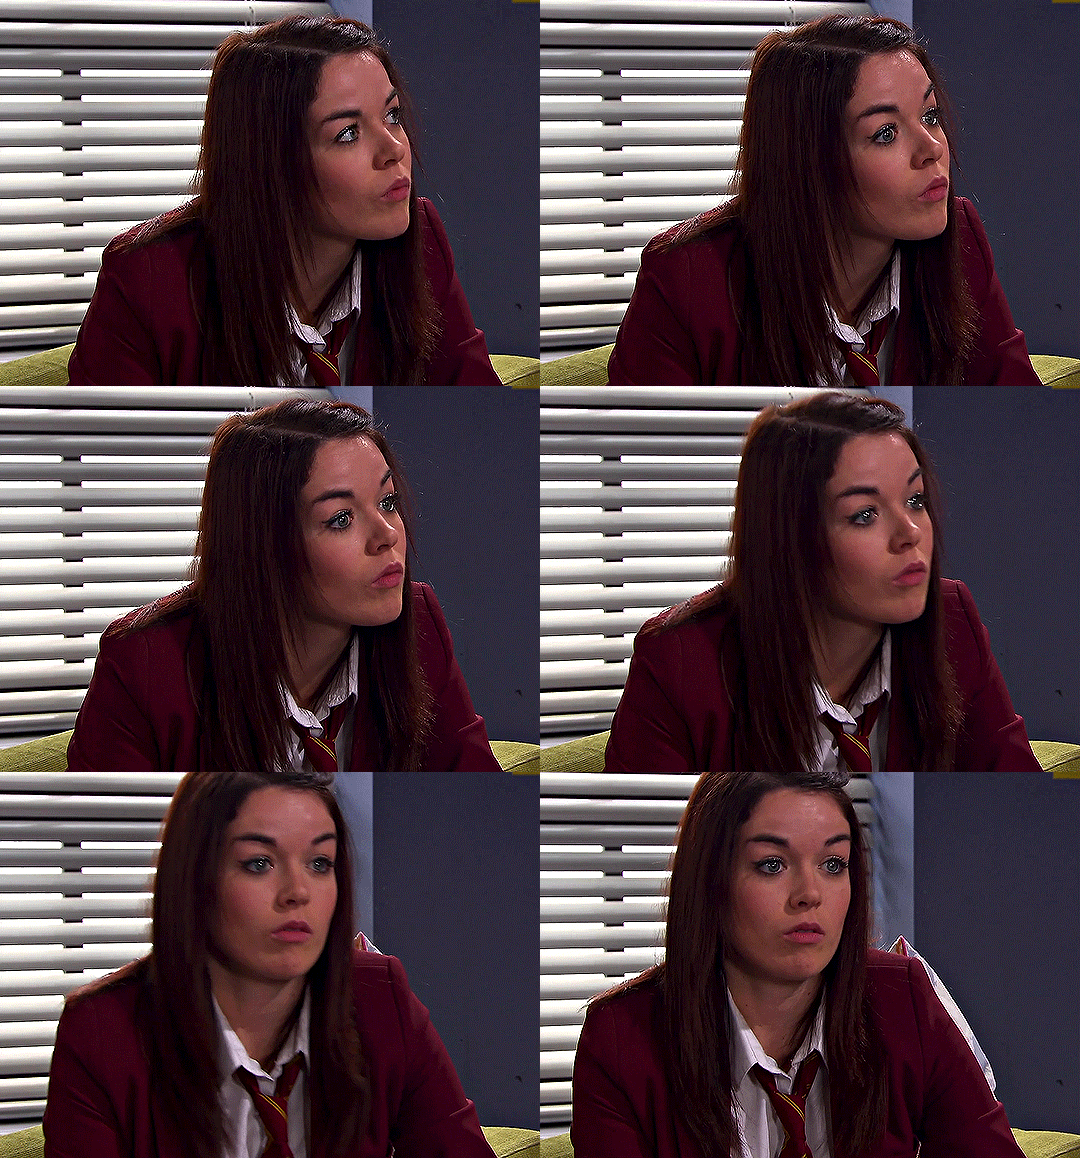

to this
I use the same four adjustment layers on every gif I make. for ease, I have these come up as blank layers to adjust as I want as the action called ‘correction layers’. either press play on this action or choose your own under layer > new adjustment layer.
CURVES: this is best used to brighten and correct the colours in the lighting. use the white and black eyedropper tools on your gif and adjust the graph accordingly to make your gif look the way you want it. I recommend messing around and selecting different light and dark places until you find the one you like best.
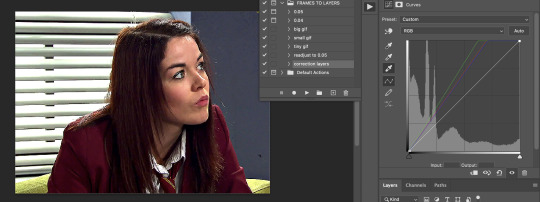
VIBRANCE: just change the amount to make your gif look more (or less) colourful.

SELECTIVE COLOR: click on the different colour options and adjust the different colour amounts until you get your gif the way you want it. I recommend always increasing the black under the black option menu by at leat one or two to increase contrast in your gif.
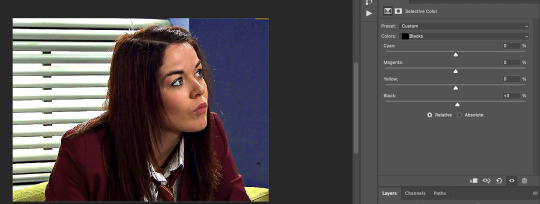
EXPOSURE: this one is probably the most important, especially in darker more dull settings. make sure you don’t over expose though because it’ll look bad.
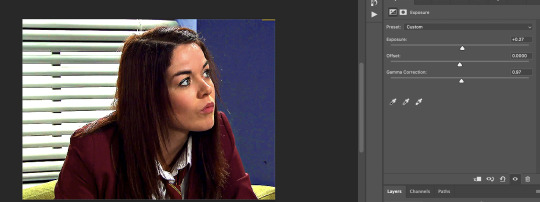
I also recommend the colour balance adjustment layer if your gif isn't looking how you want it to after the selective colour layer. if you’re making a gif set of just one scene/you want to use the same colouring on multiple gifs, just copy all the the adjustment layers in the layers tab and paste them on your next gif.
once you’re finished, you need to export your gif. you do this under file > export > save for web (legacy) (the mac keyboard shortcut is shift+option+command+S). make sure your settings look like this and that looping is set for forever. your gif will look more saturated here, don’t worry about it.
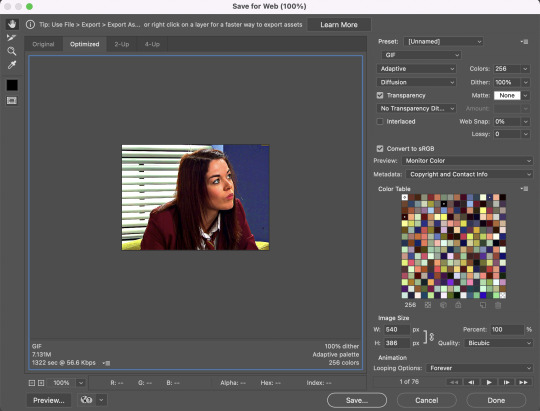
then press save and name it whatever you want and press save again. now because we changed it from frames to video earlier in order to edit it, the frame rate has changed. to fix this, reopen your gif under file > open. whilst you’re doing this, check that your gif file size is under 10mb or tumblr won’t let you post it. if it’s over, you’ll need to either delete frames or put it through this online optimiser.
for readjusting the frame rate, I have a nice easy action called readjust to 0.05 that you can just press play on. if you used a different frame rate, press the three lines on the right side of the timeline, press select all frames, and then edit the frame rate on any of the individual frames on the timeline and it’ll change it for all of them.
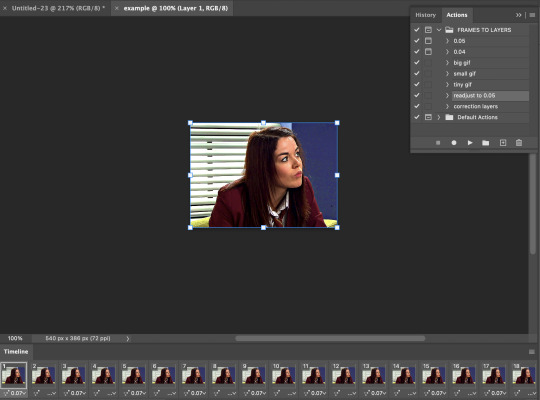
to delete frames to shorten your gif and reduce it’s size, just select them from the bottom from either the beginning or end of your gif and press the trash button at the bottom.
then simply export through save for web again and you have a finished gif like this! make sure the name ends in .gif or Tumblr tends to not let them work.

adding text is pretty easy too, just you the text tool on the left hand side. for more advanced effects, I recommend this tutorial on gradient maps and this tutorial on pretty text effects. any questions on this tutorial or further gif effects just shoot me an ask! enjoy!
also, if you want gradient text in your tumblr caption, I use this tool (just the white box part in the bottom right corner) to generate the html.
22 notes
·
View notes
Text
HOW TO GIF USING TIMELINE INSTEAD OF FRAMES

I’m coming to change your life and teach you how to make gifs using timeline animation and screen recording. This is an update of a previous tutorial I made that used Quicktime Player but we’re going to bypass quicktime player in this one since I don’t find it works as well anymore. The benefit to this method in my opinion is that it’s fast, requires little set up per gif, and gets rid of any mess regarding frame skipping and glitching.
what you’ll need: photoshop, basic photoshop knowledge, an HD video, VLC player.
I know lots of people use frame animation. I used to always make my gifs that way. This is just a way that I found worked better for me and was a lot faster and made gifs come out cleaner (making frame caps got real slow on my computer for some strange reason).
ANYWAY so what you need for this, most importantly, is an HD video, VLC Player and Photoshop. At least for the screen recording process. But if you are making gifs of short videos like youtube or something, you don’t necessarily have to record them with quick time as long as you download them. VLC player is super easy to download if you don’t have it already just google it. There’s a MAC and PC version. Now here we go:
First, I open the video I want to gif in VLC player. For this tutorial, it’s an episode of Legacies in 1080p. I get the video to about 30 seconds before the scene I want to gif (keep in mind you can do the whole scene, you’re going to cut it up later). Pause the video.
Then you’ll go up to “playback” in the menu and select record.

Play the scene through and when you’re done, go back up there and click record again to turn recording off.
The video should save automatically to your video or movie folder on your computer. Mine saves in user/movies on a mac. You’ll see that they save with these VLC labels so if you can’t find yours, try searching for that.
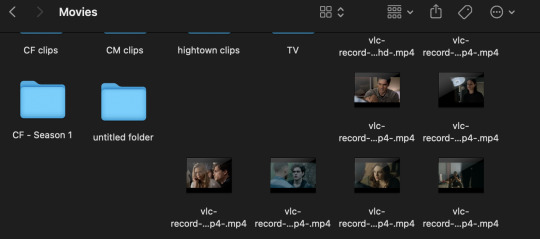
I’m going to click the one I want, and just drag it straight to photoshop. When you do that, it’ll open like this:
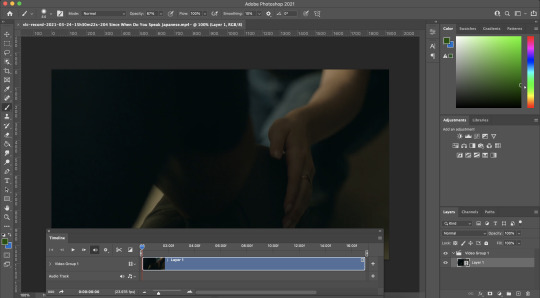
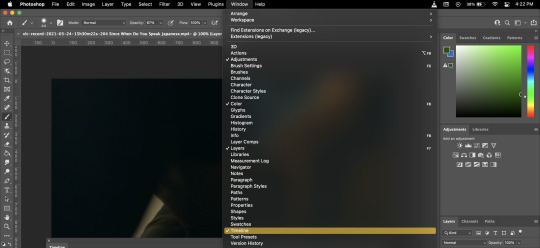
That window at the bottom is called “timeline.” If you don’t see it, go up to the menu, select window then timeline and it’ll appear.
Now your video is ready to work with. The first thing you’ll need to do is change the speed and then the size. To change the speed, you’ll go down to timeline and select the tiny arrow in the far right corner of the video.
[NOTE: IT IS IMPORTANT TO ALWAYS CHANGE THE SPEED AS YOUR FIRST STEP. Once your video is converted to a smart object in the resizing step, you can’t alter the timing as easily.]


Change the speed from 100% to 50% or 40 if you need it slower.
Next, you’ll need to double the length of the video since you just cut that speed in half. Just grab ahold of the far right side of the video and drag it to the right until it won’t let you drag it any further.
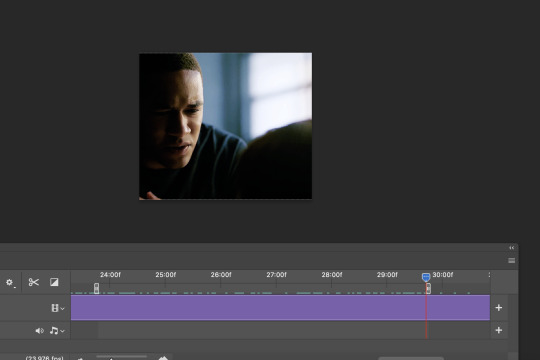
Now in the timeline, you’ll see three things: the red line, and the two gray ends at the left and right sides. Those can all be moved. Anything between the gray ends is what will be saved when you export. The red line effects what you see on your screen. I’m going to drag the red line to the point I want a gif of just to help guide my cropping process. It’s landed here.
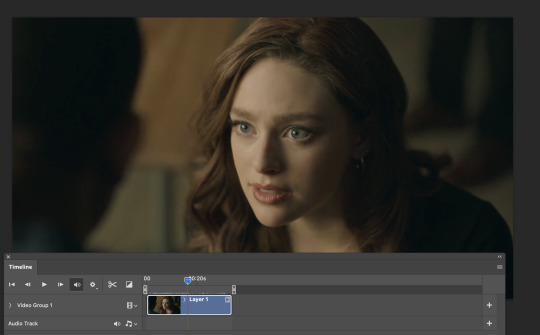
Now, you can use the crop tool to select the shape of your gif and what you want in frame. Since this tutorial is about giffing on timeline, I’ll assume you already know how to crop. But if you have questions, ask me. Cropping my gif got me here:
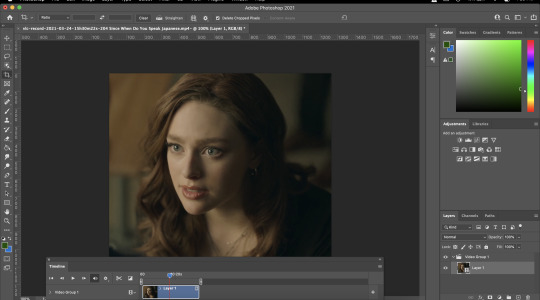
Now, I need to resize it so the gif isn’t 2930832 pixels. I go to image u in the top menu bar, and then image size. And resize the width to 540 for tumblr and here I am.
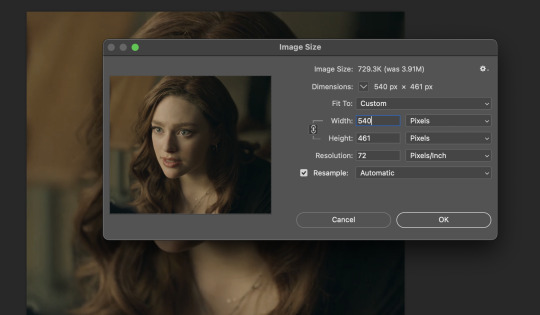
Photoshop will ask if you’re okay with converting the video, select convert.
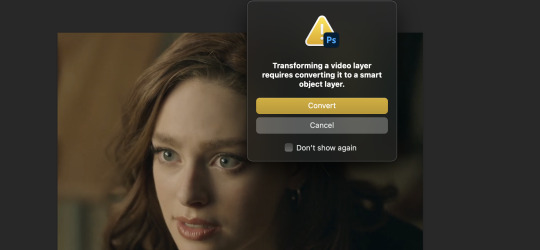
You’ll see the video get smaller and you’re here:
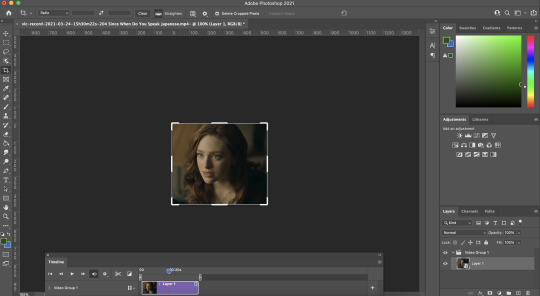
I zoom in to the size I want it for editing and now you can begin adding your sharpening and coloring.
To sharpen, make sure your video layer is still selected over on the right, and then select filter + sharpen + smart sharpen
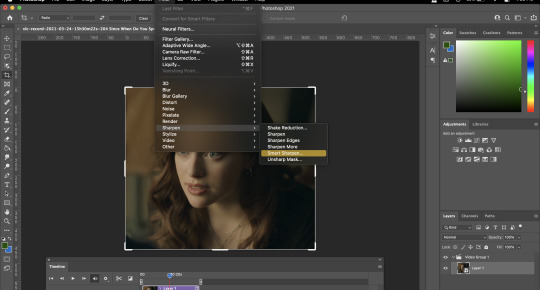
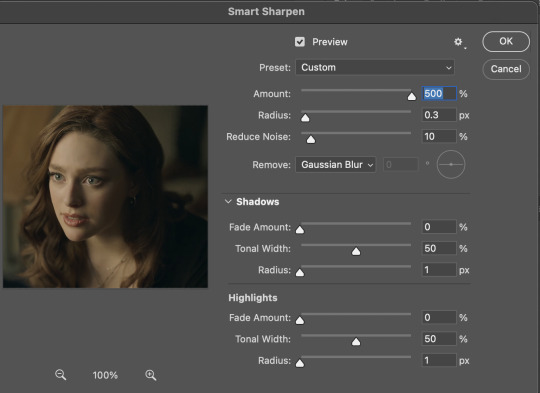
Now add your sharpening settings as you like them. Mine look like this, and as you can see when I add them, they are added to the video layer on the right:
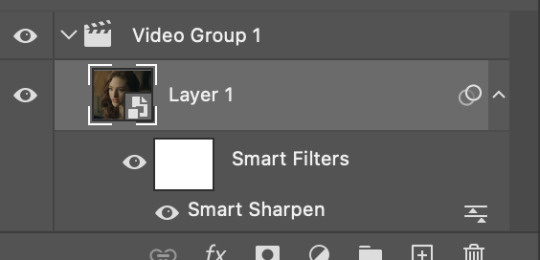
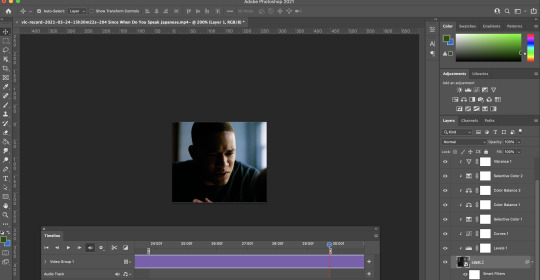
Now that you have a sharpening, you can add coloring as you see fit. It’s up to you how you add your colorings. I like to keep mine inside the video group on the right. If you put the outside of it/above it, they’ll show up on the timeline as separate layers. That’s dealers choice. Once you apply your coloring, it should look like this:
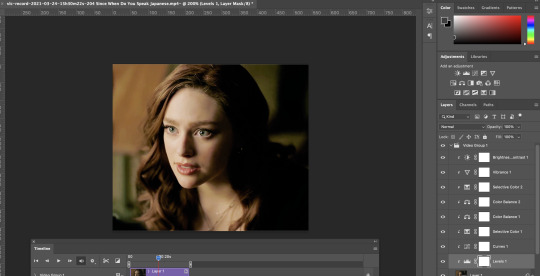
Once you have your scene colored, sharpened, and properly sized, you can select the area you want to export as a gif. Use the gray sliders on the timeline to select the area you want. Keep it to roughly 6-8 seconds long for larger gifs so you can fit under the tumblr limit. But this will vary depending on colors and such.
The little mountains with the slider underneath the timeline will help you to zoom in and out along the timeline to focus in on smaller chunks.
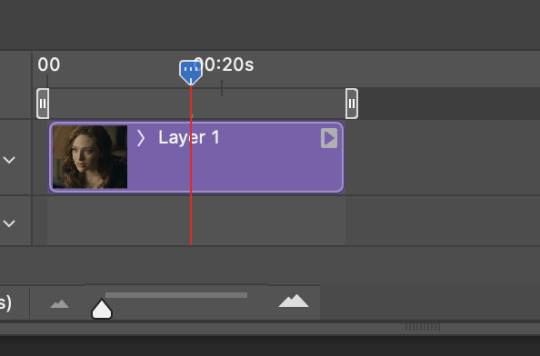

As you can see down here, I selected the area I want to gif for my first gif.
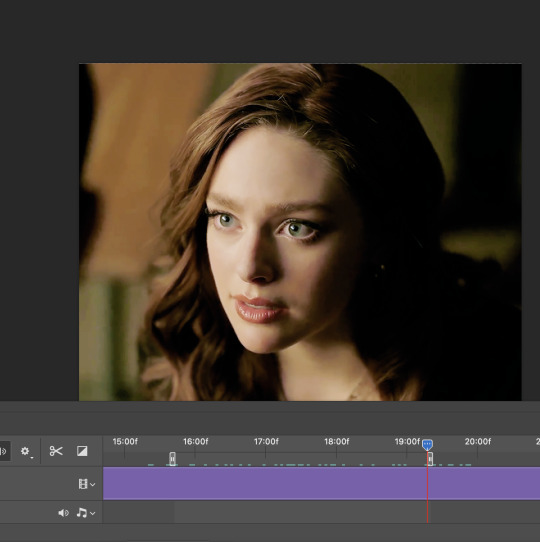
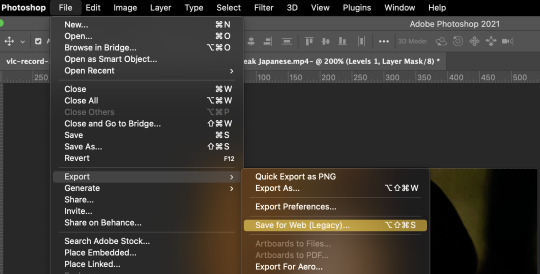
Now, I can hit file, export, save for web and export my first gif.
[Full disclosure, I went back and resized mine before I added it here because I realized 540 was going to be too big for the tutorial but that’s the width i usually use for big gifs. ]

Once that’s saved, you’ll be brought back to your photoshop document. And now, you can go right ahead and make the next gif in your set without having to do or change anything besides the sliders. So I’m going to just move the sliders over and gif Rafael.
As you can see, he’s a little off center. So I’m just going to grab right ahold of the video layer using the move tool, and move him over.
Now I export + save for web again. And save my second gif.
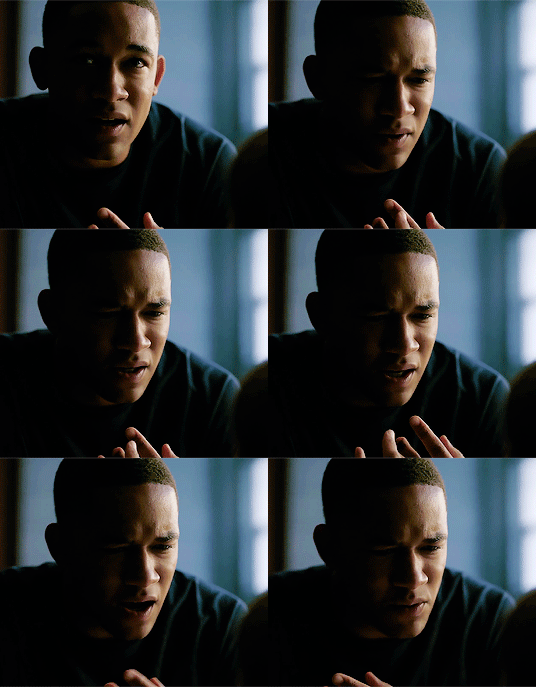
And I can keep going if I choose to.
The beauty of this method is that once you get set up, you can make 934828423 gifs from one scene at once and you only have to color, crop, size, and sharpen once. Sometimes, you’ll need to make some coloring or placement adjustments along the way, but it’s al in one document. And you’ll also see that in time, the early steps like timing and sizing come in second nature and take just a few simple seconds making this method really quick and breezy.
#userbru#photoshop tutorial#dearindies#gif tutorial#userfleur#userdrea#usermeliorn#idk whoever wants to reblog this that's cool#mine#tutorial#quirkyresources#i know the last time i made one of these people had their minds blown so hopefully it helps someone
385 notes
·
View notes
Photo
Hello! As requested, here is a tutorial on how I make my gifs. I would like to preface this by saying there are many ways to make gifs, and there’s no right or wrong answer imo. This is just how I personally go about doing so!
I will be using PS CC 2017, but as long as you have the video timeline option, it shouldn’t matter too much; on any version of PS, you should be able to adapt anything I mention here! You will also need some kind of screen recording software. I’ll talk a little more about that under the cut.
To start, you need the source material you will be making the gifs from! I get mine from snahp(.)it (avoiding links so tumblr hopefully doesn’t banish this from the tags lmao) and I always opt for either 1080p or 2160p. Not all laptops will support 2160p as it’s 4K, but either works great! You just want your gifs to be the best quality possible.
Next is where the screen recording comes in. I don’t use the screencapping method to make my gifs (where you use a program to cap a clip and then load those caps into a stack in PS). This isn’t for any particular reason… it’s just how my friends, (who very kindly taught me to gif), had always done it, so it’s now how I do it too. Personally, I find the quality to be just as good as the screencapping method, and have never noticed a difference between the two.
As I have a PC, I use the software built into it for screen-recording. If you go here: theverge(.)com/2020/4/21/21222533/record-screen-pc-windows-laptop-xbox-game-bar-how-to – you can see how to use the XBOX screenrecorder to record from files you have d*wnloaded. This also works on some streaming sites, but I think it depends on what browser you use. Personally, I recommend Firefox, as that seems to bypass a lot of the blocking and ads that occur when trying to do this sort of thing.
For MAC users, I have been told handbrake works well, as it converts MKV files to MP4, which can then be used to make gifs. You only need to convert part of the file to MP4 depending on how much you want to gif, and this also bypasses the screenrecording stage, as you can edit MP4 clips on Quicktime. I am told you can split them into smaller clips by going to edit > trim and it saves the new clip!
I have also used anyvideoconverter for small clips, but I can’t say what it does to the quality of your video, or how big of a file it lets you put in! With the XBOX screenrecorder, it doesn’t matter what type of video files you get, as the recording will save to MP4 anyway.
LOADING YOUR FRAMES
Now, go ahead and record whatever clips you want to gif. Make sure you have the video timeline open, by going to window > timeline. Then, go to file > import > video frames to layers.
Next, select and open your clip from where it has saved (with the XBOX recorder, it saves in video > captures). You should see a little window pop up, where you can move the sliders back and forth to clip your recording to whichever part(s) you specifically want to gif. I recommend trying not to load a lot of frames into photoshop at once, but I would be a hypocrite to say that, since I do it a lot lmao. Just be patient if you do!
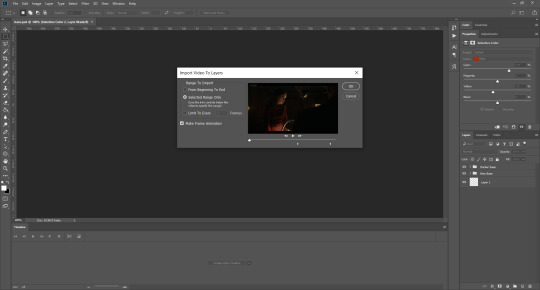
Once you have chosen the length, click okay. Never, EVER, I repeat NEVER click the button that says “limit to every __ frames”. This really ruins the flow and quality of your gif—it’s better to have shorter, but smoother gifs, I promise. And with tumblr’s new 10 MB limit, it shouldn’t be a problem anyway!
Then, your frames should open up. What we want to do is make them into a smart object, so we can edit all the layers at the same time. To do this, click the small button in the left-hand corner. ALWAYS click this first. If you don’t, it will only convert the first frame to a smart object and the gif won’t work.

Give it a second to sort itself out, then, on the right-hand side, select all your frames at once using the shift key.
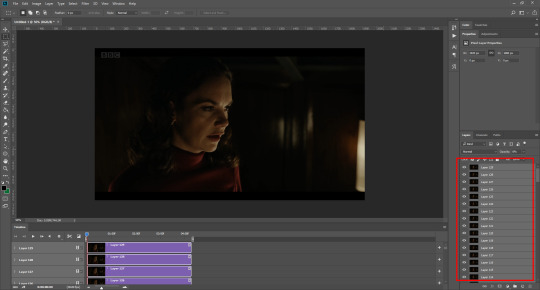
Then, go to filter > convert for smart filters. This might take a minute. Don’t click anything else in case PS gets angry lmao, just leave it for a second and it’ll do its thing. The more frames you have, the longer it takes! Now we have our gif, but it needs to be cropped, sharpened and coloured!
CROPPING
You want to start by selecting the rectangular marquee tool on the left-hand side, then drag it across by clicking and highlighting the area you would like to crop your gif to, like so:
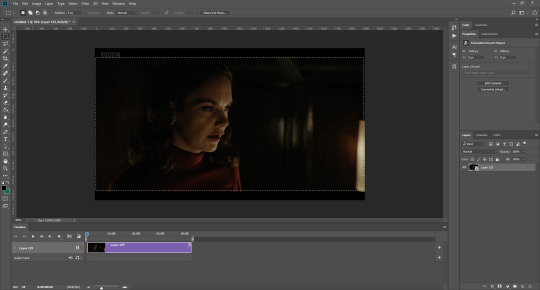
What I tend to do is select everything inside the black lines you sometimes get around your gif (this depends on what file you d*wnload), and also the tiniest bit inside the sides. This is because I’ve found if you crop it right up to the edge, you get a tiny bit of transparency on the sides of your gifs, which I’d rather avoid.
Once you have your desired selection, go to image > crop. Now, the dimensions for tumblr are 540px width, so all your gifs have to be that width. However, the length is up to you. I really like big gifs, so sometimes I even make a full square, or even longer. It’s entirely up to you, and what kind of set you want to make.
For the purposes of this gif, I will stick to what I usually go for, 540px by 350 px. This will mean you’ll have to crop some width off, but that’s okay, since Marisa isn’t central anyway. The cropping is always trial and error for me, as sometimes people move out of the frame within in the gif. The best thing to do is just try it, and then move the slider in the timeline window at the bottom to see if the person stays inside the gif, and if not, adjust accordingly.
Next, go to image > image size:
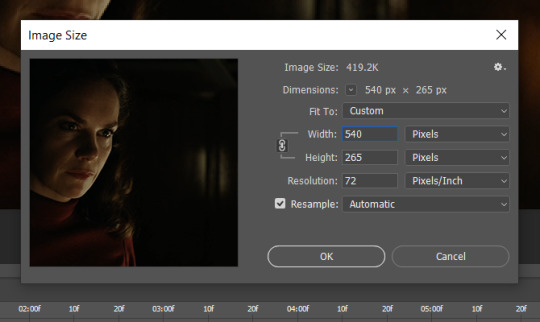
In this box, if I put the width as 540, the gif is a smaller height than I want, as it keeps to the dimensions of the gif when you load it into PS. That’s okay, just put the height you want instead, and we’ll crop off the excess.
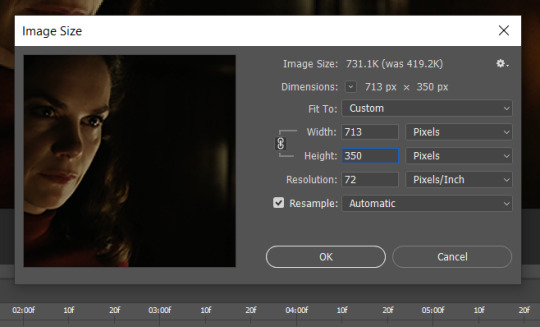
Then click OK. Using the rectangular marquee tool again, we need to remove the excess width. Part of the reason I like this version of PS is that it tells you the width of your selection as you do it, but you can always use the ruler as a guide, and check the size of your image by going to image > image size again.
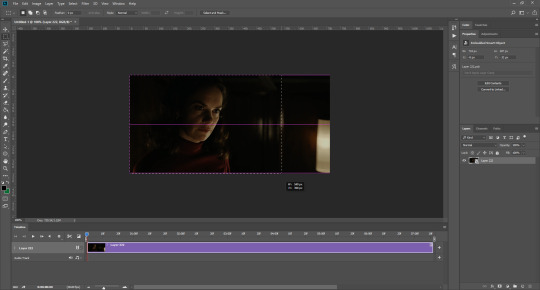

Again, use image > crop, and your gif should now be the correct size!
You can also use the crop tool in the timeline window to crop the length of your gif:
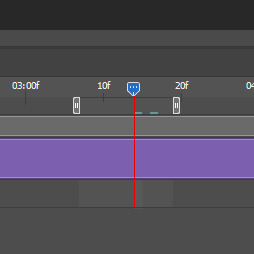
However, I tend to wait until later on to do this (which will be explained further down!)
SHARPENING
Next you want to go to filter > sharpen > smart sharpen.
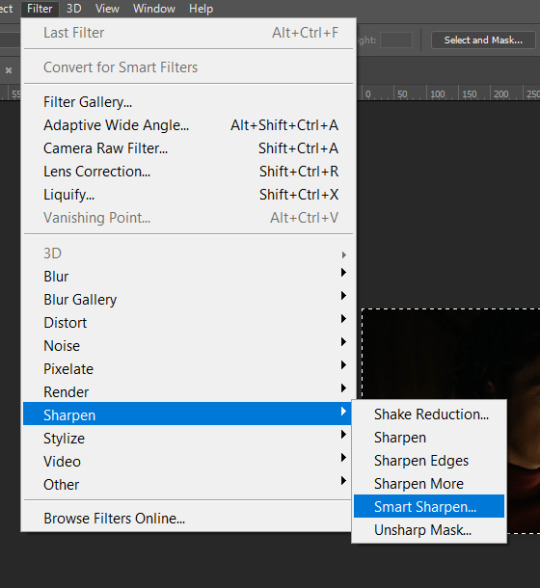
These are my settings. However, 0.4px is very sharp, too much so, but that’s easily fixed.
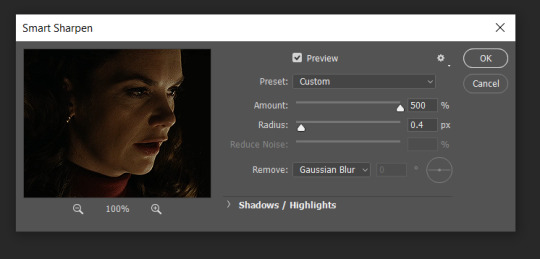
Go to filter > blur > Gaussian blur and then set it to 1.0.
Now on the right-hand side, we need to reduce the blur, so double click the little adjustment button, and change the opacity of the blur. I usually go for 20-30%!

Then click OK, and that’s your sharpening done!
COLOURING
I picked this scene on purpose as it’s dark, so good for showing how to colour a gif. I have a base psd which consists of some very basic adjustments, but it mostly exists so I don’t forget what adjustment layers I like to use. I adjust them every time I make a gif, essentially colouring each gif from scratch.
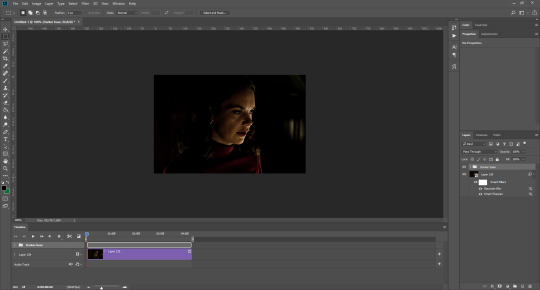
In this case, the psd actually makes it darker. So, what I will do is turn each layer off, and adjust as I go. A lot of people say using lots of adjustment layers ruins the quality of your gif… I have never found this to be true, as long as you are gentle with them. If you whack the brightness right up to the top, it’s going to ruin your gif no matter if you use 1 adjustment layer or 100. I would just say use your common sense, and adjust a little at a time!
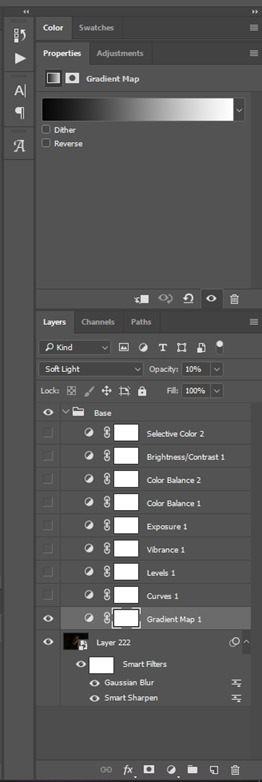
I start with a simple black to white gradient map set to soft light, because I think it helps you see depth once you add some brightness to it. I usually do this on about 10%, or more if needed. It’s probably unnecessary, I just like how it looks!
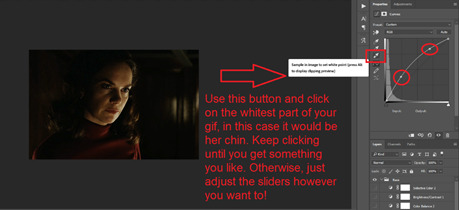
Then, I move onto using curves and levels. This is where things can diverge depending on who you’re colouring. If this person is white, it doesn’t matter too much. If they’re not white, you don’t want to white wash them. My best advice is to play around with it. By adding vibrance and other (usually the red) selective colour settings later, you can ensure you don’t change the person’s skin tone from what it originally was. You can also use layer masks at varying opacities (various shades of grey), on your curves and levels, to remove some brightening so that you’re not changing anyone’s skin colour. Just brighten slowly and check in with yourself honestly about how your gif looks.
Some people don’t like using levels, or curves. It’s completely up to you. I tend to use both because levels are good for bringing depth, even if not brightening (though I like to use them for that as well).
One thing you can do is use the white point of the gif to make PS adjust the curves itself, however I like to drag the sliders myself and see what it looks like. Just make sure it’s not too bright, as we will be using further layers to brighten more, after.
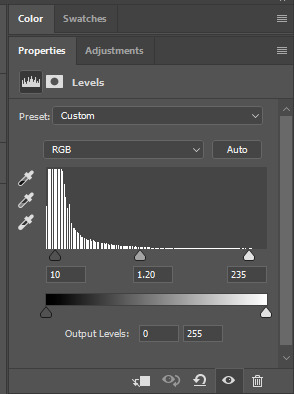
Next is levels. The slider on the left controls the black point, the one in the middle controls the midtones, and the one on the right controls the white points. The black brings depth, the midtones adjust the overall brightness, and the white points produce stronger highlights. Again, you’ll get a feel for how this works as you practice. Just don’t use the white point excessively, especially if your characters are not white.
Then I add vibrance (+20!), because we’ve removed a lot of it when lightening the gif. Next is exposure, which I find brings out the highlight and shadow areas more effectively:

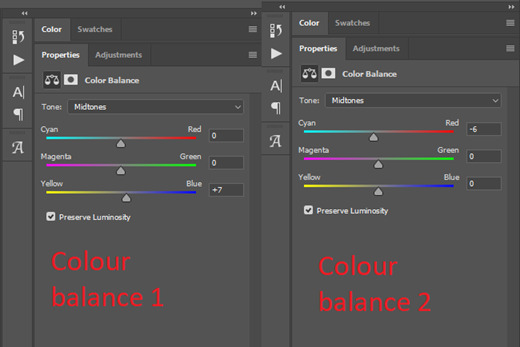
Then colour balance! This helps with scenes that might be a certain colour, i.e. too blue, too green, too red, etc. Moving the sliders in the opposite direction of the colour your gif is will counteract it. The best thing to do when accounting for different colours, is to make a new layer every time you change colour, so that you don’t get confused. I always add a new layer for colour balance and selective colour if I want to change more than one thing. So one for red, one for yellow, one for pink, etc.
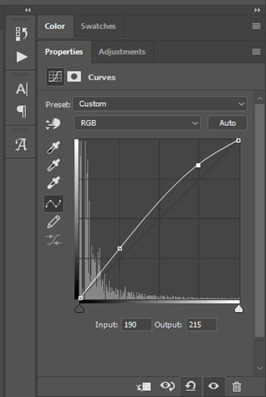
A layer of brightness just to make the gif pop, and because the scene is extra dark, I added a very gentle extra curves layer:
SAVING YOUR GIF
Time to save the gif. You can go ahead and file > export > save for web (legacy) now, but then you’ll have to reopen the gif to reset the frame rate from 0.07, to 0.05. Instead of doing that, I use a modified action. The original was made by the very talented @elenafisher! So I do not take credit for that at all. You can find the original here: elenafisher(.)tumblr(.)com/post/190817437374/gif-sharpening-action-2-preview-download and in my resources tag. Please reblog it if you’re going to use this!
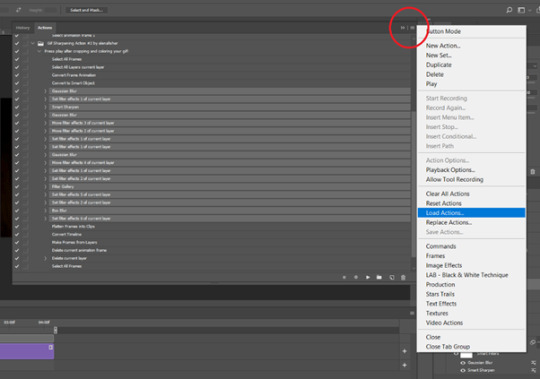
To use an action, first make sure you have actions turned on in window > actions. To load in your action, go to the little lines circled, and then load the action from your downloads:
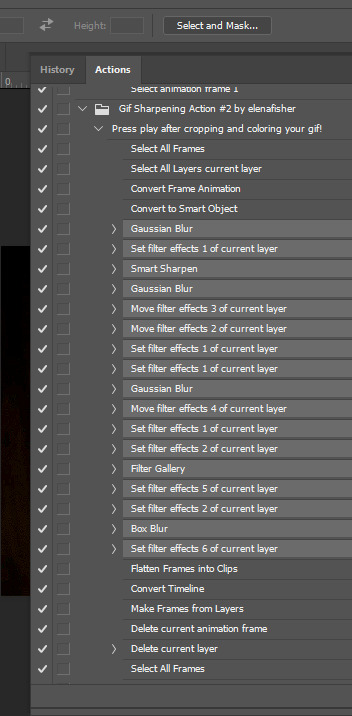
Obviously if you don’t want to sharpen your gifs yourself, you can use the action as it is, and it will give you a beautiful glowing effect. If you’d just like to use it to flatten your gif into frames like I do, make sure to take out all the items I have highlighted:
Until it looks like this!
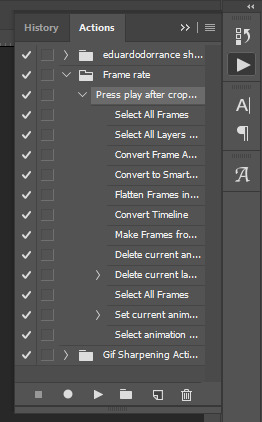
Make sure you have the layer under the file name highlighted, and then click the play button at the bottom! (If you get a screen saying select all frames cannot be found, don’t worry, just click continue!) You can delete the layer that does that if you want, I just keep it in case I realise I’ve forgotten to do something, because you can click cancel and edit your gif before you flatten it. Of course you can undo the steps to get back to the smart object version of your gif, it just takes longer!
And now your gif is in frames and set to 0.05 already, so you don’t have to change the speed! All you need to do now before saving is change the gif cycle to “forever” in the bottom left-hand corner:
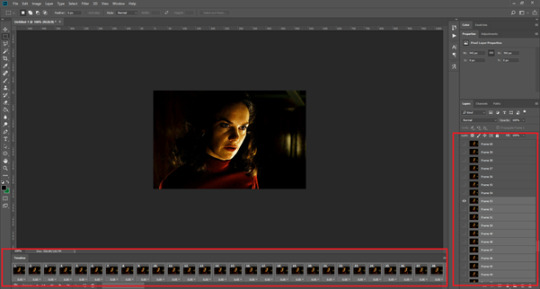
Then to save the gif go to file > export > save for web (legacy). Sometimes, the gif is bigger than the tumblr 10MB limit. You’ll be able to see this in the bottom left-hand corner of the gif save settings. If this is the case, I like to preview the gif, to see whether it would be best to cut frames off of the beginning or the end, or both. When you’ve decided, you can select the frames at the bottom, and in the right-hand side panel, and delete them both using the little bins/trash icons.
I keep checking and deleting frames until I get the gif under 10 MB! Just don’t delete frames from the middle, as then you’ll have the same issue as if you selected “every other frame” when making the gif: it won’t flow!
Lastly, these are my save settings:
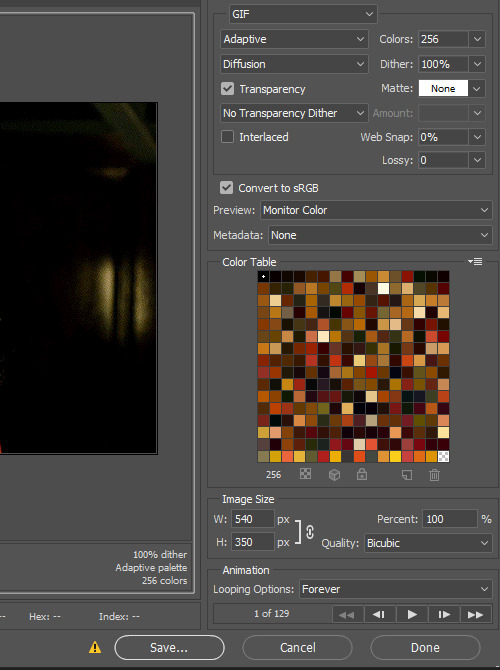
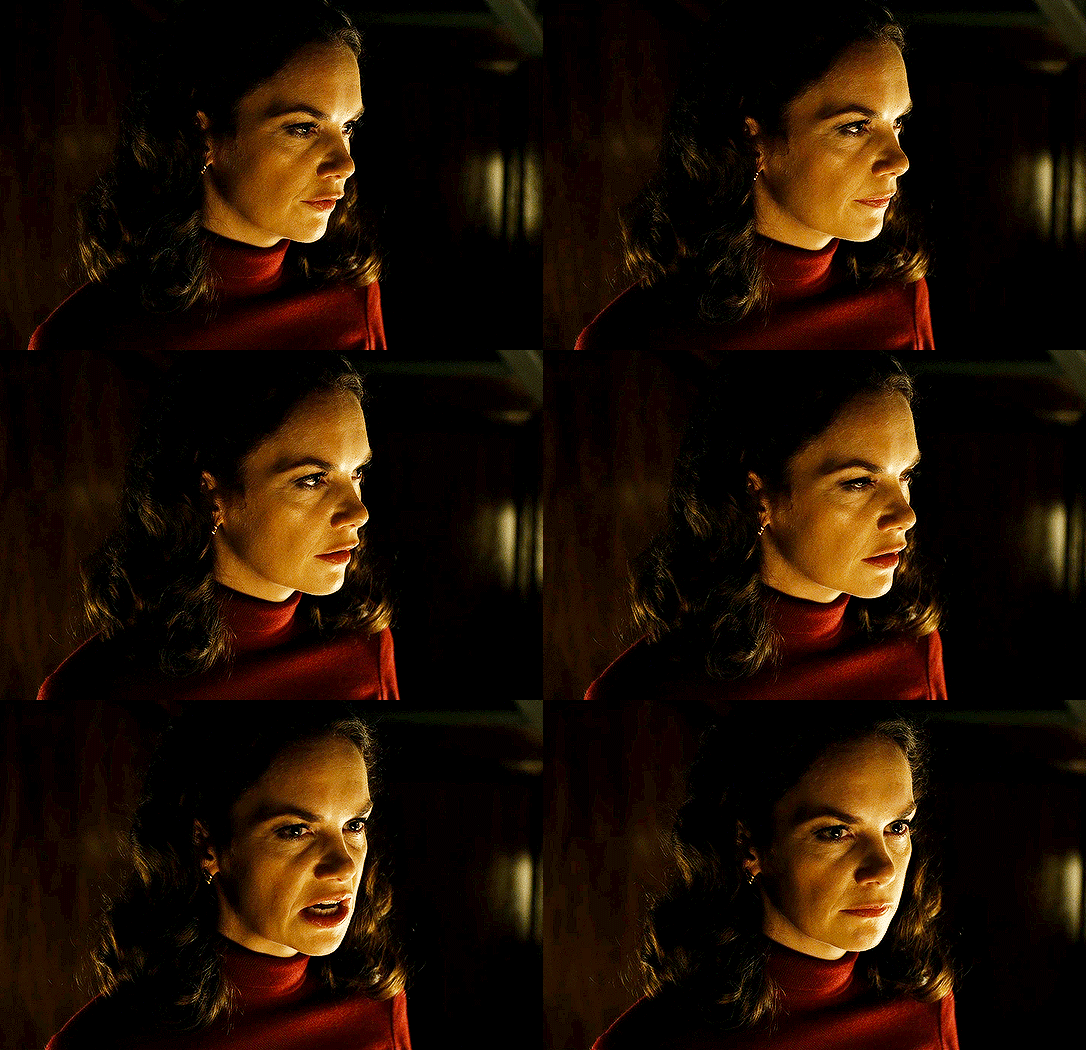
So that’s it! That’s how I make all my gifs. Blending I do when the gifs are in the grouped, smart filter stage, whereas text I add on during the framing section above! Really hope this is helpful, please feel free to ask any questions you may have! 💖
#gif tutorial#tutorial*#completeresources#yeahps#chaoticresources#allresources#mikesmom#usergeo#userava#usertix#usersmile#usertom#if you'd like me to cover anything more advanced just shout#i wanted to show how i add text too but tumblr wouldn't let me add any more pics#but people can let me know if that's something you'd want!
518 notes
·
View notes
Photo

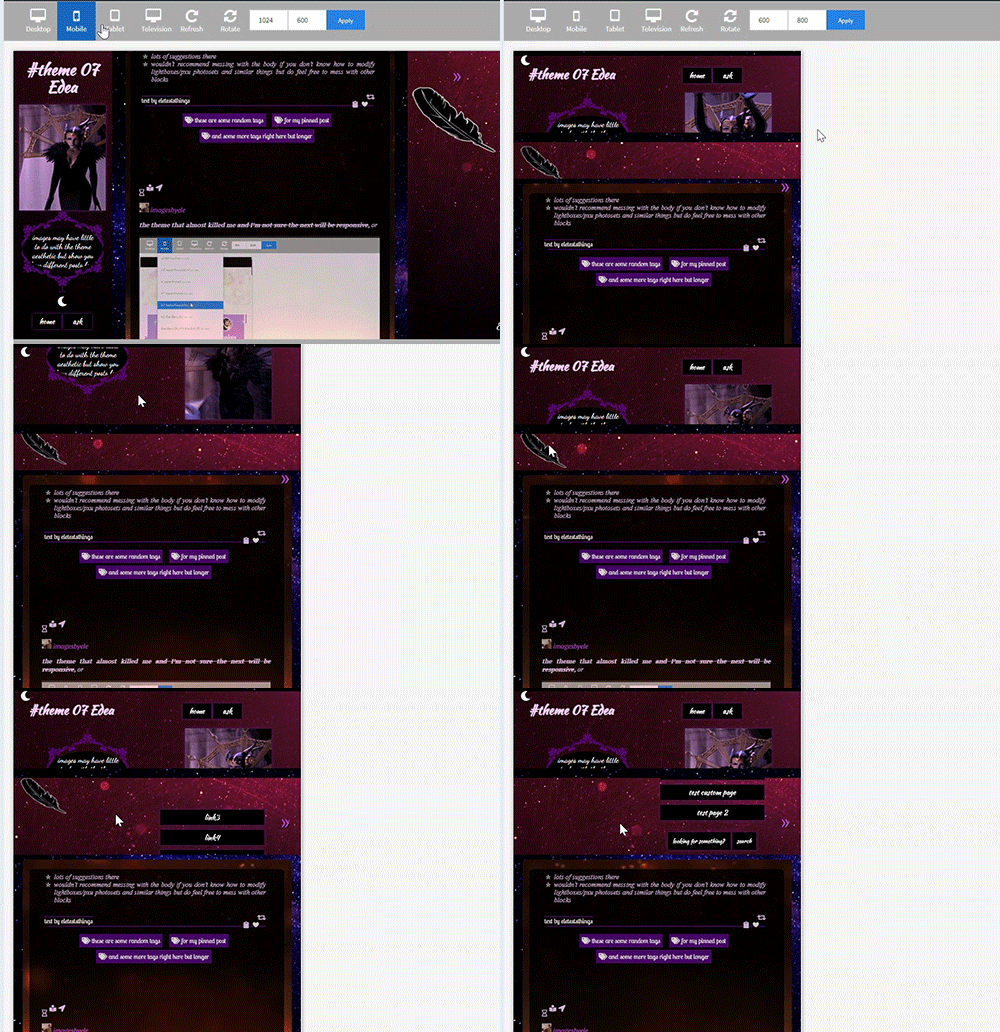
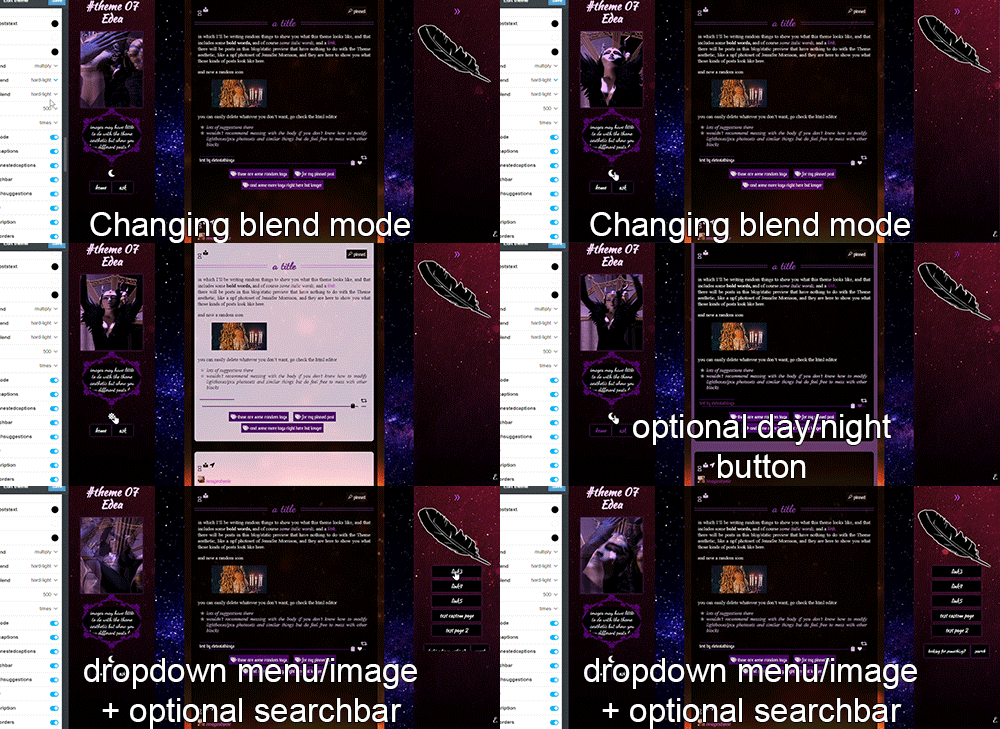

click for a full view!
this is the blog I legit grew to love or
theme 07 - Edea
100% tall container and sidebars on desktop / see gif 2 for responsiveness. As always super customizable!
like or reblog if you use (or just if you like!). Don’t take off the credit, but edit as you please. Links and more instructions/specific sizes in the source! Do let me know if something is wrong, I welcome feedback of any kind. reminder I have a ko-fi if you’d like to support me <3
in this blog you’ll find: -the soundcloud player button will automatically be the same color as your tags background (because it's small and it looks nicer to have it match). The player is minimal with visible album cover, by shythemes. Also by @shythemes and with @bychloethemes fix, the pxu photosets and the way I styled the like button, lightboxes, and the script for automatic video resizing. -npf photoset fix and the (optional) searchbar (hidden under the feather) by @glenthemes and button to copy the url of the post. -a second source link will appear if the post has a custom source/a source outside of tumblr. - @magnusthemes' no ‘href.li anymore’ script. -by @eggdesign (optional) daynight button you can toggle off. -dropdown menu that appears when you click on the animated link, a floating feather (or whatever image you choose instead of it) will show 5 more navi-links and a link to each custom page you make if you enable 'show link to this page'. As many as you want, you can scroll down the sidebar when they exceed its height. -Spotify (audio and npf posts) will have a max height that is half the width of your posts instead of a big album art so they won’t become giant (keeping the 80px height to make the album art disappear will remove the list of songs if you post a playlist so I shortened it * see notes in the post linked in the source. -responsiveness: even 540px posts + padding and containers will fit in the smallest desktop screen (1024px) because sidebars grow slightly smaller than their regular 250px. In all tablets and mobiles you get the sidebars on top and the container below, you can scroll down to see the content and the screen will also scroll if needed. (due to everything being naturally 100% tall and the post-width changing depending on the user I couldn’t have thin posts fit in big tablet or I’d risk cutting off the larger ones). Topsidebar1 will also show as much content in a row as possible. -lines around titles of posts from css-tricks, optional unnested captions by @annasthms -lots of instructions in the html if you decide to change something more.
what you can customize without going to the html page:
rest under read more because as always it got long. Please check it out!
for the toggle on and off section: -turn on and off the visibility of the second sidebar bg if you just want the floating feather (or an image you may upload instead), daynight mode, the searchbar, the searchbar suggestions that appear when you click on it if you don't want to go to the html editor to add the links, unnested captions for textposts and unnested captions for all other posts ( see faq if curious as to why I divided them); the glow around navi links and description. The normal description if turned off will be replaced by one with a "fancy" background that fits this theme. Rounded borders.
for the pick it/upload section: -pretty much all colors in your 'regular' theme, including each sidebar, the posts container, the posts second container (entries) and the posts background. All images you see except the nightmode button. Including a secondary bg image for your sidebar when they turn into topbars (given the big change of width), see post linked in the source for more instructions. -if you have enabled daynight button, you can change the color of posts bg, text, entries, backgrounds, bottom permalinks, links, italic, questions, answers. I couldn't add more or I'd surpass the number of allowed meta tags, but it should be enough to allow people to read your posts (if someone can't read white on black text, like me, they can click on the button and have black on white text, or some other combo) If you want to add more you’ll have to go in the html edtior and search body.night for ‘instructions’, it’s pretty easy now that the rest is already written.
select section: -when it comes to the container behind the posts and each sidebar you can select the blending mode between color and background image, which can be none if you want only one to show fully, or can be hard-light, soft-light, multiply and more, to make the image an overlay and see the result (for example in the preview the sidebar's bg gifs are on multiply or they'd be golden, on top of violet/purple, but in gif 3 you also see the 2nd sidebar on hard-light). -post width (between 400, 450, 500 and 540 px). -the font of the posts text among MANY options, including some that wouldn't work well for a post but is there to show you all the potential fonts present in this theme. Why? See below.
text section: -you can type the following fonts (picking among those shown in the select menu for body font): description, blog title, post title, bottom permalinks, tags -the size of the gutter/distance between images in photosets, blog title size, post title size, posts font size, description font size -the symbol in lists items, currently a star or ' \26e6 '. You can replace with other codes or straight up the symbols, there will be a link in the source-link with a page full of other css symbols, remember to add a \ before the code itself. -the names and urls of navi links (two are under sidebar 1, currently being home and ask, 3 more in the other sidebar)
#themes#codehunters#theme#free themes#free resources#evansyhelp#dailyresources#themehunter#rp themes#rph theme#rph#rpc#fansite theme#main theme#complete resources#resourcemarket#tumblr theme#rp theme#my themes#theme 07#mine
89 notes
·
View notes
Text

i’ve been asked to make a gif tutorial so here it is! i tend to over explain and go on tangents so i’m going to try to keep this as understandable as possible lol
so first you need to download your video. i use 4k video downloader.
when you open photoshop the first thing you’ll do is go file --> import --> video frames to layers and it will bring up your finder to locate the video you’re going to be giffing.
once you select the video, this screen will come up:
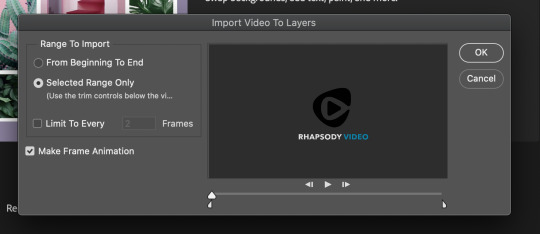
make sure you’ve selected ‘selected range only’ and then you’re going to use the two cursers on the bottom to select the portion of the video you want to gif. this won’t really work if the video is over like. 40 minutes long. because you can’t select a small enough number of frames. so keep that in mind. if i’m giffing something like lotms or a full length show i’ll open the video in imovie and cut it down so that this step works. if you have further questions on how this works i can try to answer them but i think it’s just trial and error for this part the first couple times you do it. once you’ve selected the range of the video that you want, hit ‘ok’.
once your frames/layers open in photoshop, you wanna click on ‘window’ and make sure you have these selected:

your next step is to go through the frames on the bottom of the screen and choose which ones you want to be your gif. usually importing them will give you more frames than you need so you’ll want to trim a bit off each end.
you can press ‘play’ here and it will scroll through the frames automatically for you so you can see what the gif will look like in motion
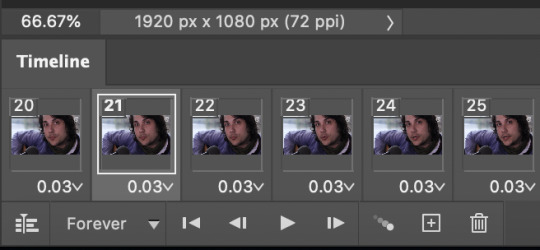
it depends on the size of your gif but i tend to go for 80-85 frames. if you have too many your gif can end up being too big for tumblr. 8mb is the size limit. this is another thing that tends to be trial and error but yea i go for about that many, try to stay under 100.
next step is to delete the layers that you don’t need, because deleting the frames when you’re trimming the gif down doesn’t delete the corresponding layers. when you select a frame, the corresponding layer on the right will have an eye next to it.

like this ^ select your first frame, find the eye in the layers, and delete all of the layers that come before that. do the same with the last frame in the gif and delete all the layers that come after it. click + shift will select as many at a time as you want, to make this easier.
at the far right of your timeline (the frames) on the bottom of the screen there’s an icon thats 4 lines which you can see below:
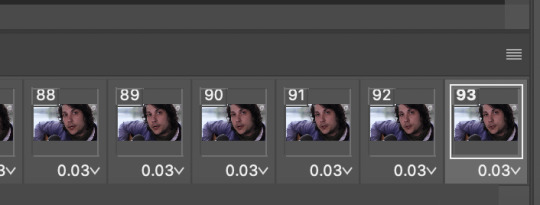
click this and select ‘select all frames’
then go to the top of your screen where it says ‘select’ and select ‘all layers’
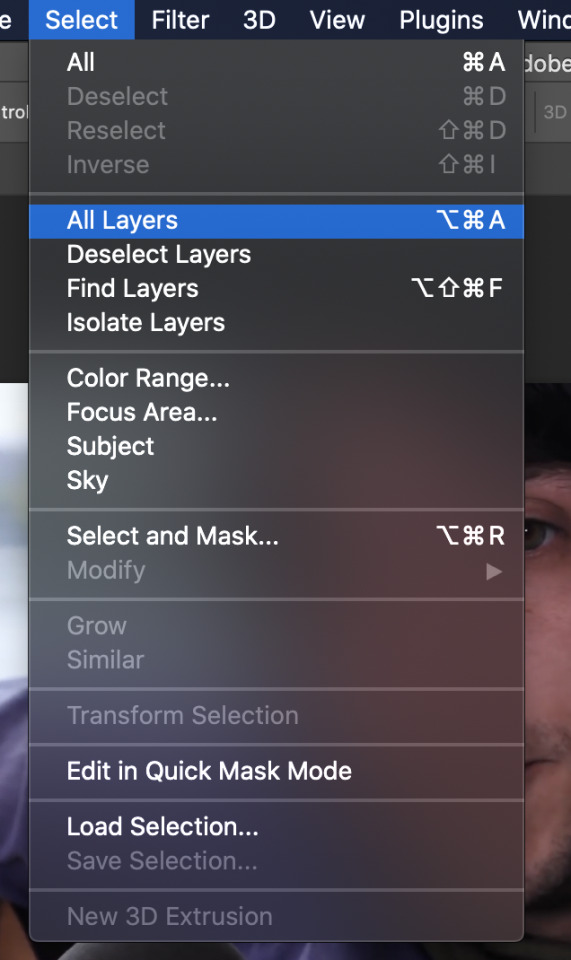
once everything is selected you need to change the framerate/delay. you see where it says ‘0.03′ underneath each frame? a lot of videos will be 0.04 in which case i would click on the framerate, select ‘other’ and type in ‘0.07′. that tends to work well. this video is 0.03 so i’m going to change it to 0.06 instead. that’s just a personal preference. if you don’t do this step, the gif will be too fast. if you don’t have all of the frames selected when you do this part, it will only change the selected frame so make sure they’re all selected before you do this.


so now it’s changed.
next you need to convert to video timeline. that’s the icon on the far left on the bottom here:
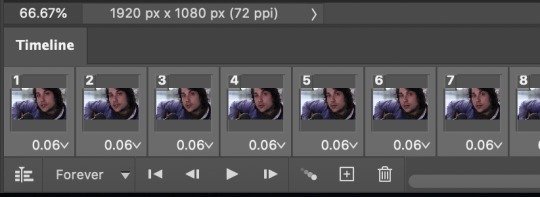
the one before ‘forever’. once you’ve done that, you need to right click on your layers (which should still be selected) and select ‘convert to smart object’.
now for all intents and purposes you have a gif! but you still need to edit it a bit.
first you should crop it if it needs cropping. i’m not going to crop the one i’m making but it’s pretty self explanatory, just select the crop tool and pick one of the preselected crop ratios. you can preview them all by clicking on them.
after that you’re going to go to the top bar and go: image --> image size
you need to resize your gif for tumblr. tumblr’s post width is 540 pixels. if you’re doing two gifs side by side they would both be 270.
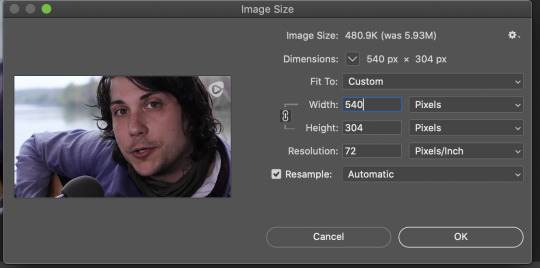
the height will automatically adjust itself.
now your gif is going to look like it’s really small but you’ll just go to the percentage above the timeline and change it to either 100% or 200%. it’s usually 100% to view it at full size but my new macbook has more pixels or something? so i have to set it to 200% to view it at full size.
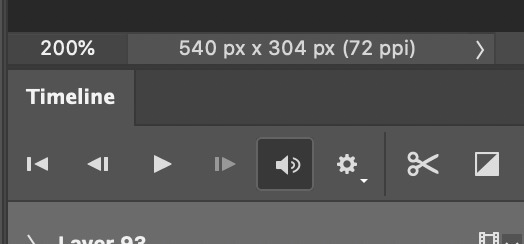
you can see here how i changed it ^
now you have a properly sized gif and any changes you make are personal preference. usually you’ll want to sharpen it. i use a sharpening action that i downloaded from a friend but you can also do smart sharpen. i would look up good sharpening settings because i don’t know them personally because i use an action. you can find the sharpening stuff through the ‘filter’ dropdown.
and then the last step i do is coloring. coloring isn’t necessary but it makes your gifs look better. coloring is personal preference though and it’s just about playing around with settings. i usually use brightness/contrast, vibrance, hue/saturation, selective color, and color balance. you can also download coloring PSDs from the internet which is like premade coloring layers that you can open in photoshop.
this is what my gif looks like without any coloring and i’ll show you the finished product at the end when i save it
so one you’re happy with your gif you’re going to go: file --> export --> save for web (legacy)
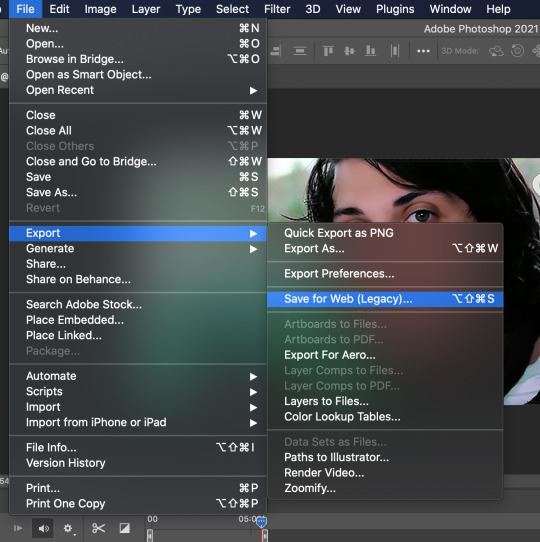
depending on how your computer wants to operate, this can take a while. while it’s buffering i hit ‘escape’ and it takes me to the save page without the wait.
these are my save settings:
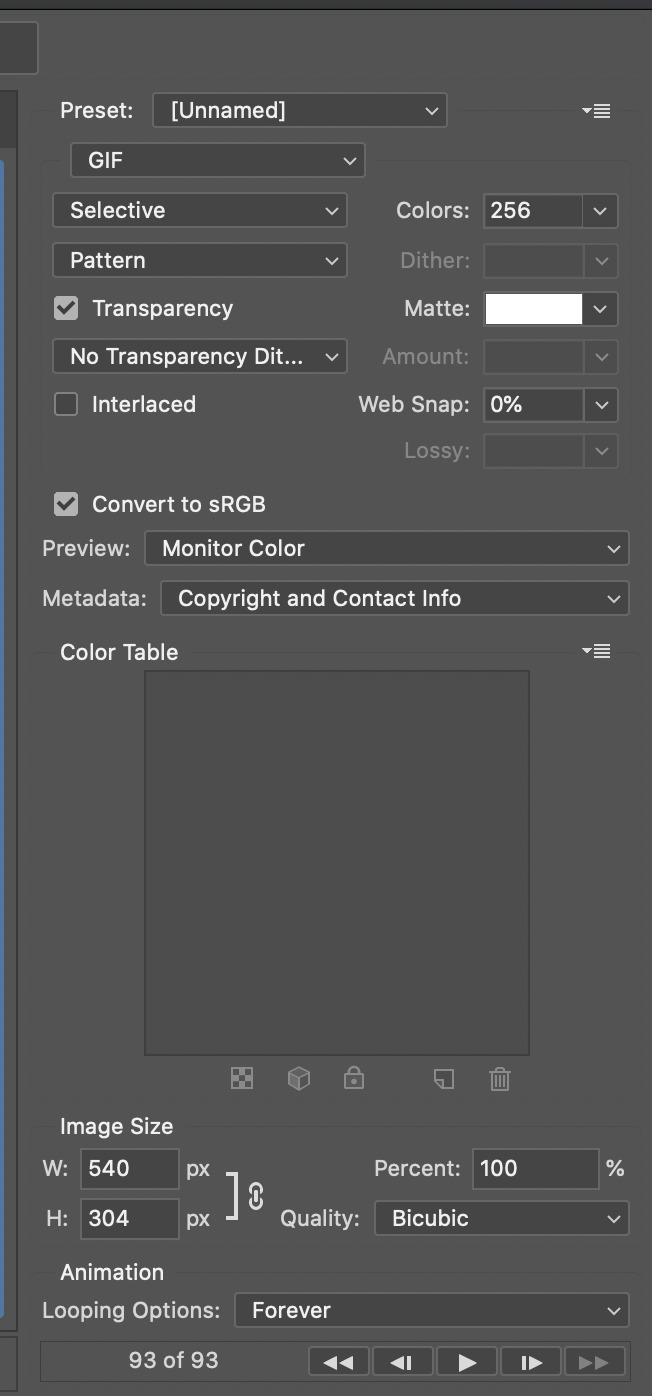
but before you hit save you want to ‘preview’ on the bottom left. this will open your gif and show you what it will look like on the web and it also tells you how big your gif is.
look for this:

if it’s under 8mb you’re good to post it on tumblr so close out and go back to photoshop and save it! i think saving is self explanatory
and you’re done! here’s the gif i made for this tutorial:

if any of this was confusing or not clear i’m happy to try and explain better!
33 notes
·
View notes
Text
gif tutorial ✨🎥
I got a few requests to make a gif tutorial so here it is. hope it helps :) It’s quite long so I’ll put it all under a read more. If you have any questions, feel free to ask or PM me directly for help!
Alright....sooo, I don’t remember the last time I made a gif tutorial on this site, but I figured I would even though I use the same method a lot of gif makers have been using for years. I have never strayed from this process and I’ve been making gifs on this site for a decade.
There are a couple methods to making gifs. You can import your video directly into photoshop and cut your gif there. OR you can use a separate video player that has a screencapping tool, then import all your frames into photoshop; this is the method I use and it’s how I’ve adapted and perfected my giffing skills over time.
This post will be long, but I want to be as detailed as I can and explain it step by step. It’s really NOT difficult once you get the hang of it, which is probably why I’ve always done it this way.
Disclaimer: There are three programs I use and I highly suggest you look for reliable links yourself if I’m not able to provide one. I use pretty old versions of KMPlayer and Photoshop (I’ll explain why later), so be careful where you go looking for downloads. There are some photoshop downloads here, but I can’t vouch for them.
Let’s start :)
DOWNLOADING VIDEOS
I use a program called 4k Video Downloader to rip HD videos from Youtube. 1080p is the way to go, but obviously that’s not always possible. It’s ridiculously easy, all you do is click the “Paste Link” button and it’ll download your video. Clicking the “Smart Mode” button will let you set the default quality and the folder you want all your videos to be saved to.
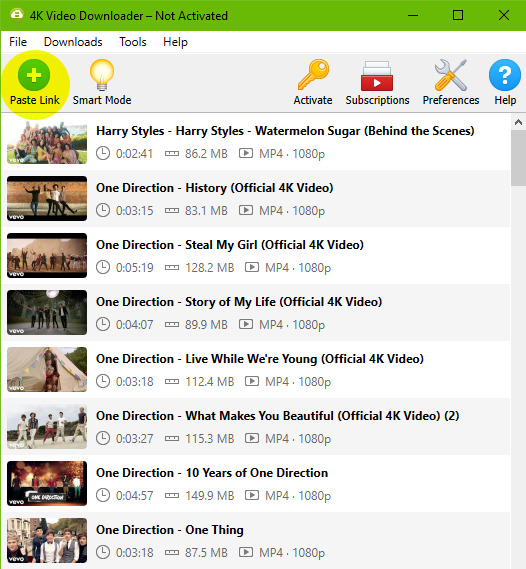
As you can see, here are all the videos I’ve downloaded recently for my gif posts. You can clear this download history list at any time.
SCREENCAPPING
After your video is done downloading, I open the video in KMPlayer. Now, I use an OLD version of this program because this was exactly how I learned to do this back in the day. You can find old versions online, I don’t really know exactly which version mine is because I’ve had it forever, but it’s the old school one that looks like this.
When you open the video, it might stretch the player to full screen so I always adjust it by dragging the corner of the player inward so it shrinks to a more medium size. This will also make your screencaps not so GIANT, which will take longer to load into photoshop.
Anyways, you’re gonna open your video and right click anywhere on the video to select Capture > Frame Extract... (or Ctrl+G on Windows). This window will come up. Make sure all your settings look like this to ensure a really smooth gif.
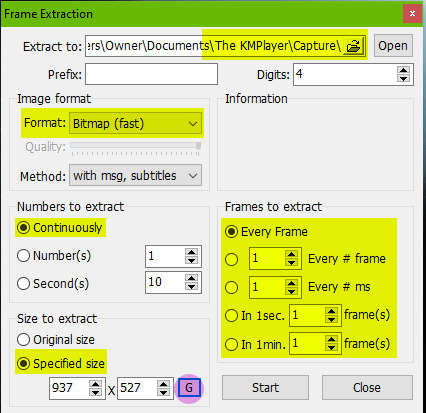
The first thing you should do is click that little “G” button next to the window size at the bottom. That’ll lock in the dimensions of however big you’ve made your video window, and if you stretch it you’ll see these numbers change. If you start capping without remembering to push that and you make your window smaller/bigger, your caps might be a wacky size or look stretched and you’ll have to go back and do it again. Also note the extracting location at the top. All your caps will go directly to a default folder titled “Capture”.
Once all the settings are ready, go to your desired section of the video, pause it, and hit “Start”. Play the video, pause the video when you’ve got all your caps, then hit “Stop”.
Locate your “Capture” folder and doublecheck you got all the caps you want. This is where I take a moment to delete any caps I don’t want in my gif, that way you don’t bother loading them into photoshop and making it take longer than it needs to.
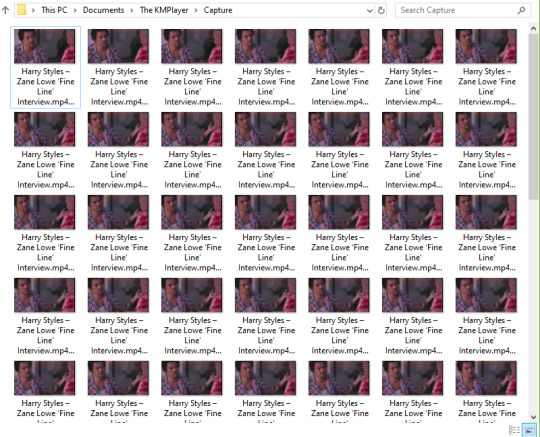
MAKING THE GIF
You’re gonna open whatever version of Photoshop you’re using. I hilariously still use CS3 to make gifs because the next script I’m gonna run doesn’t work in the free download that I have of CS5, but that’s what you get sometimes when you don’t pay for stuff. Hopefully whatever more recent version of PS you use, you have no problems.
Go to File > Scripts > Load Files Into Stack...
This window will come up.
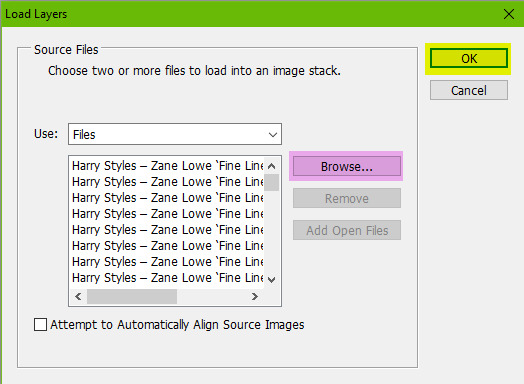
Hit “Browse” and locate your capture folder. Highlight all your caps and press OK. You’ll see them all come up in a list as shown above. Press OK again. Your caps will start to load into one big stack of layers. This will take a minute or so.
When it’s all loaded in, you’ll see them all stacked in your Layers window (Windows > Layers). You’re gonna open your animations timeline (Windows > Animation) and click the little drop down button in the top right corner of the window and select “Make Frames From Layers”.
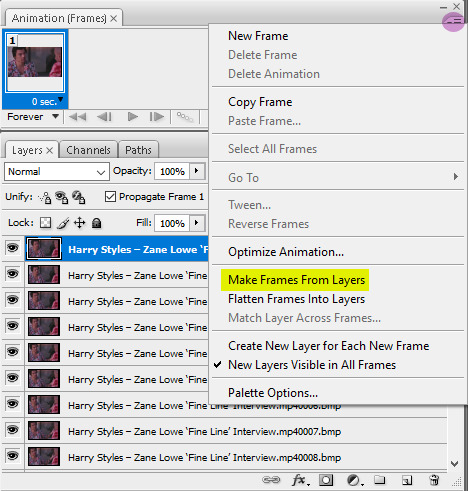
Click that drop down menu again and hit “Reverse Frames”. Click that drop down menu again and hit “Flatten Frames Into Layers” (this is so our sharpening action will work later). Click the drop down menu again and select “Select All Frames”. All your frames will be highlighted. This is where you’ll set your animation speed. Under each frame you’ll see “0 sec.” Click on that and select “Other”. Type in your desired speed. I usually go for 0.04 if it has a lot of frames. For less frames, 0.05 or 0.06. This is honestly entirely up to your preference. I actually made myself a photoshop action doing all these repetitive steps so it saves me a few precious long seconds of clicking around over and over. I just run the action after my caps are loaded. If you make gifs a lot, I recommend it.
Next it cropping. The reason I don’t crop right away after the files are loaded into a stack is because I like to see where the subject in the gif moves before I decide where I need to crop. I don’t want to accidentally cut anything off. The subject might sway in and out of frame or be off center if I crop it blindly before seeing exactly where the object moves around. So I’ll play the gif first to see exactly where to crop.
Anyways, you’re gonna set your desired width x height of your gif. I’m making this a big gif so you can see the details better. 540 px is Tumblr’s width for big horizontal gifs. If you’re making a photoset with two gifs side by side the width for Tumblr is 268 px.
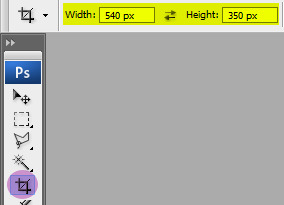
Go ahead and crop your gif. It’ll resize itself as well. Play the gif back so you can see if anything gets cut off or it’s not where you want it. You can undo the crop and do it again until you’re satisfied.
Here is what my gif looks like animated and cropped.

As you can see, it plays nice and smoothly due to our screencap settings from before in KMPlayer and with our set gif speed (I used 0.05 here).
Next is sharpening the gif. I use a sharpening action that can quickly sharpen up to 120 frames. You can download it here. Open the action by going to File > Open and locating the file. It’ll be added to your Actions window. (Window > Actions if you can’t see it.) In order for it to run correctly, you have to have the first frame selected on your animation window, as well as “Frame 1″ in the layers window. Just like this:
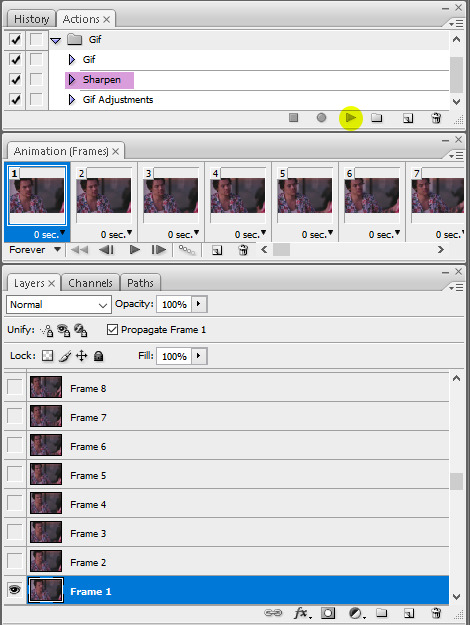
Click the play button on the action and wait a few seconds for all the gifs to finish being sharpened. For any gif with less than 120 frames (which I hope is always, good God) a pop-up will come up when it reaches the end of the frames asking you if you want to stop. Click “Stop”.
Tip: If you think you want to delete more frames, run the sharpening action before you do it. Otherwise you’ll have to flatten your frames into layers again. The first frame and the “Frame 1″ layer should always be the same (the little eye will appear to the left of the layer to let you know it’s visible when you have that specific frame selected) otherwise the action won’t work.
Here is what my gif looks like now that it’s sharpened.

COLORING THE GIF
This is where all the fun (or pain) comes in. All your coloring will be done by using Adjustment Layers (Layers > New Adjustment Layer). I usually go in the same order of adjustments, but this is where personal style comes in and you do no have to do it in the same order I do. You can practice with this part all you want and see how you like to do it.
I start with brightening the gif first and fixing the white balance if a scene needs it. I chose this video specifically so you could see this next handy trick that a lot of people don’t even know about. It’s a dark scene and the white balance makes the subject look quite blue.
I can fix this by starting with a Curves layer. By clicking the third eyedropper tool, you can go and click on a white point in your gif (in this case, I clicked on a white square on his shirt) and bumped up the input number a bit for a little contrast (optional). My curves look like this. Click OK.
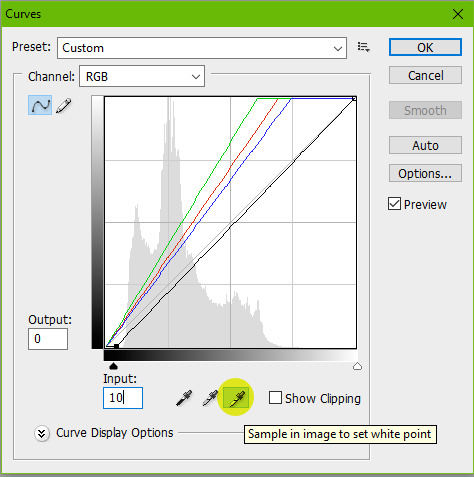
My gif now looks like this.

It’s much better, right? The white eyedropper tool will become a lifesaver sometimes, but it’s not always needed.
Next, I go in with a Levels adjustment to do some more brightening. This is all up to preference, but you can play around with this. I typically like to add more contrast with this layer. I just adjust the sliders until I’m satisfied.
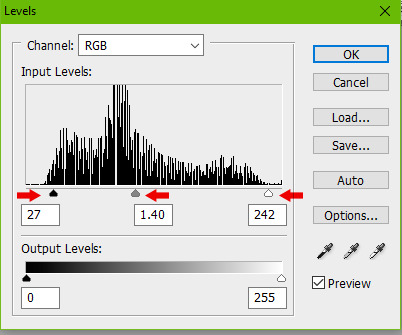
Here is my gif now.

Onto yet another brightening layer. Brightness/Contrast. A couple teeny tiny more positive numbers and I now have this.

Next is Selective Color. I wish I could explain this in a way that makes sense, but this is the layer that takes a bit of practice getting down and boils down to how you like the colors in your gif to look. I personally don’t like a lot of yellow in mine, so I focus a lot on the Yellow and Black sliders in each specific tab. I start in the Reds, then Yellows, Whites, Neutrals, then bump up the Blacks a tiny bit.
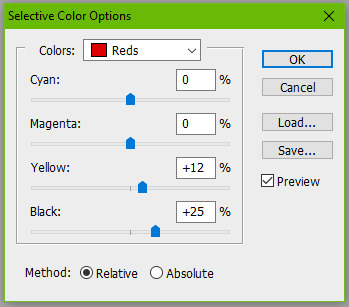
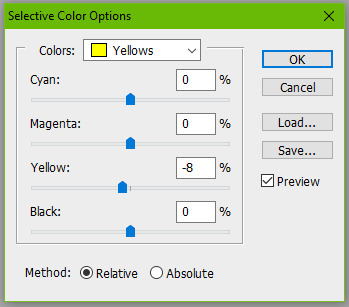
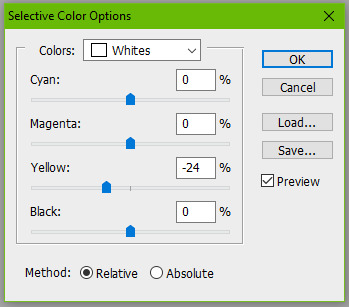
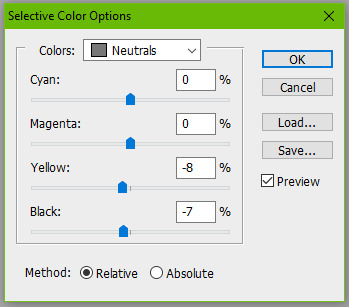
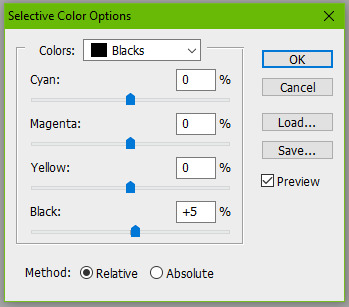
Here is my gif now. It’s a bit more cool toned, which is what I like.

Next I’ll go in with a Color Balance layer and play with the Midtones and Shadows.
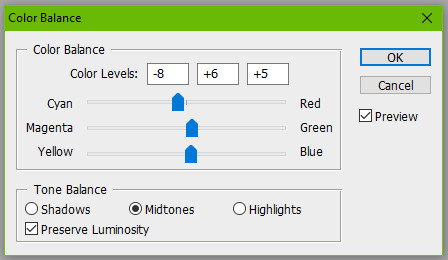
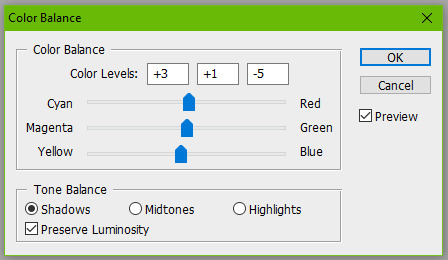
Here it is now.

This is usually my last step unless I want to adjust the brightness again (which I do), so I might go back into my Curves and Levels layers to bump it up.

And you can totally stop there, but I would like to mention a few more optional layers to add depending on your gif. If I wanted more saturation, I would add a Hue/Saturation layer at this point, but I think it’s colorful enough so I’m not going to.
Another layer you can use is Gradient Maps.
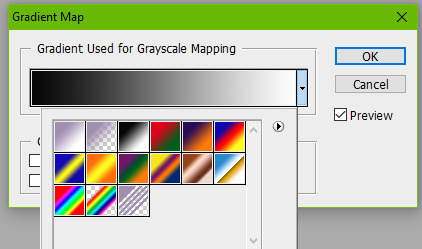
Setting a black and white gradient map overtop your gif and setting the layer to Soft Light and lowering the opacity to your heart’s desire (you might need to go to the little drop down menu in your animation timeline and hit “Match Layers Across Frames”) can give your gif a very contrast-y look like this.

Or you can change the black color to something else for a different tone, like a dark blue.
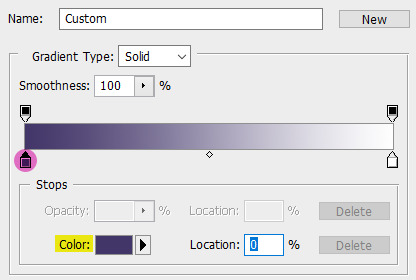
Here is my final gif.

If you want to add a caption to your gif, you can do so with your font of choice (Arial and Calibri are good) and add Stroke or a Drop Shadow to it by going to Layer > Layer Style. You can make sure the text is perfectly centered by clicking on your top frame layer under all your coloring adjustments, hitting Select > All, then clicking your text layer again and going to Layer > Align Layers To Selection > Horizontal Centers. Then hit Select > Deselect and go to your little drop down menu in your animation timeline and click “Match Layers Across Frames”.
Here is what it looks like with a caption.

SAVING YOUR GIF
Go to File > Save for Web & Devices...
A big window will come up where you can preview your finished gif by pressing the play button on the right hand side. In the bottom left corner will tell you what size your gif is. Tumblr’s gif limit is a whopping 10 MB, so we’re good.

Your gif settings should look something like this.
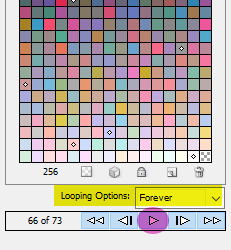
We always want to keep all colors at 256 (the highest). Lowering this number will make our gif file size smaller, but also decrease the quality of the gif itself. If your file size is more than 10 MB, I recommend going back and deleting some frames or making some more curve adjustments. Some users also like to set their gif to “Adaptive” instead of “Selective”. This is up to you.
Click Save and you’re done!
#this took me all day and half the gifs dont even move when you view this post on my desktop theme#LOVE THAT#please view this on the mobile view
220 notes
·
View notes
Note
Hi! Just a question, do you make your own GIFs? And if so, how do you do it? I would like to start making my own but have no idea where to start! Love your page!!
Hi there! I do indeed make my own gifs. I’m not sure if this is the “correct” or most efficient way of doing it, but it’s worked out for me just fine! Previously, I used a website called ezGIF, but since then I have moved on to Photoshop. I’ll explain both methods, because they both have pros and cons!
For both methods, you’re going to need to start by getting a video clip to make your gifs with. You can rip the footage off of YouTube (I use a program called 4k Video Downloader), or download footage through ..uh … other sources, if you catch my drift.
ezGIF Method:
• If you’re using full episodes, you’re going to need to trim the footage down to just the relevant parts, because ezGIF’s maximum file upload size is 100mb. I used Vegas Pro for this, but you can also use VLC Media Player, which is free! I’ve never used it for this purpose, but it looks like there’s plenty of tutorials on how to do it.
• Once you have your clips, go to https://ezgif.com/ and click on “Video to Gif”
• Click “Chose File”, navigate to your clip, and click “Open”, then “Upload Video”.
• Click the dropdown menu for framerate, and set it to the maximum! Otherwise, your gif will look choppy and gross. Then, click “Convert to GIF”
• Now, we need to optimize the gif to make sure it stays under Tumblr’s maximum size. Here’s their official guidelines on that subject:
“Any GIFs under 3 MB don’t get compressed at all. However, we do convert all uploaded GIFs to GIFV. If you’re uploading a compressed GIF, the file should be no larger than 5 MB. If your GIF is uncompressed and under 10 MB, we’ll do our best to compress the file down for you.”
• Click “Resize” and set the width to 540 px, which is Tumblr’s maximum size. If that doesn’t optimize it enough, click “Optimize” and set the compression level to as high as you can manage while staying under 5mb.
• Click “Save” to download the gif to your computer. Voila!
Photoshop Method:
• Go to File > Import > Video Frames To Layers, and select your clip. You can use a trimmed down clip, as discussed above, or load in untrimmed footage and trim it there, using the little sliders below the video preview.
• Next, click File> Export> Save For Web (Legacy).
• Select the tab that says “Original”. Under “Image Size,” change the width to 540 px. Then click “Preview” in the bottom left corner. If the file size of the preview is above 5mb, you will need to optimize. Lower the “Dither” percentage until you can get the file compressed enough to upload.
• Click “Save” and save the gif to your computer. Tada!
I hope this tutorial helps you out! If anything wasn’t explained clearly enough, or you need more advice, I’m a message away! Happy gif-making :)
10 notes
·
View notes