#therian tutorial
Explore tagged Tumblr posts
Text
super easy realistic tail tutorial!
A Therian that doesn’t want a taxidermy tail but still wants realistic look and feel? Or just need a quick tail for a costume and don’t want to spend money/get one of those ugly Walmart tails? This is a super easy tail tutorial, using scrap material and very basic sewing skills that I also direct how to do if needed. It can be completed within an hour if you already have basic sewing skills, and will only take 3 hours max even if you’ve never sewn before! The end result moves like a real tail and looks like a real tail if you use realistic fur.
I make a wolf tail, but this method can be used for almost any animal with fur.
Possible TW- Real taxidermy tails shown, and an up close picture of the leather in a tail for reference
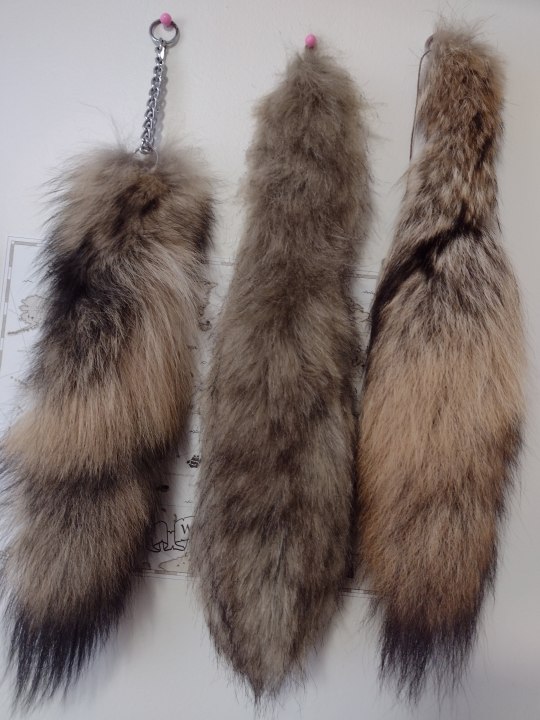
The middle tail is the fake one I made in this tutorial, next to my tanned coyote tails.
YOU WILL NEED
Scissors
sewing needle and thread
a strip of fur (i’m using scrap fur from a coat hood and will show how to use that), twice as wide as you want the tail and as long as you want the tail, plus at least 5 inches for doubling it over if you’re making a coyote/wolf tail- for cat tails you won’t need this, for fox tails you will need it twice as long as you want the tail. Ex.- mine was a 5 inch wide, 26 inch fur strip. my tail ended up being 3 inches thick not including the length of the hair and 19 inches long.
optional- seam ripper, they can make it easier but you can just use scissors if you don’t have one

STEP ONE (if using a hood)
cut the fur off of the hood- make sure not to cut any of the actual fur! Leave some of the fabric from the hood on when making the first cut to make sure you don’t cut the fur fabric, or you won’t have enough fur for the tail. Cut close to the fur, but not the fur fabric. Then, cut about half an inch off each end of the fur, where the thick seams are- this is to separate the fur fabric from the hood fabric. now you will be able to remove the fabric of the hood- you can probably just pull them apart but you may have to cut the seams.
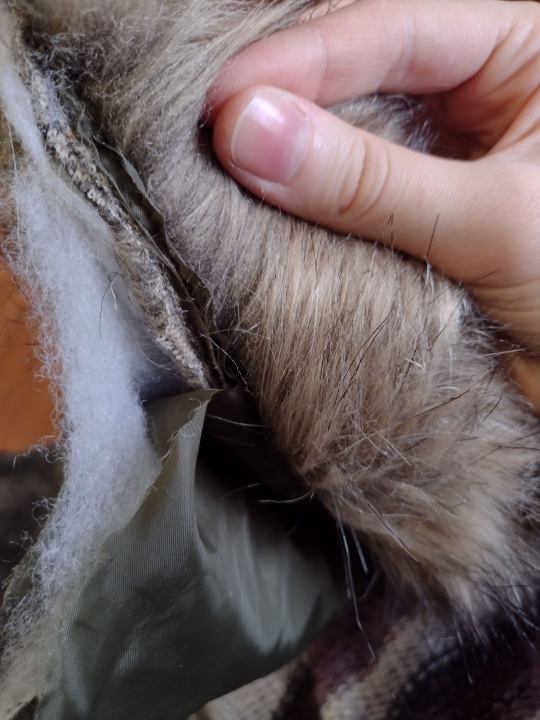


make sure not to cut the fur strands or you’ll have weird square cut fur on the tail!
STEP TWO
-skip to under picture if making a cat tail or one you don’t have to fold widthwise-
now that you have your fur, mark where you want the bottom of your tail to be- so if you want your tail to be 20 inches long completed and you have to fold the fur halfway up to be thicker at the end than the top (wolf and coyote tails are shaped like that) Then mark at 20 inches. this should leave 10 inches to be folded. Now, to make your tail pointed you will need to cut it into shape. To do this, draw two triangles like so-
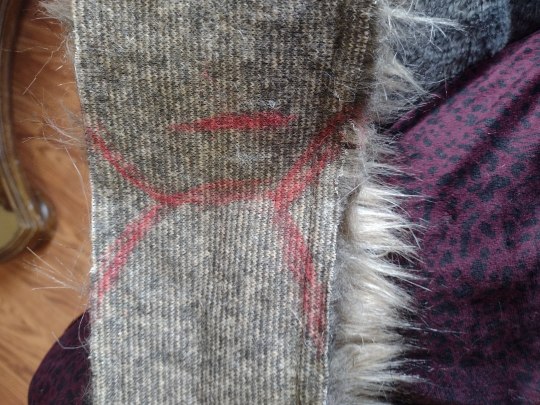
And cut them off. when folded, the tip of the tail should look something like this-

If you’re making a cat tail, fold the fabric lengthwise and cut the corners off! you do not have to fold it horizontally, only vertically.
STEP THREE- skip if making cat tail
Now you can start sewing! you will want the fur sides in, the fabric side out to sew. it doesn’t have to be sewn well, you won’t see it from the outside at all. Starting from the tip of the tail, use a basic straight stitch, which looks like this-

and is done just by sticking the needle through both layers from one side to the other in a pleated pattern and then pulling the thread through. the fabric should be flat after you pull it through, or you pulled the thread too tight. You can just pull the fabric flat usually, if you have enough thread to go through all the fabric. Make sure you leave about 1/8 inch of the edge of the fabric, or if it frays your sewing can come undone.
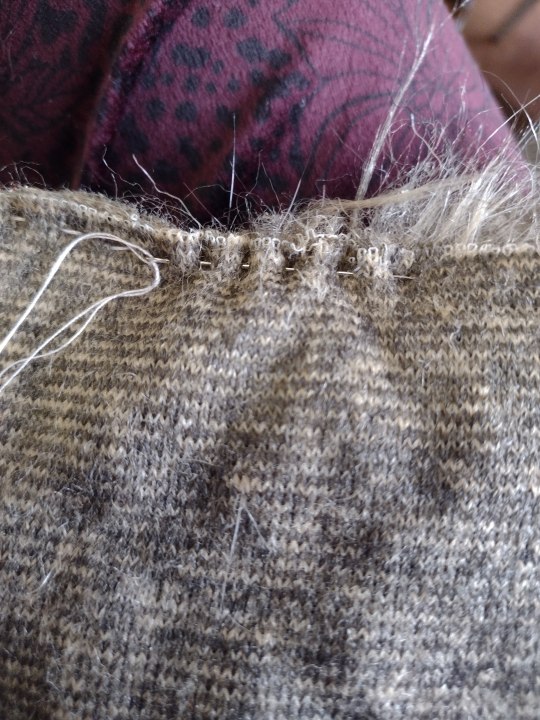
continue sewing until you get about 2 inches from the edge of the folded piece, here-
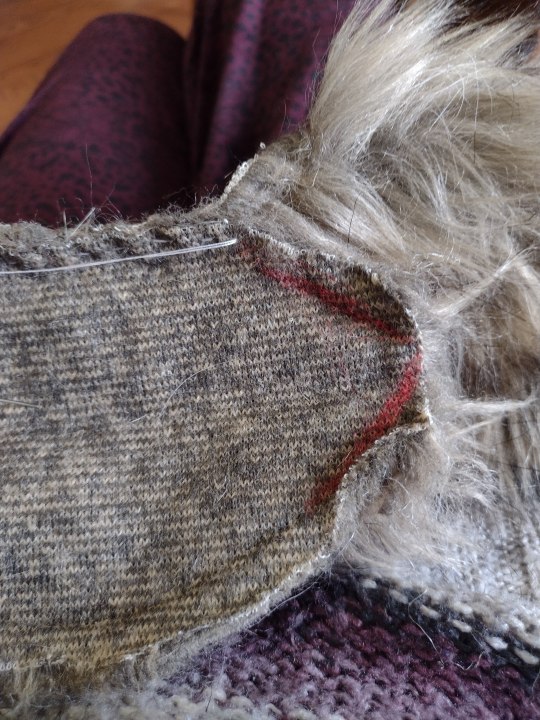
And cut the corners off, so it’s triangular. sew only the one side of the triangle to the side you’re sewing. Now end the stitch, by going through only the top layer of fabric with the needle, pulling the thread only halfway through, and then putting the needle through the thread loop. Then pull it tight. Do this two or three times, then cut the thread. Leave about half an inch of thread on the knot, so if it comes loose it doesn’t completely undo.
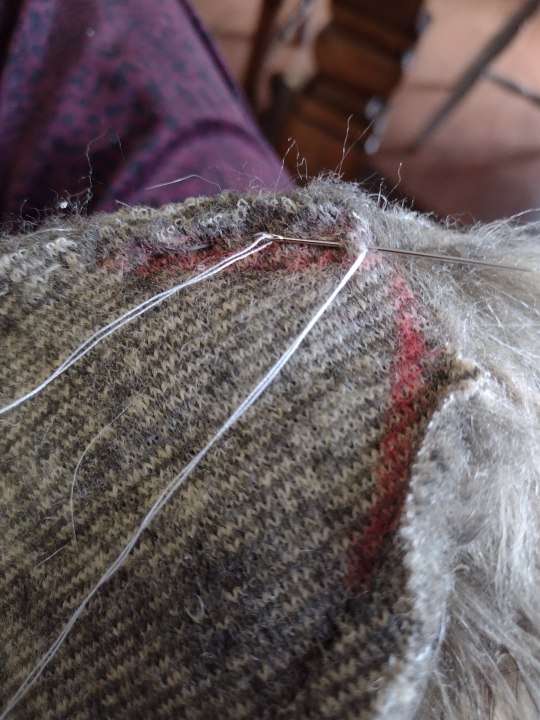

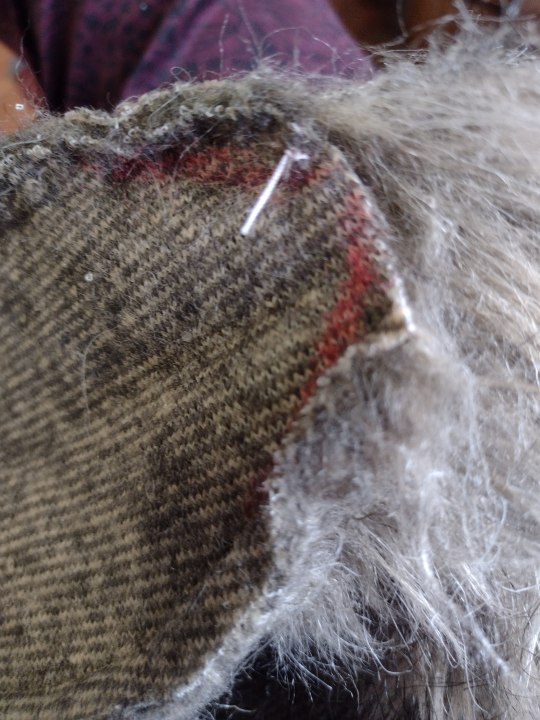
repeat on the other side, getting all the way to the end of the folded fabric. If you made a fox tail, then you’re done until Step five because the whole tail is folded like that, there is no skinny part..
STEP FOUR
For the skinny part of the tail, or for the whole tail if making a cat tail, fold the rest of the tail horizontally-

and sew up to the top. Make sure to leave an opening of about 2 inches to flip it right side out!
My cat decided to join me here, so he’s become part of the background XD
STEP FIVE
Flip right side out/ fur side out!
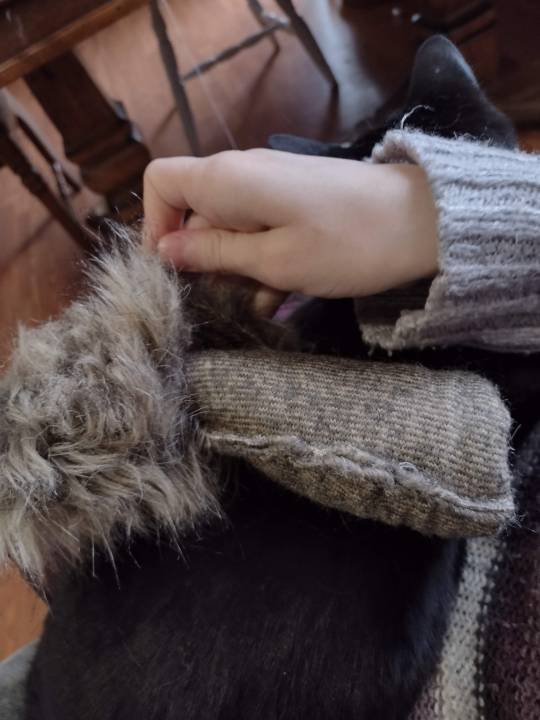
For realistic movement, you DO NOT want to stuff it with anything. Real tails just have a little piece of leather in the center, nothing else-

If you want it to be poseable, you can put wire in the middle. You’ll want to add a dab of hot glue to the ends of the wire so it stays put. The top of the tail will still be open, you will want to sew it closed by folding the very edge of the fabric in and sewing it like that, so you don’t see the edge of the fabric-
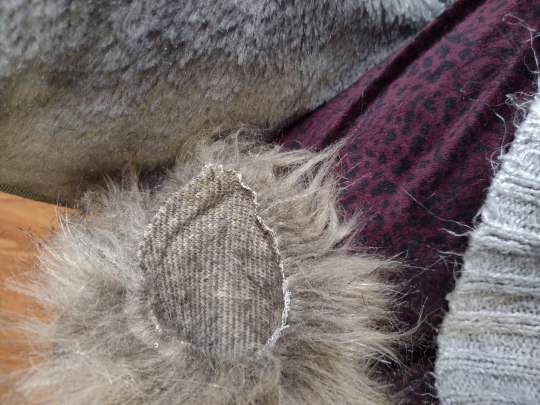


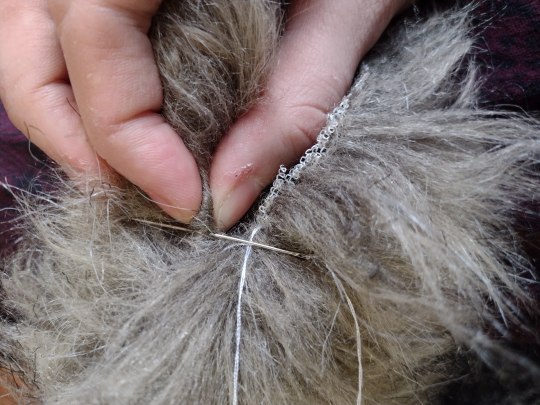
sew it shut using that method every stitch. Now you can sew any type of fastener or clip to it to attach it to you. And it’s done!


#wolf therian#therian#coyote therian#werwolf#wolfkin#werewolf therian#werewolf aesthetic#fox therian#Otherkin#dog therian#diy#costuming#furry#sewing#tutorial#tail tutorial#therian tutorial
428 notes
·
View notes
Text
Long awaited Hera's mask tutorial (no cat base, low budget)
example of the masks I've made, here:
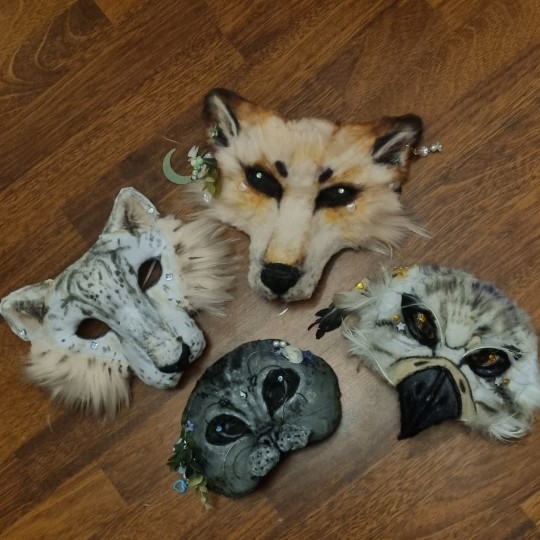
Author note: I have a 3 year experience, and I got used to making gear like this, so if you are trying masks for the first time, you might find some difficulties.
also, the whole thing Is REALLY "trust the process"... Anyway here we go!
You need: Cardboard, paper(optional), hot glue gun, felt/something to fur it/any material is okay if it works, foam (optional), basic tools like scizzors
1. Cardboard forming
You need a piece of cardboard that's kinda a little bigger shape than your face, and measure where the eyes should be, so you can see well.
you can make the mask symmetrical by bending it in half, but it's optional
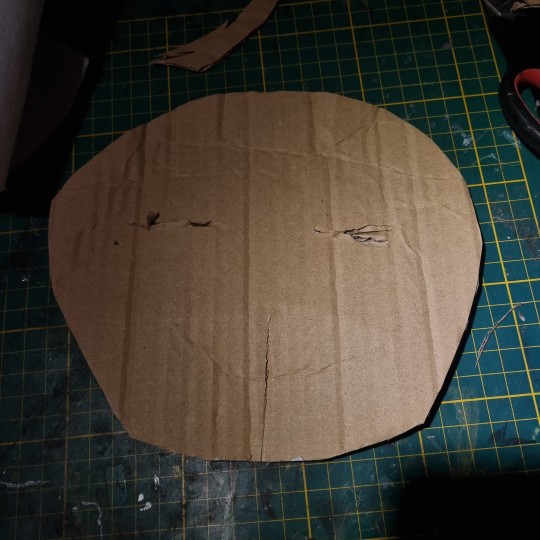
the first picture down there shows the back of the mask, don't be scared to pull it in and out, I'd say, you need to form the mask shape with your fingers VERY GOOD.
it really depends on what species you wanna make, I'm making a snow leopard rn!
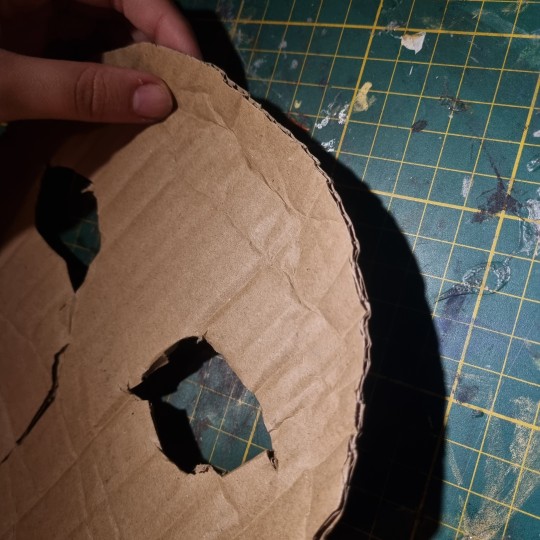
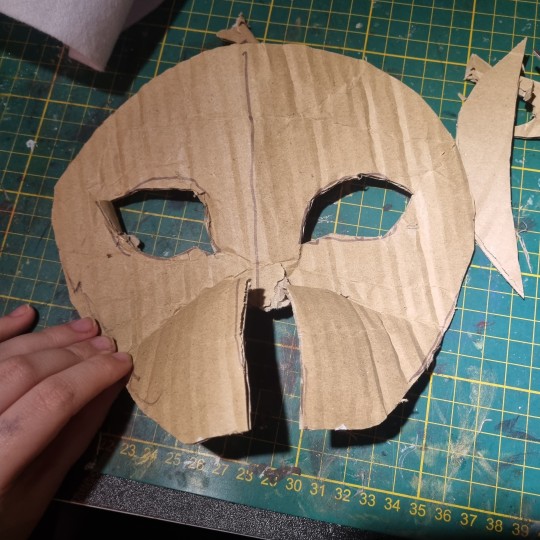
you can even cut it almost in half, and shape it to your liking
2. Texture
for this part, when you have your BaseOfTheBase ready, you need to make it more 3d, so it doesn't seem flat. small pieces are a key.
u can use various materials to recreate the real look, for example - foam that is easy to work with, and maybe more cardboard pieces layered on eachother. also you can use the pieces to glue the whole thing down together so it's sturdy.
I smooth it out with paper too, so the fleece/felt/fur sticks better to the mask and doesn't leave unnecessary bumps..
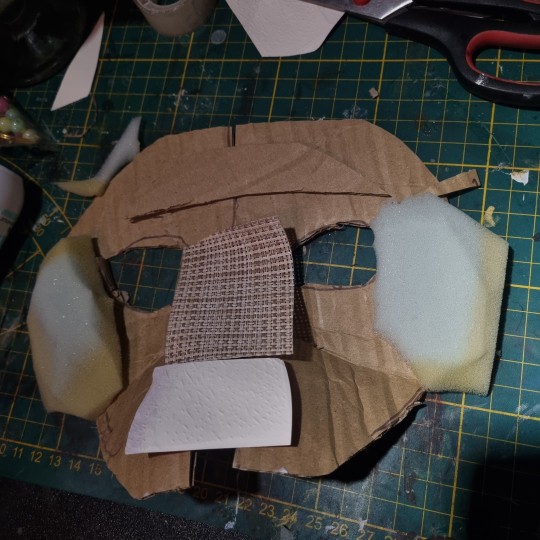
you use the bends like that to create a 3d effect, and expand the mask a little.
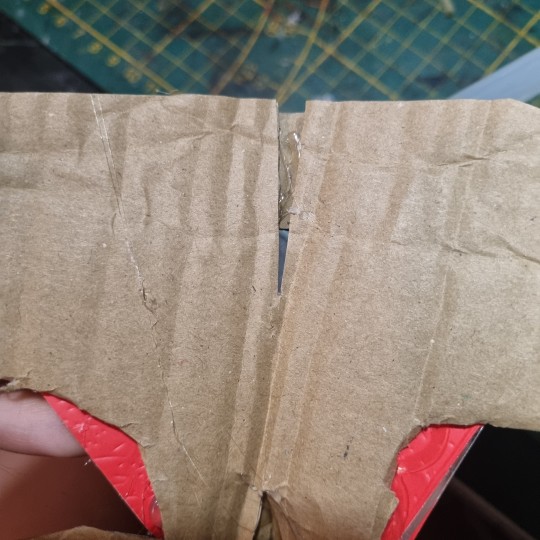
That's what I came up with! I added alot of paper pieces to smooth it down ^^
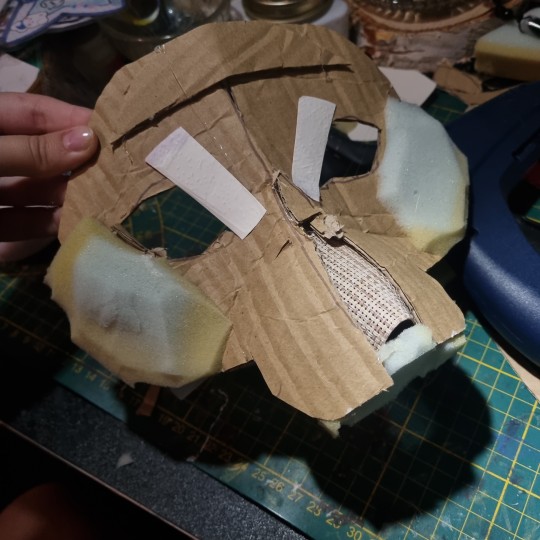
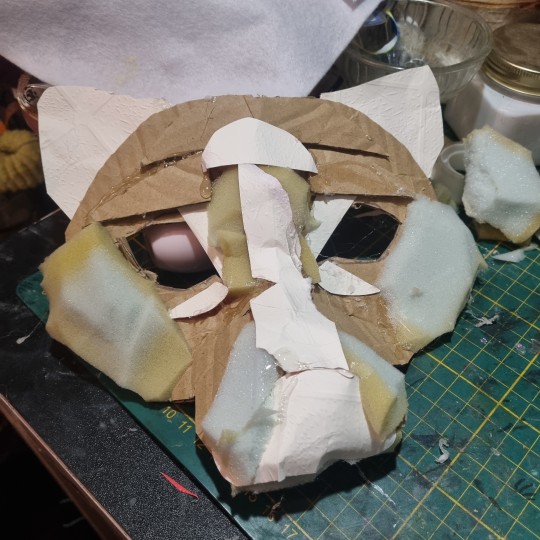
3. furring/felting, and the final touches
this part may be kinda tricky, so i reccomend you to watch various of felting tutorials on cat masks, cause this works basically the same!
I didint take any more photos rly, but here's the final product, and only felted one. (the nose is made out of hot glue)
I don't really want to elaborate on how to do the patterns, since you're the one who's customising the mask, but I like to use alcohol-based markers to make them! acrylic paint is also okay ^^
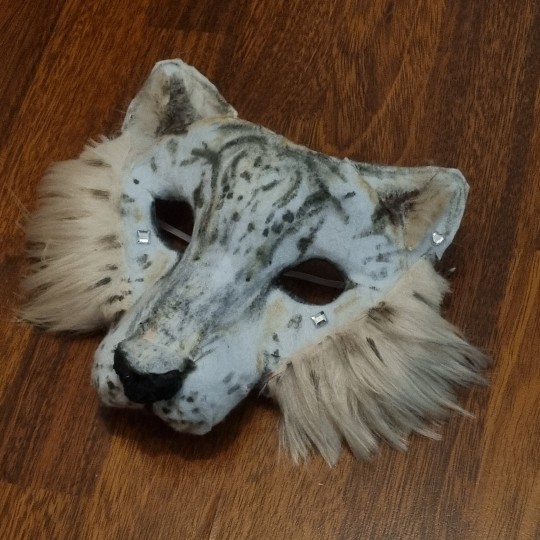
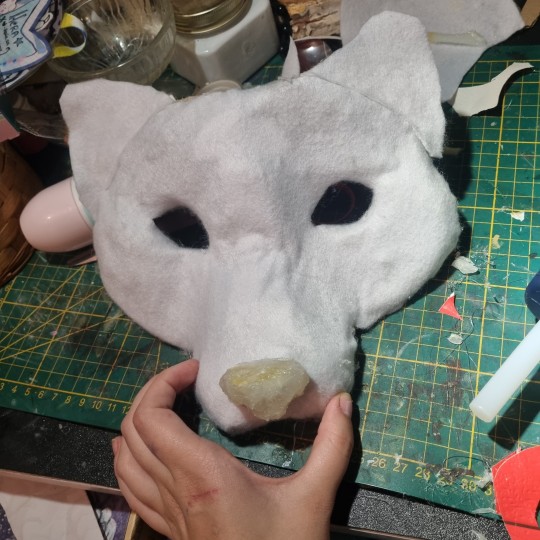
I hope I helped in some way !
If you have any questions, feel free to ask <3
#alterhuman#therian#nonhuman#bird therian#therian gear#snow leopard#art#therian art#tutorial#aviankin#birdkin#therian mask#mask making#otherkin
411 notes
·
View notes
Text
Barking tut from my insta!
#therian#alterhuman#nonhuman#therianthropy#otherkin#therian stuff#therian things#canine therian#therian help#therian vocals#therian vocal tutorial#tutorial
203 notes
·
View notes
Note
how do you make your userboxes? i've gone looking for tutorials before but the only one i found didn't work for me .::(
I use ibis paint x to make them! I also use this template

I usually get my images from pinterest and/or google, depending on what the request is for.
let me show an example:
I get my subject and my 2 pictures. the left one is for the icon, and the right one is for the background (credit to this post for the pet dreaming flag!)
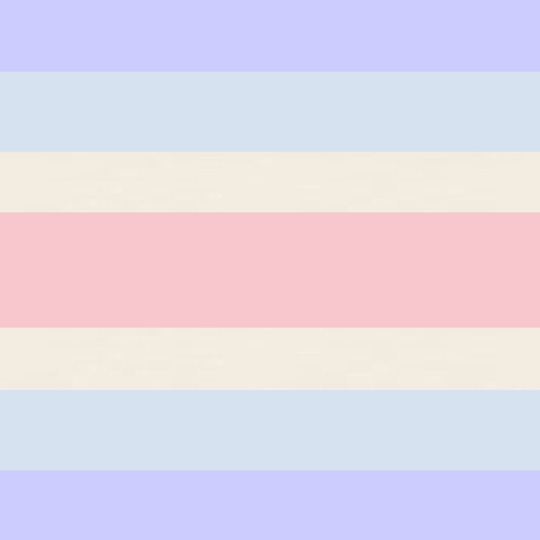

I then import the template as a new piece.

I use the selection tool to select the icon box, and then insert the icon picture I want.


for the smaller rectangle, I select that rectangle and then fill it in with whatever colour fits the userbox (you can also lower the opacity to 80-90% if you want)


I then insert the background WITHOUT selecting the background. you do not need to select the background, but you can if you want. IF YOU DO, you’ll end up with a thin white line around where the template is.
this is what the layers should look like once you’re done the designing part
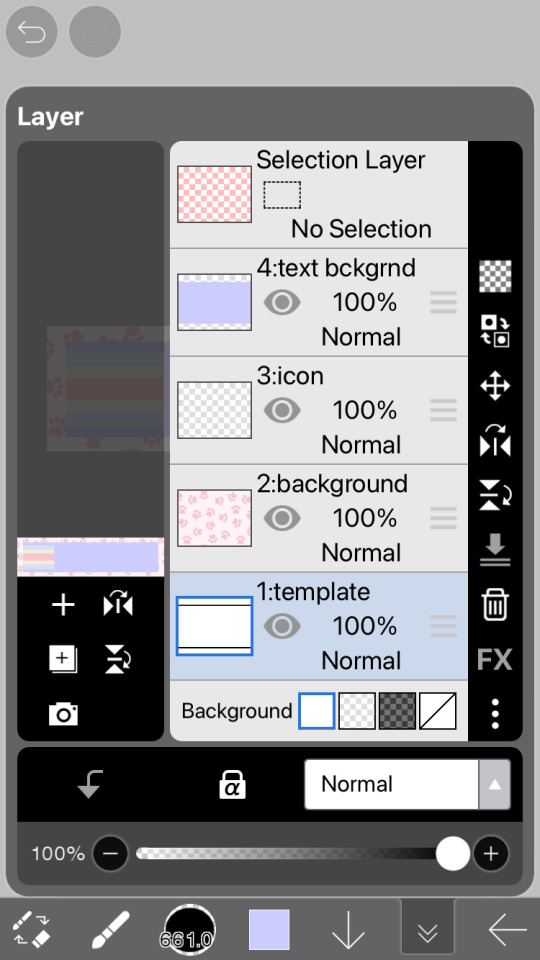
now you just gotta insert the text! just go to the text option, select “add text” and put in the text you want for your userbox. you can also change the font and size if you want (highly recommend this because the default font kinda sucks and you want the text to be big enough to read). if you want to have that little white border around the letters, just go to style and change the stroke colour/thickness (the FIRST slider, not the second one!!)


and there you go! you now have your userbox! just save it, and bam! here’s the finished product of the example.

hope this helps! feel free to leave any questions below; I’m free to answer any questions if anything was confusing or unclear :3

#alterhuman#nonhuman#otherkin#therian#my userboxes#custom userboxes#userboxes#art tutorial#tutorial#how its made#kin stuff#kin request#open requests
122 notes
·
View notes
Text
LEAVING THIS UP BUT VERY IMPORTANT UPDATE
Someone reblogged and said it can weaken the leather inside, this has never happened to me for the year or so I've done it, but very likely can happen!! Please be cautious:) this is likely better advice for faux tails! (As most of those dont have leather middles)
Reminder for all therians who have gear/anyone with animal gear
WASH
YOUR
TAIL!!
Don't know how/are afraid to do it wrong
Here's a step by step on how I do it! (This is for real fur tails but should also work just as well for faux fur !)
Fill up a sink or a large pot with warm water, NOT boiling/hot!! This can cause the fur and hold on it to grow a lot weaker and possibly fall off
Pour in dawn dishsoap/sensitive skin laundry detergent(regular downy also works!) into the water and mix it around :)
Gently take your tail and soak it in the water, slowly and carefully running your fingers through the fur to remove any excess dirt/grime
Dump out the dirty water and refill it with slightly colder water, run the tail through this again!
Smell testing is also a good idea, step away into a better smelling room then walk in and smell the tail, if it smells bad or grimey another less intensive wash may be needed
If done, Take the tail out, lay it FLAT DOWN on a surface, do not hang dry it from its keychain if it is big or heavy, if not then feel free to hang dry!
Check on it every hour or so, in less than a day it should be good! (Depending on length:] )
And thats all!! I hope this helps anyone with gear who wasnt shure how or if to wash it:)!!
#therian#therian community#therianthropy#bear therian#therian gear#animal gear#taxidermy tail#faux tail#washing#hygiene#tutorial#alterhuman#alterhumanity
169 notes
·
View notes
Text
can somebody teach me how to growl like a canine. Every time I do it at someone it sounds wrong. Pleeeeeease
#I'm kidding#I know there are tutorials#alterhuman#otherkin#otherhearted#alterhumanity#werewolfkin#caninekin#therian#dogkin#canine kin
27 notes
·
View notes
Text
ok ok as someone who's made yarn tails before here's some advice:
USE HIGH QUALITY YARN. Red heart works in a pinch but if you can get something slightly pricey-er I promise it pays for itself in the long run.
S T R A I G T E N IT!!! ESPECIALLY if you are using cheap yarn. It will mat and tangle way quicker if the yarn isn't straightened.
If you've already made your tail (using a tiktok tutorial where you tie strands onto the base), then run a straightener or iron over it a few times until it's smooth. Also adds a nice sheen to the fluff.
If you're using the wefts and base method then sew them on don't tie them.
Use a bead for the top attachment. Metal rings tend to slip open and lose strands and it is incredibly annoying. one of those clips with a solid ring works too in a pinch.
Use a slicker brush to brush the fibers, not a deshedding tool
this one I stole from tiktok: you can attach tails to a belt loop even without a clip. Safety pins can clip them on if they're light enough, you can use a paperclip if you slide the tail in on one end and slide it through your belt loop on the other (like a keychain ring). Rubber bands work too bc you can tie them on by folding it around the tail and then over the belt loop
You can make yarn tails in unnatural colors, and ones that aren't your theriotype. Tails are just for fun, as much as they are gear. My favorite yarn tail is rainbow after all and I love that thing to death.
Brush them after each use, especially at the base and ESPECIALLY if you've been sitting on them. detangle the tangles when they happen.
#chattering#therian gear#therian tail#therian tails#yarn tails#yarn tail#crafting#therian craft#tail tutorial
46 notes
·
View notes
Text
small little intro and I give a tutorial on how to bark for anyone that needs it :3
fun fact! The constricting your throat does when you hiccup is a great way to bark! Why? Oh because I’ve accidentally barked so many times by hiccuping mid-sentence.
It’s also a thing of habit. If you practice it enough times, it comes without even thinking about it.
Most ways of writing animal noises don’t get things all that accurate, yeah the cat goes “meow” - we understand, but usually it’s always more gutteral and focuses on certain words or letters more than text could explain (well, maybe with languages which have accents on letters could get it right but they still write animal noises like words).
A bark would more likely be an “ARV!” Or “arf!” Than a ‘bark’, have you ever heard a dog casually say bark? No, but you have heard “uip, awf, wuv/wuf, haf,” etc. like I said, these don’t translate through text easily. but where I’m going with this is that often times you need not to focus on what you expect an animal to sound like but rather the sounds that make up it. Although, for me atleast, it comes more automatically. But if you’re learning you can always just experiment by combining different sounds you can make until you get something animalistic!
or, best of all, simply look at recordings and mimic the creature.
Personally, I’d say a good way to learn how to make a realistic bark is first what sort of bark your going for and your vocal range, which you could just try make the highest noise you can and lowest noise you can, a growl, a whimper, and something resembling a bark, listen through or just make mental notes, and go from that.
Then, practice expelling air sharply through your lungs, it’s what helps make that “aaRF!” effect, rather than just seeming like you’re saying the word. Best of all is to use the letter “A” and combine it with an F/V/R noise as they’re the most canine sounding and seem rough, if you’re going for something gentler or sweet then U/O/W may be your friend! Some combinations you can try which are pretty much the basics are, as mentioned prior, “arv/arf”, “wuf”, “Arhf” (to make it more breathy), “Rkuf” gives it a trill, if you get what I mean.., “Eip/yip/eup” to make a small dog yap.
if you need, I could supply you with how I pronounce those specific sounds. Can’t say I’m the best at them but I have done them since I was about five so I know what I’m tapping about.
I also suggest learning to roll your R-s as it’s a great way to be able to growl/purr! Also no clue how to explain it but.. if you know how to make a whine/high pitch sound, kudos to you! It’s something apparently not all can do and is pretty much just how well you can control your vocal chords. Silly stuff, ain’t it?
Some won’t be able to just immediately know how to make certain noises and that’s okay! Keep trying and I’m sure you’ll do great :) oh, and good luck!!
#Went off on a little tangent here oh wow#therianthropy#dog therian#wolf therian#caninekin#therian vocals#Advice#tutorial#tips#how to#puppy#pet regression
19 notes
·
View notes
Text

Cardboard canid mask I finally finished bc if I spend another day snoutless I will perish. Might paint it, might not. Partial face rev ig
73 notes
·
View notes
Text
"Say the thing" Gate keeping artistic processes isn't a thing. I dont think its 'gatekeeping' for an artist of any craft to not share their process or make tutorials. obligatory I'm not a therian, but I'm a gear maker and there seems to be some discourse around tutorials, tips, tricks, etc An artist who spends so much time on their craft and developing their style doesn't owe you that knowledge, and it isn't gatekeeping to keep their style and process to themselves. Dont call someone a gatekeeper for making art, there are always going to be other artists who are making those tutorials who will help you. practice and create your own art
#therian community#not a therian#therian gear#art#gaslight gatekeep girlboss#stop pressuring artists to make tutorials on tiktok#why are we doing that#make your own shit if you want it so bad jfc
2 notes
·
View notes
Text
Hey I made a cool tail and an instructables tutorial for it so if you want to make a cool tail, here you go.


11 notes
·
View notes
Note
How do you make the wallpapers? /genq
oh, they’re actually quite easy!
I take some images based on the request (usually found on pinterest, but sometimes I’ll just use google depending on the animal/character), and then put them together on a blank canvas. I use the custom formatting to make the canvas the right size. I use ibis paint x to put all the images together, and I usually put the theming pictures on lower layers before putting the main topic of the wallpaper on top. I use png images of the theta delta/otherkin/fictionkin symbol on top, and then use random brushes/stickers to add the little symbols.
hope this helps!
#alterhuman#nonhuman#therian#otherkin#answered asks#art help#art tutorial#kinda?#wallpaper#custom wallpaper#anon ask
9 notes
·
View notes
Text
I'm in hell actually
#mask making is such a PAIN IN MY ASS#all these ppl doing tutorials and shit 4 therian masks like “oh heres how to make a dog mask” ok what about LITERALLY ANHTHING ELSE#or how do you make masks that are glasses compatable#how do you measure them on your face without wanting to rip your hair out bc all the tutorials have you doing one tiny piece at a time#“start with the muzzle” that's great. on a canine or feline face that works! but it doesn't for a sheep bc it doesnt line up the same#how do you do the planes of the face when the face itself is too different from your own#i cant exactly put the eyes on the side of my head bc then i cant SEE#im overstimulated and pissed off ive been working on this stupid fucking thing ALL DAY#and its not coming out how i want it to at all#and its not like i have any type of base or guide to use so im just winging it and everything looks like shit!#im tired i just want this stupid mask done so i can do other shit#elliot rambles#vent#rant
5 notes
·
View notes
Text
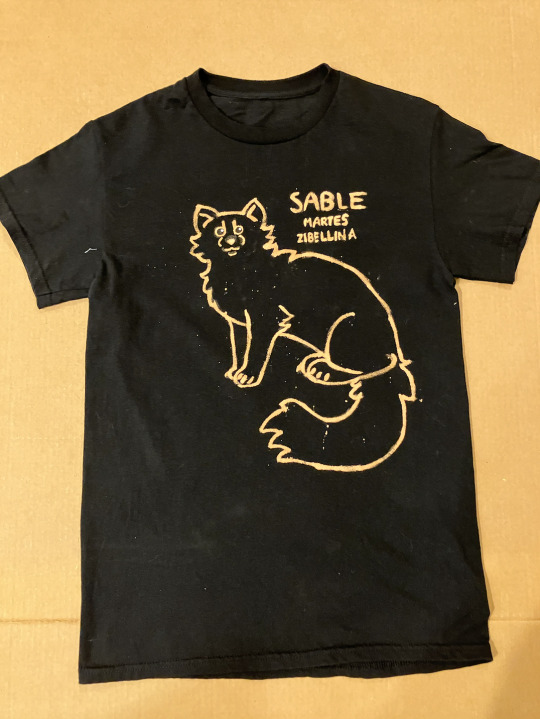
I see a lot of 'diy gear' around so I'm surprised I've hardly ever seen bleach dyed shirts! They're honestly one of the coolest, easiest, and relatively inexpensive ways to make discreet gear - especially if you're like me and you can't exactly find shirts of your theriotype being sold.
Tutorial under the cut!! :3
What you will need:
A black t-shirt, preferably 100% cotton (avoid polyester and spandex)
Bleach
Water
Sidewalk/blackboard chalk, or a chalk pen
A paintbrush to apply the bleach
A disposable cup
A bit of cardboard or plastic to put under the shirt (to prevent the design from bleeding through onto the other side)
GLOVES and other safety gear (ie, a mask and goggles)
fabric paint, not puffy paint (optional but if you're heavy handed like I am it helps so you can fix screw ups)
SAFETY:
Work in a well ventilated area.
Wear gloves, goggles, and ideally a filtration mask when handling bleach.
WASH YOUR HANDS thoroughly after handling the bleach and do not touch your eyes or face before washing your hands
Be mindful of chemical reactions that can occur when mixing bleach with other cleaning products - never, ever, EVER mix bleach with anything containing ammonia as it can react and create toxic chlorine gas.
Keep bleach out of the reach of pets and small children, and if you have small animals like birds or rodents, work AWAY from them as the fumes can damage their lungs.
Make sure you read the back of your bleach container so you know how to handle and dispose of it safely.
Process:
Slide the cardboard into the shirt, adjusting it so you'll be drawing on the side you want your design on.
Use the chalk to draw your design on the fabric - don't worry about screwing up here, it'll wash out later. (If you want to, you can digitally draw your design, print it out, then trace the back with chalk and press it onto the shirt to transfer the art)
Put on your safety gear (ESPECIALLY your gloves) and move to a ventilated area (I did this on my back porch)
Carefully pour some bleach into your cup, then cut it with water. Remember that the more water you add, the more of the solution you'll need to apply to get your design to show up.
Apply the solution over your sketch using your paintbrush. You might need to apply it multiple times if your bleach solution is less concentrated.
Once your satisfied with your design, let it sit for 20 minutes to allow the bleach to fully stain the fabric.
After 20 minutes, rinse out the fabric under cool water. Make sure you're wearing your gloves as you do this so you don't hurt your skin.
Wash your shirt in your washing machine by itself, otherwise the bleach might transfer to other laundry. Put it in the dryer after or hang it up to air dry.
Clean up your area, wash your paintbrush out thoroughly, throw the cup away, and then remove your gloves to scrub your hands with soap and water.
Once your shirt is clean and dry, you can use fabric paint to touch up any mistakes. I used black paint to remove excess lines and white to give my design eye shines. Follow the directions for fabric paint on the back of the bottle, as the instructions for washing it can be different. Don't use puffy paint, the touch ups will end up raised and it'll look funny.
And there you have it! :D DIY gear shirt for all your alterhuman needs >:)
#therian#therian gear#alterhuman gear#otherkin gear#textile art#bleach dye#otherkin#alterhuman#therian gear tutorial#otherkin gear tutorial#bleach tshirt#alterhuman gear tutorial
32 notes
·
View notes
Text
did some anatomy practice for canines! all species are different, this covers "wild" ones like coyotes wolves and foxes.

0 notes