#text tool in photoshop cc
Explore tagged Tumblr posts
Visit Tumblr Blog
Explore Tumblr blogs with no restrictions, modern design and the best experience.
Last Seen Tumblr Blogs


Fun Fact
70% of Tumblr users say the Dashboard is their favorite place to spend time online.
Text
Tutorial: Manga Banners
Basic Manga Text Change/Coloring/GIF creation in PS
Hey, so as promised making a very basic tutorial for making banner gifs in photoshop for fics/drabbles/layouts, etc.
I'm going to keep things super simple here for beginners.
END RESULTS↴

(NOTE: This gif I made will be used for an unreleased story of mine so please don't use this exact gif/images but you are free to follow the tutorial to create your own).
All I ask is if you find this helpful to REBLOG! :) No need to credit me.
For this tutorial you will need ↴
Photoshop
At least 2 manga panel images (non-transparent*)
Optional: Manga fonts. I mostly use CC Wild words (speech bubbles) & Manga Temple (narrator boxes)
Basic knowledge of photoshop layout/where tools are.
*this tutorial is essentially the same if working with transparency but if you do work with transparency you will need to have knowledge of clipping masks which i do not cover here.
Tutorial ↴
(optional) Prepwork: so i didn't think to include this do this but you are going to need to crop and resize your image. make sure the width is either 540 or 1080px. This is the recommended width for pictures in tumblr. Height can be what you want it to be. This is done image > image size (make sure the link-chain is pressed for aspect ratio)
Step 1
This is what you want your setup to look similar to. Delete locked background layer.

Steps 2 & 3
Make a new layer. It might be helpful for beginners to re-name all their layers so instead of "Layer 2" you might name this ⇢ "White fill layer or Text cover up". (doubletap layer name to change it).
Use rectangular marquee to select text you want to change. If you are just replacing a word or two you dont need to white out everything. But you could choose to cover up all if you wish. I just wanted to remove "senpai".

Steps 4 & 5
Use Paint Bucket Tool to fill in selection area with white (make sure the new layer you made is selected when you do this).
Select Text Tool. There is no need to make a new layer as once you are done typing it will become a text layer. I used CC Wild Words bold font for this for emphasis. If you do multiple lines of text use a new text layer for each line.

Step 6 - Optional Step - Highly recommended if you did multiple lines of text.
Rasterize Type by right clicking the layer. This is an optional step. I tend to do it out of habit and rasterizing lets you use the move tool to give you exact px distances between other rasterized elements but nothing we are doing requires this tbh and if you do decide to do it you can't go back and edit text.
If you did multiple text layers you cause space them out evenly using the move tool (zoom into 200%-400% if necessary to get exact pixel distances). Tip: Manga text is centered in the bubble and leaves a good distance away from the edge.
When you are done ctrl/cmd to select all text layers then right click and merge the layers. This is so incase you have to move the text layer for whatever reason they are all on one layer now, evenly spaced and you won't accidentally mess that up.

Step 7
Create an exposure layer (half filled in circle in layer bar for menu). This is important as it can lighten/darken image to make the colors we will add later pop by playing with the sliders for each setting.

Step 8
Apply exposure settings. On the right-hand side there will be 3 slider bars. The screenshot shows my settings but your settings will vary depending on the image. The one that gives the biggest benefit for manga is Gamma Correction which affects the midtones to make them lighter/darker and adds better contrast to the image so it doesn't look as muddy, often in black and white images it is easy for midtones to look muddy. Offset affects mid to dark tones of an image. Exposure affects midtones to highlights to make brighter or darker, overall use this the least. TIP: If you want to make an image brighter or darker you usually want this to apply equally to the overall image so then you would create a brightness/contrast layer instead. most manga images skew muddy and need a midtone and dark adjustment rather than highlights. the better the manga scan images the less adjustments you will need.

Step 9 - Optional
Apply a gradient map (half filled in circle in layer bar for menu). This is optional. a Gradient map adds gradient but preserves the shading in the image so essentially adds a gradient to the shading. I do this in black and white. But if you are happy with how it came out in the exposure phase you don't need to.

Step 10 & 11 -
Apply a gradient (half filled in circle in layer bar for menu). So when you add a gradient there are a ton of preset color combos you can use or you can create your own. I think this one is a preset but can't remember. I like a diagonal gradient from light to dark depending on where the light source on the image is but it is completely up to you. I tend to set the gradient angles near these 4 settings: -145, -45, 45, 145 depending on what corner I want the lighter part in.
One thing to note is brighter colors work better with a darker background. Lighter backgrounds can get washed out. One you add this as you can see it will be solid color.
*note* once this layer is applied any edits such as moving text, etc. around you want to do to the lower layers beneath it click the "eye" button to hide the gradient (same for the map) or there's a good chance it will move the gradient layers around and not the layer you want.
Change layer blending mode. By default it's set to "normal". You can play around with these. Depending on the effect you want and whether the image has darker or lighter colors will decide the blending mode. My typical blending modes are screen, overlay, hard light, vivid light or pin light. You can duplicate this gradient layer and play around with multiple settings and opacities to create something you like.

Step 12 - Optional
Add a Brightness/Contrast layer (half filled in circle in layer bar for menu). Brightness/Contrast on this step will look wildly different than if you added it right after the exposure step. It's not necessary but if you want more overall contrast or brightness then you can add it.
You can see my settings below on the sliders on the right-hand side.

Step 13
Create new layer for highlights. (also good check point to see how your layers are organized).

Step 14
Select the brush tool and ensure brush settings are a soft round brush with a hardness of 0% for the highlight effect. (if you click the brush image you can see my settings better)


Step 15
Select the dropper tool and pick a color from the gradient image. I usually pick the darkest colors available as it will have the best dodge effect for highlights. Since this is pink/redish I only have one highlight color but if you were doing a green/blue gradient you would pick the darkest from both. (ignore the purple here its not being used)


Step 16
Create highlights with brush tool. Do a few tests placements randomly around the image for positioning and then swap the blend mode to either color dodge or linear dodge. I usually do color dodge. You will get awesome highlights like below. You can play with the sizing of the brushes and opacity to decrease the effect.

Step 17 & 18
Export as PNG. Do this even if you want to make a gif as I always recommend a clean canvas for gif making. If you want to be done here and don't want a gif thats fine too. File > Export > Quick Export as PNG (do not save as jpeg/gif you will lose image quality).
Repeat for second image. You don't need to open a new file unless it helps you to not get confused. You can just make a new layer and paste your new image into that layer (if you just right click copy the file in the window/finder folder you can directly paste it into a layer in PS) and use the transform tool to resize. However you can totally just open the image in PS. The benefit of same canvas is you save yourself some time as you can just duplicate gradient layers/adjustment layers and move them. But this is kinda more advanced so if you aren't comfortable with photoshop just make a new image.

Step 18-19
Create new file/open one of the PNG in PS (more advanced can just create new layer, select image, then copy > copy merged and paste on new file for each. Otherwise open one file, create a new layer then copy the other file. The bottom later will be the first image in the gif.
Create Frame Animation on the timeline window. (if the timeline window does not appear then window > timeline) *note* if this is your first time working with the window it may be set to "create video timeline", if that's the case create it then from the frame menu (in step 23 theres an example of where this is) select "convert to frame animation".
If done correctly your setup should look like the below with two images. One for each layer and one for each frame.
MAKE SURE PROPAGATE FRAME ONE BOX IS CHECKED IN THE LAYERS WINDOW.
lmao, not to be dramatic but this ensures most effects you would add to frame 1 (which corresponds to layer 1) is applied to all frames. I'm not too sure its super vital for this super basic gif I'm showing you but its better to get in the habit of always having it checked. otherwise it will fuck you over later down the line in my next tutorial where I show how to add frames to gifs.

Step 20
Select both layers, then select both frames (ctrl/cmd) and finally select tween from the timeline window. It is the multi-faded dot option on the bar below.

Step 21
Add Frames to Tween. Tween is the fading effect adding more frames is the longer the fading effect is. I added 20 for this step, you can play around and add more or less.
Once you do that you can see 20 new frames being added onto the timeline. This will not automatically add new layers, this is fine. Frames and layers don't need to be a 1-to-1. (Another reason why propagate frame 1 needs to be checked as you can still adjust those layerless frames by adjusting frame 1's layer)

Step 22
Adding delays. Automatically the delay on every frame is at zero. But especially if you have text you want people to be able to read that so you need to add in a delay. Your delays can be in increments of 1/10th of a second. I add a 1 second delay to the first frame only.

Step 23
Select and Copy the first frame and then select the last frame and Paste. A paste window will appear in this case we want to paste after selection. I circled where the menu for frames are. (sorry used a different gif as an example so ignore everything but the circled menu)


Step 24
Adding additional delays. I add a 1 second delay to the last two frames.

Step 25
Add more Tween I added 5 frames this time as we want the transition to be much quicker to reset the image. You can see frame 23 in the previous step are now frame 28.
You can add more images in than 2 and follow these steps to add tweening.

DONE! Now to save.
Step 26
Export your gif. File > Export > Save for Web (Legacy) and the screen below should pop up. Here are the settings I use for gifs. You can play around with it but I really wouldn't lol. (again ignore image size, this is from a different gif) it will also tell you how big in file weight your gif is. This isn't something you have to worry about for something simple but the bigger the image size and the more transitions/images you use the more frames you will have. Reducing image size (make sure chain link is on like in the below) will take off more sizing then removing frames will and I would recommend that. But tumblr allows 10MB MAX per gif so just something to keep in mind.

Let me know how this was! If you have questions just drop me an ask. ❤
#✩𝓀𝒾𝓏𝓏𝒶𝓉•𝔱𝔲𝔱𝔬𝔯𝔦𝔞𝔩𝔰#✩𝓀𝒾𝓏𝓏𝒶𝓉•𝕘𝕗𝕩#gfx#fic banners#tutorials#resources#photoshop tutorial#manga edit#edits#fan fic writing#fic writing#anime edits#manga edits
126 notes
·
View notes
Text

THE SIMS 3 TUTORIAL
HOW TO CREATE DEFAULT REPLACEMENT MOD USING CUSTOM MESH & TEXTURE FOR SIMPLE OBJECT
⚠️ Tumblr has 30 pictures limit, so I cannot include too many pictures. If you want to zoom in the pictures, click the pictures to enlarge, or save the pictures into your PC, zoom the pictures on picture viewer or zoom in the pictures on your mobile phone. ⚠️
----------------------------------------------------
I create this tutorial to make easier to follow because there are older tutorials available before but scattered on internet and usually only say "Export to replace s3asc" without explaining how to export the edited object properly.
My method is using TSR Workshop instead of exporting the object using Sims 3 Object Export/Import plug in because exporting to replace the s3asc using that plug in always giving error notification "ERR: Model has 1 groups; original had 0" and cannot be exported.
For beginners who are very new using s3pe and haven't created default replacement mod before, better start from simple object first.
Simple objects I mean in-game object that has single MODL and single texture with no morphs, no GeoStates, no presets, no CAS colour channels, and easily cloned from OBJD on catalogue. Usually as utensils that Sims holding in their hand, not buy/build objects. For example: Pencil, pan, fork, spoon.
----------------------------------------------------
Tools to prepare:
s3oc
s3pe
Milkshape 3D for bone assignment (Version I use 1.8.5 beta, discontinued by its developer, therefore feel free to download the full version with its license key provided).
Sims 3 Object Export/Import 1.01 by Wesley Howe (Milkshape plug-in. Download msS3ObjPluginsV101.rar )
TSR Workshop (Older version for TS3 only version 2.0.88)
TSR Workshop plug-ins for export.import TSRW Object.
3D Program (Blender/Maya/3dsMax)
Editing images software (Photoshop, make sure you have to install .dds plugin by Nvidia. For free software alternative, you can use GIMP with its .dds plugin)
This tutorial will not teach you how to:
Meshing object ❌
Create alpha texture ❌
Change thumbnails in-game ❌
Install programs and plug-ins ❌
This is how I created Chinese chopsticks replacement mod using custom mesh and texture.
In summary, this tutorial has 10 steps:
Step 1. Clone the Object using s3oc
Step 2. Open S3PE to Copy the Original Resource Code and Export the Files
Step 3. Export the Original Mesh as Base Mesh to .obj format
Step 4. Create Your Custom Mesh
Step 5. Bone Assignment & Create Group
Step 6. Create custom Texture
Step 7. Import the .wso of Edited Mesh on TSR Workshop & Export the package
Step 8. Export MODL file from Package saved from TSR Workshop
Step 9. Finalizing in s3pe & Replacing the Original file with Edited File & Correcting the Code As Same As Default Code
Step 10. Test the CC in your game.
-----------------------------------
✳️ Step 1. Clone the Object using s3oc
Before cloning the object, check the Game Folder for in-game object file location. Settings > Game Folders...
Take a look if the Base Game or Expansion Pack for object file you want to clone is in the right folder. For example, my The Sims 3 game are all bought from Steam, so the location is D:\SteamLibrary\steamapps\common\The Sims 3
If you want to clone object from Expansion Pack, make sure input the folder location. For example, the location for World Adventures EP is D:\SteamLibrary\steamapps\common\The Sims 3\EP1

If you are done, close the pop-up box. You can continue click Cloning then choose Normal Object...
Wait until you get the whole catalogue. Click Search...

For example, I clone object from World Adventures Expansion Pack. You can clone object from Base Game or other Expansion Packs as long it is considered as "utensil" that Sim holding on hand. For example: "Pencil" or "Pan"
Search for text: chopsticks
or if you want to clone object from Base Game, search: utensil
Tick check marks for Resource Name, Object Name, Object Desc then click "Search button"
Search result gives you results with name "chopsticks". Here is the object we are looking for: UtensilChopsticks
We need the OBJD file to clone. OBJD = Object Data.

Click "Clone or Fix" at the right bottom. Then you see the next page to determine if you want to clone with renumber or not. If you want to make default replacement, then do not check the Renumber box. Keep it blank.
Tick check box means the s3oc will generate new resource code for new item. Not tick the check means the s3oc will overwrite the same resource code, it is to replace object you cloned in-game.
I am personally a detailed person, so I usually tick as many as I want: tick "Deep clone" "Missing String Tables" and "Include Thumbnail" to include more details. Then click "Start" to proceed.

It will give you file name [CreatorName]_ObjectName_Number
Then save your package file in "DBPF Package" format in your project folder. Always make folder for any file to make everything organized.
✳️ Step 2. Open S3PE to Copy the Original Resource Code and Export the Files
Open S3pe, locate your package file you cloned from s3oc. Find the MODL of Utensil Chopsticks, Right-Click, "Details..."

On Resource Details, click "Copy TGI" to copy the Resource Code. Type, Group, and Instance will automatically be copied on clipboard. Then open Notepad, Right-Click to "Paste".
Click GRID on bottom of the s3pe (I mark it red on picture), it will give you pop-up box with Data Grid. Click "Resources", it will be highlight blue and there's 3 dots button appeared on the right side. Click the 3 dots button. It will give you TGI Block List Editor.
Inside MODL's TGI Block List Editor only has IMG. You may wondering why, but that's how the game coded. Type, Group, Instance of _IMG inside TGI Block List Editor should be the same as _IMG on the package.
Copy the TGI, Group, Instance to your Notepad.

After you copied code of MODL, do the same for the texture image (_IMG), but only copy the code from Resource Details. You cannot edit TGI Block List Editor for _IMG as the Grid button for _IMG is greyed out.
The main task is the code of your edited mesh and texture should be the same as the code you copied now from original package you cloned with s3oc.
Keep the code on notepad. You will need this code later.
Export the MODL file. Right-Click, "Export to s3asc". The file appears in long string such with name for example: S3_01661233_08000001_B619DB2238C3430B%%+MODL_filebase
Do not rename the file. Save.

Export the texture file. Right-Click "Export > To File..." The file will be saved in .dds format. Do not rename the file. Save.

✳️ Step 3. Export the Original Mesh as Base Mesh to .obj format
Open Milkshape. Import the s3asc file you saved before.
More steps click spoiler tag "Read More / Keep Reading" below
File > Import > Sims 3 Object Import v 1.01 by Wesley Howe

Locate the s3asc file, then the original chopsticks mesh appears.
Click the "Joints" tab. It has 4 codes. Check box "Draw vertices with bone colors" It will show Bone Assignment colors on the original mesh. Yellow on top chopstick and light blue on bottom chopstick. The colours are to make the object has rig and movement following the Sim's interaction.

Take a look at the 4 codes on Joints Tab. You can play around to see which colour of the code will appear, after that copy paste the code to Notepad to make it easier to comprehend.
Click Select from Tools menu, Select Options: Face. On "Right/Left/Top/Bottom 2D View", Left-click make selection of one part of chopsticks. While the part of object being selected (Red), click Joints then Choose "Assign".
0x96239247 --> Yellow 0xFEAE6981 --> Purple 0xCD68F001 --> Light Blue 0xD0DECA8E --> Red
Your edited mesh must have the exact same Bone Assignment colour later. Check again if the code and colour are correct.

You can save object mesh as .obj to other 3D software such as Blender or any other 3D software.
✳️ Step 4. Create Your Custom Mesh
Use the original .obj as base model. While you can create longer mesh or any edited version as you wish.
Make sure the scale and position of the edited mesh is same as base original mesh, because the edited mesh will be used on Sim's hand.

If you are done editing the mesh, export the UVmap.
You can export the uvmap in higher resolution, as long as it is Power of 2. 64x64, 128x128, 256x256, 512x512, 1024x1024, 2048x2048, 4096x4096. I export in 1024x1024 pixels to make the size of texture larger and have more details.
Then export the mesh object in .obj format.
✳️ Step 5. Bone Assignment & Create Group
Open Milkshape. Import the original mesh.
Check the Groups Tab. Original mesh has 1 group, "group 00". Group 00 means it is the main mesh. There is no shadow beneath the object.

Import the edited mesh as .obj file.

My edited mesh has one single name "default" name on the Group Tab. While edited mesh may have a lot of file name scattered on Group Tab. Regroup the file name to simplify your edited mesh into one single name. Select > Regroup.
The main task is replacing the EA's original mesh with your edited mesh.
Before you delete anything, you must do Bone Assignment first to the edited mesh you created.
Your edited mesh does not have Bone Assignment, so it appears white.
Remember the 4 codes you copied earlier in Notepad.

Copy Bone Assignment from original mesh to your edited mesh.
This case, your want to Bone Assign Yellow colour.
Select > Face to select one part of chopsticks of your edited mesh. On Joints Tab, double click the appropriate code 0x96239247 in blue highlight then the code box on the right side of "Rename" will appear 0x96239247. Make sure the code is correct. Then you can click "Assign".

Your edited mesh will appear in Yellow colour. Then do the same for another part of chopsticks.
Select another part of chopsticks of your edited mesh. On Joints Tab, double click the appropriate code 0xCD68F001 in blue highlight then the code box on the right side of "Rename" will appear 0xCD68F001. Click "Assign".

Your edited mesh will appear in Light Blue colour.
Then what's the other code for? With colour purple and red?
Leave them. Let the codes have the same exact codes as appear in original mesh and let the colours only assigned Yellow and Light Blue. The colours are to determine rig for interaction in-game, which only use Yellow as upper part of chopstick and Light Blue as bottom part of chopstick.
You can safely delete the original mesh with name group00 until it remains your only your edited mesh.

Rename your edited mesh to group00. Type group00 on the box then click "Rename" on the left side.

Export to TSRW Object in .wso format. .wso is format with bone assignment on object attached.

Save your .wso in your project folder.
✳️ Step 6. Create custom Texture
Import original texture you exported from s3pe to your editing image software.
Look at the original texture made by EA. 32x64 pixels. It is very low resolution, blurry and stretched, because the texture should be compressed as low as possible by game designer. As player you want it has higher detail to look realistic as possible and your PC of course can handle high resolution content, sure you can make the resolution much higher than EA's.

Import the UVMap you saved from 3D software. For example, UVmap I imported has 1024x1024 resolution. Add your custom texture. Then save it to .dds format in the same name as original texture. Save in separate folder, name it "Edited Texture" to keep it separated from original texture.
✳️ Step 7. Import the .wso of Edited Mesh on TSR Workshop & Export the package
Open your TSR Workshop.
Create New Project > New Import >Next...

Then Browse original mesh by EA in package format in your project folder.
On Open file box, you cannot see .package file because the filter is .wrk (TSR Workshop Project). Choose the .package dropdown.

Then you can see .package file.
Open the .package. After the file is located, then Next. On Project Details I usually skip without giving name of Project Name and Title. Next.
You must have seen green land with white blank sky.
Where's the mesh? It is actually there... just being zoomed in too close. You need to zoom out by scrolling down mouse.
You can see the original chopsticks mesh by EA. You can save the project file in .wrk format. After you save the file, import the .wso of your edited mesh. Mesh tab > High Level detail. Click green arrow folder icon to import. Then your edited mesh will appear replacing the original EA mesh.

As you see, the texture is messed up because the texture is still using original EA's texture. But then you check Textures tab and it has blank dropdown...
I cannot change the texture on this TSR Workshop!
Don't worry, we can replace the texture on s3pe later.
No need to change anything other than importing mesh. Click Edit > Project Contents to save as package.
You will see pop up box with number or files DDS, FTPT, LITE, MODL, OBJD, OBJK, etc. Export > To. package. Give name such as "EditedChopsticks_TSRW"

✳️ Step 8. Export MODL file from Package saved from TSR Workshop
Open S3PE, File > Open package "EditedChopticks_TSRW" that you saved from TSR Workshop.
Export MODL. Right-Click, export. It gives you file name with [StringOfNumber] .model .
Save it on project folder. Keep it organized and separated from original MODL. Name the folder "Edited MODL". Do not rename the file.
✳️ Step 9. Finalizing in s3pe & Replacing the Original file with Edited File & Correcting the Code As Same As Default Code
Open s3pe, File > Open original package that you cloned from s3oc. [CreatorName]_ObjectName_Number
Find the MODL. Right-Click > Replace...
Locate to your edited MODL with filename .model .
Then click Open.
The original MODL of the package should be replaced with your edited mesh.
Do the same for the texture.
Locate to your edited texture with filename .dds
Then click Open.
The original texture of the package should be replaced with your edited texture.
Take a look at MODL's Type, Group, Instance. It has the same code as original MODL in the original package cloned with s3oc (because it has been replaced)
Don't forget to see the code inside TGI Block List Editor.
Repeat step 2 how to check the code. Right-Click on MODL/IMG > Details... and click GRID > Resources > TGI Block List Editor.
The Type, Group, Instance of the _IMG are different compared from IMG from original package clone, which means that is the evidence of edited mesh replaced the original.
Rename the Instance with default/original Instance you copied on notepad from Step 2. Type, Group, Instance should be the same as default/original Type, Group, Instance.

Open notepad with resource code you copied from Step 2. Make sure the Type, Group, and Instance are all the same.
If the codes are the same, then your edited mesh and texture will overwrite the default mesh and texture with the same code in the game. Save, Commit, Save the package.
Check again if the texture is replaced properly. Right-Click on _IMG > ViewDDS.
ALTERNATIVES!
Yes, you can delete unwanted files in your edited package, to keep the package clean. Simply Right-Click>Deleted.
The only files needed in package are: MODL, _IMG, _KEY
They are the only files with your edited mesh/texture including codes to overwrite the default codes.
You can Start new fresh blank s3pe. Right-Click>Import from file...
Locate your edited MODL and _IMG (texture) file.
On Resource Details box, tick mark "Use resource name" > OK.
Make sure all the Type, Group, and Instance of MODL and _IMG including in the TGI Block List Editor are all the same as the code in original package.

Save the package.
✳️ Step 10. Test the CC in your game.
Put the package to your CC folder in your The Sims 3 document folder to see if the CC is working or not.
If the CC is working as your intended, with your custom mesh and texture, then test the animation. Are the chopsticks animation working as the same as original EA's? If the animation are working well too, then congratulations!

Your default replacement are working. Give applause to yourself. 👏
-------------------------------------
QUESTIONS!
Q:
Can I use this tutorial for making default replacement for buy/build object?
A: This tutorial covers basic method of using TSR Workshop and replacing the default codes (Type, Group, Instance), so you will understand the basic principle of doing default replacement mod.
Keep in mind that different object has different case. Buy / build object has MLOD (not just MODL) more than one, texture images more than one, has presets, and CAStable colour channels.
The TGI Block List Editor for buy/build object has a lot of codes, so have to spend a lot of time to do trial-and-error to make the default replacement working properly, because a lot of times the texture doesn't work (still using default EA's texture), or when the object appears right with your edited mesh and texture, after you choose the presets, the object reverts back to your edited mesh with default EA's texture.
Q:
Help! The texture is black! / still using same EA's texture when tested in the game!
A: The texture codes must be not the same. Check the Type, Group, Instance of _IMG. Do the codes are the same like codes in original package? Check the TGI Block List Editor for MODL, is the _IMG inside has the same Type, Group, Instance as in original package.
Q:
Help! The object disappears when tested in the game!
A: You must be replacing OBJD in your package. Do not replace OBJD. Just MODL and texture only.
#tutorial#the sims 3#the sims 3 tutorial#thebleedingwoodland#the sims 3 default replacement mod#modding#s3pe#s30c#TSR Workshop
98 notes
·
View notes
Note
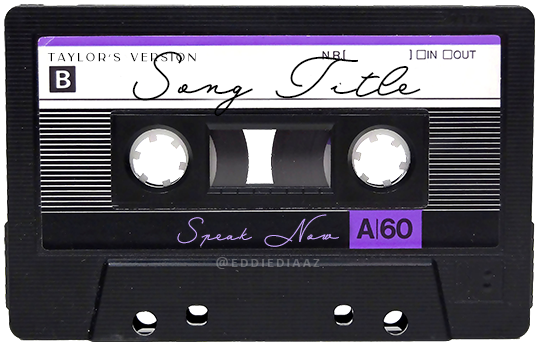
Hey!! I just wanted to say that your recent speak now gif set is sooo stunning. I was wondering how you managed to create that cassette tape effect if it isn’t any trouble? It’s really so pretty.
Have a great day! ✨
ahhh thank you so so much! first of all, i cannot take any credit for this effect, as it was greatly inspired by this amazing yellowjacket gifset by @thewintersoldier!!
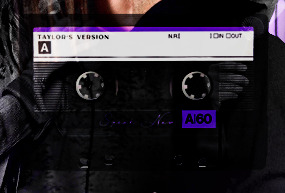
but here's how i recreated the effect, from a cassette png (found on pngwing here), to this animated cassette effect (as seen in my speak now set):
psst: i usually always create in photoshop cs5, but for this effect you need a recent version of photoshop because it's using transform keyframes (i think cs5 doesn't let you do that, or i just don't know how to lol). i used cc 2019 for this.
sorry if this is lengthy or has too much or too little details haha, but i hope it's comprehensible! english is not my first language so i also apologize in advance for any mistakes!
I. PREPARING THE CASSETTE
so, starting with the png here:

i removing everything i didn't want on the cassette png with the brush tool by just drawing the right color over the unwanted text. for the color, i then went to image > adjustments > hue/saturation and in the red tab, i played with the hue slider to get that purple color. finally, i added some text to my liking, and this is what i ended up with:
(not necessary but: i also selected the white lines on each side with the magic wand tool because i wanted these lines to be transparent. once your selection is done, go right click > layer via cut. it will create a new layer of the cutout you just made. you just need to disable or delete the layer to make the selection (lines) transparent.)
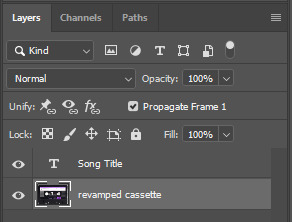
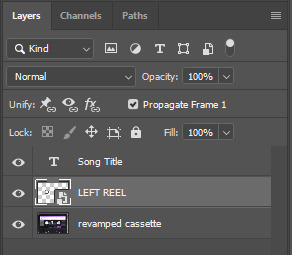
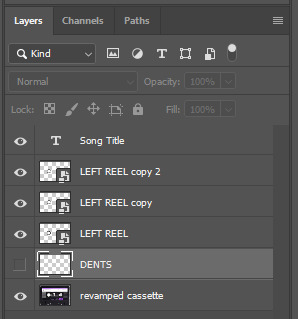
at this point you want to have only 2 layers: the revamped cassette and the text layer. you can remove the text layer actually, and just add the title back at the end, as it is not necessary for this effect. i just like to have the visual.
if you have multiple layers, you need to select all of them (except the song title layer), right click on the png layer and click on merge layers. this will create one layer with all the editing you made on the cassette. if you think you will need to edit this later though, i would save the file as a psd before merging the layers.
II. THE EFFECT
okay, so now that you have your cassette, make sure your video timeline is activated, not frame animation, and you are ready to go.
first, you want to create a perfect circle shape around one of the reel with the elliptical marquee tool (hold shift while dragging the circle). make sure it covers the entire area that will later be rotated. make sure this circle is perfectly centered around the reel or otherwise the animation will be a bit lopsided.
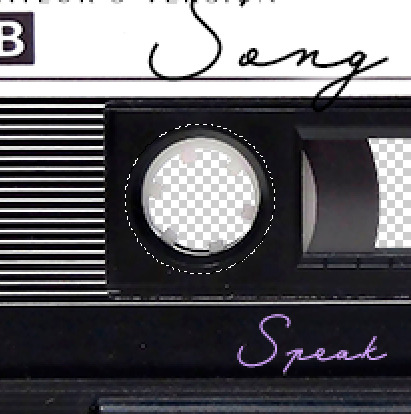
then right click on this selection and go "layer via copy". this will create a layer of only that circle selection. important step: right click on that new layer and go "convert to smart object". the layer should look like that, i've renamed mine:
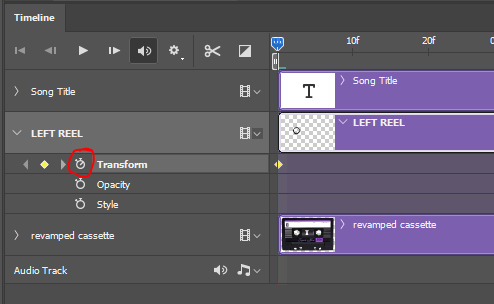
now if you go to your timeline and open that new smart object layer, you will see that you have 3 keyframe options. we only need the transform one.
go to the start of the timeline and activate the transform animation by clicking on the stopwatch button. a keyframe will be created automatically.
to create the actual animation, move the position of the cursor on the timeline further, i put mine at the 01:00f mark so it's easier to create the right timing.
then what you want to do is select the reel smart object layer and hit ctrl + T. a box will appear and this is how you will make the reel rotate.
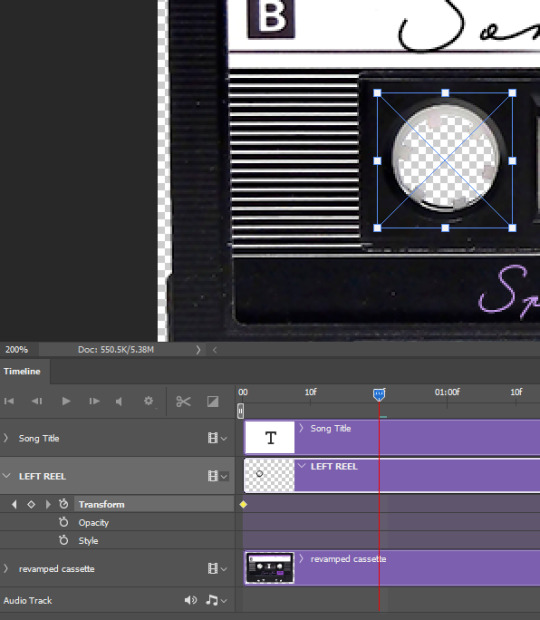
to rotate the reel shape, move your cursor near the blue box on your canvas and drag it until you have rotated the shape halfway through and hit enter. another keyframe will be created and if you play your animation, the reel should rotate on itself for half a turn

move your position on the timeline to 02:00f and do the same thing: select the left reel smart object, hit ctrl + T, rotate for another half turn, and hit enter. this third keyframe should be the last one needed for the animation and you should have a full animated rotation of the reel.
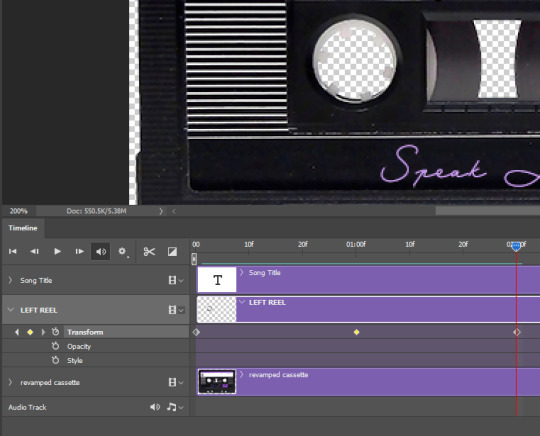
play your animation, and adjust the speed to your liking by dragging the keyframes on the timeline (but make sure they stay within the same distance from each other). the closer the keyframes are, the faster the animation are, and the further they are, the slower it'll be.
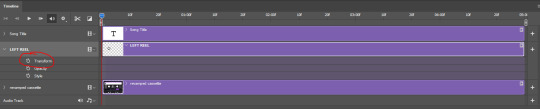
then you can just trim the smart object to your animation's length, and duplicate (right click the smart object > duplicate layer) this layer the amount of times needed (i find this less finicky than duplicating keyframes), and placing them one after the other. three full turns should be enough. this is what my timeline looks like right now:
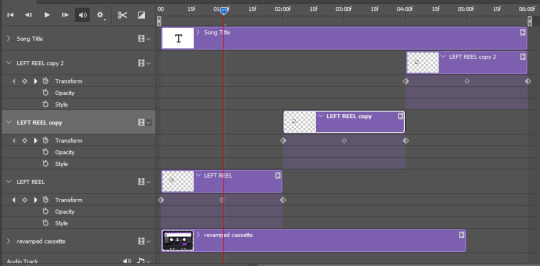
and my animation for the left side looks like this:
as you can see, we can see the little "dents" peeking through behind the animation. we don't want that! to remove it, select the revamped cassette layer (that should be under the reel smart object), and create another perfect circle around it with the marquee tool. this time make sure it's smaller than the previous one, it just needs to cover these dents.
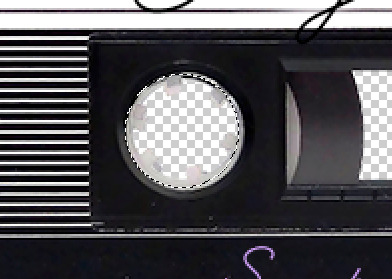
then right click on this selection on your canvas and go "layer via cut". this will create a new layer with that selection, and all you need to do is to disable it. this is removing the information in that circle.
once you are happy and the animation works, you can just delete that cut layer. now the animation is done and looks like this:

III. SECOND ANIMATION
one you have done it on the left side, you just gotta do the same thing on the right side. you can also try duplicating it, but i found it finicky for some reason (or maybe i'm just not used to the controls of this 2019 photoshop version?).
this is what i have once i've done the same thing on the right reel:
once i am happy with the speed and everything, i want to have only one layer so it's easier to use on gifs. first, i will save this animation as a psd file, in case i want to reuse it. then i am removing the song title layer and will be flattening everything and creating frames from this animation. to do so i am using the "save" action from here.
i'm not sure why it does that, but it's creating a couple of frames where the reels are a bit offset from their position everytime there's a full circle done, so i just delete these 5-6 frames. you can also change the speed here, but by default it should be 0.05.
once you are happy with it, just turn these frames into a smart object with the video timeline again (convert frame animation to video timeline and select all the frame layers > right click > convert to smart object)
now you have a smart object that is ready to be used anywhere!
IV. FINAL TOUCHES
for my particular speak now gifset, i have multiple layers of the animated cassette on each gif:
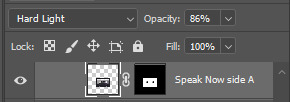
1, bottom one - cassette layer set to the blending mode "hard light" and set to opacity 86%:

2, middle - this same cassette layer set to hard light, but with the opacity at 100%, AND with a layer mask so it's only applied to the animated reels (i wanted them to show up more):

3, top one - and finally a third layer with another layer mask because i wanted the white label and speak now area to be less see through. it's set to the normal blending mode and the opacity is at 75%


and then i just added the song title on top at 100% opacity and normal blending mode, and added some drop shadows, and tada!
there we have it, i hope this was helpful <3
#alie replies#Anonymous#photoshop#tutorial#*ps help#completeresources#allresources#resourcemarket#userrobin#userraffa#userpjo#usertreena#tuservaleria#tuserheidi#userdean#userrainbow#usersalty#userzaynab#usernik#swearphil
406 notes
·
View notes
Text

Yoneda Kou included a little extra on the cover of the digital release. In the upper left corner you can see Doumeki holding Yashiro's hand.
And according to the extra bit of hidden translation... Yashiro's been RUNNING UP THAT ROAD...RUNNING UP THAT HILL!!!
youtube
EDIT: I FOUND AN ANSWER!!!!
While climbing the mountain road (Yama ji o nobo ri na gara)
The beginning of Soseki Natsume's novel "Kusamakura".
"While climbing the mountain road, I thought like this.
If you work for wisdom, you will get a horn. If you let your feelings flow, you will be swept away. If you're stubborn, it's cramped. In any particular, it's hard to live in the world of people."
In CC 2017 or later versions of Adobe Illustrator, if you select the character tool and click on it, the text is already included. And you must remember to delete it before publishing. In CC 2022, this feature was turned off by default.
Kind of reminds me of Photoshop's old "Lorum Ipsum...." text. I think the really important thing to note is that publishers in Japan still use Adobe Illustrator 2017!!!!
#saezuru tori wa habatakanai#saezuru chapter 51#saezuru spoilers#while climbing the mountain of doumeki... I got a hard on!
124 notes
·
View notes
Note
Hey, I don't know if you've said this before, but may I ask which program you use for digital art? I'm still trying to figure out which one I want to get because I wanted to try out something new. (I've drawn on Gimp and I feel like it's a lot better for editing images than it is for drawing ^^")
i got just asked that and replyed here
i use Photoshop. and i know its costy for a lot of people. so i recomend to look at the following programs Krita its free, lots of brushsettings, brush stabilizers, and vectors + text. you can even do smaler animations in it.
if you would like to invest, you could try
Clip Studio Paint i have artist friends that use this programm. its loved by many artist. its created by having artists need in mind. lots of brushes, stabilizers, vector lines + texts. animations option. a huge library or resources you can download form (carefull some could cost money) and 3D models to make the drawing process easyer. it also does this fancy recording your drawing thing we know form procreate. i think you can still get the old version without the subscription payment methode, which costs around 50 bucks.
Affinity Photo i admit i used it once and it took me getting used to. but its fine. the Affinity programs are like the counterpart to the AdobeCC. i know some people recomend it as an alternative, and got this and more programs for a steal on black friday. currently they cost around 80 bucks for a one time payment. way cheeper then the CC. it does what PS does. so if you are an artist that is used to PS you could give it a shot
i want to honorably mention CorelDRAW because i began my digital drawing journey on that program like.... 15+ years agon... but its expensive.... -i am not gona say it but if you thought about it.... well... go for it!-
if you have the option of a ipad or screen touch tablet. get a good stylus pen and check out the app store for digital drawing apps. there are lots of free ones out there. most popular i know of are:
Ibis Paint x - is free. and if you want to use all the tools and features you can by just watching one add and then everything is unlocked for like 8 hours. apart everything you need it also has this fancy procreate drawing recording option
procreate - its not free but as far i understood its an amazing program and just costs around 13 bucks? it only works on ipads. but professionals use it, has animation option just like everything! hope this helps! (sorry idk how to link the apps)
#chip!ask#art programs#again.... i mean... exspecially about the... you know#just do it the good old ways#maybe with an eyepatch and a clothes hanger as hook to get the right vibe#you know???
66 notes
·
View notes
Text

Download Link
Pass: drop357
Adobe Photoshop 2024 Crack is a professional image editing software application used worldwide to inspire people. Millions of designers, photographers and artists around the world are using it to achieve the impossible. You can design posters for packaging, basic banners for beautiful websites, and memorable logos for striking icons. Photoshop keeps the creative world moving.
Adobe Photoshop CC Full Version 2023 has a very clean and eye-cached interface and is equipped with Adobe Sensei AI technology that will provide photographers with many different options such as black and white options, pattern brushes, painting and depth of field. It also provides you with a one-click selection of many different themes for easy operation, and also provides a skin-smoothing effect.
Adobe Photoshop 2024 Crack has a new symmetry mode, where you can paint perfectly symmetrically, make sample axes, and choose from pre-configured models such as wheels, radials, mandalas, and spirals. It also comes with a frame tool that allows you to create different shapes or text frames to use as a placeholder on the canvas. In general, the full version of Adobe Photoshop CC 2023 is pre-enabled to increase efficiency and will greatly help photographers develop and customize digital images.
#Photo editing#Graphic design#Adobe Photoshop Crack#Crack#Image manipulation#Photography#Adobe 2024#Photoshop#Selection tools#Color correction#Photo effects#Masking#Install#Adobe Creative Cloud#Adobe design#Install software#Adobe#Crop tool#Adobe Photoshop
4 notes
·
View notes
Note
Which image editing software do you use, since you’ve mentioned not using photoshop? Is it gimp?
Hi. Yes, I use GIMP for photo editing and creating CC, and Canva (online tool) for creating previews with text, headers, etc.
7 notes
·
View notes
Text
TAGS MASTERLIST WIP
Create-A-Sim
🌱 Genetics
Skin | Eyes
🌱 Hair
Female Hair | Male Hair | Black Hair
🌱 Facial Hair
Eyebrows | Beards
🌱 Makeup
Blush | Eyeshadow | Eyeliner | Lips | Full Face
Freckles | Moles | Birthmarks | Wounds
Face Enhancers | Misc Face
🌱 Clothing
Female | Male
Adult | Teen | Elder | Children | Toddler
Tops | Bottoms | Outfits | Everyday | Formal
Undies | PJs | Swim | Athletic | Outerwear
Top Only | Bottom Only | Pantsless
Androgynous | Trans | Momma Lisa | Dummy Thicc | Maxis Fat
🌱 Accessories
Glasses | Jewelry | Piercings | Nails | Hair
🌱 Sims
Female | Male | Nonbinary
Face Templates | Default Templates | Sliders | Genetically Correct
🌱 Pets
Cats | Dogs | Coats | Accessories | Objects
Buy Mode
Appliances | Comfort | Decor | Dressers | Electronics | Hobbies | Kids | Lighting | Plumbing | Surfaces | Vehicles | Misc
Build Mode
Doors | Windows | Walls | Floors | Stairs | Railings | Terrain Paint | Gardening | Columns | Fireplaces
Neighborhood
Neighborhoods | Decor | Skyboxes | Townie Pools
Mods
Hacks | QoL | Gameplay | Traits Project | Food | Poseboxes
Resources
Tools | Trackers | Photoshop & Gimp | Hair Systems | Recolouring CC Making
Themes
🌱 Aesthetic Themes
Cottagecore | Emo | Fantasy | Futuristic | Goth | Medieval | Punk | Solarpunk | Suggestive/NSFW | Witchy
🌱 Cultural Themes
African | Chinese | Indian | Indigenous | Japanese | Korean | Southern
🌱 Religious Themes
Christian | Islamic | Jewish | Pagan
Misc
🌱 Text
Simlish | Non-Simlish
🌱 Sources
1t2 | 3t2 | 4t2
🌱 Lots
Residential | Community | Makeover
Defaults
Default Genetics | Default Hair | | Default Facial Hair | Default Makeup | Default Clothing | Default Accessories | Default Pets | Default Buy Mode | Default Build Mode | Default Neighborhoods | Default Foods | Default Misc
Stay safe and have fun. Everything will be okay 🫂
1 note
·
View note
Text
How to create a calendar design in adobe photoshop cc 2024?
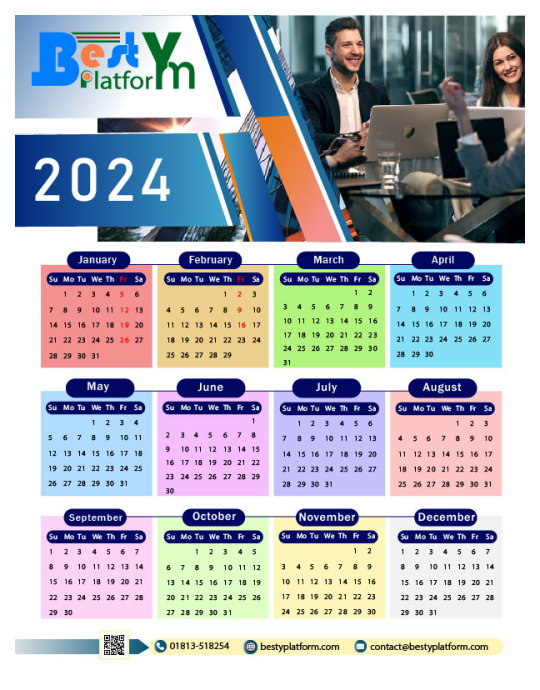
Looking to create a sleek and professional calendar design in Adobe Photoshop CC 2024? Here's a quick guide to get you started!
1. Set Up Your Canvas: Open Photoshop and create a new document with the dimensions you want for your calendar.
2. Add Gridlines: Use the "View" menu to enable gridlines, which will help you align your design elements perfectly.
3. Choose Your Colors: Select a color scheme that suits the purpose of your calendar. Remember, simplicity and readability are key.
4. Add Months and Dates: Use text tools to add the names of the months and the dates for each day. Consider using a clean, easily readable font.
5. Incorporate Images: If you want to include images in your calendar, use the "Place" command to insert them into your design.
6. Finalize and Review: Once your design is complete, take a step back and review the overall layout and aesthetics. Make any necessary adjustments to ensure a polished look.
Creating a calendar design in Adobe Photoshop CC 2024 can be a fun and rewarding project, allowing you to unleash your creativity while staying organized. Give it a try and showcase your unique style!
#graphic design#digital marketing#branding#marketing#ecommerce#business#sales#success#web development#seo services
0 notes
Text
Download Link
Pass: drop357
Adobe Photoshop 2024 Crack is a professional image editing software application used worldwide to inspire people. Millions of designers, photographers and artists around the world are using it to achieve the impossible. You can design posters for packaging, basic banners for beautiful websites, and memorable logos for striking icons. Photoshop keeps the creative world moving.
Adobe Photoshop CC Full Version 2023 has a very clean and eye-cached interface and is equipped with Adobe Sensei AI technology that will provide photographers with many different options such as black and white options, pattern brushes, painting and depth of field. It also provides you with a one-click selection of many different themes for easy operation, and also provides a skin-smoothing effect.
Adobe Photoshop 2024 Crack has a new symmetry mode, where you can paint perfectly symmetrically, make sample axes, and choose from pre-configured models such as wheels, radials, mandalas, and spirals. It also comes with a frame tool that allows you to create different shapes or text frames to use as a placeholder on the canvas. In general, the full version of Adobe Photoshop CC 2023 is pre-enabled to increase efficiency and will greatly help photographers develop and customize digital images.
#AdobePhotoshop#PhotoshopEditing#PhotoshopArt#PhotoshopDesign#GraphicDesign#PhotoManipulation#DigitalArt#PhotoRetouching#Photography#CreativeEditing#PhotoshopTips#PhotoshopTutorial#PhotoshopSkills#PhotoshopWorkflow#PhotoshopCommunity
0 notes
Text
Illustrator 2024
Adobe has released the new version of Illustrator CC 2024 introducing features and improving existing tools. These improvements can help artists and designers improve and enhance their workflow. Some of these include:
Text to Vector Graphic – this tool is an addition allows designer to convert texts into vector graphics. “Similar to Generative Fill in Photoshop, this feature uses vectors to create generative fills, opening up new possibilities for designers.”
Retype – this tool identifies fonts in raster images and applies them to editable text objects. This comes in handy for designers who are constantly matching fonts in their work.
Mockup – Wraps vectors around the geometry in mockup images, creating a realistic mockup effect for showcasing designs. This tool is quite useful for creating mock-ups for clients.
Share for Review - allowing users to share their artwork as a PDF, enabling feedback from other people all within Illustrator. This feature can be used by artists and designers wanting or needing feedback from other fellow artists or even clients. They can access the artwork and provide notes right in Illustrator. Since it shares it as a PDF, there is no worrying about changing the artwork or file.
Contextual Task Bar – This tool came from Photoshop. It offers convenient tools and shortcuts for common tasks and saving time.
Smooth Tool - automatically smoothens paths and making the design look cleaner. This tool is not as effective sometimes, but it is really useful when attempting to create smooth and flowing shapes.
0 notes
Text
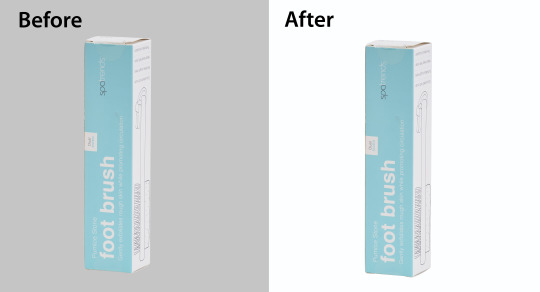
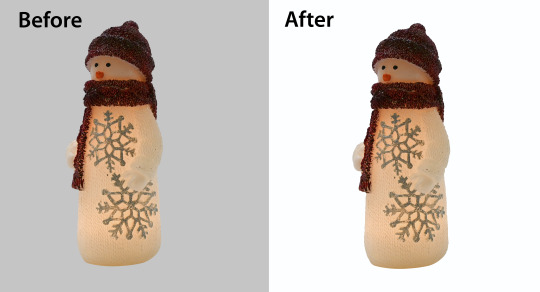
Photo Editing Service
Photo editing service refers to the process of enhancing or manipulating images using photography software such as Adobe Photoshop, Lightroom, and more. These services are offered by professional photo editors who have the skills and expertise to transform and improve the quality of images based on the clients’ specifications and requirements.
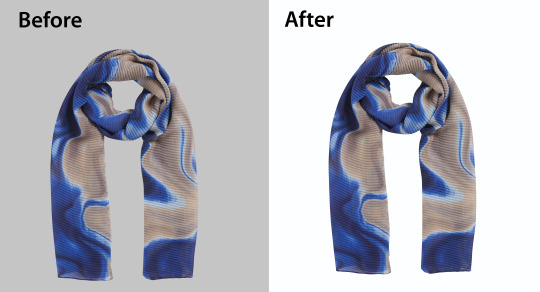
The photo editing process can involve performing tasks such as adjusting color balance, brightness and contrast, exposure correction, removing unwanted objects or background, retouching, adding text, resizing, cropping, and more. The specific types of photo editing services offered may vary depending on the provider, but the goal is always to enhance the appeal and quality of the image.
Professional photo editing services have various applications, including in commercial industries such as advertising, e-commerce, and media as well as for personal use for social media, events, and weddings. These services can help businesses and individuals to create high-quality images that are more attractive, pleasing to the eye and with better visual appeal.
What Is Editing in Photography?
Editing in photography is the process of making adjustments to an image to enhance its visual appeal or communicate a particular message. It involves using editing software to make changes to various aspects of the photo, such as brightness, contrast, saturation, color balance, sharpness, and clarity. Editing can also involve cropping, resizing, removing blemishes or distractions, adding text or graphics, and applying filters or special effects. The ultimate goal of editing is to create an image that best represents the photographer's vision and conveys the desired message to the viewer.
Have you photo format restrictions?
Some image formats are more widely used than others. The most common image formats are JPEG, PNG, GIF, and TIFF. JPEG is a compressed format that is ideal for photographs. PNG is also a compressed format, but it supports transparent backgrounds and is best suited for graphics. GIF is ideal for animations or images with very few colors. TIFF is a high-quality uncompressed format that is ideal for printing and professional use. It's always a good idea to make sure the image format you are using is compatible with the software you’re using to edit and display them.
Which Photoshop is best for editing?
Adobe Photoshop is a popular photo editing software that offers a wide range of features for editing and processing digital images. Adobe releases new versions of Photoshop periodically with added features, enhancements, and bug fixes.
Photoshop CC (short for Creative Cloud) is the latest version of Photoshop and is the most advanced version to date. It offers several benefits such as cloud-based storage, integration with other Adobe software, such as Lightroom, Premiere Pro, and Illustrator, access to online resources, and the ability to work on multiple devices.
Photoshop CC is available through a subscription-based license, which means that users pay a monthly fee to access the software. However, there are other versions of Photoshop available, including Photoshop CS6 and Photoshop Elements. These versions have fewer features and are less expensive than Photoshop CC but are still very capable photo editing tools. So, the best version of Photoshop for editing photos depends on the user’s needs, budget, and the features they require.
What are the benefits of photo editing for my business?
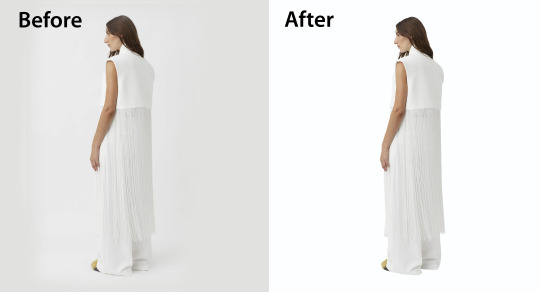
Photo editing can have several benefits for your business. Some of these benefits include:
1. Improved visual appeal: Edited photos have a more attractive and professional appearance that can help your business stand out from competitors.
2. Better communication of your brand message: You can use photo editing to ensure that your visuals are consistent with your brand message and values.
3. Increased customer engagement: High-quality visuals and images attract and hold the attention of customers for longer periods, increasing engagement and ultimately boosting sales and conversion rates.
4. Customization of images: Photo editing provides flexibility to customize your images, allowing you to tailor them to suit your specific marketing needs and showcase your products or services more effectively.
5. Cost-effective: Instead of having to re-shoot photos or hire a professional photographer, photo editing can help enhance existing images at a lower cost.
Overall, photo editing can help your business create more impactful visuals that can effectively communicate with customers and increase your brand's visibility and credibility.
How can I be sure my order is secure?
If you are making an online order, there are several ways you can ensure that your order is secure:
2. Look for the padlock: The website URL may also display a padlock symbol to indicate that it is secure. The padlock symbol may appear on the left or right side of the URL.
3. Use a secure payment method: Make sure you are using a secure payment method such as PayPal or a credit card with fraud protection.
4. Use strong passwords: When setting up an account, make sure to choose a strong password and keep it private.
5. Check for security certificates: Make sure the website has a security certificate indicating that it has been audited and approved as a secure site.
6. Avoid using public Wi-Fi: Be careful about ordering online over public Wi-Fi, which can be less secure than a secure and private network.
By taking these measures, you can help ensure that your online order is safe and secure.
Why is Photoshop necessary for web design?
Photoshop is not strictly necessary for web design, but it can be a very useful tool for creating and manipulating images that are optimized for the web. Here are some reasons why Photoshop is often used in web design:
1. Ability to create and edit high-quality images: With Photoshop, you can create and edit high-quality images for your web design projects. You can adjust the color balance, brightness, contrast, and other aspects of an image to create a visually appealing and impactful design.
2. Optimization for web: Photoshop has features and settings that allow you to optimize images for the web, making them smaller in size without sacrificing quality. These optimized images help websites to load faster, which can improve the user experience and boost SEO.
3. Efficient design process: Photoshop allows designers to create a web design mockup before implementing the actual design. This helps the designer to identify potential issues and refine the design before the development phase, saving time and cost in the long run.
4. Cross-platform compatibility: Websites need to be compatible with various devices and screen sizes. Photoshop has features that allow designers to create flexible and responsive designs that can adapt to a range of devices and platforms.
Overall, Photoshop is a useful tool for web designers, especially when it comes to creating and editing images for the web, optimizing images for faster loading times, and ensuring cross-platform compatibility.
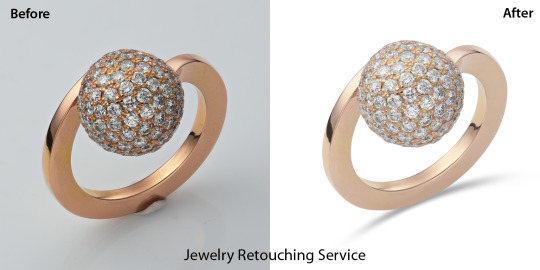
How does photo editing/retouching help with magazine and brochure advertisements?
How can product photo editing & retouching boosts my online e-commerce business?
How can I send you my photos?
If you want me to assist you with any image-related question, you can describe the issue you are facing with the visual elements, and I can suggest a solution or provide guidance based on your description. Alternatively, you can upload your images to a cloud storage service, such as Google Drive, Dropbox, or iCloud, and share the link with me to view the images. I can then provide suggestions or assistance based on the images you have shared.
0 notes
Text
Text Tool in Photoshop | फोटोशॉप में टेक्स्ट टूल का प्रयोग कैसे करें
Text Tool in Photoshop | फोटोशॉप में टेक्स्ट टूल का प्रयोग कैसे करें
Photoshop में Text Tool का Use कैसे करें (How to Use Text Tool in Photoshop) Text Tool in Photoshop – Type Tool आपको अपने Documents में Text जोड़ने की अनुमति देता है। आप विभिन्न Project पर Text का Use कर सकते हैं- Example के लिए, आप Poster, अवकाश कार्ड या आमंत्रण बनाने के लिए अपनी Images में Text जोड़ सकते हैं। यदि आप Photoshop में किसी Documents या Image पर Text को Type करना चाहते हैं तो सबसे…

View On WordPress
#adobe photoshop#adobe photoshop cc#how to edit text in photoshop#how to use text tool in photoshop#how to use text tool in photoshop cs6#photoshop#photoshop cc tutorial#photoshop in hindi#photoshop text effects#photoshop text tutorial#photoshop tools#photoshop tutorial#photoshop tutorial in hindi#photoshop tutorials#text in photoshop#text tool in photoshop#text tool in photoshop cc#text tool in photoshop in hindi#type tool in photoshop
0 notes
Text
photoshop, a powerful program with an absolute nightmare tool for making lines. like ???? how goddamn hard does it have to be to make a good dotted line photoshop??? WORD does it better. WORD. ive been GOOGLING how to make a line that works in photoshop for the last 30 mins because the ones i drew on these frames originally while nice looking were so small they rendered away in premiere on the frames, which *sigh* more work and head desk for me i guess. i hate it here
#text#if anyone has any excellent suggestions for settings for the line tool in photoshop CC i would looooooove to hear them y'all#margaret babbles#photoshop issues
0 notes
Text
i have seen alot of people manually write their url/ watermark or place their logo (essentially, a photo) in each gif or photo they make/edit, which is obviously a waste of time and effort. "Actions" is a life and time saving photoshop function for watermarks.
When you make an action for the watermark, the action will place your text / photo exactly where you positioned it while making the action with the font, blend, size and position you chose.
So, here is a small but helpful tutorial of how to put your logo/text watermark in photoshop using actions on photos or gifs by your friendly neighborhood CC!
i use photoshop 2021 for making my stuff. You can download photoshop and other gifs/grfx related resources from this page. (studiocarat, a grfx network for carats)
This was originally going to a part of my other "photoshop tips n tricks" tutorials but i noticed that this is a sorta big one and imp one and thus needs a tutorial of its own.
ABOUT "ACTIONS"
You can record most—but not all—commands in an action.
You can record operations that you perform with the Marquee, Move, Polygon, Lasso, Magic Wand, Crop, Slice, Magic Eraser, Gradient, Paint Bucket, Type, Shape, Notes, Eyedropper, and Color Sampler tools—as well as those that you perform in the History, Swatches, Color, Paths, Channels, Layers, Styles, and Actions panels.
Results depend on file and program setting variables, such as the active layer and the foreground color. For example, a 3‑pixel Gaussian blur won’t create the same effect on a 72‑ppi file as on a 144‑ppi file. Nor will Color Balance work on a grayscale file.
When you record actions that include specifying settings in dialog boxes and panels, the action will reflect the settings in effect at the time of the recording. If you change a setting in a dialog box or panel while recording an action, the changed value is recorded.
Go to Window > Actions. You will see a small play botton in your toolbar on the right side, that’s your actions. Click on it and it’ll open your box with some photoshop actions.

LOGO IN GIFS
Step 0: open photoshop, load your gifs, convert them into a smart object, do you colouring ! Make sure your gif is in timeline video mode !
Since, your doing a logo, you have to have a logo already made and saved in a png format in your laptop. So when you play your action, PS will automatically place you logo png from the destination it was saved in. Your logo can be in a 100 x 100 px transparent background.
for example, my logo looks like this:

Step 1: Click on the folder icon to create a new "Action Set". Name your set. for example, 'watermark'.
Step 2: Click on the '+' icon beside the Action set icon. It will create a new action. You can select which Action Set you want it to be a part of; in this case, "watermark" action set. Rename your new action as your preference.
The second you hit the record button in the dialog box, everything you do will be recorded as steps/action so don't do unnecessary steps or else you'll have to redo your whole action.
Step 3 : The small button in (3) will turn red (🔴) indicating the recording has begun.
Step 4 : Assuming you already have your logo made and saved, click on File > Place / Place embedded. It will open your file manager, select your logo and press enter. It will place your logo on your gif as a separate layer. If it is made on a small PNG (eg. 100 x 100 px), you wont need to resize the photo, but if necessary please resize the logo to your preference.
Step 5: Right click your layer and rasterize it clicking "rasterize layer". Place your timeline cursor thingy at the starting of the timeline.
Step 6: Select your whole document by the shortcut CTRL/CMND + A or Select > All.
Step 7: Now, select your logo layer by clicking it. Go to Layer > Align layer to selection. Select Align Bottom. You'll see your logo move to the bottom. Go to Layer > Align layer to selection again and click on Alight left or Align Right according to your preference.
i don't like my logo sticking to the edges, so i selected the logo, pressed CNTRL/CMND + T and used arrow keys and pressed right & up arrow keys 5-8 times so that logo doesn't stick to the edge.
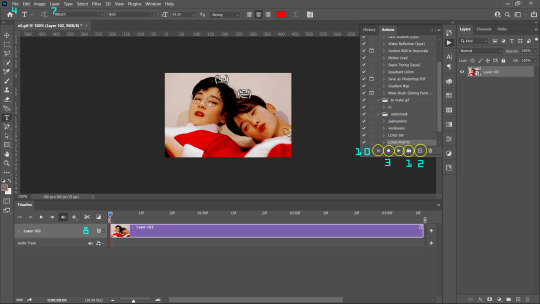
Step 8: Now, in most cases, the logo layer will be longer than the gif layer in timeline. Like this:

Now, You can place your Timeline cursor thingy somewhere in the middle of the logo layer from the starting by dragging it and press cut ( the scissors icon) on timeline. This will split your layer in two. layer “logo” and “logo copy”.
Step 9: Delete the second half of the cut (logo copy) by selecting it and pressed 'delete' key on your keyboard.
Step 10: Press the square logo (■) on your action box to stop recording. Voila! you're done recording your action !
Step 11: you might notice that you can't see you logo, just adjust the logo layer so that it matches the gif layer! The only thing you'll need to adjust in each gif is the size of layer by matching it to the gif layer.
Don’t make the adjust layer size in timeline as a part of your action because it is different with every gif.
You can adjust your blending mode according to your preference but recommended are overlay & soft-light.
TEXT IN GIFS
STEP 1, 2 AND 3 ARE THE SAME
STEP 4: click on your text tool and type out your watermark name (url, name, whatever) in your preferred font and size. ( recommended size: 10). Press enter.
STEP 5: You don't require to rasterize your layer cause you may want to edit the text later.
STEPS 6 THROUGH 11 ARE SAME.

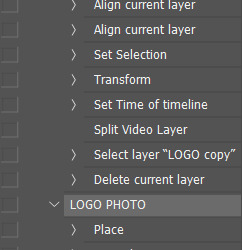
LOGO IN PHOTOS
FOLLOW STEPS 1 THROUGH 7 to get your action for logo in photos.
Action you just made for gifs won't work with photos because it has the command like "set time of time line", "Split video layer", " Select file 'LOGO copy'" and "Delete Layer" and these won’t work on a photo.
Since there is no timeline in photos, you don't require steps 8, 9 and 10.
TEXT IN PHOTOS
STEPS 1, 2 AND 3 ARE SAME
STEP 4: click on your text tool and type out your watermark name (url, name, whatever) in your preferred font and size. ( recommended size: 10). Press enter.
STEP 5: You don't require to rasterize your layer cause you may want to edit the text later.
FOLLOW STEPS 6 & 7 AND PRESS STOP RECORDING ■.
You can choose your preferred blending mode.

You will see all your action recorded and saved. PS has an auto syncing function so once you have made your action, you don't have to make it again. When required, just select the Action you want and press play ▶
My actions look like this for logos & text (url) in gif:
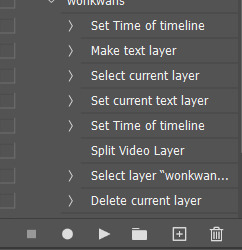
End result:

i tried my best to explain. if you have any problem or doubt in a step, please feel free to approach me!
Thankyou for coming to my little tutorial. The End ♡
#seventeen#lee.guide#watermark#watermark tutorial#ps help#ps#photoshop#photoshop tutorial#ps guide#photoshop 2021#tutorial#studiocarat#svtsource#kpopccc#resources#allresources
362 notes
·
View notes
Text
PIRATING ADOBE CC MASTERPOST
I was about to make this one of those posts that say, "Hey everyone, WATCH OUT, there's some ILLEGAL PIRATED Adobe software that you should definitely AVOID. Here's the link so you know what to look out for, because you wouldn't want to get stuff FREE by MISTAKE"... and then I realized, if Adobe actually wanted to come after me for copyright shit (which they don't), their lawyers don't fucking care if I did it with a coy wink and a nudge.
So fuck em.
Fucking steal that shit. It's a moral imperative.
(And if you don't want to for personal reasons, or because you're a business and they will come after you, you can get Adobe CS2 free legally, or any of these decent free alternatives.)
But if you want the real CC, read on!
The crack:
god I sound like a drug dealer now
I use the 2019 CC cracks made by Zer0Cod3, who was taken down almost immediately after, but this mirror site still works as of July 2021: https://cgpersia.com/2019/01/adobe-2019-cc-collection-win-x64-148263.html
You have to download it using one of the options at the bottom of the site (I used RapidGator) and it's a pain in the ass but still ultimately safer than trying to find a torrent (send me an ask about that if you want another masterpost).
How to use:
Once the files download, PUT YOUR COMPUTER IN AIRPLANE MODE
Make a System Restore Point just in case anything goes wrong and you want to roll it all back.
Install the programs you want. They may ask for you to sign in or put in a key. Just click the "do it later" option and close out of the program as fast as you can. Ideally, try to install the programs without letting them launch at all.
Copy the crack file (the one with its name listed on the website) and REPLACE the original file of the same name. You don't actually have to use the patch tool.
If you're confused, let's do Photoshop as an example. So you've run the installer, and you now have Photoshop installed. Go to its Program Folder (on Windows it's usually "C:\Program Files\Adobe\Adobe Photoshop CC 2019\" but if you're ever unsure, you can install Everything Search then just search your whole computer for "photoshop.exe"). Delete the original photoshop.exe, and put the photoshop.exe that you downloaded in the exact same place.
DON'T OPEN IT YET. We need to block Adobe from verifying/updating these programs...
If you have any other genuine Adobe programs (e.g. Acrobat DC) make sure you've signed out of your Adobe account.
Block all these apps in your firewall (You can look up how to do that for your specific device). Also, if you're on Windows, you can open "C:\Windows\System32\drivers\etc\hosts" in a text editor and add the follow: 0.0.0.0 lmlicenses.wip4.adobe.com 0.0.0.0 lm.licenses.adobe.com 0.0.0.0 na1r.services.adobe.com 0.0.0.0 hlrcv.stage.adobe.com 0.0.0.0 practivate.adobe.com 0.0.0.0 activate.adobe.com
Next (on Windows), open Services.msc and set the following to Startup Type - Disabled: Adobe Genuine Software Monitor Adobe Genuine Software Integrity Service AdobeUpdateService
(Mac has an equivalent called launchctl, so you can check there for things with similar names to disable.)
That's it! You're good to go!
Obviously if you get any requests in-app to sign in, check for updates, or access the internet or Adobe Cloud, deny that shit. If something does go wrong with the install, the worst-case scenario is that you'll be on a free trial that will expire, and you'll have to FULLY UNINSTALL everything discussed above and try to repeat the steps fresh.
Final notes:
There's another way to get free Adobe CC called CCMaker. It uses AmtEmu, which emulates the amt files that Adobe used to verify these programs up through CS6. I didn't think AmtEmu still worked though. I've also heard CCMaker is faster and more lightweight, but I haven't tried it out so I can't confirm any of that. Try at your own risk.
Speaking of risks: I'm a stranger on the internet. There's no reason you should trust things I tell you to download (hell, I didn't trust these things when I was downloading them). I did run them through virus checkers (VirusTotal, Kaspersky, and Comodo), and apart from a few false-positives that are common with cracked software, it looked clean. I always recommend having a robust antivirus running. If you notice any suspicious behavior, try to isolate it and delete it. When in doubt, rollback to a system restore point made before you did any risky installations. Kaspersky is a very good free antivirus.
Lastly, if you found this guide useful, PLEASE REBLOG AND TAG THIS POST (and my other post linking to this one) so other people can benefit just the same!
And remember, piracy is cool! ✌
#free adobe cc#piracy#free software#photoshop#adobe cc#cracked apps#photoshop crack#premiere#premiere pro#adobe audition#lightroom#aftereffects#after effects#indesign#photoshop free#gimp#sai#Mine
1K notes
·
View notes