#*ps help
Explore tagged Tumblr posts
Visit Tumblr Blog
Explore Tumblr blogs with no restrictions, modern design and the best experience.
Last Seen Tumblr Blogs


Fun Fact
US Tumblr user growth rate is estimated to slow down to 4.1%.
Note
Hi! Can I ask how you did the double exposure gifs for your merlin set? They're beautiful btw!
heyy, thank you!! of course!
it's actually not very hard, the trick is to find the right shots for this. here's how i did it (reference gifset), under the cut.

for this tutorial i will be: — using photoshop cs5 on windows — assuming you know how to make gifs using the timeline — have basic coloring, sharpening, groups, and layer masks knowledge
I. CHOOSING THE RIGHT SHOTS
the ultimate trick to pull this off is to choose the right image. in order to do the double exposure, you need a silhouette shot that has these:
a defined and dark silhouette with a background that is not too busy
enough contrast between the silhouette and the background
the silhouette should take at least 50% of the space
not too much movement
here are a few examples of why they work and why they won't:
gwen: perfect example since this shot is already quite contrasted with a defined silhouette. there won't be a lot of work needed to make this one work.
merlin: not a great example because even tho there's a somewhat good contrast between him and the background, the silhouette is just too bright, not dark enough.
arthur: another good example, even if there are some bright spots on his face and armor. since he's not moving too much, you can definitely brush some black over him to make his silhouette darker (i'll explain/show later)
morgana: this one could work because the contrast is great, but of course her skintone is very bright against the black clothing. that being said, since the movement is not too bad, it could be possible to brush some black over her and move these layers with keyframes (as mentioned for arthur's example). i haven't tried it tho, but i think it would work well enough.
once you have your silhouette shot, you need another gif for the double exposure. what works best, in my opinion, are:
wide, large shots
shots with no to little camera movement (no pan, zoom, etc), but the subjects in the shot can have little movement of course
pretty cinematography/scenery shots
i find these are easier to find and make it work, it's not as "precise" as with silhouette shots. it's mostly just trial and error to see what works best with the silhouettes.
II. PREPPING THE SILHOUETTE
for the effect to work, we want a silhouette that's dark as possible. i'm gonna use the gwen and arthur shots as examples.
for the gwen gif, i started by sharpening, and then upped the contrast by quite a lot so her silhouette is mostly black, while retaining some nice details. i've used only 3 layers here:

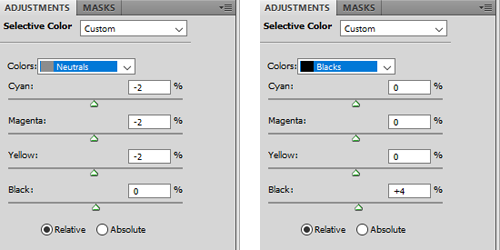
selective color layer: in the blacks tab, playing with the black slider (value: +10)
brightness/contrast layer: added a lot of contrast (+61) and a bit of brightness (+10)
black and white layer: on top, its blending mode set to soft light and at 20% opacity. gives a bit more depth and contrast

then for the arthur example, i've also sharpened it first, and added contrast layers in this order (the skintone looks horrible, but it won't matter soon lol):
levels layer: black slider at 0, grey slider at 0.76, white slider at 104
selective color layer: in the blacks tab, black slider at +10
brightness/contrast layer: brightness at +1-, contrast at +47
black and white layer: on top, its blending mode set to soft light and at 20% opacity. gives a bit more depth and contrast
as you can see, half of his face is still quite bright. to correct that, create a new empty layer and put it between the gif and the coloring layers.
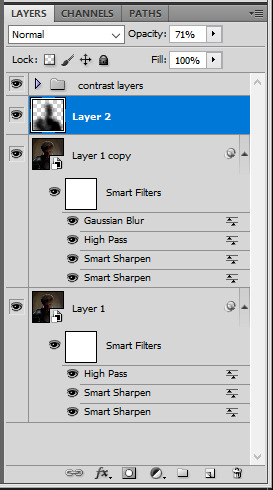
using a really soft brush and the black color, brush some black over his face and body on that new empty layer. you can edit the layer's opacity if you want, i've set mine to 71%. since arthur doesn't move much here, there's no need to keyframe this layer's position. for the morgana example, this is where you'd need to play with keyframes to make it work. here's where i'm at now after this:
you can always edit this layer later if you need, after doing the double exposure blending.
once the silhouette is all ready, you can put all layers in a group and rename it (i've renamed mine silhouette).
III. BLENDING
now the fun part! import the wide/scenery shot in photoshop, then resize it to the same height of your silhouette gif. make sure the gif is a smart object layer, and sharpen it. finally, bring this gif onto the silhouette canvas (by right clicking the smart object > duplicate layer). once you have both gifs onto your canvas, put the wide shot gif layer in a group, and set this group's blending option to screen.

you can then position the wide/scenery gif the way you like it in the canvas. this is how it looks for both examples after i've done that:

if the blending mode screen doesn't give you the best result, so you can play around with other blending modes (such as lighten and linear dodge in these particular cases), but generally speaking, screen is the real mvp here haha.
IV. COLORING
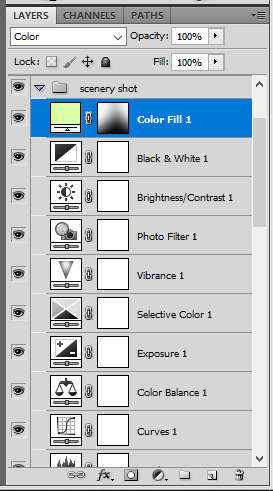
now that the double exposure effect is done, we need to color the gifs to bring them together. i went with simple coloring here, simply enhancing the colors that were already there. just make sure that the coloring layers for each gif are in their respective groups. here's how i've colored both examples:
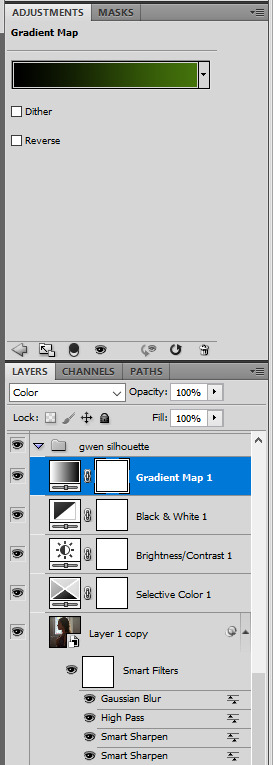
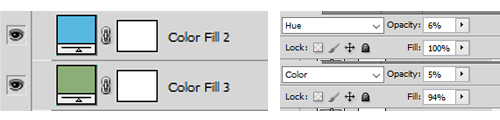
gwen silhouette group: i added a gradient map layer on top of the contrast layers in black to green and set the blending mode to color
scenery shot group: multiple coloring layers, with a green color fill layer (blending mode set to color), with a layer mask so it only affects the top half of the gif
for the arthur gif, i did something very similar but with warmer colors. i didn't use a gradient map for arthur though:
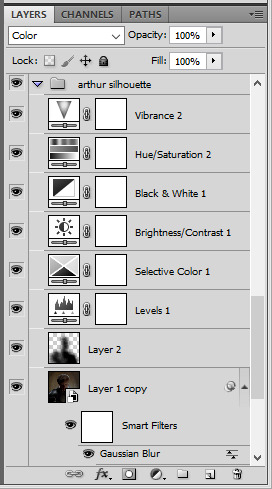
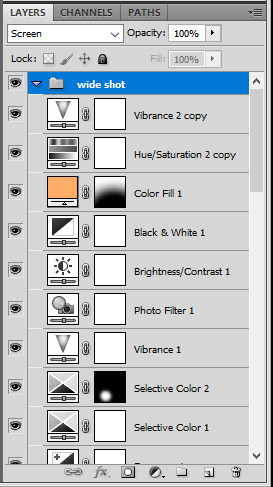
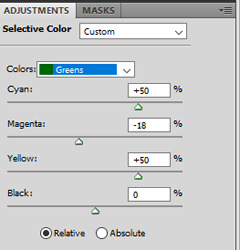
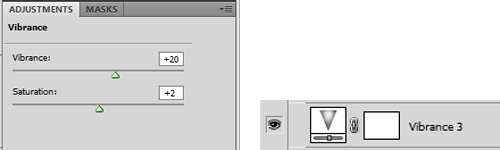
arthur silhouette group: i made the yellow warmer, closer to orange/red, with a hue/saturation layer, and added more vibrance. didn't feel like it needed a gradient map layer here though.
wide shot group: basic coloring layers to enhance colors from the merlin & daegal shot, and an orange color fill layer set to the color blending mode.
at this point you're pretty much done. just need to add some final touches and typography (if you want).
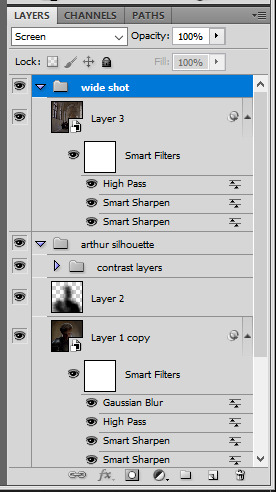
V. FINAL TOUCHES
a small and completely optional detail, but i wanted to soften the edges of the wide gifs. to do so i've duplicated the smart object gif layer and removed the sharpening filters (right click on smart filter > clear smart filters). put this layer on top of the other smart object layers (but still below the coloring).
then with this same layer still selected, go to filter > blur > gaussian blur... > 10px. this will give you a very blurry gif, but we only want the edges of the canvas to be softer. so add a layer mask to this layer. with a very large and soft brush (mine was at 0% hardness and about 800px size), brush some black onto the layer mask to remove the blur in the middle of the gif.

you can play with this layer's opacity or gaussian blur amount if you want (by double clicking on the gaussian blur smart layer filter). here how both examples look with this gaussian blur layer:

you can also mask some of wide/scenery gifs if you'd prefer, so it shows less outside of the silhouette. just put a layer mask on that whole wide shot group and brush some black or grey on the layer mask. it's what i did for the gwen gif, with a very soft brush and i set the mask density to 72% (i kept the arthur one as is tho):

and that's how i did it! hopefully that was clear enough :)
#alie replies#*ps help#resource#tutorial#allresources#*gfx#usercats#usersmia#userrobin#userfaiths#usertina#usermoonchild#userchibi#uservivaldi#usertreena#userraffa#userriel#userelio#usermadita#usersmblmn
1K notes
·
View notes
Note
do you have any tips to someone who wants to start to make gifs? Like what app you use or coloring tips?
this ask was all the way from july, I was busy sorry >.< this explanation will be very brief unless you ask follow-up questions for me to elaborate since I'm not sure how much you want to know.
Softwares
CapCut / HitFilm (depending on how big the file is)
VapourSynth
Adobe Photoshop
Colouring Tips
Download PSDs
everything i've learned about colouring has been through downloading the PSD of other creators and analysing how they use certain Photoshop features to colour different stage lighting and create contrast. no PSD fits all, and there's no singular tutorial that works for every single video. this way you can learn how to create your own PSDs and adjust it for every different scene.
Join a Community for Photoshop Resources
to learn colouring and other photoshop techniques i really suggest you join a community of fellow giffers. there's plenty of photoshop resources that get reblogged and this is how you learn new tricks since the search function on tumblr is crap, and it barely shows up on google tbh.
some other resources that I learned from:
limyouna
PiXimperfect
sorry i dont have specific sources to link since I learned everything through trial and error.
2 notes
·
View notes
Note
Hi, I'm a big fan of your blog and your gifs in general! I was wondering if you had any tutorial on how you color? Particularly your Wicked and Hadestown gifs look incredibly gorgeous and the colors really pop, and I'm so curious as to how you achieve those effects. Amazing work overall :D
hiii, oh my god thank you so much!! 🥺❤️
i'm happy to show you how i color my gifs but pls note that i basically have no idea what i'm doing, everything i know i taught myself via trial and error and this is just something i found works for me.
that being said, here's a quick (and very messy) bootleg coloring tutorial under the cut!
okay so, when it comes to making gifs and coloring in general, good source material is key. bright and clear videos make the coloring process SO much easier.
i picked an old 2010 wicked oberhausen boot for this tutorial. it doesn't have the highest resolution but the colors translate nicely and the lighting is pretty good as well.
now, this is our base gif cropped and sharpened. i usually want my gifs to look as natural and as close to their base version as possible with just colors and contrast enhanced slightly. baby steps are important here!
first thing i do is add a brightness/contrast layer. these are my settings for this gif:
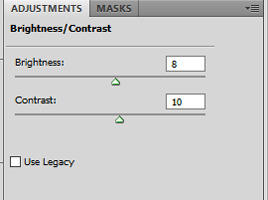
i rarely ever go above 20 with either brightness or contrast. adding too much early on will make your gif look grainy in the end. our gif now looks like this:

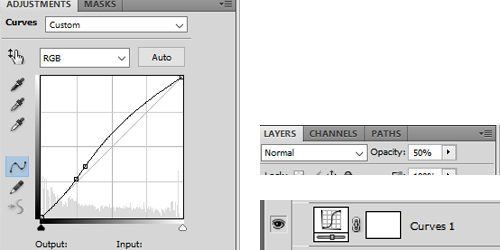
not much has changed but a little goes a long way, trust me. next up is a curves layer. i click the little arrow to open the drop down menu and select increase contrast (rgb). afterwards i reduce the opacity. for this gif i set it to 52%.

this will darken the gif again but it also gets rid of these white spots on elphaba's dress which is great.

next, we start playing around with colors. i usually use 3 color fill and one or two selective color layers. this really is just playing around until you find the settings that you think look good. for this gif i wanted to enhance the green and neutralise some of the yellow, so i went with two color fill layers first.
green to slightly enhance the green of elphie's skin and blue to neutralise the yellow in glinda's hair.
next we're going with a selective color layer. think of the colors you want to pop. for this gif the obvious choices are elphie's skin and glinda's dress.


i added a second layer to further adjust the greens
and ended up with this gif

i then added another color fill layer, set it to multiply and reduced the opacity to 12

followed by a color balance layer

the purpose of these layers is to slightly "cool down" the gif, meaning they decrease orange/yellow undertones while enhancing the blue and purple ones.
next up is a levels layer to add a tiny bit more brightness

followed by a vibrance layer to make existing colors pop
and another curves layer for more brightness/contrast with the opacity set to 50%
our gif now looks like this:
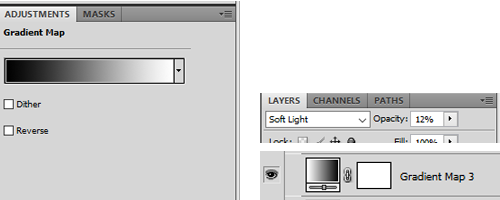
almost done! we're finishing up with a black and white gradient map layer for some more depth
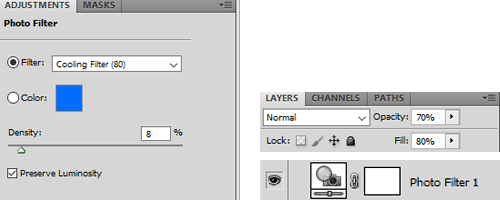
and a cooling filter to further reduce the yellow/orange tones of glinda's face and hair
and that's it!
so, here you go. this is my coloring process most of the time. sometimes i add more layers (on top or in between), other times i use less, it all depends on the specific scene and the mood i'm in lol.
now, could you leave out some of these steps? yeah, definitely. some layers probably don't even make that much of a difference but i like adding them anyway.
you can download the psd here. feel free to play around with my settings and add or delete layers as you see fit. hope this was at least somewhat helpful!
#ask#coloring tutorial#photoshop tutorial#*psd#*tutorial#*ps help#i don't know how to explain things i'm sorry
10 notes
·
View notes
Text
LOOK I JUST REALLY ENJOY THEIR FRIENDSHIP OK?? You can't tell me they wouldn't hang after their respective personal quests (spawn ending ofc)/emotional breakdowns over their own mortality
EDIT: I forgot to watermark these so now more than ever PLEASE don't repost
#baldurs gate 3#astarion#astarion ancunin#karlach#bg3#Karlach 'I could kiss his pointy little face' cliffgate#karlach cliffgate#karlach bg3#bg3 fanart#my art#I discovered CSP is a lot better than PS for animating#consistent artsyle? I don't know her#I just like their vibes#they seem like they'd be there for each other#maybe karlach just wanted someone to talk at her about absolute nonsense while she processes her own mortality bc that girl needs some help#I JUST REALLY LIKE THESE TWO
23K notes
·
View notes
Text
because sometimes there are invisible tests and invisible rules and you're just supposed to ... know the rule. someone you thought of as a friend asks you for book recommendations, so you give her a list of like 30 books, each with a brief blurb and why you like it. later, you find out she screenshotted the list and send it out to a group chat with the note: what an absolute freak can you believe this. you saw the responses: emojis where people are rolling over laughing. too much and obsessive and actually kind of creepy in the comments. you thought you'd been doing the right thing. she'd asked, right? an invisible rule: this is what happens when you get too excited.
you aren't supposed to laugh at your own jokes, so you don't, but then you're too serious. you're not supposed to be too loud, but then people say you're too quiet. you aren't supposed to get passionate about things, but then you're shy, boring. you aren't supposed to talk too much, but then people are mad when you're not good at replying.
you fold yourself into a prettier paper crane. since you never know what is "selfish" and what is "charity," you give yourself over, fully. you'd rather be empty and over-generous - you'd rather eat your own boundaries than have even one person believe that you're mean. since you don't know what the thing is that will make them hate you, you simply scrub yourself clean of any form of roughness. if you are perfect and smiling and funny, they can love you. if you are always there for them and never admit what's happening and never mention your past and never make them uncomfortable - you can make up for it. you can earn it.
don't fuck up. they're all testing you, always. they're tolerating you. whatever secret club happened, over a summer somewhere - during some activity you didn't get to attend - everyone else just... figured it out. like they got some kind of award or examination that allowed them to know how-to-be-normal. how to fit. and for the rest of your life, you've been playing catch-up. you've been trying to prove that - haha! you get it! that the joke they're telling, the people they are, the manual they got- yeah, you've totally read it.
if you can just divide yourself in two - the lovable one, and the one that is you - you can do this. you can walk the line. they can laugh and accept you. if you are always-balanced, never burdensome, a delight to have in class, champagne and glittering and never gawky or florescent or god-forbid cringe: you can get away with it.
you stare at your therapist, whom you can make jokes with, and who laughs at your jokes, because you are so fucking good at people-pleasing. you smile at her, and she asks you how you're doing, and you automatically say i'm good, thanks, how are you? while the answer swims somewhere in your little lizard brain:
how long have you been doing this now? mastering the art of your body and mind like you're piloting a puppet. has it worked? what do you mean that all you feel is... just exhausted. pick yourself up, the tightrope has no net. after all, you're cheating, somehow, but nobody seems to know you actually flunked the test. it's working!
aren't you happy yet?
#almost wrote the champagne line as ''effervescent'' but legit could not write it without saying ''effervescent like a snail''#ah tumblr...#writeblr#warm up#idk . having trouble writing rn#ps i don't like to talk about it . it is my medical information. but before you ask. yes this is about being on the spectrum#i really don't like when ppl make my writing about how im [whatever ID]. i want it to ring true for the people who it rings true for#i don't want it to be like ''awwwww look at this person!!! she's the EXCEPTION!!! :)" .....#no.... not really.....#idk something gross happens whenever i admit to certain conditions and i turn into like inspiration p*rnography#like yes they actually let us use keyboards these days#furthermore i just... dont feel comfortable talking about this part of me. i had too bad of a childhood. adhd is one thing...#this one im like. still coming to terms with. which is like. my own journey.#idk. just please be kind. some things are more private than others. this one feels private to me.#i do not know how to help others w/this . and i do not know how to help myself. i will talk about it if im ever ready. idk if that will#actually ever happen#ty in advance i love u im kissing you we are kissing somewhere on the spectrum
51K notes
·
View notes
Text
Tommy 'my priority is Evan' Kinard
#evan buckley#tommy kinard#bucktommy#kinley#911#911 spoilers#911edit#911 abc#oliver stark#lou ferrigno jr#one thing about tommy is he'll be there!#whether it's chim calling for help or eddie asking to hang out or buck asking him out#HE 👏 WILL 👏 BE 👏 THERE 👏#this man cares so much 😭#but he's also so gone on buck it's actually adorable#he worked like an 18 hour shift in a literal FIRE and didn't even stop to rest or shower before he ran to buck#(also my PS is acting up pls don't look at the quality of these gifs)#my stuff
4K notes
·
View notes
Text

i would like to draw him more i think..
#marvel mcu#xmen#xmen apocalypse#charles xavier#professor x#snap sketches#drawin him and i cant help but feel he looks like matt mercer i elakjleakjveal something i must work on in the future#a LOT to work on really but this was just a quick thing just to get basics and the sort#anyway and if i say his best outfits were in this movie. and ironically best hair#this is very closely followed by his psychedelic shirt and bell bottoms from dofp but ANYWAYS#again just wanted to do a quick doodle .. a quick study i spose#i dont have any major art plans . wait im lying yes i do but not with young charles and erik#ill have to practice those two another time ... for now i hope you may enjoy a humble professor#ps if im so tbh i just wanted to draw him cause i needed to color his eyes and lips#because i am forever mesmerized by how blue his eyes can be and how pigmented his lips can be#wait i have a text post to make. im sick ..
743 notes
·
View notes
Text

#companion#sophie thatcher#jack quaid#iris#companion 2025#gifs#thrilleredit#filmedit#pls help my ps settings#film
250 notes
·
View notes
Text
Reuniting with a distorted past.
Extra:(New personality tested gone wrong)
wanted to play with rin living in the aftermath aus aswell and had these drawings laying around to share so yay
Panel 1: Was buried alive.

Comic 1: Who are you supposed to be?


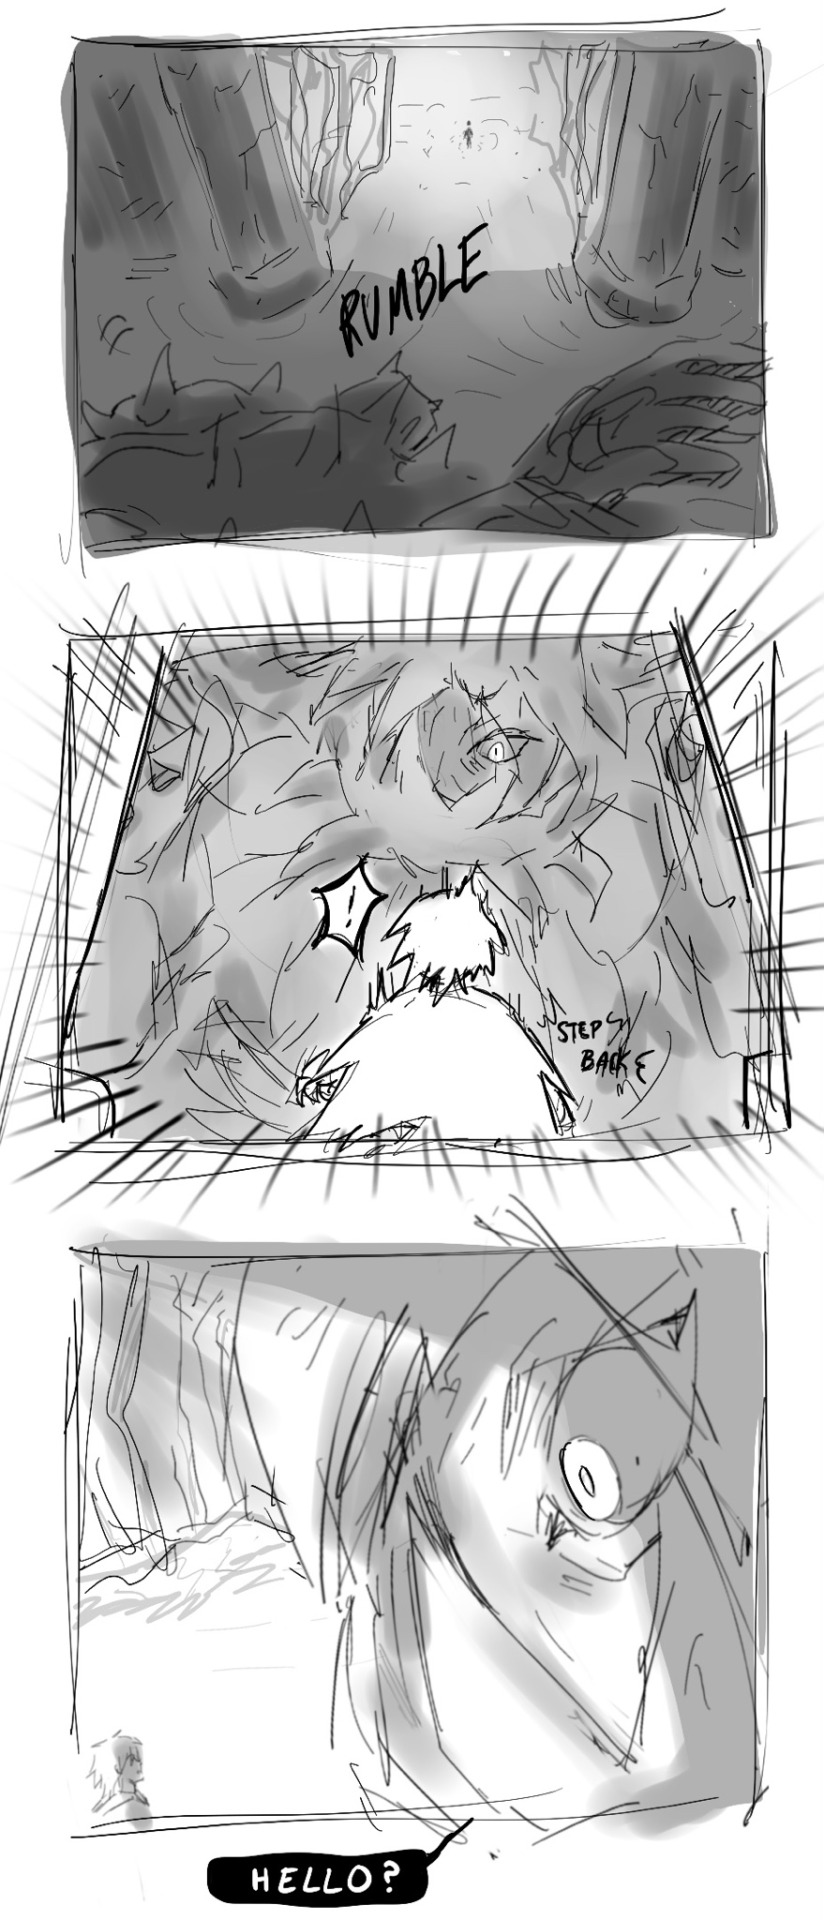
new friends
Comic 2: Misguided protection.
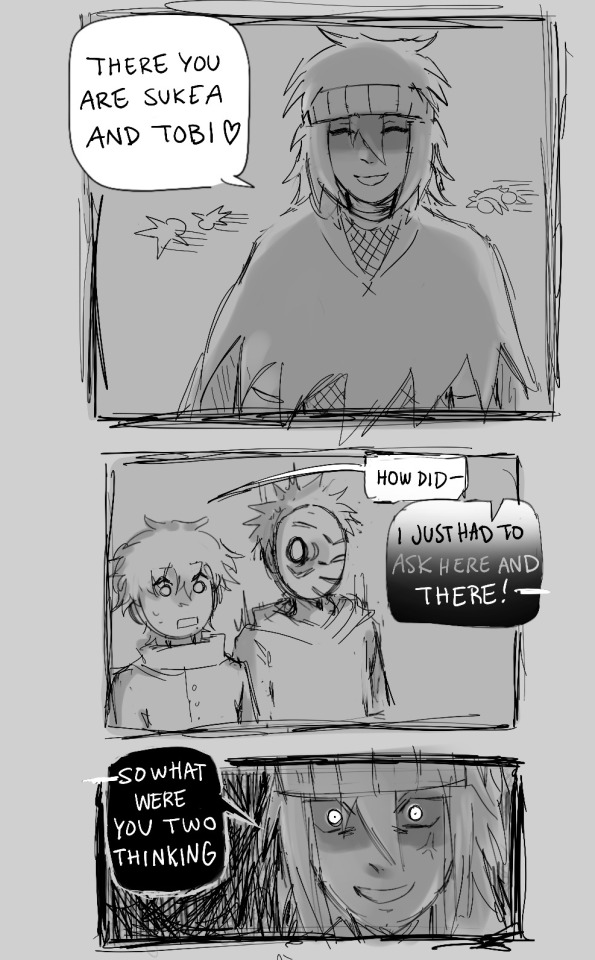

obito still sensing the warning signs of rin losing her temper. anyways they proceeded to be dragged into the ocean by rin like some sea monster
Comic 3: Finding out (Now what will you do?)

obito is harshly brought back from his delusions because now its not just kushina but rin too who he needs to ripped out the tail beast from
#naruto#naruto fanart#kakashi hatake#rin nohara#obito uchiha#naruto sukea#fanart#art#my art#sketch#drawing#digital art#hope i can add something new and if not may i shall add fuel to the fire for rin!! :)#So Rin loses ALL of her memories forever (kinda)#the only thing that remains for sure is the feeling of missing something that she'll never reach it again#she's alone and is left to roam directionless until she meets an elderly civilian that is also alone#she stays with her for a year+ but she passes away. But Rin with her new identity decides to walk forward (with love comes pain#but to love at all was the greatest thing to her.) She cherishes her new memories and won't let it stop her from moving on#inbetween this time frame she meets isobu in her mind after he gains enough form within her (who is also without memories)#Now WAY LATER she meets Sukea who looks like he's about to panic and she tries to help (which uh doesnt work too well)#but then Sukea joins her on her travels (sending minato an letter through his summons of rin being alive and forgetting the mission)#they both wander around (he doesnt know how to bring up their past) but then obito appears (always at the wrong times)#At first glance he's pissed but then realizes that this isnt fake AND its both the worse thing yet best thing to ever happen#Now Rin thinks she made two new friends who give her feelings of warmth but they both also reminded her of something old she thinks#PS Minato and Kushina are freaking out back in the village but can't do anything about it (Obito hasn't acted on his plans yet so yes)
468 notes
·
View notes
Text


Drive to Survive Season 2, Episode 5
#max verstappen#f1#*#**#drive to survive#dts#dts2#dts 2#formula 1#f1edit#tw flashing#s/o to @toyotacorolla1942 and @danthropologie for helping me find the clip!#the part where he stared straight into the camera 😩😩😩😩😩#he's so just like. straight up handsome it's insane??????????#also the lip freckle#i stared at it for like 20 minutes in ps now i feel like a new person like my eyes have been christened#the standoffish icy stare i won't ever be able to shut up about it#im obsessed#these might be my fav gifs ive ever made of him#pinned
916 notes
·
View notes
Text

COLORING + SHARPENING TUTORIAL
someone asked for a coloring tutorial and my sharpening settings, so here it is! there are also a few tips to achieve more HQ gifs. :)
tutorial under the cut!
FOR HIGH-QUALITY GIFS
FILE SIZES
it doesn’t matter what your sharpening settings are if the file you’re using to gif is too low quality, so i tend to look for the best that i can get when downloading stuff.
usually, movies (+2h) look better if they’re 5GB or more, while an episode (40 min/1h) can look good with even 1GB. the minimum definition i try to find is 1080p, but i gif with 2160p (4k) when available. unfortunately, not every computer can handle 4k, but don’t worry, you can gif with 1080p files just fine if they are big enough. contrary to popular belief, size does matter! which means sometimes a bigger 1080p file is better than a smaller 2160p one, for example.
SCREENCAPPING METHOD
this can too influence the quality of your gifs. as a gifmaker, i’ve tried it all: video frames to layers, directly opening video clips, loading files into stack, and i’ve finally settled down with opening screencaps as an image sequence. with bigger files, it doesn’t matter much what technique you use, but i’ve noticed with smaller files you can do wonders if you screencap (either by loading files into stack or opening as an image sequence) instead of using video clips. for example, this gif’s original video file was only 4GB (so smaller than i’ve usually go for), if you can believe it!

here’s a tutorial for setting up and screencapping with MPV, the media player i use to screencap. again, you can keep using video clips for bigger files, but you’ll find this useful when dealing with dire causes. i don't file loads into stack, though, like the video does. i open as an image sequence (open > screencap folder > select any image > click the image sequence button). just select OK for the speed. this will open your screencaps as a video clip (blue bar) in timeline mode (i'm a timeline gifmaker, i don't know about you). you will need this action pack to convert the clip into frames if you're a frames gifmaker. i suggest you convert them into frames even if you're a timeline gifmaker, just convert them into a timeline again at the end. that way you can delete the screencaps right away, otherwise you will delete the screencaps and get a static image as a "gif".

ATTENTION if you’re a Mac Sonoma user, MPV won’t be an option for you unless you downgrade your system. that is, if you have an Intel chip. if you have M1 Max chip (or even a better one), here’s a fix for MPV you can try while keeping that MacOS, because nowadays MPV is skipping frames in its latest build. or you can use MPlayer instead for less hassle. here are two tutorials for setting and using MPlayer. Windows users are fine, you can use MPV without trouble.
FOR EVEN MORE QUALITY
ADD NOISE
here’s a tutorial for adding noise as a way to achieve more HQ gifs if your original material is too low quality.
REDUCE NOISE WITH CAMERA RAW
instead of adding noise, you can reduce it, especially if your gif is very noisy as it is.
the path is filter > camera raw > detail > nose reduction. i do this before sharpening, but only my video file isn't great to begin with. because it’s a smart filter, you can reduce or increase its opacity by clicking the bars next to its name in the layers panel.
TOPAZ AI
i use Topaz Photo AI to increase the quality of my screencaps when i need to. it’s paid software, but there are… ways to find it for free, usually on t0rrent websites. if someone’s interested, i can make a tutorial solely about it in the future.
SHARPENING SETTINGS
here are my sharpening settings (filter > sharpen > smart sharpen). i sharpen things twice: 500% 0.4px + 10% 10px. here's an action for it, for more convenience. here's a tutorial on how to use Photoshop actions. for animated stuff, i use this action pack.

COLORING
here’s the gif i'm gonna use as a base. it’s already sharpened like the way i always do it.

LIGHTNING THE SHOTS
half of the secret of a good coloring is good lightning. i always useCurves (layers > new adjustment layer > curves) and Brightness & Contrast (layers > new adjustment layer > brightness & contrast). the settings depend on the scene you’re giffing, but i always try make my gifs bright and with high contrast to make the colors pop.
CURVES
besides lighting your scene, the Curves adjustment layer has four automatic options that will color-correct it for you. it’s not always perfect and it doesn’t mean you won’t need to do further coloring, but it’s a great start. it’s a lifesaver for most ridiculously yellow scenes. look at the difference! this gif uses the 3rd automatic option (the screenshot below isn't mine btw so that's why the fourth option is the chosen one), from top to bottom. what automatic option you need to choose depends on the gif.


sometimes i like to tweak my Curves layer. not everybody does that, it’s not that necessary and if you’re not careful, it can screw your gif up. to modify your layer by hand, you will need to click and drag points of that straight line in the position you desire. this is the concept behind it:

basically, the lower part of the line handles the shadows, while the upper part handles the highlights of the image. if you pull a highlight point up, the image’s highlights will be brighter. if you pull it down, it will make them darker. same thing for the shadow points. you should play with it to get a grasp of it, that’s what i did when i first started giffing.
BRIGHTNESS & CONTRAST
then i added a bit of brightness and contrast.

CHANNEL MIXER
the scene looked a bit too yellow, so i used the Channel Mixer (layer > new adjustment layer > channel mixer) adjustment layer. here’s a tutorial of how it works. not every scene needs the Channel Mixer layer though, i mostly use it to remove heavy overall tints. in this particular case, the Curves layer got rid of most of the yellow, but i wanted the gif to be just a bit more blue so the Channel Mixer tweaks are very minimal.

SELECTIVE COLOR
now, this adjustment layer i always use: Selective Color (layer > new adjustment layer > selective color). this is THE adjustment layer to me, alongside the Curves one. this is how it works:

ie, you can separately edit a color this way, giving it tints. for this gif, i wanted to make the colors more vibrant. to achieve that, i edited the selected colors this way:

for the reds, i added even more red in them by moving the first slider to the right, making the color more vibrant. for his hat to have a more warm tint, i added yellow to the reds (third slider, moving it to the right). finally, to make the reds stronger, i moved the last slider to the right (more black).
for the yellows, i made them brighter by adding white to them, thus making the tile wall and Paddington more bright as well.
for the cyans and the blues, i just added the maximum (+100) of black that i could.
i wanted for Paddington's nose to be brighter, so i added more white to the whites.
lastly, i added depth to the blacks by increasing their own blackness.
you should always play with the Selective Colors sliders for a bit, before deciding what you want or need. with time, you will automatically know what to change to correct the color grading. it all takes practice!
HUE/SATURATION
i don’t know if you noticed, but there are some green spots on the blue wall behind Paddington. to correct that, i added a Hue/Saturation adjustment layer (layer > new adjustment layer > hue/saturation) and made the saturation of the greens 0%, making that unwanted green disappear from the background.

while the green spots on the wall are specific for this gif, i use hue/saturation a lot to tweak, well, hue and saturation. sometimes someone’s skin is too yellow, i made it redder by tweaking the reds and the yellows, or vice-versa. the hue bar follows the rainbow bar, so the maximum settings (+100 and -100) give the selected color to change its hue to something more red or pink (the rainbow extremities). changing hue can give pretty whacky results, like turning someone’s skin tone to green, so you will need to play with it to get the hang of it. you can also tweak the opacity of your hue/saturation layer to further improve your gif’s coloring. i didn’t do it in this case, the opacity is still 100%. the reds and the blues had their saturation increased to make them pop just a bit more, without affecting the other colors.
COLOR BALANCE
the highlights of the gif still had a green tint to it due to the automatic correction of the Curves layer, so i used Color Balance. this is how it works: instead of giving specific colors some tints, you can give them to the shadows, highlights, and mid-tones. if your shadows are too blue, you counterbalance them with the opposite color, yellow. same thing with the cyan-red and magenta-green pairings. in my case, i added a bit of magenta.


B&W GRADIENT MAP
now, if this gif was a dish, it’s time for the salt and pepper. i always add a Gradient Map (layer > new adjustment layer > gradient map) (black to white gradient) with the Soft Light blending mode, thus giving my shadows more depth without messing with the mid-tones and highlights. it also doesn’t “deep fry” (you know those memes?) the gif too much by adding even more contrast. usually, the opacity of the layer is between 30% to 70%, it all depends on the gif. it always does wonders, though!

COLOR FILTER
finally, i like to add Color Filters (layer > new adjustment layer > color filter) to my gifs. it’s very handy when giving different scenes for the same minimalistic set because it makes them kind of match despite having completely different colors. in this gif’s case, i added a “deep blue” filter, opacity 50% density 25. you can change the density and the opacity of the layer for further editing, again, it all depends on the gif.

VIBRANCE
if i feel like it, i add a vibrance layer (layer > new adjustment layer > vibrance) to make the colors pop. this can ruin your coloring sometimes, especially when regarding skin color, so be careful. i didn't do it in this gif because i felt i didn't need it.
TA-DA! 🥳
AN OTHER EXAMPLE
the color grading of the original scene it’s pretty good as it is, to be honest. let’s see a worse scenario, a VERY yellow one:


no channel mixer this time because the automatic curves option dealt with the yellowness, but you can see it made the gif too green. i needed to correct that with the following adjustment layers:
curves (automatic option) (gif 2) >> same curves layer (tweaks) (gif 3) >> brightness & contrast (gif 4) >> hue/saturation (tweaked cyan+blue+green) >> selective color >> color balance (gif 5) >> b&w gradient map >> (sepia) filter >> vibrance (gif 6)
i added a hue/saturation layer to remove the blues & greens before my selective color layer because i thought that was more urgent than tweaking the tint of all colors. color balance (gif 4) was the real hero here, though, by removing the green tint. the selective color layer was meant to make the red pop more than anything else, because the rest looked pretty good, especially her skin tone (despite the green tint). you can notice that tweaking the curves layer (small gif 3) also helped A LOT with the green problem.
tl;dr 😵💫😵💫😵💫
here's a list of my go-to's while coloring and lightning gifs. it's not a rule, just a guide. there are gifs in which i don't use all these adjustment layers, or use them in a different order. it all depends!
1. curves (automatic option + tweaks) 2. brightness & contrast 3. channel mixer 4. selective color 5. hue/saturation 6. color balance 7. b&w gradient map 8. color filter 9. vibrance
i'll suggest that you study each adjustment layer listed for more info, either with other Tumblr tutorials or YouTube ones. the YouTube ones focus on images, but you can translate what they teach to gif making very easily. you can ask me to further explain any adjustment layer, too! i was brief to keep this short (which i kinda failed lol).
feel free to ask me for clarification or something else about gifmaking wise, i always like to help. ❤️
#*#*tutorials#gifmaker tag#resources#resource: tutorials#ps help#uservivaldi#tuserjen#userrin#userelio#useralien#userzaynab#userchibi#userbuckleys#usertj#userbess#tuserlucie#useraljoscha#userdavid#usershreyu#usernolan#userhallie#userisaiah#tusergio#tusergeo#userjesslynn
677 notes
·
View notes
Note
Hi! Would it be possible to post a tutorial of how you created the white text in this set /post/695221752725422080/buckpendragon-911-verse-coc-week-day-1 thank you :)
hiii! you mean the text in the first gif, right? it's actually a pale green so i hope that's what you meant 😅
i somehow still have that psd so i was able to go grab the exact settings for the two text layers used here:
(if you meant the little white text, it's simply the font candara with different values of tracking/letter spacing)
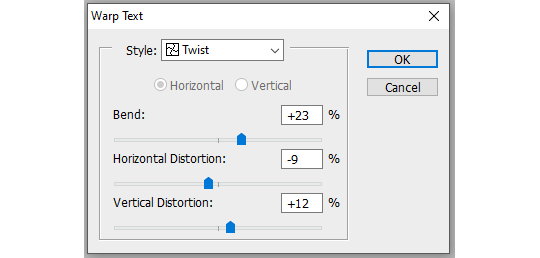
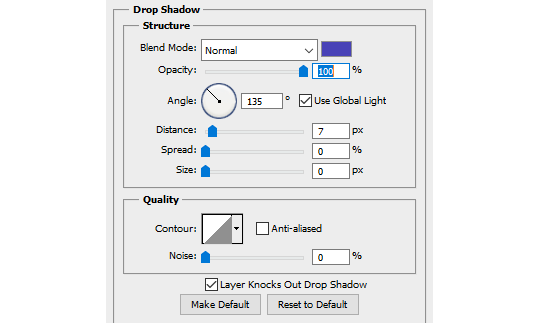
the font i used is called letter magic, and i've given my bare text a bit of warp (right click ont the text layer > warp text > style: twist). by the way, the color of the text doesn't matter, so no need to pick one.
BASE LAYER
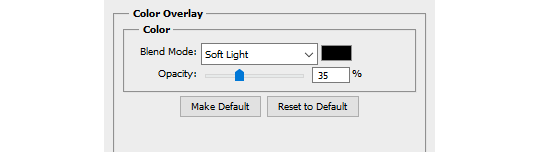
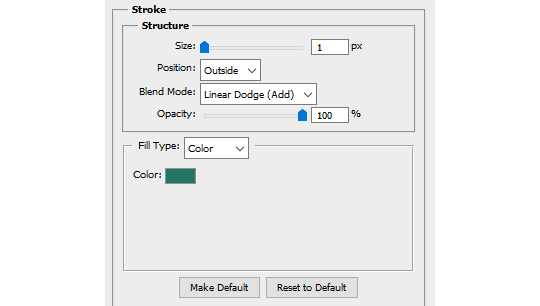
first, put the text layer's opacity to 100%, and the fill to 0%. the text will become transparent, it's what we want. then double click on the layer to get to the layer style options. you'll want to add a drop shadow, a color overlay, and a thin stroke:
DUPLICATED LAYER
i found the stroke a bit too thin on my gif, so i duplicated the base layer (right click on the layer > duplicate layer > destination should be the same canvas), put its opacity to 50% and kept to 0% fill. and disable the drop shadow and color overlay by clicking on the little eyes on the layer:
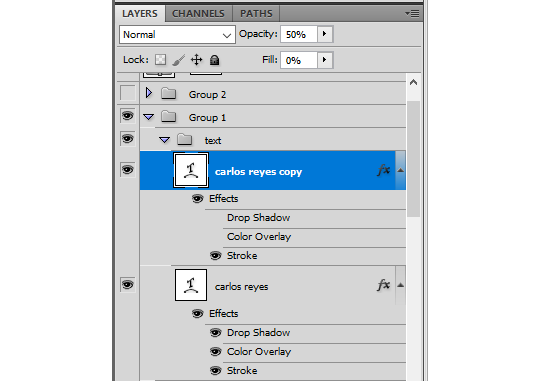
voilà :)
#alie replies#Anonymous#*ps help#photoshop#tutorial#resource#photoshop tutorial#typography#mialook#tuserzee#userabs#usertj#userchibi#userhella#userkarolina#usertina#quicklings#userraffa#usercats
450 notes
·
View notes
Text

Zack Fair in Final Fantasy VII Remake: Episode INTERmission
#gamingedit#ffgraphics#dailygaming#videogameedit#ffedit#ffgifs#ffvii intermission#final fantasy vii intergrade#zack fair#ffviir#ffvii#ff7#ffvii remake#gamingmen#videogamemen#*#gifs: mine#finally got to make this set#kinda mad that i had to re-record this scene on pc because on ps it was a 'blocked scene'#*growls* anyway#he looks so pretty here i just couldn't help myself
635 notes
·
View notes
Text


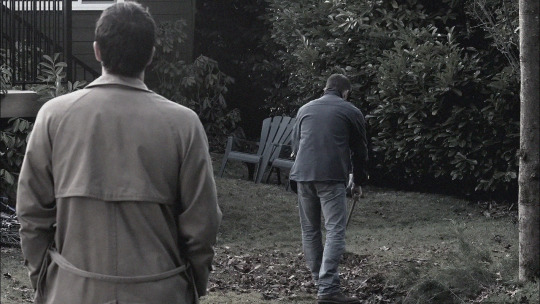

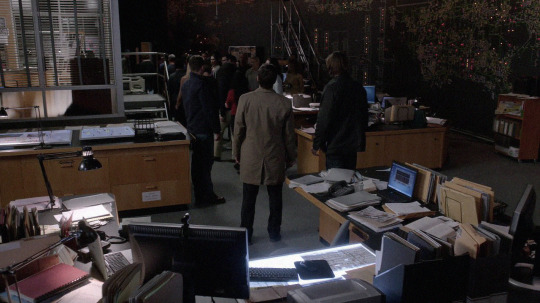

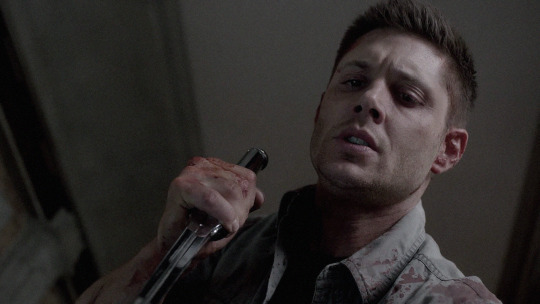

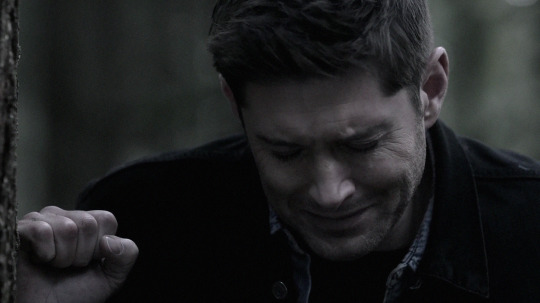

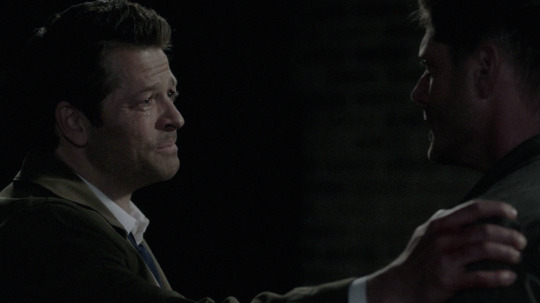

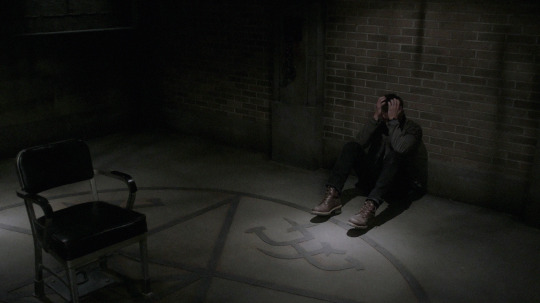
i deserve it, don't i? | mitski - i'm your man (part 1 of 2)
#spnedit#destiel#mine#girl help i was scrambling for screen caps. this song............#i have completely forgotten how to do anything in ps so this is not that great BUT#going wild in my room by myself over this#hello.....
1K notes
·
View notes
Text
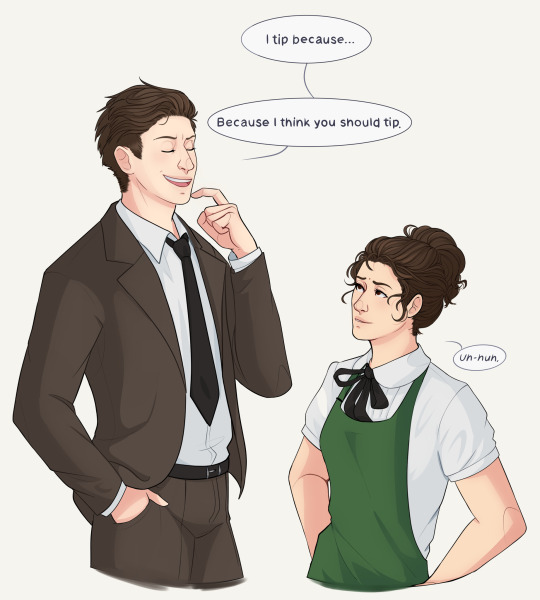
Despite herself, the Emma is wooed
#an anon wanted Paul and or Emma so here’s both!#just don’t look at the arms don’t do it stop it oh my god#alt captions: Getcha cup of autistic rizz#//Art request#this was the kinda piece where I knew it was going wrong but I was too stubborn to pause and fix it ✨#Paulkins#that’s the ship name right?#Paul matthews#Emma Perkins#Oh PS. all artist and non artist: Make sure to go to your visibility settings and turn on Prevent third party sharing!#will it help? who knows but at least you’ll have some proof you did not agree to the AI bs#starkid#hatchetfield#tgwdlm#Jon has such…. such a face! I don’t think I can ever do it properly#the guy who didn’t like musicals#@staff 👎👎👎👎👎👎👎👎👎👎
550 notes
·
View notes
Text
jstor: the people’s “hey, has anybody smarter and/or more thoughtful than me written about this already?” princess, tbh
#i am gonna have to speedrun my free 100 articles this month it’s been Weird i forgot to do it before now#also for anybody who isn’t already a fan of jstor it is INVALUABLE#free jstor plug here: they rock they will help you they are here to make being curious better#anyway starting with a review of gender and the archaeology of death that sounds like it slaps#ps: check out jstor
544 notes
·
View notes