#stitchmarker
Explore tagged Tumblr posts
Visit Tumblr Blog
Explore Tumblr blogs with no restrictions, modern design and the best experience.
Last Seen Tumblr Blogs


Fun Fact
US Tumblr user growth rate is estimated to slow down to 4.1%.
Text

Etsy | Facebook | Instagram
Yarrow stitchmarker 🌼🌿🧶
Plant allies while knitting 💚
#stitchmarkers#stitchmarker#knitting#knittersofinstagram#knitter#knitters#knittersgonnaknit#handmadestitchmarkers#handmadestitchmarker#customstitchmarkers#customstitchmarker#handgemacht#handmade#artisanjewelry#stricken#strickenisttoll#strickenfürmich#breien#strikke#вязать#针织#뜨다#tejer#tejerias#knittingaccessories#knittingfun#makersgonnamake#makersofinstagram#plantally#quintessentialarts
3 notes
·
View notes
Text
Making Progress Markers

Took myself to Michael's @michaelsstores and got some accoutrements in the beading aisle. I always like pretty and fun progress markers, so I decided to make some. They're just little silver + gems/polished and rock, nothing too fancy but also something to make my hippie heart smile.
0 notes
Text
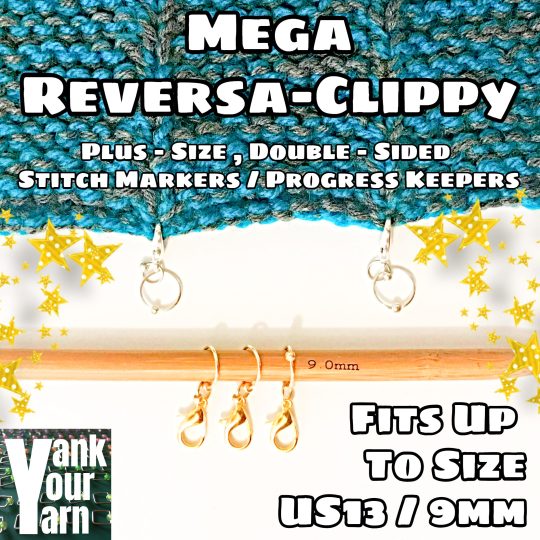
Heavy Metal Mega Reversa-Clippy Stitch Markers
Heavy Metal is so much more than just screaming lyrics and distorted guitar chords! Heavy Metal is a natural element characterized by its rather high atomic mass its their high density! Yeah!
These are the PLUS-SIZED versions of my Reversa-Clippy Double-Sided Progress Keepers! Finally, there's a larger version that will fit on your chunkiest of yarns, with a larger lobster clasp that is easier to manipulate. One side of the marker has a 16mm lobster clasp that will hang comfortably on most yarns with the exception of your lace-weight and cobweb variety. On the flip side is a round closed stitch marker that will fit up to a size US13/9mm knitting needle. It's two stitch markers in one! You can even use them for your crochet projects as an edge stitch marker or a beginning of round marker.
You get a SET OF THREE in the packet.
Made from hand-coiled copper wire, the glass seed bead is glued over the joints to ensure smooth moving. Because the rings are hand-coiled and cut, your markers may be slightly wibbly-wobbly and not completely round. All stitch markers are shipped in a zipper bag in a padded envelope.
Fits needles up to size US13/9mm.
#stitchmarkers#stitchmarker#crochetstitchmarker#crochetstitchmarkers#progresskeeper#progresskeepers#crochetersofinstagram#crochetersofig#crochetersofinsta#crochetersofravelry#knittersofig#knittersofravelry#knittersofinstagram#knittersofinsta#knitters of tumblr#stitch markers#stitch marker
1 note
·
View note
Text

knitter or crocheter? Look at these adorable stitch markers
#giraffes#cute animals#stitchmarkers#knitters of tumblr#knitting#crocheting#yarn crafts#crochet#small business#handmade#handcrafted#etsy#jewellery#style#christmasjoy#christmas#fiber arts#yarn#crafts
2 notes
·
View notes
Photo

Yes, I Have Too Much Yarn Already, But I Could Go Buy A Stitch Marker
As I dressmaker, I have more fabric and more imagined garments than I have time. Then I took up crochet and knitting and now I have more yarn and imagined garments than I have time. Sigh.
But you may not, so why not enjoy Local Yarn Store Day and go buy something? Or take a knitting friend to lunch and then go buy something?
13 notes
·
View notes
Text

New project new project new project
Yayyyy dopamine!!
Yayyyy pretty colors!!

Also playing with beads this morning, making new stitch marker designs with a new eyepin tool I bought
1 note
·
View note
Note
Little concept: past winners having gray clothes instead of red cause they're dead, instead of Scar, who never died. And they all have a body part that's purple and glowing like the Enchantment Glint, which have special powers, and a "Domain Expansion" style ability which takes them to a significant place, (exaggerated and whatever state they were left in) with a specific "terrain effect". When it's in effect, no powers can be used by anyone. Grian's wings allow him to soar like a jet, and the storming desert, which obsures all vision except his and is littered with venomous cacti and lava pools. Scott's little floating blaze rods in his season 2 skin, which shoot exploding end crystals, and the Scottsge, overflowing with infinitely spawning mobs that ignore Scott. Pearl's shadow summons ghosts of Scott, 5 wolves, or Cleo and Martyn, and her Tower, enveloped in deep snow which freezes those trapped inside except her. Martyn's eyes, which stops time for either 8 seconds or till he opens them again, and a sea with Skynet above, tnt constantly dropping from above, which he is able to predict. Scar's is his tongue, which can send disorientingly loud sonic booms when he yells, and the Secret Keeper, but with buttons all over the ground, with only him knowing which is succeed, "reroll" which simply doubles the effect of the next button, and failure. Cleo's arm, seperated from the rest of her body by a stitchmark, absorbs any weapon or tool, allowing her to shift it into whichever tool she needs on the fly, and the Village, with increased gravity, making all movement more difficult and fatiguing, except for her.
THAT'S SO COOL.
102 notes
·
View notes
Note
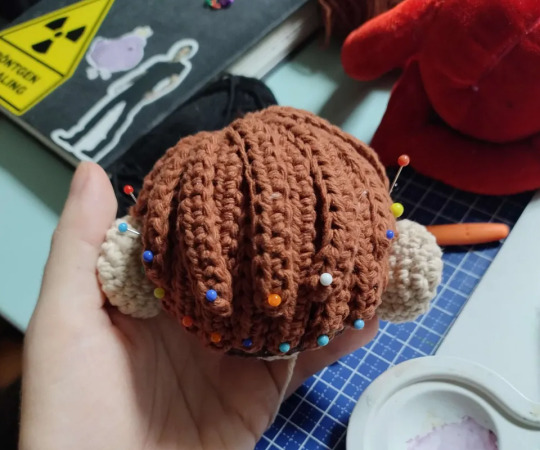
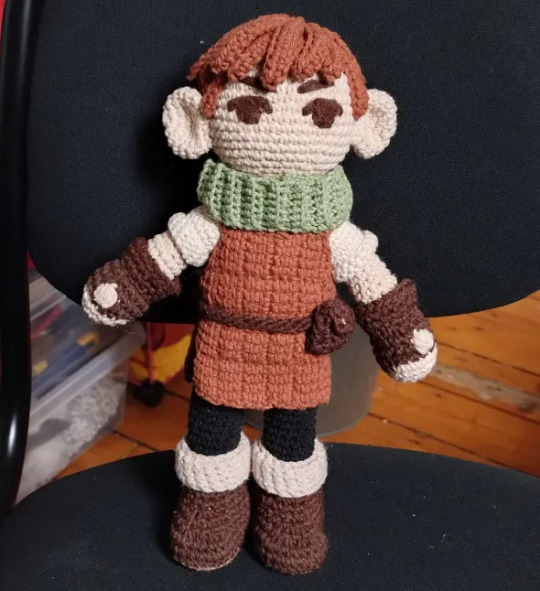
hey if you write a pattern for the chilchuck amigurumi I will buy it instantly
ive gotten multiple asks about this, so ill just answer them all here in one go.
i wrote down everything while i was working on it, but i theres some stuff that i would do diffrently and i also didnt take a lot of process pics so it wont be a full proper pattern for those reasons, but ill add all that i have under the cut!
i dont want any compensation, but if you wanna do me a favor you can donate to esims for gaza, unrwa, any of these gefundme's, or another trusted charity of your choice.
now to the pattern! i would love to see the results of anyone making a squeakychuck, feel free to tag or dm me :)
the dimensions of this depend on the size of ur squeaker and yarn, i had a 4ish cm squeaker and somewhat thick 4/8 cotton yarn (kinda 6/8ish thickness). depending on ur yarn and squeaker u might need to follow a different pattern for the body.
if youre using a different body base pattern, the tunic and blouse pattern are pretty easily adjustable. ill add some notes for that at those sections of the pattern. ill also link some videos i used at relevant sections.
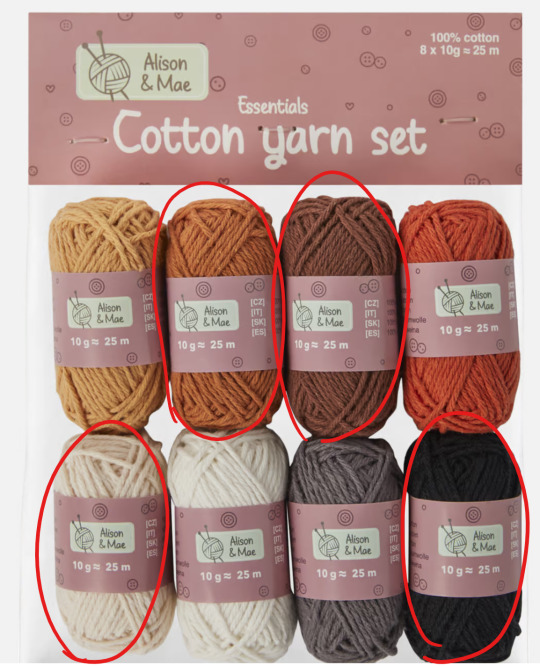
if theres an Action store near where u live, see pic below for the yarn i used for the skin, reddish brown, black and light brown. i got 3 of these but 2 packs was enough. the dark brown and creme were from my stash. i also got the squeaker from a donut dog toy from Action.
-
abreviations list (all in us terms):
mr = magic ring
sc = single crochet
hdc = half dubble crochet
slst = slipstitch
ch = chain
bobble = 5 double crochet in one stitch
4inc = 4 sc in one
4 inc = increase in the next four stitches
BLO = back loop only
FLO = front loop only
what you need:
-skin color of choice yarn
-creme/white yarn (normal for body, thin for blouse)
-greyish creme (for boot flaps)
-black yarn
-dark brown yarn
-light brown yarn
-reddish brown yarn
-green yarn
-4 tiny buttons (for arm joints)
-cardboard (for shoe sole
-3.5mm hook
-squeaker
-needlefelt needle
-stuffing
-stitchmarker (optional, i always mark the first stitch of the round)
-
once again disclaimer, this is not a propper pattern, this is just what i wrote down while i was crochetting. it may not nessecarily be the best way to do it. i wanted most clothes to be removable, but you have to partially disassemble the doll if you want to remove them. if you dont like how something looks or works ur free to do whatever you want. big fan of fucking around and finding out personally.
if you have any questions feel free to dm me, might take me a while to reply though.
-
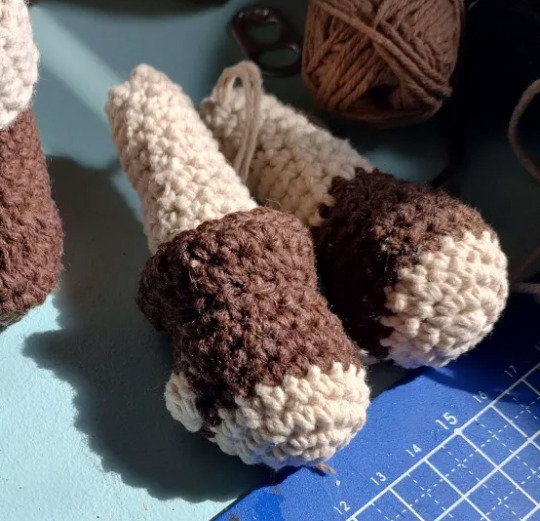
SQUEAKY CHUCK PATTERN 3.5mm hook
head (skin)
r1: sc 6 in mr
r2: (inc) x6
r3: (sc 1, inc) x6
r4: (sc 2, inc) x6
r5: (sc3, inc) x6
r6: (sc4, inc) x6
r7: (sc 5, inc) x6
r8-15 : sc 42
r16: (sc 5, dec) x6
r17: (sc 4, dec) x6
r18: (sc3, dec) x6
r19: (sc2, dec) x6
r20: (sc 1, dec) x6
r21: sc 12
slst, fasten off
ears x2 (skin)
r1: sc6 in mc
r2: (inc) x6
r3: (sc, inc) x6
r4-6: sc 18
r7: dec 9. slst fatsen off.
Body - leg up (skin, black, thick creme)
start with skin
r1: ch 6, inc in 2nd from hook, sc 3, 4inc, sc 3, inc
r2: inc 2, sc 3, inc 4, sc 3, inc 2
r3: inc 3, sc 5, inc 6, sc 5, inc 3
r4: BLO sc in all
r5: sc 3, dec 2, sc 3, dec 2, sc 6, dec 2, sc 3, dec 2, sc 3
r6: sc 1, dec, sc 4, dec 6, sc 4, dec, sc 1.
r7: sc 6, dec 3, sc 6
stuff
-r8 dec, sc in all
change color to black [color change video]
r9-23: sc in all
1st leg: fasten off
2nd leg [joining legs video]:
r24: sc7, ch 1, sc join in 1st leg after last sc, sc13, sc1 in visible v loop of ch1, sc 7
r25: sc7, sc 1 in remaining v loop of ch1, sc21
r26-31: sc 28
r32: sc 7, change color to creme/white, slst 1, sc 20
r33-35: sc 29
r36: (sc 8, dec) x3
r37: (sc7, dec) x3
r38: (sc6, dec)x3
add squeaker
r39: sc21
r40: (sc 5, dec) x3
r41-42: sc18
r43: (sc 1, dec) x6
fasten off
Arms (skin, dark brown)
i made the arms movable with button joints, but after looking at some videos i discovered that what i did is not called a button joint and i dont have a video explaining it, so i hope this drawing helps.
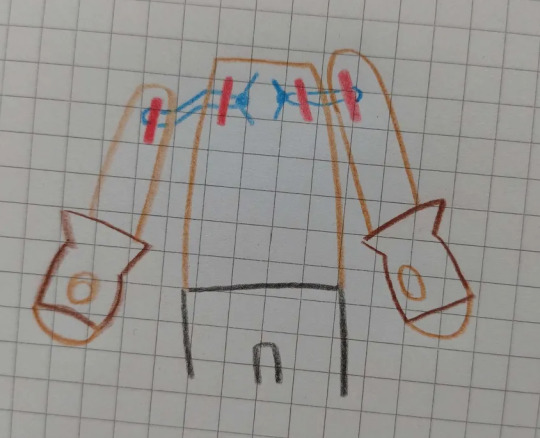
the red bits are the buttons inside of the arms and body, and the thread (blue for clarity, i matched it w the skin) should be pulled tight and finished off with a double or tripple knot inside the body.
or you could just sew on the arms that also works. but wait with doing that until youve finished the blouse as the hands dont fit through the sleeves. i have a seperate section on assembly at the end of the pattern.
start with skin
r1:sc6 in mc
r2: inc x6
r3(sc, inc)x6
r4 : sc 18
change color to brown
r5: sc 18
1st arm r6: sc 3, bobble, sc 14.
2nd arm r6.2: sc 14, boble, sc 3
[i matched the top loop to the bobble color but i think it would look better if u didnt]
r7: sc 18
r8: (sc 4, dec)x3
r9: (sc 3, dec)x3
r10 sc12
color switch to skin (you might want to do this a round earlier, i didnt initially plan on making the gloves flared, and this color change part can sometimes be seen and look kinda weird)
r11-14: sc 12
r15: (sc4, dec)x2
r16-19 : sc 10
r20: (sc3, dec)x2
r21: sc8
insert button joint
r28: (sc2, dec)x2
slst, sew shut
glove flare (dark brown)
r1: ch 15, slst join LONG TAIL
r2: (sc4, inc)x3
r3: sc4, inc, sc8, inc, sc 4
r4: sc 2, slst fasten off
sew 2 rows below thumb bobble
boots (light brown, dark brown, greyish creme) [video]
these are removable but they dont go on easily, so you gotta patiently massage the feet in there.
start with light brown
ch 7, start in 2nd from hook:
r1: sc 5, 3inc, sc 4, inc
r2: inc, sc 4, inc 3, sc 4, inc 2
r3: inc, sc 5, hdc inc 7, sc 5, inc 2
r4: slst fasten off. sew in holes/tails, fray ends for flat gluejob. trace onto cardboard for sole.
switch color to dark brown
r1: BLO join slst, BLO sc in all
r2-3: sc in all
glue in sole
r4: sc 8, dec 5, sc 12
r5: sc 7, dec 4, sc 10
r6: sc7, dec2, sc 10
r7-10: sc in all
switch color to greyish creme
r11-12: sc in all
r13: slst, FLO sc in all
r14-16: sc all
slst fasten off
flip the greyish creme flap over.
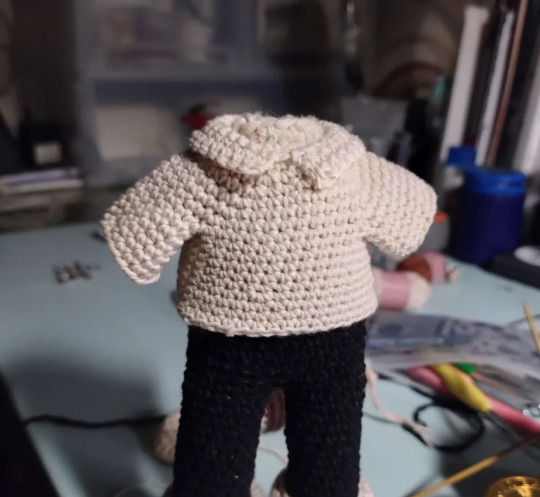
blouse (thinner creme)
this is a standard raglan pattern, if you need the whole thing bigger/smaller you need to have more/less chains at the beginning. this change also carries over to the collar. the increases are evenly spaced for me, and unless your doll has a very broad chest this shouldnt have to change.
if the arms need more space you need to either add more rows to the r3-7 part and/or add more chains in r8 (this part should fit pretty sugg around the body)
i was experimenting a bit w using BLO to minimize the gap where the sleeve and body seperate (r8). it worked p good but you can ignore it if you dont understand it and just sc in all.
(edit: if this confuses you, understandable. I answered an ask abt it here but feel free to ask if its still unclear)
r1: ch24, slst join.
r2: (sc 5, inc) x4
r3-7: inc in first of previous inc. last row should have 10 sc between increases.
r8: sc5, blo sc 1, ch 5, blo sc join in 1st of next inc, sc 11, blo sc1, ch5, blo sc join in 1st st of next inc, sc 5
r9: sc6, blo sc 1, sc 5, blo sc1, sc11, blo sc 1, sc 5, blo sc 1, sc 6
r10-13: sc in all (36)
r14: (sc8, inc)x4
r15: sc in all (40)
slst finish off
Sleeve
r1: join mid armpit, slst ,sc2, sc in the leftover bits from the BLO stitches, sc 11, sc in leftover BLO bits, sc2
r2-6: sc in all
collar
join left-middle front, sc 7, inc, sc8, inc, sc 7. turn
r2: sc7, inc, sc 10, inc, sc 7. turn
r3: sc8, inc, sc 10, inc, sc 8. turn
cuffs
r1: join mid body-facing side, FLO sc 20
r2-4: sc 20, slst fatsen off
Tunic (red brown) [tunesian entrelac crochet]
if you want to make this bigger i recommend keeping the same square layout, but making the squares bigger. its a bit of measuring and math to figure it out.
the tunic is made in tunesian crochet and i dont really know what written patterns for that look like so i hope this makes sense.
for a single square:
r1: ch4, start in 2nd back bump from hook. pull up a loop from ever back bump. you should have 4 loops on your hook total. simplestitch in all
r2-4: simplestitch in all.
r5: slst in all. fasten off
for the slanted parts i did the decrease by pulling through the middle 2 loops in one go on the back pass
this is how the full thing should look, its worked from bottom left to top right.
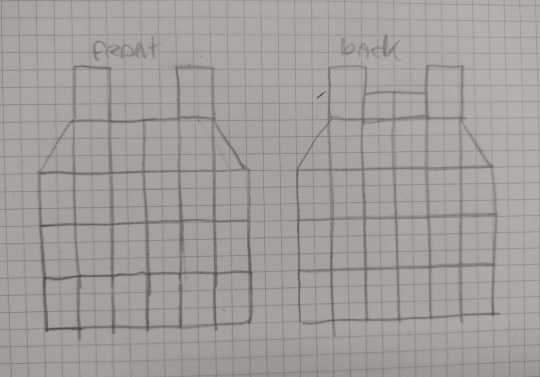
sew together the shoulders together, then sew in all of the ends
:) good luck
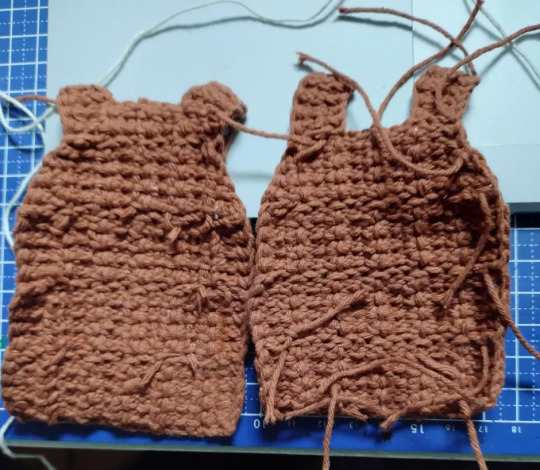
tunesian crochet has a tendancy to curl, so if you used cotton i def recommend blocking it
i defined the grid a little bit with a dark brown pencil.
cowl (green)
BLO sc 7, repeat till desired lenght, then BLO slst join the last row to the first.
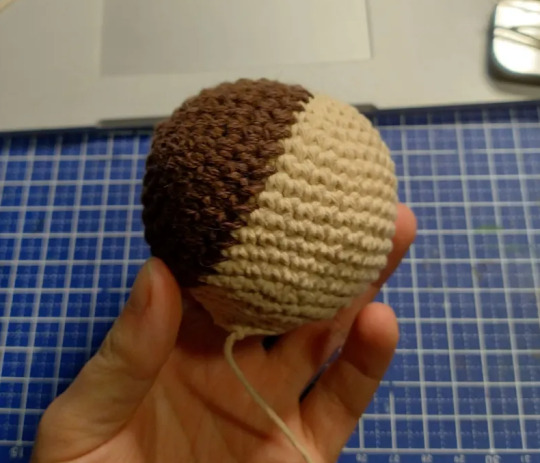
scalp undercut bit (dark brown)
r1: sc 6 in mr
r2: (inc) x6
r3: (sc 1, inc) x6
r4: (sc 2, inc) x6
r5: (sc3, inc) x6
r6: (sc 4, inc)x6
r7: sc36
sew on back of the head (recommend doing this before the ears and face, see end for more detailed assembly instructions)
hair (reddish brown) [hair video]
disclaimer, this is kind of a mess. the lenghts didnt line up the way i intended so i improvised by adding loose strands and spent a lot of time pinning every strand in place before glueing them down.
i used bison kit contact glue since its sturdy, transparant, flexible and waterproof. you can use hot glue as well, i just personally dont like it because its bulky.
r1: sc 21 in mc. join BLO slst
r2: ch 12, sc in 2nd from hook, gdc10, BLO slst join
r3: ch 12, sc in 2nd from hook, gdc10, BLO slst join
r4: ch13, sc in 2nd from hook, hdc 11, BLO slst join
r5: ch13, sc in 2nd from hook, hdc 11, BLO slst join
r6: ch 14, sc in 2nd from hook, hdc 12, BLO slst join
r7: ch16, sc in 2nd form hook, hdc 14, BLO slst join
r8: ch 18, sc in 2nd from hook, hdc 16, BLO slst join
r9: ch 18, sc in 2nd from hook, hdc 16, BLO slst join
r10: ch 14, sc in 2nd from hook, hdc 12, BLO slst join
r11: ch 12, sc in 2nd from hook, hdc 10, BLO slst join
r12: ch 10, sc in 2nd from hook, hdc 8, BLO slst join
from now on, join in the FLO's of previous round
r13: ch10, sc in 2nd from hook, hdc 8, FLO slst join
r14: ch10, sc in 2nd from hook, hdc 8 , FLO slst join
r15: ch12, sc in 2nd from hook, hdc 10 , FLO slst join
r16: ch12, sc in 2nd from hook, hdc 10 , FLO slst join
r17: ch14, sc in 2nd from hook, hdc 12 , FLO slst join
r18: ch16, sc in 2nd form hook, hdc 14, FLO slst join
r19: ch 18, sc in 2nd from hook, hdc 16, FLO slst join
r20: ch16, sc in 2nd form hook, hdc 14, FLO slst join
r21: ch14, sc in 2nd from hook, hdc 12 , FLO slst join
1x ch 6, sc in 2nd from hook, hdc 4
2x ch8, sc in 2nd from hook, hdc 6
2x ch 10, sc in 2nd from chain, hdc 8, slst in same, fasten off.
2x ch 12, sc in 2nd from chain, hdc 10, slst in same, fasten off.
3x ch14
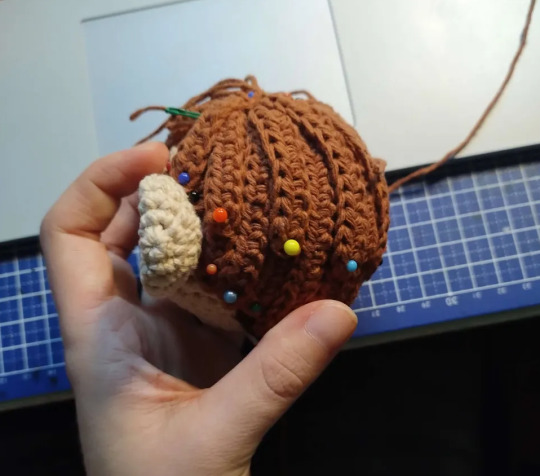
pin all in place until it looks good, tie +glue loose strands first. then glue back pieces, crown, and lastly bangs/ top back layer. some of the lose strands go behind the ears, one is the left sideburn, and the rest is to cover up the crown. these pics are the best i can do as a guide, this was my first time doing this so i was struggling lol.
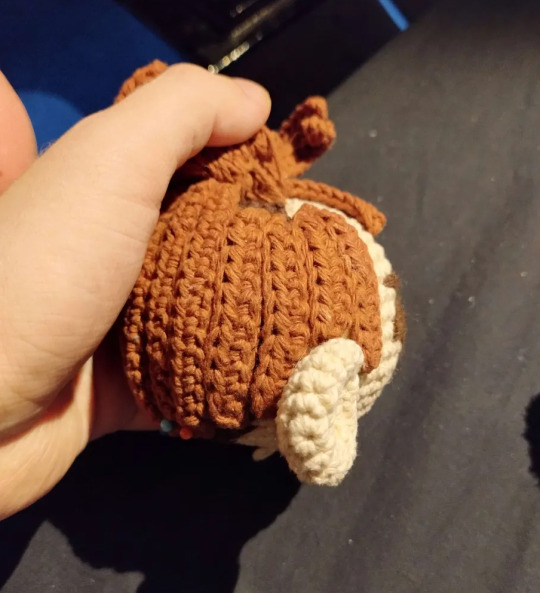
i didnt fully glue down the bangs and the top back layer bc i thought it would be fun if u could ruffle his hair, but my friend who i gave the plush to has significantly abused him (its been 2 days) and his hair is a mess so im gonna have to glue it down again lol. might as well do it all the first time if u plan on throwing him down the stairs or something.
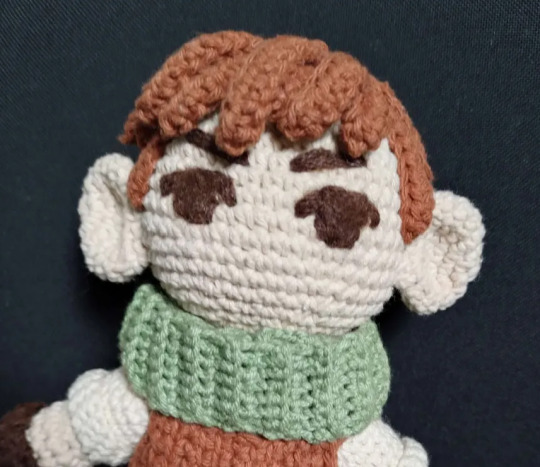
Face
for eyes + eyebrows, embroider outline with dark brown, then needle felt [video] the inner parts w unraveled dark brown fluff. the dark brown i used was probably acrylic. cotton doesnt really work well for this.
Belt and pouch (dark brown)
the belt is a 3 strand basic friendship bracelet! [video]
sew together the ends and hide it with by sewing the pouch on top.
i didnt write down the pattern for the pouch, but from the top of my head its the same start as the squares for the tunic
r1-9: simple stitch in all
r10: simple stitch 1, decrease by putting your hook through 2 vertical bars when pulling up a loop, simple stitch edge 1.
r11: slst in all, finish with a long tail
use tail to sew together the sides, and sew the pouch onto the belt. use some yellow thread to make a button.
ASSEMBLY.
put on the blouse, put the arms in their place and finish the button joints.
put on the tunic, lace the sides with dark brown yarn, finish with a knot and hide the tails underneath the chest part of the tunic.
slide on the belt and boots.
sew the scalp undercut bit to the head
sew the ears to the head
tie + glue the loose hair strands behind the ears
glue the back of the hair
glue the back of the hair
glue the middle circle part of the hair
glue the top back layer and bangs
sew the head to the body
put on the cowl
i hope this is somewhat clear, feel free to dm me is you have questions.
enjoy your squeakychuck :D
350 notes
·
View notes
Text
꧁𓊈Ppyong crochet pattern𓊉꧂


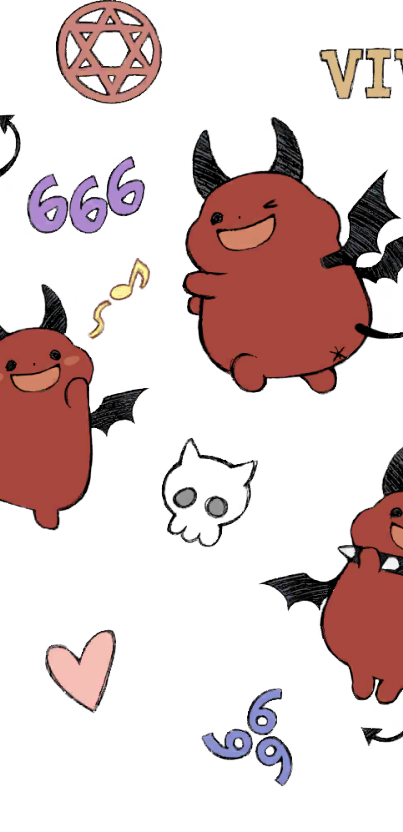
A/N: Aaa my first crochet pattern! And also a lil celebration of 500 followers ^^ (My explanations kinda suck imo, so don't be affraid to ask about anything♥)
Hook size: 5mm (I use size 3.5 yarn tho) Other supplies: Stuffing, material for the features & stitchmarkers Difficulty: Beginner! (could even be your first project ^^) Final size: About the size of my hand
Stitches/Abbreviations used:
ss - slip stitch
st - stitch(es)
ch - chain
sc - single crochet
inc - increase (two st into one st)
dec - crochet two stitches together
inc-lump - part made out of increases (you'll see when you get there)
Join each round with ss and ch1 to start another round

Start with magic circle
R1: sc6 into magic circle R2: inc6 R3: (inc, sc) all around R4: (inc, sc2) all around R5: (inc, sc3) all around R6: (inc, sc4) all around R7: (inc, sc5) all around R8: (inc, sc6) all around R9 – R16: sc all around
Count out or find quarters of your stitches and mark them
R17- R22: sc around, dec in marked st
Take out the middle stitchmarker (the one opposite of the beginning of your row, not the ones beside it)
R23: sc all around
Make sure your stitch markers are still in the relative quarters they should be in
R24: sc around and do inc into both marked spots
(Keep track of which extra stitches come from the increases – I'll refer to them as inc-lump)
R25: sc around while (inc into the first st, continue sc, inc into the last st) of each inc-lump R26: sc all around R27: sc around while (dec (the first two st), continue sc, dec (the last two st)) of each inc-lump R28: sc around while (dec2 (the first two and the last two st)) of each inc-lump R29: (dec, sc5) all around R30: sc all around R31: (dec, sc4) all around R32: sc all around
Stop and stuff as much as you can
To close off the body just dec all around and sew the remaining opening close after adding extra stuffing if you need

For the wings, horn and face I recommend felt (my mouths are out of fabric bc I didn't have pink felt) and for the shibari rope I just used some random twine I had.
Shape-wise, for the horns I cut out a circle and cut that into quarters. For the eyes I cut out a small circle and cut that in half (plus some tweaking to get that uneven shape). The mouth is kinda annoying bc you just gotta draft up the shape. And for the wings I have the shape here:

How you attach these is entirely up to you, but I've sewn on the tail and horns(didn't even need to stuff them) and hot glued the face features.
If you want to add his tail, you possibly could pull some pieces of the same yarn through the centre stitch on his back and braid it (or just cut it out of felt)
#what in hell is bad#what in “hell” is bad?#whb ppyong#crochet pattern#free crochet pattern#the only MDI post of this blog lmao#also I literally wnt out to buy ferrero just for the pic :D
69 notes
·
View notes
Text

my new Fancystyle Stitchmarker is so cute
32 notes
·
View notes
Text
Guys meet Harvestmoon! My SAMS oc
Inspired by the scarecrows in horror movies

-Hair is made of straw
-Clothes may or may not have been stolen by an actual scarecrow
-Bloodmoon & Jack-O-Moon personalites in one
-Rarely speaks but it sounds spooky as hell
-Fingers are partially numb
-Has a scythe as a weapon
-Does has stitchmarks around his mouth
-Goes by Harvest
-Master of disguising as a scarecrow
-Can stay still and go limp on command
Go crazy with him 🤗
@sillytwofaceboi
@deadlycreechur
@gremlininthedark (Not sorry for tagging u 3 times >:])
@insane-nexus
@the-old-moondrop
@silly-solar
@liminal---nightmare-aliza
@escapetheslaughter
(Srry for all the tagging-)
41 notes
·
View notes
Text


In the tender year of 1988, The Timelords released the song "Doctorin' The Tardis", which they claimed was recorded by Ford Timelord, their 1968 Ford Galaxie 500 V8 ex-American Police Car!
No, really!
Okay, this song is based on the British TV show Doctor Who, and even the band's name is taken from the program. In case you've been living under a rock, in the show, the Timelords are a race that can control time, and the TARDIS is a time-traveling spacecraft. The name stands for Time And Relative Dimensions In Space.
Show off your love for the amazing Gallifreyan (and their revolving door of companions) with this "Big Clippy" moveable stitch marker. The lobster clasp is 23mm long and will fit comfortably on worsted, chunky, and bulky wool. You can also use it as a zipper pull on your favorite sweater, project bag, or purse. You could also use it as a scarf or shawl clip. The possibilities are endless! You will receive 1 marker, made with a plated lobster clasp and an enameled TARDIS charm, connected with a TARDIS Blue hand-coiled copper ring and a River Song Blues glass bead.
#tardis#tardisblue#tardistuesday#doctorwho#doctorwhofan#doctorwhofandom#bluepolicebox#doctorwhoknitting#progresskeeper#stitchmarkers#stitchmarkersforeveryone#stitchmarkersforknitting#stitchmarkersforcrochet#knitters of tumblr#crocheters of tumblr
0 notes
Text
I'm late but it's time to open @littlebirdinagarden's autumn equinox mystery package!

Lovely packaging, as always, and cute little goodies - I love the stickers and the stitchmarker! And I can't wait to try out the recipe!


And the fibre! Mini braids this time, which I didn't anticipate at all, but what a lovely surprise! This might be my favourite colour scheme yet, combining autumn shades with purple and this shade of green is unusual, but very fun. Witchy. I love it <3 Thatk you, Robin!


#cant wait for the winter one :D#crafts#i woke up with a sore throat and cough so this was a much needed monday pick me up
24 notes
·
View notes
Text
Day 6!
There were two pearls that could be future stitchmarkers?? Who knows!


Also look at how delicious this gradient is so far!!

28 notes
·
View notes
Note
Look at what i gyatt!
Ur supposed to put paperclips at the bottom thing, but i dont use them so ill just put pin and stitchmarkers

Theres this tanjiro one, ur supposed to wrap wires around the fire, but i thought it looked kinda dumb 😓

THOSE ARE SO CUTE WHATTTTT :333
also getting them at Ross is so frickin real... that's where I got my tiny little nezuko!!
10 notes
·
View notes
Text
Prompt #26 - Zip
Character: Bexy Age: 35 Location: The Black Shroud, Present Day Warnings: None
A shoulder half shrugged from her shirt, she traces the fading line with a frosted index, discoloured skin on show with the removal of her gloves.
She'd been shot thrice. Thrice in the same arm, for a strange mercy, but almost any trace of the wound was gone, now. Ghosts of stitchmarks still sunk into her skin, but they too would fade with the rest.
Honestly, it hadn't been that long. A moon or so. Any normal person would have still been sore, the scars still angry little zigzags from surgery no matter how talented their healers might have been.
These scars, too, would fade like the rest, ebbing into nothingness.
4 notes
·
View notes