#sourdoughrecipe
Explore tagged Tumblr posts
Visit Tumblr Blog
Explore Tumblr blogs with no restrictions, modern design and the best experience.
Last Seen Tumblr Blogs


Fun Fact
The KCSC sent more than 20K requests to delete posts related to prostitution and porn to Tumblr from January to June 2017.
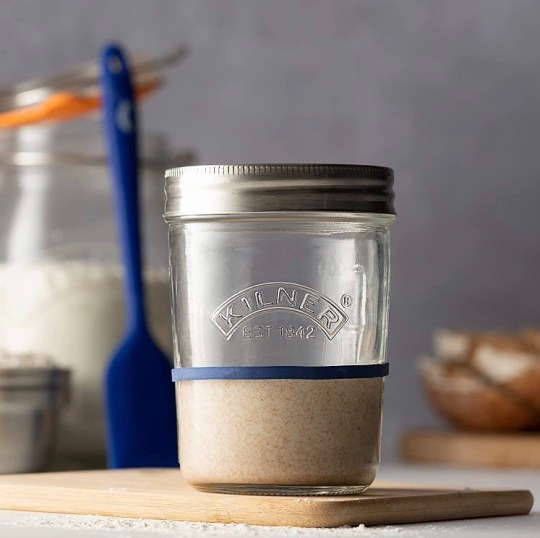
Photo

Recipe: How to Make A Sourdough Bread Starter Craving the wholesome goodness of fresh sourdough bread? Our tried-and-true recipe for a starter is here to help you create a bread masterpiece from scratch.
0 notes
Text

Sourdough Pizza Crust Recipe: Easy to make and oh so yummy!!!
We make this every Friday night for dinner and then watch a family movie together!
For this recipe and more great ideas visit: "http://thenorthbirdblog.com/2023/06/26/sourdough-pizza/"
#pizza#pizzapizzapizza#pizzalover#pizzalovers#pizzalove#sourdough#sourdoughpizza#sourdoughrecipe#sourdoughrecipes#sourdoughpizzarecipe#easysourdough#pizzarecipe#pizzacrust#sourdoughpizzacrust#movienight#familytime#cleaneatingfamily#family#familytime#familytimes#familytime❤️#healthyeating#healthyeats#healthyfood#healthylifestyle#healthydinner#pizzatoppings#pizzaideas
#easy sourdough pizza#recipe#recipes#homemade#easy sourdough#healthy#sourdough#pizzalover#good pizza great pizza#sourdough recipes#sourdough baking#sourdoughpizza#family#healthy food#healthy eating
1 note
·
View note
Video
youtube
FAMILY OF AMERICAN CHEFS HOWE
=============================
* YOU ARE WATCHING THESE VERSION FROM THE MAIN CHEFS of AMERICAN CHEFS HOWE with ( FATHER CHEFS HOWE AND MOTHER CHEFS HOWE ) who are DIRECTLY TO PREPARE THESE PROJECT OF “ BAKING INDUSTRY Vs COOKING INDUSTRY IN FOOD NUTRITION INDUSTRY FOR BEST SERIES ” WITH CULINARY ARTS FROM THE BAKING LEAVENED DOUGH BREADS TO PREPARE THE MEALS OF COOKING INDUSTRY WITH NUTRITION BEST OF THESE INGREDIENTS FROM SEAFOOD HERE IN THE FULL FOOD STUFFS LISTS INTRODUCTION FROM FAMILY OF AMERICAN CHEFS HOWE MADE & AMERICAN ARTISTS HOWE FOR CULINARY ARTS MADE & AMERICAN SONG WRITER AND MUSICIAN’S HOWE & AMERICAN DESIGNER’S HOWE TAKING PART IN THE SAME PROJECT OF ALL IN ONE TO INTRODUCTION WITH YOU !
#food #foodie #foodies #foodlover #foodlovers #foodstuffs #foodstuff #foodproducts #foodproduction #foodindustry #foodcooking #countrycooking #cooking #cook #cookingseries #foodcookingfamily #foodcookingchannel #foodcook #foodandfamily #foodandhealth #foodanddrink #foodblogger #foodvlog #foodphotography #cookingvideo #foodshortvideo #foodandmusic #foodandtravel #foodandculture #foodandnutrition #foodandfitness #foodandlifestyle #foodart #foodaroundtheworld #foodartchefs #foodchef #foodarea #cookingtime #seafoodlover #seafood #seafoodcooking #seafoods #seafoodrecipe #seafoodrecipes #cookingvlog #cookingwithlove #cookingvideo #cookingart #cookingathome #cookingshow #cookingtips #cookingvideos #cookandeat #bake #baked #baker #bakery #baking #bakingbread #bakingrecipe #bakingindustry #cookery #cuisine #countrycooking #foodstuffrecipes #newfoodvideo #newfood #newfoodrecipes #fooddesign #fooddessert #countryfood #countryfacts #countrylife #tastemade #taste #tastegood #bakingislife #network #networking #chefstable #chef #chefs #cheflife #chefathome #topchefvip #topchef #worldchefs #chefstalk #chefstyle #healthandrecipes #healthylife #healthyeating #healthyfood #healthyliving #healthytips #healthylifestyle #healthandbeauty #healthandwellness #healthandfitness #health #americancuisine #topfoodeating #topfood #texasliving #texasfood #texasfoodie #texascountry #texasculture #texans #texas #usa #americanfood #americanfoods #americanfoodrecipe #sourdough #sourdoughstarter #sourdoughbread #sourdoughbaking #sourdoughrecipe #yeastdough #yeastbread #culinary #culinaryart #culinaryarts #cookking #foodking #chefkitchen #chefstatus #worldcuisine #superchef #chefskills #cookingking #foodbank #bakingbread #bakingrecipe #topfood #topfoodeating #foodtechnology #foodprocessing #entertainment #television #cookingseries !
1 note
·
View note
Photo
Have you been baking sourdough during lockdown? If you’ve been thinking about giving it a go I have a fail proof recipe below from the the experts in fermenting products Kilner. We also have a Sourdough Starter Set on our store to get you started, product tag on photos or on Store www.goecostore.com.au INGREDIENTS * 500g Strong unbleached white bread flour * 300g Mature sourdough starter * 250ml Filtered water * 2tsp Salt * Flavourless oil * Method METHOD 1. Mix the flour, sourdough starter and 250ml / 8.5 fl oz filtered water in a mixing bowl. Add the salt. 2. Tip the dough on to a floured work surface and knead for 10 minutes. 3. Place the knead dough into a lightly oiled bowl, cover with a damp tea towel and leave to prove for 2 ½ -3 hours. 4. Tip the dough onto a work surface and knead briefly to knock out any air bubbles. Shape the dough into a smooth ball and dust it with flour. 5. Line a medium-sized bowl with a clean tea towel and flour it really well or use a proving basket. 6. Place the dough, seam-side up, into the bowl or proving basket and cover loosely. 7. Leave at room temperature until it roughly doubles in size. This can take anywhere from 4-8 hours. 8. Place a large baking tray in the oven and heat to 230°C/210°C fan. 9. Fill a small roasting tin with a little water and place this in the oven to create steam. 10. Remove the baking tray from the oven, sprinkle with flour, then carefully tip the dough on to the tray. 11. Slash the top of the dough, if you like, then bake for 35-40 minutes until golden brown. 12. Leave to cool on a wire rack before serving. ~~~~~~~~~~~~~~~~~~~~~ 🌱 Follow @goecostore for #ecotips and #ecoproducts ~~~~~~~~~~~~~~~~~~~~~ 🐳🐳🐳🐳🐳🐳🐳🐳🐳🐳 #sourdough #sourdoughrecipe #lockdown #baking #sustainablehome #lowwasteliving #ecoproduct #waronwasteau #goecostore #ecobusiness #aussiebusiness #consciousbusiness #ecowarrior #zerowaste #reduceplasticwaste #reduce #reuse #kilner (at Long Jetty, New South Wales, Australia) https://www.instagram.com/p/CSxT9INhzx6/?utm_medium=tumblr
#ecotips#ecoproducts#sourdough#sourdoughrecipe#lockdown#baking#sustainablehome#lowwasteliving#ecoproduct#waronwasteau#goecostore#ecobusiness#aussiebusiness#consciousbusiness#ecowarrior#zerowaste#reduceplasticwaste#reduce#reuse#kilner
2 notes
·
View notes
Text
Master Recipe
This recipe is very similar to the master recipe on foodbodsourdough.com, but with some added helpful tips from my gracious Mother, who has been my sourdough guide through this entire journey. I have had nothing but success with this process, but I am in no way an expert. I recommend checking out other recipes and resources for more inspiration and guidance!
Total time is about 24 hours (or longer depending on how long you cold-ferment) from start to finish but requires very little time hands-on. Makes one big loaf.
When starter is at its most active, weigh 50g starter into a bowl and add 350g water. Mix them with hands until starter is mostly dissolved.
In another larger bowl, weigh 500g unbleached flour and 11g salt. Combine well.
Pour the liquid starter into the flour and fold/smush together in the bowl until all the flour is mostly combined. The dough will be ragged (shaggy) and a bit wet. Cover the bowl with plastic wrap, a plastic bag, or shower cap. Let sit for about an hour.
After an hour, and while still working in the bowl, go ahead and do a fair amount of stretch-and-folds (I haven’t counted, but something like 20-30). You don’t need to get it super tight, just until you’ve got a smooth-ish ball of dough. For the next 2-4 hours, come back to your dough every 30-60 minutes and do a few stretch-and-folds. After the first round, you will only need to do a few stretch-and-folds each time (I do about 4-6 per round). There’s no golden rule for time in between or amount of folds, but the more the merrier! Cover and leave on counter between rounds.
Now your dough is ready to be covered again and bulk-ferment. At room temperature, this takes about 8-12 hours. Warmer goes faster, colder goes slower. I usually put it somewhere colder overnight and then bring it to room-temp or warmer at the end. You’re looking for your dough to at least double in size and be nice and jiggly. Its fun to ferment in a glass bowl to see the bubbles!
I test it by poking a hole with a wet finger and looking for it to spring back at least halfway, leaving just a little divot. If you made a double recipe, you should divide your dough into loaves after this fermentation.
Now you do a final round of stretch and folds, either in the bowl or on the counter is fine. You don’t want to overwork the dough at this point in order to preserve the air pockets and bounciness. After that round, I plop it on the counter to develop the skin. You can either dust the counter with flour or wet it. Both prevent sticking, but I find that a little bit of stickiness helps push the dough together, so don’t keep adding flour. I find my scraper works great for this process by pushing under the edge of the dough towards the center while turning it gently against my hand. You can also just use your hands, which may work better in a bowl. You’re trying to stretch the top of the dough outwards and down to get a tight skin and a more spherical shape. Basically, the goal is to create tension in the dough for it to rise into. If bubbles form near the surface, just gently pinch them. I do this skin-tightening until it’s a great little bouncy ball, then let it sit for 20-60 minutes, then repeat once more. I’m sure you could get away with just one round though. Now your dough is ready to go in its proofing basket (banneton)! Lift it gently and place it in the rice-floured banneton/basket with the nice skin facing down, lumpy bottom facing up. You can dust with some more rice flour to make sure nothing sticks. Cover and pop it in the fridge.
If you want to roll your dough in seeds, do this before it goes in the banneton. (Wet the top of the dough and roll in seeds before placing seed-side down.)
This part is the final proof or cold-ferment, where the dough develops its signature flavour and stability. I’ve heard minimum is 3 hours, but I usually aim for 10 hours. If I’m not super confident in my dough, I let it sit for closer to 24 hours in order to develop more stability. You’re ready to bake! A good trick to keep the bottom of the dough from burning is to preheat the oven to 500˚F and reduce it to 450˚F when the dough goes in. This is so the bottom element of the oven won’t come on for a long time. I also pop a baking pan on the rack below to protect it from direct heat.
I preheat the roasting pan as well, but many bakers don’t. Enamel pans heat up and cool down very quickly, so it doesn’t make as much of a difference as with cast-iron.
From your banneton, place a sheet of parchment paper overtop and then a cutting board or plate. Flip the whole thing over so your dough is right-side-up, on the parchment paper. Another dusting of flour (can be wheat flour) will make your score-patterns stand out more for purely aesthetic reasons.
Now you need to score your dough to allow it to open up and expand! Don’t be shy and cut deep, at least ¼ inch. You’ll want to do at least one big score that is surprisingly deep so it has lots of space to grow. My personal favourite is three big scores towards the middle, but I’m getting bolder with more intricate patterns now. After the big scores, feel free to get creative with designs such as leaves (which are just tiny little scores). Look up examples of patterns!
Now, without burning your knuckles, lift the parchment paper and drop it in the roaster. I like to pop a couple ice cubes between the parchment and the roaster to keep it moist. Lid (or tinfoil tent) on, and in the oven she goes!
Now for the hardest part… No peaking!!! You want to maintain moisture and even temperature. You do get to open the oven once, after 30-35 minutes, to take the lid off and let it brown. Once the lid is off, it should take about 25-30 minutes to finish baking. If you have a proper thermometer, the internal temperature should be 205-210˚F, but I have never had to bake it longer.
Carefully lift the parchment paper and place on a cooling rack, then slide the paper out from underneath.
Okay I lied. This my be the hardest part! Do not slice too early! Seriously, it will likely be gluey and sad. I would say wait for absolutely a minimum of 2 hours, but I usually leave it overnight. Once it has cooled a bit, wrap in a clean tea-towel and let it finish cooling all the way. To store bread, I keep mine on a cutting board under a glass bowl for the sole purpose of displaying it to myself. After a few days of this I put it in a bread-bag before it gets too dry.
Congratulations! You did it! A long, but incredibly rewarding process of love, patience, creativity, and confidence. Keep sharing Cornelius with the world! Find recipes for things other than loaves of bread like pizza crust, cinnamon buns, pancakes, focaccia, etc.! Go explore the internet, ask friends and family, find inspiration everywhere! Sourdough Facebook groups have tons of inspiration, tips, and can answer any other questions. Tag your creations with Cornelius’ hasthag #corneliusthesourdough and check out his other babies around the world! Cheers to you both!
1 note
·
View note
Photo

Check out my latest post on How to make Slow Cooker Sourdough Bread! with recipe for Malted Grain Sourdough! With energy prices soaring baking in the slow cooker never made more sense! This recipe doesn't compromise on quality and my family love this loaf. I'm sure you will too! https://www.fabfood4all.co.uk/how-to-make-slow-cooker-sourdough-bread/ #realsourdough #sourdough #sourdoughbreadclub #sourdoughbaking #SOURDOUGHBread #sourdoughlove #sourdoughrecipe #artisanbread https://www.instagram.com/p/Ca_8cBcg_31/?utm_medium=tumblr
#realsourdough#sourdough#sourdoughbreadclub#sourdoughbaking#sourdoughbread#sourdoughlove#sourdoughrecipe#artisanbread
0 notes
Photo

Sourdough Starter Recipe
Making sourdough starter in Indian climate! Sounds interesting? Do try this easy mother yeast aka sourdough starter recipe and let me know!
https://kitchenofdebjani.com/2021/04/sourdough-starter-recipe/
0 notes
Text
OPA SAUERTEIGBROT
This is my Opa’s sourdough bread recipe. The recipe is in German!
VORTEIG
250g Vollkorn Weizen
150g Vollkorn Roggen oder 150g Dinkel-Vollkornmehl
1/2 Glas Sauerteig (Schraubglas)
ca. 400 ccm Wasser (30oC)
BROTTEIG
600g Roggen (changed to 300g Dinkel-Vollkornmehl & 100g Roggen-Vollkornmehl & 200g Dinkel Mehl Type 630)
300g Weizen Vollkornmehl
120g Kurbiskerne
ca. 3 teel. Salz
ca. 3 teel. Brot-Gewürtz
600 ccm heißes Wasser (60oC) -- Opa nimmt 550 ccm
*Sauerteig hält sich nur 14 tage im Kühlschrank* *When too much water, put more flour*
ZUBEREITUNG
Am abend vor dem Backtag, Vorteig bereiten.
Den Sauerteig in das Mehldemisch Vorteig rüren, das warme Wasser zugießen und alles gut vermischen.
Zugedeckt über Nacht an warmen Ort stehen lassen.
Schüssel mit Deckel oder Folie abdenken, Tuch reicht nicht aus.
Der Teig muß am nächsten Tag gut durchsäuert sein (Bläschenbildung)
Vom Vorteig etwa 1/2 Marmeladenglas Teig für das nächste Brotbacken abnehmen
Der Sauerteig hält sich im Kühlschrank etwa 14 Tage. Nicht Vergessen!
Zum Vorteig das Mehldemish, Gewürze und Körner geben und mit heißem Wasser gut verarbeiten. Der Teig soll fest aber noch klebrig sein.
Gut zugedeckt soll der Teig ca. 1 Std. in der Wärme gehen.
Teig kurz mit Mehl formen und in eine gefettete Form . (denaer Glasform) geben.
Zugedeckt wieder ca. 1 Std. gehen lassen (nicht länger).
Backen: ca. 1 1/4 Std. bei 220oC zugedeckt backen
1 note
·
View note
Text
Sweet and Sourdough
There is something magical about the warmth and deliciousness that comes with the aroma of freshly-baked bread in the morning. It musters up sensations of lazy Sunday mornings, slow meals around the table, and abundance. The melting butter on warm crispy bread straight from the oven causes one to sigh in unadulterated pleasure. Another of mother’s recipes is the star of this post. Shout-out to…

View On WordPress
#foodblogger#foodgasm#foodie#foodporn#gutgoodness#guthealth#healthybread#healthyvegan#howtomakesourdough#sourdoughbread#sourdoughrecipe#veganfood#veganrecipe#vegetarianrecipe#weightloss
0 notes
Photo

Jalapeño cheddar sourdough is one of my favourites to make! Can’t wait to make a sandwich with it for lunch tomorrow! Recipe link in my bio @margotdreamsofbaking #sourdoughbread #sourdough #bakingfromscratch #homemadebread #jalapenocheddar #bakingblog #bakingblogger #food #selftaughtbaker #amateurbaker #artisanbread #sourdoughrecipe #sourdoughbaking (at Barrie, Ontario) https://www.instagram.com/p/CExriFqsDp5/?igshid=pqi7ygmkngld
#sourdoughbread#sourdough#bakingfromscratch#homemadebread#jalapenocheddar#bakingblog#bakingblogger#food#selftaughtbaker#amateurbaker#artisanbread#sourdoughrecipe#sourdoughbaking
0 notes
Photo

This week’s sourdough sandwich bread is in honor of Colonel Klink. I was on my deck, calling my cat in for the night. The Colonel saw me, jumped up on his roost and did his squawky, preteen cock-a-doodle at me when I called his name. 😂 #sourdoughrecipe #sourdough #sourdoughbread #sourdoughbaking #chicken #chickensofinstagram #roostersofinstagram #rooster https://www.instagram.com/p/CC_1EPXpPqx/?igshid=1hplilptdct1v
#sourdoughrecipe#sourdough#sourdoughbread#sourdoughbaking#chicken#chickensofinstagram#roostersofinstagram#rooster
0 notes
Photo

I’m tackling the most frequently asked question on my blog this week! How to make a sourdough starter from scratch. 🥖I’m going through the easy steps starting today live on my stories; *also now pinned to my highlights* 🤗 It’s super easy, I will hold your hand the whole time (virtually). So, come to my kitchen science lab and let’s get started! . . . . . #sourdoughstarter #sourdoughrecipe #sourdoughclub #sourdoughbread #sourdoughbaking #sourdough #foodstyling #foodfluffer #bakersofinstagram #thebakefeed #eatingfortheinsta #huffposttaste #buzzfeast #feedfeed #foodblogger #bakefromscratch #foodblogeats #makeitdelicious #foodstagram #damnthatsdelish #eeeeeats #thekitchn #foodblogfeed #foodphotography #imsomartha #realsimple #kitchn #thefeedfeedbaking (at Satellite Beach, Florida) https://www.instagram.com/p/B-XErzwpprm/?igshid=959x8b9c52sq
#sourdoughstarter#sourdoughrecipe#sourdoughclub#sourdoughbread#sourdoughbaking#sourdough#foodstyling#foodfluffer#bakersofinstagram#thebakefeed#eatingfortheinsta#huffposttaste#buzzfeast#feedfeed#foodblogger#bakefromscratch#foodblogeats#makeitdelicious#foodstagram#damnthatsdelish#eeeeeats#thekitchn#foodblogfeed#foodphotography#imsomartha#realsimple#kitchn#thefeedfeedbaking
0 notes
Photo

Have you been baking sourdough during lockdown? If you’ve been thinking about giving it a go I have a fail proof recipe below from the experts in fermenting products Kilner. We also have a Sourdough Starter Set on our store to get you started, product tag on photos or on Store www.goecostore.com.au INGREDIENTS * 500g Strong unbleached white bread flour * 300g Mature sourdough starter * 250ml Filtered water * 2tsp Salt * Flavourless oil METHOD 1. Mix the flour, sourdough starter and 250ml / 8.5 fl oz filtered water in a mixing bowl. Add the salt. 2. Tip the dough on to a floured work surface and knead for 10 minutes. 3. Place the knead dough into a lightly oiled bowl, cover with a damp tea towel and leave to prove for 2 ½ -3 hours. 4. Tip the dough onto a work surface and knead briefly to knock out any air bubbles. Shape the dough into a smooth ball and dust it with flour. 5. Line a medium-sized bowl with a clean tea towel and flour it really well or use a proving basket. 6. Place the dough, seam-side up, into the bowl or proving basket and cover loosely. 7. Leave at room temperature until it roughly doubles in size. This can take anywhere from 4-8 hours. 8. Place a large baking tray in the oven and heat to 230°C/210°C fan. 9. Fill a small roasting tin with a little water and place this in the oven to create steam. 10. Remove the baking tray from the oven, sprinkle with flour, then carefully tip the dough on to the tray. 11. Slash the top of the dough, if you like, then bake for 35-40 minutes until golden brown. 12. Leave to cool on a wire rack before serving. ~~~~~~~~~~~~~~~~~~~~~ 🌱 Follow @goecostore for #ecotips and #ecoproducts ~~~~~~~~~~~~~~~~~~~~~ 🐳🐳🐳🐳🐳🐳🐳🐳🐳🐳 #sourdough #sourdoughrecipe #lockdown #baking #sustainablehome #lowwasteliving #ecoproduct #waronwasteau #goecostore #ecobusiness #aussiebusiness #consciousbusiness #ecowarrior #zerowaste #reduceplasticwaste #reduce #reuse #kilner (at Long Jetty, New South Wales, Australia) https://www.instagram.com/p/CSyo52_n-vY/?utm_medium=tumblr
#ecotips#ecoproducts#sourdough#sourdoughrecipe#lockdown#baking#sustainablehome#lowwasteliving#ecoproduct#waronwasteau#goecostore#ecobusiness#aussiebusiness#consciousbusiness#ecowarrior#zerowaste#reduceplasticwaste#reduce#reuse#kilner
0 notes
Photo

Getting crisp up here on the mountain! Leaves are changing and it’s gorgeous!! Been working on sourdough starter for the last week and a half. You can see them still working in the background. Reaping the rewards with some waffles, fermented cinnamon apples and @dublinroasterscoffee “Brown Eyed Girl” coffee this morning! All the fermented foods for breakfast! Even added a little Spring energy to these with my lilac infused honey...🍯. Kinda excited about this! 🍂🍁Happy Fall!🍁🍂 🍎☕️🧇🍎 ☕️🧇🍎 ☕️🧇🍎 #fermentedfoods #fermented #sourdough #soughdoughstarter #sourdoughstarterdiscard #sourdoughrecipes #sourdoughwaffles #soughdoughstarterrecipe #fermentedapples #fermentedcinnamonapples #dublinroasters #dublinroasterscoffee #breakfast #fallbreakfast #fallbreakfast🍁 #coffee #goodmorning #morningonthemountain https://www.instagram.com/p/CGcpGYms8Li/?igshid=1gzd86pjoak55
#fermentedfoods#fermented#sourdough#soughdoughstarter#sourdoughstarterdiscard#sourdoughrecipes#sourdoughwaffles#soughdoughstarterrecipe#fermentedapples#fermentedcinnamonapples#dublinroasters#dublinroasterscoffee#breakfast#fallbreakfast#fallbreakfast🍁#coffee#goodmorning#morningonthemountain
0 notes
Photo

In a New York Minute. Sourdough discard blueberry crumble muffin. Drop a ----> 🍽 (for the recipe) #foodinspiration #foodstagram #peterborough #foodaholic #foodies #foodpics #foodofinstagram #food #merakimeals #athomechef #peterboroughuk #goodfoods #quarantinefood #quarantinecuisine #quarantineeats #christophernolanoffood #sourdoughdiscard #sourdoughrecipes #blueberrymuffins (at Peterborough, UK) https://www.instagram.com/p/CBLyHSWHxvE/?igshid=1d4zmpjafkf1i
#foodinspiration#foodstagram#peterborough#foodaholic#foodies#foodpics#foodofinstagram#food#merakimeals#athomechef#peterboroughuk#goodfoods#quarantinefood#quarantinecuisine#quarantineeats#christophernolanoffood#sourdoughdiscard#sourdoughrecipes#blueberrymuffins
0 notes
Photo

It's far too hot to turn the oven on this week but you don't have to miss out on your sourdough bread or any type of homemade bread! Just follow my Slow Cooker Sourdough Recipe or adapt any bread recipe following my simple steps! Best of all it saves you about 40% on your energy bill! https://www.fabfood4all.co.uk/how-to-make-slow-cooker-sourdough-bread/ #sourdough #slowcookersourdough #sourdoughbread ##homemadebread #sourdoughbreadclub #artisanbreadathome #sourdoughbaking #sourdoughrecipes #sourdoughclub #homemadesourdough #foodbloguk #hungrygirl #frugal #frugalliving #frugalrecipes #foodart #foodfluffer #foodstyling #inmykitchen https://www.instagram.com/p/Cf3m5Yytvu4/?igshid=NGJjMDIxMWI=
#sourdough#slowcookersourdough#sourdoughbread#homemadebread#sourdoughbreadclub#artisanbreadathome#sourdoughbaking#sourdoughrecipes#sourdoughclub#homemadesourdough#foodbloguk#hungrygirl#frugal#frugalliving#frugalrecipes#foodart#foodfluffer#foodstyling#inmykitchen
0 notes