#sewing with linen
Explore tagged Tumblr posts
Text
So I'm trying to make folk linen pants from sowing to sewing.
Second post (here's first)
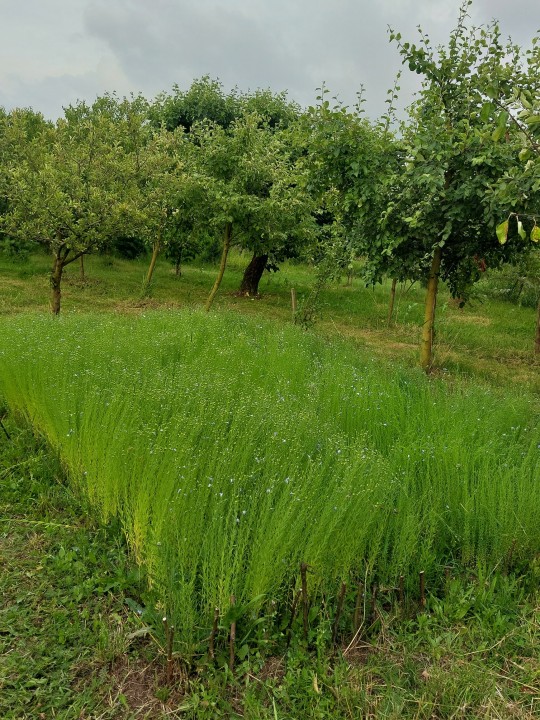
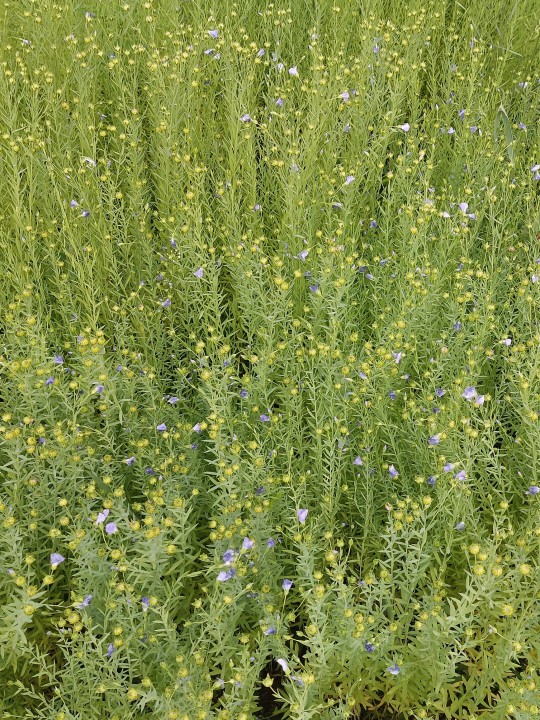

It's been about 60 days since sowing (it's 22nd of June). It's looking so pretty and started blooming about 55th day. I've been watering it one or two wheelbarrows of every 2 weeks, which I thought would be too little but it's growing pretty good. It's still not that high (about over the knee) and I doubt it'll get much higher sadly. That means lower grade of fibers but whatever. It'll be fine.
Every now and again there are parts laying down and I've been seeing some hares running about so they probably hide in it tramping down the plants. But it gets up no problem so all good. Maybe next time I'll put up a little fence around it.
Also idk when should I harvest it bc all the info is about oil flax, not textile flax, and even then it's contradictory sometimes. But either way it's around 100-120th day, so we're still only halfway.
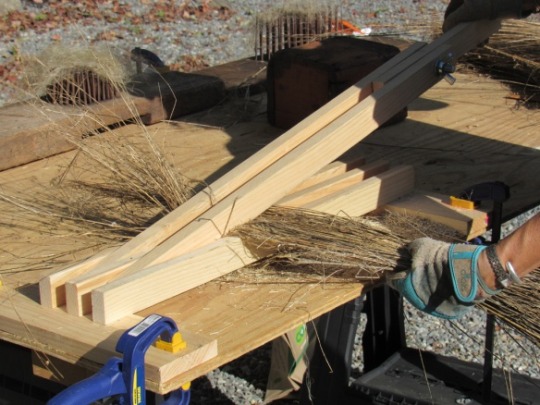
Next up I need to start thinking about scuthing it, and it requires some equipment. But it's easy enough to build on my own probably. It should be something like this flax-brake:
And then this kind of metal comb, which I'll make just by densly putting nails in a blank:

So yeah, that's the plans for the near future. Here's a bonus flax video if you stayed till the end ❤️
#mine#flax#linen#cottagecore#light academia#goblincore#farmcore#farming#gardening#folk#stroje ludowe#ludowe#len#earth to garment#sowing to sewing#fiber art#fiber crafts#textiles#textile art
7K notes
·
View notes
Text

‘my love’ embroidered by me for my best friend’s 23rd birthday 🤍
#mine#girlhood#embroidery#embroider#embroidered#linen#handmade#sewing#handmade with love#crafts#tenderness#softness#on love#seamstress#on friendship#cottagecore#love as tenderness#tenderhearted
181 notes
·
View notes
Photo
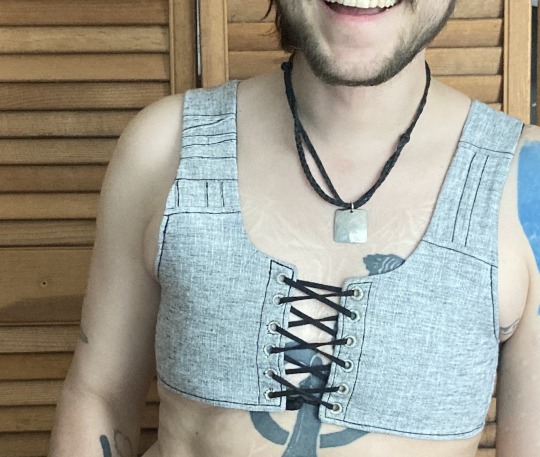
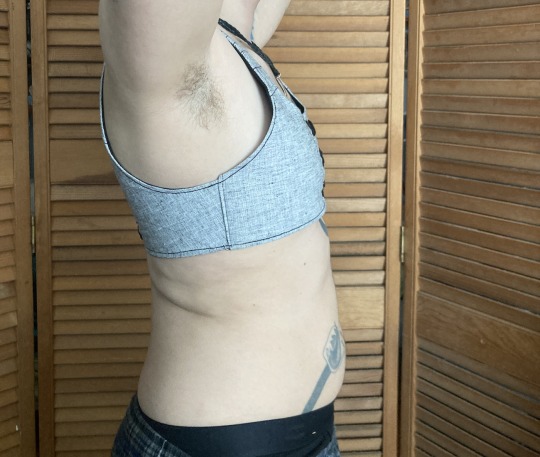
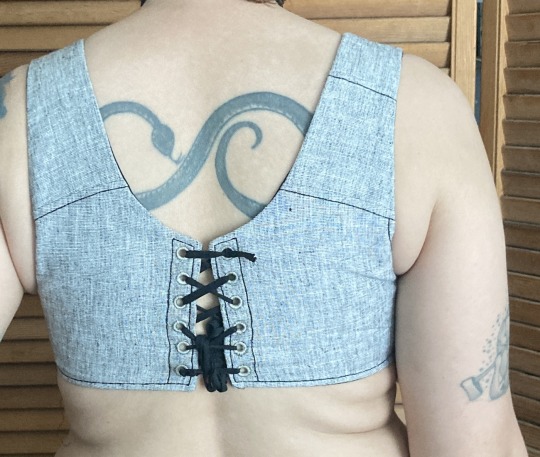
summer binder picture tutorial
this is the third binder ive made for myself recently and the first one i’m writing up. it’s designed to do a few things: 1) allow me to put it on by myself without dislocating my shoulders 2) allow me to breathe well enough to partake in normal activity 3) be cool enough to wear throughout a muggy 90-100F summer 4) not constrict my ribs in a way that aggravates my lack of connective tissue and causes intense pain.
this has become necessary even though i had top surgery many years ago, because when i had it i was extremely skinny and since then i’ve increased in size by about 50%. this has been really fucking good for my health in every single way* except that when my chest is squishy or moves at all it’s So Goddamn Triggering for me. but also since ive had top surgery ive developed and/or been made away of a plethora of chronic conditions that make every single commercially available binding option medically impossible. unbound, my chest is pretty much what you’d expect for a chubby cis guy but venturing out into the world in just a tshirt no longer works for me
*anyone who badmouths weight gain or fat bodies in the notes WILL be blocked
under the cut are a bunch of process pictures and explanations of what they all mean:
first i’ll give you a look at the pieces and measurements:
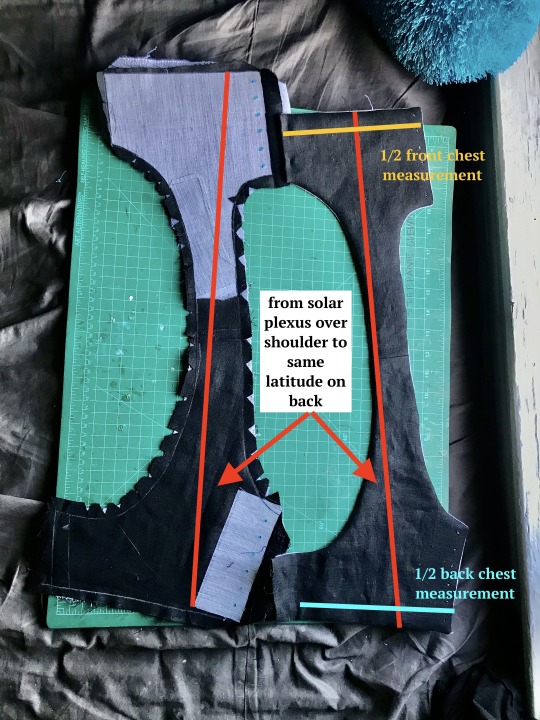
most of the seams are sewn in this picture and one half is turned inside out, allowing you to see both the finished dimensions (right) and the placement of the fusible horsehair canvas that gives this lil scrap of linen any structure at all (left)
to get your chest measurement, you’re gonna have to do some math:
first measure above and below what you want to bind. average these numbers. mine are something like 32 and 34, which average to 33. subtract a few inches--this is to allow the air movement between the laces at center front and back, critical in the summertime. i deleted 3 inches bc i like that number but you can go bigger if you want. the more inches you subtract here, the more youll be able to ratchet all your chest material down later, but at the same time you need to leave enough fabric for a sturdy garment. let’s say a range of 2-6 inches/5-15cm. by taking your measurements this way, you’re essentially measuring the chest you would like to have. that + the horsehair canvas work together to compress any squishy tissue/force anything that doesnt compress up and to the outside (basically into the armpit/lower shoulder--the chest might stick out but it will give a very puffed chest captain america pectoral silhouette)
you can also see how ive clipped my curves and pre-drilled my lacing holes. i used the marlin spike on my knife to open up the holes on the interfacing side, mainly as a way of marking them. this worked well bc the interfacing’s glue kept the linen from raveling
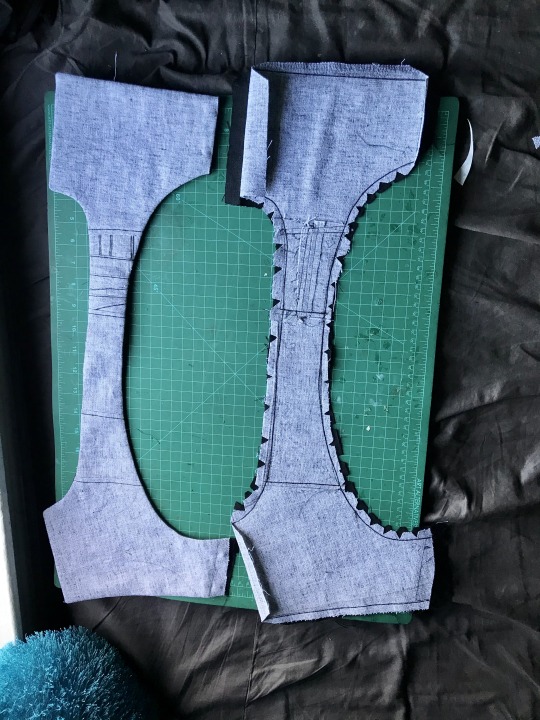
this is the same stage but looking at the non-interfaced grey linen/cotton blend (the black is some 100% linen from my cabbage stash). you can see ive broken the solar-plexus-to-back measurement up into a bunch of pieces to save on fabric but that’s not necessary. my original pattern was just two pieces (front and back) and chopping the straps into thirds on both sides was aesthetic
in the following picture you can really see how this is really just overgrown regency stays:
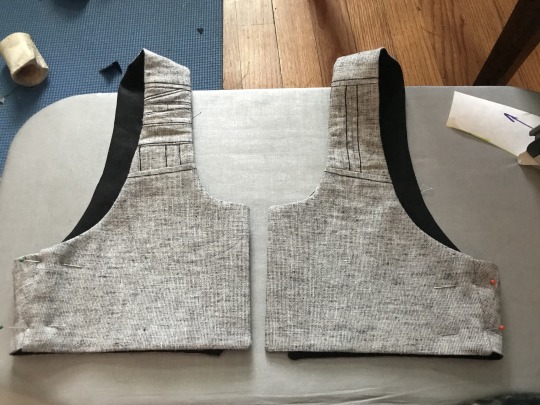
i thought about doing side lacing but didn’t think that would be comfortable for me. on the front, the side seam allowance was pressed inwards before turning to create a finished looking slot. on the back the side seam is left unfinished with an extra wide seam allowance, and is inserted into that slot.
here’s a closeup on it pinned in place (you can adjust the angle of the side seam and the fit during this pinning stage):
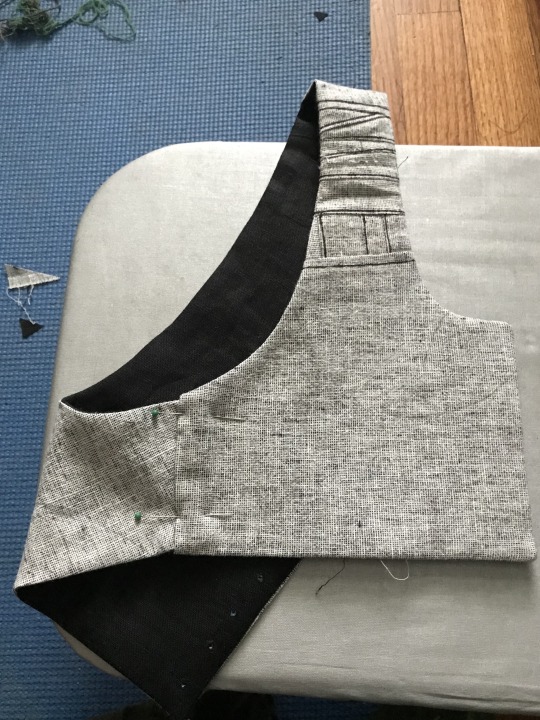
that side seam was just topstitched in place once i had the fit how i liked it, and the armhole was reinforced with more topstitching
alright, time for eyelets: first, you can see how well the marking worked:
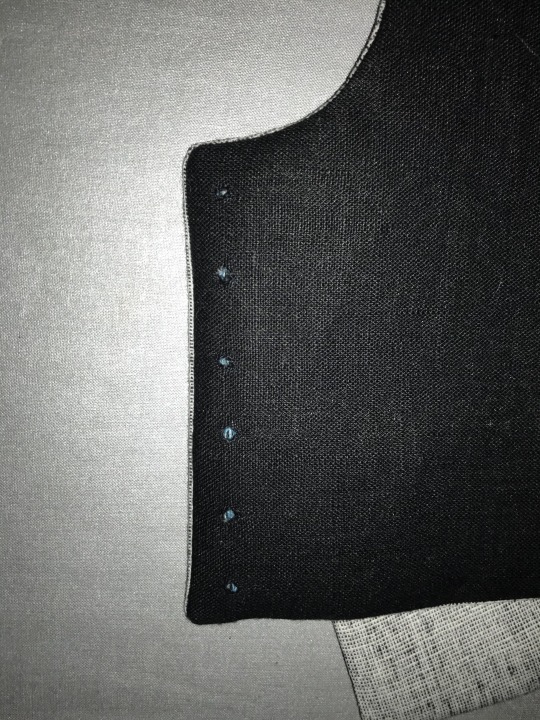
next, two rows of basted eyelets (left), one row of eyelets sewn with a doubled and waxed cotton thread (center right), and one row of eyelets opened and stainless steel rings placed (right).
next time i’m going to mark the eyelets same as i did above, but do this step differently--i’ll mark and baste the steel rings in place BEFORE widening the eyelets. this is bc i had a lot of problems keeping the eyelets on center
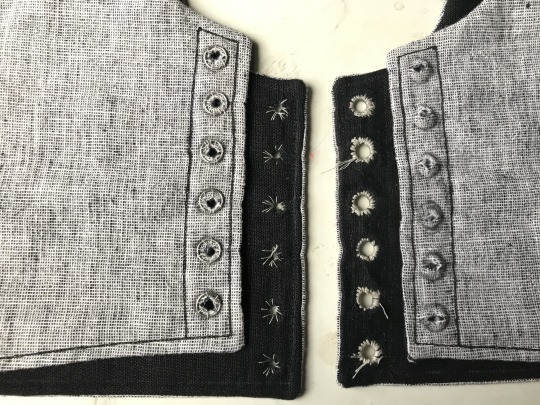
eyelets half done on this one! on the left are eyelets sewn with doubled and waxed cotton thread and on the right eyelets sewn with quadrupled and waxed thread. the center is basting again. i was able to force the holes back in line while sewing the eyelets but it was kinda annoying. adding a second picture that doesnt have great focus but hopefully shows how that process worked and shows the spike clearly
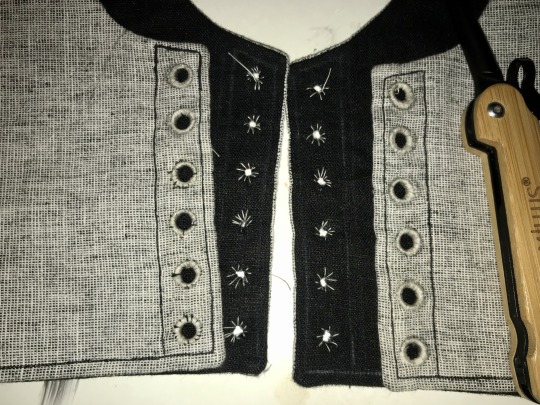
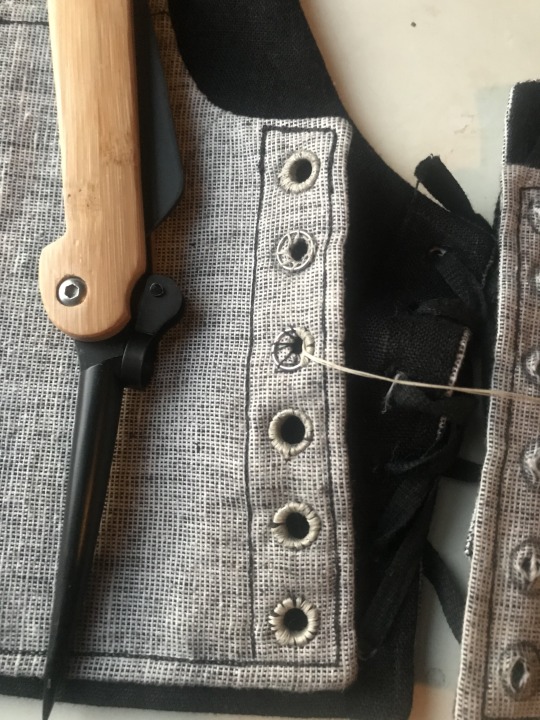
i ended up using this white cotton thread because it’s stronger than my black cotton thread (which the rest of it is sewn with). [eta: after this was first posted, i pressed the whole thing heavily, which effectively de-waxed the thread, and i dyed the whole thing a medium charcoal grey, the thread blends in perfectly on the lighter side and isn’t such a sore thumb on the darker side]
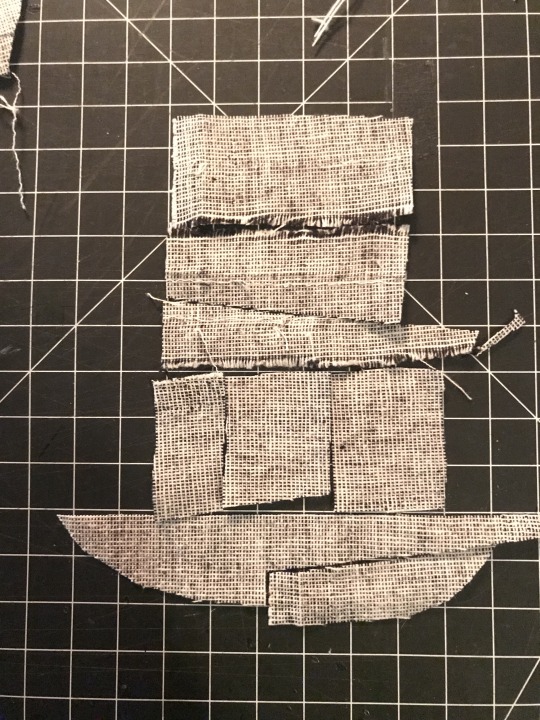
bonus: the piecing layout for that little piece of strap. the whole light gray half of the binder was made from 1/2 of one of the legs i cut off some linen suit pants to make slutty camping shorts last year and i really really didn’t want to break into any of the other three halves for this garment--i have Plans for it
overall the fit of this is incredible. it DOESNT hurt my ribs which every zip-up garment ive been able to find (and it is difficult) does due to really thick elastic at the base. it doesnt aggravate my sensory issues with the synthetic fibers that every commercial option is made of. i can walk up a hill or stairs, or go to pt, without getting too out of breath. i can eat with it tight, or loosen the front easily and without taking it off to make eating easier and less nausea-inducing. it is reversible!
best of all the lacing at the back gives the garment enough movement for me to get it on without dislocating, and the interfacing and steel rings give it structure once it’s on. the shaping comes only from fusible horsehair linen canvas and stainless steel rings like youd use for chainmail, there’s no boning at all, which makes it very quick to sew (except the eyelets, but metal grommets would be sturdy and quick provided theyre of good quality)
there’s a small amount of gaping on the outside of the shoulder strap, which i plan on fixing with a tiny tiny dart in the armpit, i want to add pockets to tuck the laces into, and i need a better lace for the back, but it’s completely wearable in time for the 90 weather next week which is all i wanted. i’ll do a reblog when it’s perfectly finished with an update on the fit but for now it is done enough
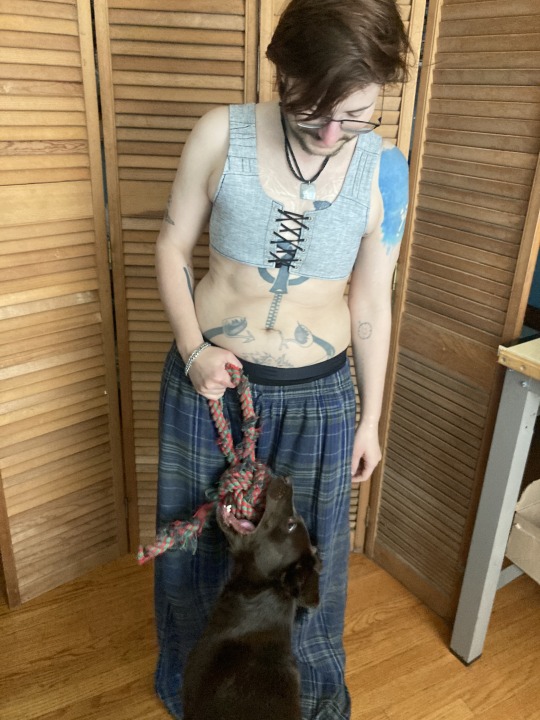
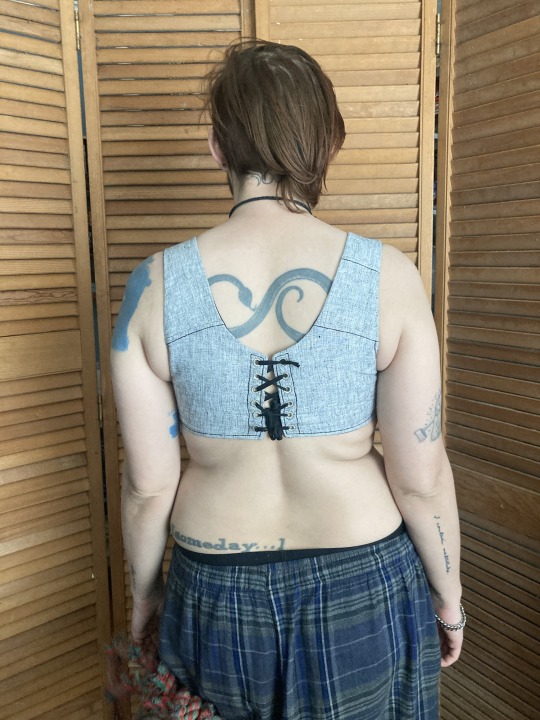
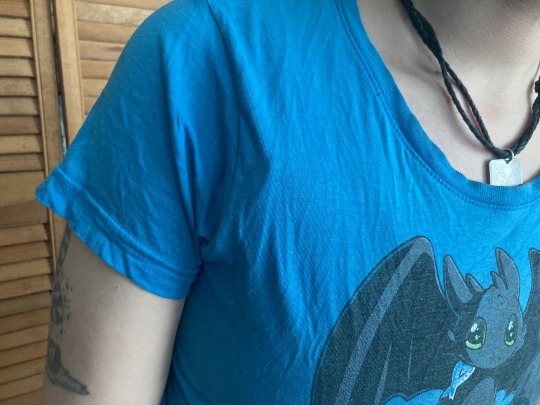
the little ridge where it doesnt lay flat against the shoulder is most visible with just a single t shirt over it. with a flannel or a sweater, it disappears, and by itself, it’s hidden in movement
eta: after dyeing this, i relaced it a bit looser in the back and that gape mainly disappeared. ive decided to leave it in instead of smoothing it with a dart because the loose fabric gives space for my chest to expand when breathing and shapes my silhouette in a way that emphasizes my shoulders
#sewing#trans#trans man#binding#body shaping#cotton#disability accommodations#physical#sensory#eyelets#fusible interfacing#historical fashion#regency#horsehair canvas#lacing#linen#lining#new build#drafted pattern#picture tutorial#piecing is contemporary too#stainless steel#stashbusting#stays#structured garment#treadle machine
1K notes
·
View notes
Text
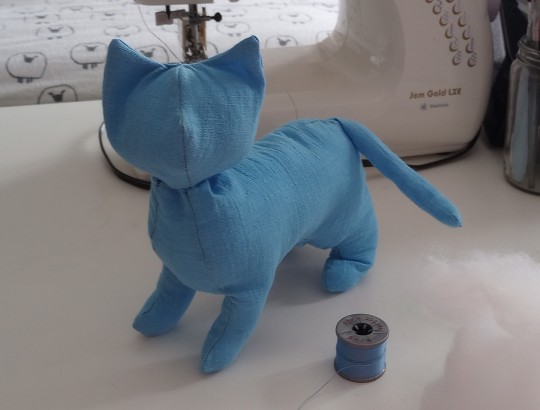
Kitty Being Constructed.
#nunodoll terry cat..... not made of terry LOL im using some linen weave from an old busted t shirt rn#mostly as a mockup to learn how to do this thang. but im liking my lumpy cat#out of terry it'd be a lot more forgiving because of the pile. altho im glad i did a mockup because im learning a lot#1) i forgot to press the middle seams in the head before sewing the back and front together and i shoulda LOL#2) the original pattern probably either stuffs the tail before sewing it in and forgot to mention OR uses the terry pile as a faux stuffing#i just stuffed it since i had no pile LOL and 3) mayhaps runo was using a knit terry?#most toweling i find is woven but theres some things in the pattern that are really tricky without a TINY bit of give#like not a lot of stretch but like a liiiiittle bit. it looks like theyre using a weave but its so low resolution so i dunno <3#maybe even a weave with a little more give? because the inner ears and legs are smaller intentionally#but its a little tricky to do with this linen kjfsdhjlkfsdfd i also shoulda uses a lighter pen to trace it and also probably lighter thread#cause red thread behind slightly translucent blue makes those seams a little muddy. my laziness in never switching out bobbin threads has#finally caught up to me HGKJDSKFDSJHdsa but its fun! i gotta finish up adding seams and a face to the head and then sew da head on#(thats what the blue thread it for. i remembered to at least use it for the finishing touches LOL)#and then i shall have a silly lumpy kitty. hee hee
36 notes
·
View notes
Text
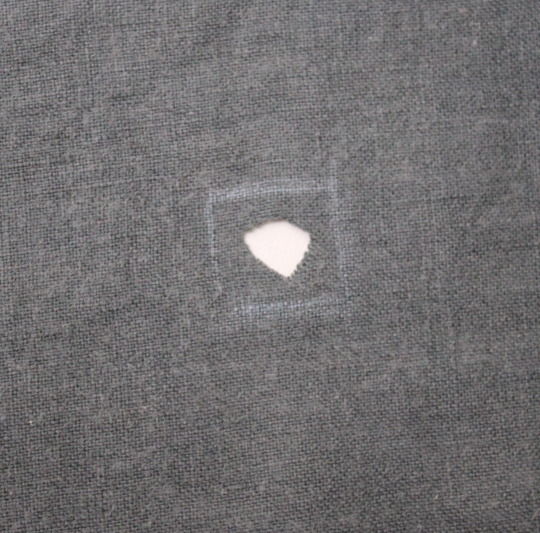
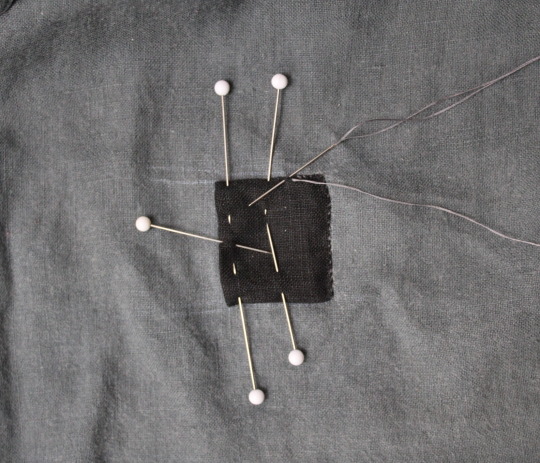

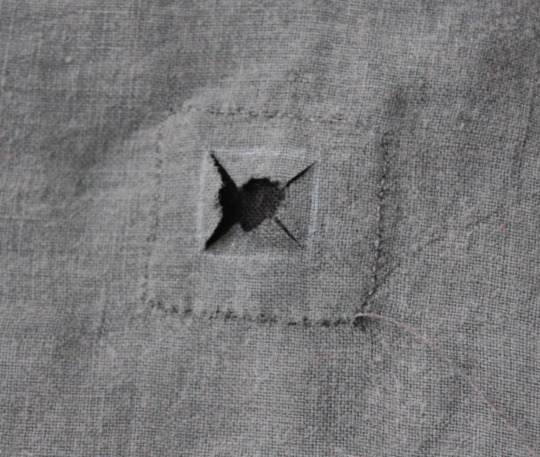
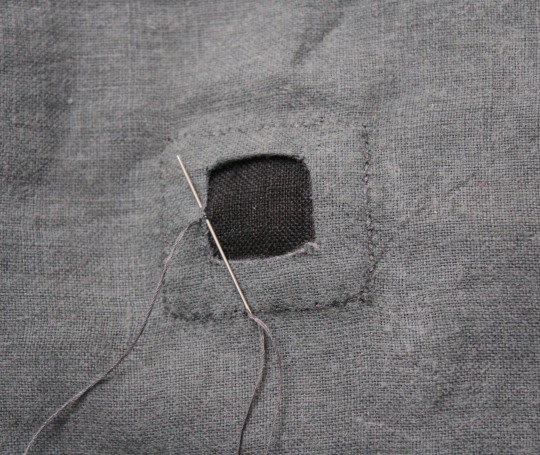

Patching a small hole I accidentally cut in the front of my shirt while opening a package of sour gummy worms.
#sewing#mending#shirts#repairs#I couldn't find any scraps of the grey linen so I had to use black in the same weight.
679 notes
·
View notes
Text

tshirt that says RESIST SPIRITUAL DEATH: TAKE UP A TEXTILE ART
#don't judge my lack of bedsheets my linen is drying on the line in the garden#anyway ! excited to be quilting again !#going to start with smaller decorative projects before moving back on to full size adult quilts#I'll also be handsewing rather than machine sewing so i can really get the feel of long labour with my hands
61 notes
·
View notes
Photo
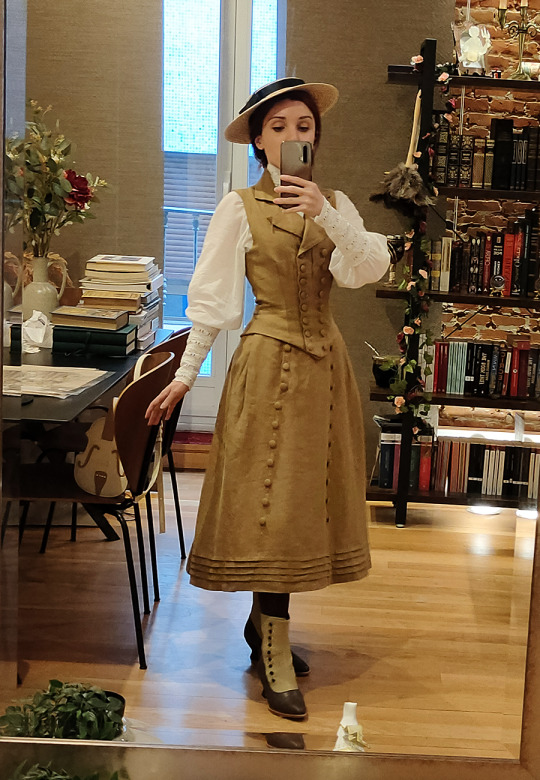


OHHHH my god I just got my latest GibsonGirlDress order and it’s a dream!!! this set is my new favourite 😭 look at it!!
#I keep ordering these vests in different colors they are so good!!#I ordered custom measurements for this one and it fits way better than my old ones I'm so happy!!#I have to take in the others but I'm too scared to ruin them..my sewing is not at that level yet ;;#but now I can use the measurements of this one for reference#the boots are from American Duchess#this set came with petticoat and stockings#also I'm wearing a corset! I'm built like a plank so it's worth mentioning that any shape is understructure#this is all linen and the blouse is cotton cambric#🥺❤️#personal#nips photos#nips blogs
748 notes
·
View notes
Text


One of my favourite things I made this year were my linen overall shorts that were made entirely from leftover pieces and scraps I had lying around. Even the covered buttons I used were secondhand and vintage (if you look at the backs/shanks of them they don't match at all)
I feel they give a healthy dose of whimsy, especially with the little mushroom buttons I embroidered that I ended up using for the straps. I'm very proud of how they turned out because I came up with the design for them myself and had to come up with solutions for things like the closures without following a pattern.
The colour combo makes me think of matcha and chocolate with it fitting very nicely in both summer and autumnal vibes.

28 notes
·
View notes
Text
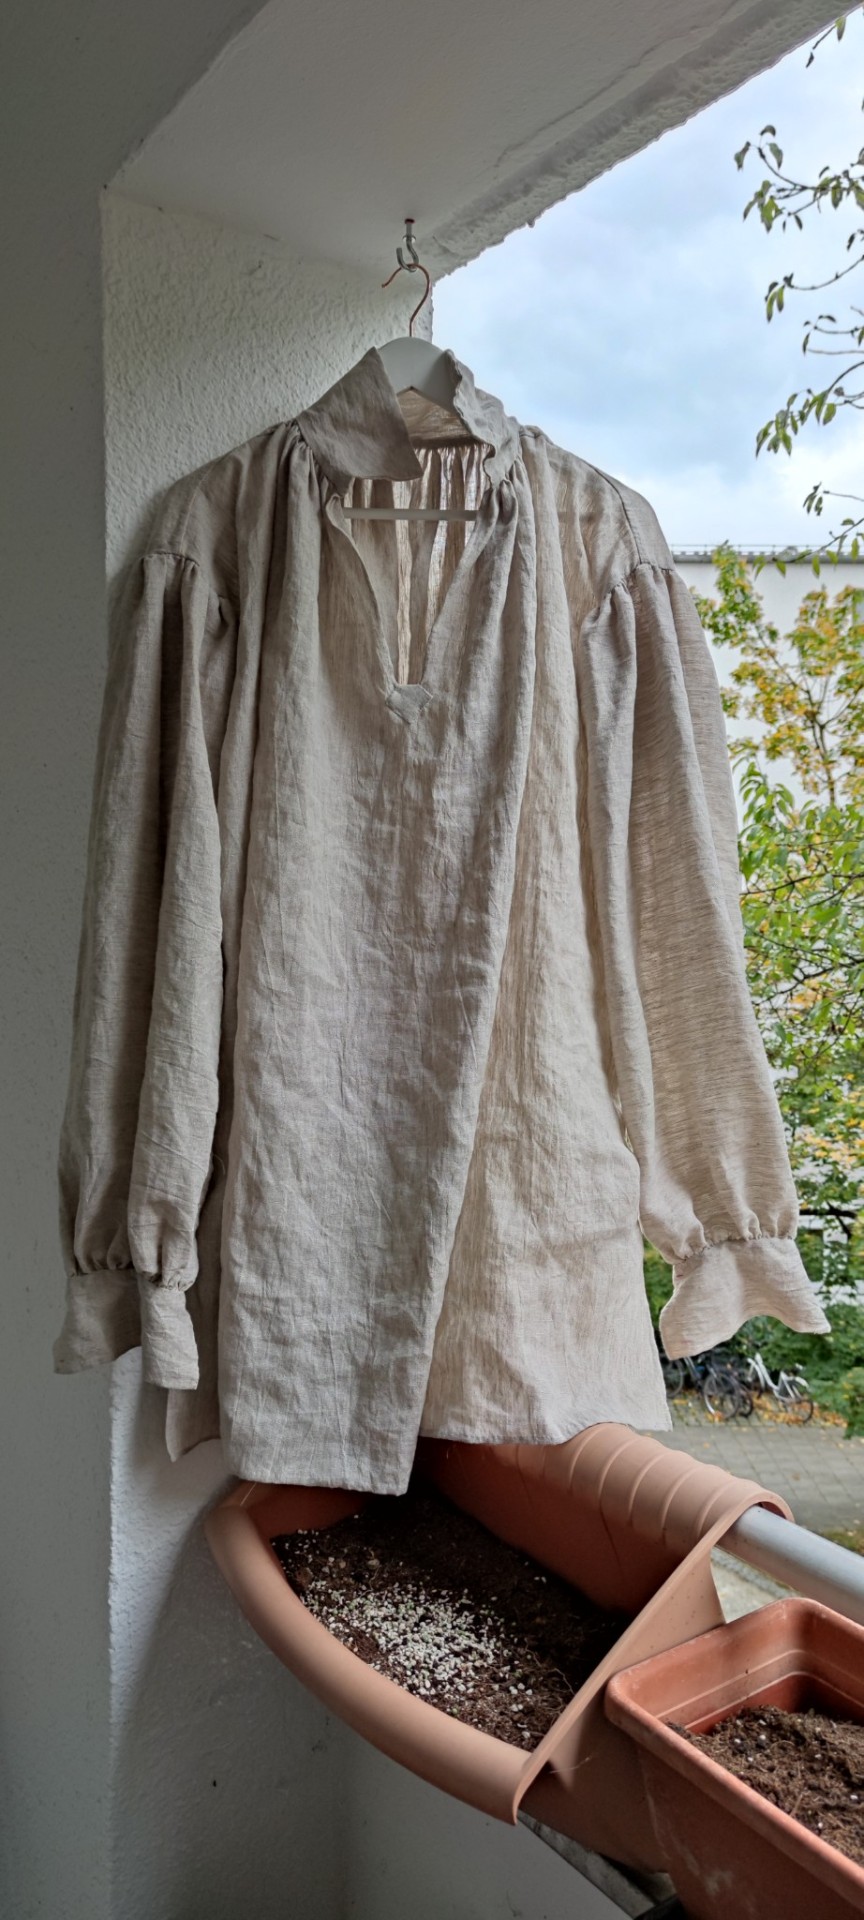
Almost done with the shirt I work on since... July...
Now I only need to make 6 bottoms, sew them on. Sew the button holes and then I am actually done!!!!
204 notes
·
View notes
Text
For all my fabric/sewing people out there, can I have some help identifying some fabric backing? I’m trying to make a reproduction of a 1914 WWI cap badge for a friend and this fabric is glued to the back. If I had to Guess, I’d say it’s maybe a fine weave cotton canvas but I’m not sure. Look familiar to anyone? (Pin diameter is 37mm if that’s of any reference for the weave)

#I figured it’s most likely cotton or linen because these were army issue and they tended to use basic fabrics#I’d just use that too but wanted to see if it was actually something more specific that would be more accurate to use#wwi#crafting#sewing#fabric
86 notes
·
View notes
Text
I'm so mad! I had to spend an hour and a half mending a pair of pants I sewed six months ago because they're literally coming apart at the seams.
There was ten inches of this in the thighs and crotch
(Inside photo)

(Outside photo)

And the waistband was coming apart in two places


I got this linen from metro textiles and it was originally $29/yard!! I got it with one of their constant discount codes for like $15/yd but I've bought MUCH better linen for $15/yd at BH linens. My pink linen pants are thinner and I've had them longer and they're intact besides a few pulled threads from my cat's claws!!
Anyway, I decided to have another episode of V sews in their underwear and spent an hour and a half in my (cold!!) Basement stitching down various patches.
This one was 14"×3" (35.5cm×7.6cm) and I did running stitches in both directions. I decided it was going to be more of a hassle trying to sew it down by machine than I wanted to bother with so I just stitched it down by hand. It took me an hour.

This one was to cover a small hole I noticed a couple weeks ago

Here's the patch for the center back of the waist band. I did an especially bad job cuz at that point I was tired and my "hey don't forget to eat dinner and take your meds" alarm had gone off so I was in a hurry.

Didn't patch the other waistband spot yet because I needed to eat and that spot has several layers of stiff interfacing so I need to use my sewing machine and I didn't feel like clearing space for it and finding the right bobbin and threading it with the right color thread.
I'm mad. There's no good reason for this kind of damage. These have been line dried and washed on the delicates cycle. Don't buy linen from metro textiles. Try BH linens or I've seen grey line linens recommended but I haven't tried them yet. They're on my list of places to try. Fabric wholesale direct sells linen and I have some of it but I haven't finished the pants I am making out of it. Will report back on quality.
39 notes
·
View notes
Text
I'm so close to finishing my blouse but the podcast I'm sewing to is going on a christmas break ;(
#also the cotton is just soooo thin I'll get to wear it only next summer...#BUT I found a nice linen fabric for the next one! (rn no money for it though)#sewing#reg thoughts
24 notes
·
View notes
Text


I just remembered I forgot to post this outfit! I made these pleated linen pants over the summer. I was inspired by 18th century petticoat breeches, but I adapted the concept to my own taste.
They button in the front and lace up in the back. I can wear them high- or low-waisted by adjusting the lacing. I hand-sewed them with waxed linen thread, which was time-consuming, but very satisfying to do, and it looks great!
And they have pockets, of course! I may have skipped out on them with the blue linen dress, but I’m never making pants without pockets!
41 notes
·
View notes
Text
I keep thinking everyone knows the exact same information as me, but since I'm about to make more posts about textiles and clothing, as I'm reading the book on them, I'm going to write down some basic information, just in case it's not very common, because a lot of this I only gathered recently. If I get something wrong please correct me in a kind way!
So where does the clothing come from, and how do we make it? During most of the history, textiles were made by women, from natural materials; flax, wool, cotton, silk, jute. Recently we started using more synthetic materials, like acrylic, polyester, nylon, spandex. If you want to make clothing from the natural materials, like wool or cotton, they first need to be processed, cleaned and combed, then spun into yarn, or thread. Spinning is the process where women manage to pull a thin part of the material and spin the fibres into one consistent, firm thread. It's super impressive to watch them do it and I have no idea how they manage to make it consistent, I've not yet tried to do it myself.
Once the thread is done, it can be made into a textile by knitting, crochet, or weaving. There are also other more complex, decorative methods, like tatting or lacing.
For knitting, you need two needles, or a special circular needle, or, there are also knitting machines, which you can use to make woolen fabric. For weaving, you need a loom. For crochet, you need a crochet hook. While knitting and weaving can be done by a machine, crochet can only be done by hand. Woven fabrics are firm, sturdy, durable, and not stretchy, while knit fabric is the most stretchy and soft. I'm not sure about crochet since I only have one crochet garment, but mine is very sturdy!
All of these methods were historically done by women; families were able to grow flax plants close to their homes, and women would then create linens, woven textiles made from processed flax, which was used to make sheets and clothing. Linen was specifically useful in keeping people clean, since it's very good at absorbing moisture. Used as an under-garment, it was capable of absorbing sweat, and protecting the outer layers, which were not washed. Experiments have shown that frequently changing into clean linen was more effective at keeping clean than showering and then putting on the same clothing back on.
Women's ability to create clothing was sadly exploited, and women were even banned to sell it commercially, or from competing at the commercial market, but their husbands were allowed to profit off of their craft.
In the USA, cotton was the most produced material, however for this too people were enslaved and exploited; cotton took human labour to grow, harvest and process, it also required a lot of water, and caused destruction of environment, because of the chemicals used in it's growth, and the unsustainability of monocrops.
Creating a piece of clothing out of textiles, or sewing, is a process that still cannot be completely automated; while you can use a sewing machine, you cannot make a machine that would produce a whole garment out of textiles. No mass-produced piece of clothing was sewn by a machine, it always has to be made by a human being. This is why a lot of the sewing labour is currently outsourced to third-world countries and companies use modern slavery in order to create fast fashion; there is no machine that can do it, so by the rules of capitalism, the companies are trying to get that labour as cheap as possible, often at the cost of human lives.
We didn't use to have as many garments as we do today, in the 18th century people would have two outfits, one for normal days of the week, and one for Sunday. The clothing they owned was usually made to fit them exactly, either by a female member of the family, or a seamstress, and these garments were made to last them for decades. As clothing became cheaper to buy than to make at home, and more of it became mass-produced, people started acquiring more of it, but also using it for lesser period of time. This would eventually grow into a bigger problem, due to the amount of chemicals and labour used to grow, process, dye and sew the garments, and the amount of waste we were starting to accumulate.
Introduction of synthetic materials, like acrylic, made the yarn and the textiles much cheaper, however it lacks the important properties natural materials have. Do you ever notice how synthetic garments sometimes continue smelling bad even after you wash them? That is because they'll absorb sweat, but become hydrophobic when wet, meaning they will take in your sweat, but refuse to let it go once they're in the water. This means that the longer you have them, the worst their stink becomes. This, of course, can be hidden by the generous use of scented fabric softener, but it won't exactly make the garment clean. This information I've learned recently, but it helped me identify what were the most synthetic pieces of clothing I had. Acrylic clothing had also proven to shed 1.5 more microplastics than any other polyester when put into the washing machine.
Having our clothing grown, processed, spun, woven/knit, and then sewn far out of sight, it's possible to lose the sight of where it came from, or how it's made. Only by trying to do it yourself, or learning closely about the process can one learn to appreciate what a monumental task it is, to create fabric, or a garment. Other than the synthetic textiles, of which I still know very little of, all of the natural clothing is a product of plants and animals, it takes land, farming, agriculture and water to grow the plants, raise the animals, and then labour to process and spin the fibres. It's also something people used to do in their gardens, inside of their homes, something that was normal for women to do, and to trade for anything else they needed, saving them from having to work for wages. Women making fabric was always to the benefit of everyone around them, while m*n taking over the industry and doing it commercially, ultimately brought slave labour to a lot of people, cheap and low quality garments to the select few, and money to the hands of the exploiters.
Being curious about clothing and what becomes of it, is a big benefit to the environment and the future of the earth! Knowing what the textile industry is doing, and how does it affect the planet, can be a great motivator to try and sew, or upcycle and mend clothing, or create garments. It's presented to us as something women were forced to do in the past, and it's connected to 'feminine hobbies', but in actuality, it is power to create something humans cannot do without. Women in the past used it's power too, whenever they could. And we are the only ones who ever used this power for good.
#textiles#clothing#linen#women's history#herstory#radical feminism#sewing#weaving#crochet#synthetic fiber#random information on clothing i've gathered#i feel much smarter so i wanna share!#if anyone knows more and wants to share please add#my sources are the book Worn#and dozens of youtube videos on textiles I've watched recently
145 notes
·
View notes
Photo

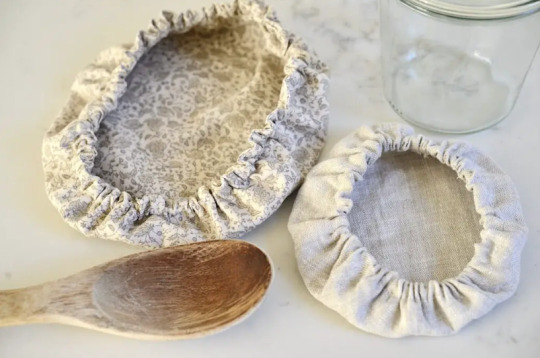

DIY Reusable Bowl Covers
Reusable bowl covers are very easy to sew and you can make them exactly fit all those bowls and jars you use the most.
✖✖✖✖✖✖✖✖
sew-much-to-do: a visual collection of sewing tutorials/patterns, knitting, diy, crafts, recipes, etc.
#DIY#sew#sewing#tutorial#how to#craft#reusable#bowl cover#kitchen#gift#green#sustainable#fabric#cloth#linen#jar
303 notes
·
View notes
Text
I make up a skirt pattern. the waistband measures 30". my waist is 28". it can barely overlap. I replace the waistband with a 32" one and it fits comfortably
I make it up again. same grainline for cutting. same pieces. I weigh exactly the same as I did before. my waist is still 28". I make the waistband 32"
it has WAY too much overlap, to the point where the closure will have to be almost on my hip to fit properly. thus throwing off the pleat placement at the center back
w h y
#sewing#fuck fitting all my homies hate fitting#I just want my sage linen skirt with black lace trim damnit
174 notes
·
View notes