#psd request
Explore tagged Tumblr posts
Note
haaaii could you possibly make a psd based on black forest cookie from crk ? thank-you .. !!

Unveiled . psd ☕️
rules : dont reupload / claim as yours . editing is fine, credit is mandatory . works best on dark skin .
* when using , tagging OR linking back to this post is fine 🐬
13 notes
·
View notes
Text


🔪 - - Ryoba Aishi themepack !! 𝜗𐑞 ┊USE W/ credits !!
𝜗𐑞 ┊requested by: @eyelessraven ! ^^
┊dni irl yanderes.. /srs ( uu guys make me extremely uncomfy )
N♡TE ‘s.. : hai mwoot!! Himu hopes uu like th themepack nn sorry for the delay..! :3
**I DO NOT SUPPORT YANDEV**
divs r f2u,, // psd by me
tags: dm 02 be removed,, @sweetchuii @bandagewastern


#YANSIM#yansim#yandere#yandere sim#yandere simulator#rentry#rentry graphics#requests open#editblr#rentryblr#dni yanderes#Dni irl yanderes#ryoba aishi#aishi#aishi yansim#ayano aishi#Themepack#i dont support yandev#Theme pack#edits#Request#request completed#Rentry dividers#Blog theme#Pinned post#layouts#layouts with psd#tumblr layouts#banners#edit blog
288 notes
·
View notes
Text


SPIKE, Buffy the Vampire Slayer — Season Two.
#request#spike icons#buffy the vampire slayer icons#btvsedit#btvs icons#james marsters icons#james marsters#buffy the vampire slayer#btvs season 2#icons#twitter icons#tv shows icons#boys icons#male icons#icons without psd#icons sem psd#tvshowsedit#coral#90s tv shows#90s icons
262 notes
·
View notes
Text
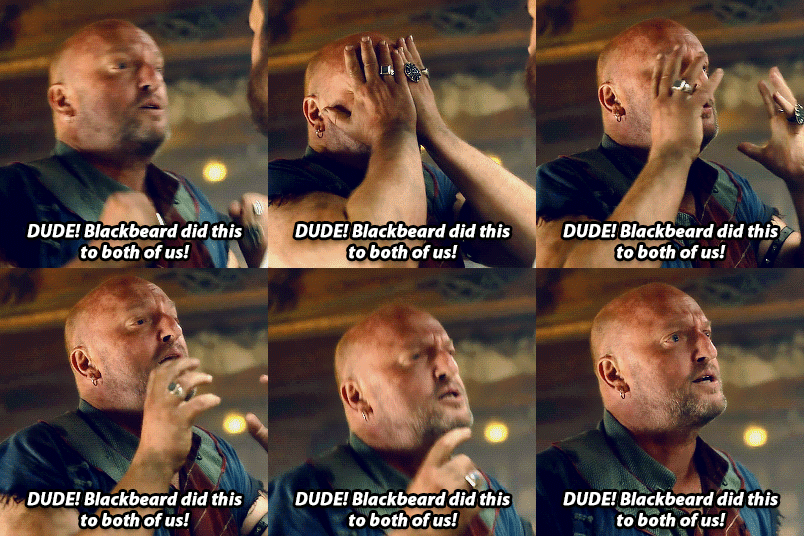

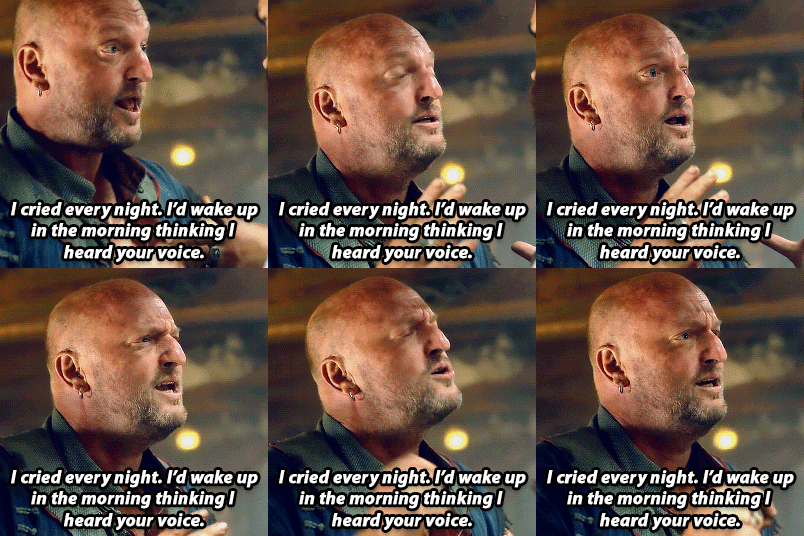
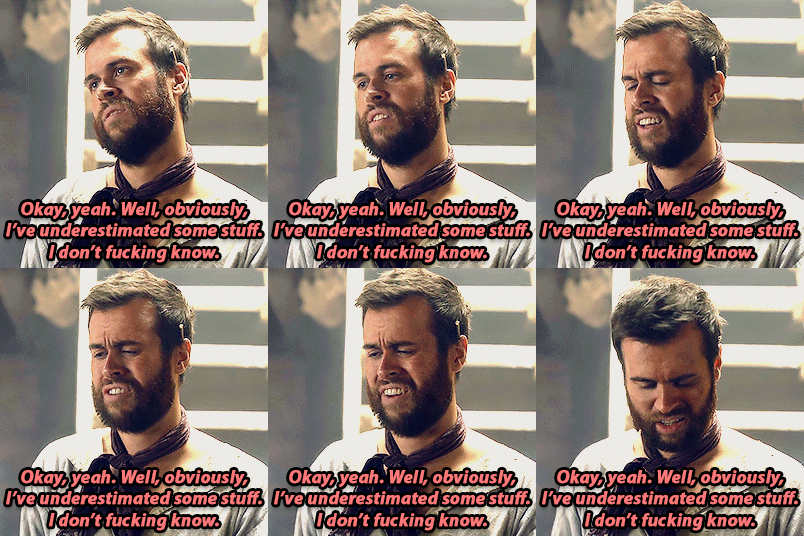
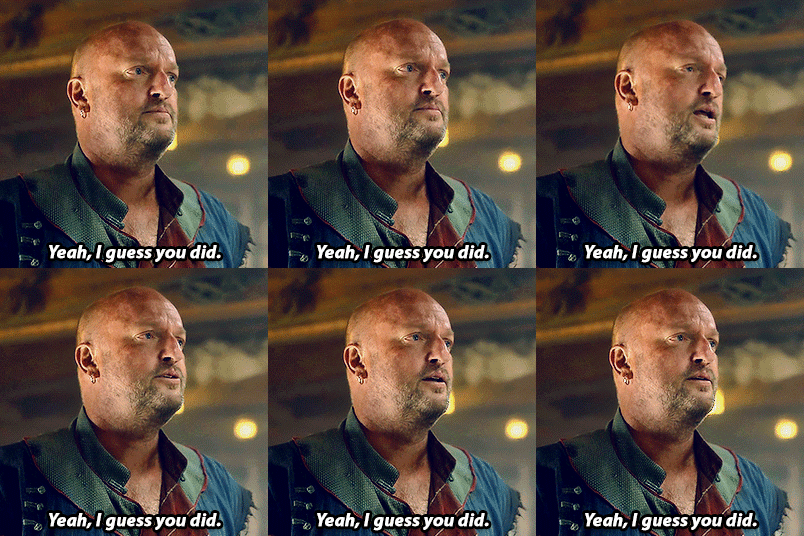
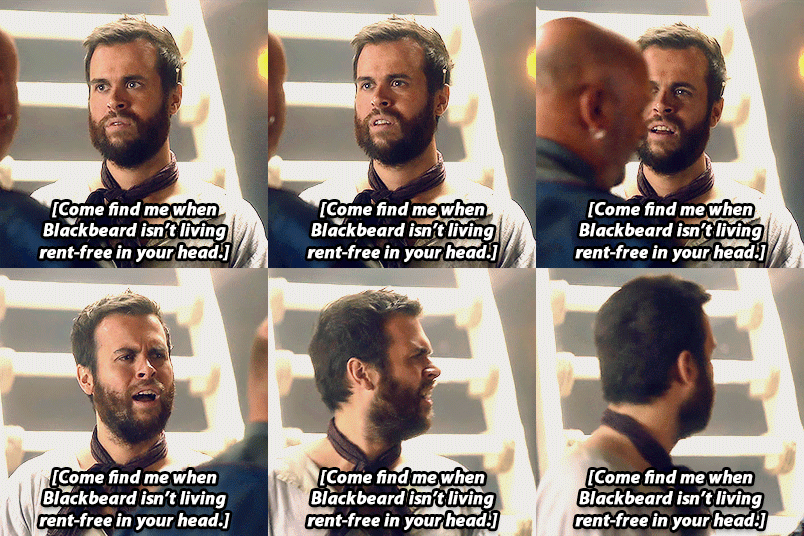

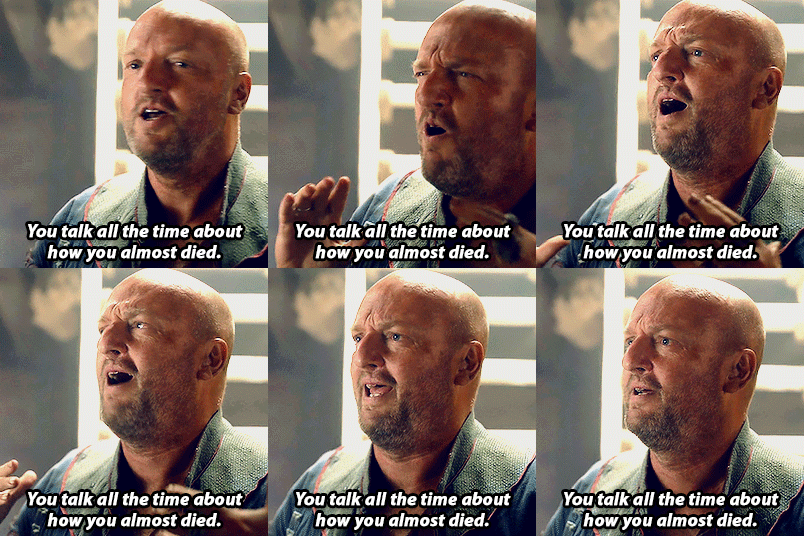

Our Flag Means Death 2x5 | You have no fucking idea what I've been through. (requested by anon)
#gif request#ofmd#ofmd s2#ofmd s2 spoilers#our flag means death#ofmdedit#ofmdsource#ofmd gifs#ida.stuff#ofmd 2x5#lucius spriggs#black pete#lupete#i am slowly getting around to requests now!!#whole scenes like this just take a lot of time#the psd for this set is 2GB akdfhjks#my poor laptop
2K notes
·
View notes
Text


NEW LOOK MV
309 notes
·
View notes
Text


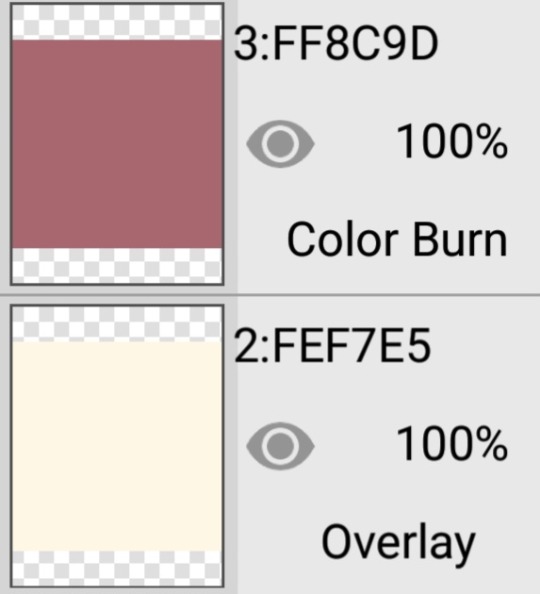

✞⠀┈⠀⠀Firework ash⠀⠀𓂃
₊﹚⠀self indulgent
₊﹚⠀f2u /w⠀;⠀credits + reblogs
⠀†⠀f2u without credit only if moots.⠀†

#⋆⠀♡⠀⠀coloring⠀⠀—#⋆⠀♡⠀⠀requests open⠀⠀—#new post#rentry stuff#rentry decor#rentry resources#rentry#rentry graphics#f2u with credit#rentry inspo#rentry psd#psd coloring#coloring#digital coloring#reqs open#send reqs#inbox open
101 notes
·
View notes
Text

SUBURBAN HOUSE / requested photoshop coloring – FREE RESOURCE
Please like or reblog if you decide to download/use this resource!
Do not repost, redistribute or claim as your own! Other than that, you do not have to credit me when using this coloring.
DOWNLOAD: DEVIANTART or PATREON
+ KO-FI, donations are optional! Please do not feel any pressure to sub or donate, I just hope you enjoy the resources I post. If you decide to tip or subscribe to a tier, I thank you from the bottom of my heart for supporting me ! ♡
#requested#pink#green#spring#free psd#coloring#coloring psd#colorings#photoshop resources#psd coloring#psd#resources
119 notes
·
View notes
Text


TWD: The Ones Who Live - Finale Opening Scene + Blurred/Faraway
Requested by Anonymous
#the walking dead#the ones who live#twdedit#towledit#tvedit#dailyflicks#dailytwd#michonne grimes#rick grimes#richonnegifs#tvarchive#richonne#otpsource#romancegifs#request#denim rose graphics#i hope you enjoy anon!#I think I created 5 different PSDs trying to get rid of the muted green color wash lol#i always really liked the way they shot this scene#you can tell they went back to the cabin and packed EVERYTHING#they took the black label and the two glasses 😂#there is an open pack of chicken flavor sauce on the table (yes i read the writing lolol before cropping and shrinking)#also i never realized on first watch that was little rj's ax laying beside them and carl's photo#also the drawing mapping out the direction to Jadis's room#just little tidbits to remind us of their journey here#but also everything abt this scene is about UNITY UNITY UNITY#from their actual act of union to the ax being rj's aka the physical embodiment of their union to carl's photo aka who brought them togethe#to their signature weapons laying side by side; to the shot of him sliding the wedding ring on her finger#there was no reason for the ring to be off her finger except to have Rick slide it back in place and reemphasize they are one again#a visual representation of what Michonne declares later in the ep: ‘we are back’
324 notes
·
View notes
Text


meursault icons, credit to use
#meursault lcb#meursault#limbus company#lcb#projmoon#project moon#icons with psd#mine#i'll get to requests. when im not going through the horrors.#just enjoy my bad taste in characters. ty.
89 notes
·
View notes
Note
Can I get a Tango of the Tek variety?

remember that tango design i made ages ago and then only drew like ONCE after yeah whell i drew it again asdjkfh
just a couple more requests for tango beneath the cut <3


#my art#fan art#tangotek#hermitcraft#hermitcraft season 9#mcyt#thank you for the request!#fun fact i accidentally put horns on tango's headband but remembered he doesnt like being drawn with horns#so i have a horned version in my psd BUT IT'S NOT LIKE. HIS HORNS. THEYRE PART OF THE HEADBAND. BUT I GOT NERVOUS AND TOOK EM OFF
1K notes
·
View notes
Text

✚ ⦂ (⇀‸↼‶) rosa ( pokemon ) psd

for day O7 of @lavendergalactic ' s event : a character that you could beat up in a fight
no f/o tags like/rb to use && cred
req by @ anon
✩ download

#✩ : psd#lavendersillyweek#psd coloring#psd colouring#psd request#photopea psd#pokemon white 2#rosa pokemon#pokemon b/w#unova#ポケットモンスター
23 notes
·
View notes
Text


ALICENT HIGHTOWER House of the Dragon, S01E09.
#request#alicent hightower icons#olivia cooke icons#house of the dragon icons#hotdedit#ocookeedit#alicent hightower#olivia cooke#house of the dragon season 1#house of the dragon#icons#twitter icons#tv shows icons#girls icons#icons without psd#icons sem psd#tvshowsedit#coral#hotd icons
115 notes
·
View notes
Text
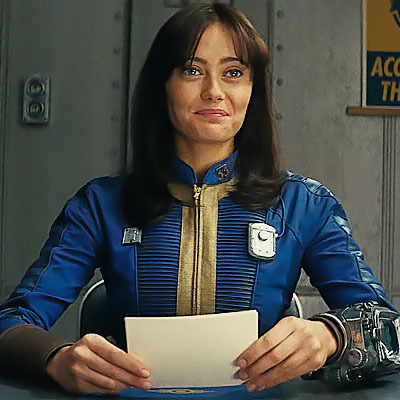
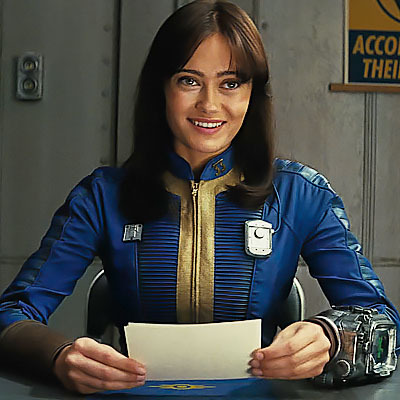
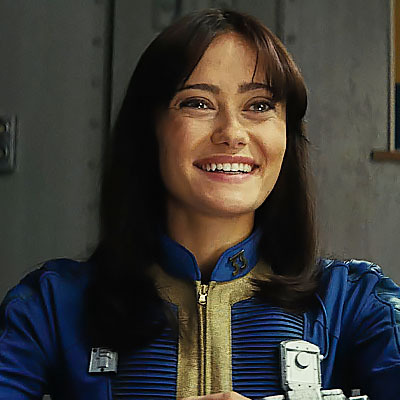
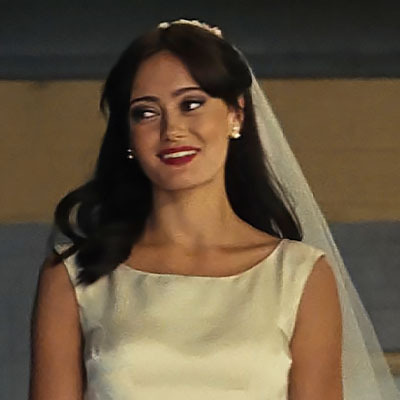
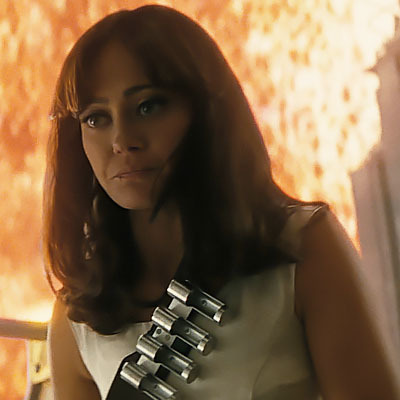

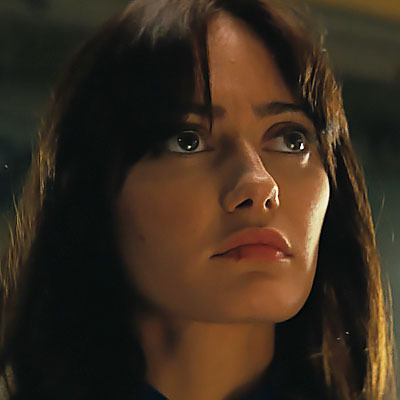


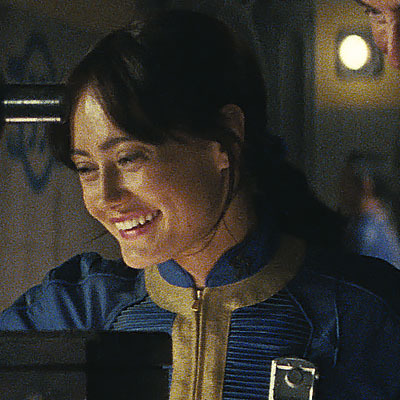
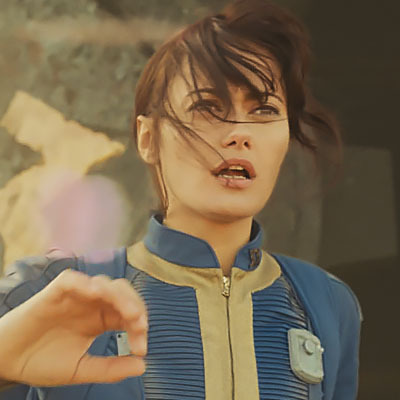
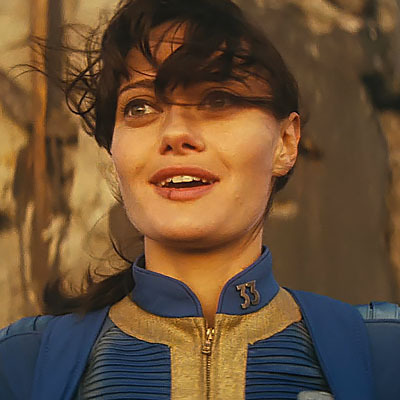
Lucy MacLean - Fallout, S01E01
#lucy maclean icons#lucy maclean#fallout icons#fallout#ella purnell icons#ella purnell#prime video#amazon prime#icons#icons request#lucy mclean#fallout tv series#fallout tv icons#icon#twitter icons#tv icons#random icons#icons without psd#fallout tv spoilers#fallout the ghoul#fallout prime#fallout amazon#fallout spoilers#fallout series#fallout tv show
173 notes
·
View notes
Note
As a fellow gifmaker (only not quite as skilled as you are) I've been struggling and your gifs always look so amazing and nice and colourful so I was wondering if you could share some tips on how do you colour tinted scenes like in MoTA? thank you Jess you are amazing 🤗
heey there!!!! First of all sorry for taking so long to reply to this, I was so happy with your nice comments that I wanted to give you a proper insight on how I do it, but unfortunately I'm quite HORRIBLE at explaining things?
I'll put it under the cut because it's gonna be a long post! but if you have any doubts my askbox is always open!!!!

So first of all I already gave some tips on how does my process with coloring gifs work so you can check it on my resources and tips tag
As you said you are also a fellow gifmaker so I'll take it from there as I assume you already know gif 101, but if you are new to this you can again check my tag for some beginners tips
Also want to point out this lovely tutorial by @ajusnice that might be even more helpful, since I learned a lot from it
Disclaimer: i'm colorblind, I can see all the hues, just not all the shades and I tend to struggle with greens, oranges and yellows so apologies for any mistakes or if this turns out looking weird!

HOW TO COLOR TINTED SCENES????
So at this point I hope you already have you gif all cut down to the size that you want and used your fav action/sharpening presets ( I use this or this actions to sharpen my gifs
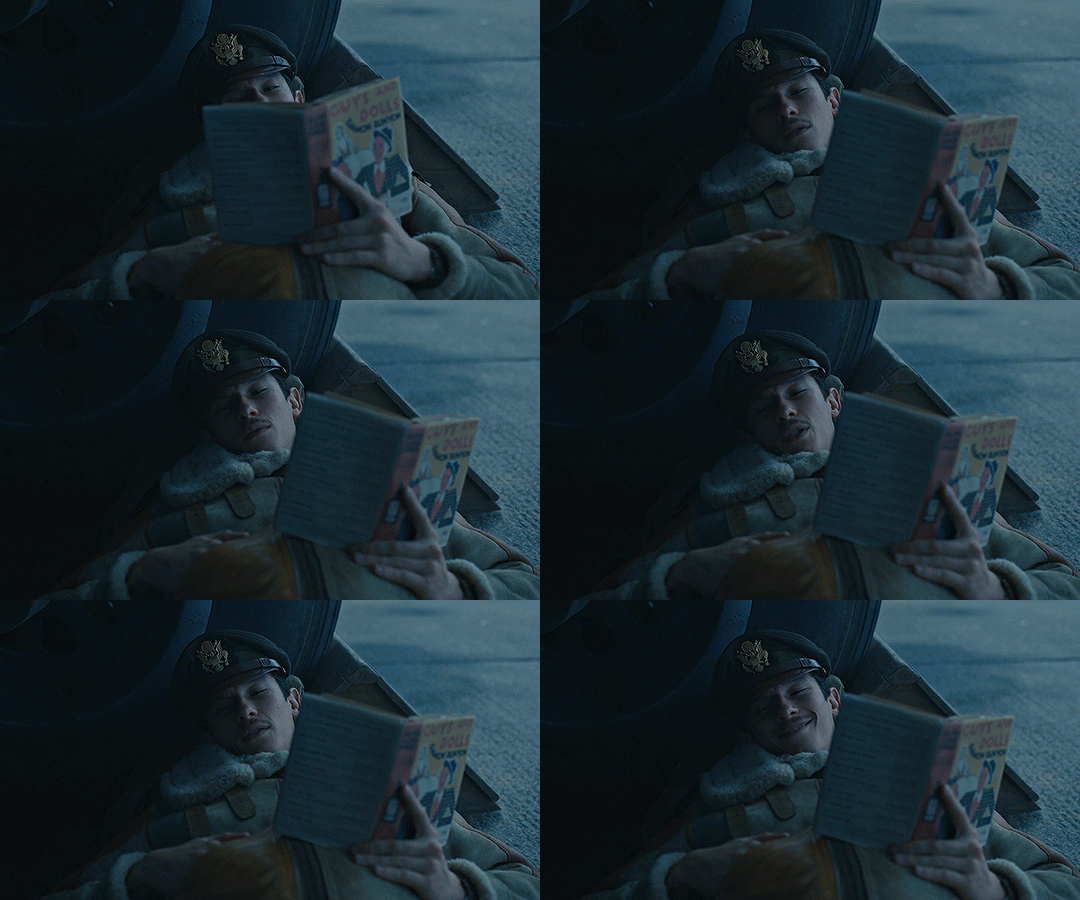
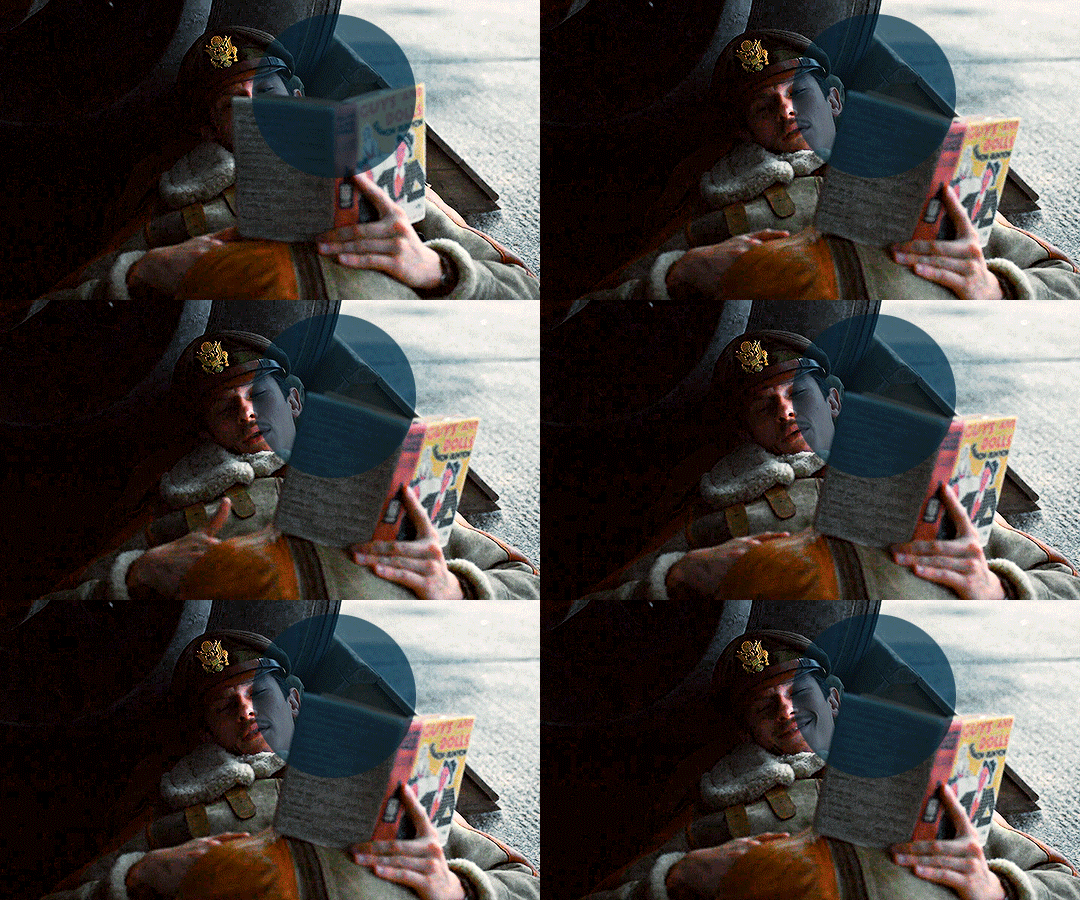
Now I'll use the footage down bellow as it is really blue tinted and I worked with it for this gifset (MoTA SPOILERS AHEAD!!!!!!!!!) so it looks like this
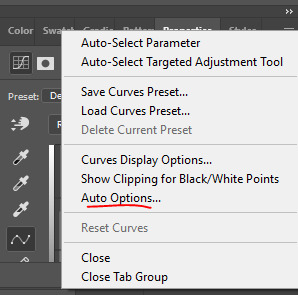
3. So the first thing I do is work with curse as it gives me a better grasp of what I have and how do I want to go with it. I have been using this method where you go to Curves >> Click on the top right menu >> Auto Options
4. Now a new window thing will open up and then I click on the option Find Dark and Light Colors, as you can see my gif already looks a lot brighter and now so tinted
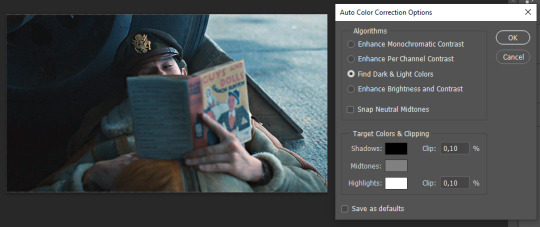
5. this is how my gif looks like I selected that option
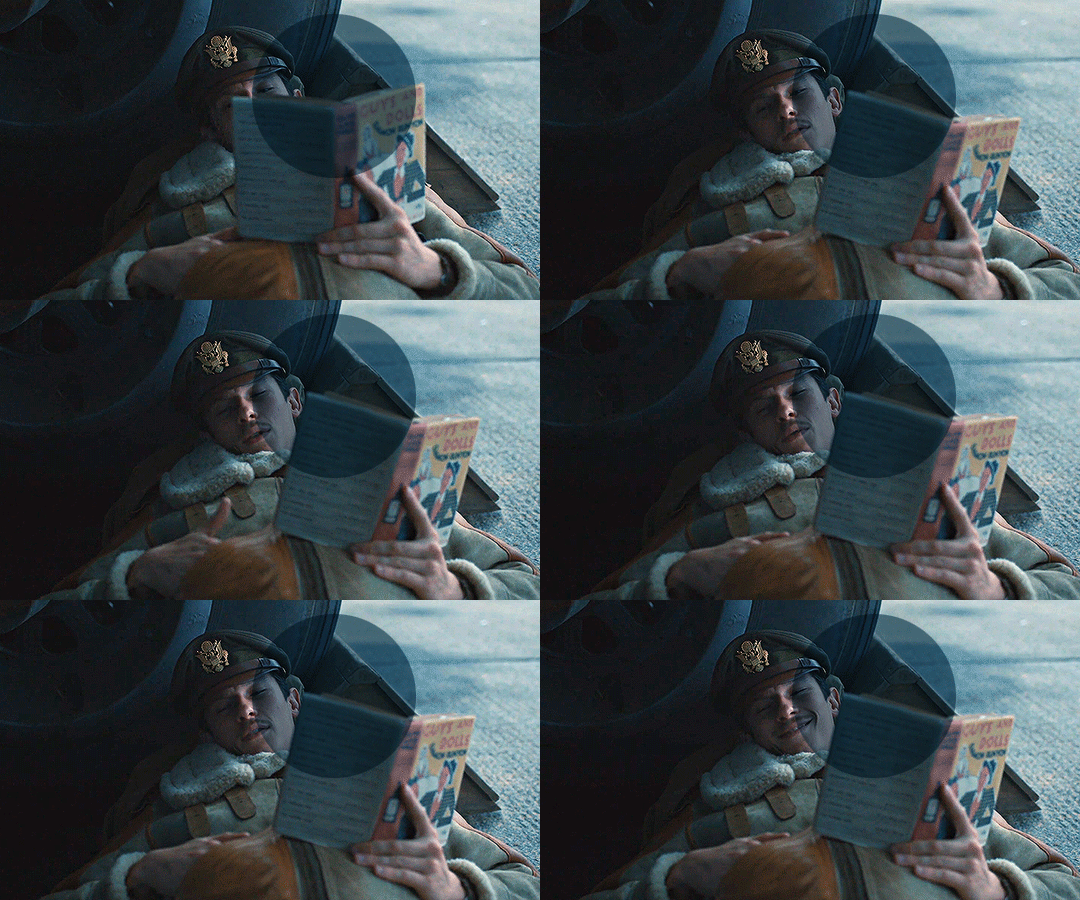
6. still does look a little blue-ish doesn't it? Okay so now I'll go to some adjustment layers, the first thing I do is work with hue/saturation. I'll go to the cyans and blues first and I want to remove some of the blue tint of my scene. I prefer to decrease the saturation of those colors so it looks a bit like this
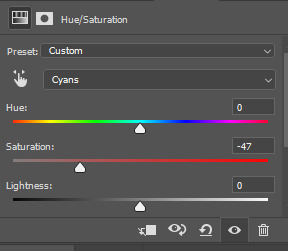
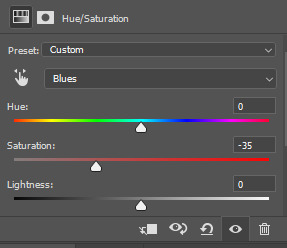
and my gif looks like this
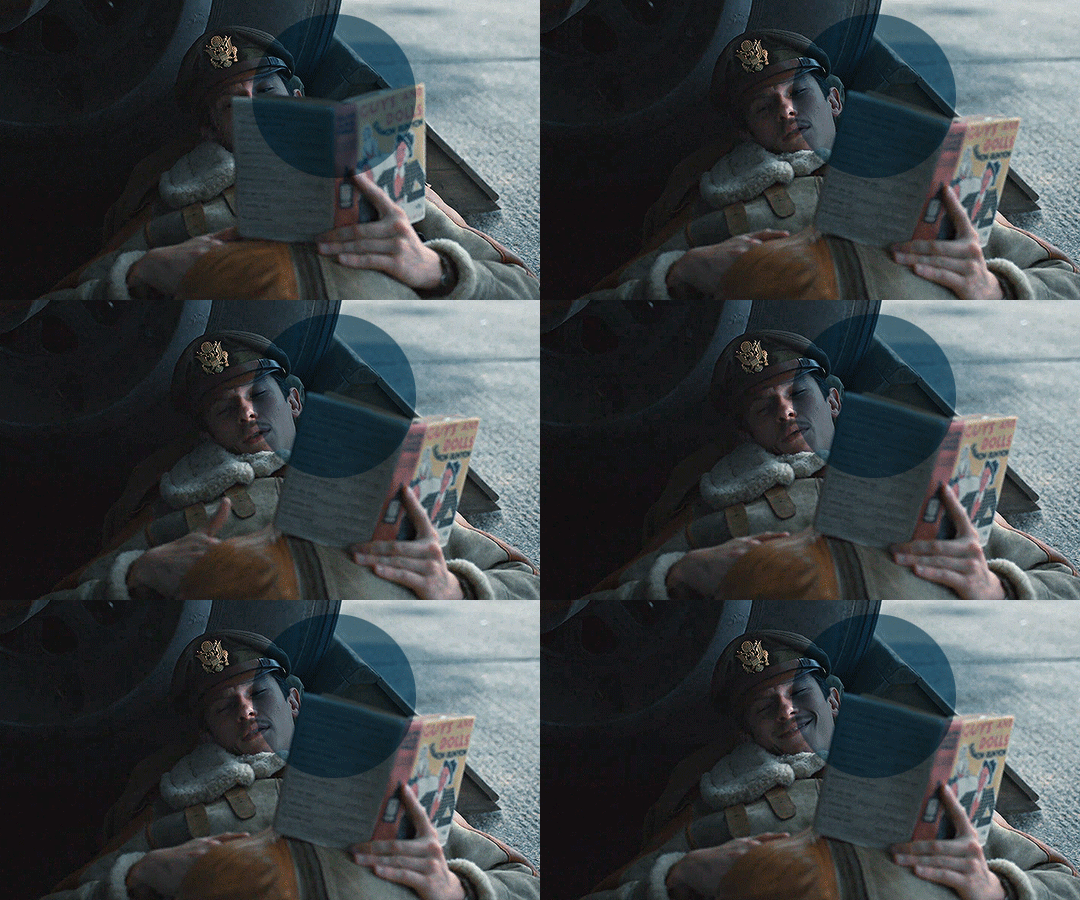
7. So here is our first problem, while I took away the blues my gif now looks a little dull as the scene was delivered to us in such a different color scheme, It wasn't supposed to look like this so now we need to color correct!! For this I work my way around vibrance/saturation so my menu looks like this
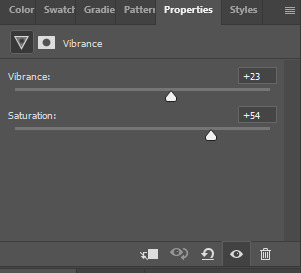
And my gif looks like this
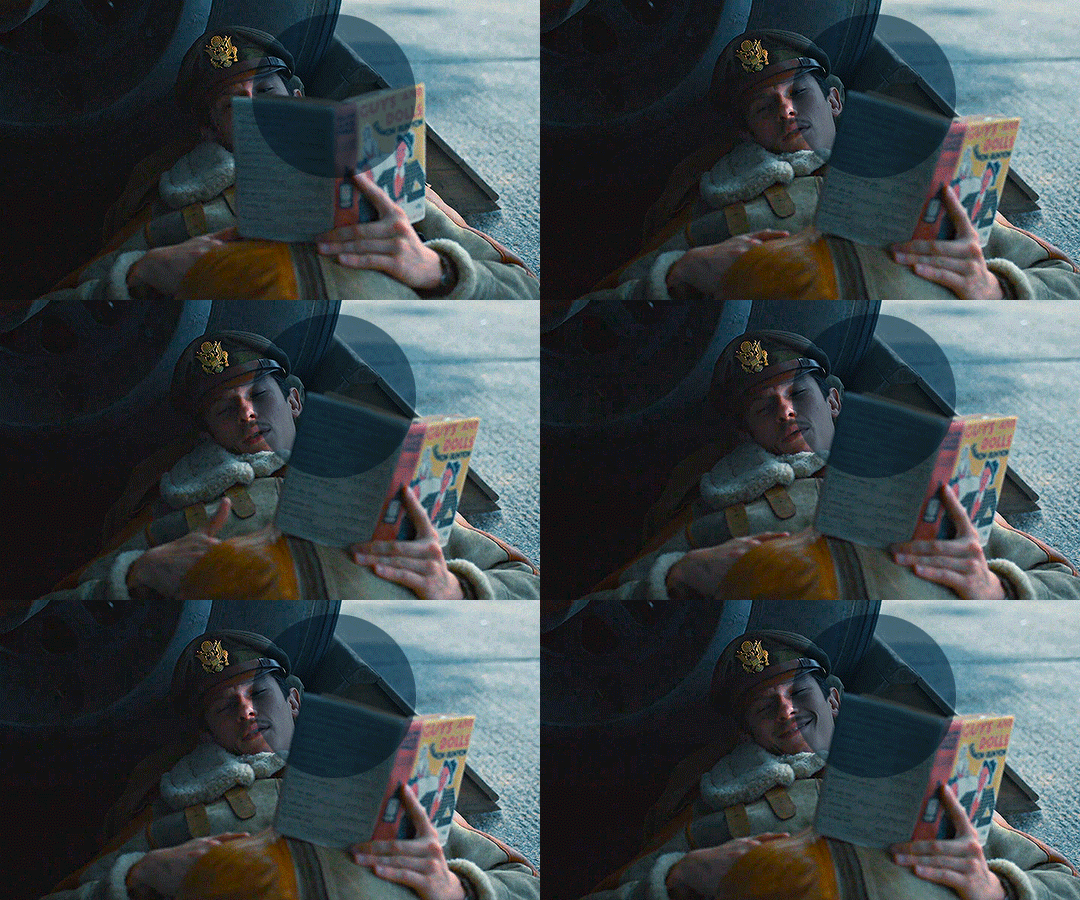
8. Problem #2 because now it looks too blue tinted AGAIN! so I just repeat step 6 again so my menus look like this
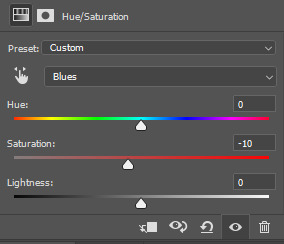
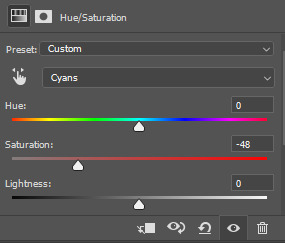
and my gif looks like this
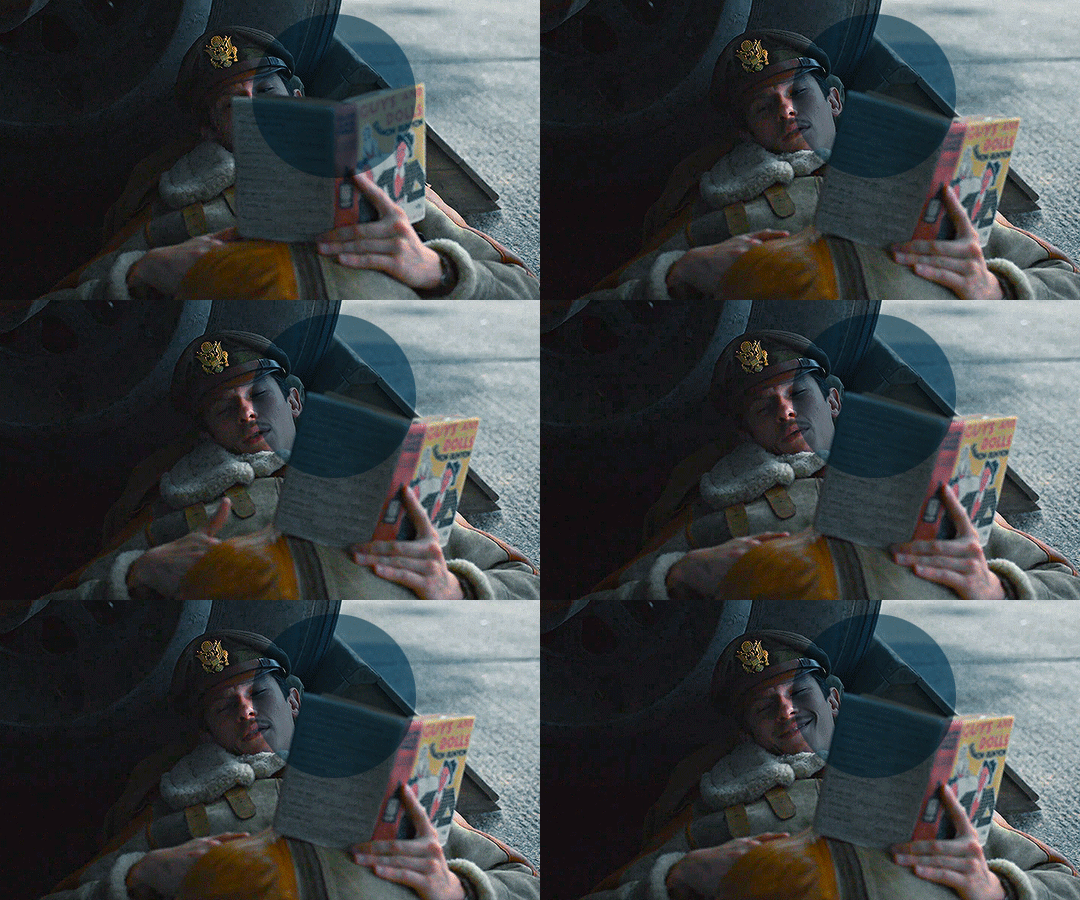
9. from now on it's only about some details such as correct the brightness/contrast of the scene and I personally like to use the color balance adjustment layer, I'll leave it all here
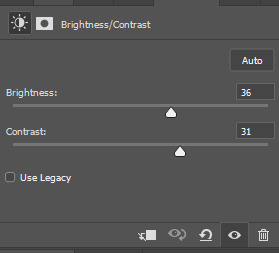
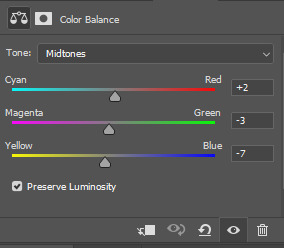
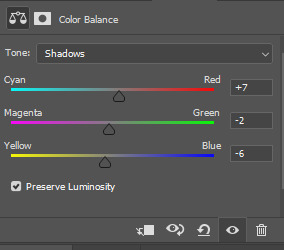
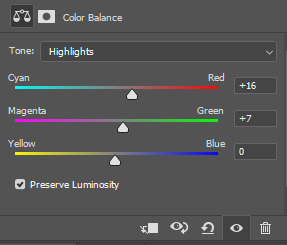
10. finally one of my fav adjustment layers -> SELECTIVE COLOR i just mess around until it looks nice to me, I'll leave the configs I used down bellow
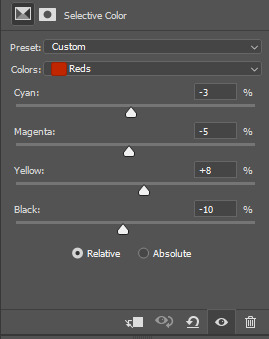
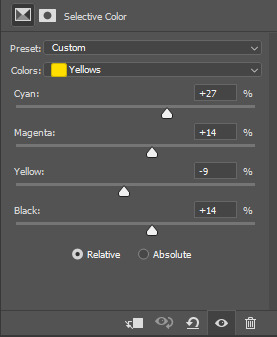
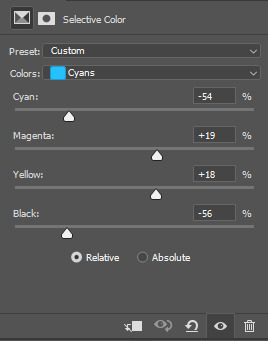
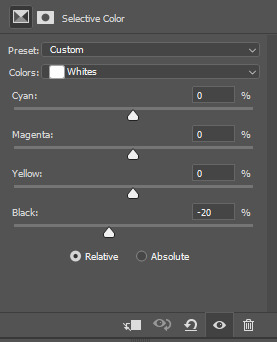
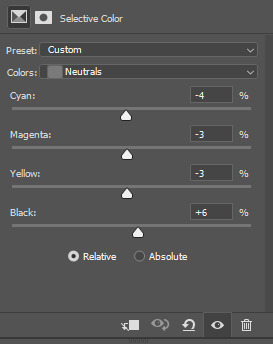
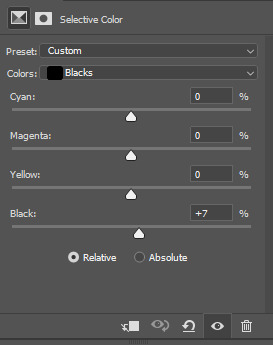
Finally after all those steps my gif looks like this
#asks#anon#s: resources#requests#coloring tutorial#usergif#allresources#chaoticresources#gif tutorials#gif tutorial#psd tutorial#completeresources
216 notes
·
View notes
Text
𓈒༷♪˚.✧ How to make a mockup like this for smaus, ocs, etc. (step-by-step tutorial ☆ no Photoshop, easy, free) (requested by @lovebittenbyevans) ✿
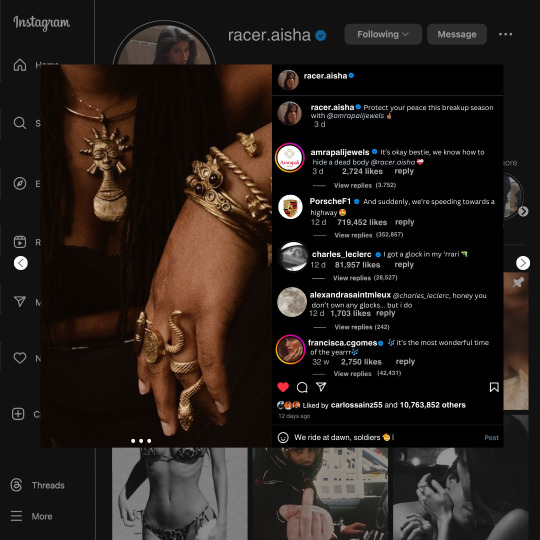
guys this took me two hours to make and you could probably get this done in like, 30 minutes :) I hope this is coherent <3 Please look back this image for comparisons, if my explanation is not well explained, etc.
first of all, if you dont already have one, make a free canva acount. once you're signed in, hit the purple "create design" button on the sidebar. A pop-up will appear with different design template options. For this design, we want the dimentions to be 1080 x 1080, so you can either make a custom size or choose the instagram post (square) template by either searching or scrolling through the list.

2. Now you have a blank page. Zoom in with the slider at the bottom of the page if you need to (Mine is currently zoomed in 41%). Click on the page and change the color to an off black (hex code #111111).
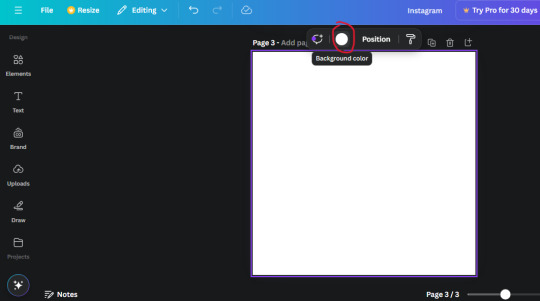
3. Now that the color is changed, click the "elements" tab and search "line". Click the shape and it will add it to the page automatically. These line are particularly hard to navigate and hard to get it at the right angle and length so this part might take a little longer than the rest.
4. stretch it from top to button and turn in a 90 angle so its straight on the left side of the page. Change the color of this as well to a grey tone (hex code #2F2F2F).
5. Now we'll add the Instagram logo. Click the "text" tab then click the purple "add text box" button. Write "Instagram" in the box and change the font to "apricots". This is the closest font I could find that resembled the logo font but if you find a better one, feel free to use that instead. Make the font size 19.3 (you can do this manually or do it in the text options). Change the color to grey color (hex code #707070). Add it to the upper left corner of the page like this:
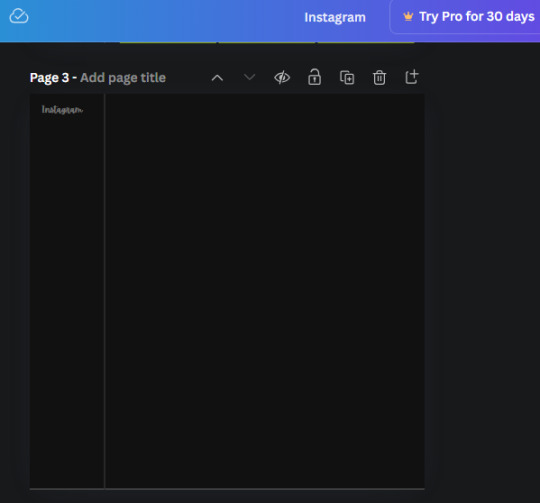
6. now we're adding icons and a menu inside the border we just made. Click the "elements" tab again and search for "instagram home icon" and add the element by sketchify to the page. Click the home icon, an options icon with pop-up above the page. Look for the "Position" button and click it. Scroll to find the advanced options and you can manually type in the width and height at 26.6 and 28.7.
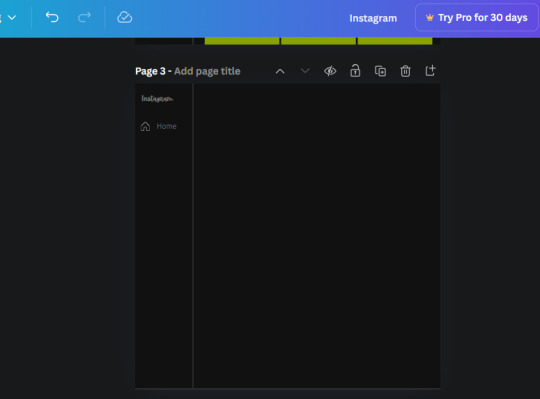
Move it inside the border, under the logo (photo below). Change the color again (the hex code is #707070).
7. Open the text tab and add a text box. Change the font to Canva Sans and write "Home" in the box. Change the font size to 18.1 and align with with the house icon. It will look something like this,
8. Go into the elements tab again and search "instagram search icon". Scroll until you find the one by sketchify and add it to the page.
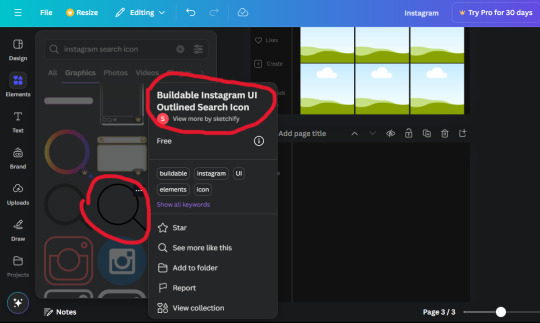
9. Shrink it so the W and H is at 36.6 and 31.3. Move it below the home icon until a purple "67" pop ups and aligns under it. Change it to the same color as the Home text and icon (#707070). Go ahead and Duplicate the the "Home" text box and clicking it and a pop-up will show up then edit the text so it says "Search" and align with the searcch icon we just added.
10. You know the drill. We are continuing to search up more icons in the "elements" tab. Search "instagram compass icon" and choose the one by sketchify (are u seeing the pattern?). Add it to the page and change the width and heigth to 33.1. align it under the search icon just like how we did before and change it to the say colors as the other icons.
11. Do the same as before and write "Explore" in a text box and align it with the icon. We're doing the same thing for all of these.
We'll be using the same search prompt for all of these icons so just change the type of icon you're looking for like we've done before hand. Next look for the Instagram reel icon and add the outlined one by sketchify and change the W and H to 31.2 x 30.9. Change the color to the ones we've used before, align it underneath the icons above and add your text ("Reels").
12. The next icon is an outlined, "sent" one. W and H is 31.1 x 27. The text will say "Send". Then an heart outline by sketchify; W and H is 34.2 x 29.1 and the text is "Likes". Next is the "create" outline icon by sketchify, W and H is 36.8.
(p.s if you are struggling to align the icons and text correctly, shoot me a message and I'll send you the X and Y positions ;D)
If you followed it through, it should look like this,
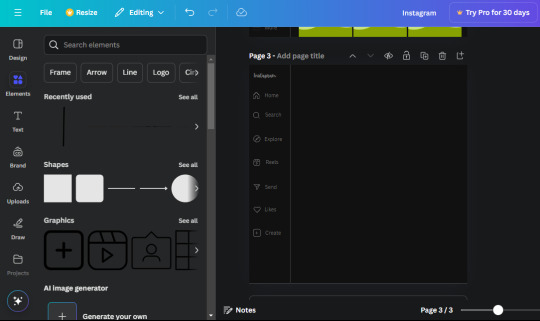
13. Now onto step 13, we'll be adding the Threads logo. You don't have to add this but to make it look more like the actual website, I will be adding it. Open the "text" tab and add a text box. Write an "@" symbol in the box and change the font to Nanum Sqaure and the size to 24.9. Add in the bottom corner below all the icons we just added to our page. We need another text box now (Color is still #707070), write "Threads" and align it to the "@" symbol.
14. We're adding another icon now. Search "Instagram menu icon" and find a wireframe menu icon by sketchify. the W and H are 42.5 x 24.6. Add a text box that says "More". It will look like this:
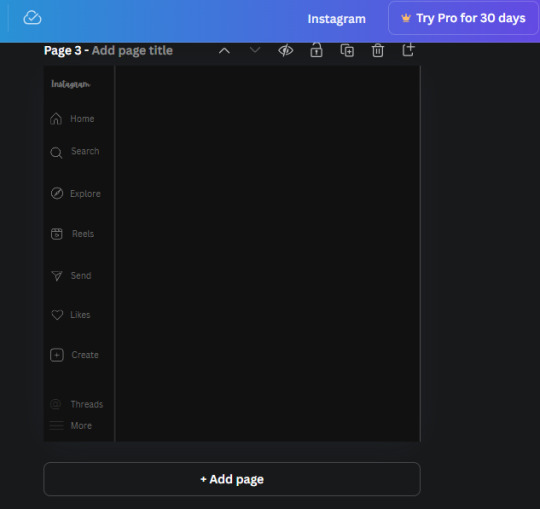
We are a quarter way done now :D
15. Search in the elements tab "circle frame" and look for the one with a little border around it.
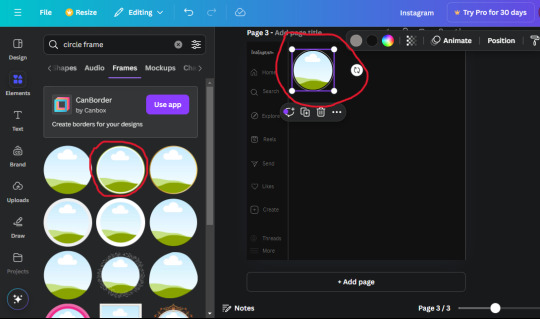
At first, the circle will be green and inside the circle will be white. Change the white to color of the background of the page (hex code #111111) then change the green to a grey color (#8D8986).
16. Add a new text box, change the font to Canva Sans and the size to 22.8 and the color is white. I just wrote "user.name" in the box. the W and H will be 153.3 x 35.7.
Enter the "elements" tab and search for a blue checkmark and find the icon by Victor Aguiar. The W and H is 28.1 by 28.
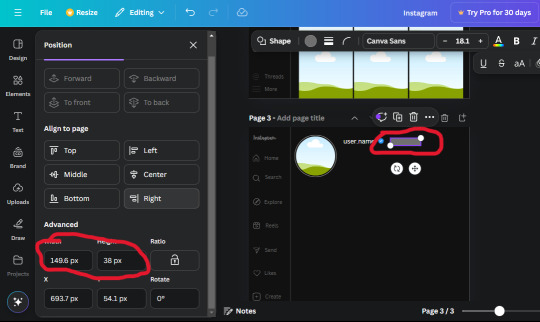
17. Search in the search box for a rectangular shape and add it to the page. Place it next to your username and checkmark icon and make the W and H to 149.6 x 38. Add another and place it next to the other rectangle shape. the W x H is 111.4 x 36.7.
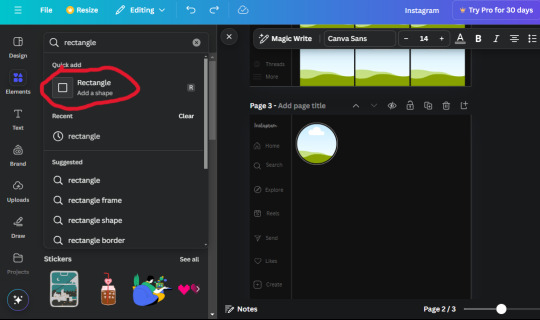
Change the color of both boxes to #2F2F2F. Add a text box and write "following" then change the W and H to 82.6 x 21.8 and fit it inside the first box. Add a second text box and write "message" in it then change the W and H to 77.8 x 21.8. Change both text colors to #7A7A7A

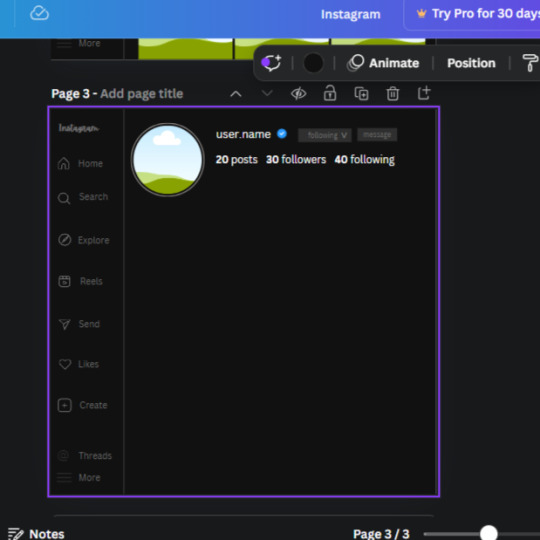
18. Add another text box. Write "<" and turn it upside down and place it beside the "following" text inside the rectangle. Adjust the size as you need to. I also like the round the corners to around 8 so its not so pointy and square.
19. Add 3 new text boxes. Write the amount of posts, the amount of accounts you're following and the amount of followers your have. Write "20 posts", "30 following" "40 followers". Bold the numbers and change the text W and H to 116.4 x 32.7. These are just place holders that I use.
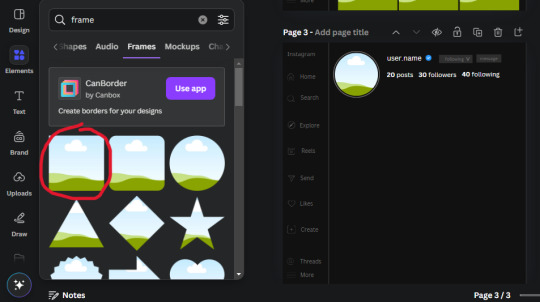
20. Open the "elements" tab again and search "frame". Choose the first one.
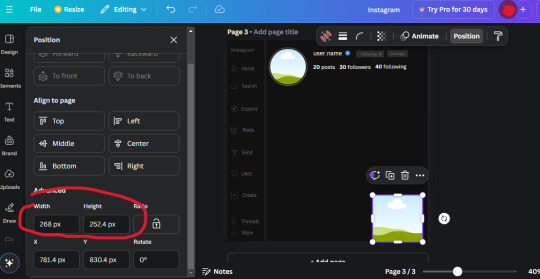
We want the height and width to be 268 x 252.4. Place it at the bottom of the page but we want some space between the frame and the page.
Now we'll duplicate the frame we just placed (the icon between the comment and trash can on the pop up above the frame). Place it next to the previous frame but we want to leave a bit of space between them like this:
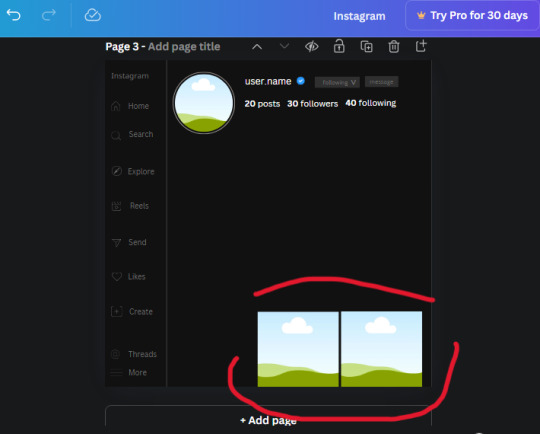
If its a little wonky, don't worry. You can always adjust it so it looks right.
Duplicate the frame again and place it next the second frame you just placed, same distance between. Make sure they're even. Now we have a row.
Select all three frames and duplicate them. Move them above our original frames but leave a little space between them.
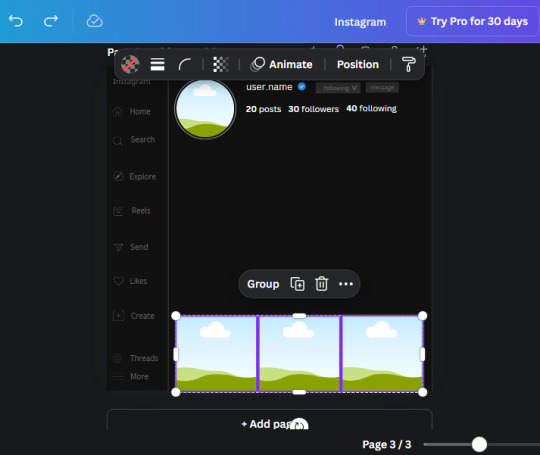
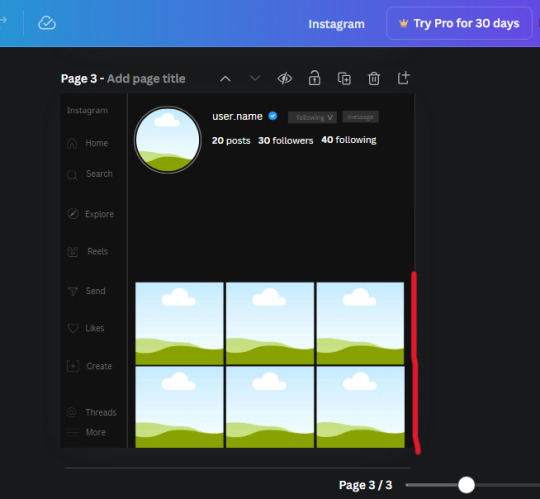
Again, if they're uneven, adjust them as you need to.
21. Select the line again from the elements tab. Stretch starting from the top frame to the last frame and make the color grey (#2F2F2F).
Because the line is stupid hard to navigate, use something like a text box to mark where you want it to end like this:


Delete the text box and the line with be where we want it.
22. On to the highlight reels. Seach for "add button" and find the one by Barudak Lier.
Change the heigh and width to 81.1 and move it above the border.
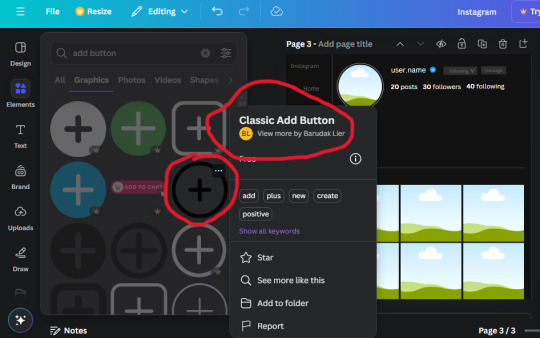
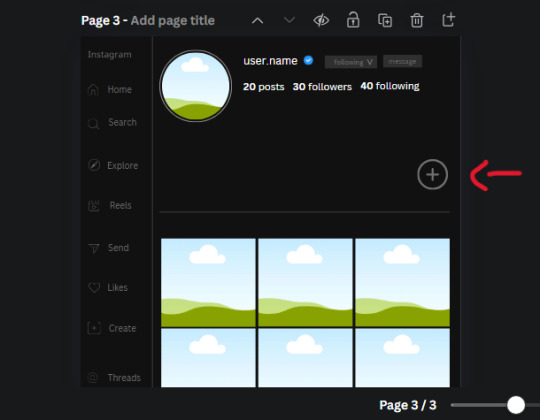
Search for circle frames now and add this one to the page (The same one we used for the pfp), change the width and height to 85.4 and move it next to the add button. Since this is a generic, blank template, I add about 4 of these highlight frames but you can do however many you want. You can change the border color to a gradient or leave it grey.
Add a text box now. The font will be Canva Sans, the size will be 18.1 and the color will be white. Change the text to "Add" and place it under our add button. Make more of these text boxes to place under the circle frames. Depending on which frame its under, write "Highlight 1", "Highlight 2", etc. etc. or you can give them different names and such.
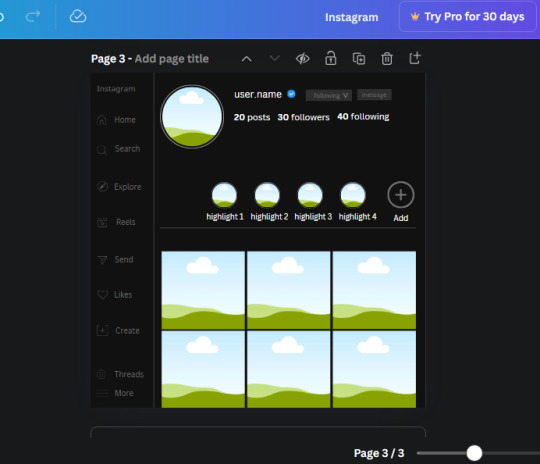
23. Add another text box, write "name" and bold it, change the size to 19.1 and the W and H to 69.2 x 28.8. The font will be Canva Sans and the color will be white. It will go under the amount of posts, followings and followers.
Add another box. The font is Canva Sans, font size to 20.1, the W and H is 40.8 x 31.3 and the color is white as well. This is our "bio". Place it under "name".
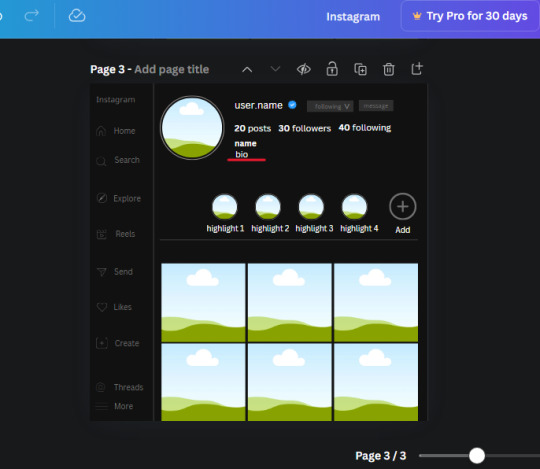
Yay!🎉🎉🎉 You're halfway done!
24. Search for a shape in the elements. Look for the rectangle again and add it. Change the width and height to 460 x 760.4 and the color to an off black/grey color (#191919), placing it like this:
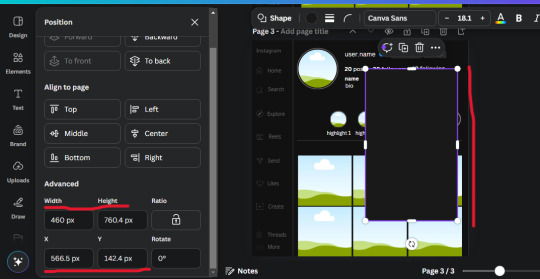
Get the same kind of square frame we used before to make the profile grid and make it the same size as the rectangle we just added. Place right up against the rectangle like it's its other half. Add another line like before and span across the upper half of the black rectangle as a border then add a circle frame inside the border.
Add a text box, "user.name" and align it with the frame. The text is white and the W and H is 111.5 x 25.9
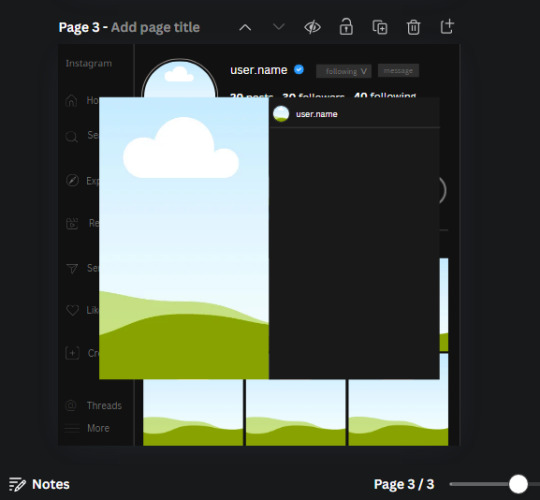
25. Add more circle frame along the inside of the rectangle to resemble the comment section. Make sure the W and H of the frames are 46.1.
Add more text boxes that align with the frames you just made and write "username" again and bold them. Add even more text boxes that align with the usernames and write "comment". These are place holders for when you decide to use this template.
Add another rectangle on the lower part of the rectangle and make the color black. and search for "instagram heart icon", "instagram comment icon" and "instagram send icon". Make sure the lines are thick. Find the heart icon by sketchify, and the the comment and send icon are by Mirazz Creations. Make the lines white and make sure the W and H are the following:
Heart icon: 38.7 x 32.9
Comment icon: 35.2 x 35. 8
Send icon: 35 x 32
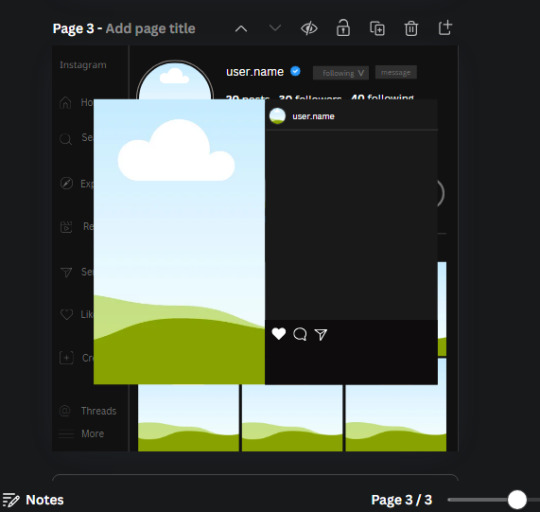
Next, look for "instagram bookmark icon" and find the one by Adricreative. Change the color to white and the W and H to 29.7 x 40.2. Move it to the other end of the rectangle.
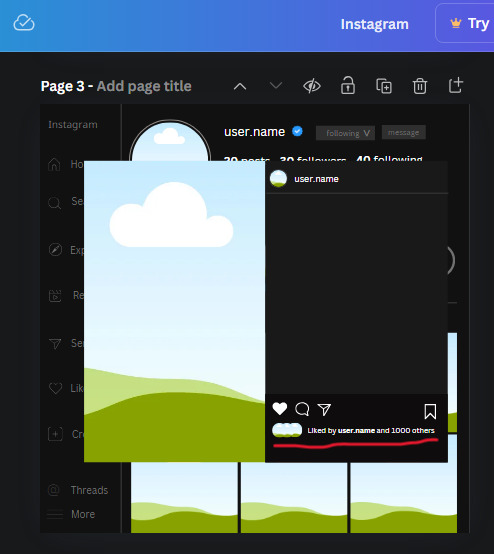
26. Now add three circles frames and change the W and H to 37.2. Move them below the heart icon and have them overlap each other some. Then, add a text box and write "liked by username and 1000 others". Change the font size to 13.6 and change the font to Canva sans. the color will be white. Align this with the three overlapped frames.
27. Look in the elements tab for an emoji icon and choose the one by Soni Soukell from Noun Project. The W and H will be 32.8 and the color is white.
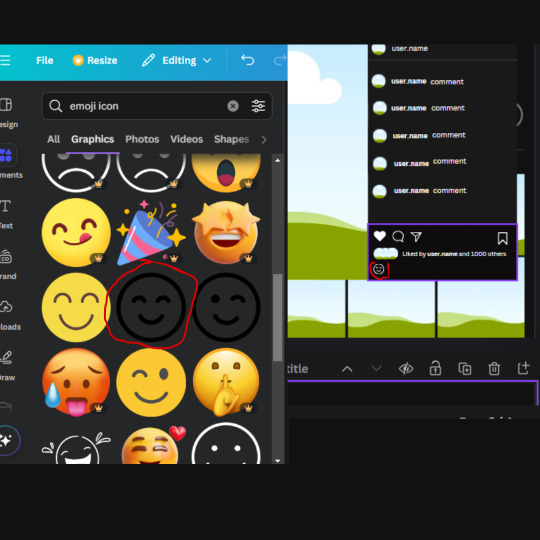
Now add a another text box and write "Write a comment". The color will be white, the font size will be 14.2 and align with the emoji icon you just placed.
Search for "next arrow button" by Pixeden and make the W and H 42.8 then add it to both sides of the post.
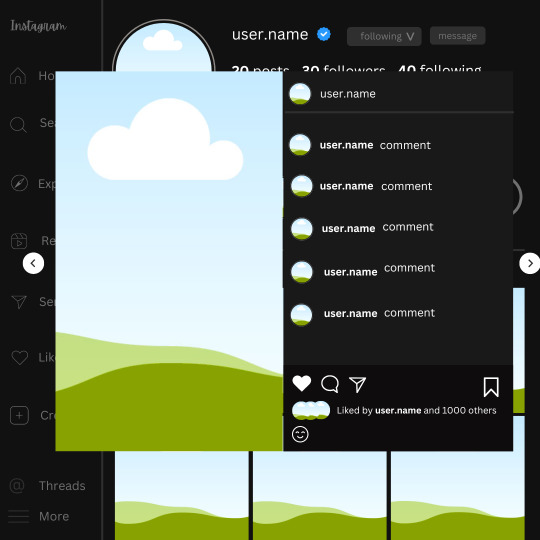
And you're all done with your template! All that is left to do is fill it but before doing that, duplicate the page so you always have an extra blank mockup if you want to use it again.
To fill the frames, upload an image (or use a Canva stock photo), drag and hover it over the frame and it will fill the frame.
Hope this was helpful and you you successfully made one :D <3
#requests#text#smau#template#mockup#moodboard#instagram#instagram moodboard#instagram mockup#graphic design#canva#psd#free tutorial#tutorial#instagram au#social media au#free psd#photoshop#resources#fanfiction resources#graphic design resources#graphic design tutorial#psd tutorial#photoshop tutorial#au#au ideas#mockups#digital design#digital design tutorial
115 notes
·
View notes
Text


macne nana tumblr layout . . . ❜❜
requested by anon ! ☆
like/reblog if using, credit preferred
#editblr#! request tag#my edit#edit by me#vocaloid icons#vocaloid#macne nana#nana macne#macne nana icons#tumblr pfps#tumblr layouts#tumblr icons#tumblr themes#aesthetic icons#aesthetic edit#icons with psd#psd edit
47 notes
·
View notes