#plus more as needed •Chopped fresh parsley leaves for garnish
Explore tagged Tumblr posts
Visit Tumblr Blog
Explore Tumblr blogs with no restrictions, modern design and the best experience.
Last Seen Tumblr Blogs


Fun Fact
Tumblr.com rank in the US is 25.
Quote
• 2 cups drained well-cooked or canned chickpeas, liquid reserved • 1/2 cup tahini (sesame paste), optional, with some of its oil •1/4 cup extra-virgin olive oil, plus Oil for drizzling •2 cloves garlic, peeled, or to taste •Salt and freshly ground black pepper to taste •1 tablespoon ground cumin or paprika, or to taste, plus a sprinkling for garnish •Juice of 1 lemon, plus more as anyone who's ever gotten their hand stuck in one second.
age-empres
#QUOTE#DAY 1#Serve#drizzled with the olive oil and sprinkled with a bit more cumin or paprika#or to taste#plus a sprinkling for garnish •Juice of 1 lemon#Plus more as needed •Chopped fresh parsley leaves for garnish •Juice of 1 lemon#plus more as needed •Chopped fresh parsley leaves for garnish
4 notes
·
View notes
Text

Coq au Vin
Ingredients
3 pounds bone-in, skin-on chicken legs, thighs, drumsticks, or a combination
3 teaspoons kosher salt, divided, plus more as needed
1/2 teaspoon freshly ground black pepper, plus more as needed
4 ounces thick-cut bacon or pancetta, cut into 1/4-inch-wide pieces (about 1 cup)
1 large yellow onion, diced (about 2 cups)
2 large carrots, peeled and diced (about 1 1/2 cups)
3 cloves garlic, minced
1 tablespoon tomato paste
2 dried bay leaves
1 teaspoon dried thyme
1 1/2 tablespoons all-purpose flour
1/4 cup Cognac or brandy
2 cups dry red wine, preferably Burgundy or Pinot Noir
1 cup low-sodium chicken broth
3 tablespoons unsalted butter
8 ounces cremini or baby bella mushrooms, quartered (about 3 cups)
8 ounces fresh or frozen pearl onions, peeled if fresh (do not thaw frozen, about 2 cups)
Chopped fresh parsley leaves, for garnish (optional)
Instructions
Pat 3 pounds bone-in, skin-on chicken pieces dry with paper towels and season all over with 2 teaspoons of the kosher salt and 1/2 teaspoon black pepper.
Cook 4 ounces chopped thick-cut bacon in a Dutch oven or heavy-bottomed pot over medium heat, stirring occasionally, until the fat is rendered and the bacon is browned, 6 to 8 minutes. Transfer to a plate with a slotted spoon.
Increase the heat to medium-high. Working in 2 batches, add the chicken skin-side down to the pot in a single layer. Sear until the skin is crisp, golden-brown, and releases easily from the pan, then flip and sear the second side, 3 to 4 minutes per side. Transfer the chicken to a large plate or baking sheet; it will not be cooked through.
Reduce the heat to medium. Add 1 diced large yellow onion, 2 peeled and diced large carrots, and 1/2 teaspoon of the kosher salt. Cook, stirring occasionally, until the onion is softened, about 5 minutes. Stir in 3 minced garlic cloves, 1 tablespoon tomato paste, 2 dried bay leaves, and 1 teaspoon dried thyme. Cook until the tomato paste is fragrant and darker in color, about 2 minutes. Stir in 1 1/2 tablespoons all-purpose flour and cook for 1 minute to remove the floury taste.
Add 1/4 cup Cognac and cook until evaporated, about 30 seconds. Add 2 cups dry red wine and 1 cup low-sodium chicken broth, and scrape any browned bits from the bottom of the pot. Bring to a simmer. Reduce the heat to maintain a gentle simmer.
Return the chicken to the pot skin-side up so that it is mostly submerged (some overlapping is OK); pour in any accumulated juices from the plate. Cover and simmer until the chicken is very tender, about 30 minutes. Meanwhile, melt 3 tablespoons unsalted butter in a large skillet over medium heat. Add 8 ounces quartered cremini mushrooms, 8 ounces pearl onions, and the remaining 1/2 teaspoon kosher salt. Cook, stirring occasionally, until tender and lightly browned all over, 10 to 12 minutes. Turn off the heat.
Add the reserved bacon, mushrooms, and onions to the pot and stir to combine. Cook uncovered for 10 minutes to let the flavors meld.
Remove and discard the bay leaves. Taste and season with more kosher salt and black pepper as needed. Garnish with chopped fresh parsley leaves if desired.
27 notes
·
View notes
Text
Skillet-Seared Lamb Chops with Crispy Potatoes
The recipe for these outstanding lamb chops and crispy red potatoes appears in the September issue of Food and Wine magazine.
Every so often a photograph of a dish just compels me to try it. Such is the case with this delicious entree we enjoyed last week.
I must admit I did not make the tangy herb labneh dip to accompany it, since I knew my husband would pass on it. However, lamb chops and potatoes are two of his favorite foods so I knew we would both enjoy that.
I will definitely try the labneh dip at some point and make it for dinner guests!
The T-bone-style lamb loin chops are crusted with toasted coriander and cook quickly. After searing on both sides (I used my 12-inch cast iron skillet), they are finished with a buttery rosemary and garlic pan sauce.
The crispy potatoes roast in the oven on a sheet pan while you cook the lamb chops on the stove top.
I served them along with an heirloom tomato salad, simply dressed in red wine vinegar, olive oil, Kosher salt, black pepper , and fresh basil.
Here is the complete recipe...(including the labneh dip)
Skillet -Seared Lamb Chops with Crispy Red Potatoes (Food and Wine Magazine, September, 2023)
1 tablespoon plus 1 teaspoon coriander seeds
4 large garlic cloves, divided
1 cup labneh
1 cup packed fresh flat-leaf parsley leaves (about 1 small bunch)
2 tablespoons water
4 and 1/2 teaspoon kosher salt, divided
1/2 teaspoon grated lemon zest, plus lemon wedges for serving
1 and 3/4 teaspoon black pepper, divided
1 and 1/2 lb baby red potatoes, scrubbed and quartered (about 4 and 1/3 cups)
1/4 cup olive oil, divided
12 (1-inch -thick) lamb loin chops (about 2 and 1/4 lb)
2 tablespoons unsalted butter
4 fresh rosemary sprigs, plus more for garnish
Flaky sea salt, for garnish
Preheat oven to 450 degrees. Heat a small skillet over medium-high. Add coriander:cook, swirling skillet constantly until seeds are fragrant and lightly toasted, 1 to 2 minutes. Remove from heat. Transfer 2 teaspoons toasted coriander to a blender. Transfer remaining 2 teaspoons coriander to a small bowl, and coarsely crush with a wooden spoon.
Finely grate 2 garlic cloves. Add grated garlic, labneh, parsley, 2 tablespoons water, 1 and 1/2 teaspoons kosher salt, lemon zest, and 1/4 teaspoon pepper to coriander in blender. Process until smooth, about 45 seconds, stopping to scrape sides as needed. Transfer mixture to a small bowl. Set aside.
Toss together potatoes, 2 tablespoons oil, 1 teaspoon kosher salt, and 1/2 teaspoon pepper on a large rimmed baking sheet: spread mixture in an even layer. Roast in a preheated oven until golden brown and crispy, about 30 minutes, flipping potatoes after twenty minutes.
Meanwhile, heat remaining 2 tablespoons of oil in a large cast iron skillet over high. Sprinkle lamb evenly on all sides with reserved crushed coriander, remaining 2 teaspoons kosher salt, and remaining 1 teaspoon pepper. Crush remaining 2 garlic cloves using the back of a chef's knife. Set aside. Cook lamb in a single layer in skillet until golden brown on each side and a thermometer inserted in thickest portion of each chop registers 135 degrees F. 6 to 8 minutes total. Add butter, rosemary and crushed garlic to skillet during final 2 minutes of cook time, swirling skillet to melt butter and tilting skillet to spoon mixture over lamb.
Transfer lamb to a platter. Spoon butter mixture over lamb. Garnish with lemon wedges and rosemary. Sprinkle with flaky sea salt. Serve with crispy potatoes and (if using ) labneh mixture.
0 notes
Text

Slow Cooker Corned Beef and Cabbage
Serving: 8
Ingredients
For the corned beef and vegetables
4 pound corned beef brisket
1 corned beef spice packet see Notes
2 tablespoons brown sugar or coconut sugar, or Brown Swerve
1 cup dark beer optional
6 cloves garlic smashed
4 cups water plus more if needed, see Notes
2 pounds small potatoes
6 medium carrots cut into sticks
1 medium head cabbage approximately 2 pounds, cut into wedges
chopped fresh parsley optional, for garnish
For the creamy horseradish sauce (optional)
¾ cup sour cream
2 tablespoons mayonnaise
1 tablespoon horseradish
1 tablespoon red wine vinegar
Freshly cracked black pepper to taste
Directions
For the creamy horseradish sauce
Add all sauce ingredients to small bowl and mix well. Chill sauce until ready to serve.
For the corned beef
Place corned beef brisket in slow cooker. Sprinkle spice packet and brown sugar over top of brisket, then add beer (if desired) and garlic.
Add enough water to cover brisket (see Notes). Secure lid on Crockpot and set to low heat for 8 hours.
For the vegetables
After corned beef has cooked 3 hours, add potatoes and carrots to slow cooker. Secure lid on Crockpot and continue cooking another 4 ½ hours.
After 7 ½ hours of cooking, remove lid and add cabbage wedges to slow cooker. Return lid to slow cooker and continue cooking for final 30 minutes.
To serve
After cooking 8 total hours, remove corned beef brisket from slow cooker and transfer to cutting board.
Thinly slice corned beef, cutting against grain of meat, and serve immediately with potatoes, carrots, cabbage, and creamy horseradish sauce (optional). If desired, garnish with fresh parsley before serving.
Notes
Spice packet: Your corned beef should come with a spice packet. Make sure you’ve got that before leaving the store!
Water: Make sure the brisket is fully covered with water (and beer, if using that) and then add additional water so the waterline sits roughly 1″ above the top of the brisket. It’s important that the corned beef is fully covered so it doesn’t end up tough or chewy.
Make it added-sugar free: Use Brown Swerve in place of the brown sugar.
Substitute horseradish: Because my husband doesn't like horseradish we needed a substitute to give that bite that we were looking for. To do so, we used spicy brown mustard in its place.
Substitute dark beer: We got to the store a little late and all the dark beer had been bought out for St. Patrick's Day. In that case, you can substitute beef broth, chicken broth, mushroom stock, apple juice, apple cider, root beer, or coke.
(Source)
0 notes
Text
Equal parts parsley and mint make a good base for tabbouleh (there are more recipes for tabbouleh than there are Jewish opinions, I will write up what I do if you wish).
Put mint in lamb meatballs, plus lots of garlic, make a lemon tomato sauce for simmering after browning them.
Cut up any good summer melon and toss it in a dressing made of thinned honey (add a little hot water and mix so it becomes more runny, let it cool) plus lots of mint and tajín (that is key, you can dupe it with chili, lime zest, and salt but it’s hard to get the balance right). You can also toss chiffonaded mint in the thinned honey and then coat it in tajín and pop it in a really low oven or dehydrator very briefly and it will turn into the most supreme garnish for fruits but it does not last long
Mint and basil play nice, get a good tomato and some fresh mozzarella and do caprese but alternate mint and basil. Mint pesto can be fairly bitter but I’ve done a good mint and arugula pesto that was like half and half plus almonds instead of pine nuts that as nice, did that with peas and ham on pasta.
It doesn’t always work but you can sub mint for shiso in a variety of East Asian dishes. Mix it with miso, shoyu, and a little sugar to glaze roasted or grilled vegetables like eggplant, mushrooms, or zucchini, or chicken skewers. Pair with umeboshi in onigiri or maki or on something like broiled mackerel. Or go Vietnamese. Make fresh rolls/spring rolls with rice paper, mint, cabbage, lightly pickled carrots and daikon, shrimp and/or bbq pork and/or baked tofu, serve with peanut sauce or fish sauce and lime. Cold vermicelli bowl with mint, lime, fish sauce, chopped peanuts, fried egg, cucumber, additional proteins and veggies of choice.
Limeade is better with mint than lemonade imo. Super fancy technique: wash then thoroughly dry then zest a fuck load of limes and then juice them. Wash then thoroughly dry then slice a fistful of mint leaves. Put the lime zest and mint in a lidded container plus an approximately equal weight of sugar, and mix it up. Seal it and stick it in the fridge at least overnight, giving it a shake every once in a while. The sugar will draw out all the oils and flavors and so-on from the zest and mint and get kind of gloopy, no water added. Measure about an equal amount of water to the lime juice you have in the fridge and heat it up to below boiling, but still a little warm. Put the sugar syrup gloop in a strainer on top of a pitcher and pour the warm water over it, so all the mint gets strained out. Then add the lime juice to the pitcher and however much extra cold water you want to get it to the dilution you like. Mix some more warm water and sugar do dissolve it thoroughly if you need it more sweet. Aim for a bit more concentrated than you want to drink and serve over ice.
at the thing yesterday, the person leading it told everyone present to harvest as much spearmint as we wanted from the community garden because it is doing what mint do, and the goblin within me thrilled at the prospect like a medieval peasant enticed to steal potatoes, but though i am generally a fan of spearmint as a flavor, i do not know of many uses for it, so if anyone has any recipes or anything, lay 'em on me
8 notes
·
View notes
Note
🥧 pie: let’s talk about food in your wip. are there any special recipes or traditional meals? do any of your OCs cook or bake?
Porch Talk || Accepting
Okay, hun, I'm gonna be honest. Beth cannot cook to save her life. It's almost like she has a permanent paradox flaw: kitchen-disaster. She can prep/chop/measure anything one needs like a champ, but once she applies any actual cooking method, whether she follows a recipe exactly or experiments? What comes out is...non edible on the scale of biological hazards. She cannot explain this or understand why it happens. Riley on the other hand, can walk by a Michelin star restaurant, glance at a menu or a dish, and walk away with something as good or better when he finally gets around to making it. He started cooking as a teenager, when Beth's mom left the family, and his dad was pulling duty aboard the USS Mercy. Something he'd snort about if it is ever brought up. Because of his background and growing up where he did, Riley has learned how to make traditional poi, and will sometimes, if Beth is having a hard time, pull out his wooden board and his basalt pestle and pound it by hand, so as to provide her with a 'taste of home'. He can bake, but he prefers cooking. In another life, I imagine he would have been an excellent celebrity chef.
Riley's Irish Stew recipe {{all measurements are US. If you need UK/European measurements, feel free to send me an ask.}}
Ingredients:
1 tablespoon butter 4 slices thick bacon, chopped 1/2 cup all purpose flour {I use King Arthur Unbleached AP} 2 lbs. lamb stew meat or beef chuck roast/stew meat, cut into 1 inch cubes 1 cup Alien stout or dry red wine {actual wine, not the 'cooking wine' they sell in the grocery section. Trust me on this.} 1 tablespoon red wine vinegar 1 tablespoon tomato paste 1 tablespoon minced fresh garlic 1 and 1/2 teaspoons kosher salt 1 teaspoon black pepper {2-3 if using fresh ground} Leaves of 2 sprigs of fresh thyme or 1 teaspoon dried/ground thyme 2 bay leaves 1/2 teaspoon paprika 2 1/2 cups beef broth or stock, plus more as needed 3 large onions, red or white, chopped 4 large carrots, peeled and chopped 2 lbs new potatoes, quartered, or use russets that have been peeled and large diced 2 tablespoons chopped fresh parsley, plus extra for garnish ~*~ Instructions:
In a large oven-safe pot or Dutch oven, sauté bacon in butter over medium heat until crisp and browned (about 3-5 minutes). Remove bacon with a slotted spoon and set aside. Pat lamb (or beef) dry with a paper towel. Place the flour in a bowl or large Ziploc bag and season with about ½ teaspoon of kosher salt and ½ teaspoon of pepper. Add the meat and toss to coat well. Remove coated meat from the bowl and discard any extra flour. Sear meat in the butter/bacon fat until browned on all sides (about 5 minutes). Depending on the size of your pot, you may need to work in batches so that the meat can brown without overcrowding. Remove the meat from the pot and add the stout (or wine) and vinegar. Cook over medium-high heat, scraping the pan with a wooden spoon to loosen any browned bits. The browned bits and residue is called fond and it is beautiful. Add bacon and meat back to the pot, along with the tomato paste, garlic, remaining 1 teaspoon of kosher salt, remaining ½ teaspoon of pepper, thyme, bay leaf, paprika, and broth. Stir really well to completely combine. Bring to a boil; then reduce to a low simmer. Cover and cook, stirring occasionally, until the meat is tender, about 1 ½ hours. Add the onions and carrots and simmer, covered, for 20 minutes. Add the potatoes and simmer until vegetables are tender, about 30 minutes more. Add more broth at the end to thin the stew, if necessary. Discard bay leaf; stir in parsley, and season with salt and pepper, to taste. Ladle into bowls and serve with crusty bread fresh from the oven or you know, the cupboard you keep your regular bread in. Remember Turtle loves you. Garnish with additional fresh parsley, if desired.
Notes: If you don't have Alien stout, I mean...Guinness could work. It will only kill my soul but you do you, bunny. You can add mushrooms if you like but really why not ask me for my burgundy wine mushrooms instead?
6 notes
·
View notes
Photo

Recipe: Easy, Creamy Lemon Garlic Skillet Chicken
This recipe basically makes itself.
The Kitchn Sheela Prakash
Before I dive into how obsessed I am with this recipe, I have a quick PSA: When you’re shopping for the ingredients, go ahead and grab some rice or crusty bread. There’s a whole lot of velvety sauce going on here, and trust me when I say you’ll want to mop up every last drop
This rich and creamy skillet dinner is just the kind of thing I want to eat on cold winter nights. The chicken breasts simmer in a pan of lemon garlic goodness, and taste like they were made at your favorite neighborhood Italian restaurant. Because the recipe comes together so quickly — less than 30 minutes — you can turn to it over and over again, no matter how busy life gets.
A Saucy Chicken Dinner in Minutes
This recipe basically makes itself, leaving you time to pull together an easy side. Since there’s lots of sauce that deserves to be soaked up, we love serving the chicken over rice, orzo, or mashed potatoes, or with a side of crusty bread. A simple leafy greens salad or steamed green beans are also nice additions to round out the meal.
I’ve given you two options for richness here. If you prefer your dinner on the lighter side, opt for milk instead of half-and-half. If you’re down to make this chicken dinner a bit more luxe and special, go ahead and reach for that half-and-half.
Lemon Garlic Chicken
Yield: Serves 4
Prep Time: 5 minutes
Cook Time: 18 minutes to 21 minutes
Ingredients
4 boneless, skinless chicken breasts (about 2 pounds total), pounded to 1/2-inch thickness
1/2 teaspoon kosher salt, plus more for seasoning
1/4 teaspoon freshly ground black pepper, plus more for seasoning
1 tablespoon olive oil
3 tablespoons unsalted butter
1 small shallot, finely chopped
4 cloves garlic, minced
2 tablespoons all-purpose flour
1 cup half-and-half or whole milk
1/2 cup low-sodium chicken broth
Juice of 1 medium lemon (about 3 tablespoons)
2 tablespoons chopped fresh parsley leaves
1 small lemon, thinly sliced
Instructions
Thoroughly dry the chicken with paper towels. Generously season all over with salt and pepper.
Heat the oil in a 10-inch or larger skillet over medium-high until shimmering. Working in batches if needed, add the chicken and sear until deeply browned on the bottom, 6 to 7 minutes. Flip with tongs and sear the other side until browned, 6 to 7 minutes. Transfer the chicken to a plate; set aside.
Reduce the heat to medium and add the butter. When melted, add the shallot, garlic, 1/2 teaspoon salt, and 1/4 teaspoon pepper and cook, stirring occasionally, until just starting to soften, about 1 minute. Add the flour, stir to evenly coat the shallots and garlic, and cook for 1 minute more.
Stir in the half-and-half or milk and broth until no lumps from the flour remain, making sure to scrape up any browned bits from the bottom of the pan. Bring to a boil. Reduce the heat to a simmer. Return the chicken to the pan and simmer until the sauce is thickened enough that it coats the back of a spoon and the chicken is cooked through, 3 to 4 minutes. Stir the lemon juice into the sauce. Garnish with the parsley and lemon slices and serve immediately.
Storage: Leftovers will keep in an airtight container in the refrigerator for up to 3 days.
Sheela Prakash received her master's degree from the University of Gastronomic Sciences in Italy and is also a Registered Dietitian. She is the author of “Mediterranean Every Day.”
https://getpocket.com/explore/item/recipe-easy-creamy-lemon-garlic-skillet-chicken?utm_source=pocket-newtab
More from The Kitchn
Spanish-Style Chicken and Rice Skillet
Recipe: Blueberry Pancake Casserole
Recipe: Smoky Sweet Potato & Black Bean Casserole
More Stories from Pocket
From Ketchup to Pineapples: The Food That Should Never Be Kept in a Fridge
The Only Texas Chili Recipe You’ll Ever Need
The Trick to Growing Your Own Avocado Plant
How to Make Breakfast Like the French, According to a Chef
How to Eat Like a Nutritionist (And Never Feel Like You’re On a Diet)
9 notes
·
View notes
Photo

Lablabi (Tunisian Chickpea Soup)
4 servings, 2-2/12 hours plus overnight soaking
There are myriad ways to cook lablabi, the classic, cumin and garlic scented chickpea soup from Tunisia. This version, adapted from Joe Yonan’s cookbook “Cool Beans” (Ten Speed Press, 2020), has crunchy, spice-sprinkled chickpeas garnishing the top, and a creamy, silky broth made from puréeing some of the chickpeas and stirring them back into the pot. It’s earthy and satisfying, with a chile kick from harissa and a bright tanginess from a squeeze of lemon at the end.
Ingredients
For the Crispy Chickpeas:
1 ¾ cup cooked chickpeas (or 15-oz can), drained & rinsed
2 teaspoons extra-virgin olive oil
½ teaspoon kosher salt, plus more to taste
1 teaspoon za’atar, plus more to taste
For the Soup:
1 ½ cups dried chickpeas, soaked overnight and drained
¼ cup plus 3 tablespoons extra-virgin olive oil, plus more for serving
2 bay leaves
1 ½ teaspoon kosher salt, plus more to taste
½ loaf hearty rustic bread (about 8 ounces)
1 cup chopped onion, from 1 medium onion
6 garlic cloves, minced or finely grated
1 tablespoon ground cumin, plus more for serving
1 tablespoon tomato paste
1 tablespoon harissa paste, plus more for serving
3 tablespoons fresh lemon juice
1 tablespoon finely grated lemon zest, for serving
½ cup chopped flat-leaf parsley, for serving
Preparation
Prepare the crispy chickpeas: Transfer chickpeas to a rimmed baking sheet lined with a clean dish towel or paper towels. Cover with another towel (or paper towels) on top, rubbing gently to dry. Remove top towel and let air-dry for at least 30 minutes and preferably 1 hour.
As chickpeas dry, start preparing the soup: In a Dutch oven or heavy stockpot, combine soaked chickpeas, 5 cups water, 1 tablespoon olive oil, bay leaves and 1/2 teaspoon salt over high heat. Bring to a boil for 2 to 3 minutes, then reduce heat to a simmer, cover and cook until chickpeas are tender, about 1 to 2 hours.
Heat oven to 400 degrees. While chickpeas are cooking, cut bread into thick slices, then tear slices into bite-size pieces. Place bread in one layer on large rimmed baking sheet and toast until crisp and light brown, about 10 minutes. Let cool on pan and set aside.
Finish the crunchy chickpeas: Raise oven temperature to 425 degrees. Remove the towels from baking sheet with the chickpeas, and toss the chickpeas with 2 teaspoons olive oil, 1/2 teaspoon salt and za’atar until well coated. Roast until golden and crispy, about 13 to 18 minutes, tossing halfway through. When chickpeas are still hot, sprinkle lightly more salt. Taste and add more salt or za’atar, or both, if you’d like.
When the chickpeas for the soup are tender, discard bay leaves. Using a slotted spoon, transfer 2 cups of chickpeas, 1/2 cup of chickpea cooking liquid and 1/4 cup olive oil to a blender or food processor, and purée until smooth. (Alternatively, you can use an immersion blender to blitz half the chickpeas into a rough purée. Add the olive oil before puréeing. The broth won’t be as silky as it would be puréed in a regular blender, but it will taste just as good.)
In a large skillet over medium-high, heat the remaining 2 tablespoons oil until shimmering. Add the onion and cook, stirring occasionally, until softened, about 5 minutes. Add garlic and cook until golden, about 2 minutes. Add the remaining 1 teaspoon salt, 1 tablespoon cumin and tomato paste and cook, stirring, until fragrant, 1 minute. Add a splash of the chickpea cooking liquid to the pan, and bring to a simmer to deglaze, scraping up the browned bits on the bottom of the pan. Turn off heat.
Add chickpea purée and onion mixture to soup, along with harissa and lemon juice, and stir well. Add a little water if soup seems too thick, and more salt, if needed.
To serve, divide toasted bread pieces among soup bowls, then ladle in soup. Garnish with lemon zest, parsley, olive oil, more cumin and some of the crispy chickpeas — you’ll have leftovers. Serve hot, with more harissa on the side.
Tip
You can use an electric or stovetop pressure cooker in Step 2 if you like. To do so, cook on high for 35 minutes, and let the pressure release naturally.
3 notes
·
View notes
Quote
How the inside of a Man who sailed before the mast, But seemed like a mate or skipper accustomed to be obeyed or to taste, plus a sprinkling for Garnish •Juice of 1 lemon, plus more as needed to be disposed of in the dead dead dead dead dead Dead dead dead daddio!
#QUOTE#DAY 14#Too much responsibility ?!?!?? I want to Do look more as needed •Chopped fresh parsley leaves for garnish •Juice of 1 lemon#Plus more as needed to be ruthless
3 notes
·
View notes
Text
Recipe: Dutch Oven Chicken and Dumplings
Recipe via Delish (with some changes)

Main Soup Ingredients:
2 tbsp extra virgin olive oil
1/3 sweet onion, chopped
2 medium carrots, peeled and diced
2 stalks celery, chopped
1 tsp dried oregano
Salt (to taste)
Pepper (to taste)
3 cloves garlic, minced
6 cups low-sodium chicken broth (1 carton)
5-6 boneless, skinless chicken thighs
2 boneless, skinless chicken breasts
3 sprigs fresh thyme
1 cup heavy cream
2 bay leaves
Parsley for garnish
Dumplings Ingredients:
1 1/2 cups flour
1 tbsp baking powder
1 1/2 tsp salt
1 large egg
2/3 cup buttermilk
2 tbsp melted butter
Special Note:
In case you missed it in the title- you need a cast iron dutch oven.
Directions:
1. In a large Dutch oven over medium heat, heat oil. Add onion, carrots, and celery.
2. Cook about 5 minutes, until tender.
3. Add oregano, salt, pepper, and garlic. Cook about 1 minute.
4. Add broth, thyme, bay leaves, and chicken to pot. Bring to boil.
5. Reduce heat to medium-low once the pot is boiling. Place lid on pot and set timer for 10 minutes.
6. In a large bowl, whisk together flour, baking powder, and salt. Add egg, buttermilk, and melted butter. Mix until combined, then set aside.
7. When the 10 minute timer goes off, remove chicken from pot and shred with forks. Before adding it back in, remove the thyme and bay leaves from the pot.
8. Add the chicken back in, plus the 1 cup of heavy cream. Cream can make the pot bubble up more, so keep an eye on it and stir occasionally.
9. Using 2 forks or spoons, scoop balls of dough directly into the pot. Stir occasionally as you work. The dough will be sticky- hence the 2nd spoon or fork to help scrape it off.
10. Put lid back on and cook on medium-low for 5-6 minutes. Sample a dumpling to make sure they are done.
11. (Optional) Garnish with parsley before serving.
124 notes
·
View notes
Text
Spinach & Gruyère Potato Casserole
Chef’s Note: I really like how this turned out. Very herbaceous, and I think the effort was well spent.
Original recipe [link]
Ingredients
1.25 lbs (~ 4) red potatoes (skin on), cut into 1-in. chunks
2 tbsp olive oil
4 eggs
1/4 cup half-and-half {{can be made by combining 2 tbsp heavy cream and 2 tbsp milk}}
2 cup (~8 oz) shredded Gruyère cheese (or Swiss cheese, for a cheaper alternative)
1/4 cup chopped fresh basil, plus more for garnish {{alternately, 2 tbsp dried basil}}
1/4 cup chopped fresh parsley, plus more for garnish {{alternately, 2 tbsp dried parsley}}}
3 cloves garlic, finely chopped
3 cup packed fresh spinach (spinach leaves)
Instructions
1. Preheat the oven to 450 degrees F.
2. Toss potatoes with oil and 1/4 tsp salt.
3. Arrange in a single layer on a rimmed baking sheet. Bake for 20 to 25 minutes or until golden brown and tender.
4. When potatoes are finished, reduce oven temperature to 375 degrees F.
5. Meanwhile, in a large bowl, whisk together eggs, half-and-half, and 1/2 tsp salt.
I do mean large because you will use this to toss potatoes later
6. Stir in Gruyère cheese, basil, parsley, and garlic.
7. In the large bowl, toss potatoes and spinach with egg mixture until well combined. You may need to stir and mix more than just a simple toss.
8. Transfer to a 2-quart baking dish. Cover with foil.
9. Bake 30 to 35 minutes or until the custard has set.
10. Uncover and bake for another 5 minutes.
11. Garnish with additional basil and parsley, if desired.

#red potatoes#olive oil#egg#half and half#gruyere cheese#swiss cheese#basil#parsley#garlic#spinach#oven#casserole
1 note
·
View note
Video
tumblr
Classic Coq Au Vin
Ingredients
for 6 servings
4 lb skin-on chicken leg quarter
kosher salt, to taste
black pepper, to taste
3 sprigs fresh thyme
2 bay leaves
¼ bunch fresh parsley stems
3 cups red burgundy wine, or any dry red wine
1 cup bacon, cubed
3 large carrots, peeled and minced
1 large white onion, chopped
½ lb cremini mushroom, sliced
½ lb cremini mushroom, quartered
5 cloves garlic, minced
2 tablespoons tomato paste
2 tablespoons all-purpose flour
¼ cup brandy
2 tablespoons extra virgin olive oil, plus more as needed
2 tablespoons unsalted butter
8 oz pearl onion, peeled
1 pinch sugar
¼ cup fresh parsley, chopped, for garnish
1 baguette, sliced, for serving
Preparation
In a large bowl, season the chicken with salt and pepper. Toss until well coated.
Tie the thyme sprigs, bay leaves, and parsley stems together with kitchen twine to make a bouquet garni.
Add the bouquet garni to the bowl with the chicken. Pour the wine over the chicken. Cover with plastic wrap and refrigerate for at least 2 hours or, even better, overnight.
In a large Dutch oven, cook the bacon over medium-low heat until the fat has rendered and the bacon is crisp, 15 minutes. Using a slotted spoon, transfer the bacon to a paper towel-lined plate, leaving any excess fat in the pot.
Remove the chicken from the marinade, reserving the liquid, and place on a paper towel-lined sheet pan. Pat the chicken with more paper towels until completely dry.
Heat the bacon fat over medium heat until nearly smoking. Working in batches, add the chicken legs skin-side down in a single layer and cook until well browned, 5 minutes per side. Remove the chicken from the pot and set aside.
Add the carrots, onion, sliced mushrooms, and garlic to the pot. Cook until the vegetables are softened and lightly browned, about 10 minutes.
Stir in the tomato paste and cook for 3 minutes, until darkened and fragrant. Then, sprinkle in the flour and cook for another minute, until incorporated.
Pour the brandy into the pot and cook, scraping up any browned bits at the bottom of the pot, until the liquid has evaporated, 2 minutes.
Add the reserved marinade, including the bouquet garni. Stir to incorporate, then bring to a boil and cook until the liquid is reduced by half, about 15 minutes.
Return the chicken and half the cooked bacon to the pot. Cover, reduce the heat to low, and simmer for 1 hour, until the chicken is tender and the sauce has thickened.
Meanwhile, heat the olive oil and butter in a large, preferably nonstick skillet over medium-high heat. Add the pearl onions and a pinch of salt and sugar. Cover, reduce the heat to low, and cook for 15 minutes, shaking the skillet often to move the onions around.
Uncover, add the quartered mushrooms, and increase the heat to medium-high. Continue to cook until all the vegetables have softened, 5-8 minutes. Add the onions and mushrooms to the coq au vin.
Sprinkle with chopped parsley and the reserved bacon. Serve with crusty bread.
Enjoy!
8K notes
·
View notes
Text
If you don’t like onions, this is not for you
Spoiler alert: this also contains meat so this is definitely not for all you vegetarians or vegans out there. (Sorry, not sorry)
But if you love Italian food, specifically tube shaped pasta, onions and meat, you’ll absolutely adore this dish. I’m talking about a sauce that has a lot of onions and braised meat, cooked for hours, eventually melting away to form this sweet, meaty, gooey sauce that’s paired perfectly with al dente pasta, garnished with fresh herbs and as much grated parmesan as you like.
The dish I’m talking about is Tortiglioni all Genovese, a pasta sauce from the region of Campania in Italy. According to some very half-assed internet research (Wikipedia), it was introduced to Naples from Genoa during the Renaissance. And since then, it has become very famous in the region but forgotten elsewhere mysteriously.
I came across this gorgeous dish when in Naples, at a restaurant that specialises in ragu called Tandem. Of the many delicious and numerous pasta dishes we ordered that evening, when this dish hit the table and went into my face, I was immediately jealous that it was Kei who made the order (she’s always had the better judgement when it came to menu items) and proceeded to eat most of it.
The dish was luscious and velvety, where you could taste the sweetness of the onions, married with a subtle hint of the sea (they used octopus instead of beef). That experience has lingered with me ever since.
And so in this time of social isolation, coupled with the fact that I’m stuck at home after an ACL reconstructive surgery on my left knee, meant that this was the perfect opportunity to try to recreate this Neapolitan classic. However, if you google “Pasta alla Genovese”, it’s all becomes very confusing because all you seem to get from Google are recipes for a pesto-based pasta with fine beans, which is not what this is all about.
Amidst the confusion and hysteria, I turned to New York Times Cooking, where they had a delightfully clear and simple version of the recipe by Mark Bittman, food author.
Sidenote: Mark (yes, we’re on a first name basis) has written a bunch of great cookbooks like the incredible “How to Cook Everything: 2,000 Simple Recipes for Great Food” which is one of the better books if you’re looking to start cooking. As a warning, it is a mammoth of a text as it literally has 2,000 recipes so have a sturdy bookshelf before ordering.
So after endless onion prep, cramp from standing on my one good leg and a cook that lasted over three hours, I instinctively knew that this recipe was going to be near and dear to me before it was even completed. And the final result was everything I had hoped for and sent me to carb heaven.
Like my experience in Naples, what stood out to me the most was the amount of flavour and joy packed into every bite. You could taste the natural sweetness of the onions and the slight “oomph” from the chuck steak, enhanced and tempered with only time and heat.
Ultimately, this is an incredible expression of what I believe good food should be, simple ingredients cooked with patience and love. I hope you try the recipe and love it as much as I do. Enjoy.
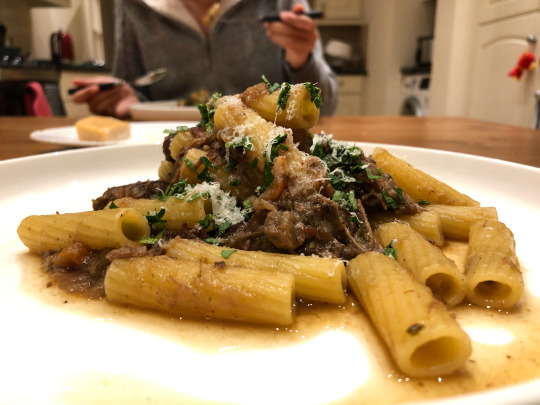
Tortiglioni alla Genovese
Servings: 6 to 8 (or 3 to 4 if you’re me) Cooking time: 3 1/2 hours (strap in and open some wine)
Ingredients
2kg red onions, thinly sliced (wear your goggles or prepare to cry for awhile)
Extra-virgin olive oil (use that good shit)
2 carrots, peeled and roughly chopped
2 celery ribs, trimmed and roughly chopped
120g pancetta, chopped (I used 180g because that was the package it came in and I didn’t want to keep a random 60g of pancetta lying around, plus animal fat = flavour)
1kg beef chuck, cut into 2-inch cubes (or any alternative cheaper, leaner cuts used for braises or stews)
Salt and freshly ground black pepper
2 bay leaves (I used four because I got mine from Chinatown that comes in a giant packet for cheap. Therefore I worry that the quality of the leaves aren’t as good as the ones you would get from a farmers market or fancy supermarket so I overcompensated)
Handful of oregano leaves (or you can tie a bunch of oregano together and fish out the stems later on. I like leaving the leaves in and I’m lazy to pick stems out)
Some dry white wine (to taste and drink while you cook)
500g dried pasta, like ziti, tortiglioni or rigatoni
Finely grated Parmesan cheese
Fresh parsley, finely chopped
Preparation
Use a large heavy pot over medium high-heat, season your beef chuck cubes and coat them with oil. When pot is hot, starting putting the beef cubes into the pot to brown the meat on all sides. Be sure not to crowd your pot or else it won’t brown properly. You may have to do this in batches but once done, set browned meat aside. Additional note: You may skip this step if you want as browning the meat is slightly unnecessary. I only did it because I wanted the beef to hold its shape for a bit more bite at the end. In fact, according to more half-assed internet research (i.e., one other internet link), most classic Italian recipes will call for a large cut of beef chuck steak, which would be set aside once cooked and served as a second dish. This is how I did it but it’s your kitchen, your choices.
Heat a healthy glug of extra virgin olive oil in the same pot over medium-high heat again; chuck in the carrots, celery and pancetta and cook until it’s browning or caramelised (DON’T FORGET TO SEASON AND ADD PEPPER AS YOU GO, TO TASTE)
Add your onions to the pot, seasoning again as the salt will draw out the water in the onions quicker, you may even add a splash of water at this point if you’re worried that the bottom will burn because you’ve never seen so much onion go into a single pot before unless you’re cooking a giant batch of French Onion soup.
When it looks safe and it doesn’t look like your bottom is burning, chuck in the browned beef cubes. (Pun fully intended)
Add in your bay leaves and oregano and give your pot a little stir.
Bring it all to a simmer, cover it and cook it low and slow for two hours (or more), you will be amazed at the amount of water that will come out of the onions. It will almost be as much as the tears you shed while prepping 2kgs of onions by hand.
Once the meat is squishy and tender, uncover and crank up the hit all the way to bring it to a boil. This is wear you will need to be a bit more active with the stirring, making sure nothing sticks and burns at the bottom. Fiddle around with your heat if you need to. Cook until the meat falls apart or you can stab at the pieces of meat as you’re stirring to help it along a bit. This will be roughly 45 minutes of stirring so you best be ready.
Once the meat is falling apart and the sauce is thick, gooey and beautiful, add half a glass of wine to it and bring your heat down to low. If you’re a drink while you cook type human, you should have just enough white wine left from when you first opened a bottle at the start of this cook. Or perhaps you need to open your second bottle. No judgements here, just solutions.
Stir until the sauce is glossy. When you can’t taste the alcohol in the sauce anymore, it’s good to go. Although if you’re on your second bottle, best get someone to taste just to be sure.
Cook your pasta in a large pot of boiling salted water. I won’t go into detail here because I’ve covered how I cook pasta in this recipe here. (Don’t @ me)
Garnish with parsley and parmesan.
Eat all of the pasta.
Food coma.
#recipe#food#pasta#genovese#napolitan#naples#tandem#foodporn#homecooking#nytcooking#carbs#carbsarelife#omnomnomnivore#noms#ragu#coronavirus#quarantinelife
2 notes
·
View notes
Photo

RECIPE: Caponata pizza (from Genuine Pizza by Michael Schwartz)
I love eggplant, and one of my favorite ways to use it is to make caponata (see below). Served alongside some warm focaccia, caponata is a great way to kick off a meal. It’s also a terrific pizza topping: Soft, sweet-and-sour eggplant, studded with plump raisins, pairs well with fresh mozzarella and salty Pecorino-Romano. Fresh basil, as a finishing touch, makes this a perfect pizza to make in the summer, when eggplant is at its best. And because I love using one dish in as many ways as possible, using leftover caponata on pizza helps you to be a little bit more efficient in the kitchen.
Makes 1 (12-inch/30.5-cm) pizza
1 (8-ounce/225-g) ball Pizza Dough (Michael Schwartz’s recipe can be found in Genuine Pizza), at room temperature
Flour, for rolling
¼ cup (60 ml) Caponata (see below) or a quality store-bought eggplant-and-tomato spread
¼ cup (30 g) fresh salted mozzarella cheese, diced
2 tablespoons finely grated Pecorino-Romano cheese
6 basil leaves, torn
At least 30 minutes before baking, place a pizza stone or baking sheet on a baking rack in the top third of the oven, and preheat the oven to 500°F (260°C).
After you have made your dough, allow the dough to come to room temperature for about 1 hour before making your pizza. Dip the dough into a little flour, shaking off the excess, and set on a clean, lightly floured counter. Start stretching the dough with your hands, turning the ball as you press down the center. Then, using either your hands or a rolling pin (if you’re finding stretching the dough by hand to be tricky), work the dough until you form a 12-inch (30.5-cm) circle. If any holes form in the dough, patch them up so the topping does not seep through.
Dust a wooden pizza peel with flour (if you don’t have a peel, use an upside-down baking sheet generously dusted with flour) and slide it in under the dough. Spread the caponata on top, then add the mozzarella. Sprinkle with half of the Pecorino and top with the basil.
Slide the prepared pizza onto the hot pizza stone or baking sheet and bake until the crust is properly browned, about 10 minutes. Check the bottom of the pizza to make sure it has been cooked well—it should be rich brown and burnished. Transfer the pizza to a cutting board, garnish with the remaining Pecorino, and cut into slices. Serve immediately.
RECIPE: Caponata
Caponata is misunderstood in the States, as many don’t realize that it needs to be both sweet and sour (in Italian there’s a wonderful word for that—agrodolce). Caponata is traditionally served at room temperature with some warm focaccia, and I think it’s one of the best ways to kick off a meal. Keep in mind, when making the plump raisins, don’t overcook them or the raisins will turn gummy.
Makes 2 quarts (2 L)
For the plump raisins:
½ cup (75 g) dark raisins
¼ cup (60 ml) extra-virgin olive oil
½ sprig rosemary
For the caponata:
2 red bell peppers
2 red onions, peeled, halved, and sliced into ¼-inch (6-mm) half-moons
2 large beefsteak tomatoes (about 18 ounces/510 g)
2 large Italian eggplants (about 3. pounds/1.6 kg), peeled and cut into 1-inch (2.5-cm) dice
¼ cup (60 ml) extra-virgin olive oil, plus more for drizzling and greasing
1 tablespoon kosher salt, plus more as needed
¼ teaspoon freshly ground black pepper, plus more as needed
2 garlic cloves, minced
2/3 cup (105 g) Castelvetrano
olives, pitted and sliced
2/3 cup (30 g) basil leaves, roughly chopped
1/3 cup (60 g) plump raisins (recipe follows)
3 tablespoons champagne vinegar
Chopped flat-leaf parsley, for garnishing
Make the plump raisins:
Preheat the oven to 350°F (175°F).
In an ovenproof dish, combine the raisins, oil, rosemary, and 2 tablespoons water and cover tightly with aluminum foil. Transfer the dish to the oven and cook for 15 minutes, or until the raisins are plump and soft. Remove from the oven, let cool, and set aside. If not using the raisins immediately, transfer them with their cooking liquid to a container, cover, and refrigerate for up to 5 days.
Make the caponata:
Raise the oven temperature to 500°F (260°C). Place the whole red bell peppers on a sheet pan and place in the oven for 25 to 30 minutes, turning them twice during roasting, until the skins are completely wrinkled and the peppers are charred. Remove the pan from the oven, transfer the bell peppers to a nonreactive bowl, and immediately cover it tightly with plastic wrap. Set aside the bell peppers for 30 minutes, or until they are cool enough to handle. Lower the oven temperature to 425°F (220°C).
Once the bell peppers are cool, peel, stem and quarter them, then discard their peels and seeds. Return the bell peppers to the bowl along with any juices that have collected. (If not using right away, cover with oil and refrigerate for up to 2 weeks.)
Lightly grease four half-sheet baking pans. Spread the onions on one, spread the tomatoes on another, and divide the eggplant between two half-sheet pans. Drizzle the vegetables with the oil (be generous with the eggplant, as it loves oil) and season them with the salt and pepper. Transfer the pans to the oven. Roast for 20 to 25 minutes for the onions and tomatoes, until the onions are wilted and starting to caramelize, and the tomatoes start to split down the side; roast the eggplant for 30 to 35 minutes, until it is nicely browned and very soft. Remove the vegetables from the oven and let them cool until just warm to the touch. Halve and seed the tomatoes, then chop into medium dice. Transfer all the roasted vegetables to a large bowl.
In a small saucepan, warm ¼ cup (60 ml) oil over medium-low heat until shimmering. Add the garlic and cook, swirling the pan, until fragrant and toasted, 1 to 2 minutes. Do not let the garlic burn. Remove from the heat and transfer to the bowl with the roasted vegetables. Add the olives, basil, raisins, and vinegar, and let cool to room temperature.
Serve the caponata with warmed focaccia. Drizzle the focaccia with oil, top with the caponata, and garnish with the parsley.

Throughout his acclaimed career, chef Michael Schwartz has been celebrated for his skilled use of quality ingredients, and with his pizzas, this talent is on full display. Genuine Pizza is Schwartz’s vibrantly illustrated guidebook for creating unforgettable pies at home. His cookbook makes the pizza process approachable and fun, giving the reader the tools they need to make better pizza and then run with them. First providing a clear and simple view of the fundamentals—with detailed step-by-step methods for making the best pizza doughs—Schwartz then empowers home cooks to mix and match ingredients, playing with different sauces, cheeses, meats, vegetables, and more, to build pies both classic and innovative. Pizza is just the beginning—it’s a jumping off point to colorful, delicious meals.
For more information, click here.
#abramsbooks#abrams books#genuine pizza#genuine pizza at home#michael schwartz#chef michael schwartz#caponata#caponata pizza#eggplant pizza#eggplant#pizza#pizza recipe#recipe#free recipe
6 notes
·
View notes
Photo

Crawdad Quiche
I'd like to dedicate this week's recipe to Anthony Bourdain, who passed away from suicide last week. For those of you unfamiliar with him, Anthony was an excellent celebrity chef whose numerous cooking shows I watched religiously growing up. He was adventurous and unconventional, and his style of cooking and exploring the unusual in the culinary world was unmatched and greatly influenced the style of Tastes of Tamriel to be more than a recipe blog, but one about adventure and exploring beyond your comfort zone. As a suicide survivor myself, I hope that this little message reminds those among you struggling that you are not alone. RIP Anthony Bourdain, your legacy lives on in the hearts of all us foodies, budding chefs, and adventurers.
The Summerset Isles are known throughout Tamriel for their light, fragrant dishes, with emphasis on taste and quality over quantity. Several small dishes are preferred during a meal as opposed to one or two big dishes such as in High Rock or Skyrim, which leaves the diner with an opportunity to sample a wide array of flavours! Crawdads are ample in the freshwater rivers and streams throughout Summerset, and their sweet and tender flesh features prominently in High Elf cuisine. Crawdad quiche is the perfect food for breakfast or tea, with delicious pieces of crawdad in a delicate quiche base (to save the diner the indignity of ripping apart shells and claws at the dining table, of course)!
You will need: 600g fresh crawdads (crayfish), live if possible 1 red onion, diced 3 cloves garlic, minced 1 lemon, sliced 50g butter, plus extra for brushing ½ cup heavy cream 5 large eggs ¼ cup milk 500g premade shortcrust pastry (or make your own) 1 bay leaf 1 tsp paprika ½ cup shredded mozzarella Pinch of chili powder (optional) Ground sea salt, to taste Cracked black pepper, to taste Fresh parsley, to garnish (optional)
Method: Soak the crawdads in fresh water for 10-15 minutes to clean them. Fill a large pot with water and boil, adding the lemon slices and a teaspoon of salt
Put in the crawdads and boil for 5 minutes, or until they turn bright red. Remove from the water, drain, and leave to cool until crawdads are able to be peeled safely.
Peel the crawdads (don’t forget to crack open the claws, which contain plenty of juicy meat) and chop them into small 1" chunks. Place aside in a bowl.
Preheat oven to 180C/356F. Grease a round pie tin with butter, and roll out the shortcrust pastry evenly. Place the pastry into the tin, then brush the surface with butter.
In a pan, heat the remaining butter and fry the onions and garlic on medium-high heat until browned and the onions are caramelised. Add the bay leaf and chopped crawdad, and continue frying until the crawdad browns slightly. Remove from the heat and set aside.
In a bowl, whisk together the eggs, cream, mozzarella, salt, pepper, and spices. Add the crawdad mix, remove the bay leaf, and whisk again until everything is mixed.
Pour the mixture into the pastry case and bake for 35-40 minutes, or until the filling is golden brown and the crust is nice and crumbly. Remove from the oven and garnish with fresh parsley to serve.
#the elder scrolls#tes#eso#elder scrolls online#recipe#recipes#provisioning#cooking#altmer#crawdad quiche#quiche recipe#quiche#baking#food#tasty#crawdad#crayfish#seafood recipe#shellfish#geek#nerd#games#gamer#gaming
386 notes
·
View notes
Photo

Chicken Fra Diavolo Bake
From The Cozy Apron
Yield: Serves about 4-6
Ingredients:
• 1 – 1 ½ pounds chicken breast tenders (or skinless, boneless breasts), cut into bite-sized pieces • Salt • Black pepper • 1 teaspoon granulated onion • 1 teaspoon granulated garlic • ¼ cup all-purpose flour • Canola oil • 1 onion, finely diced • 6 large cloves garlic, pressed through garlic press • 1-2 teaspoons red pepper flakes (more or less, depending on how spicy you like things!) • 1 teaspoon Italian seasoning • 3 tablespoons tomato paste • ½ cup white wine (you can also use red) • 42 ounces canned, crushed tomatoes (that's one 28-ounce can plus one 14-ounce can) • 2 tablespoons chopped flat-leaf parsley • 8-10 ounces dry penne pasta, cooked according to package instructions and held warm • 2 cups whole-milk mozzarella cheese, grated/shredded • ¼ cup julienned basil leaves, for garnish
Preparation: -Preheat oven to 350°F and lightly mist a baking/casserole dish with cooking spray.
-Season the chicken pieces with a couple of good pinches of salt and black pepper, plus the granulated onion and garlic, and toss to coat; sprinkle in the flour, and toss to coat the pieces once again.
-Place a medium-size pot or a large saute pan over medium-high heat, and drizzle in about 3-4 tablespoons of oil; once hot, add in the chicken pieces in a single layer (work in a couple of batches, if necessary), and allow them to sit, undisturbed, for about 4 minutes, or until golden-brown and slightly crisp on that first side; stir and allow the chicken to become golden-brown on all sides for a few minutes more; remove with a slotted spoon and set aside for a moment.
-Into the pot/pan, add a touch more oil (if needed) and add in the diced onion; saute for 2-3 minutes, then add in the garlic, red pepper flakes, Italian seasoning, and the tomato paste, and stir together to combine; cook for about 30 seconds to 1 minute.
-Add in the wine, followed by the crushed tomatoes, and a few pinches of salt and pepper; lower the heat to medium-low/low, and allow the sauce to simmer gently, uncovered, for about 20 minutes; finish the sauce with the chopped parsley and a little more salt and pepper, if needed.
-Add your cooked penne pasta into the sauce, along with the chicken pieces, and gently stir to combine; turn the mixture out into your prepared baking/casserole dish, and top with the mozzarella cheese; bake for about 20-25 minutes or until the cheese is melted and bubbly.
-Serve with some fresh basil as garnish.
#fra diavolo#pasta dish#granulated onion#granulated garlic#red pepper flakes#italian seasoning#red wine#white wine#fresh parsley#fresh basil#chicken dish#casserole
0 notes