#picrew tutorial
Explore tagged Tumblr posts
Visit Tumblr Blog
Explore Tumblr blogs with no restrictions, modern design and the best experience.
Last Seen Tumblr Blogs


Fun Fact
After the announcement of the deal with Yahoo!, there were 170K signatures of unhappy Tumblr users petitioning to prevent the sale in 2013.
Text
So I tried to make Picrew tutorial, This is what I managed to figure out myself because the tutorial is a bit confusing on the website, so I tried to make it simpler
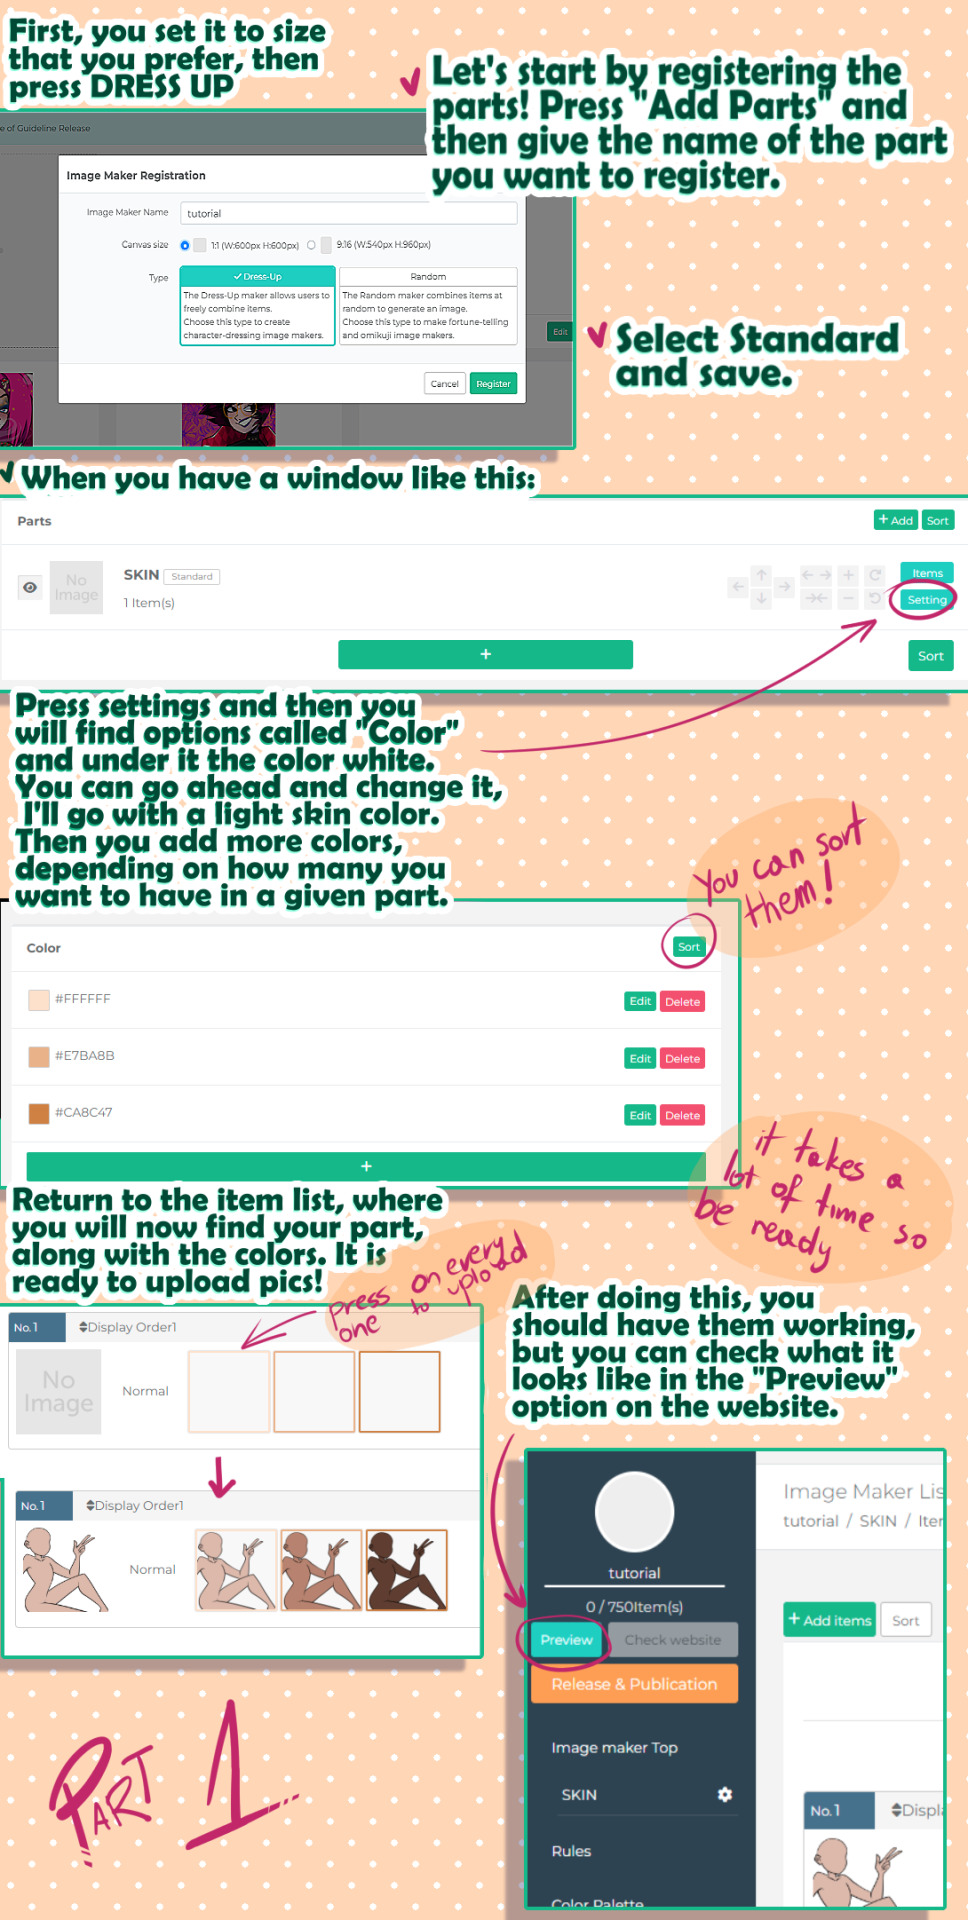
If something is too pixelated because tumblr screws up the quality as usual, I'll try to fix it somehow or smth but yeahhh
92 notes
·
View notes
Text
Bulk part recoloring for Picrew: a guide

Hi! Some of my friends asked me about this and I figured I'd make a tumblr post instead of writing it all in a discord message never to be seen again.
This guide covers how i personally quickly recolor parts for my own picrews, to use with picrew creator's bulk uploading tool. This likely isn't going to work for everyone, especially since I rely on Clip Studio Paint very heavily.
Using this tutorial will give you the files you need to bulk upload with picrew creator a bit faster than if you were to recolor everything by hand. Especially if doing a bunch of parts and colors.
Tutorial under the cut!
What you'll need
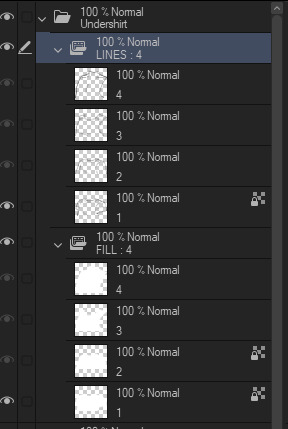
Clip studio paint (or another art program with animation features that lets you export each frame to a separate layer. I only will be showing CSP however)
Your artwork. Each color needs to be on a separate layer. (Sorry for those who like to paint everything on the same layer! This won't work for you)
(optional, if on windows) https://www.bulkrenameutility.co.uk/ to speed up one specific step
Let's do this
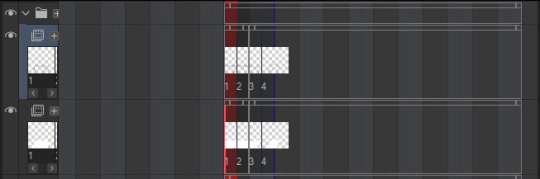
1) open the animation timeline, with CSP pro you can do 24 parts at a time due to the frame limit, which is still plenty to speed the process up.
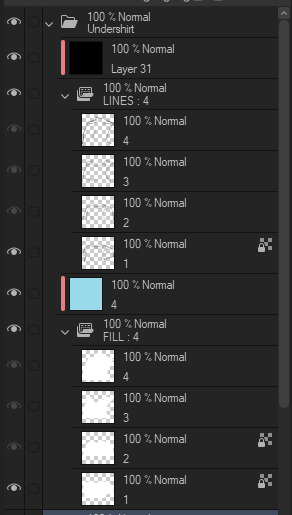
2) say you're doing the shirts like i did. make an animation folder for the shirt fill color, as well as the lineart. if you have any more layers that are recolored with the same color each time, make an animation folder for those as well (so say, shadows. or secondary colors)
3) put each individual shirt part in it's own animation cell. make sure the frames for each part line up. you'll want to be able to go through the timeline with each shirt on a separate frame
Your layers should end up looking somewhat similar to this

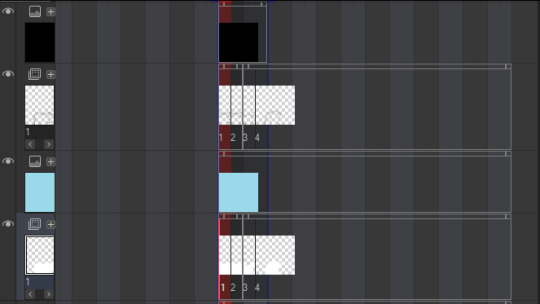
4) now for recoloring: clip a layer to each animation folder. so clip one to the shirt fill folder for instance. fill that entire layer up with the color you want that part to be. Check the frames in your animation again, now every part should be recolored with the colors in the clipped layer.
Your layers should now look something like this

5) Shorten the timeline so only frames with an actual item in them are included. (Otherwise you'll end up with a bunch of blank images later that you're not going to do anything with)
6) Hide every layer other than the animation folders and their clipped layers. So only the part is visible. Go through your frames one more time to make sure they look alright and nothing is out of place.
7) Time to export! Go to file -> export animation -> image sequence (you might want to set a shortcut for this so you don't have to go through 3 menus haha).
Make sure you're exporting to the correct folder. Set file name settings to anything you like, but make sure the start number is 1 (there might be exceptions to this, I'll go over that later). Set the image type to PNG, make sure the canvas size is correct and that the framerate lines up with your timeline's framerate.

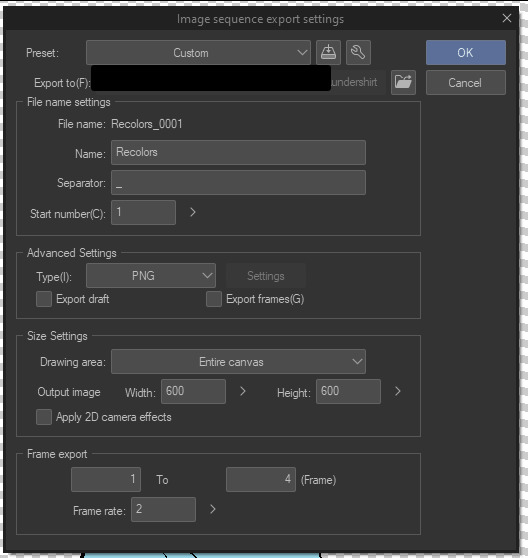
8) Export it! You should have some files in your folder that look like this now. We'll want to rename them to just 1.png, 2.png... etc.

9) You can rename them by hand, but this is rather slow to do each time and I'm lazy. So here's how you rename them in the bulk rename utility. Open your folder in there, and then copy the settings I have here.


Yes, this is EXTREMELY overwhelming. I know. The first box (RegEx) is the only one you'll need to touch. Set the Match field to something like "Recolors_0{0,3}". Replace "Recolors_" with whatever your files start with. Also check the v2 box.
Replace can be left empty, since we're essentially removing anything that matches the regex (which is a text pattern matching syntax. We're essentially matching "Recolors_" with up to 3 zeros after it)
Select all the files in the top panel, then hit Rename in the bottom right! It should rename everything to just 1.png, 2.png... etc in one go.
10) Go to your part page in picrew. Make sure your colors are set up and you have created the amount of parts you'll need. Go to the Bulk Upload tab (there's a link in the top right).
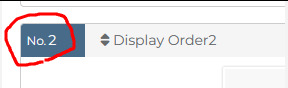
11) Select the color you're uploading, then select the files you're uploading. Make sure the filenames match with your part ID numbers. This is important. 1.png Will match the first part, 2.png will match the second. Note how I said ID numbers, not the display order.
This means in the exporting step, you might need to change the starting number of your files. If you messed this up since you didn't read the tutorial in full before following it (I get it. I've been there before), just export and rename again.
12) If everything looks good and you got your files previewing no problem, hit upload, then wait a few seconds while picrew uploads your files.

13) YOU DID IT!!! You successfully added a recolor for your parts. Now go back to your file in CSP and fill each clipping layer up with a different color. You can now repeat the process from step 7. (export, rename and upload) to upload all parts for the other colors.
How much time does this actually save?
I never timed myself, but from experience, once you have set everything up and get the hang of it. It's pretty damn fast! Granted it does take a bit of set-up to get working. It gets more efficient the more parts you recolor at once.
I'll often go ahead and recolor the next color while the previous color is still uploading. Usually a single color only takes me a minute max to create and upload, instead of several minutes recoloring every single layer and saving each file separately.
For bulk rename utility, I set it to allow overwriting files. Which means I keep every color in the same folder and just overwrite the files whenever I rename. It's the fastest for me and saves me some storage space on my PC as well. Just make sure to click out of and then back into the folder to reload the files in there.
Hopefully this should help someone! Creating your own picrew is a daunting task and this made it a little easier for me at least ^^
#picrew#picrew tutorial#picrew guide#image maker#my picrew#the example picrew im showing isn't out yet. it's still in the early stages#idk if it'll ever be finished#i'll reblog this post + make a separate post on my blog if it does tho!
26 notes
·
View notes
Text
Are people uploading their drawings to their computer and digitalizing/editing them somehow, or is everyone just really good at drawing smooth lines via practice?
#I really want to draw Jollin but well you've all seen my attempts at drawing characters#or it could be digital drawing from the start#idk#I'm going to start practicing drawing heads via this picrew I found#not tracing or anything I just need to study muzzles more#take notes on how to do it#I think I'm usually ok with the bodies so far#Maybe some more tutorials
7 notes
·
View notes
Text
I'm working on another dress up game rn and like ~2 years ago when I made my last one, making all the colour variations took soooo long. then right near the end I remembered that I knew how to automate things like that. since I had to get it set up again anyway, I figured I'd record myself doing it and make a tutorial to hopefully save some other people some time
youtube
#picrew#meiker.io#meiker#dress up games#tutorial#still quite a ways from finishing but hopefully I'll have it done by the end of the week !#and now that I can do this I'll probably have a lot more options for stuff since colour variations won't take so damb long#also it's just a coincidence that I made a tutorial on acsd yesterday demonstrating basically the same feature#I was planning to make this video today I just happened to get that anon yesterday#Youtube
24 notes
·
View notes
Text
youtube
I'm tired of seeing AI generated and Creator TOS-violating PNGtuber models 😠
PLEASE let me help you make your own free model w/ Picrews that allow commercial use‼️
I've got 70+ of them for ya here, PLUS a set up tutorial, it's so easy my guy
16 notes
·
View notes
Text
I can't add any more pictures to my tutorial, so here's a little extra. Don't mind me.
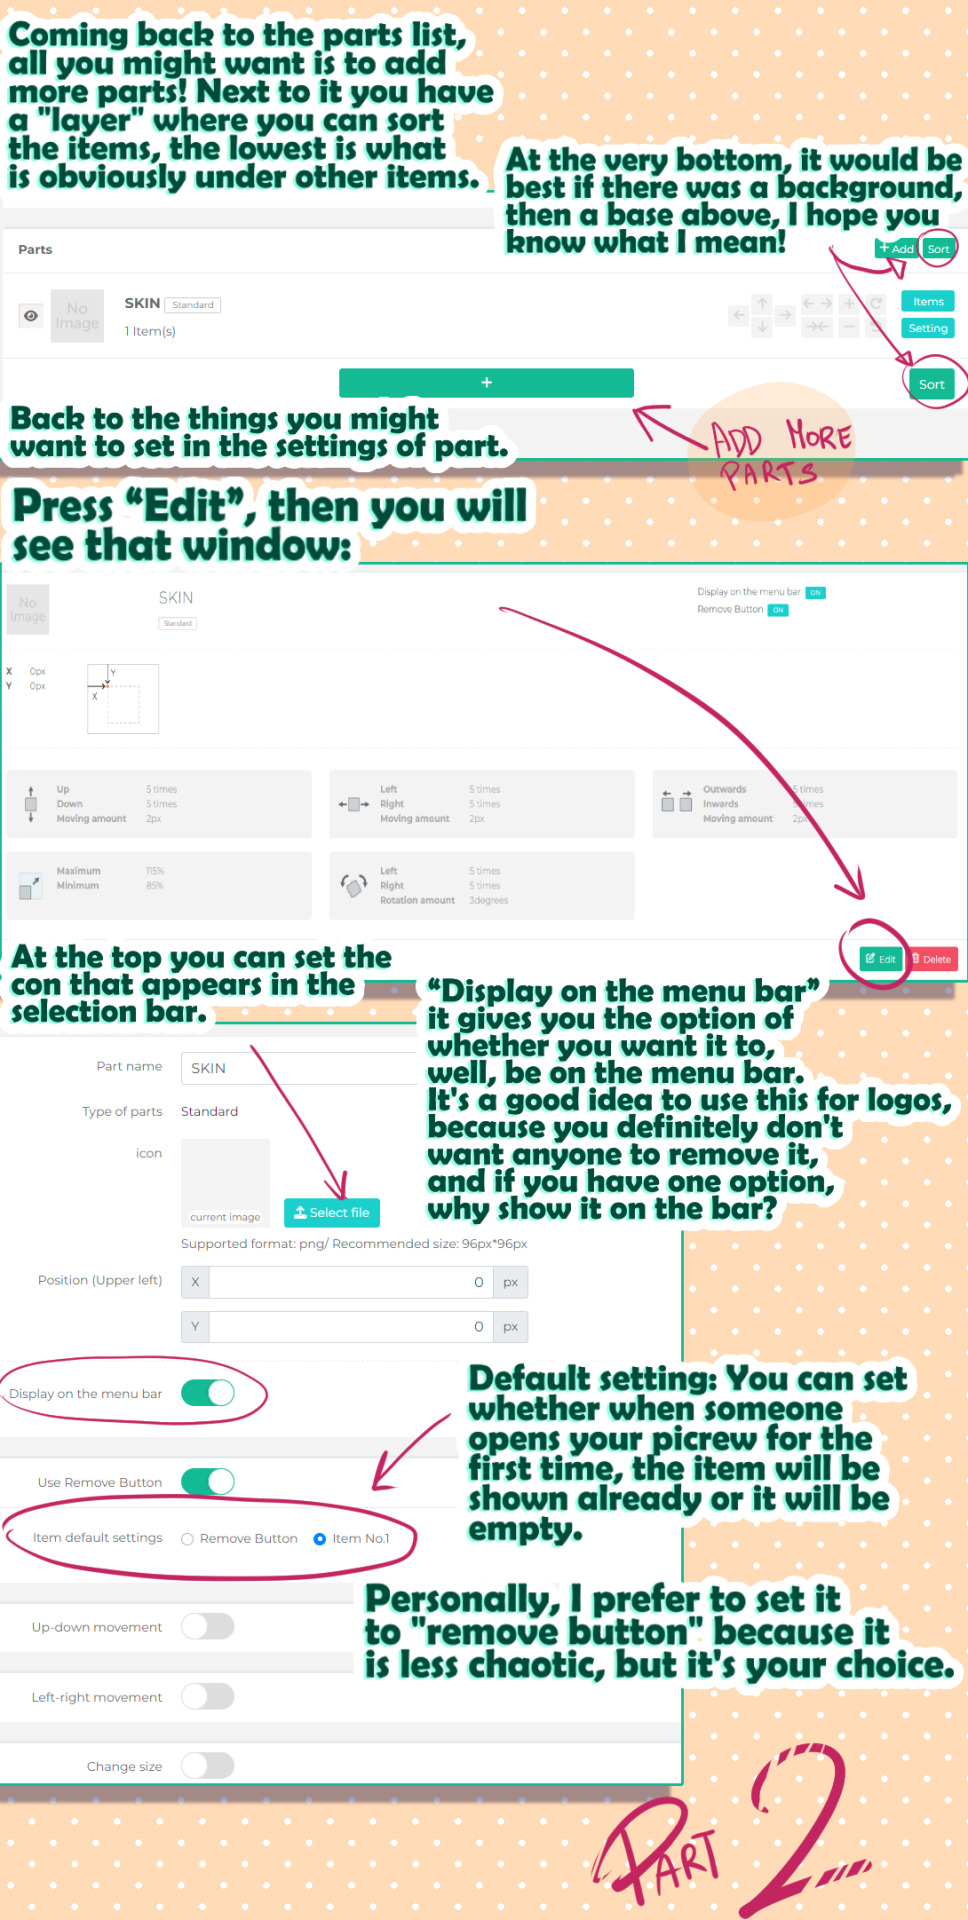
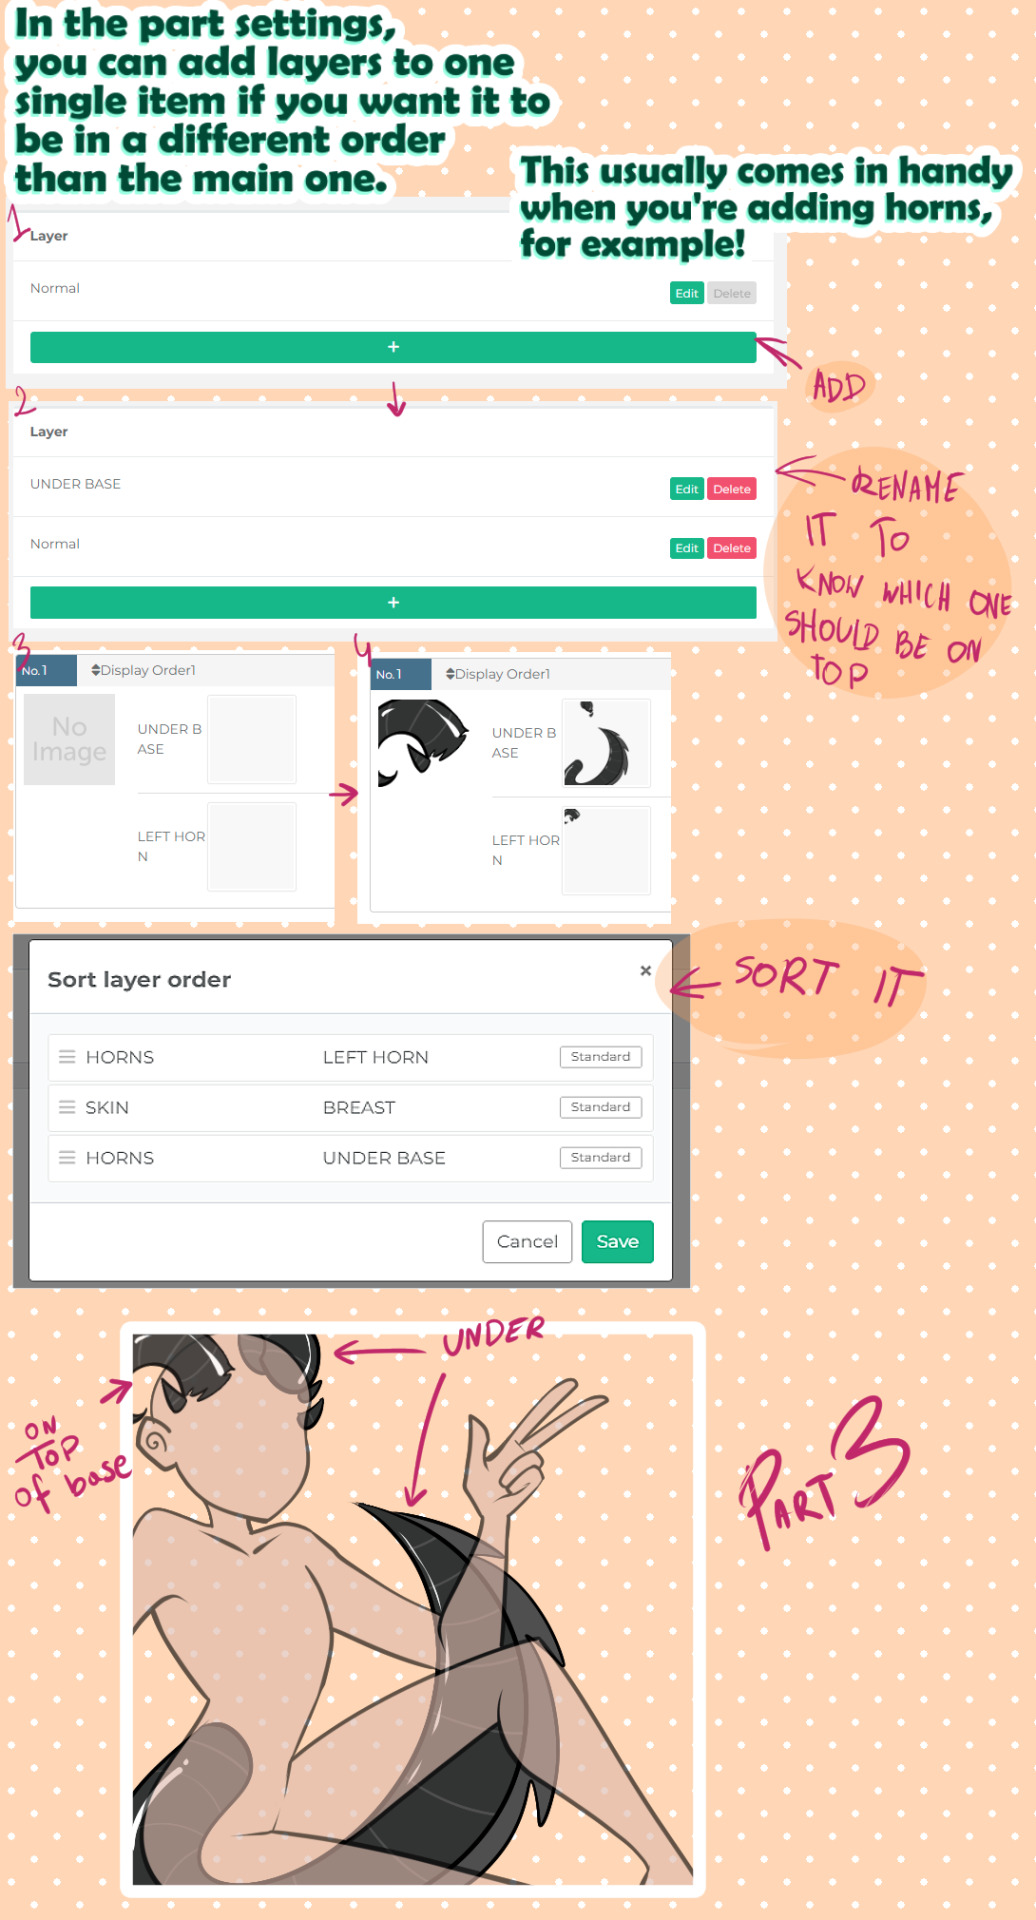
50 Layers - That's how many different layers you can stack (think layers in an art program). For example: background (1), body (1), ears (left and right, 2) would be 3 "parts" categories but 4 layers in total, since you divided the ears into two separate layers. I don't know how many layers one part can have, but you can change the order of the layers independently of the parts position (so if your picrew order is "body", "ears", "background" then you can move the background layer to the bottom, ear 1 next, then body and then the second ear so they show up properly).
The overview of the parts (with the thumbnails and info, first image) is the area where you change how users see the part options in the selection menu of your finished picrew.
Separate from that is the "Layers" section, where you change the display order of the "parts" layers like you would in an art program (second image).


3 notes
·
View notes
Text
Como fazer um PNGtuber ANIMADO no PC TUTORIAL COMPLETO | Veadotube Mini
youtube
youtube
Neste tutorial vou ensinar a como fazer um PNGtuber animado no PC utilizando um programa gratuito chamado Veadotube Mini, ensino a como baixar o programa, criar um PNGtuber, importar o PNGtuber para o programa, configurar as expressões do PNGtuber e como salvar e carregar. Além disso, dou várias dicas extras para melhorar os vídeos de lives do seu Vtuber PNGtuber. Esse é um tutorial simples e completo de como utilizar o VeadoTube Mini para animar o seu PNG tuber.
Programas pra baixar (Lembrando que todos são gratuitos):
Veadotube Mini (Programa de animação de PNGtubers): https://olmewe.itch.io/veadotube-mini
Winrar (programa para extrair os arquivos):
https://www.win-rar.com/start.html?&L=9
OBS Studio
(Programa para gravar e fazer lives com suporte a várias coisas):https://obsproject.com/pt-br/download
Streamlabs
(Programa para gravar e fazer lives idêntico ao OBS, só que mais simples):
https://streamlabs.com/pt-br/
Canal do Moderador Rick Komori com várias dicas e tutoriais de qualidade de Vtubers e PNGtubers:
https://www.youtube.com/@rickkomoribr
Vídeo relacionados no Canal:
COMO FAZER UM PNGTUBER TUTORIAL COMPLETO NO PICREW https://youtu.be/dQHsH9UEex0?si=a69CL7XgvTkAc3ty
youtube
COMO FAZER UM PNGTUBER NO CHARAT ME CELULAR E PC TUTORIAL COMPLETO https://youtu.be/zh4MzxYA6lk?si=lyPVylA_5sF1pj7F
youtube
EXPRESSÕES que todo PNGTUBER DEVE TER! Tutorial de como fazer emoções no Picrew https://youtu.be/7hCDtaO9a14?si=qOhzUX1p6Htql-cZ
youtube
Como eu virei um Vtuber PNG Tuber https://youtu.be/gll_zh_y9p0?si=SVZowt9YnnWfeh14
youtube
#pngtuber#pngtuberbr#pngtuber brasil#pngtuber tutorial#vtuber#vtuber br#vtuber tutorial#como virar pngtuber#como virar vtuber#picrew#charatme#pngtubers#Youtube
1 note
·
View note
Text
How to OC post without being an artist (or spending money)!

As much as I yelled about OC-posting, some people said that they struggled to know what exactly they should be posting. Obviously the answer is whatever you feel like but if you’re already aimless, that answer isn’t very helpful. Additionally, not everyone knows how to draw (which I think is an obvious method of OC-posting) so I wanted to give some ideas for what people could post for their OC! This will be split up into different sections.
Creating visual representations of your OC
Disclaimer: I will not suggest nor support the usage of generative AI. OCs are about creating something yourself, not allowing a computer to do it for you.
Outside of commissioning someone else for art, it can be disappointing and frustrating to not have any visual representation for your character. An easy way to get a representation of your character is to use Picrew, Meiker and other similar sites. There’s a large number of art styles, types of fashion, species, that can all be used to make your OC and that amount only grows by the day. Many of these websites can be accessed on PC and mobile and take very little processing power.
However, this can be limiting at times since you might not find exactly what you’re looking for, especially if your OC has a unique combination of features. For something with more customisation, you can use video games with character creation to make a version of your character. I personally would recommend games like The Sims or Skyrim as both have very active modding communities. This way, if a certain type of clothing or facial feature isn’t present in the base game then you can often find someone who has created a mod that adds it in instead. This does require you to have access to a computer that can run not only the game but the mods as well.
Another option would be using a program like Vroid Studio to make your character from a base model. This has both a mobile and PC version, although I will primarily be speaking from a PC perspective. The mobile app, while able to create a character from scratch, is a lot more limited than the PC version. The great thing about Vroid is that there’s a lot of user-made content that you can often get for free through websites like Booth, as well as many tutorials for beginners to follow along with. Again, this requires a computer that is able to run it. I would recommend against using Vroid on a laptop as it will likely be too intensive for it.
My final suggestion for character visuals is to take a character from anime or cartoons and simply edit them. This was actually how I first got into making original characters! You can recolour their hair or outfits with an editing program (with some free examples being FireAlpaca, Krita or GIMP) and even edit different images together to create something more unique. Please only do this with characters from existing media and avoid using fanart for this.
Other OC visuals
Other than just what your OC looks like, there are other ways to visually put together your OC. Moodboards are the most obvious example of this, but you can also edit other things such as putting together outfits for them or finding pictures of items they would keep in their bag.
If you have multiple OCs, you can create fake text conversations between them using a number of websites. These can be as silly or as serious as you like!
Finally, you can always build them a pinterest board. I am a massive pinterest enjoyer and not only can you use pins that others have posted to pinterest, you can add your own from off the site.
Writing
Beyond writing out your characters’ story, there are numerous other things you can write. Keeping in line with what you’ve already written, you can re-write scenes from alternative perspectives. These can add context to what is seen in the main story, as well as flesh out background or side characters and their relationship to your other OCs.
Another fun thing to write is non-canon scenes. Write a beach episode! Write about a character getting sick and someone else having to take care of them! There are countless ways to draw your OCs interacting with their world or other characters that wouldn’t necessarily ever fit into the “main” story.
Next is genre changes. If you had to categorise the genre of your OCs’ current story, what would it be? Now image what if the genre was something completely different? Romance to mystery… Slice of life to horror… Part of the challenge is figuring out what story beats remain the same and what gets changed, including character dynamics! And of course… Alternate Universes. There are too many types of AUs to list but some of my favourites are superpowers, mafia, zombies, time loops and time-travel-fix-its. These are similar to genre-changes but often include a number of AU specific tropes. If you’re struggling to figure out the staples of a certain AU or what kind of AUs exist, there’s a really good page about alternate universes on Fanlore.org!
Other ideas
These are ideas that didn’t quite fit into the other categories.
First is music playlists! There are two types of these. The first is a playlist of songs that describe a character and their story while the second is a playlist of songs that the character would listen to. Some people like to combine the two as well! There are no rules to this, simply have fun listening to music and picking out songs that remind you of your OCs.
Second is incorrect quotes. I remember these used to be beloved by fandom and now they can be beloved by you and your OCs! The concept of incorrect quotes is that well-known and funny quotes from pop culture (such as memes or movies) get written out and your characters are assigned a line of dialogue. While there’s a website that’ll generate these incorrect quotes for you, I personally find more fun in coming across quotes organically while scrolling social media and realising that they fit my OCs almost perfectly.
Finally, ask games. These typically take the form of lists of questions or prompts with emojis or numbers next to them. People can send in the relevant emoji or number and you then answer the corresponding prompt. There used to be a kind of “ask game etiquette” where if you reblogged an ask game from someone, you sent an ask from the list to them as well. This way, it allows the game to continue circulating and you can spread the joy of OC-posting with others! It can also lead you to making friends within the community.
And that’s it for my post! If you have other suggestions for kinds of OC-posting then I would love to see them!
#oc posting#oc#original character#unrelated to this post but when looking for a gif to go with this post#i nearly yelled AZUNYAAAAAAAAAN when i saw azusa. i used to be a big k-on girlie. it was the first manga i purchased!#it's 3am and i should have posted this earlier but i watched more re:zero with my partner today#he is loving rem so far.... he doesn't know what happens to her...... he might cry.......
607 notes
·
View notes
Text
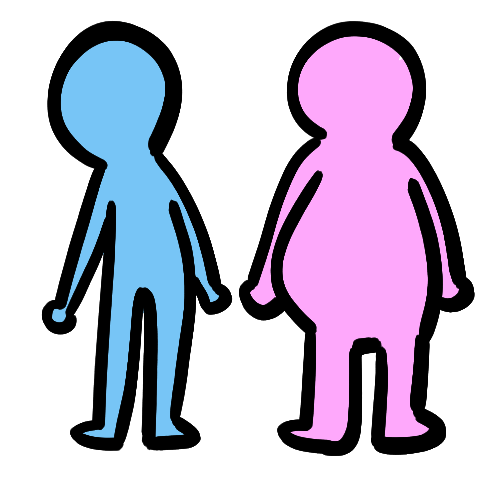
i’m trying to make a picrew and im like does this even Look good
#like it’ll look a lot better when it’s not just a blank head and face but yeah#im being good about labeling my layers/groups and saving them in files that are organized tho so#character development#i plan to make it purely decora / emoscene themed to keep things easy on me wrt coming up w ideas for parts#im also just trying to figure out picrew creator via tutorials and such#but it’ll be worth it if i actually get it useable#picrewblogging#<-im gonna ramble about it as i go maybe so it’ll be tagged This
1 note
·
View note
Note
Hihihi!! Could I have some tips for a tv kin pls?? Ty and have a nice day c:
tips for a tv
pt: tips for a tv end pt
make a tvhead! there are tons of tutorials on youtube!!
get an old tv, or collect them!! they may not work but they're super neat to keep around!
use technology/tv/etc themed neopronouns!
use objecthead picrews to show what you look like!
if you’re an older tv, wrap some wire around a headband to make some antenna gear!
wear lots of clunky or boxy/ square shaped clothing!
try doing some pixely/square/tech themed makeup!
watch some of your favourite shows or movies!
wear something holographic to look like tv static!
hope these help! -🩸

[ID in alt!]
#mod 🩸#tvkin#tv kin#tech kin#techkin#machinekin#objectkin#robotkin#computerkin#nonhuman alter#otherkinity#otherfolk#otherkin#nonhuman#alterhuman community#otherhearted#alterhuman#otherkin community#non human#nonhumanity#otherkith#otherlink#other folk#alterbeing#alterhumanity#voidpunk
22 notes
·
View notes
Text
How to Get Selfship Merch and Art with Low or NO Budget
*Okay, kinda misleading title as many of these are DIY but they can be cheap or free depending what materials you have access to. These are just some basic ideas I hope will inspire people to try their own things.
Feel free to add any ideas you have, too!
Things you can get/make for free
Picrew / Dressup games
I’ve seen some couple/romance picrews before!
I don’t always find the options I want in Picrews (ie body type) but you can always edit them using free software like Autodesk sketchbook, gimp, etc
Wallpapers
If your f/o is popular, you might be able to find some good phone/desktop wallpapers by searching online
Edits
There’s free apps for editing selfies where you can put in a photo and add in filters, stickers, etc. (Not my area of expertise, also may not work as well with animated f/o’s)
Free apps for video editing - I see a lot of edits on Youtube and Tiktok for example
Making silly edits where you put your ship into existing memes
Free art?! - Artists doing art requests / free art for experimental purposes
(Search for “art requests: open”, only ask if people offer first)
Free art?! - You can draw whatever you want, whenever you want
Apologies if that sounds condescending, but that’s often the thought that motivates me to draw selfship art when I do. No one can stop me from drawing myself kissing my f/o!
If this is daunting, try breaking it down into smaller steps. Search for tutorials on how to draw your f/o, or how to draw romantic scenes, etc.
Misc arts & crafts!
Whatever you have on hand you could make - especially in your f/o’s colors! Or things you associate with your ship
Sometimes schools and libraries have free events where they let people make things free of charge - check out your local library’s site! They’re always open for feedback, you can email suggestions for events.
I’ve seen events where they let you paint, make friendship bracelets, make buttons with their button machine, etc
For example my uni had a “destress from finals” event where you could make bracelets with plastic beads (like kandi?), and I made one with my friend’s f/o’s name and color scheme.
Things you can get/make for cheap
Keychains! Get one of those keychains where you can put a photo in, print out or draw a pic of your beloved, and put that bad boy in there
A lil character shrine! It doesn’t have to be huge
A good place to start could be a photo of the character and little trinkets you associate with them. Like an eraser shaped like their favorite animal or a candle in a scent that reminds you of them.
150 notes
·
View notes
Text
blog masterpost!
(bc I repost a lot of stuff)
~
Welcome!!
~
my name is Pixie (they/them), I post artwork/comics/silly posts/tutorials
I post about tmnt, rottmnt, Sonic, and other cartoons!
I AM A MINOR!
~
my asks are open! pls use them if you’d like, and you can always recommend drawing or writing prompts, in fact- I encourage droppin drawing prompts for me :DDD
~
things I do not support (DNI)
-racism/sexism/anti-semitism (discrimination or hate of any kind)
-maps
-zoophiles
-neo-nazis
-incest
-TERFs
-anyone who is anti anything that/whom this is a safe space for
this is a safe place for:
-age/pet regressors! (Im an age-regressor myself actually!)
-people with disabilities (physical or mental or both! no hate here!)
-mental health (this is a safe space for anyone struggling with mental health, I support you!)
-systems (I do my best to understand and learn about DID/OSDD, but I'm not perfect!)
-LGBTQ+ (I'm here and I'm queer!)
-BIPOC
-beginners! beginners of any kind (such as new artists, musicians, creators, etc!) are always welcome and supported here!
-religion (as long as you're not hateful and aren't pushing your beliefs on anyone, any and all religions are welcome here!)
-furries! (I, myself, have a fursona)
-therians/alterhumans (similar to my knowledge with systems, I do my best to learn, but I'm not an expert)
-"cringe" people (I support anyone and everyone (who isn't on my DNI list), whether you make kandi, cosplay, are a gacha kid, or are/participate in other stereotypical "cringe" things, you're always welcome here!)
-alternative views/tastes/style (goths, emos, scene people and of all the above welcome!)
links to my posts and tags below ⬇️
ask post (aka moot interaction w Lunar)
reblog game (picrews)
the odyssey boyscouts au 1
mini blog update (politics)
LEGENDARY
rottmnt x epic
EPIC (suffer w me)
‘favorites’ ask
rise Leo drawing (marbled)
rise Leo comic sketch
reblog text post (the outsiders fanfics??)
sleepaway camp text post / poem attempt
the golden guard fanart (draw w me!)
Viktor Arcane (S2 SPOILERS)
2012 "raised by Shredder" au
inspirational quote (photography)
vent-ish sort of post
spidersona sketch
silly reblog chain!
WYJEMP fanfic planning sheet
rottmnt goretober day 2
Mabel doodle to get out of art block😣
Dipper w allergies doodle
ask to irestuff (yall should support their shop and art its super cool!)
daily clicks reminder & link!
TMNTember Day 3
TMNTember Day 2
TMNTember Day 1
silly ask to claws and paws
discord server promo!
rottmnt au storyboard
breakfast text post
Lunar’s agere ally button (not made by me, but important to my blog)
fanart of hatekawa’s 3 months AU
Poll
Allergy Text Post
Yaelokre fanart
TMNT 40th Anniversary comic
2012 tmnt fanfic fanart
Sonic fanfic fanart
25 reblogs!
au rottmnt comic
au sort of vid rottmnt movie
womp womp
Limited Space rottmnt au
Sonic and Tails
Lunar’s DTYIS
Hey Sunshine text post
Tails
Mystic Mikey
tmnt comic
rottmnt new years
poll
original character
arcane text post
shooketh text post
mm Leo and Amphibia Anne text add-on post
how to add images into ao3 tut
rottmnt Mikey ballet
Amphibia artdump
The Owl House artdump
Kraang Prime drawing
TOH Flapjack tattoo post
TOH skill issue
ROTTMNT turtles
Marcy Wu - Amphibia
my tags: (first four)
#pixie promo💕#pixie’s rambles#pixie’s asks#pixie’s art inspo/help🌟#digital art#rottmnt#tmnt#fanart#sonic the hedgehog#miles tails prower#masterpost#pixieperson19#safe space#ao3#tmnt 2012#2k12 tmnt#rise of the teenage mutant ninja turtles#lgbtq safe space
26 notes
·
View notes
Text

I finished that dressup game I said I was working on !! would very appreciate people giving it a go because I spent literally a week on this. like 7 days off work doing nothing but drawing clothes lmao
in order to make the different body types work without ballooning up the file size way more than it already is, I had to make it so you choose your skin tone twice. in meiker you can't arrange the order elements appear in, but I recommend starting with these two options to pick out your body type and skin tone first, since some options look better on certain bodies imo

also !! meiker !! I don't hear people talk about it much, but it's really cool I like it a lot! it's like picrew, but instead of uploading a bunch of pngs, you arrange and label your layers in folders and upload a single psd file. personally I liked the process a lot more than picrew because I'd rather work with one big file than a million tiny image files, but that's just me. plus you can make the images bigger than you can on picrew too
also posting this again since I can attach it to a post with the game, but I made a tutorial on how to create a bunch of colour options super fast if you want to make your own dressup game. there's no way I'd have nearly as many options if I didn't know how to do this. once you understand the actions feature you can do so much stuff so much more efficiently it's insane it's like my favourite photoshop feature
youtube
#this is literally like 1.5 hours after I made my last post about being so so patient lmao oops ty meiker mod#meiker#meiker.io#picrew#dress up game#my art#I feel like you can tell I designed all the clothes on the plus size girl first and then remade them for the other bodies#bc everything looks best on her lmao#also I saw a robot girl game but it only had like 6 options total for the entire thing and now I'm like#ooooh I should make a robot girl game#I love robot girls but I don't draw them much bc I'm too indecisive about what features I want them to have#and drawing takes too long to just draw more lmao#animated gif#also I wanted to add like chains and belts and bracelets and necklaces and stuff to this but after a week I was like.#I need to be done. I need to stop.#Youtube
238 notes
·
View notes
Text

The recom OC picrew is here!
After weeks of suprisingly tedious work, the picrew is finally done! I'm so, so glad it's finally off my shoulders and into the wild! I've gained a lot of respect for picrew makers, as it was definitely a challenge on my patience!
Massive thank yous to :
@livisart for the actual tutorial that enabled the madness. @straydaddy for the amazing painted backgrounds and atokirina seeds @bombshe77 kindly contributed the bite and wire tattoos @exxorciusxxx on twitter did the Mansk tattoo @Killveous on teitter contributed the Quaritch and Lyle tattoos!
Many thanks as well to everyone on the Deja Blue server for keeping the hype alive as I struggled through this one! Feel free to drop me a ko-fi! <3
Instructions and tips!
Any OC goes, but for the moment the gear and haircuts are recom only! Makes icons and pfps! Just, don't edit, don't crop the watermark, don't use for commercial purposes. Please try and credit me (here or the picrew) if using.
The ears do not match the skin colour automatically, due to the stripe colours needing to blend. Sobe sure to check the ears! The wrap around queue current has two settings, and only one goes with a jacket (the one with a knife). Please feel free to DM if you see any bugs. I'll be polishing it for a while.
#thanks everyone!#picrew#icon maker#pfp#recom#recoms#avatar#avatar picrew#recom picrew#my picrew#avatar 2#avatar the way of water#recom quaritch#recom prager#recom mansk#recom walker#recom zhang#recom z dog#recom OCs#oc art
186 notes
·
View notes
Text
Dealing with Dysphoria: Dead Edition
pt: Dealing with Dysphoria: Dead Edition

1) using makeup!
using a paler foundation than your skin color, or adding white foundation to your regular one to make it lighter
using dark shadow under and around your eyes, giving them a sunken look.
^ similar but with your cheeks/cheek bones
there are even some really cool makeup tutorials to help you achieve this!
dead glam by roxette arisa
wearable dead makeup by mirrorsandhaze
easy dead looking makeup by anoushka
some other ideas!
making an OC or sona who is dead , undead or died/dies
creating art of oneself appearing dead/undead
or using picrews & other doll creators for it!
#undead dysphoria#death dysphoria#dead dysphoria#atypical dysphoria#desirdae#dissodic#dissomei#our posts#our guides
10 notes
·
View notes
Note
your tutorials keep popping up on my dash, and every time i get super excited because i recognize you from your picrew! it's saved me time and time again whenever i wanna make picrews of my disabled ocs ^_^ thank u for making tutorials aswell, super helpful!!!
<3 I'm glad you find them helpful! Thank you
19 notes
·
View notes