#oil-control primer
Explore tagged Tumblr posts
Visit Tumblr Blog
Explore Tumblr blogs with no restrictions, modern design and the best experience.
Last Seen Tumblr Blogs


Fun Fact
Post activity is at the highest at 4:00 pm EDT; notes peak at 10:00 pm EDT.
Text
#Focallure primer#matte primer#poreless primer#makeup primer#oil-control primer#hydrating primer#long-lasting primer#foundation primer#skin-smoothing primer#flawless makeup base
0 notes
Text
#aroma blend moisture mask#primer spray#makeup fixing mist#soft blusher#almond milk bomb sheet mask#power foundation serum spf 20#bronzing powder#stars baked highlighter palette#mattifier oil control primer#green tea watery cream#age defense foundation#erase balm cleanser#makeup shine killer primer#concealer
0 notes
Note
Where reader  beg Kenji to let her do her makeup on him and he all pout the entire time but he secretly likes it
Glam Before the Slam
Kenji Sato x Reader
Word Count: 1,435
Genre/Warning: Established Relationship, Fluff, Makeover
Author’s Note: This felt like Kenji’s GRWM and him looking bonita 𓍢ִ໋🌷͙֒ ᰔᩚ
MASTERLIST

You were so so excited for Kenji’s upcoming big interview tonight, and you, being the supportive girlfriend that you are, were more than willing to help in your own way.
Kenji stood in front of the mirror, combing his hair for what felt like the hundredth time. The Grand Slam Show was just a few hours away, and the nerves were starting to get to him.
“You look handsome,” you said, creeping up on him and hugging him from behind. You tiptoed so your chin could rest on his shoulder and stare at him in the mirror.
“I know what’s missing,” you told him, referring to the unending combing of his hair. He's been doing that for the past minutes, trying to get things to look right.
But if he asked you, you’d tell him he didn’t have to change anything because he already looked perfect. He was the most handsome guy in the world and nothing can change your mind.
“What is it?” He asked, his form relaxing and leaning back into your smaller figure.
You smiled as you circled his body, arms still wrapped around him until you were in front of him. You let go to lean on his your vanity table in his room, pulling one of the drawers out to show your makeup essentials.
Kenji crossed his arms, the corners of his mouth tugging into a familiar pout. "I don't do makeup, (y/n)."
"Please," you pleaded, stepping closer and giving him your best puppy-dog eyes. "Just this once. For me?"
Kenji sighed, his resolve already crumbling. He could never say no to you when you looked at him like that. "Fine," he muttered, “but just this once."
Or so he thought.
You beamed, guiding him to sit on the edge of the bed. He settled down reluctantly, still pouting but clearly resigned to his fate.
“Aren’t we going to do this in front of the mirror?” He asked, looking up at you.
You shook your head. “No because I know that you’d just go against everything,” you said, chuckling and giving him a kiss on his forehead.
“First, before applying your makeup, we’ll need to moisturize,” from the vanity drawer within reach, you took out a small bottle and showed it to him. It’s important that he knows what’ll be applied to his face.
“Intense renewal serum,” he read. He looked up at you to see your eyes sparkling with excitement.
With the dropper, you put some on his forehead and under his eyes before spreading it on his face using your fingers.
“Next, we’ll create a base,” you said. “This would control the oil on your face.”
“Oil blocker ex,” he read. You scooped a small amount with your fingers and applied it to his face.
“Alright, the base is done,” you said, placing the primer on the table. “We’ll now put…” you paused, rummaging through the drawer. “Foundation!” You held it close to his face for him to read.
“Gel creamy foundation,” he said.
“Very good!” you chuckled. “You’re so good at reading.”
You pumped it twice on your hand, leaving two dots of foundation on it. Afterward, you gently ran a brush over it and then applied it to Kenji’s face.
He closed his eyes, his lips still set in a stubborn line. As the brush moved across his face, his pout gradually softened, and he began to relax.
After applying the foundation, you grab a sponge and pat it on his face; this process really makes a difference. “This would even your skin tone,” you told him.
You leaned back to check him. “Your skin looks really good!” you said, smiling at him. At that moment, he felt like he fell in love with you again. He does every time he sees you happy.
Next, you held the concealer in front of him, waiting for him to read it.
“Skin reflect fresh concealer,” he said.
“You’re going to look so good on camera,” you said, leaning close. You used the other side of the sponge to dab it and blend it on his face, covering any signs of tiredness.
"Yeah, yeah," he grumbled, but you noticed the corners of his mouth twitching upwards.
“To finish up the base, we’ll use this,” you said, holding up yet again another product in front of him.
“Invisible essence loose powder translucent,” he read, chuckling afterward. “That’s a long one.”
Using a big brush, you applied the powder lightly to set everything in place. “There you go,” you said, holding him below his jaw.
“We’re done?” Kenji asked.
“No, but I’m gonna let you have a water break,” you answered. “Mina, please get him a glass of water.”
As the two of you waited for Mina, you went over the vanity to place back the items you’ve used and to take out the ones you’ll be using next.
This time, it was his turn to hug you from behind. He gave little tickling kisses on your neck. “Stop!” You said, laughing and squirming away from his embrace. “You’re gonna ruin your makeup!”
“Here is the wa— oh,” Mina said, pausing when she saw the two of you.
You finally escaped his arms, still laughing as you took a step back. You thanked Mina as Kenji took the glass, drank the water, and handed it back to Mina.
Kenji then returned to sit on the edge of the bed, letting you continue. “I’m going to contour the sides of your nose, your jawline, and your cheeks,” you said, walking towards him.
“Shading powder,” he read the product.
You used the included brush in the palette to apply the product to the areas you mentioned.
“Suck in your cheeks,” you told him as you were about to apply contour on his cheeks. Surprisingly, he did as told but you could see him trying hard to hold back a smile.
"Almost done," you said, reaching for an eyebrow pencil to define his brows slightly.
He opened one eye to peek at you, his expression softening. "This really necessary?" he asked, though his tone was more curious than annoyed.
"Absolutely," you replied with a grin, stepping back to admire your handiwork. "You look amazing."
You took his hand, “Don’t open your eyes yet,” and guided him back to the mirror. “Okay, you can look now.”
Kenji opened his eyes, looking at himself in the mirror. His expression shifted from skepticism to surprise. "I do look different," he admitted, turning his head to get a better look. "Better, I guess."
You smiled, feeling a warm rush of satisfaction. “You already looked the best even before the makeup,” you said. "You're going to knock 'The Grand Slam Show' out of the park."
Kenji chuckled, finally letting a genuine smile break through his pout. "Thanks, (y/n)."
He leaned down to press a quick kiss to your forehead, his hand giving yours a gentle squeeze. "I appreciate it. Really.”
You stare up at him lovingly, knowing that he secretly loved every moment of being pampered by you.
When you guys arrived on the set, you made sure to apply a bit of lipstick on Kenji so he wouldn’t look pale.
“Thanks, (y/n),” leaning in for a kiss but you held your hand on his chest, stopping him.
“Micro kiss only,” you said as you gently pressed your lips on his so as to not ruin his lipstick.
Bonus Scene: The Grand Slam Show
"So, Kenji, you've been having an incredible season so far," the host said, leaning forward with a grin. "But I have to say, you're looking particularly sharp today. What's your secret?"
Kenji chuckled, a blush creeping up his cheeks as he glanced at you in the audience.
"Well, I have to give credit where it's due," he said, a playful smile forming on his lips. "My girlfriend actually did my makeup for me today."
The host raised an eyebrow, intrigued. "Really? That's fantastic! Tell us more."
Kenji's smile widened, and he looked directly into the camera, his eyes twinkling. "Yeah, she insisted on it. Said I needed to look my best for the cameras. And honestly, I think she did a great job."
The host laughed, clapping his hands together.” Well, she certainly did. You look amazing. Shoutout to Kenji's girlfriend for the excellent work!"
Kenji nodded, his expression softening. “Thanks, babe," he said sincerely. “Couldn't have done it without you."
The audience let out a collective "aww" and applauded, and Kenji couldn't help but grin, feeling a warmth in his chest.
From that day on, in every interview, you became his personal makeup artist.
Taglist is open! Comment if u wanna be tagged on future Kenji oneshots
@sweetangle8 @eternallyvenus @puppyminnnie @wattpadsuckssohard @sakura-onesan @reggies-eyeliner @buggs-1 @miffysoo @spencerrxids @stupidbutsmart
#kenji sato x reader#kenji sato#ken sato x reader#ken sato#ultraman: rising#ultraman#fanfiction#oneshot#grwm#grwmmakeup#fluff#established relationship
1K notes
·
View notes
Text
Everyday Makeup Routine 💄🪞💋✨
Primer: Apply a lightweight, mattifying primer to create a smooth base for your makeup and control excess oil.
Foundation or Tinted Moisturizer: Even out your skin tone with a light layer of foundation or a tinted moisturizer that matches your skin shade. (You don't always need foundation. I only wear foundation if I am going for a full glam look. Other wise, I use concealer and tinted moisturizer on days my skin is not cooperating.)
Concealer: Use a creamy concealer to cover any blemishes, redness, or under-eye circles.
Setting Powder: Gently dust a translucent setting powder to lock in your base and reduce shine.
Blush: Add a natural flush to your cheeks with a soft blush in a shade that complements your skin tone.
Eyebrows: Fill in and shape your eyebrows using a brow pencil or powder for a polished look.
Eyeshadow: Apply neutral eyeshadow shades for a subtle enhancement of your eyelids.
Eyeliner: A thin line of brown or black eyeliner along the upper lash line can define your eyes.
Mascara: Coat your lashes with mascara to open up your eyes and give them a more awake appearance.
Lip Color: Choose a lip color that suits your style, whether it's a nude shade, a soft pink, or a subtle berry.
Additional Steps for a Polished Makeup Look:
Contour and Highlight: Use a contour powder to define your cheekbones, jawline, and nose. Then, apply a subtle highlighter to the high points of your face for a radiant glow.
Setting Spray: Finish your makeup by spritzing a setting spray to lock everything in place and give your skin a fresh, dewy finish.
Lip Liner: To enhance the shape of your lips and prevent lipstick from feathering, use a lip liner that matches your chosen lip color.
Lipstick or Lip Gloss: Apply your preferred lip product, whether it's a classic lipstick for a bold look or a lip gloss for a more natural shine.
Finishing Touch: Take a moment to blend everything together and ensure there are no harsh lines or uneven patches.
Product Suggestions:
Primer: "Mattifying Pore Minimizer" - Helps create a smooth canvas and control shine.
Foundation or Tinted Moisturizer: "Natural Glow Tinted Moisturizer" - Provides light coverage and a healthy radiance.
Concealer: "Creamy Conceal & Correct" - Covers imperfections while remaining blendable.
Setting Powder: "Translucent Setting Powder" - Sets makeup and reduces oiliness without adding color.
Blush: "Soft Rosy Blush" - Adds a natural flush to your cheeks.
Eyebrows: "Brow Sculpting Pencil" - Defines and shapes your brows for a put-together look.
Eyeshadow: "Everyday Neutrals Eyeshadow Palette" - Offers versatile shades for subtle eye enhancement.
Eyeliner: "Precision Eye Liner" - Provides a defined line along the lash line.
Mascara: "Lengthening Lash Mascara" - Gives your lashes a longer and fuller appearance.
Lip Color: "Nude Lip Crème" - Choose a shade that complements your style and skin tone.
Contour and Highlight: "Sculpt & Glow Contour Kit" - Comes with contour shades and a shimmering highlight for dimension.
Setting Spray: "Hydrating Setting Mist" - Sets makeup and provides a luminous finish.
Lip Liner: "Precision Lip Liner" - Defines your lips and extends the wear of your lip color.
Lipstick or Lip Gloss: "Creamy Matte Lipstick" - Offers rich color and a velvety finish. "Glossy Lip Shine" - Adds a touch of shine and moisture.
Finishing Touch: "Blending Brush Duo" - Helps seamlessly blend and soften your makeup for a polished result.
Let me know if you guys want me to do a post with my personal product recommendations :)
#makeup#beauty tips#beauty#level up journey#dream girl guide#dream girl journey#dream girl tips#dream girl#it girl#clean girl#soft girl#girlblogging#glow up tips#glow up#rebranding#self improvement#personal development#feminine energy#femininity#divine feminine#elegant woman
509 notes
·
View notes
Note
pls please let us know your skincare routine & the products that you use 😭🤌 please I've oily skin too soo it would be prtty helpful ♡ tysm! :)
I have everything u need in this blog ! Click in the pink title !
skincare routine !
my overall advices for you is
Cleanse your face twice daily using a gentle, oil-free cleanser to remove excess oil and dirt without over-drying your skin. ( Because I have rough acne I use CeraVe acne control cleanser)
Apply an alcohol-free toner to balance your skin's pH level and reduce the appearance of pores. ( I recommend toners with rice water )
Use a lightweight, oil-free moisturizer to hydrate your skin without adding extra oil or clogging pores. (I didn't buy one yet but I recommend la Roche Posay moisturizers )
Exfoliate 1-2 times a week with a gentle exfoliant to remove dead skin cells and prevent clogged pores.
Incorporate a clay mask into your skincare routine once a week to help draw out impurities and absorb excess oil. ( I use green clay cuz it suit oily skin)
Drink plenty of water to stay hydrated, which can help regulate oil production and improve your skin's overall health. (I'm not lying)
Choose oil-free makeup products and opt for a mattifying primer to control shine and keep your skin looking fresh throughout the day.
#luckybloom#bloomivation#bloomdiary#becoming that girl#glow up#wonyoungism#wonyoung#it girl#dream life#creator of my reality#divine feminine#skincare routine#skincare#self growth#self development#self love#self confidence#trust yourself#tumblr girls#dream girl journey#this is a girlblog#girlblog aesthetic
31 notes
·
View notes
Text
🪞🕊️🤍✨ Top 5 Local Foundations in Indonesia ✨🪞🩰🦢🕯️

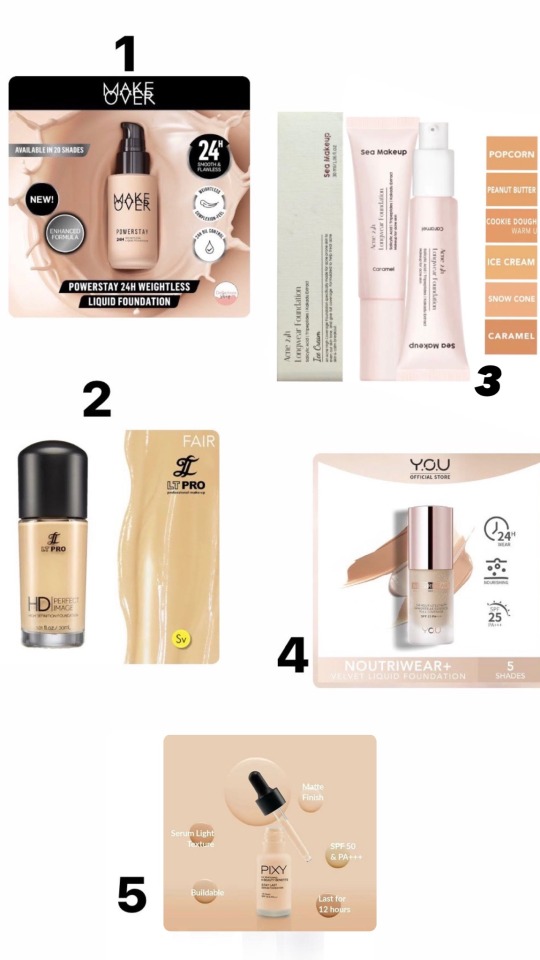
𓍢ִ໋🌷͙֒ ᰔᩚ hi beautes! im back! hope u are doing well and stay healthy𓍢ִ໋🌷͙֒ ᰔᩚ
I want to let you know about make up from my country. I am honored to let you guys know 5 Top Foundations MakeUp from Indonesia
Foundation is a form of makeup that is applied to the skin after primer to balance out the skin tone, conceal flaws, and provide a flawless base for the rest of your process. It comes in a variety of shades finishes, and coverage options to suit your natural skin tone as well as your desired style.
And Foundations have their type of using for your desired. The most often used foundation kind is liquid foundation. It is suitable for most skin types and provides buildable coverage, a natural finish, and many benefits (such as being matte, imparting radiance, or being long-lasting). Cream foundation is ideal for dry skin because it is moisturizing. It typically provides more coverage but can be expanded. Powder foundation is ideal for oily or mixed skin since it provides matte coverage and helps to control shine. They provide lighter coverage but can be built up. Stick foundation is comparable to cream foundation but comes in a stick form, making it easier to apply and carry with you.
Foundations can provide a variety of finishes, and the choice comes down to personal preference, desired outcome, and skin type. Let's look at several foundation finishes and why individuals choose them. A dewy finish foundation is all about creating a fresh, luminous, and radiant appearance. It's perfect for folks with dry or older skin because it adds moisture and radiance. This polish reflects light, leaving your skin looking healthy and youthful. On the opposite end of the spectrum is matte finish foundation. This option is ideal for those with oily or mixed skin who like a shine-free, smooth finish. Matte foundations provide a smooth and equal appearance while helping minimize the appearance of oil. Satin finish foundations fall somewhere in between. They provide a delicate glow without excessive shine, making them suited for a variety of skin types. Satin finishes create a natural-looking, healthy complexion that is a little shining and not at all flat. They're ideal for everyday wear. If you want to achieve a "no makeup" look, natural finish foundation is your greatest buddy. This finish matches the texture of your skin, creating a subtle appearance. This is sometimes referred to as a skin tint because it evens up skin tone while appearing natural. Foundations with radiant finishes are intended to give off a glowing, young appearance. They frequently contain particles that reflect light, making your skin appear radiant and healthy. Because it gives your skin dimension and warmth, this finish is great for special occasions and photos. Velvet finish foundations provide a soft focus, smoothing effect that makes flaws less noticeable and gives your skin an elegant.
So here's I am happy to represents this the top 5 foundations from my country Indonesia:
1. Make Over Powerstay 24h Weightless Liquid Foundation. This is my favorite foundation beautes!! ever!! ✨🫶 I repurchased this foundation for many times! 1000/10 ᯓᡣ𐭩
NEW Enhanced Formula! Make Over Powerstay 24H Weightless Liquid Foundation is a liquid foundation that can provide FLAWLESS AND SMOOTH results on all skin textures with a MATTE FINISH that can LAST UP TO 24 HOURS. Formulated with MICRO-FIX, provides results that look smooth and flawless all day long. Apart from that, this foundation is formulated with Oil Regulatory Technology which can properly control excess oil production in the skin, not only that which appears on the surface of the skin, but also regulates oil production from below the skin layer. Foundation that feels light on the face WEIGHTLESS COMPLEXION-FEEL, with 20 INCLUSIVE SHADES that are suitable for all skin tones.
The Superiority: Smooth Matte & Flawless Results 24 hour smooth matte and flawless results. Supported with MICRO-FIX™ provides a smoother skin appearance, achieved through zero-crack, zero-smudge & zero-cake. 24H Oil Control; Control oil for 24 hours with Oil Regulatory Technology: Sebum Absorber and Sebum Controller. Weightless Complexion-Feel; Feels light on the face when used for indoor and outdoor activities. Inclusive 20 Shade Options, Fits All Skintones; Using Shade Matching Technology offers 20 shade choices designed based on skin mapping research on 1000 multi-ethnic Indonesian women, from light tone to dark. Water resistant; A formula that will not fade or fade when exposed to water. Mask-proof; Provides minimum fading under mask use. Pro-Artists & Beauty Experts Approved; Formulated to meet standards and be approved by Pro-Artists (Make up Artists) and Beauty Experts. Has medium coverage that can be built up to get the desired level of coverage. A formula that doesn't clog pores & maintains healthy skin. Non-Oxidizing, Formula with color that suits all day. SPF30/PA+++, non-Comedogenic, Non-Acnegenic & Dermatologically Tested
2. LT Pro HD Perfect Image Foundation
LT Pro Perfect Image High Definition Foundation (Liquid Foundation HD) combines very fine components and light scattering ingredients that serve to balance out skin tone and conceal the appearance of dark spots and fine facial creases, resulting in a smooth skin texture and natural-looking make-up. LT Pro Perfect Image High Definition Foundation contains moisturizer to keep skin moist, making it suited for daily usage. And I once used this product at an event; my mother hired a make-up artist, and they used this product to do my make-up; I was surprised that the results were so beautiful, long-lasting, and poreless that my appearance stayed steady for 7 hours. ༘˚⋆𐙚。⋆𖦹.✧˚
3. Sea Make Up Foundation
Sea cosmetics Foundation is a cosmetics product that is specifically created with the primary goal of treating and preventing acne. It contains salicylic acid, tripeptides, and kakadu extract. With its complete coverage and 24-hour wear time, silk velvet matte finish, comfortable all-day wear, and excellent oil management, this foundation not only helps to protect your skin but also conceals acne, acne scars, pores, and fine wrinkles in just one swipe. and shield against acne. designed to resist oxidation even after prolonged use. Although my skin is prone to acne, I own the product and don't often use it. However, it is an excellent gentle acne fighter beautes! ⋆.˚🦋༘⋆
4. YOU Noutriwear+Velvet Liquid Foundition [SPF 25& PA+++]
The high-quality NoutriWear+ VelvetLiquid Foundation can last up to 24 hours, while Immortelle C-lock Essence helps preserve the flexibility of the skin. 24 Hours helps manage sebum without making the skin feel dry, forms a thin layer on the skin, and offers good coverage that lasts up to 24 hours. Immortelle C-lock Essence: Centella asiatica, which is well-known for hydrating and soothing the skin, combined with Immortelle flower extract to help preserve skin elasticity. Complete Reporting Soft Skin: Gentle Light-diffusing With a velvet-matte finish, powder can regulate extra oil without making the face feel dry. It also hides blemishes on the skin. SPF 25 & PA+++: Long-lasting, non-comedogenic, non-acnegenic, and dermatologist-tested, this product protect skin from the damaging effects of UV radiation. °❀⋆.ೃ࿔*:・
5. Pixy 4 Beauty Benefits Stay Last Serum Foundation
For makeup that appears bright and lasts up to 12 hours, use Pixy liquid foundation. It is appropriate for daily usage because of its mild feel on the skin. Benefits; 1. Whitening: Skin appears brighter with the 2-Way Whitening solution. 2. Protecting: Skin is shielded from sun exposure by SPF 50 & PA+++. 3. Moisturising: The skin is kept hydrated with jojoba oil. 4. Beautifying: Makeup can last up to 12 hours with Stay Last Micro Powder. 𓇼🐚☾☼🦪
so thats all from me beautes!! if u are curious and interested in make up from my country, please don't hesitate to ask or contact me! Because I am here for you!
always remeber, happiest girl are the prettiest! see u later my beautes!˚˖𓍢ִ໋🌷͙֒✧🩷˚.🎀༘⋆
#makeup#foundation series#woman#indonesia#foundationedit#top#dailywomen#lot makeover#happy girls#be happy#this is what makes us girls#daily noods#beauty products#beauty
8 notes
·
View notes
Text
My Makeup
People seemed interested, so this is a post of my makeup. I didn't include everything I have, as I have more moisturizers, setting powder, setting spray, and brushes. So yeah.
My favs will be bolded.
I use makeup for expression purposes; makeup has no gender babes.
People who seemed interested; @eynnwwyjth, @krenenbaker, @twistwonderlanddevotee, @silvers-numberonefan
Eyeshadow Palettes
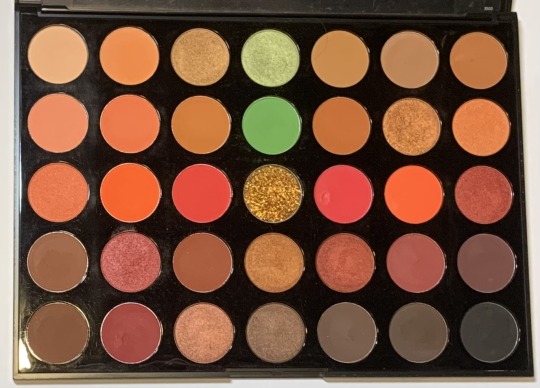
Palette; Fierce by Nature from Morphe (I think it's out of circulation now)
1st Row; Trance, Consume, Frenzy, Power Play, Savage, The OG, Disrupt
2nd Row; Temptin', Flame Game, Ferocious, Come Alive, Major Hottie, Stun Wild, Embers
3rd Row; New Flame, Ball of Fire, Red Alert, Make Believe, Unstoppable, Explode, Hot Contents
4th Row; Domination, Full Blast, Ignition, Mesmerize, Inferno, In Command, Hypnotic
5th Row; Stamina, Warning Label, Combust, Outta Control, Smolder, Jolt, Smoked Out
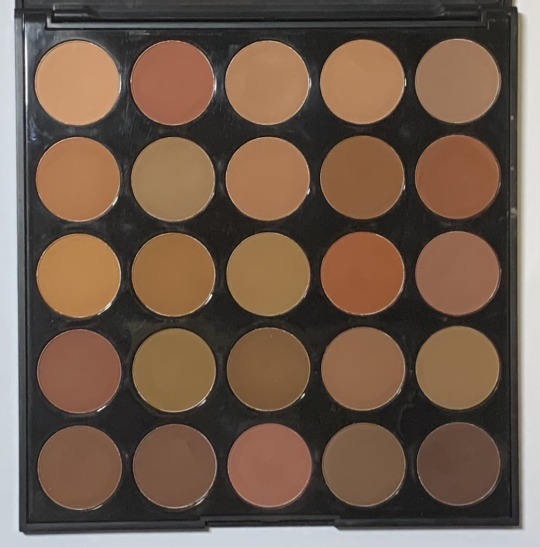
Palette; Oh Boy by Morphe (out of circulation too I think)
1st Row; Hendrix, Derick, Benji, Maddox, Alexander
2nd Row; Jacob, Wyatt, Timmy, Carter, Liam
3rd Row; Max, Kai, Austin, Mace, Blake
4th Row; Bentley, Jax, Chris, Jonah, Oliver
5th Row; Paxton, Knox, Eli, Jace, Daniel
I only really have it to have a neutral palette just in case I need to do something more business or formal.
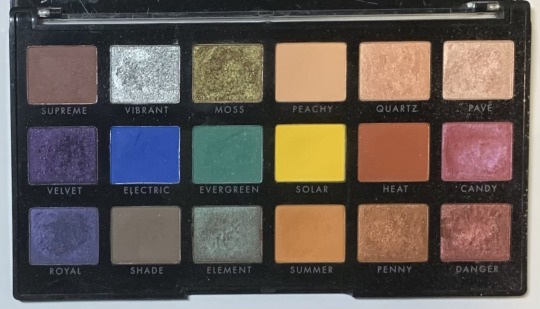
Palette; 18 Hit Wonder by e.l.f
1st Row; Supreme, Vibrant, Moss, Peachy, Quartz, Pave
2nd Row; Velvet, Electric, Evergreen, Solar, Heat, Candy
3rd Row; Royal, Shade, Element, Summer, Penny, Danger
I also use this to do some dorm-inspired makeup; plus look at that rainbow.
Single Eyeshadows (also blush and highlighters but I use them as eyeshadow too)
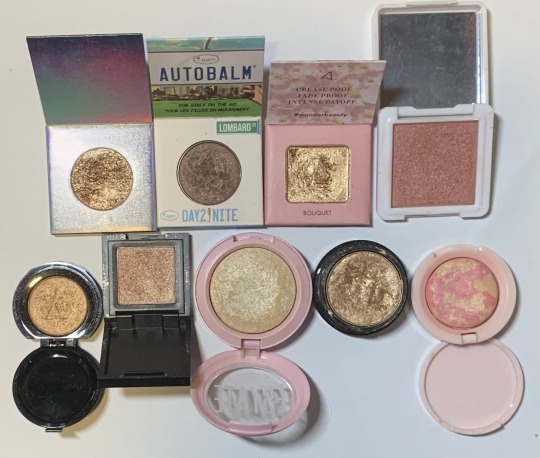
Starting at the top left;
Dito Galaxy Shade in Mars
Autobalm Day2Night in Lombard ST
Wander Beauty in Bouquet
Kaleido Cosmetics Skin Blush in Primadonna
Bottom row, left to right;
Nomad Cosmetics Desert Sands
Araceli Jalisco Eyes in Tequila
Estate Dew Me Baked Highlighter Powder in Lit
inmo cosmetics velveteen dream shadow in Kween Bee
Ciate London blush highlighter in Pinch Me
All from IPSY; why did they keep on sending me gold eyeshadows?
Foundations & Moisturizers
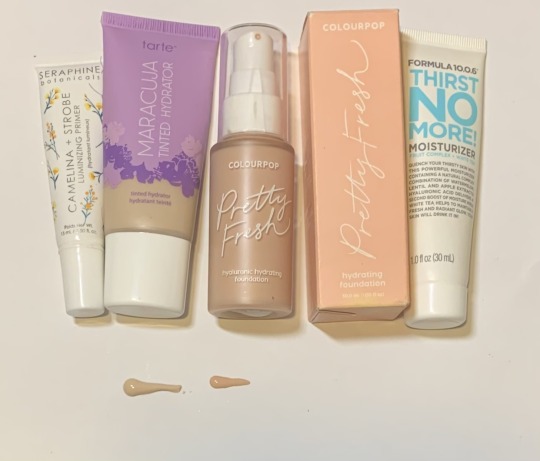
Left to right;
Camelina + Strobe Luminizing Primer (I use it as a highlighter)
tarte Maracuja Tinted Hydrator in 10N Fair Neutral
ColourPop Pretty Fresh Foundation in Light 40N
Formula 10.0.6 Thirst No More! Moisturizer
I mix the two shades together, but it also depends on the season. I don't wear foundation very often, so yeah.
Clear Lip Stuff
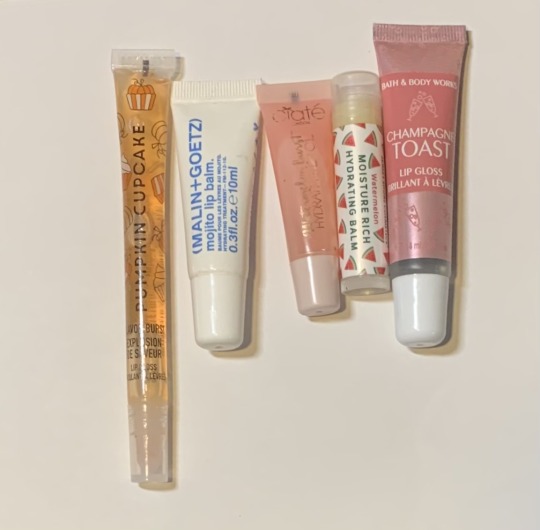
Left to right;
Bath & Body Works Pumpkin Cupcake
(Malin + Gotez) mojito lip balm
Ciate London Watermelon Burst Hydrating Lip Oil
Jersey Shore Cosmetics Watermelon Moisture Rich Hydrating Balm
Bath & Body Works Champagne Toast Lip Gloss
Lipsticks
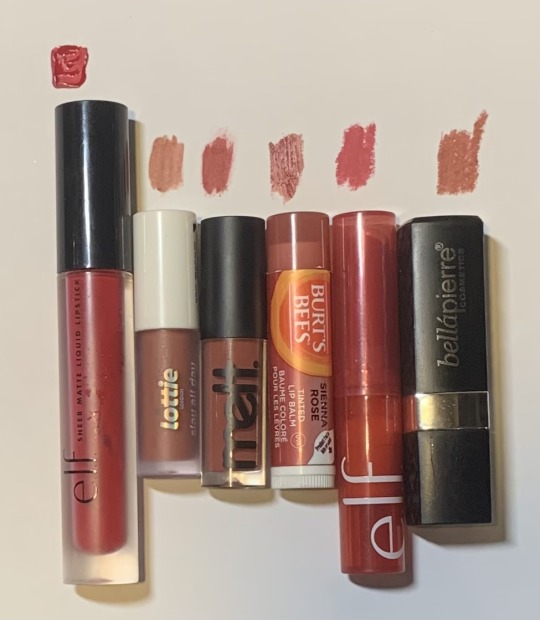
Left to right;
e.l.f Sheer Matte Liquid Lipstick in Bright Poppy
Lottie London Slay All Day in Fleek
melt in rebound
Burt's Bees Tinted Lip Balm in Sienna Rose
e.l.f. Sheer Slick in Dragonfruit
bellapierre cosmetics Mineral Lipstick in Envy
Liquid Eyestuff
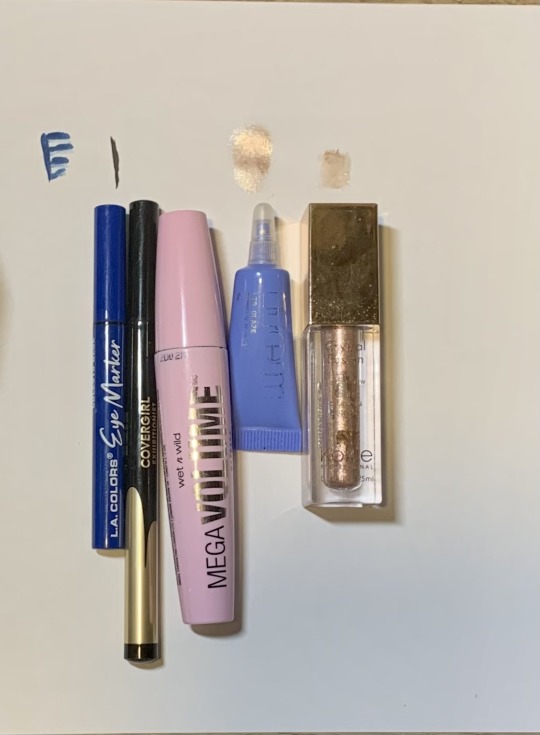
Left to right;
L.A. Colors Eye Marker in Blue
Covergirl Exhibitionist Lash Enhancing Liquid Eyeliner in Matte Black
Wet n Wild Mega Volume Mascara
item Lid Glaze in Lunar Drop
Kokie Profesional Crystal Fusion Liquid Eyeshadow in Polaris
#dove's makeup stuff#i don't plan on getting any more until i use up something#also idk if the foundation options are great with the ones i use; for colourpop they have 42 options but it's :/#might get colour matched at sephora when i go idk#neon eyeshadow my beloved <3#ALSO I WENT APESHIT WHEN I SAW A BLUE EYELINER I FUCKING LOVE IT#yes i do twst inspired makeup on the occasion; or an attempt is made#... yeah all of it is def 'expired' but bitch i paid money and I'm getting my money's worth
25 notes
·
View notes
Text
🥀Book Review: Pagan Portals: Persephone by Robin Corak
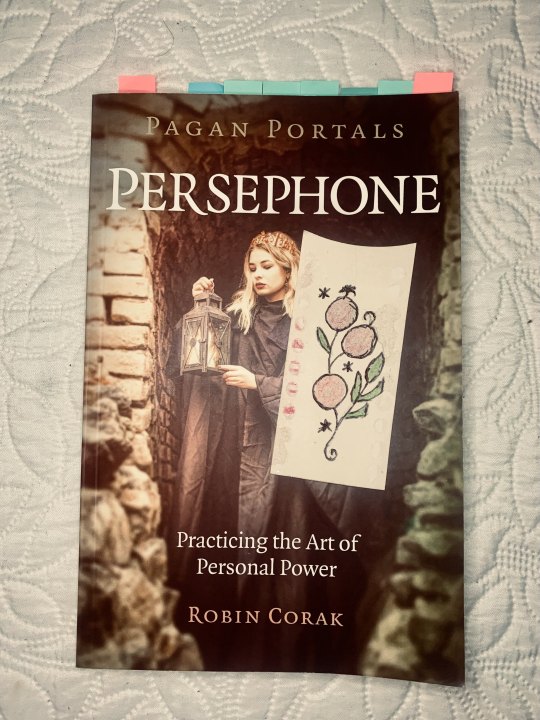
Full Title: Pagan Portals: Persephone, Practicing the Art of Personal Power. Author: Robin Corak Published by: Moon Books (John Hunt Publishing) 2020 Good Reads: Link
My Quick Review: ⭐⭐⭐ (3/5) stars. A good Persephone themed self-help book, touching on shadow work, Persephone's Mythos and with some interesting resources. I recommend it but not enthusiastically.
Official Blurb: Embark upon a powerful journey with Persephone, queen of the Underworld and Goddess of Spring, as she helps you discover your personal power and take control of your life. Personal Reason for Purchasing: I was familiar with several other Books in the Pagan Portals and bought this one hoping for a primer on Persephone's Mythology and modern pagan practice. (Bought from Amazon UK).
Overview of the book's contents. Introduction: An Introduction to the Author, their Personal Practice and their Experience Working with/Learning from Persephone. Chapter 1: 'From Helpless child to Powerful Woman'. A basic but welcome introduction to the core Myths of Persephone, The Homeric Hymn to Demeter, and a Personal retelling by the Author of the Abduction of Persephone by Hades, told from Persephone's Perspective and with a core theme of empowerment, self-determination/personal sovereignty. Includes journaling prompts. Chapter 2: 'The Eleusinian Mysteries'. An Overview of the Eleusinian Mysteries with discussion surrounding what they may have entailed and the possible lessons/take-aways initiates would have received. Includes journaling prompts. Chapter 3: 'Descent and Ascent'. Primarily a self-help section, discussing Persephone's personal ascent and descent into the Underworld and her growth from it. followed by an exploration of how such an ascent and descent into the shadow self might promote growth in the reader. Including the script for a guided meditation and journaling prompts. . Chapter 4: 'Persephone as a Psychopomp'. An Exploration of Persephone as a Psychopomp (defined as 'a guide with the realm of souls'), touches on the idea of Persephone as a Triple Goddess, with a description of the Nekromanteion. Followed by a discussion of how to access ancestral wisdom, the wisdom of ones own subconscious. Including the script for a guided meditation and journaling prompts. . Chapter 5: 'Persephone and the Art of Discernment'. Focusing on discernment (defined as 'acute judgement and understanding'), with suggestions on how to develop this skill. Includes several divination/discernment techniques using bay leaves. Includes journaling prompts. Chapter 6: 'Rituals for Persephone'. Includes rituals from the dark and light half of the year (one ritual for each) and the script for a guided meditation with the aim of building personal sovereignty and highlights themes discussed in previous chapters. Chapter 7: 'Forging the Path: Additional Methods for Connecting with Persephone'. Begins with an extensive list of correspondences, several chants/invocations, recipes for a Persephone Incense/Bath Tea and an anointing oil, with some discussion of the ingredients' significance. Followed by an explanation for a unique Divination style using Lithomancy dedicated to Persephone known as 'Persephone's Seeds of Wisdom'. Chapter 8: 'Persephone's Feast'. Contains several culinary recipes incorporating foods sacred to Persephone or with 'Greek Flavour', contributed by Steven Corak. (Recipes are as follows: Greek summer salad : Pomegranate vinaigrette : Pomegranate chicken and kale : Pomegranate reduction : Persephone's Pastries) Conclusion: It is a conclusion, with some final journaling prompts.
Personal Thoughts and Review. While I was hoping for an overview of Persephone's: myths, cults, correspondences etc, what this book is at its heart (imo) is a pagan self-help (maybe shadow-work) book using Persephone as inspiration and theming.
While a generally pleasant and quick read (around 95 pages of text) there are portions where sentiment is repeated and perhaps hammered home a little to hard, however for what this book is rather than what I wished it to be, Pagan Portals Persephone is an excellent example of how to learn from myth and grow from the lessons + experiences therein, and I do recommend it to those interested in Persephone from a Pagan perspective, but it probably shouldn't be your first book on the Goddess.
Books Content in detail. General content: Pretty surface level, but well done given the short page count. Journaling exercise: Themed primarily around shadow work, the questions were In depth and thought provoking (however, as a Masc (he/him) individual I did notice they were written assuming for a Fem reader). I found them useful and have completed the exercise twice so far and have learned more of myself each time. Origin Myth retelling: Interesting and inspiring but undoubtedly written with the lens of supporting the ‘self-help’ personal sovereignty narrative of the book. Persephone’s correspondences: Broad but far from exhaustive, simply a non-referenced list. Rituals and Meditations: Interesting as always to see another practitioner’s approach, I did notice certain Wiccan elements (casting circles, Athame/tools, ‘So mote it be’) not a complaint but worthy of note. Recipes: I’m not qualified to answer this, and food quality is always down to personal taste anyway. However, it is an interesting concept. Persephone’s Seeds of Wisdom: A personal highlight from the book, I use a modified version of this method in my own practice.
The most interesting hot takes from the book. Triple Goddess Persephone: While a throw away comment in Chapter 4, the idea of Persephone embodying all Three aspects of the Triple Goddess (namely the Maiden, Mother, Crone archetypes) is interesting, and has inspired me to explore the idea further. Personal Myth Retelling (Mythic fanfic): It is definitely decisive to rewrite myth within pagan circles, but isn’t that what Humanity have done from the Dawn of time, and perhaps by personally retelling Persephone’s transition from Kore to Queen, we might learn which aspects of the Myth, Goddess and their role in our practice are most influential to us as individuals. (Obviously attempting to masquerade one’s personal retelling (myth Fanfic essentially) as the one true version is mind numbing, but on a personal level it may be useful.)
Final Thoughts. While not what I expected, Pagan Portals Persephone has taught me alot, and added to my personal practice, but I am glad I got the this book while equipped to recognise what the text is missing.
#🥀Book Review#book review#persephone#persephone worship#persephone deity#persephone goddess#persephone devotee#persephone devotion#paganblr#paganism#pagan witch#hellenic pagan#hellenic books#hellenic gods#pagan books#witchblr#witchcraft#witch book#spirituality#shadow work#greek mythology#mythology#gay witch#gay pagan
9 notes
·
View notes
Text

PHOERA Foundation 102 and 103 & Face Primer,Liquid Full Coverage Foundation Set,Foundation Brush Powder Brush,5 Makeup Sponge,30ml PHOERA 24HR Matte Oil Control Concealer
#beautiful women#lifestyle#asianbeauty#makeup#spring outfit#hairstyle#nail polish#nail art#gift#mom#pretty face#my face#face masks#sally face
2 notes
·
View notes
Text
How to Prepare a Canvas/Surface for Painting
If you are an acrylic or oil painter, listen up! I know it is tempting to dive head-first into a new project, but if you want to have more control of your paints and have a smoother look to your paintings, you should first complete these steps to prep your canvas or painting surface.

(NaturalEarthPaint.com)
Introduction to Gesso
Gesso is a primer that is applied to canvas or other painting surfaces before painting. It creates a smooth and even surface to work with. Because canvas is a fabric material, it has many bumps and ridges in its design. Other materials like wood and paper also have this issue. The textures of these surfaces can interfere with the painting process, which is where gesso comes in.
You will want to get an acrylic gesso, which will work for either acrylic or oil painting. Liquitex is a very popular option, which can be found at almost any art supplies store.
How to Use
To apply your gesso, first clean off your canvas. There can be dust and particle buildup on the canvas, so take a clean and dry brush to the canvas to brush it down.
Then, take a large brush or roller and coat the entire canvas in a thick layer of gesso. Don’t forget the edges here.
Next, use a scraper or flat surface of some kind to run over the gesso to smooth it out. Have a light touch here, but also apply enough pressure that you are hitting the top ridges of the canvas. The thickness of the gesso is up to your personal preference; if you do want more texture, then press harder when scraping.
Finally, let the gesso dry. How long this will take depends on your environment and how thick your layer of gesso is, but I recommend letting the gesso sit for at least 2 days. Take it from me, trying to paint on half-wet gesso is no fun.
This simple addition to your process will help you elevate the feel and look of your painting. Just remember, it is a good idea to have canvases prepped for when inspiration strikes!
3 notes
·
View notes
Text
Page 27 of 366
Dear diary 🧸,
got these new fire boltt fire pods melody enc 501 today! really missing my classy samsung ones but they were having some problem with the volume 😭 but let's give these new ones a try :) also went shopping today for some makeup products because my cousin's wedding is right around the corner! i bought —
• blue heaven flawless makeup base primer
• blue heaven long lasting makeup fixer
• blue heaven oil control compact powder matte finish cream blush
• blue heaven hyper matte foundation honey medium
• blue heaven bold mascara
• makeup blender sponge
could you ever guess I'm promoting blue heaven right now? blue heaven peeps y'all better come here and give me free products
love,
me


2 notes
·
View notes
Note
heyyy
i'm so boredddd
time for random questions
what's your🫵 skincare routine? 🧖♀️
what products do you🫵 use?🧼🧴
(might go around asking these questions at random avatar writers hehe)
🫵🫵🫵
hiiii my 🫵 anon hehe. how are you love?
ooohhh i love sharing products! i’m gonna preface this by saying i have very oily, acne prone skin so 😀 and i’m gonna say my skincare n makeup routine bc why not!
1. to cleanse in the am, i use garnier micellar water on a cotton round (i’m always running late/never have time to do a full face wash lol)
2. then, i like to use panoxyl’s oil control moisturizer (has spf 30 which is great, i kill two birds with one stone using a combined moisturizer/spf). if i know i’m going to be in the sun for longer than 30 min, i also apply the skinscience sunscreen (it’s very glowy tho so i’m not positive it’s great for my oily skin lol)
3. i recently purchased the elf power grip primer (the new pink one with niacinamide) and it’s nice! so i’ll use some of that and press it in, don’t rub since it has that tackiness feel to it and you don’t want the product to pill
4. then i’ll either spot conceal if i’m in a big rush w/ the dior forever skin correct, or if i have time, apply charlotte tilbury’s beautiful skin foundation (it’s pretty lightweight which is nice, especially in the summer)
5. for brows, i love the nyx eyebrow pencil. it’s a staple for me, i’ve been using it for years now. for contour, i also recently picked up the elf halo glow contour beauty wand, and it’s a very good dupe for the charlotte tilbury contour wand. dare i say better?
6. for mascara, honestly any drugstore mascara is good. i also like the little mini “travel” sized ones from sephora, since you’re supposed to replace mascara every month anyway. might as well spend $13 on the mini instead of $28 for the full size one since it’s getting tossed at the end of the month regardless!
7. for powder, maybelline fit me (the loose one) is great, and givenchy makes a good loose powder too but it’s $$. setting spray i like urban decay’s all nighter, but i don’t use setting spray every day.
8. at night, i always double cleanse. it is essential. i use an oil cleanser from the dermatology group i belong to, it’s pretty nice. it removes all the mineral spf that’s sitting on top of the skin, as well as makeup. then for cleanser, i like cerave’s foaming facial cleanser, or their acne control cleanser. both are nice.
9. then i use the advanced snail 96 mucin power essence after cleansing, slimy yes but it makes your skin look dewy and glowy. and after that i apply a moisturizer & retinol from the derm group i belong to :) and then eye cream & lash serum!
wowee that’s a lot hahaha sorry for info dumping i just love talking abt products, this was such a fun ask <3
3 notes
·
View notes
Text
Mastering Makeup for Acne Prone Skin: Top Tips for Acne Fighting
Navigating makeup application with acne-prone skin can be a challenge, but with the right techniques and products, you can achieve a flawless finish without aggravating your skin. Know what expert tips on how to apply makeup on acne prone skin, along with recommendations for the best foundations specially designed for this skin type.
1. Start with a Clean Canvas:
Begin by thoroughly cleansing your face with a gentle, non-comedogenic cleanser. This sets the stage for a smooth makeup application.
2. Moisturize Wisely:
Opt for a lightweight, oil-free moisturizer to hydrate your skin without clogging pores. Look for products labeled as "non-comedogenic".
3. Use a Primer:
Apply a mattifying, pore-filling primer to create a smooth base for your makeup. This helps control oil and keeps your foundation in place.
4. Choose the Right Foundation:
Look for foundations specifically formulated for acne-prone skin. These are often labeled as "acne-fighting" or "non-comedogenic." They contain ingredients that won't clog pores or exacerbate breakouts.
5. Apply Foundation with a Light Hand:
Use a makeup sponge or brush to apply the foundation evenly. Avoid using fingers, as this can transfer bacteria and potentially worsen acne.
At the end of the day, use a gentle makeup remover to thoroughly cleanse your skin. Follow up with your regular skincare routine.
Conclusion:
With the right products and techniques, applying makeup on acne prone skin can be a confidence-boosting experience. Acne will cover with foundations mix with skin along with good Makeup products and applying on daily bases, can help you achieve a flawless finish while supporting the health of your skin. Remember, everyone's skin is unique, so it may take some trial and error to find the perfect routine that works for you. Read more in detail about Makeup for acne prone skin.
1 note
·
View note
Text
Smokey Eye Makeup Tutorial: Step-by-Step Guide for a Flawless Look

A smokey eye is a classic and timeless makeup look that adds depth, drama, and intensity to your eyes. Whether you prefer a soft, subtle version or a bold, dramatic effect, mastering this technique can elevate any tutorial Makeup Smokey Eyes. Follow this step-by-step guide to achieve the perfect look with ease.
Step 1: Prepping the Eyes
Before applying any makeup, it’s essential to prepare the eyelids properly. Begin by cleansing your face and ensuring the skin is free from oils or residue. Apply a thin layer of eyeshadow primer or a bit of concealer to the lids. This will help create a smooth base and prevent creasing throughout the day.
Step 2: Choose the Right Shades
A well-blended look requires a combination of colors. The typical shades include:
A transition shade – A neutral brown or taupe for smooth blending.
A darker shade – A deep brown, charcoal, or black to add dimension.
A lid color – This can be matte or shimmery, depending on your preference.
A highlight shade – A lighter color for the brow bone and inner corners.
Step 3: Apply the Transition Color
Using a fluffy blending brush, apply a soft brown shade into the crease. Blend in a windshield-wiper motion to diffuse any harsh lines. This creates a seamless transition between colors.
Step 4: Build Depth with Darker Tones
Next, take a darker shade and apply it to the outer corner of the eyelid, blending it into the crease. Use a slightly smaller blending brush for more control. This step is crucial in adding depth and creating the signature smokey effect.
If you want a more dramatic look, gradually build up the intensity by layering the dark color instead of applying too much at once.
Step 5: Apply the Main Lid Color
Using a flat eyeshadow brush, press your chosen lid color onto the center of the eyelid. A matte shade will create a more intense effect, while a shimmer or metallic tone can add a glamorous touch. Blend the edges to ensure a smooth transition between shades.
Step 6: Define the Lower Lash Line
To create balance, take a small pencil brush and apply the same dark shade along the lower lash line. Smudge it gently to give a soft, diffused effect. Adding a bit of the transition color underneath can also help blend it out.
Step 7: Highlight the Inner Corners and Brow Bone
To enhance the look, apply a small amount of a light shimmer shade to the inner corners of the eyes. This brightens the eyes and prevents them from looking too heavy. Lightly dust the same shade onto the brow bone for a lifted effect.
Step 8: Eyeliner and Mascara
For added definition, apply a black or dark brown eyeliner along the lash line. A smudged liner gives a soft, blended effect, while a winged liner creates a more defined appearance. Finish off with several coats of mascara to add volume and length to the lashes.
Step 9: Perfect the Look
Clean up any fallout under the eyes using a makeup wipe or a bit of concealer. Ensure everything is blended seamlessly for a flawless finish.
The beauty of this technique is its versatility—you can keep it soft and natural for daytime or bold and intense for a night out. Experiment with different color palettes to suit your personal style.
0 notes
Text
Lash Tech Supplies: The Essential Toolkit for Every Lash Artist

The eyelash extension industry has grown significantly, with lash artists seeking high-quality supplies to deliver flawless results. Whether you’re a beginner or an experienced technician, having the right lash tech supplies is crucial for precision, efficiency, and client satisfaction. In this article, we’ll explore the must-have items for every lash artist, their uses, and how to choose the best products for your business.
1. Lash Extensions
The foundation of every lash artist’s toolkit is, of course, the lash extensions themselves. These come in various types, including classic, hybrid, and volume lashes, made from materials such as mink, silk, and synthetic fibers. Lash extensions also vary in length, thickness, and curl type (J, B, C, D, L curls) to suit different eye shapes and client preferences.
2. Lash Adhesives
A strong lash adhesive is essential for long-lasting and secure lash extensions. Professional-grade adhesives contain cyanoacrylate, a bonding agent that ensures retention for up to 6-8 weeks. When selecting an adhesive, consider factors such as drying time, fume level, and humidity compatibility. For clients with sensitive eyes, opt for low-fume or hypoallergenic glues.
3. Lash Removers
When clients need a fresh set or want their extensions removed, a lash remover is necessary. These come in different forms, including gel, cream, and liquid removers, each formulated to dissolve adhesive without damaging natural lashes. Gel removers are widely preferred for their precise application and minimal risk of spreading.
4. Lash Prep and Priming Solutions
Lash prep products ensure better adhesion and longevity of lash extensions. These include:
Lash Cleanser – Removes dirt, oil, and makeup residue.
Lash Primer – Prepares natural lashes by eliminating excess oils and improving glue bonding.
Lash Sealant – Forms a protective barrier to extend the retention period of lash extensions.
5. Lash Tweezers
Precision is key in lash application, and tweezers play a vital role. Lash artists typically use:
Isolation Tweezers – To separate natural lashes for accurate placement.
Volume Tweezers – To pick up and create volume lash fans.
Straight Tweezers – Useful for classic lash applications.
Investing in high-quality, lightweight, and ergonomic tweezers ensures better grip, control, and reduced hand strain during long appointments.
6. Eye Pads and Tape
Eye pads and tape help protect the client’s lower lashes and delicate under-eye area during application. Hydrogel eye pads are a popular choice as they are gentle, soothing, and help reduce under-eye puffiness. Medical-grade tape is another alternative for securing lower lashes while preventing skin irritation.
7. Lash Fans and Nanomisters
Humidity and temperature impact lash adhesive performance. A lash fan or nanomister helps control humidity, speeds up curing time, and reduces irritation by dispersing fine mist. This ensures better retention and enhances client comfort.
8. Lash Brushes and Microfiber Wands
Lash aftercare is crucial for maintaining extensions. Providing clients with spoolie brushes helps them keep their lashes tangle-free and fluffy. Microfiber wands are used during application to apply primers, cleansers, or removers with precision.
9. Lash Tile and Adhesive Rings
Keeping supplies organized during appointments improves efficiency. A lash tile holds extensions in an easy-to-reach manner, while adhesive rings allow artists to work faster by keeping glue closer to the application area.
10. Disposable Applicators and Sanitization Tools
Hygiene is non-negotiable in the lash industry. Disposable lip applicators, lint-free wipes, and sanitizing sprays help maintain a clean working environment, preventing infections and ensuring client safety.
Final Thoughts
Having the right lash tech supplies is essential for delivering exceptional lash services and maintaining client trust. Investing in high-quality tools not only improves application efficiency but also ensures better retention and comfort. Whether you’re just starting out or running a professional lash studio, always choose products that prioritize quality, safety, and performance.
By equipping yourself with the best lash tech supplies, you’ll elevate your lash artistry and keep your clients coming back for more stunning, long-lasting extensions!
0 notes
Text
Top 5 Long-Lasting Bridal Makeup Tips – Stay Flawless All Day!
Your wedding day is one of the most special moments of your life, and you want your makeup to stay flawless from the first photo to the last dance. Here are 5 expert tips to ensure your bridal makeup lasts all day without smudging, fading, or creasing!
1️⃣ Prep Your Skin for a Flawless Base
💡 Why It’s Important: Great makeup starts with great skin! ✅ How to Do It:
Exfoliate your skin 2-3 days before the wedding to remove dead skin cells.
Hydrate with a lightweight moisturizer to prevent dry patches.
Prime your skin with a mattifying or hydrating primer (depending on your skin type).
🔹 Pro Tip: If you have oily skin, use a primer with oil-control properties to prevent shine.
2️⃣ Use a Long-Wear Foundation & Concealer
💡 Why It’s Important: The right foundation will keep your skin looking smooth and radiant all day. ✅ How to Do It:
Choose a high-coverage, long-wear foundation that suits your skin type.
Blend it well using a damp beauty blender for a natural finish.
Set it with a translucent powder to prevent creasing and shine.
🔹 Pro Tip: Waterproof formulas work best for emotional moments (tears of joy included!).
3️⃣ Set Your Makeup with a Setting Spray
💡 Why It’s Important: A setting spray locks in your makeup and keeps it fresh for hours. ✅ How to Do It:
Use a light mist of setting spray after applying your base makeup.
Let it dry before proceeding with eyeshadow, blush, and highlighter.
Apply another layer of setting spray after your full makeup for extra hold.
🔹 Pro Tip: Choose a matte setting spray for oily skin and a dewy finish spray for dry skin.
4️⃣ Waterproof Everything – Eyes, Lips & Brows!
💡 Why It’s Important: Weddings involve long hours, happy tears, and lots of dancing! ✅ How to Do It:
Use waterproof mascara and eyeliner to prevent smudging.
Fill in your brows with a waterproof brow pencil for a defined look.
Choose a long-lasting, matte lipstick or use a lip stain for extended wear.
🔹 Pro Tip: Blot your lipstick with a tissue and apply a second layer for extra longevity.
5️⃣ Blot, Don’t Powder – Stay Fresh All Day!
💡 Why It’s Important: Over-powdering can make your makeup look cakey. ✅ How to Do It:
Use oil-absorbing blotting papers to remove excess shine.
If needed, apply a light dusting of translucent powder to refresh your makeup.
Avoid layering too much product to keep your look natural and radiant.
🔹 Pro Tip: Always carry mini blotting papers & a travel-size setting spray in your bridal touch-up kit!
Conclusion:
With these long-lasting bridal makeup tips, you’ll look fresh, radiant, and camera-ready throughout your wedding! Follow me on Instagram @jasmitabeauty_ for more beauty tips and bridal makeup inspiration! 💖
#BridalMakeup #FlawlessBride #LongLastingMakeup #MakeupTips #WeddingGlow #BridalBeauty #MUA #MakeupArtist #WeddingMakeup #BeautyHacks
0 notes