#jewelry tutorial
Explore tagged Tumblr posts
Visit Tumblr Blog
Explore Tumblr blogs with no restrictions, modern design and the best experience.
Last Seen Tumblr Blogs


Fun Fact
The Tumblr office adopted Tommy, an 11-year-old Pomeranian.
Text


This is the last of the three necklaces patterns I made for my Hemptique collaboration collection this summer.
Full pattern with notes on my blog for free here.
Video tutorial can be found on my YouTube here.
Use code SCARLET10 for 10% off order at Hemptique 💕
#crochet#crocheting#fiber art#yarn#yarn crafts#fiber artist#fiber crafts#jewelry diy#crochet jewelry#jewelry tutorial#jewelry#crochet tutorial#crochet pattern#crochet inspiration#crocheter#crochet easy#crochet necklace#crochet choker#choker#art stuff#artist#my art#my pattern#my crochet#easy crochet#easy pattern#crochet ideas#fibre crafts#crafts#necklace
16 notes
·
View notes
Text
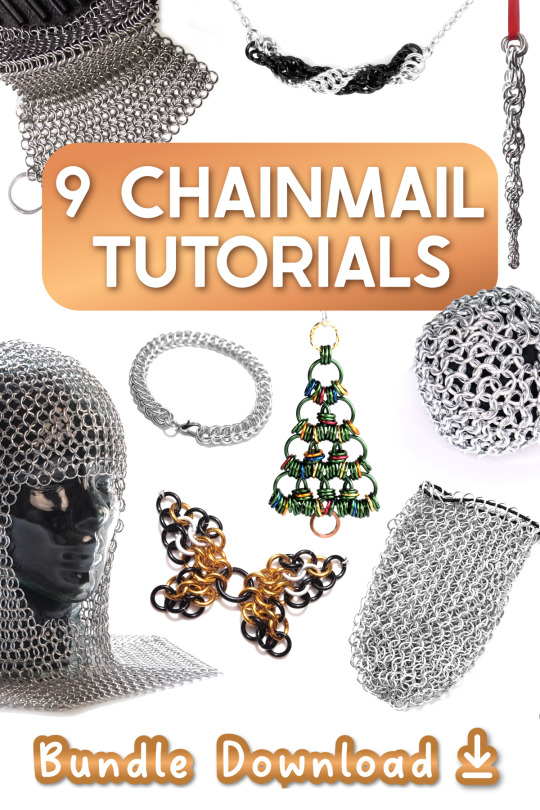
Start the new year with a new hobby! Learn to weave chainmail fabric and chains with one of my DIY kits or downloadable tutorials 📓
DIY Chainmail Kits: https://streetmaille.etsy.com?section_id=26148962
Digital Tutorials: https://streetmaille.etsy.com?section_id=32313335
#chainmail#tutorial download#how to make#diy kit#chainmaille#streetmaille#jewelry tutorial#dice bag tutorial#costume tutorial#chainmail butterfly tutorial#diy christmas ornaments#metal craft tutorial#crafting ideas#nerdy crafts#new hobby
7 notes
·
View notes
Video
youtube
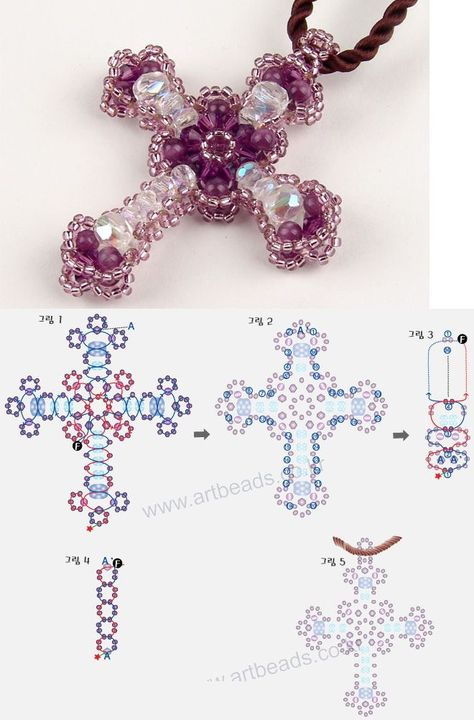
Dragon Crystal Pendant Charm - **Detailed Tutorial** - Great for Beginnners
0 notes
Text
youtube
0 notes
Text
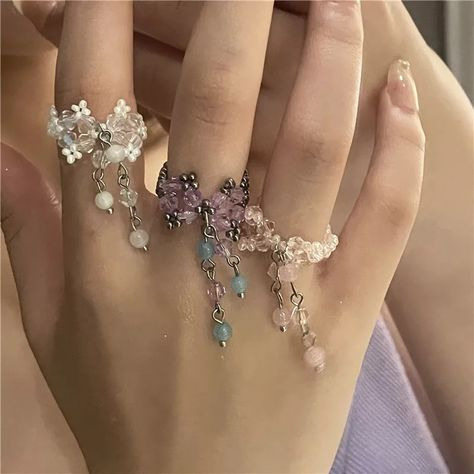
Exorcise the curse in the ring (cr: AmyTing中古)

#china#fashion#jewelry#vintage#diy#tutorial#exorcise the demon#remove the spell#washing jewelry#funny#soothing
901 notes
·
View notes
Text
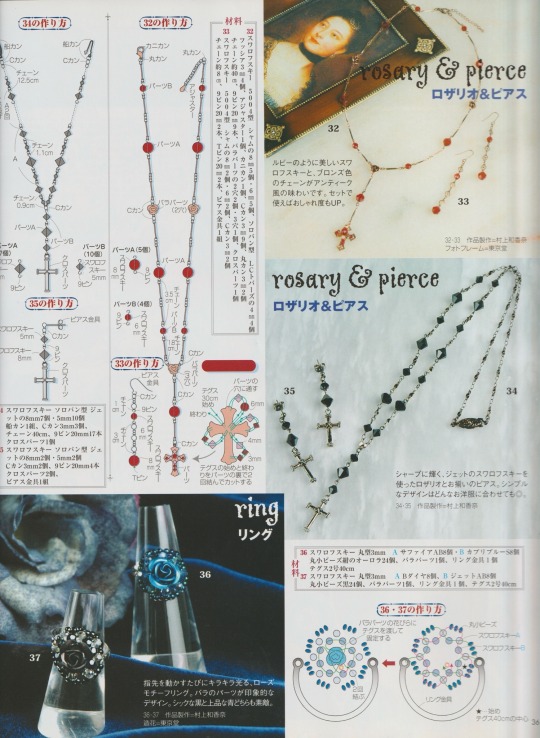
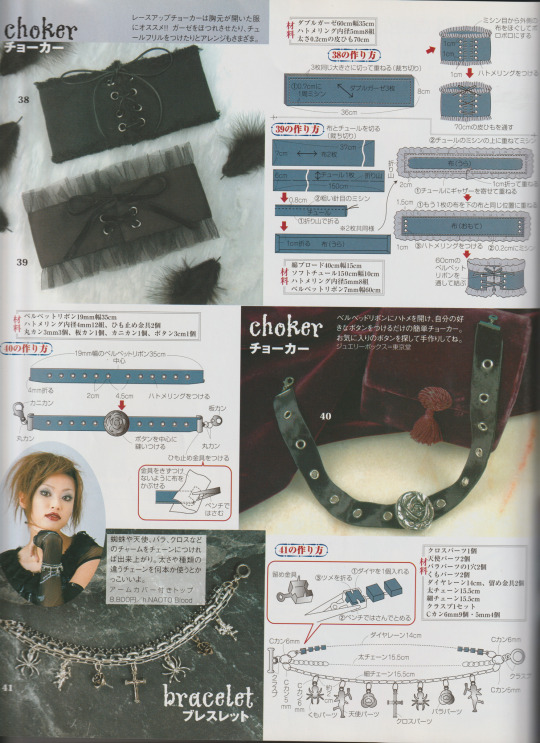
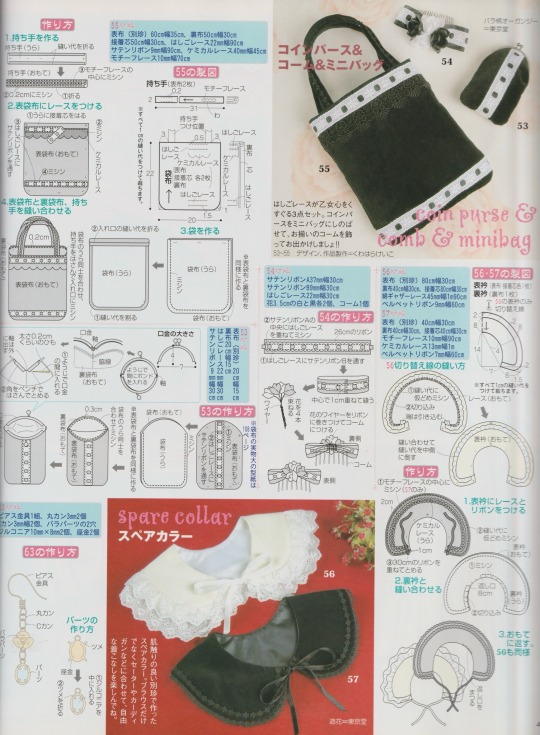
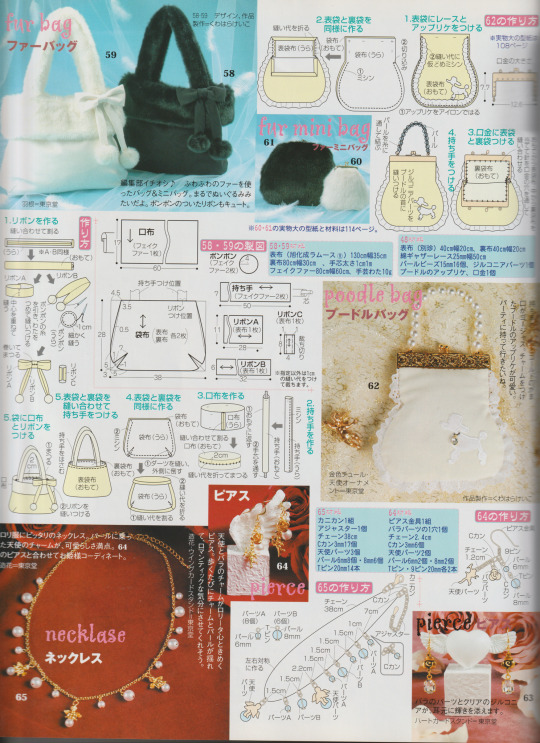
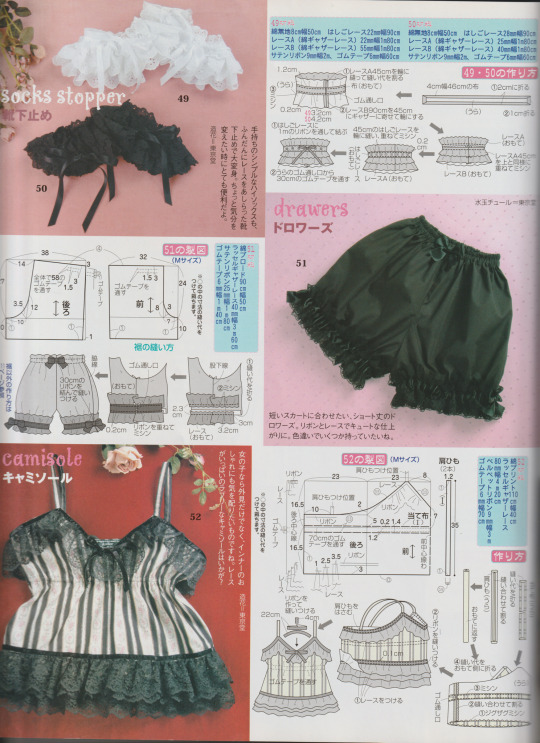
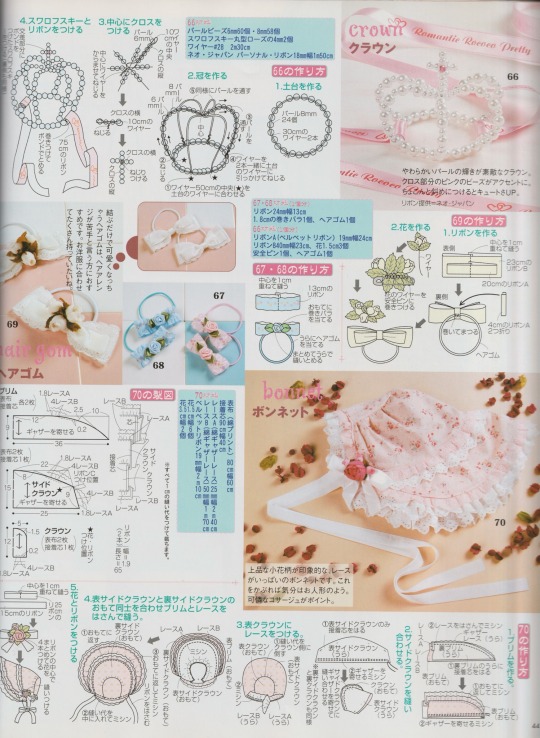
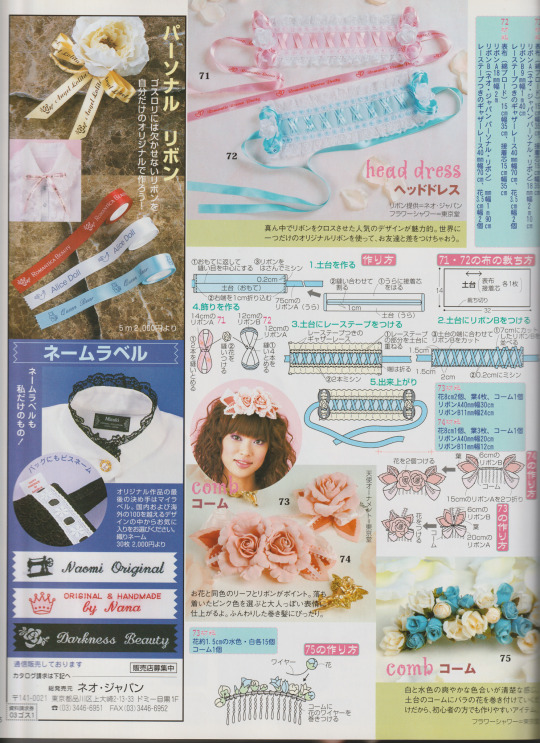
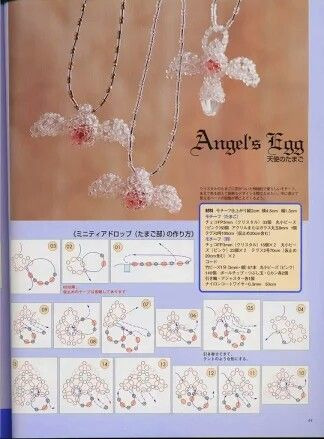
Lolita Accessory tutorial pages from Japanese mook “Gothic & Lolita Patterns”, 2004
Included are: head dresses, hair clips/ties, camisole pattern, drawers pattern, sock stoppers, multiple bag patterns, detachable collars, and jewelry.
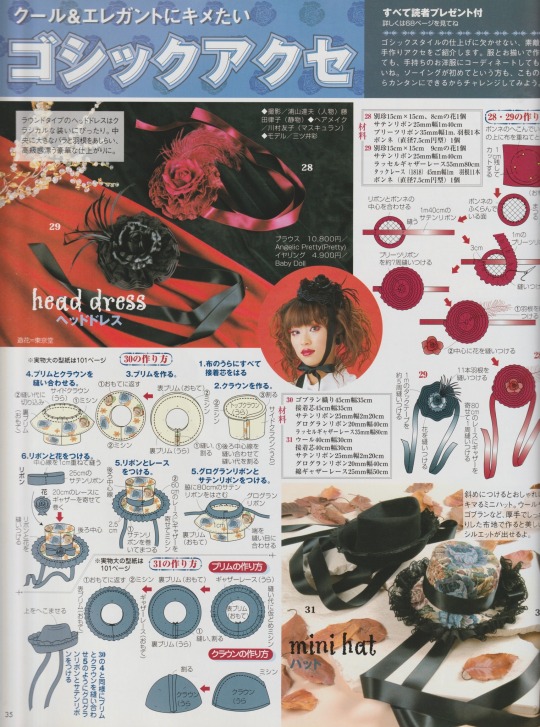
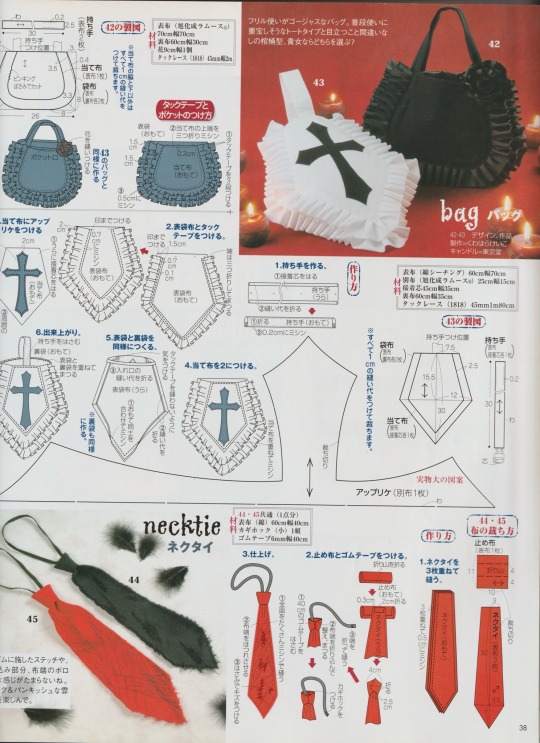
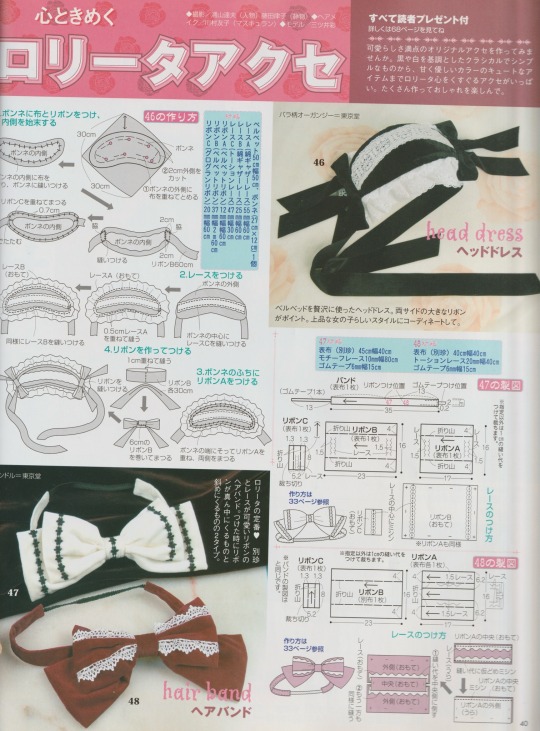
Consider this as my Valentine’s gift to you guys!! Thank you for being very kind about my post ^-^
*Also* If you would like the patterns to some of the tutorials (ie: the mini top hats, pattern 62) let me know so I can make a post later!
#gothic lolita#lolita fashion#j fashion#old school lolita#egl#egl fashion#coord#fashion#tutorial#magazine#sewing patterns#jewelry#goth#archive#my scans#happy valentine's day
1K notes
·
View notes
Text
Soda tab flower tutorial post! 🌻🌼🌸 lots of pictures included. ****This is part one, check the reblogs for the other half!! *****
****also this is not my idea. It's been done before and I got inspired by pinterest where I saw really similar diys****
What you'll need: scissors, yarn or string (any color) and soda tabs. 6 tabs for one flower (or 7, but I use 6 personally)
Step 1: take 2 tabs and lay them over each other so that the hole on the bottom of one lines up with the hole on the top of the other, like this-


And tie them together. Then cut the short end of the string sticking up to get rid of the excess. You'll want to tie it with the back of he tabs facing up so the knot will be on the back side. Make sure to tie it tightly so the knot doesn't slip around when you're wrapping the tabs with the yarn
Step 2: wrap the side edges of the 2 tabs 3 times. You'll want to do it relatively tightly, but not as tight as possible. The tension is a little tricky to figure out because you want the flower to keep its shape well but also be loose enough to bend into a flower shape with ease. This takes practice.


Step 3: On the 3rd wrap, add another tab under the 2nd tab, like this-


And pull the string through the back of the new tab you put under the 2nd tab. And wrap 3 times to attach it to your other tabs. Pulling the string over the edges to the back, through the lined up holes, and pulling it out towards you. On every 3rd wrap, add another tab the same way until you have 6 tabs wrapped together like this-

#solarpunk#punk#solarpunk diy#punk diy#solarpunk fashion#solarpunk aesthetic#punk fashion#diy#fashion#tabistry#soda tabs#upcycled jewelry#goth jewelry#jewelry making#jewelry#punk jewelry#goth diy#goth#goth fashion#hatchet makes stuff#tutorial#long post#crafting#art#recycling#recycled jewelry#hopepunk#ecopunk
243 notes
·
View notes
Text
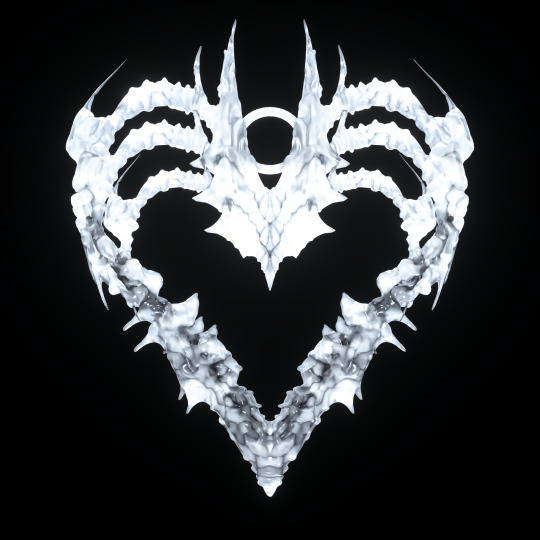
glass works sculpted by me
#mine#misc#aespa#3d art#fashion#y2k#art#pink aesthetic#y2k aesthetic#goth#y2k core#xg#chrome aesthetic#chrometype#my art#cocquette#ariana grande#metal#goth art#goth fashion#vampire#custom jewelry#kpop#newjeans#dropdead#gothcore#webcore#pastel pink#tutorial#lgbtq
667 notes
·
View notes
Text
Shrinky Dinky Ghost with Recycled Plastic


I have discovered one of the hidden secrete of life that is #6 plastic! IT WORKS AS SHRINKY DINK SHEETS!

I am thrilled! These polystyrene plastics don't recycle well in my area due to their shapes and they are rather commonly found trash from takeouts. Plus I save money and don't have to buy more plastics!


What I used:
#6 clear plastic lid from takeout box
Sandpaper
Pencil and red color pencil
Scissors
Parchment paper
Pan with flat surface
Oven
What I did:
Clean the #6 plastic lid
Cut #6 plastic lid into desired shapes
Sand the sheet with sandpaper
Draw on sanded plastic sheet
Turn on your exhaust fan and open your windows
Put finished dinks on parchment paper in oven pan
Turn oven on at 320F
Put pan with dinks in oven
Watch your dinks
It will shrivel up, then flatten back down, this is when you can turn the oven off
Dinks have shrunk!
Notes:
The sanding is optional. I did it because I wanted to use pencils for my shrinky dinks and the original clear gloss surface won't work with pencils. The sanded marks and frostiness will stay after shrunken, but it leaves an interesting effect! If you want clear glossy dinks, you can skip the sanding and use oil-based markers instead.
They shrink fast! So definitely keep an eye on them. Mine shrunk to 1/4 of the original size. This may differ depending on different sheet thickness.
I drew on the plastic both on the back and the front. Whatever you draw on each side will become higher contrast after shrinking.
I tested for waterproofness and the shrunken drawing was able to go through a quick soapy rinse with no issue!
This would be great for jewelry like earrings and necklace charms.
Potentially going to be very useful to make miniature stain glass windows for dollhouses!
#craft#cute crafts#crafting#halloween#spooky#spooky cute#spooky crafts#spooky art#ghosts#ghost#upciclyng#art#cute art#upcycle#recylcing#shrinky dinks#artists on tumblr#craftblr#jewelry#miniature#miniatures#tutorial
22 notes
·
View notes
Text
Moth pin/brooch
A couple people asked me how I made this so I figured I’d just make a little post explaining it.
Before I start I WOULD like to disclose that the pin I’ve made is hugely inspired by the one by TheClosetHistorian (on YouTube) and you should definitely consider checking out her video if you want more instruction or like that format better.
I made a little graphic showing some work in progress pictures as well as materials and techniques used in the different areas. I will type it out in more detail below.
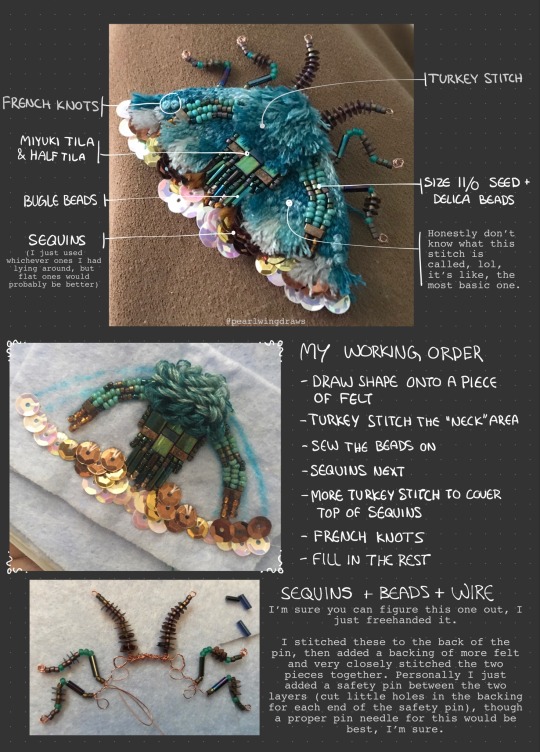
1. First draw out the shape I want on a piece of felt. Add some guide lines for different parts of the design. I layered mine double because it’s quite thin. I used an (unused) dish rag, so don’t worry about the quality of your felt.
2. I start off embroidering the “neck area”, using turkey stitch. Starting from the bottom up, I use a dark turquoise floss, then later mix in a lighter shade.
3. Next I sew on the beads. String on 5-6 at a time and then go back and tack them down with small stitches. I don’t know much about embroidering with beads, so this may not be the “correct” way to do it. The types of beads I used are size 11/0 seed beads and delica beads, as well as bugle beads and Miyuki’s Tila and half Tila.
4. Sequins. I recommend using flat ones instead of the ones I used. I work from the bottom up, trying to get a nice silhouette with the bottom layer, as this will form the outline of the finished piece.
5. After finishing with the sequins, I do some more turkey stitch around the top, so it covers up that edge where you can see the tread. Optionally you can do the whole thing with sequins if you want.
6. Next thing I did was some French knots, just above the turkey stitch in a contrasting color. This is just for some textural variety and decoration, as little “spots”. You can really add them wherever you’d like, or not at all.
7. Then I just finished embroidering the thing. Don’t know what the stitch is called, it’s just making little stitches beside each other until it’s all filled in. I did a little gradient because I felt like it.
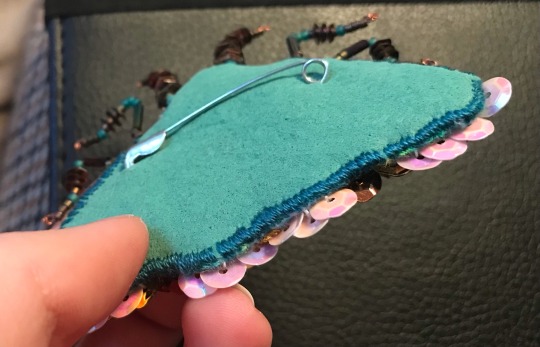
For the legs and antennae, i also just winged it. The legs and antennae got layered double in wire and twisted before adding the beads and sequins, then I just used the very tip of my round plier to curl the remaining ends into round little “feet”. Then stitch them securely to the backside of the pin.
I finish it off with another layer of felt, this one painted with a fabric paint I happened to have lying around, both for some extra strength and to match the color scheme better. I cut little slits to fit in a regular safety pin (I recommend get a proper pin/brooch needle) and stitched the backing on with very dense stitches. Pictures below.

Extra suggestions:
If you don’t have sequins, or want a different look, you can embroider the whole thing. Alternatively you can fill the whole space with sequins if you don’t want to embroider it all. You can of course do any shape, size and color scheme, whether based on real life moths or just fantasy!
Lastly I just want to thank everyone for the love you’ve shown for this silly little bug 💖 it means the world to me, and it has really inspired me. I wish I could sell these, but I don’t think that’s really an option for me right now. I’ll let you know if that changes in the future, but until then, I hope those of you who have the interest to make your own find this helpful.
#my art#art tag#embroidery#jewelry#accessories#embroidered pin#embroidered brooch#fabric art#textile art#tutorial#art tutorial#i guess??#moth#moths#insects#bugs
150 notes
·
View notes
Photo


DIY Travel Jewelry Pouch
1 Fat Quarter or (1) 18 x 22 inch piece of fabric will make 1 jewelry pouch. If you would like the coordinating print, you can make 2 jewelry pouches with 2 fat quarters.
✖✖✖✖✖✖✖✖
sew-much-to-do: a visual collection of sewing tutorials/patterns, knitting, diy, crafts, recipes, etc.
#DIY#sew#sewing#pattern#easy#cloth#fabric#pouch#bag#drawstring#jewelry#jewellery#tutorial#craft#how to#make it yourself
151 notes
·
View notes
Text


Here's a mini pattern formatted for my socials from my Hemptique collaboration. Let me know if you like patterns posted in this way!
Full pattern with notes on my blog for free here.
You can find the video tutorial for this in the pattern and yarn review from my youtube here.
Use code SCARLET10 for 10% off order at Hemptique 💕
#crochet#crocheting#fiber art#yarn#yarn crafts#fiber artist#fiber crafts#crochet tutorial#crochet pattern#free crochet pattern#free pattern#crochet inspiration#crochetblr#crochet jewelry#crochet necklace#jewelry#wearable art#jewelry diy#jewelry tutorial#necklace#yarnblr#yarn art#my patterns#my crochet#easy crochet#project ideas#diy ideas#jewelry ideas#artist#fibre artist
15 notes
·
View notes
Text

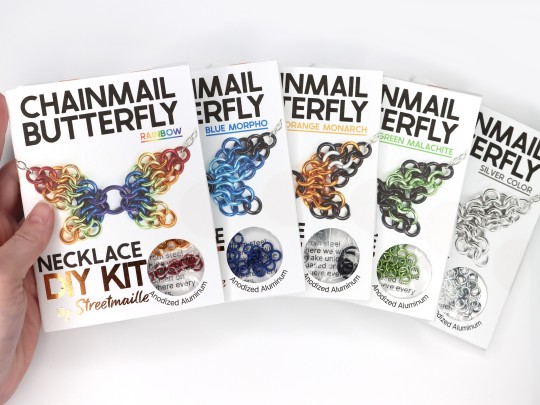
Learn to make a beautiful butterfly pendant this spring with my DIY Kits! Now available in rainbow and green malachite patterns in addition to the classic orange monarch and blue morpho 🍃🍃 See all the colors here: https://www.streetmaille.etsy.com/listing/660718261
#diy rainbow butterfly kit#learn to make jewelry#diy kit#pendant necklace#diy craft#streetmaille#chainmail jewelry#chainmaille necklace#butterfly necklace#rainbow butterfly#spring crafts#crafting#jewelry tutorial#learn to make chainmail#how to make pendant#rainbow#gift idea
9 notes
·
View notes
Text
Hello kitty 3d kandi cuff <3

What I based it off ->
youtube
#youtube#kandi making#kandi beads#craft tag#crafts#kandi#kandi collection#kandiqueer#my kandi#pony beads#kandi inspo#kandi tutorial#kandi insp#kandi art#kandi stuff#kandi jewelry#kandi cuff#kandi bracelet#kandi crafts#kandi bracelets#sanrio hello kitty#sanrio stuff#sanrio fandom#sanrio characters#sanrio#hello kitty#hello kitty sanrio#hello kitty stuff#hello kitty fandom#you tube
8 notes
·
View notes
Note
do you think you could make some users with the songs from the band big thief? thank you anyway 🫶🏻

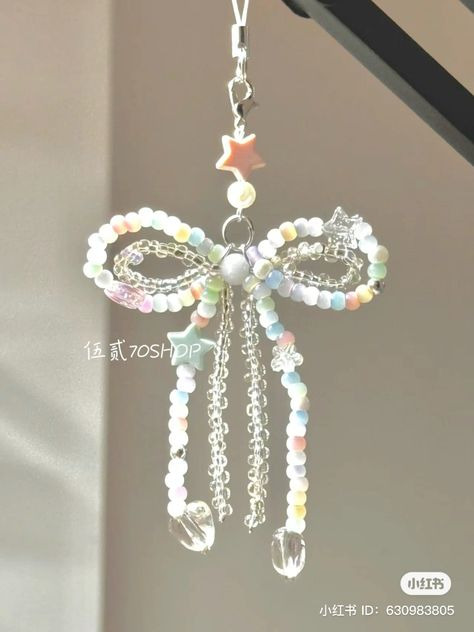

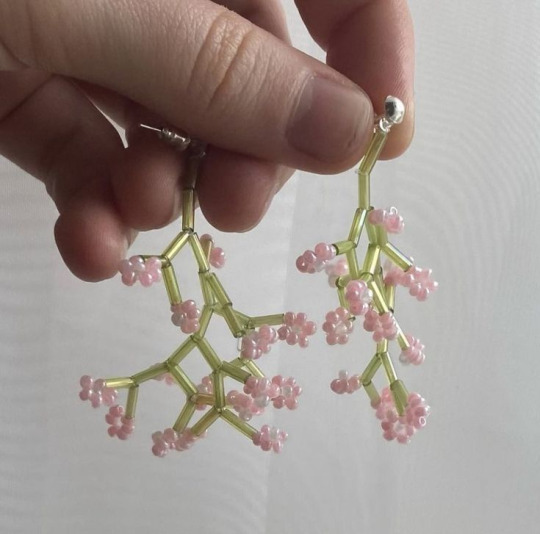


𖦁ׅ ࣪ ׂbeaded
#beaded jewelry#beaded bracelet#glass beads#perler beads#beadwork#inspo#fave ever#save#waow#art inspo#muse inspo#outfit inspo#rentry inspo#nail inspo#carrd inspo#fashion inspo#tutorial#pink#pink tumblr#pink vibes#pink pilates princess#pink pink pink#pink packs#pinkcore#soft pink#pastel#hot pink#flowers#hydrangea#roses
8 notes
·
View notes
Text
I made a 30s video (kinda tutorial) of how the heart shaped trinket tray turned out!
I used air dry clay. I'd recommend punching all the air out and using A LITTLE BIT of baby oil/any oil for your hands and surface, to make it easier to handle.
Also, I painted it with acrylics and then added a cost of white glue for protection (it becomes transparent no worries)
Please, reblog to support and keep the inspiration rolling! 🩷🌸
#craft#clay#air dry clay#ceramics#heart#trinkets#rings#jewelry#jewellery#diy#diy projects#diy tutorial#diy tips#diy craft#craftblr#tonbane#video
11 notes
·
View notes