#i sharpened up the colors and made it more vibrant but it was already really good tbh
Explore tagged Tumblr posts
Visit Tumblr Blog
Explore Tumblr blogs with no restrictions, modern design and the best experience.
Last Seen Tumblr Blogs


Fun Fact
Celebrities use Tumblr as well.
Text


BANG YONGGUK - THE THIRD EP
#yongguk#bap#~gif#~#the quality of these is terrible and the coloring is iffy but i just wanted to do a little rainbow thing and i did so it's getting posted!#i really love the third one tho that shot in the mirror and the color scheme is so good#i sharpened up the colors and made it more vibrant but it was already really good tbh
2 notes
·
View notes
Text
BEFORE/AFTER COLORING CHALLENGE
I think I made this voluntarily after last year's giftober, but since I'm one gifset short of finishing this year's set & I got tagged by @elennemigo (with some insane colorings - i think i'll cry if i ever pick up making marvel gifs) here's some before & after coloring* for this year's giftober gifs :)
*these already have blurs & sharpenings to make the base gif look better

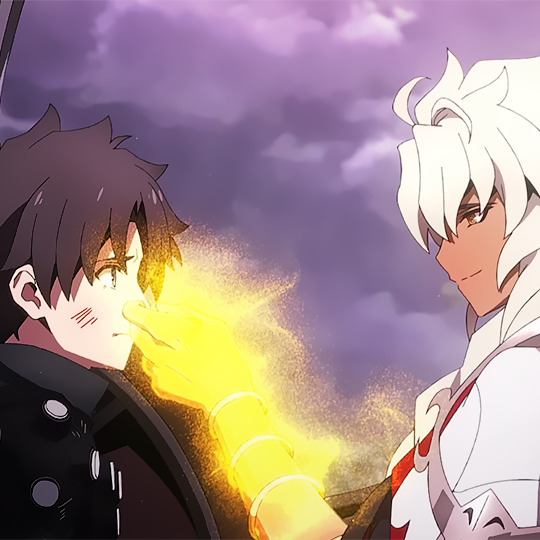
This was for day 4: eyes. I wanted to contrast the eye color change along the HF movies, thus I changed the background & sakura's hair more purple from the original blue/gray bg & blue-purple hair. I also removed the soft white color that ufotable slaps on everything.
This was for day 28: change. It was overall a very gray scene, made it brighter & more vibrant. To achieve this result I actually slapped on a whole 18 adjustment layers lol. Boosting the green of the scarf was a challenge of itself really, photoshop was very certain that it was not green.

Day 22 Yellow was easy mode, making the oranges & reds more yellow, brightening the gif, the usual.

Dat 13: clocks. The whole scene was very green, so i boosted the blues and yellows, keeping the green out.

DAY 29: backbags/handbags - I wanted to make the scenes brighter while softly colored, the cyans are a lot more visible after the adjustments. There was a blue/gray filter on the scene, which I removed, bringing more light to the scene.
Day 30: goodbye. This scene is very purple, even Romani/Solomon got some of that, so I toned down the blues in his skin making it more warmly colored. The background sky was turned blue.
Each of these gifsets took hours to create, the blur I use to fade out the background & multiple unnecessary details a bit, then i sharpen twice with different settings to make the characters stand out more against the background.
Make sure to check out the other participants in @giftober this year & remember to support the content creators by reblogging the content that you enjoy! ❤
10 notes
·
View notes
Text
GIF Tutorial for Beginners
People keep asking me to teach them how to make gifs and I end up writing them long confusing messages, so I figured maybe it’s time to just write up an actual clean tutorial instead! This is supposed to be for total beginners! (Or people who want to switch to a new process that I’ve curated and streamlined over 8 years of making gifs.) I’ll try to keep this as barebones as possible, and won’t include all the advanced stuff I usually add. I hope it’s easy enough to follow, and I’ll include some links at the end for more stuff. I really do think it’s better to make a few simple gifs before doing more complicated stuff though, just to get used to it!
There will be three sections in this tutorial: #1 Basics - How to make a gif in PS at all #2 Sharpen - How to use sharpen/denoise filters in an easy way #3 Colouring - Just a few very basic adjustment layers
What you need:
A video (most common formats should work, although .mkv doesn’t always)
Photoshop (I use PS CC 2018 - this one because I'm morally opposed to Adobe’s subscription model - but versions aren’t super different from each other)
In the end, you should hopefully be able to make something like this:
This is gonna be so long. Sorry. You can make a gif with just part #1! The rest is just to make it look better.
#1 Basics
If any of the tools/functions aren’t where they should be for you, your best bet is googling it, you might need to change something in your preferences!
Make sure to save your PS file... often. PS has a tendency to crash, especially on laptops.
First, you need to get the video file. I recommend a shorter video, a few minutes long, if it’s longer you might want to cut it into shorter parts beforehand. This is just because PS’s video import tool sucks.
I chose the Butter MV, specifically Jungkook’s body roll at 1:24 because that’s what I want to look at for the duration of this tutorial. No further questions, thanks.
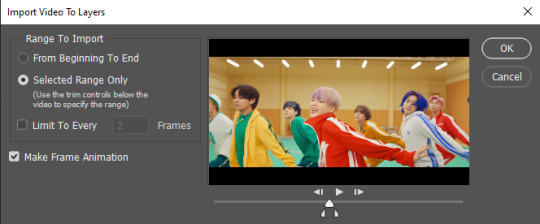
1. Open PS, go to File > Import > Video Frames to Layers

2. In the little pop-up, choose the part of the video that you want to gif. This will import every frame of the video into PS as a layer, so it has to be a relatively short part, or it’ll take ages (and gifs can’t be that big anyway). Now you can also see why it’s almost impossible to select the correct part if the video is too long.
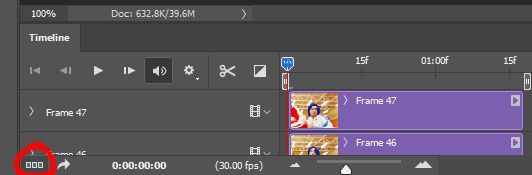
The little controls at the bottom are for trimming, the one in the middle just for the preview. Make sure “Make Frame Animation” is selected! Then click OK.
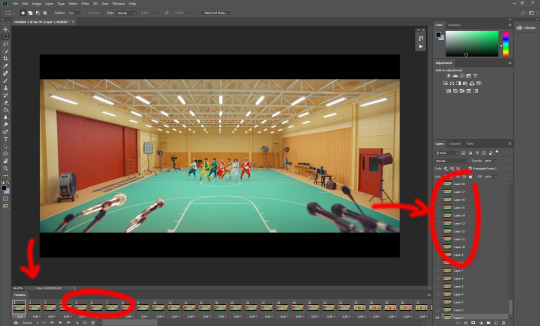
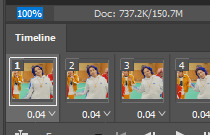
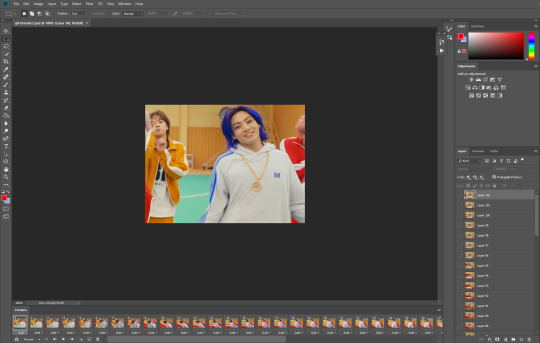
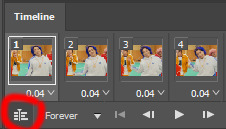
3. Now you have your layers, and you have a frame animation! On the right are your layers, that’s where we’ll apply the colouring etc. later on. On the bottom, that’s your timeline or frame animation - that’s what the gif will be in the end! So if you delete frames, the layers will still be there, but they won’t show up in the gif. If you click on a frame, you can see the little eye checkmark on the layer that’s currently visible.
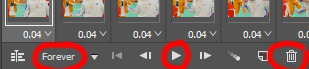
4. The timeline controls at the bottom that are relevant right now: set to “forever” so the gif will loop, you can play the animation with the play button, and you can delete the selected frame(s). The number on each frame is the speed of the gif, depending on the video I usually set it to 0.05 or 0.06 (photoshop lies to you when you play the animation, the only way to test this is to open the finished gif, preferably on tumblr or wherever you want to upload it).
5. As you can see, the animation starts a bit before the actual part that I want, so go ahead and delete all the frames in the animation that you don’t want! You can delete the corresponding layers too if you want, to make the PS file smaller, but it has no influence on the gif. (Hold Shift to select multiple frames as usual)
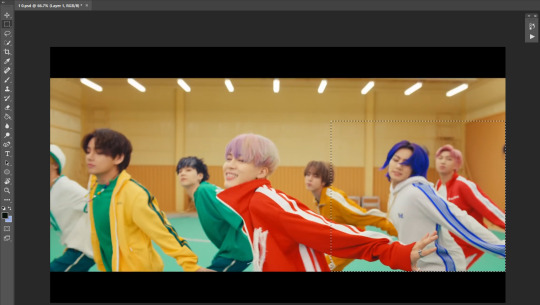
6. Next, we’re gonna crop the gif however we want! You can do this with the crop tool in the left sidebar, but with gifs like this where there’s a lot of moving parts, I sometimes just use the selection tool in the left sidebar, like so:
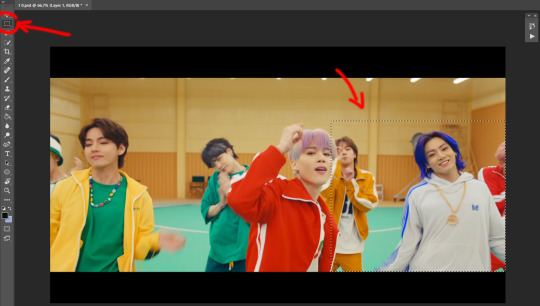
When you click on different frames, the selection stays, and you can check to make sure Jungkook doesn’t suddenly go out of frame if you crop it like that!
At this point, make sure the selection/crop isn’t smaller than you want the gif to be! For tumblr, what matters is the width (in pixels) of gifs. In the end, the width dimensions on tumblr should be 540px (1 gif per row), 268px (2 gifs per row), or 177/178px (3 gifs per row). Anything else will lead to very shitty resizing!
For this gif I’m going full sized, meaning 540px wide, so I made sure my selection isn’t smaller than that.
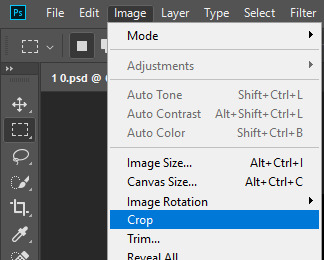
Then just go to Image > Crop, and it’s done!
7. Check to see if this is what you want, then resize: go to Image > Image Size to resize the picture. Make sure the little “link” between Width and Height is active (to keep the same aspect ratio), then set the width to 540px or whatever you chose. I always set the resample option to Bicubic.
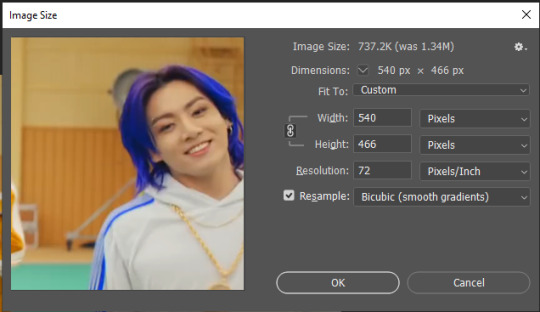
Once that’s done, set the zoom to 100% right above the timeline, to see what it really looks like.
Almost done! A little note about the sizing: width is the important part for tumblr, but if you want to make a whole gif set (especially with more than 1 gif per row!!!) make sure to make all the gifs the same height, otherwise they won’t line up and tumblr will do whatever it wants.
I ended up making mine 540 x 400 and ended up with this:
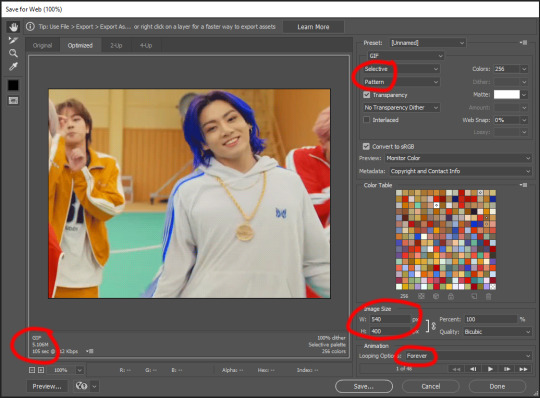
8. Time to save the gif!! Go to File > Export > Save for Web (OR just use the shortcut Ctrl + Shift + Alt + S) (or whatever it is on Mac).
In the pop-up, you can change things about the gif, but most things should already be the way you want it (Image size, Looping option forever). Selective should be the default, just like the rest.
You can choose between Pattern and Diffusion, some gif makers swear on one or the other, I go back and forth.
On the bottom left, you can see the size of your gif. Keep an eye on that! I believe Tumblr allows every single gif to be up to 10mb, but I try to keep mine under 5mb or close to it, because I think tumblr adds compression if it gets closer to 10mb?? Anyway back in my day you couldn’t upload anything over 1mb. You’ll never know our struggles.
Then just save it, and that’s it, you made a gif! Well done!! Here’s the end result:
:)
#2 Sharpen
There are countless ways out there to make gifs as smooth and clean as possible! Here I’ll show you the easiest way, but it also provides a good basis for other methods. The main difficulty is that you you need to sharpen the layers, but you don’t want to 100 layers one by one. So what we’re gonna do is convert the layers into a Smart Object, which functions as one layer!
1. Convert the frame animation timeline to a video timeline with the little button right underneath on the left:
It should look like this, and I’m sorry but I can’t explain this one because I’m not an expert here, but you can just ignore it:
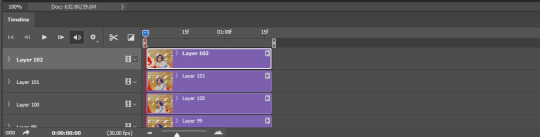
2. Select all layers: Select > All Layers, or just manually.
Then right click on the layers > Convert to Smart Object. Now there’s only one layer left, but don’t worry, the frames are still there!

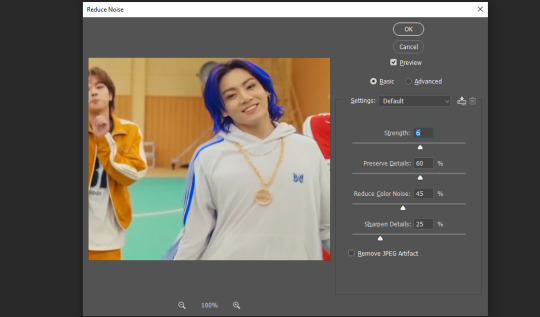
3. De-noise! It reduces noise, takes away some of that grain. More necessary in some videos. It also makes it less sharp, so I do this one first. Filter > Noise > Reduce Noise

My default settings are, Strength: 6, Preserve Details: 60, Reduce Color Noise: 45, Sharpen Details: 25, Remove JPEG Artifact: No. But you can play around, especially with the strength, and see how the little preview looks. Don’t apply too much of it! Or it will look weirdly smooth with no details in the end.
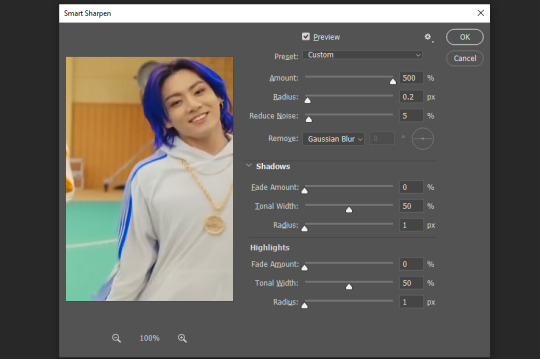
4. File > Sharpen > Smart Sharpen.
Settings: I usually have mine at Amount: 500, Reduce Noise: 5, and Radius at either 0.2 or 0.3, depending on the video. I’ll actually do 0.3 here, because I find it a bit blurry otherwise. If you sharpen more, it can quickly get grainy.
The difference isn’t huge, but here’s a little before and after denoise & sharpen:
5. Technically you can just save it as a gif (save for web) as shown above now, or you can convert it back to a frame animation, which I’d recommend especially if you use certain other sharpening methods (I’ll show you how to convert it back at the end of the colouring part), but for now, let’s go straight to the next part:
#3 Colouring
Now, you CAN do this part right after part #1, still in frame animation, without a smart object. I prefer it like this because sometimes PS acts weird, but if you want to skip the smart object stuff: select all frames, and add the adjustment layers at the very top, above all the other layers. (It only affects selected frames; and it only affects the layers under it.)
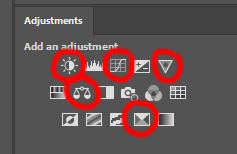
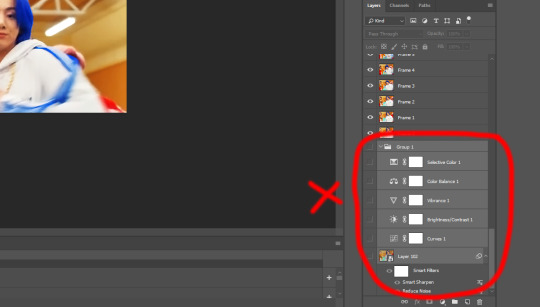
The adjustment layers should be above the layer tray, and these are the ones we’ll use today: Brightness/Contrast, Curves, Vibrance, Color Balance, Selective Color.
All of these are optional! You can do one, or all, or any combination. This is just the very most basic for me to get a gif to a point that I like. I’d recommend sticking to these for a start, but once you get the hang of it, definitely feel free to play around! It’s fun! Every gif maker has different preferences here, too, so there’s tutorials for everything.
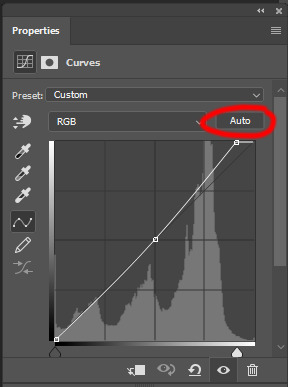
1. Curves: Just click Auto, tbh. You can play around, but Auto works fine for me as a start, just to brighten or darken some parts as a base.
2. Brightness/Contrast: Usually videos are a bit dark, and contrast can help to make it seem sharper AND cut down on gif size, so I usually just up both of them a bit (but not too much! Or it’ll look cheap). Here I put them at B: 19, C: 23

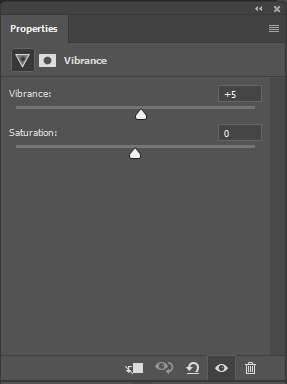
3. Vibrance: I love very vibrant and colourful gifs, so I usually up the vibrance (and sometimes the saturation). This one is already very vibrant, so I only put +5, but if you try to colour, say, a very moody tv show, this can help wonders, especially if you want to work with the colours more later.
If you prefer less vibrant gifs, you can also lower the values here!
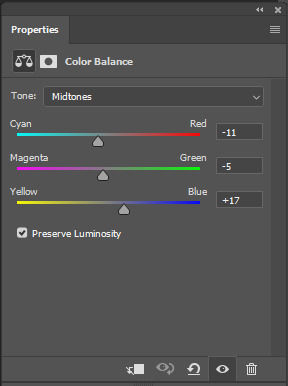
4. Color Balance: getting a bit more complicated now. Often, videos will have a slight yellow or green or blue tint, and this is where you can correct that. This video is a bit yellow, so I added +17 Blue. It was still too warm, so i added -11 Cyan as well. This neutralized the yellow tint, but I wanted some of the reddish tone back, so I added -5 Magenta. I usually do a similar process like that, depending on the tone.
Instead of Midtones, you can also do this for Shadows and Highlights individually.

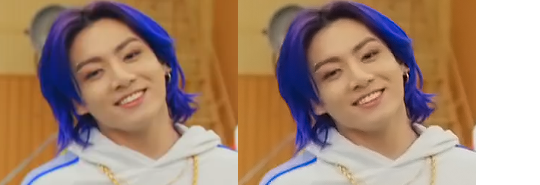
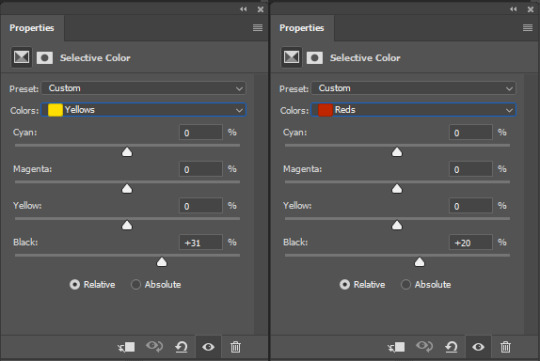
5. Selective Color: now this is the most complicated, but also the most fun to play around in my opinion! Be careful here, if you do something too extreme it’ll look like shit or make the gif super grainy. I some rough goals in mind here: make the blue hair as blue as possible, make their skin tone a bit less pale, and enhance the black and white (which I always do).
You choose a colour at the top, and then add or subtract cyan/magenta/yellow/black values for that colour.
Skin tone: yellow and red. For this gif, I just added black to both, making them darker. Sometimes, if you change one or both those colours for a different part of the gif (for example, if I wanted to make the background less yellow, I’d subtract yellow from the yellows - but then I’d add yellow to the reds, to make the skin tone natural again.)

Blue hair: Just ramp up the cyan for the blues. Be careful with putting anything to +100, but here it’s already so bright that it should be fine. His roots are more purple, so I changed the magentas by adding cyan and black, and subtracting magenta and yellow. It’s not super clean, but fine for our purposes.
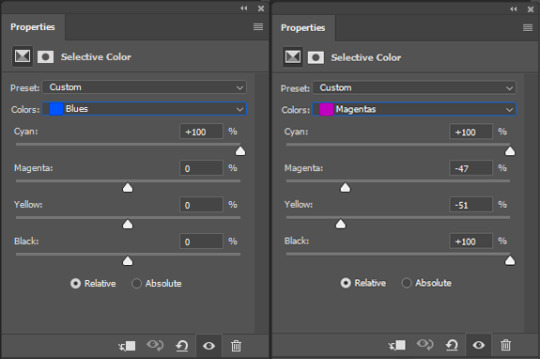
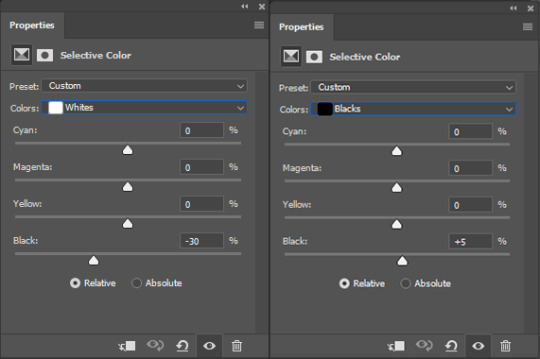
Black/white: depending on the gif, I often either add or subtract black to the whites. Adding makes the highlights less blinding, a bit darker, and flatter (I like to do that if one side of the face is bright white in the sunlight, for example). Subtracting creates contrast, makes it brighter, can wash it out. It can also lessen the gif size, and here it’s mostly just the tracksuit instead of important details, so I subtracted black. For the blacks, I almost always just add a bit of black, to make it more intense. Just like adding contrast, this can make the gif seem sharper and less grainy.

And done!
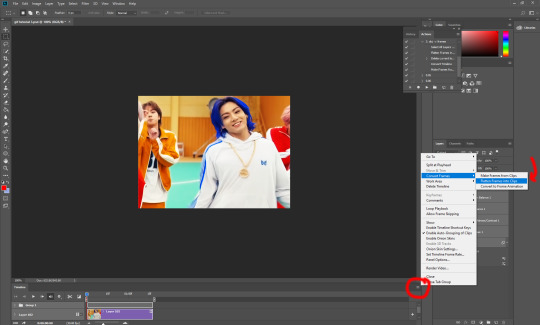
6. You could just save it as gif now, but as I said, I prefer to convert it back to frame animation timeline first, if only because I like to let it play through before I save it, and it works better for me there than in the video timeline.
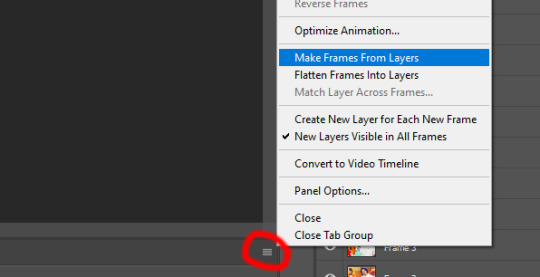
Select all frames, then click the little menu on the top right of the video timeline > Convert Frames > Flatten Frames into Clips
7. When you scroll down to the bottom of the layers now, the old smart object + adjustment layers should be at the bottom, under all the new layers. Delete the old ones, we don’t need them anymore.
8. Convert the timeline back to frame animation, by clicking the little button at the bottom left of the video timeline:
9. Click on the menu top right of the timeline again > Make Frames from Layers
10. Now, just some potential cleaning left to do. Sometimes, there’s a doubled or empty frame or layer at the beginning or end, just delete those as necessary. The timing of the frames is probably off, too, just select all frames and set the delay time to 0.05 (or whatever).
Now your done! Save as gif, and you should get this:
I included some bonus links and tips after this but tumblr ate that whole part so I guess it’s going into a separate post. (Here is is)
Anyway, I tried to make this as easy to follow as possible for beginners, but feel free to send me an ask for clarification anytime. Hope this helps, now go make gifs and have fun!!
#photoshop#tutorial#gif tutorial#ps tutorial#btsgif#*#*tutorial#this took so much longer than i expected i'm not giffing for at least a week now
234 notes
·
View notes
Note
Hi! Your gifs are always so vibrant and pretty. What's your giffing process if you don't mind me asking?
Thank you for this sweet message!
I don't mind at all anon! This is going to be a pretty basic coloring tutorial, for more advanced stuff I would recommend looking at @clubgif or other photoshop resource blogs.
I do want to say that I am by no means an expert in photoshop, and that there are many different ways to make and edit gifs/photosets. This is the method I've found works best for me :)
Putting this under the cut because it's long:
Here is an explanation of how I make gifs using "import frames to layers." I've tried doing the screencap method but the screencapping programs always give me viruses so I prefer video frames to layers. I use clipconverter.cc to download videos from youtube. And always try to use 1080 videos (720 can work for smaller gifs).
So after I've made my basic gif, the first thing I do is crop. I set the crop ratio to 5:3, but you can play around with the dimensions all you like.
After I've cropped, I recently started using @grimreaper 's hd sharpening action. I've tried a lot of different sharpening methods, but this is the one I've found to be the easiest and highest quality.
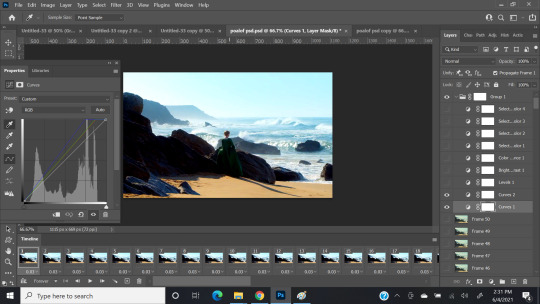
Then I use the curves layer to brighten up the gif. I click the white eyedropper and then click the part I want to be brightest, in this case the white sea foam:
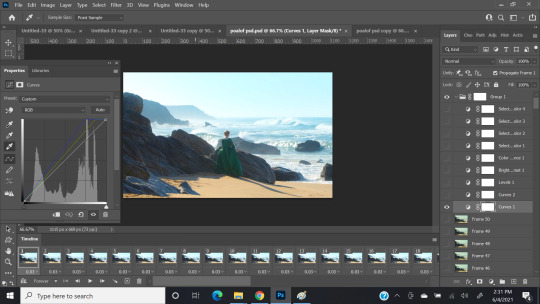
Then I make a second curves layer, select the black eyedropper, and click the part I want to be the darkest (the folds of her dress) to give it contrast:
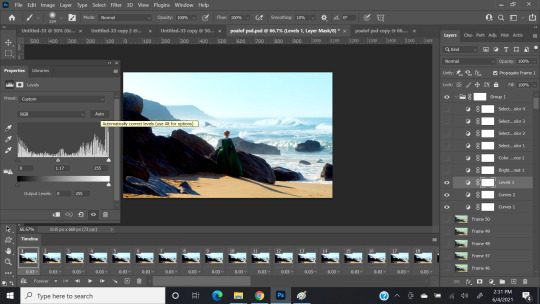
Then I add a levels layer to balance things out: (Usually I just click auto, but if that doesn't look good I'll play around with the arrows until I like the way it looks)
Then I add a brightness/contrast layer, same steps as above:

Then color balance. You don't need to go too crazy with this layer, since most of the coloring happens with selective coloring, CB can help balance out a strong tint. I just adjust until I'm happy with how it looks:

Now for the fun part! This gif has four main colors: Red, yellow, cyan, and blue. It's already got some good base color, so I don't use neutral, white, or black selective color. For murkier scenes (like anything from Vikings), I'll use those three to add some color and dimension. I start with red selective color, and just play around with the settings until I like how it looks:

And repeat for yellow:
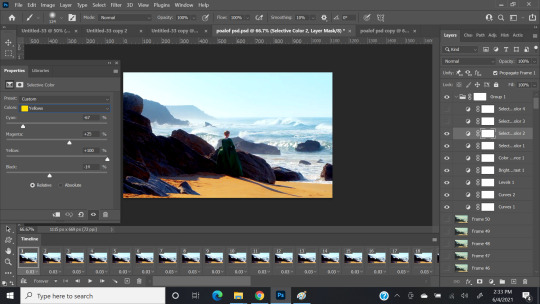
For both red and yellow, I decrease the cyan, and increase magenta and yellow to make the warm colors pop.
Repeat for cyan:

and for blue:

I increase cyan and black, and adjust magenta and yellow until I find the shade I like.
After all of this, I resize the image to width of 540 if it's a single gif, or 268 if it's two side-by-side gifs. Personally I like to sharpen and color before resizing, but it's up to you what order you do things. Then save for web and I'm done!
I also highly recommend @inejz-ghafa 's coloring tutorial. It's actually the method I used to color my pride set.
I've also shared some of my psds, so feel free to use them! You'll probably have to adjust the curves and levels layers, but you can try playing around with the other layers as well! I actually got started by using other psds, and then adjusting the layers to fit my style.
That being said, some shows/movies are just easier to color than others! I really enjoy giffing Reign, Portrait of a Lady on Fire, Aquaman, Pacific Rim, The Good Place. I struggle with coloring Vikings, Black Panther, and a lot of Bollywood movies. This is my general giffing process, I make adjustments depending on what scene I'm workign with. Hope this helps!
#photoshop#ps resources#yeahps#gif resources#coloring psd#coloring tutorial#gifmaker tag#my graphics
180 notes
·
View notes
Text
Mini Fanfic #975: Wedding Planner Meeting (Sonic X Crash Bandicoot)
6:34 p.m. at Rabbits/Chaotix's Household's LivingRoom........
Cream: (Stands Beside the Large Paper Pad in Front if Everyone Present While Tapping it With a Pointing Stick) Alright, everyone! Now that we've officially found our marriage officiant and singer, we can finally discuss a very important topic at hand.
Cheese turns the page of the pad from his side, showing off three shaded colors: White, Purple, and Peach
Cream: Which colors do you guys would fit well to the wedding's theme? At first, I chose purple since it's mommy's favorite color, but then, I noticed how pretty looking the color of the peaches are when I ate one a few mornings ago. But then I remembered that color White is what makes weddings....w-weddings, you know!? So....('Sigh Heavily') I'm afraid I'm in a teensy bit of tight spot here.....
'AHEM'
Cream: (Turns to She Cheese Crossing his Arms, Raising an Eyebrow at Her Before Giggling a bit Awkwardly) O-Oh and umm....The fourth color that Cheese picked was Green. I forgot to color it in and sharpen the color pencil at the last minute....
Cheese: Chaoooooo?
Cream: (Sighs Heavily While Rolling her Eyes) And because of that, I owe him three cookies from the cookie jar. (Immediately Turns Back to Her Chao Friend with a Glare) Which I will give to him LATER, by the way!
Cheese: (Rolls his Eyes as Well) Chao Chao Chao.....
Cream: (Starts Wiggling Her Finger at Cheese in a Motherly Fashion) Hey, don't give me that attitude, mister! Be patient. (Sighs Once More) But anyways.....(Smiles Brightly at the Others In Front of Her) Any thoughts?~
Espio: Well....I think the colors you two have chosen are decent enough choices in their own right. But if I must, I suppose I would say......(Points at the First Color on the Left) Purple would be the best option.
Tails: (Grabs his Chin While Thinking) I dunno..... Peach does seem like the most vibrant out of the four....But Green is definitive color for the current season......('Sigh') I already can't decide which of the two I prefer more.....
Coco: (Brushing Tails' Tails While Sitting Next to Him) I'd be fine any of them as long as it isn't white. It's too obvious and generic for my liking.
Charmy: (Looks at the Colors Front of Him Very Closely) Hmmmmmmmmmm........
Coco: (Turns to the Young Bee) Got any favorites on your end, kiddo?
Charmy: I'm not sure......I mean, Purple's pretty, Peach is Fruity, Green is Greenie, and White's pretty much the most boring one. So we just rule that one out easily.
Everyone: Agreed./Chao.
Cream: ('Sighs in Defeat') I suppose that one's settled...But you really couldn't choose out of the three of them, Charmy?
Charmy: Nope. All of them are pretty cool choices in my book. (Suddenly Comes Up With an Idea) Ooh! How about we combined them all together? I call it....Pureench.
Espio: (Raises an Eyebrow at Charmy) Pureench.
Charmy: (Happily Nodded) Yep! Half Purple, Half Green, and Half Peach. Mixed together into one ultra wedding theme color! (Places his Hands on his Hips With a Confident Grin on his Face) Pretty neat, huh?
Tails: (Quickly Looks at Coco Before Turning Back to Charmy) That....is a...pretty neat idea for sure, Charmy. But uhh....Maybe it would be better if we just choose one out of the three colors instead, yeah?
Coco: (Nodded in Agreement with a Bit of an Awkward Smile on her Face)
Charmy: (Sighs While Rolling his Eyes) If you say so.....Wanna play a game of Uno to see who's color is on top? My money's on Green!
Cheese: (Raises his Hand Up) Chao Chao Chao!
Charmy: (Smiles Brightly) All right, Cheese! Up top.
Cheese: (Happily High Fives Charmy) Chao Chao!
Tails and Coco whispers among one another before nodding and turning back to the group.
Tails: Given the thoughts and discussion Coco and I made, we offically decided to be on Peach side. It is a pretty unique color out of the bunch all things considered.
Coco: Not to mention one of tastiest fruit out there. Also, fair warning, buuuuut.....(Starts Smirking a Bit Smugly While Crossing her Arms) I just so happen as the undisputed champion of Uno.
Tails: (Shrugs) It's true. She beaten me in it over fifty times.
Coco: And I never lost a game since!~
Espio: ('Sigh') Then I suppose I'll be on the Purple side then. (Turns to Cream) Care to join with me, Cream?
Cream: Sorry, but...I'm gonna have to go on the White side on this one.
Charmy: Seriously? But it's a boring color though.
Cream: Yeah, but I don't want it to be left out completely. So as such....(Points Up at the Ceiling) I will stand by it's side and fight for it's honor!....Or at least try not to lose too badly.
Tails: Not good with Uno?
Cream: I'm only average at best..... (Immediately Glares at at a Certain Bee Boy and Chao) Because a certain pairs of hooligans wouldn't stop trolling me with their cheap tactics!!
Charmy: (Smirks at his Soon to be Sister with Cheese While Suddenly Wearing Sunglasses) Hey, don't blame the players, bunny girl, blame the game and your lack of skillz.
Cheese: (Nodded in Agreemen) Chao Chao Chao. (HI Fives Charmy Again)
Cream (Has a Very ConfusedLook on her Face): .......Where did those sunglasses came fr-
Charmy: Cool guys don't need to explain random occurrences.
Cheese: Chao.
Cream: (Stares at the Duo For a Few More Seconds Before Sighing in Defeat Again While Pinching her Nose) You know what? Fine. Whatever. Let's just get the fame started already. Meeting dismissed! (Uses her Pointer to Tap on the Coffee Table)
Charmy/Cheese: (Immediately Rushes Towards the Dining Room) GREEN SQUAD RULES!!!!/CHAO CHAO CHAOOOOO!!!!
Coco: (Follows the Duo While Having her Arm Around her Best Friend's Shoulder) You have nothing to worry about here, bud. With my guidance, we'll both be champions in no time flat.
Tails: It would be fun to win Uno for once.
Espio: (Smiles Softly at Cream) I must say, Cream. You're doing a fairly good job planning out the wedding so far.
Cream: (Smiles Brightly at Espio) Thank you~ It's a lot of work, but I'm really having a blast doing thess.
Espio: (Simply Nodded) I do as well. (Points his Finger Up) But it's important not get too invested into them. You could stress yourself out too easily if you're not careful.
Cream: (Happily Hugs Espio Lovingly) Don't you worry about a thing, Espio. I'll be careful. (Puts on a Playful Smirk on her Face) But what you SHOULD be worrying about right now is getting your bottom whopped in Uno.
Espio: (Smirks Back at the Rabbit) Having confidence of winning already? I thought you said you were an average player.
Cream: I did. But who's to say any of you would would actually win this evening? When I have a strategy to do so on my own.
Espio: You haven't thought of one yet, haven't you?
Cream: (Makes her Way to the Dining Room With Espio) While Sighing Yet Again) No. But.....I-It'll definitely be something! (Points at the Ninja Beside Herself) And you're not allowed to know what it is, buster!
Espio: (Chuckles Lightly) Whatever you say, little sister.
@keyenuta
@caleb13frede
@rechicken-and-waffles
@cyber-wildcat
@albion-93
@ma-lemons
#sonic series#crash bandicoot series#cream the rabbit#cheese the chao#espio the chameleon#miles tails prower#coco bandicoot#charmy bee#wedding planning#humor#vector and vanilla wedding adventures#edited#chaotix family
14 notes
·
View notes
Text
Redamancy | Takashi Mitsuya x Reader (Tokyo Revengers)
Redamancy (n.): The act of loving the one who loves you; a love returned in full.
Treasure the time you spend together,
Treasure the ride in the evening time,
Treasure the confession under the night sky.
May you all feel the love and fall in love!
____________________
It is now eventide, the moment when the Sun deliberately goes down, exuding its vibrant red and orange rays that tints the former azure firmament. And here you are, resting on the leather chesterfield sofa while gazing at those skylights above. Broken lines of cumulus, or cotton-like clouds, are stretching for miles in the air, reflecting those fiery shades that intensifies the whole scene's saturation.
"Beautiful." You mumble, eyes lingering at that exquisite sight.
It doesn't take that long for a pitch black color to invade the sky, noticing that dusk is coming to your city. You raise up both arms to stretch that stiff upper body before a small growl grabs your attention. Looking at the clock, it's a quarter past six already.
"Guess he'll come back late tonight. I've to eat alone then."
You place your right hand on your stomach to feel that small rumbling sound - a signal for dinner time. The corners of your lips pull down to reveal a sad but so-be-it face. "Well, time to eat." You reheat the bento box in the microwave and prepare a glass of water before bringing them both to the table. Hands clasp together, you mumble, "Itadakimasu."
After finishing your meal, you sip a cup of warm tea while walking towards the bust mannequin, where the sleeveless white bridal gown is put on. Four different length of layers were sew from the waist line, covering half of the chapel train - the last and longest layer of the dress. To break free from the usual, monotonous gown, that man thoroughly embroidered roses on the left lateral, artfully arranged those small flowers from the shoulder to the side of the waist, and bigger ones when reaching the end of the train.
There's only one more piece left to complete the dress, a wedding veil. And it's also the final task for you - the girl making a messy bun for her wavy silver hair with apparent black highlights. Heading to the table where the folded tulle fabric is laying, you put the tea cup down, left hand slowly grabs your pair of black eyeglasses beside it. Eyes giving a quick glance at those thin lines drawn by tailor's chalk, you take one deep breath, ignoring some strains of hair falling down on the side and hold the sharp piece of scissors. After all, this dress is made for Hinata Tachibana, one of your best friends. I can't screw it.
You slowly cut off the excess length of the tulle until those metal blades return to their starting point, making the cabbage falls down the ground. Your other hand holds the outside edge of the fabric to trim its corners slightly, adding the curve for a graceful look. "Now then," A delighted smile appears on your face. Your sparkling gaze is looking through the edge of the veil again to see any jagged or uneven fabric needs cutting.
Immersing yourself in your work, you don't even recognize the presence of another man at the entrance, crossing his arms on one another. His head leans against the door frame, looking at you with those adoring droopy lavender eyes. "Quite meticulous, aren't you?" The lilac-haired mumbles, giving his compliment before he turns around and walks along the hall.
After that final touch, you sigh in relief, gently using your left hand surface to mop the sweat from your brow. "All we need to do is sew it. I should wait for Taka—" You startle. Whatever touches against your cheek literally makes your heart jump because of the cold sensation.
"What in the—" Like a natural reflex, you turn your head around to search for the source, but that sixth sense of yours can somehow guess the person standing behind this.
"You call for me?" He asks in a soft tone voice. In front of you right now is Takashi Mitsuya, a gentleman in his dark grey suit layered with a black shin length trench coat, projecting his professional image which instantly forms the first impression to anyone he meets. Hand passes you a bottle of water, the lilac-haired chuckles at the face he saw.
You keep staring at him, your eyebrows pull closer together while your lips tighten, making an angry but quite adorable face in his opinion. As you're about to give him a piece of your mind, his genuine smile immediately blows your anger away. That gentleman appearance, combining with his somewhat irresistible face are like a deadly combo suppressing your anger. How can I get mad like this? Placing your palm on the forehead, you ask yourself before telling him,
"You can just give it normal—"
Hold up! You pause when a thought runs through your mind and interrupts your speech. An idea? No, more like a revenge! Lower your face while smirking devilishly, one side of his slit eyebrow lifts up as he wonders what has got into you until...
"Actually, thank you very much, Takashi."
Calling for his name in a mischievous voice, you raise your slender hand not to take that bottle but to gently grab the other big, masculine one. Eyes lock with the others droopy lavender, you smile innocently as a way to express your affection toward him.
It doesn't take that long for the Second Division Captain to realize your intention. Instead of questioning about your rapid change in behavior, the lilac-haired decides to go along with your act. [First name]-chan, you're no match for me. His surprised face soon reveals a smirk, taking his time to respond you.
"My my~ you really mean it, [First name]?" said Mitsuya in a low tone voice.
He takes a few steps toward while you're doing the opposite, walking backward till your body hits the table without noticing. You startle but your attention is still drawn to his hand pulling the tie knot side to side to loosen that black plain necktie. This soon piques your curiosity. Is it because of the heat or he's doing it on purpose? However, judging the look on his face, you have every reason to eliminate the former assumption. Actually, no one will argue once they meet his sharp, yet flirtatious glance trying to lure you in his sweet trap. The gap is now shortened to only a few centimeters apart, Mitsuya rests both of his hands on the table to trap you inside then leans his lips closer to your reddened ear.
"Or you're asking for something else?" He whispers, sending shivers down your spine.
A flush of excitement is rising to your cheek, but you - my friend, show no signal of being dominated. In spite of the wild beating heart in your chest, you naturally grabs his tie and pulls it closer, looking straight into that man's eyes. "Make a guess."
Now you've done it. That confident expression of yours finally pulls the trigger for a massive explosion in his heart. It's not really something unexpected, but the Captain can't help himself whenever he sees you like this. The lilac-haired signs, looking down the ground to hide his defeated face. But, things won't end that easy.
"Alright, you said it. But," Unveiling a devilish smirk, his left hand wraps around your waist and gives a sudden pull, making your eyes widen from his unexpected move, "don't mad at me afterward."
The other hand is gently placing on your cheek before his thumb touches your lips. He's not gonna... There are butterflies in your stomach as you realize his intention, but sadly, it's too late to escape by now. Feeling his head is leaning closer, you place both hands on his chest to try and stop him though his body doesn't move a single bit. Hold up, hold up, hold up!!! Too close!
"Takashi, wait—" Your eyes shut immediately, knowing what he's about to do.
Mitsuya pauses when his lips are only a few centimeters away. That man is taking a glance at your heavily blushing face and secretly smiling to see this shy and nervous side of yours. Oh my, now I'm the meanie. He signs. Well then...
Soft. Something touches the tip your nose - a light kiss, as light as a feather. As your mind is still trying to comprehend the whole thing, his giggle soon gets you back to your senses.
"I'm just joking! You don't have to worry!" You open your eyes and freeze like a statue. Noticing how tense up you are, his hand gently caresses your cheek where the heat is still lingering around. "Did I scare you, [First name]-chan?"
You know the answer, don't you? Well, he did surprise you in a way but... why not let him guess a little longer? "Who would?" You mumble.
"Really? Shall we try again the—"
Like an instinct, your palm covers his lower face as you know he won't leave you time to answer.
"Not so fast. I won't be tricked again." You smile cheerfully because this time for sure, victory is in your hand. However, life rarely happens according to your plans, and especially when you are with him.
His gaze sharpens and that makes you think twice about your action. Just when you're about to let your hand down, the lavender-eyed holds it in position and gives your palm a kiss. You raise your eyebrows and are completely shocked at his gesture. Mitsuya gently places your hand in his palm, bowing down like a gentleman greets a lady before his lips touch your knuckles. This greeting gesture, hand-kissing, normally indicates courtesy and politeness but not in this case scenario.
"Are you sure about that, my Muse?" He asks with a mischievous smile.
And the Cupid - the god of love in the Ancient Roman, shots his arrow right through your heart, again. Love and passion are spreading out from your wound, making you fall for this man for... how many times you have lost count to be honest. The only difference is that you sink deeper and deeper every time the Cupid has his decision.
"So now you're into role play just simply because of the suit? And what Muse would wear a white tube top with grey sweatpants like me?" You chortle.
"Well, doing it once in a while isn't so bad though." He answers. "And you're always beautiful no matter what you wear."
That makes your heart skip a beat. He always says what in his mind, even if you're ready for it or not. "You sure are good with words." Whispering softly, you don't know what to do but to smile happily like a child.
"Anyway, how was the meeting with your customers?" You ask.
"The good news is we have a big order coming up. It's for their wedding and they chose the design already. One mermaid wedding dress and a tuxedo. We have to make five dresses for the bridesmaids too, so it's gonna be a busy week."
"Oh no, it's not that much... Lemme fainted a little." Without waiting him to respond, you let your head fall down on his shoulder, creating a big "thump" sound in the ears. The Captain is trying hard not to laugh by now. He gently pats that heavy head of yours.
"But still, I'll try my best to help. Can't let my beloved handle everything, right?" There you go, being mischievous again.
Wish you could see his face at that time. It was the most happiest face in the world. He wraps you in his arms for a full, warm embrace. "And I don't want my Muse to be exhausted too."
"But we'll put that aside for now. Wanna go for a ride? It must be bored to spend your whole day in the workshop."
Your eyes wide open to hear his suggestion. How long has it been since the last ride you guys had with each other? You're obviously happy to hear that but you're quite concerned about his health. "Maybe you should rest for today, you must be tired already."
"It's okay. I need to refresh my mind a bit. Lemme get change real quick." He gives you a light pat on your head.
Standing in front of the garage, you're gazing at Mitsuya, who is wearing an energetic set of cloth, opposite to the formal style earlier. He layers his white tee with a loose black baseball jacket with cream leather sleeves. This jacket was you two first couple cloth, and it was made by you-know-who. For the bottom, he puts on grey sweatpants and a pair of sneakers.
Your man is taking his baby Impulse out. The lavender-eyed is looking for something, your helmet. He slowly puts it on for you to ensure your safety while you sit behind him.
"Hold on tight." No matter how many times he has taken you out, that sentence always comes up first like a habit. Yes, you understand clearly that he cares about you, but seeing him like this somehow makes you want to tease him.
"Come on! It's not like my first time letting my boyfriend take me for a ride~" Leaning your body closer to his back, you slowly give that muscular body a hug from behind. The lilac-haired sighs, lowers his head before turning around.
"And it's not like my first time saying this to my girlfriend." He responds while gives you a light flick on your forehead. "I just want to make sure you'll feel safe."
You release your hands to touch the spot where he aimed. Knitting your eyebrows, you ask. "Alright, but do you have to give me a flick?"
"Cause I feel like it." Now your nose is being pinched. Right after when you try to react, Mitsuya grabs your hands and puts them around his waist again. "Alright, no more teasing. We'll be back late if we don't leave now."
You actively tighten your arms so that someone won't give a long lecture again. "Fine, baka Taka."
"That's my girl." Closing his eyes, those lips reveal a winsome smile before his black full face helmet covers it. Once everything is set, he starts the engine and drive you both to the main road.
Resting your head on his firm back, your eyes slowly observe the night life in the city, looking at those cars running on the road and how people spend the rest of their night. Every time the winds blow through your hair, they always give a sense of relaxation, relieving all the stress you have during those working hours.
You breathe out bit by bit, tighten your embrace without noticing, which is a good sign for the person sitting in front of you. Glad she's enjoying this. The lilac-haired chuckles in secret, feels glad at your reaction.
Fifteen minutes have passed by, you two leave the city center, driving on a deserted road that leads to an abandon outdoor parking space overlooking the city's view. This is his go-to place whenever he seeks for the tranquility and now, it's yours too. Mitsuya drives right to the spot where you can observe the mesmerizing scene below and parks his Impulse.
Arms in the air, you stand up and stretch your back after spending nearly the whole day in his workshop, helping him to finish the wedding dress on time. Turn your head around to look at the man sitting side saddle, you ask. "Just three days left. We'll finish Hina-chan dress before it, right?"
"Yeah, I only need to sew the veil and adjust the length of the dress a bit." Mitsuya responds before gazing at you with a delighted face. "It all thanks to your help! Your skills have improved a lot after two months."
"Really? Guess I have to thank someone being patient while teaching me too~" Your mind then recalls how many times he sighed and flicked your forehead when you messed up during your practice. Despite of that, your caring teacher always there to explain and demonstrate again and again. Also, you can't forget the times you injured yourself because of your clumsiness, and he was always there to help you. Those are the memories that you're always cherish.
"I'll still be in your care, Sensei~" You giggle.
Sitting beside the man you love, you lean your head on his shoulder while getting lost in thought. 12 years huh... They finally make it. The fact that Hanagaki could travel back in time is always unbelievable because to you, it's something that only appears in sci-fi movies. You're really grateful that he tries to save everyone even if he has to risk his life. Not knowing what the future may hold, every moment staying with Mitsuya just becomes precious and you truly appreciate it.
Hina-chan finally escapes from the Death, now they're about to engage. "I'm glad for them."
Hearing your mumble, his left arm, which wrapped around your waist, moves its way up to pat your head. Those fingers that he uses to design beautiful clothes are now gently stroking your hair.
"What're you thinking about?" He asks out of curiosity.
"I was thinking..." After a few seconds of consideration, you say something out of the blue "when will I become a bride?"
From your unexpected answer, Mitsuya completely freezes. His astonished face with raised eyebrows and wide-opened lavender eyes is fully drawn to you. Looks like someone's heart just skips a beat. You really are...
Not seeing the Captain react, you ask him with concern. "Taka— Wh—what???"
As you're about to lift your head up, his hand quickly covers your eyes, pressing it down to the old position. You're wondering what the heck is going, not knowing Mitsuya is facing the other direction, hands cover his face. He's making time for the blush to fade away but it's impossible when you're struggling like this.
"Stay still for awhile, will you?" A long sigh escapes from his lips when you're trying to pull his hand off.
After realizing how physically strong he is, you finally surrender. "Fine, I give up."
The atmosphere go into silent, no one has opened up first because you're waiting for him, and your boyfriend? He's still trying to calm himself down. Once Mitsuya gets back to his cool, usual shelf, he removes his hand to reveal your sound sleeping face.
"[First name]-chan?" He whispers.
Oh... She must be exhausted. Caressing your cheek before moving to your ear, his mind suddenly recalls your words. The Captain tries to move his other hand without waking you up, manages to take something out of his pocket. He then remains silent, eyes are focusing that small box lying in the palm of his right hand. "A bride, you said..."
His thumb opens the box, staring at the thing placing in the middle. For some reasons, your man hesitates before taking out the circle object, raising it up to the night sky and gazing deeply.
"You should fall for someone else." He mumbles.
"That's what I said when you confessed your feelings. But you, you still stay around after everything we went through, after knowing my background." Mitsuya pinches your cheek lightly because he doesn't want to interrupt your sleep.
"How stubborn you are."
You can feel something touch your face but only make an annoyed expression like a reflex.
"You always talk to me, run toward me whenever I'm around, and even learn how to sew. And just like that, I get familiar with your presence in my life."
"I used to think if you were in love with someone else, I would be rooting for you and make sure you find a good guy. But right now, I don't think I can let you go—— No, more like I won't let you go this time."
His hand puts something on your right ear. It's his other signature piercing - a black huggie earring with silver crosses.
"One for me, one for my most important person. Hope you won't laugh at my childish thought, I was young and bold." He chuckles at his own thought.
"I'm not ready to be your spouse yet, not when I'm still struggling with financial issues. I don't want my love to struggle it with me."
"Just a little more, will you wait for me, [First name]-chan?"
#tokyo rev x reader#tokyo revengers#takashi mitsuya#mitsuya takashi#mitsuya x reader#takashi x reader#takashi mitsuya x reader#tokyo revengers mitsuya#fanfic#tokrev mitsuya#mitsuya x you
27 notes
·
View notes
Photo


#ShowYourProcess, pt 2
Tagged by @inessencedevided for this gifset ❤ (you can see her post here)
From planning to posting, share your process for making creative content!
To continue supporting content makers, this tag game is meant to show the entire process of making creative content: this can be for any creation.
RULES: When your work is tagged, show the process of its creation from planning to posting, then tag 5 people with a specific link to one of their creative works you’d like to see the process of. Use the tag #showyourprocess so we can find yours!
This is a bit long so sticking the rest under the cut. (^ω~)
1. Planning
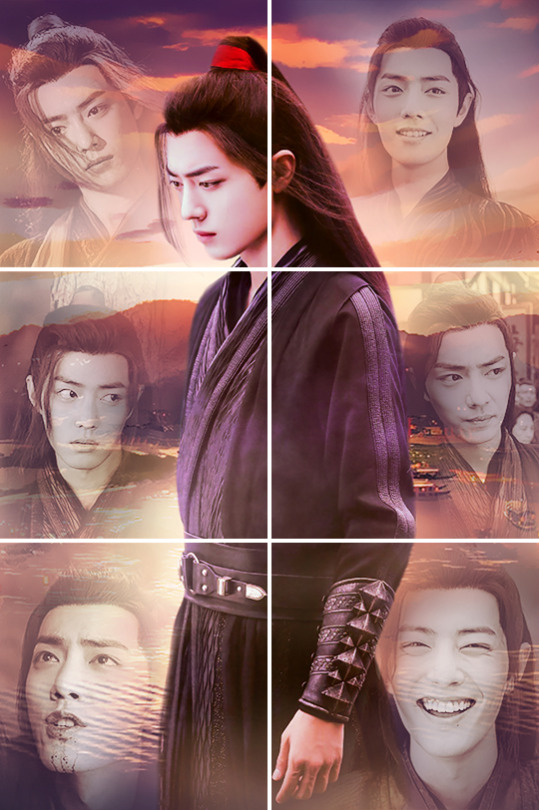
This set was actually part of a pair (with this Lan Wangji one) so most of the planning happened when I made that one. Basically, I knew I wanted a static central image surrounded by animation. I tried to pick a variety of scenes to show Wei Wuxian’s range of emotions, and wow was it hard to narrow it down to only 6.
For these kinds of gifsets, there’s actually two stages: creating the photomanip and then making the actual gif.
2. Creating
So here’s what I started off with for the photomanip:
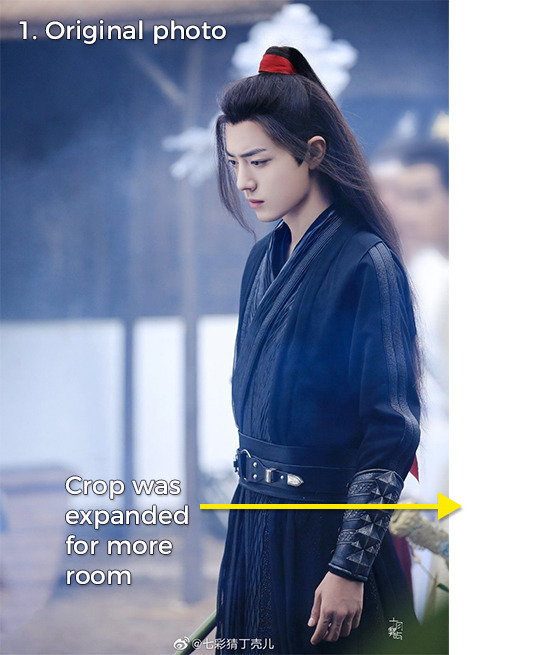
The photo had Wei Wuxian on the right side of the image, so I extended the crop to put him closer to the center.

I used a layer mask to remove the background. It’s not a super precise mask but I know I can always come back later to refine it.
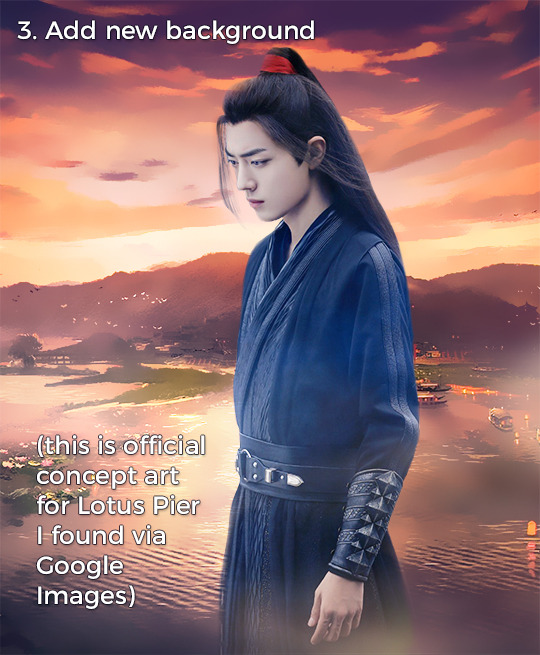
This is official (I think?) concept art of Lotus Pier, and I just added some Surface Blur + a hue/saturation adjustment layer to make it look smoother and more vibrant. The Lan Wangji set was very blue/green, so I wanted this one to be heavy on the warm colors.
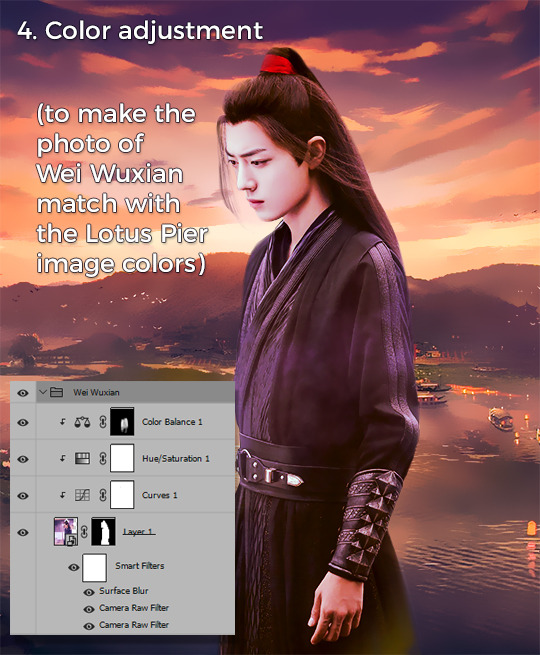
Obviously the photo of Wei Wuxian didn’t match at all with the background. To change that, I first used to Camera Raw filter to change the overall temperature from cool to warm. A little Surface Blur was added on top to remove some of the film grain. After that I played with some adjustment layers until I was happy with the overall coloring.
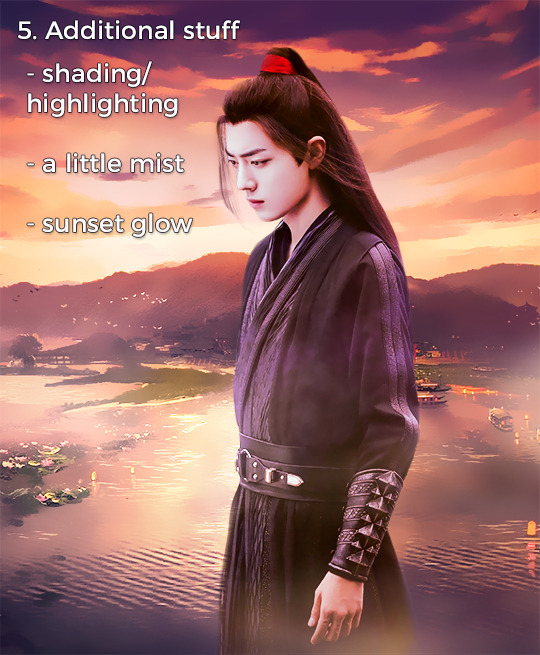
Almost done! It didn’t quite have the visual pop I wanted, so I painted in some mist + more golden light to make that sunset really stand out. I also adjusted the shadows/highlighting (a separate layer set to Overlay or Soft Light + brush tool).
Phew, that’s stage 1 done! Now on to the actual gifset.
I always make a separate “planning” file for these types of sets to make sure the overall look is right:

Each segment of the photomanip gets cut and added to the corresponding gif. I often mock up what it looks like to make sure the masking is correct:
After that, I import video clips and create each separate gif. Here’s what gif #1 looks like after it’s been trimmed, cropped, and sharpened:

I wanted the overall gifset color to have those sunset colors, so each gif got a group of adjustment layers to make them more neutral. The section of the photomanip then gets added on top:

Repeat for the other gifs, add in the watermark, and then they’re ready to export!
3. Posting:
As always, I hold posts in drafts for at least a day or two and check for mistakes. I also look at it on both desktop and mobile to make sure any details/text don’t get lost.
Wow that was a lot. Hopefully it made sense! I already tagged people in my first #showyourprocess, but if anyone else would like to play please feel free to tell me!
(づ ◕‿◕ )づ
#showyourprocess#tag game#gif making#photoshop#tutorial#mystuff#mytutorial#wei wuxian#long post#fun fact: i originally was going to include more clips of WWX being just really sad and/or distraught but man i couldn't do it#he baby and when he sad i sad T_T#don't judge me lol
48 notes
·
View notes
Note
i’ve never made gifs before and i have absolutely no idea where to start T-T can you share your process or is that top secret lol? and dw i’m not using you instead of google lol it’s just i’m very picky about what looks good and your gifs have such a nice frame rate and sharpness and stuff so i was wondering how you go about making them (i have photoshop which i’ve heard is what most people use i think? idk) sorry if you get this question all the time feel free to ignore!
hi!! dont worry i had no idea where to start either and it took me a while and looking at several tutorials to figure out what i was doing cus its unfortunately not something u can just google and find all the steps to lol,, but anyway no my process is definitely not top secret!! i think most people use mostly the same process and then things like sharpening + coloring are all about personal preference! but heres some things that might help u out!! 🥺
heres a couple tutorials that could help u get the hang of the actual technical process and steps of converting a video file to a gif which for most people is about the same, kookyjin’s tutorial, sugajimin’s tutorial
you don’t have to use vapoursynth but it does make the process a little easier by cropping and resizing the video for u, and it also has a denoise filter which will make your gifs look smoother, it can be a little tricky to install but heres the link for that
as for my personal way of sharpening i use smart sharpen, and sometimes unsharp mask if i want it just a little bit sharper. the basic sharpening for tumblr gifs is 500% at 0.3px, but u can use more or less depending on the quality of the video. lower quality videos (like youtube videos) usually cant take more sharpening before they start to look oversharpened so u can lower it to 0.2px. but for things like my music video gifsets where the source video file im using is higher quality and hasnt been compressed the way youtube videos are (i get them from other websites where people have access to higher quality versions of the mv), for those i’ll often use 0.4 or even 0.5px, so it really depends! i also sometimes change the opacity of the sharpening filter to fine tune it a bit more. what i like to do lately is start off at an amount thats like obviously too much and oversharpened, and then gradually work my way down until i think it looks ok! i think its just something you have to build up a sense for over time :] but yea those r just some tips
as for coloring, its even more up to personal preference than sharpening is! i personally like a really natural coloring that just brings out the colors that were already in the video. so i cant give tips about other coloring styles but if u like mine id say the most important thing is creating contrast. and the best layers ive found to do so is with levels and curves. i ALWAYS start my coloring with a levels layer and darken the shadows and brighten the highlights as much as i think looks natural. this creates a good base to make the rest of the coloring on, gets rid of the “gray cast” (you’ll notice it if you click the little eye next to the levels layer and turn it on and off and see the difference with and without it), and makes the colors in the gif look more vibrant and saturated without actually using a vibrance saturation layer. i rarely ever use a vibrance saturation layer and if i do its actually to lower the saturation. after a levels layer ive been using (in order) two curves layers (its kinda hard to explain how to use those u just have to mess around with it until it does what u want), a brightness contrast layer, an exposure layer, sometimes a selective color layer (just to darken the blacks a little which is another good way to create contrast), and a gradient layer at about 10% opacity of just the white to black one to add a little bit more contrast :)
for frame rate i also prefer it to look natural and almost as fast as the original video. i will usually do 0.01 seconds above what the frame rate was when i originally imported the frames. so for 25 fps videos i would use 0.05, for 30 fps 0.04, and 60 fps 0.03
i hope all of that made sense and u find at least some of it helpful🥺 if u have any questions please feel free to send me another ask id be happy to answer!! even if u think it might be a dumb question i probably had it too at some point and might be able to help<33 good luck i promise giffing is really fun n worth sticking thru the first little bit of confusion!! ^_^
#mail#gif help#oh and yes photoshop is what most people use i think there might be alternatives out there but everything i said here is about photoshop!
10 notes
·
View notes
Text
Eager Deal Maker
Not all demons enjoy making deals and stealing souls
But most of them thrive off of it
((Gonna add some warnings for implied abuse, implied domestic disturbances, threats, manipulation, threats against animals, and dark themes))
The drama was a frequent occurrence within the household, and frankly, none of it came as a surprise anymore. If anything, the demon found it amusing, and the negative environment fed him well. It began when the dumb brunette harlot moved in with her worthless drunk of a boyfriend. Naturally, her teenage daughter went with her; Not that she was given a choice on the matter. The woman’s boyfriend also had a daughter of his own, who’d made it clear from the very beginning that she had no interest in befriending the other girl.
Living together wasn’t always the best, but it was doable. Then the family relocated, and a little time passed before the woman’s eldest child moved in with them, absolutely riddled with anxiety and depression. Of course, while Othni relished those emotions, it was the fear and anger that blossomed there that really caught his attention. First it was from the pair of siblings and their overactive imaginations, causing them to fear their new home’s basement. They despised the dirt and cobwebs, the old, musty odor, and the various dark crawl spaces. Their minds painted the image of monsters lingering in the gloom, and more than once, they feared that if they looked into the darkness too long, they’d catch something looking back at them. Othni had been so very tempted to indulge their imagination a little, and he contemplated all the various forms he could take to scare them.
He never got the chance, though. The rage that took hold of the house was located on the second floor, and it was provided by the daughter of the mother’s boyfriend. She was so angry and often carried the stench of jealousy, and Othni was intrigued. She had such an easy life; So he didn’t understand what she had to be angry about. Her parents loved her, she didn’t have to work even a single moment to attain anything she currently owned, she had a loving boyfriend of her own, and she had virtually the entire upstairs of the house to herself. She was bitter and ungrateful, and Othni could hardly believe some of the things that she had the audacity to say to her father. Hell, if he’d even considered saying such things to his father…
Othni shook off those thoughts, refocusing his attention on the present moment. Right now, a fluffy black cat that belonged to the pair of siblings was staring at him from across the small living room, it’s large, green eyes locked on his every move. He paused, stopping in the doorway that connected the living room to the kitchen, and he arched an eyebrow, watching the cat tilt its head and take one tiny, cautious step toward him. Smiling slightly in amusement, the demon slowly lowered himself to the floor and sat down, turning his body a bit and facing away from the cat. As he’d expected, the fluffball continued to very cautiously approach him, stretching its neck and sniffing the air. This was a creature that was pure of heart, and he could tell how timid it was, so he did his best to stay as still as possible.
Crouched low to the ground, it crept even closer, slowly making its way around him and sniffing at his arms and hands. Looking up at him with wide eyes, its mouth hung open as it tried to process the new scent, and he chuckled, amused by the way that particular expression looked on its face. A door slammed upstairs and the cat immediately bolted for the stairs, likely to go hide in its owners’ room. Othni made a face, pouting as he watched it leave; It was fluffy and timid, and it reminded him of his precious Misfit. It saddened him ever so slightly that the fluffball was gone now, but he shoved the feeling aside. After all, he could always see it some other time.
The stairs creaked and he vanished into the shadows, quietly watching as the resident home-wrecker descended. Usually she emitted nothing but anger and jealousy, but at the moment, she gave off a sick, twisted sense of joy and satisfaction. Noting the cocky smirk she wore, he frowned; Oh, wonderful. Just what in the hell had she done now?
He waited for her to pass from the room before he warped through the shadows and manifested in the shadows that occupied the guest room. Careful to stay out of sight, he took a deep breath, sensing the anger, frustration, fear, and despair from across the hall. The elder sibling’s anxiety had grown so much that it was almost suffocating, and he furrowed his brows in puzzlement. Again, he warped through the shadows of the house, manifesting a second time within the siblings' closed bedroom closet. Listening in, he caught the sound of sniffling, as if one of them was crying. When they spoke, their voice shook, “If she does anything to him, I swear… I’m gonna throw the bitch down the damn stairs. I’m not letting her get away with this.” As they spoke, he could hear the anger and venom that were laced into their words, and he tilted his head.
He was all for violence and revenge, but just what was going on? The one that was speaking was usually so reserved and considerate of others. They reeked of kindness and empathy, and this was incredibly out of character for them. Willing to risk being seen, he warped through the small gap beneath the door, quickly finding a new spot just outside one of their windows. Peering inside, his eyes scanned the room before they settled on a piece of paper that laid on the foot end of one of their beds. Squinting a bit, he focused in on it, and then immediately bristled. On it, there was a threat to kill their cat, along with an additional insult. From the brief meeting he’d had with their little black fluffball, he could tell that it was a sweetheart. In such a short amount of time, it reminded him so much of Misfit that he felt his long dead heart give a small pulse in affection, and he found himself already harboring the urge to protect it. This… This wouldn’t fly. If these humans didn’t do something to protect it, then he’d be taking it with him, and that was all there was to it.
“I can see you out there!” The other siblings' words caught Othni by surprise and he jolted, quickly ducking out of their line of sight. Hiding in the shadows again, he listened as the first sibling questioned them, frowning as they gave their response, “There was a shadow out there. It was all dark, and then I saw it move.” The demon mentally kicked himself for not being more careful and he remained frozen in place, waiting for their conversation to change before he moved again. When it did eventually drift back to the subject from before, he prepared to move, but then abruptly stopped, listening as he caught the tail end of something the first sibling had said, “-I wish demons were real. At this point, I’d willingly give one of them my damn soul if it meant getting rid of that bitch and keeping Bubby safe.”
A lightbulb went off in the demon’s mind, and a wide, sharp toothed grin stretched across his face; An opportunity to make a deal had just presented itself, it seemed. He didn’t even care if he laid claim to their soul or not, all that mattered was protecting their little feline friend. Grinning devilishly to himself in delight, he warped back into their closet and waited. Some time passed before their light shut off and the room became illuminated by nothing more than a small, handheld lamp, and he prepared himself, his tail and claws disappearing, his sharpened teeth becoming dull and human while his eyes faded and turned emerald green. He allowed his greyed skin to shift, becoming a more human looking color before he rapped on the door exactly three times and waited.
Naturally, a few expletives slipped from their mouths, and he arched a brow. There was the sound of movement before the closet door slowly opened after a moment and the pair of siblings gawked at him. Clearing his throat, he took the most polite tone he could manage, “One of you wished for a demon to solve your recent problems for you, so here I am.” While the elder of the two continued to stare at him, the younger one seemed taken aback, “Uhh, no, we didn’t. Who the hell are you, and why are you in our closet?” The demon couldn’t help the amused grin that found its way onto his face and he tilted his head, “One of you said they’d willingly give up their soul to get rid of that dunderheaded doxy across the hall and to keep your pet safe.” The younger sibling shot a look at the elder of the two, and the elder seemed to shrink back a bit, offering them a small, guilty smile.
Shifting his attention to them, he hummed, “I presume it was you?” They sheepishly nodded, not quite meeting his gaze, and he warped through the distance between them, “Luckily for you, I can do that. I can get rid of her, and I can make sure your cat is safe. You caught me on a good day, so I won’t even ask for your soul.” The elder of the two siblings regarded him with a look of clear suspicion, narrowing their eyes, “…What would you be getting out of it? You’re a demon, so I don’t think you’d ever do anything just for the sake of being nice.” He chuckled lowly to himself; Oh, so they were a clever one. How interesting.
The demon shrugged his shoulders, noting the way their cheeks reddened the slightest bit as he drew even closer to them and leaned down, wrapping an arm around them. Lowering his voice, Othni murmured, “I saw the note she left, where she threatened to kill your cat.” He paused, slowly letting his appearance shift back to normal. As his fair skin became greyed and his teeth sharpened, his eyes began to glow a vibrant shade of blue and his tail appeared, unwinding from around his waist. It curled around the elder sibling’s waist and he dug his clawed fingertips into the fabric of their shorts as he purred, “As you can probably imagine, I happen to love cats. If someone has the audacity to kill a cat, then I kill them. Simple as that.” Registering the change in his appearance, the tail around their waist, and his words, their eyes widened and they froze, unsure what to do.
Sensing this, he lifted his free hand, delicately turning their head so they’d meet his gaze. As their eyes met his, he offered them a sharp, charming grin, “While your soul would be a nice little add-on to this deal, I don’t need it. All I want is the satisfaction of ridding this home of someone who’d dare hurt an innocent animal. All you’d have to do is keep your mouth shut and let me feed off of the growing negativity here.” He stole a glance at the younger sibling, “Both of you. Do you think you could do that?” The siblings shared a look, the younger one nodding first before the elder nodded back. Meeting Othni’s gaze again, the elder sibling made a soft sound in agreement, “Yeah… We could do that.” He seemed to light up, his grin widening, “Wonderful, I’m glad! Since I am still making a deal with you though, I’ll need you to shake my hand.” Offering them a blackened hand, he patiently waited as they internally battled with themselves.
A few seconds passed before they hesitantly took his hand, and his grin became mischievous. He tightened his grip on their hand and dug his claws into their skin, drawing a small amount of blood as he hissed, “Excellent, I’ll get started immediately, then. I’d suggest putting your headphones on… You might not want to hear the screams.”
#writing#othni.exe#tw: implied abuse#tw: implied domestic disturbances#tw: threats#tw: manipulation#tw: threats against animals#tw: dark themes#four horsemen of the apocalypse#riders of the apocalypse#undertale#undertale au
19 notes
·
View notes
Text
coredrill’s basic gif coloring tutorial!
hey y’all!! so basically an anon asked for the general steps that i use to color my gifs, and i thought i’d turn it into a mini-tutorial!
i’ll be using a gif from rwby as an example, since it’s got pretty simple coloring but it represents my process well. i use the same steps for all my gifs, including those from other shows. essentially, i’ll be showing you how to get from the gif on the left to the gif on the right:

to the anon who asked for this, or anyone else who happens to see this, if you have any questions or need me to clarify something: please don’t hesitate to ask!! i do not mind at all :)
tutorial below the cut:
okay, so i’ve started with a basic gif of winter, which i’ve already resized, sharpened, and converted to timeline / smart object.

as you can see, this gif is...incredibly blue. it’s also kind of dull-looking, since the scene takes place in a dark location. if i’m sitting down to gif this scene, i’ll want to make it brighter, and i also want to make it so that the entire thing isn’t blue-washed!
there are two steps that i always, always start with when making gifs. it doesn’t matter what show or scene i’m giffing, i always start by adding a selective color adjustment layer, and a vibrance layer on top of it. here are my settings for those:

and here is the gif that it results in:

now, i know this just made winter more blue, which is the opposite of my goal. but that’s okay! it’ll be fixed later. basically, the point of this step was to make the colors in the gif as bright as possible.
the selective color layer helps with that by providing a strong contrast for the other colors to play off of. basically, if you make your blacks as black as possible, other colors will just look more vibrant next to them. here’s a comparison between what i would consider to be a “finished” version of this gif (on the right) and that same gif, but without darkening the blacks (left):

sure, most of the colors are the same, but they look brighter in the gif on the right, because they’re being compared to a true black instead of a dark blue.
this selective color layer is also super important for me when i make gifs because i rely so heavily on making all of my colors ridiculously vibrant! the .gif file format only allows for a maximum of 256 distinct colors--which works fine in this example, because it’s a pretty small gif. but, if you’re making longer gifs, or gifs with a whole bunch of different colors, or gifs with a lot of movement, photoshop will pick what it thinks are the 256 most important colors in your gif and try to replace any excess colors with the closest match. sometimes it looks okay, sometimes it doesn’t. but, if you add this layer, you can help mitigate this problem a little, since all of your dark blues turn into black and all of your dark greys turn into black, etc. etc. that way, you still have 255 colors left over to play with!
the vibrance layer is pretty self explanatory--it makes the colors more vibrant and saturated! it’s different from the hue/saturation layer because vibrance actually adjusts the color in an intelligent way. if you turn up the saturation in a hue/saturation layer too much, you run the risk of your gif’s colors blowing out and getting all grainy (like a deep-fried meme). but using the vibrance layer pretty much prevents that altogether!
occasionally, i will set the saturation slider on my vibrance layer to a lower value. this really only happens if the scene that i’m working with starts out pretty saturated to begin with--95% of the time, i set both sliders all the way to 100.
alright! now that i’ve got those two layers down, i move onto the scene-specific coloring. i always color each scene differently, but i follow a similar set of steps each time.
the first thing to be aware of is that generally, turning the vibrance all the way up will tend to also amplify the color of the lighting. for this scene (and a lot of rwby v7/8), it’s the blue lighting of the atlas military compound. if i’m giffing rwby v5, turning up the vibrance just makes that godawful yellow filter even worse. the early rwby volumes sometimes use a magenta lighting. weird stuff, lol. but these steps are where we fix that!
some things to mention: the layers i use for these steps are color balance and selective color. i also place these layers between the two layers i already have, so that they’re on top of the selective color layer where i darkened the blacks but under the vibrance layer. i’ve found that colors are much easier to adjust when they’re less vibrant, but i like having my vibrance layer in there already so i can see the final product without any surprises! (also, i’ll include a screenshot of the layers i have at the end of this post, so you can see the order i put them in!)
if i find myself going “ugh, why is this scene so *insert color here*” the first thing i add is a color balance layer. i always fix as much as i can by adjusting the midtones first, then i mess with the highlights. i’ve found that if i start with highlights, i end up overcorrecting, and get really weird color combinations. i never touch the shadows, since that tends to mess with the blacks that i’ve already added. here are my settings for this gif:

and here is the gif that it results in:

hooray! winter’s less blue! i will say--in this case, i had to make pretty big adjustments to the red/cyan sliders. normally, the color balance layers are pretty touchy (at least, they are when there’s a vibrance layer on top of them lol), and i don’t have to make either value greater than +/-10. but this scene was really blue, hence the large change lol.
and, i know, it’s still pretty blue! but at this point, you can start to see the distinctions in the colors that are supposed to be there--winter’s skin looks like a blue-tinted yellow, for example, and her sword is actually grey. if i’d made any larger changes with the color balance layer, it would’ve started affecting the more neutral parts of the gif. for example, dragging the sliders to try to get rid of more of the blue in the gif would’ve tinted her sword hilt yellow or red, which isn’t what i was looking for! so, at this point, i added two selective color layers on top of the color balance layer. here are my settings for these layers:

i probably could’ve combined these changes into one selective color layer, but i tend to split up my coloring into a whole bunch of different layers so that it’s easier to fine-tune. for this gif, the first layer i added adjusted the whites in the gif (so winter’s skin, hair, and clothes) by removing cyan. this works because there are no whites in winter’s sword hilt--the neutral colors are left alone, but the lighter ones are adjusted! you can see this adjustment in the gifs below:

the gif on the left shows the effect of just the first selective color layer. you can see how just that small adjustment helped a lot--winter’s skin finally looks like actual human skin, instead of being tinted blue! the gif on the right is a pretty subtle change, and it’s the result of adding the second selective color layer as well. you can see that winter is just the slightest bit brighter--which has the benefit of getting her hair farther from blue and closer to white, lol.
the last thing i do is adjust the brightness of the gif itself. i do this last because, similar to the color adjustment, i don’t want to be surprised by its effect when i add color adjustment layers on top of it! normally, i use the levels, brightness, and exposure layers here, in that order. they all go underneath the very first selective color layer (darkening the blacks). for this gif, i only needed to use levels adjustment. here are my settings for that:

and here is the resulting gif:

and there it is! ta-da! you can see that adding that layer brightened the background just a bit, which is nice so that all the blacks don’t completely blend together. more importantly, it also got her hair to the pretty shade of white it’s supposed to be, and got rid of the residual pesky blues!
as promised here is the order of my layers:

you can see that even though the blacks layer and the vibrance layer are the first things i add, they’re definitely not the first two layers! i’ve found that this general order (brightness/levels/exposure, then selective color to darken the blacks, then fixing the colors with color balance and selective color, then vibrance on top) tends to give the best results for my gif style, even if it doesn’t match the order that i’m adding the layers in!
of course, this exact coloring won’t work on all gifs, but hopefully it gives you an idea of where i start and the general process i use!! a lot of the specifics--like figuring out how much you can move the sliders before it does something wacky to the colors, or how many selective color layers you need to add, or which colors to actually adjust in the selective color layers--comes from practice and experimentation!!
that’s pretty much the end for this post, though--hopefully i was able to make some sense! like i said at the beginning, PLEASE don’t hesitate to send an ask if you have any questions or need me to clarify something!! i’m sure i’m not using proper terminology with a lot of this--i just kind of learned by messing around in ps! if you managed to make it to this point, thank you for reading the whole thing!!
#fkjahkj how do i even tag this#gif tutorial#giffing tutorial#coloring tutorial#sure that'll work!#hope you like it anon <3#i'll put together one for text on gifs tomorrow!! that one will be pretty short though#since i don't really have that as standardized as i do my coloring asjkdhak#anyways i'm so honored that you like my gifs enough to ask for this!!!#hopefully you learn some new tricks from it <33333#t.tutorial#oh also#f: rwby#ch: winter schnee#went a little overboard here but!! idk it was fun lol#misc: gif ref
36 notes
·
View notes
Text
Let’s talk about coloring in edit and gifs
I have seen it going around in the AH comunity with whitewashing in art, and I wanted to talk about it in gifs, and show how I do my coloring (basicly the same for edits I have just used a gif for this example).
I excuse any spelling mistakes (I’m both danish and dyslexic) and if you have any qustion for me feel free to send an ask!
I use Photoshop CC 2017
Here is where we start of (it has been cropped and sharpened):

I’m gonna start with a basic coloring where I use some adjustment layers, you find them here in Photoshop:

I use curves, levels, brightness/contrast, selective colors and vibrance:

Curves is used the brigthen up the picture, and levels bring back contrast and color. Be careful with brightnes/contrast cause it can wash out your picture. Selective color just makes the black little blacker. And vibrance is just making the gif more vibrant.
Then we get this:

Then if you are like me you like playing around with the colors of the background and stuff like that, it really depends on the project on what I use, for this I used selective colors, here is a quick overlook at what I used here (I do also just mess around with levels and curves a bit more);

And then I get this:

Here is an exsample of a coloring that works on another set that just dont work here:

Here is a bit more visual explanation on why it’s “just no”:


My biggest tips:
Don’t use that brightness to much. They are other ways to make your gif light and colorful
Look back at the source, cause when you edit and look at it for a long time it can be easy to lighen it too much
I hate to say it but practice makes perfect
Here are some other tutorials that could help and probably explain better that I do:
How to spot and stop whitewashing poc in edits
A guide to coloring poc (including vibrant gifs, pastel gifs, and dark gifs)
Making gifs without whitewashing (inclused a psds - a coloring someone else has already made)
How to avoid whitewashing when coloring your gifs
How to avoid whitewashing a poc tutorial
238 notes
·
View notes
Note
How do you color your 911 sets?
hey nonnie! i’ve never done a tutorial before, so i hope my explanation makes sense! putting this under a cut because it gets image heavy:

okay, so i’m gonna go into this assuming you already know how to make a basic gif. i use photoshop cc, but this should work for any version. get your layers, make them into frames, convert the frames and layers into a video timeline and smart object respectively, sharpen the gif as you usually do and we’re good to go!
this is what my gif looks like without coloring:

so what we’re gonna do first is add a curves layer. with curves, you first use the white eyedropper tool on the lighter/white parts of your gif to make them brighter. then do the same with the black eyedropper tool with the dark parts of your image to give it some contrast.
these are the settings i use:

adjust the white curve as seen in the image to add brightness to your image where required, i recommend going with similar settings to this so you don’t end up making the characters look whitewashed. be especially careful while coloring POCs!
adding a curves layer really changes the way your gif looks drastically:

big difference, right? now, we’ll add a selective color layer to bring out the reds of the image, make it look brighter, and darken the black parts so to deepen the shadows and add more contrast.

increasing the values of cyan, magenta and yellow make the reds darker, though the difference is subtle. you can skip out on this step if you want to, but i recommend that you do add a selective color for black at the very least to deepen the shadows like so:

again, it’s a subtle difference, but it makes the gif look much better in my opinion.
next, we add a levels layer to add more brightness to the gif. these are the values i use:

this is what the gif looks like with levels and selective color:

now, this is where you can probably stop, the gif is bright enough and looks quite good! however, i like my gifs to be a touch more vibrant, so i have a few extra steps.
i add a vibrance layer and dial it all the way up. it tends to make the gif look oversaturated with way too much yellow, but there’s a fix for that. this is the vibrance layer, to begin with:

if the lighting is paler, i might take it even higher, but this really depends from gif to gif. when it comes to this part, the method is different for different scenes/shows. it’s pretty much a trial by error method, i just go at it pretty haphazardly lol.
now, to fix the oversaturation, i add another selective color layer, for yellow, this time:

usually, the yellow gets dialed up way too high with the vibrance layer, so i bring it back down to a normal amount with these settings. (you don’t need to adjust the black as much as the yellow, but i did it out of personal preference. it doesn’t actually make much of a difference, its your call.)
and this is the final result:

not much of a difference with the added vibrance, but what can i say, i’m picky about this lol. sometimes it does make a huge difference, but this scene was pretty bright to begin with so.
and there you have it! i hope this made sense, feel free to ask again if you didn’t understand something!
19 notes
·
View notes
Text
detailed giffing + basic coloring tutorial for beginners
so a lot of gif/coloring tutorials are pretty outdated or not that detailed & i wanted to put my own out there! in this:
how to get the screencaps for your gifs
how to make a general gif
basic coloring (no psds here, it just gives you a basic idea for making colors pop and look nice. you can look up how to use psds, but i prefer making my own for every gif as it’s much more personal, gratifying, and creative. there’s nothing wrong with using psds as long as you don’t claim them as your own, it’s just not my personal thing)
how to save a gif
we’ll be going from this:
to this
what you need:
photoshop (cc 2019 is what i’m using, but this works with any version of photoshop really as long as you download a version with the timeline feature) i won’t add download links here since i don’t want this deleted, but you can look some up on tumblr or use the pirate bay (current url is pirateproxy.blue as of 4/29/2020) & follow the instructions there.
for windows: potplayer/kmplayer (both use literally the exact same instructions) this tutorial uses potplayer but kmplayer uses like literally the same instructions, it just doesnt work right on my computer
for mac: mplayer. this tutorial does NOT cover this so find a tutorial on tumblr on how to take screencaps with mplayer & then skip to the “how to make a general gif” section. though, again, i’m on a pc so i have no idea if this is entirely accurate for mac.
if you’re downloading from youtube: clipconverter
if you’re Definitely Legaly torrenting: utorrent + the pirate bay (again, current url is pirateproxy.blue as of 4/29/2020) or another torrent site + you should really consider getting a VPN when torrenting (i use privateinternetaccess but you can find one that suits you)
note: download an adblock of some kind, disable automatic downloads on your computer, & download an antivirus program if you want because some sites are sketchier than others! this is ESPECIALLY crucial on sites like piratebay. keep your computer safe babes.
1. screencapping
there’s several ways to get screencaps on photoshop, but this is the easiest imo and i’ve never done the whole convert video frames to layers thing. like i said, you’ll need potplayer or kmplayer. i’m using potplayer. important note: don’t accidentally download viruses here! read each screen carefully & make sure you’re not hitting accept to download any secondary programs.
1. download your .mp4/.mkv. you can go to youtube & find a clip/scene/whatever and use clipconverter to download it. just make sure you download it at 720 (or higher) as anything lower than that will give you a poor quality gif. you can also download using somewhere like the pirate bay, but for this you need utorrent & i would HIGHLY recommend using a vpn if you live in a country where torrenting copyrighted content is illegal, as your internet provider may flag your ip address if you don’t & you torrent too often.
2. download potplayer/kmplayer & get it set up
3. create a screencaps folder. i always put mine on my desktop. in your screencaps folder, make a folder for however many gifs you want in your set. i just have one for mine so:
4. open up your .mp4/.mkv

5. hit ctrl + g to bring up the screen capture pop-up & set your settings to these. click the button w/the three dots next to the storage option & select the folder you created for your first gif
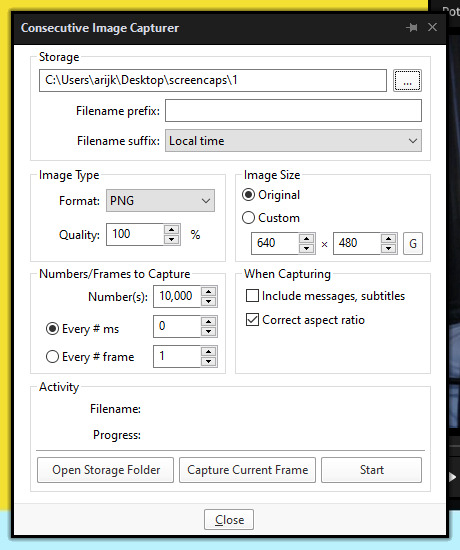
6. navigate to the scene you want to gif. when you’re there, pause it and hit the start button on the consecutive image capture screen, then play the video. how many screencaps you need depends on the size of your gif. for larger gifs (so like 540px wide gifs), you’re probably going to want to keep it below 30 frames. for smaller gifs (268px wide or less) you can maybe stretch it to 60, depending on how much coloring you add. you can always delete screencaps later though in photoshop, so don’t worry about it too much. for this gif, i only had 17 frames because the scene was really short lmao
7. go to your screencap folder you made & delete any unnecessary frames. it’ll look like this:
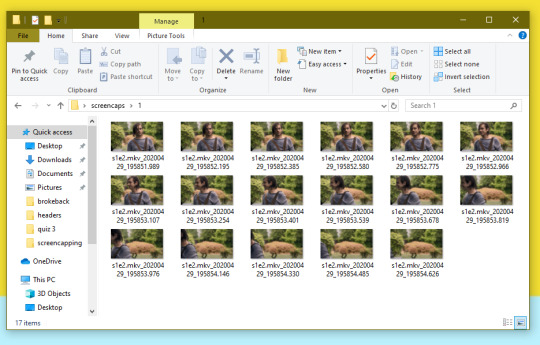
8. repeat the process for any other gifs, making new folders in your “screencaps” folder, numbered for however many gifs you’re making. make sure to change the folder you’re loading the images into on the image capture pop up though so they don’t all go into folder 1.
2. making a simple gif (+sharpening)
1. first, you need to load your screencaps. when you open up photoshop, go to file > scripts > load files into stack
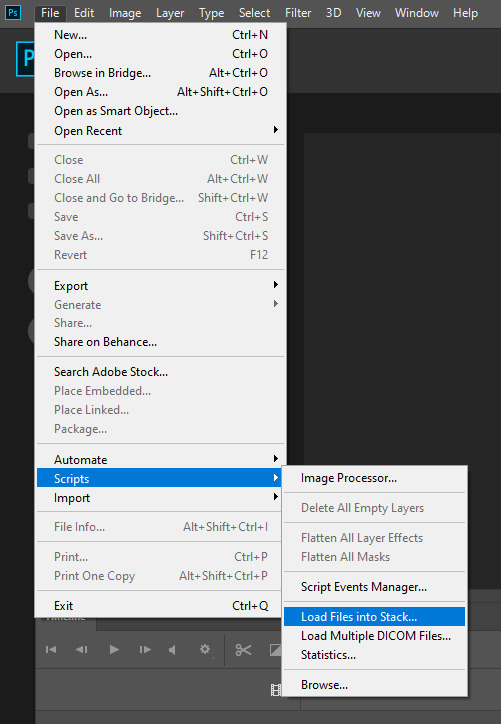
2. when the window pops up, switch the “file” option to “folder”

3. click browse and find your screencap folder for your first gif (in my case, desktop > screencaps > 1) once it’s all loaded, click “OK”
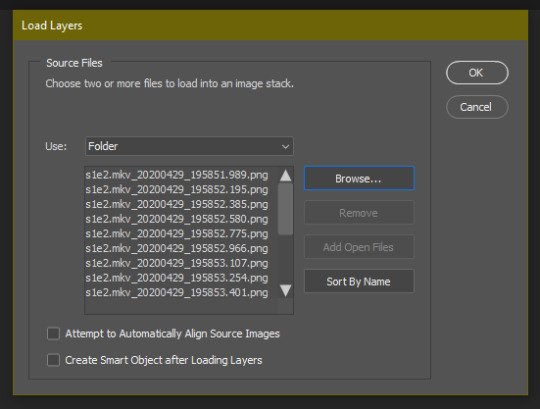
4. it’ll take a minute to load all your screencaps into photoshop. when they do, go to the upper bar on photoshop > windows > timeline
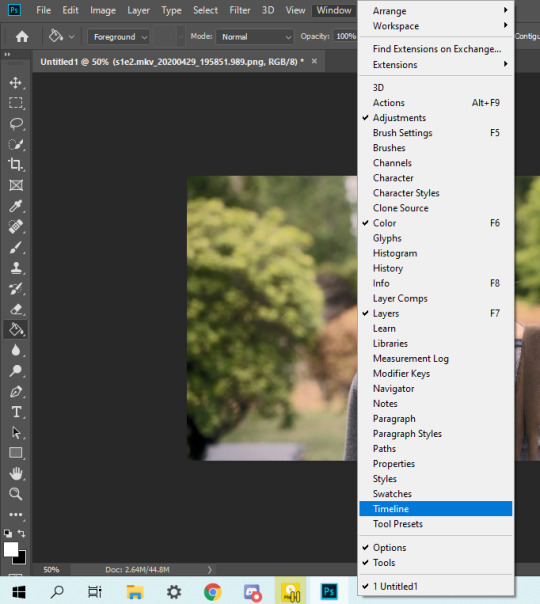
5. when the timeline bar shows up, click “create frame animation”

6. hit this button and click “make frames from layers”

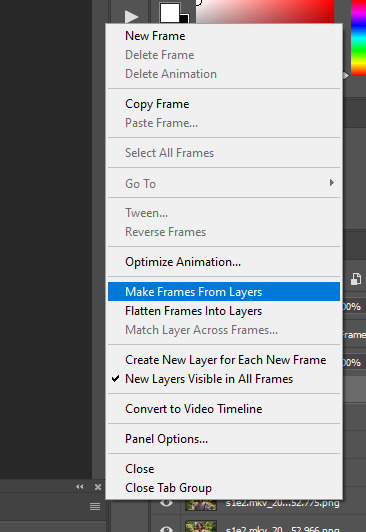
7. hit the button again and click “reverse frames”
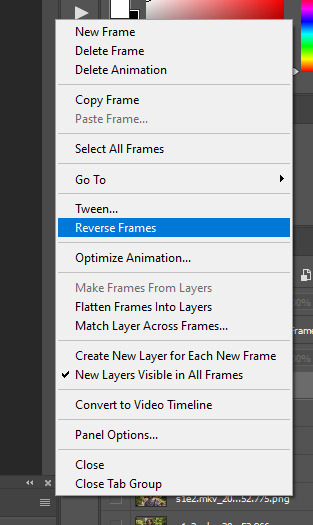
8. click back onto your first gif. then select the rectangular marquee tool and set it to whatever gif size you want. the width for 2 small gifs next to each other is 268px, the width for full size gifs is 540px. most people use 268x150 px for gifsets of 4+


9. use the marquee tool to select what area you want for your gif, like this. it’s up to you how to crop it! get creative!
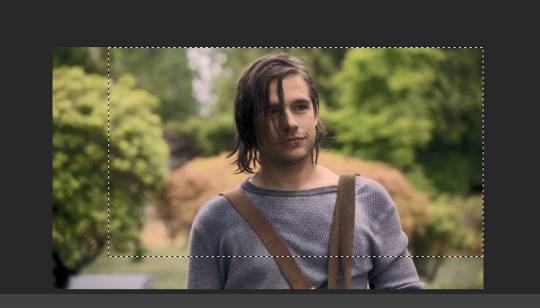
10. go to image > crop
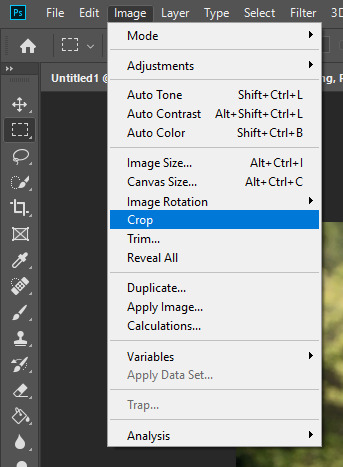
11. now that your image is cropped, go to image > image size. change the size to your desired gif size (in this case 268x150). hit “OK”. then make sure it’s zoomed in to 100%
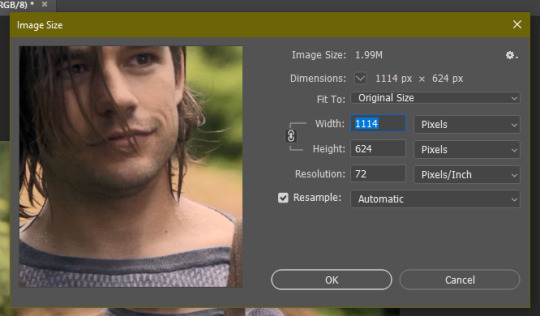
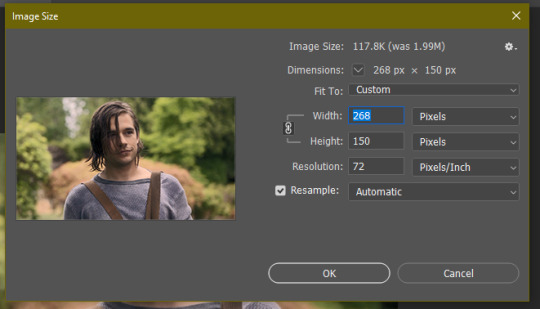

12. now, you COULD just save this gif, but they look way better sharpened. so you need to convert this to a smart object. to do so, first select all your layers in the righthand layer window. to select all the layers, click on your top layer, hold shift, and scroll down to your bottom layer & click on it as well while still holding shift
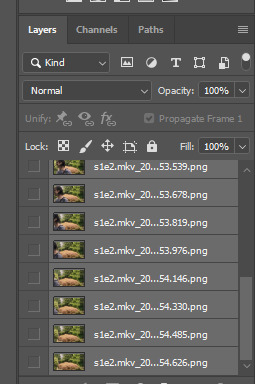
13. next, you need to select all your frames. go back to the options button from part 6 > select all frames
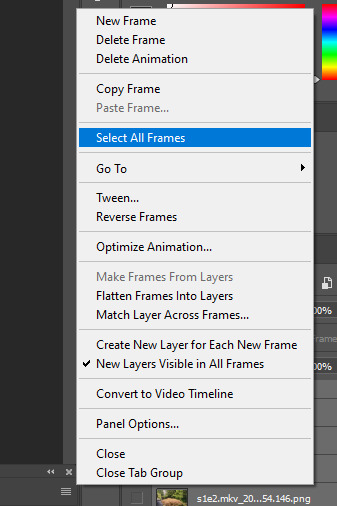
14. next, we’re going to create an action to make your life 100x easier when it comes to sharpening gifs in the future. to do so, go to the actions icon (may look different on different versions of photoshop, but basically just find the actions window)
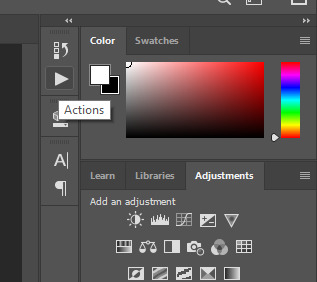
15. create a new action with this button. name it something. i named this one “sharpen tutorial” and hit “record”
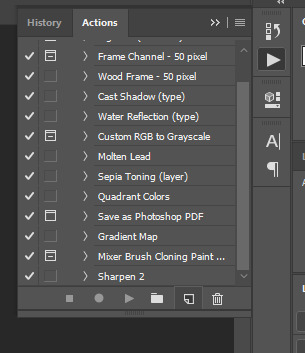
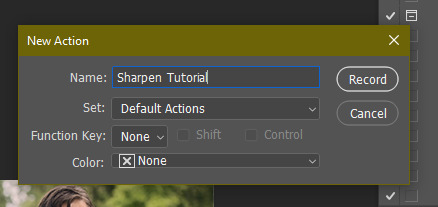
16. click this button to convert to video timeline
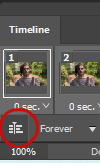
17. go to filter > convert for smart objects
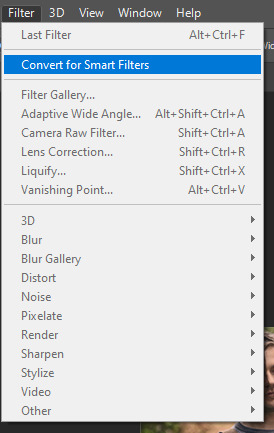
18. go to your single created layer and right click and click duplicate layer. this helps get rid of the transparent border around the gif.
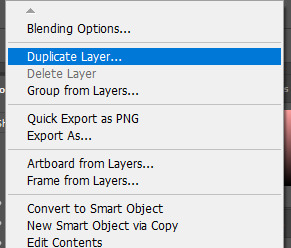
19. go to filter > sharpen > smart sharpen & use these settings
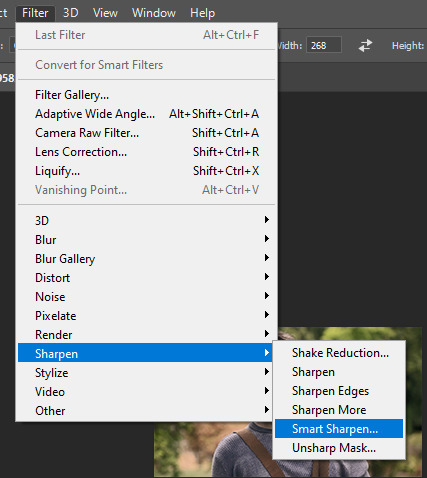
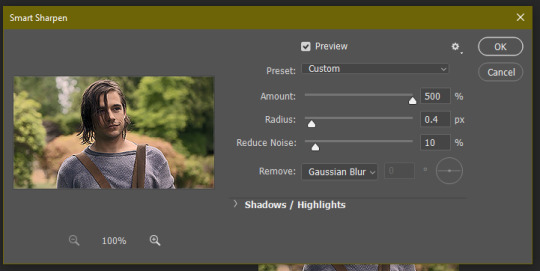
20. go to filter > blur > gaussian blur. set it to these settings.
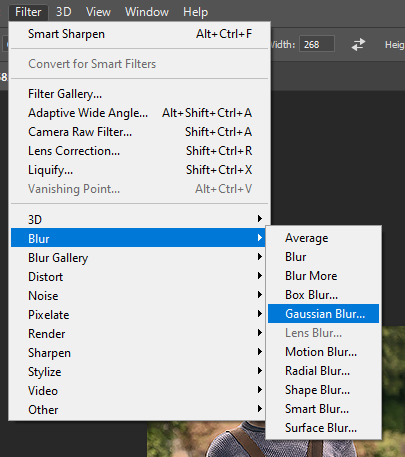
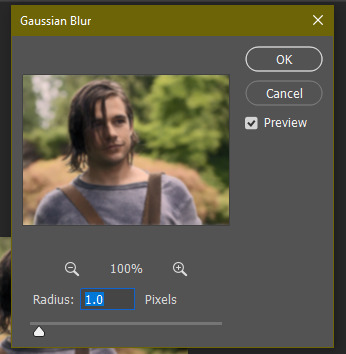
21. go to your second layer with the filters on it & right click on the gaussian blur filter to select “edit smart filter blending options” and set the opacity to 50%. you can mess around with this for different levels of sharpness. the closer to 0%, the sharper your gif will be.
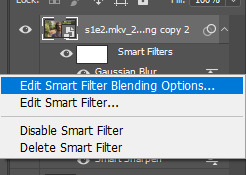
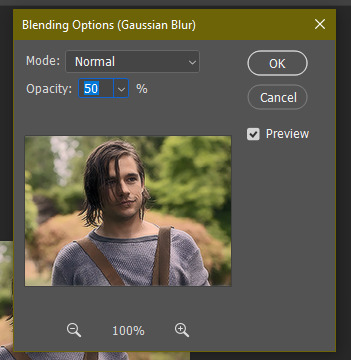
22. hit the stop recording button on your sharpen action. now you’ll have an action to use next time you make a gif! after you’ve followed all the steps 1-13 you simply go to actions, click on your saved sharpening action, and hit play instead & it’ll do steps 14-21 in a few seconds. here’s a pic of the stop button on the actions window
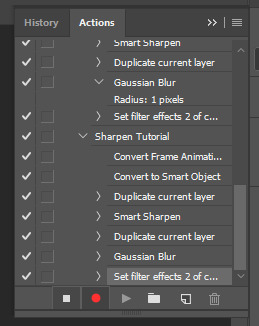
23. our gif is now sharpened! you can end with this & skip to the saving a gif section, or you can continue to coloring. here’s what we have so far.
3. coloring
now on to coloring. this is pretty basic coloring and it probably won’t work if you follow my numbers exactly, as every single scene is different color + lighting wise. but this is just an example of the kind of thing you could do. basically, if you’re making vibrant gifs, you want to up the brightness + contrast + vibrance and make the colors already present pop. if you want anything more complicated (pale gifs, changing the colors to make, say, quentin’s shirt in these gifs red instead of blue), you’ll have to find other tutorials or experiment on your own. learning how to color & finding your style takes time! you can download psds if you want, but imo those kinda take the fun out of making gifs? that’s just me though.
after each step, i’ll show you what the gif looks like.
1. i usually start with a curves layer. i usually don’t mess with the color curve options, just this one:
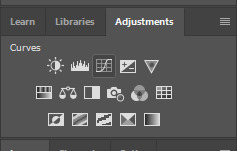
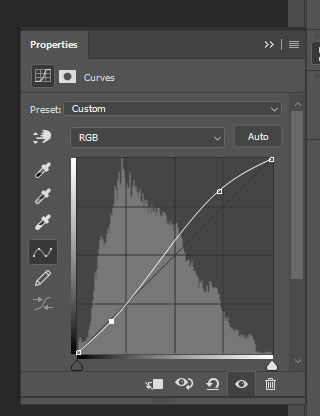

2. next, i do a brightness/contrast layer
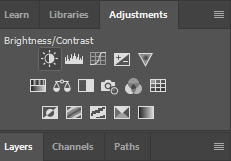
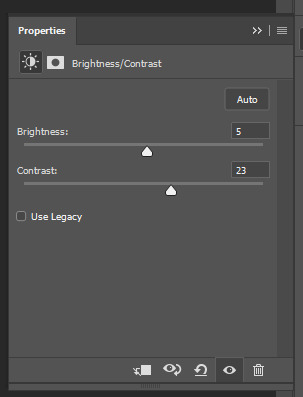

3. next, i do a vibrance layer. make sure not to make it TOO saturated or it’ll look bad.
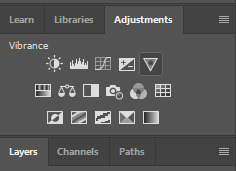
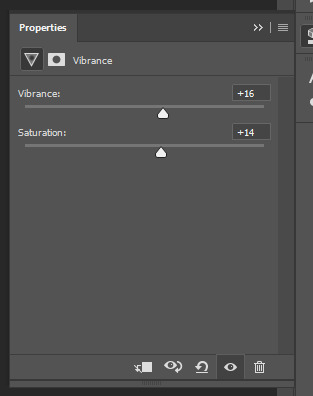
4. next i do a color balance layer. this is where it really starts differing depending on what color you want your gif to be.

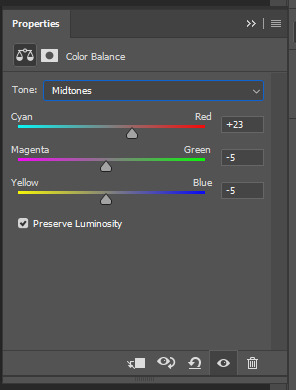
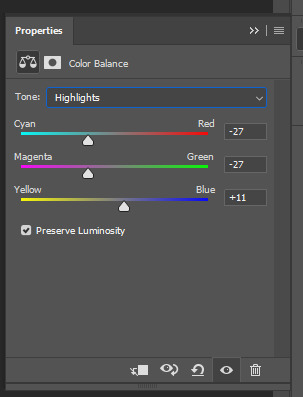
5. next we move to the selective color layers, which are arguably the most powerful. here you can make colors pop, change colors, etc. it’ll take lots of practice & messing around with, but here’s what i did with this gif. this one is making yellow + blue pop
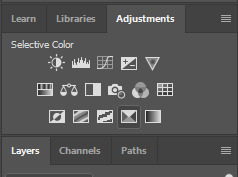
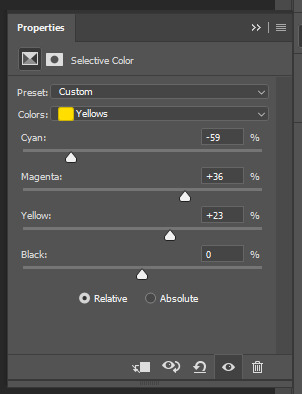
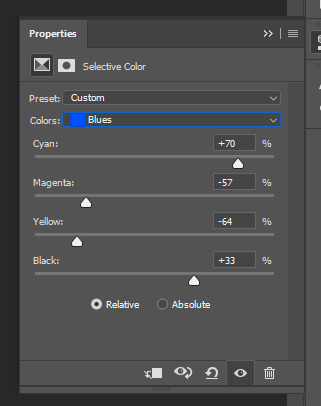
6. next, i did two more selective color layers editing the blue tab to make the blue pop even more
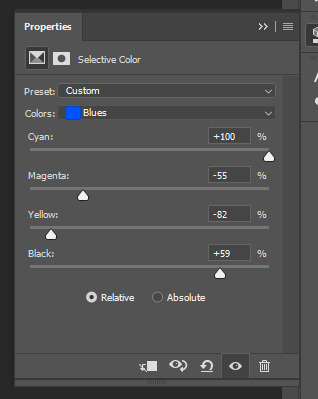

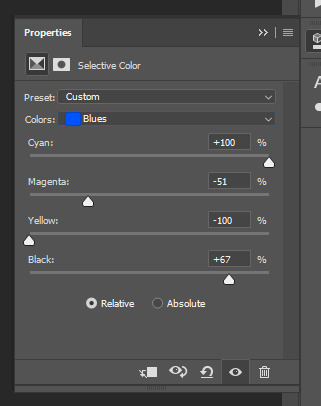

7. i still wasn’t quite happy with it, so i added another selective color layer to edit the blacks + neutrals + greens
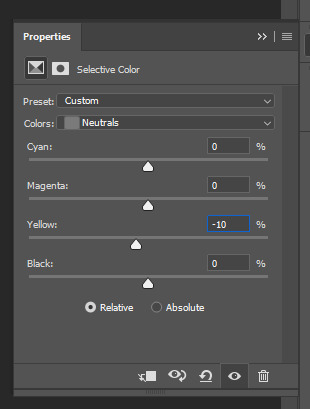
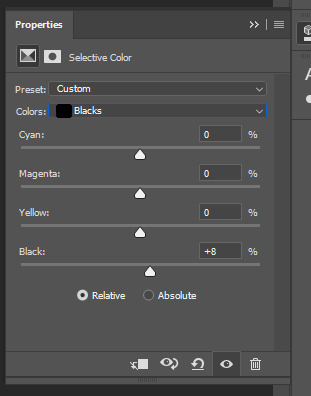
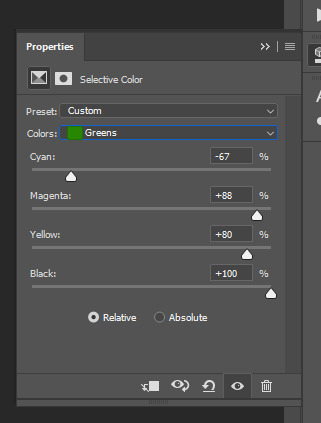
8. for good measure, i added one more brightness/contrast layer
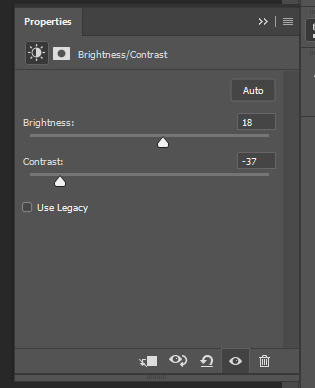

9. and the gif is done! however, you can play around with various adjustment layers until you’re happy. again, this is just an example of how to do basic coloring. it’s a skill like any other & takes practice. to keep consistent coloring in a gifset,
9b. you may want to make a psd of this coloring. to do so, you need to put all your adjustment layers in a folder, delete your frame layers, and click file > save as. save it as a .psd. then you can open it and drag it onto any other gifs you make, adjusting the coloring accordingly but still with the same vibes. you don’t have to do this, but it makes life easier. here’s how to use your saved psd, though obviously you’re using your own in this case and not a downloaded one.
4. saving your gif
1. on photoshop cc 2019, you go to file > export > save for web (legacy). for other versions, you can just go to file > save for web. use these settings. the gif size limit is 3mb per gif, so make sure your file size is under that. if it’s not, you’ll need to delete some frames or some adjustment layers.
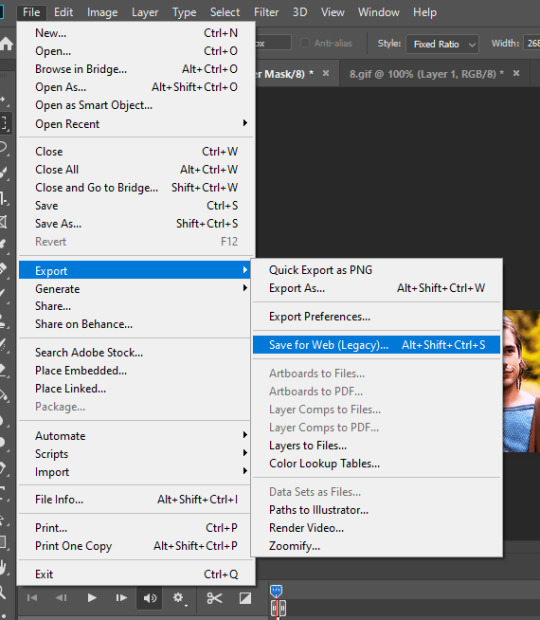
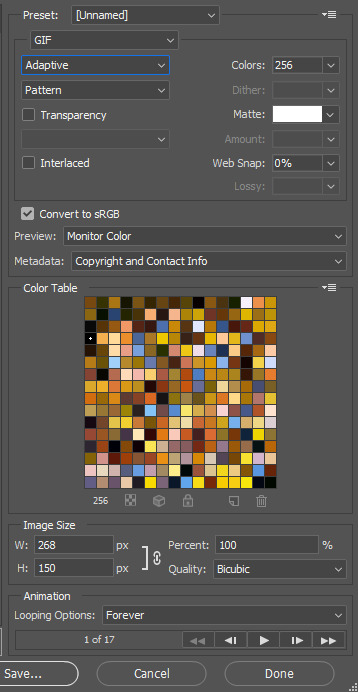
2. now, photoshop is a bit of a pain & this gif timing will not be right. so you need to open your newly saved gif. then you hit this button + select all frames
3. click this button & select “other”. tumblr gifs are typically .05-.08. my photoshop is glitchy and i have to set mine to .1-.15 or they’re WAY too fast. but usually, go with .05-.08 unless yours ends up glitching too.
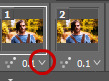
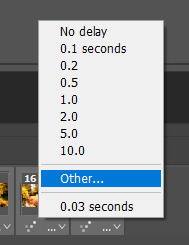
4. save it like you did the first time and ta-da! you’ve made a gif!
#gif tutorial#photoshop tutorial#edit tutorial#coloring tutorial#yes im using the magicians its my hyperfixation and i get to choose the gifs
164 notes
·
View notes
Text
Old Maid
The beautiful images of Cell 6 in Building Three had busy schedules. Even outside of entertaining the attentions of their fanclub, there were photo shoots and promotional materials to pose for, quizzes on beauty and general education to take, ammo ranges to clean, and mechanical projects to help out with.
But whenever the beautiful inmates did have some downtime, they tended to spend it playing card games to sharpen their wits and poker faces.
Well, Inmates 0303 and 0382 did. Inmate 0307 just hoped that he would not lose as badly as he normally did.
His lack of familiarity with the game strongly suggested that these hopes were soon to be dashed.
“So...the Joker is...bad?” Nana asked, staring at his hand of cards like they contained the secrets of the universe.
“For the fortieth time, yes.” Hani groaned. “Have you been listening at all?!”
“I have!” The young inmate flushed. “It’s just—it’s difficult.”
“How?!”
“Be nice, Hani-kun.” Trois laid a concilatory hand on his cellmate’s shoulder. “It is his first time after all. Nana-chan needs a bit of guidance so he can properly gain experience after all.”
“This stuff is basic intuition though!” Hani griped, shaking his cards for emphasis. “Not knowing it is as stupid as not knowing you have five toes!!”
“Jyugo-san has six toes. Nico-san told me he told him he lost one of them to a piranha.”
The two paused and looked at Nana. Trois reached out, carefully keeping his cards hidden, and pressed a hand to the boy’s shoulder. “Nana-chan, do you remember what we talked about the other day?”
Nana’s brow furrowed. “...That Jyugo-san shouldn’t be consulted about anything that isn't jailbreaking?”
“Yes. This is an example of one of those times.”
“Ah, that lockpick is seriously useless. Who the hell doesn’t know the number of toes humans have?! Did he sleep through goddamn school or something?” Hani complained, rolling his shoulders.
“...Did Jyugo-San go to school?” Nana asked, looking up from choosing a card from Hani’s deck.
There was a pause as the trio considered this.
“...Well, he must’ve! It’s not like the emotionless brat was born in jail— even if he was in juvie, he had to have a life before this— goddamn elementary schooling at least.” Hani proclaimed, rubbing the back of his neck doubtfully.
“Although, he and the rest of Cell 13 always say he’s in here for ‘jailbreaking’. There’s no mention of an original crime which lead to that like there is for Uno-kun and the others. And if he even drowns in the bathtub...” Trois mused.
Another, more dour silence as the implications sunk in.
“I-it’s kinda amazing that Jyugo-San functions as well as he does, isn’t it?” Nana asked shakily. “If he really was born in a prison, like Bane...”
“Bane?” Trois asked, raising a perfectly sculpted eyebrow as he placed the pair he’d just made with Nana’s card down.
“American comic book villain.” Hani informed him curtly. “Big guy on steroids, fights Batman. He was part of the inspiration for the bandit boss Yama in Winds and Clouds Chronicle Ninja Kamikaze that—”
“Wow, Hani-kun looks cool even when he’s oversharing about his favorite movie~” Trois steamrolled, leaving Hani to glare mutinously down at his cards.
“I-I’d like to hear more about it, Hani-senpai.” Nana tentatively volunteered, quailing slightly under Trois’ dry stare. “I-if it’s not too much trouble...”
“Hah!” Hani pointed a finger at Trois in smug glee. “Don’t worry Nana, we can do a movie marathon later.”
“Ah, okay! I’ll look forward to it!” The youngest member perked up again, turning back to his cards. The flash of panic on his face made it clear who had the Joker.
The mechanic sighed. “There go my hopes for having any cellmates with taste.”
“TROIS, YOU BAAAASTAAARD!!”
“Trois-senpai is mean!” The youngest inmate stuck out his tongue.
“Sorry, sorry. I’m just joking.” Trois held up a conciliatory hand. “Still, going back to the previous topic at hand, it is amazing that Jyugo-san is able to interact as a fairly stable and compassionate person, even given his...areas for growth.”
“How the hell does anyone get mugged by a grade schooler?” Hani sighed, taking a card from Trois’ deck. “And then get tricked into buying a weird vase in the same day, too?”
“...Jyugo-san was what now?” Nana asked, a look of incredulity crossing his face.
Trois chuckled. “Ah, you weren’t here for that story, were you? You’ll have to ask Uno-kun for the full version later.”
Nana went dark red for some reason, and began fidgeting with his cards. “A-ah, n-no, I’ll, I’ll just ask for i-it from Ni-Nico-san.”
Trois chuckled again, while Hani looked between them in confusion.
“Anyway,” The bespectacled inmate continued serenely, waiting for his cellmates to take their turns. “Maybe someone should provide Jyugo-san with some life advice, so his naïveté is not taken advantage of if he’s ever released.”
Hani scoffed as the smallest inmate’s fingers hovered indecisively over his hand. “As if that’d even help. It’d go in one of the lockpick’s ears and out the other.”
“Be nice, senpai.” Nana admonished gently, finally picking a card and holding his hand out to Trois.
“That’s right Hani-kun.” Trois added. “After all, Jyugo-san is just an unfortunate who couldn’t even guess the brand of underwear a woman wears, let alone the color.”
Hani’s expression became pensive and thoughtful, almost pitying.
By contrast, Nana’s face twisted in exasperation and disgust. “Why. Why do you two always do this?”
Both of the older inmates ignored him.
“Huh...” Hani closed his eyes and crossed his arms, keeping his cards pressed against his chest. “Life advice...like the fact that women who are wearing skirts without anything underneath are more likely to wear sexy or plain panties rather than anything patterned, just in case. And that white pants or bottoms usual mean white or pale pastel underwear, unless the material is thick enough that color wouldn’t show through.”
“How is that life advice?!” Nana squeaked, cheeks a vibrant red.
“That’s right Hani-kun.” Trois nodded seriously. “It’d be much better to advise him that the best laundry lines to get bras from are those on apartment buildings in big cities that are close in proximity to another building or roof. Those don’t tend to have the space inside to hang laundry, and it’s much easier to avoid a trespassing charge if you lean over and swipe it than if you’re caught climbing into someone’s garden, even if those have less security cameras.”
“That’s not any better!!” Nana shrieked. “In fact, it’s kinda worse! That’s seriously sexual harrassment at least! You’re gonna turn Jyugo-san into a deviant with advice like that!!”
“He’s in jail. He’s already a deviant.” Trois pouted.
“What the hell would you say then, if you’re so wise about how the outside world works?” Hani sneered, eyebrow twitching.
“I never said that! But...hm...life advice for Jyugo-san...” Nana pressed a knuckle to his mouth, frowning in concentration while his other hand flopped into his lap and showed off the faces of his cards. “Ah!”
He sat up straighter and gestured with an index finger. “Ryphenol makes your drink taste really salty, and you can fight the effects for about 20 minutes to get attention before the drug makes you pass out. Additionally, if you’re being followed by a scary person, go up to a building and yell ‘fire!’ while banging on the door, because that will make people come out rather than ignore you.”
There was a moment of stunned silence as the two beautiful inmates absorbed this.
“...Do you mean Rohypnol, Nana-chan?” Trois asked with a slightly strained smile.
“Um...Ah, yeah, that’s the one!” The child smiled, looking pleased with himself. “Plus, if you ever get taken somewhere against your will, do whatever you can to escape before you get taken to a second location, because your chances of survival go down drastically once that happens!”
“Why the hell is all your advice an anti-abduction PSA?!” Hani demanded.
“W-Well, Jyugo-san is clearly the type of guy who gets into trouble easily!” Nana countered, puffing out his cheeks. “It’ll be of more use to him to know that the police can find him easier with forsonics if he leaves hair or blood behind than how to guess a woman’s underwear color!”
“You take that back!!” Hani roared. “And what the fuck are forsonics?!”
“Forsonics! Forsonic science! The stuff police use to identify DNA and fingerprints and clothing fibers!” Nana yelled back.
“THAT’S FORENSICS, YOU LITTLE IDIOT!!”
“Is not!”
“IS!”
“Is NOT!”
“Nana-chan, I think Hani-kun is unusually correct about the pronunciation.” Trois intervened, finally finished with examining the content of the arrow head’s deck.
“HAH!” Hani cheered, sticking a finger in Nana’s face. “Wait, thE HELL DO YOU MEAN, ‘UNUSUALLY’?!”
Nana’s cheeks went red and he stared sullenly down at his cards, tears beading at the corners of his eyes.
“Ah, Nana-chan, don’t cry.”
“‘M not.” He rubbed his face on his shoulder.
“Seriously?” Hani quirked an eyebrow. “If that’s enough to start the waterworks, maybe you’re the one who needs life advice.”
Nana dropped his cards, bright red spots high in his puffed cheeks, lips pressed together sharply.
The boy stood, strode back over to his bunk, and crawled underneath it.
“Now you’ve done it.” Trois sighed, picking up the scattered cards and using them to discreetly make pairs
“Oh for fuck’s sake—“ Hani shot a glare towards the bunk. “Come out, brat.”
“Don’t wanna.” Came the stroppy reply.
“Don’t be stupid, Kiji’ll get pissy if you get dust on your clothes again.” Hani barked, fuse rapidly burning short. “Come out from under there already.”
“Take it back.” Nana demanded, the pout audible in his voice.
“Like hell!”
“Ah, I win again.” Trois said, satisfied.
Hani started down at all the “miraculously” formed pairs of cards in front of his innocently-beaming cellmate. Then at his own hand, where the Joker which most certainly hadn’t been there a minute ago was surreptitiously nestled into his grip.
“TROIS, YOU BAAAASTAAARD!!”
(In Cell 13, Inmate 1315 finally gets over his compulsive sneezing fit.)
(“Maybe it was girls talking about you!” Nico volunteers optimistically.)
(“What, him and his pink nipples?” Uno jokes. “Get real, it was probably Hajime complaining again.”)
(Jyugo throws a cushion at the braided asshole.)
(He misses.)
#my writing#nanbaka#nanbaka the numbers#old maid#nanba prison#nanbaka oc#0307#nana#trois nanbaka#nanbaka trois#0303#0382#hani nanbaka#nanbaka hani#honey nanbaka#nanbaka honey#1315#jyugo#nanbaka jyugo#alternate title#in which Jyugo gets shittalked
16 notes
·
View notes
Text
Rules: answer the questions and then tag 10+ other creators to answer the questions!
thank you so much to @askmetostays for mentioning in your post! Your so talented and your gifsets are amazingggg!
I feel like most of my gifs I made this year were for my turkish blog, so they’ll be some of those included!
first creation and most recent creation of 2020: This grease set was my first one, I actually loved this coloring that I did here! My most recent one was this Pacey gifset about Joey in one of my favorite scenes.
one of your favorite creations from 2020: This Marilyn gifset was definitely a favorite of mine, I thought it (and she) looked gorgeous. Also this Pacey one I made from my all-time favorite scene and episode of Dawson’s is a DEFINITE FAV just bc he’s babyyy
a creation you’re really proud of: I’d have to go to my turkish blog for this one. This one I made the other day of Aydan’s relationship growth with Eda took so longggg and I had to remember and sift through like 22 two and a half hour episodes to find the scenes, but it came out so good. And it’s one of the very, very few long, cumulative, “multiple gifs into one big one” gifsets I’ve ever made.
a new style you tried this year and a gifset that uses it: I had a couple of gifsets on my turkish blog that were like pastel-y and had text in it which is something I never do. This one with text from a tweet and this one with text from a song.
your favorite coloring: OOooh I actually have a couple, this Pope one I just loved, this Kie one I loved, and this JJ one too! I liked this Niall one a lot too, so vibrant and pretty. And this Finn Hudson one was a true win bc I always thought glee was so hard to color, and I finally did it and it came out great!! I was like damn girl u really are the shittttt
a creation that took you forever: again the one from my turkish blog with Aydan definitely took forever, between finding the scenes, figuring out translations, piecing them together and just general photoshop annoyances, it took like 12 hrs. This one I made of Eda’s outfits took forever too.
your creation from 2020 that received the most notes: I think this other Marilyn Monroe one had the most notes.
a creation you think deserved more notes: oooh prob my “#same” one about Pacey, idk i guess ppl don’t want to be swept up in joshua jackson’s arms or something, whatever, oh and this Watermelon Sugar one too!
a creation with a favorite scene/quote: Def this one from the shaving scene from Castaways. The fact that I made like 5 gifsets from this one scene aloneeee. I think I still have one in my drafts too lmaooo
a creation you made that breaks your heart: this scene with Jack and Jen FOR SURE
a ‘simple’ creation that you really love: prob this Lara Jean/Lana Condor one. The coloring was great, the sharpening was great, it just looked so pretty!
a creation that was inspired by another one (add both your creation and the one that inspired it!): sad as it is to say, i don’t think i made anything that was inspired by anyone...
a favorite creation created by someone else: ok but definitely @askmetostays Pacey and Joey every episode one and her Pacey and Joey™ one, because whew the time and effort put into those is incredible. And even though I’m not even in the fandom I had to reblog these Witcher gifsets, this one by @yenvengerberg and this one by @anya-chalotra because they were truly so gorgeous. This Winter in Avonlea by @laurens-german is just beautiful. This one with the Hargreeves Siblings by @seance is truly amazing. And this Shape of Water one by @antoniosbanderas and this Chicago gifset by @madalainepetsch were both so gorgeous and colorful!!!
some of your favorite content creators from the year: @askmetostays is definitely a favorite, since I’ve gotten into Dawson’s Creek, she’s been a definite bright spot on my dash. The fact that she’s running two other Dawson’s blogs on top of her main, and is still gracing us with The Content™ is impressive. I don’t think I follow them, but @livelovecaliforniadreams has been supplying the Pacey/Joey fandom with some quality gifs. The gifsets are so involved and all-encompassing, they must take forever to make, so I have to applauded them for that! @inejghafta has been out here making quality gifs for Anne with an E, Community, New Girl, This Is Us, and this list goes on. She’s gotten experimental with her coloring and her concepts and it’s been great to see! @baharsahins is another great one! She is like single-handedly giving the rping community an unlimited supply of Turkish celebs. Her gifs are always on point, the coloring’s always amazing and her sharpening is so soft and pretty. And @imikhailo has such such such gorgeous gallavich/mickey gifset!
a for good measure, another a couple more creations of yours that you love: oooh ok there’s this Pacey and Joey + Docks one, this Deckerstar one, this one with Kie and Sarah bc 👀, this Zoey’s Extraordinary Playlist one, this Lara Jean Valentine’s Day one, and my Sen Cal Kapimi icons from my turkish blog bc i just love making icons sm
I don’t think I’m gonna tag anyone, esp since the new year already started, but anyone was already tagged or anyone that just wants to do it, feel free!!!
#ooof this took forever#i meant to do it before new year's but whatever#this was fun#and such a great way to remember the past year i've spent on tumblr#tag game
10 notes
·
View notes
Text
Halloween Colouring Tutorial
Hello everyone! A few days ago I got a request from an anon to share the psd I created for this gifset. So I decided to make this mini tutorial to show you how I made my psd. I think is better to explain it rather to post a link to download it bc there a few steps I think you need to know in order to get the exact same result I got. So here we go!

Step 1: For this I’m assuming you already know how to create gifs, if you don’t please check out this tutorial first. Once you have created your gif and sharpened it, you should have something like this:
NOTE: this psd works better for scenes where there isn’t too much movement, so please keep that in mind :)

Step 2: Now you need to add a Curves layer. Just play around with the eyedropper until you are satisfied with the result. This is mine:

Step 3: Next thing you want to do is to add Selective Color, the settings depend on your gif and the colors you want to enhance. In this case I was looking for vibrant greens and a bit less of reds so I chose these settings (X) (X) (X):

Step 4: I also wanted to add a new Selective Color layer to enhance the greens a bit more. This isn’t a necessary step, as I said before it entirely depends on your gif, the colors it has and what you want to pop up. Here’s my gif now:

Step 5: Now it comes the pivotal moment when you’ll finally start to add the Halloween-ish colors (aka oranges and blacks). For this you need to add Gradient, then you select the shade of orange of your preference. My choice was this one. Then set the Gradient layer to Hue.

Step 6: Now your gif looks like this and of course it isn’t the result we’re looking for bc Laurie’s face looks too orange and it just doesn't look natural at all. What should you do next? Just add a Layer Mask and then select the eraser tool to erase the parts of the gif you don’t want to look orange like in this example Laurie’s face and blouse (here is a tutorial that teaches how to use that tool in case you need it). This should be your result:

Finally, you don’t actually need to do this but I thought my gif would look better with a new Selective Color layer (especially bc I really wanted vibrant oranges and blacks) and that’s how I got this:

That’s it guys! Hope this helps you. If you have any questions please don’t hesitate to send me an ask or message :)
#allresources#completeresources#dailyresources#onlyresources#psedit#tutorial#halloween tutorial#coloring tutorial#request#mine
17 notes
·
View notes