#fkjahkj how do i even tag this
Explore tagged Tumblr posts
Visit Tumblr Blog
Explore Tumblr blogs with no restrictions, modern design and the best experience.
Last Seen Tumblr Blogs


Fun Fact
Tumblr is available in 18 languages.
Text
coredrill’s basic gif coloring tutorial!
hey y’all!! so basically an anon asked for the general steps that i use to color my gifs, and i thought i’d turn it into a mini-tutorial!
i’ll be using a gif from rwby as an example, since it’s got pretty simple coloring but it represents my process well. i use the same steps for all my gifs, including those from other shows. essentially, i’ll be showing you how to get from the gif on the left to the gif on the right:

to the anon who asked for this, or anyone else who happens to see this, if you have any questions or need me to clarify something: please don’t hesitate to ask!! i do not mind at all :)
tutorial below the cut:
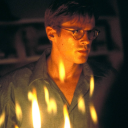
okay, so i’ve started with a basic gif of winter, which i’ve already resized, sharpened, and converted to timeline / smart object.

as you can see, this gif is...incredibly blue. it’s also kind of dull-looking, since the scene takes place in a dark location. if i’m sitting down to gif this scene, i’ll want to make it brighter, and i also want to make it so that the entire thing isn’t blue-washed!
there are two steps that i always, always start with when making gifs. it doesn’t matter what show or scene i’m giffing, i always start by adding a selective color adjustment layer, and a vibrance layer on top of it. here are my settings for those:

and here is the gif that it results in:

now, i know this just made winter more blue, which is the opposite of my goal. but that’s okay! it’ll be fixed later. basically, the point of this step was to make the colors in the gif as bright as possible.
the selective color layer helps with that by providing a strong contrast for the other colors to play off of. basically, if you make your blacks as black as possible, other colors will just look more vibrant next to them. here’s a comparison between what i would consider to be a “finished” version of this gif (on the right) and that same gif, but without darkening the blacks (left):

sure, most of the colors are the same, but they look brighter in the gif on the right, because they’re being compared to a true black instead of a dark blue.
this selective color layer is also super important for me when i make gifs because i rely so heavily on making all of my colors ridiculously vibrant! the .gif file format only allows for a maximum of 256 distinct colors--which works fine in this example, because it’s a pretty small gif. but, if you’re making longer gifs, or gifs with a whole bunch of different colors, or gifs with a lot of movement, photoshop will pick what it thinks are the 256 most important colors in your gif and try to replace any excess colors with the closest match. sometimes it looks okay, sometimes it doesn’t. but, if you add this layer, you can help mitigate this problem a little, since all of your dark blues turn into black and all of your dark greys turn into black, etc. etc. that way, you still have 255 colors left over to play with!
the vibrance layer is pretty self explanatory--it makes the colors more vibrant and saturated! it’s different from the hue/saturation layer because vibrance actually adjusts the color in an intelligent way. if you turn up the saturation in a hue/saturation layer too much, you run the risk of your gif’s colors blowing out and getting all grainy (like a deep-fried meme). but using the vibrance layer pretty much prevents that altogether!
occasionally, i will set the saturation slider on my vibrance layer to a lower value. this really only happens if the scene that i’m working with starts out pretty saturated to begin with--95% of the time, i set both sliders all the way to 100.
alright! now that i’ve got those two layers down, i move onto the scene-specific coloring. i always color each scene differently, but i follow a similar set of steps each time.
the first thing to be aware of is that generally, turning the vibrance all the way up will tend to also amplify the color of the lighting. for this scene (and a lot of rwby v7/8), it’s the blue lighting of the atlas military compound. if i’m giffing rwby v5, turning up the vibrance just makes that godawful yellow filter even worse. the early rwby volumes sometimes use a magenta lighting. weird stuff, lol. but these steps are where we fix that!
some things to mention: the layers i use for these steps are color balance and selective color. i also place these layers between the two layers i already have, so that they’re on top of the selective color layer where i darkened the blacks but under the vibrance layer. i’ve found that colors are much easier to adjust when they’re less vibrant, but i like having my vibrance layer in there already so i can see the final product without any surprises! (also, i’ll include a screenshot of the layers i have at the end of this post, so you can see the order i put them in!)
if i find myself going “ugh, why is this scene so *insert color here*” the first thing i add is a color balance layer. i always fix as much as i can by adjusting the midtones first, then i mess with the highlights. i’ve found that if i start with highlights, i end up overcorrecting, and get really weird color combinations. i never touch the shadows, since that tends to mess with the blacks that i’ve already added. here are my settings for this gif:

and here is the gif that it results in:

hooray! winter’s less blue! i will say--in this case, i had to make pretty big adjustments to the red/cyan sliders. normally, the color balance layers are pretty touchy (at least, they are when there’s a vibrance layer on top of them lol), and i don’t have to make either value greater than +/-10. but this scene was really blue, hence the large change lol.
and, i know, it’s still pretty blue! but at this point, you can start to see the distinctions in the colors that are supposed to be there--winter’s skin looks like a blue-tinted yellow, for example, and her sword is actually grey. if i’d made any larger changes with the color balance layer, it would’ve started affecting the more neutral parts of the gif. for example, dragging the sliders to try to get rid of more of the blue in the gif would’ve tinted her sword hilt yellow or red, which isn’t what i was looking for! so, at this point, i added two selective color layers on top of the color balance layer. here are my settings for these layers:

i probably could’ve combined these changes into one selective color layer, but i tend to split up my coloring into a whole bunch of different layers so that it’s easier to fine-tune. for this gif, the first layer i added adjusted the whites in the gif (so winter’s skin, hair, and clothes) by removing cyan. this works because there are no whites in winter’s sword hilt--the neutral colors are left alone, but the lighter ones are adjusted! you can see this adjustment in the gifs below:

the gif on the left shows the effect of just the first selective color layer. you can see how just that small adjustment helped a lot--winter’s skin finally looks like actual human skin, instead of being tinted blue! the gif on the right is a pretty subtle change, and it’s the result of adding the second selective color layer as well. you can see that winter is just the slightest bit brighter--which has the benefit of getting her hair farther from blue and closer to white, lol.
the last thing i do is adjust the brightness of the gif itself. i do this last because, similar to the color adjustment, i don’t want to be surprised by its effect when i add color adjustment layers on top of it! normally, i use the levels, brightness, and exposure layers here, in that order. they all go underneath the very first selective color layer (darkening the blacks). for this gif, i only needed to use levels adjustment. here are my settings for that:

and here is the resulting gif:

and there it is! ta-da! you can see that adding that layer brightened the background just a bit, which is nice so that all the blacks don’t completely blend together. more importantly, it also got her hair to the pretty shade of white it’s supposed to be, and got rid of the residual pesky blues!
as promised here is the order of my layers:

you can see that even though the blacks layer and the vibrance layer are the first things i add, they’re definitely not the first two layers! i’ve found that this general order (brightness/levels/exposure, then selective color to darken the blacks, then fixing the colors with color balance and selective color, then vibrance on top) tends to give the best results for my gif style, even if it doesn’t match the order that i’m adding the layers in!
of course, this exact coloring won’t work on all gifs, but hopefully it gives you an idea of where i start and the general process i use!! a lot of the specifics--like figuring out how much you can move the sliders before it does something wacky to the colors, or how many selective color layers you need to add, or which colors to actually adjust in the selective color layers--comes from practice and experimentation!!
that’s pretty much the end for this post, though--hopefully i was able to make some sense! like i said at the beginning, PLEASE don’t hesitate to send an ask if you have any questions or need me to clarify something!! i’m sure i’m not using proper terminology with a lot of this--i just kind of learned by messing around in ps! if you managed to make it to this point, thank you for reading the whole thing!!
#fkjahkj how do i even tag this#gif tutorial#giffing tutorial#coloring tutorial#sure that'll work!#hope you like it anon <3#i'll put together one for text on gifs tomorrow!! that one will be pretty short though#since i don't really have that as standardized as i do my coloring asjkdhak#anyways i'm so honored that you like my gifs enough to ask for this!!!#hopefully you learn some new tricks from it <33333#t.tutorial#oh also#f: rwby#ch: winter schnee#went a little overboard here but!! idk it was fun lol#misc: gif ref
36 notes
·
View notes