#how to import any font in my website
Explore tagged Tumblr posts
Visit Tumblr Blog
Explore Tumblr blogs with no restrictions, modern design and the best experience.
Last Seen Tumblr Blogs


Fun Fact
Forty percent of Tumblr users are between the ages of 18 to 25.
Text
So, you want to make a TTRPG…
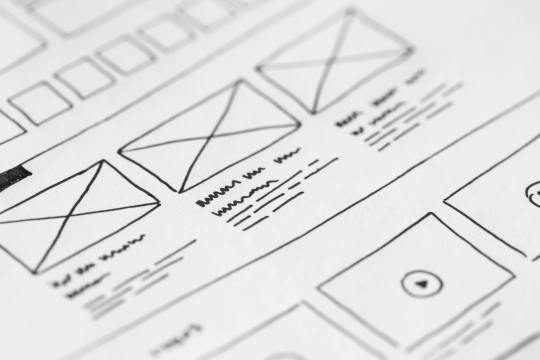
Image from Pexels.
I made a post a long while back about what advice you would give to new designers. My opinions have changed somewhat on what I think beginners should start with (I originally talked about probability) but I thought it might be useful to provide some resources for designers, new and established, that I've come across or been told about. Any additions to these in reblogs are much appreciated!
This is going to be a long post, so I'll continue beneath the cut.
SRDs
So, you have an idea for a type of game you want to play, and you've decided you want to make it yourself. Fantastic! The problem is, you're not sure where to start. That's where System Reference Documents (SRDs) can come in handy. There are a lot of games out there, and a lot of mechanical systems designed for those games. Using one of these as a basis can massively accelerate and smooth the process of designing your game. I came across a database of a bunch of SRDs (including the licenses you should adhere to when using them) a while back, I think from someone mentioning it on Tumblr or Discord.
SRDs Database
Probability
So, you have a basic system but want to tweak it to work better with the vision you have for the game. If you're using dice, this is where you might want to consider probability. Not every game needs this step, but it's worth checking that the numbers tell the story you're trying to tell with your game. For this, I'll link the site I did in that first post, AnyDice. It allows you to do a lot of mathematical calculations using dice, and see the probability distribution that results for each. There's documentation that explains how to use it, though it does take practice.
AnyDice
Playtesting
So you've written the rules of your game and want to playtest it but can't convince any of your friends to give it a try. Enter Quest Check. Quest Check is a website created by Trekiros for connecting potential playtesters to designers. I can't speak to how effective it is (I've yet to use it myself) but it's great that a resource like it exists. There's a video he made about the site, and the site can be found here:
Quest Check
Graphic Design and Art
Game is written and tested? You can publish it as-is, or you can make it look cool with graphics and design. This is by no means an essential step, but is useful if you want to get eyes on it. I've got a few links for this. First off, design principles:
Design Cheatsheet
Secondly, art. I would encourage budding designers to avoid AI imagery. You'll be surprised how good you can make your game look with only shapes and lines, even if you aren't confident in your own artistic ability. As another option, public domain art is plentiful, and is fairly easy to find! I've compiled a few links to compilations of public domain art sources here (be sure to check the filters to ensure it's public domain):
Public Domain Sources 1
Public Domain Sources 2
You can also make use of free stock image sites like Pexels or Pixabay (Pixabay can filter by vector graphics, but has recently become much more clogged with AI imagery, though you can filter out most of it, providing it's tagged correctly).
Pexels
Pixabay
Fonts
Turns out I've collected a lot of resources. When publishing, it's important to bear in mind what you use has to be licensed for commercial use if you plan to sell your game. One place this can slip through is fonts. Enter, my saviour (and eternal time sink), Google Fonts. The Open Font License (OFL) has minimal restrictions for what you can do with it, and most fonts here are available under it:
Google Fonts
Publishing
So, game is designed, written, and formatted. Publishing time! There are two places that I go to to publish my work: itch.io and DriveThruRPG. For beginners I would recommend itch - there's less hoops to jump through and you take a much better cut of what you sell your games for, but DriveThruRPG has its own merits (@theresattrpgforthat made great posts here and here for discovering games on each). Itch in particular has regular game jams to take part in to inspire new games. I'll link both sites:
itch.io
DriveThruRPG
Finally, a bunch of other links I wasn't sure where to put, along with a very brief summary of what they are.
Affinity Suite, the programs I use for all my layout and designing. Has an up-front cost to buy but no subscriptions, and has a month-long free trial for each.
Affinity Suite
A database of designers to be inspired by or work with. Bear in mind that people should be paid for their work and their time should be respected.
Designer Directory
An absolute behemoth list of resources for TTRPG creators:
Massive Resources List
A site to make mockups of products, should you decide to go that route:
Mockup Selection
A guide to making published documents accessible to those with visual impairments:
Visual Impairment Guidelines
A post from @theresattrpgforthat about newsletters:
Newsletter Post
Rascal News, a great place to hear about what's going on in the wider TTRPG world:
Rascal News
Lastly, two UK-specific links for those based here, like me:
A list of conventions in the UK & Ireland:
Convention List
A link to the UK Tabletop Industry Network (@uktabletopindustrynetwork) Discord where you can chat with fellow UK-based designers:
TIN Discord
That's all I've got! Feel free to reblog if you have more stuff people might find useful (I almost certainly will be)!
468 notes
·
View notes
Note
hi I really like your mb and I'm new here. Do u have any suggestions or tips to make mb? like where did u get the pics and the captions.
𝓜oodboards: a guide for beginner blogs!


I decided to bring here a small tutorial that can help other blogs that are starting out and still have questions that need clarification, with tips and links that you may need. I wrote this from my point of view of creating moodboards and I tried to be as brief as possible in my explanation, there may be errors in English as I'm not fluent in that language and everything here was translated using Google Translate, any questions you can contact me via asks or by message.
how do I find pics for moodboards?
Pinterest is where you'll find most of the images you'll use on your moodboards, so create boards on Pinterest separating by color and aesthetic to make it easier to find. On Tumblr there are some blogs with cool stuff too (like @/m0ney, @/angelicdewdrop, @/rkivo, @/ohimesama-okinawa and @/bambiiis for example), but in this case I recommend putting the credits in the alt text.
Some blogs have a pinned post or carrd where they put the link to their Pinterest account (my Pinterest here). You can follow them and save the pins they post/save on the app. I also suggest looking at the other profiles they follow on Pinterest to find more photos to use. By doing this, you will influence the Pinterest algorithm, which will recommend more related pins in the feed.
You can also search on Pinterest for the aesthetic and color you want (like hime gyaru, y2k, dollcore, coquette pink aesthetic, coconut girl e etc.).
how to make moodboards + tips:
Well, it's not such a complicated thing for me. I generally make moodboards with 6 or 9 images, taking inspiration from the moodboards of other blogs that I admire, so I can get an idea of how to make the captions and how to position the photos in a way that matches them.
To make it easier, first I create the moodboard and then I look for an icon of a kpop idol that can match the aesthetics and color of the moodboard. The reverse can also be done: first choose an icon and make a moodboard for that image, paying attention to the color palette and tonality (and for some reason, for me it's better to create moodboards in Tumblr's light mode instead of dark mode).
When I finish the moodboard, I add the caption, the hashtags (which will be very important for your post to reach other blogs) and a divider or blinkies. Dividers can be found on tumblr by searching for "dividers", on my blog there are some (other blogs with beautiful dividers that I recommend: @fairytopea, @v6que, @plutism, @h-aewo).
If you need png, I recommend these blogs here: @slipng, @pngcabinet, @heemeiji, @honeyluvsw, @hibscubus. Tip: If you want to add more than 10 photos in a single post, add it via Chrome.
tutorial on how to make this gif here


tutorial on how to make this gif here

tutorial on how to make this gif here
tutorial on how to make this gif here
tutorial on how to make these gif here

website to split a photo into two or more parts
how to create captions:
To make the captions, I use parts of songs that I like, but they can also be album or song names, movie names, a phrase you thought, etc. The symbols you will put in the caption can be found on this website or just by searching for "symbols", "kpop symbols", "kaomojis" on tumblr (blogs with cute symbols that I recommend: @v6que, @l-unitas)
If you want to use a different font for the letters, there are these two websites (01 and 02). And to change the color, there are also these two tutorials (01 and 02).
what to do to make your blog "popular":
Add popular hashtags that relate to the content you are posting. If you use almost the same tags as other big blogs, your posts will have more reach. Posting frequently and your account looking nice and organized helps too.
Ask several other popular blogs to promote your account. This was very important for my profile to grow in the number of followers and engagement, Also make friends with other blogs that make moodboards, reblog and comment on their posts and tag them in your own moodboards.
Join the events that some blogs do, as they offer good prizes like reblogs if you win and join some tumblr communities. And remember to have patience, as it often takes a while to get good engagement on Tumblr.
366 notes
·
View notes
Text
Making Accessible Interaction Banners - a Guide by Binoo "ChildrensWard"
Interaction or "DNI" (do not interact) banners are a staple of the age regression community, but too often are they made without taking accessibility in mind, whether it's because they're unreadable, have excessive eye strain, or aren't marked with alt text.
Therefore, in the hopes that I can help people out with this, I decided to write a mini guide on how to make your banners accessible for as many people as possible!
Under the "read more" cut, this guide will cover the following:
Fonts, and how to choose the best ones
Text, and what your interaction banners should say
Colour contrast, and why it's important in making your graphics accessible
Eye strain, and why it generally should be avoided
Alt text and image descriptions, and how to write them
And an example of an interaction banner I made using the criteria I've written in this guide!
So, without further adieu, let's get into the real meat of this guide!
Fonts
Fonts are easily the most important thing about an interaction banner! It's how you're going to best convey the contents of your banner in a way that's readable to the viewer. Here's a quick and firty rundown of the different kinds of fonts, as well as which ones you should (and shouldn't!) use for your banner:
Body Copy fonts are your basic Sans and Sans Serif style fonts that you'll most often find on books and websites, because they're some of the easiest fonts to read in smaller text (10-14pt) due to their lack of details. Examples of Body Copy fonts include PT Serif, Arial, Comic Sans, Roboto, and Helvetica Now.
Display fonts are often used for headers and subheaders and include features such as being thick, having unconventional letters, and, on occasion, being in all caps. However, these fonts should not be used for body or small text, as they will be very hard to read. Examples of Display fonts include Futura PT, Elephant, Noto Serif Display, and Shoreditch.
Script and decorative fonts are subtypes of display fonts, with the former having a handwritten quality to them, while the latter are considered to be the fun display fonts. However, you should be very careful with using either of these fonts- not only can they be hard to read on their own, but neither should be used specifically for body or small text in any circumstance. For the sake of readability and accessibility, however, I'd be more inclined to avoid using these fonts.
Text
Aside from the fonts that your text will be written in, the text itself is also a mandatory aspect of your banners. After all, it's what banners are entirely based on, and it's the very thing that tells you who can and can't interact with your posts.
However, there's something important to keep in mind, and that is how much text you're trying to cram into your banner because you're trying so desperately to fit your entire DNI criteria onto it.
What I think is important when it comes to making your banners is to keep any text you have on there as short as possible. If you bombard your banner with all this specific criteria, then you're more likely to make your readers confused, whether or not they happen to be a screen reader user.
When making your banners, ask yourself the following questions when deciding on your criteria:
How likely is it for someone interacting with the age regression or similar communities to fit this criteria? Have I come across a good number of people who fit this criteria that makes it worth mentioning?
Is this criteria at all relevant to the content I'm presenting? Do I need things like inter-community discourse terms from other communities on my banner if I'm making content specifically for age regression?
Is there any "unspoken" criteria that everyone agrees upon that doesn't need to be included? These might include nazis, racists and white supremacists, homophobes and transphobes, ableists and eugenicists, misogynists, anti-choice, etc.
If your answers show that the specific criteria is not relevant, then it's best to leave it out to keep the information on your banner more clear and concise.
Colour Contrast
While colour contrast is something often talked about in web development circles, it's also an important skill to learn when making any sort of graphic design- which is what interaction banners essentially are. Without taking colour contrast into mind, you're left with a banner that may not be easy for most people to read; let alone those with low vision or blindness. We also need to think about things like people who may be using old or outdated monitors, people reading on smaller screens (like a smart phone), and bad lighting and glare. As Contrast Rebellion puts it: aesthetics are important, but aren't the ultimate goal of design.
Okay, so you've understood the reason why colour contrast is important, but how do you put it into action? How do you know your colours of choice are readable?
Well lucky for us, there's many resources out there that help us in choosing the right colours! Here are a few of my favourites:
CSUN: Color Contrast - An introduction article on colour contrast, why it's important, and some examples of good and bad colour contrast choices.
Random A11y - If you don't have any colour combinations in mind, Random A11y is here to help! With it's vast amount of randomly generated colour contrast combinations, you'll have plenty of options to work with. Don't like the combination you're given? Just click on the "new colours" tab to generate a new palette!
Colour Contrast Analyzer - This is a free program for Windows and Mac that helps you with colour checking with a variety of different features; including multiple ways to select colours (CSS color formats, RGB slider, colour picker tool), and a colour blindness simulator.
Accessible Colors - If you don't want to or can't download the program above, then this website works just as fine with checking colours, too! Just enter in the hex codes of your colours, the font size and weight, and which level of conformance you'd like your colours to pass.
Eye strain
A bit of a sore topic for some, but I feel I must put it bluntly for people to understand: making your colours easy on the eyes of the viewer should be your top priority over your aesthetic. Some people, like myself, have certain health conditions that are triggered by eye strain, and by continuing to slap extremely contrasted rainbows on your banners, you're continuing to put disabled people through worsening symptoms, all because you feel the need to retain your aesthetic.
Many of the same resources shared in the Colour Contrast section can also help you to rule out any eye-straining palettes. Also, a general rule of thumb to keep in mind is: if a colour palette is eye straining enough to cause you some mild problems, then it's enough to cause someone with a disability more severe symptoms.
Alt text and image descriptions
I think a lot of us find writing alt text to be daunting- I know I did for a long while, which is why I never wrote any for my posts until recently. But really, once you get the hang of it, it can be very simple and easy to write! Even so, people who don't know how exactly to write alt text often fumble with this- either writing too much or too little, not being clear enough, or just copying the image caption and calling it a day.
Here's some tips and tricks on writing better alt text:
Alt text generally follows the Object-action-context rule. In the words of Alex Chen at Medium: The object is the main focus. The action describes what's happening, usually what the object is doing. The context describes the surrounding environment.
Be specific and concise, and even consider the content of the post or webpage it's on as well. You'll also want to consider the function or purpose of the image, and what you want your viewers to gain from it.
Keep your alt text short, as long descriptions with too much flowery language and filler words can be distracting when using a screen-reader. Generally, most screen-readers will cut off alt text at around 125 characters.
Avoid using "image of..." or "picture of...," as HTML codes will already identify your images as such. However, in this case, mentioning what type of image it is can add context.
Always check for spelling mistakes, as this can affect the user experience, causing interruptions and confusion.
Not related to interaction banners specifically, but avoid including alt text for decorative images that are used to make your post prettier. In this case, insert the word "null" in your alt text fields.
Image descriptions are a little different in the fact that they're allowed to be more descriptive than alt text, considering screen readers won't be able to cut off any alt text at 125 characters. Even so, it's still best to keep your image descriptions as short as possible to save from redundancy and confusion.
Please remember that writing alt text and image descriptions can take a lot of practice and trial-and-error, so don't give up if you can't get it right the first time! Write and rewrite it as much as you need to, or even consider changing your interaction banner altogether if you think it can't be described in words concisely.
An example
Taking what we've learned above, let's take this banner I made just for this post as an example of these characteristics put into action.

In this example, I have chosen the hex colour #4D0000 for my text colour, and the colours #B5F3DC and #E3B158 for my background. According to CCA, the contrast ratios for my colours of choice are 12.8:1 and 7.9:1 respectfully, which both meet the minimum contrasts of 1.4.3 for AA and 1.4.6 for AAA.
I have chosen the font FS Lola Bold, which is a type of display font that's best for headers and subheaders, but not so much any body or small text. I don't have to worry about this though, because I don't have any small text in my banner.
I've also kept my criteria to a simple "No DDLG/CGL interaction," because I feel that this is the most relevant information regarding the content of my blog and the posts I make. Short and simple, yet specific to who I don't want interacting with me. I also like the idea of my favourite fictional characters protecting my blog, which is why I've included another short sentence for it!
Here's an example of what the image description or alt text for this banner could look like:
[Image description: Banner that reads "Toopy and Binoo protect this blog, no DDLG/CGL interaction!" On it are the titular characters from the show. /End ID]
And if I were to have both alt text alongside an image description, then the alt text could be as simple as what the banner reads, which would be:
"Toopy and Binoo protect this blog, no DDLG/CGL interaction!"
Remember, you don't have to go into every little detail with your image descriptions or alt text, because then it can become very confusing for certain people to decipher! Keep it simple and state the minimum.
Closing words
I think that's everything that I wanted to cover in this post. Of course, there's more to accessible design than just text and fonts alone, but when it comes to interaction banners, it's usually the focal point of the images, which is why it's so vital that people with disabilities can also read your banner- especially when they contain important information about your personal boundaries.
Age regressors often pride themselves for the image we've set up for our community, that it's safe for everyone to join and no one will be judged or excluded for who their are. But the reality is, we still have lots of work to do before we're ever at that place, and making our community more accessible is just one of these steps that we should all be encouraged to take. Besides, what kind of message are we sending if we don't take the steps to make our space as accessible as possible? How do you think it'd feel to realize that a community you wanted to join is actively hostile towards you because of the refusal to learn how to accommodate for them? Especially when we have such a huge demographic of disabled people in the community, we can and should be doing better to accommodate for everyone as much as we possibly can.
Learning accessibility is a skill that requires time and practice, and I don't expect anyone to be perfect at it the first time around. The aim of doing these things isn't to make sure that every single thing is 100% accessible in every single way imaginable and with no mistakes whatsoever; but to instead encourage, develop, and incorporate good accessibility practices into our every day lives.
Thank you for reading,
- Binoo
#age regression#agere#agere community#sfw age regression#sfw agere#age dreaming#agedre#sfw agedre#dni banner#interaction banner#accessibility#a11y#long post
227 notes
·
View notes
Text

🧡 Tuesday Tips #3 🧡
Your website is more than just a collection of pages—it’s your digital home. It should reflect you, your interests, and your personality. But with so many sites out there, how do you make yours stand out?
Here are 25 ways to make your website feel more personal, unique, and personalized to you!
........................................................................................................
🎨 Design & Aesthetics
1. Custom Color Palette – Pick colors that resonate with your personality and aesthetic.
2. Unique Typography Choices – Use a mix of fonts that match your vibe.
3. Handwritten or Doodle Elements – Add personal sketches or notes.
4. Custom Cursor – Let visitors use a fun, themed cursor on your site.
5. Personalized Favicon – A tiny but powerful detail that makes your site feel complete.
6. Themed Layouts for Different Pages – Make each page visually distinct but cohesive.
7. Custom Backgrounds – Textures, gradients, or even a personal photograph.
8. Retro or Experimental CSS Styles – Go wild with unique styles that make your site stand out.
9. Create a Custom Hand-Drawn Logo – Instead of a standard logo, try sketching one yourself for a unique touch.
10. Add Subtle Animations – Small hover effects, background animations, or cursor trails can bring your site to life.
11. Play With Layering Elements – Overlap images, text, and shapes for a more dynamic look.
12. Design a Personalized Loading Screen – A custom loading animation or message adds a fun detail visitors will remember.
13. Add Your Own Handwriting as a Font – Convert your handwriting into a web font for a truly personal touch.
14. Design a Seasonal Theme Switcher – Let visitors toggle between different seasonal or mood-based color palettes.
........................................................................................................
📜 Content & Personality
15. Create a Behind-the-Scenes Page – Show how your website was built, share your thought process, or include fun bloopers.
16. Add a "The Making Of" Section – Share drafts, sketches, or early concepts behind your creative works.
17. Include a Personal Dictionary of Words You Love – A list of favorite words, phrases, or slang you frequently use.
18. Design a "Things That Make Me Happy" Page – A simple, uplifting page filled with personal joys.
19. Show Your Progress on a Learning Goal – Track and share your journey in learning a new skill, language, or hobby.
........................................................................................................
💾 Interactivity & Engagement
20. Add a Clickable Mood Indicator – Let visitors see your current mood with an emoji or phrase that changes over time.
21. Create a Dynamic Banner That Updates Automatically – Display different messages depending on the time of day or special occasions.
22. Add a "What I'm Listening To" Widget – A live-updating display of your current favorite song or playlist.
23. Embed a Poll or Voting Feature – Let visitors vote on fun topics or help you make creative decisions.
24. Introduce a Mini Personality Quiz – Something quirky like “Which of my favorite books/movies are you?”
25. Make an "Ask Me Anything" Page – An interactive page where visitors can submit questions for you to answer.
Closing: Make It Yours!
Your website should be you in digital form—fun, unique, and engaging. Whether you add just one or all 25 ideas, the most important thing is to have fun and make it your own.
If you try any of these ideas, let me know—I’d love to see what you create!
-----------------------------------------------------------------
Want to help the Small Web movement grow?
Join us on other platforms. ♥
FB Page & Group:
facebook.com/thesmallweb
facebook.com/groups/thesmallweb
Twitter/X:
x.com/smallweblove
Tumblr Community:
tumblr.com/communities/thesmallweb
Mastodon:
indieweb.social/@thesmallweb
#small web#indie web#web revival#old web#blog#neocities#2000s web#decentralized social media#decentralizedfuture#old internet#decentralization
17 notes
·
View notes
Note
hi can you please make a tutorial how you made the soundwave in this gifset /post/764144877729628160/
omg i'm flattered that i'm still getting curious people asking about this set because i'm still so proud of it!! yes, i will try to explain how i made the song player (for fun!) and soundwave, it was quite easy :)
here is the gif you are referring to:
this post was my inspiration. however, i did not use any premade templates for this set, so i made the song player myself.
here are what my layers looked like for that:
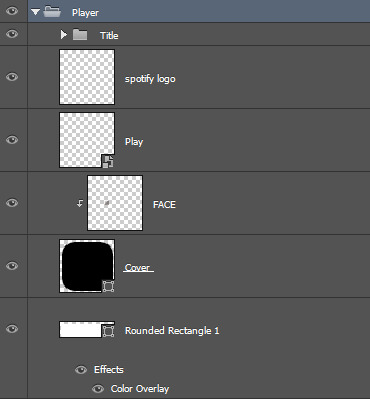
first, i used the rounded rectangle tool to make my shape (white fill, no stroke, 10px radius, 217px by 58px), then set this layer's blending mode to exclusion before adding my layer style (yellow color overlay with it's own blending mode set to color).
next, i used the same tool to draw a square with a black fill this time inside that shape. it's not perfectly aligned or sized, but mine is 47px by 45px. then i layered my album art on top and created a clipping mask before sizing it down to the shape.
i googled a spotify logo .png and used this for the play button, then made them smart objects (with a hue/saturation later on them to make them white if needed) and sized/positioned them where i wanted.
for the song title and artist, i used the font figtree bold at 15px and 11px with some drop shadow respectively. the elypses are 17px with the letter spacing set to 40.
now for the soundwave! i used the website veed.io and imported the song. you're gonna want an actual audio file of the song you're using. then you'll be directed to an editor where you can trim down your file on the timeline. i selected about 12 seconds of the song and chose the exact lyric i wanted to include as text so that the soundwave actually matches what he's singing. will people know this when they look at it? no but the details mean a lot to me lol.
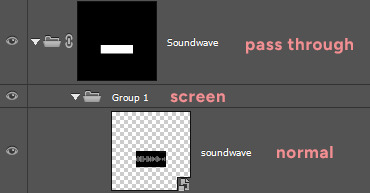
then you're gonna click "elements" on the left. you'll see a tab that says "visualizers" and then "soundwaves". here you'll find a bunch of cool soundwave styles. select the one you like and it'll appear on your video screen. since we're gonna export this and make a gif overlay out of it, you want the background to be black. click on the element to resize the soundwave to fit the whole screen without cutting any of it off and change the color to white. play it back to make sure it looks okay!

when you're set, export the video and go through your gif process to open it up as a gif in photoshop. i use the screencapture method, so i opened it in kmplayer and took screencaptures like i would for any other gif.
once it's in photoshop and converted to a smart object, i layed it over my gif below the music player and used free transform to size it down. trim the layer to be the same length as your gif!
i put the soundwave layer inside a folder and set the folder's blending mode to "screen". then i put this folder in ANOTHER FOLDER and it'll automatically set it's blending mode to "pass through". notice the video exported with a watermark in the top right corner, so i just selected around the soundwave on the pass through group and created a layer mask to hide it.
that's basically it!
this tutorial goes a lot more in depth with the soundwaves and setting certain blending modes if you're going for a different look/effect. i recommend checking it out.
15 notes
·
View notes
Note
hi lovely!! do you have any tips on making cool fun and sexy typography?
hey joanna!! this made me giggle haha, i'm not quiiiite sure how to answer that, but here are some tips i keep in my when i do typography, and some examples:
FONTS
don't be afraid to "shop" for fonts and try funky fonts you've never used/seen. i often try so many before settling. i almost always use at least 2 different font for gifsets, even 3 sometimes. i think a good font pairing can do a lot for a gif. it's usually something like:
serif + cursive/funky fonts (example)
sans serif + cursive/funky fonts (example)
serif + sans serif fonts (example)
two different cursive/funky fonts (example)
or even simply the same font but all caps + all lowercase (example)
in case you're unsure where too start or want inspiration, here's a great resource: usergif's font pairing guide and its fonts page
BLEND MODES & LAYER STYLES
i think playing around with different blend modes and layer styles will always elevate your typography game, in my opinion. it's usually a bit more dynamic than just an opaque color. tho this minimalist typography can also be really good.
when you double click on a text layer, you get all the layer style options, as well as the blend modes. a very popular layer style is setting the layer's blending option to difference, paired with a color and/or gradient overlay (often set to multiply/color dodge). a drop shadow is also important so the text is more easily readable. we often see a black soft drop shadow, but don't hesitate to be creative with it, for example a thick, hard line, colorful drop shadow.
i feel like this step often takes the most time for me because the possibilities are endless. definitely play around with layer styles, especially drop shadow, color overlay, gradient overlay, stroke. and also try different blending modes for these settings.
as for the layer's blend mode, also definitely play around with them. and keep in mind that the text's color will also give a different result, it doesn't have to be white + blend mode set to difference, even tho this is a classic that works well.
TEXT WRAPING & POSITION
a great feature on photoshop is definitely the text warping tool. to access it, right click on a text layer and go "warp text". from there you'll get a few different styles and setting sliders. my favorites are flag and wave (example). you can always go back to edit these settings once they're done by right clicking again. and you can even keyframe/animate these settings!
typography doesn't always have to be centered and straight, i often prefer it on a side and rotated a little. you can easily rotate typography by selecting the layer(s) and hitting ctrl + T. you can also play with the skew and pespective after hitting ctrl + T by right clicking the canvas and clicking on either. these will give different ways to move your text.
SIZING
i love playing around with different font sizes, it makes the typography more interesting in my opinion, and it's a way to emphasize some words.
so for that reason i usually put each word on a different layer so i can edit each word separately. sometimes i will also put each letter on a different layer, because it can be interesting to offset/rotate some letters sometimes (example) (another example).
i often pair a quite small serif or sans serif font with a much bigger funky font (example). and often that bigger font will also have different sized words (example). i play around a lot with this!
ADDED EFFECTS
there are some things than can be done to enhance typography:
adding a colorful rectangle block behind the text (example)
using text symbols such as quotation marks or backets (example)
using lines around the text (example) (another example)
these can definitely bring typography to a different level
MORE RESOURCES
great font website
usergif's typography tag
my fonts tag
this is all i can think of right now, i hope it helps :D if you have any question on a specific text effect let me know, i can definitely make a tutorial!
#alie replies#silversmists#typography#photoshop#*ps help#resource#completeresources#allresources#resourcemarket#usercats#userabs#userpjo
221 notes
·
View notes
Text
How I Manage my personal AO3 e-library Archive
Download everything I want/hope to read in EPUB format. I try to anyways... if I notice I got too many tabs open on my browser, time to download If multi-chapter remember first to press 'Entire Work' and then 'Download'

2. I use Book Story (Android App) to manage the mess that is my downloads folder - this app is a great book database manager AND scroll reader with Big letters as well - The app has this fantastic feature that allows me put the books into 'Reading' 'Already Read' 'Planing' 'Dropped' categories; I move the books around and it helps me keep a visual tab on them - , plus if you like scroll reading this one is fantastic at that as well.

Periodically I update the BACKUP of the folder(s) were the copies of books live. KEEP A BACKUP OF YOUR BACKUP , if you mess around and don't got no backup is really painful and irreversible.
On my computer I then make a copy of my messy ass downloads folder from my phone into my computer. While looking at the visual information the app provides me I delete books that I 'Dropped' and I move 'Already Read' books into my computer E-Library Data Base (I use Calibre) that's my main book hub where I will quickly notice what books need covers and I take my time working to finding an image I like for the book , so I can recognize them books by just looking at the covers I am terrible at remembering book titles
If you are curious this is what Calibre looks like - this is just AO3

3. To read EPUB books I use Libera FD Is frankly the best reader I have tried because I prefer page turning. If you like scroll reading Book Story is much better option for scroll reading.
Libera FD can customize pretty much EVERYTHING and is very very feature rich ( it can be overwhelming) HUMONGOUS FONT SIZE , you can download any font you want to use, replace words if I want to , it has OLED dark mode for reading at 3 am, you can configure it so it reads to you (using TTS) , several reading modes including auto scroll and speed reading mode, and so much more; the dev(s) are still updating and adding functions to it is kind of amazing I am probably not using it to its full potential You can sort books by 'Genre' which is how the app recognize the tags from the website.
Here some visuals of Libera FD (I wrote in the ALT of pics, click on it)


Book Story is a neat app , less overwhelming and the UI is a lot more intuitive. It looks like this for me , you can configure the essentials to your preference. Is a fairly new app be patient with it (sometimes just give two minutes to cook) , it is still being updated. The dev is very active if you got suggestion or present bugs.


4. How to provide enrichment to glorious magnificent authors , that share their passion with us for free. When you open any ao3 .epub on either of these apps the links are underlined. I tap on the link it leads back to the original posted website page at the beginning of every book you get from A03.
Tap the link, keep it open in your browser and star reading.


Open a note taking app.
I usually take notes about my silly musings as I read, copy quotes and whatever else I want to leave in the comment section of the chapter I am on. Cut and paste and that's it. I load the next chapter in the website and then continue reading the next chapter on the reading app (I comment on all the chapters if I have something to comment, sometime I don't have anything to say so I don't . Figure it makes authors happy and i find it very fun. Sometimes they answer back it feels nice) remember to leave kudos and comments specially if you are rereading.
I use Quillpad (android app) the most important feature of any note taking app you choose, in this case in particular, is that it saves your notes automatically (I used some apps that didn't it was devastating losing all my notes like that. I though that as long as I didn't close the app it was fine turns out not - some you have to manually save - and sometimes it would timeout and gone , all my notes gone. With Quillpad I haven't lost notes)
I haven't taken the time to figure out if Librera has a feature for annotation that could be useful for commentary note taking
I think that's all I can think of sharing on this topic. I am open to questions and adding things to this post with visual aid and whatever I can do to help , do let me know.
Keeping a copy of books safe and easy to find KEEP BACKUPS OF YOUR BACKUPS
-Updated Nov. 11 , 2024.
#ao3#e-library#personal library#ao3 is down#so keep a copy them books#managing#data#i live in fear of lost media#author deleting their work and me not having a personal copy hunts me#I forget book tittles all the time#Closing a browser tab and accepting I might have lost something that I wanted but forgot what it was is an experience#once lost ALL the tabs like at least a hundred tabs and I think about it all the time#personal archive management#this keeps me sane#will probably occasionally update this#open to questions about this#Housekeeping#KEEP BACKUPS OF YOUR BACKUPS#I somehow managed to delete my To Be Read file with 600 plus books it was real bummer I still don't know how that happened
22 notes
·
View notes
Text
the bachelor pitch website, recreated
this official website with a pitch for bachelor route was found on jan 2nd and then promptly sniped by IPL, without us getting a good wayback machine copy. i've been working on restoring it, and at this point i think it's rather faithful to the original and worthy sharing!
not perfect YET - namely, the mobile version kinda sucks, - but i'll be looking to improve it over the upcoming weekend! (more info under the cut)
some liberties have been taken in developing this page:
first of all, all source code has purged, and the website was rewritten from scratch - this is to avoid copyright conflict with readymag, the website builder IPL used. such services often allow exporting code, but only limit it to business clients and usually forbid editing the exported code in any way
the mobile version seemingly wasn't a thing that IPL considered with this single-page pitch/"business card" kinda website, but i'll still try to get it to work - my main goal is to ensure all assets load in a harmonic way, while IPL's original website was skipping some of them on mobile
unused assets/disabled elements were not restored. i honestly don't really want to tangle through readymag's messy messy ripped code to find out how were they supposed to look like. also, all of them are developer portraits with their names and contact information, and i don't know which of these people are public personas and which arent :^)
a little "about this page" button was added, including my contacts for incase anyone wants to tell me anything important, or (HOPEFULLY NOT) IPL will have problems with this website being present and would like to ask me to remove it
the chosen by IPL fonts were restored - i'm not sure if the saved .html file that i possess didn't preserve them, or were the fonts simply failed to load on some platforms..? either way...
AND ALSO, if you happen to have screenshots of the PC version, feel free to DM me, and i'll be happy to tweak the layout for better historical correctness!
FINALLY, currently i'm using for reference a saved .html shared by abyssal + screenshots shared by lillia, both on pathomodding discord - so thanks a lot to them because otherwise i would definitely not have enough patience for this project lol!
82 notes
·
View notes
Text
Accessibility & why it's important (with examples)
First off, I want to say this isn't targeting anyone in particular. I just wanted to make an educational post about how to keep your account accessible while keeping it cute. If I need to add/take away something, please tell me I don't want to spread misinformation.
Accessibility is defined as "the quality of being able to be entered or used by everyone, including people who have a disability" (https://dictionary.cambridge.org/dictionary/english/accessibility)
This can be seen as adding a wheelchair ramp outside buildings, including braille on buildings/signs, or making a website easy to read.
"The purpose of making things accessible for everyone is to create a more inclusive environment that is accessible to everyone." It also impacts everyone by" ensuring everyone has access to the same resources, information & opportunities." Some countries have laws to make "public places, digital platforms, & other environments accessible to people with disabilities."(https://www.handtalk.me/en/blog/accessibility/#:~:text=One%20of%20the%20most%20important,voice%2Dcontrolled%20options%20for%20devices.).
Keeping your account accessible is important so everyone can correctly read & see how your account looks. For example, users who use a screen reader won't be able to read the fonts you use in your posts. Screen readers cannot read them & if you have your dni in a font they won't know if they can interact. Some fonts in general are too hard to read even without a screen reader which makes an account inaccessible to more people than you realize. (https://www.siteimprove.com/glossary/accessible-fonts/#:~:text=Inaccessible%20fonts%20tend%20to%20have,Slow%20the%20reader%20down)
For example, do not do this

It's best to not use any fonts when you are making an account so that way everyone is able to read your account clearly
" But fonts make my account look cute." You can still maintain a cute/aesthetic account without the use of fonts. For example, this is my insta account's bio and it still looks cute

Continuing from my next point, adding alt text to images also helps improve your account's accessibility.
"Image descriptions help those with visual impairments understand the meaning of an image. This description is often labeled alt text or alternative text.
When a screen reader reaches an image, it will read aloud the description that has been added. The user gets a sense of what that image is and its purpose in context." (https://www.brandeis.edu/web-accessibility/understanding/images-alt-text.html#:~:text=Image%20descriptions%20help%20those%20with,and%20its%20purpose%20in%20context.)
When writing alt text, you want to ensure it's as simple as possible. For example, if you have a picture of a dog jumping over a box, the alt text would be "a [color] dog is jumping over a box"
Also, please don't use alt text to get interactions from others, such as making the alt text "like and follow for more" on a picture of a dog, for example
The colors you choose for your account/dni banner are super important as well since sometimes they make it so it's hard to read what you wrote
Using similar colors (red & orange) or colors that blend into each other (white & light pink) makes it difficult to read what's on your page. Using lots of different colors can also make it difficult for a person to read what's going on (such as using lots of bright colors)
This is what not to do

This is what you should do

What helps is asking others if they can read something before & changing it if needed remember if a person who doesn't use a screenreader can't read it then neither can a person who does
Dni banners are going to be very similar to the last point but use colors people can read clearly & don't include too much info to the point where it's too crowded (include your main dni points)
Remember if someone is telling you they can't read your account please fix it accessibility is important for everyone
If you read this far please consider donating or commissioning me I need to pay off my credit card statement

#agere blog#safe agere#sfw age regression#sfw agere#age regression#age regressor#baby regression#sfw regression#agere community#agere#🎮 pup info#🦷 pup writes
13 notes
·
View notes
Text
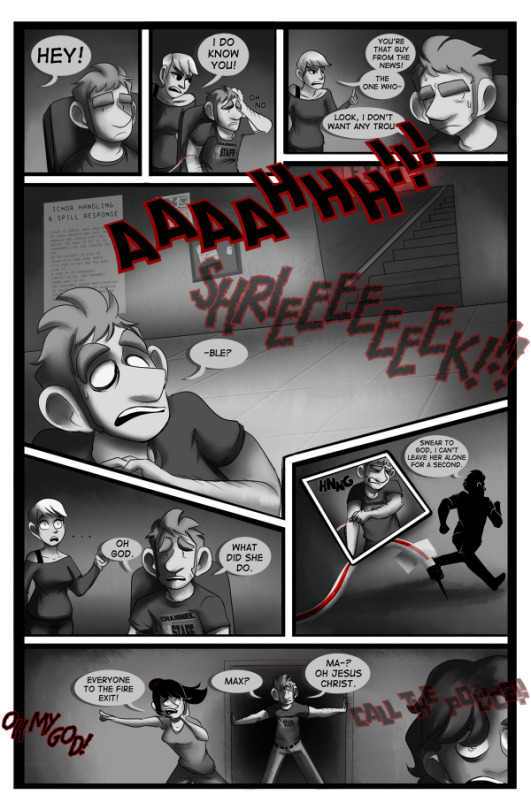
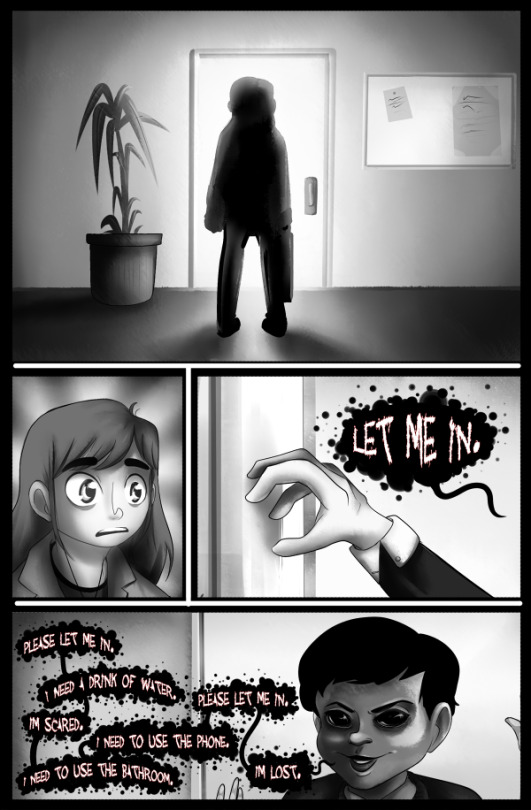
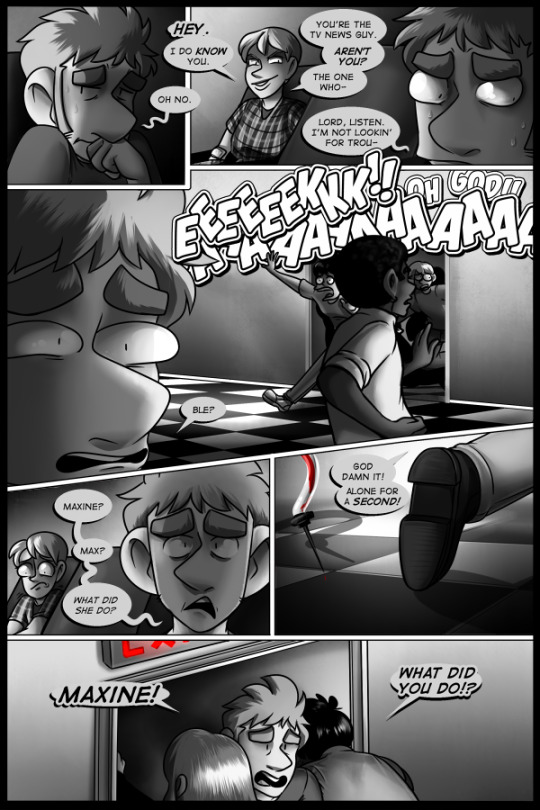
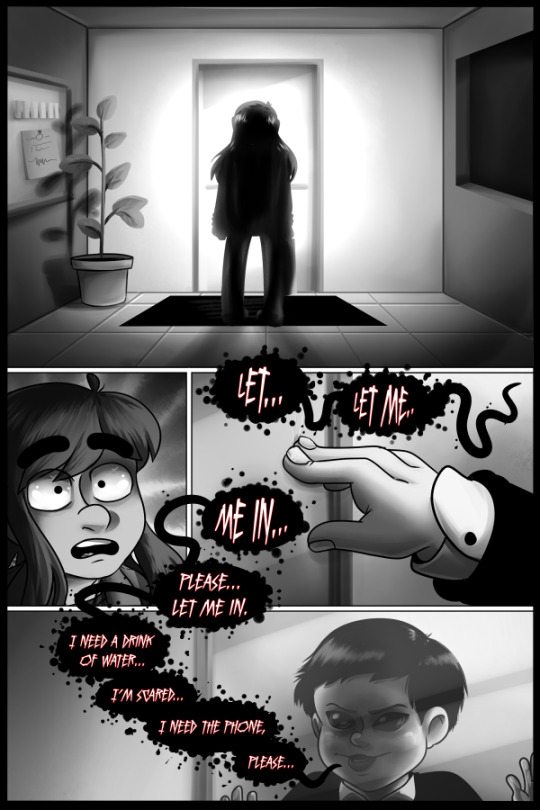
"A GHOST STORY" IS A WEBCOMIC I MAKE THAT I WILL BE RE-POSTING, GRADUALLY.
the top row is from 2013. the bottom row is the re-draw from 2018.
lol i forgot to mention this but in the 2013 row, first page, last panel on the right, the woman with the dark hair was modeled after how my sister looked at the time. the blonde lady was based on someone who was once my friend. i have stopped including cameos entirely bc i got sick of the people i was associated with turning out to be complete lunatics and having to live with their memory stinking up my precious baby.
e: NOT MY SISTER SHES NOT A LUNATIC. but everyone else
the odd borders of the first page here made more sense when my website background was white so it looked like the font was sort of "escaping the boundaries. but that kind of stuff doesn't work well in print...or in this instance lol. it was an attempt!
the speech bubbles are soooooo much better in the new one even if the art is still like ???? in the 2018 redraw. black bubbles are for ghosts who are particularly degraded or removed from the living experience. imagine it as kind of hollow sounding and echo-y.
the kid's hand is objectively worse in the new page. weird choices all around. when i was nearing the completion of the re-draw i realized i was going to have to come up with a price for the .pdf and now, more than ever, am i glad i didn't listen to any of the insane prices people told me to list it as bc i would have sold 0 and would have deserved to sell 0. "pay what you want" was the right choice here. this shit is not worth 15 dollars, or even 5 dollars. i am incredibly fortunate that the people supporting my patreon allowed me to even do this at a price point far beyond what it warranted. people on patreon cut me a lot of slack or offer a level of support that, to this day, remains mind-boggling. it's still hard to reconcile with what i produce
i am still glad i was able to do this since it felt important at the time and gave me a concrete goal to work toward.
---
♥ read the comic: A Ghost Story
♥ support the comic for as little as $1 a month on Patreon
♥ pay what you want for the re-draw of the first chapter on itch.io
you can block the tag "#AGS repost" to keep this off your dash
16 notes
·
View notes
Text
Hello, everyone who is freaking about the CDC censorship in news and press reports. I would like to make clear a specific portion or claims HAVE actually been exaggerated- which is good news! It means that not everything is bad. But, to keep straight what is currently being censored is important, as well as other happenings of the CDC that affect the release of information.
1- The CDC is not allowed to speak to the public.
Despite being a public health awareness agency, the CDC is currently banned from speaking to the press, or utilizing their own public speakers to release information on health concerns. This is dangerous because it limits the intervention that officials can provide on public health emergencies and alerts, such as disease outbreaks.
2- The CDC website is under construction, not down.
This is an important distinction, but equally as dangerous. The site is still accessible to visual readers, though actual accessibility such as screen readers, large font, and other features is not on most pages. These pages are being revamped visually everywhere on the site, but so far, I cannot find any actual missing data on the web pages I have visited. There are thousands of web pages, I cannot visit them all to confirm, and the Internet Archive does not save every single page. Even worse, science is an ever changing field, and pages even a year old are not useful when comparing to the current pages. There are so many web pages, I doubt they could be removed methodically in the way the pages have been modified on the site. This is optimistic, but optimism with more evidence then the alternative. The alternative seems true upon first glance, but with further digging, I have found only surface level proof to the panic.
3- Other sources are available.
Scientists use other websites to gain information, usually NIH's systems for research papers. This is not useful to the public, because these papers can be painful to read. But with that in mind, the primary source material is FAR more powerful than any transliterated report, because it contains minute details that are essential in science but unhelpful to the public. They contain data, collection methods, other referenced sources, and so much more information that the friendly-to-read versions cannot provide. The best part? Getting rid of these are close to impossible. I, personally, have hundreds of these papers downloaded on 6 different topics and 48 different specifications on my 1 TB hard drive, and that takes up less than 7% of the entire drive. I am not even a professional researcher, just a nerd who works in applied science. Can you imagine how much the researchers hold? Imagine the back ups in the cloud, the forgotten paper files in the library, the teachers and professors in colleges? The more understandable information can be given from the complex later, if they choose to remove data on the CDC.
Download more, please. This isn't perfect, and every page lost is a tragedy to humanity. Freely available information is the greatest feat humanity has achieved, along side the Tropical Neglected Disease project and the obliteration of Smallpox. Every page saved, is likewise, a boon to society. If papers are truly being removed, or worse, destroyed by our current suspected regime, let them know backlash, and let them know that nothing is ever lost on the internet. Put it on the dark web for all I care, next to hacker forums and suspicious ads, so long as that informative stays in the world, I can have hope.
Finally, for those who threaten this modern burning of Alexandra. Count your happy days. Count your blessed moments. Every page you ruin, every second you waste burying information that ultimately benefits lives you deem lower, will be counted on your death toll. When the bell finally stops ringing, you won't even be able to enjoy the blessed silence before I cut you down. Your actions threaten lives outside of what you target. You target gender care, you risk patients with chromosomal abnormalities. You target sexuality studies, you threaten mental health research and psychology as a whole. You target medical papers that threaten your pathetic understanding of the world, and you will watch hundreds of children die from disease forgotten long before your miserable exsistence.
I have a personal claim in this. I have siblings, I have friends, I have lives threatened by your actions. You so much as step in that direction? Well, thank God for the actions of our forefathers, who gave us the right to bear arms. I have the right to self defense, and in defense of those who you forced to be legally classified as 'other' and unworthy of rights, I will knock you down.
#uspolitics#unitedstates#americanpolitics#us politics#CDC#centers for disease control and prevention#good news#sorry for the rant at the end#tw us politics#information#information wars#history repeats itself
10 notes
·
View notes
Text
l1l dev1l gives me the worst 2nd hand embarrassment and i don’t even follow her. But sometimes people will share her things or IG thinks i should see her posts because someone I folllw does. Her persephone doll…… none of the joints work on the casted version, the “professional” version, and she is still trying to sell it for $550 USD???? it doesn’t even look like a finished doll because of the sculpting ability! The eyes don’t look like they have proper eyewells so that the eyes can fit properly. This isn’t a style choice. People complain here that “oh don’t like don’t look” (i decided to block before sending this because insta clearly wants me to see her stuff…) or “dont make fun of beginner artists” (i don’t consider this making fun. But just expressing shock and dismay.), or “people complain about this all the time”. it’s a confession blog! my confession is i don’t understand how she thinks $550 USD is normal for her work.
I also want to know: who is even buying her things? her marketing is so very bad. Her dolls are never posed well or dressed appealing, and flop everywhere. You can tell the joints are bad because the doll can’t even hold a sitting pose without looking cast to the side. My friend showed me a story of hers. She writes everything in fonts that you can’t even see????(Maybe too that’s why the colors she picks for her resin colors aren’t appealing?) It’s probably better that she sticks to just selling her files on websites and not trying to get casted things, because she’s going to be stuck with a lot of dolls and a lot of money wasted if she keeps going this way. There is no improvement either in her sculpting, because it seems like she doesn’t focus, she just keeps making, but not keeping the lessons from the last one. Maybe take a sculpting class. There is some on skillshare or youtube for free!
People complain that we are too hard on novice doll makers. I don’t think so. I think everyone pretty much agrees if you’re just making a doll for yourself that it is fine, do whatever, and it doesn’t matter how messy or beginner it looks. It’s the selling and “toxic positivity”. L1l dev1l doesn’t have any true friends if she is showing them this work and they are not stopping her, helping her. Critique is important! Even if it is said with vinegar. It hurts but you have to look at why people said that!!!! Immediately trying to sell a $550 USD resin doll who can’t stand (looks very heavy, joints don’t fit well, no balance, casted resin is different than printed resin. Printed resin has different friction!) will lead to failure. But by all means keep making and creating things you like, but stop forcing yourself to make it just so you can sell it. It might take you years to make a doll that is good enough to sell for $550 USD. Start small and only cast one or two for yourself, maybe even at home, so you can fix issues.
Stop rushing things!
~Anonymous
15 notes
·
View notes
Note
hi babesss so ik this is random and u totally don’t have to reply but do you have any tips on cleaning up and fixing aesthetic of your profile? i’m trying to pretty mine up since it’s summer and i actually have time to upload but i can’t seem to figure it out like you do 😭 like ur pinned post is magical to me idk how u did that at all.. any tips are accepted and appreciated 😭😭
-🍃
First of all, thank you SO much because this theme and pinned post shit ain’t no joke. But what I typically do is make all my text small (if you’re on mobile, usually when you go to make a new post, highlight the text that you want to be small and click the button that’s like this: <s>)
Also to make it like “smedium”?? you have to make it big first (mobile: go to the “Aa” icon and put however big you want it first and then put it in small.)
To get custom colors, you have to go to “color text generators” and pick and choose the colors you desire and to paste it properly as you wish, you have to go to tumblr from the actual search engine and place that HTML link in the post. (Go to the gear icon in the top right of the post, text editor, then choose “HMTL”) Now if you have a lot of text that you need to paste down, all the HTML coding can definitely be confusing so make sure to just paste everything down first, then go to preview and adjust it how you like.
For banners, I usually use IBISPAINT because it is so beginner friendly. Take an image of choice, go to IBISPAINT X and press the “+” icon and press “import image” and choose the image you want to crop into a banner. Press the paintbrush Icon, then canvas, then obviously “trim” and adjust it as you please. I also use IBISPAINT X to remove backgrounds to pictures I need to create that transparent sticker effect. (brush->magic wand-> make sure the black dotted line it outside of your image or at least on the parts you wish to delete. When you’re finished go to the dotted square in the top right and then click “remove selection area” to get rid of the lines->press the arrow in the bottom right-> pick the save as a transparent image option-> then put it in the post and make sure it looks how you want it to.
(also to save the banner do the same JUST DONT SAVE IT AS A TRANSPARENT IMAGE)
I also get all the extra glittery stuff from tumblr or you could get them from some other website that i totally forgot the name of. will post it if i ever do find it because hot girls don’t gatekeep. also for really pretty icons and fonts that aren’t found here, just look through the search “aesthetic copy and paste icons” and “ig fonts”
let me know if there’s anything ultra specific about my theme that you need help on, this is like the in general stuff. LOVE YOU!
3 notes
·
View notes
Note
I hope you realize nothing screams fetishizing blindness like posting fics about a blind reader in the tiniest font possible...
hi anon! i usually don't respond to messages like this but i thought i'd address this.
i do tons of research about blind and visually impaired people when i write these little drabbles-- such as avoiding cliche or toxic tropes like cloudy eyes and face touching, not writing about how their blindness will suddenly be cured, and how to write blind characters falling in love.
this research is from many different websites and perspectives, especially advice and information from blogs written by actual visually impaired people. i talk regularly with my friend who has juvenile macular degeneration about how i can write stories like this without offending people like her, and she has no problem with my drabbles after she reviews them. of course, she may have a different opinion than other people who are visually impaired, and i keep that in mind as well.
i try my hardest to write about common struggles and experiences a blind person may have in these made-up scenarios and universe without constantly and outright mentioning the disability.
another important thing is that i thought it would be an interesting challenge to write these little drabbles because it's rare to read fanfics with people with disabilities. with a story like attack on titan where many characters have impairments, like being an amputee or suffering from PTSD, i thought it would be interesting to write drabbles where the reader has one in their own way.
that being said, i sincerely apologize to you and any other readers i may have offended. it was not my intention whatsoever to fetishize or glamorize blindness. again, i've taken a lot of effort to minimize this, and i know i can't please everybody, but it really does sadden me to know that i've hurt somebody.
instead of being condescending, let's handle this with kindness. it's my first time living, too! i'd really love if you reached out and helped educate me on how i can improve my writing, especially on this topic.
2 notes
·
View notes
Text
How to Have Fun while you Study
Here are 20 ways that you can use to have fun while you study.
Reward yourself
One of the best ways to have fun while you study is to reward yourself. This makes your studying take some sort of game effect. Studies show that people enjoy things better when they feel rewarded. Set an intention to reward yourself when you finish studying.
Have snacks
Eating snacks while studying can make everything so much fun. You can also reward yourself with snacks. Be sure to eat non-greasy foods so you don’t get your books messy.
Use colors
What better way to have fun while studying than to use all the colors out there? Use colors to have fun while studying. Colors have a way of brightening everything up. they inspire fun and joy.
Listen to study music
You can make everything a lot more fun by listening to music. I’d recommend piano, or the famous lo-fi beats that are popular everywhere now. Be sure to choose music with no words for the most efficient study session.
Watch youtube videos
Studying doesn’t have to be boring. You can learn things better than your teachers taught you on youtube! Youtube is one of the best ways to learn new things online. if you miss any class, you can go on youtube and for sure you will learn what you missed.
Take breaks
Hard work is only as fun as taking breaks. Taking breaks is very essential to have fun while studying. if you don’t take regular breaks, you stand the chance of frying up your energy and crashing. I have prior experience with not taking breaks. A study break can be as simple as standing up and stretching.
Wear comfortable clothes
When I was a kid, I had this awesome dress that I imagined was a doctor’s lab coat. I’d wear it to feel like I was doing some important doctor work! If you want to have fun while studying, be sure to wear clothes that make you feel inspired and motivated to change the world!
Create to-do lists
Studying gets boring if all you do is stare at your books. Be sure to start creating and using to-do lists. This is simply a list of what you expect to accomplish within that day. I divide my to-do lists into two parts. These are: the least productive things I can do, and the most productive things I can do.
Do what makes you happier
Make sure to make yourself happy every single day. Find out what boosts your happy hormones and do a little of that every day. For me, that would be painting, reading a good book, or listening to great music. Do what makes you happy so you can boost your mood and enjoy studying that day.
Draw mind maps
Mind maps are a great way to have fun while you study. A mind map is something you draw to connect all your ideas together using lines. I love to use mind maps to connect my facts together. Draw mind maps with markers and colored pens for a little extra fun.
Use different study techniques
Reading all day can get boring. I have a few study techniques that you can try in order to have more fun. These are:
Writing down important points
Summarizing all your notes into tiny bite-sized chunks of information
Recording your notes on your phone
Making up questions
Studying old exam questions
Using online study tools
Drawings
If you have any degree of artistic talent, it’s time for you to shine! Drawings are great to make studying a lot more fun. Make funny drawings based on information in your notes. Even a simple doodle will do. If you’re feeling crazy, make some comics.
Use cool fonts
Using cool fonts is a great way to be more artistic. Go on websites that let you download fonts and study them. I like to use creative market to get inspiration for my titles. They have some awesome fonts that you can re-create for your study sessions.
Use flash cards
Flash cards are a life saver. If you aren’t using them, then you are missing out. A flash card is a piece of paper where you write down important points. It sounds pretty basic but it promotes visual learning, and boosts your memory. Be sure to create loads of flash cards and shuffle them, all the while reviewing your notes.
Make a study video
What better way to have fun while studying than to pretend to be a youtuber! Test your videography skills by creating a time lapse of your studying. remember to use markers and colors of all sorts to make your video awesome!
Make up songs
Making up songs sounds silly, but it’s the perfect way to make studying fun. In fact, making up a song about your history notes can help you when you need it the most during exams!
Create infographics
If you fancy yourself a graphic designer, create some awesome infographics using graphic design software. Infographics can be as easy as just typing out your notes in awesome fonts. Canva is a great app to use. You can print all your infographics and use them for reviewing at a later date. Remember that by making these infographics, you are helping your brain create more connections to remember faster.
Duolingo for languages!
Everyone knows of Duolingo. If you don’t, then let me enlighten you: It is an awesome app to help you learn a new language. I’m currently using Duolingo to learn Japanese. よろしくお願いします。
Use quizlet.com
Quizlet is an online study tool to help you create flash cards. It’s a great site, and rumor has it that teachers use it to make tests! That means you can go on quizlet an find your next text, or at least related questions.
Go on memrise.com
Memrise is another online study tool that helps you to study and have fun while you’re at it. It’s a memorizing platform, and let’s add all sorts of images and audio. You can literally learn anything on there. You can also create your own course and use it to study.
#diary#biology#blogger#unidays#science#real life#university#my day#study motivation#study blog#student#grad student#new studyblr#phd student#stem academia#med student#student life#study aesthetic#study#study inspiration#study notes#study hard#study tips#study with me#studyblr#studyblr community#studygram#studying#studyspo#studystudystudy
25 notes
·
View notes
Note
How do you do the gradient text in your pinned post? It’s really cute and I have no idea how to do it 🫠💕
hi anon!!! okie so im gonna try to be as thorough as possible, dis is really ez too btw (if on mobile, you may have to use browser mode)
so first, i use dis website right here

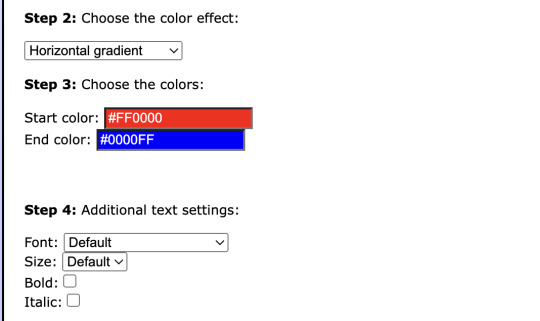
n pretty much, what u do is paste or type whatever txt u want here:
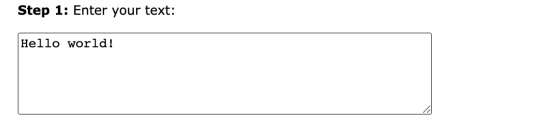
n then choose which kind of gradient u want, i typically do horizontal but its totally up to preference : ) then u pick ur colors using the hexcodes (if u tryna create like a certain palette from an image, use dis website click dis), and font for me i dont usually change, if i do its usually arial, i change the size tho depending on how big/important the txt is ! and for bold/italic, thats something u can always edit using the tumblr editor like how u would normally bold and italicize any other txt : )
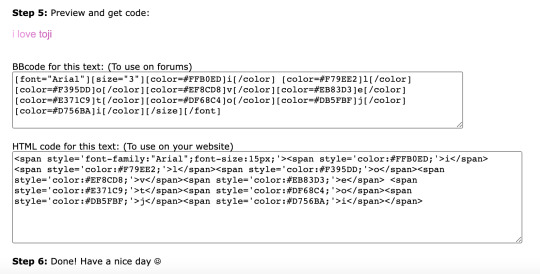
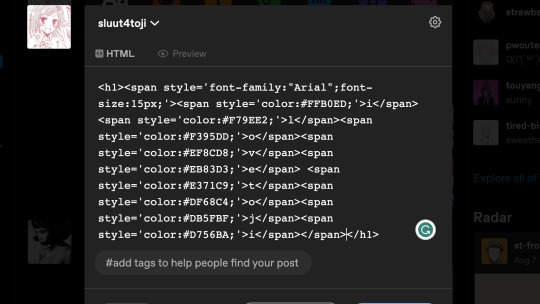
okie so i picked my colors n stuff n now what ur gonna wanna do is copy the html code (bottom box) if u wanna make the bottom box bigger, just drag the bottom right corner out : )
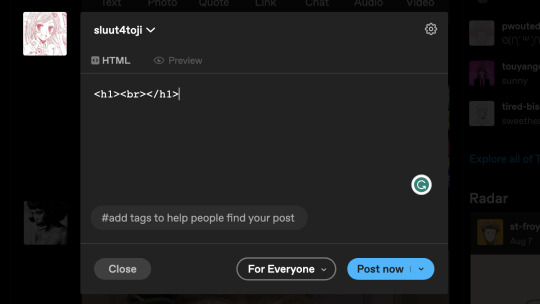
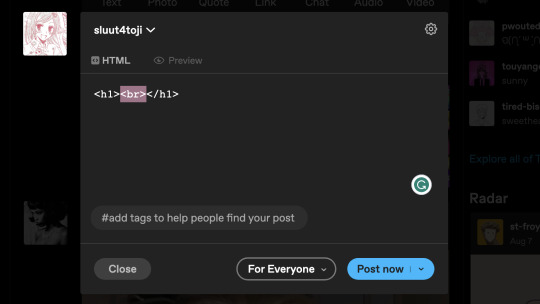
next thing ur gonna wanna do is go to tumblr n go to whatever post/create a new post and click the gear in the top right hand corner of da post n then scroll all the way down to the bottom and change rich text -> html.


so for this one, bc i'm doing a header for this ex, between the h1s, im just gonna paste the html txt from the gradient website. n honestly, if u wanna paste the text after the header, or u dont want a header txt at all u can just copy the html code into the html editor and it should be fine !
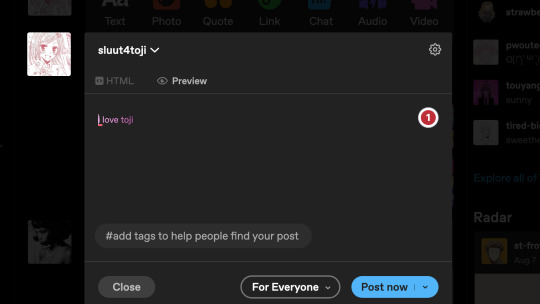
and this should be ur end result ! (i made the txt smaller in tumblr editor lol
#also tysm#im srry this post was like#rlly lengthy#but i hope it helped!#u can always slide into my inbox#again if somethin doesnt work<3#yall dont mind the grammarly..#i be using it 4 school pls#*ੈ✩ 𝐬𝐞𝐜𝐫𝐞𝐭 𝐩𝐫𝐚𝐲𝐞𝐫𝐬‧₊˚
42 notes
·
View notes