#guide to painting
Explore tagged Tumblr posts
Visit Tumblr Blog
Explore Tumblr blogs with no restrictions, modern design and the best experience.
Last Seen Tumblr Blogs


Fun Fact
After the announcement of the deal with Yahoo!, there were 170K signatures of unhappy Tumblr users petitioning to prevent the sale in 2013.
Text
#drawing book#sketch book#learn to draw books#animal drawing book#digital download#printable#book#drawing#learn to draw#coloring#painting basics#painting improvement#guide to painting
2 notes
·
View notes
Text
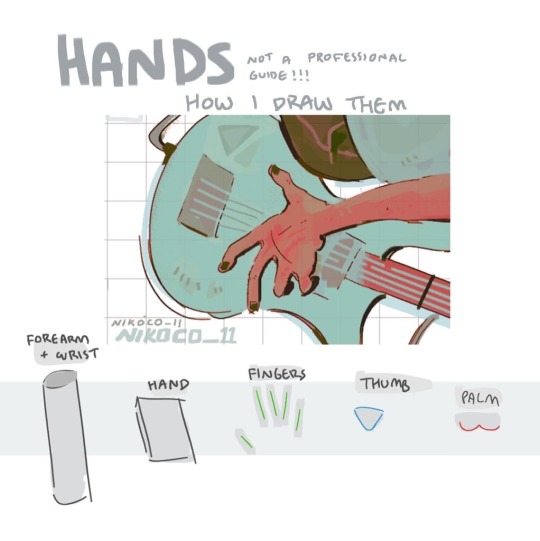


my recipe for drawing hands!
(small note that this is a shortcut that is more abt style and ease than anatomical accuracy. it helps to take time to really properly study hands, makes it easier to bend the rules a bit like this and have it still look good!!)
(learn rules b4 u break them or whatevah)
#qna#tutorial#guide#drawing tutorial#digital art#illustration#drawing#artists on tumblr#my art#clip studio paint
60K notes
·
View notes
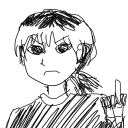
Text

my darling tsukki!
#i still can't believe he works at a museum in post-timeskip like?? that's so fitting???#my dinosaur loving dinosaur living his dream as a curator/tour guide?? good for him#i can imagine tsukki stoically explaining sculptures and paintings but his eyes are all lit up when they reach the dinosaur section LMAO#i'd give tsukki all the strawberry shortcakes in the world!!!!!!! ILOVEHIMSOMUCH!!#my art#2024#haikyuu#haikyuu!!#hq#hq!!#tsukishima kei#tsukishima#haikyuu tsukishima#haikyuu tsukki#tsukki#kei tsukishima#art#fanart#digital art#digital drawing#anime#manga#sketch#doodle
3K notes
·
View notes
Text

I wanted to try my hand at sheer fabrics and I absolutely love this panel of Minako so I decided to colour it :)
scan credit: @silvermoon424
#please ignore artemis I was having so much fun painting transparent fabric and that I forgot he was there :/#I hope silvermoon’s credit guide hasn’t changed from 2022 because that’s the only post I found >_<"#sailor moon#sailor Venus#Minako aino#artemis#manga coloring#my coloring#alt text provided
721 notes
·
View notes
Text
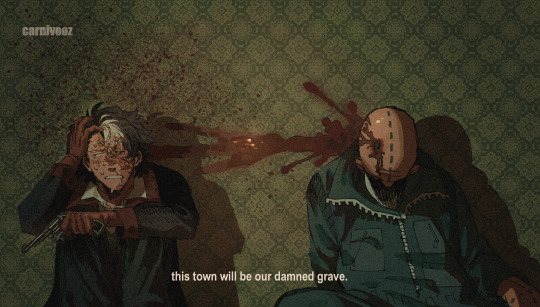
Ominous murder in front of green background number 384856392910
#this one isnt a metaphor actually its a canon scene! i think this is my first time drawing something truly relevant and canonical#its from the first arc of the story... babys first murder (and a direct reflection to her own yet to come death scene)#this was supposed to be just a bland sketch but it started feeling cinematic as hell midway through so i decided to embrace it#donmuska's ultimate survival guide#dollar#oc#original character#fake screenshot#clip studio paint#digital art#art#my art#sherry art#/ blood
422 notes
·
View notes
Text
PDF:
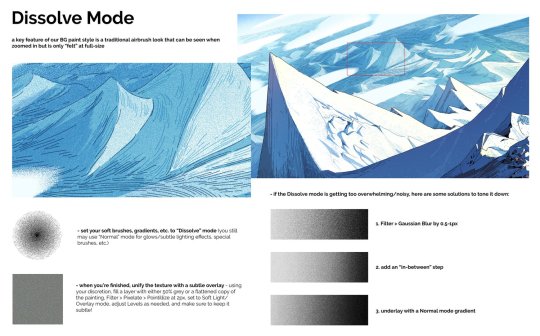
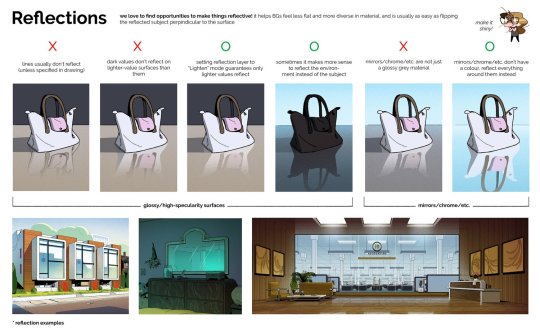
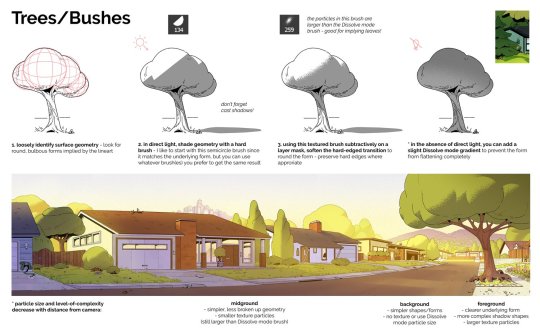
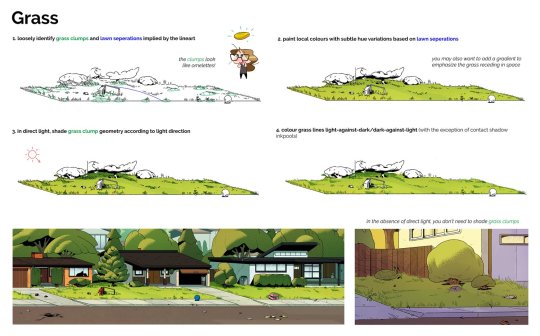
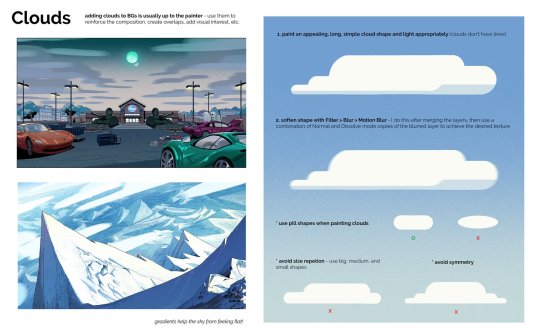
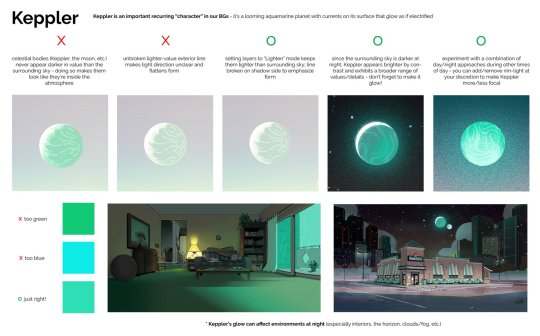
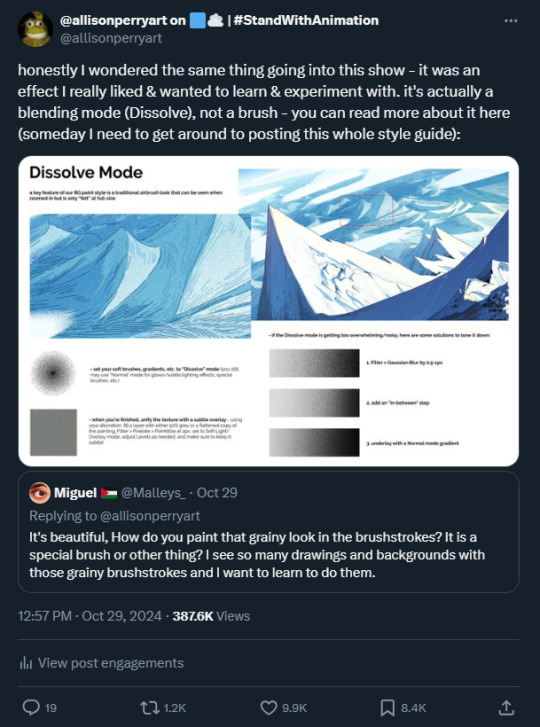
Back from my birthday hiatus, and um, wow... was not expecting this kind of overwhelmingly positive reaction to a simple QRT about how we used Dissolve Mode in our BG paintings on Carol and the End of the World (see last image) - since people seemed to have enjoyed that so much, I thought I'd put all the pages of the Carol and the End of the World BG Paint style guide I drafted in one post! TBH I'd been meaning to do this for awhile but kept forgetting since I have it in a different folder than the BG paintings themselves... I believe all the paintings are mine and all the designs are by Alex Myung unless otherwise noted. I wrote this pretty early on pre-vis, so some of these guidelines got a little massaged during production, but the broad strokes are definitely still there! This wasn't the only style guide on the show BTW! A couple of our other leads Alex Myung and Kal Athannassov also put together a BG and Character Design style guide that are super cool - unfortunately I don't have the files myself (nor would I feel comfortable posting work that's not mine) nor do I think they've posted them yet, so if you two were looking for a sign to do so, this is it!! Now you have everything you need to paint like a Caroler - thanks for looking!! Showrunner: @dan-guterman Art direction: @ellemichalka
#style guide#art direction#Photoshop#mountain#house#city#street#tree#grass#office#exterior#interior#cloud#night#day#lead#leadership#background#background painting#background paint lead#supervisor#carol#carol and the end of the world#adult animation#animation#cartoon#Netflix#Netflix animation#allisonperryart#allison perry
938 notes
·
View notes
Text
He wonders, briefly
When it stopped being just him,
And started being them.
art for @stump-not-found's Theseus' Guide to Ruining a Perfectly Good Boat because i am. normal
#gravity falls#gravity falls fanart#stanford pines#ford pines#bill cipher#billford#gf theseus' guide#i think my painting skills are improving yayyy#cw blood
1K notes
·
View notes
Text
these two !
#my art#clip studio paint#papyrus undertale#spamton g spamton#deltarune#undertale#these two have never interacted and yet i drew them together because i wanted to#would they be friends or enemies? business partners?#lost skeleton and tour guide??
5K notes
·
View notes
Text
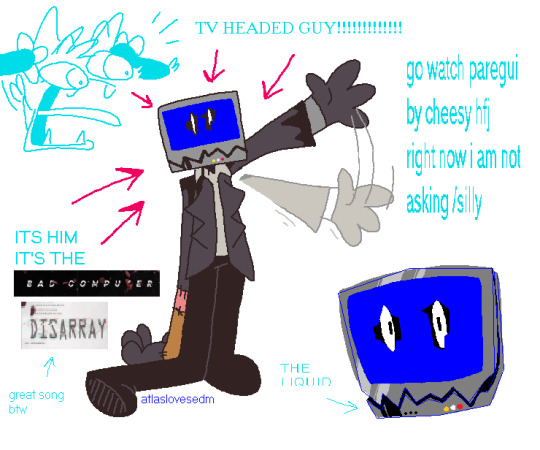
had to draw him
#paregui#the guide paregui#<- i dont think he has a tag yet but fuck it we ball#art#digital art#doodles#ms paint
209 notes
·
View notes
Text
Guiding Bolt 🏹
painting practice with Lydia & Kasper
#illustration#artists on tumblr#art#dnd art#dnd 5e#curse of strahd#curse of strahd art#digital painting#lydia petrovna#kasper dunant#cleric#guiding bolt#konstantin petrovich
3K notes
·
View notes
Text
I adore Di-er and his little smiley faces from @k0mmari fic Endless Abyss Travel Guide
everyone plz go read it!
got inspired for the color palette from k0mmari's amazing art (warning spoilers)
#svsss#shen yuan#komm's endless abyss travel guide#I would kill/die for Di-er#sure mamasy and happysy are cool and all but DI-ER#his so sweet and i love his little notes#lbh's crush on his is also so cute#ps I discovered clip studio paint#omg how have I been drawing before this#also finally tried to do bounce lighting#I'm so happy with how much my art has improved!#my art
378 notes
·
View notes
Text


i had a vision
#pip.txt#charles leclerc#f1#shout out to lottie monacoprince for guiding me through how to use photopea#an upgrade from my microsoft paint days...
178 notes
·
View notes
Text

ms paint. you know her. u used her age 8 to make loads of rainbow ovals all over the canvas and then scramble it with selection tool. now u will know her true powers with my handyrandy tips under the readmore. some will be pretty basic and others are very special.
this post has 8 cool trix to learn for you. enjoy and i may do another in the future if i remember/learn more stuff
some of it might be common knowledge. but its got some deep cuts. all tips have gifs to show process easily.
🙂 enjoy and i hope this encourages you to fuck around in mspaint more
soundtrack for this post (loop it while you learn for advanced learning experience)
TIP 1) the right click trick
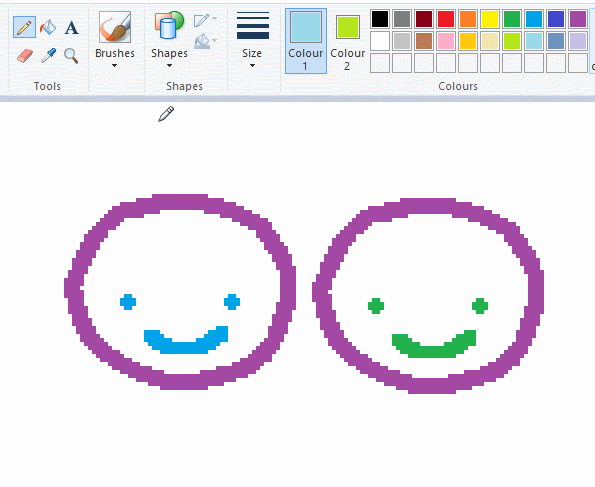
left and right mouse click correspond to col1 and col2 respectively, which u can see in the top bar. this applies to all brushes and the fill tool like above. when using shapes col2 will be the fill colour (if you have solid fill selected). right clicking with shape maker will reverse the colours use on the shape.
TIP 2) right click eraser
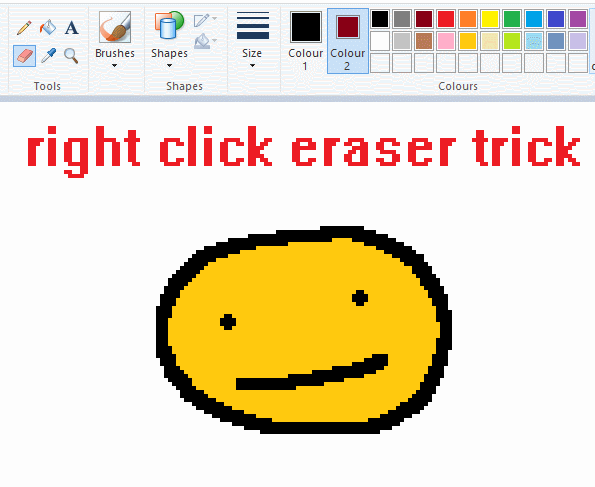
this one is extremely helpful for lineart or add shading. the eraser always uses col2. so your eraser can technically be any colour. but here's where you get powers: right clicking with eraser will only erase onto col1, with col2.
TIP 3) transparent selection change a guy destination
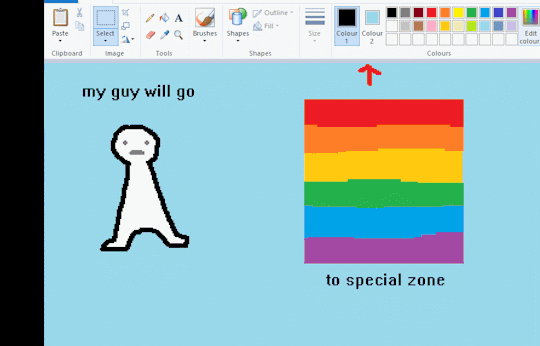
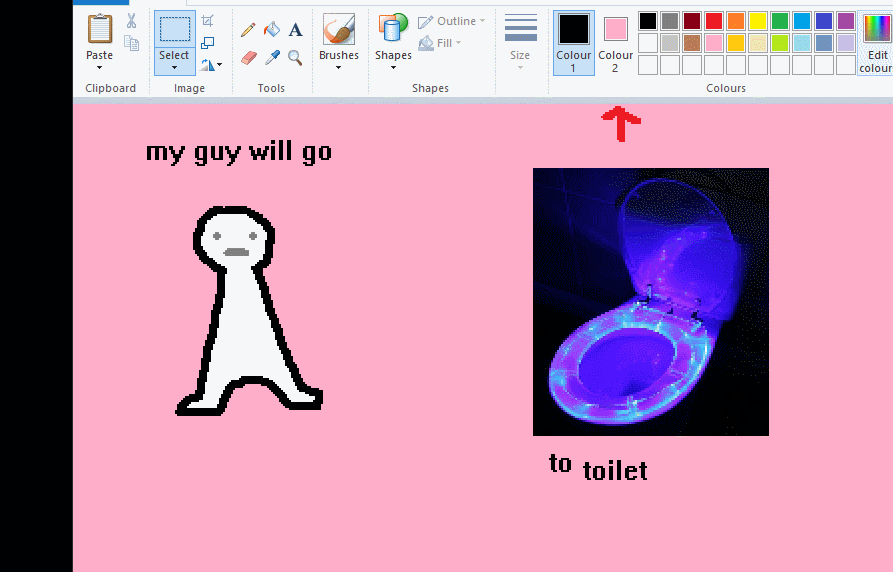
the beloved transparent selection tool works based on what is selected as col2. so long as you have the correct colour as col2 you can make any image transparent and put it on top of anything else. and yes this works with photo bg as you can see.
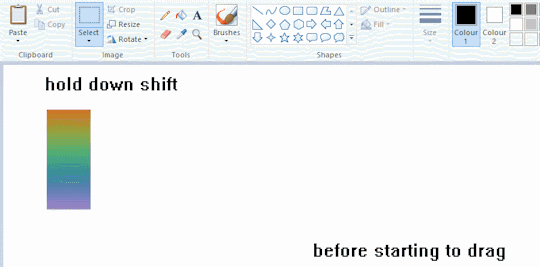
TIP 4) the gradience
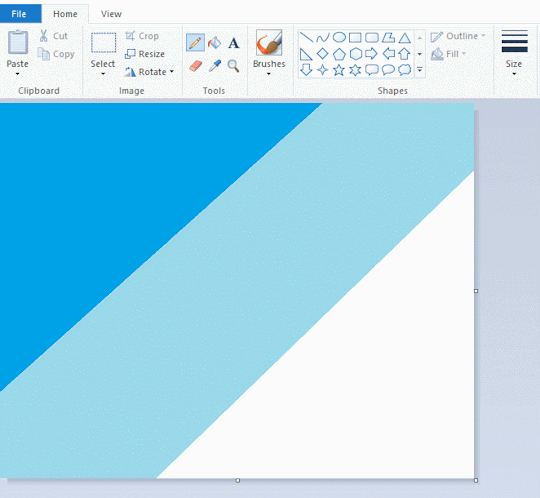
this one is a little more complex. you want to start off with any canvas size, and make as many diagonal coloured bands as you want. (protip: holding down shift makes a perfectly diagonal line with line tool)
then you need to resize the canvas to a width of 1px (make sure you resize by pixels, and do not maintain aspect ratio). then resize again back to its original width (or a different width i cant stop you). you will have your lovely gradience.
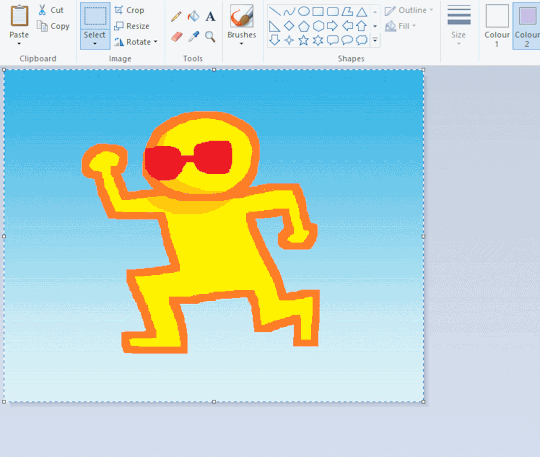
TIP 5) superimposter

so. you got a cool gradient and wanna put a guy on it. heres what i do:
i open a 2nd mspaint with same canvas size and draw whatever i want on there. i then pick a completely unrelated colour to my entire piece, and set that as the bg. you could use white, pink, geen, whatever you want as long as it doesnt appear somewhere else in ur drawing. copy the guy.
go back to your gradient tab. ensure that col2 is set as that bg colour you picked (lilac for me). have "transparent selection" enabled. paste your guy in. cue fanfare
TIP 6) advanced superimposter
the great thing about this method is u can put multiple gradients in multiple areas of the image. this is where it gets all japanese printmaking type of shit. ukiyo-esque
all you need to do is make another canvas with a new gradient, ensure col2 is set as the colour you want to replace, then paste your original piece onto the new gradient. now my guy has a soft fade. you can do this as much as you want. (you could even make a canvas with a texture or photo and paste your drawing onto there)
TIP 7) "sketch layer"
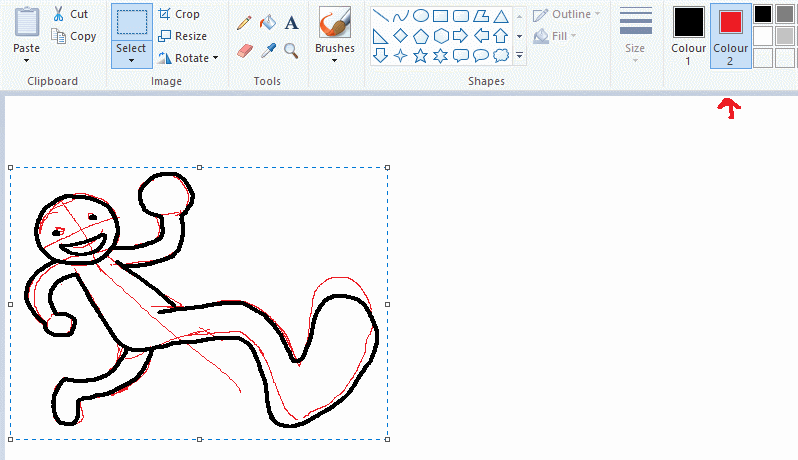
so as you now know, col2 is what is removed when you click "transparent selection". which means you can also remove any instance of a colour from ur drawing. which means you can have a unique colour for sketch layer and remove it from the drawing later. i admittedly dont do this but it is a great trick to have.
now combine this with lowering your dpi for smoother lines. may seem obvious but it helps. its like a free stabiliser whenever u want.
TIP 8) rainbow art
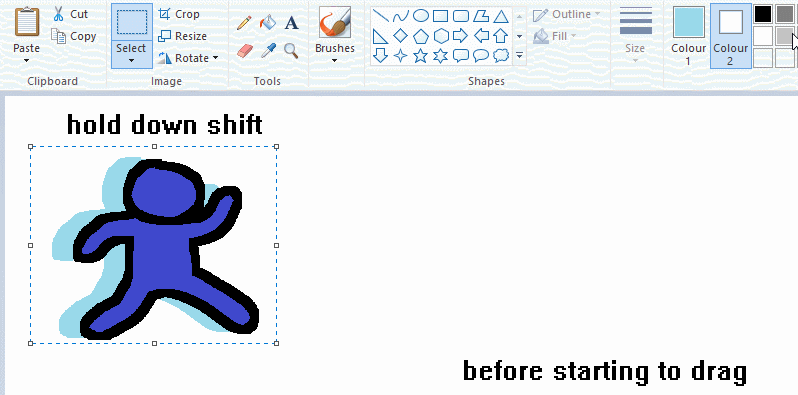
now this is where you can get dizzee rascal "bonkers". check out my small and shitty rainbow trick. you can select anything and hold down shift, then drag with left mouse, to turn that selection into its own brush. i even did it with a guy. and you can of course do this with a photo as well.
🙂well that it for now. hope you liked it thanks for reading now back to your regularly scheduled tgcg programming
2K notes
·
View notes
Text
Soooo
My brain is rotten from hdg
And my brain keeps remaking memes into hdg versions
Aaand this one got slightly out of hand
So yeah
Hope you enjoy ^w^

#hdg#human domestication guide#hdg shitposting#meme#drawing#not an artist#never will be#ms paint#touchpad drawing
200 notes
·
View notes
Text
247 notes
·
View notes
Text
Thinking about Carlo's hair
In the main game, for 2 years we had this one picture, where it looks like he wears his fluffy hair combed to his left side.
In the DLC we got more pictures of his hair. One from the Monad group picture and a drawing, both having the opposite combing style. On these he seems to be a child.
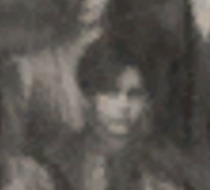
But then, there are the ones with older Carlo, where he has an evenly separated hair. Also, a very important thing, he has wavy/curly hair. Even on the child's drawing,his hair is drawn with circles while his parents' have straight hair.
So, what I wanted to to say, that there is no right way to draw his hair now. It's really cool, how they kept the shape recognizable yet different with the combing directions. And the very good new information, that he had wavy hair, somewhat makes me even sadder :'D Geppetto missed that opportunity to make P's hair cuter with more natural waves, or maybe he didn't like it. He still styled P's hair but it's straight :/
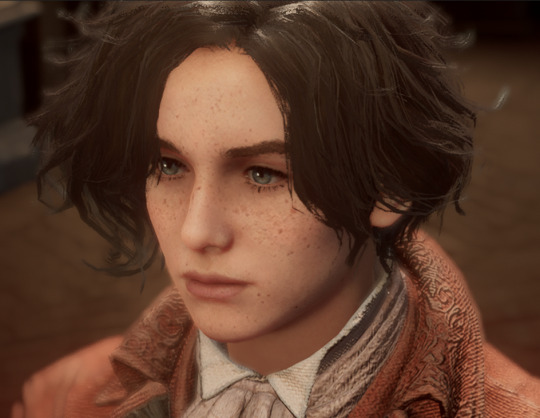
#lies of p#lies of p overture#lies of p overture spoilers#carlo#p#carlo geppetto#lies of p carlo#P's hair still cute and fluffy but you know there was nothing wrong with Carlo's hair#or geppetto a curly hair hater idk#maybe he didn't know/couldn't see how was carlo's hair on his corpse?#and he didnt even had the painting as a guide at that time
133 notes
·
View notes