#free to use graphic design tools
Explore tagged Tumblr posts
Visit Tumblr Blog
Explore Tumblr blogs with no restrictions, modern design and the best experience.
Last Seen Tumblr Blogs


Fun Fact
In 2020, 27% of US Tumblr users had an annual household income of over $100,000.
Text
Canva: What It Is, Why You Need It, and How It Works
Unlock your creativity with Canva! 🎨 This user-friendly design platform lets you create stunning graphics, presentations, and social media posts easily. Perfect for beginners and pros alike! Join millions and elevate your design game today! #Canva
Canva is a user-friendly, web-based design platform that allows users to create eye-catching graphics, presentations, social media posts, posters, and much more without needing advanced design skills. Founded in 2013, Canva has quickly become an essential tool for individuals, businesses, marketing teams, and even educational institutions. What is Canva? Canva is an all-in-one design platform…
#animations#branding#business cards#Canva#Canva for Education#Canva for Teams#Canva Print#collaboration#color palette#content creation#creativity#customizable#design#design tools#digital marketing#drag-and-drop#E-Commerce#easy-to-use#educational materials#fonts#free#Generate income#graphic design#graphics#icons#images#infographics#layout#logos#Make money online
0 notes
Text
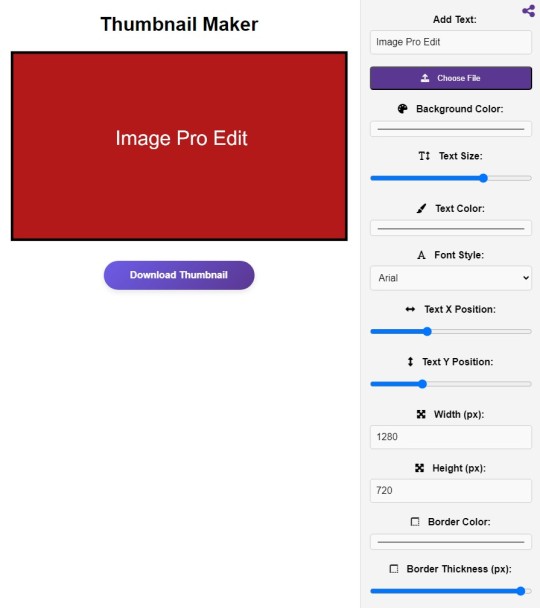
Thumbnail Maker
#image#photo#free to use#picture#tools#photography#graphic design#online#photographers#jpg#image edit#thumbnail
0 notes
Text

The new photoshop AI picture generator sure is special. I asked for Karl Marx with a molotov cocktail but instead got a Bureaucrat with a Bloody Mary.
#photoshop#ai generated#mine#(if ''mine'' is even a term i can use here. but i just need it for my tagging system)#-sigh- and here we go‚ losing another fun aspect of working as a graphic designer to ai and use the saving of time to...#... -checks notes- work even more in the same time :')#I'd appreciate tools to generate backgrounds and such much more if it was used to give us more free time#but no.. instead we now have to work ourselves to burnout instead. it's frustrating.#ease and/or fun tasks are taken away by technology and the tasks that are so exhausting and require much concentration increase#don't get me wrong. i do love some complicated tasks that put my brain to its limits. if it's then followed by going home or simple tasks#but no it's now two or three of the hard tasks after another‚ five days a week.#fuck capitalism#eternal growth is just a bullshit concept
1 note
·
View note
Text

rofl. lmao even.
#icymi he's an AI art bro now too#he is making bland abstract graphic design and chibi anime girls specifically to sell them as prints#his entire projected persona appears to be shilling and begging for free labor#no filter no common sense and i have to see his stupid advertisements unless i reward tumblr for hiring him with my money#and fwiw I mean 'ai art bro' as 'dude obsessed with tech scams who immediately tries to use accessable art tools as get rich quick shemes'
1 note
·
View note
Text
How to Live Your Dream Life on a Budget
1. Define Your Dream Life
Clarify Your Priorities: Identify what truly matters to you. Is it travel, a peaceful home, pursuing a passion, or more time with loved ones?
Set Realistic Goals: Break your dream into achievable milestones. This helps make the process feel manageable and less overwhelming.
2. Focus on Experiences, Not Things
Prioritize meaningful experiences over material possessions. For example, a picnic with friends can be as fulfilling as dining at an expensive restaurant.
Look for free or low-cost activities in your area, such as community events, nature trails, or local museums.
3. Budget Strategically
Track Your Expenses: Use budgeting apps or spreadsheets to understand where your money goes and identify areas for savings.
Cut Unnecessary Costs: Reduce spending on non-essential items, such as subscription services you don’t use or frequent takeout meals.
Save Smartly: Allocate a portion of your income, no matter how small, to a "dream fund" for your long-term goals.
4. Leverage Resources and Skills
Learn for Free: Use free online resources like YouTube, Coursera, or local libraries to develop skills or hobbies that align with your dream life.
Barter or Trade Skills: Exchange your expertise for goods or services. For instance, offer graphic design in exchange for language lessons.
5. Maximize What You Have
Repurpose and Reuse: Upcycle old furniture, clothes, or decor to create a refreshed living space without spending much.
Enjoy Simple Pleasures: Appreciate small joys like reading a book, journaling, cooking, or spending time outdoors.
6. Pursue Low-Cost Travel
Take advantage of budget-friendly travel options like camping, house-sitting, or volunteering abroad (e.g., WWOOF or Workaway).
Use travel rewards or discounts to save on flights and accommodations.
7. Build a Support Network
Surround yourself with supportive people who share your values and inspire you.
Join communities (in-person or online) that focus on minimalism, frugal living, or achieving dreams on a budget.
8. Stay Positive and Flexible
Embrace Gratitude: Celebrate small wins and recognize the progress you’ve made toward your dream life.
Adapt Your Vision: Understand that your dream life may evolve over time, and that’s okay. Be open to new opportunities and adjustments.
Examples of Dream Lives on a Budget
A Creative Lifestyle: Pursue writing, painting, or photography with inexpensive tools and platforms to share your work.
An Adventurous Life: Explore local attractions, hike nearby trails, or road trip on a budget.
A Peaceful Home: Create a cozy, welcoming space using thrifted decor and DIY projects.
Pursuing Personal Growth: Dive into free or affordable online courses, read self-improvement books, or attend community workshops.
Your dream life isn’t about how much money you have—it’s about how you use your resources to align with your values and aspirations. With intention and creativity, even modest means can lead to extraordinary fulfillment.
#clean girl#clean moodboard#girl things#girlblog aesthetic#girlblogging#girlhood#glow up#pinterest girl#self care#that girl#it girl energy#dream girl#pink pilates princess#becoming that girl#it girl#higher self#manifesation#vanilla girl#motivation#wonyoungism#self healing#self improvement#it girl tips#level up#becoming her
1K notes
·
View notes
Text
You need more free art.
I quit my job yesterday. Well, actually I quit my job eight weeks ago, but they finally released me yesterday for good behaviour. Don't get me wrong, I love what I do - but I do it for the wrong reasons. Working for major charities, you learn very fast that 'I want to make the world a better place' is a phrase you use to ask people for money, not to give them things. I was an ass-backwards fit for that world.
You need more free art. I need more free art. Everyone has felt the shift in our media landscape over the last ten years, away from access and towards nickel-and-diming the human experience. That lack of access is making life and culture worse for all of us, across the board. Paywalled news sites leave us less informed, attacks on the Internet Archive leave us less capable of research. Algorithmic social feeds and streaming walled gardens trap us inside smaller and smaller demographic bubbles, where we are increasingly only likely to encounter ideas that have been curated for us by marketing departments. Hasty efforts to resist AI commodification have only led to more artists locking their work away and calling for even more onerous systems of copyright law. This is not good for us.
We all need more free art.
So what am I going to do about it?
This is a question I have been asking myself for years. It's easy to sit here feeilng frustrated and thinking 'boy I hope SOMEONE does SOMETHING'. It's harder to take action in a world where I still have rent to pay. But hard doesn't mean impossible. Sometimes hard just means time-consuming, frustrating and slow. And sometimes it's worth doing something time-consuming, frustrating and slow because...I want to make the world a better place.
I'm going to do this:
1. From April 1st, I am relaunching as a freelance writer and editor.
This is the one that will (hopefully) help to pay the bills. I am a very good and experienced editor. I've worked on hollywood movies, I'm a member of the Chartered Institute of Editors and Proofreaders, I have clients who have been coming to me exclusively for more than 10 years.
Alongside bigger contract jobs, I am going to refocus on offering my services to small-press creators at a reduced rate. That means you, graphic novelists. That means you, itch and amazon writers. I want to help you develop your work, the same way I help large organisations. You can learn more about what an editor even does and what kind of pricing you can expect here.
2. I'm also going to start giving shit away. Like, constantly.
Next week I'm going to launch a new free shop. If you're unfamiliar, a free shop, giveaway shop, swap shop, etc. is an anarchist tradition of setting up a storefront where anyone can take what they like for no cost. Offline, this often means second-hand clothes, tools, furniture, food etc. Online, I am going to be giving away digital art. Copyright-free, no strings attached. It will (eventually) feature everything from print-res posters to zines, poems, tattoo flash, t-shirt designs and anything else we come up with.
Yes, I said 'we' - while this is a curated collection, it will feature work from a variety of credited and anonymous artists and activists, all of whom have agreed to give their work away to the public domain. Some of it will be practical, some of it will be political, but a lot of it will be decorative or personal. This is, in part, a response to recent difficulty I had finding somewhere that would print a one-off joke poster for a friend that featured the word 'faggot'. Enough. No middlemen - no explaining ourselves. Just print our shit and enjoy it.
I'm very, very excited about this project. I'll have more to say about it closer to the launch, but you can expect it to go live on March 27th.
2.2 I forgot to mention the ACTUAL LAUNCH GIVEAWAY
To celebrate my launch, I am going to be giving away a ton of physical prints. When I went looking for my old stock to see if it was worth setting a new (paid) storefront up, I realised I had way more old work in storage than I thought. This will be announced in its own right on Monday, but this is why I've been hinting you should go follow my Patreon.
On April 1st, I will pick 8 random patrons (from across all tiers including non-paying followers!) and mail them a bundle of assorted prints and postcards. The prize pool includes A3 and A4 posters, packs of A6 postcards, and printed minicomics that I've previously sold for up to £12 each.
You don't have to be a paying subscriber to enter - this is strictly no-purchase necessary. It is purely and entirely a celebration of the concept of GIVING ART AWAY FOR FREE.
3. PORN, YOU PERVERTS

Because I still have to pay to stay alive, I am going to be subsidising all this free art with the introduction of Fuck You Fridays. Starting from March 29th, I will drop a new 18+ short story on the last Friday of every month, over on itch.io (yes I know my page is desolate right now, don't worry I'll get there).
The first edition, Go Fuck Yourself, is about, well - telling your boss where to stick it. Julia has had it with her millionaire man-child manager, and is just about ready to let him know what she really thinks. It's a short and steamy 5k words, with a gorgeous cover illustration by @taylor-titmouse, and you can pick it up for $3 starting from March 29th.
4. ANOTHER BIG SURPRISE
I'm keeping this one under wraps for now, but April 1st will also play host to one more (FREE) launch. If you've been following me for a long time, you might remember the other significance of this date (no not April Fool's day, though that is certainly thematically relevant to this entire effort). That's all I'll say right now. Watch this space.
tl;dr: I'm sick of paywalls and career ladders. I'm literally putting my money where my mouth is. More free art for everyone and I'm not kidding around!!!
3K notes
·
View notes
Text
some graphic design resources cause im bored and itching to write something but i cant write anything i'm happy with--- anywayssss
unsplash for lots of royalty free pics
heres a cool site to learn how to pair fonts together
heres another site to learn kerning [spacing]
in fact heres a bunch of games to help u get better at graphic design stuff
some free online video editors x x x
color accessibility resources :]
savee.it - like pinterest but for designers!! unfortunately it has a save limit for free users but u should still be able to browse it for inspo i think?
some free fonts
aside from coolors i really love adobe color!! it has color palette generator [triads, monochrome, complementary, etc.], accessibility tools, palettes+gradients extractors, and color palettes inspired by trends within diff industries.
make moodboards online for freeee i miss u polyvore
spline and womp for web based 3d design! + blender of course [go make that donut!]
we all know and love them: photopea [photoshop but free and on a browser?!] and canva [no introduction needed im sure]
upscale the resolution / quality of pics it says anime but it works really well with most stuff like video game screenshots [gets rid of hard edges/pixels]
typography inspo
more color palette generators [already meets accessibility guidelines]
filmgrab - a curation of movie scenes 💕
here's another one but for color palettes from films
more inspo and tutorials
cargo - for web design stuffs
an archive of BRANDING GUIDES
free online zine hosting
milanote - very very useful for organizing creative projects :D kinda like a mix of notion and pinterest ? [its basically notion but more visual]
a collection of free luts
lots of pngs for editing
freepik - lots and lots of free design assets.
flaticon - lots of flat icons / vectors. i haven't used this in a while, but it was free last i checked
in case u need more help pairing fonts go here and here
idk ilu all have fun!!!!
4K notes
·
View notes
Text
HOT GAMEDEVS DON'T GATEKEEP
Inspired by this post by @midwinterhunt, here's a compilation of all the game dev resources I have come across, most of which I use fairly frequently. Most of these are free, some are paid but fairly cheap. Feel free to add your own resources. ✌️
Important reminder: When using basically any works or programs someone else created in your games, make sure you thoroughly understand the licenses and terms it has been shared with. If you don't know what the terms are, reach out to the resource and ask. Don't be lazy about this; it's not only dishonest but it can come back to bite you.
Engines
Unity - Best suited for mobile and multi-platform.
Unreal - Tailored for shooters and high-fidelity experiences.
PICO-8 - Virtual console for simple games
Godot - Open source and free!
GameMaker - Good for 2D games
Bitsy - Great little engine for making simple games and experiences
Construct - Never used but have heard nice things
Scratch - If you've never coded before, this is the best place to start. Great for young devs and those who want to get their feet wet.
Adventure Game Studio - Best suited for adventure games
RPG Maker - Best suited for top-down classic JRPG style games
Twine - Text-centric games like Interactive Fiction
Assets
OpenGameArt - Many assets, various licenses, and plenty of CC0 content.
Unity Store - For Unity only. Some free.
Unreal Store - For Unreal only. Some free.
Godot Asset Library
Jean Moreno's Toon Effects - Some of the best effects available on the Unity store. Unity only but I've used them in basically every project.
Steamworks.net C# Wrapper For Unity - Unity only C# wrapper for integrating Steam compatibility to your game
Itch.io - Plenty of free art assets and game dev resources
Kenney - Kenney makes tons of open-source assets for devs to use.
Art
Mixamo - Generates rigs for your humanoid models and lets you apply a library of free humanoid animations to them. Super helpful for prototyping. Adobe.
Blender - Free, open source and fully featured 3D program.
XNormal - Free offline normal map generator
Normal Map Online - Free online normal map generator
Crocotile - Cheap tool for building 3D models from sprite sheets
MagicaVoxel - Free voxel modelling tool
Piskel - Free online sprite drawing tool
Aesprite - Paid sprite drawing tool
TurboSquid - Not always great quality, but can be good source of free placeholders.
Textures.com - Limited texture downloads per day but free for personal use.
Pexels - Free stock photo resource. Most are free for commercial use. Check licenses.
Clipstudio - Good for illustration or graphic design. One time payment.
GIMP - Image editing program a-la Photoshop. Free.
Audio
Audacity - Free and fully-featured DAW/audio editor.
sfx.me - Free 8-bit synth-style sound effect generator for games.
CastingCallClub - Easy forum to find amateur voice talent for your project (p.s.: you should pay them).
FreeSound.org - Free sounds, searchable by license. A go-to for my audio needs.
Incompetech - Royalty-free music by Kevin McLeod.
Scott Buckley Music - Royalty free with conditions. Generally more on the cinematic side of things but very good stuff!
SoundCloud - 'Search -> By Track -> Filter: Use Commercially' leads to songs posted with allowance of commercial use. Always reach out to the artist to understand their terms and confirm that it's okay to use with your project.
Project Planning
Keymailer - Handy for mailing keys to influencers (don't expect a lot of traction unless you're paying for some of the features though).
Trello - Kanban board. Great for organizing tasks, managing bugs, etc. Free.
Notion - Private text and wiki page editor. Good for project organization, note taking, and fleshing out ideas. Free.
Obsidian - Alternative to Notion, with similar features.
Miro - Free whiteboard for organizing thoughts, images, brainstorming, etc.
Wave - Free Bookkeeping site. Great for keeping finances organized.
#gamedev#game development#game dev#indie games#indie game#gamedevelopment#indiegames#indiedev#indie dev#game developer#resources#blog
737 notes
·
View notes
Note
Do you like the youhitmetal17times_everyday analogue horror?
I dont watch any analog horror. I dont really like any "devised" analog horror, none of them feel authentic enough both from a tech standpoint but also from a content matter standpoint. They are trying to be scary and I feel like once youre going down that road your shit will never be scary. The only stuff Ive seen that manages to interest me in that genre is stuff that makes earnest and genuine attempts at mirroring feelings we've all had, through analog mediums, instead of conjuring up a scary face for 2 seconds or writing some scary text.
Ive had some of my work be called analog horror and Ive never set out to make it horror. I think people are just unsettled by genuine and authentic portrayals of analog mediums because of their inherent imperfections. And I also think that making things as accurate as possible - from graphic/motion design, sound, editing, every part of it - will either transport the viewer back to when they saw that kind of stuff on TV, or make a viewer who never had that experience feel like they did.
A lot of people shit on the use of nostalgia as lazy or low-effort, but I think it's more about what you do with it, it's a tool. Most analog horror makes no attempts at using nostalgia. Nothing about them is accurate or genuine, it's just a flavor slapped on the work. If you use nostalgia in a way that's real and genuine then you've come pretty close to being able to communicate one to one with the viewer. It's a way of disarming people so you can express what it is you want to express clearly. And thats really hard to do in art, but it's the goal (at least for me)
Feel free to recommend me any analog horror you think fits the bill. No local58 or mandela catalogue or whatever. Only real stuff.
658 notes
·
View notes
Text
My thoughts while using different drawing programs
Photoshop: I am at work,, I am a professional artist
Procreate: I love my ocs :3 pretty colours, I love drawing on my bed
Clip studio paint: This is the superior drawing software. Why don't I use this more
Krita: hahaha I like free things
Paint tool sai: I feel like I'm 12 again. Why is the layout like this
Fire alpaca: what
Auto desk: what x2
Illustrator: not what I had in mind,,, guess I'm a graphic designer now
Gimp: no.
111 notes
·
View notes
Text
Writing Notes: Book Cover

“Don’t judge a book by it’s cover!” We’ve all heard the phrase and we all know that’s impossible. Because the cover of a book is the first thing a potential reader sees—it should stop them in their tracks. It’s a very powerful marketing tool; having a well-designed book cover is crucial.
Tips for Making a Great Book Cover Design
Using more than two to three typefaces on a cover is discouraged, as it can look really messy.
Keep things simple. Your cover will be in a sea of other covers so try to keep your design from getting muddy and make sure it stands out.
Show your designs to people who have a design eye and/or you trust. It’s great to get feedback.
If you hire a professional designer, write a brief and send them info. Be really clear on what you want. Designers usually do a certain number of design rounds included in the agreed upon fee and any extra rounds of design will be extra.
If you hire a professional designer, they will likely have ideas about printing and may have connections to printers. They are a resource so don’t forget to ask questions.
Don’t forget: a book cover is an important part of selling any book. Whether you decide to do it yourself or collaborate with a professional, pay special attention to this part of the process, as a great cover goes a long way.
6-Step Guide: Professional Book Cover
STEP ONE Generate Ideas. Look around at book covers you like. Go to a bookshop and peruse what’s currently happening in book cover design. Take notes of what elements you like on the cover image. A certain typeface? Color? Do you prefer an image or an illustration or something purely typographic on the cover? Another option is to create a mood board. You can use a platform like Pinterest or Evernote, or create a folder on your desktop, and pull book cover inspiration from the web. While you’re gathering inspiration, keep in mind what genre your book is and what kind of book design feels appropriate.
STEP TWO Find a Designer (Who Could Be You!). Do you have design skills? If so, your next step is to begin layouts and mock-ups of the covers. You should use whatever software program you are comfortable with. Most professional book cover designers use a program from the Adobe Creative Suite:
InDesign. InDesign is a multi-page design platform but can also be used for single page design.
Photoshop. Used to manipulate and experiment with photography.
Illustrator. Illustrator is a vector-based program, which means you can create graphic art that can be scaled up or down without loss of quality.
Photoshop and Illustrator. These can also be used together as you can bring your Photoshop file into Illustrator to set the type after you have worked with your cover image.
If you don’t have design skills, now is a great time to hire a book cover designer. The first step is to figure out what kind of budget you have for this. A designer’s fee will range depending on their expertise. Get a figure in mind and then write a design brief which should include the book specs:
Size
Print-run
Intended audience
Where and how the book will be published
Anticipated publish date
You should also include a summary of what the book is about and what you are looking for in a cover. Also share the inspiration you’ve gathered with the designer.
If you don’t have design skills but want to create the cover without the help of a professional, there are a few software programs you can use, such as Canva or 100 Covers, design tools that allow you to DIY the cover (for free or a fee).
STEP THREE Decide on the Dimensions. If you’re self-publishing and printing with a local printer you can work with them to make sure your book dimensions will fit on their printer (remember a book prints front, back, and spine in one sheet of paper). It’s also a good idea to find examples of books whose size you like and feels good to hold. Use that as a jumping off point for your book.
Book Cover Dimensions List. If you are printing for a specific market, from print to ebook, here is a handy list:
Amazon Kindle Direct Publishing File Format: JPEG or TIFF Cover Size (Recommended): 2560x1600 pixels Cover Size Requirements: between 1000x625 pixels and 10,000x10,000 pixels (one side must be at least 1000)
Apple iBooks File Format: JPEG or PNG Cover Size (Recommended): 1400x1873 or 1600x2400 pixels Cover Size Requirements: at least 1400 pixels wide
Barnes & Noble File Format: JPEG or PNG Cover Size (Recommended): Rectangle height and width, at least 1400 pixels Cover Size Requirements: Min. 750 pixels height and width
Kobo Books File Format: JPEG or PNG Cover Size (Recommended): 1600x2400 pixels Cover Size Requirements: Min. 1400 pixels width
Smashwords File Format: JPEG or PNG Cover Size (Recommended): 1600x2400 pixels Cover Size Requirements: Min. 1400 pixels width Draft2Digital
File Format: JPEG Cover Size (Recommended): 1600x2400 pixels Cover Size Requirements: Tall rectangle
STEP FOUR Choose Your Style
Photo-based cover. If you’re creating an photo-based book cover, you’ll need to source stock imagery. There are lots of great resources online to find stock imagery including ShutterStock, Getty Images, and Adobe Stock. (Keep in mind: most photography archives require payment to use their images. Always investigate the copyright of images you’re interested in using.) Look for images that convey or allude to your book’s genre. You can use programs like Photoshop to manipulate your image, making it black and white instead of color or cropping it in a certain way.
Illustration-based cover. If you’re considering a more graphic approach to your cover, Illustrator is the tool to use. You can bring hand-drawn drawings into it and outline them to create scale-able, high-res illustrations which you can manipulate within the program. You can also create shapes, patterns, experiment with typography within illustrator and play with color, transparency, size and much more.
Typography-based cover. Finally, many successful book covers use typography as the main graphic device. This takes some skill and knowledge of typefaces, the historical context of a typeface, and how to manipulate it thoughtfully. That said, using type as a graphic can be very impactful.
STEP FIVE Pick a Typeface (Font). No matter what kind of cover you are designing, you are going to need the title of the book and the author’s name on the cover. As mentioned above, picking an appropriate typeface is very important. You want to pick something that feels right for your book—is it a sans serif or serif? A heavy weight or lighter weight? You want to make sure it’s not something with a lot of baggage, like Comic Sans or Papyrus. It is a good idea to actually do a little research on when, where, and who your typeface was designed by to give you context and feel out if it will be right for your book. You might also consider using up to two different typefaces, one for the title and one for your name. A serif and sans-serif mix can give a bit of contrast and visual interest. There are some typefaces that pair really well together. Check out the website TypeWolf to get ideas of what fonts pair well together.
STEP SIX Test, Tweak, and Repeat. Once you have a few versions of your cover, print them out on your home printer and take a look with a critical eye. Does the type size feel chunky? Too bold? Too small? How does your image look? Is it cropped right? Are the lines of your illustrations too thin and not showing up? Go back and refine your design and then repeat! Don’t forget to look at your book cover as a small thumbnail as well. People are on their mobile phones and you want to make sure your cover still stands out and is impactful.
Book Cover - serves as your first impression with potential readers—and though book covers don’t always look the same, they do tend to contain the same essential elements.
Design standards may be different in the world of traditional publishing than they are in self publishing, and book cover templates for physical paper books may differ from those of ebooks—but they all serve the same purpose.
Some Functions of a Book Cover
A book’s cover provides essential information. At its most elemental, a good cover includes a book’s title, the author’s name, the publisher, and the price.
A good cover offers clues about your book’s content and tone. Your cover design indicates whether your book is a work of high-minded literary fiction, a pulpy page turner, or a compelling work of non-fiction.
A front cover reveals a book’s genre. You can usually tell if you’re holding a thriller, a memoir, a sci-fi epic, or a nineteenth century classic just by looking at a book’s cover art and typography.
A back cover offers broader context. It may feature quotes from reviewers and fellow authors. Softcover books may contain a plot summary or author biography on the back; those summaries and bios are typically moved to the inner flaps of a hardcover book.
How to Hire a Professional Book Cover Designer
Book covers are marketing materials, and a well-designed professional cover can make your book stand out among the competition. If you want someone with expertise in the realm of cover design to work on your book, you may want to hire a professional book cover designer. Here are some steps to consider when hiring creatives to design your book cover:
Hire a cover artist. A cover artist produces the cover art and imagery that will appear on your book cover, either on their own or with heavy input from an author or publisher.
Hire a graphic designer. Certain graphic designers specialize in layout; they incorporate cover art that you provide them—whether that’s an original illustration, photograph, or even a stock image—into the overall design of the cover.
Find a cover designer online. Reedsy is one of a number of online resources for independent authors, self-publishers, and anyone connected to the world of books. Many professional book designers list their services on Reedsy.
Use your personal network. Seek out writers’ groups, either locally or on Facebook. In these groups, people share professional referrals and help support one another when a member has a new book in the works. A group of like-minded individuals can be an invaluable resource when creating your own book cover for the first time.
When to Call a Pro:
You have a budget (a designer’s fee will vary depending on experience and location).
You have enough time to work with the designer.
You have a clear idea of what you want or at least what you don’t want.
You don’t have any design skills.
You don’t want to invest in the design software.
Your book isn’t selling.
How to Design a Book Cover Yourself
If you don’t have the budget for a pro designer or just have a DIY itch you want to scratch, it is easier than ever to design your own book cover. While it may not be quite as rudimentary as when you covered your textbooks in a brown paper bag back in fifth grade, modern technology has made cover image design accessible to anyone with a computer. Here are some tips:
Use a template. There are numerous websites that offer book cover templates and step-by-step tutorials covering basic cover design skills. Some even have a free book cover creator tool, along with cover ideas, design tips, pre-made design templates, and digital cover image tools.
Use standard design software. Book covers can also be made using standard home computing software including Photoshop, Microsoft Word, and even (with a little sweat equity) Google Docs. This is particularly easy if you are importing a pre-made cover image from another source.
Make a prototype. The process for assembling a book is straightforward and satisfying. If you want to test out how your book will appear in print, you can learn to bind a copy yourself.
When to DIY:
You don’t have any budget for design.
You have design skills to do it yourself.
You have the design software.
You have a template and know exactly what you want.
You have people with an eye for design that can guide you.
How to Make a Hardcover Book
So you’re ready to bind your own book. Here’s what you’ll need:
Content, of course.
Uncoated printer paper for book pages
Decorative paper for endpapers, such as wrapping paper or cardstock
Davey board (aka bookbinder’s board), thin chipboard, or cardboard for the book covers
Craft knife
Polyvinyl acetate (PVA) glue such as Elmer’s glue
Hot glue gun and glue sticks
Ruler or straight edge
A long stapler
Thin fabric or book cloth for cover
Binder clips
Thick decorative paper (optional, for dust jacket)
Paper trimmer (optional, for trimming book pages)
Paintbrush (optional, for spreading glue)
There’s more than one way to bind a book, and you’ll find tons of great tutorials online for making homemade books, including Japanese bookbinding and perfect bound softcover books. The most popular style of hardcover book binding is called case binding, which is traditionally done by stitching pages together with thread. Here is how to make a hardcover book step-by-step—no sewing or special materials required:
Assemble the content. The number of pages and the type of paper you work with depends on whether you’re binding a novel, a full-color photo book, or a sketchbook. Familiarize yourself with the format by taking some hardcover books down from your bookshelf and observing how they were made.
Format your pages. If you’re creating a blank book, you can skip this step. If you’re printing a book with text, you'll need to format the text so that you can print it into a book. You can get help with this at a copy shop, or you can download book design software and print at home. Eventually, you’ll end up with a PDF with a page count. This page count has to be divisible by four so that your book can be bound as folios made up of eight sheets of paper (32 pages) each. You may need to add some blank pages at the end of the book to keep your page count correct for the folios.
Print and fold. Once all of your pages are printed, fold pages in half and stack eight within each other, making sure the pages are in the correct order. Staple the folios together in the folds, alternating the location of the staples so that you don’t end up with a bulge in the spine.
Bind your folios together. Arrange all of the folios in the correct order and flatten them between heavy books. Once your folios are flat, it’s time to glue them together. Hold the folios together with binder clips and use a glue gun to glue the folios together along the stapled edge. This will become your book’s spine. Be careful not to overdo it on the glue: Use just enough to keep the folios together. Before the glue cools, use a thin piece of fabric to cover the spine only.
Even out the pages. Carefully trim the edges of the pages with a paper trimmer or craft knife, if needed.
Make the hardcovers. Cut two pieces of cardboard for the front and back covers of your book. For the spine, cut a piece of cardboard that is the same height as the front and back covers, with a width equal to the thickness of the spine plus the front and back covers.
Attach the hardcovers. Paint the cardboard (both covers and the spine piece) with a thin layer of PVA glue and attach to the cloth you’ll use to cover your book, leaving a space between the covers and the spine equal to one and a half times the thickness of the cardboard. Let dry.
Assemble the book. Use PVA glue to attach the fabric-lined spine of your bound folios to the cardboard spine. Keep the book propped up between other books while you wait for it to dry.
Attach the endpapers. Trim the paper lining so that it’s twice the size of the first page and fold it in half. Paint glue onto the inside of the front cover and the front page, and attach paper lining. Repeat with the back cover.
Make the dust jacket. If you’d like to cover your book with a dust jacket, measure a piece of thick decorative paper as tall as your book and as wide as the entire book, plus a few extra inches to fold over the edge of the cover. Fold the dust jacket over the bound book. Lay another heavy book on top of it to help the dust jacket keep its shape. This is the place to add a cover design, if you’d like.
Sources: 1 2 3 4 ⚜ More: Notes & References ⚜ Writing Resources PDFs
#books#book cover#writing tips#writeblr#booklr#literature#writers on tumblr#writing reference#dark academia#spilled ink#writing prompt#creative writing#bookblr#writing inspiration#writing ideas#writing advice#on writing#light academia#writing resources
113 notes
·
View notes
Text
zenin’s shadow - chapter 2 (gojo satoru x reader)

SYNOPSIS: Y/N, the outcast daughter of the Zenin Clan, a weapon forged from a forbidden union and raised in isolation. Gifted with immense cursed power, she is treated as little more than an instrument in the clan's pursuit of dominance. Her existence is one of obedience and sacrifice, a life defined by brutal training and a relentless drive to serve. Yet beneath the surface of her rigid purpose, a quiet curiosity about the world beyond the Zenin estate begins to grow. Despite the clan’s control, her strength, independence, and the haunting longing for something more are forces she cannot easily suppress. As she grapples with her role as a pawn in the Zenin Clan’s ruthless games, she must confront the delicate balance between her duty as a weapon and the desire for a life outside their cold walls. In a world where power, control, and family define everything, Y/N must explore the internal struggle of a girl caught between the chains of her bloodline and the faint hope for something beyond the shadows of her clan’s ambition.
WARNINGS: graphic depictions of violence, profanity, self-harm, abandonment, mental health struggles, violence, abuse and trauma, gender discrimination (it is the Zenin's afterall), self-discovery -- will probably add more and the warnings for individual chapters if needed, grammar issues here and there - but I will try to catch them if I can.
TAGS: f!reader, strangers to friends to lovers, very slow-burn, angst to comfort to eventual fluff (but angst will be a very on-going thing), gojo being super mean - until he isn't, CANON-ADJACENT (will follow aspects of the original timeline, but I have changed the timings of things and/or characters fate).
a/n: Took me way too long to post this and I had to do it from my phone...I still cannot figure out how people make their posts so pretty (and ngl I am a bit too lazy to figure it out). Enjoy the angst and let me know what you think :)
COMMENTS, LIKES AND REBLOGS APPRECIATED

previous < Chapter Two: Breaking the Spirit > next
The Zenin estate felt colder than ever. Its imposing walls, stone cold and towering like silent sentinels, wrapped around her with an almost suffocating grip. The sense of isolation was a constant companion, the echo of her footsteps in the empty halls a painful reminder that she was locked in a cage of her own making. Despite the bruises and scars—both physical and mental—that she had accumulated over the months, the worst punishment had come in the form of silence.
She was not allowed to leave the estate. No missions. No contact with anyone. Only the endless rounds of psychological conditioning designed to break her down further. The Zenin Clan had stripped away her individuality, her autonomy. All she had left was the sharp, unyielding knowledge that she was nothing more than a tool for their use.

Months passed.
She felt like a shadow, moving through the estate with quiet precision, always under the watchful eye of those who had been tasked with ensuring she stayed compliant. There were no longer any training sessions—just endless hours spent in isolation, reflecting on her place in the world. Her cursed energy, once a seething, untamed force, now lay dormant within her, as if it, too, had given up on ever breaking free.
But even in her isolation, the mission call came. It was a brief moment of hope, though it quickly turned to dread when she realized what it meant.
The Zenin daughter was summoned before the Clan’s higher-ups, the familiar stone chamber cold and unwelcoming. The air was thick with incense and a strange tension. She stood rigid, awaiting her orders, the sting of previous failures still fresh in her mind.
"Zenin daughter," the Elder began, his voice as cold and calculating as ever. "You are to accompany Suguru Geto and Gojo Satoru on a mission."
A knot twisted in her stomach. After months of silence, months of training meant to break her, they were sending her out once more. This time, it wasn’t a simple assassination or a task for elimination.
"Your task is clear," the Elder continued, his eyes narrowing. "You will ensure that Riko Amanai is delivered safely to Master Tengen. You will follow Geto and Gojo’s orders. You are not to deviate from the plan. Do you understand?"
The words were laced with authority, but even as they echoed in the cold stone room, something inside her recoiled. She was a tool, a vessel for their power. She was not allowed to make decisions. She was not allowed to think for herself.
"Yes," she responded quietly, bowing her head in deference. She had no choice but to obey. It was always that way. Always.
The Elder dismissed her with a sharp gesture, and without another word, she turned and exited the room, the weight of her obedience heavy on her chest. She was merely an extension of the Zenin Clan’s will, nothing more.
The night before they left, she found herself standing beside Suguru Geto and Gojo Satoru at the designated meeting point. The sun had long since set, and the moon cast its pale light over the desolate landscape. Her heart thudded quietly in her chest, but she made no move to show it.
Geto stood with his arms folded, his usual calm demeanor in place. Beside him, Gojo was leaning lazily against a pillar, his ever-present grin plastered on his face as if nothing in the world could shake him.
"Zenin" Geto acknowledged her with a small nod, but his tone was clinical, almost detached. "You’re early”. He glanced at Gojo, who eyed her with curiosity - was this really the so called “Zenin Shadow”. Her cursed energy wavered slightly, but it was low. All he had heard in clan meetings -not that he paid much attention anyway, was that the Zenin’s had an ace under their sleeve. One that was supposed to tilt the scales on their side.
Gojo remembers a conversation he overheard during one of the clan meetings way before his time at jujitsu tech. One that maybe he was not supposed to overhear - not that he ever cared much for the rules anyways.
“I heard that they are not allowed outside the compound” one whispered to those around them, “that all they do is train and go on missions”
“Already?” A different member of the group asked “do we even know anything about this so called “shadow” or are these all rumors” they asked smartly in a low voice, “either way, that Gojo kid will be the strongest, so as long as we can keep him in check, I am sure that they will be able to deal with that so called asset”
Gojo rolled his eyes, quickly losing interest. They were right. Not only he could beat them quickly, but they would not move against him - he was a Gojo after all. The future clan head. Who cares who they were? They would never compare to him.
Now, she stands in-front of him. Her gaze low and her lands clenched beside her. Gojo quickly lost interest, seeing that those rumors about her being a “cold blooded” individual may be true; but her supposed strength is nowhere close to where either Geto or himself were. He loudly sighed, earning a quick glance from Geto.
Her eyes remained lowered, her posture stiff. "I am ready," she said softly.
Gojo raised an eyebrow, a smirk forming at the corner of his lips. "Oh, I’m sure you are," he teased, clearly unimpressed. "But I still don’t get why you’re here. It’s not like you’re much of an asset, right? All the Zenin Clan sees is some weapon with a bit of power."
Her chest tightened, but she remained silent. Gojo’s words were sharp, but they weren’t wrong. Weapon was all she had ever been to the Zenin Clan. And it seemed that was all she would ever be.
Geto’s gaze shifted from Gojo to the Zenin girl his face unreadable. “That is not up to us, Satoru. Let’s just focus on the mission.”
Gojo chuckled lightly, but there was something dismissive in his voice. “Sure. Whatever. But this mission would be a lot smoother without the baggage.”
Geto didn’t respond, but his jaw tightened slightly, betraying his irritation. He didn’t want this anymore than Gojo did; but rules were meant to be followed.
As they walked away first, starting their normal bantering, the Zenin girl couldn’t help but bring her gaze up slightly. They were pushing each other, Gojo laughing loudly as Geto chuckled. They reminded them of those two sorcerers she had seen in her last mission prior to her punishment. She smiled slightly under her masks. Although she was a weapon meant to follow orders, she had for once done something that she was sure was good: protecting someone who was cared for.
As the trio made their way to the meeting place, a sudden chill filled the air. A low hum of cursed energy rippled through the area, signaling the approach of someone important. A figure appeared from the shadows—Yaga, the headmaster of Jujutsu High.
"Geto. Gojo. Zenin." Yaga’s voice was deep, a low rumble that carried weight.
The three turned to face him, but Yaga’s gaze shifted to the Zenin daughter, scrutinizing her for a moment. His eyes narrowed slightly, as though sizing her up.
"You’re the Zenin Clan’s prized weapon, aren’t you?" he said, his tone neither kind nor harsh. "I’ve heard little about you, other than that you’re strong. No name, no cursed technique, nothing"
The Zenin girl kept her gaze down, her heart racing. She had heard of Yaga’s reputation—a skilled sorcerer, capable of commanding the greatest threats. The fact that he was even acknowledging her strength felt unsettling.
"Yaga," Geto greeted him with a nod, though his expression was neutral. “You know the situation. We’re just here to deliver Riko. What’s the deal with her tagging along?”
Yaga’s eyes lingered on the Zenin girl before meeting Geto’s gaze. "It’s not about you. It’s an order from the higher-ups. They've specifically instructed that she accompany you, no exceptions."
Gojo, leaning against the stone wall beside them, chuckled. "Yeah? But why? What’s the point of bringing along a deadweight like her? She can’t even use her cursed energy properly without them hovering over her every move."
Yaga’s eyes flashed with a warning, but he didn’t let the tension rise. “Don’t underestimate her, Satoru. The higher-ups seem to think she’ll be needed in some capacity. I’ve heard… things.”
“Things?” Gojo raised an eyebrow, his voice tinged with curiosity. "Like what?"
Yaga crossed his arms, his gaze turning more serious. "I don’t know the full details. But I’ve been told that she is stronger than she appears. The higher-ups trust her… and I trust that they have their reasons. Don’t make the mistake of assuming she’s nothing more than a tool."
Geto’s eyes flicked to the Zenin girl for a moment, his face impassive. He clearly wasn’t convinced, but he didn’t say anything more. Instead, he turned to Gojo. "We’re going to have to keep an eye on her, Satoru. Don’t take any unnecessary risks with her."
Gojo rolled his eyes dramatically. “Yeah, yeah. I get it. Baby-sitting a supposed “super strong weapon”, keeping her out of trouble while we do all the heavy lifting.”
Yaga sighed one more time “Gojo, just do as told. Now, it’s late, go back to your dorms and show her an empty room near - the mission is scheduled to start at sunrise”
The Zenin girls chest tightened once again as she overheard their conversation. The same frases going through her head: “Stronger than she appeared.” “A tool.”
That was the only truth she knew. And yet, hearing them discuss her as a “liability”—a “weakness”—did something to her. It solidified the very thing she had been told her entire life: she was a tool, a weapon. Nothing more. Nothing more would ever be allowed. She wasn’t a person. She wasn’t anything other than a means to an end.
And now, even though her body was being forced back into the mission, she knew that her purpose was set in stone. She was to serve, to obey. Nothing would change that.
As the group continued on their walk towards the dorms, Geto and Gojo kept their distance from the girl with the the tension only growing among them. It was clear that they didn’t trust her.
The mission was important, and while the Zenin girl remained silent, she couldn’t help but feel the weight of the judgment that followed her. To them, she was a burden—a liability.
“Here you go” Geto said with a tight smile “you can sleep here tonight, we will come collect you in the morning”
“And just be ready. I know how long you girls take to get ready” Gojo said, his voice slightly irritated as he typed away on his phone, clearly disinterested in the conversation already as he started walking away.
Geto quickly raised his hand, waving good bye as he caught up to Gojo, rapidly falling into a conversation. She took the chance to once again stqre at their relationship, he chest tight and heavy as she could almost feel the ache in her hands from how tightly she was closing her fists.
She knew that could not be her. But as she stared, she wondered what her life could have been had she not been cursed cursed energy.
Could she have a purpose?
As she entered the dorm room, she looked around. She felt on edge and uncertain of her new surroundings. But her eyes quickly caught onto the item in the left wall: a bed. She had never properly slept on one since being with the Zenin clan. They always believed that using a tatami that she would move out of the way would always be easier.
Her hands quickly caught onto the sheets, feeling the softness in them. She knew that even if it was for one night, this was probably about to be the best sleep she had in a while - and she would cherish it based on the fact that she did not know when that was to occur again.
As her body started to ask for rest, she moved towards the small bag she had - taking out a pair of pants and a shirt. She walked towards the sink and placed her items down. She took her hair out and removed her mask, forcing herself to not look at her face on the mirror. As she took off her clothing, her mind grew curious. Despite her heart begging her to not look, she glanced up towards the mirror. There, she saw a girl with scars littering across her body, some deeper, some larger, some tinier. As her eyes continued to wander, they landed on her face. The large scar that went horizontally across her face and the vertical one that went down her cheek were a reminder of the one time in her life where she felt alive: at the hands of a too strong of a curse for her inexperienced self - one that brought her to the closets she was felt to dying and to her freedom.
The first time the clan had realized the power of her reversed cursed technique, it was an accident. Her trainer had brought her to a curse as some clan elders stood at a distance; they wanted to see the supposed improvement she had with this new trainer - one known for their harsh but effective techniques. As she activated her cursed technique, she noticed that the fire touching her finger tips was burning her, causing her to instinctively stop her technique. The curse took her hesitation to their advantage, clawing themselves towards her, hashing her face and her body: Blood ran to her head as adrenaline cursed her body along her curser technique. Blood was covering her eyes, but her training forced her to use her senses to find a weakness. Her mind raced, how could she be so careless? Are they going to be mad? What will my punishment be? As her mind spiraled, her mind asked a last one, “wouldn’t death mean freedom?”.
She stuck in that last question - maybe in her next life she would be lucky? As tiredness hit her body, she allowed herself to open her eyes to look at the sky. She decided to give up, smiling. She could hear her trainer yelling at her in the distance, words muffled, the curse being gone, and the calmness of nothingness as she started closing her eyes. She felt herself smiling.
“Maybe in my next life” she thought, “I will learn to be happy”
Her body was taken to a medic in the main estate, hoping to not lose their asset so fast. However, the medic, perplexed, mentioned that her body was already healing. Slowly, but she could do it by herself.
When she finally woke, back in her closed quarters, she was confused. Was the afterlife going to look just like her previous life? Her head snapped when her door opened - her trainer storming up to her angrily as he pushed her off the bed and forced her head to the ground.
“You made me look like a fool” he sneered, pushing her head harder onto the floor, “you made my trainings look useless, when the only one that is useless here is you”
Her gaze stayed static - she had survived? Her eyes quickly watered, realizing she was in the same position in life as she was before - if not worst.
“How am I still here?” Her hoarse voice asked in no more than a whisper.
“That was the same thing I was wondering myself after that unsatisfactory performance you gave” he said, anger lacing his voice, “but your cursed technique saved you. I was hoping that was it for you so I would be freed, but I can never get what I want” he finished, grasping her hair as he pulled her to meet his face, her knees still on the ground.
“I will make you the perfect weapon” he whispered with a sly smile, “we will see if you can actually die - and then I’ll bring you back and do it again…you will never embarrass me again” he said one more time , his smile never leaving her face as she looked as forced on her feet, pushed towards the training grounds even as h was legs trembled from the lack of usage of them, her arms weak, and her head still disoriented.
As she finally laid in that bed at jujutsu tech, her mind continued to run. She felt jealousy towards what Gojo and Geto had - each other. Could she ever find someone that would stand by her side? Maybe she could try to befriend Geto? He did not seem very fond of her, and she did not have good interpersonal skills (if any)…but he seemed cordial. Maybe she could learn with him what a friendship is.
Her hands clenched as her body filled with anxiousness. The Zenin Clan had pushed her so roughly towards a life of isolation that she felt that she couldn’t possibly be unable to have normal relationships with someone. Never speaking out of turn, always keeping her gaze down, always alert.
Her mind reeled back to her encounter with the two young sorcerers, and then to the punishment that followed.
Her heart felt heavy, and for the first time in a long time, she felt her eyes welled with tears. Frustration and pain filling her body. She could never befriend anybody, she thought that with resolute. Nobody would ever know who she was, because she was nobody, all but a shadow who will continue to live behind the greatness of others.
The Zenin Clan had left their mark on her forever: she was nothing more than a weapon to be used. And, for the first time, she understood that more than ever.
#gojo satoru#geto suguru#jujutsu kaisen#jjk gojo satoru#jjk gojo#jjk x reader#jjk x you#gojo satoru x reader series#gojo satoru x reader#gojou satoru x reader#gojo satoru x reader angst#gojou satoru x you#gojou satoru x y/n#gojo x reader#satoru x reader#jjk x y/n#jjk x fem!reader#jjk fanfic
63 notes
·
View notes
Text
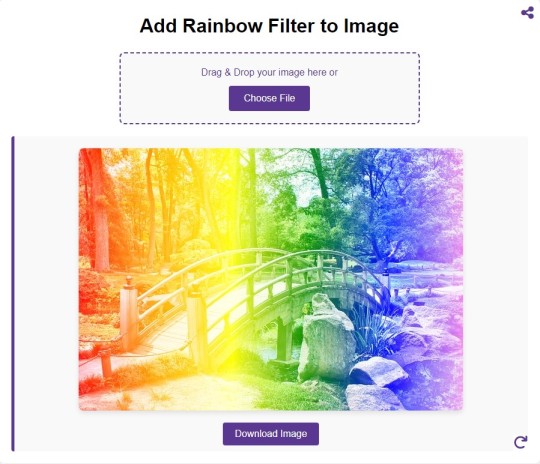
Add Rainbow Filter to Image
#image#photo#picture#free to use#photography#tools#jpg#online#graphic design#photographers#image edit#rainbow#photo effects
0 notes
Text
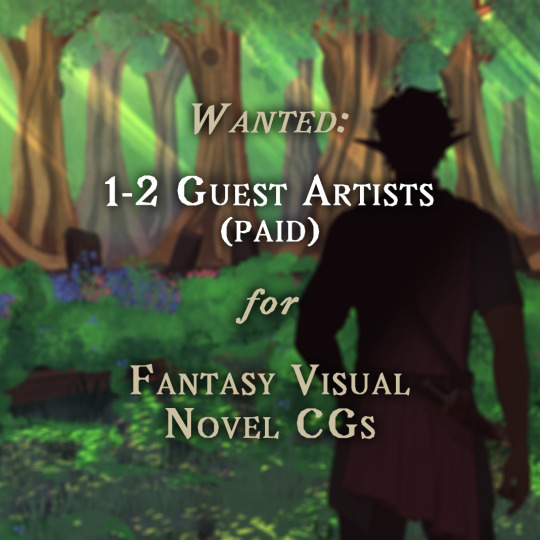
Howdy, fateful friends! Are you an artist or illustrator with an interest in visual novels?
If so: Moirai Myths, creators of the visual novel The Good People (Na Daoine Maithe), are in need of guest artists! More specifically, we're looking for up to two artists to help us with the content graphics ("CGs") for Maeve and Shae's upcoming routes. All of the details will be listed on our application form (linked below), but here is the gist:
This is paid work with 20-30 business day deadlines per piece!
Complicated revisions in the post-sketch phase are compensated!
You will be prioritized for future guest artist opportunities!
You will be featured/credited on Moirai Myths' website and in the game itself!
Sound interesting? If so, apply here:
Click under the cut for some F&Q 👇
Who are you? (I'm new here!)
Hi! We're Moirai Myths: a small, newish visual novel company based out of Canada. We're making a game inspired by mostly Irish mythology, which was funded on Kickstarter in 2023! Our game's got fairy politics, a diverse cast, a Gaeilge-to-English translation tool, and routes that can be played either romantically or platonically! Also horses. An ungodly amount of horses, really.
If that odd pitch sounded intriguing, perhaps you'd like to play our demo! It's free on Steam & Itch.io.
Why are you looking for guest artists?
When we originally launched our Kickstarter, the plan was to have our three in-house artists collaborate on the CGs in the same way our header image was. However, we quickly realized that adding CGs, even if they're done collaboratively, onto the existing duties of our artists was a tall order. Add to that the departure of our original sprite artist (who has since been replaced by our graphic designer), and we determined that having our in-house team work on CGs was simply not possible if we still wanted our first release to happen in 2024. So, rather than omitting CGs or adding them in at a later time, we came up with the idea of hiring guest artists. Overall this means our CGs will be a bit more varied in terms of art style, but we like to think of this as a positive! NDM's development will take a number of years to complete in full, so we hope our CGs will allow us to feature a lot of artists either within the VN/indie dev community already, or artists who aspire to work in gaming and are looking for entry positions.
How long will applications remain open for?
This application will be open until Sunday, March 24 at midnight (EST)! If we intend to extend past that deadline, we'll make an announcement about it.
I can't apply right now. Will you look for more CG guest artists in the future?
Definitely! As mentioned, NDM will take a while to develop in full, so this is by no means your only opportunity to apply. That being said, we suspect we're going to end up shortlisting a number of artists over the course of this application period, and we intend to keep a list of all the runners-up. So, even if you won't be able to participate this time, it might be a good idea to apply anyway just to remain in our contacts! Either way, this will not be the last time we have apps.
Will you be looking for guest artists outside of CGs?
Maybe! We already have two guest artists (Nefukurou and Madi Funk) working on sprites and CGs respectively, so it's always possible that we'll have other artistic needs later down the line. Likewise, we may also reach out to past guest artists for future work with us, whether it's on this game or something else!
You say we need to sign an NDA. What does that entail?
The non-disclosure agreement essentially means you will be legally unable to publicly disclose any confidential information you become privy to as a result of working with us. This would include personal information about the developers, as well as spoilers from the game itself. In addition do this, you will be expected to sign over the IP and copyright of any artworks you produce for us.
Can I still use my artworks in portfolios, even if I don't own the copyright?
Yes! We'd only ask, if your portfolio is a website, that you wait to do so until after your art has been made public by us, either on our social media or via the publication of the game. Our first release is anticipated to happen later this year, most likely mid-autumn.
How do you guys feel about AI? Do you intend to use it, or would you ever train an AI off of the artworks whose copyright you own?
No.
Making a game is expensive and time-consuming, but AI is no replacement for human artistry. We fundamentally believe that any advancements in AI should be used for the purpose of giving people more time to make art, not take away opportunities for it. Moirai Myths will never, ever use AI or train an AI off your work.
***
If you've got any more questions for us that we didn't think to include here, feel free to send us an ask!
#the good people#na daoine maithe#ndm#visual novel#interactive fiction#otome#english otome#amare#amare game#visual story#visual storytelling#romance game#otome romance#romance visual novel#dating game#dating sim#moirai myths
191 notes
·
View notes
Text
Making Fanfic Banners/Collages with Canva for FREE
Hello friends! Canva is an online software tool that mostly gets used for creating social media advertisements, but YOU can use it to make pretty, custom banners/collages/images for your fanfiction! For FREE!
WHY should you do this?
Fun
Custom art thing for your fic!
If you put pictures on your fic posts, sometimes you get more notes (sometimes)
The joy of creation!!!
I will walk you through it (with pictures) below the cut!

STEP ONE: GO TO CANVA, MAKE AN ACCOUNT
You can sign up with email, gmail, or FB. Gmail is the most convenient, but I think they do 2FA no matter what, so take that into account.

STEP TWO: DON'T PAY ANY MONEY & IGNORE AI
Every time you login or make stuff or do ANYTHING, Canva will try to get you to pay for Canva Pro. Don't do that. I've had access to the Pro and free versions and there's no reason to pay for anything on here. Also, they have an AI that's supposed to make things for you, but it sucks & isn't fun. Ignore it.


STEP 3: CHOOSE A TEMPLATE
Okay, so if you're a graphic designer... I mean I'm not sure why you're reading this tutorial, you can definitely make cooler stuff than I can! You should just use the 'create blank [post type]' button and go to town! But if you're not (like me) what I usually do is pick a type of template that Canva has (like blog banners, instagram posts, facebook covers, etc) and go browse their designs. My advice is not to look for something that you completely like, but something that has the right vibe-- you're going to be messing with all the individual aspects of the post anyway, so just pick based on aesthetics. Try to make sure that if you're going to put your fic title on your work that you pick/create a design where the text is clearly displayed/in an easily legible font.
NOTE: Some of the designs will have a little crown in the corner, and these designs are only available if you pay for premium. If they have a little $ on them, instead, that just means they have individual paid elements in them that you can get rid of, so feel free to use those, too!

STEP 4: CHOOSE YOUR PICTURES
Okay, so I like this screaming seagull one. I clicked on it, and selected 'customize template'. So now I want to get rid of the seagull, and replace him with my own stuff. You can do this a couple of ways: if you have screenshots from your game/show/other media, you can upload them by clicking on the little cloud icon on the left side that says "Uploads". If you DON'T have pictures, or you don't have ones you need, there are a couple options:
You can try to browse Canva's selection of pictures. It is in the "Elements" tab; you type in a search, and then select the "photos" filter from the little marquee below the search bar. My advice is to only use one word search terms, because Canva loves showing you all the photos that you can use if you pay for them, and if you use more words, they do that more often. There ARE free photos in there, but you have to scroll a bit.
If you don't want to deal with the search system or can't find what you're looking for, sites like Pixabay, Pexels, and Unsplash provide free photos that you can use without attribution, and do not require you to have an account to download. Please DO NOT just search using google/other engines and take things from there-- those photos are often not licensed for free use. The sites I linked will try to sell you pictures, but not as much as Canva, and there's usually a lot of free stuff to choose from. Download the pictures you want in a good resolution and upload them to Canva!


STEP 5: MESS AROUND WITH STUFF!
Okay, so now you can add your stuff and mess around with it!! Just click on the element (like the seagull) and delete it. Then go to your uploads and click + drag the image you want onto the canvas. You can use them as the background by dragging them to one of the corners, but you can also just put them on the canvas and mess around with them. In the left picture, you can see some of the options you have to resize and move around the image, so different elements appear on top of or behind it. If you click on the button that says 'edit' on the little bar menu that comes up when you select the image, you'll get the menu in the right picture, where you can mess with filters and colors, etc. It's not a completely comprehensive editing software, but you can do a lot of things! I encourage you to mess around and see what looks cool!


STEP SIX: ADD MORE STUFF, IF YOU WANT!
I love adding more stuff. You can change and add text by clicking on the textboxes that are already there, or you can use the "text" section on the left menu to add new blocks. They have some fun combinations and a lot of fonts! A thing I like to do is go in the elements tab and search for 'patterns'; you can add them on top of your image or elsewhere! The opacity setting is your best friend; you can overlay a bunch of stuff and create interesting/unique collages! You can also add basic shapes, frames, moving elements, and clipart, if you want!

STEP SEVEN (FINAL): DOWNLOAD YOUR THING!
When you're done, the 'share' menu in the upper right corner will let you download your image in a bunch of different formats (I'm pretty sure you could make a looping GIF for your fic here on Canva, too!) I usually do PNGs for the quality. I haven't had any issues uploading on Tumblr (or on Twitter, when I used it).
Anyway, I hope you'll try making these! I didn't show it, but there are a lot of different templates you can use, so if you want to make a collage instead, just look around! I think it's super fun to do for my fics! If you have any questions, you can bother me on my blog or in the replies section of this post, just please be polite! Thanks for reading!
39 notes
·
View notes
Text
CLİPART - DRAGON+ (3)

Clipart.tips offers a diverse range of clipart categories to cater to various design needs, including tools clipart. Whether you are working on a DIY project, creating digital content, or designing promotional materials, the tools clipart collection provides a wide array of graphics to enhance your visuals. With over 21 million free and royalty-free clipart images, vector illustrations, stock photos, and fonts available, you can find the perfect tool-themed graphics to elevate your projects.
For those in need of people clipart, Clipart.tips offers a vast selection of high-quality images and graphics. With over 100,000 vectors, stock photos, and PSD files available for free commercial use, the people clipart category provides a rich source of inspiration for various creative projects. From detailed illustrations to digital art and stock illustrations, the people clipart collection on Clipart.tips offers a diverse range of copyright-free options.
Nature clipart enthusiasts can explore a treasure trove of visuals on Clipart.tips, with a dedicated category for nature-themed graphics. Boasting an extensive collection of over 555,900 nature clipart stock illustrations and vector graphics that are royalty-free, this category allows users to discover captivating images of landscapes, flora, fauna, and more. Whether you are looking for scenic views, botanical elements, or wildlife illustrations, the nature clipart section on Clipart.tips offers a plethora of options for your creative projects.
147 notes
·
View notes